|
|
|
18:28 |
|
|
transcript
|
2:28 |
Welcome to htmx and Flask, Modern Python web applications hold the JavaScript. If you're building rich interactive web applications, you might think you must use lots of JavaScript on the frontend. Your choices are not whether or not to use javascript, they are: should I use VueJS or React or some other framework that is going to come out in six months. In this class, we're going to talk about htmx. This is a really cool JavaScript library, that is basically the last bit of JavaScript that we need for many amazing interactive features on our website. So instead of working with these rich JavaScript frameworks like Vue or React and then following the conclusion that well, if you're doing almost all the work in JavaScript on the front end and you're just barely talking to the backend, maybe the back end should just be NodeJS or a bunch of static files, talking to cloud lambda functions or something like that. You know, what we're going to say is let's reverse that. Let's put the emphasis back on the server-side where we can write richer code in a variety of languages and technologies. In our case, of course, Python and Flask. And we're going to include htmx in our page, and it will turn on a bunch of features, but those features are driven by the server-side. We'll use cool little HTML attributes to say this page or this part of the page is driven by this thing on the server and htmx takes it from there. There's almost no JavaScript to write to get very, very similar behaviors, but you can choose any technology that you like. We're also going to see some really cool libraries, some open source libraries that I created for both Jinja and the Chameleon temple language in Python that allow us to create composable, reusable elements of HTML. This turns out to be incredibly useful for Python web applications in general, but it's extremely helpful for the way htmx works as you'll see. So if you've been looking to create interactive dynamic web pages, kind of like you would with Vue or React, but you really don't want to switch your entire tech stack over to JavaScript, you want to keep doing Python with Flask or Django or one of these server-side frameworks, but get the same outcome. Well, htmx is going to be extremely exciting for you, and I think you're gonna love this technology. Let's get into it.
|
|
|
transcript
|
5:03 |
So what is htmx? Is it like Vue.js or React or one of these frameworks? Well, not really. It's a little bit different, in fact kind of exactly the opposite in a lot of ways. So if you read the way that it talks about itself here, it says htmx allows you to access AJAX, so these are calling APIs on the service and then making some change to the DOM, the HTML, interactively on the page. CSS transitions and WebSockets directly in HTML using attributes. So instead of writing a bunch of Javascript, we just write regular HTML, what you'd do anyway. And then we put attributes on those and that triggers events and other behaviors done by htmx. They ask some interesting core questions here, such as why should anchors and forms be the only thing in the page that can make an HTTP request. Why should only click and submit events trigger them? Why should you only be able to do GET and POST and why should you only be able to replace the entire screen with web server-side POST backs. And by removing these arbitrary constraints, htmx basically completes HTML, and that's really a good way to look at it. It's all these things that we've come to know and expect as limitations about how HTML works. There's a whole bunch more stuff that it should have been doing that everyone's relying on Javascript to do and here we can just put little attributes and make them go. Really the best way to see what's going on is to see a quick example. htmx has a great bunch of examples, and I'm going to dive into them later. I just want to show you quickly this first one here. So this is what it looks like to write htmx code. This is not part of it, this is literally all of it. So what are we doing here? We have this section down here at the bottom that looks like this. We have a little div that contains a first name Joe, last name Blow and email address. But it's not editable, right? So what we wanna do is have a button that we could click to turn this into a form in line and then save it and then put the update back right in place. So what we have is we have our little labels here in our div so label, value, label, value and so on. And then we have these `hx`. These are the htmx attributes here. So hx-target means whenever anything happens, we're going to do something to this and what we're gonna do is swap out the entire HTML. So this entire section of the page will just be replaced with well what when we click this button here, what we're gonna do is a GET against contact/1/edit and that's going to return some HTML that is useful to us. In the scenario I described, what we want is a form. So this is what the server is going to give back. It's going to give us a form with more hx attributes. That will then when we save the form, change it kind of back to how it was before and here we have instead of just a div and a value, we're gonna have a div and an input and a label and input and a label and input and so on. And then on the button what we're gonna do is we can cancel it and pull it back, or we can submit the form over there. Alright, so here we go, let's click it and see what happens. This is going to be those changes here, and let's hit submit. Look at that, how awesome is that? Now notice at the bottom around here. There's this cool little like debug thing, actually. So there's three things that happened. First, we were on the initial state which is what we talked through. When I clicked the button, this click to edit button here, we got that form sent back to us. This is the request we made, a GET and zero parameters, and when we save the form, what we did is we did a PUT, not a POST but a PUT to that contact. We said the first name is Michael, the last name is Kennedy. And the email is this, and if we go down here you can see what the response from the server was. Well, now what should be on the page is a static section of HTML where the name is Michael Kennedy and the email is michael@talkpython.fm And again, the ability to edit this further, so we could change this to michael2 or whatever. So this is the magic of htmx. All we have to do is we have to write a little tiny bit of server-side code in Python that will. when we ask for it, return another bit of HTML. Instead of writing Javascript that calls APIs that then transforms the DOM, we just let the server do it as if it was a regular non-interactive, non-dynamic server-side application, but instead htmx is making this live, just as we expect. So that's what htmx is. There's many, many features and use cases for it and things we have to do to make it clean and useful in Python. In the end, I think you're going to absolutely love this technology. It is so clean and neat and beautiful, and it lets you put your code that you've gotta write on the server-side anyway right next to this dynamic elements in a wonderful way
|
|
|
transcript
|
1:36 |
When people talk about web applications, they sometimes talk about the stack being used. The most common or at least the most widely known one is what was called the LAMP stack. Linux, Apache MySQL and PHP, you may have also heard of things like the MEAN stack. Mongo, Express, Angular and Node. So in htmx, the creator of htmx, Carson Gross has dubbed it the HOWL stack, which has a great graphics, doesn't it? What does the HOWL stack stands for? Hypertext On Whatever Language and framework you want, which is amazing. If we want to write Flask and Python, great. htmx is perfect for that. We want to use MongoDB on the back end? fine. Postgres? fine. In the HOWL stack and with htmx it just doesn't really care. It doesn't worry about that. I just, I make a request to the server, and the server gives me HTML that goes in the page. It's up to you to decide how to do that. So in this course we're going to use htmx and Flask. But as I said, this could be FastAPI or Django or even ASP.NET or PHP or some other framework that has nothing to do with Python if you want to integrate and do a lot of the ideas here. But we're going to focus on htmx because that's the topic of the course. And Flask because Flask is widely known and a lot of people know how to use it. That's not saying it's better or worse than say using Django or Pyramid or any other Python web framework. I just chose something I think most people would be comfortable with working through our htmx examples and Flask turns out to be amazing for it.
|
|
|
transcript
|
3:04 |
Let's talk just for a moment about the big ideas that we're going to cover in this course. Kind of a loose table of contents. We're going to build a video website. This is a site that collects a bunch of videos that we might like and categorizes them and lets us view them and even add new ones, search it and so on. We're not going to write it from scratch because what I want you to do is have a realistic, legitimately nice looking website that we can extend with htmx. So we're going to start with this video site built in Flask, and it's already going to have the web design, and then we're going to add these features and clean it up with htmx and of course htmx is what this course is all about, so we're gonna focus on that. We're gonna cover this idea of view models that help us do data exchange and keep our Flask views very, very simple and allow our data validation, and all those things to happen. We're also going to work with an open source package that I created, both for Jinja and a separate one for Chameleon, the two template languages that are my favorites. That will allow us to work with partial elements of pages. What is very, very common, and you got a sense of this in the last video is that we need to create small fragments of HTML sometimes and other times we need to create the whole page which may also contain that fragment. So we're going to work with this idea of partial templates, maybe that one div where it had the name with a click to edit the name and the email. Maybe that is its own template file that sometimes can be rendered in the larger page, but other times during these htmx exchanges with the server, we just want to return and render those views. So we're gonna work on this idea of partial views and you'll see a really cool library I created to make this easy. And then we're gonna add three features to our Flask video site. Infinite scroll, so we can see a feed of popular videos that are coming in to the site. Live search, live search has a lot of aspects to it, so if we go and type like I want to search for whatever video on some topic, I'm going to type in some words and as I type, I want to see the videos that match that result immediately show up on the page. If I type car, I want to see the stuff that has to do with cars as soon as I stop typing. So we're going to add that feature. But on top of this we're going to add two more interesting aspects. One is it's going to also change the URL and put those various searches, so if I first search for a car and then race, I would have two entries in my browser history, and I could use back and forward to get between them, even though they were generated by htmx. And the other one is we're going to do deep linking. So if we somehow create a URL by doing a search, we could copy that and then open it up or share it, and we'll come back with the exact same results. So all sorts of cool stuff around live search, and finally we're gonna add Click to edit. You saw that in action, we're going to use this, to add new videos to our site quick and easy and inline. That's it, so much fun stuff to cover and a lot of things that we're not calling out explicitly. But ways to design these Flask sites integrating with htmx that are super clean, with almost no duplicated code or HTML templates anywhere, it's gonna be fun.
|
|
|
transcript
|
1:22 |
If you're thinking about taking this course, you wonder maybe I've got the right background knowledge, maybe I don't. Well, what do we assume that you know? Not too much to be honest. We think that you need to know Python, you should understand the basics of the web and HTTP, you know, what is HTML, what is a GET vs a POST, those kinds of things. And you should have basic knowledge of Flask. None of this is super advanced. We're not using the crazy features of Python, not doing like async generators or anything like that. We're not doing really fancy stuff with HTML either. And we're not using actually very many fancy aspects of Flask, but you should know how they all work. And so we're assuming these, we'll talk to them as we work with them, but we're not going to be teaching them from scratch. If you do need to learn them, we have two great courses that cover both of the main areas. We have Python for Absolute Beginners, which teaches you Python. It's not as simplistic as it might sound, but it just has no assumptions about you getting started. So it really is a good foundational course, and Building Data-Driven Web Apps with Flask and SQLAlchemy, a really good course on Flask, and we do talk about HTML and CSS and things like that over there. So if you need to learn Python or Flask, maybe consider taking one of these courses first. But again, basic knowledge, not super advanced knowledge of our three topics is all you need.
|
|
|
transcript
|
2:52 |
Let's take just one minute and do a quick comparison of some of the major frontend frameworks that are very commonly suggested for building these types of applications with htmx. We're going to look at VueJs, which is my favorite for full on web frontend frameworks. We're gonna look at React, and then I'll compare that with htmx, which we've already seen. But we'll throw it up on the screen one more time. So we're going to look at three similar but not actually the same applications. I didn't find one that had all three implemented just the way so I could compare them exactly. So what I want you to take away from what you see here in this VueJS application is sort of the kind of code that we have to write. So here we're going to create an application. You can see it has a name, VideoPlayer, it has a Navbar component, it has some data elements like loading and videoLoading and comment and replies and so on. And then it has some methods like chooseVideo or addLike or disLike or add comment. And these are the logic of the application that we might write. It makes changes to the local data model, but we also do need a way to push that back to the server, that's not shown here. But also, look at the scroll bar, get a sense like how many pages is that? 10? 8? I don't know. There's a lot of stuff happening. So this while it may look complicated is only a small fraction of what we're looking at here. Okay, so this is Vue. Again, I like it pretty well. It is also on the HTML side, attribute driven, which is nice. Here's another thing, in React. So here we are exporting a function which registers the application, and you can see that it's very full of callbacks. So we have like window.addEventListener, which takes a lambda expression here. Then as part of that, we're going to go to the navigator and add a callback and then and so on. So you can see there's like nested little lambda expressions all over the place, and again this is not super clean. This is fairly intense javascript right here, on the front end. Ok this is the active search example. We saw the `click to edit` example before. It has a couple of things. It has the input, which has four hx tags, and it has a body of results at the bottom, and you can see within the table there's a tbody where it says search-results. So as we interact with it, it's going to do a POST to /search and then stick the results in the search results there. Done, no more scroll bar. Again, the React one, this is only four or five pages. The Vue one was 10. This, this is all of it. And you might say, well there's the server side, there's going to be a lot to that. It's honestly probably about as much code as you see on the screen, but in Python. Hopefully this comparison gets you excited about working with htmx, and I've been going on and on about this, about how clean the code is and how simple everything is. It's true, and here's just another example of it.
|
|
|
transcript
|
0:54 |
I'd like you to take a minute and just pause the video and go over to the GitHub repository. On the course student page there's a button that says repo, you can click that or just type this simple URL in the bottom here (https://github.com/talkPython/htmx-Python-course). I want you to download the code. If you use GitHub and you have an account go ahead and star and maybe even consider forking this. This is all the code that you're going to see me write on screen. Starting from the beginning of the video application written in flask to all the changes throughout the entire course that we make and everything that you need is going to be right here. So make sure that you star and fork this so that you have it And if you don't do git, don't worry you don't actually need to use source control at all. Just click on that green button that says code and there's a downloaded zip file. The most important thing is that you get the source code because we're going to be working with it, and you don't want to have to re type everything you see me do. You want to just start for example, from where I'm starting, with the starter app.
|
|
|
transcript
|
1:09 |
you met me at the beginning, but I didn't really get a chance to introduce myself. Hey there, my name is Michael, I'm so excited that you're taking this course with me. As you can probably tell, I'm psyched about htmx and how it works with Python. A little bit of my background and contact info. If you want to get in touch with me, you can find me over on Twitter where I'm @mkennedy. I host the Talk Python To Me Podcast as well as co-host the Python Bytes Podcast. You may have heard of both of these. And I'm also the founder and one of the principal authors right here at Talk Python Training. So I've been doing a lot of stuff in Python, both in writing code, as well as interviewing the thought leaders in the Python community and I can tell you many of them are excited about htmx. Speaking of thought leaders, I actually interviewed Carson Gross back on episode 321 about htmx, of course. He is the creator and maintainer of htmx and he's also super excited about what it has offered and how the Python community is adopting it. If you want to get the full story and the history and whatnot, this interview is really, really interesting, it's about an hour long, jump over to talkpython.fm/321 and put it on your podcast player, and learn a little bit more about htmx and it's background.
|
|
|
|
13:12 |
|
|
transcript
|
1:09 |
Welcome to Chapter two. In this chapter we're going to explore a bunch of pre-built pre-canned examples on htmx.org. htmx is a technology that is fairly unlike what you are used to. We're familiar with JavaScript that calls stuff on the server. We're familiar with server-side code that generates HTML that then returns to the browser. But what is unusual is this partial exchange where some of the stuff, most of the stuff is generated on the server and then a little tiny bit of interactive htmx attributes triggers more stuff to be generated on the server and then maybe applies a CSS transition to it. So what we're gonna do is explore four examples on htmx.org where there's actually a little cool debug network traffic analyzer. After that, you'll have a real good sense of both what htmx is doing to make its magic happen but still leverages the server-side, as well as the broad list of all the examples up there. You'll see there are many, to give you a sense of just what htmx can do when you combine all of those together.
|
|
|
transcript
|
2:40 |
We've already seen one of the examples over here, "Click to Edit", and it's fantastic. It's actually one that we're going to work with. Let's look at another one that we're eventually going to add to our video app. I do want to give you a sense of walking through these, so you can kind of see where we're going and what to expect and just get a sense of what htmx has to offer. I actually encourage you to go play with almost all of these examples to just get a sense of the scope here. But let's look at "infinite scroll". Here we have the code that's going to do all the work. This is part of an HTML table, so it has a table and then a table row. Table data, table data, table data. Now this is just the last row of that table and it has three hx tags or attributes, it has the ability to get more. So contact/?page=2. Then the next one would be page three, page four, page five, assuming there are more results to get. And then, when does this run? before we had, when you click it, it would run like the "Click to Edit". This is when this element is revealed. So if we scroll down to the bottom, so we see this last element of what we have so far, it's going to say, oh we gotta go load some more and then we're going to swap out what, after this. So I'm gonna put another set of table rows after whatever we get back at contacts page two. Let's just see it in action. So down here we have our agent smith void 10 11, 12 and so on. And if we go to the bottom you can see a little working and then that's it. And then more working, and you can see we've done a bunch of those requests and here you can see we start out with the initial state, and we have this hx-indicator. This is the thing that at the top was showing this little spinner type thing for working, and we'll see that later. When we did a give us the page 2, the parameters passed was well we need page 2 right, go get this URL and this is just the query string and the results were all of this kind of stuff here and at the end it will have, I guess we're not sure yet, but it's going to have, let's go to the top here, it will have that on the last of these rows, but instead it would say page 3 and page 4 and page 5. So when we got to the bottom the first time it pulled page 2 and then page 3 and then page 4, you know, and this example, it's just going to keep running. But eventually when you would have no more in the server, the thing you would return would not have those elements on there. You're just returning the final set of results. Assuming you're not Twitter or Facebook, that's basically infinite. But if there's an end, you just don't put that on the last response and that's it. That's infinite scroll. Incredible, right?
|
|
|
transcript
|
3:29 |
Our next demo that we want to look at, our example, is "Active Search". So if we come over here, let's just see it in action. Then we'll talk about the code. So what we want to do is we want to search by email for a bunch of users and notice there's no users in our table here and also keep your eye right here. As we do the search, you'll see some active indicator type thing. So let's suppose we're going to find all the educational users in our database. We can just search for .edu and then look at that, there they are. Now, one thing you might have noticed, I typed that pretty fast but let me try it again. If I type e-d-u, notice it didn't really refresh until I stopped typing. You don't want this to just power through so that every keystroke you type goes to a server. It kind of waits until you pause, and then it'll search. How about the organizations, the org. There we go. We've got Owen and Walker and Klein, all of these dot org domains. What about the dot coms? There we go. Really cool, right? let's see what it takes to do this. Over here we have our search indicator, that's that little spinning active bar that says searching. This is the text box I was typing in. It has form-control class, but it's actually not in a form. That's just a bootstrap style. Here's the relevant section, for doing a POST to /search. The trigger is on keyup when the data has changed and the user has stopped typing for half a second or 500 milliseconds. That's why it didn't bounce around as I was typing it, it waited till I stopped. Then it's going to replace #search-results, which is down here in this body. We had First Name, Last Name, Email, and in our table, and then it was filled up with the results as they came back. And then, finally, while it's thinking, this is the CSS selector that its going to show and then hide. That is up here. The dot means `class`. So class htmx-indicator, and it just shows that span and these bars. That's the entire implementation other than, at the server side, when we give it some bit of data, it has to actually do the search. Let's look at our history here. So the initial state is basically what we talked through, when we do this POST on /search, notice its {"search": "value"} and the name of this input is search. So the value to search was, I typed edu. There's not one for "e", there's not one for "ed" just "edu" because of the delay. Come down here, and it got these results, and it jammed them inside there. Then we did a search for nothing. We deleted it, and we got edu and here's our org, our org ones we got back. On the server. we're doing some search that generates these users, and then we're rendering a template like a Jinja template. It's turning those into a bunch of table row, table datas, that look like this. Pretty impressive, right? For all that functionality, this is all that we have to write, plus the server-side search implementation, which is also simple. One other thing that we can do here that's not indicated is we can do an hx-push, which we'll talk about later. That would actually come up here and say something like you know, search=edu, search-com, search=org and put those in our browser history. But this example doesn't actually show that.
|
|
|
transcript
|
2:37 |
The next example that we're gonna explore. It's not one that actually appears in our final application, but it's extremely useful. Let me lay out the scenario for you. Imagine I've got a page, trying to render it for the user, right? They make a request, we want to show it to him, but maybe it's doing some kind of report, or there is some part of the page that's actually really, really slow, and I want to get most of the page shown to them and then have this other slower section, like a report or a graph or something along those lines. I want that to be generated and delivered to the user as soon as possible, but without blocking the original page load, and we also want some kind of indicator for what's happening. That would fall under the "Lazy Loading" section. Check this out, that's pretty simple. So what we do is we say, this section of the page, this whole section, that's one of those slow pieces. What I want to do is I want you htmx, to go to the server and call /graph and when it's done, put it right here. But while it's loading, I want you to show this indicator with those bars sort of spinning around here. And the trigger is going to be that the page has loaded. So just the page was shown and then fill out these missing pieces that are slow. In order for this to work, you're going to need a little bit of CSS somewhere, included in the page to basically have some of the behaviors that are indicated here happening and down here we have our graph and this is the part that was slow, but it doesn't take that long, it's like half a second or a second. So what we didn't see is this actually loading because by the time I got down here it was done. But if, notice if I load this page, it's instant, but there's like a one second processing of something else. If I scroll down, I can refresh here and show that to you. So page is loaded. But now it's thinking on the graph request, input came back or the response came back. Boom, here's our report and let's go and look at this. So our initial state was that the page was loaded and this section was here. Right, this is what we talked about. But then as the document loaded, was complete, I said right, now we've got to fill out the slow pieces, and it went and did a request for GET /graph, no parameters. The response was, here is your generated image, of your report. How cool is that? So I'm sure there are many websites that there's a little part of it or a little piece of information that's slow and the rest is really pretty quick, and yet the user experiences, I go there and I click, and I wait, and I wait, and I wait and finally the page loads. This would be so much better. Show most of the page, and calculate the little final things that you need using one of these lazy loads.
|
|
|
transcript
|
3:17 |
Okay, final example. Let's look at "Bulk Update". What does that mean? Let's see it in action and then we'll talk about the pieces. So here we have a table of users, and they have a status and really what we want to edit is their status. Are they either Inactive or they're Active. And let's suppose that Joe and Fuqua, they now need to be deactivated or set to be Inactive. We're going to highlight them in their checkbox. Hit this. There's a cool little UI feedback that notices those changed, and then they were made Inactive. Let's actually activate these two down here, at bottom, so the bottom three will be activated. And there they go, they're back active. So if you want to make changes to all of them, right? This big group here, maybe I need to delete these three, or move them or who knows what we're doing. What we can do is we can add a button for each behavior, and these go to different endpoints on the server, or we could pass a query string that says set new state to Active or Inactive, or whatever, and then we just re-render or re-determine this entire table whether or not they're active or not. Okay, so come down here and look at this. So we're going to say, we're going to work on checked, the thing with id checked-contacts. That's this form. What you have to do is you have a form that contains a table, and each table row has a checkbox. Initially it's unchecked and then that's pretty much it. What we're going to say over here is the target is going to be to replace the body. And if you click the activate, it's going to post something to /activate. And if you deactivate, it's gonna click, POST something over to deactivate. And then there's some CSS transitions to make those red things happen. And let's look at what happened when I clicked it. So it started out with just the table. Again, you're not going to see the whole thing, right? It gets truncated here, but you're going to see this table coming in as we saw. And then, we click deactivate. It does a PUT to deactivate, and it passes over the ids that we checked. Those were the first one and the 3rd one, zero and two on index based zero. And then we reactivated the last two, that should be 0, 1, 2, 3. So, here we go. The ids that were selected to reactivate were 2 and 3 and notice down here each time we've got Joe and Angie and more stuff for activate and deactivate. That part is not changing, the reason is, it returns the entire table up to the server. It basically makes a change, and then it regenerates the whole table and sends it back on each request and gets dropped into the tbody there. All right, that's "Bulk Update" and our final example that we're going to look at. Hopefully this, looking at the way these are exchanged. looking at the way htmx works, you both get a bigger appreciation for the types of things that it can do and a little bit better intuition on how it's working. After this, we're going to go and actually write code to make these things happen, both on the client-side, which we've been exploring. But I've said the service-side easy and stuff happens there. But you haven't seen any of that yet. Well, we're going to do that in Flask as well.
|
|
|
|
16:45 |
|
|
transcript
|
1:26 |
Now you've seen htmx in action. I bet you're about ready to dig into some code, and we're almost ready to start writing htmx-enabled Flask web apps. We have one thing to do first and that's what this chapter is about. In this chapter we're going to review the application were starting from. What you saw over on those example pages was extremely simple, extremely isolated bits of fairly unstyled and to be honest, uninspiring examples. What they could do is powerful and amazing, but to see them in action is to kind of see some just unstyled basic HTML. For this course, what I've done is design a beautiful, somewhat realistic, fairly full-featured application that allows you to collect videos, put them in a cool categories with nice visualizations, go and play the videos, interact with the videos and see their thumbnails and stuff like that. So for this course we're going to start with an existing Flask application that already has a solid web design. We're basically gonna do no more web design for the course. But we are starting from an application that's not just completely bare HTML, it's cool, it does stuff, it looks beautiful. So we're going to dive into the code here and get you all situated so you can run the starter code and start developing along with me for the rest of the course. Let's dive into that sample app/
|
|
|
transcript
|
3:38 |
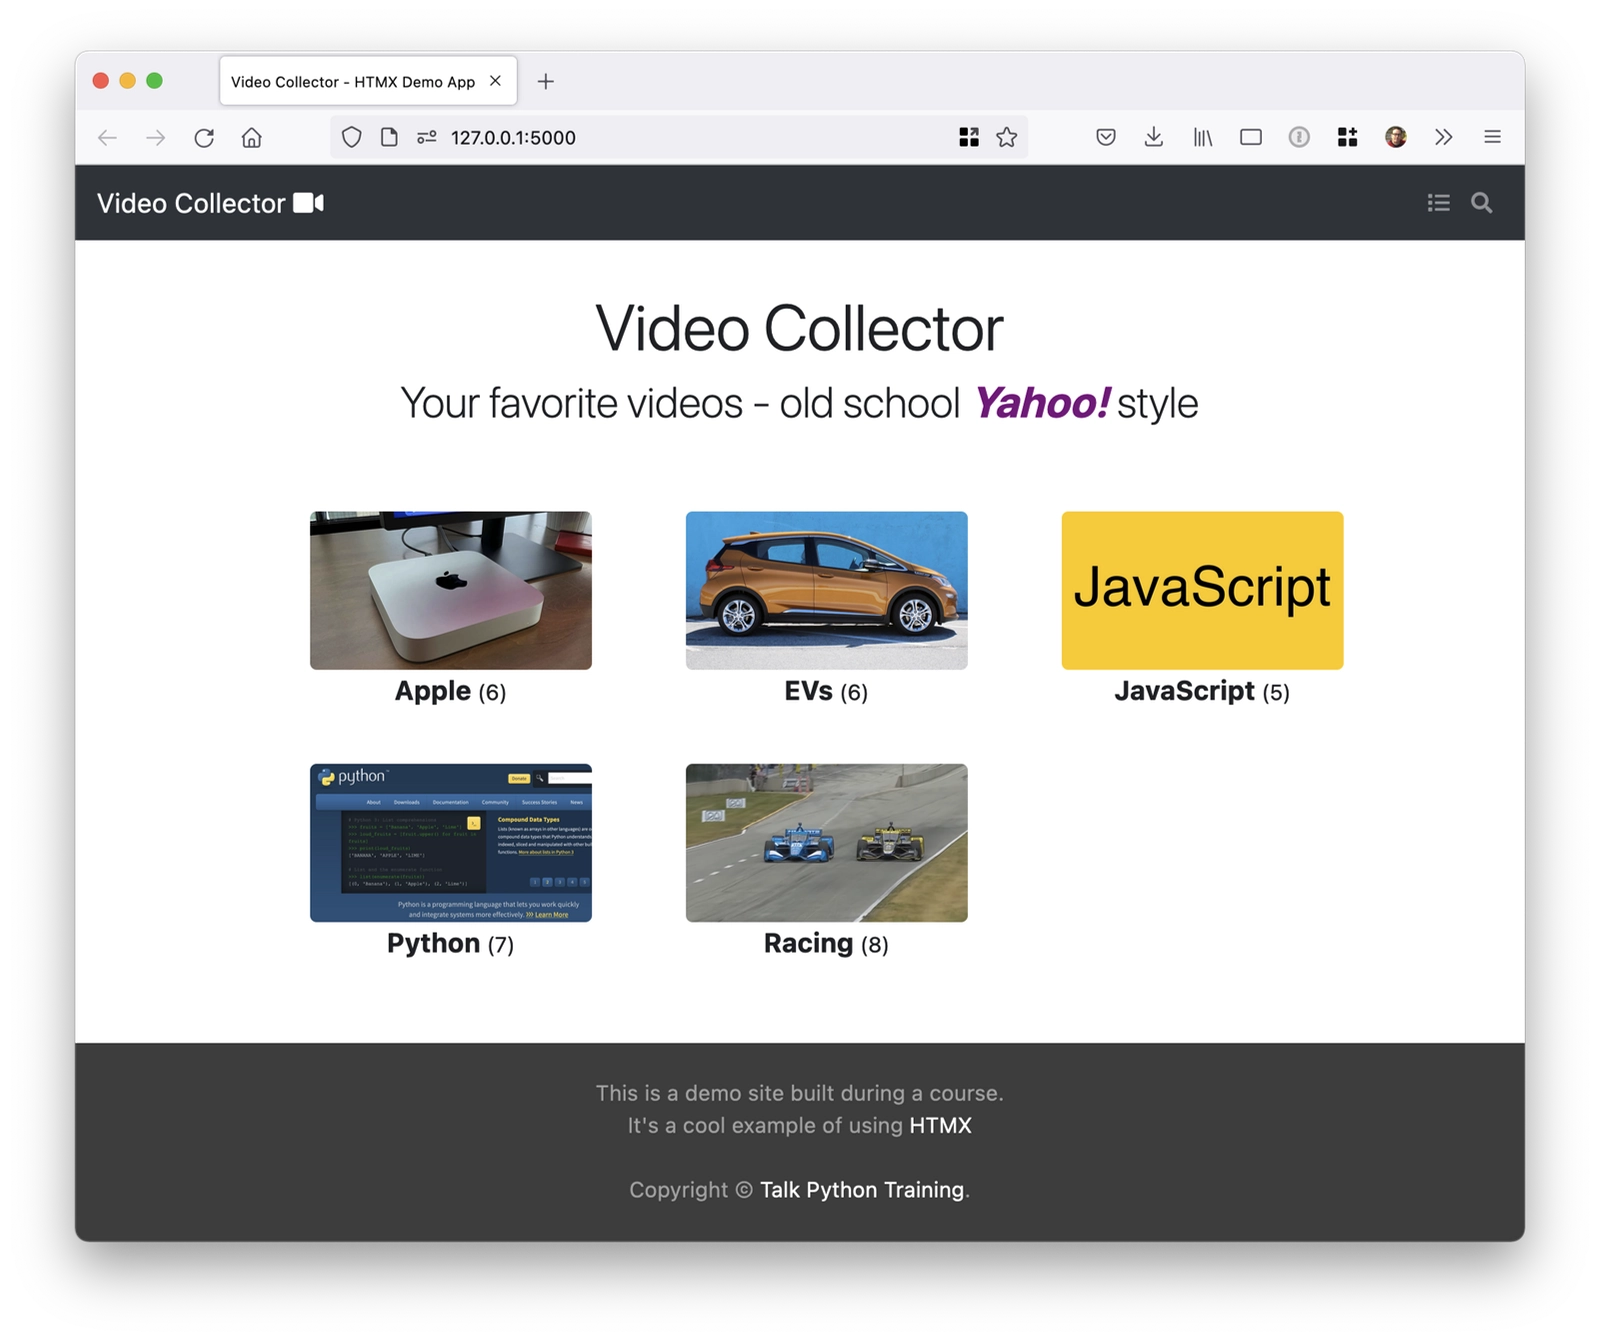
Here we are in our GitHub repo for the course. When you get to it I'm sure there'll be a lot more things going on. But we're going to start from the beginning and here we are with our starter video collector Flask web app. In order for us to explore it and run it, the first thing we need to do is open it up in an editor, install some of the configuration files, the requirements and then we can go and run it. So we're gonna use PyCharm and drop this over here and PyCharm will open it up. That only works on Mac, if you're on Windows or Linux, just click on file, open directory, browse to that. PyCharm has noticed that there's no virtual environment but that we have a requirements.txt, so he thinks we should have one and offers to create it for us, which is great. We come down to the terminal and do a pip list, see what we've got, it's actually already installed, Flask and everything that's specified here in the requirements file, except for, it didn't update our pip, did it? Let's go and do that real quick as well. Just so we don't see warnings for the rest of the course. Great, we've got our system all set up and ready to go.Before we look at the code, I think it makes sense to just run this app and see what's going on. So in PyCharm we have no run configuration. We have to go over here and right click and say run 'app'. Fires up our Flask web app after just a second. And here it is! This is our video collector. Your favorite videos, old school, Yahoo! style. So what is this thing about? Well, it has categories of videos. Here, You can see five categories on the screen. Apple, EVs, JavaScript, Racing and Python, you know, Apple has six videos. same with EVs, JavaScript five, Racing has eight. And if we dive into one, like if we go to racing, you can see here that we've got some driver coaching stuff about trail braking, Romain Grosjean's first IndyCar race. Some stuff about Formula E. This one's kind of this crazy video here about this SIM that this Australian guy put together, and if you click on them, they'll actually play. So here you can see this guy driving in his, here, go back and see this IndyCar start. So these are real videos that we got off of Youtube and we put them into these categories, and it's Yahoo! style because we're just kind of keeping track of the ones that we like, right? we save them to the categories and whatnot. That's how Yahoo! used to be in the early days. It was literally like the yellow pages of the internet. Very weird. The other thing that we have up here is this little dot, dot, dot hamburger type thing. And if we click it, see it spins for a while, thinking, thinking, thinking and then eventually it gives us every single video on the site. Oh, that seems not ideal. Wouldn't that make a lot of sense to do like an infinite scroll? and over here when we're in a category, like one of the Python category, what if we wanted to add a new video? Well that "Click to Edit", right there would be super handy. And if you don't really know what videos are interesting, maybe a little search. We have no search placeholder, anything yet. We're gonna have to write that entire page. So this is the application that we're going to be starting from in order for you to get started and run it yourself. Just make a copy, so you have the original. Of course, as you evolve it, create a virtual environment, pip install -r requirements.txt after you've activated environment, run app.py. That's it, you'll have this site up and running right away.
|
|
|
transcript
|
5:49 |
Let's go through how I've organized this application and the various important key elements as we go through it. One of the things I really don't like to do is give you a simplified demo tutorial style application, I want to give you something that feels real, that you can use to build real applications. if you go to the Flask site and you follow along with the tutorials. Very often they say we'll create an app.py and then proceed to jam everything about the website into that one file, and you'll end up with one huge Python file that's hard to understand. Our application couldn't be farther from that. We've organized it a lot into different areas. Models, these are like our database models effectively, Services, these are our data access query layer. Static files are like CSS and images and so on. Templates, these are our HTML file. Virtual environment, that's just hanging around. We have viewmodels, we'll talk about that in a minute, and we have our views. These are the different categories of implementation, like here's all the stuff to do with videos and here's the homepage and here's the feed and so on. Then we have our app.py here of course. If we go down to the bottom, you can see we're checking to see if you run it directly as in right click and say run, ten we have to configure(), which sets up like URLs and database access and all that kind of stuff, and then we're running it, and we're only putting it into debug mode if we're running it in a debugger. So like if I press this button right there, but not if I press the play. So you can sort of do that here, if you're interested in that. You don't have to say it's being debugged, it'll do like reload and whatnot. This is our application in terms of how it's running. Let's look at these various pieces. So our models, we're using what are called pydantic models. Pydantic is a fantastic way to define these models, it can parse JSON, it can turn into JSON and whatnot. And they have validation on their values and automatically adapt to the type. So if you said this was an int but you passed in a string, it would just try to parse it to an integer. So we have our pydantic models here, our data access models basically. We've got one for video and then our category, this is what we were looking at with the, like the racing or the EV and so on. We have category, which has a name and a banner image and then a list videos. So that's our models. In our service it does queries against aspects of the database. So let's see down here. Get a video by id. And we're just looping over, This is just an in-memory, real simple thing. We are not even using an actual database because I don't want you to have to deal with figuring out SQLAlchemy and schema changes and all those kinds of things. We're just keeping it really, really simple storing our data in JSON. And then this thing just parses across those values. OK, just think of, you know, we're just going to use these functions here in the video service to do queries against the video data or even make changes like adding data. Static files should be pretty straightforward. I've downloaded htmx. I don't like to pull them off of CDNs, I want to make sure we have the same one all the time. Multiple times, I've had the CDN just go away or stop offering that file and that's no fun. So let's take control of that ourselves and serve up our htmx file. Here are our templates. So for example, when we get to our homepage, we have our video collector, I'll point you at that real quick. This page where it says Video Collector, favorite videos, Yahoo! style, and it has the categories. All right, here's your style, and then it does standard Jinja stuff where it loops over and puts a row for each category in the row, we're going to pass over a bunch of rows where each row holds three categories. Some cool stuff on how we did that, I'll show you that in a second. But we get one of these category models from right there. And it's super easy that we can just say here's the URL to the categories, the basically, lowercase name, here's this title, there's that. How many videos there are in it and so on. So the HTML is incredibly simple, and it's generated by the views over here at home. So for example, this is the view that we were just looking at. It uses home/index. I've employed this idea called View Models. And the idea of the ViewModel is to know what data the template needs. You saw that it requires rows all put together. You know, each row is going to contain a category and so on. And if it was a form, it would actually do the data exchange as well. So this part is actually incredibly simple. Let's go look at the ViewModel and that will kind of round things out. So this thing here is going to hold a list of categories, that's what we're looping over. But what was more interesting is we needed rows. And remember if you look here, I wanted three categories per row, as many as we had. So what we're actually doing is using more_itertools and say, given all the categories, returned them into smaller collections, each sized three or smaller. First time I got three, then we only had two more, so then it was two. And then because it's an iterable, we turn that into a list and that's basically the entire application. It has this data that it parses on load up into memory. It has these services here that do queries against that in memory, data, converts them over to these two different Pydantic models. The Pydantic models are then loaded up with these view models down here, like this one that we're in here. Stores fields which gets returned over to the views. The views render the templates, the templates generate their HTML and send it back. So standard Flask stuff along those lines. So take a minute and familiarize yourself with all of this code here. Make sure you get it running and set up the virtual environment and just maybe follow one of the URLs or two through their various spaces to see what's happening.
|
|
|
transcript
|
2:03 |
Here's our first concept video, and before we get to the content on the screen, let me just do a quick sidebar. When we're going through these demos, you're seeing everything built up hands on, and sometimes it takes five or six minutes to figure out. You know, here's how we build up this idea. But there's little takeaways that will help you now, but will really help you if you try to use this course as reference material, like, oh, what was that thing we did with Pydantic models? or how did you query that data? or whatever. That's what the idea of these concept videos are about. It's here to remind you and refresh your memory. For example, here about Pydantic models, but you just saw them. It's more here for reference material, so you can go and watch a one-minute, two-minute video and get the core idea of a concept and run with it. With that mind, let's talk about a few concepts. Pydantic models, these models are very similar to data classes, but they're a little more web friendly. They'll take data that's not exactly in the right format and structure, and they'll, if possible, convert it and parse it into that structure, and they'll otherwise give you really good validation error messages. I'm a big fan of Pydantic as a way to describe our data. Here, we're creating a category class. And in order to make it a Pydantic model, you simply derive from base model which comes from pydantic. Then you say all the fields colon the type. So here's a category. It's a string in this case we're telling Pydantic it has to have a string. It can't possibly be omitted from the data, for example. If it was not necessarily required, but could be there, you would say it's an optional string. So the Python type hints, or type annotations are super important here. We have an image which is also required because it's a non optional string. And we have a list of videos, which is a set of other Pydantic models. We saw the video classes, also a Pydantic model, so they can be nested in this way. And what we do is we just go to that JSON file and say for each category in the JSON list, give it to Pydantic and let it turn it into this class. A really nice way to create structured, verified, typed data in Python.
|
|
|
transcript
|
2:17 |
When we're working on the web in Flask, very often what we need to do is take some data and provide it to the HTML template and Flask will combine that with Jinja, do a bunch of work to actually turn it into HTML and return it to the client directly for us. This data exchange can be tricky. So we're using this idea of View models. Now, View models are classes that are dedicated basically to that template file. It knows what that template file needs and if it accepts data it knows what data, say through a form or something, that that template might send back. So it does both validation, as well as that transformation. A little bit like Pydantic, but it turns out Pydantic doesn't make a lot of sense in this scenario. So the way it works in our applications is we have this thing called the ViewModelBase and its primary job is really to return itself as a dictionary, and it just leverages its fields, it says my fields are whatever as a dictionary. Then we can derive from that. In our case we saw the IndexViewModel was the homepage, it has categories and it has rows. So it does all the querying and data transformation that might be necessary to get the data ready for the view. And then over in our view method we just create the view model and possibly we might give it some form data and other types of things, this was a real simple example, so it just does its own internal work and returns itself as a dictionary. The home/index.html and Flask takes it from there. I really, really like this design pattern. It might seem a little disjointed but look at how simple and clean that view method on the right here is it just does a couple of things, and you know when you get to that point that the data is already validated, it's already parsed correctly and so on. So you'll see we can take a lot of the challenges of data transformation, of parsing that might get stuck directly into a view method and we'll put it over in these classes, and then we can test these classes separately. Right? We could create an instance of a view model an IndexViewModel for example and then go and inspect it in pytest and make sure everything's working right and so on. So it's a really nice separation. Good way to have a class dedicated to knowing what it's HTML template needs in terms of data and getting that ready for it to go
|
|
|
transcript
|
1:32 |
We saw the pieces of code that we're working with. We saw the models and the views, and we even saw some few models stuff. But I want to highlight a little bit more organization than we've seen so far. So over in our project structure. We have a couple of things. We have our View models and notice the View models have a home folder. And in there we have the index_viewmodel. So here in the views we have a home file and an index method. Both the folder structure and the view models as well as the name of the file have a direct correlation. So if you're in that index_viewmodel and the home folder, well what does it apply to? the home set of views and the index method. Also, it derives from the ViewModelBase in shared. Everyone's going to be sharing that. No one really directly uses that. Just like the view models have a sub structure that matches the view and method name So do our templates. So we have our template folder which again has a home folder because that has to do with the home views and the home.py there. And we have a method called index. So we have an HTML file called index.html. So this helps us know if we're in one section. If we're working in HTML. What is its view model? What is its actual view implementation? You can use these two steps. What is the name of the view file or collection? home and what is the name of the method? index. And that will help you quickly know where the various pieces go. So this is how I've organized everything.
|
|
|
|
41:38 |
|
|
transcript
|
0:49 |
In this chapter, we're going to add the first of three features that we're going to add using htmx, "Click to Edit". In our sample application, we saw we had different categories of videos and in each category there was a bunch of videos. Over here, we would like to go and add the ability to seamlessly and subtly turn our categories into editable categories, something small and out of the way until we interact with it, will expand into some form that will allow us to enter YouTube video information that will then be saved back into that category and saved into the database. So we're going to leverage htmx's click to edit feature as well as a few other cool tricks to put a little polish on that. Let's get to it.
|
|
|
transcript
|
0:57 |
I'm excited. We're about to add our first feature using htmx. But before we use htmx, we need to do a little bit of work to actually get just the non-interactive functionality in place. So in this chapter we're going to add inline editing or, more accurately the ability to inline add a video. So down here we want to have this form show at the bottom of every category For example, this is the apple category. Check out the URL at the top, video/category/apple. And what we want to do is if we have another cool apple based video we want to collect, we're going to add it to our database right here. But do you want this huge form just stuck at the bottom? No, of course not. You want something subtle and when you interact with it, it comes to life, lets you edit it, and then it goes away again. So that's what we're gonna do in this chapter. We're going to create this form and make it dynamic and classy with htmx.
|
|
|
transcript
|
6:35 |
In this section, we're going to look at adding that HTML form. But before we do, we've got to sync up with the GitHub repository real quick. So if you look over here, we're in our GitHub repository, and we have code, and now we have a new section, ch4_app because guess what? we're in chapter 4. And notice over here, there's actually two folders. ch4_starter_video_collector and ch4_final_video_collector. These are identical at the moment, but I want to give you exactly what we're starting with, here. And then, the code we write during this video, this one. Obviously they're the same at the beginning, but by the time we get to the end, I'll have edited this version a lot. So if you want the final version, go to the one that says final. If you want to start out and follow along, Be sure to make a copy of that one. So over here, let's open up our Chapter 4 code. Now, remember the structure. We want to work with the videos. Specifically, the category section where we're passing in the category name. So videos/category, our example we saw was /apple here and that means over in the template, we're in the videos module, so there's a videos folder and then look, there it is, category. This is where we're working. This looks like an error, but it's really just the Jinja stuff not being properly understood by PyCharm's checking. Don't worry about that. So down here at the, this section here, let's close that up. This section is where all the videos are being listed. And what we want to do is add another section, another responsive section using bootstrap where our form is going to go. So let's come down here, we'll have a div, and it's going to be a container. In PyCharm, you can use this zen coding where you say like the CSS name so dot container would be a class and in here we'll have a div.row, if we hit tab, it expands like that. So you may see me do that throughout the course and in here we want a div.col-md-4 and we want 3 of those. So in this one is where things are going to get interesting. These are just really kind of padding on the outside. So we're gonna put, and here's where we're gonna put our form. Now, before we move on, I'm sure you've noticed it. But let me just emphasize it right here. There's already CSS, there's already a style, as you can tell, here's the page that we're actually editing right now. There's a lot going on in terms of how those pages are laid out. There is not pure HTML, is it? Let me add just a couple of CSS classes that are going to apply the design that we already have in place. We have an ad-video class in the category container and then in row a click-to-add. Obviously this is not the order, you would do it, you would write the HTML, then style it. But really this is not a design course. So let's just keep it moving, right? Now, the next thing we gotta do is just write some standard form stuff. So let's first of all set the action on our form here. It's going to be /videos and we don't yet have this action or view method over here. We've got, remember, category and play. We're going to add another one called `add`. Where we're going to add it? We're going to add it to the category, so we need to pass the category information back as part of the URL. So we'll come over here, we have category, look at our, look up at the top, looks a little funky. There's a class or variable called category and then the text that shows what it is. Right? So for example, EVs or Javascript or Racing, That's also the category. So variable, field. What we need to do down here is we say we're going to go category.category. Let's set the method of the form to be POST. And in here I'm going to write just a bunch of inputs and zoom ahead. So you don't have to watch me type them all. I'll do one, and then we'll carry out. So we're gonna have an input of type text. That's good, and it's gonna have a class of form-control. This is just a bootstrap thing to make it look a little bit better. We're going to set a name. That's super important because this is basically the name of the value, the key that we look up in Flask. We'll add a placeholder. This is just helpful text. So this is gonna be the YouTube ID that we need to save. We're looking over here when we play these, all these videos here, for example, these are actually just specifying the Youtube ID, like that. And then finally we're gonna say this field is required. We can probably put that on one line, right? let's do a bunch more. That's all the data that we have to pass in. And now let's just add a button, and we'll give it a class of btn and btn-danger, this is going to create it. And it'll just be called Create, and let's say the type is "submit" so it will submit the form. Perfect. So let's see what we've created. Almost there, this is looking pretty good. We've got our YouTube section. You can see that it's required our YouTube ID, our title, our author and our view count, which is a number. I did Miss one CSS style here. Let's set some classes on this as well. Can be a video-form, it's gonna be a fade-me-in, fade-me-out. Here we go. Let's have a look, much better. Now it looks nicely formatted, doesn't it? So here's our form. This is pretty decent, you know. It's got its validation like I said, things that it requires, it's got its little placeholders and the ability to POST it back once we put something in here. Let's go and find a Python video we can use. How about this? Stop Watching Coding Tutorials. Let's say we want to add that one over to our Python section and come down here, and they'll be the YouTube, no that's the title, gotta get the YouTube ID. Author, Devslopes I guess, and the view count let's say it's 24 views. Oh sadly it was not POSTed back. It didn't work, did it? We're still missing the server side bits, but I think our form is pretty much ready to go, isn't it?
|
|
|
transcript
|
7:09 |
We saw that we had the HTML working beautifully. But when we tried to submit the form, it gave us an error that there is no URL at /videos/add/<some category name> So let's go over here and add that view method now. So remember we are in views videos here. You can see up at the top, we were previously working on the videos category. We're gonna work over here as well. Now we're going to POST this back and it's really similar to what we have for the category. So I'm just going to copy that. Now, we're using blueprints. So you might see @app.get we're not using app, we're using blueprints, which allows us to put these code in a much nicer factoring into different files and so on. And we don't want to do a get we want to do a post. We saw the, was /videos/add/<cat_name>. And that category name goes there, and we don't really need a template file here because we're gonna do a redirect. Remember we talked at the beginning about the structure, we have these view models whose job it is to exchange data with the HTML. We don't have one yet for add, let's called it add_post. Was going to say add_video but it's already in the video section, so add probably is sufficient. What we need to do is come up with a AddVideoViewModel, and let's go and see what's happening with like say this play one over here. Remember viewmodels, videos because we're in the videos views, and we've got these different ones here. So they all drive from this ViewModelBase, and then we just give them a constructor and then they sort of create the data and this one is going to be a little more rich than the other ones as we'll see. So let's calle this add_video_viewmodel.py, rename the class, get rid of this, perfect. So the arguments that are passed in like this category name of a string. We're going to need to pass that over here as well, and we'll just put it like this, and we want to save that probably, I will add a field, PyCharm will write hat code for us. It kind of needs to change his mind about what that means, there we go. Let it write that code for us and let's go ahead and also import this over here. Now what we do in the view model, let's pull up our category template again, Is we need to have it exactly in sync with all the data that is being passed over to the form, but also is being submitted from the form back to the server. So what we need to do is we need to have the fields in the view model exactly match all the data that's required or being provided by the form so required by the page are being provided back by the form. In this case we're just submitting here. We're going to do a redirect. So we just need those pieces of information there, id, title, author and view_count. So let's go and make this. I'm gonna put None for a minute because we don't know what they are yet, right? Let's also go ahead and give this a type. So we're gonna go over here and say this is, we'd like to say a string but PyChamrm is saying, you know what? it's set to None. It can't be None and be a string at the same time. One thing we could do is set it to be empty but if we won't allow empty values, that's not ideal. So let's actually go over here and say this is an Optional. That's the way Python allows us to specify it could either be a string or it could be None. All right, so we have an id, we have a title, author. We have a youtube_id, we have a view_count. This one is an int. Well, this is the data that the form is giving to us. But how do we get it? Remember, in Flask the way we do this as we go to the request and we say did somebody submit a thing called title? Did somebody submit a thing called youtube_id? So let's have one more function here called restore_from_form. Now, if you look at the ViewModelBase here, it stores the request, and it also creates this thing called a request_dict, which is a little bit of a leaner more all encompassing a way to get the data submitted by Flask. So what this is, is it stores the form, the cookies, the headers, all those things in one place so we can just ask. However did it happen, did somebody submit this data? So we'll do like this. Put in a temporary short variable just so there's less typing and we'll just say self.title. Get the title like that. What's the next one? Author, author and so on. The last one is kind of interesting because this is going to return a string but we want a number so let's do an int and if they don't submit anything, if the view_count is not there. What's going to come back from this get is a None which will make int crash. We can say if there's nothing just return zero and that'll make it a little bit safer. Alright, last thing to do, let's go and actually call this function vm.restore_from_form(). And we don't want to have them view the data again, we want to have them go somewhere else. So we'll say flask.redirect, we want to redirect over to videos/category/ and then we want to put the category name. So what we're going to have them do is change the data and then go back and look at that form. But let's just really quickly put a breakpoint like say right here and run this and see what we get. We go back, and we try to submit this now. Look, look, look at what happened. All right. So we got, our category name is Python. And we created our view model. Let's see what the view model has in store for us. Let's go to the debug section here and expand it. There we go. Look at that! author Devslopes, category Python, no errors. The id was not captured. I think I've got that a little bit wrong. So title is good, the view_count is good, youtube_id not so good. Let's see what we missed here. Ah yes, so in our view model we don't have a youtube_id, we just have id. Like this, and it's just id. But it looks like it works right? Let's just do one more time through to make sure everything worked. Re-submit the form, name, category, no errors, good, id is good and title, view_count, which is an integer. You can see the int there. Perfect. So we're getting the data from the form, and we're capturing it in this view method add_post, and we're verifying that it gets parsed over correctly using our view model, perfect.
|
|
|
transcript
|
3:36 |
Well we got the data over to the server, we got the form, but we haven't added the video yet. All we did, we'd run this. What we did is when you submit this data it just reads it, throws it away and then it goes back over here. What we would like is to have another video that goes right there isn't it? Let's see if we can get some memory on these things. A beautiful, beautiful. Here we go. It's got five or six views. Perfect. So now, when we submit this form we want to actually put it in the database. So when it redirects here, it reloads that from the database which will have the new video on it. So how do we do that? Well recall another section. Another bit of organization in the course here is this services and we don't have a whole lot going on here. So it's pretty straightforward but this services thing, its job is all about managing the data, so we don't have to think about it if we want to switch from one kind of data format to another, we could easily do that by just rewriting all_videos and all_categories and so on. One of them though, check that out right there is really interesting, add_video. So all we need to do is go to this video_service and call add_video and pass in this data like the category name, youtube_id, title and so on. And guess what? again this is exactly the data that both our form and the URL together combined have been capturing, you can go over here and just type video vs, and if we hit Ctrl + Tab a couple of times PyCharm will say oh you want me to import this and use that one? Yes please. We want add_video And what does it take? It takes a category name which were passing in. Right? see the parameter at the top and then the other ones that it needs come from this restore_from_form in our view model. So we have the id, we're looking for the title, the author. and vm.view_count. We don't need our comment or TODO because this hopefully is doing it. Let's give it a try, see how it works. So I have not pressed submit yet over here. What we hope to see is that it's going to create the video in the database and then stash it right there. Let's see, moment of truth. Of course, there it is. Of course. But as we click around we can come over here go back to Python, still there, right? We put in the database and go play it. There's that guy again. Play this, fun, right? Go watch this Python Bytes one, so on. That was pretty awesome, right? We were able to create this form, create the code on the server that will capture it. Create the view model to make it clean, add it to the database. Do a redirect, we've got everything created. Now, everything we've done so far has been only Flask code. There's zero htmx involved in this. But why did I go through all the trouble? I could have just written this and thrown in the view model and done the HTML But I really want you to appreciate this is what it takes to build it in Flask and here's how it's different to how we build it in htmx. So what we're going to do now is we're going to go and change how this works, turns out most of what we've already done would be required anyway. So we're going to change how this works to make it much nicer as we've wanted to from the beginning with htmx. But we've got it working in Flask, for sure.
|
|
|
transcript
|
2:26 |
It's time to start using htmx to add our first feature, which is Click to Edit, click to add in our case to add a new video. So how do we get started with it? Well, it says "htmx is small" and then a link over here, and it will say here's a min version, and we could just go view raw and possibly we could just link straight to that thing, which would be fine. That would work great. I'm not a big fan of using CDNs from different places for different parts of our JavaScript. Too often I found a year or so later they've decided they're not going to host that anymore, and it's just gone. It just stops working in ways that are really unclear to me> So what I did is I downloaded that, and I put it over in our static files, in the js section right there. We've got both the non minified and the minified version, and we'll go and just use the minified version. And in order to use this, there's not like a CLI, there's not webpack, there's not all this stuff going on, check this out. This should be refreshing. Here's our style sheets at the top, and at the bottom. We can have some JavaScript. How do we get this in here? We'll just like any other JavaScript, we say <script src="static/js/htmx.min.js"></script> Done, we've now installed htmx, and we're ready to have it go, let's just verify everything is working over here. I'll just do a inspect element, console, make sure there's no errors. Looks like our Source Map is not there for Bootstrap, but you know what, Who cares? That doesn't matter. Our htmx is absolutely working. Here we go, you can even see it in action, htmx right there. But what else do we have to do in terms of JavaScript to make this work in order to like wire up events. Remember if this was jQuery from way back when we would have to do like a $document on ready. If this was Vue, we'd have to create a Vue App and then wire the pieces together. Well, the cool thing about htmx is, it's running, it's done its thing. All we have to do is put attributes in certain places and the magic is going to happen. We've completely set up and gotten htmx working with just this super simple one line of code right there, done.
|
|
|
transcript
|
4:55 |
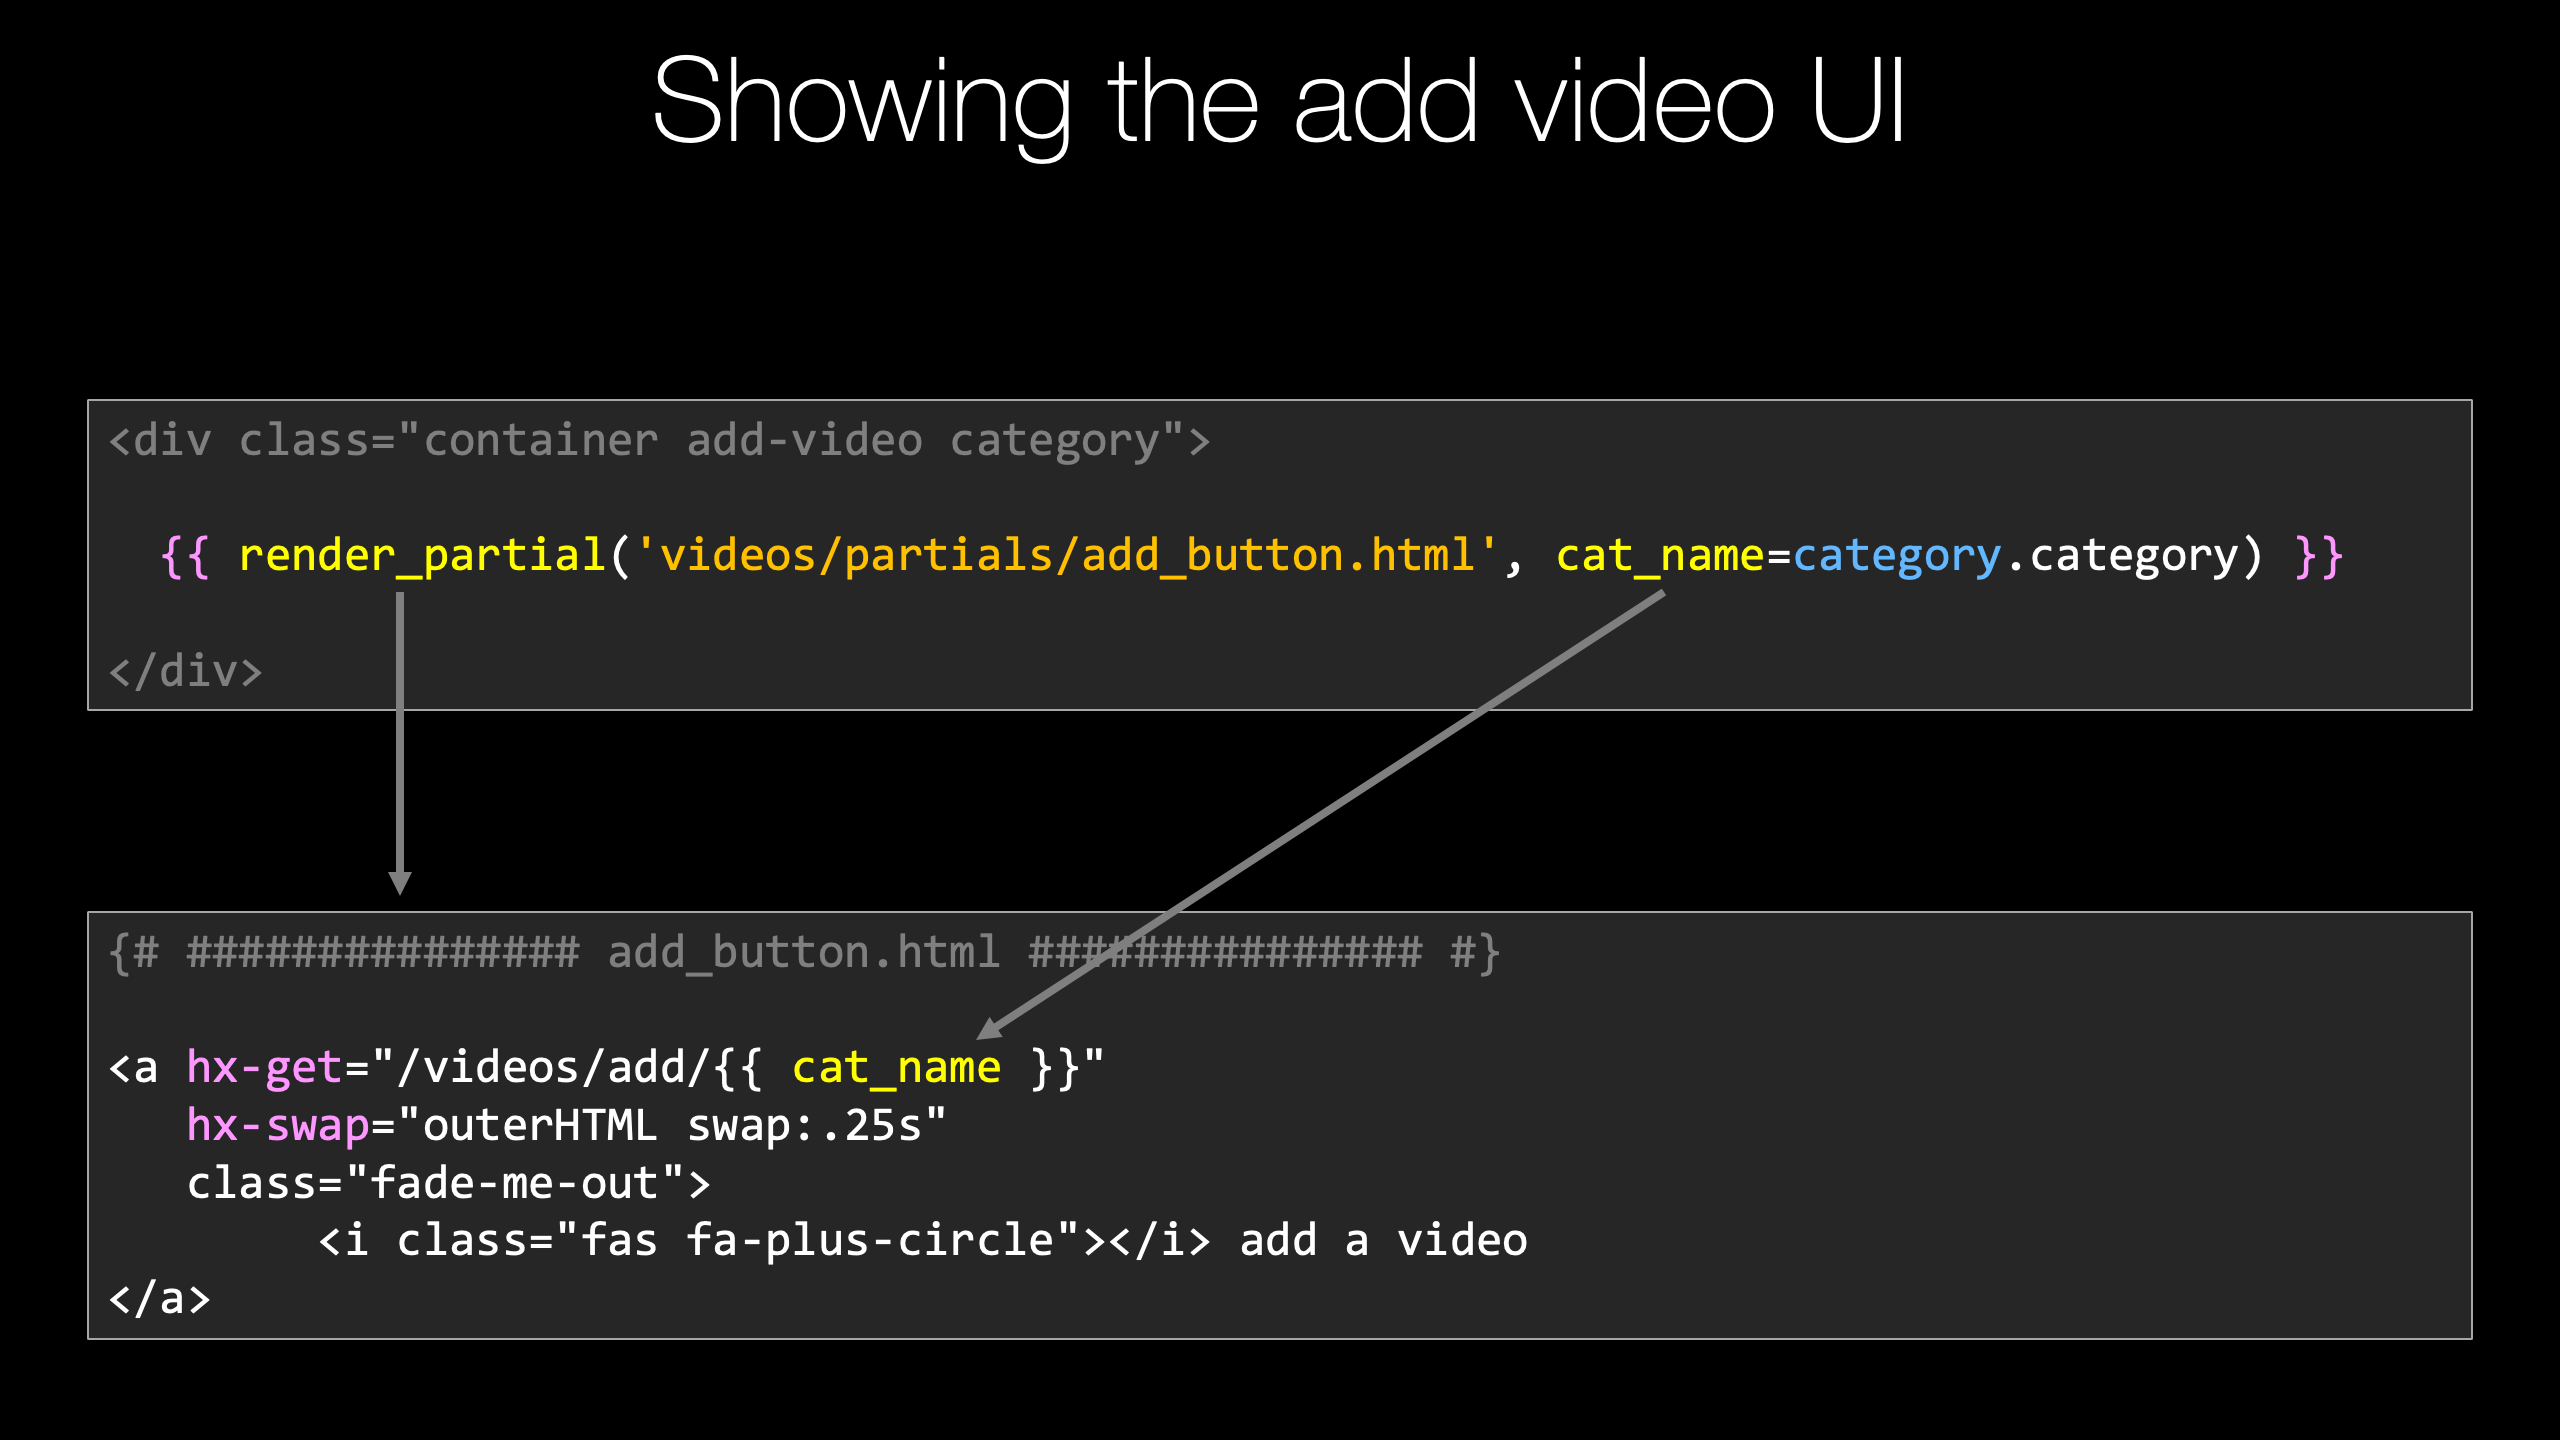
So what we would like, instead of having this big form here, we look over, and we have this big form that's just permanently stuck to the bottom of all the categories, is we want something clean and subtle, like a little tiny button that says add a video here, you know, something that looks maybe like this or something along those lines. Not this huge form and we'd like to bring it in with htmx, make the changes and then bring it back out, or decided we don't want to. So that's what we're gonna do now, and let's just start by getting something in here. What we're gonna do is we're gonna use a hyperlink. One of the things that's cool about htmx is this could be an image, it could be a paragraph, could be whatever, right? You don't have to just hook hyperlinks, but we're actually gonna use one anyway so we're not gonna set the href. Instead, let's just put some things into it first. Let's go over here and say that we're going to have an <i>, we're gonna use font-awesome and font-awesome, is pretty awesome. If you're not familiar with that, font-awesome, it let's you have all sorts of cool icons and like, like you put a YouTube image in your page but it's actually stylable like text, you can set its size and its color and so on. So the way we do that, we're just gonna say "fas fa-plus-circle" like that, and we'll just call, add a video. Now if we go back and refresh this, Ups, I've got to restart, then refresh. There we go. We've got this cool little add a video button right there, that looks great, right? Except what we want is we want this to appear only when we click this button, when we click this hyperlink. So that's where, well, htmx stuff comes into play. We're gonna somehow need to return this when we click this button and then put it in here. So what we're gonna do is I'm gonna put this content into another section. Now, something that's incredibly common, and htmx is returning fragments of a page fragments of HTML, not the main one. And I want to somehow distinguish the small pieces from the holes over here in our templates. So what I'm gonna do, and we're gonna go way into this later. I'm going to create a folder called partials and then put some views in there that we can use. We're going to do this kind of the heart and clunky way at first, I'm gonna show you some libraries we can use to make this even better. But let's just go over here and add some HTML and what are we going to call it? Let's call it, add_video_form, something like that, all of this, all this stuff here. Now, we don't want this, we only want partial HTML. This is unlike, say up here, where we have it extend other things. This doesn't extend anything. This is the entirety of what we're working with here. Okay? This is pretty different. So down here. We're just going to have this add. Now, how does htmx do anything with this? So what we need to do is we need to set some hx tags. So we're gonna say hx-get and I'll give it a URL, /videos/add/ and just like we had before, category: category.category. Like so. When it gets this, what is it supposed to do? It's supposed to replace this little hyperlink with its text and its icon with that form So the response here when we go and do a GET over here, this does not exist yet. This one. Remember this is a POST. We're going to do a GET that's similar but not the same. So when we do that GET we're going to hx-swap something, and what we want to swap is outerHTML. Now we could just pop that into existence. but it would be nicer if it kind of faded from one to the other. So we can say swap .25 seconds. So it fades in the form in a really nice way. And then if it goes away for some reason, let's say I want to set the class to fade-me-out, like that. Refresh, we run it. Now, check this out. We've got this hyperlink, notice it now looks like a hyperlink, whereas before it didn't have that color and the form is gone. But if we click it, nothing is happening. Down here, you can see stuff is happening. We're trying to do a GET to video/add/EVs and we're getting a 405. Basically, nope, not there. The final thing we need to do to make this work is we need to return that form over here and then that will get things set up where the form will now be on the page. Remember we're trying to go here. htmx is already working, it's trying to go here and get this content and swap it, but the server is not yet ready to do that.
|
|
|
transcript
|
3:42 |
We saw that we added our little hyperlink here to add, basically show the add form, but the server wasn't ready to do that. So we're trying to do a GET against videos/add some category. Let's go look over at the videos controller. Now we have this for POST videos/add, some category. But for POST, right? This was what we had already implemented to actually save the form and add the video, and it was working. But what we need to do instead or in addition is to first provide the form and then let this, then we can sort of follow this path here. So let's go like this, and I'm gonna duplicate that real quick. We can do a get, make sure we call the method name something reasonable, like add_get, and we're going to do a whole lot less work here. We're not getting the data, we're not doing redirects, we're not do anything like that. What we're going to do instead is we're going to render a template, and I've got this cool decorator that will make that easier. And what are we going to render? We're gonna render videos/partials/ whatever we call this. There, add_video_form. This is only going to return that small little bit of the form, right? Just that fragment of HTML. And what data does that form need to work with? Well, well, it actually works with what we have here. Right, the same thing as our view model. Almost, you'll see there's one minor change we're gonna need to do. So the way this response decorator works is we return a dictionary, it turns it into HTML or the data that's passed to the form which then turns into HTML. The one thing that we need to make a change to is, this is category.category. And in our view model, if you look real quick. It's just called cat_name. Maybe not the best name but we're going to need to use that right there, or we're going to run into trouble. Other than that I think we might be good to go. Let's give this a try. Probably don't even need to actually refresh this. Let's try again. Oh yes. Did you see that? Here, I'll refresh the page to reset it and watch. It's going to go to the server, it's going to get that information and then instead of just popping into existence it's gonna fade this video in. Notice, It did not refresh the page, the scroll position didn't change. Notice, I'll do it one more time, up at the top. There will be no like firefox navigation. Just all AJAX, all behind the scenes like you would expect. Super cool, right? Well, we're over in the EVs section. so let's add another video. How about this Cool. Mach-E thing coming from Ford. Major changes coming to Mach E - Ford Listened! Thank you Ford, so amazing. We have the ID, who is the author, Rev, and it's got however many views that is. Remember this was loaded, this form dynamically from htmx. We've made no other changes than to put that button and then, later on, add this form, and it works like a champ, right? There it is. There's our video. Yes. And the reason it worked is because there was nothing really that changed. We have a form on the page, we submit it, we process it, and we redirect back over here. We could do a little more work with htmx to have it sort of replace this section of the page. But I kind of think what we've got so far is good enough. You can enhance this further with htmx, but really nice, isn't it?
|
|
|
transcript
|
5:58 |
So are we finished? Have we done our "Click to Edit"? Almost. Not quite. Not all the way. So yeah, we've got this cool section on EVs, were able to add this big changes coming for the Mustang Mach E, which is fantastic, and we can add more videos. But what if we click that button right there and like, oh actually you know what? I changed my mind, I decided not to add a video. Do I have to just live with it hanging out there forever and depending on what kind of page you're creating, this might not matter, just whatever. You navigate away and it's gone. However, if this is a very dynamic page, and you're interacting a lot with it, you might want this to go away, to have a cancel button let's go and change this to have that cancel button, and we'll learn a couple of interesting things while we're at it. Let's go over here and say actually that's not a submit. This is going to be a Cancel and let's make this success, let's say green is going to be the submit And over here we're gonna have a button that says Cancel. Now, this is going to get a little bit interesting because how does this cancel operate? Do we want to put it back so it looks just like this? right? That's what cancel for us will mean, What we want to do is somehow get that HTML and put it here, that we have on the page right here, right? We want to put that back into place. How do we get that? Well we got to go to the server and get that from somewhere, but there's no real way in Jinja templates to say exclude everything but this, it's easy to say include or exclude this section conditionally, but you can't say drop everything else and return this. So we're going to need another little one of these HTML fragments or HTML partials. We'll call this show_add_form.html and just like before none of this. So here's where we get into a place that's going to be kind of clunky for now. It's gonna get really, really awesome as we go on. So we're gonna have this HTML there, and we're going to have it here. Does that seems like a great idea? What if I want to change this word or make that a capital A or whatever? And it's going to possibly need to be changed in the same place, right? So that is a problem, and we will address it. But let's just first acknowledge like, hey, that's not ideal. It's a problem. And I'll show you some really cool ways to fix this. What we need to do is we need to get this HTML back over here when you hit cancel. Well how do we get this HTML, this form over there in the first place? We did a GET like that, right? So we're going to do something super similar in our form, going to come down here and say GET, but we're gonna say cancel_add. We're going to pass over the category. This is now known as cat_name here. Why do we have to pass that over? Well, when we get the form back, we're going to need to pass that over. Right, we're going to need to pass the category right there. Right. So we have to basically propagate this category name over and over. And again, let's just call this cat_name. So what we're gonna do is we want to do a GET. Remember, We need to swap it out, and we can actually do what's called a target. We can say hx-target because we're not just possibly swapping out our outer HTML. We need to go somewhere else larger on the page, and we're going to do this. That's that's why we wanted this CSS name here. So the target is going to be .video-form. Right? That's the CSS selector to get this larger thing. It could be somewhere outside of the tree of this, we could be changing other parts of the page but there you go. Let's put it like that. We need to write this code right here but let's just see what it looks like first. We refresh, now we add a video. Oh, here's our Create, trying to submit it, Cancel, doesn't do anything yet. You can notice there's stuff happening, just trying to go get this Cancel. It can't, but that's okay. That's really, really good. Were basically getting everything to work. Final thing. Let's go and add that cancel. So we've got our GET, our POST and remember what information did this one need? Well, it really basically just needed the category name, that is our cancel. So let's do it like this and here's the URL All right here, cancel_add category. The partial that we're going to do is show_add_form. So the partial we're gonna do is show_add_form.html like that. Give it a little spacing and then again this needs to change. Let's call this cancel_add. I'm not going to do a GET, POST because there's only ever a GET on it. And let's put this at the bottom, and I don't, I'm going to do our add stuff and then our possibly cancel there. All right, let's run it one more time and see how things work. We're gonna refresh. Guess we wouldn't actually have to refresh. But I did. Let's try to add a video. You know what? Changed my mind, I don't want to add the video, cancel. Look at that. It's back. Okay. Our add video is back, and it was pretty quick the way that happened Right? But notice that this is not, this is not redirecting or refreshing. It just doesn't have a delay on it. So we go add a video, there's a form. We can cancel it. You add a video and again let's go at our Ford video, like that and make sure the whole thing works round trip. It's back. Very, very cool. So we're able to use multiple aspects of this "Click to Edit". A little bit more advanced than what they have over on the example page, but still the same core idea of what's happening.
|
|
|
transcript
|
2:04 |
Before we got to htmx, we just had the form to add a new video just jammed at the bottom of the page. And yeah sure we could have added an admin section that was like a parallel oh here you can administer a category and navigate in there, or you could be in a category and just look at it. I really like the fact that you can kind of edit it live right there, you're in there, just I'm in a category, I want to add something click to add, that's great. However, having a huge form stuck at the bottom was a real drag. So we used htmx to add a tiny little plus icon and a add a video bit at the bottom that was really subtle, and if you want to add it, you click it and right there the form just fades in, and you can add the video. How do we do that? Well we have to go to the server and get the form HTML, remember? that's the core way that htmx works. It's really about adding attributes that allow you to on demand or on some trigger pull fragments of HTML from the server and then replace parts of the page with that. So what we did is we said we're gonna do a GET to a URL when somebody interacts with this, when they click it. So hx-get and we could come up with whatever URL we wanted. We said video/add/{{ cat_name}}. That might be strange because we already had that as the destination for our form. But remember, Flask separates requests by HTTP verb. So this is going to the GET one we wrote and the form submission was going to the POST which worked out pretty well because actually the data exchange was basically the same. When this HTML fragment comes back, what do we do? We want to swap out this hyperlink. We want to completely get rid of it and replace it with whatever the server gave us, which we know will be the form. So we do a swap on outerHTML, and we also say swap: .25s, make it fade out. We also had to have that class there to make that happen. That was it. Instead of just having the form on the page, we do this very simple thing to say. Here's the URL to get the form in a smooth, classy fade in fade out way, when the user wants it. Otherwise just have a hyper link on the page, beautiful.
|
|
|
transcript
|
1:51 |
Once we got the form on the page, we want to be able to have users enter data into it with validation and then either submit the form or decided to cancel it. That was the final thing we did in our demo, it is to say, you know, we changed our mind, just cancel it. We're not actually interested in submitting this data. So here we have our form. This is a standard HTML form. It's going to do a POST over two videos/add/{{cat_name}} and it has some inputs here like the idea of the video, the title, the author and so on. And then it has a button that says create and we actually, in ours had type=submit although it's not technically required. So this submit button here, this create button is just going to submit the form as usual. Like I said we could extend this demo, this idea further and have it do some replaces on like a larger part of the page to kind of make this more seamless. But I think this is good enough. We're gonna submit this back and create it. It'll save it in the database and then redirect it to the page. Again, it's gonna reload by basically just doing a POST redirect pattern. Going to reload this category in the browser. On the other hand, if we decided that we don't want to do that, we want to cancel it. We're going to do the same trick as we just did for showing this form in the first place, we're going to say if you hit cancel, we want to do a GET against videos/cancel/add/{{ cat_name }} and pass along the category name. And then we're going to say, instead of hx-swap, we're gonna say hx-target, because it's not just swapping out the button's HTML, like outerHTML or something. We're going to swap out the thing that lives at that CSS selector ".video-form", which is a form with class "video-form". That's the whole thing. Right? So let's cancel, and replaced this entire form that got put in the page back with that add video hyperlink. And that's it. That's how we either submit the form and create a new video or decide to cancel it and take the form back off the page.
|
|
|
transcript
|
1:36 |
Final thing that we need to talk about and rounding out this feature we've added is actually processing the form submission on the server. So when they go, and they fill out the form, they hit create new video. It's going to do a form submission and do a POST back to the server. It's going to run this method add_post and notice our blueprint is not doing a blueprint.get or blueprint.route, it's doing a blueprint.post. So we'll only listen to the POST HTTP verb. And we have our add_post method. It's getting the category name sent into the URL And we're going to create our view model. Remember the job of the view model is to very carefully understand, validate, transform the data exchange between the HTML page in the form and what gets submitted on the server. Exactly, what we need here. We create our view model. We give it the parameters that are passed in. We say restore yourself from the form and that says oh I think the form is going to pass me a Youtube ID, and a title and a view_count. No, I also have to convert the view_count to an integer and use a reasonable default value and stuff like that. So it's going to parse all that data and get it ready for us to work with. We want to add it to the database, so we're going to use our video service.add_video, pass category name, vm.id, title, author and view_count. And then we're just going to reload that category page by simply redirecting back to it. But now when we reload the page it will have new data in the database, it will refresh. So we're gonna do a flask.redirect over to videos/category/ cat_name and that does it. This is it. This is all we had to do to save the video to the database and validate it and so on, on the server.
|
|
|
|
14:47 |
|
|
transcript
|
1:48 |
"Click to Edit" was super cool, wasn't it? But it started to reveal a problem that Flask by itself is not well designed to deal with. That is, we need to show the entire page with some element of HTML, and then we need to show a partial part of that page or just that fragment of HTML again in a different view. Remember we had that add button to add a video which would then reveal the form? We had to have that in two different locations and that's clearly error-prone and not a good idea. So what we're gonna do in this chapter is take a little diversion and talk about an open source package I created for Flask and really any library that uses Jinja called Jinja Partials. Now, Jinja Partials is kind of like adding functions to HTML. We can go to any part of our template, pass it along data to one of these sub templates and it will render inside of that template as well as being able to treat that piece completely separately and isolated and return it back directly from a view for the htmx interaction side of things. Some people think this is similar to Jinja's include or sometimes Jinja's macro features. It's definitely not the macro feature, that's completely different. This has a whole new feature, like include, it is similar, but it has more functionality to structure the way the data is passed over to sub templates. So I think it's pretty unique, and it's going to generate incredibly clean code on the HTML template side. It allows to reuse it exactly the way we need to for htmx. We're not gonna do htmx in this chapter yet. That's the next one. But this is the groundwork to having clean code with htmx
|
|
|
transcript
|
2:05 |
When we're creating web applications, there's often times we need to duplicate some part of our HTML. Here's an example from a project I'm about to tell you about. You can see we've got a video, we've got a subtitle, and we have the number of views, and we're going to use that on the homepage, and we're also going to use that in this listing where we can see more of them. They should look kind of familiar, huh? Well that is exactly the same thing. Yes, it's in a different section, and it probably has a different overall CSS selector applied to it, but the HTML is identical. And so, why should we write that and maintain it in multiple places? We've already seen that in our application. Remember the click to add video button? It has to appear in two places. But I really wanna emphasize that while this is not specifically about htmx, it really applies to all web applications. They would benefit from having more organization. It especially applies to using htmx with any of the Python web frameworks be that Flask, Pyramid, Django or some other one like FastAPI. So this ability to reuse like a function parts of our HTML in different places is really critical. We haven't seen a complicated example of it yet, but if we kept going without taking a pause and adopting this package, we'd be in big trouble. Speaking of the package, here we go, Jinja Partials. So this package Jinja Partials, which I created specifically for this course, as well as I just realized this problem is not being solved in Jinja or Chameleon or Django templates. All the places, that really should be solved better. So I created this package specifically for Jinja. Notice right under the title there, it says there's also a Pyramid/Chameleon version. So if you're using Chameleon, you're not left out. We're going to use this Jinja partial package to make our code much cleaner and have it defined one time, not in multiple places, in our Flask plus htmx web app.
|
|
|
transcript
|
1:49 |
Let me give you a slightly more realistic, more complicated example where we get bigger winds with this partial concept. We haven't talked about installing it yet. It's really easy to use, and we'll see in just a moment. But let's just look at one thing. This is the final version of the app that we're building towards and there's going to be this infinite scroll section. So over here, notice that we've got our recent videos and as I scroll, it's pulling more and more of them in. Okay. So this implementation of, I need to show some of the videos right at the beginning and then as I scroll, I need to bring more and more in. Well, that's a beautiful htmx thing that we're going to add. But what I want to show you is what does the code look like. This page is the page we were just looking at, all of it. That's all of the HTML right there. Now there is this partial section that's going to show you the videos. So here are the videos that are going to show up, and we're gonna show, we're gonna go through each one, and we have a way to show the video. So there's these three levels of these partials, but taken as a whole, they're quite simple and that is the entire HTML that we need to write to make that cool infinite scroll happen with zero HTML duplication. Fantastic, right? Well, probably it's complicated on the server, right? Nope. That is the entire server-side implementation. Here's the one that loads up the original page and then when it comes back, when htmx comes back, it just, it's going to ask for a partial and say what page, what section it needs to get in this partial scroll and then directly render one of the smaller pieces. Amazing, so this is the kind of code we're going to be able to write and we will write later as we adopt this Jinja Partials package.
|
|
|
transcript
|
3:48 |
Well let's go and get this Jinja Partials package installed and integrated. Here we are on GitHub. The public repo, this is open source as of course you would imagine. Scroll down a little bit here. We, there's an example we saw. To install it, we just need to pip install jinja-partials. So we're going to put that over in our code. Notice we've moved on to chapter five, so code, chapter five, partials and then chapter five final. Just like before what we're starting with here and then the final version, both in that repo for you. Now I could come down here, and I could just pip install this but that doesn't work well for the longevity of our project here. What we'd be better off doing is putting it here into our requirements file and immediately PyCharm says, oh, we need to install that. So let's go and do this. Boom, it's installed. Okay, now, what do we need to do? Well, the partials thing, one of the things that tries to make really easy for you is for, just to basically become a natural feature of Jinja itself. The last thing you want to do is have to pass a bunch of information over to each template or write a little bit of fragment of Python to make this possible So all you have to do is run this one line here, jinja_partials.register_extensions and pass the app at startup, and then you can use it like we saw in that example. So let's go and do that as well. Here's our app.py and notice it has this section about configuring the template operations. So if we go down here, there's a few things that I was already passing over, for example, I would like to be able to use the len function or isinstance or str or give me the type of something inside of Jinja. Normally you can't do that, but if you run this bit of code you can. Let's go and do our other things. So we're going to say, we want jinja_partials and we've got to import that. And then we want to say register_extensions, I want to pass in the app, or not pass into this right, grabbing the global one, but we're doing it here and now we should be able to use this functionality within our page. So for example, We'll now be able to just call render_partial and pass some partial view, some partial Jinja template and then all the data that it needs. So basically keyword arguments, just like we do with regular Jinja. This is all we gotta do, it's basically set up. Now all we gotta do is just call render_partial where we need to use it. One other thing, I talked to people about this package and they said that's neat, but you should probably be using Jinja macros, Jinja already has this. It sort of has this, let's have a look. So over here in the Jinja pallets project. Notice there is this kind of an idea of creating a function in Jinja. Here we can create a macro called input, and it's going to render this. Yes. And then down here, just like render_partial, you can say input and give it data. That looks a lot like what this jinja_partials thing is. The difference is, in the jinja_partials world, we need our partial, we'll find one, like this, we need this to be directly usable as a template right? We don't want to have to define a function and then call the function every time on every page. It would be very weird to do that. The ability to directly use that as a standalone page doesn't really make any sense. So while macros are very similar, they're not exactly the same thing. I think you could pull it off maybe with macros but not nearly in a such a clean and natural way. So jinja_partials, it is for us in this courese.
|
|
|
transcript
|
3:53 |
Now that we have our partials around,this idea of the Jinja Partials and we've actually already created that. Remember over here we have our show add form, this one. The HTML required to show the form, and in our category here, we're gonna load up the page and say here's the add a video button. Now, if this was changed somehow, we forgot to change it in both places. Obviously that's going to be a problem because remember over here we have a duplicate of this. Go on and run and just have a quick look. We go over here and say I want a new video and you go cancel add a video. Wait a minute. That's weird. Why did that happen? It happened because we have the same basic thing in two places. We don't want that. That's a problem. So we're going to employ our partials in order to fix this. So let's go down here, and we're just gonna say into this section, a string goes render_partial. I do wish we had auto complete, but we don't. And in there what we're going to put is relative to the template folder, the partial. So I'm gonna say over here and copy path from content root. That's probably close but not quite right because we don't want templates. So we want videos, partials show_add_form and then the data that we have to pass over. Let's look at this. It needs a cat_name. And what we have available is this category.category. So we're going to say cat_name equals this. And let's delete this. Beautiful, let's go down here and make sure this is add a new video. I want to make sure that it says something different so I'm gonna refresh it. You're like yes, it's definitely using this one, right here. All right. So we can wrap this around if the, if the wrapping gets too much. My fonts are really big. My screen is small to record, so normally it would fit. But what this, will do that. Okay, let's rerun it. Come down here. Refresh this. Look at that, add a new video. Where did that come from? That came from this render partial which, I'm going to roll it back a little, like this. It came from this render_partial line right ther, and we passed over category.category and it became category or cat_name over here. I love it, so works, perfect. Let's go and add a new video. It's like cancel, add a new video. It's using just this one piece right here. We've got our partials that were rendering in line when the page is loading, we call it over in the views, we're rendering this one when we get the page itself. But then we have our add cancel. We're just going to render that partial view back as if it was a whole page and this is the part where the macros really doesn't hang together very well. We're just rendering this page back directly out of the view and that's it. Again. This is not that complicated of an example, the ability to, you know, sort of do a cancel and get this tiny bit of HTML back. But that infinite scroll one, where we're going, if we didn't have this functionality, that would be a huge pain to make that work. I hope you like this ability to basically treat parts of our HTML like functions and render it in different places. This is massively useful regardless of whether you're doing htmx, but it's especially important because we do this kind of stuff so often, show the main page where it needs some of the partial data and then show it again with possibly different data directly.
|
|
|
transcript
|
1:24 |
Quick concept review of using partials to show our add video UI. So remember, we installed the jinja_partials package. We registered extensions which makes the render partial function available on every Jinja template. And then we just say here is an HTML file and here's the data it needs. So in this case we wanted to show that add_button, that partial HTML to add the button. And that thing has a piece of data it requires, called cat_name. We had that same information but not in the same variable. So we can just like you would with a parameter and a piece of data you just set the value, and you pass it over variable name and the functions argument or parameter name doesn't have to match. All right. So that's what we're doing. We say cat_name = category.category. And then down in the add_button.html we just write our code in our HTML that we would have put there and use the data that's passed over. So we're going to add a hyperlink with hx-get and swap and the add a video button or the add video hyperlink. And then you can see we're using cat_name because we're going to have to propagate that back as part of our htmx exchange. That cat_name is being used right there. So we just use keyword arguments to specify the data that the partial needs, couldn't be simpler
|
|
|
|
37:41 |
|
|
transcript
|
0:47 |
Now that we have the Jinja Partial foundation to allow us to write clean reusable HTML, it's time to add feature number two "Active Search". Active Search is where we have some kind of search box and as the user types and interacts with it, the results continuously just come up. You don't have to hit a search button, you don't have to wait until you're finished typing. Kind of like auto complete for search. This feature is really fun, and it's also the most comprehensive round trip thing we're gonna do during this course. We're going to add new pages and new functionality to the site and then htmx-sify, to add the active search as well as two cool things such as deep linking and browser history. It's incredibly easy to use. But as you'll see super powerful.
|
|
|
transcript
|
2:00 |
Before we get into the details of implementing "Active Search". That is not just search functionality but search functionality that happens dynamically as we type, I want to give you a sense of where we're going. So here's a screenshot of the finished feature and notice that we're searching here for indycar and as we type, the results are refining themselves and coming down at the bottom So here are two results that are coming in. So we're going to hook up htmx to notice when we type up here and then when typing happens, we're going to do a search on the server, use a partial Jinja template to render out this result at the bottom. Now this is pretty straightforward. A lot of sites have search like this, but we're going to do two additional things that make this both much nicer for a user and in general makes it better for SEO and sharing. Notice up here, search=indycar, what is this? This is both browser history. So if I search for indycar, then racing and then Romain Grosjean, those would all appear up here in my history, and I could go forwards, backwards, and it would work just like they were real static HTML pages. Not some kind of AJAX magic that we're doing. So that history is amazing. But also, I could copy this, give it to someone else. They could click it, and it will pull up exactly the same view. That's called deep linking. So instead of just going to the app, and then you've got to like drive the app and get it to build up its data to come to life in a way that you might want to share, but you can't actually do that because if you give a link to it, like it's not in the right state and all that kind of stuff, very, very common with SPAs, we're going to create the ability to deep link in here, so share that link, give it to anyone, post it on the internet, they will get the same view. Amazing. All with htmx and incredibly simple.
|
|
|
transcript
|
4:06 |
Welcome to the source code for chapter 6. You can see down here we're in ch6_final_video_collector. Just like before, I've created a new folder with a starter and a final bit of code, so you can start where we start right now and then also have the final version for Chapter 6. In this chapter, we're going to add active search along with deep linking, history, all sorts of good stuff in this feature. This might be the most complicated feature we're doing in this course, actually. It's also the first time we're adding a brand new separate page to our site. So far, what we've done is we've modified aspects of, say, the category, details page and so on. So what I want to do is add that new page and we're going to do search, more searching videos. So I'm gonna go ahead and just put it in here. We could possibly justify coming up with a search set of views, but I'm just going to add it here because we're only searching one thing, videos. Now pretty much everything in our app looks like this. So it's easier for us to just do a little copy paste and then change the name. So we're gonna do a GET against videos, search, and I'll call this search_text like that and let's get rid of this. Down here, we're going to do videos, not partials. We're gonna just do search, videos/search. Seems nice and clean. Change the name to search and then the variable is finally we'll get that thing right, search text. We also want to have a view model, just like we do for all of these. As we'll see, this is going to be super handy, So we'll say SearchViewModel, it doesn't exist yet, so let's jump over to the viewmodels section and do it. Again we have a little bit of structure that's nice to work with. So let's just go over and copy paste and I'll just call this search_viewmodel, not video search because it's in the videos subdirectory there. And we're just going to call this SearchViewModel. Remember we're passing in search text, and we're gonna store it like this. And that's all we need for the moment, We can come back up here and let PyCharm do the import statement for us, and this will almost work except for there's no template. Let's run it and see how far we've come. Over here, we'll go to videos/search/indycar like we had before. I didn't spell it right, but it doesn't matter because it says the next thing you got to do is create a search.html. Yes, we do. All right. So, final thing to add this skeleton structure of what we're searching for is to go over to the templates, videos and then again, let's just do a copy paste to make it similar as you'll see, do a search and we're extending the main layout page, which is great. That's how we get most of our design. We got a bunch of stuff going on in here. And this is our main block of content. I'll just put <h1>a search page for the moment, and notice if we go to that shared layout, that up at the top, we have the ability to override a default title. So this is a block title, Video Collector - HTMX Demo App. But most of the pages change what the title is. So here we have category. We want Search @ Video Collector or something along those lines. All right, so this is our skeleton page. Let's run it and see where we are, Refresh, tada! Amazing, right? well, not so amazing, but somewhat amazing. We got our page working. It's a good place to start. We've got our view method in the videos views, we've got our video, our SearchViewModel and we've got our template deriving or extending the main layout page. Everything is ready to go and add this new feature to our site now.
|
|
|
transcript
|
1:28 |
Now before we leave this, adding this general structure for search, I did realize that our search text would really be better off if we kept it more optional. Let me show you what I mean. Over here we've got our site, and we saw that we come over here and we can say videos, search for apple, and it says, okay, here's your page. But what we really want is like a button, we could click, some link we could click, and take us to search and we fill it out and notice if there's nothing there, it says it's not gonna work right? There's just no URL match. It would be easier if we did it like this. Let's take this out of here, and we'll just pass it as a query string like this and then down in the SearchViewModel we'll just say instead of this, we'll say self.request_dict.get("search_text: str") like so and let's make it explicit that this is a string. Here we go, let's try it now. Right, we got our search and if we search for search?search_text=apple, still works. I guess we should print it out to make sure we're capturing the data, but we're going to find out soon enough whether or not we're passing it over. That's just an easier way for us to have both a page where we say search that we just go to and then also pass search_text along for deep linking.
|
|
|
transcript
|
4:14 |
Well, I think it's time to go ahead and perform the search. That might sound complicated. We have all these videos, and we want to search their title or their author or things like that. And we need to break the words apart into small pieces and do and clauses, it could be complicated. Luckily not so much, not so much. We've already got a lot of this in place, and it's not really relevant on how we do the search. So we're just gonna run it. Before we get quite that far. One thing I would like is to go over and change our navigation over here. We've got our stuff that goes to the right. So here's this feed. Let's go look at this real quick. So it's this thing over here. Remember it's slow, it takes like five seconds or so to load, but eventually it will get a feed of those. What I would like is to put something like that for search. So we'll come over here and just say /search and what do we put here, what font-Awesome thing do we put here? I don't know. Let's go find out on font-awesome. So if you're not familiar with font-awesome, it's a really great place to get all sorts of fun stylable icons. We're going to come down here and say we want search. You know, I think that one, that plane one right there will be good enough. So we just click to copy and paste that sucker right there. If we go refresh it. Not that one. Let's go somewhere else. There we go notice we have our search. If we click it. Oh, it does not take us to the right place because it should be /videos/search. Go back and try again. Here we go videos/search. Okay, so we've got this up here, we want to actually perform the search if somebody supposedly added an input here and we could submit it back, let's go and perform that search. So we're going to start over here. This thing is going to come to life and it knows about the search text and all those kinds of things. It also needs to be able to pass the video models, the actual video objects down to this search template. So it makes a lot of sense for this thing to come along and do that as well. So we'll say self.videos which let's define this to be a List[Video], that's going to require some imports isn't it? I want to make that nothing. But if there is search text, let's go ahead and do a search. So we'll say self.search_text and self.search_text.strip(), make sure there's really something there, then we want to actually perform the.search. So videos is going to be, you guessed it, the video_service search. self.search_text. That's it. That's all we gotta do. So you can come down here and look at how this search implementation works, but again, we're not really using a real database, so it's, it's not super relevant, honestly. But let's put a breakpoint right here and run this and then do some kind of search. All right. Let's go to our search and the first time there should be no search text, but as we step over. Notice what is search_text. None. Okay, good. We'll come down here. And off it goes. So let's go and put our search?search_text=apple. Now, if we step down, what is the search text? Oh, it's Apple. Very, very good. We're going to come down here, run the search, step over, let's see what our vm videos are. Look at that. We've got a bunch of videos. We've got one about WWDC, one about the M1, one about Apple and one about Python developers exploring Apple. I think our search is working, what do you think? Really all we did was go in and check, look if some search text comes along. Let's create a place to store the results. Set them up for if there's no search, it's the first time we hit the page will get an empty set of results. And then if there is, go and just use the video service and let it do the search for us.
|
|
|
transcript
|
2:29 |
Here's our search results and our ability to do search, well kind of non existent over on this page, isn't it? Let's go and add the HTML in here necessary to make this thing go. So what we're gonna do is we're gonna have two divs We're gonna have a div here and another div here. This one is going to be the inputs and this one is going to be the results. On the input side, we want to have this have a class search-inputs and you know, maybe down here class search-results like so. All right, super. So and here we want an input of type="text" All this are is going to have to have a name and the name has to exactly match what we're looking for over in search. We're looking for search_text. So that is exactly what the name there has to be. Let's also give people some help with a placeholder, so they can type whatever they want. And if it's blank as they search for a video and as they start to type the placeholder of course will go away. Let's say this has a class form-control. I think that might be enough for us to get started. Let's find out. It seems like it thinks something is missing. We don't care if it has a label, it has a placeholder. Look at that, Search for a video... And then let's also in this section put a header Search videos, video collector. That's the name of our little site. Here we go. Search video collector. Search for a video, and then we're gonna need to do something fun with the results down here. All right, so let's go over here. This also needs another class I realized, videos and search-results, and let's give it an id, because when we do the actual search, we want to say, where did the results go? They're going to go into the thing with id search-results. That's the one and only thing, how's things looking? Alright. Nothing super impressive yet. But we're about there. So, we're gonna go and add our content into this section when we get them back from the server. If this was a normal form thing, we'd go and we'd put this into a form, right? This would be in a form. The form would have a submit button, but we're doing active search. All we want them to do is type and we want htmx to take it from there. So I'm not gonna worry about adding the form and then taking away the form. We're just going to leave it like this because this is all we need.
|
|
|
transcript
|
7:09 |
So we've got this basic input field that we ask users to search by typing in Of course it does nothing yet because we haven't done our htmx magic. Again, to do htmx, we do hx and then, what? The first thing we want to do is we want to do GET and this is gonna be /videos/search and then we have to have an hx-trigger. What is going to cause this to happen and then gonna be a key up changed delay 250. So let's break this apart key up is basically as they release the keys as they type. So if we did just this that would totally work. But it would be very spastic. It would be every single keystroke would be going to the server and results will be coming back and it would be totally crazy. Instead we're going to have changed and a delay. The delay means you can type as much as you want, but it will only go to the server if you stop for a quarter second between your typing that may be you've only typed part of it and you're thinking and you'll see some results come in and you'll type some more and the results will update or it could be you typed really quick and then boom, the results show up but it won't every single keystroke start hammering the server and giving some weird experience. The other one is not every keystroke actually results in different data being sent to the server. So if I press the letter A and then letter B those keystrokes should have some kind of effect. Right? I could have searched for absolute or whatever. However if I use the right arrow and the left arrow key that's not changing the content of that text box. We don't want to rerun the same search over and over just because you're mousing around or arrowing around inside there. So change means there has to both be a keyup and the result has to have changed the contents of the text box and it has to wait for 250 milliseconds then rerun the search. And then the last thing is hx-target and here we put the CSS selector of where the results go which is search/results that will do it. I think. It's going to do something really weird. It's not gonna come out well, but it's gonna, I think it's going to do it. Let's give it a try, refresh it here and now let me type something like apple. That's weird, look at that I could type inside myself it's like inception for search and so on. We could put indycar or whatever and now we're getting the results and here what in the world is this? Well remember we're going to this URL For the page, the entire page right let's get rid of the search thing. It's not really participating. We go here and then we said our target, our GET is /video/search. That's the same thing. How is this ever gonna work? Right. So if I put apple here, it's gonna say great, I went there, the page that came back is the entire website and it jammed it in there. So what we need to do is we need to differentiate between somebody coming like this and somebody coming there by through htmx. Now you might say, we'll just make two views that are basically the same, but one returns a partial and one doesn't, we can do that and that's fine, but we're also going to need to deal with this search_text=apple deep linking things. So we want to kind of process it in both places anyway, so really what happens is it's identical code. The only different choice is what is being sent back. We're going to need to change that over on the server, here. Now, when this request comes in directly from the browser, it's just a standard old request, but when it comes in differently when it comes in from htmx, htmx says you might need to treat this separately, you might need to treat it differently. To enable us to do that, they actually put a header in the request, so they put a header over and we can check is this an htmx request? So we'll say something like if vm.is_htmx_request, which we don't have, then return something else. Let's return something real simple. Like we'll just say how many videos there are for the moment. That's not really helping them because we got to actually render them, but well we got to create some more HTML to make that happen. Now, what about this? Let's go over here, and you might say, well let's put it into the search model, but we have this cool base class and it's very likely other parts of our site in the future will also possibly need to make the same decision. So let's go down into here. Well say something like this self.is_htmx_request. And then what we need to do is ask if there's a certain string in flask.request.headers. We don't care what its value is. Just, is this header present? and that header text or the header keyword key is HX-Request capitalized like this. So if htmx makes a request, it's going to also add this header to say, hey, this is just coming from us in case you need to do something different than normal. So we're going to try to use that here. When a request comes in like this, we're going to give them a different set of HTML. In this case, incredibly simple HTML rather than rendering the entire page back. Let's try again. So we refresh this page come over here and let's just type apple. Oh, something has gone wrong, ah we expected a dictionary, that's right because the way that this is set up we need to return something like this flask.make_response, there we go. So we had to call flask.make_response. But you know, there are four videos. How about racing? How many videos are there on that? How about indycar? two videos on indycar, Python? six videos on Python. Now we're not rendering the results, but we're doing the search and we're sending it back actively. It does that delay and it does change, freeze the arrow keys. Although I guess we can't really tell you would see the at least back here, you would see there are no more changes. So you see those are not moving by but check it out down here, you can actually see the request coming in as a query string. You see py, py, Python, all the stuff that's coming in indy, indycar, racing, racing, that's how it's communicating back to the server. So it's exactly matching what we already set up here, and it's sending the header over so we know to treat it differently and just send that little bit back and not do that crazy inception thing. This is pretty awesome. We're super, super close, we just need a little more HTML to make this look real.
|
|
|
transcript
|
4:28 |
While I'm sure people were super excited to be seeing the number of results, they probably actually want to see the results when they're doing a search. So let's go and work with this, and make this a little bit nicer. So we're going to use a partial, but we're going to actually render it directly right here, for now, and then you'll see later that we're gonna use the render partial inside the page. So let's go and add a new HTML file, and we'll call this search results and none of that applies. Remember, this is a partial response, so we don't need the HTML and the extends and all that. In fact, there's a lot of design here and there's not very much value. So I'm just going to drop in something and show you real quick. So we're going to pass over a list of videos called videos, and then we're going to loop over each video, we're say how many results there were, and then we want to say for each video `v` we want to link to it over this way. And I'm gonna show a picture of it, and then we're going to show some information about what is the title, the author, the number of views and so on. We also want to get this partial, notice that we can use a partial within a partial, which is awesome. And that those can be at different locations. So these search results are here, but we don't yet have a partials for this one So have partials, and these are the partials well that are shared. That are going to be common across different places, and I actually want to change the name a little bit. Let's call this _video_image, and I've been using the preceding underscore to say this is a shared thing. That kind of shouldn't be used directly like I did with the layout. So I'll put it over there in the shared, we'll give it this name. Well, let's add one more, Again, not basic HTML and I'll just paste something. Again, not super, super impressive. The amount of HTML here. But there's a lot of places we want to just put the image of a YouTube video, and it has this funky format with this certain thing and so on. So it'll be nice to have that there. So we're going to just pass along the video, the `v`, give it the variable video over there and that should be good to go. All right. I think that this is ready. Now, what do we do with it? This was the text that we sent over before. Let's go and do this. Let's extract this. So what we want to do is we want to generate different variables or different HTML here so we're going to say flask.render_template. We can give it a template path. Which one do we want to render, the videos? Look at that, partials. And then what is in here search_results, and what does it need? It needs videos=vm.videos. I think that's all it needs. That will do it, actually. So instead of just coming up with our contrived little HTML as text that we just wrote as a string. We're actually going to go back to Flask and say render our partial right there and then just return that. But only if it's an htmx request, otherwise render the entire page. Alright, let's try this. So here we are again, we're back at our page. There's our results. Of course we want to empty that out and let's say apple again, wow, look at how slick that is. What if we said Python? What if we said indycar or just indy, super, super neat the way this works. So it looks like our search is coming along great. The only thing I didn't really love there, it was here that we actually had results when it was empty. So we can just put nothing. Now we come in, and we type for Python. Boom! There's our answer. And look through those, those look like the right ones, don't they? This definitely Python topics. And look, here's even the interview I did with Carson about htmx. Hopefully you saw how easy that was and were again leveraging this concept of a partial view. So here we have a partial that we give a bunch of videos, it does a bunch of stuff, and then it also leverages this partial video image thing what you saw was fairly complicated and doesn't need to be thought about more than once. So allows us to just treat the image based on what YouTube will give us back for the video Super, super neat. We ended up with this, our active search is actually working.
|
|
|
transcript
|
2:21 |
Well let's do some more searching. Over here, I want to search again for apple. Cool. That's nice. What about wwdc. Got those two results there. Those are fantastic. What about indy and maybe EVs. Oh what was that second one I searched for? I'll just hit the back button. Wait where'd search go? What just happened? I feel like I did a bunch of things and then the browser temporarily decided they weren't relevant for my history, and it just ignored them. And now I jumped back like five actions in my web browser. Wouldn't it be cool if we could put those in our browser history and put them in the URL? Turns out that we can it's actually super simple. So down here we can say hx-push-url="true" That's it. Come back here, refresh. Go to our search. Let's search for apple. Look at the URL, search question mark. search_text equals apple. What about indy? What about EVs? Okay. Same thing as before. I want to go back and see what I just searched for, back. there's indy, there's apple. I wanna go forward again. Indy, there's the EVs. Oh my goodness, look at that. That was all we had to do there. That was it. Now, while this is amazing, and I really, really like this feature, it leads to a challenge. Now that this is up in the URL. Guess what? I might want to bookmark it. I might want to share it with somebody. I might want to just come back to it. So if I go away, and I come back and I hit this site. Not so amazing. Remember we talked about deep linking, that is our application behaves like a website, not a crappy SPA that doesn't understand that you can link to things. So right now it is one of those crappy spots. Unfortunately those single page app type of experiences. But we're going to add it, we're gonna add this functionality to support deep linking as well. But already the ability to go over here and search for like car, have that show up and go in our history. It's a huge step especially given that we typed what, 12, 15 characters to make it happen. Yeah, it was totally worth it.
|
|
|
transcript
|
4:01 |
Recall when we entered the URL to go to the page, we didn't get any results. So again, if we take this, we close it, and we pull it back up, and we put it in the address bar and go to it. It looks like there's nothing here. But if we actually set a breakpoint over here or even if we just did a little thing, let's just say print searching for, I don't know, vm.videos, let's do search_text, that should have it, actually. Let's see. If we go to the URL and hit it again, got to the run page, searching for car. This information is being passed over and the search is being run, this is actually not even a server side problem per se. It's just an HTML problem. We're not doing anything with the results on the initial page load. Okay, well let's get to it. We've got to fix this. So we only want to do this if search_text has a value. Okay, we don't want to try to render results and say there are zero results. I could do it, it wouldn't crash, but it would be not good. So we're gonna go down and say if it's the case that they're either already typed something or in this situation, deep linking to something. We want to basically do what we did up here. But remember, the deep link, this is false. This doesn't run, but we need to basically render that with those variables. You know what? We've got this really amazing library that makes this super easy, render_partial, that. Done. We're done except for that we don't have the concept of a thing called VM that's it. There's one other step up here and that is the value should be set. Notice if we're over here, even when we're deep linking, what we should see is the word, we should see the word car appear here. Right. It's odd that it doesn't. So what we've got to do is come over here and put a little expression. We'll say it's nothing if not search_text but if there is search_text, it's search_text. We might be able to simplify this. We could say search_text or that. Let's try that one. Okay, now let's try our deep linking again. Oh my goodness, it totally worked. That is so awesome. So all we had to do was, this bit, the information is already being passed over. Why? Because of our beautiful, beautiful view models. But we won't do anything with it. We weren't repopulating our input with the value, and we weren't rendering the results. We were just showing the blank page even if that data appeared. So we're doing this in the situation where there is a deep link as well as this, and then we're going to get the results here and jamming them into that section in the case that we're doing a basic plain load and then typing in the input. I think it's time for a round trip thing. So we go here back to our beginning, let's go do a search. It didn't crash. Right? We added that stuff for the deep linking but when there's nothing, all the default values and stuff seem to work. So let's search for apple. There we go. In the history, let's search for a car. Let's search for EV. Actually, let's go back to car. History is working. Let's take this and let's close it, create a new window and paste it up here. Still get exactly the same results. Now we don't have one of those dumb SPA single page applications apps that has no concept of URL's. No, this is perfect. This is exactly what you would want. It all runs locally and super fast with this htmx exchange with the server but it also behaves just like you would expect for a web app. You can link to stuff in it. Love it.
|
|
|
transcript
|
1:13 |
What did it take to trigger an active search with htmx? Well incredibly less than actually everything you even see on screen here. Not even this much. So we have three attributes that were required to basically do the search. We have hx-get to get the search results. We have a trigger keyup changed after a delay. So remember keyup as long as the contents have changed, and they've stopped typing for 250 milliseconds or more. And then a place to put the results. We had a div named with an id search-results. So we say hx-target="#search_results". We added two more things here. We had hx-push-url="true" for browser history. And then in this part we also had to set the value to support deep linking because it would be weird to load the page up, see the results but have an empty text box. So we would reload the text box with the search text as well. That's it. That's all it takes to basically do the work of active search with htmx. We still have to do the server side stuff and then render the results somehow. But again, that was slightly different. Right? That's whatever lives at the end of hx-get.
|
|
|
transcript
|
1:24 |
We saw that we need to treat the request differently if it's a direct browser initiated request or if it is an htmx initiated request. Remember, if the browser is requesting it, it wants the entire page. But almost always if htmx is requesting it, it wants just part of the page. So here's our search implementation that we made a decision. We want to show them the video/search.html result if it's a full page request, either deep linking or just to show the original search page. But if it's an htmx request to the same location, we want to render the partial search.html one. We can use this is_htmx_request property or field that we've added to the view model. Where does that come from? We realized that htmx sets a header, so we just go to the headers and we say do you have any sort of value for something called 'HX-Request'? because we don't really care what that value is. If that header exists in the collection, htmx added that there for us to say hey, this is a request from us. So if you need to behave differently for us rather than the regular web browser, this is your key to do so. And that's how we made search work to render both deep linking as well as the regular response in just a couple lines of code.
|
|
|
transcript
|
2:01 |
You probably heard me make a couple of disparaging remarks to web apps that don't support URLs. I mean how insane is that? I have a web app, and I can't link to things in it. And yet so many of these single page apps created with Vue or React or other frameworks, Angular and so on. They get themselves started and then you have to just generate the javascript to move into different locations, and they often don't take the time to support deep linking that is being able to link to a current state of the application somewhere that's not just the homepage. Yes, I know that they can do it, but often they don't. And we also saw the same thing for htmx. We could have supported deep linking but our first pass at it just didn't, right? and we could have stopped there. But we decided no, actually, let's do a little bit of extra work. If there is a request from htmx, we'll do one thing, but we're going to actually do all of the work necessary if a full deep link comes in to render it. So if there's just a request for part of the results, this is the active search in the typing in the input box. We're going to run this branch of code, and we're going to return the partial search HTML result passing the data that we got from the search. If it's a full page request, we're going to return this and the trick that really made this work was the PartialSearchViewModel. We just call it SearchViewModel in our actual code we wrote. That always does the search if there's search text present, so it doesn't care how it got the search text. It just runs the search if it has something to search for. So it's always going to work regardless of which scenario we go down here. And the other is our video/search/HTML. That had to assume there might be search results, set the value of the input box and then render them at the bottom, again using exactly the same partial idea that we have right here. So there was very little work to do it, but if you don't take a few steps to make it happen, it just won't happen. Alright, add deep linking support to your apps, it's easy and your users will thank you.
|
|
|
|
22:05 |
|
|
transcript
|
0:53 |
We're on to the final and third feature we're going to do with htmx. That is "Infinite Scroll". Surely you've encountered Infinite Scroll.. It's on Twitter, it's on Instagram, it's on Facebook, it's even on DuckDuckGo under the right settings. So this is if you have a ton of content and you don't want to show it all at once because that would just overwhelm the users. You want them to interact with it a bit. And if they need more let's show it to them. This is useful for the users because they don't get so much data sent to their browser. But it's also useful for you if it would take 10 seconds to generate 10,000 response, and you're not sure how far the user is going to go into it Maybe just generate the 1st 100 and then that could happen really really quick. So it'll keep your app more responsive. Make it feel a little bit lighter. So that's what we're gonna do, we're gonna add Infinite Scroll to the video feed our video collector.
|
|
|
transcript
|
1:52 |
Even if the term "Infinite Scroll" doesn't connect with you, if you're not exactly sure what this is, you've definitely seen it. Popular social media sites like Facebook or Instagram, they don't have pages, you just keep scrolling, especially on mobile. Similarly, with Twitter, here's my personal Twitter feed, and you can see if you just scroll, the scroll bar is however big it is, but if you get to the bottom it's not done, it just pulls in more content and more content. Even places like search engines, like Duck, Duck go, one of their options is to do infinite scroll for the search results. I don't remember if this is the default, but if you go in here you can see like here's page one and page two and they just put this divider, and you just keep scrolling, keep scrolling to figure out where the thing you're looking for goes up in the results. So Infinite Scroll is very, very common. It's great on these sites that have tons of content and they really don't end. How does that apply to our video collector app? Well, we have this feed. Remember we saw the feed, and it was really slow. I had to pull it up, and it took about five seconds to render this feat of all of the videos on the site. Well, first of all, do you want to show them all of the videos? Probably not, like let them go see the new ones and the popular ones and then if they keep scrolling, just keep providing them more. So what we want to do is when they get to the end of the feed, the ones we've displayed so far. We want to show this little, this bar thing at the bottom that's animated, this little working, thinking type of animated thing as we're pulling in more videos and then boom more of the videos just falling, and we just keep scrolling and keep scrolling. So that's what this chapter is about. We're going to add that feature right there. This infinite scroll to the video feed, which shows the most recent or most popular videos, something like that. I don't remember exactly what the sort is, but it shows all the videos on the site in some sort of ranked order. Our video collector users are going to love it.
|
|
|
transcript
|
4:18 |
Welcome to chapter 7. That means a new bit of source control, a new part of our code. So here you can see ch7_infinite_scroll and we're doing the final one. Again, we have the starter and the final just like always. So what we're gonna do is we're gonna open up this project and let's just run it really quick. We'll go over here and click on these little dots, and it's gonna take a while for it to run. And then eventually I'm gonna see all the videos, there's no infinite scroll here, there's just all the videos. So what we want to do is make it so it's quicker. It'll just show a couple of the videos. And then as we scroll, then, as we sort of expose this part of the page, it's gonna go back with htmx, go to the server and say give me the next three videos, then the next three or however many we decide to put in a block of you might think of as a page. It really is just this one long list. Now to do this, we need to organize our HTML a little bit. This is the entire page of what we just saw here. So we've got Video Collector: Recent Videos and then it has the title, the picture and a link. If we click it, it will go over and play this video, and then we just loop over that and that's the whole thing. So here's the header, here's looping over all the videos and each individual video, here's a video block. So we've got the title at the top, and we have a hyperlink to play it locally. And then here's the image. We can clean this up a little bit. Remember we already have a couple of things like for example, this image here, we have this partial of video images. So instead of this, let's clean that up. I'll just say {{render_partial('shared/partials/_video_image.html')}} And then let's look and see what this wants. Something called video. So we're gonna say video=v like that. Alright, so again, this gets, it's better re-use of our HTML. It's not technically necessary yet. But let's just get this all cleaned up and get the HTML as nice as we can so that we'll have everything working. Let's go and refresh this page. It should look exactly the same unless we broke something, nope, nothing's changed. Okay, that's good. We also have this element here which you could think of as a block of videos and then here we have that whole list. So what we can do is we can put this section here into a partial because what's going to happen is we're going to render some, we're going to provide here, the first bit of videos, the first batch of videos, and then we're going to add a trigger down here with htmx. And then we're going to need to run this again for the next batch and again for the next batch and again for the next batch. When you see that kind of pattern in htmx. It means partial. So let's go over here, all the same pattern of having a partials folder and let's just call this video_list or something like that. And again, it's just gonna be this right here, so move it over and then what we need to do is we're just gonna again render_partial and remember over here, it needs this videos, so we're going to just say videos=videos and we also have the videos already here as that's what, what we got going into this one. Alright, so again, this should look the same, We rerun it, and we refresh it, and we wait the time that it takes. It should be unchanged. Perfect. Everything is exactly the same. But now we have the possibility of providing a smaller set of videos here, Later on rendering this section, which we can make a little nicer rendering this again and again, as you scroll to the bottom of the page, as the rule, trigger scrolls into view, it looks like everything is set up and ready to go for adding infinite scroll with htmx
|
|
|
transcript
|
3:23 |
The first thing to add "Infinite Scroll" is really on the server side. We don't want to return all the videos. We need to set up a way to return just some of the videos and then some kind of htmx trigger to say if you get to the bottom of this set, go get more. So we're gonna go over here to the feed, and we've got our FeedViewModel here and this is really why things have been slow. This is just a small set of videos in memory. It doesn't actually go slow at all. So we've had to add this slowness to it. We're going to come back and add that back in a moment. We'll actually need that to see the progress indicators so you can actually tell infinite scroll is working. So what we need to do is we need to define how many pages we're going to have that. So we'll have VIDEOS_PER_PAGE and let's set that to be 3 So instead of having all the videos, were just going to show 3, if you scroll beyond those 3, we'll pull 3 more and then 3 more and then maybe 2 more, then 0, depending on how many videos are, whether they are divisible by 3 and so on. So now this FeedViewModel, if we go look at it, it looks incredibly simple, right? It's just well here are all the videos but what we need to do is we actually need to pass over a little more information like the number of videos per page And what page it is. So we'll say page=1. Let's be explicit here. Let's call this page_size like that. Now those two don't exist yet, obviously. So we can come down here and change the signature, default value i's going to be None, and I guess we could even leave it on page equals one by default. There we go. So we're going to need to save this. Obviously this is going to be an int, and so is this, let's save these. I'm not sure we'll need them later. We could just work with them here, but it's always kind of nice to have them. Okay, It looks like it's all good. Now the next thing we need to do is actually get those videos. So let's create a variable here. We can do refactor, introduce variable. We'll say all_videos and the videos that we're going to return are actually a subset of all the videos. Now, in a real service, you would do this in the database or at the API level. But remember this is a pretty wimpy data layer we got. So we're just going to use a slice here. So what we want to do is we want to go take the page minus one So what page we're on times page_size all the way up to. That's good. Store this here as a variable. I will say start as that. Now I have an end, start plus page size, that seems a little cleaner. So we'll just do a slice start to end. And that should give us, you know, when we come to the first page, or the first 3 if we're passing in 3 for page size and so on. Over here, it looks like everything should be working. We're now passing that information over. Well, let's run it and find out. We go and refresh. All right, it worked and there it is. Look at that exactly what we want. So now we're just getting the first 3 and what we need to do next is put some kind of indicators, some kind of trigger that will tell the system that will tell htmx: OK, they got to the end, go get more if there are any.
|
|
|
transcript
|
5:22 |
Now that we have the ability to show just some of the videos. The next thing to do is to actually add the trigger. So over here, this loop shows all the videos and then after it, we need to add some kind of thing that when we hit it in the page that it is going to tell htmx go get more. I'm gonna make some interesting changes here. We're going to start and say first we want a div and this div, it doesn't have to have any content, but soon as it appears it's, this will be the thing that does the trigger. What we're actually going to put in here instead is this thing called bars.svg, and just let's hard code a width of 150 pixels. We also need to give it a class so that it can be worked on so. So it'll be an htmx-indicator. Right? So this thing will be shown. And then as soon as the new videos come in, as soon as the new content that's being pulled in through, infinite scroll comes in, it's going to replace this whole section, including the image. So you see how this goes, What we're gonna do is we're gonna do some hx things. We're gonna do an hx-get, we can come over here and say feed/more_videos, let's call it like that. And then we're also going to need to pass along what page we're on. So far, we haven't had to track this because we had all of them, right? We said show every single one. But what we couldn't find out is the first time through this is going to be page equals 1. The second time to is going to be page equals 2 and whatnot. So this, this partial here is going to need to receive what page it's on and whatever page is on, we want to get the next page. Again, we're gonna need a trigger. Right? This is, not this time clicked or anything like that. This one is going to be revealed. So when, this is basically when it's shown on the page, scrolled into view, go with that. And then what is the swap? What are we going to do? Well, exactly what I said, we're going to replace this entire fragment with whatever comes back from here and this is going to be outerHTML. Finally to give this a little style, let's say this has a class. Now this looks like a warning or an error, but it's just PyCharm not loving the Jinja inline Python, but it'll work just fine. Okay, so this should work. Let's go and view it again. I'm gonna refresh Now we're right at the top of the page. Oh yes, we do need to pass in that information. So here in the index where we're using it. Remember I called this when we passed in videos. The very first time this is coming in. What page are we on? We are on page equals 1. And on the first page of the first request, we're on page equals 1, but then subsequent ones, it'll be 2, 3, 4, 5 and so on as it iterates. Lets try Again. Here we go. Look at this. Let's go to the top, actually. And I'll do a refresh down here, so we can reload that. Notice, There's just the CSS in the main page, got a 200. Clear this out and then let's go to the side here. And I'll scroll down and as soon as we get past that electric, Are Electric Cars Worse For The Environment? Myth Busted. Hang tight. Here it comes. Bam! See that, right? As we revealed that section, GET more videos, page 2. All right. So now, obviously this is a 404 because we don't have the server side bits, but that is what we needed to do over here. It turns out there's still one thing to do because this is always going to be happening, and we don't want it to run. We don't want it to go and try to get more content if there is no more content. So final bit that we're gonna need to do. If has, has_more_videos, then we're going to do this. But if we don't have more videos, don't show the trigger that will try to get more videos. All right, let's go and say if self.has_more_videos, and we'll have the videos we're showing now. But what we need to know is would there be more if they got to the end of that? So we have to say something like the length of all the videos. Right? So how, this is the total number of videos, is that greater than end. So if there's not any more or if there's 20 and this is 17-20 videos, right? This is gonna be False. But if there's a 21st video past the 20th one, it should be good. And the final thing is we're also going to need to pass this over. So let's wrap this around something like this, and we'll say has_more_videos equals that. Passing this along, our view model or partial view should have it in place. Let's do one final test to make sure this is now working. Go to the top, reset it. As we scroll in. Yes. Perfect. It was trying to get page two because it knows that there are more. Again, the server is not implemented to do anything with that, but our HTML should be all good over here. We're rendering the videos in the case there's more videos we're now showing the trigger. But as soon as we get to the last page, the trigger goes away as well.
|
|
|
transcript
|
3:54 |
We have everything set up right in terms of HTML and so on. The final thing to do is simply write the method that lives right here. A view that will return the videos. Remember in the active search one we were supporting deep linking and all that kind of stuff. And so I said really we're going to hit the same URL, the same view method under these different circumstances. So we had the case, we said, well in the case that it's if vm is an htmx request, we're going to do something, but it's not exactly like that here. So we could go either way. But what I'm gonna do is go and put a different URL here and that's going to look like page, and then we're going to pass over page and let's call this just more_videos. So I'm going to have a separate additional, this will be the callback for when we get more. It's kind of similar, but it's not exactly the same. So it's up to you. You could make it work. So what else is left to do? Actually incredibly very little Let's go over here and say, I think we can say this is an int and then over here we can say partials, and what do we have in that section? video_list. We can just say the response to what we're going to use is that partial view remember not the whole thing, just this bit right there, which is exactly the fragment of an additional page of videos to be dropped in and then possibly another trigger the next time and another trigger the next time. But eventually that will go away, and we'll just put the last set of videos in. We're going to use that partial view right there and we can go and say this is also an int, and then we can just say page equals page like that. That hopefully looked simple. That should actually do it. We might have just completed this feature. Let's give it a try. Let's do it, a round a trip here. So we go over there, gonna hit this view. One other thing before we do this, hold on in order to actually see the indicator, to see something is happening. Let's go down here and throw in a time.sleep for 0.25 or 250 milliseconds. So we're going to do that because otherwise it's just gonna stream by and you won't actually see that anything is happening. Let's go hit this feed, bam there's the first bit, I'm gonna scroll. Remember when you get past the third video, the green one? It should kick in and get the next batch. So I'll come over here and show the run. Let's clean that up. Here we go, a little bit more and look, did you see it? There they are. Watch, I'll go quick this time, and you should see the indicator going it, See it? Oh we're going to need more time. It's not even close to long enough, is it? Perfect, that's our infinite scroll, and it's just going right along. I love it. And you can see right here back we're going get more videos page 2, 3, 4, 5, 6, 7, 8. Well we're this far down. Let's see if there's any more, there's a few more, few more and that's it. The last one we got was Go Python Go. And apparently there's 10 pages of videos. Every one of those came back with a 200, came out. OK, even though it's red, that's just like the way the output gets colored in Flask. There you go. That's it. That's the infinite scroll. Let's, let's give it one more little bit of polish. The only bit of polish is let's make this take longer. So you can actually feel what it's like. Back home, go to the feed, then scroll. Working. Oh yeah, there it is. That feels good. Obviously in a real app you want that to appear as fast as possible. So you wouldn't put that delay in. Remember? We're running on localhost, not up to a server across the internet with pink time. We're not hitting a real complex database we're just hitting an in memory database. That's super fast. You would never put that time.sleep there in a real one but to demonstrate, simulate like the latency of the real world. That's what we got. And that's our infinite scroll. Pretty awesome, right?
|
|
|
transcript
|
2:23 |
Let's close out this chapter, this feature by reviewing how we rendered video results for a single page and how we triggered the infinite scroll to get more pages down to the browser. So first of all, I really hope you thought that partial section was awesome. I mean there's just so many use cases for these partial ideas. in this one we're having our loop here, and actually we don't even have the HTML that we saw. We put that all into a separate partial block. But we just say for each video render that video with its HTML as we already did. And this would show either all the videos on a single page or however many were applied, but then we need our trigger. So in order to add the trigger, we come down here and we say add a div, or it could be anything, it could be an image. It could be a hr you know, it doesn't matter like put an HTML element here and have 3 htmx hx attributes. hx-get so we go back to the server, feed_partial. Next page, gonna pass in you're currently on page 3 and if you need more videos, go get 3 plus 1, or 4. The most important part, the infinite scroll aspect here is on revealed. We put it at the bottom, and then we say if it's revealed, go get more. So that basically implements infinite scroll. We scroll to the bottom, reveal is triggered, that gets us more. The next one of these triggers goes probably off-screen. Down below again, you scroll to it. It's kind of like recursion and then finally an hx-swap. So this whole section, this whole div here that contains this animated image, like working image and so on. All of that is going to be replaced by basically regenerating this whole page. But with page equals plus 1. Final thing to do, if you don't check that there are more pages, you're going to end up in this weird cycle where you get to the end and it's hitting the server and giving you errors and possibly even returns another one of these triggers when you get this weird infinite loop type thing. So be real careful to check the end the case, right? If there's no more just don't show this trigger. So it's really easy to do, but it's also easy to forget and that's it, that's how we used htmx, our idea of partials and this whole trigger with revealed to implement infinite scroll. I think it came out super, super well. And again, htmx plus this idea of partials comes out with such incredibly clean Python web apps that it just makes me smile to look at it. It's really nice.
|
|
|
|
17:50 |
|
|
transcript
|
1:58 |
Look at that. It's the course conclusion, you've made it to the end of the course. That sure looks like a finish line, yep, that's right. You've done it. So you are ready to build dynamic web apps with htmx. You've seen three separate examples where we've taken a rich web application that was completely server side and had no frontend dynamic nature to it, our video collector app, and we added "Click to Edit" to add a new video. We added "Active Search" with browser history and deep linking. And we even added "Infinite Scroll". With all those examples at hand, you should be able to build pretty much whatever you want. So let's review what we've learned. We began by talking about the HOWL stack, Hypertext On Whatever Language and framework you want, as opposed to the MEAN stack or the LAMP stack or some other technology specific stack. This is sort of a freedom statement. Look, you can use whatever you want. Now the title of this course had "Hold the JavaScript" in it and some people maybe see that and go, oh you're anti JavaScript. No, not at all. I'm just pro whatever technology you want to use, so long in the world, we've been told you must use JavaScript, and you have to use JavaScript on the front end you should probably use more than you're using now and then why do you even have that server stuff anyway because guess what? You're barely doing any of it anymore. This lets us use Python in a very powerful and clean way and build dynamic interactive web applications. But it could have been ASP.NET, it could have been JAVA. Heck it could even be NodeJS on the server and htmx on the front end instead of Vue. So it's definitely not anti anything, it's pro whatever you want for your language and framework. I love this idea of the HOWL stack, and I hope it empowers you to work on the web platforms that you love. I'm guessing that's Python, because you made it all the way through this course.
|
|
|
transcript
|
1:03 |
As you continue your journey through htmx. I encourage you to start with the examples. The documentation is fine, but I really find that going to an example that shows exactly the two or three pieces of htmx that you need to bring together, to get everything to work just right for that scenario. That's really what you need. The way that I learned htmx and the way I encourage you to continue your exploration is go to the examples, find something that's doing just what you would like, and then you can go over to the documentation to say look at the hx-trigger to figure out what the options are for maybe a delay there or something like that. Right? Use the example and then let that drive you or dive deeper into the documentation. And here's an idea if you don't find an example of something you want, and then you figure it out. Go and submit a pull request to add an example that will show that for people right? So you can help contribute back to the htmx project. Right? So remember htmx.org/examples is a great jumping off point for going further.
|
|
|
transcript
|
3:13 |
In this course we did not start from file new project. No we started from an existing Flask application that already worked and that had already quite a bit of structure and web design and everything in place, and we added some features to some of the pages and then added new pages in the case of the Active Search. So let's just review a couple of the core building blocks and pillars of this app as we got started. So remember, our models, our data exchange that sort of stood in for our database and if we use SQLModel, could actually be our database models or Pydantic models. So we've got for example our category which holds a bunch of videos and we just basically derived from the baseModel from Pydantic, create the fields and give them types like str, str and List[Video], another Pydantic model. And then we can immediately just load up some sort of JSON document and hand it off to Pydantic, and it will load these up and create them and that's basically how our database, our lightweight database worked. Another really important idea was the idea of View Models. The view models job is to exactly exchange the data that the template needs. Go to the view, it gets the data may be off the URL and so on and then this thing is going to go and get the rest of the data may be from a database or an API, possibly from a form, do the validation and then sync that back to the HTML Jinja template. So we have this ViewModelBase. It had all sorts of good things like it would store the request, it would create this merged request dictionary like headers, cookies, form and so on. All that data together. We would derive from it like here's our IndexViewModel and it has a list of categories we got from the database, and then it turned those into rows because we want three categories per row and that was easy to iterate over, so hen we got to Jinja we didn't have to write complex Python code embedded in HTML. You should never do that, do it in the view model and then hand off the final data to the template. Then we just return the dictionary out of our index view for our homepage and that shows all the categories right there. Finally we had a lot of conventions in the way we structured our code. Remember we had our views and they kind of drove everything. We have feed home and videos. Then over in the viewmodels folder we would have view models that corresponded to view methods inside of that home. So we have the folder home, and then we had the name of that function inside home. So we have an index function and home.py So in the view models we have viewmodels/home/index_viewmodel. We also have this shared/viewmodelbase and then we have the same basic organization for templates. We have their home, set of views and then in there we have a function called index. It's gonna use the HTML Jinja template index.html. Hopefully you're familiar with this at this point. We've been working with it for a long time, and I find this organization very helpful You don't have to use it. You can use a different organization but just have something like this where, you know, I'm working on this function or this HTML template. Here's all the other pieces and how it fits together.
|
|
|
transcript
|
1:54 |
The first feature we added was "Click to Edit", of course we could have some sort of form or parallel admin organization for our videos, but we wanted to just go to the end of the category and say let's add one more to this category. We've got this HTML form here that we're gonna fill out. Of course we didn't want that there all the time. We wanted a subtle little button or hyperlink, you could click that would then show this, and when you save it back it goes away So the way we did this is we just put a hyperlink with some font-awesome plus circles in the text "add a video". We had two htmx attributes. We said hx-get video/add/ where the category name is. Remember htmx is going to go do a request against that when we click the hyperlink. Whatever HTML is returned, we're gonna swap it out. And that's what we're saying next with hx-swap, replace this entire element with whatever comes back from the server. What came back was this form that would let us edit that. This is what you saw on the screen with the red circle around it. And we have a button to submit it and also a cancel button. Here we have a GET for video/cancel_add/{{ cat_name }} and then we set the target which is not outer HTML but a larger, different piece that's actually the whole form. And when we get that one it just returns the HTML you saw previously. So super simple. We basically juggled these two things back and forth. Whether or not we wanted to have the add link or have the add form, we cancel it, we put the link back, otherwise we submit it, and we just redirect back to the page again. We could have actually done more interesting things on that post back instead of redirecting. But I felt like at that point this feature was being, our first feature was already complicated enough. And wanted kind of to keep it straight down the line and not get too complicated with what's going on here. Very nice. We can take this further, and you're welcome to do so as you keep going with htmx.
|
|
|
transcript
|
2:10 |
One of my favorite things to come out of this course is the partials package. Remember we did render_partial, and we would give some small part of HTML and some additional data right inside of one of our HTML templates. I really like this because even if you're not doing htmx, it's a really cool way to break apart a huge, complicated template into small building blocks. Just like you would not really want to write a 1000 line long function, it would be way better to write 10 100 line ones or maybe even more short ones. It helps you understand what's going on. And these partials both add to reusability, as well as to maintainability along those lines So really useful in general. Now it's especially important as we saw in htmx because so often we want to show the whole page and the page might contain some HTML, and then based on the server interaction, the server needs to return in another instance maybe with other data, basically a subset of that HTML again. And that's exactly what partials let us do over and over throughout this course. Just to remind you, let's do one quick review of using one of these partials. By installing the package, and then at the app startup we have to say jinja_partials.register_extensions, pass it the app. And then magically, well through the magic of Flask and Jinja, this render_partial function will be globally available within all the Jinja templates. So here we just use double curly to say take whatever text you get and put it out here, and then we call render_partial, give it an HTML link to a partial. Here we have videos/partials/add_button.html. Of course contained in the template folder. And then we pass along the data. Like here we have the data we're working with, which is a category that has a category field. What the template needs, what the partial needs is something called cat_name. So we say cat_name equals that value. Just like a function call, and then when we call render_partial, It's going to go to this add button HTML and here you can see the data being passed from the outer template down to the inner template. Really nice and reasonable. Basically functions for templates.
|
|
|
transcript
|
2:16 |
We saw that htmxwas fantastic for adding "Active Search". That is search as you type. Of course we didn't want every single keystroke to drive a search. You want to let people type just a little bit and then basically the soon as they stop and are ready to, it's Okay, that's what I'm searching for. Boom! The results pop right in. So they type here, the results dynamically reappear here without reloading the page, but we went farther. Remember we did a couple of things, we actually added the search text to the URL, so that would show up in the browser history, adding back and forth support, you know, navigate back as well as very importantly we supported deep linking. So if you were to bookmark that or share that URL, that is now possible. It'll actually regenerate exactly the same view or really rerun the same search. Maybe the data has changed. Let's see how we did that. It really only took four hx attributes. We have hx-get /videos/search and then the trigger this time was an interesting combination. It was keyup so when people are typing basically release the key but also changed, the text has to change in the input. It can't be enough that it's an arrow key, key up and down. It has to be that there is a key up and the resulting value of the input is different, and then avoiding every single keystroke hammering on the server. We have a delay of 250 milliseconds. If you pause that long or longer that search will be sent off to the server. We have a target that was that bottom red block where the search results went. It's just a CSS selector and id=#search-results here, and then we want to have the history. So basically the browser history side but not the deep linking side. We said hx-push-url is true. One of the things we did in part of this input here also to support deep linking was too pre-populate the input value with search text. So we did this Jinja string, search_text or empty string. So when you load it up the first time it's empty., but if you deep link to it, it's gonna say grab the search text out of the URL and then pass it back and populate this part of the page with that text as well. Incredible, right? This is all it takes.
|
|
|
transcript
|
1:59 |
We saw that sometimes when you make a request you're loading up the whole page and other times you want maybe just a fragment of that page. The example where this was happening was in the search and specifically for deep linking. So if you're loading the page but you've got the search text because we've put that in the URL and you're clicking or loading up that link. You need to do all the stuff of showing the outer page but also loading up that video search and putting that in the results of the page. On the other hand if someone's typing you need to go back and do a search and render just the partial bit and put it into that section. It turns out that we can do that with a single function. You may or may not want to do this, it might be simpler to have them separated, or it might be simpler to have it together. My current thinking is that if you're doing deep linking it might make sense to have it all in one, if you're not doing deep linking like for example the infinite scroll. Nobody's deep linking to that. In our example, in the click to edit no one's deep linking to that. So those were separate but this search one did support deep linking, and so I thought it made sense to put it together. Well how do you know which it is, a request coming into /videos/search could be from htmx, it could be from a browser directly trying to load the page. We added a feature to our view model that says is_htmx_request. How does that work? Recall that all that happens when htmx makes a request, every time it puts some header value that says HX-Request. That's the key thing you're going to look up, and it has some value but we don't actually care what the value is. We just say if this is present in the headers, this means that htmx very likely put it there. We're going to assume it's an htmx request. So this simple bit of code HX-Request in flask.request.headers is really all you need to do to check to see if it's a full page request or some callback from htmx.
|
|
|
transcript
|
2:18 |
The final fun feature we added with htmx was "Infinite Scroll". And remember we added this to the video feed where we're showing basically all the videos in the system, sorted. Now in our example, there weren't so many videos that we couldn't actually put them on the page. But if you have 1000 or 10,000 or a million or nearly unlimited amounts of content obviously you need to do something like this. So the idea was when you get to the bottom of the page, that's going to trigger some sort of request to the server and as soon as that happens we want to show an activity behavior so the user knows that it's not just empty and then something will pop in but oh look, it's working so we have this little set of gray bars and then goes to the server, gets some more results. I called these fragments pages because it's kind of like pagination but based on scrolling instead of a next previous type of navigation and that's it That was infinite scroll. And again super straightforward to do with htmx. We render the set of videos that were on that current page. So here we have for v in videos, render_partial off it goes. And then as long as there are more pages, we're going to add this div. Remember it could be anything, it could be an image. It could be basically any HTML element, but I chose a div because that has no real visual representation. It's going to have an hx-get /feed/partial for the next page. So remember we're passing your current page to this partial view, like you're on page 3. So if you get to the bottom of page 3 you need page 4 for the next set. So we carry that forward through each request and then pass it back again. The trigger, this is the infinite scroll aspect is revealed. You scroll the bottom, it reveals this invisible piece here and off it goes. And what we swap out is the outer HTML, completely replace it with basically recursively calling this entire template with the next set of videos. The other thing, here in orange that you see that we had, that's the bars we didn't do anything special to make them appear. They were just literally there at the bottom of the page. But soon as they were visible to the user, that already kicked off the going and getting the next page from the server. If there's no more pages than we don't even show this. So then the bars are gone. That's infinite scroll with htmx.
|
|
|
transcript
|
0:59 |
Well, it's time to say goodbye. I hope you've enjoyed this course. Congratulations on making it all the way to the end. I don't know how you feel, but personally, I think htmx transforms the way that we can build web applications. Using the HTML partials, the Jinja partials library, transformed the way we can structure our code and reuse the HTML side of our code. It's really powerful. There's a bunch of cool lessons to take for building your app This course was in Flask. But to be honest, you could do this in almost any of the Python web frameworks. You could use Django, you could use Pyramid. You could use something like FastAPI, I think you can adapt it to pretty much whatever you'd like to do. That's part of the beauty of htmx and the HOWL sack, isn't it? All right, well thank you, thank you, thank you for taking the course. I hope you enjoyed it. If you go out and you build something amazing, be sure to shoot me a message and share it with me. I'd love to see it. Bye, good luck.
|