|
|
|
8:35 |
|
|
transcript
|
0:54 |
Welcome to HTMX + Django Modern Python Web Apps Hold the JavaScript. My name is Christopher, and I'll be your guide. This course is an introduction to HTMX for Django developers. HTMX is a web toolkit written in JavaScript designed to help you build dynamic web pages by writing little to no JavaScript yourself. It does this by adding attributes to HTML tags, pairing server interactions with changes on a tag. It's a similar idea to what happens when you click a link or submit a form. An action happens with the URL associated with that tag. How HTMX is different is those associations can be with other kinds of tags than just links and forms, allowing you to dynamically place chunks of HTML through a server call when an event happens on your page.
|
|
|
transcript
|
1:24 |
Ever heard of the LAMP stack? It's an acronym talking about a set of technologies used to build web applications. LAMP stands for Linux, Apache, MySQL, and PHP, the four things that together used to be the most common way of building web stuff. Inspired by LAMP and other similar acronyms, the inventor of HTMX, Carson Gross, came up with his own stack, HOWL. Howl stands for hypertext on whatever language. Besides being fun to say, it also nicely encapsulates the idea behind HTMX. HTML is a hypertext format, and the same design ideas that are used between HTML pages can be used on partial pieces of HTML within the page. By using HTMX, you're closer to the soul of HTML, concentrating on the parts that need to be sent around rather than the mechanics needed to do so. HTMX is agnostic of your web tech. It sits within the HTML page itself. That means you can take advantage of it on your favorite web framework, whatever that may be. For me, that's Django, and the sample code used in this course to demonstrate HTMX is built on top of Django. But everything you learn here can easily be used with Flask, FastAPI, or dare I say it, even Node.js.
|
|
|
transcript
|
1:12 |
This course shows you how to implement four features that are very common on web pages. Clicking something to make it editable, creating a page that dynamically adds content as you scroll down, interactive searching, and dialog boxes. To demonstrate the implementation of these features in HTMX, I'm going to start with an already working Django project called Video Collector. It's a simple site that allows you to collect links to YouTube videos, track them in categories, and then play them using an embedded player. The base project has no HTMX and no JavaScript in it. It's a traditional page-based Django application. For aesthetic reasons, the site is built on top of Bootstrap and uses Font Awesome. That means you'll be seeing real-world code as I go through rather than a toy problem. Throughout the course, I'll be adding the features I mentioned by implementing them in HTMX. The primary HTMX mechanism connects to the server, fetches a piece of HTML, and replaces part of the page. These fetched pieces are called partials, and I'll be writing views to feed these partials to HTMX.
|
|
|
transcript
|
1:11 |
In order to keep the topic focused on HTMX, this course assumes you're already familiar with Python, Django, and HTML pages. Nothing in here would be considered an advanced topic in any of these areas, but you'll be more comfortable if you're familiar with these three topics before taking the course. Before diving into HTMX, one of the lessons gives a tour of the base project. This also serves as a bit of a Django review. So if you're a little rusty, it can work as a refresher, Or if you come across a topic that's new to you, you can go brush up and come back. And of course, Talk Python is there for you if you need to cover some of those prerequisites. Python for the absolute beginner is a foundations course. It covers how to get going with Python on your machine, variables, the core data types, writing functions, interacting with files, using packages, and more. Django, getting started, is an introduction to Django. It teaches you how to create a Django project, write templates, use the database, take advantage of the Django admin, deal with user accounts along with the files and data users can submit, and more.
|
|
|
transcript
|
2:14 |
There's loads and loads of choice out there for bringing dynamic features to your web pages. Let's briefly talk about two of the more popular ones and how they compare to HTMX. React is an all-encompassing front-end framework. It isn't really designed to be used in pieces. Once you're using it, you're well using it, and typically React is used to build a single-page application. React is heavily callback-based, which is common enough in the JavaScript world. The result though is you often end up with deeply nested code with Lambda-like methods littered throughout. Vue is a little lighter weight than React, allowing you to decide just how deep you want to dive into the pool. I'm a fan of Vue as it meshes a little more easily with tools like Django. I've used it a fair amount with Django Ninja. Django being my backend, Ninja providing the REST API, and Vue in the front. The code here is part of a project that has a video player, similar to what is demoed in this course. You can see the use of a structure in the data section, as well as methods. But like the React code, it's not immediately obvious how this ties to the HTML. That relationship happens through shared IDs. By contrast, look at this little beauty. First off, you'll notice the complete lack of scrollbars that were in the previous two examples. Second, it ties nicely in with the HTML. If you're comfortable with HTML but have never seen HTMX before, you can probably take a good guess at what this code does. The placeholder attribute inside the input implies a search context, while the table is the results. Reading the unfamiliar attributes, hx-post, hx-trigger, and hx-target, you might be able to guess what's going on here. The hx-trigger says ""keyup changed delay 500ms"" while hx-post has a URL. If you guessed that typing something in the input will trigger calling the URL, you'd be right. HTMX is one of those things that really feels like it should have been invented before. Once you've got it, it just seems like the right way to do things.
|
|
|
transcript
|
0:38 |
All the source code you see in this course is available on GitHub. The code is divided up by lesson section, giving you the results of each lesson. If you're going to code along with the course, which I highly recommend, for any lesson you can use your own code or start with the final version from the previous lesson and go from there. On GitHub you can clone a read-only copy of the repo, fork it if you want to track it for yourself. Or if you're not familiar or comfortable with GitHub, you can download a zipped copy. All these options are available under the big green ""Code"" button.
|
|
|
transcript
|
0:41 |
Let me take a quick moment to introduce myself. My name's Christopher Trudeau, and I'm a fractional CTO. That means I consult for companies, giving advice on their tech stacks and their dev team processes. You might know me from the Real Python podcast, where I'm a bi-weekly co-host, or from my book Django in Action. Feel free to reach out on social media platforms. If you hang out at the artist formerly known as Twitter, I'm @CLTrudeau. Or, on LinkedIn, you can find me as Christopher L. Trudeau. And for any fellow Canadians, let me anticipate your question. Nope, I'm not related.
|
|
|
transcript
|
0:21 |
The Talk Python podcast interviewed Carson Gross, the inventor of HTMX. If you want to know more about the drive behind the library, you can hear about it here. Alright, you're all set to go. In the next lesson, you'll get a tour of HTMX's capabilities through live examples. You're off to the races.
|
|
|
|
14:10 |
|
|
transcript
|
0:44 |
In the previous lesson, I gave an intro to the course. This lesson gives an overview of HTMX's capabilities by walking you through some of the examples on their website. You can find HTMX on its home, htmx.org. Included there are a whole whack of examples you can use to understand the toolkit's capabilities, including the features you'll apply to your Django code in later lessons. This is a sister course to another Talk Python piece that teaches HTMX through examples with Flask. The Flask version of the course is by Michael Kennedy, of Talk Python fame. I'm going to hand you off to him right now to go over the examples on the HTMX site.
|
|
|
transcript
|
1:09 |
Welcome to chapter two. In this chapter, we're going to explore a bunch of pre-built, pre-canned examples on htmx.org. Htmx is a technology that is fairly unlike what you are used to. We're familiar with JavaScript that calls stuff on the server. We're familiar with server-side code that generates HTML that then returns to the browser. But what is unusual is this partial exchange where some of the stuff, most of the stuff is generated on the server. And then a little tiny bit of interactive HTMX attributes triggers more stuff to be generated on the server, and then maybe applies a CSS transition to it. So what we're going to do is explore four examples on htmx.org, where there's actually a little cool debug and network traffic analyzer. After that, you'll have a real good sense of both what HTMX is doing to make its magic happen, but still leverages the the server side, as well as the broad list of all the examples up there. You'll see there are many to give you a sense of just what HTMX can do when you combine all of those together.
|
|
|
transcript
|
2:41 |
We've already seen one of the examples over here. Click to edit and it's fantastic. It's actually one that we're going to work with. Let's look at another one that we're eventually going to add to our video app. I do want to give you a sense of walking through these so you can kind of see where we're going and what to expect and just get a sense of what HTMX has to offer. I actually encourage you to go play with almost all of these examples to just get a sense of the scope here, but let's look at infinite scroll. Here we have the code that's going to do all the work. This is part of an HTML table, so it has a table and then a table row, table data, table data, table data. Now this is just the last row of that table and it has three HX tags or attributes. It has the ability to get more, so contact slash page equals two, then the next one would be page three, page four, page five, assuming there are more results to get. And then when does this run? Before we had when you click it, it would run, like the click to edit. this is when this element is revealed. So if we scroll down to the bottom so we see this last element of what we have so far, it's going to say, ""Oh, we got to go load some more. And then we're going to swap out what after this. So we're going to put another set of table rows after it, whatever we get back at contacts page 2. Let's just see it in action. So down here we have our agent Smith, void 10, 11, 12, and so on. And if we go to the bottom, you can see it's all working. And then that's it. And then more working and you can see we've done a bunch of those requests. Here you can see we start out with the initial state. And we have this HX indicator. This is the thing that at the top was showing this little spinner type thing for working. We'll see that later. When we did a give us the page two, the parameters pass was what we need page two, right? go get this URL and this is just the query string. And the results were all of this kind of stuff here. And at the end, it will have, guess we're not showing it, but it's gonna have, let's go to the top here, it'll have that on the last of these rows. But instead it'll say page three and then page four and page five. So when we got to the bottom the first time, it pulled page two and then page three and then page four. You know, in this example, it's just gonna keep running. But eventually when you had no more in the server, the thing you would return would not have those elements on there. You just return the final set of results. Assuming you're not Twitter or Facebook, that's basically infinite. But if there's an end, you just don't put that on the last response. And that's it. That's infinite scroll. Incredible, right?
|
|
|
transcript
|
3:29 |
Our next demo that we want to look at, our example is Active Search. So if we come over here, let's just see it in action and we'll talk about the code. So what we want to do is we want to search by e-mail for a bunch of users. Notice there's no users in our table here, and also keep your eye right here as we do the search, you'll see some active indicator typing. So let's suppose we want to find all the educational users in our database. We could just search for .edu and then look at that. There they are. Now one thing you might have noticed, I typed that pretty fast, but let me try it again. If I type edu, notice it didn't really refresh until I stopped typing. You don't want this to just power through as every keystroke you type. There's a server, it kind of waits until you pause and then it'll search. How about the organizations, the org? There we go. We've got Owen and Walker and Klein, all of these .org domains. What about the .coms? There we go. Really cool, right? Let's see what it takes to do this. Over here, we have our search indicator. That's that little spinning active bar that says searching. This is the text box I was typing in. It has form control class, but it's actually not in a form. That's just a bootstrap style. Here's the relevant section. We're doing a post to search. The trigger is on key up when the data has changed and the user has stopped typing for half a second or 500 milliseconds. That's why it didn't bounce around as I was typing it. It waited till I stopped. Then it's going to replace ID search results, which is down here in this body. We had first name, last name, email, and in our table, and then it was filled up with the results as it came back. And then finally, while it's thinking, This is the CSS selector that it's going to show and then hide. That is up here. The dot means class, so class htmx-indicator. And it just shows that span and these bars. That's the entire implementation, other than at the server side, when we give it some bit of data, it has to actually do the search. Let's look at our history here. So initial state is basically what we talked through. When we do this post on search, notice it search value, the name of this input is search, so the value of search was I typed edu. There's not one for e, there's not one for ed, just edu 'cause of the delay. Come down here and it got these results and it jammed them inside there. Then we did a search for nothing, we wanted to delete it and we got edu, and here's our org, our org ones we got back. So on the server, we're doing some search that generates these users, and then we're rendering a template, like a Jinja template, that's turning those into a bunch of table row, table datas that look like this. Pretty impressive, right? For all that functionality, this is all that we have to write, plus the server-side search implementation, which is also simple. One other thing that we can do here that's not indicated is we can do an HX-push, which we'll talk about later, that would actually come up here and say something like, you know, search equals edu, search equals com, search equals org, and put those in our browser history. But this example doesn't actually show that.
|
|
|
transcript
|
2:37 |
The next example that we're going to explore is not one that actually appears in our final application, but it's extremely useful. Let me lay out the scenario for you. Imagine I've got a page trying to render it for the user, right? They make a request, we want to show it to them, but maybe it's doing some kind of report or there's some part of the page that's actually really, really slow. And I want to get most of the page shown to them and then have this other slower section like a report or a graph or something along those lines. I want We want that to be generated and delivered to the user as soon as possible, but without blocking the original page load. And we also want some kind of indicator for that's happening. That would fall under the lazy loading section. Check this out. That's pretty simple. So what we do is we say this section of the page, this whole section, that's one of those slow pieces. What I want to do is I want you, htmx, to go to the server and call /graph. And when it's done, put it right here. But while it's loading, I want you to show this indicator with those bars sort of spinning around here. And the trigger is going to be that the page has loaded. So just the page was shown and then fill out these missing pieces that are slow. In order for this to work, you're going to need a little bit of CSS somewhere included in the page to basically have some of the behaviors that are indicated here happening. And down here we have our graph. And this is the part that was slow, but it doesn't take that long. like half a second or a second. So what we didn't see is this actually loading because by the time I got down here it was done but if you notice, if I load this page it's instant but there's like a one second processing of something else. If I scroll down I can refresh here and show that to you. So page is loaded but now it's thinking on the graph request. Input came back or the response came back. Boom! Here's our report. And let's go and look at this. So our initial state was that the page was loaded and this section was here, right? This is what we talked about. But then as the document loaded was complete, I said, ""All right, now we got to fill out the slow pieces. And it went and did a request for get/graph, no parameters. The response was, ""Here's your generated image of your report. How cool is that? So I'm sure there are many websites that there's a little part of it or a little piece of information that's slow and the rest is really pretty quick. And yet the user experience is I go there, I click and I wait and I wait and I wait and finally the page loads. This would be so much better. Show most of the page and calculate the little final things that you need using one of these lazy loads.
|
|
|
transcript
|
3:17 |
Okay, final example, let's look at bulk update. What does that mean? Let's see it in action, then we'll talk about the pieces. So here we have a table of users and they have a status and really what we want to edit is their status. Are they either inactive or they're active? And let's suppose that Joe and Fuqua, they now need to be deactivated or set to be inactive. We're going to highlight them in their checkbox, hit this. a cool little UI feedback that notices those changed and then they were made inactive. Let's actually activate these two down here at the bottom so the bottom three will be activated and there they go. They're back active. So if you want to make changes to all of them, right, this big group here, maybe I need to delete these three or move them or who knows what we're doing, what we can do is we can add a button for each behavior and these go to different endpoints on the server or we could pass a query string that says set new state to active or inactive or whatever. And then we just re-render, re-determine this entire table whether or not they're active or not. Okay so come down here and look at this. So we're going to say we're going to work on the thing with ID checked-contacts, that's this form. What you have to do is you have a form that contains a table and each table row has a checkbox. Initially, it's unchecked. And then that's pretty much it, what we're going to say over here is the target is going to be to replace the body. And if you click the activate, it's going to post something to slash activate. And if you click deactivate, it's going to click post something over to deactivate. And then there's There's some CSS transitions to make those red things happen. And let's look at what happened when I clicked it. So it started out with just the table. Again, you're not going to see the whole thing, right? It gets truncated here. But you're going to see this table coming in as we saw. And then we click deactivate. It does a put to deactivate and it passes over the IDs that we checked. Those were the first one and the third one, zero and two on index base zero. And then we reactivated the last two, that should be 0, 1, 2, and 3. So here we go, the IDs that were selected to reactivate were 2 and 3. And notice down here each time we've got Joe and Angie and more stuff for activate and deactivate. That part is not changing. The reason is it returns the entire table up to the server, it basically makes a change and then it regenerates the whole table and sends it back on each request and gets dropped into the T body there. All right, that's bulk update. And our final example that we're going to look at. Hopefully this looking at the way these are exchanged, look at the way HTMX works, you both get a bigger appreciation for the types of things that it can do, and a little bit better intuition on how it's working. After this, we're going to go and actually write code to make these things happen both on the client side, which we've been exploring, but I've said the server side is easy and Stuff happens there, but you haven't seen any of that yet. Well, we're gonna do that in Django as well.
|
|
|
transcript
|
0:13 |
Let's all say thanks to Michael. Thanks Michael! From here on in, you're into the code. In the next lesson, I'll show you the base project, and from there, you'll be adding the HTMX features.
|
|
|
|
19:55 |
|
|
transcript
|
1:24 |
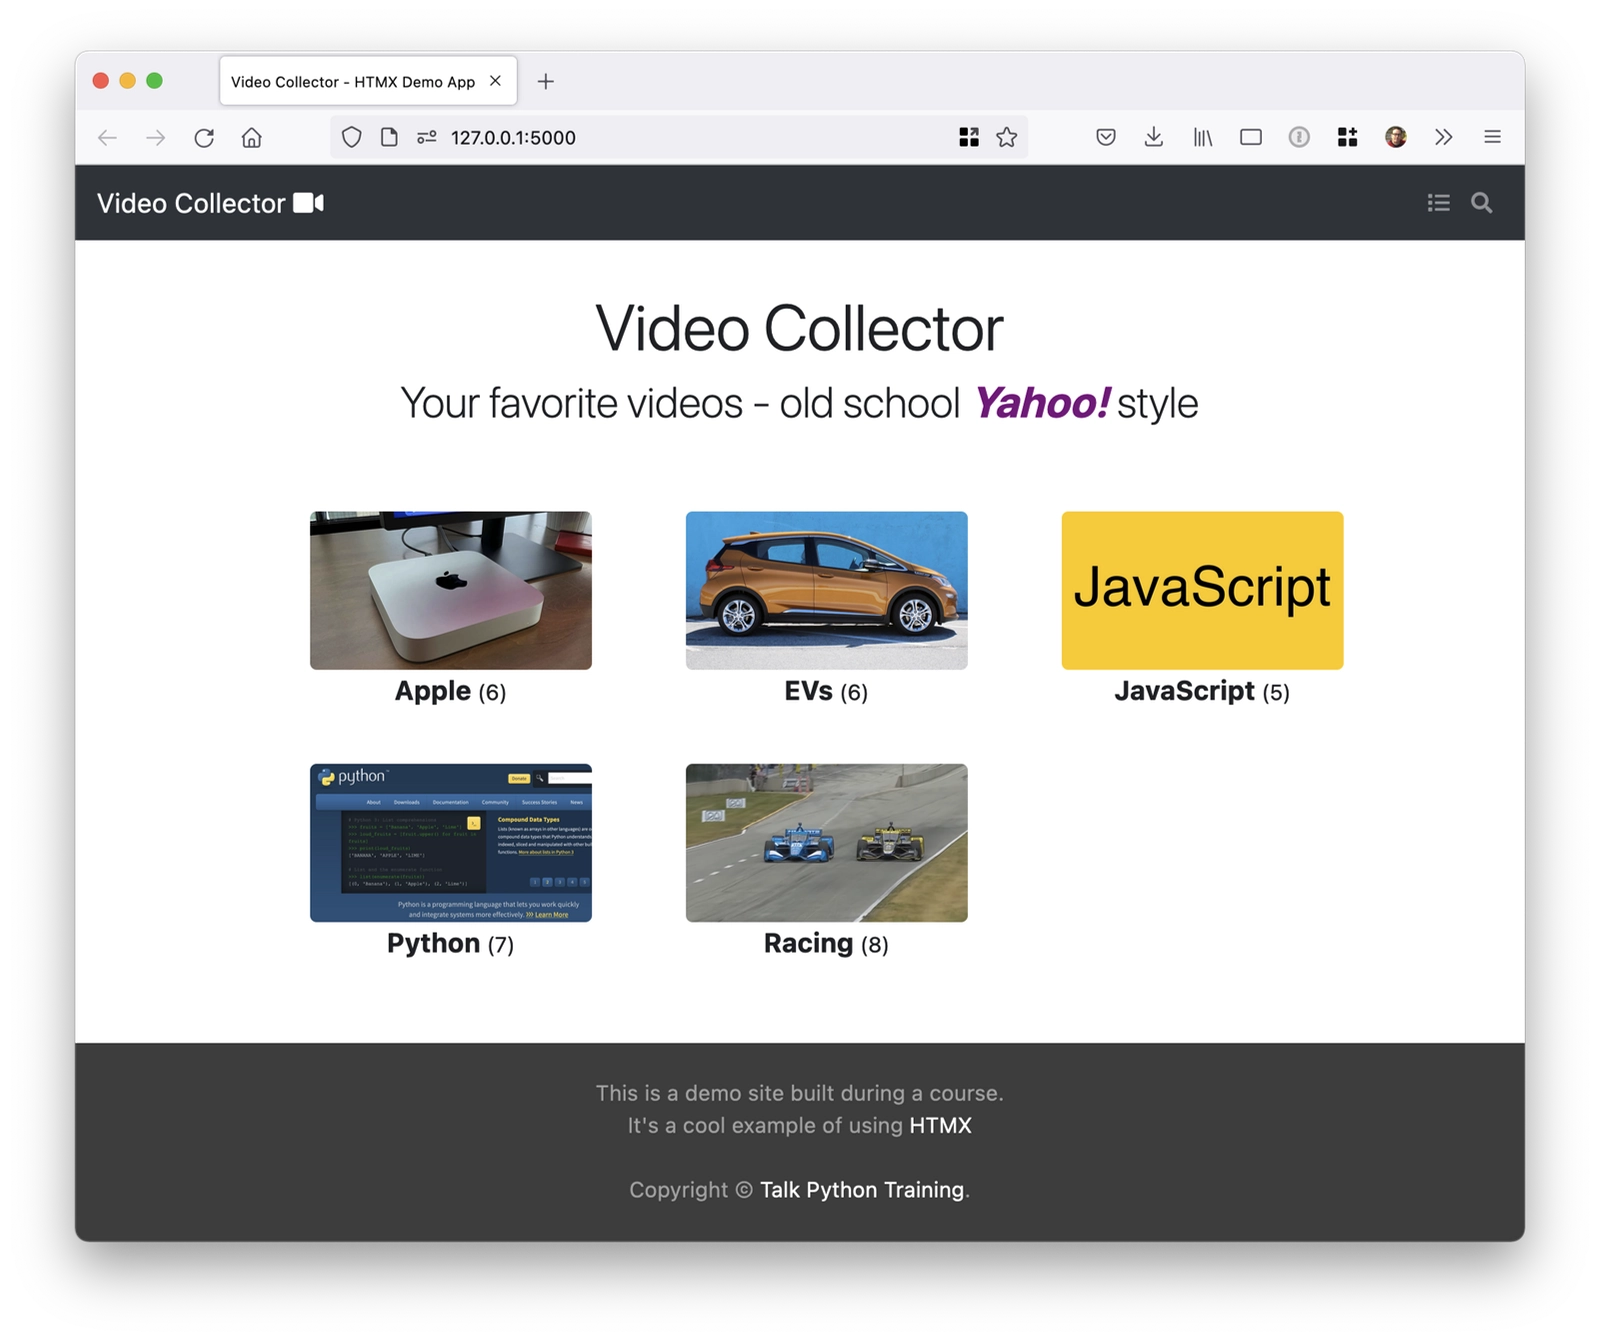
In the previous lesson you saw some example HTMX from the toolkit's own website. This lesson gives an overview of the Base Django project you'll be adapting with new HTMX features later in the course. The Video Collector project is a website that tracks YouTube video titles and stores them by category. It's reminiscent of the old Yahoo-style category sites where topics were grouped together. This is a screenshot of the base project, and if you squint at that tiny little URL you can see it's being hosted out of the local Django development server. Project has four pages. A homepage that lists the categories of videos. A category page that displays all the videos in that category. A feed page that shows all the videos in the site. And an embedded player page that is shown when you click on a video in either the category or feed pages. Here on the homepage, there are five categories of video content, each with its own banner image. If you click on any of these images, you'll be taken to a page listing all the videos in that category. The site is built using Bootstrap and Font Awesome. Nothing terribly complex is used, mostly just row column divs for layout. If you haven't used Bootstrap before, don't worry, there isn't much HTML to write in this course.
|
|
|
transcript
|
4:10 |
The structure of VideoCollector is typical of a Django project. The project's name is VideoCollector, and that weird design decision from the Django folks to have the configuration directory named the same as the project is present here. Inside the config directory you have the usual files. In this course you'll be leaving the ASGI and WSGI files alone, as they're for putting your project in production and I'll be sticking with the development server. .py file is where you set Django's configuration. There are a few things that need to be changed from their default values, particularly getting static files and template files configured. I'll touch on those changes shortly, but the sample base project has those changes made already if you're using it. Since the video collector project is small, I've been lazy and haven't subdivided my URLs into sections, so all the pages in the site - yep, all four of them - are configured in your urls.py. I'll review the route declarations with you before the end of this lesson. As you can guess from the presence of db.sqlite3, I'm using SQLite to store all of the data. You'll recall that static files are things like javascript, images, and css - files that are used by your web pages that don't require the template engine. As I'm a little cdn adverse - nothing like your site falling over because some CDN somewhere decided to stop hosting the file you need, I've downloaded fontawesome, htmx, and other things to be served here. The CSS directory contains a couple of style files. The JavaScript directory contains bootstrap's JavaScript files and eventually will also contain the htmx JavaScript file. The image directory contains the category banner images. A more advanced version of the site would allow you to upload those, but to keep it simple, adding a category means needing to change the code a tiny bit. And now for the rest of the code. The logic for our project, that's fun to say, is in a Django app called ""content"". I'm horrible at naming the main app. Utility apps that do things, no problem, but I never know what to call the central one. I used to call it ""core"", but somebody pointed out there is a Django core and that's confusing. I tried main for a while, but that implies it's the entry point like in a script, which it isn't, so here I'm calling it content. With only 4 webpages, this app isn't terribly large. The data structure model files are in the usual models.py file, while the functions that are the views for the 4 pages are in views.py. I won't be demoing it here, but admin.py has been written, so if you want to go and tinker with the data directly, the admin models for each of the data models does exist. The database file has been included in the git repo, so you don't need the fixture here, but if you did want to start from scratch or had a strong desire to use a different database, you could run the load data management command against this fixture to populate your database. As I mentioned in lesson 2, this is a sister course for a Flask equivalent. I stole Michael's data from the Flask version so I didn't have to create my own, and there's a custom management command in here to feed the database from his JSON. As you've got the fixture, you won't need it, but I left it there in case you're curious. Every Django developer I've ever talked to has a different opinion on whether a template should go with the app or not. I know that half of you watching this will be cranky with my decision. Try to be forgiving. Generally, I only tend to put templates with an app if the app is one that that I plan on being removable or is very self-contained. Otherwise, I use a single templates directory. I find it easier to search for things this way, but understand that other coders do this differently. The templates directory has a base file that all other files extend, containing the usual HTML boilerplate and a bunch of the bootstrap stuff. The other four files correspond to the four pages of the site.
|
|
|
transcript
|
1:56 |
Now that you've seen the structure, let's go over the core components. The main components, the content components, the stuff and things. There are four pages to the base application. The shot in the top right there is the homepage, which you saw before, with its five categories. You'll recall that when you visit a URL that is owned by Django, it looks the URL up in its route structure, stored in urls.py. And then if it finds the URL, it calls the corresponding view function. The code here is that corresponding view function for the home page. Each video category is an object model, so what this view does is gets all the category models from the database and renders them using home.html. The only slightly tricky thing here is the use of more-itertools. If you're not familiar with this, it's a third-party package that has itertools-like functions in it. Here I'm using the chunked function which takes an iterable and breaks it up into groups. I'm grouping the categories into chunks that are 3-wide and doing so so I can display them in a row purely for presentation reasons. If you happen to be using Python 3.12, you can use the new batched call inside of itertools instead. Django's render shortcut loads a template, takes a data context, renders the template, then returns the result to the framework. The call to render here uses home.html as its template and passes in context. The template file has HTML and tags which loop over the rows with the first row containing the Apple, Eevee, and JavaScript categories, and then the second row the remaining two, Python and Racing. The template engine processes all this stuff and returns the result to Django. Django then returns it to your browser, which makes the pretty picture you see in the top right.
|
|
|
transcript
|
1:22 |
Inside the home view you saw the category model. This is that model, and it's responsible for storing the video category. It has two fields, name and image_name. The name is what is presented on the screen when a category is shown, while the image_name is used to store the file name of the banner image. A more robust approach would be to use an image field instead, but as I'm not uploading the banner images, I've gone with a somewhat hackier way. Inside the template, I use the static image tag to get at the folder and then just append the image name. I've also set up some metadata so the default querying order uses the name field in the database. At the bottom of the code, you can see a neat little trick. I've overloaded __len__. This is the method that Python calls if this object is used with the len function. Here, I've had it return the number of videos in this category. This gets used in the template. The number beside the category name is how many videos it has. By implementing __len__, I'm able to use the length template filter to get at that info. On the homepage, when you click one of these categories, you get taken to a page that shows all the videos in that category. Let's look at that next.
|
|
|
transcript
|
0:48 |
The thumbnail in the top right here is what you'd see if you'd clicked the ""EV category on the homepage and scrolled down just a little. The top of the page uses the same banner image as the homepage, and some bootstrap magic is used to overlay the name of the category as a title. The code in the box here is the view function for this page. This view takes an argument, the name of the category. The argument is used to look up the corresponding category object, and then all the videos that have that category are queried. Once again, the more_itertools.chunked function is used to split the result up into groups of three, and then the whole thing gets rendered using category.html. Now let's look at the model for the video objects themselves.
|
|
|
transcript
|
1:06 |
To work with a YouTube video, it's helpful to have YouTube's ID of the video. It's important to remember the difference here between the ID of the video object, which is named ID, the default for all Django models, and the ID of the YouTube video, which is a field on the object. The Title and Author fields store info about the video so it can be shown on the site. The View Count field contains a counter of the number of times you viewed the video. Now that I'm saying that out loud, I'm pretty sure it does no such thing as it never gets updated. Let's call that a bug and move on. A video object can belong to more than one category, so I'm using a many to many field to track those relationships. Unless your eyes are far better than mine, you probably can't make out there's a little outline bullet icon in the nav bar in that image. If you click on that, it takes you to the site's feed containing all the videos regardless of category. Let's take a look at the view that produces that page.
|
|
|
transcript
|
0:56 |
The feed page is just a long list of the entire site's contents. The view for this is pretty small. It simply queries all the video objects in the system and then renders the feed.html template. On this page, or the category listing page, you can click a video to play it. Clicking a video takes you to a new page where there's an embedded player. Let's take a look at the view for that. of the magic here is inside the HTML getting the correct content to embed a YouTube video. Thankfully I had the Flask course to copy the code from and barely had to think about it. The view for this page takes an argument which is the ID of the video (no, this is the Django ID, not the YouTube ID) and once inside, the video is looked up by ID and then playvideo.html is rendered, including all of the YouTube embedding magic.
|
|
|
transcript
|
1:50 |
You've got the basic gist of the project now. Let's go over a few details and then I'll give you a whirlwind tour of the actual code in PyCharm. First off, as this course builds on top of existing code, you're going to need that code. It's available on GitHub at the following URL. If you're comfortable with GitHub and want to track your changes, you can fork the course. If you're comfortable with Git and are happy with a read-only copy, you can clone the repo instead. If both of those things sound frightening to you or like too much work, you can also grab a zipped copy of the code from the site. All three of these options are available through the big green ""Code"" pull-down button on the GitHub page. The repo has multiple directories in it, one for each of the lessons that touch the code. You're currently in lesson 3, and so you'll find the base project in the lesson3 directory. The contents of each directory contain the outcome of the lesson. If you wish to code along, you want to start with the previous lesson's output. For example, when you start lesson four, use the code from the lesson three directory. The lesson four directory contains what you should end up with by the end of lesson four. As with all things Python, you should be using a virtual environment. Depending on your IDE, this might be done for you, Or if you're old school like me, you can use venv to get one going. The base project has two dependencies, Django of course, and the more-itertools module used to group things together. If you're using PyCharm, it will automatically detect the contents of requirements.txt and prompt you for setting those up. Speaking of, let's go get this running in PyCharm.
|
|
|
transcript
|
3:43 |
All right, I'm inside PyCharm at the welcome screen. I'm on a Mac, so things might be slightly different depending on what platform you're using. I'm gonna create a new project. Choose my copy of the video collector from the lesson three. And notice here that a virtualenv will get created. I'm running the Community Edition of PyCharm. The Pro version understands Django. If you're running Pro, there will have been a bar along the left-hand side when you create the project. If it's there and you select Django, you'll be able to skip some of the steps that I'm about to show you. When I created the project, PyCharm added a virtual environment for me. Now if I open the requirements.txt file, it detects that it is a requirements.txt file and prompts me to install the packages. Let's do that. And there you go. Django and more-itertools is installed. It'd be nice to be able to run the development server within PyCharm, and you can if you create a run configuration. If you're running Pro, this will have been done for you by selecting that it's a Django project. In the Community Edition, you have to do this for yourself. Start by clicking the Run Configuration dropdown. Choose Edit Configurations, and then Add New Configuration. Use the Python option. And what you're doing here is telling PyCharm that when you hit the Run button, you want to run a script. That script is the Manage.py script, so you can run the development server. You can pick that from the file chooser. Adding run server as an option to the management script means when you hit run, the development server will be run. the parent directory as the working directory. And you're good to go. Now if I hit the run button, the development server is activated. Let's go off to a browser and see that it worked. And here it is, the video collector site. already seen it in the screenshots, let me just quickly show you it live. Let's look at the racing videos. This is the category page. It has 8 videos. Back to the top, and in the corner here is the button for the feed page. And here are all the videos in the feed. You get the idea. Let's go back to PyCharm. Clicking this stops the server.
|
|
|
transcript
|
0:40 |
Obviously the package has got installed because it ran, but let's just go take a quick look. I'm going to open the terminal. And this is everything installed. Note that there's more here than what's inside requirements.txt. The requirements file has Django and more-itertools. The rest are dependencies that get installed automatically. If you're not using PyCharm and you wish to install the tools by yourself, the command would be... I'm not going to run this, because I've already got them going.
|
|
|
transcript
|
2:00 |
Let's look at some of the project details. I'll start inside the configuration area with settings.py. There are a few changes from the default. As you've grabbed the code from GitHub, these changes have been done for you already. You don't need to do anything. First off is my content app where all the business logic is that's been added to installed apps And the common templates directory that I'm using has been added to the templates configuration I also had to add static files dirs here so Django knows about the directory where I'm keeping all my static files That's pretty much all the changes for settings.py. Nothing too drastic. Let's look at the routes. As you would expect, there are four paths in addition to the default admin, one for each of the four pages in the project. Home, Category, Play, and Feed. The ""Category"" and ""Play Video"" URLs take arguments. For the category, it's the name of the category. For play, it's the Django ID of the video object. I've already guided you through the code for the app, so there isn't much to see here that you haven't seen already. The usual models and view files, and an embarrassingly empty test.py. So that's the grand tour. Make sure to get everything set up and going, test that you can visit your site before continuing on, and from here you'll be modifying the code with the HTMX goodness you came for.
|
|
|
|
19:24 |
|
|
transcript
|
1:34 |
In the previous lesson, I walked you through the Video Collector project in its Django-only incarnation. In this lesson, I'll show you how to add click-to-edit capabilities to the Category page using HTMX and the hx-get attribute. The goal for this lesson is to modify the Category page that lists videos, implementing a form that allows you to add videos to your collection. I'll be doing this in two stages. First, building the bits and pieces you need to submit a new video without HTMX. I'll be adding a form to the page and the usual form handling code to the view. The results of this code can be found in the lesson4a form directory in the repo. Once I've got the form handling in place, I'll convert it to HTMX. When you first load the page, instead of a form you'll get an ""Add Video"" link which you click to replace with the form. In order to do this, the form needs to be moved into its own template. Once all that is in place, I'll show you how to add ""cancel"" functionality so you can cause the form to go away and be replaced back with the link once more. The final result of this lesson can be found in the lesson4b.htmx directory in the repo. This is a screenshot of what I'm aiming for in the first version - a small form at the bottom of the category page using Django-only techniques. Let's open up PyCharm and get this going.
|
|
|
transcript
|
1:44 |
I'm going to start with a template first, then add the code afterwards. As the form goes on the category page, that means editing category.html. I'm not going to make you watch me type out the whole thing. I'll just paste it from a pre-prepared buffer. If you're not a Bootstrap person, the first three lines here look kinda messy. Bootstrap has a grid-based layout system, and these three lines are establishing where the grid goes on the page, and then where the form ends up in the grid. The grid is 12 columns wide. I'm making the form 4 columns wide, and putting it in the middle of the grid. The form itself has some fancy class stuff to make it a little more pretty. And if you're wondering why I'm not using a form object to render, it's because I've got extra styling here from Bootstrap. Yes, there are ways of doing that in Django, but I prefer to show you exactly what's going on in the HTML instead. The post URL for the form is being looked up using Django's URL tag, and is going to the already existing view for the category page. I'll add the post handling to that view in a moment. Inside the form, I've got four input tags, each styled with Bootstrap's form control class, 'cause base HTML is ugly. And of course, at the bottom here, a button to submit the form. That's the form. Let's go modify the view.
|
|
|
transcript
|
3:10 |
I'm going to use a ModelForm class to do the processing of the submission, so at the top here I need to add an import. As the form for the video closely maps to the model for the video, I'm going to use the ModelFormFactory function to quickly create a ModelForm object for me. OK, I've got a ModelForm now, time to actually change the view. Let me scroll down a bit. Currently, this view only handles the default get mode, but to handle form submission it needs to deal with post as well. To keep the code simple, I'm going to create a form in both get and post mode. I'm not actually going to use it in get, but that's just laziness. A better implementation would use the form inside the HTML and then write if-else blocks to get placeholder attributes to work properly. this isn't a tutorial on good HTML so I'm going to be a bit naughty and keep the example shorter. I'm using a default empty form in the Get mode And in the Post mode, I'm processing the submitted content, validating it, then using the form's Save method to turn it into a model object. I then add the category relationship to that newly created video. Again, a more robust example would include some error handling, especially down in the HTML, but there's not much that can go wrong in this case if the user is actually using the form. In the real world, you should never assume that the user is using the form, but for our purposes it's good enough. If you were going to do that kind of error processing in the HTML, you'd need the form sent down to the template. Let's put it in there, with the promise that we'll come back and be better coders later. *cough* Sorry, had to stifle a little bit of a giggle there. I'll fire up the dev server here. Switch to the browser. Let's go down to the Python area here. Scroll down. And there's our form. Let me try to add something here. There you go, the page is reloaded. And I've got a new video. Excellent. All set to switch this over to HTMX.
|
|
|
transcript
|
0:57 |
Having that big form at the bottom of the page is kind of ugly. Our goal now is to hide it away until it is needed, and that is done with htmx and the hx-get attribute. When the page loads, you'll now see a link instead of the form, and clicking that will substitute the form. If you were using Vue or something else to do this, your page would need the HTML for both the link and the form, and then a bunch of JavaScript that did the replacement when the link is clicked. In the world of HTMX, what you do instead is add special attributes to the link which tell HTMX to fetch new content from a URL when the link is clicked. That new content is the form, and it needs a view to serve that content. HTMX then replaces the link with the form that comes back from the server. Let's go back into PyCharm and try this out.
|
|
|
transcript
|
1:15 |
The first thing I need to do is get rid of the form from the Category Template page. Of course, I'm going to need it later, so rather than delete it, I'm going to squirrel it away in its own file. HTMX is designed on the idea that HTML snippets can be passed around instead of entire pages. The structure of that on the server means having views that render those snippets. I'm going to show you a couple of different ways of doing that in the course, but each time you're going to need to render some snippet. It makes sense then to keep those little chunks of HTML in their own templates. These are often called partials. I'm going to create a directory so I can keep all my partials together. Inside that, I need a new file that I want to move the form into. I'm going to call it ""add-video-form.html"". Go back to the category page and grab the form.
|
|
|
transcript
|
3:16 |
Ignoring the new attributes for a second, what you have here is an HTML link. If you haven't seen Font Awesome before, it's an icon toolkit and it uses the italics tag as a hook for inserting pretty pictures. This will show as a circled plus sign, along with the ""Add New Video"" words in the link. Now to the new stuff - the hx attributes. this link doesn't have an href. In this case, the hx-get is taking its place. All the htmx attributes begin with an hx suffix, and as you might guess, the get says to fetch the contents from a URL. As I'm a good little programmer, albeit a lazy one, instead of hardcoding the URL, it's using a django_url tag. This tag is pointing to a view I haven't written yet, which is responsible for sending the form contents you just watched me move into the new partial file. hx-get says where to go get the new content from. While hx-swap says what to do with the content. The first argument to hx-swap tells it what to do. In this case, outer HTML means to replace the outer tag. That's the link. By contrast, another supported choice is inner HTML, which would replace the contents inside of the link, leaving the link itself intact, if that's what you preferred. The hx-swap attribute also supports modifiers. The badly named swap modifier tells htmx to put a little delay in before actually swapping out the contents. Other tags actually support a modifier named ""delay"", it's unclear to me why they didn't name this one ""delay"". Anyhow, I'm not actually doing anything with this delay, but it can be useful if you want to use CSS transition effects and need to time how they work. Take a moment and bask in the glory of just how clean this is. Without HTMX, you'd have to have the link and the form, and the form would would have to be hidden from the start. You'd need to worry about when your JavaScript fired, register it properly after the page was loaded, and you'd have a bunch of JavaScript handling the transition in a place elsewhere in the file or in another file altogether. With HTMX, the context of what is about to happen is right there on the tag. There isn't anything hiding elsewhere in the HTML and the page only contains those things it needs right now. Think about a complicated single page application with loads of dialog boxes. With HTMX, none of those have to be loaded until after the user does something that requests them. This is just so tidy. At risk of sounding all fanboy, I think I'm in love. One last thing to do in the HTML, which is to actually load the HTMX toolkit. I'm going to do that in the base file, so it can be used on any of our pages.
|
|
|
transcript
|
0:36 |
Scrolling down to the bottom here. And there you go, you've got an htmx-capable site. Of course, this file needs to be added inside of the static directory. You can grab a copy of it from the GitHub repo if you like, under lesson 4b, or grab it directly from the htmx site. Your site is now HTMX capable. Our Click to Edit link needs a new view. Let's go do that now.
|
|
|
transcript
|
1:28 |
I'll just scroll down to the bottom of the page, and let me add the code. The view for the partial is pretty small. It merely needs to render the form that got tucked away in its own file. Of course, the one thing to remember is what context info that partial needs. In this case, it's the category object. The form needs that because the submission of the form uses the name of the category in the category view. Okay, that's the view. Now let me register the route. Let's try it out. Heading to the browser. I'm starting here at the home page like before. Picking Python. Scrolling down, and there's our link, including the Font Awesome icon. Let me click this. And there's our beautiful form. Let's make sure I haven't broken anything by htmx-ifying and test it out. The page gets reloaded. And there's our new content. Like I said, I think I'm in love...
|
|
|
transcript
|
0:44 |
So you've got the form coming in dynamically. Well, what about getting rid of it? Let's add a cancel button that reverts the form back to the link. Let me pause here for a moment. Take a second and think about what needs to change. You've already got the tools you need to implement this. Swapping the link back isn't terribly different from swapping the form. Cancel button will work a lot like the original click to edit link, but replacing the form with the link instead of the other way around. So to do this, you'll need a new view that can serve the link as a partial, a cancel button, and some HTMX on that button to do the swap. Let's go back into PyCharm and give this a try.
|
|
|
transcript
|
1:14 |
I'm going to want to serve the ""Click to edit"" link from Django so it makes sense to move it into its own file. This is similar to what I did with the form earlier. I'll create a new partial. Open up the category, grab the link content, and paste it into its new home. Of course, the link does need to be on the category page when the page first loads, though. Rather than doing that dynamically, I'm going to use a Django include tag. This include tag will pull the contents I just put into the partials file, into this template when the template is first rendered. If you're coding along, this is a good spot to pause the video and check that everything still works. The change I just made has only moved some code, it hasn't modified the functionality. Nothing should have been broken yet.
|
|
|
transcript
|
1:07 |
Now it's time to add the cancel button to the form. Let me open the form up. Not much new here, just a button in the form. BTN Danger is a style thing, it just makes the button red. And as I hinted before, swapping out the form means an hx-get attribute, this time to a new view that responds with the Click to Edit link instead. On the Click to Edit link, I used hx-swap. This time I'm using hx-target. The hx-target attribute takes a CSS selector, which in this case points at the form tag. hx-swap is used to change the tag it's associated with, while hx-target allows you to change anything you can identify on the page. Say I wanted a button that changed the footer, but the button wasn't in the footer, hx-target would be how you did that. That's it for the HTML. Now all I need to do is add the new view for the link.
|
|
|
transcript
|
1:02 |
This view is rather similar to the previous one, but it spits out our new click-to-edit link partial instead of the form. Like the form version, this one also needs to know the category. Finally, I'll add a route. And it's time to try this out. Starting from the home, and then going back to the Python category. Scrolling down. There's the link. There's the form. And there's the link once more. Ain't it beautiful?
|
|
|
transcript
|
1:17 |
Let's briefly review the concepts covered in this lesson. By adding the htmx.js script to your web page, you gain the ability to use HX attributes. The HX attributes allow you to dynamically change the content of a page. The first attribute you saw was hx-get. It points to a URL. When the associated tag is activated, in this case the link being clicked, htmx fetches a new HTML partial from the given URL. The hx-swap attribute specifies what to do with the newly fetched content. The outer HTML argument says to take the new content and overwrite the tag this attribute is on. By adding the swap modifier and a time, you can even add a little pause before the work is done in case you want to time it with CSS transitions. Instead of using hx-swap, you can also use hx-target. The idea is similar, but this time you're specifying what tag in the document gets replaced. hx-target takes a CSS selector, so you can specify anything else on the page as the target for replacement.
|
|
|
|
19:38 |
|
|
transcript
|
2:31 |
In the previous lesson I showed you how to use the hx-get attribute to dynamically replace the contents of a tag using HTMX. In this lesson I'll be covering how to build an interactive page with Search As You Type. This image shows the desired outcome. A page with an input for search and some results. As the user types in the search field, the results are added dynamically. There's also something a little subtle going on here. Notice that the URL has a query parameter with the desired search term as well. The goal is for the URL to get updated as you enter a new search term. There's a couple reasons to do this. First, it allows deep linking. You could copy the URL, send it to a friend, and they'll see the same results you're looking at. The second is browser history. By modifying the URL on the fly, you can now take advantage of the back button. Search for electric cars, search for IndyCars, then press back and you'll see the electric car search again. This is something that single page applications often make impossible or require the programmer to jump through hoops to achieve. To build this feature, the first step I'll take is to create a view and template for the page. I'll start by hardcoding the search results, ignoring what's in the search field, and just make sure the structure of the page works and that I've got the query right for searching on text terms. Once the base is in place, it's time to start wiring the HTMX. The search field needs to be changed to respond to the user's input, and as a search goes to the server, the results need to come back as a partial. In the previous lesson, I used multiple views to cover each step here. This time around, I'll show you an alternate approach where you can do it all in the same view. HTMX sets a header when it makes a call, so you can differentiate vanilla browser calls from an HTMX one. You can check for this header explicitly, but there is a handy third-party library called DjangoHTMX which provides a bunch of utilities. One of these is some middleware that sticks a a data object in the request which has HTMX-related info on it. I'll be using that inside the view to check if this is an HTMX call. Once I've got the page working and results showing up dynamically, then I'll go back and add the URL updating feature.
|
|
|
transcript
|
1:14 |
Before I start writing the view, a quick summary of Django QObjects in case they're not fresh in your mind. A QObject is a way of creating queries that are more complex than what you can do with the filter method all on its own. The top example here shows two QObjects ANDed together. Each QObject is created using the same kind of arguments you would put in a call to filter. by ANDing a Q with title and another with author, I'm creating the same result as putting those both in a filter. To run the Q or a composed Q, you simply pass it into the filter call. This kind of mechanism can be really helpful if you're trying to create dynamic clauses to queries that have differing numbers of terms based on some business logic. My most common use of these is actually simpler than that though. I use it when I need to OR terms together instead of ANDing them. The example at the bottom here does that. Here, videos with the title Indie or the author Romaine will be found in the results. Momentarily, I'll use QObjects to search our videos in the search view. Let's go write some code.
|
|
|
transcript
|
2:32 |
I'm going to need a new page for searching. Let's start by creating the template. Nothing too fancy here. A title, an input, and an include for something I haven't written yet. This include is for the results. I've done it this way in anticipation of the fact that I'll be wanting to load these results dynamically using htmx. Let's create the partial for the results right now. A lot of this is similar to the category or feed pages. In fact, a better developer would put these little bits into a common file and reuse them through includes. If you happen to come across a better developer, send them my way. I've got a whole to-do list they could help me with. The first chunk here displays the number of videos in the results. I've wrapped it in an if clause so that zero results doesn't display when the page first loads. The second chunk is a for loop over the video results. Each row displaying the video's thumbnail, and a title and an author, both of which being clickable, taking you to the player. If you haven't come across the Humanize library before, it ships with Django and has some tags and filters that make numbers more readable. I'm using the int comma filter, which adds thousands separators to an integer, which in North America would be commas, but the library is location aware and will use periods as is appropriate. This particular filter is being applied to the view count of the video. One last bit of HTML to change. It'd be good to have a link to our search page. So I'll open up base HTML and add a link in the nav bar. Let me just scroll down to the nav bar here. And the code I've pasted does a URL route lookup for the view I'll be writing in a second. It also uses Font Awesome to show a little magnifying glass icon. Speaking of that view, let's go write it.
|
|
|
transcript
|
2:38 |
I mentioned I was going to use Django Q objects in the search routine, so the first thing I need to do is import those suckers. Let me scroll to the bottom of the file… and now I'll start to insert the search. For now, I'm hardcoding what is being searched for as the string ""indylate"". I'll use this to test the page, and then I'll come back and htmx-ify it. The search is going to be pretty simple. It won't support quoted terms, and spaces will be ors. This hardcoded text should result in the videos with the words ""indie"" or ""late"". Because I want to or the terms together, I'm going to split them up on whitespace and use the pieces to construct a QObject query. Here's the code for that. The query here uses the first search term and checks for it in either the title or author fields of the video model. I use __icontains so that the term can show up anywhere in the field and be case insensitive. If there are more terms in the search text, which in this case there are, I then build the same kind of query, ORing it with the existing one. This keeps going for as many parts as there are in the search text. Once the loop is complete, I have a large union of QObjects ORed together, and this looks for all of the search terms in either the title or author fields. The query then gets executed by calling the filter method. The rest of the view is just the typical building of a context and rendering the page. So the search text and the resulting hardcoded videos will be rendered using search.html. Let's go add a route. And now I've got a search page. Let's go try it out. In the background I reloaded the homepage. The little spyglass thingy here has been added to the navbar. Let's click that. And here is the search page with some hardcoded results. All good. Now let's make this puppy actually dynamically interactive.
|
|
|
transcript
|
1:55 |
I'm back inside of search.html. Now let's add the hx attributes to the input tag. You've seen two of these attributes before, hxGet and hxTarget. When applied to an input field, hxGet is smart enough to call the URL using a query parameter. Whatever was typed in the input box gets added to the URL. That's how the view will get the actual search text when you type. You'll remember hx-target from the Cancel Form example in the previous lesson. It tells HTMX where to put the results from the GET. I'm telling it to put the results in the div with the ID ""search_results"". hx-trigger is a new idea. This tells HTMX when to take an action. The trigger I'm interested in is typing, which in the JavaScript world is the ""keyup event. Any of the supported JavaScript events can be used with hxtrigger. I've also got a couple of modifiers here. You don't want the search to be refreshed if someone pressed an arrow key. You only want the search to be refreshed if the input's value has changed. Hence the ""changed"" modifier. You also probably want a bit of a pause after the change. If the user is typing a long string, you don't necessarily want to refresh on every keypress. The delay modifier allows you to do that pause. Here I'm saying wait half a second after a change before triggering. Each change will reset the counter. So HXGET only gets called if there has been more than half a second between keypresses. My love letter to HTMX continues. This is the only thing you need to do here in the HTML.
|
|
|
transcript
|
2:02 |
It's almost time to go back to the view and change our hard-coded search to the actual search. Earlier I mentioned that this time around I was going to have a single view do all the things, not just the page but the partials as well. This is actually a better design than what I showed you in the previous lesson and fits with how you typically do a view with both a get and post when dealing with forms. HTMX sets a header any time it calls your URL, and you can check for this header to determine whether it is a regular page view or a request for a partial. Rather than write that extra header checking code myself, I'm going to use a third-party library called DjangoHTMX. It has other neat features as well, but I'll start out with just this one. Let's add it to requirements.txt. And since I updated the file, PyCharm prompts me to install the library. If you don't have the fancy IDE stuff going on, you can use pip install django-htmx instead. To use the library, you need to do a couple of things. First, it needs to be added to installed apps in settings.py. Let me go do that now. now. The other thing you need to do is register its middleware. This is what actually inserts the data object with htmx information onto the requests object. With these two bits in place, the request object now has a member on it called htmx. This gives you access to all of the library's goodness. Just go back into the views file and update the search view to deal with the HX get call.
|
|
|
transcript
|
3:16 |
It's time to remove the hardcoded text. Now instead I'm grabbing the search text out of the query parameters. I'm using the get method on the GET dict, so I can provide a default value of empty string. If there isn't any query parameters, then the search text is assumed to be empty. The search text is going to be URL encoded because, well, it was inside of a URL. Let's deal with that as well as any padding it might have. Now search text should contain what's needed to build the query string. I want to differentiate between a clean load of the page that is empty and a page that has video results. In order to do that, I'm starting with videos as None. If it is None, the result count won't be displayed because of the if clause. There's a chance there isn't any search text, so I need to move this chunk into a block. Now, if there is search text, the None value of videos will be replaced with search results. The last thing I need to do is deal with the fact that this page can be called either in full mode or partial mode. The Django HTMX library's middleware has added an HTMX member to the request, which, when checked in Boolean context, reports true if the call is an HTMX call, and false otherwise. Now the view can be used for the entire page or for the partials. If it is an htmx call, only the partial gets rendered. And if it isn't, the original render is called, which displays the whole page. I'm almost ready to test this baby out. URLlib hasn't been imported yet, so I need to add that at the top of the file. And here we go. Refreshed the home page, let's go back into search. And as a clean page, there's no results to load. Let me type something. And as I type, things get filled in. And there's another one. If I move the cursor around, nothing changes, so the HX Get doesn't get triggered. If I wipe this out, it clears. Hmm, I'm not sure if I'm happy with that. A lot of search-as-you-type pages require you to type a few letters, as F could mean every single result in our video archive. Let's do two last things. First, require a minimum-sized search text, and second, to update the URL as you type.
|
|
|
transcript
|
1:48 |
I'm back inside of Search HTML. Let me start by adding that length restriction I talked about. The square brackets here put a restriction on the keyup event, causing the trigger to only happen if the target (that's the input tag) has a length greater than 1. Now search will only happen if you've typed at least two letters. Next I'm going to put in code that updates the URL with the search terms. The first thing I did was add the current search text value into the input box. This is so if the page has been deep linked, the search field will show what was being searched. The second thing I did was add the new htmx attribute hx_push_url. This pushes the contents of hx_get into the URL. By setting hx_push_url to true, when the input triggers htmx, not only will the hx_get fire, but the URL will be updated as well. That's it, one line change and you've got deep linking and the use of the back button. I believe I've already said something about love. Gonna run the server. Go back to the search page. Type a single character. And nothing happens. Type a few more. and not only do I have my search results, but the URL has been updated so you can deeplink.
|
|
|
transcript
|
1:42 |
Let's briefly review the concepts covered in this lesson. Adding an HX_GET attribute to an input tag causes HTMX to append the contents of the tag as a query parameter to the URL. The HX_TRIGGER attribute specifies when the HX_GET is triggered. Using KEY_UP causes the trigger to happen on a KEY_UP event. Adding the ""Changed"" modifier limits the event to when a keypress changes the contents of the input. Adding the ""Delay"" modifier allows you to insert a pause, ensuring the event only fires after the time has expired. Like in the previous lesson's ""Cancel"" form example, you used ""hx-target"" to specify what content is replaced by the hx-get, in this case a div which contains the search results. You can further modify an event by applying a restriction. The restriction here uses the target member of the event and checks if its value is longer than 1. This way, if there is only a single character in the input tag, the HX get does not fire. Adding a HX pushUrl attribute to a tag causes the URL associated with the tag to be updated with the new value being fetched via hx-get. In this case, that means the search URL, including the query parameter, is pushed into the browser's URL bar. This is good practice for two reasons. It allows deep linking, and it means the back button will work to take the user back to previous searches as if they were on a separate page.
|
|
|
|
8:29 |
|
|
transcript
|
1:51 |
In the previous lesson I showed you how to build search as you type using HTMX. In this lesson you'll be adding infinite scrolling capabilities to the feed page. If you haven't heard the term before, I guarantee you've seen the feature. Infinite scroll is the idea that as you scroll down in a web page, more content is added at the bottom. In the olden days there was always a ""more"" button, but sites realized making you push button meant you were making a decision which increased the chance that your attention span would drift. Infinitely filling the feed means your eyeballs stay in place. Most social media sites use infinite scroll, and if you use DuckDuckGo as your search engine, it's an option you can turn on under the settings value just below the search bar. Once it's on, instead of showing you the bottom of the page, it shows you a page number and loads the next chunk. Recall, the feed page in Video Collector contains every video in your collection. If you have a lot of videos, this could take a long time to load. The goal in this lesson is to change the page over so it uses infinite scrolling. There's an old engineering joke that 2 + 2 = 5 for sufficiently large values of 2. In this case, it's the other way around. It will be infinite scroll for a sufficiently small value of infinity - the total number of videos in your collection. The HTML for the feed exists already, so there's no step of creating the HTML on its own this time. All I have to do is make the HTML modifications. The first thing I'll need to do is add the new trigger to the bottom of the feed page that fetches the results. Then I need to modify the feed view to be able to handle partials. The end result can be found in lesson6_infinite.
|
|
|
transcript
|
2:05 |
As in prior lessons, I'm going to start by editing the HTML. I need to make changes to the feed page, so let's open that up. This block here needs to become a results block that is fed dynamically, so I'm going to move it into a partial. First, let me create the new partial. This chunk doesn't have to change. It's still going to be feeding videos, just not all of them. What is needed here is something that detects when the user reaches the bottom of the page. You do that with hx-trigger, but with an event you haven't seen before. It's called revealed. Let me show it to you. I only want this block to appear if there are more videos to fetch, so the whole thing starts by being inside of this if condition. As I mentioned, I'm using hx-trigger. Instead of using keyup as the event, this time I'm using a special HTML event called revealed. This fires the hx-get when the marked tag shows up on the screen. If it's off screen, nothing happens, but when the user scrolls, revealing the tag, the hx-get fires. The hx-get calls the same view as the page, but appends a query parameter indicating the page number. I'm going to use a Django paginator to divvy up the video list, so that page number will indicate which chunk of the result list to return. And that's pretty much all I've got to do on the HTML side. Since I removed the code that renders the results from the feed page, I'll just quickly go back and insert an include for when the page loads. That's the HTML. Now time for the view.
|
|
|
transcript
|
3:18 |
As I mentioned, I'm going to use Django's paginator to chunk my videos together. I need to add that as an import. Now to look at the feed. I'm making enough changes to it that I'm just going to wipe out the old view and start fresh. First, I grab all the videos and feed them to a new Paginator object. If you haven't used Django's Paginator before, it takes an iterable (the query set result in this case) and a size. I'm chunking the resulting videos into sets, two videos large. The Paginator is built for having multiple pages of results. Here I'm doing the same thing, but a ""page"" in this case would just be the partial rendered with a subset of videos. Paginator's terminology is all around page numbers, but in our case it really is more like chunks of data instead. Once I've got the paginator object, I look for the page query parameter so I know which chunk of videos to feed. If the query parameter isn't there, I use the first page's worth. URLs are people-facing, and people do tricky things. They shouldn't be trusted. Here I'm checking the boundaries on the page number. Our code should never generate out of range, but that doesn't mean somebody won't play with the URL and mess things up. Once I've got a page number that I'm sure will work, I use the page method on the paginator. Usually when I work with a paginator, I pass the page object down into the rendered page. so the HTML is a little clearer, I've created more_videos and next_page items in the context instead. The idea is the same, a signal as to whether or not there's more content, and what value the next page number is. All that's left is to render this guy. There are two rendering cases. The second is the entire page, and the first is the partial result. I've put a sleep statement inside the code that deals with the partial so you can actually see things happening. The infinite scroll query now will take a little over two seconds. Without this delay, you'd never see it happening, especially as all this is taking place on my local machine. Let's start the server up and give this a whirl.
|
|
|
transcript
|
0:56 |
From the home page, I'll click the feed page. Here it is. And now if I scroll down a little bit, there's the spinner. And two seconds later, there's more content. I'll scroll some more. There's the spinner. And some more content again. Now that you've seen it in action, I'm going to go back into PyCharm and remove the delay. Reload the page. And let's scroll down. And you can see how quick it is. I'm just going to keep going and make sure that everything works until we run out. And there you go. I'm at infinity.
|
|
|
transcript
|
0:19 |
The new concept covered in this lesson was the revealed event with the hx-trigger attribute. This event fires when the marked tag is visible in the browser's viewport. By attaching it to a div and using hx-swap, you can replace it with new content, implementing infinite scrolling.
|
|
|
|
7:19 |
|
|
transcript
|
0:28 |
In a previous lesson, I showed you how to use the Revealed event to implement infinite scroll. In this lesson, I'll cover how you can mix and match htmx with other frameworks, using Bootstrap as an example. The goal this time is to create a Bootstrap-based modal dialog box. The button that pops it up will be a little info icon in the navbar, and the content of the dialog box will be a partial sent by the back-end.
|
|
|
transcript
|
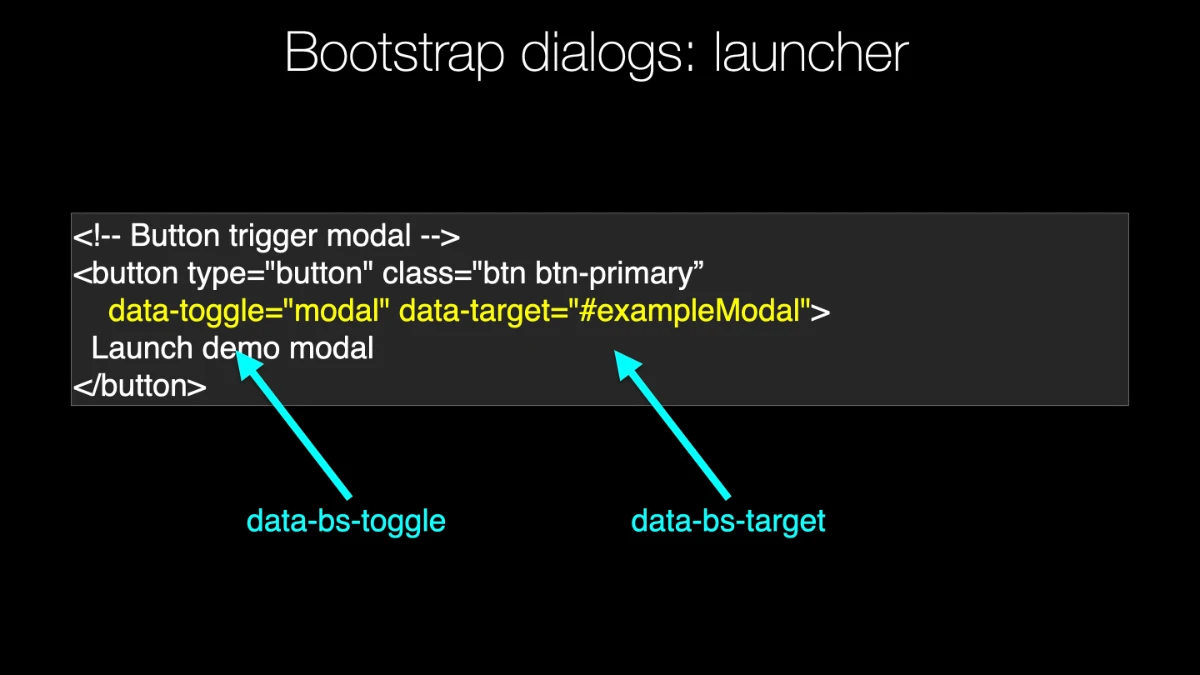
2:44 |
Bootstrap is a bit of a beast. It's a wonderful beast that makes it easier to create good looking pages, but man oh man are there a lot of divs. To implement a modal dialog box in Bootstrap, you need two things, a button that launches the dialog and the dialog divs itself. How Bootstrap knows a button is for dialog launching is through the use of the data toggle attribute. Setting it to modal associates this button with a dialog. The Data Target attribute is used to specify the ID of the actual modal to display. Note that I'm showing you Bootstrap 4 here. The attributes have been renamed in Bootstrap 5, adding a namespace. Who doesn't love a little extra BS? This is the corresponding tags to define the structure of the modal. It has the ID specified in the button, and a very nested set of divs to define the structure. I've left it out here, but the content section typically also has a header. The body part would be what shows in the dialog. In the footer of this modal, I have a button that has a data dismiss attribute. This is what makes it a close button. When you click on it, it will hide the modal. Make sure you spell it correctly. When I wrote this code, I missed one of the S's and it took a while to figure out why my dialog wouldn't close. To implement our about box, I'm first going to create a partial with the modal contents. It will look a lot like that bootstrap modal I just showed you. Then I'll open up the base.html file. The button for the modal is going in the nav bar, so I need to add a link that pops up the dialog box. This link will have the necessary bootstrap attributes, but it also will have the necessary htmx attributes to dynamically fetch the modal. The tricky part is bootstrap won't work if it can't already find the modal when the page loads. Instead of putting our modal there, I'm going to put a small placeholder. The placeholder will be what gets replaced by HTMX when the link is clicked. The neat thing about this approach is that if you have many dialog boxes, you can get away with only a single placeholder. As you're dynamically injecting the contents, you could have a single view that takes an argument as to what modal to display and always call the same view. This would mean your pages would be smaller and the code for the dialog only gets put in the page if the user actually invokes it. Lastly, I need a view that renders the partial modal, which will be very short, just two lines of code. Let's go into PyCharm and write us a dialog box.
|
|
|
transcript
|
2:33 |
I'll start by creating the partial for the popup modal. There's a lot going on here, especially considering it just displays two measly lines of info to the user. But that's Bootstrap. It's divs all the way down. There isn't anything htmx specific here. I'm simply keeping the modal dialog in its own template file for future rendering as a partial. Now I'm going to add the triggering code to Base.html. I'm going to scroll down to the navbar. This is the new item on the navbar. It consists of a little info icon and when clicked fetches the about box dynamically. It uses both HTMX and Bootstrap attributes. The hx-trigger attribute uses the click event, which I haven't shown you before, but as you might guess, this fires when the link is clicked. When it fires, hx-get fetches the new content, and uses hx-target to replace that div. This is the placeholder. The action doesn't stop there, though. HTMX passes the event down to Bootstrap, so Bootstrap sees that it's a modal, and because it was clicked, launches the dialog box. Let me scroll down just a bit here, and I'll insert the placeholder. This is a simplified version of a modal box. It's as small as I can get it so that Bootstrap doesn't barf when the page loads. When htmx gets the click event, this chunk gets replaced by the dynamic content. For a single dialog box, this is probably overkill, especially as the content being rendered is static. But if you want the dialog to have dynamic content, or if you've got a lot of dialog boxes, this would simplify the amount of HTML you needed. There's a bit of doubling up as you can't completely get rid of the modal, the placeholder has to be there, but with the right code you could get away with one of these rather than one for each dialog box. Let's add the view to make this work.
|
|
|
transcript
|
1:05 |
And at the bottom of views.py, I've added the about view. It's as simple as a view can get. You'd probably even be better off to use Django's built-in render shortcuts, but I'm going to stick with the tried and true just to keep it clear. Let me go register this. And there's the corresponding route. I'll run the server. And reload my homepage. Here's the info icon, and when I click it, one dynamic about box. As I said, you'd never go through all that just to get this simple ""about"" going, but it gives you the idea how you can mix bootstraps, actions, and events with htmx, actions, and events and get them to work together.
|
|
|
transcript
|
0:29 |
Because HTMX passes events on to any of the tags it's attached to, you can mix and match it with other frameworks like Bootstrap. In this lesson you saw yet another event that hx-trigger handles, this time called ""click"". It causes the hx-get to fire when a tag is clicked. After HTMX handles the click, it passes it to Bootstrap, Bootstrap and its own attributes then fire as needed, resulting in the modal being displayed.
|
|
|
|
6:55 |
|
|
transcript
|
0:37 |
In the previous lesson, I showed you how to mix Bootstrap Modals and HTMX. This lesson wraps the course up, reviewing what you've learned so far, and pointing you at places where you could explore further. Throughout this course, you've been adding new features to the Video Collector site using HTMX. You created a click-to-edit link, which dynamically replaced itself with a form, implemented search-as-you-type, complete with pushing the URL into the URL bar as it changed, built infinite scroll, and mixed bootstrap attributes with htmx ones to get the best of both worlds.
|
|
|
transcript
|
0:31 |
To use htmx, you need to include its JavaScript file as part of your site. You can also optionally install Django htmx to take advantage of some common utilities in that library. This course only showed you the request.htmx feature from the middleware, but the library also provides more information about the object that triggered the event as well as some handy response classes that can be helpful when using more advanced HTMX features.
|
|
|
transcript
|
0:46 |
The core idea behind HTMX is to use parts of HTML pages the same way a browser uses full pages. These partial pages can be served by Django like any other view, and then HTMX inserts or replaces that content into the active page. You can even use the same view to build a page and the partials associated with it. HTMX sets a request header whenever it is the source of a fetch. You can look for this header to tell whether a page or a partial should be rendered. The django-htmx library provides middleware that inserts an HtmxDetails object on the request which you can use as a truthy object to determine if the call was from htmx or not.
|
|
|
transcript
|
3:33 |
You use HTMX by adding attributes to your HTML tags. The first attribute you learned about was hx-get. This specifies the URL to fetch new content from. The received response is used to modify the existing page. Which part of the page changes and how is determined by other HTMX attributes. When you use hx-get on an input tag, the associated URL is called with a query parameter containing the value of the input box. You used this feature to implement the search-as-you-type mechanism. hxswap is one of the attributes used to specify how to replace content. A value of innerHTML causes the contents inside the tag to be swapped, while outerHTML swaps out the entire tag. You can also add the Swap modifier to this attribute to specify a delay in action. This can be handy if you're timing the appearance of the change with other CSS transitions or animations. Instead of swapping content on the current tag, you can target content anywhere in the document using hx-target. The value of hx-target is typically a CSS selector specifying the tag to be replaced by the fetched response. The hx-trigger attribute specifies when hx-get gets invoked. A value of KeyUp invokes the fetch when a key is pressed and released. You can modify KeyUp when the trigger is on an input tag with the Changed modifier. This limits the invocation to cases where the key press also changes the value of the input. You can also add a delay modifier to specify how long after a press htmx should wait before invoking the fetch. This is useful to limit the number of times the server is called. If the user is typing something quickly, you can wait until after they're finished. You can further limit a trigger by adding conditions in square brackets. The conditions are based on the event being triggered. The example here restricts triggers only to those keyup events where the value of the input is longer than one character. You used this restriction to prevent searching on a single letter in the search-as-you-type feature. In addition to supporting JavaScript events, htmx provides some of its own. The revealed event happens when the associated tag is made visible in the browser's viewport. This can be used to cause an action when a user scrolls something into the frame. You used this to implement infinite scroll in the Video Collector project. Adding hx_push_url=true as an attribute causes htmx to update the browser's URL when a fetch is invoked. This enables deep linking on your site, and allows the user to hit the back button to go back to a previous fetch. HTMX does its best to interact with other frameworks in a friendly fashion. Events that HTMX processes are passed through to the tag so other frameworks can see them. In this course, you combined Bootstrap's ability to display pop-up modal dialogues with HTMX to dynamically specify their content.
|
|
|
transcript
|
1:28 |
You can dig further into HTMX by visiting its website, htmx.org. There is plenty more in the library. In this course, I stuck to hxGet, but all the HTTP mechanisms exist. You can get, post, put, patch, and delete. The HX targets you used in the course solely relied on a CSS selector. HTMX supports more advanced selectors as well. Closest"" looks for the closest match for a selector. Next"" and ""Previous"" look for the selector before and after the tag respectively. And ""Find"" looks for child descendants. If you have a lot of HTML with classes rather than specific IDs, these extensions to the selector mechanism can help you specify your target. HTMX also supports polling for content, integration with CSS transitions, and has features that allow you to coordinate between two tags. For example, if you need to ensure an input and a form that both use HTMX don't fire at the same time, you can synchronize them. HTMX is a well-designed library that brings some of the original design intent of the web back into play, even in dynamic pages. I hope you've found value in the course. It's been fun talking to you about it. My name is Christopher Trudeau. Feel free to reach out on X or LinkedIn.
|