|
|
|
3:30 |
|
|
transcript
|
0:26 |
Hi, my name is Gordon Shotwell and in this course we're going to be learning all about a relatively new Python web application framework called Shiny. And Shiny is great because it uses reactive programming to let you build beautiful, fast web applications without needing to spend a lot of time managing cache or callbacks or application state. So let's just dive right in and get started installing Shiny and building a very, very simple first product.
|
|
|
transcript
|
3:04 |
We learned to write some basic Shiny applications, and I wanted to take this opportunity to walk through the course website and show you how to do the exercises that are a really important part of cementing this kind of understanding that you've learned in the lectures. So here's the Shiny for Python workshop, and you see they have these exercises which more or less map the divisions in the Talk Python course. And when you open up one of these exercise pages, it'll load a little bit, spend a little bit of time loading the exercise pane. But what it'll give you is a bunch of different exercises that either reinforce some core concept of the course, or test, give you an example of a failure state that you might find yourself in when you're building your Shiny apps in your day-to-day life. So each of these is organized the same way. There's four tabs. There's goal, problem, and solution. And the goal will show you the working Shiny application. So this first one is really simple. It's just ""hello world,"" but down here, you know, we have a data frame. Further down, we have some selectors and things like that. So this is showing you the goal, what you're trying to do with this application. And then on the problem tab, you have a little editor that you can use. So I can go ahead and type something in here, and it will allow me to click this play button to run the application. And you can see, like, do we want to have, you know, we can compare the application that we wrote to the goal to just say, okay, what am I trying to do here?"" And if we get stuck or just want to confirm that you got the same answer that I got when I was writing the course, you can click the solution tab and see what the real solution is. If your implementation doesn't look identical to mine, that's fine. More or less, what you're trying to do is get an application that looks and feels and works the same way that the goal application does. If you'd like to do these locally in VS Code or another editor, you can go to the GitHub source. And this will also have ReadMe, which gives you the prompt for the problem, an app.py file, which shows you the problem, and then this app solution.py file, which shows you the solution. So again, you can look at the app. If you get stuck, you can go to the solution. Each of these exercises is pretty short, shouldn't take very long, and it's really important to do every single one of them. We've taught this course a number of times, and the consistent feedback that we've gotten from people is that the thing that they learned the most from was going and doing the exercises. And that's true for my personal experience kind of learning this or any other type of programming. You kind of listen to somebody talk about a framework, and you kind of get it. But then when you actually try to implement something, you realize that, oh, I need to look at the documentation again, or I didn't, I was tuning out for that piece of content. So these exercises are really minimal. So there isn't a lot of duplication or fluff. And so I'd encourage you to do all of them. And this first one has a lot of cases, a lot of simple ones. And then as they get further along, there's fewer of them to just test the kind of main single concept of that section. So give them a try and I hope you like them.
|
|
|
|
18:56 |
|
|
transcript
|
3:01 |
Okay, so Shiny lets you use any web editor that you like, but we'd recommend using something like VS Code for the purposes of this course, mostly because we have a pretty good VS Code extension for Shiny, which gives you some auto-completion and a nice viewer. So let's go ahead and install that right now. So you go to the extension tab on VS Code or if you're using cursor, which is a fork of VS Code, and just search for Shiny for Python, and we're going to go ahead and install this one. Once that's installed, you'll be able to run a Shiny app. The next thing we need to do is actually install Shiny, and Shiny is on PyPy, and I can recommend using pip for this. But before I actually go ahead and install it, I'm going to create a virtual environment. I think most people these days tend to use virtual environments, but if you don't use one, it's really important, especially when developing web applications, because it makes it easier to deploy your application to a hosting service and have everything be installed properly. Again, you can use whatever environment manager you like. I'm going to use the VM one that's built into Python. Then I need to select my interpreter. Now when I do that, I see this little.vn thing at the beginning of VS Code, and that tells me that when I'm installing, I'm installing into that virtual environment. The next thing we do is just type ""Pip install Shiny"", and hopefully this will give me a nice little Shiny app. We have Shiny installed, and now we want to try to figure out what to do with Shiny. One of the best things you can do to get some ideas or see what Shiny can do is to go to the website. In particular, I want to start with this little components tab, and this has a few different things that are worth just being aware of. One is it has the components. These are the buttons and links and inputs that are available in Shiny. Each of these has, you can click through to see some examples. It lets you interact with the widgets to see what they do. There is also a templates gallery, and this templates gallery includes full-featured Shiny applications. There's some basic ones, some nice dashboards. If you click through to one of these dashboards, it gives you this little shell command that will just basically clone this code locally. Down here, you can see a running version of the application to give you an idea of what that actually is going to do. Shiny has two syntaxes. One is Express, which is what we're going to be using in this course, and the other one is Core. For the most part, whenever you see a little tab set like this, just make sure that it's clicked on Express, and that'll give you the example and everything that's appropriate for this class.
|
|
|
transcript
|
2:17 |
So here I'm just gonna copy this command and go back to my editor and type shine, and just copy it in. And it'll ask me for a destination directory and I'll just hit enter to have it go here. And what we have here is we have a nice, we have a little, we have this dashboard brought into our environment, has some data, has a requirements file. To sort of view this application, we're gonna need to install that requirements file. So I'll do pip install -r dashboard requirements.txt. That'll install everything, which is mostly Seaborn and its dependencies. And up here, since we've installed the Shiny extension for VS Code, I can click run Shiny app, and it'll run the application in the viewer pane. If I wanna sort of get a bigger picture from this, I can click that little pop-out button and I can see the full application. So what you can see here is a kind of pretty standard, nice looking dashboard. It's got a little collapsible sidebar. The boxes are responsive. So if I change the size of the window, kind of gives you sensible spacing between your cards. And you can also manipulate some of these inputs to get changes in outputs. So here, if I wanna just select some species of penguins or filter on mass, Shiny is going to let me do that. And the important thing here about Shiny is that whenever you're making a change to one of these inputs, the only things that are changing downstream are the things that either directly or indirectly depend upon that input. This is a really nice thing if you're used to working with another, with a application framework where, you know, maybe everything reruns or everything is kind of independently powered by callbacks, because you can get this sort of like relatively efficient execution of your application without needing to do a ton of work. That's kind of like a basic look at what Shiny has to offer. Through the various different templates that give you a bunch of different options, a bunch of different ideas. And it's nice to look through these on the website or just copy them down as a starting place for some of your tools. So you know that Shiny can do all of these things, even if you don't yet know exactly how.
|
|
|
transcript
|
3:36 |
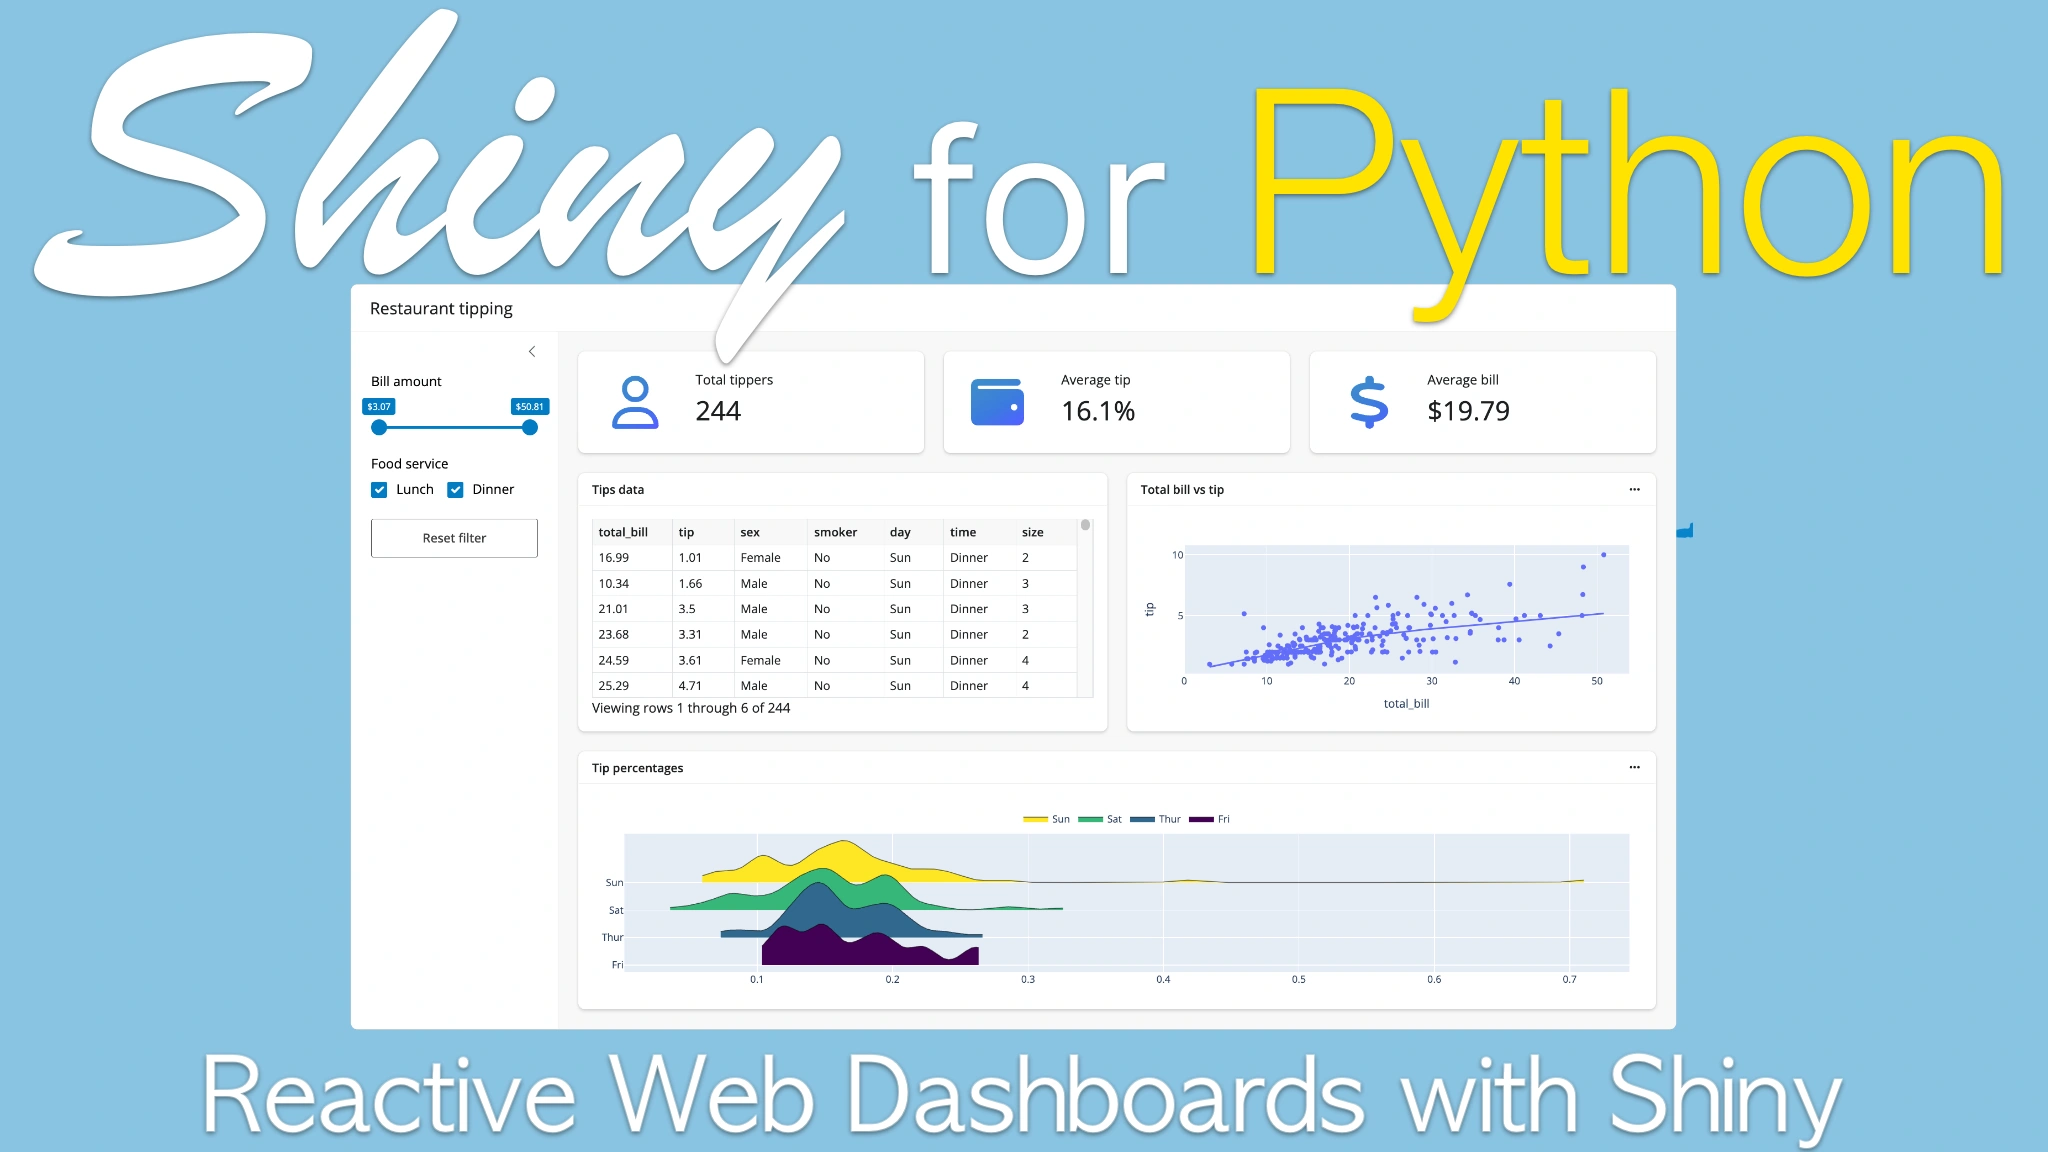
But this is a course where we're going to start from scratch. And so I'm just going to start off by going ahead and deleting everything and starting from a blank slate. And again, what we're using here is Shiny Express. And for Shiny Express to work, you need to import something from the shiny.express module. And this is going to start almost all the scripts that you're going to use in this course is import, or I'm sorry, from shiny.express. And you just need to import some object. So in this case, we're going to be importing UI to just get started. Oops. Import UI. And then now that we have this one line, import shiny express, we can run this application and it'll run it. You can see we have a little web server running in our terminal down here. But we don't have anything in this application yet. So to just generate some things in this application, we're going to start pulling things off of this UI submodule. The UI submodule includes all of the UI elements. So there are some HTML tags, inputs, various different things like that, layout objects, cards, sidebars, things like that. In this case, we're going to be using a UI H1, which is just a heading one. And we're going to call this my dashboard. When I save it, since I used the VS Code extension, it will automatically re-execute the application as soon as I make a change. So we have UI H1 dashboard, and we'll do maybe UIP. So this is all good, but effectively what we're doing here is writing a static document. There's no interactivity here. It's just a kind of odd way of writing HTML. And what we want to do is we want to start using some interactivity. And to do that, we need to import another thing, which is called render. So render is what lets Shiny kind of react to a particular action. So whenever anything is inside a render decorator, that means that it's going to be reactive in some form. And how that reactivity is going to manifest is going to differ based on each case. Let's start by pulling in the data. So whenever you're working with static files on your site, I recommend using pathlib and this path object. And what that's going to do is basically let you define the location of this file relative to the location of this app file. And that means that if you're running it, you don't need to worry about your terminal being in the right directory to run the application. And we're also going to import pandas to do the actual reading. So we have df, and we're going to actually start by just breaking this up into two little bits. Call this file path. And so the path to the file gives you the path to this app.py file. And my copilot is very helpfully giving me the thing that I actually want. And then I'm just going to use this penguins.csv file. Call this file path. And then df, we can just do pd readcsd file path. And just to see that that worked, I'm going to try saving it. And you see we have this pandas data frame read in and printed out in the console.
|
|
|
transcript
|
3:52 |
Okay, so that's great, we have the data in there, but it's not over here in our dashboard. And to get it into the dashboard or the application, we need to use these render decorators. There are lots of render decorators, so if we start with pulling this in, you can see we have data tables, plots, tables, text, UI, image, various different things. And the important thing is that these need to match the output of the function that we're calling. So we're going to define a function called data, and then we're just going to return the data frame. So because this render decorator is, we're returning a data frame, and this render decorator is expecting a data frame, then we get this nice looking table output in our application. But if I was returning some text, I'm going to get something like this, an error that says, ""Hey, I don't know how to render things of class string,"" so you need to either use a pandas data frame or something that has a to pandas method. So you'll get this nice, fairly informative error, but this is something that when you're getting started and trying to match these things up, it might cause you some trouble. But let's return that data frame. And so now we have this rendering a data frame. And again, it's a little bit interactive, but maybe this is kind of a little stock, I can sort and filter this dashboard. But if I want to include another interaction, I need to use another object from Shiny Express, which is input. And inputs are things which let the user interact and generate some value. So again, if we go to UI, we have this, in the UI object, we have various different inputs that we have. And so there's radio button, select, select eyes, slider. And I'm going to use a slider here. And we're going to use the slider to give the body mass of this, and then filter the data frame based on the body mass, which is over here, body mass G. The inputs all have a couple of arguments which are important to be aware of. The first is an ID, and that's the ID that's going to let us refer to these inputs in our render function and use them. The label is what's going to be shown to the user, usually, for most of them. And then there's, for each one, there's different specific values. So for example, in a slider, there's a min and a max value. But for a text input, there wouldn't be a min and a max value because it's not a numeric. So we'll start this with, say, 2,000. The max value, say, is 8,000. And the set value is going to be 6,000. And let's see where that goes. Now we have a slider. And the slider is, you know, we can move the slider. But it's not doing anything for us. Like, this is not connected to any particular thing. So in the render function, we can get the value of that slider by calling input_mass. And I'll say print_input_mass. Now if I look here, when it's initialized, the value of that function is--or the value of that object is going to be 6,000. And if every time I move it, this render function is going to fire and print out the current value. And one important little thing about this is that all of the inputs in Shiny are callable objects. So you need to have brackets at the end of them. If I try doing this and I just have input_mass, that's going to refer to kind of like the reactive object it's called. But it won't give me the value. Like, the value is returned by calling that object. So if you ever sort of have your application not behave the way you think it should be behaving, and you see this Shiny reactive value thing that maybe you don't totally understand, Just check that you've included all the braces there.
|
|
|
transcript
|
1:17 |
So now that we have this, you know, we can print it out. We can use that function or that value just like we would use any value. So we have a number here. So I can say df, I think this is body mass g. I'll use the autocomplete. So df body mass g is less than input mass. And I'm going to return that, the subset of the data frame there. And if I take a look here, we can see that if I kind of go really small, I get only one penguin. And as they get a little bigger, you know, the data frame is changing. If I scroll down here and go over to the mass, you can see that these are all kind of the lighter penguins. They're all less than 4,400 grams give us the right value. And that's kind of the basic pattern that we're going to be using for most of our Shiny applications. So we will usually have some inputs that are going to be consumed by outputs. And those outputs are generated by these render, these functions that are decorated by one of these render decorators. And using that, you can have many inputs, many outputs, you know, one output, which is consuming many inputs, outputs, which are sharing inputs, all those different types of things.
|
|
|
transcript
|
2:37 |
So let's just do one more here and I want to draw a little, I want to include a little Plotly plot. To use Plotly we actually have to install another package here and that's the Shiny Widgets package. So I'm going to do pip install shiny widgets and also Plotly. And the reason we're using Plotly here is just because it's a, you know, quite a popular plotting library and it gives you a nice interactive plot experience which is handy without really doing much and Plotly Express I think is a wonderful way of expressing simple plots. So from, so we're going to first we're going to import another renderer. So first we're going to import from shiny widgets, import, render Plotly. And then we're going to import Plotly Express as PX. So down here we can once again render Plotly. And since we're going to be using the same filter we're just going to go ahead for now and copy this filter. So say call this DF subset. And we can return a PX scatter plot. And I think I'm going to accept that but I will say call this build width. Oh, build depth is what I want. And if I run this application again, see we have this little thing and maybe I want to have this colored by species. Just like that we have a little nice looking Plotly plot which also reacts to our inputs. But this is a little funny because the plot is probably mostly what people want to view and the table maybe is useful but kind of takes up a lot of space. So if we want to move these around, Shiny Express makes that really simple because all we need to do is just copy them, like copy paste, and put the plot above the data frame. And this will, in a simple Shiny Express application, just put things in order in a fairly well spaced linear website. Just like that in 26 or so lines of code we have a little interactive dashboard that we can use to display the values of some data. So this is kind of the first step for getting started with Shiny. We're going to go further in terms of understanding how it works and how to make your applications more complex.
|
|
|
transcript
|
0:55 |
But before I get started with that, I just wanted to show you a couple of different things that we're going to be working through. So first of all, for all of the inputs and outputs, just like I was mentioning before, you have the Shiny Components Gallery and the reference, the documentation here. Shiny Express would be the documentation you're looking for. So if you're wondering about syntax or how things actually work, this is a really good spot to look. So for example, in the slider that we were just working with here, you can click through to the slider and get a runnable value of this with the code that you would use. So here we have some code. There's also sort of more details about how this thing actually works. So this kind of gives you a nice sort of simple visual place to get oriented of just like, oh, I'm trying to replicate that particular type of behavior I'm looking for. What component do I look for? This is the place to go.
|
|
|
transcript
|
1:21 |
The second thing is on the course website. This is a an exercise based course So we have a bunch of extra exercises which you're going to ask you to do and also ask you to do every one of them they're very straightforward and each of them is going to either teach you like a single concept about shiny or Test you in some sort of failure state to get to get make sure that we sort of run you through all the common bugs That new learners kind of experience when they're using shiny and what's special about these exercises Is that they're all run in your browser. You can use run them in your browser with WebAssembly so you don't actually need to install anything to get started and They have sort of goal which gives you the target application that you're trying to do the problem and then the solution So if you want to edit these in the website You can just go ahead and type in this little web editor and click rerun app to run it or if you prefer to do It locally each of them have a little have a link to their applications that run them so you can open these up in VS Code and work on the app dot pi file and if you get Stuck or just want to know the answer and go to the app solutions dot pi file And we'll do these these sets of exercises between each of the videos So you see we have basically there's five right now. It's going to be one more on here You can sort of go through there's about seven. So thank you very much and I'll get to see you on the next one
|
|
|
|
7:15 |
|
|
transcript
|
7:15 |
Okay, so we made a lot of progress with our basic Shiny app, and we've got a slider which filters the data frame, and that updates a plot and a data frame output. So you can see the plotted data and the raw data. But when you look at this application, it's got some layout problems. So first of all, this input here affects both outputs, but it's kind of a little bit hard to see it, especially when you're scrolling down here to the bottom of the data frame. Secondly, it would be nice if there were some sort of visual differentiation between the two components. And lastly, we might want to explore just putting them side by side so that you could see the plot and the data frame at the same time. So whenever you have layout problems like this, like you have all the components you want, but you just need to organize them in a different way, the first your first step should be to go to the Shiny layout gallery, which gives you a nice visual representation of some of the layouts that we have for our applications. So there's nav bars down here, we have tabs and cards. And the one I'm going to look at first of all is sidebar. This is probably the most common thing that you're going to do with an application is just stick some inputs in the sidebar. You see here, sidebar is a nice little collapsible container, which you can add inputs and outputs to. And when we look at the code example here, it's pretty simple, you use a context manager. And we can just go ahead and copy this and bring it over to our application. So with Shiny Express, to add a sidebar, you add a context manager with UI sidebar, and you can add a background color if you like. And that will create a little sidebar in your application. If you've never used a context manager before, they're just a kind of different way of calling a function. Instead of calling UI.sidebar with all of its arguments inside the braces, you can call it with UI sidebar and then have this colon and then add the arguments to that function underneath without commas. So it's a little bit more convenient, especially in the Shiny Express style of writing applications. So let's put our input over there and see what that looks like. It's a little better because we're able to see the input as we scroll. So it sort of stays at the top when we scroll down in the main panel. But it still works just like it did before. And you can collapse or not collapse that sidebar. Okay, so that's great. So the next thing we want to do is add some visual differentiation between the cards. And again, we're going to go to the layout gallery and see if there's anything here that can help us. So down at the bottom, I see there's some content and cards that maybe looks like what we're looking for. And this actually has both of the things we're looking for. We have content in a little differentiated card, and also they're laid out side by side. So let's see how that happened. So see, we have two context managers here. So there's UI card and then layout columns. And so I'll start here with the UI card. Again, we can add any type of content we like here. So add with UI card around that one and around this one. And that'll give us this nice little rounded box, which oddly makes your application a lot easier to read and more attractive. Cards also let you add a title pretty easily. So we can add some text here at the top in the first argument to give us a little bit of information about what's going on in that card. And they're also great for grouping together inputs and outputs. So for example, like let's say we wanted to add input that changed just this plot, but not the data frame. It might not make sense to put that in the sidebar because then it's not really clear what that is modifying. But when we add it directly under the plot or somewhere in the card, it makes it a lot more clear. So here I'll add a show species checkbox. And this will add that show species down here. This doesn't do anything yet. But we can then handle it just like we did before here. So for example, if input show species, and then if not, we can add else return the scatterplot without the species. And now when we have this thing, you see there's like a checkbox and it's clear that that's going to apply just to this plot because it's in the, it's a little easier if we see it on a big screen. It's clear that this only applies to the plot and not to the main body mass slider. The last thing we probably want to do is try showing these side by side. So this plot maybe doesn't actually need this much horizontal space. And it would be nice to be able to see the plot and the data next to each other. And there's a very convenient function for this called layout columns. And what layout columns does is it just takes the, so the children, the things that go in that container and puts them side by side with equal space. You can modify how that spacing works, but as a default, most of the time you kind of just want to have it be, you kind of want to mostly just have it be side by side. Let's see what went wrong here. And now you see that since we have this layout columns, we're able to put these two side by side. One nice thing about layout columns is that it's dynamic to the screen size. So if it shrinks, you see the two cards shrink with it. And also if it gets very small, for example, if you're viewing it on a phone, the whole thing collapses to show things above them. And this is again, things you can configure, but the defaults are mostly what you want. So as it gets to a larger screen, it does this, but if it's a smaller screen, it's going to stack them up. All right, so that application is looking a lot more presentable. Before we move on, there's one little technical thing that's worth just noting here. So one of the things that is important for Shiny applications is that you take all of your code that is expensive, like data reading, and you put it in a sub-module. And the reason for that is that whenever any user is opening up your application, this whole script is going to run. And one way you can prevent that data from being re-read on every single connection is to put it in another file. So here I took the data import code that we had before, and I have it in this other file where I'm defining this df variable, but otherwise it's just the same reading in the CSV. And when you do that, what'll happen is that Python will cache that value whenever it's run. So then in the same session, every time a user connects, they're going to retrieve the cached value rather than doing the CSV read again and again. So we're going to be using that for most of the other exercises in here, but I just wanted to mention that that's why that's happening there. All right, so we have the basics of how to actually construct a Shiny application, and next we're going to move into some more details about how this actually works and why Shiny is designed the way it is.
|
|
|
|
24:12 |
|
|
transcript
|
6:26 |
So now that we've learned a little bit about how to build a basic Shiny app, let's take a step back and learn how this actually works. So when I open up a Shiny application like this one, the first thing you'll notice is that it's reactive. So when I change this top-level account filter, both of these plots change. But when I change this metric one, this is the only plot that recalculates. Because this plot over here, the training scores, doesn't depend on the metric selector, it doesn't need to recalculate, and so Shiny doesn't recalculate it. But when you look at the actual code, this is a little confusing. So here's the code that I used to draw those two plots. And the thing that pops out is that there's no state management in this code. I'm not writing a callback function, I'm not using any state variables. All I'm doing is referring to the value of this input, the value of this input, and Shiny is figuring out how to update these plots in response to those inputs. One way of putting this is we told Shiny what to do, we told it how to draw these plots, but we didn't tell Shiny when to do it. So how does Shiny know? Shiny uses a system called runtime tracing. And this is a very simple algorithm when it's explained to you, but it's incredibly powerful and scales very well to large applications. The basic idea is that all these components have code that asks for values from other parts of the application, that's for inputs for the most part. So we can watch when those components ask for those inputs, and then keep track of those relationships. And if we do that, we can use those relationships to build a directed acyclic graph, which will let us figure out what things in our application need to re-render. So that's the basic idea. We want to have Shiny automatically build up an execution graph for our application and use that to minimally re-render it. So let's just take a look at the simplest possible application. This app just echoes back the value of a slider. And so we have an output here and we have an input. And what happens is, first thing it does is when you open up the application, it says, Okay, I need to go render that output. And we have a rendering function here, which tells it how to render that output. So Shiny goes through and tries to render that function. When it does that, it discovers that it needs the value of input n. And then it goes and gets that value of input n from the DOM, the website. When it does that, it can create a little graph here, which is this output asked for that input. And for the purpose of this course, we're going to look at a lot of graphs like this, and we're always going to use ovals for outputs and squares for inputs. So let's take a look at this graph. We have two inputs, this account input and this metric selector input. And we have two outputs, the metrics plot and the scores plot. When Shiny starts up, the only thing it knows is that there's four things. It doesn't know the relationships between any of these things. It just knows that there's a metric plot, there's a distribution plot. This is the metrics plot, which can be one of two plots. And this is the distribution plot. But it's okay that Shiny doesn't know the relationship between these things, because it's going to be able to discover it as the application runs. The first thing it does is it goes and it tries to calculate the metric plot. And in doing so, it realizes, okay, when I calculate the metrics plot, I need the metric selector and the account selector. So I'm going to go get those values, and I'm going to draw a dependency between those inputs and that output. Then it'll go and calculate the distribution plot. And again, when it calculates the distribution plot, it realizes I need the account selector. So it goes and gets that value. But notice, since it didn't reach out for the metric selector when it was calculating the distribution plot, it didn't draw a line there. We know that this selector is irrelevant to the value of this output, because it wasn't in the code that we used to define that plot. And right there, we have a complete graph without you, the user, needing to do anything. This is an accurate and minimal representation of how things need to change when the application updates. So let's take a look at what happens when that updates. When the user changes the account selector, changes this thing over here, Shiny does something called ""invalidate. And what invalidation means is it follows these arrows down, and it tells anything immediately downstream of this selector that it's invalid. It needs to be recalculated. The second thing that invalidation does is it causes those elements to forget all of their old dependencies. Again, this is happening at runtime. So even though those were the dependencies last time this application runs, they might not be the dependencies this time. Something might have changed. So it'll start from scratch and do the same thing. Draw the metric plot, get its dependencies, draw the distribution plot, get its dependencies. And we're back to the complete graph. When the metric input changes, though, something different happens. Or the same thing happens, but the effect on the application is different. So we take this metric plot, follow its dependencies down to invalidate, and it'll only invalidate this metric plot. So this needs to recalculate, and it forgets all of its dependencies. But importantly, since distribution plot wasn't dependent on the metric selector, it's not invalidated. So it doesn't need to be recalculated, and its dependencies don't need to change. So Shiny just goes and draws the metric plot. So it draws the thing that was invalid, goes and gets its inputs, and we're back. So this is what happens when I make a change here. The only one that depends on this is this graph here. So that's the only one that gets invalidated, and none of this code runs again. What's great about this system is that it scales really well. So when we have a simple graph like this, a simple application, you know, you can, it'll do that rendering without you needing to take any action. But that's also true for very, very complicated ones. So you can imagine this is a, you know, an application with dozens or hundreds of nodes, and we're still going to have this quality of when things change, the application minimally re-renders in response to that change. And all of this is accomplished without you, the developer of the application, needing to do very much work. You don't need to define callback functions. You don't need to manually define this execution graph. All you need to do is refer to inputs within rendering functions, and you'll get this graph for free. craft for free.
|
|
|
transcript
|
4:19 |
In the previous exercise, we went through this application and looked at how the application minimally re-renders in response to a given change. And we ended up with this execution graph for that application. One thing that you might think is, Why did we go through all this work of discovering these dependencies each time when they don't change? So for this application, all the dependencies are going to be the same, regardless of what the user does for that element. But these graphs actually are a lot more powerful, and they can support what's called dynamic execution. Let's take a look at an application like that. This is a very simple application. It just echoes the value of a slider. But we have this second input here, which is a radio button input, which tells Shiny which slider to listen to. So here, when it's selected slider 1, slider 1 changes the value of the text, and slider 2 doesn't. But if I change the button to slider 2, now slider 1 doesn't do anything, and slider 2 is what powers the value of that text. When you look at the code that's generating the output, it's a very simple conditional. It's just the same thing that you would write if you were writing Python code outside of a web application. We have this input choice conditional, and then if that's slider 1, I'm going to return the text value that refers to slider 1. And if it's not, I'm going to return the value that refers to slider 2. Again, no callbacks here, no state management, just a very simple conditional. But Shiny's kind of doing the right thing, and figuring out that it doesn't need to invalidate this, it doesn't need to redraw this text if the irrelevant slider is fired. Again, when Shiny starts up, it just knows that there's three things. So we have the buttons, the button value, and then the two sliders. Three inputs and one output, the text output. When the application opens, just like before, we try to draw the output. So we draw the text output, and the first thing it needs is the button value. So it goes and gets the button value, and when it first starts out, the button value is slider 1. And with that conditional, we go and use the value of slider 1. And we end up with this graph. There's a dependency on buttons, a dependency on slider 1, but importantly, not a dependency on slider 2. Because in the early return, this output never asked for the value of input slider 2, so there's no dependency there. What that means is that when slider 2 changes, nothing happens. So slider 2 changed, but we didn't need to re-invalidate the text output, because there wasn't a dependency between slider 2 and the text output. It's worth taking a minute to reflect on why this is correct. So whenever you have an early return on a function, what you're effectively saying is that anything that happens outside of that, or after that early return, doesn't matter. So since we didn't use the value of slider 2 last time we calculated the text input, it could be any value, and it wouldn't change the outcome of that function. It could be 1, 2, banana. It really doesn't matter, right? Because we were able to calculate the value of text output without ever reaching for that value in the first place. And if that's the case, that means that if a user changes that value to anything, it shouldn't affect the output of text output. If slider 1 changes, we do the same thing that we did before. Invalidate text output, go get the buttons, still says slider 1, so we go and get slider 1, and we're back. But if the button changes, the same invalidation happens, but we end up with a different graph. So when we calculate the graph this time, button says ""go get slider 2, and so we go get slider 2, and now slider 1 is the orphan input that doesn't affect any of the outputs. And just like that, we have this different graph. Again, for a very simple graph like this, the one that's easy to see in a microcosm, this doesn't matter that much. It could fire again if the irrelevant slider changed. But you could imagine this being a bigger application, or something with more complicated or time-consuming functions, and having this kind of ability to avoid re-execution is going to really make your application faster and more accurate.
|
|
|
transcript
|
8:31 |
So far when we've been using reactivity, we've been using what I'd call shallow reactive graphs, where each of the inputs are being directly consumed by an output. So here in this application we're looking at, we have these two inputs and each of them are being consumed by the rendering function of these outputs. This is great, but it doesn't give us a very nuanced way of building our application. And what we actually want is something with more depth. We want to be able to maybe store intermediate values and have them kind of re-execute intelligently across those values. And there's something called reactive calculations which does just that. So let's take an example here to sort of build up our intuition about what we want. So this is a second tab of this application. This would be like if we had deployed our model and we are taking a sample of the data from production, kind of a query to see like, okay how is our model doing in production. And we have three inputs here. We have the same account input that we had before, but we also have this dates input which lets us select a time frame from the database. And we have a sample size that we're able to make a change to sample. You know, I want to sample 20,000 records or 25,000 records from the database. And what I want here is a few things. I want this sample to be stable. So this dates and sample size, I want it to be stable and I also want it to run not that often, right. This might be an expensive database query or something where, you know, I don't want to have it rerun. So I want to like pull all the account information within this sample and have that same sample be used by both of these plots. And then I want to be able to do these filters in memory. So I want to pull the sample for all of the accounts into memory, into the memory of my application. And I want to be able to make changes to these accounts without retaking the sample, without checking the sample. And lastly, whenever I make a change here from sample size to sample size, I want this to be a fresh sample each time. So I want the sample to be retaken whenever I change the dates or the sample size, but not when I change the account. So let's just write this down, what I actually want. So I want to query the database for a sample between dates and I want to filter that account by the account name in memory. And lastly, and then I want to use that same data for both of the plotting functions. Okay, so that's the basic like what I want the application to do. But I'm really demanding, I have some more things. I'd like to cache the results of one and two. What caching means is that I want this to, in certain circumstances, keep the copy of the data in memory somewhere and return the cached value instead of recalculating it. So when I change the account name, I want to return the cached value of the sample instead of taking a new sample each time. But I also want to invalidate the cache whenever the upstream inputs change. So when the sample size gets changed or the dates gets changed, I want to invalidate the cached sample result. And lastly, I don't want to do any thinking or work. So this is kind of the demanding thing that I think Shiny does that the other application frameworks don't do so well. So these last three. So I want this sort of caching and validation without actually requiring me, the software engineer, to do much work and thinking about how that caching should happen is where Shiny really shines. So reactive calculations are the tool that we use to do this. They're defined with a new decorator, a reactive calc decorator, and they cache their values so it's cheap to call them repeatedly. And we get perfect cache invalidation through reactivity. Since it takes place within that reactive graph, we know exactly when we should discard the cached value whenever its upstream elements change. And when that cache value is discarded, we know that we need to notify the downstream elements to cause them to recalculate. This is how you would actually, the code that you would use to do this. So we have a reactive calc decorator on sample data. We have another reactive calc decorator on filter data. So this is the one that takes the sample from the database. This one filters that sample data in memory. And then finally it's sent to the plotting function, the plotting renderer, at the end of the day. Reactive calcs are defined like functions. They are functions. And they're called like functions. So we define sample data as a function. And then when we call it to get its value, we use the filter data, just like you would with an input. And for the purpose of this, adding these to the graph, I'm going to use hexagons for reactive calculations. And they'll be blue when it's retrieved from a cache and orange when it's recalculating. Taking a look at again our application, we have three inputs, account, dates, and sample size. And we have two outputs, the scores plot and the, what am I calling it, API response time plot. And I have these two hidden reactive calculations, the sample that stores the data that's pulled from the database, and the filtered data which stores the in-memory data which has been filtered by account. Again, when Shiny starts up, it doesn't know the relationship between any of these things, although I've kind of drawn them so you can guess what the relationship is going to be. We first start with calculating the model scores. So we calculate the model scores and we go and get the filtered reactive calculation. We try to calculate that reactive calculation. We discover we need this other one. We need the account information and we also need the sample. Go and calculate sample and we need to get those inputs, date, and sample size. So right there we have, sort of, in the same way we auto-detected the graph for the simpler application, we've auto-detected this kind of more complicated or an application with more depth. When we calculate API response though, since filtered hasn't changed, like none of filtered's inputs have changed, it's still a valid reactive calculation, we don't recalculate it. We retrieve the value from cache. This is always going to happen in this case because API response is going to calculate after model scores, so it's always going to get its value from cache. When the account changes, so if I go up here and I change the account, but I don't change the sample size, I'm changing this back and forth, what happens? Well, we do the same algorithm that we did before. So we have the account, we follow the arrows down, and we invalidate its immediate descendants. But whenever we invalidate the descendant, we're going to also invalidate its descendants. So we're going to validate, so account changes, filter invalidates, the two plotting functions invalidate, and then once they're done, we recalculate. So model scores calculates, then we go get filtered, go get the account, and we get the sample. But since samples, its precedence didn't change, its dependencies didn't change, we can get the value from cache. So we're not taking a new sample every time the account changes. And then API response gets the filtered reactive calc from cache. When sample size changes, the whole plot invalidates, or the whole graph invalidates. So sample invalidates, filtered invalidates, the two plots invalidate, and we're back to the beginning. Calculate model scores, get the reactive calc, get its dependencies, and then we get the other inputs, and API response fires, and we get the filtered value. So right there we have this reactive graph with more depth. We're able to store these intermediary values as reactive calculations and reuse them in multiple places. And because all of those calculations exist in this reactive graph, we can use that graph to do calculate, to do cache invalidation. We know exactly when those need to be recalculated, and we know what should happen when they recalculate. So they recalculate whenever its upstream inputs change, and when it recalculates, it notifies its downstream, the things that depend on it, that they also need to recalculate. We did this without the user really necessarily even needing to know that this is happening. But what this lets us do is build up applications with a lot more complexity while maintaining the performance of those applications. So you, the engineer, don't need to necessarily think about how the application is re-rendering all the time. All you need to do is make sure that whenever you have repeated calculations, you're storing them in reactive calculations and using them in downstream elements.
|
|
|
transcript
|
4:56 |
Now that we've learned a little bit about how reactivity and reactive calculations work, let's take a concrete example to know when we should apply them to our, to, or when you should apply them to your own code. So here is a example application, and we have two inputs here that both filter us the same dataset, and that dataset is used by both of these plots. When we go over and look at the code, the first thing that should trigger that you should use a reactive calculation is just when you see any type of repetition, whenever you maybe copy and paste some code or use the same basic logic in two places. So for example, in this case, I've got this subset happening, and this subset takes the data frame and selects the species that are in input species and the body mass that is lower than input mass. And down here when I'm returning the table, I'm doing the exact same thing. This is the same code down from line 48 to 51 as up here, 26 to 29. And this causes two problems. So the first problem is that there might be a mismatch between this code and this code. Maybe I make a change, add in some other filter in this data frame, but forget to do it up here in the plot. That might cause my application to be out of sync with itself. The plot and the table are not showing the same data, which can be confusing for the user. But the second main reason is that this is being run twice. So it's being run once when the render plot function fires, and then again when the render data frame function fires. And to prove that, I'll just start by extracting this into a regular Python function. So I'll call this filter data, and it's just going to return this filter here. And I'll add a print statement so that we can know when it's used. And I will replace this call here with a call to the filter data function. All right, so I haven't actually changed anything about this code. I'm just using a function to do the subsetting instead of calling it twice. But this will let us look in our terminal and see that this firing is happening two times. So when I make a change, so when it first loads up, it's doing the filter once for the plot and again for the table. And if I make any kind of change here, it's always going to be firing two times because the filter is happening twice. So it's not taking advantage of any of that fancy caching behavior that we went through in the last exercise. The way to get it to take advantage of that is to decorate this function with a reactive calc decorator. And the reactive calc decorator is in the reactive submodule, which is imported from the main Shiny module. So it's not from Shiny Express, it's from just the base Shiny package. I've already imported reactive here, and then I can decorate this function with reactive calc. And this is where all of the functions that all the methods that manage reactivity are stored in the reactive calc module. I'll still have that firing function there. And since we decorated it, maybe I'll save it to actually get that to load. Now when I've decorated it, you see this is only happening once. So if I make a change to the body mass, it's only doing the filter one time and then passing that same filter to plot and table. So this is a little bit different than probably how you would program outside of a web application. Like if you were just writing a Python script, you might tolerate some repetition. Maybe you extract a function after you repeat yourself three or four times. But with Shiny, you really benefit from being pretty strict about not repeating yourself. So anytime you see some repeated code in a reactive context, it's a good trigger to just say, I should probably take that out and put it into a reactive calculation. You'll get the benefits of using functions, like you're able to sort of reason about this, or if you do type annotation, you can use type annotation on this function. But you also get some major performance benefits to your application, because when you use this function in the reactive graph, Shiny will automatically figure out the best way to call it so that it won't be called too frequently, and yet everything will still stay up to date. So that's basically the one takeaway from this whole session on reactivity is whenever you find yourself using, like copying code, using code in two places, that's a sign you should put it into into a reactive calc. If you do that, all of your Shiny applications will be very happy.
|
|
|
|
12:12 |
|
|
transcript
|
6:03 |
Reactivity is a great default for a Shiny app because it will automatically update all of your outputs when a given input changes. And most of the time, this is what you want. But there are some cases where that type of eager evaluation, where your whole app re-executes, all of the elements re-execute whenever they need to, isn't quite what you want, and you want to introduce a little bit more control. Here's an example of one such app. So I have this data import function, and all I've done is made this function artificially slow. So there's just a little bit of a lag before it runs. And when I run this function, this application, you'll see that it starts getting a little bit annoying to work with. So I have this plot, and whenever I make a change here, it takes a second to update. This is fine when you have a single interaction like this, but we actually have several things that we want to allow the user to filter. So we can change the species, and oftentimes what the user is going to want to do is make several changes, like change this, change this, and change this, and have some kind of button where they can say, ""Now apply all of the filters that I just did. So instead of having this process re-render the plot four times, we might want to let the user batch that up so that they're able to just make a bunch of changes and then render the plot once. And with reactivity without anything else, that's not really possible, right? Because every time I make a change here, Shiny's going to invalidate everything that depends upon that input and then cause that recalculation to happen. And it won't wait for the user to finish making all of their changes, because Shiny doesn't really know when the user is done making changes. But we can use a tool called ReactiveEvent to allow Shiny to know that. Let's go ahead and do this. So what I'm going to try to do is add a little button that just is a refresh button. First thing, we'll go and look at the Shiny website. So the Shiny website has this nice little components gallery, and we can scroll down and there's an action button. Great. So here's the code for the action button that we need. Go ahead and copy this. And I'm going to put this button right here in our sidebar. So I'll call this refresh button. And the label is going to be refresh. So now I have this button. I can click it, but it doesn't do anything. And in order to connect this button to something, I am going to use a ReactiveEvent decorator. What the ReactiveEvent decorator does is it just says, Shiny, I don't want you to automatically detect dependencies for this node. So instead of automatically detecting what this function asks for, I'm going to intervene and say the only thing that you should respond to is this refresh button. Notice one important difference here. So when we're calling inputs for their values, so in this case, I want the value of species at any given time or the value of mass at any given time. When we in ReactiveEvent, we're actually just referring to the button itself. So we don't call this. We just pass the reactive class as this, this reactive button into the ReactiveEvent decorator. And so what this means is that this node is only going to recalculate when this button is pressed and everything downstream of it is still going to invalidate in the same way that it did before. So I'll go ahead and save this. And now when the application opens up, nothing happens until you click refresh. And then the plot is going to populate so I can make several different changes to this. As many as I want, oh, maybe I decided I wanted to run the different species and then I click refresh and it's going to execute. This is great, but that initial behavior maybe isn't quite what we want. We might want to show the user the plot even when they haven't the first time, but not the second time. So there's a argument to ReactiveEvent. All these decorators have arguments. And you see we have this ignore none. And so for buttons, that's the one we want. I think it's false. So when we click ignore none equals false, that means that you're going to ignore it when it hasn't been clicked the first time. And then it'll show the plot the first time, but then also require me to make some changes to it. Even though this is introducing a kind of event handling to Shiny, it's important to note this is still taking place in that same reactive graph. So even though this node is not automatically recalculating when its upstream elements change, it's still able to notify the downstream node that it should change. So when we look at this render plotly decorator here, notice that we didn't put a ReactiveEvent here. We didn't put something to say, ""Calculate this plot whenever this button changes. Instead, we did it at the reactive calculation level and passed that value. And that's able to notify the plot itself that it needs to recalculate when the button changes or when the reactive calc changes. So it does work the same way. It's just kind of intervening in this one part of the reactive graph. So ReactiveEvent is a great thing to have in your toolbox. I think in general, you want to have Reactivity be the default for building these applications. But sometimes you do need to intervene and override Reactivity to get the behavior you want. And ReactiveEvent is one important way of doing that. One last thing to note about it is that ReactiveEvent can go under any decorator. So we can put it under ReactiveCalc here. We could also put it under any of the plot or table rendering functions if we wanted to just control how those ones are rendered. And lastly, and maybe most commonly, it's used in combination with ReactiveEffect to trigger side effects. And that's what we're going to go through in the next lesson.
|
|
|
transcript
|
6:09 |
Okay, so we've learned a lot about reactivity and we kind of understand roughly how reactivity works in Shiny. You might, as you start developing Shiny applications, realize that there are some interactions that are really, really hard to capture in a reactive framework. So let's go through one of those interactions and see, you know, just how maybe reactivity is not giving us everything that we need. So this is an example of a modal. So this is a feature of Shiny where you can click a button and have this important message or some other thing pop up and let the user interact with it. And when you sort of think about this interaction, it's a little bit hard to figure out how it fits in a reactive framework. I'm sure we could do it with some work, thinking about storing some reactive variables or something, but this is a little bit different than a lot of the other interactions we've been dealing with because we're really triggering a side effect, right? So when we click this button, it's triggering this side effect of this message popping up. And we click this button, there's a side effect where it's going away. And these types of side effect interactions are a lot easier to deal with using event handling. And event handling is a little different from reactive programming where instead of defining the relationships between things and letting Shiny figure out when to implement them, we actually want to tell Shiny what to do when this happens, right? We want to capture this particular event and handle it somehow. That's why it's called event handling. So in Shiny, those event handlers are called reactive effects. And down here at the bottom, you can kind of see this reactive effect and reactive event decorator. That's what makes it sort of escape the traditional reactive framework and instead let you do something specific when that particular action happens. So let's go through an example of that. The example I'm going to use here is I want to let the user update the label of this species checkbox. So this is a little bit of a synthetic example. Probably you wouldn't really want to do it, but it's illustrative of the type of pattern that you're going to use to do some of these interactions. So I need a text box and I need a button to let them enter a new label and to click the button to change that text box. So we know how to do that. So I'll use input text, new label, and then I'll also add a UI input button for update. I save that. It'll rerun and now we have this space where somebody can add some text and click this update button to do something with it. Right now this isn't connected. It's not doing anything. So we're going to add a reactive effect. This again, just like reactive calculations, can go anywhere. So we're going to call this update label. And for now I'm just going to click say pass, ignore the copilot. So there are two things we need to use as decorators. So one is a reactive effect decorator. This just says that this is a function that is triggering a side effect. And then we're going to do reactive event and specify the trigger of that reactive event, which is this update trigger. This reactive event is exactly the same as we used for controlling reactivity in the last session. So reactive event is a generic thing. It can go under any reactive decorator, reactive effect, render, any of the render decorators, or reactive calculations. And it'll just trigger this function when this input is passed. So here I'm going to use something called the update functions so we can update checkbox group. And this takes the speed, the ID. So this is the same ID that we are specifying down here when we're defining the checkbox group. And you can pass any argument that you would normally pass to the function that creates the input to the update method. So we're going to say label, and then we're going to say that's going to be input new label. So what this is going to do is whenever I click this button, it's going to update the label of that input to be the label that I've typed. So I enter that and I click update, and you see that's going to change. There's one other thing probably we want to do here. We probably want to clear this text input at the same time. And we can do that the same way that we did with the label by having a UI update text input text and call that new label. And the value is just blank. So now when I type my species or whatever, it's both going to update that label and also clear the new label text input. One of the most common problems that I see when people are starting to develop in Shiny, especially if you have experience in another web application framework, is that you use reactive effect too often. So some other frameworks, event handling is the only way that you can build interaction with your application. So it's often the first thing that people go to. But with Shiny, you want to do the opposite. You want to start with reactivity, start with the declarative framework where you're just telling Shiny what to do and letting Shiny figure out when to do it, and only use reactive effect in particular circumstances. And those circumstances are when you want to handle side effects. So some examples of that is anytime you're posting to an API or downloading a file or making some specific change to your application in response to user actions, you usually want to reach for reactive effect. Everything else, you should try to use the traditional reactivity pattern. This will result both in you doing less work because there's fewer things that you need to worry about, but also in your application being more efficient. For the most part, Shiny will do a really good job of rendering your application and adding in a bunch of reactive effects where you're handling particular things will often just kind of get in the way of that execution. So it's for things like this where you want to update a UI element or handle a button click or something like that. That's where the case is where reactive effect is really helpful.
|
|
|
|
18:29 |
|
|
transcript
|
7:18 |
In the last session, we learned a little bit about how to build dynamic user interfaces with Shiny by updating input elements. So we had a little button. When you click that button, it changed something about the user interface. But what if we want to take that one step further and actually add or remove things? So have your whole application actually dynamically respond to the user. One of the great things about Shiny is that it has a really robust pattern for doing that called Render Express. So in this application here, we're going to try to build a password-authenticated dataframe. This is just a basic one. I wouldn't use this for anything, you know, any sort of actual serious security purposes, but it's a good illustration. So we're going to add, first of all, an input text. Oops. And we'll call that ""password,"" and the label will be ""enter password. What we want to do here is have the user enter a password and only show the dataframe when that password is correct. So in this case, it's going to be ""penguins. One way we might want to do that is with a conditional. So we would say ""input password equals penguins,"" and if it does, say ""render dataframe,"" and define our little data function that returns the dataframe. But this is going to fail with an error, because we're trying to call this input password outside of a reactive context. So remember, whenever you try to call input outside of a render function or a reactive calculation or reactive effect, you're going to get this error, ""no current reactive context, because Shiny doesn't know what to do with that call outside of a render function. Those render functions kind of define the nodes of our reactive graph, so if we don't have those nodes, we can't really figure out when to render things, or what, in fact, to render. The solution to this is to use the decorator renderExpress. Decorator renderExpress is kind of a pretty generic way of a renderer, which doesn't take a particular output, it doesn't take a plot or a table. Instead it creates some Shiny express code, which are then added to your application under certain contexts. So we'll create another function here, and I'm going to call this ""dynamic data,"" just to separate it from the inner renderer. And now if I run this, I'm not going to get that reactive error, because this is taking place within a reactive context. And in fact, if I go and I type ""penguins,"" I'm going to get the data frame out. So this is a really great pattern, and it differs—it's very different from the pattern we used before, updating an existing element, because the data is actually not in the application when the user starts it up. So if I open this up, I can prove this to you by using something called the Chrome developer tools by inspecting the HTML. I promise this is the only HTML we're going to look at in this course. And you don't need to be able to really read this super well, but just notice that there's kind of only one thing with an input ID. So the only thing that's here that's kind of Shiny-related is basically this input password ID. So there's nothing down here in the bottom part where the data frame is going to go. You can sort of see over here, if we close up that div, there's a bound output called dynamic data,"" but there's no data in here. There's nothing about the penguins dataset. And every time I make a change here, this application is going to re-render, and each time it's going to check, ""Did he enter the password correctly? Should I render that data? And each time it's going to say, ""No, not going to render anything,"" until I get here. And suddenly, you see there's actually some stuff in this bound output. You see the data frame over here, and now when you look down here, there's a Shiny data frame, and it's got a bunch of different things in there. Once the password has been entered correctly, it's rendering this output. And you can put any type of Shiny code in a render express. So for example, I'm going to have a little else statement down here, and I'm going to say, ""Please enter a password. So this is going to be some code here, and when I first start it up, before I enter the password, and the password is incorrect, I'm going to get this, ""Please enter a password prompt. But when I actually do enter the password correctly, I'll end up with this bigger data frame. You don't necessarily have to have just one thing. For example, I could have an input here. Let's call it ""slider. So now when I enter this, oops, missing a value. So I can include the slider and the data frame as well. I haven't connected these two, but you could connect them in the same way that you connected them in the previous exercises. And this kind of illustrates one of the funny things about render express. This is a bit of a magic function, which you don't need to know too much about the magic. But one sort of key thing here is that whenever you have a render express function, we're kind of basically stepping into this function and reading it for, and parsing it to get the Shiny code that we then include in the application. And as a result, it's important that render express functions don't have return values. So you just type in the Shiny code that you want, and that's going to be printed. So any kind of valid Shiny code that's in a part of the function that you end up in is going to be sent to the Shiny application. So for example, if I have here, instead of ""uih1,"" I would do ""return uih1,"" I'm going to get an error. And the error I'm going to get is very informative. It's going to tell you right away, ""Hey, don't use a return value. Instead, it'll just render every printable line within the function body. So you don't need that. In fact, you can't use that with render express. If you've used Shiny core or Shiny for R, this is very different from the render UI, which is the pattern in those cases. And this is just a way of fitting this pattern into the express framework. So you don't need to think too hard about it. Just remember that whenever you're using render express, don't use a return value. Just type the code that you want to be rendered to your application. Render express is a lot more flexible than the update pattern that we used before, because you can add things, remove things, include multiple things in your dynamic user interface. And the input doesn't need to be there right when the application starts. So it might be that only when a user enters one path of your application are you going to return a particular value. And that's the way of doing it. So it's a powerful tool, and it's one that lets you build really flexible applications to suit pretty much any kind of user need for your application.
|
|
|
transcript
|
11:11 |
So at this point we've actually learned all of the main concepts of the Shiny framework. So we have all the tools that we need to build a full-featured web application. You know how to add inputs to an app, you know how to add rendering functions which produce outputs, how to connect inputs and outputs, and we learned about how reactivity works, reactive calculations, and reactive effects, which give you the sort of main interaction model for Shiny apps. Finally, you learned how to build dynamic user interfaces with render express or update methods. And most of the rest of the journey of learning Shiny is figuring out what you need to add to your application and going and finding that. This session and then the exercises which follow it are going to be about how do you learn what you need to add to your application, how do you do that, and in particular how you use the Shiny documentation to find the things that you're looking for. So let's take a look at this basic Penguins application that I've been building. Let's say you look at this app and you think, well it would be really great to highlight some big numbers somehow, like the number of penguins that are selected at any given point or the mean values of some of their characteristics. How do you do that? Maybe you don't know what Shiny component you use, if Shiny even has a component which solves that problem. So how do you go about answering that question? Well, the main way you can do that is to go to the Shiny for Python website and look through some of the galleries. We've done this a couple of times but let's just do it again. So one of the best tools on the Shiny website is this template page, this template gallery, which shows you some of the applications which we've built which kind of show off a particular style of Shiny app. So we have basic apps, we have some dashboards, we have some things that handle streaming updates, and we have some data entry forms. And we'll keep updating this over time so this should have some applications, some templates for almost anything that you want to do. So when you look through this you might see, oh look there's some these apps up here have something going on which highlights a particular value. So we have a stock picker, restaurant tips, and basic dashboards. And down here as well there's this kind of highlighting big numbers. And if you click through here you have some code where if you want to actually just go and clone this application to your computer you can do that. If you're using coming from this course I'd recommend using the express syntax. And then it has some other things. So it has a working application here which you can kind of look through and see what we've put together. And it also has a list of all of the different components that are used in there. So the components, the layouts, and then the external packages that are used. And here we kind of look through and we see, okay there's this value box one that looks sounds interesting, slider input, checkbox groups, and popover. I might not know what that is. And if you click through here you'll get some documentation on value boxes, how they're used, and some of the variations. And down here you see we have this reactive value box. So here's a working app where yeah okay if I change this I'm able to highlight and produce some numbers. When we look down at the code here, highlighted the relevant parts here, where we have some UI value box, and then it looks like you can use this with a regular rendering function to get a reactive value. Okay so let's copy this and go over to our application and see if we can edit. And since I want these boxes to appear above the other the plots, I'm going to use another layout columns to lay them out. And then I'll copy this over and just to keep things simple I will take out the showcase icon and I'll make this blue. And let's say let's call this mean beak length. Just to give it a something simple to get started I'll just put some text in the second full thing there. And see now we have this value box which gives you a nice big bold numeric output and it's just a static one. But I know from the documentation that I can also do a dynamic one and since this is a text I will do I'll do render text and define a rendering function. And since I have already this reactive calculation that does the filtering for me I can reuse that. So I'll return filter data. Remember we have to call that to get its value. And since that's a data frame I can use this syntax to get the column and I can call mean and I know I'm going to want to round this. Okay great so I've got this single value box up here that's taking up the whole space because I have it in a single layout columns. So let's add a couple more. So I can go ahead and copy this one and call this depth. I'll change the name of the rendering function here just so it doesn't conflict in the application. And if I run this bring my app back over I have now two of them I mean big length and big depth. Okay one more time I'll go ahead and copy this and I'll call this number of penguins. And I think I can call this I can do length of filter data and that will give me the number of rows in that data frame which should show the number of penguins. And there we have the number of penguins. So these are nice looking big bold value boxes. But since I'm using layout columns they also do the nice give me a good mobile view or a small screen view as well and make the app make them space out nicely. Okay so that's a one that's one sort of example of just identifying that you have a problem looking through the documentation to see how shiny apps typically solve that problem and finding it. Another thing you can do is ask us on the shiny discord. So shiny has a has a discord which you can join and we have some great help forums here which you can ask your questions and the shiny team is pretty active on this discord answering questions or you might be able to get some things from from the community. And if you really can't find your answer you can also raise a github issue and we'll try to solve your problem for you. The next thing you might want to do with this application is maybe you get some feedback from somebody that this table is maybe not that useful to most people and it's also a little small right. I can't see all the columns on it and maybe there's not quite enough it's not prominent enough for the people who do actually want to look at the raw data. So I like to sort of have this hidden for most people but available for some if they need to. So again we can look at so this is a we can look at the template gallery if we want to but we know that this is a layout problem right. We like that this component exists we just need to put it somewhere else. So in the components gallery there's a layout gallery which just shows you like how do you lay things out on the shiny application. We have these nice little graphics that show you okay have navbar at the top never up at the bottom put the sidebar in different places. We can have different sort of tab sets if we want and collapsible accordions are nice and just sort of generic like layout customized layouts that you can do. So this is a pretty simple one so let's go and look at this navbar setting and this navbar application looks like what we're after. It lets us kind of have content on the main page and then have these background tabs and here's the code. And one thing you can also do here is you can click this little edit in shiny live button if you just want to open this up in a shiny fiddle sort of thing if I want to make changes to this I can I can do it and it'll show me you know the changes. So this is a nice way of just messing around with something without needing to download anything or or change anything on your laptop. So this navbar is pretty easy we just have a context manager. We'll kind of do this first of all up here and we'll call this maybe plots and I'll just go ahead and indent all the value boxes. And since we're going to maybe we're going to be moving this data to the background I can actually just get rid of this layout columns because there's only going to be one item in the in the in the second row. And then over here just oops I'll add a second panel and this will be called data. Now when I look at my application you see I have a nice big plot so this plot is taking up the whole second second row and the data has been moved to a background tab. And this is also a good performance tool to use because if you remember your reactivity discussion shiny only calculates things when the user asks for them. So when the user first opens up this application the data actually isn't rendered at all. The shiny we had the user hasn't asked for it so none of that reactive calculations get kicked off. So if you have for example like some it's not this doesn't matter in this case because the app is so fast but if you had a slower computation or something that was coming from a larger database query putting things in a background tab is a good way of speeding up the rest of your application because if most people are just working on these summary statistics they don't need to actually call that expensive calculation. But this app will work the same way so we have the ability to do these filters. If I change the filter the data is also going to be updated when the user asks for it and lets me kind of view the view the data view the application in a few different ways. So that's kind of the general approach to adding new components that you don't know about. Identify what the problem is your is with your app go to the website kind of search through some of the components to see what's the one you want to add and then try to integrate that in your application. And if you're running into trouble go to the discord or github and ask us a question and we'd be thrilled to help you out. So the next couple of exercises are a little harder because they ask you to add components which I haven't taught you in this course. So there's a download button there's a popover those are things which are doable in Shiny but you need to kind of go through and look at some of the templates some of the other applications and see how that source code works to figure it out. It'll take a little longer but stick with it because it's a sort of realistic example of what what you're going to work through as you build your shiny apps yourself.
|
|
|
|
3:03 |
|
|
transcript
|
3:03 |
So now that you know how to write a Shiny application, your next question might be, How do I share it with other people? And we have a service, a free service, called Posit Connect Cloud, which lets you host all different types of Python applications, and in the future it'll also let you host R applications. So you can do Cordo, Shiny, Streamlit, Jupyter, Dash, and Bokeh. And the great thing about this is it's a GitHub-enabled process, so it's really nice if you're used to using GitHub. And also the deployment and hosting of your application is quite performant. So I'll just show you an example here. So I have on GitHub, on this repo, an application. And one important thing about this application is it includes all the files that your Shiny application needs, but it also needs to include a requirements.txt file. And one thing I'd just recommend for this file is that you try to keep it minimal. So if you use something like pip freeze, it'll sort of exactly replicate every package that you have installed, which is not necessarily what you want. Because what's going to happen is when you deploy this application, it's going to try to install all of these packages on a Linux server. And your working environment might include some things that are Windows-specific or Mac-specific, which are not really installable or resolvable on the server. So ideally what you want in this requirements.txt file are only packages that you're actually importing from. And once you do that, it should install pretty easily. So I'll just go ahead and go to my content. And you have this little publish content button here. And when you first sign up, you're going to sign up through GitHub, so it's aware of the repositories that you have on your GitHub account. And we're going to select one of them. And you can pick a different branch. In this one, I just have the one branch main. And I'll go ahead and find my ml example 2 file. One important thing here is that when you're selecting this primary file, you select usually the app.py file or whatever file is called the entry point of the thing that you're actually running with Shiny Run. Usually that's going to be app.py. And then we click deploy. And it's going to clone the repository, install dependencies. The Connect Cloud has a pretty fast dependency resolution process, so that goes pretty quickly usually. And then it's going to publish it and spin up a little container for us. This part can take a second, but overall really fast. And then the Shiny app is live and it's running. I'm just going to go ahead and draw those plots. And so this is public to the internet, so you're able to share this URL with other people. Eventually we're going to be adding additional features like private sharing and the ability to modify what that URL is. This is in alpha as of this recording, but it's usable and it's great for sharing especially public applications that you want to learn. So go ahead and give it a try. Deploy your applications and share it with the world.
|
|
|
|
1:27 |
|
|
transcript
|
1:27 |
The great thing about Shiny is that it gives you a few building block concepts which you can combine and recombine in a lot of different ways to build simple applications and very, very complicated ones. And believe it or not, you've actually learned all of those concepts in this course. So right now you have all the tools that you need to go out and use Shiny to build real products or real example websites and share them with the world. So at this point I have three requests for you as a kind of sum up for this course. The first one is if you use Discord, go and join the Shiny Discord channel. It's linked on the Shiny website. Second one is go ahead and build a Shiny application about something that you're interested in or proud of and publish it to Posit Connect Cloud so that we have a free way of sharing it with the rest of the world. And lastly, if you could tag me. My handle on most social media sites is gshotwell, g-s-h-o-t-w-e-l-l, or Posit, P-B-C, who's the company that supports and sponsors the Shiny framework. And just tell us about the application that you built, why you like it, and we'll do our best to share it with other people to repost it and promote and amplify it. And if you can do those things and tell us how you like Shiny or if you have any problems with it on GitHub, we'd really appreciate it. Thank you so much for your attention during this course. It's been a joy to record and I hope that you use Shiny to build some wonderful things.
|