|
|
|
7:05 |
|
|
transcript
|
2:01 |
Hello and welcome to Python powered chat apps with Twilio and sendgrid. I'm Michael Kennedy and I'll be your instructor and guide on this journey. We're going to build an amazing Python Web application that integrates with Twilio services, such as WhatsApp and SendGrid. But you might be wondering, Why am I in a bakery? I want you to imagine that you're a solo developer at a tech friendly bakery, Cloud City cake company and the owners of this bakery have asked you to imagine how you might lower the friction of ordering a cake and making sure that we don't make mistakes You know, taking the order of the phone. Somebody mispronounces something or we miss here it and then their cake is all messed up They won't be happy. So what they've asked us to do is to use some sort of chat applications like WhatsApp that will allow people to come to our website see what we have to offer, say, Hey, I'm interested in ordering a cake and start a conversation through chat This chat application should be able to reach back. Go find our menu, see what our specials are. See how much our current cake price for different types of combinations. All those kinds of things. And even we need to gather up all their information like their name and their email address, for them to order the cake so we can send them, say a receipt. So they're going to have this entire conversation over at Twilio with periodic integration back into our flask application. And when they do confirm that they want to order this cake we're going to receive some kind of notification in our site. And we have an admin backend for our bakers to see. Oh, and new orders come in over WhatsApp, we better get baken once they bake it and the cake is ready, they're going to be able to send a message back to our customer right through that same mechanism, right through WhatsApp and say, Ding, your cake is ready. Please come pick it up. We're going to build a real comprehensive Python application that you can take and adapt whatever it is you need to build. I think you're really going to enjoy this deep dive into Python. So, Lets get started.
|
|
|
transcript
|
3:01 |
We have a really fantastic application put together that we're going to build during this course It's going to bring together, so many interesting things, a lot of cool stuff from Twilio and Send Grid, but also a ton of cool Python and Flask and SQLAlchemy that we're going to write. So, let's talk through what this is going to be real quick, and then we'll go into it much deeper as we get started later in the course, customers are going to be able to order cake from the bakery and the way they do that is they send our official WhatsApp phone number. A message says, Hey, I want some cake. There's gonna be a back and forth exchange, as you can see here, like what kind of cake do you want? What kind of topping? like, lemon frosting and maybe some bacon topping, on their outrageous right And then we're going to need to determine how much that cake they've asked for costs. So in this part here, where it says your cake cost, 23 gold coins, are twilio workflow has actually gone out to an external API that will price our cake and come back and said, What they've asked for is 23 gold coins and then we're able to work that into the conversation with our chat application. We agreed to it, so we need to gather a few more pieces of information And after we get their email address, we're going to send all that information we've gathered through WhatsApp over to our Flask application. Our Flask app is going to accept it. Save it to the database using SQLAlchemy. And it's going to take that id generated by the database and return it back and we'll say, Great, your cake orders accepted. We're getting started on baking it. Here's the order ID, will send you a message when it's ready. Super cool, right? So this is the WhatsApp experience that the user will have. Then they're going to go and open up their email. And as they placed that order, they're also going to receive a message from us. Look how beautiful this message looks. We've got a nice little banner picture. We've got a cool HTML formatted table and some bolding, And what not to highlight the important things, and you can't really notice it that well. But there's this attachment. There's even a PDF invoice receipt that we've generated live, out of our Flask application attached to this email right here. Super cool. So, I don't get this great professional looking email right when they order it. At the same time, our admin backend that we're going to build in Flask has received that order and is now available for our bakers to pull up and say, Oh, look, a new order came in. Let's expand it, go see what they've ordered and go bake it. Once the baking is done, and the cake is in the cooling rack, they're going to press this fulfill button right here. That's going to shoot another WhatsApp message back to that same conversation and see at the very bottom your cakes Order Status code is ready for pickup, so they've received a notification right on the phone where they started this order process that now their cake is baked. They should come in, give us their credit card at the cash register and hand them their cake. Hopefully, it's exactly what they wanted. They were going to be a loyal customer because it's so much easier to order from us than some random other bakery, we got a call or fill out a webform or whatever.
|
|
|
transcript
|
1:22 |
So, what are we going to learn during this course? We're going to cover a bunch of really interesting things, but at a high level, we're going to see how we can use twilio twilio studio workflows to build these really interactive conversations through chat and voice and other things like that. And you saw that we're able to integrate both external API's and API is that we can create and run in flask. Speaking of API is that we create, we're going to see how to create a piece that exchange JSON Data in Flask as well as build an entire application that has a home page. It has an admin back in and things like that. So I'm going to dig into Flask and build some really cool stuff over there. That Flask application is going to want to work with data in a persistent, scalable, questionable way. So we're going to use Sequel alchemy, one of the most popular arms for Python seek welcome. You'll take that data as a class and save it into the database, and finally, we're going to send messages and emails back out of our Flask application Using send grid, we saw there going to be beautiful emails. Nice HTML formatted ones. But they also have pdf attachments that will generate within our Flask application. So here's just a portion of what we're going to learn during this class. I think you're really going to love it. This is such a neat, comprehensive application for working with twilio and Python.
|
|
|
transcript
|
0:41 |
Finally, you may be wondering, what experience or background do you need in order to take this course? Well, simply put Python, basic experience with the Python language. We don't assume really any experience with flask. Certainly no experience with twilio or send grid or emails or those kinds of things. And we do give a pretty good introduction to SQLAlchemy. And even if you don't know SQLAlchemy, there's a whole appendix section that you can go through that will teach you SQLAlchemy and databases. So, really, there's hardly anything you need to know in order to take this course in terms of technical prerequisites. But having a basic understanding of Python, the language and how to work with it? is certainly something you're going to need to be able to do.
|
|
|
|
6:02 |
|
|
transcript
|
2:10 |
welcome to this really short chapter on setting up your computer to make sure you have the right tools and often the same tools to follow along with what we're doing, as we build code in this course, it's going to be very hands on. We're going to write a lot of code work with our database and so on. So, I want to make sure that you're all ready to go. First thing, Would it surprise you to know that you're going to need Python for a Python course, but specifically, you're going to need Python 3 and you're gonna need Python 3.6, Twilio and SendGrid The two Python libraries that we're going to be working with primarily require only 3.4 but we're using language features during the course, such as f-strings and others that require 3.6. So you want to make sure that you have Python 3.6 on your computer, do you? Well, that's a good question. How do you check how you check various just a little bit, depending on the operating system that you're on, and I'll give you some detailed guides for that in just a moment. But quickly on Linux or macOS. If you just open up your terminal and type Python3 -V, it will either print out the version. Python 3 or Whatever or it'll say command, not found. No Python 3, In which case you just don't have it all. So, make sure that version is 3.6 or higher on windows, There's a little more nuanced because there's not a two versus three. It's just how it got installed. So the order of what appears in your path matters. But just go and type Python -V and see what you get. If it says Python 3.6 or above, you're good to go. Of course, having the latest is best, but 3.6 should be sufficient. And if you don't have Python or you would like more detailed steps on checking whether or not you have Python, visit this article here. training.talkpython.fm/installing-Python. It gives you detailed steps for each operating system you might be using. How to check whether or not you have Python. Then, if you do need to install Python, it'll actually give you three or four options on how you might do that, some of the trade offs and so on. So instead of going through in the video, just drop over here, select your operating system and figure out what the best option for installing Python is.
|
|
|
transcript
|
1:41 |
As I mentioned at the opening, we're gonna be writing a lot of Python code, and you need to have an editor that works very well with Python. To do that efficiently and accurately. We're going to be using PyCharm PyCharm is a fantastic tool both for beginners and for experts in Python. It comes with a free community edition that you can use or there's the paid professional edition. You can find out more about it here at jetbrains.com/pycharm. If you do decide to install it, I recommend that you use their toolbox app, those little things that runs either in your task-bar or your menu-bar, and it will let you pick which versions you like. It'll tell you if there's updates, it will automatically updated all sorts of good stuff like that. So, just the management of it is a little bit easier. It will also allow you to install command line options like pycharm charm as a command line option to launch files right from the terminal. If for some reason you don't want to use PyCharm, the other really good option out there right now, is Visual Studio Code, so you can get Visual Studio Code. Just go over to code.visualstudio.com. This is also a cross platform. This one is 100% free. Works pretty well. Honestly, I prefer PyCharm just a little bit these days. But, you know, this is a really solid second, I would say, and many people, this is their primary editor, that they just love. You can get this if you'd rather not use PyCharm. If you do get it, make sure that you install the Python extension for Visual Studio Code. Otherwise, it's not gonna work very well for you, so make sure you install this, if you want to know how to find it, you go click on this little box there in the editor, it should be near the top. But you can just search for Python. Once you install it. You'll have all sorts of cool Python features that make working with Python code and environments much easier.
|
|
|
transcript
|
1:17 |
We're going to be working with a relational database to soar all the interactions that we have from twilio back over to our flask application, in order to make the most of that, understand what's happening. We really need a decent database visualization tool. If you have PyCharm and it's the Pro edition, it comes with some really fantastic data exploration, query and visualization tools, like we have right here, so you can go and open your database, go to the table. See the columns, were either even pull up these diagrams. I give you the option to not use PyCharm Pro, which is paid not super expensive. You can pay like $8 a month. And if your student if you work at university, if you have an open source project, they'll give you a free copy and sort of follow the pricing page for that. Nonetheless, if you don't have PyCharm pro, you won't have this view. So what do you do? We're going to be using a different tool in that situation. We're going to be using Beekeeper Studio, so if you don't have the PyCharms tools built in, just go and get Beekeeper Studio at beekeeperstudio.io. It's a really nice database exploration tool, lets you see the tables, see their column definitions, go into queries and edits and whatnot. So this is really nice option for working with the databases that we're going to be creating during this course. If you don't have PyCharm pro, if you already got that, you can just use that as well.
|
|
|
transcript
|
0:54 |
And last, but certainly not least make sure that you get the code to come with this project. If you want to see exactly what I typed. If you want to jump into the middle of a project. And honestly, there's a couple of steps throughout this course where I say here's a really boring page that we're going to right? And let's put a much more stylized version with some fancy CSS and images. Let's just drop that in here. You don't need to see me work on HTML for half an hour, just so we have something slightly better to look at. All of those things are going to be over here and GitHub as well as some of the twilio studio definition files and whatnot. So make sure you go over here star and fork this GitHub repo, so that you'll be able to follow along exactly during this course. That's it. Your computer should be all set up. If you've got an editor, you got Python 3.6 or above, got some database tools and you got the source code. Now its time to learn about twilio and Python.
|
|
|
|
59:31 |
|
|
transcript
|
1:33 |
It's time to start building our application, and in this chapter, we're going to work with the twilio cloud tools. In particular, we're going to go to our twilio dashboard and work with something called Twilio Studio, Studio is a way for us to create what you would think a largely of as the user experience for the user interaction, that people working with our chat application are going to have we will find, what messages we send and what kind of responses we allow. For example, what kind of cake would you like, about a small, medium or large? We're going to be able to check things like they said small medium and large. If it's something else. Well, too bad that's not the right kind of cake we offer. Please pick one of the right options. And so, like that kind of work flow we're going to build in Twilio Studio But Twilio studio is not the whole application, not even close. It needs way more information than we give it, so we're going to integrate External API's like what is the menu? What is currently for sale? What kind of toppings can you get for a cake at Cloud City Cake company. And then once you've chosen your cake, how much does a cake like that cost? What is a small chocolate cake cost today at Cloud City Cake Company? Then finally, once we gather up all the information and the cake that they want to order, we're gonna post that over to an API that we're gonna build during this course in flask. And that's where we're going to save that to our database Tell the Bakers it's time to start making that cake. Send them an email receipt, all those kinds of things around that order. So we're going to get started building this user interaction in twilio studio, and I'm going to start plugging Python and external API s into it later in the course.
|
|
|
transcript
|
4:43 |
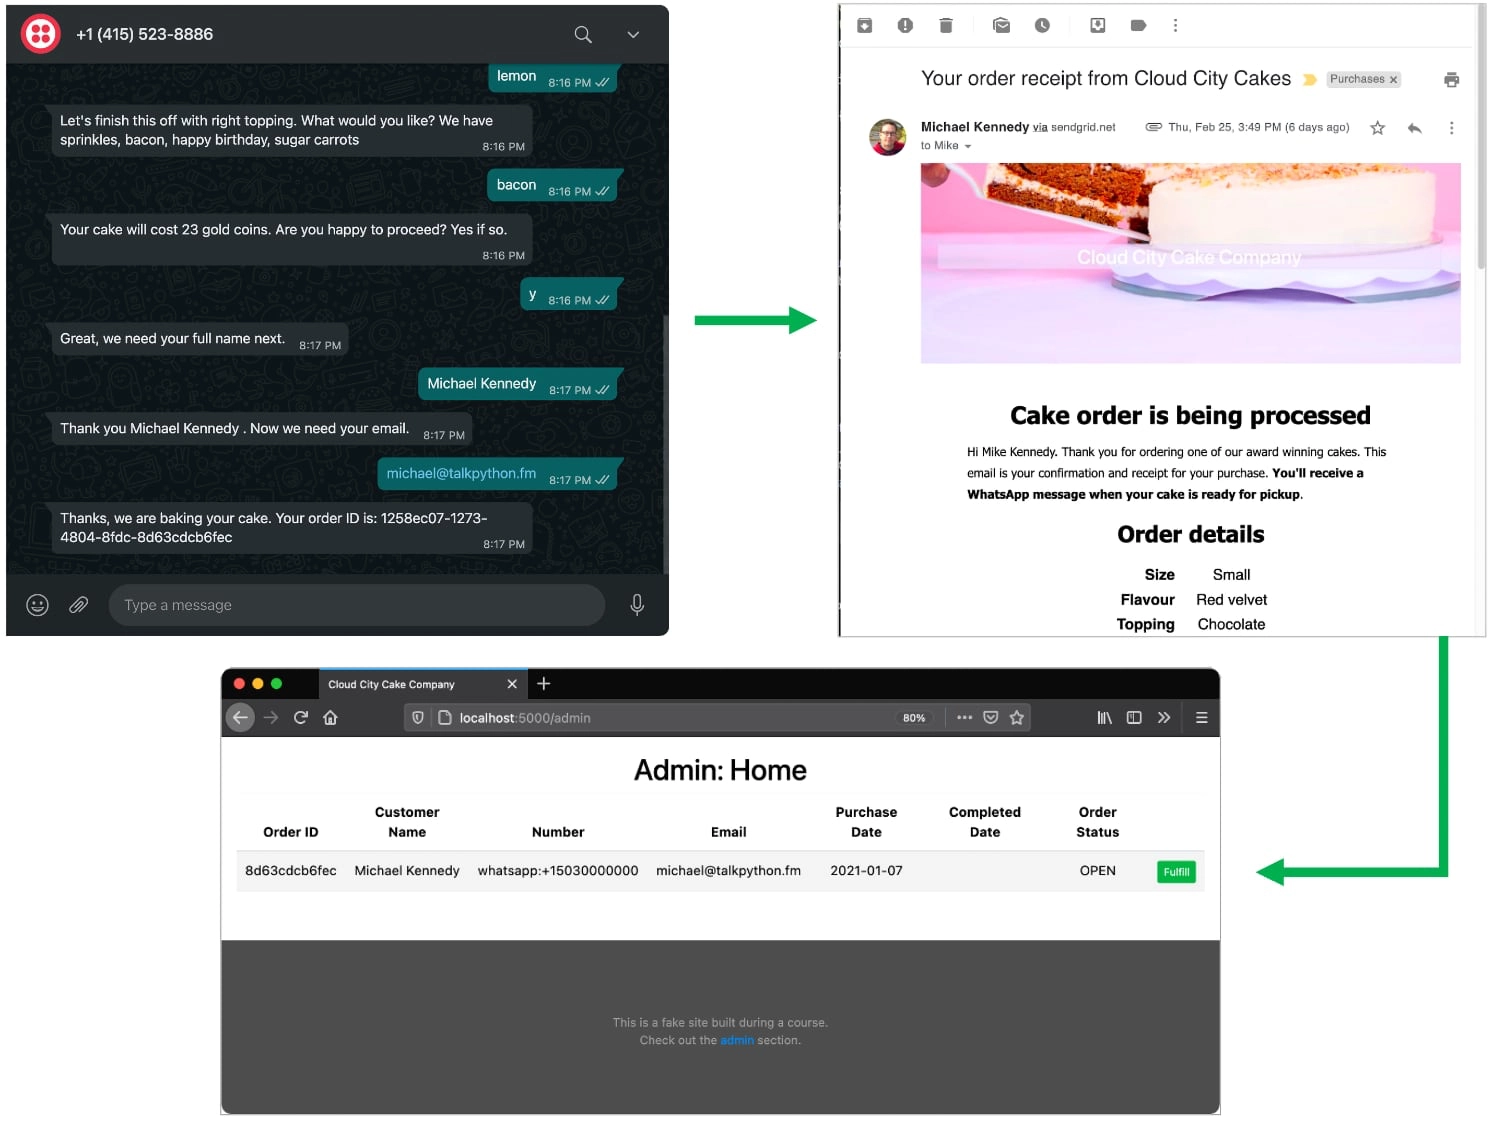
Now, before we dive in to start working with Twilio studio and building our messaging workflow, let's take a pass as a user through the entire experience. So you get a sense of what we're going to build. It's gonna take us a while to get there, but you'll see where we're going by having seen this. Okay, we're going to build a Flask based Python Web application. We're also going to build a chat interaction where people can use WhatsApp to order a cake at the Cloud City Cake company. So they could either just remember our number, find it somewhere and click it on WhatsApp. Or they could actually just click this link right here, which will open WhatsApp and start the conversation over here, It loads up our sandbox test number because we haven't pushed this to production yet. So it's a twilio number, not the primary one. We'll do that when we finish this. If we were going to actually put it in production, we'd have our own business account here. So we'll say something like, Hi, I need cake. That's great. Welcome to the Cloud City Cake Company and it knows what type of cakes that it can work with. So in the Twilio studio, it knows, if I get a message, the first thing I want to say to them is, Welcome. What size of cake? Well, we'll say small because we don't want to go overboard here. We're going to order a lot of cake during this, Of course. Now the twilio studio went out to our website actually, and got the available cakes from our menu and said, These are the cakes were currently offering? What kind of flavor would you want? Well, let's say we want to carrot cake, with some lemon frosting. Maybe Sprinkle it with bacon. A little outrageous there. Now it goes to another API that says, given a small carrot cake with lemon frosting and making toppings, How much is that going to cost? And it offers that says, Do you really want to do this Yes or no So sure we'll do that. We could say y or yes or whatever. Now it's going to collect our personal information so that it can store that in the order information over in our Flask Web application that you just saw. So, I'll enter some info here. My name, my email. Fantastic. So, when I enter that information, what happened? Is twilio studio actually called over to our Flask application our Flask application said, Can we process this order? Yes, we can. It sent us an email through Send Grid, and it actually generated a order invoice as a PdF and attached it to that. So let's go check our email and look what we have in our email over at michael@talkpython.fm. That's what I said. My email was We got a cloud City cakes receipt and a nice template here. It says our order is being processed. It summarizes exactly what we ordered. A small carrot cake, bacon with lemon frosting and bacon topping. It costs 19 gold coins. Fantastic says thank you. It has a little extra information at the end, and it has this invoice. Do we have a proper PDF invoice that says, you know you were placed an order with Cloud City Cake company at 123 Main Street Tech Town USA. Here's our invoice number. The number of gold coins we paid in a little bit of summary information about what we've ordered. Check that out, So this is what we got working with our WhatsApp messages over here. We talked to the twilio studio. It's sent that back through an API to our Flask application, our Flask application generated this email and this invoice and send it our way, over in the admin section Let's see if we have a new order. We do, here we have an open order. You can see that some have been fulfilled, but there's one that's open. So let's do all the work. Bake the cake put in the oven and it's time to let our user Michael Kennedy here know that their order is finished and they should come pick it up. They started this conversation on WhatsApp, so we're going to send an outbound message to WhatsApp to their account. So we press fulfill and if we watch up here in the top right in just a moment, we should see a notification your cakes order status is ready for pickup and there it is. We've gone to the website or otherwise figured out a number to place the order. We sent a text message through WhatsApp. We had this whole exchange, some of it worked managed by Twilio studio and some of it actually interacting with different parts of our application or API. We have placed an order. We got a receipt. Eventually, our bakers notice that they bake the cake and let us know through WhatsApp that the order is ready for pickup. This is a fantastic application and we're going to build that out throughout this entire course it's gonna to be so much fun to build, and I think you're going to learn a lot.
|
|
|
transcript
|
3:19 |
To begin building our application. We're going to start over on twilio.com, and you need to create an account. It's free, but you have to set one up, since I've already logged in. If I click log in, it takes me straight to the Twilio dashboard. And over here there's a couple of things you can use to manage your account and notice. I have a few things that are stuck to the side that might not show up in yours. So the first thing that we want to do is actually find the relevant sections because there's many things you can do over here in the twilio dashboard, and we want to pin those, so we can just quickly jump around them and not get distracted with other stuff. So if you expand this out, what we want to do is we're gonna pin programmable messaging. Just click that so we pin that one. If you scroll down, we're going to use the studio to develop our workflow and our message exchange. Once we've done, those two things should have them pinned on the left. In the messaging Section though does a little information about what's been going on. A few errors we may have had potentially as we're developing our application, Now the part that's going to be relevant for this course is under the try it out section and we can do SMS text messages. But we're going to do whatsApp. Now In order to use WhatsApp, you have to set up your account. You have to come over here and you have a unique joint code for this number here. What you need to do is find that code and text it to this number you can see down here. It says your sandbox for a particular WhatsApp account is valid for three days and worked on it for a while. It's going to expire, and you have to come back and reactivate it with this same code. So it says, we're waiting for you to send a message. Let's go and do that. Now you saw I was already working with this earlier so it's actually okay, but just to take you through the workflow, I'm going to send that message here, as it's fantastic. You're all set. You can now send and receive to this particular message. You can reply Stop to make it stop or if you wait too long, it's going to expire, right, So now we're going to be able to interact with this. As we develop our application through our WhatsApp account, you'll notice here that I'm using WhatsApp the desktop version. But of course, you can use it from your phone or your tablet or whatever It doesn't really matter. The app you're using to send the WhatsApp messages. And there it is. Message received. So we've pinned are programmable messaging and we've set up our WhatsApp sandbox here. The other thing that's interesting is studio, which we pinned, and this is where we're going to build out our application, notice It has our recent workflows. This is the one I built ahead of time to show you what's going on. We could delete it. It opened the logs and in the logs, you'll actually see running workflow. So here's somebody who is partially through one of these workflow conversations, and you can actually stop it to reset it. But what we're gonna do is we'll go create a new one, a cloud city one, that will build up through this entire course, so those are the three things. Well, two things. So we've got our dashboard, but we also need to pin programmable messaging and enable our WhatsApp sandbox for our particular account. And then we're going to use studio to create these workflows that orchestrate the messages that come in from WhatsApp, interact with the various API's and send messages ultimately over to our Flask web app.
|
|
|
transcript
|
2:13 |
We're going to use Twilio studio to build our first workflow. Let me make this full screen because everything we're going to do is 100% in this application here. So we're not going to be jumping between apps. Let's give us all the space we can get, and we're gonna go over here and create one of these cynical in my first flow How about Cloud City? The name you'll see? It doesn't really matter. Just use something that's meaningful to you. Now there's a whole bunch of different types of workflow templates that we could choose to get started from so we could have appointment reminders. We could have a messaging chat bot we could have call forwarding. We could do JSON stuff so these blows can be exported to JSON and they could be reimported here if you want to maybe store some stuff and GitHub and then use it to generate something here and so on. But what we're gonna do is just start from scratch. Now, over here we have a nice bit of help from one of the twilio evangelists, and that's great. I encourage you to watch this video when you get started, but we're not gonna do it. During this course, when we first get started, we need to figure out what is going to kick off this workflow. And that's the trigger. So we could listen to an incoming message. That's what we're gonna do. That's our WhatsApp. Hey, I need cake message coming in or we could listen to a phone call or somebody could call a REST in point. Our application can call a REST in point, which could start this whole flow that does whatever it does, does phone calls, does messaging and so on, We're just going to focus on this particular trigger to get things started over on the right. We have a flow chart like things, you can make that a little bit bigger. We can have split based on. That's like a if statement, we can define variables. Maybe we've called an API, and we want to hang on to that response and, maybe parse it apart. We're going to do that. We have our voice, which we're not going to do, but we have our messaging, which we can send a message and then carry on doing things or we can send a message and pause the workflow until some work happens We're also going to be doing things like making http requests over to our various API endpoints and external API's as well. So the interesting parts for us are going to be around the flow control, the messaging and executing API and point calls.
|
|
|
transcript
|
3:20 |
To get started. Let's just do a really simple message exchange. Somebody sends us a message. Let's just send them a really simple response. We come down here, to the messaging, we want, just send message. We're not going to wait for an answer from them. The whole flow is going to be Hello. Hi, there. So let's drag this over here and notice. We've got this little lollipop thing here and a whole that's the same size. So we dragged these together. Now you can see when a message comes in, we're gonna run this. Let's go over and actually change. The name should definitely set meaningful names here. You're gonna have to program against this name as if it was a variable or class name or something like that throughout this whole workflow. But this one I'm gonna do TEMP_Echo Message or something like that. Maybe normally I'd call it echo message, but I'm gonna call TEMP. There's also something wrong with it. And see the body may not be null, so let's just so Hey there. Thanks for your cake interest. Great. And we save that it goes back to good. Each workflow has its own URL as you'll see. So if we go over to the trigger and expand this out a little bit in order to start this workflow in order to trigger the trigger, we could either do an API call here. Or we could use this webhook that we can plug into other parts of Twilio or other Web apps. Basically, this is an endpoint that if you do a post message to, it's going to start this workflow. So what we do is we're going to copy this, and we need to tell our WhatsApp sandbox when it receives a message to start this workflow. You already saw that we have multiple workflows. Which one is it going to start? Well, this one, over the programmable messaging we saw that there's the Try it out WhatsApp. We've already been here. That's great. But what we need to do is go to the Settings section, WhatsApp sandbox settings, and we need to set the webhook right here. So when a message comes in right now, it's who knows is running some particular webhook that is not our workflow. So we're going to change this, come down here and press save. And now when a message comes in, it should run that workflow. We have one final thing to do. In order to make this work, we go back to our Cloudcity, notice at the top. Here we have 10 changes. So as we work, changes we make are saved, but they're not pushed to production. Remember, there could be live people interacting with this. And you don't want to just push this out as you just mess around with it You want to get everything ready and say, now we're ready to publish it. So let's press publish. Great. Our workflow is up to date. Let's see if we can send it a message it should respond with. Hey there. Thanks for your cake interest. So back over here. Let's say I really need a cake. Awesome! Awesome. Awesome. Look at that. It said, Hey there. Thanks for your cake interest. It's not nearly as involved in interesting as what you saw us do before, but we're on our way down that path, aren't we were getting it set up. So we've sent a message over there to Twilio. It hit our sandbox which pushed over to that webhook. That webhook triggered the workflow. The workflow simply says, Hey, if you start up, send the message back. Hey there. Thanks for your cake interest. Perfect. Everything set up and we're ready to build our workflow.
|
|
|
transcript
|
4:26 |
We had our simple echo message here that just when we got a message to trigger the workflow, we said, Hey, thanks for your cake interest, but it's time to start building something more interesting and more useful. What we want to do is we're going to go out and get rid of this, because we want to do a send and wait for a reply. Down here, we'll add our send and wait for reply, because what we're going to do, you wanna say, Welcome. Welcome to the cake company. We would love to get you some cake, but we need to know a couple of things first. What size cake do you want? So let's go over here. And first of all, give us a good name. Call it welcome. Remember, you have to use these names in programming. These are like variable names, basically so descriptive, but not to the enormous gonna wire up the inbound message to it again. So when a message comes in, it's going to do whatever this does. It's going to say, we'll say greetings from Cloud City Cake company. What size of cake would you like? Now we're gonna give them some options, and they're supposed to respond with at least one of these. And if not, we'll tell them Well, that's not a good choice. You got to pick one of these, so we have a small, medium and large. So this is the message that we're going to send over. And if a reply comes in, what we want to do is we want to test it. Remember, they're going to say we have small, medium or large. They're supposed to, anyway, and what we need to do is check. Do we actually have a response from them? That makes sense. If yes, we'll carry on. If no, there's sorry that's not the right size or type of cake. And ask the question again. So we're going to do that with a split based on an if statement like things. So, if we get a reply when I come over here and say check size in order to check the size, we have to give it a variable. Wait a minute, variables what you type here, maybe a type of welcome, and sure enough, as you start to type here, you'll see you get things that are useful. So we could type Welcome. We want inbound .Body, but that's a variable we're going to test. And then we need to come over here and add a condition, if the value it gets equal to. But it's going to be better is it matches any of, now for multiple values. We just separate with a comma(,), so we'll say small, medium, large. I'm not sure about the space here, so let's do it like this. A small, medium, large and now it's saved and let's just send, great that works or we're going to send them back around. So send a message like this. If there's a match of one of those sizes, let's for now. Just go over here and say Great, that's a good size. We'll fix the name in a minute as we change this meeting of this little control here. If it doesn't match, however, though, let's send them another message. And here I will say wrong size. So we'll say Sorry, that wasn't a valid choice, like that. Way back to the top. Here we say, Welcome again. So comes in. Welcome. What size? What kind of cake would you like? We have these three sizes. We check their answer. If it's the right size great, that's a good size. For now, go ahead and follow my convention. I'm going to say this is a temp because we're not really do anything with it yet. But we might have the wrong size, in which case we say wrong size and we ask again. So we'll just go in this loop until they say small, medium or large. Let's go ahead and publish it so that we can try this out. It's published after Whatapp we go, I say, cake time! Greetings from Cloud City Cake Company. What size of cake would you like? We have small, medium and large. I want huge cake. Sorry, that wasn't a valid choice from the cake company. What size would you like? We could also say that wasn't valid choice. Please choose small, medium, large and just loop them back to ascend and wait for reply. But I think this is okay. Let's try Small. Great Small is a good size. It was small, medium or large. Fantastic. We've got this little bit of interactive exchange this back and forth in this validation, all happening over in twilio studio in our flow.
|
|
|
transcript
|
2:14 |
You saw in our split based on control, that we could refer to variables or properties from these various widgets that we've dragged onto the flow. And in fact, it's not just saying the name of something, but there's complex and interesting transforms that you might want to make. For example, if we call the Web service and we get an array of things back, we might want to put them into a string that says, we have these options x,y,z. Which one would you like? Those types of transformations require more than just saying the name of an array or something like that. The flows use the liquid template language. The liquid template language is pretty similar to what you might consider something like a Jinja template from flask or chameleon or Django template, one of those types of things, maybe even a little bit more like a JavaScript front end framework way of talking about variables. And so over here you can see you have the documentation over on twilio about this language, but stuff within double {{. You can put markup within early percent. You want to just take a variable and turn it into a string within a larger string. You can say something like Hello, {{name}} or traverse a variable relationship like we did with our welcome.inbound.body so we can work with variables. We can work with dictionaries that we get back and we can use them at in this dictionary style. But more likely, you would like, just treat them like an object like this. There's also this idea of filters. If I'm going to take some variable and make a change to it, maybe I want to capitalize it or format it as a date or divide it or something. The thing that's going to be really interesting for us is join. When I spoke about, I got a list of things back from an API I want to show it to the user. The way we're going to do that is take that list and join. It was, say, the string, space. So it goes. Item one, space item two, space, item three, space and so on. So this is not a complex programming language, not a lot of things going on that we're going to use here. But this liquid templating language is really important for transforming and testing this data that we might be working with both from API's and from the user.
|
|
|
transcript
|
2:15 |
If we look at our interaction, it was very vague. We said, Come over here and ask. You want a small, medium or large size and we check if that's good We say, Great, you've made the right choice and if the wrong you've made the wrong choice, it would be much better if we could be specific. And now that we know about Liquid, we can. So if we come over here, we can see where it says Great. That's a good size. The send and wait for reply element that has got the data and it is called welcome. So what we can actually do instead of say that? Well, say something. Concrete is a good size. So we say double curly ( {{ ) notice our auto complete is coming up here. I get it to show on the screen with somewhat small resolution. And we could say widgets, welcome inbound. And as you type, you can see it narrows down. So inbound body like this is a good size, and this is the same thing we're going to want over here as well. So let's live settle. So this one has a good response, and we could say sorry such and such isn't a valid response a valid choice. So let's go ahead and republish those changes or publish the new changes and try again All right, let's kick off another flow. So is it cake time? Yes. Greetings from Cloud City Cake Company. What size of cake would you like cake time? I want a huge cake. Sorry. Huge, isn't a valid choice. All right, fine. I'll tone it down. We'll have a small, great small is a good size. Now, of course, we need to ask them other information like, Well, now, what flavor do you want to want? Chocolate, Vanilla, carrot cake kind of frosting. You want toppings on it? Like Sprinkles. We're going to have a lot more of this interaction. But you can see already that we've got this really cool workflow and validation, and we're using the liquid template language to actually grab data from one part and use it concretely as we interact with the subsequent part of our workflows.
|
|
|
transcript
|
8:03 |
Well, we've come a long ways. We've got our workflow triggering, doing some validation, interacting with the user, if they get things right or if they get things wrong. What we've asked them is, what size of cake would they like? But there's a lot of other information that we need to ask them. What flavor, what frosting do you want? Toppings and so on. Then, once we figured out what they want, we got to decide on the price. You know, maybe bacon topping is more expensive than vanilla or Sprinkles or something like that. Instead of trying to bake all that stuff hard coded in here, we're going to use an API endpoint, and we already have one in place for years over cloudcitycakecompany.azurewebsites.net /api/flavors. We have a HCP JSON API. If we just look at the raw data, this is what we got. We can look at it a slightly nicer like this and notice we're getting three arrays back within this object, flavor, topping and frosting. And for the flavor, we have red velvet and chocolate and vanilla. What we want to do is call this API within our workflow at twilio have it saved those three different pieces the three arrays, these three variables to three variables, we're going to call flavor topping and frosting using liquid We're going to access those again later throughout our flow. That way, if we take an item of our menu, it'll disappear from that interaction. If we add some more items or running a special they'll appear automatically. So what we're gonna do is want to copy that URL, right up there about, cloudcitycakecompany.azurewebsites.net/api/flavours and we're going to get rid of this. Hey, great, That was a good choice. And instead, if they say the right size, we're going to go and get some data, Ask them further questions with that data, we got so down here at the bottom, we're going to go and make an http request. Now things are getting a little crowded, as you can see here. So let's click this button to make it more full screen and we can zoom in a little. We're not going to be looping back as much so, zooming in is good And over here try to line these things up so they feel good. And if the condition matches small, medium or large, we're now going to I'll call this get menu over here. We're gonna go get the menu and we need a request. URL, It's going to be that, we hit save. Now we're going to get this data back, and it's going to live in it's somewhat complicated form and this object as one whole thing over here. But we want to parse it apart and do a little bit of work on that data. So what we're going to do after this is going to go back and say, Set a variable And I'll just call this menu or items or something along those lines, I'll go with menu and we need to add a variable. And this is where we're going to use liquid template. So we're gonna give it a name. And if we flip over here again over here working, copy it. So we're gonna have flavor just like this. And the way that we get it is with liquid. So we come over and say widgets.GetMenu.parsed. We get a JSON response. It's parsed into JSON. That's that whole document. And so what do we want? We want .flavor. So when you add another one, this time we want topping and the value will be GetMenu.parsed like that. Really nice to get some auto complete there, and it should just be topping, my flavor topping. We're gonna need one more. We're frosting. I'm just copying to make sure I get the spelling exactly right, so I'll be frosting GetMenu parsed, go back, got frosting. Great. Now let's just do a quick little echo here to see how things are coming along You had temporal test, and we're just gonna echo back what we set in these variables. So we'll say menu, we just say the variable names we go back here, and maybe it's also worthwhile to echo this to see what comes out. And finally, we're going to need to connect that, published those changes back to WhatsApp to see if we got it right. More cake please!, to get some feeling like a lot of cake close to go get a large, Oh, it looks like we made a mistake. Let's go fix that, over here where we're pulling out the values, it has to be widget.menu like this. So somehow I lost my way when I was trying to get the auto complete together. So it's just widget.menu topping. All right, now we're ready to try again. Republish, still more cake. We're gonna be full of cake by the time this courses over medium got to tone this down a little perfect. So there's what we got back from the API our Flavors are red velvet chocolate, vanilla, carrot, rainbow, velvet, chocolate, vanilla, carrot Rainbow is an interesting word. So is cheese chocolate, vanilla, maple. So something's going on. Obviously we're just getting that data back directly and just dropping it in place. We're going to need to do a little bit more work when we're caption or variable or at least when we're displaying it. We'll do it when we capture it just once, but you do our display it with liquid templates to make it a little bit more human readable, not just computer data. So the final thing where we're going over here to set our variables let's go and edit these, yourselves a little more room. Remember what I showed you? That we can work with grabbing variables through liquid. But we can also further process them with these filters, and the one that we want to use is join. The way you apply a filter to some piece of data in this case is going to be an array of strings coming back from our API as JavaScript as we say. Pipe (|) the filter name Colon(:). And then the arguments and the arguments we want is to join each element and put a comma(,) and a space between it. So take the string, all the elements and stringify it by putting together with the string in between all of them. That way we don't get chocolate Vanilla carrotcake is all one giant piece of text. So we're going to do this to all three of our variables. Save that one. We're gonna do it to the Topping, and we're gonna do it to the frosting. And then we can put that back a little bit. Publish it, about a little more cake because after the large and the medium, I'm quite full. So I'll go for a small this time. Perfect. This is what we're hoping for. The flavors that we have available on our menu are red velvet, chocolate, vanilla, carrot, rainbow and we have cream cheese, chocolate vanilla and maple frosting. This is not exactly how we're gonna interact with our user. We're going to ask them. What flavor do you want one of these? What frosting do you want? One of those in a nice exchange. And we could even do validation that it's valid what they've said each time along the way. But just for testing. It's nice every now and then to stop, an echo back what you think you're working with. So it's really easy for us to see. Yeah, we did get that data from the API. And our filter our joint filter did split it into a string like we would expect. Now check this out. We're getting this data from the API, and this means a whole world of possibilities. We can make changes through some management app or some backend, and all of our twilio interactions are just picking up those changes instantly and continuing to work in the best way they can.
|
|
|
transcript
|
1:41 |
We saw that the primary way to interact with users, through chat be that WhatsApp or SMS messaging, over at Twilio is twilio studio. And it's this workflow designer that we have here with different types of operations send messages send and wait for reply, split based upon and so on. So it's over here where you design that user interaction experience. And we saw that we can integrate other things as well, like external calls to API's and other data sources that we might need as part of that interaction. But the primary way that we build that interaction is through this workflow designer over at twilio. Now, before we move on, let me just go meta for just a second and tell you about these concept sections because this is the first one we're covering in this course you might be wondering. Well, we just talked about Twilio studio. Why do we have this little summary? Obviously you probably remembered if you just watched it, right? Idea of these concept sections is to reinforce the learning. Yes, but even more important, these are reference material for you. Yes, you've just gone through a demo and you've seen this stuff in action. But maybe you just want to see that one precise summary piece of information about calling it API, creating a flask in point. Whatever it is that you're looking to come back to and with these concepts sections, you'll have 1 to 2 minute little bite sized pieces that you can just dump back to you. And you won't have to try to find your way through a 5, 10, 15 minute demo to see the piece that you're looking for. Hopefully, one of these concepts will call it out for you. So be sure to remember that these are here as your reference, as well as to reinforce what you learned as you go through the course and as you come back to it as you build your applications afterwards.
|
|
|
transcript
|
4:02 |
Now that we're getting the data back from the API and storing it into the variable menu, in the menu widget with its variables, we want to have a little bit of back and forth, much like we had up here. Well, we said, Welcome what size you want. Check the size and either say sorry that's wrong or carry on. We're going to do a similar thing down here, so we don't need this anymore. Now we're gonna do that similar type of flow, and it's going to be a send and reply Again the name is super important. So those who we AskCakeFlavor, then what we wanna do? They've come in. They've said they want a large cake. We've looked at the menu through the API, and we know what sizes we have. Remember, those sizes are stored in widgets, menu, variables, for example, flavor. I think its flavor not flavours perfect. It is so it's stored right there, and what we want to do is just ask. Here's what we have, Which one do you want? So it's a great what flavor of cake do you want? We have that, that should work well. It's going to come along and ask them what they want. But what we have to do now is confirm that a valid selection was made. So we'll come back and we'll do a split based on and we're also going to have send message. But if no condition matches, we're going to send this message. And when the message is sent, we're gonna send a background. That's our loop. That's our something went wrong. So let's connect this here and start our test. So this will be test cake flavor in here. What do we want to put? We want to put menu.flavour like this. Actually, it needs to be widgets again, widgets.Menu.flavour and we're going to do. There's no condition that matches will do that, but let's go and add a condition that says MAtches Any Of, widgets.Menu.flavour like that. So we've already got the options we've already stored into that string Remember, at once multiple values, comma, separated as a string. That's what this is. So we should be able to just use that again, and this is not the right one. Sorry, What we want is we want to AskCakeFlavor.inbound.body That's the message that they sent as a response. So we sent waiting for the reply. The reply is the inbound body. Then we're going to test if any of the body was any of the things that we have as an option. Great. We'll continue on. Let's go and just add a temporary little that worked great. Like this, good flavor like that over here, though this is what happens if something is wrong. So we'll say wrong flavor. Say sorry. We don't have whatever this value that they asked for, which will be AskCakeFlavor.inbound.Body widgets.AskCakeFlavor.inbound.Body Inbound body. I really think we need a small now. Much too much cake. Alright, Vanilla perfect that's a good flavor test the other way. Large rain box. Sorry, we don't have rain box. We have red velvet, chocolate, vanilla. How about we go for carrot this time? Perfect. That's a good flavor. All right. So you can see we've taken this data we got from the API And we've created this little interaction we've asked them to select one of them. As long as they get it wrong, we're just keep asking them. Let them know. No, that's not right. Try again when they get it right and we'll moveon in our workflow
|
|
|
transcript
|
4:56 |
This pattern that you see here, ask with a send and wait for reply and then test it. If it's wrong, say sorry, that's the wrong choice. Send them back to ask again. But if it's right, we have this condition to carry on, which we haven't connected again. This pattern is super, super common, and we're gonna have to do it again exactly like this for the frosting. I'm going to do it for the Topping as well. So instead of you watching me type all out these little bits, I'm just gonna write out those and we'll review it in a moment. All right, I've repeated this pattern. Ask, Test. It is wrong. Let them know, Go do it again. Otherwise carry on, for the three different questions that we have to interact with the three different things we need for the cake. Now to review that. Let's hide this out of the way for a minute, so we can just see it going. I'll go through this slowly, but I didn't want to recreate each step with you. This is exactly the same because you take a lot of time, but I do want to fall along close enough that if you're following the video and writing the code through your studio that you can do it as well. All right, So this one we just did together and we added the same type of thing. We're going to have another send and wait for reply to get the frosting. And I thought it would be fun to have a little bit of information carried forward at each step. So, for example, we're going to ask the cake frosting and say, you know, you just selected chocolate cake, so chocolate cake sounds delicious. What frosting do you want to pair it with? We have, and then we're putting out the same string like we did for the flavors. But now for frosting, want to test the carry on, get a response to test the frosting against the body, the inbound body of AskCakeFrosting. And then we have two conditions. One no condition matches. Then we're going to go to wrong frosting, if it matches any of the widgets menu. This is where we stored our variable. And remember, this is a string that is comma separated with the values, which is exactly what we're looking for here. It's also what we need for all of our messages. So we're going to test against this, But you can't write it like this. Remember, this is not the string that you want the variable. So you gotta use liquid to get the variable. All right, again, if they get the wrong frosting, will say, Oh, no, We don't have whatever you ask for as frosting. Do you know one more time? Ask with a send and wait for reply, Test, It's wrong. Let him know. Go back. Otherwise carry on. In this case, we're going to say we've got the flavor. We've got the frosting. So let's just get that topping. So finally, let's pick a topping for your It's a chocolate cake with chocolate. I guess the cake I put in here probably belongs. They're like that for your chocolate cake with whatever frosting. So vanilla frosting, so on. And then we have these various toppings. This is our test. We're gonna come down here and we're gonna do the test on the AskCakeTopping.inbound.Body or the transitions we have. If nothing matches, tell him what's wrong. Otherwise, like before, use liquid to get the value of the menu topping variable And if it matches any of those carry on, I finally just say onward because this is where we're going to write more code and do more interesting things with our workflow, but we're not ready to talk about it. So let's just make sure we're running what is working here and we'll try one more time. More cake, great. We have a bunch of cake. Well, let's keep getting small cakes because we're going to order a lot of cake Okay, so what flavor do you want? Let's say rainbowwww. Sorry, we don't have rainbowwww. What flavor of cake? Alright, Rainbow, Rainbow cake. all we got to put a space there. Sounds delicious. What frosting do you want to pair it with? Cream cheese? Chocolate? Vanilla? I'll say choco Oh, no. We don't have Choco as frosting about Chocolate. There we go. Finally, let's pick a topping for your rainbow cake with chocolate And many of those space will fix that up. We have Sprinkles, bacon, Happy birthday to be written on the top or sugar carrots. How about bacon? No. How about lettuce? That sounds delicious, doesn't it? No. Thankfully, they don't have lettuce at the topping. So,Bacon will be outrageous. We'll choose Bacon. Now. We've gathered up all the things of the order. The flavor, the frosting and the topping. Onward says our workflow and onward means. Usually we start writing the rest of the code to actually start placing the order. I feel like we've got this really cool interaction. Besides, you know the spaces I gotta fix with our chat interaction.
|
|
|
transcript
|
3:01 |
One thing you can run into that's a little not obvious. Once you see it is completely easy to fix. But knowing what to do here, it's not entirely obvious. So let's suppose we've started our conversation with Cloud City Cake company. We're gonna love a small cake with some vanilla flavor. But for our frosting, we want Mapel, I notice here there's a little problem. Vanilla cake Sounds delicious. Oh, well, that's no problem. We can go fix that. Let's just go back to the studio and I'll make a change here. So we're asking for the frosting. We want that little space, right? Like so, we hit save, Perfect. We're ready to fix our problem. We can publish it. Let's go back over to WhatsApp and see if I fixed it. maplee. We're not maplee Wait a minute. What's going on here? Why am I still seeing this old one? What happens is, once you start one of these workflows, you're tied into that version of the workflow. And if it's in flight after changes are made, well, too bad you won't see those. That's totally good. It means it's consistent. And, you know, maybe there were questions that were needed later that would not have been asked because you're already halfway through it. You don't want it to restart. You want to just carry on. And yet, as a developer, you probably wanted to restart. You're like, Okay, great. We'll just start over. Hi. Let's just start this conversation over, so I can fix. I can verify my fix for my changes. Wait a minute. No matter what I type here, I am stuck halfway through this workflow. So one thing you could do that's painful is to make your way all the way through it. Another thing you can do is click a button over in studio and say, Cancel this and the next time you talk to it will start over. Over here remember, we've already made our fix, but we have these running workflows. If we come out of full screen mode and go to logs over here, notice there's this one that's running right now. This is the one that I was trying to get out of, the one we just saw. So let's stop the execution. We'll just go back to the editor. Doesn't matter. But that's where we want to be. And back to WhatsApp. Now, if I type hi. Greetings from Cloud City. What size of cake would you like? Well, I would like, large. That made me hungry. That bug hunting. So here we have our rainbow and look at that fixed rainbow cake, Sounds delicious. What kind of frosting would you like with it? So that's how you can exit out of or stop these running instances of these workflows with your WhatsApp instance to say, No, no, no. I want to start over. Let's try again. I've made some changes. Just drop what you're doing and start over. So this is really important as a developer to make it really easy to jump back and check out your changes and so on. It doesn't really much matter in production. Most of the time, people won't be in those problems. It maybe but is really something you are going to do frequently as a developer.
|
|
|
transcript
|
5:28 |
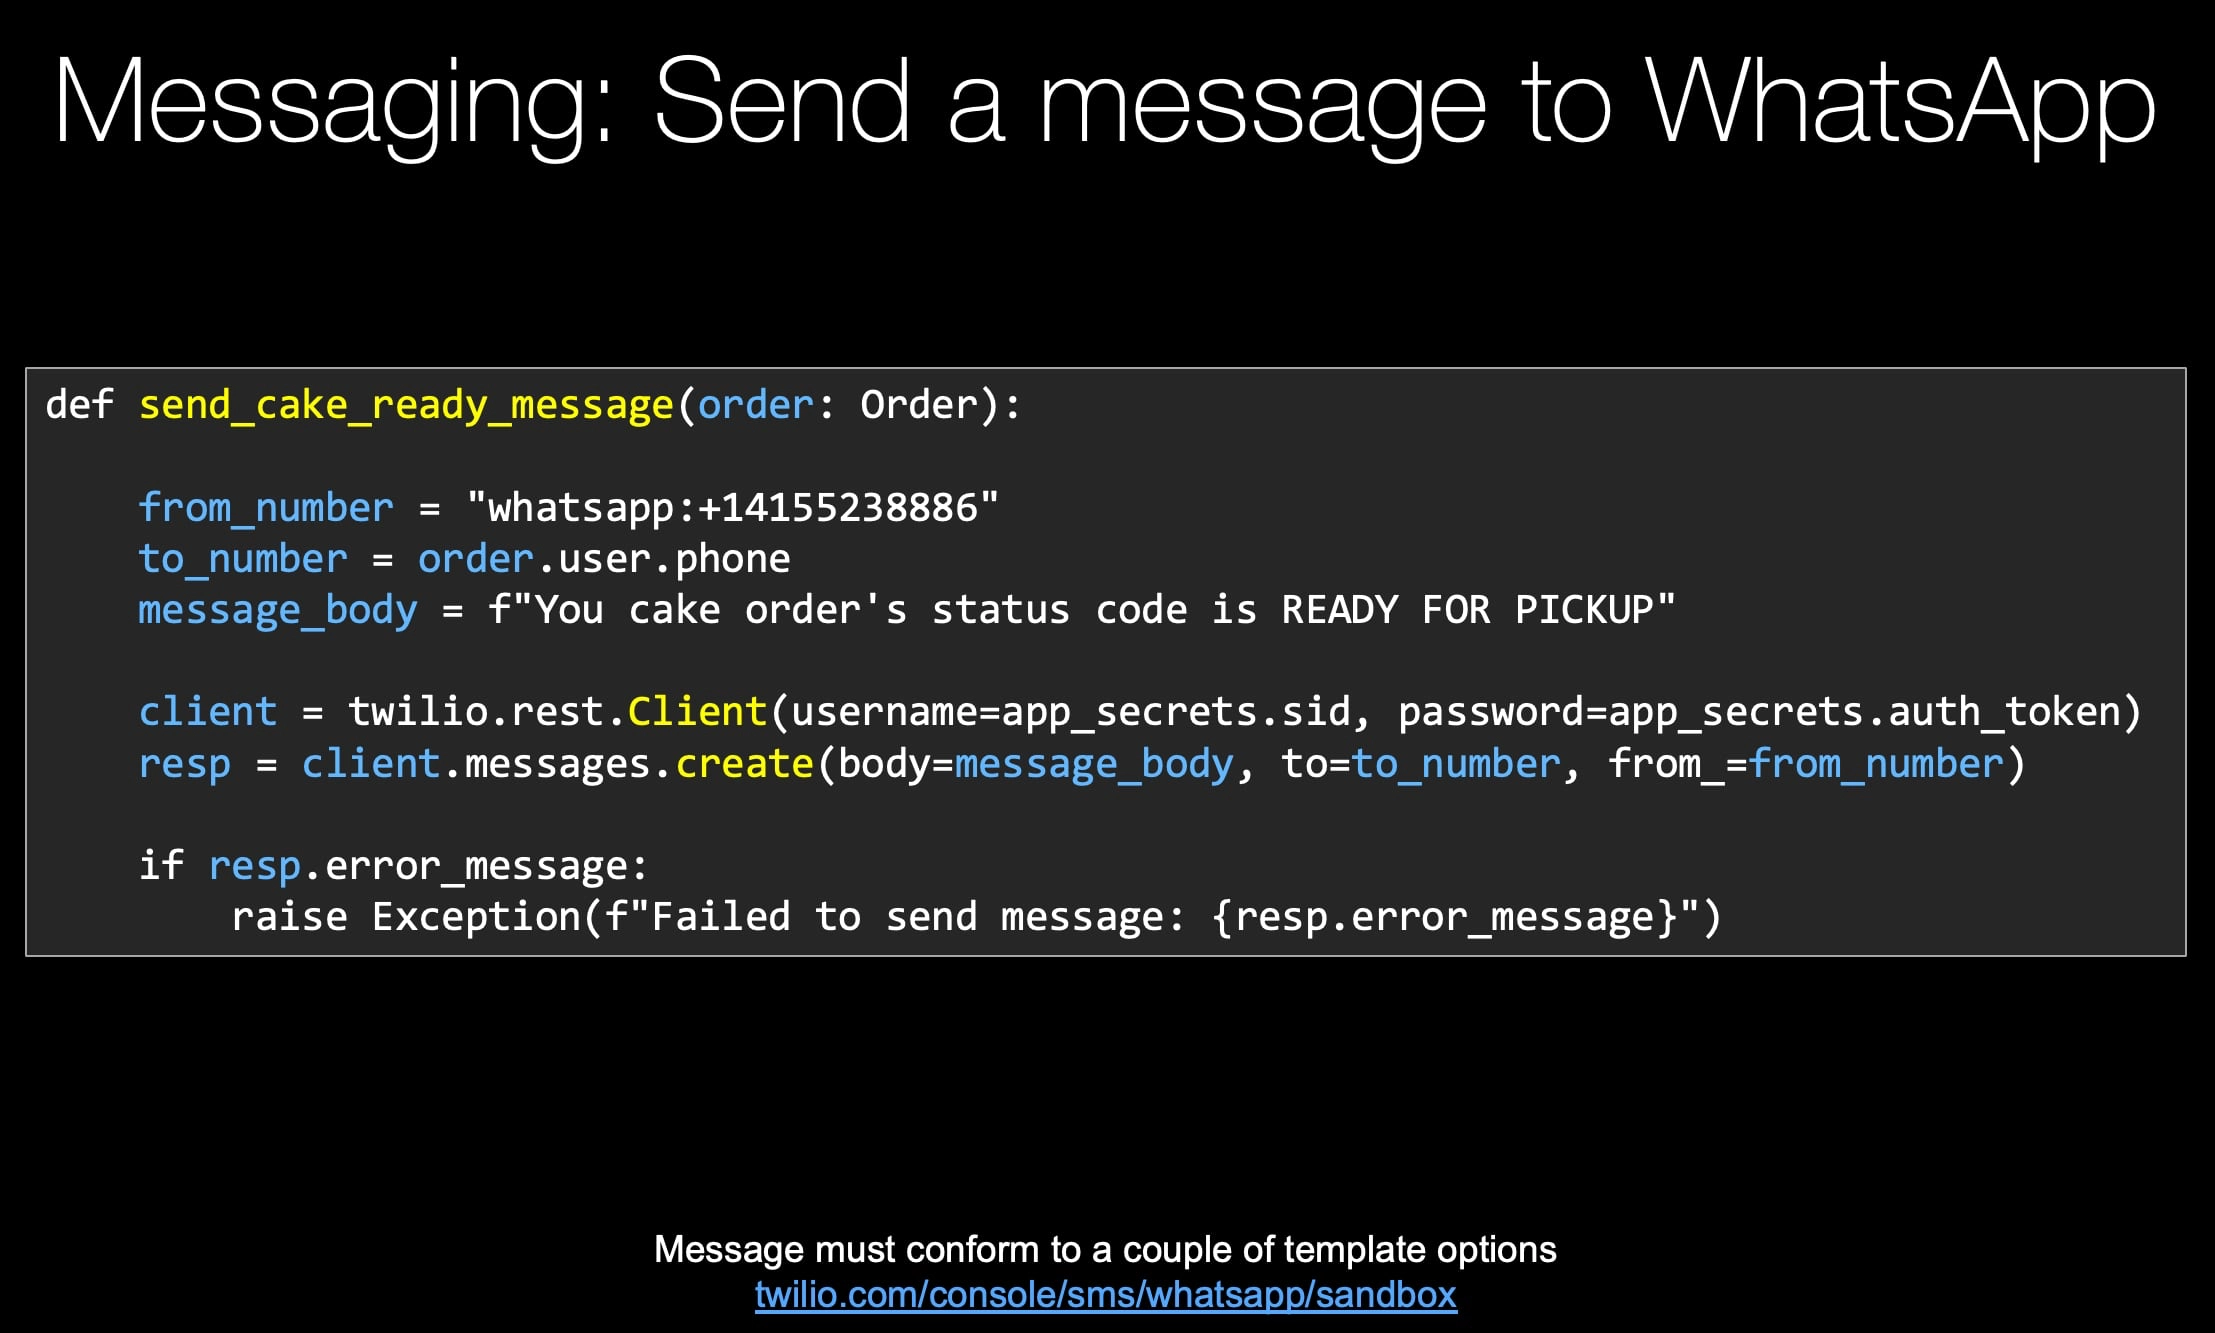
We've gathered all the information about the order from the user. We've at each step along the way verified what they entered was something that was actually valid. We made sure that if they asked for a frosting that it actually was a frosting available on our menu. So now it's time. Once we got all that information to determine the price of the cake because ultimately they want to purchase it and we're going to charge the money. We need to at least tell them how much it's gonna cost. Right? Recall We had our menu, API appear that gave us the flavors, the toppings and the frosting. We have a similar one for given this selection to generate the price. Over here, we've got cloudcitycakecompany.azurewebsites.net/api But now it's price calculator and we pass a bunch of things along on the query string. So size, flavor, topinng and frosting And these API's are maintained by our British Software Development Team. So we have our make sure we use our proper spelling over there. So what I'm gonna do is I'm gonna copy. Not the whole URL, but this first part up to the query string, but not including it. And we're going to use that over in studio to take what they've given us and determine a price. And ask them your cake is going to cost in this case, eight gold coins. Do you want to buy it? Yes or no? Alright. So back over here in studio instead of this test where we said onward, we're going to actually do some other stuff. So we'll go over here, and what we want to do is make another http request, and I'm going to call it PriceCake. And it's the right thing. We're gonna go over and call our API. So then our URL is here. Do a get with Form URL encoded data. and notice down here we have an Http parameters. This is the size of flavor and so on. So instead of trying to come, you know, build up a complicated URL we're just going to do it over here, so we'll have size, and then we need to use liquid to get the size So cake. see, this person came from the welcome.inbound.Message.body. Remember, this is the thing we started of with. I didn't mean to close it for you. Make it larger. So this will be widgets. Welcome, inbound body. This is welcome to the cake company. What size of cake do you want? The next thing that we need was we had the flavour and remember spell like that So this was askcakeflavor.inbound.body like so? So ask cake flavor, widgets.AskCakeFlavor.inbound.Body That's good. You have to add another will be our frosting. Very similar. You can imagine Frosting.inbound! Pick that one. widgets.AskCakeFrosting.inbound.Body And last but not least, are topping.inbound.Body like this, which wigets.AskCakeTopping.inbound.Body save. Oops! Save that one multiple saves on this piecer. let's go back and actually send one more message. Your cake will cost PriceCake.parsed Okay. And we're gonna have our currently gold coins. Save that. Connect them up. Alright, Once we publish it, we're ready to test. So can we call that PI with the right URL and get the right response back. We do. They're on to the next step. Hi. Welcome, Welcome. Let's get a small cake. Rainbow, Rainbow will be good, I think Vanilla on the toppings, The frosting in the topping Let's go for Sprinkles. Almost perfect. I guess if you're a program or maybe that's perfect. So we got the total back end, I need to pull total out of the parse value. So we'll do a .total on this, But you can see that we successfully took all that information Small rainbow, vanilla Sprinkle cake. And we sent that of to the pricing calculator and we did get 22 back. It's got to work on our formatting. So down here, we'll just say .total, we publish and order another cake. Rainbow. Oh, I want a small rainbow, some vanilla with Sprinkles. Check that out. Your cake will cost 22 gold coins. Come on over and pick up your cake. Well, we're not quite that far yet, are we? But we're getting there. We're now figure out how much the thing cost. We can ask them like this how much it's gonna cost. Would you like to order your cake. Now please say yes or no and then we'll go through, get their information. What's their name? What's their email and so on? And we'll start their cake baking in the bakery.
|
|
|
transcript
|
1:28 |
we can go a really long way working just in twilio studio using the liquid template language and so on. But eventually there will be external data that we need to get things that we need to verify and integrations with our own applications that we would like to make. The best way to do that is to call an external API through twilio studio to remember when the person says they want a cake and they go along a little ways eventually, we need to say Well, here, the types of cakes we offer, the different frostings, the flavors, the toppings and so on. Sure, we could hard code that into our studio flow. Then it would be hard coded. What if we wanted to run a special? Do you really want to go and have to edit this and change it? No. You want to just have it automatically pick up whatever data you have available and offer that up as part of the flow. So what we can do is we can call an external API. In this case, we're calling this Cloud City cake company.azurewebsites.net/api/flavours to get us the flavor of frosting and so on. So what we do is we drop make a Http request widget onto our flow, give it a proper name. In this case, we're just going to do a get against that. URL so as a get and URL and then formula encoded content, even though we're not actually passing additional information. If we were, it would basically be query strings, and that's it. That's all we gotta do to integrate. Working with external data and external API's into our studio flow.
|
|
|
transcript
|
4:07 |
We don't know the price. And we've told them what is going to cost. But what we really need to do is ask. Here's how much it's gonna cost. Are you ready to pay for that? But let me just nab this. Copy this message body. So I'm to type it again and get rid of that and want to come over here instead of doing a send. We're gonna do like we have been a send and wait for replies also be confirmed price. And the message is going to be this. Do you want you place that order, over here? If they say no, we're gonna need to do a test first. So let's get our split. We're going to test if they said yes, basically, in some way or another. If not, then we're going to send him a message like Sorry, I guess you're not looking for any cake. But if they do confirm yes, they want it, then we're going to send a message like, and that's just gonna be a little placeholder while we're working on this. So let's say CheckConfirm And what is our variable? It's going to be ConfirmedPrice.inbound.body And if no, there's no match, We're gonna say sorry. I guess you don't want cake. But if there is, and I have to determine if there's a match, So what could they type? They might type. Yes, but they might just have y type? y they might type. Yeah, they might type, please. They might type. Definitely. You can just go through the various things you would be willing to accept here, right? We could also loop around and make them say yes or no But I'm just going to keep it. Keep it simple like this. But if it matches this one, we're gonna go along here and say, Great. we'll need some info from you to keep going. This one will just say no cake. Sorry. You're not having cake with us today. Something along those lines. All right, publish it. I think we are about ready. So when I come through and make sure that they say yes. Yeah, Y, please. Definitely something like that. Which case? Down the path they go. Please tell me your name, your email and so on. More cake. Feel in rainbow again. How about you guys, but small. You have to do this a lot of times. Rainbow don't need to test our error handling. Won't try to not try to not trigger it. All right, let's have Sprinkles on our rainbow maple cake or pricing it at the API should have an answer and get a response back. Oh no, our order stopped. Actually, there's a really small mistake. Let's go fix it when we price our cake. We forgot to make that little connection right there. So when it got to this part, it priced it and then exited. Let's try one more time and we're back. Let's get a small, rainbow chocolate Oh, chocolate. Hey! And I think I'll go for Sprinkles again. Those sound fun. Perfect. That will cost us 18.5 gold coins. Would you like to place that order? Remember, we could type Y,we could type. Yeah, we could type. Definitely. We don't We type something wrong or something that is not confirmation is going to say sorry, you're not having cake with us, but let's go ahead and with try. Yeah, great. We'll need some info. That's actually the end of the workflow, but this is where we can go and ask questions like All right, tell me your email address. Tell me your name and so on. Cool. So it looks like we've got our pricing and our price confirmation integrated.
|
|
|
transcript
|
2:42 |
So we're almost done. We've got the price through our API. We've confirmed it. They said yes, we do want this. Well, we asked them the question over here. We confirm it with our split based on, and I've gone ahead and just added the final couple of steps, we need to ask them for their Name. We need to ask them for their Email, and then we're ready to send that off to our Python application to begin the whole process of placing the order, sending their receipts and so on. So I've simply asked the question. Send and wait for Reply. Excellent. To place the order, we're gonna need a lot info. What's your name? And then make a little personal like, Nice to meet you, Michael. Now tell me you're Email address. And then finally we thank them. Your order has been placed. Not really. See you soon and it will be under your name and your Email. The reason it says not really, is that functionality is not in place yet. And that's going to be written in Python over on our Dev machine. Not appear in the cloud, at least not within twilio studio. So let's do a final test to make sure this is working. And then we'll be ready to start writing some Python code to interact with these endpoints back here in WhatsApp. Say, yo!, Greetings Greetings. How about a small cake? Because you probably have a belly ache from all that rainbow cake. I do. That's why I'm going for vanilla. I'm gonna get some cream cheese on there. And how about it's hard to turn down some good Sprinkles, so we'll get a small vanilla cream cheese cake with Sprinkles on top. Do some pricing. How much that cost? Let's find out cool. That's 14 coins. A pretty inexpensive cake, it seems. Do we want to place it? Yeah, sure. We'll place it excellent to place your order. We need a little info from you first. How about your name? My name is Michael. Great. Nice to meet you, Michael. Cool. Little personal touch, huh? How about that Email address? Michael at talkpython.fm. So far, it doesn't matter. We can just put arbitrary stuff in here, but eventually, when we start communicating back over email, you want to have a real email address here? Awesome. Your order has been placed? Not really. See you soon it will be under Michael with email. michael@talkpython.fm. Pretty awesome, huh? We've got our entire workflow. And we spent a lot of time and energy over in twilio studio, which was great. We were able to build this nice interaction, but you'll see from here on out, we're going to be just handing a couple of things off to the Python side of things that would be writing a lot of Python code and doing most of the remaining work processing, the order notifying of the order complete and so on in Python code it'll just require a little bit of integration between Twilio studio and our web app
|
|
|
|
44:43 |
|
|
transcript
|
0:41 |
Welcome to another day of software development at the Cloud City Cake Company. It's time that we turn our attention to Python and Flask. In this chapter, we're going to build a basic flask application going to create an http JSON Endpoint that will allow us to plug that into the twilio flow, when an order is finalized and confirmed by the user. We're going to receive all that information that we've gathered up in Twilio studio and send that over to our Python application to save it to the database, to send them a receipt to kick off the actual baking of the cake with our admin backend all that kind of stuff. So been waiting for your Python? It's time to get it on.
|
|
|
transcript
|
6:02 |
It's time to finally start writing some Python code. We've been coding over in Twilio studio, and now it's time to write our Python code. And this is really, really exciting going to be one of the funnest parts of this course for sure. It's a good chance to remind you about the GitHub, repository over in chapter three. I've exported the JSON definition of what we've done so far for the workflow over there and sort that JSON file here. Be sure to go and get the GitHub repository fall along now in this particular chapter Chapter 4, I'm going to walk you through. Setting up the project in PyCharm is really, really close to what you would do in Visual Studio Code as well and get everything ready to go. And then afterwards, Chapter 5,6 and 7, I'm just going to say I opened it the same way Okay, so this is the one time well, sort of really step by step. I go through it, for our project. We're going to need to use Flask no surprise for our flask app. And whenever we have external dependencies like that, it's a really good idea to have a virtual environment. This is an isolated environment that you can install stuff, too, and only the things for this application and it's dedicated versions will be installed Gonna go over here, have a little cool app called Go to Shell that will open up the working folder there. And what I want to do is I want to create a virtual environments will say Python3 -m venv, That's the commander of the module, and then venv is going to be the folder name. Now with this folder, we have to activate it. So we'll say .venv/bin/activate, now on macOS and Linux. This is what you do on Windows. You would just say venv/scripts/activates or activate.bat. Why those are different? I have no idea you're in the windows. Just be aware. You got to do that as well. And you may also have to type potentially could type Python3 Python. Just make sure you're using the right version of Python there, and then we need to have a file where we define our dependencies. Don't need to create a file. Just use touch or we could use in our editor. I'll just go and do it here for the first time and then do the rest in the editor requirements.txt We're also going to have a file called app.py. So Windows you can just open this up in pycharm and create those two files I don't think touches in Windows these days, anyway. So now over here, we've got our application file. We've got our requirements and a virtual environment. Let's go ahead and open this in pycharm on macOS. You can drag and drop this onto the dock icon and will open on Windows and Linux. You have to simply say file open directory and browse to it. You see, it's a founder virtual environment. It's colored it and then ignored way. So that's good. And it's got are two files here. It also automatically discovered our virtual environment, this one that we had created. If it doesn't do that, you can just go over here. Sometimes it doesn't say add interpreter and browse to it, but let's go and set our requirements first. We'll say flask and says, Oh, look, you're going to need to install flask. So in pycharm, I can just click this button and frequently I will. But this one time we'll go down to the terminal notice the virtual environment should be active and we'll say pip install -r requirements.txt How about we try it with two l's There we go Now, We always want to recreate a virtual environment. It's almost always out of date. The pip command is out of date, which is unfortunate, but we just run that little thing to make sure we don't get warnings again. Right now. We should be good to go. Take a moment for PyCharm to realize that was installed. And now it is. If you worked with flask before, it's really easy to create a minimal flask app. So we'll just say import flask. The way it works is we create this thing called an app, and we'll say flask.flask(__name__), pass in the name of the file Here, we're going to define a function. I'll call it Index that's just going to listen to / and it will return Hello world. Now, this is not enough to make it an in point that Flask will host or the Web browsers can talk to. We have to tell flask, Hey, this is part of somewhere URL's we say app.route ('/'). That means just you go to the server or domain name. That's what we want. All this is great, but it's not enough to actually run the program. So we're going to use the Dunder named dunder Main convention, which is only do this command if you're actually trying to run the file, not trying to just import it and pycharm happens to know that this is very common. So every type main tab it will write the code to say, Am I being run directly or am I just being used in other ways? So if that's the case, we'll say Run and of it goes. Final comment here. Notice at the bottom. There's like these little comments. If I format, the code will do one thing by going cut a line out. It'll show you what command that was and so on. So you'll see me using hot key's and not just the menus throughout this course, and those over here will show you what the command is that I used what the hot key was if it was a hot key, or even if you click a menu item. If I click this even though I click the menu item, I still get to see the hot key pop up there. So if you're wondering what's going on, be sure to keep an eye on the little green section down there at the bottom Last thing to do is to run it, see if it works. Now there's a cool button right here that looks like she's going to click it and run it and even shows me if I had control+r it'll run it. But there's nothing set to run, so we're gonna choose that we're gonna run this app. Then it runs down the bottom. It looks like it's up and going, and subsequently I'll have the controls to run this app. Click on it and Hello world not super impressive, but it is kind of impressive, how simple this app is that we've got here. Get everything set up. So just 13 lines of code with all the proper spacing in there and we have our hello world flask app, up and running.
|
|
|
transcript
|
6:21 |
Now, when you look at this, it seems like it couldn't be simpler, right? However, this application is going to grow and grow. It's going to get more complicated as things come along. For example, we're gonna have to set up our database. We're gonna have to set up our secrets, and our API key is that we can import. As the APP starts, we're going to have API end point. We're gonna have also admin HTML style Web methods. Not all of those things belong in just one file. It's very common for people to say, Well, you just start with app.py and flask and then you write, Well, that's true, but it doesn't have to be that way. The default most obvious path with the way flask works is to do those things, but it really will not suit you. Well, as your application grows larger and larger over time, what I'd like to do is in this short section, just get a little structure some organizations. So as our application grows, it's really clear where what functionality lives, and it's not all piled in together. So we're going to have a couple of folders are going to create well, API. So we're going to have some API endpoints that are being called by studio, by the flow there, and we're going to have some Web in points that are just the HTML pages of our site. So those are going to put into the Views folder. We're also gonna need a place to put the static HTML templates and create one called templates, and you'll see that we'll have more as we go. But this is enough for us to get started. So this is one of these HTML views now it's not really that much HTML. It's the string hello world, but it's kind of the general role that it's going to play and let's have one more. But when that's going to process an order and well, so I'll just call this ordered like so, like this. So we'll have some API stuff that's going to live over in the API. will have our homepage sort of things over here, so I'm gonna create module called home. And let's just take this and stick it over there. That's that red squiggly under the APP. What are we supposed to get that Hang tight We'll fix that in a second. Over here on this side, we're going to have another Python view API module. I would call that order_api and again, this stuff over here, it's going to go there, like that. And again we see this warning. So here's one of the reasons why I said that flask encourages you to jam all the stuff into one file because, well now, how do you deal with this? We've just somehow to find this API reference to this URL's set attached to this order function, and yet we can't use it. We can't even import this piece because if we import that and it's going to create the circular reference that Python does not like. So flask has a really great solution for this. It's just not used as much as I wish it was. And the idea is that there's a thing called a blueprint, and what blueprints do is they let you define all the routes and then take that blueprint and register and say, Here's a bunch more routes that you didn't see a little bit of go, But let's register them as if we had done this. So we'll come over here and say, this is going to be flask. We gotta import. Thank you. PyCharm. Give it a blueprint. And then it's going to need a name and import name. And you can also do things like change the static folder, Change the template folder so on. But all we're gonna do is just call this order API. like so And then down here, where we saw App along with all of its behaviors that it had, like, route and so on. We use a blueprint and now we've got blueprint.route and so on. This is exactly what we're going to need also over in the home view. this is the home view, sorry. They will put home,home have to do the same thing over in the order API, like this. So this will be blueprint. A little format. Everything is looking good. Now this is not going to make it run. If I try to run this again, I refresh it. Now, the home page 404 not found. What's going on? Well, just because we have these blueprints defined, they're not included in the App. So what we have to do is go over here and say from views import home and from api import order_api and then we say app.register a blueprint, home .blueprint and you guessed it api.order api.blueprint Okay, clean it up a little. Now, if we run it, that's what Hello world works and Oh, yeah, Over here we can go to api/order. And we get some random JSON back. Fantastic, as a little bit of a diversion. But I really think you'll find it valuable. And we're going to continue to evolve and refine this. You can find it really valuable to take our application and partition it by functionality. All the stuff that has to do with a home HTML thing, goes here all the API stuff about ordering cakes goes over here. HTML templates go there. Final thing while we're on. This is we can go to Pycharm and say mark this directory as a template folder. It seems like we might not need to do that. We can already render templates out of their these jinja templates that you're probably familiar with from Flask. But if I do this, it does turn on some interesting functionality. It goes over two pycharm and says, Oh, you're working with HTML templates. Hold on, Hold on. What flavor of dynamic language do you want to use It says We don't know. So we say, Well, let's go and configure it. Wouldn't it be amazing, if what happened when it said, Do you want to configure? It took you to the feature for that. Nope. You got to go over here and say, - template, down here under language and frameworks, there's template language and notice this is empty, but it can be million or Jinja to or jinja 2. Because jinja 2, is the way to do it with flask. We're going to pick that. And now if we have an HTML file over there and we interact with it, it's going to give us auto complete colorization, syntax highlighting and whatnot for jinja on top of plain HTML. All right now, we've got our App organized in a much nicer way for it to grow without growing in complexity.
|
|
|
transcript
|
3:05 |
I think applications are more inspiring when they're beautiful and feel a little more realistic. And yet this whole horse is not at all about Web design, and this application is really not even about Web design at all. But let's just take one minute and quickly move in a design that I've already created so that we can feel a little more at home when we're working with our Web app. So over here, let's go and create a directory called home. What we like to do it is each module and the views gets a folder, and then each method within that module gets a file. Well, come over here and stay home. Then inside home, we have index. We have an HTML file called Index, like this. Let's call this cloud city We'll just keep it static for just a moment. But let's get flask to use that file so we can come over here, and instead of this, we can say and flashed that render template, and we can give it a template name, so we could say home and check that out as I type H because I set that up as a template folder pycharm like Oh yeah, so I can help you find the files in there. Which one you want to render? Home/index. How cool is that PyCharm Auto completed that I didn't cut out typing that in. And then once it's here, notice I can click on this to jump back and forth where it's used, and then where it's consumed. That's pretty awesome, right? So here we're rendering that template and let's just run it one more time and make sure we have slightly different Hello world. Welcome to Cloud City. And if we view page source selection by the whole page you can see that is that simple page over there. So, like I said, this is how we're going to set it up. But I don't want to use this design. Let me, but in a better design, copy something I've already created and just look at it. So now we've got two views over here. We've got an index which extends this shared layout that the entire site is going to use, and it's got this big Hero section, a big image banner at the top and then some information about you know how you can get started with a WhatsApp message or something like that. You already saw this design when we played with it earlier. This is close. The other thing that we're going to need if we're going to need to have a static folder blask already uses this blask static as the place to serve static files. We don't have to do anything to make it do it. It just has to be present. And then we're just going to copy those static assets over here. We've got the CSS files, some image files and so on. And now, when we gave all of that and we re render it after we started, of course. Now look at that. We've got our beautiful design Cloud City cake company. We've got our link that I'll just fire open WhatsApp message to the right location, and we have a link, although no destination or admin site. All right, so now we've got a little bit better design and a little bit organization with our CSS images in our shared template, again not required for this course or really for this app. But I do think it feels nicer to have something that looks good.
|
|
|
transcript
|
3:20 |
In order to integrate with Twilio. What we need to do is create our API endpoint. Now, we've come a long ways with our flask application over here, and we've worked on our home view and we've had our design in place. But now we're ready to build the actual reason that this site exists, at least for integration with twilio. And that is to do our order api, That is just basically a simple flask end-point that returns JSON Now, the fact that it returns JSON is already what we want to do It just takes a Python dictionary and converts it over to JSON. But what we want to do is we want to accept a JSON body as part of our API. Over in twilio studio, we're going to come up with a JSON document that will be posted over to this end point. Right now, it responds to get, what we want to do is we're going to go over here and say the methods = ['POST']. We wanted to just respond to post. So now, before I put this, let's test it out here. If we go to /api/order remember, We got our JSON back here, but if we put this, obviously it's going to say no longer possible. You have to do a post not to get, so that's going to be fine. Now we're going to get as I said, some sort of data posted over. I'll call this just data and in flask, the way you get the body posted over as JSON. As you say, you go to the request, which is always this sort of ambient thing. flask.request and you say get_json(force = True), if you want to force it, even if it doesn't think the type is that and let's just return, let's just echo back the data we got, return{"received:" data}data itself. We could just return data, but it's gonna be a dictionary. But just to show that we've kind of done something with it, we're gonna put it like this. Now how do we call it? How do we pass something over to it? That brings us to a cool tool called a postman? The over postman it allows you do much more controlled much more highly controlled requests do various verbs we're gonna do a post over to http://localhost:5000/api/order. Singular. All right, And then we have to pass a body over so we can go to Raw, Say it is JSON, JavaScript and we can just have name need, double quotes, in JSON, "name":"Michael" and "location": "Portland", let's just say active is true because we want something other than just strings passed over. All right, let's go do this post, see what we get. Look at that. We posted it over our application received it, that a little receive that data said, Here's what we got. Well, it's just echoing it back, of course, So we're not doing anything interesting yet, but our API endpoint is here and ready to receive JSON posted over from anywhere. Right now, it's just coming from postman, but ultimately we're going to go to Twilio Studio to the flow and say at this stage, when it's time to do in order, post all the information we've gathered through our chat, back to our order endpoint here
|
|
|
transcript
|
2:39 |
We saw how to call an API from Twilio studio. But how do we create one? Well, we're going to use Python and flask, and it's really, really straight forward, but we're going to define a Python function called cake_order(). You call it whatever you want. This name actually is only needs to be making sense. You it's not used publicly. We're going to add a route. And we used to blueprints this properly, separate our code and not just jam it into one giant file. So blueprint.route give it the URL until it accepts posts. Remember? That's what we were doing over in studio. We said we're going to post JSON body, so make sure we set it to be post. Then we need to get the data submitted. My twilio studio. So we say flask, request get JSON. That gives us a Python dictionary equivalent of what we had over there Is that JSON document, we used pydantic to convert and validate that model that data So we created an order model and it had a cake and a customer and a price and so on. So we just take the data and this double * thing means take a dictionary and converted to keyword arguments, passed to the constructor or initializer here that generates the model data, which is all validated and verified. We had this user service which recorded the order and created the user if necessary. So we passed over things like the cake customer and price. And then finally we create a response because, remember, Twilio Studio wants to say, thanks that worked, your order was accepted and your orderid is 700 or whatever it is. So then we're going to pass that back, and because we want to have a dictionary and not a pydantic models return, we have to say response.dict And that's all we do. This is all of it, except it's not because maybe something goes wrong. Maybe they submitted the wrong data and that model validation that order model **data Maybe it says, Whoa, the customer part is missing. That's not going to work. That would look like our service crashed. But the problem really is what they submitted right. In order to communicate that back, we put this into a try except section, and then we send back some kind of error here. We're just saying error code 500. But we could also catch a validation error out of pydantic and say, That's a 400 or 422, you know, invalid data was passed in all sorts of things like that. We could have different error exceptions and send those back. But the main takeaways come up with their body, come up with the error code. That's the status code. And then we just say, flask.response. Give it the JSON has text, set the status code, set the mimetype application, JSON, and send it right back to them. That's it. That's the entire order, API implementation. And this is how studio and our Python flask application work together to hand of the ordering process.
|
|
|
transcript
|
3:23 |
Let's jump back over to Twilio Studio. Now here's our workflow that we've been working on throughout the course. If we go all the way down to the bottom here, remember, we got their email address, we got their name and we are already gathered up all the details about their order And we said, Super, your order has been placed. Not really. Why not? Really? Because we didn't have our Endpoint that we just finished billing available to send. So let's go and add that here are not using voice I'm going to do and make an http request here. I'll call this order API. And as we saw, the method is going to be post now the domain. I'll put something in here. Do you think that's gonna work? No we have to come back and figure out something for that. Let's say we're going to add some JSON and let's expand this so we get some room. What we're gonna do is we're going to construct a JSON document that's going to have customer data and the details of the cake order data. Consider you watching me. Type that out. Let me paste something here like so and then we can have a look at it Our overall document is going to be that there's going to be a customer with a number, name and email, and there's going to be a cake, which is all the stuff that they filled out and then also the price that we've quoted them. So the number all of this stuff here is going to be filled out with liquid. Let's do this one first. So we'll come over here and we'll say widgets. GetName. I believe we called it inbound.Body body email is going to be the same. GetEmail.inbound.Body now number is interesting. We didn't ask them their number. They sent us their number when they connected, right, That's way up at the top here, on the trigger. So what we can do for the number is we can say trigger.message.From, So we got their number. We got the name that they've answered, entered. We've got the email that they've entered, and we're just going to do the same thing for topping, frosting, flavor, size and price. So when I go through all of the various widgets as cake topping, as cake frosting, as cake flavor. Get the inbound body. That's the various answers they gave. And then we're gonna go to the size one, which was the welcome. Their response to the welcome over here when we asked them what size do they want? And the last one slightly slightly different here, because this comes from our other API call Remember, we confirm the price here where we priced the cake with an http Get request. We got back and see regular widgets.PriceCake.parse.total So that's what goes right here. Perfect. So that's the price in gold coins that we're gonna have. So everything is ready around our body. Let's have made a mistake, which we'll find out soon enough and will fix, of the top. We still need some way to call this, so it's not exactly going to work, But we've got everything set. As soon as we find a place to send that request to.
|
|
|
transcript
|
1:59 |
At the very end of our studio flow, we gathered up all the information. We need to send that over to the Cloud City Cake Company and actually record the order. Tell the Bakers here is what the user, through chat through WhatsApp has decided they want. Let's get that started. So in order to do that, we decided to create an API of our own. And we did that in Flask, and we hosted it through in ngrok, Remember, one of the challenges is how does Twilio Studio running up in the cloud get all the way back into your machine, so it can call those API You can test it. So we did that with in ngrok, and that's what will be this cloud city.ngrok.io domain here. And then it goes to /api/order. And this time we decided we're making a change and we want to submit a complex JSON body. So we made the request method post. We changed the content type of application, JSON. And then we just typed out the JSON document here at the end and where the values went, we put whatever came from the various widgets and things in the flow. We use liquid to get that back. One thing to realize here is that puts the raw text into this field. But in JSON, that has to be put in quotes unless it's a number or something like that. But strings have to go in quotes, so we have to put double quotes around both of these. It's not super obvious, but that right there is a double quote, just like the one at the end of the line. The thing that's happening, I believe, is that blue outline that highlights the fact that this is some kind of liquid template section. It's Z order. Its position is above or in front of the part of the double quote, so just be really careful. There's weird things around, like spaces and quotes that kind of get obscured. So you just have to do a little testing. But be really careful on the lookout. That's double quote on both ends, even though visually, it doesn't look that way. So this is a really great way for the studio flow to hand off control of what happens next over to our flask application. and it was Python from there on up.
|
|
|
transcript
|
4:34 |
So we've run into a bit of a problem and I have a fantastic solution for you, but let me lay out the problem really quick. We have our local Web API running right here, on local host. We cannot get to it outside of this computer. It's very unlikely we want to set up some mechanism to do so. We've got this computer which probably is a firewall. It's probably behind a wireless router, which has some kind of NAT firewall. Exposing that all the way out to the Internet is tricky. And then our ip changes and all sorts of stuff can be complicated there. I'm gonna show you a really cool general purpose way to expose local API's and Endpoints and even just Web applications in general, outside of our network, in a really, really straightforward and simple way. But we're going to use a tool called in ngrok The idea is that in ngrok will create an ssh tunnel from our computer all the way out to the end. ngrok servers, then the ngrok servers, Listen on the public Internet. So what we're gonna do is when a point twilio studio at the public in ngrok Server, which will, behind the scenes, find a way for that request through ssh to actually get to our web endpoint as if it came directly to us. And that's going to be how we are going to develop and test this end point is going to be really, really awesome. All we gotta do is download in ngrok and you can see we're gonna run it right there, like so it has a free version, so that's great. So we're gonna hop over to the terminal if you're on windows do this in the command prompt and what we're gonna type is in ngrok, and then we're going to type the type of tunnel we're going to create. What? We want to listen to http. Also https traffic. And then we say, the local port on this machine that we want to listen on. You look over in flask. You can see that there's Port: 5000 right there. So we say 5000 and check that out. We got an http and Https port like so, And if I just go throw that address into the browser, check it out. It's cloud city. But cake Company. So this is the actual end point. This is our our local server running. See, down here we're getting those requests by Erase that and make another request. You can see there's our get right there. So this is our local Dev machine, our local Dev environment exposed out on the Internet in a public way. This is a public end point so we can put something like this in the twilio studio and test our code. However, instead of just running it this way if you have a paid account. No if you don't, this is fine. Just do that. Take that. You're all but notice if I rerun it and now have a totally different thing. 5c, if I rerun it again and now it's f0. Every time you rerun it, it's going to be starting over. So if you're doing this and you don't have a paid account, just run it and leave it running. It doesn't matter if the website up and running or not. But what I'm gonna do is I'm gonna go over here. I'm gonna say sub domain is Cloud City and notice this I can go to a more stable endpoint cloudcity.ngrok.io. That way, throughout the course, I don't have to keep changing it, going back and sinking it up and whatnot again. This requires one that domain to be available currently and to do you have a paid account. But if you don't just use the temporary one, So let's go over here and put this in, as the end point right here. Now we don't want just this. Remember, we want api/order, but this may well do it. It's it's save, and now we're going to be able to go and do our post against that endpoint. Let's just double check that really quick with postman. Do a post against https for Cloud City. Send it and sure enough, we're getting something back. Let me just make a change. Show that actually this data is live. It's not just some kind of caching. There we go. It looks like a round trip through in ngrok, exposing our API to the public Internet is up and running. You can use ngrok for all sorts of amazing tools. If you got to do like a webhook at Git Hub. If you're building a mobile app and you want to be able to debug, the API calls that the APP is making all those kinds of things are possible and easy with ngrok. Definitely, definitely recommend it, and it's going to be what we'll use to integrate Twilio studio into our dev environment before we push our API itself into production.
|
|
|
transcript
|
3:33 |
Now that we've defined our OrderAPI call here. We're going to need to go over and and put it in this order. So we go and call it. We'll just throw away this order placed in a minute. Now, over here, we've got our Cloud City ngrok Endpoint, and we still have our in ngrok running here. So this is good. And we have our JSON body that's being passed over from all the elements that we've gathered. So let's make sure we save and then publish all those changes. Now we go over to WhatsApp and we can send a message. It may be too long since I've done this. Remember, our sandbox only listens for a little while. We'll say hi and we need to reconnect our sandbox. Of course, I could have done this, but I'd like you to see this because you're gonna run into it a bunch of times. So let's go ahead and go over here. And what I've done is I've gone to programmable messaging. Try WhatsApp, and it gave me my personal code. You use your code, not mine, and I'm going to connect that over, great now, We're active again. So cake me. Let's go for a small, as you know, we're gonna have to order many cakes throughout this course, went out to our menu, API. And it asked, What are the options? And we got all those stored them in our variable. So we're going to get a vanilla maple, sprinkles cake. That sounds really good. It'll cost 19 gold coins. Fantastic. Let's go for that. Excellent. To place your order, tell us about yourself. Not really. Over here. What happened? Did it work? Well, probably it's running. If we look over here, we can see there was, in fact, a post, and it looks like it put this as a clear string. But that's just the encoded body the way that it got posted. So yes, it did. Now let's do a little bit more. Let's print out data and let's also put a breakpoint right there, that runs in the Debugger. Now, if everything works correctly, we should be able to actually hit a breakpoint here. Now it may seem simple. Okay, well, it stopped at a breakpoint, but this is incredible. What we're doing is we're going out to the public Twilio Cloud. We're talking to one of the workflows there. It's orchestrating all this WhatsApp conversation, and at the end it's going to take all the data gathered and post it back to in ngrok in ngrok gonna funnel it over into our local flask app. We're going to do a break point during the workflow for twilio. Check it out and carry on that to me, it's fantastic. All these new things coming together. It sounds like fun. Let's try it. Get a small vanilla cake, chocolate and Sprinkles that seems reasonable, enter our contact info And I hit this. It should go and call our API. Let's see what happens. Boom. How about that? Here's our break point. You can see we've already got some meaningful stuff up here in pycharm. If we expand it out, you can see we've got a cake and a customer There's all the values. There's my email address is my name the vanilla, chocolate cake with Sprinkles Small costing 8.5. That's it. So we've now got our data passed over correctly from Twilio Studio through ngrok back into our flask app, and now it's time to start building out what to do when we get some data from our WhatsApp conversation.
|
|
|
transcript
|
7:32 |
Now it's time to actually receive the data. We got it as a Python dictionary out of JSON, but I want to do more. I want to validate it. I want to put it into strongly type classes in Python, so that brings us to a library that's fairly new. And it's not often used or not naturally used with flask, but certainly should be going forward. And that's pydantic. Let's just look an example real quick. So pydantic is a way to very simply define classes using Python types. This id is an integer. This is a string with a default value of John Doe, because it's set to a string. This is a daytime, but it could be none or nullable. Then we have a friends, which is a list of integers, and then we have some, JSON Data is actually a dictionary, but right it came from JSON being posted over and check this out. If we just go to this class way to find and say, load that data, it's going to validate and potentially even convert it. Notice that the ID. Here submitted as a string, but it can be parsed to an integer, and it is, notice we have a list of integers, but one of the strings. One of the things in the list is a string in the result it actually converts it and validates everything through a list of integers, even though they're not. Not all of them were and so on, really, really need. So what we're gonna do is we're going to use pydantic for our application, and we're going to define sum pydantic models go along with it. So it's time for a new requirement. A second one, I guess pydantic, And let PyCharm install that. If not pip install -ourrequirements.txt is the way to go. And what we're gonna do is we're gonna create a separate section where these classes that model the state exchange go. We're gonna have a couple of them throughout the course We'll call these models that's typically the way they're referred to within pydantic. And I'm going to add something here or order. We're going to get an order model and within here, we're going to have a customer, and we're going to have a cake. But let's see about finding a couple of classes here. So have a class customer and I'll just put it empty for a second. And I have a class cake, which is also empty for a second, in our order is going to be a class I'll have a cake order and it's going to have a couple of things. It's going to have a customer, which of type, the mer, import that which is going to be cake. So it's also going to have the price that is just going to be a float that how we specified it. Let's go double check, our price is part of our cake. Let's change this. Let's make it actually, separate like this match, what we're doing, perfect there and published that now this is pretty neat. But in order for us to use pydantic, you can see there's nothing about pydantic yet. These are just all types in Python. Does this have to derive from base model, which is a pydantic type? There has to be true here, but also for the nested items like customer and cake. So let's go over here and make this a base model and this a base model just like I did with the order. Let me go and put the types here, or the fields that we're going to need along with their type. We look back for our order, we're gonna need a topping, and I'll just copy this over bar cake we're going to have is a topping. And all of these are going to be strings like so by sounds like it could be an integer. But remember, that's small, medium, large and so on. So here we've got these types, they don't have default values and they're not optional, so they must be supplied for this to validate. I want to do something similar for a customer. And let's go double check what we're passing over here, again These are all strings like that. And as simple as defining these little classes here and then putting together like this, we're gonna get automatic data parsing and conversion, and it'll even reverse the hierarchy. Right? So it knows there's a customer and the customer is itself one of these models and so on. So it's going to build this all up, and this is gonna be really easy for us to do. Let's just go over here and use our model. So we'll go over here today. Let's call it order. We're going to use our cake order. And all we have to do is take the dictionary pass it as keyword arguments. The way to do that is our store data. And now let's just return our order. And I guess we could set a little break point this while this cake order because it's conflicting with the name of the function also called Order. Here we go. All right, so let's put a little break point here, I guess. And have it run again. How about we order some more cake? Has more cake. Feel like some rainbow cake with vanilla coming on? Alright, here we go. This is gonna call back through ngrok into our service and let's see what happens here. Hit a breakpoint and we've got our data, but we have not yet converted it notice, Here's our customer info. If we take one more step in debugger, we've now converted our cake order over and check this out. If we expand the cake order, we've got a cake and we've got a customer. We can expand the cake and it's got all the data flavor frosting and so on And the price is an integer. How did the price come over in the data? Let's have a look. Look at the price came over as a string. Well, 24. That's not actionable. We can't use that. And so in order for this to actually be a number we would have to do that conversion our own, our ourselves and make sure that that worked not with pydantic automatically is converted. And all the hierarchical things are parsed that we're going to use pydantic for all the data exchange or our entire app. Really, really nice. It's a great extra layer to add into our API to make it super easy to exchange JSON data with Twilio studio and any other external API's that we work with. One quick thing. I did hear that maybe we should just throw on it doesn't really matter because we're not actually using this response or anything. But in order to return one of these as part of this dictionary, it can't directly be returned. We have to do a really simple dictionary like this okay, that will convert it over to a dictionary that then I thought can take and turn that into your response. Now this should be perfect.
|
|
|
transcript
|
1:34 |
Let's look at one more super quick thing we can do to make our pydantic model data exchange a little tiny bit better over at pydantic. They have this thing called model config, where you can set all sorts of information and auto transformations and validation for your models so we can set the title. So how it refers to itself, things like strip off any white space on any strings or what the maximum or minimum length of any string we're willing to accept is, and so on, the way you do it is real simple. There's an example right here is you create an inner class called config, and then you set those elements those validations there. So let's go over here and go back to our cake and we'll say, class config. What we want to say is any string strip the white space. So, for example, if the topping somehow got chocolate space or space chocolate, really, when you just wanted to say chocolate and of course, we could go write code to say if there's a string here and make sure that we take away any spaces, tabs, new lines and so on in there but we don't have to. We can just use this. But we're going to put this on all of our various classes like this. If you want to do further validation like the price has to be greater than zero, but less than some number or whatever, that makes sense. You know, you can add all those types of things here. We're just going to keep it simple. But I wanted to point out that we do have these really advanced automatic conversion and validation features of pydantic that we can layer in with this inner config class.
|
|
|
|
53:45 |
|
|
transcript
|
1:06 |
Everyone was thrilled with the flask app we built. They can't believe how quick all this is coming together, but there's no persistence layer yet. We're not really saving any data, are we? And databases are exactly the kind of thing we need. You may have a lot of experience with databases. You may be entirely new to databases, but don't worry. In this chapter, we're going to use a really cool ORM object relational mapper that lets us write plain Python classes and convert those into database tables and database queries. We're going to use SQLAlchemy and SQLAlchemy is the most popular way to access relational databases in Python. We'll see that we can use the SQLAlchemy to actually generate the tables and then form the queries. So even if you're new to working with databases, don't worry. There's not another query, language and definition language, all that kind of stuff. You have to learn. We're just going to use SQLAlchemy and Python classes, and we'll be off to the races. We'll round out this chapter by updating the order API and saving those new orders coming in from Twilio Studio straight into our database, let's dive-in.
|
|
|
transcript
|
0:57 |
In this chapter, we're going to be talking to a database. And rather than directly writing SQL queries and insert statements and delete statements and so on we're gonna be using SQLAlchemy. SQLAlchemy is an ORM, object relational mapper. You may know of it. It's certainly the most widely used ORM in Python. We're not going to go into each and new SQLAlchemy In this course. We're just going to use it. So if you're familiar with it, fantastic, just follow along. We're not going to be doing anything super advanced or fancy with our ORM. But if it's totally new to you and you want to learn about it, don't worry. I put a special appendix at the end of this course that you can go and find where you can learn all about SQLAlchemy and then, you know, come back after this video and carry on, and you will also be ready to follow along. SQLAlchemy is a ton of fun to work with, so I hope you're looking forward to using it to actually saving all of these orders and customers that come in properly to a database.
|
|
|
transcript
|
3:13 |
Well, let's start writing some code. And now that we've moved on from Chapter 4 to 5, I've made an exact copy of what we finished with with 4 and what we're going to start with for 5. Be sure to update your location in GitHub. If you're following along with the code, there, also notice there's a Cloud City flow start. This is the JSON definition of our studio flow, as it is at the start of this chapter. If I make changes to the flow, then I'll come back here, of course, an update that as, well, fantastic. So in order to use SQLAlchemy, the primary thing we do is we define classes, and these classes map over to tables in the database, and they also linked together through relationships. Maybe I will call those models, but because we already have models from pydantic. Remember our data exchange format for our API's is here. We're going to create similar things. But instead of being something that drives from a pydantic model and does that kind of thing, it's going to be a SQLalchemy model with similar things. So just to keep them distinct, let's go over here and make a directory called DB. I'm gonna start by defining the top level classes, and then we're going to make them SQLAlchemy compatible, I guess, if you will. So let's work with the order. The two classes were going to work with our order and customers or users, who are users are going to have multiple orders, potentially or none, I suppose. But we'll start with order. So the way it works is we're gonna define a class and seems like order is a good name for it and then the fields of the class map over to the columns in the database. So we're going to have an ID, which is going to be an integer. And let me just write this out in plain Python and then add on the SQLAlchemy aspects to it. I have a created date, and that's gonna be a date, time, datetime like that. I like all of my records in the database to have some kind of information about when they were created. But another thing that our order is going to have to do is it's going to have to go through this workflow first we get the order and then we start working on it. Then we fulfill the order and let the customer know your cake is actually done not just received. We're going to have a fulfilled date as well. And we have information about the cake, like the size which is a string, remember, Small, medium, large as a flavor. Now I'll use the British belly because remember, our API is implemented by has, British billionaire, so just keep it consistent. We've topping also a string like Sprinkles. frosting like chocolate. Also a string. We have a price, which is how many gold coins we gotta pay. This is a float. And then we're gonna have some information how this relates over to the user because stand alone here. This is a great order, but who does it belong to? We're going to use a foreign key by specifying the id of the user. There we have it. This is our order class and sort of bare data form before we turn it into a SQLAlchemy classes are blank order class that we're going to store in the database. It's going to have an ID, created date, fulfilled date, size and so on as the columns with the data types that we've shown here.
|
|
|
transcript
|
1:31 |
The other main SQLAlchemy class that we have to define is going to be our user. And let's just go ahead and make a copy paste because there will be some similarities here. So I'll just call this user and we'll make a few changes. So user like that, we're going to have an id. In our database, as every entry has to, also have a created date. But from then on, it's going to be a little bit different. So our users are going to have a name, which is a string, a phone, which is a string, an email, which is a string. We're also going to have orders, which is going to be a list, and let's actually use the typing. And this is going to be a list of being come up here and import order and say this is a list of order and so on. All right now that defines our basic user class, and we want to do something similar here. We're going to have a user, but in order to specify what type it is, you can't import user here that will actually cause an issue. So I'll just say this is a user like so, we'll get a warning by pycharm. But that's okay. It'll figure out what it is in the end. All right, so we've got our user class created Name and email we've collected as part of our studio flow phone number comes directly from the trigger. Remember that when they come in, they actually initiate this WhatsApp conversation with their phone, which provides us their phone number. We store this. This will be auto incremented, and this is just going to be the relationships between the customers or the users and their orders. Right? There are two main top level SQLAlchemy classes that we're going to work with.
|
|
|
transcript
|
6:00 |
Now these classes were defined. They're interesting, but they are definitely not SQLAlchemy classes. So what we need to do is two things, we need to make these all derived from a certain base class that comes from SQLAlchemy. And then we need to actually initialize these two, what are called descriptors. Certain column definitions saying this is an auto incrementing primary key integer column and this is a string column and so on. At runtime, it'll look exactly like what we had Those will really be strings and integers, but from the SQLAlchemy definition, we need to tell it more information about the columns. In order to do that, we need to define a base class. Now, this might look like a little bit of overkill, but I'm going to create a well, I'll just call it base class or something like that, and we're going to give it a name SqlAlchemyBase. Now, normally we need to find a class. You do it like this, you'd say class SQLAlchemyBase, but we're going to dynamically defined this at runtime. But we're going to use SQLAlchemy, now We don't have SQLAlchemy installed yet, do we? Because otherwise that would come up. Your PyCharm would actually let us install it here if we like, or we can come over and just put it right here like this. Let's press install, wait a moment and we're good to go. But it's not just SQLAlchemy We want we want ext.declarative and copy that whole thing down here. The way we're going to do this is at runtime. We're going to say .declarative_base(). That's it. You can have multiple ones of these with different connection strings associated with different databases all within the same app. Okay, so what we're gonna do is we're going to use this as our base class for a user like so and imported and for order, like so and imported. That's step one. The other one is Let's go up here and we're going to say, import SQLAlchemy. We could just say this and SQLAlchemy, but let's say as sa, so we can type a little bit less here because we're going to say, SQLAlchemy or sa, the package name a lot. I want to go as far as directly importing the types I still like to have the auto complete from the name space you can say Import column if you like. So we want to column here, and this is going to be an sa integer. But we also want to say it's a primary key, right? Every table needs a primary key, and we don't want to control it or specify what it is. I just when I save a new order, I want the database to automatically figure out what the latest number is safely and set it, so we'll say auto increment is true, right over here. We're going to say this is sa column of sa date Capital D DateTime like that. Then add some more things to them. But let's quickly throw these out. It's going to be a string, going to be a float. It's going to be another integer and this one I'm gonna comment it out for just a second. We're going to set up some relationships in a moment, but let's not get that much into the detail. One more thing here. This just like here with this auto increment. I don't wanna have to deal with setting the created date every time I inserted item I just wanted to go look when you put a new item in there, set the date. But there's a really nice way to do that. We can come over and say Default. Let's wrap this a little more. So it's easier for you all to read. Default = And then we give it a function that's called when things are inserted. So daytime.datetime.now, not be super careful. If you hit enter, it's going to put parentheses here. That is not what you want. Then the default would be for all the things get inserted when the program started. You want a function that's called every single time? I want to set the default to this. These all look okay. We don't necessarily need to do anything with that, and we'll deal with our foreign keys set up here in just a minute. Now, the next thing we want to think about what this order is, how do we want to query it? Well, maybe we want to order by create a date or ordered by fulfilled data Show me the unfulfilled items, and we want to do that quickly. It's incredibly powerful and important to add the right indexes. So what we can do over here and say index is true without one little bit right there. We're going to make querying or sorting by created date incredibly easy. Similarly, here, show me the unfulfilled items where that's none or null boom off it goes. If you're going to sort by size or flavor or something, you could do that. Maybe we'll do that for the price, right? Show me, you know, stuff that costs so much. This will be a foreign key, so we shouldn't have to set an index on that. Okay, so this is going to be the SQLAlchemy version of our order, and we're going to do the same thing over here again. id:int = sa.Column(sa.Integer, autoincrement=True) that is auto incrementing like so and I'll just copy this created date as exact same story. We wanted to auto insert auto- set its value and sort by it. And then down here, this will just be sa column. I say sa.string again, we'll comment that out for just a moment now for the email or phone. If we get a second order from the same phone, I'd like to get that user. I'm associating a second order with the same user, not creating two users. In order to do that quickly, we want an index. Thanks for the email. Probably not by name, right? They might say one time. Their names Michael, the next time their names. Mike, right? We don't really care about that, but that's important here. So these will come back into play when we set up our relationship. But other than that, we've created a SQLAlchemy Base are two classes derived from it, and we've set the columns to be SQLAlchemy descriptors, describing exactly what we want. Primary keys, default values, indexes and so on.
|
|
|
transcript
|
2:03 |
To work with our database. We did very little direct database operations. What instead we did is we said we're going to use an ORM, an object relational mapper named SQLAlchemy. And over there we create classes and then SQLAlchemy will manage the tables and the inserts and the queries and everything like that for us. Do we get started by giving a short name to the SQLAlchemy Name Space and We Create a Class which derived from SQLAchemy Base, which we created elsewhere. Give it a table name so that, SQLAlchemy knows where to store it in the database. And then we start defining the columns as fields in this class. So we define ID, which is an sa column of type sa string It's a primary key, and it's auto incrementing. So when we do an insert, it automatically gets the correct and latest value. We don't have to worry about that. It's also really good to know when these things were created. When did this user sign up? When was their order placed? We're going to have a creative date, which is a datetime column, but we gave it a default value of datetime.daytime.now a function not the result of calling that function. Remember, no parentheses there. And what happens is whenever you insert something SQLAlchemy will automatically call that function and set the creative date right when you did this you don't have to do either of these things. They're automatic as you save the data. We want to give the user a name like Michael. I want to give them a phone number like WhatsApp :+1503, Whatever it is. And because we may want to query by their phone number. We're gonna put an index here, Same thing for their email, but as a string and give it an index. We also have orders and users and their related to each other. So we created this relationship. There's a relationship over to the order class Over there There's a user field which gets back populated, and here we have a list of orders a one to many relationship from user to their orders, right here. And this allows us to quickly given a user, go find their orders or given an order,step back and find the user its associated with.
|
|
|
transcript
|
3:27 |
The final thing to use these SQLAlchemy classes is to go through a couple of steps, create what's called an engine, which takes a connection string. Use that to work with our SQLAlchemy Base, to bind them together. Use the SQLAlchemy base to create the database and the tables and all those sorts of things. This is exactly the same for every single SQLAlchemy Project you ever work on the We have a little nicer version to work with. Let me just paste file in here that we're going to just talk about. I'm going to call it session. Now it's going to have a single function that we call it Apps Startup, where we specify basically the connection string. We're going to use SQLlite. You can use any database you want. POSTGRES, SQL Server, My SQL Any relational database almost is supported by SQLAlchemy, but I don't want to have to have you set up a separate database server and have the connection, the network connections and permissions and all that stuff lined up just right. We're going to use SQLLite, which is a local file based database built into Python so there's nothing to run and nothing to install. So here's what we're gonna do. Make sure we've set it up once. Make sure that we have a database file. That's the connection string for SQLAlchemy specified. We're going to make sure the path exists, and we're gonna use pathlib to say, basically, if it doesn't exist, create the folder structure that has been passed in, before we try to save a file Their SQLLite, will create the file, but it won't create the parent directory structure required to save that. But then we've got our connection string. We're specifying some connection settings here, like we're going to create this thing called the Engine This is the thing that actually talks to the various database implementations with the connection string, you want to see the messages are SQLexchange with the database you could set echoed a True and we're going to say we don't care about which the red stuff is running on and they're going to create this thing called Factory. Factory is what creates a session or a unit of work and the design pattern nomenclature. That's the thing that we're going to use each time we want to make some database operations. We're gonna use this factory to create a session and then do all then do other work and then commit or not commit that session. Now one of the things we have to do for SQLAlchemy to work is we have to make sure it's seen everything that derives from SQLAlchemy base. So I'm going to come up with this little idea here of saying what we're going to do is create a single file here called this. And in this we'll just say from db import And let's just put the things we need to put order and we're going to import user. If we had another option, another class, we would put it here as well. Now, sometimes some tools will take this away, especially PyCharm under certain settings. So I'm going to tell it, you know these, even though they look like they're not used this time, this matters. What this effectively does is it loads this file and make sure that this statement is executed before we do what's next in the session. While okay, so just that's just necessary for to actually create the tables and then over here, where it's going to go to SQLAlchemy base and say, create all tables using this engine or this connection. Then, whenever we want to talk to the database, we'll just call either create session or will create one of these session context things if we want to use it within a with block, which I think is a little bit cleaner. But either way, you could use this one or this one to talk to the database.
|
|
|
transcript
|
5:00 |
All right, So let's go ahead and call from our app over here. Certainly not like just piling all this code here. So let's create a function called Configure and then we can configure the database, configure the routes and so on. So let's just move some stuff into here, which is def business. Now I have configured_db(). I'm going to put that to the side for a minute. Now, down here, if it's been run directly, which is maybe in development, depending how you run it, we want to make sure we call configure. But in production, we don't want to call run. We just want to call configure. I don't want to do this step, so I'm going to make sure we call it either way. Alright. Final thing to do is just come up with a database folder name, or file name that we want to work with. So what I want to do is I want to go to this file wherever app is, and I want to make sure we have a folder over here. I'll call it SQL and inside sql. We're going to have our database file gonna live in this directory and not necessarily going to check it into the database and to GitHub. But it's going to go into here and be automatically created by SQLAlchemy. What's a good way to do that? Well, we can come up here and say from pathlib, import the path, class. This is one of the newer ways to work with past not super new but newer than some of the older styles in I thought to work with paths in a clean way. What we can say is that the db_file is going to be create a path. Give it the dunder file(__file__) that's this app. File the full path on the hard drive to this file, this module and then we can say, Parent, that will go from here to here. And then there's an interesting way where they overload the divide operator so you can see it is to be SQL,Yeah, and then in the sql, what do we want? The file name to be cloud city.SQLLite. All right, that's it. That's all we should have to use. So we come over here safe session, import db_session and say global, in it? db_file. You gotta be careful here. It's easy to pass this along. We look over here, this expects a string. This is not actually a string. It's a path object. We can say as posix() as a URL. And we'll get that as a the right kind of string. Or we could just call string on it. However you get it, we've got to make sure you convert this to a string when we pass it over. Well, let's go and run it and see what happens. Oh, yes. one other thing we need to set here notice, We got to specify a table name in our order. We also need to do this for our other ones. So let's do that. Now. This is going to tell SQLalchemy what we want. The actual table name, Not just the column Names in the database to be, I want to use orders. lowercase and plural. That's just the way I like to do things that will do the same thing for our user, because we have exactly the same problem. This won't be users. Try one more time. All right. Well, it looks like it ran. And you can see it's connecting to the quote db with this full path right here which Yeah, that looks correct. If we look in here and we reload from disk to look at this, we have a cloudcity.sqlite database. Super cool. Let's just see if we can see what's in it. Normally I could come over here and add data source from sqlite. I don't think this is gonna work. I'll give it a quick try. Notice. I can download the missing drivers. We can go to the file. Choose that right there. Test connection, oh! it worked. What I was going to say is till very recently, a few weeks ago, this didn't work because this is an apple M1, the new arms silicon version. And they didn't have drivers that supported Apple silicon. It only was intel. So look at this. All right, Now let's see what we got. We go over to our schemas and expand this out. We've got our orders, which has? id, created a datetime notice. They have indexes. Those are the blue, and then the primary key. Here's another index. actually listed there. Here's our users as well. Awesome. So we've used sqlalchemy to define some classes to store in our database and then SQLAlchemy is actually connected to SQLLite and then created the database structure that we're going to need to work with those classes in that database. Fantastic. I just love sqlalchemy. It's so easy and nice to work with. If you're doing a relational databases,definitely recommended it.
|
|
|
transcript
|
4:51 |
Before we call our ORM model is completely done and move on from them. Let's just quickly follow up with one thing that we did touch on, but we didn't finish, and that's our relationships, over here, I would like to come over here and say that this is a relationship and in order to specify relationships, I need to go over here and import something else Will say from sqlalchemy.import orm, Now, in the ORM, we can use that to define a relationship like this, and then we just specify the class name. These relationships can be tricky because sometimes they speak in table name like lowercase users, lowercase orders, and sometimes they speak in class or object terms. Right here. What we put is the class that we're related over to. So we call this order, now, This user class kind of stand alone, it doesn't actually store any information about the orders. It only has the fundamental ideas of the user itself. Remember, it has something over here that actually does have information linking them together. So this is where we know this order belongs to a particular user. But what we can do is we can go over here and say, This is an sa foreign key And then and here we put the name the column, again. Sometimes you speak in class terms. Sometimes you speak in table database terms. This one we speak in database terms. So its users id not capital user, little case users. Plural, right? So that says, there's a relationship between the order table and the user table, and the relationship is go back to the users table by the id. Which is the primary key. Great, but we'd also like to have a friendly thing. When I go to order, I'd like to say .user and actually get the user. And if I haven't loaded from the database SQLAlchemy will go and do a lazy load, a secondary query to pull that information up. And that's this information right there. So again, this is a relationship. So we'll say from sqllchemy import orm. This one. We speak in class terms, so it's going to be user like that. Now there's a relationship of final order. There's the user it belongs to. If I go to the user. There's all the orders and it would be nice if I could say, If I happen to go user, let's say order.user.orders, that that already is loaded because I've actually done the queries on both directions out of the database don't need to go back. So what we can do is we can say these back_populate, and then you say the name This one will be user. You say the name of the field over there. So here it's called User. So when we go to the orders, it sets this object to point to that field there and similarly orders. Okay, now that should do it. Let's try to run our app and see what happens. Looks like everything's fine. We go back to our database and I say, Refresh this. There's nothing changed about this right. We should probably least have a key to represent the foreign key, and you don't see it here. What's going on? The problem or not really a problem. It's just the way it works, is the challenges SQLAlchemy will never change a table once it exists. No matter what you do to the class once the table exists, it's not going to make that change. It wants to make sure like you don't to lead a column and it throws away data in production. That would be bad so we can use alembic and migrations. And that's fairly complicated, really beyond the scope of this course. So what we're gonna do is a simpler style. We're going to hit delete and rerun the app, that's going to come over here and recreate. Regenerate this if we go now and refresh this. Hey, look at that. We've got a foreign key from user id over the users Perfect, and you can see the little key. The Blue key means foreign key, this one. I don't think it has any changes in the database, but it's the orders that now have that foreign key relationship. Alright, perfect. So quick Review. We went over and had our user id, and we upgraded it to a foreign key and then we use that foreign key to define a relationship. We also wanted to make sure that if you work with one we automatically set the values for the other case you kind of bounce back and forth. So orders back populates user user, back populates orders and there we have it I'm very easy way for us to work with the relationships between a user and it's orders.
|
|
|
transcript
|
9:11 |
We have our database created. We have our SQLalchemy ORM models are ready to go, our connection string set up. Let's go back to our API. mean, after all, our goal has to fill this thing out, so we could record in order and let our people in the bakery know, Hey, there's a new order you got to work on and ultimately fulfill it later on down the road, I put three comments about some stuff that we're going to need to do here. We're going to focus on this video. And how do we create or update a user and record their order, later We're also going to want to send them an invoice about this and let him know Here is your receipt for your order, and then eventually we're going to need to send when we have it. We're going to send that information back through JSON back to studio because our WhatsApp conversation won't be finished. What we're gonna do is we're gonna say they were like, I want a cake and I want this information and we'll say something like great your order id is 'xyz', we will send you some more information through WhatsApp. When your order is ready to be picked up and eventually somewhere down the road we'll do some baking, do some cooking, and we will send another WhatsApp message as part of that conversation. So in order to keep that flow going, we want to return some kind of id or something about the order details, so the studio can keep working with that, right now, like I said, we're going to focus on this. I could start writing SQLalchemy code here, right in my API end point. That would be wrong. What I want to do is I want to isolate our data access code into a special section. This will mean if we want to write a test around this function, we can just patch or mock out that one function, call to some other place and completely remove a database dependency in our testing story and also just for maintenance are code will be over in some other place. I'm going to call that a service not like a Web service, but just a service provided to our application. Don't call this a user service. It's going to put the order on the user, but also potentially create the user. So over here we have a record order. That effect was put a pass. Now we're going to need to know something about the cake and something about the user Luckily, we've already done a lot of the hard work on both ends of this story. Here on the DB side. We've got our models we want to save, but on the model side coming in, remember, we're doing this cake order **data. This is validated and parsing the data that comes in to give us a customer and a cake. If we look at customer, well, these are the things we're going to need. So what we can do is actually pass that information along in our user service. So we can say that's gonna take a user which is a customer. Maybe that's an odd way to put it, and it's going to have a cake, now down in here, we can just say things like user.email or cake.size. Remember, these are all the things that we're going to need. It was really nice that that information is already there and let's go and do this little bit. Here is take away that you do the import a user service and then we can say record order and it's just cake_order.customer cake_order.cake. Let's call this db_order. We're going to get some kind of database order back and then we're going to pass it along. We want to do a little bit of extra work before we pass along, but basically, that's the flow. We've got this data sent over from Studio. We're going to validate it automatically through pydantic and pass it along here, in order to interact with the database. We're going to use the unit of work or that session and, like I said, my favorite ways to use a context manager. We're going to import the session context from that session while that we had there and then later on throughout this whole thing, we could just work with the context. Now this is intending to make a change to the database. Sometimes it's just a query, but this one. We wanted to actually do a save, but this has an optional thing here that says should commit on success. I'm going to say True, these context managers, these with blocks, they know whether or not you exited them cleanly or you exit with an exception. So all we have to do to make a change to the database is, say, if you make it through this code, successfully save it to the database. If not, roll it back. Don't save it. So it's a really clean way to do error handling in our application. The first thing we want to do is make sure that there's not already another user here. We'll say existing_user. Actually, let's just shorten these because we're gonna want to use these names over and over. I'll just call this the user here, and I want to do a query The way we do it was a session.query of the type is going to be user. This is the ORM type. Then we could do a filter and say, user.email== u.email. If they pass in an email, we want to maybe say get that one back. Or maybe we want to say user.phone= number, There we go. It looks like that might be an or this is actually an end. And it's not what we're looking for, most likely. So what we want is if they have specified the email and we've seen that email before, use that person. If they specify the phone and they've used that phone before, even if they've given us a different email, it's still in our mind the same person. Okay, so in order to do that, we have to go up here and say from SQLalchemy, import or_ like this, Here we can say or_ and pass in these things like that. We can wrap that around, and then we also want to just get one of them so we can just say .first, right, Either that's going to give us no users back, or it's going to give us the first one that matches. But because the way we're doing this, we should really only ever have one or zero. If we've got to user back, great, we're going to associate their order with that user. But if not if not user and we want to create one real quick, it's going to be a new one. So we'll say it's going to be a user. And what do we need to specify? Has an ID. We don't need to set It is auto increment has a creative date. We don't need to set it. It's got a default function to create it. The name, though the name we want to set. So this will be a you.name. What else have we got? We've got phone. It's gonna be you.number. An email is going to be you.email. Anything else? Orders. We don't have to set those that's good. This creates the user, but it doesn't held the database. We want to commit it, so we could just say session.add(user). But we've either gotten our user or we're going to insert a new one. Either way, our user object user variable is ready to go, now It's incredibly easy from here. We just create an order is going to be an order object like that from our database. Then we specify the values again id not set as automatic creates Automatic fulfilled is later but size. It's gonna go down to our cake.size and we'll just set these values. We're not passing the price over. So what we need to do is add another variable to make sure we get that So let's go back and say Price as a float. Now the last thing to notice we could set the user ID you notice. Here there's a user id is set to none. We also could go to the session and add the order, but check this out. If we just go to the user and I go to their orders, remember that relationship we set up? Check this out going to append as a list of the order. That's it. It's now associated the foreign key relationship between order and user, and it said that this order object needs to be inserted to the database, regardless of whether it's an existing or a new user. When we exit this context block here, it's going to assume that makes that far succeeds. It's going to automatically commit because of this. How neat is that? I kind of want to clean it up just a little bit. Let's just in line this session thing here because we're only using it in one spot, So I'm gonna in line that with the refactoring tools using those two spots. Okay, so it's a little bit cleaner, but this is it. Create a user or update an existing user, create the order and put them both into the database in a single transaction. Super cool. We do need to update what we're calling this, So that's right here, we have the price just directly on the order, along with a cake and customer. All right, I think it's ready. I think it's going to work. And we're also saying We're returning something. So over here, let's go back and outside of our context, Manager, I'll just say Return order. Perfect. I think our whole processing in order. Get it in the database. Associate with the user. It looks Good.
|
|
|
transcript
|
2:39 |
Insert data with SQLAlchemy. We use this unit of work pattern. Some other ORM's use what's called active record, where you work with one item and save it with SQLAlchemy. You get everything all set up and then at the end, boom. Make all those changes go to the database. In order to do that, we created this wrapper around what they call a session Call a session context. A wrapper is called as the Session Context, and this allows us to use with blocks and just say, If you go through this with block successfully, please commit those changes to the database. Everything that happened inside that with Block. If there's an error, some kind of exception along the way, roll back the transaction threw away the changes. So what we're gonna do is going to say with session context. And if you're doing changes, say, commit_on_success=true. If you're not just doing queries, you omit this or set it to false the default as well. And then we're going to just do a query based on the SQLAlchemy session. So ctx.session.query(user).filter, and then we need to do two things either the email matches or the phone number matches. So we're going to use this or_user.email==e.email, It's very cool. SQLAlchemy overrides what column type is with this descriptor, so double equals(==) actually turned into a query. This is quite neat, so we'll say, user.email==u.email the passed. in email or user.phone==u.phone in the passed in phone. And that's going to get us the user who either has this email address or this phone number. That's a query that could theoretically return many of them. But we just want one and the first one if it's not going to be there If there is no such user, it's just going to come back as none. So we need to test. Was there a match? Was their user? If there's none, let's just go quickly. Create one, and we need to tell SQLalchemy as part of this context. Part of this unit of work, please insert this user into the database because they're new. So we say, session.add_user, Then finally, we're going to create an order object. This is what we're trying to do here. We're creating an order for what's coming. So we've got c.size, c.flavour, cake.size, cake.flavour basically and so on. I want to create the order and finally to tell it to insert into the database Also, we're going to use that relationship between users and orders. So we go to the user, go to their orders list pin down the order and SQLAlchemy knows. Oh, I need to associate these things and also put the order in the database That's it. We've done some really cool stuff. We've done some queries and potentially 1 to 2 inserts into the database in a really clean and object oriented way using SQLalchemy.
|
|
|
transcript
|
2:39 |
Well, we wrote our code to insert record this order, but we haven't tested it yet. Let's go out and call it. Make sure the APP is running. And first, before we go all the way back to Twilio and use studio to send messages over here. Let's just test this locally. So I've got Postman fired up. We're gonna go to localhost:5000/api/order and they're going to post over the body here that we're expecting. We have a customer which has a number, name and an email and a cake which has these things and a price. So let's go over here and make sure we're doing a post. Send it over and see what we get. Remember what's going to happen. We're going to save it to the parse it over save it to the database, and I'm going to print out the cake order. Actually, let's print out the db_order and then we're just going to echo back what got sent over. So I'm going to restart this. Okay, Moment of truth. Let's push the button. Also, before I push the button, we go over to the table and we double click it notice there's no data, no users and no orders. Let's give it a test. Look at that. Awesome. Well, we got something back. That's a really good sign. We received an order for a cake with this customer. And there's the price. We haven't done anything to tell them their order_id or anything like that, but it looks like it might have worked. If we go back here, you can see something was printed out. A database object was created and printed out. And if we go to the users, you can see there's now one here with id 1 and there's an order or somewhere over here you can see the user ID. There's our foreign key relationship. Is 1 fantastic? It went in with the date correctly. Auto incremental, ID know Fulfilled date. Perfect. Exactly what? Like what we want. Let's do one more just to test this. Finding a new user versus an old one. So bacon was fun. But how about, chocolate or are topping And the price of that one is going to be 19. We're going to send it over and let's even let's put, change this to 504 There we go. A different number, but same email address send it again. Alright, Something good happened. It looks like it worked. And if everything worked correctly, we should have two orders we do. If we look, they should be associated with the same user_id. Awesome. And they are here. You can see the difference of the price. And over here, just one user. Still, awesome. I think we've got it completely built. It looks like our api is working and will be able to integrate that into twilio later.
|
|
|
transcript
|
3:30 |
The final thing we need to do is return some order details, so it can go back to studio and work its way into that WhatsApp conversation. We don't need to print anymore. That seems like it's working. One option would be real simple. "order_id": db_order.id That's fine. That would work. But I really like to have the response message sort of summarize like, Here's the whole details of the order. Here's the cake we think you ordered. Here is the user who ordered it. Here is the price we think you ordered that and so on. Just like we're using this on the incoming boundary for our pydantic model. Let's create another one. I'll order response model like this down here, and we're going to have that kind of information I just described would have an order response. Also, it's a class like this, remember, derives from base model. That's how pydantic works. We specify a few things that we're going to pass the order ID, which is an integer. Remember, that comes from the database order date, which is a date time. Hope you didn't want to import, that way there we go a datetime.datetime. I'm going to have an email, which is a string. That's the person that ordered it Have a price, which is a float. Let's go ahead and actually pass the whole cake model back that we got. So it's gonna be the cake model. Think we called it? No, just cake. It's like that. Okay, so all we gotta do is set these values and return it over here So import this locally. Let's give ourselves some room lets say. order_id=db_order.id.order_date is going to be db_order.created_date, email is going to be customer.email. The price is going to be cake_orde.price. We can also do db_order.price to make sure that's what we had in the database. And finally, the cake is going to be cake_order.cake and down here, we're just going to return this. And you would think you could just return it directly, but not in flask. What you need to do is get the dictionary from it There we go. We've created our order. And now we've got those that information and passive act. Let's try it one more time in postman before we move on. And let's say we don't want lemon for our frosting or actually will make it a small It's going to change the price is 17. Yeah, we'll go with that. That's send this over. Look what we got for our response. How cool. Here, this whole object is our order Response, which has its cake object, testified with its small update. Everything we expected. Here's the email. Here's the order date. We can make that maybe a little bit better if we do iso format, but I think that's okay. Order id is three. The price of 17.0 gold coins. Fantastic. So our API is exchanging data and this information here. Those are the kinds of things that we can send back to studio and finally through WhatsApp to our customer to let them know that we've actually received their order saved in our database at our store and we are working on it.
|
|
|
transcript
|
1:30 |
Where are we with our WhatsApp integration Into our order. API Well, we almost had it. You can see your order's been placed. No, no, not really. Not really. Just kidding. So let's go back to studio and have a look and see what's going on. We've made it really far through this and honestly, were almost entirely done with working with studio at all this. This may be the very last thing we do. We work our way down to the bottom here. You can see we are calling the OrderAPI if we expand this out even more and we look, we're actually passing over all the information that's expected. So we're calling the API. But what happens when we get it back? Well, here we just say Great. The order has been placed, but not really. So what we wanna do is check. Make sure this worked and then give them some kind of actual information. Your order has been placed. We'll see you soon. It will be under such and such with that the order ID is we call with this api. We were returning back some information and the way we get that information here. Move over is we're going to go to the widget order_placed.parsed and then on there. We have an order_id, But I believe we called it like this. How great your order's been placed the order id is, whatever it is we had saved, publish changes.
|
|
|
transcript
|
2:30 |
Well, we're ready to test the entire flow, including calling into our API and talking to the database and getting information back into WhatsApp But it's very important to remember that if WhatsApp is going to find its way back onto our computer, two things must be happening, First, we must be running the app over here on localhost:5000 Just hit Run! That's running. But also remember our friend in ngrok We haven't seen in ngrok for a while, but it's back and we're going to run it again. This is how studio flow is going to get through into our local machine. Now remember, I use the sub domain option because I have a pro account. If you didn't do that, you've got a new ID potentially here. And when you get a new id, and you've got to go back to studio and updat it and publish it. So just be aware they give the URL here Changes should be good to go. Alright with those things in place, kick me, over a small on the red velvet coming on. We haven't ordered a lot of red velvet, vanilla frosting and Sprinkles.,17 gold coins. Sure, we got lots of gold coins It's all good. Excellent. We just need your name. I'll put Michael. I'm going to make sure that I use my same email address I've already used, that way When it comes back, it's going to find again that same user and associate. Still, a new order with it should be making that call, Now you order has been placed. Oh my gosh, look at that. It's under Michael, michael@talk Python.fm, and it's order number 4 that came out of the database. Well, let's go check the database. Exciting. You can see the call came in perfect. Go to our database and get our orders. What is order for a small red velvet Sprinkles, Vanilla, 17 gold coins? user_id is 1 and that 4:51:43 4:51, 43. I'm going to say that's what The secondary. You don't see it there, but exactly that time, that's our order that came in and we go to the users again. There's just the one user because it found that email address and pulled it back and said, that user exists or is going to put the order on to their existing account. So that's it. We've got our database entirely integrated into our API which received the order from studio. The studio flow saves it validates it, sends it back beautiful.
|
|
|
transcript
|
3:38 |
Let's do one more thing to make our order API just a little bit more polished. There's all kinds of things that could go wrong here. And they would appear to the end user to the consumer, the API as a server side crash. But they wouldn't always be, for example, if we pass in the wrong information here. Like we forget to put some data into our JSON pydantic is going to crash and say that was wrong through a validation error, which is going to get converted to just a Server 500. That's not what we want. Let's go over here and put this into a try except block and we'll say, except validationError from pydantic as ve and take a pass for a second. Maybe we want to particularly handle crashes from the database layer, so we might want to do something there that we can't do a lot about. But we can do that as some kind of thing there as a SQLAlchemy error Then we can do a catch all like, Well, we tried the others who knows what happened here and what I'm gonna do is, I'm gonna define two pieces of information. The error body, which is going to be a string with the error code, which is a status code. So in this case, the validation error happened, and 422 is invalid data, Incorrect data type of code. We can go with that. And for this, we would actually give it some kind of JSON that it can work with. So we're gonna go over here or say that there is an an error and it's going to be the string of just it's not always a good idea. I'm just going to pass back the string representation of the error message straight back to them, and I think it's going to be okay. One challenge, though, is this is going to have a bunch of new lines and it potentially might come back looking a bit were someone to replace the new lines with just a space or something like that. And we can do that similarly over here, this one as see, this is the database crashed. Maybe they didn't pass in something that was like a constraint that wasn't met. But I'm just going to say this is a 500 and again down here, we might do something different and say the regular exception versus SQLAlchemy error. But that's when we got and then remember up here, we're turning already in the good case. So down here, whatever happened in the errors were going to just return some kind of error. So flat, start response or use JSON over here, they dump s, turn this into a string error body. The status is going to be error code, and the mimetype is going to be application/json. So you can read that little easier. And these huge fonts, will wrap it around like that. I guess we could test one more time just to see that something is coming back with postman. Let's go over to our body, for example, and remove the name. Remember, the name is required to send that over. What kind of response did we get? 422 unprocessed double entity. It was well formed, but there was some issues, right? The validation error, cake order, customer name field is required, which is missing. So we got our error code and our error message. Let's put that back extra things are good, they are, perfect. I feel like having that little touch of proper error handling instead of just all the time saying the server crashed. If even it's their fault, Yeah, there's a little bit nicer, I think.
|
|
|
|
23:25 |
|
|
transcript
|
0:42 |
People are getting excited about what we're building. We've been given the go ahead to push this whole app into production. People are believing it, and it's time to start adding the final features. The big outstanding one that we really have to focus on now is building the admin back end. We have accepted the orders through our API, and we saved them to the database. But how would the Bakers know that the order is here to be baked? How will the customers get notified that their orders done? How will the Bakers tell them all these things are going to be handled by this admin backend that we're going to build in flask? Let's show everyone at cloud city cake company, what we can build and put a cool UI admin back end in place for them.
|
|
|
transcript
|
2:56 |
At the beginning of the course, we went through an end to end Walk through, the app that we're going to build and you may remember it had this admin back end section. But let's go through it one more time to remind you of exactly what we're going to build during this chapter. The whole time I've had in our style of the website down at the bottom, this little admin section, and to see how it says /admin, you click it in our demo site right now, it will go no where. It'll just crash. But in the finished version that we're building towards, we have it right here. Check this out. So the idea is we've gone through WhatsApp as a customer. We've selected the type of cake we wanted from the menu with the chat interaction that we've set up at Twilio studio. We've priced the cake, and then when they placed the order that goes through the API that we built in our flask application and that saves it to the database, Well, that was great. But then what? We actually have to make the cake. How do we know whether we should make a cake and what kind of cake we should make. Well, we need an admin back end, and we're gonna, of course, create a simplified version just enough for you to get a sense of like, how you would work with this. So we're going to show, say, the order ID, but not necessarily things like the exact flavor of what they wanted and so on, since we're not really baking the cake. But the idea is, here is the admin back end that the Bakers would use And it would just show them the new orders that are not yet fulfilled and the ones that have already been fulfilled. So here you can see these are fulfilled, and it has the date in which that was done. And here's a new one that was open. And if we click this button, what it's going to do is it will mark in the database that it was fulfilled and it will send a WhatsApp message over to the customer at their WhatsApp contact Remember, they got a confirmation in their WhatsApp with the order ID. But what we're going to do is we're actually going to let them know their cake is now ready for pickup. If we click this fulfill button here, what should happen is we should update the record in the database to market as fulfilled Set the date on which it was completed. Flip the order status from open to fulfilled. And in the final version, we're going to send a WhatsApp message to let the user know. Hey, your cake is ready for pickup, you ordered a few days ago. It's ready. Please come get it. If we go and click this, see, it's updated it and wait for the WhatsApp message. Make sure WhatsApp is running. And there it is. Your case Order Status code is ready for pickup. Well, awesome. We got our message sent all the way back to the user through twilio to their WhatsApp account. So that's what we're going to build out during this chapter. We're going to build a section that shows this data that allows us to indicate whether it's open or fulfilled and actually flip it over to fulfilled. We're gonna wait to do the direct WhatsApp messaging in another chapter, but this UI and data element this database exchange that we're doing here, thats we are going to focus on for this chapter.
|
|
|
transcript
|
5:35 |
The HTML set of our websites a little bit lonely. We just have this one little old '/' view method. This index. That's what we get when we land on the homepage. But let's go in and build our admin backend, and we can just borrow from what we got here because it's going to be so similar. So we're going to copy and paste and just call this admin. Remember each major section I like to have organized under its own things that we have an admin section. We've got our API order section up here at home and so on. Now, in our admin up here, it's not going to be '/'. Of course, it's going to be /admin. That's going to be the index view here, and it's going to render the admin/index, which PyCharm happily tells us it's not there. Let's go do that next, again, The best way to take one of these HTML templates that derives from other templates and so on is to just do a quick copy and paste. And there we have it. So let's get rid of most of this stuff here We'll have a div as a content, style and we're gonna have a table in here with some stuff. And it's up to us to figure out what goes into the table. Remember, that was order, username, whether or not it's fulfilled the fulfillment button and all that kind of stuff So back over here, we need to decide what data it is that we're going to have to pass along. Let's go look over here at our database. If we look at our order, it has things like the idea that we're going to need. But it also has this relationship over to the user. What we're gonna do is we're actually going to just pull back the orders and make sure that this user field is populated. If we didn't populated, depending on how we created and interacted with the session it would either lazy load or crash the way we're going to work with it because we close it explicitly. It probably would crash, but that's what we want. So we're going to do a joint to make sure that all the orders come back loaded up with their user information, and that means we need to write a new service. We have a user service. Let's write an order service and it's going to have a simple method here, All cake orders and what it's gonna do. It's going to return a list of order now if we look back over here, remember, we have this cool session thing going on like that. So we're just going to use our session, context here to make this nice and easy and make sure that's import it. What we need to do is we need to write a query, all those orders, and we go to this context. We go to the session and we say there's a query of order, we want to do an order_by, so it created date descending. Let's show the newest ones at the top. We can wrap that around and we can say we want all of them. That's cool. And then we just say, Return orders. Now that looks like it's going to work. This little weird error from Pycharm about descending that's not actually a problem, so there's no real errors here on the page. It looks like it's okay, but if we try to access the order.user after this closes. So after that, we're going to be in trouble. So what we need to do is go over here and say .options subqueryload and import that name, and we just go and say order.user as part of this load, we want to make sure we do a join or subquery to get the user for every order that comes back. And that way we can interact with both the order and its associated user. Okay, well, that should do it. Let's go over here and just do a quick test. orders = order_service, all cake order. That should be orders, right? Let's do a refactory name and make that plural all cake orders. There we go. And then let's just, you are let's put a breakpoint right here as, just to make sure that this is coming back with something meaningful. Click on the admin section didn't load. What do we forget? One quick thing because we partition this out with blueprints. We've got to make sure that we put the blueprints back in. So down here, where we register the routes got one more. We've got admin and change, the name can have that conflicting. All right, now it should work if we click on that little link right there and it does. Perfect. It didn't crash, It just kind of came back with nothing but what we need to do. We set a breakpoint, didn't run into debugger like the debugger like this, and see what we get. Look at that. We have a list that contains one item at 0x10cff. Such and such. Let's go and expand it out. Look at that. That looks like legit data. We got a rainbow, which has maple frosting. It's not fulfilled. It has id1 and so on. Super cool. Right? Well, there's only one order in the database, so we're not gonna have too many will go and create some more and see them show up as we go through this, But, yeah, we're pulling all the items back from the database and showing them here. Perfect we have just got pass them on to the view.
|
|
|
transcript
|
6:13 |
It seems we're able to pull back a list of orders and there was only one in the list, but that's all of them. Now we need to build out our HTML side, and we need to pass that data over. So we're gonna go over here and we're gonna say orders=orders. That's the data that's the name were given to it in the template. And then we're gonna flip over to this file here and edit it and in PyCharm Click that little friendly thing. Let's do a tiny bit of styling here. We'll say this is a class of table table-striped like that and we're going to have a <thead> in a <tbody>. Head is like the header. The body is the rows of data that we're going to put into it. Now I'm going to copy and paste some data here, just so I remember what we're supposed to cover what's supposed to put in here in order. But we're going to have the order_id the Customer Name, name the customer phone number, or WhatsApp number, their Email, Purchase Date, Completed Date and whether or not it is fulfilled. And here will this non header. Things like the action to fulfill it. I'm going to copy this down again, and we can use that here. So what we're going to do is we're going to add, come down here and say we're gonna do a loop and have {% for order in orders %}. And let's just do something real simple. <tr><td> {{order.id}}Just to see that we're actually getting something here so let's run this. Make sure everything's hanging together. There it is. How exciting. The one thing appeared one time with the number one. All right, that's really good. So this is working. Let's go back and drop in a little more. Now, We need to put in pieces of data, the dynamic data from our order, so I'll just crank those out and then talk you through the real quick with the order, which has an ID. And then we're gonna use the relationship to the order.user.name, Similarly for the number. Now the order has a created date. If we just put it like this, you'll see, this is probably not how you want to see the date. Not super amazing. I think Maybe just that right there would be great. So we can come over here and simply do .date() isoformat() like this. Here we go. That's a nicer date, and we'll do the same for the completed date if it exists. So we want to use this, but only if this has been fulfilled. Otherwise, we just want to leave it empty. But nothing if not this else will put that similarly over here. We will say, if it's not fulfilled, will put open otherwise, If it is fulfilled, I'll just put the word fulfilled. Here we go. Look, it's not completed so empty, and its status is open. The final thing is, if it's open, we want to put a button. And here we're just going to put a hyperlink, and the hyperlink is going to go to /admin/fulfilled. We want to pass over the order id. So would you like this and just fulfill and let's make it pretty well, give it a class of button btn-dash success. All right, let's see how this looks. There we go. Look at that also looks a little bit big. We can make it smaller, just do one more class 'sm' like that. I did notice when I did the copy and paste. All these <th> should be <td> for the data, so let's do a quick replace. How are things looking perfect Looks a little better on the table formatting and are fulfilled button. Is the right size perfect. Well, we've got our basic table view of the data, and whether or not it's completed or not, sitting right here, let's go and add one more order just to make sure that it's going to show up in our list. Cake me. It's time for more cake. I'd better be small, though. Remember, we've had a lot. I'm going for a rainbow, chocolate and Sprinkles. Now, just a quick reminder. You have to have your ngrok running and have your website running in order for this to hit our API. Just right here. We got our post for the order that came in. That's how it got into our database. Presumably, let's refresh the page and see what happened. Oh, look at that. We have our second order with order id 2, that came in. And if you notice in WhatsApp it said your order ideas too. We've accepted it. Thank you. Well, it looks like our admin table for finding orders and fulfilling them is all set. Really quickly, before we wrap this up, I just noticed that we had previously had user.number here our Json exchange the user number is passed across, but our actual database over here, our user, they have a phone. So if you notice that that wasn't showing up, that's because that should be phone. Here we go. All good.
|
|
|
transcript
|
5:52 |
So we've got our table all built and we've got that cool fulfill button. But we need a back end service to handle that request, right? Let's go and add one more thing here and we're going to do is going to put /admin/fulfill and pass over the order id, here and now, the warning and pycharm is that this does not have an order id down here. It's going to be an integer. So, we're gonna go over here and do you actually 'get' against this doing a 'get' to make a modified change of our sites? Not ideal. We could change things supposed because it's back behind the admin section. I think this is going to be okay. I want to change this to fulfill it doesn't conflict with that name, and then we need a little protection. We need a little test here. So instead of having the orders, I want to say order, say find_order_by_id. have that function and we want to check, if not order. So if they try to fulfill an order that doesn't exist, guess what? Return flask.abort(404) nope. No order here otherwise, we want to go and say, order_service.fulfill pass over the order_id and then let's send them back you /admin. I think this is going to be all we need to do for a view. They submit the order_id. We say, Let's make sure that you've got it. Go to the database, get the order_id. If you don't well, that means effectively. The URL here is invalid. So 404, But if it does exist, let's go ahead and fulfill it. Passing over the order_id again. Send them back to that list that will refresh it, When it refreshes. It should flip from having the fulfilled button to being closed. All right, All that's left is to write these two database queries. Let's do this one first. Let pycharm write the function for us. Return an Optional[Order] optional because it's probably there, but it might not be there, So let's do that again. Everything is going to look like this. So borrow that. I'll just say order=context.session.query, and we'll just do a filter where order.id== order_id and do it first. and then return order or maybe none, Or maybe in order. Either way, it's going to fulfill that, and that'll be great. What do we got to do next? Well, we need to fulfill an order. So with that pycharm, right that as well they want to use our context again. And you might think we could just re use this function. But because this order is tied to this session and this session is getting closed, sadly, we've got to do this again. We'll see, if not order: So if there's no order, we can't close, it can weigh, so will return false. This returns the bool here. There's no order. We can't close it. That's great. If there is an order, it has already been fulfilled. And the way we're going to do that, it's going to set the fulfilled date from none to a daytime. We're just going to return True, we can't fulfill it twice. It's already been fulfilled. Given these two things are working here, we will say order.fulfilled_date=datetime.datetime.now(), Now we've got to commit on success appears True perfect. That will just push those changes back, that does indicate we don't really need it up here. It won't hurt anything, but there's nothing to do similarly up here, it gets slightly more efficient. Okay, But this one, we definitely want this one to commit on success. All right, this is looking really, really good. I think we might actually be able to fulfill it. Better view Method written. I didn't get the order. Try to fulfill it, and then we'll just go back and reload the page after doing so. Let's try it. Here we are. We go down to our admin section. There's two orders 1 and 2 which are both open. Let's go and click this Notice the URL on the bottom left, /admin/fulfill/1. We'll click this bam Super fast fulfilled. Fantastic. Let's copy this URL And just try our our testing here, So copy, link location. Let's go to not 2, But 2000 not found 404. 44 Okay, perfect. We do have our other one left here, button right, Let's go and fulfill this other 1,2 bam! Super fast fulfilled. Done, so neat. So we've got our full admin backend entirely done. Let's go down here and add a comment to do rather send WhatsApp message to notify customer. So, yes, we still got to send our WhatsApp message. But the whole data juggling side of things on our admin back end wasn't that hard was it? And it's totally done, but yes, let's go ahead. And later on, we're gonna do some WhatsApp programming to directly send that notification. Come to the shop. Your cake is ready.
|
|
|
transcript
|
2:07 |
In our admin back end. We need to fulfill an order and there's two basic steps. In order to do this, we need to go and have some functional talk to the database using the SQLAlchemy Unit of Work. Find that order and fulfill it. So here we write a simple query on the order say filter right on the id order.id==id. give us the first one If that doesn't exist. That means they passed an order_id to an order that doesn't exist. Guess what? You can't fulfill that. We just say return False. But if it's there, we can start this fulfillment process. Maybe it's already been fulfilled. We don't want to override that dates. We'll just say, Yeah, sure, it's fulfilled. Great. Still fulfilled. And finally, if it's actually unfulfilled and we're switching at date, we say the fulfilled date is currently now and then because we're leaving this context. Block this unit of work with commit on success. It was true. It's going to insert that change or update that change back to the database and then we'll. return True. This is the data layer side of fulfilling in order. We also need a public interface for this to happen. Remember, we built that cool admin back end had a table and had that green button that said Fulfill when things were unfulfilled and what it would do is it would call this flask end point here /admin/fulfill/7 or whatever the number is, we're going to go over here. We're actually going to check and see if the order exists. Now, this is a bit of a duplication, but I really wanted to make sure we could return 404 and be a good Web citizen independent of whether or not we could fulfill the order. So if it doesn't exist, we're going to say 404. But it's still a good idea to have that validation in the service. Then we're going to go to the service and say, Fulfill the order and we actually also we're going to go to our WhatsApp service ultimately and send the cake ready. We're not doing that yet in this chapter. That's still to come, but that's what is happening overall when we fulfill the order so the user will get a message. Hey, your cake is ready. And then we're going to just send them back to that admin page that will have the effect of just refreshing that page and they'll see the change state from unfulfilled or open to fulfilled. That's it really quite simple to go through that whole process, isn't it.
|
|
|
|
45:54 |
|
|
transcript
|
1:00 |
Is that a light I see at the end of the croissant case? Oh, well, actually, maybe we just left it on overnight, but we are getting close to the end of the course. There are really two things left for us to do. Send receipts and invoices to the customers to let them know. Here's your order, and you keep that for your records and then notifying them over chat. In this chapter, we're going to be focusing on sending the receipts, and sending those over email will be building beautiful HTML emails with rich formatting images and even custom generating PDF's and attaching those as attachments to our email. And in this chapter, we're going to work with a new Twilio service. SendGrid sendgrid is a fantastic way to send action oriented emails like Somebody placed an order as well as to do newsletter type stuff. We're gonna work on that action style. Somebody took an action on our site. We want to send them an email. And response to that, I think it's time to hit,reply all, Let's go
|
|
|
transcript
|
1:42 |
In this chapter, we're going to switch over and work with a new product or new service from Twilio. Twilio sendgrid. So Twilio Send Grid is an email service from twilio, as you might imagine, and they do two core things, among others. They do email campaigns where you can set up email newsletters and other types of outbound marketing, but you can also do things like as you see on the screen here, send password resets or send receipts for when somebody buys a cake And that's primarily how we're going to be using them in our application. The first thing you're going to need to work with send grid is you're going to need an account. They're free. You can go create one for free over here, and when you do, you'll be shown instead of a login button here, a dashboard. So click on the dashboard. It'll take us to the management back end. You want to go through the steps here to make sure you verify your domain so it doesn't get blocked for spam and things like that, or at least less so. But what we're going to need in order to get going here is you got to go to your settings and then to your API keys Now already have an API key that I've created. You can see that it's got a private key and the key ID. So what you want to do is click Create API key, click that button and follow along and create your API key here as well. Now, be careful. The only show you the secret key part of it once So copy that and save it somewhere safe and private. We're gonna talk about where to put in our application shortly. But the main takeaway is you're going to need an API key here from the send grid dashboard to use the API that we're gonna work with in flask and Python. We'll get logged in, get signed up and get your API key, and we are going to write some Python code.
|
|
|
transcript
|
4:09 |
We've created our sendgrid account. We've got our API key's. It's time to start usend the API. Now, if you think back to where in our Web application and we wanted to do that, that was when the order was placed over on Twilio studio. We've got a final callback to make that happen on our personal API. That's over here in the order api in this order method right there, and we even have a friendly little to do says TODO. Send email receipt and invoice. So two main things we have to do send an email receipt and generate a PDF invoice and attach it to that email. Just like we have a user service and an order service. We're going to have an email service when I go over here and say, send_cake_order_receipt(order: Order). I'm going to pass over the order one of these orders which we need to import. Okay, so what we need to do is, we need to gather the email details that would be name email and so on, generating the HTML content and then finally gather the email details. What's their name, What did they order? How much did it cost? We need to actually generate PDF. We need to generate the HTML content of the email we're going to send. We're gonna attach the pdf to the email, and we're gonna send it along usend send grid. Sound complicated? It's a little bit, but actually, you'll see surprisendly simple for each one of these steps. Now, in order for us to do this, we're going to need to use send grid. Except we don't have sendgrid installed. Pycharm will do that for us. Can say, install sendgrid that worked. And then it says, you know, this should probably be in your requirements. Yes, yes, it should. So please put it there with our other ones. Just like that. Now, this is not set up yet. send grid. We're going to have to get our API key's and configure it before we can send an email. But we've got a little bit of work to do before we're ready to work with that. So down here, let's just say a little quick print statement. I sent the email about the order to. How do we get the user well, remember, the order has a relationship and we actually do a join. So we always have the user associated with the order. So let's put their name right there. We want to send this along and let's just make sure that we're calling us. Well, that's it that actually rounds out this function. We just got more work to do over here in our email service. Let's go out and test this real quick. Let's go in and just run, again, Notice we've moved on to the next chapter of the snapshot of source code that you get out of GitHub. And instead of going through the whole, let me fire up what's happened. Asked to order a cake again, We're really just testing this one function, this one api endpoint. And to do that, it's really good to just use postman as we did in the beginning. So I'm gonna come over here and say, We want to make a call to api/order passend over this information The customer is the number. There's the order. There's a price. So let's just send that over. This is what twilio Studio is sending to our API when we talk to it through WhatsApp. So we sent all that over and you can see it's sent back information here. Perfect. Now, if we go back and look at the print statement, we'll send email about whatever order this is to Michael. Fantastic. So it looks like we have the order. The order has the user. Presumably it has the details. It does. We've already seen that in the database. So I think our order call over into our email service here is ready to go So what's left to do to make this chapter work? Well, there's some steps to be done, but they're all laid out right here. Get the email details that's just basically order.user and associated information. But generate the content, generate the PDF, set up the API with the secrets, and then send that E-Mail.
|
|
|
transcript
|
4:02 |
So we want to get started using sendgrid so we can easily do that. We can say client=sendgrid.sendgridAPIClient(api_key) and let's see what it takes. Oh, it takes the api_key, All right, No problem with api_key. And let's just put that up here. It's going to be a string, and it is equal to abu32. Wait a minute. Have you heard that you shouldn't put API keys and other secret passwords and connection strings and things like that right in your source code? But if you ever wondered why, I mean, who is this is going to be a private repository? Who's going to find it? What's going to happen? Well, it turns out that there are all sorts of services that watch things like Git Hub. And if ever there's a glimpse into your repository, somehow it became public. Somebody cloned it or accidentally made it public for a moment and put it away. Chances are, it's too late. Check this site out. There's a place or service called shhgit, as in, Don't talk about the secrets you can see down here. Just secrets being found right away. They used to have this in real time. I'm not sure if this is actually real time, but there was a way to actually see the repositories there a little bit redacted here because there was some abuse. This is what it looks like if you subscribe to the public, github feed and you look for the various configuration files and tokens and other things that should not be in your code. So you really, really don't want these to be bound. So what are we going to do? Well, we're not going to do this. Instead, we're going to say that this is none. And this is optional,to start out as none, but then be something. I'm going to set this up. We're also going to do API. I call it key_name as well. We're not technically going to use the key_name, but in the sendgrid dashboard, we get a specify key_name, and having those next to each other is probably worthwhile for us. So how are we going to store our API keys? Well, there's all sorts of options. Some people put them directly in environment variables, in which case they're not as part of your code. But you log in to the server and say, Give me the sendgrid api key out of the environment. It's easy to do in Python. There's other services like cloudy env that actually encrypt and store those. You could put an encryption key somewhere on your system and encrypt the keys. But what we're gonna do a relatively low effort, type of thing. What we're gonna do is we're gonna create a Json file. I'll call it something like secrets template.json. Why template? Because what we're gonna do is work with a file called Secrets.json But we're not going to put it into our source code. We're going to use this template file as, like a hint. So put a little bit of in here and we'll say TODO copy this file to secrets.json and set the real values going to make sure that secret.json is excluded and .gitignored so we never check it in. But we're going to have sections on say, like, it's sendgrid and over in sendgrid will have secret_key. Don't put the real data here. This is going in to GitHub and like that, we're also gonna need some stuff to talk to Twilio for WhatsApp. So we're gonna have other sections throughout this course that we add here. But for now, it's going to be this simple version. So what I want to do is copy this over to secrets.json and ignore it. But the problem is, if I copy and pycharm often, what will happen is pycharm says, Oh, new document, new file. Let's automatically add that to GitHub, to be friendly, generally helpful. Not this time. So I'm going to do it outside a pycharm and then ignore it and then come back. And here you can see that secrets.json now exists and that it's this golden color which in pitch our means that it's going to be ignored. I just copied it over and then added it to the git ignored. So what I'm gonna do is go over here and put my API keys into this file. I'm not going to show you that because there are mine and private. You do that for yours and make sure you don't commit it or share it with anyone.
|
|
|
transcript
|
6:03 |
So, you put your secrets into your secrets.json file, which we shall not open while screen recording. And you shall not put into your github repository either. Now we need to get them out. Let's go back to our app here. Remember what I talked about this configure method? I said, Oh, let's go. And just add these couple of things here because it's going to build up over time Well, here's one more function that we need to add. And I'm going to add this right at the beginning because maybe some of these things need the connection string or something like that. So to configure secrets this and write little function here that will let us open up the file, Speak of the file. Which one is it? Oh, it files easy. It's just gonna be secrets.json look how awesome pycharm is. It's like, yeah, yeah, secrets.json, we got that file. We've got you. That's true. But remember, when you run these apps, especially in production, the working directory might not be the project directory. It should be. I would think it should be, but it might not be depending on how it's run. So let's be very explicit and do a little bit more work up here. So I'm going to use a new path object. We can come out here and say we would like to create a path based on something fixed that doesn't vary on how the app is being run, what the working directory is and so on. And for any Python file, we can say Dunder file doesn't come up in auto complete, but is the full path to this. So right now it's once you expand the user bit, you would see what the path is out there, right? So it's that path right there. That's a file. If we want the directory containing that, we can say parent, And then if we want to get to the secrets, which is the file right there, we need to concatenate those. And so you just use / like the divide operator and it overrides what divide means to mean build up the string that is the file path. And, of course, on windows. That would be backslash. That's just how it looks in code. Now what we want to do is verify that this exists so we can say, If not file.exists well, that's going to be a problem. So it's just raise exception. All right, this little, somewhat helpful message cannot start the secrets.json file is missing. Do you need to copy the template over? If you do go get on that now. The next thing to do is just to load this up. Using Json will create a pathway with open file in read mode as file input stream And then we're going to say, Json, which needs to be imported. Just do a load, then take the stream. The data is that so that's going to be our secrets. Let's call it secrets. Now what are we going to do with it? Well, we have these secrets loaded up as a dictionary, but I want to be a little more structured, something that's a little easier to program against. So we're going to have a new category of code that we're going to use later as well. We've got views, templates, models, data models, API stuff. Let's have some kind of helper things that just call infrastructure. And in here, let's go ahead and add a file called app Secrets, an app.secrets is going to have what I had started to put here like that. So we'll cut those out and put them here, because this is sharing stuff like, say, from send grid from twilio from the database. I'll call this the sendgrid_key_name in the send_grid_api_key ofcourse. You wouldn't have more down here as we go. So let's go and just set these values over in our app. The app_secrets.sendgrid.api name is going to be secrets. Now I'm a fan of doing the kind of friendly get and give me the default value if you can't get it and we'll just keep going with dictionaries in general. But for this one, we want to make sure those entries are in there so we can be more explicit. More crashy about it, right? So if they give us the sendgrid thing and if it's not in there it's going to crash. And then what do we need from that? We're going to need that's build little variable here and we go to our send grid and what was it? We're going to look in our template file and it is a secret key here. We also have the key name, which will be the other one. Perfect. Now, this should be totally working. I'm gonna run it. Just make sure that it does. Starts up. No crashes. So, yeah, it looks like everything is going just fine. Now, we haven't tested this, but I'll find out whether it works, Not real quickly. Of course, in your set, a breakpoint printed out. Whatever. But I don't want to share those keys. Right. I think this is ready. And all we gotta do is go back to our email service that we were working on and over here and say, app_secrets, api_key. Perfect. We should be able to create our client. And if it'll go, we can do one more test, I suppose. Let's run postman once again, just like we did before against this order_api. And make sure that we can create the sendgrid client correctly and that it accepts our API key. Probably not validated on the server, But it's a step. Hey, look, it works. It works just fine. We should see we'll email. So and so about this. And of course, that means that line ran, and I think we should be all good. Yeah. So we've got our secrets loaded by storing them in this file that is not shared and GitHub. And you know, when you deploy, you're gonna have to make a copy of it and pasting the values. But, hey, that's just how those sorts of things go. It's definitely better than showing up and should get.
|
|
|
transcript
|
6:39 |
I'm going to finally start sending that email and see if all the stuff we put together about the secrets and the api keys. If we got all those details right, let's focus on the bottom bit for just a minute. We're going to create a message and the way we do that as good as SendGrid haven't imported it from there. But I'm using the name space. I do like that style. So you know where stuff comes from and it's going to take a mail. When I create one of these and in the mail, we got to pass a from potentially multiple two emails the subject. Plain text HTML content, some email clients except plain text only. Some will show HTML, and you can give a little better HTML view and a little bit better. More specialized plaintext view here and things like that. To notice when need to have the from email address, the to email address and so on, and that kind of falls up into this area. So working that would say from=. Now I could possibly say string here. It will take different things, but what I'd like to do is be a little more specific and have more control. So I can say sendgrid from there's a From and a To and a Subject and all those types of things I want to say 'From' we could put in the email say, michael@talkpython.fm and the name. You're the name. Let's just put my name and because From is a keyword will say from_email, and we need to do something similar in the to email, but we're going to do a to, and this information is coming through as part of the API's. We got the order, which has a user, and the user has an email, and we have an order which still has that user, which has a name. The title or the subject will be your order receipt from Cloud City cakes. And HTML. Let's put something really fancy, each one, your receipt as an H1, and then maybe we'll do a line break, a new line, line break and new line We'll just say Thanks for ordering. I will just say like large chocolate cake or whatever so we'll say large size {order.flavor} cake. We'll be, of course, much more specific about this later. And we can also put the text going to be something like this. But I'll just say yes, the \n If you're not familiar, that means line break the . We don't want that in there. Perfect. So we're gonna order that cake and this is all the details that we need, in order to create our message. So now we come down here and say message or mail or whatever you wanna call it sendgrid.mail and look at all the things it takes. It takes it from and takes a to makes a subject, plain text content, which we just called text and HTML content, which we called HTML. And we don't need anything else. Very cool, right. And then finally, to send the message down here. Let's break this up. We'll say response =. Remember the top. We created this client. It has our api_key, client.send And what I'm going to send the message. And also just to be a little bit clear, let's go ahead and set the return type so we know exactly what we're working with So what we get back? Is this Python, http_client.client.Response. And now that we know what it is, we can go to things like, Hey, it's status code. Perfect. And so the final thing we could do, No, no. Still need that down there. Do we? Final thing to do here is we're going to say if response.status_code not in {200, 201}. Whoa, something went wrong. We had a problem. Otherwise, we could just print send emails successfully. Do we have it, again we solve these other things to do about making fancier content to send and attaching things. But here's the basic flow. When a create a client, with our API keys stored secretly, we're going to set up these rich to from subject, etcetera. Fields create the message, and then we're going to use the client to send the message, get one of these responses back and make sure it's a success oriented status code. If it's not raising their otherwise, you know they've already received their email. Everything should be fine. Let's fire this up and see how we're doing. Again, we could do this by sending an email through WhatsApp or triggering this API call through WhatsApp. But just to save us the effort of filling out all those details, let's just use Postman once again. And just so we see something different because it's coming from Michael Kennedy, I'll say I'm Mike Kennedy and this is coming from It's going to go to contact@talkPython, just the general like way to reach us. What are we gonna order? We're going to order a red velvet small red velvet cake with chocolate popping in lemon frosting. But this is the stuff that should appear in our email. Make sure it's running. It is so without further a do we can press. This should call that function. It should try to talk to send grid, try to send us an email, and then momentarily, I better have something in my email client. Oh, no. Look what I did. We got a 202 back and I was saying, 202 201 is good. So yeah, 202 is totally acceptable. Let me update that and try again. 202 is also a success code. Look at that. It returns successfully instead of crashing. That's a really good sign. You can see. Order 7 was sent to Mike Kennedy. That's the new person over at contact. Well, let's go check that email address. Well, look at that. What we got your order received from Cloud City cakes is in my inbox, and you can see right now it says sent via send grid. That's because I haven't authorized or authenticated my domain, But if I did, it would just come straight through. As from Michael. And who is it to? It's from michael@talkPython to Mike Kennedy at contact@talkPython. Perfect. That is great. And here's our receipt and our message that we sent over. Thanks for ordering your small red velvet cake. I'd call that a success, a delicious one.
|
|
|
transcript
|
4:22 |
Now, some of you may have cringed when you saw what I wrote here, and I reformatted it. So it's a little more obvious what's happening. But look at Line 17 and go on from here. We're writing HTML in line with sort of variable replacement bits, and then we're writing formatted text in line as well. That's not ideal, is it? How do we solve this in normal web apps? Well, we have this whole cool section over here about, like our admin area. It uses jinja, and the jinja has this cool shared layout that has, like, all the HTML and overall style in it. Then it has this whole that it plug stuff in that seems way nicer than just writing in line text in our code, you can imagine we have many types of emails we want to send. Like you need to reset your password. here's your receipt. Welcome. Things like this, right? This is the kind of stuff that would be really good if we could use jinja, because it's exactly for building these kinds of HTML things. Check this out over here and I'm gonna paste in some code and then talk you through it because it's kind of code you write once in an application and you never think about it again. Just works. So look at this. I've got a little function called build_HTML Given it a jinja file and a data dictionary, much like you would from a view method come in here. Let's import path from Pathlib. Figure out where the Templates folder is right there. We're going to create a directory called email to go along with all of our other things and then went to use the file system loader from Jinja, create an environment with that loader set and then render a template. You get HTML out of that couple of steps there in the basically the internals of jinja and flask. But with this, we can now start writing HTML templates. But let's go over here and add a quick little test email. It's a test email. We'll put a header. And what would we do, if maybe we had that order? Well, we might. Come on, we're say, Enjoy your {{ }} double curly brace. That's how we get to strings and we say order.(dot) What do we have on our order? We had a flavor British style, and we had similarly we had a size and that's it. Let's Yeah, so let's just like here's some data that we could pass in and use. This is basically the certain area that we're looking for, but we can grow it so much better. But let's try to do that again. So instead of doing this, you look, let's leave the text for a second. Instead of doing this, you look, let's do HTML=build_HTML(), and the template file is going to be email/testemail.html. Right. That's this and then that it's not misspelled. Take that away. We have to pass over some data, which is going to be a dictionary, which is Here's the way the template sees it. And here's the actual data. We're providing it, and instead of actually sending the email print would send HTML and let's just return. We don't want to just keep sending emails and cause trouble. So let's just verify what's happening here that we're getting valid HTML. Click this button again. Didn't crash. That's pretty good. And look what we got here would send Doc, is your test email. This is a test. Enjoy your small red velvet cake. I guess there's a space in there, but it doesn't actually matter because HTML you know it doesn't. It's not space sensitive, like multiple spaces. One space. It all looks the same. How awesome is that? We got it working so very cool. So here it is. We're able to very, very easily leverage the jinja system, just like we do for HTML. Same thing for sending HTML oriented emails.
|
|
|
transcript
|
4:45 |
But we made some awesome progress. We have our test email, which, given the name you might imagine, this is transient and will not be lasting long. This is not a great email, but this will come through looking like you'd expect, right? It's proper HTML somewhere else. But it opens the door to do all the cool things, like with the shared layout and the proper content that we can put into these sections and so on. So let's do that now. Over here, I'm going to create a new file called HTML file and is called _shared_email.html. I'm gonna drop in some code because again, this is not a Web design class. It's not worth going through all the little nitpicky details of CSS and so on. So here, let me just talk you through this. We've got our email from Cloud City cakes and right at the top of this cool banner over in our static folder. We've got an email banner. If we look at that look like this beautiful, we want to put that right at the top of all the emails we send, theoretically and make that a link back to our URL here. We've got some additional styles, like the font and whatnot. And here we've got our content and the default is Hey, there's no content. But remember, all the pages will put their content in here. So every email we send is going to use this shared layout with the same advantages that every page has, like have all the common look and feel and used pieces and so on. And here's our address and so on, Right? You probably want to put the formal Canned spam type of details in here to let the people unsubscribe. Remember, this is not marketing. This is. You purchase something. Here is your receipt. You signed up and you asked us to reset your email. Here's your email reset. So it's not exactly in the email newsletter type of marketing category. So then what we're going to do is going to come over here and want to say would have reciept and let's drop in some HTML here as well And check this out. We're using our shared email template or filling in the conduct block with all of this stuff. Not that much stuff and check it out. Hi, name. Thank you for ordering one of our award winning cakes. This is your confirmation email and receipt of your purchase. Get your WhatsApp message later when we've baked it. And here we're using some of the details about the order making it capital. So, like, capital S, small, capital L large and so on. Same for the flavor. You've seen it making it look a little bit better, because everything is lower case. And that looks a little bit weird. More formatting. The number to actually have zero floating points instead of like, 12.000000..1 Which can happen sometimes with floating point numbers like No, no, no. Just show it as an integer, basically. All right, now let's rerun this and over an email service. We need to ask for a different one. We're going to ask for a receipt.html this one right there. And this can go ahead and delete that it's checked in to get up if you want to see it at that point of time. But now it's gone. Shall we try again? I say, Yes. Let's try, click this to trigger. Remember, it doesn't really send the email. It just puts it into our little output window. For the moment, we didn't crash. Good sign. What have we got? Look at all that proper HTML. Hello, world. Here's your cloud City cake. What goes in the middle? Hi, Mike Kennedy. Thank you for ordering one of our award winning cakes. We're so excited for you to pick up your small, red velvet, chocolate, lemon 17 gold coin priced cake. You'll get your WhatsApp message soon. Fantastic. Now it doesn't quite look that great yet because we haven't sent it. I think now we've done our debugging. It's time to get rid of this stuff and actually send the email. Let's send it one more time. Well, it's off. Let's go check our email. Wow, Look at this, folks, check this out. Here's our cloud City cakes. And if I click on it, you can see it's going to open in and ngrok here. OfCourse you'd use cloudcity.com or whatever your real addresses. Our cake order is being processed. Hi, Mike Kennedy. Thanks for your order and you will receive a WhatsApp. Look at this proper HTML Here. Order details size: small, flavor: Red velvet, etcetera, price 17 Gold coins, Love the little emoji. Just reply if you have any questions. Thank you, Cloud City cake team. And here's our little footer. This part and all of this stuff up top in the overall look and feel come from that shared layout, just like it does for HTML pages. We have this cool benefit for email as well. Fantastic! I'm super excited and pleased with how this looks.
|
|
|
transcript
|
2:33 |
I'm delighted with how our HTML message came out. But remember, if your client you said I want to receive text only plain text only well, you're going to get a much less impressive response. Your receipt. Thanks for ordering a small cake that's not convincing. That's not fun. So there's two things we could do. We could actually put like some kind of markdown plain text template here and use jinja to render it. That's one option. But then, of course, you still have to keep them in sync. That's tricky. What if we could just have a friendly version of text here, like even maybe a markdown version? That would be cool. Can we do that? Yes, yes, we can, watch this. We go over here, you Pypi. There's a cool library called HTML2text, and what does it do is a script that converts HTML and that clean and easy to read text. Better yet, that also happens to be marked down, for example. So if you've got like a bulleted list, it'll put Star Item 1 star, Item 2 and so on, so that would make it a little bit easier to read. How hard is this to use? Well, Not hard at all. It's over here. We want to use HTML2text install that and then we go to our HTML. We say HTML to text. We import this and then on there we can say HTML the text. And what does it take? It requires that we give it HTML, like so, that's it. Now we've converted over to HTML. Let's print the text and then return real quick. We're not going to see this in my Gmail account so, That's not gonna help. Let's send it again. Look at this. We've got our image and I guess we could exclude the image Exclude the links if we want, But your cake is being processed. How fantastic is that? Hey, Mike Kennedy, Thank you for ordering our award winning cake. This is your confirmation order and we've got a little emphasis in our text. And then here's a table looking thing that we might have, so size is small, flavors such and such and so on. Really, really nice. I think this is pretty decent. It's not perfect, but as a way of saying here's a pretty good guess at what the text should look like. I think that's pretty neat.
|
|
|
transcript
|
1:23 |
There are a lot of little details about sending an email a send grid, but in reality it's actually really, really simple. So what we're gonna do is start by building out the HTML, and we were able to leverage the Jinja template engine to do that. We'll see more about that later, but we just call this build HTML _function, give it the template and then the details dictionary that provides the data. To that jinja template. Then we create a send grid client. We just set the API key. And remember, we did that by storing our secrets secretly and not putting them into source control, knowing created from email, a to email on the subject as object oriented things out of send grid. So from class, to class and a subject class generate the HTML content. We converted the HTML to plain text using HTML2text Then we created a male object with our From, To, Subject and all that information and finally just called client.send got a response. If the response code or status code was 200 201 or 202, most likely, everything was good. Otherwise, something bad has happened. We're not really sure what, but something bad. So we're going to raise an exception. Say sorry. Couldn't send that email. That's it. And remember, we sent beautiful HTML emails that looked great and professional by having this actual HTML generated having the static files back on our site that we could reference to you and so on, came out really good.
|
|
|
transcript
|
2:00 |
We're starting to put together some really neat building blocks here with our email, Jinja language thing and so on. In order to do our next step, we have to build a pdf invoice, and I have a really cool library to show you how to do that. And the easiest way for us to do so is to give it HTML as a string and say, Turn that HTML into a pdf. Do we have a cool way to generate dynamic HTML just as text? Mm hmm. We sure do build HTML. So what about this invoice_HTML= build_HTML('email/invoice.html') and the template will be email/invoice.html and the data will be the same, I think should be sufficient. How cool is that? And then we're going to turn this HTML into a pdf with a couple lines of Python. The first thing we got to do is create this right here, So over here again, we're using our shared layout for all of our emails were sending, But this is like a formal invoice, so we're not going to inherit its design. I said I'm going to just drop in some text as I have been doing and let's go up and look. Now we've got our invoice as our title. I'm not even sure that's really used in the PDF, but the rest of this is Here's our body. It'll say. Here's official company name. Here is a table of the things you bought. It's built to so and so on such and such date. And here's a description of what you bought and so on. Really cool. Okay, so can we generate this? Let's go. Look, we've already written all the code to do it. Probably let's just print it out and see what we get. Run it and hit it with postman again. All right, let's see what we got. It worked. And check this out. Here is our fancy HTML of our invoice. Now, that's just like before, But the trick is we're going to turn this into a pdf. That will be really nice in just a second.
|
|
|
transcript
|
3:20 |
We've got our HTML. How do we turn that into a PDF? Let me introduce you to pdfkit. So pdfkit is a cool library we can use in Python that will convert HTML to pdf using Web kit. Super, super cool. So all we gotta do is pip install pdfkit. However, there is this runtime dependency on wkHTMLtopdf thing so you can install it on ubuntu and other other Linux systems like that. there, you can get it from their site. You can run the script If you're on Windows, you can check out their system for their homepage for binary installers and things like that So in addition to pip install, in order to make this step work, you have to make sure you install this wkHTMLpdf thing. Now I believe I've already set that up correctly. We're gonna find out in a minute, but let's go ahead and over and say we're using pdf kit. I'm gonna go ahead and pip install it here, so I can see what happens. Alright. Installed with near zero delay, not much effort, so that was good. And then like we did for this. It's about equally complicated, but it's also not worth going too much details. Let me just drop this in here and I'll give it to you. So we're gonna go over here and use pdf kit, and we're going to generate a temporary file. I'm just gonna put it in the current working directory. You probably want to put it in a better temporary location, but for this little demo is just going here when you create this random file there And here's the magic pdfkit. from_string, given the HTML, just store it in that file, and then what we're actually going to do is read the bytes back and then delete it the way you delete it. Using pathlib is unlinked kind of funky, but that's how you do it, and we're going to base64. Encode this because what we need to do is attach the content attached the attachment to the email as base64. I'm going to set a little break point here before we delete the file, so we can go look at it. So let's call our build_pdf() over here instead of returned then the invoice_HTML and I'll just print out the pdf. Remember, this is the base64 encoded text, but at least we'll see something and let's hit it. All right, let's give it a shot. Running the debug and see what happens, takes just a minute to generate that look at our pdf bytes. They look kind of crazy, but what about our file? There it is. So it's over in chapter seven with this great long u-u id identified. Let's go see if we can find it. Well, look at that right there. Little previews looking pretty good if we open it. There you have it cloud city cake. But there's our address build to so and so perfect. All the information, right? The invoice number. Just the order id basically the 17 gold coins. And here's what we bought a small red velvet cake with lemon frosting and chocolate topping Awesome. And we've got it as base64 encoded text right here that will be able to attach to our outbound E-Mail.
|
|
|
transcript
|
1:17 |
One of the really neat things we did here was leverage the ability of having our jinja templates, which we already completely and set up and we're working with for the HTML side of our flask website. We're able to leverage that for generating consistent and beautiful email. And in order to do so, we had to have a template file with potentially, common layout wrapper. But we don't deal with that here. That's all the template engine level. We're going to have this HTML template file. We want to pass data over to it just like we would for a Web page with Jinja. So we wrote this super simple function here, and it's just gonna basically set up a one time jinja environment. In order to do that, we've got to figure out where the template folder is We use the path lib, path object to do so. I mean, we use jinja2 we said, create a file system loader from that location, create an environment from that loader, and then use that loader to load up a template and then finally render the template given the data really quite easy and very useful, which can be reused all over the place and you can actually render stuff that's not just HTML basically any text file. If you've got RSS you want to generate, you can use that for XML could even just generate plain text out of this kind of thing, really, really useful and flexible inside your application in many ways.
|
|
|
transcript
|
2:39 |
Well, we've made it farther. We've got one more of our TODO's done. Very last thing to do here before we're completely finished with this section is attaching the invoice through the email. But we're going to create like we did a To, and From and the Subject. We're gonna create a attachment. I'm going to say a couple of things. Set the content, to be the encoded pdf I set the disposition to attachment file type to application/pdf. Then finally, when they download it, let's go out and set. The names will say attachment.file_name Cloud-City-invoice-{order.id}.pdf" That seems like a decent number. So would be Cloud-City-invoice-18.pdf or whatever. And then the final thing we have to do is go and attach this to our message. I go and say add an attachment, and we just say, Here's your attachment. I got some faith. Let's go and delete the studio. I think we're going to be good. So we're going to your client, set up the email, set the email content. create the Pdf. Make it an attachment. But if the email. Add the attachment and send it along. Let's bring it all together and see if this works, well. There was. That went pretty quick. Time to check the email notice down here. You can see this is the output from pdf kit, by the way, about what it's doing. So it looks like it generated the pdf. You look carefully. What's up here? Check this out. There's an attachment during the bottom. It is Cloud-City-invoice-19. And there it is. Cloud City Cake Company. This is a Pdf. We could download it. It's going to save exactly as the file name that we suggested. And there it is. We got our pdf attached to our fancy email that tells everybody. Hey, thanks for ordering your cake. Keep your eye on your WhatsApp messages for when your cake is ready. Fantastic. So you can see there are a couple of steps that we had to do that we're not entirely straight forward and obvious. For example, building HTML out of the jinja template system and building the pdf using pdf kit. Neither of them are major, And once you get these set up in your code, you can just use them and build out these emails in an incredibly simple way. And of course, you have access to this code, so feel free to just copy it verbatim and use it in your projects.
|
|
|
|
14:15 |
|
|
transcript
|
0:31 |
Now, even the Bakers are excited about this new ordering system that's in place. The final feature is to notify customers and give the Bakers a way to do that So, when they put that cake on the cooling rack, they're going to walk over to their tablet, hit that fulfill button we built for them in the admin section, and the customers should get notified right away. If everything works well, maybe the customers will even get to the shop while the cake is still a little bit warm. Wouldn't that be awesome? It's time to make their phones go ding.
|
|
|
transcript
|
2:04 |
One more thing to do to our app. One more chapter. So one more copy of our code here. Go ahead and fire this up. It's obviously what we just finished with from Chapter 7 and here in our Cloud City Cake company. Remember, we have our admin section, and when it's finished what we tell the people to expect, we told them to expect to get a message telling them that their cake was ready that it was completed. Well, if we push this button, it goes to the database and it marks it fulfilled and refreshes this page like we learned did in our admin section. But there is no text message to be found in our WhatsApp, but that's what we're going to do in this chapter. We're going to build out this button to actually send the notification back through WhatsApp. to the user. And if we go look at the code, the part that is relevant is the second part. The fulfill part. And it says to do send a WhatsApp message to notify your customers. So let's get this started by saying, How did we send over here real quick? How do we send email we used our email service. How do we work with our users? We use the user service. So we're going to have a WhatsApp service. I'll say, send_order_ready or send_cake_ready. How about that? And what we can pass along here is just the order that we got. Neither of these exist, So let's go make that happen. We're gonna need to import this now that it exists. And then let's write that function. Thank you. PyCharm is going to be in order out of the database. Perfect. So what we're going to need to do is do a little bit of work with the WhatsApp, API here which turns out to be quite simple to use, actually simpler than sending email. To be honest, we use the twilio WhatsApp API, to send this message over. So really, all we have left to do to finish our entire application is to write this one function. That's pretty awesome.
|
|
|
transcript
|
4:03 |
Now, in order to work with the Twilio messaging service, we're going to use the Twilio project. No surprise there. So over on pypi.org it's just twilio We're just going to pip install twilio. And of course, the thing that we're going to need to do to use it is to create the REST client. That's fine. But here we go. This is the part with our secrets. We need to set the account and the token. Well, where do we get those from? Much like we did with send grid. We need a safe place to store them. But let me show you first where to go and find yours. We go to our project and we go here and click settings and go to our general settings. We've got an account SID. But more importantly, if you scroll down, not going to click it. But here, behind this little section is our auth token. So this is our SID. And then here's our actual token that we're going to use. Do you want to get your version of this token and put it somewhere safe? We already have a place for that, right? over here, we have our secrets which are not opening and its golden because it's not stored in git. But we have our template. And for our template, we're going to have something like we had before. Twilio, is want to put our SID and AUTH token in here And of course, say"TODO: Set in secrets.json, Just like before. We don't get the value here. This is just a template to help us make sure we can recreate it successfully. You go set in your secrets.json I've already just now done that. Of course not recording. And the last thing we got to do is go load it just like we did before. So even over in our app, we have configured secrets. A little bit more is happening. So we're already verifying that we can load up this secrets.json and we want to go over and have not just in our secrets, not just the send grid name. We're going to have twilio _sid. Which is going to be one of those. And twilio_key, which looks like that as well. You want to set those two things and here will say it. twilio_keys. Then let's look at our template. What we call them 'sid' and auth_token. So there's the 'sid' and our auth_token. Let's make sure we just run this. Everything hangs together. Yeah, it looks like we were able to read those out just fine. Again. Don't really want to look at them because they're secret, But we'll get that all set up. Well, when I want to go and import our app secrets, we also need to use twilio. So let's just go out and throw twilio in here Click Install, pip install-Our requirements.txt take your pick and then we'll say from twilio.rest import client. We'll start by saying our client here is going to be one of these clients that we create. What we can do is just set the username and the password here and the username is going to be app_secrets.twilio_sid And the password can be app_secret.twilio_key, All right, that's going to create our client that we're ultimately going to use to send our WhatsApp message. Let's just make sure one more time that we can call this and this all gets set up just correctly. So we'll go over here, go to the admin section to fulfill one more of these things. Perfect. We still haven't actually sent the message. There's a little bit more to explore to make that happen, but it looks like we're able to create the client, get the private security keys and so on and get that all set up and ready to go.
|
|
|
transcript
|
1:40 |
Now, before we go and write the message we want to send, we need to talk for just a moment about sandbox message templates. What are those? It turns out that WhatsApp doesn't want you to arbitrarily start spamming people, Surprise, Surprise Right? While we're in this sandbox mode, we can only send a couple of messages so we can send your some piece of information, code is something your appointment is coming up on at such and such place or your blank order of whatever has shipped. And it's to be delivered on whatever day with some more details. Outside of that, you have to go to WhatsApp and have your messages approved in this template format. It also says there's this 24 hour window. So if you have a conversation with somebody and they interact with you, you have 24 hours to send them whatever you want. Like, we have a small, medium and large cake. What size of that cake would you like? Right that is good for 24 hours. But if days are going to go by and then eventually their cake is ready and we want to tell them we're going to have to in this horse. And this test mode and this development mode probably use something like this for our format in practice. What you would do is you would go to WhatsApp. You'd get something verified. You can click here and say, Learn more about templates and there's a whole section on how to go through and do that. But what you need to do is get the types of messages that you want to send as a inbound message to the user outside of the 24 hour window You got to get that approved. So we're just gonna go with something simple like this to make sure that it's going to work. Your cake code is ready for pickup, or something weird like that.
|
|
|
transcript
|
4:13 |
As long as we live within the constraints of our sandbox, it's actually pretty easy to send out a message. So who we're going to send it to? We'll say to_number=order.user.phone And it has a user and the user as a phone. Yeah, that's perfect. And we have from_number. And right now that needs to be what we have in our twilio sandbox, which is "whatsapp: and then that sandbox number. And then we need the message. Remember, it has to be of this form. The order status is such and such code, right? Let me drop this in. So we get it just right, and I'll even put a link here up to where you can learn about these. So your cake orders status code is ready for pickup, right? I think that will work just fine. Then how do we know what to do? Well, we're just going to go and send a message to create a message. I want to go over here and say the 'to' is the 'to_number' 'from_' 'from_number' and the body is the message body. It's probably better to think of this as a response And then we can check if response has an error(if resp.error_message:) message or Error Code will raise an exception and not send a WhatsApp message, and we'll just pass along that error message. Otherwise everything will have worked. So I think that will do it. Unless we've made any mistakes along the way, I think we should give it a try. Let's go out and run it. Now Over here in WhatsApp, I've already just a moment ago created another order. That's my order 20. And what I want to do is go over to the admin section and tell Michael here that his cake and a cake does he have something with bacon, cream cheese and so on, that his cake is cream cheese. Bacon cake. That sounds kind of weird, that that's ready for pickup. So first of all, let's refresh it here. Okay, here's Michael, and this is the order we just placed. If we fulfill it, fingers crossed. What's going to happen? Oh no. Our user has become detached. That's not good. I think we forgot a sub query Join thing going on here. Let's just fix that real quick. You'll find order by id. We're creating a session. We're getting the order and then we're closing because we're leaving this with block. We're closing the session and we can't do that joint. So let's go over here and I'll just say as we're doing these things, we'll do an option. (subqueryload (Order.user)). Alright, with our user not detached. Let's go and try to fulfill this order which will grab the user information and send them that WhatsApp message. Here we go. Alright that worked. And check that out. Your cakes. Order Status code is ready for pickup. Fantastic. So over here in WhatsApp, you can see that we have now received this message initiated by our website. When we interacted with the admin section to reach out to this user and let them know a while ago you place this order for this cake and guess what? Here it is. It's ready to go. We had a better message. Template. We could give them more information. Like your small cream cheese. Bacon cake is ready for pickup. Make sure you get it within the next hour at such and such and so on Right, We could do a better message, but within this template. Constraint. This is fantastic. How cool is that? We've got the entire round trip of the app that we've been building working. They come to our website, fire up the WhatsApp link and say, Hey, I'm looking for a cake through chat and I'd like to order something so great we go through that back and forth, we use Twilio studio and then finally went twilio studio got all the information it called an API on our flask application which put it into this admin section as unfulfilled as open. And then finally now we hit, fulfill it sends that message over through WhatsApp, back to the client and lets them know that thing you ordered a while ago. It's ready. Come get your delicious cake. Fantastic.
|
|
|
transcript
|
1:44 |
The final thing with our exchange with our user. When they were ordering a cake after they had gone through the whole twilio studio interaction they had placed the order. The orders showed up in our admin back end. The baker saw that order, bake the cake and clicked fulfilled to let them know that it was done. What we told them was we're going to send you a WhatsApp message, when your cake is ready and here we go. This is how we do it. It's quite simple, right? We create a from and until you have a proper account registered over at WhatsApp, we're just gonna use this number here. This is the WhatsApp test sandbox number. And then we're gonna use the 'to' number being the number we saved in the database on the user associated with that order. And remember that there's certain templates that we have to follow in this Test Dev mode before we get them approved. So your cakes order status code is ready for pickup is what we said. Then we just create a twilio rest client, given the user name to be the SID and the password to be the Auth token that we got out of Twilio studio. Remember, we store those secretly in our secret.json and we don't let those get into our GitHub. We just create a message. We say the body is the message body the 'to' is 'to' and 'from' is 'from' super straightforward. As long as no error message came back, we're assuming things must be good. So we check for the error message. If there is one, we raise an exception to let everyone know otherwise, we've now sent a WhatsApp message over to our users, Super super cool. So this is a really nice way to communicate back to them. Remember, outside of that 24 hour window of interaction, the messages must confirm to a couple of template options. And this link down here shows you where you can go and actually explore what the few options are and learn more about how to register your own message templates over at whatsapp.
|
|
|
|
11:32 |
|
|
transcript
|
0:34 |
Congratulations. Congratulations. You've done it. You've made it to the end of the course. Way to stick with it. Way to get all the way to the end here. You've built one of the most high tech bakeries I've ever seen. So here's the big question. How will these tools empower you to build whatever you've been driven about? Whatever your next cool project is. Well, I'm sure you're excited to get right on it and get going. But before you leave, let's just take 10 more minutes and review the important building blocks. So you have all the pieces all put together in one place. Help you remember things just a little bit better. All right, let's review this.
|
|
|
transcript
|
0:36 |
When it came to interacting with our users through chat. We primarily did that over at Twilio Studio. This is our low code way of writing and creating these workflows where we can capture an inbound message or inbound call. And we have all these different types of widgets to work with, right, split based on set variables, send a message and wait for a reply, or even call an external API. I like the pricing one which is unrelated to us or actually back into our flask application through in Ngrok initially and then out into the real public Internet, when we're doing this in production.
|
|
|
transcript
|
1:36 |
Working with twilio studio was great, but what we wanted to do is actually get that information and get those triggers over to our code to run on our back end so we could put into our Admin system. We could send them their emails and all of those sorts of things. In order to do that, we created a cake order, api endpoint'/api/orders/cake'. And all we have to do is to get the posted Json body with the request So we say request.get_json(). That's a Python dictionary, and we use pydantic to validate and convert that. So we said Order model, which is a pydantic model, passed in the keyword arguments out of the dictionary. So that's the Star Star(**). We got our validated model, and then we used our service, our user service, in order to record it and save it to the database and even create the user if needed. And then finally, we create another pydantic model that had the response message and we just returned response.dict. That was the happy path if something went wrong, we did this in a try except block, so we caught an exception and we said, Here's the error. We got 500 we returned a response with an error code. In this case, we're just catching general errors and saying 500. But of course, we might want to catch validation errors out of pydantic and convert those to 400 or 402 errors to tell the user you submitted something correct. You should be a little more nuance, but just for the basic idea. Here's what we got going on. Try to do this stuff, catch it as an exception and then return a flask response with an error code instead of just a Hey, just everything's OK. 200. Here's your error. That's it. Incredibly simple, right?
|
|
|
transcript
|
1:18 |
That Flask API endpoint we created. That was our end of the story. But over in Twilio studio, we need to connect our flow over there back to that API endpoint. In order to do that, we did a couple of interesting things. We added the make http request widget to our flow. And we told it we're going to do a post request over to our URL of type application/json. And then down here at the bottom, we put all the information we want. We've gathered up and we want to convey across to that end points with our customer with the number, and name and email, the cake with the topping and so on and even the price that we got from that PricingAPI. The other thing of note here is that we're using in ngrok. Remember, we did this all the way back to our Dev machine and we were able to set a breakpoint in PyCharm or whatever editor you're using set a breakpoint there and look at the code and inspected at this running as part of studio calling over to our api endpoint. That was super cool. How did that happen? ngrok. In my example, I had to paid account and I was able to use cloudcity.ngrok.io. But in practice, you probably have some random GUI looking thing there, so make sure that's always up to date as you're working with your api and maybe restarting ngrok, and it changes.
|
|
|
transcript
|
1:39 |
Eventually we wanted to save the information that we got from twilio and all the computation that we did. Save that into a database. We're going to use that for admin backend We're going to use that later for probably when a customer comes into the store and we pull it up on our application and say, Oh yeah, here's the order and we're ready to hand your cake over and so on. So in order to do that, we use SQLAlchemy. Instead of going straight to the database and defining the tables there, we said, Well, let's define some classes, in this case, a user class that derives from SQLalchemy base And we said it's going to correspond through the Dunder table name over to the users table in the database, and we mapped out the columns as fields in the classes with SQLalchemy column types. So, for example, the 'id' is a string and code, but in practice and SQLAlchemy Landed, it's a SQLAlchemy column, which is a SQLAlchemy string. It's a primary key, and in this case it has a default id of some arbitrary uuid, we're generating we have created date. It's datetime. It has the default of datetime. Now, now be really careful. You don't want now parentheses just now. The function with the name, phone, email and so on. And we also have orders. And we created a relationship which was very useful in binding our orders and our users together encode, for example, when we wanted to insert an order into the data base, we just found the users, put it onto the order, object and SQLAlchemy to put that into the database. That's it. When I create a couple classes and SQLAlchemy will actually create the tables for us. When it first sees those classes, Just remember it won't propagate changes after it's already created the table.
|
|
|
transcript
|
1:13 |
Once our databases all set up, we would love to save some data into it. For example, when we get a new order for a user, we want to make sure that that user already exists and, if not, create one and then associate the order, which we're going to insert into the database with them. So recall I created this handy utility session context. SQLAlchemy uses the unit of work session concept, but it doesn't naturally follow with blocks or other language constructs. To make that more consistent and automatic in the GitHub Repo, you'll find our session context here, and we say, commit_on_success=True, which means if you leave the with block successfully, apply all those changes. If there's an error, somehow don't apply the changes, and then we're just going to go do a query for the user, and we're gonna find them by email or phone number. So we're gonna use the or_ operator. I would say first to give us the one and only one or give us none If there is no user didn't exist, we're going to quick create one, and there's a session.add and then we're going to create an order and we're going to say this user, follow their relationship independent order to it and that will both update the user if necessary, and insert the order into the database when we leave this with Block because our session finished up sucessfully.
|
|
|
transcript
|
0:36 |
After we received an order. The next thing we have to do is fulfill it Our bakers had to find it and then go bake it. And when they were done said, Hey, your orders fulfilled. Your cake is on the cooling rack. Come and pick it up. So we had two steps. In order to do that. We went to the database, created one of these sessions. We found the order. He said, Well, if there's no order, we can't fulfill it. If the order is already fulfilled, also can't fulfill it. But it's sort of fulfilled. So that's all good. Other than that, we just set the fulfilled date from none to now. The session is going to commit this because that works successfully Presumably the order is now fulfilled fantastic.
|
|
|
transcript
|
1:34 |
When we received an order through WhatsApp and called into our API, we wanted to send a receipt to let the users know. Here's your official receipt for purchasing our cake. So what we're gonna do is you send grid another Twilio service to send it. So what we do is we create a dictionary that's going to allow us to pass data over to a Jinja template. Remember, we could do all sorts of things to come up with that HTML. But a really flexible thing is suggest leverage Jinja to actually generate those. And in order for Jinja to work, give it a dictionary of values and it can dynamically generate the HTML just like it does in the Web itself. We got our HTML text will create the Send Grid API client. We pass over the API Key, which were storing secretly. Remember that our secrets.json, we create 'from' 'to' and subject object, passing over our information. The to is order.users.email, following that SQLAlchemy relationship. But our HTML content we're going to generate our text content by just mark down file our HTML content and then we're gonna create our mail message with a sendgrid mail class. Just pass all the items over. Go to the clients they send when you get a response. And as long as the response.status_code is 200, 201 or 202 we're all good. If it's something else, we're gonna say there's an error and that's it. Incredibly simple to send a really nice email and in practice, remember, we also created an attachment, pdf attachment, and we attached that as well. So really powerful email system here with Sendgrid.
|
|
|
transcript
|
1:39 |
Once we fulfilled the cake order and everything was ready to pick it up. The way we wanted to let our users know was we sent them a message back to the same place they started this conversation, which was through WhatsApp. This was a little bit different, though, Instead of responding to some kind of inbound message, which is what happens at Twilio studio with our flow, we're going to initiate a message, so we're going to just simply specify our from number. This would be your business number or something like that. But here, this is the sandbox number. The to number is whatever they initiated their call from so ordered.user.phone and we give them some message like your cakes order status code is ready for pickup create a rest_client set the id set the password again coming from our secrets and we just say client messages create body, to, from. Of It goes long as there's no erro message, things are good. One thing to keep in mind is if this is outside the 24 hour interaction window, which in this case it probably is you're going to need to make sure that you're using one of these rebuilt couple of templates that you can use. See the URL, the bottom. You can learn more about that. And then when you get this set up for real, you're going to need to get the message template approved at WhatsApp, so that then you can send that we'll be sure to use the right message template to make sure that this will go through for them and doesn't get blocked. That's it. Now our user has gone round tripped. They've started the cake conversation with us. We told him what we had. They filled out all the information, requested the cake, we got it over and flask. The admin API showed it to the Bakers. They baked it. And now we send them the message and they come and pick up the cake. Fantastic app we built here, isn't it?.
|
|
|
transcript
|
0:26 |
That's it for this course, I really hope you enjoyed going through it covered so many neat ideas both at Twilio and in Python and flask. So if you enjoyed it and you would like to go further, we have many, many more courses over at Talk Python Training. Just go to talkpython.fm. Click on courses and you can browse the catalogue of many, many courses that we have. We're always adding new ones, but I hope to see you over there in another class.
|
|
|
transcript
|
0:21 |
That's it. It's time to say goodbye. You've reached the end. Thank you. Thank you. Thank you for taking this course. I hope you really enjoyed it. I hope you've learned a lot. And most importantly, I hope you go build something amazing with what you've learned here So thanks for taking the course to see you online. Over at Twitter @mkennedy Feel free to say hi and let me know what you thought about the course. See you around.
|
|
|
|
54:50 |
|
|
transcript
|
4:07 |
One of the absolute pillars of web applications are their data access and database systems. So we're going to talk about something called SQLAlchemy and in many, many relational based web applications this is your programming layer to talk to your database. SQLAlchemy allows you to simply change the connection string and it will adapt itself into entirely different databases. When you use a local file and SQLite for development maybe MySQL for testing and Postgres for production I'm not really sure why you would mix those last two but if you wanted to, you could with SQLAlchemy and not change your code at all just simply change the connection string. So SQLAlchemy is one of the most well known most popular and most powerful data access layers in Python. SQLAlchemy, of course is open source you'll find it over at sqlalchemy.org. It was created by Mike Bayer and his site is really good. It has tutorials and walkthroughs for the various which you can work with SQLAlchemy one for the object relational mapper one for more direct data access, things like that. So why might you want to use SQLAlchemy? Well, there's a bunch of reasons. First of all, it does provide an ORM or Object Relational Mapper but it's not required. Sometimes you want to programming classes and monitor your data that way but other times you want to just do more set based operations in direct SQL. So SQLAlchemy lets you work in a lower level programming data language that is not truly raw SQL so it can still adapt to the various different types of databases. It's mature and it's very fast it's been around for over 10 years some of the really hot spots are written in C so it's not some brand new thing it's been truly tested and is highly tuned. It's DBA approved, who wouldn't want that? What that mean is, by default SQLAlchemy will generate SQL statements based on the way you interact with the classes. But you can actually swap out those with hand optimized statements. So if the DBA says well, there's no way we're going to run this all the time you can actually change how some of the SQL is generated and run. Well, the ORM is not required I recommend it for about 80%, 90% of the cases. It makes programming much simpler, more straightforward and it much better matches the way you think about data in your Python application rather than how it's normalized in the database so it has a really, really nice ORM or lots of features and this is what we're going to be focusing on in this course. I'll also use this as the unit of work design pattern and so that concept is I create a unit of work I make, insert updates, delete, etc. all of those within a transaction basically and then at the end, I can either commit or not commit all of those changes at once. Cause this is an opposition to the other style which is called active record, where you work with every individual piece of data separately and it doesn't commit all at once. There's a lot of different databases supported so SQLite, Postgres, MySQL Microsoft SQL Server, etcetera, etcetera. There's lots of different database support. And finally, one of the problems that we can hit with ORMs is through relationships. Maybe I have a package and the package has releases. So I do one query to get a list of packages and I also want to know about the releases. So every one of those package when I touch their releases relationship, it will actually go back to the database and do another query. So if I get 20 packages back, I might do 21 overall database operations separately. That's super bad for performance. So you can do eager loading and have SQLAlchemy do just one single operation in the database that is effectively adjoined or something like that that brings all that data back. So if you know that you're going to work with the relationships ahead of time you can tell SQLAlchemy, I'm going to be going back to get these so also load that relationship. And these are just some of the reasons you want to use SQLAlchemy.
|
|
|
transcript
|
1:35 |
When you choose a framework whether that's for a database or a web framework it's good to know that you're in good company and that other companies and products have already tested this and looked around and decided Yep, SQLAlchemy is a great choice. So let's look at some of the popular deployments. Dropbox is a user of SQLAlchemy and Dropbox is one of the most significant Python shops out there. Guido van Rossum and some of the other core developers work there and almost everything they do is in Python. So the fact that they use SQLAlchemy that's a very high vote of confidence. Uber. Uber uses SQLAlchemy. Reddit. Reddit's interesting in that they don't use the ORM but in fact they use only the core. At least, wow, hey we're using only the core aspect of SQLAlchemy, that's pretty cool. Firefox, Mozilla, more properly is using SQLAlchemy. OpenStack makes heavy use of SQLAlchemy. FreshBooks, the accounting software based on, you guessed it, SQLAlchemy! We've got Hulu, Yelp, TriMet, that's the public transit authority for all of Portland, Oregon. The trains, the buses and things like that so they use that as well. So here are just a couple of the companies and products that use SQLAlchemy. There's some really high pressure some of these are under. You know if it's working for them it's going to work well for you, especially Reddit. Reddit gets a crazy amount of traffic, so pretty interesting that they're all using it and we'll see why in a little bit.
|
|
|
transcript
|
2:14 |
Before we actually start writing code for SQLAlchemy, let's get a quick 50,000 foot view by looking at the overall architecture. So when we think of SQLAlchemy there's really three layers. First of all, it's build upon Python's DB-API. So this is a standard API, actually it's DB-API 2.0 these days, but we don't have that version here. This is defined by PEP 249 and it defines a way that Python can talk to different types of databases using the same API. So SQLAlchemy doesn't try to reinvent that they just build upon this. But there's two layers of SQLAlchemy. There's a SQLAlchemy core, which defines schemas and types. A SQL expression language, that is a kind of generic query language that can be transformed into a dialect that the different databases speak. There's an engine, which manages things like the connection and connection pooling, and actually which dialect to use. You may not be aware, but the SQL query language that used to talk to Microsoft SQL server is not the same that used to talk to Oracle it's not the same that used to talk to Postgre. They all have slight little variations that make them different, and that can make it hard to change between database engines. But, SQLAlchemy does that adaptation for us using its core layer. So if you want to do SQL-like programming and work mainly in set operations well here you go, you can just use the core and that's a little bit faster and a little bit closer to the metal. You'll find most people, though when they're working with SQLAlchemy it will be using what's called an Object Relational Mapper, object being classes relational, database, and going between them. So what you do is you define classes and you define fields and properties on them and those are mapped, transformed into the database using SQLAlchemy and its mapper here. So what we're going to do is we're going to define a bunch of classes that model our database things like packages, releases users, maintainers and so on in SQLAlchemy and then SQLAlchemy will actually create the database the database schema, everything and we're just going to talk to SQLAlchemy. It'll be a thing of beauty.
|
|
|
transcript
|
3:10 |
When you're trying to model something like PyPI a website with a database the clearer of a picture you have the better you're going to be. So let's look around this running, finished version. Remember this is not even though it looks very much like what we built this one is actually the finished one that we're going to be sort of be aiming for. Alright, now we're not going to look at the code but we'll poke around what the web looks like and we could just as well look at the real one but let's look at this. So on any given package this is pulling up the package AMQP and apparently that's a low level AMQP client for Python. Okay, great, actually I've never used this. We have a couple of things going on here. We have the name of the package, the version bunch of different versions actually a description, right here. We actually have a release history so each package has potentially multiple releases. You can see this one had many different releases and we can pull up the details about different ones. Jump back there. We have downloads, we have information like the homepage. So, right over here we can go to GitHub apparently that has to do with Celery. We could pull up some statistics about it. It has a license, it has an author. So remember, up here we have a login and register so we could actually go login to the site or create an account just as a regular user and then we could decide as Barry Pederson apparently did, to just publish a package. And then there's a relationship between that user and this package as a maintainer and it's probably a normalization table. We also have a license, BSD in this case. If we want to model this situation in a relational database let's see how we do that. PyCharm has some pretty sweet tooling around visualizing database structure. So, here we're going to have a package and it's going to have things like a summary and a description and a homepage license, keywords, things like that. It has an author, but it's also potentially has other maintainers. So we have our users, name, email, password things like that. And then I don't have the relationship drawn in this diagram but there'll be a relationship between the user id and the user id and the package id and the package id there. So this is what's often referred to as a normalization table for many-to-many relationships so that's one part. And then the package, remember, it has releases. So here, each release has an id it has a major/minor build version a date, comments, ways to download that different sizes as it changes over time. We also have licenses, that relate back there and we have languages. So here, this is going to relate back say to that id right there. Finally, we're not going to track any of this but there actually are download statistics about this about downloading all these packages and the different releases and so on so we went ahead and threw that in there. So this is what we're going to try to build but we're not going to build it in the database. We're going to build it in SQLAlchemy and SQLAlchemy will maintain the database for us. Think the place to get started is packages so let's go on and do that.
|
|
|
transcript
|
8:31 |
Let's start writing some code for our SQLAlchemy data model. And as usual, we're starting in the final here's a copy of what we're starting with. This is the same right now, but we'll be evolved to whatever the final code is. So, I've already set this up in PyCharm and we can just open it up. So, the one thing I like to do is have all my data models and all the SQLAlchemy stuff in its own little folder, here. So, let's go and add a new directory called data. Now, there's two or three things we have to do to actually get started with SQLAlchemy. We need to set up the connection to the database and talk about what type of database is it. Is it Postgres, is a SQLite, is it Microsoft SQL Server? Things like that. We need to model our classes which map Python classes into the tables, right, basically create and map the data over to the tables. And then, we also need a base class that's going to wire all that stuff together. So, the way it works is we create a base class everything that derived from a particular base class gets mapped particular database. You could have multiple base classes, multiple connections and so on through that mechanism. Now, conceptually, the best place to start I think is to model the classes. It's not actually the first thing that happens in sort of an execution style. What happens first when we run the code but, it's conceptually what we want. So, let's go over here, and model package. Do you want to create a package class Package? Now, for this to actually work we're going to need some base class, here. But, I don't want to really focus on that just yet we'll get to that in a moment. Let's stay focused on just this idea of modeling data in a class with SQLAlchemy that then maps to a database table. So, the way it works is we're going to have fields here and this is going to be like an int or a string. You will have a created_date which, is going to be a datetime. We might have a description, which is a string, and so on. Now, we don't actually set them to integers. Instead, what we're going to set them to our descriptors that come from SQLAlchemy. Those will have two distinct purposes. One, define what the database schema is. So, we're going to set up some kind of column information with type equals integer or something like that. And SQLAlchemy will use that to generate the database schema. But at runtime, this will just be an integer and the creator date will just be a datetime, and so on. So, there's kind of this dual role thing going on with the type definition here. We're going to start by importing SQLAlchemy. And notice that that is turning red and PyCharm says, "you need to install this", and so on. Let's go make this little more formal and put SQLAlchemy down here's a thing and PyCharms like "whoa, you also have to install it here". So, go ahead and let it do that. Well, that looks like it worked really well. And if we go back here, everything should be good. Now, one common thing you'll see people do is import sqlalchemy as sa because you say, "SQLAlchemy" a lot. Either they'll do that or they'll just from SQLAlchemy import either * or all the stuff they need. I preferred have a little namespace. So, we're going to do, we want to come here and say sa.Column. And then, we have to say what type. So, what I had written there would have been an integer. And we can do things like say this is the primary_key, true. And if it's an integer you can even say auto_increment, true which, is pretty cool. That way, it's just automatically managed in the database you don't have to set it or manage it or anything like that. However, I'm going to take this away because of what we actually want to do is use this as a string. Think about the packages in PyPI. They cannot have conflicting names. You can't have two separate packages with the name Flask. You cannot have two distinct packages with the name SQLAlchemy. This has to be globally unique. That sounds a lot like a primary key, doesn't it? Let's just make the name itself be the primary key. And then over here, we're going to do something similar say, column, and that's going to be sa.DateTime. I always like to know almost any database table I have I like to know when was something inserted. When was it created? That way you can show new packages show me the things created this week or whatever order them by created descending, who knows. Now, we're actually going to do more with these columns, here. But, let's just get the first pass basic model in place. Well, it's going to have a summary. It's going to be sa.Column(sa.String we'll have a summary, also a description. We're also going to have a homepage. Sometimes this will be just the GitHub page. Sometimes it's a read the docs page, you never know but, something like that. We'll also have a docs page or let's say a docs_url. And some of the packages have a package_url. This is just stuff I got from looking at the PyPI site. So, let's review real quick for over here on say SQLAlchemy here's the name. And then what, we're going to have versions that's tied back to the releases, and so on. Here's the project description we have maybe the homepage we'll also have things like who's the maintainers what license does it have, and so on. So, let's keep going. Now, here's the summary, by the way and then, this is the description. Okay, so this stuff is all coming together pretty well. Notice over here, we have an author, who is Mike Bayer and we have maintainers, also Mike Bayer, right there and some other person. So, we have this concept of the primary author who may not even be a maintainer anymore and then maintainers. So, we're going to do a little bit of a mixture. I'm going to say, author name it's going to be one of these strings just embed this in here and it will do email so, we can kind of keep that even if they delete their account. And then later, we're going to have maintainers and we're also going to have releases. These two things I don't want to talk about yet because they involve relationships and navigating hierarchies, and all that kind of stuff we're going to focus on that as a separate topic. The last thing we want to do is have a license, here. And for the license we want to link back to a rich license object. However, we don't necessarily want to have to do a join on some integer id to get back just the name to show it there. It would be cool if we could use somehow use this trick. And actually, we can, we can make the name of the license the friendly name, be just the id, right. You would not have two MIT licenses. So, we'll just say this is an sa.Column(sa.String which, is an Sa.string. That's cool, right, okay, so here is our first pass at creating a package. So, I think this is pretty good. It models pretty accurately what you see over here on PyPI. There's a few things that we're omitting like metadata and so on, but it's going to be good enough for demo app. A couple more things before we move on here. One, if I go and interact with this and try to save it into create one of these packages and save it into the database with SQLAlchemy, a couple of things. One, it needs a base class. We're going to do that next. But, it's going to create a table called Package which is singular. Now, this should be singular, this class it represents a single one of the packages in the database when you work with it in Python but, in the database, the table represents many packages all of them, in fact. So, let's go over here and use a little invention in SQLAlchemy to change that table name but, not the class name. So, we'll come down here and say __tablename__ = 'packages', like so So, if we say it's packages that's what the database is going to be called. And we can always tell PyCharm that, that's spelled correctly. The other thing to do when we're doing a little bit of debugging or we get a set of results back in Python, not in the database and we just get like a list or we want to look at it it's really nice to actually see a little bit more information in the debugger than just package, package, package at address, address, address. So, we can control that by having a __repr__ and just returning some string here like package such and such like this. I'll say self.id. So, you know, if we get back, Flask and SQLAlchemy we'd say, angle bracket package Flask angle bracket package SQLAlchemy. So, that's going to make our debugging life a little bit easier as we go through this app. Alright, so not finished yet but, here's a really nice first pass at modeling packages.
|
|
|
transcript
|
1:51 |
Νow we defined our package class we saw that it's not really going to work or at least I told you it's not going to work unless we have a base class. So what we're going to to, is going to define another Python file here and this is going to seem a little bit silly to have such small amount of code in its own file but it really helps break circular dependencies so totally worth it. When I create a file here called model base. And you would think if we're going to create a class it would be something like this, SQLAlchemyBase. Then we would do stuff here right? That's typically how you create a class. But it's not the only way and it's not the way that SQLAlchemy uses. So what SQLAlchemy does is it uses a factory method to at run time, generate these base classes. We can have more than one. We can have a standard one. We can have a analytics database one. All sorts of stuff. So you can have one of these base classes for each database you want to target. And then factor out what classes go to what database based on like maybe the core database or analytics by driving from these different classes. We don't need to do that. We're just going to have the one. But it's totally reasonable. So let's go over here and say import sqlalchemy.ext.declarative as dec add something shorter than that. And then down here instead of saying the class then we say the dec.declarative_base(). That's it, do a little clean up, and we are done. Here's our base class and now we can associate that with a database connection and these classes. So we just come over here in the easiest way and PyCharm is just to put it here and say Yes, you can import that at the top. So it adds that line rewrite there, and that's it. This class is ready to be saved to the database. We have to configure SQLAlchemyBase itself a little bit more. But package, it's ready to roll.
|
|
|
transcript
|
6:01 |
Before we can interact with our packages and query any or save them to the database or anything like that, we're going to need to well, connect to the database. And a lot of the connections and interactions with the database in SQLAlchemy they operate around this concept of the unit of work. Construct inside SQLAlchemy that represents the unit of work is called a session and it internally manages the connection. So with that in mind, let's go and add a new Python file called db_session.py. So in this file, we're going to get all the stuff set up so that you can ask it for one of these sessions and commit or rollback the session and so on. So we need to create two basic things. We need a factory, and I'll just say None for the moment and we need an engine. Now the engine I don't believe we need to share but this factory we're going to need to somehow keep this around right this is kind of we'll use the engine to get the factory and so on. So let's go and let's create a little function here called global_init(db_file: str) and we're going to use SQLite. It's the simplest of all the databases that are actual relational, you don't have to set up a server, it just works with a file but it's a proper relational database. The way we do that is we pass in a db_file which is a string. So what we want to do is work with this and see if, this has been called before we don't need to run it twice so we'll do something like this. We'll say first let's just make sure that's global factory - we'll say if factory: return. No need to call it twice, right? But, if it hasn't been called let's do maybe some validation here. We'll say if not db_file or not db_file.strip() it'll raise some kind of exception here, like right, something pretty obvious. You have to pass as a database file otherwise we can't work with it. Then we're going to get an engine here. The way we get the engine is from SQLAlchemy so we're going to have to import sqlalchemy. Maybe we'll stick with this as sa so here we just say sa.create_engine. Super simple. Notice the signature here though *args, **kwargs". I utterly hate this pattern it means, you can pass anything and we're not going to help you or tell you what could possibly go in there. In fact, there is a known set of things you can pass in here, so they should just be keyword arguments. Well, anyway, that's the way it goes. So, we're going to pass a couple of things. We need to come up with a connection string and when you're working with SQLAlchemy what you do is you specify the database schema or the type of database that's part of the connection string. So we'll say sqlite:/// and then we just add on the DB file like this. Maybe just to be safe we'll say "strip", just in case. That seems like that's a pretty good one and then here we'll just pass the connection string as a positional parameter, and then we also may want to set this, so I'll go ahead and like prime the pump for you. I'll say "echo=false". If you want to see what SQLAlchemy is doing what queries it's sending, what table create statements it's sending, stuff like that you set this to "true", all the SQL commands sent to the database are also echoed out both just standard out, and standard error, I believe. But I'm not going to show that, but just having this here so you know you can flip that and really see what's going on here. So we're going to set the factory here but what we need is we actually need import sqlalchemy.orm as orm So we come in here and we say orm.sessionmaker session... maker. So this is a little bit funky, but you call this function and it creates a callable which itself when you call it, will create these units of work or these sessions. So we got this little bit of a funky thing going on here, but then we also come in here and we say "bind=engine". So when the session is created it's going to use the engine which knows the database type and the database connection, and all that kind of stuff. And that's pretty much it! We're going to use this factory after everything's been initialized. We're actually going to do a couple of iterations on this file to make it a little bit better and better as we go, but let's not get ahead of ourselves. I think this pretty much does it so let's go ahead and call this over here. Let's go - here we are, register_blueprints like, setup_db(), let's have just a function down here... So let's go ahead and create a data folder not a data data, but a DB folder. In here is where we're going to put our database file. So what we need to do is work with the OS module and we're going to actually figure out where this is. So we want to say "durname", "pathoutdurname" and we're going to give it the dunder file for apps. So that's going to be the directory that we're working in so right now we're this one, and then we need to join it with DB and some file name. Let's say "DBFile" it's going to be "os.path.join" this directory with "db" with some database file. Let's just call it "pypi.sqlite". The extension doesn't matter but, you know maybe it'll kind of tell you what's going on there. And then we can just go up here. import pypi_org.data.db_session as db_session and come down here and just call our global_init(). Pass the db_file, and that's it we should be golden. Let's go ahead and run it just to make sure everything's hanging together. Ha ha, it did, it worked! Off it goes. There it is up and running. Super super cool. Did anything happen here? Probably not yet, no, nothing yet. But pretty soon when we ask SQLAlchemy to do something, like even just verify that the tables are there, you'll see SQLite will automatically create a file there for us. Okay, great, looks like our database connection is all set up and ready to go.
|
|
|
transcript
|
6:26 |
Well, we've got our connection set we've got our model, at least for the package, all set up we've got our base class. Let's go ahead and create the tables. Now, notice we've got no database here even though over in our db.session we've talked to the database. We haven't actually asked SQLAlchemy to do any interaction with it, so nothing's happened. One way we could create the tables is we could create a file, create a database and open up some database design tools and start working with it. That would the wrong way. We have SQLite. We've already defined exactly what things are supposed to look like and it would have to match this perfectly anyway. So, why not let SQLAlchemy create for us? And, you'll see it's super easy to do. So, you want to use SQLAlchemyBase. Remember, this is the base class we created. Just import that up above. This has a metadata on there. And here we can say create_all. Now, notice there wasn't intellisense or auto complete here. Anyway, some stuff here, but create_all wasn't don't worry, it's there. So, all we got to is pass it, the engine. That's it! SQLAlchemy will go and create all of the models that it knows about it will go create their corresponding tables. However, there's an important little caveat that's easy to forget. All the tables or classes it knows about and knows about means this file has been imported and here's a class that drives from it. So, in order to make sure that SQLAlchemy knows about all the types we need to make sure that we import this. So, because it's only for this one purpose let's say from pypi.org.data.package import package, like this. Now, PyCharm says that has no effect you don't need to do that. Well, usually true, not this time. Let's say, look, we need this to happen and normally you also put this at the top of the file but I put it right here because this is the one and only reason we're doing that in this file is so that we can actually show it to the SQLAlchemyBase. So, first of all, let's run this and then I'll show you a little problem here and we'll have one more fix to make things a little more maintainable and obvious. So, notice over here db folder empty. We run it, everything starts out well and if we ask it to refresh itself, oo, look! There's our little database, and better than that it even has a database icon. It does not have an icon because of the extension it has an icon 'cause PyCharm looked in the binary files and said that looks like a database I understand. So, let's see what's in there. Over here we can open up our database tab. This only works in Pro version of PyCharm. I'll show you an option for if you only have the Community in a moment. If we open this up, and look! It understands it, we can expand it and it has stuff going on in here. If, if, if, if, this is a big if so go over here, and you say new data source, SQLite by default, it might say you have to download the drivers or maybe it says it down here it kind of has moved around over time. Apparently, there's an update, so I can go and click mine but if you don't go in here and click download the drivers PyCharm won't understand this so make sure you do this first. Cool, now we can test the connection. Of course, it looks like it's working fine because we already opened it and now here we have, check that out! There's our packages with our ID which is a string create a date, which is the date, time all that good stuff, our primary keys, jump to console and now, I can say select star from packages, where? All through email, homepage, ID, license there's all the stuff, right? Whatever, I don't need a where clause and actually it's not going to be super interesting because it's empty. Obviously, it's empty, we haven't put anything in there but, how cool! We've had SQLAlchemy generate our table using the schema that we defined over here and it's here up in the database tools, looking great right? Well, that pretty much rounds it out for all that we have to do. We do have some improvements that we can make on this side but that's a pretty awesome start. I did say there was another tool that you can use. So, if you don't have the Pro version of PyCharm you can use a DB Browser for SQLite that's free. And if I go over to this here I can open up the DB Browser here and say open database, and give it this file. And check it out, pretty much the same thing. I don't know really how good this tool is I haven't actually used it for real projects but it looks pretty cool, and it definitely gives you a decent view into your database. So, if you don't have the Pro version of PyCharm here's a good option. Alright, so pretty awesome. I did say there's one other thing I would like to do here just for a little debugging now let's just do print connecting to DB with just so we see the connection string when it starts up so you can see, you know a little bit of what is happening here, and that will help. And the other thing is, I said that this was a little error prone, why is this error prone? Well, in real projects you might have 10, 15, 20 maybe even more of these package type files, right? These models. And if you add another one, what do you have to do? You have to absolutely remember to dig into this function, and who knows where it is and what you thought about it, and how long? And make sure you add an import statement right here and if you don't, that table may not get created it's going to be a problem. So, what I like to do as just a convention to make this more obvious is create another file over here called __all_models and basically, put exactly this line right there. And we'll just put a note, and all the others all the new ones. So, whenever we add a new model just put it in this one file. It doesn't matter where else this file gets used or imported, or whatever, if it's here, it's going to be done. So, to me, this makes it a little cleaner then I can just go over here and just say import __all_models and that way, like, this function deep down in it's gut, doesn't have to change. It should still run the same, super cool. Okay, so that's good. I think it's a little more cleaned up. We've got our print statement so we got a little debugging and then we've got our all models so it makes it easier to add new ones.
|
|
|
transcript
|
5:00 |
Let's return to our package class that defines the table and the database. I said there was a few other things that we needed to do and well, let's look at a few of the problems and then how to fix them. created_date. created_date is great. What is it's value if we forget to set it? Null. That's not good. We could say it's required and make us set it but wouldn't it even be better if SQLAlchemy itself would just go right now, the time is now and that's the time it's created on first insert? Super easy to do that. But, we've got to explicitly say that here. We're here in the emails. Maybe we want to be able to search by author/email. So, we might want to have an index here so we can ask quickly ask the question: show me all the packages authored by the person with such and such email. Boom. If we had a index, this could be super, super fast. The difference in in terms of query time for a query with an index and without an index with a huge amount of data can be like a thousand time slower it's an insane performance increase to have an index. Helps you sort faster, it helps you query faster and so on. So, we're going to want to add an index on some of these. And maybe the summary is required, but the description is not required. So, we would like to express that here as well. So, SQLAlchemy has capabilities for all these. So, let's start with the default value. So, pretty easy, we're going to set defaults here and it could be something like 0 or True or False if that made sense, it doesn't for datetime. Well, what would be the value for a datetime? Well, let's use the datetime module and we can import that at the top. And use datetime.now. Now, notice if I just press end and then enter bicharm is super helpful and it puts parenthesis here. That is a horrible thing that happened. What this will do is take the current time when the application starts and say well that time is the default value. No no. That's not what we want. What we want, is we want this function now to be passed off in any time SQLAlchemy is going to put something in the database, it goes, oh, I have a default value which is a function so let me call that now to get the value. So, that will do the trick of getting the insert time exactly as you want. Here we can say, nullable=False you can say, nullable=True. Not all databases support the concept of nullability like, I think SQLite doesn't, but you don't want to necessarily guarantee that you're always working with that, right? We may also want to say, all like, all the packages or the top ten packages are the most recent ones. And, for that you might want an index cause then that makes it really fast to do that sort, so we can say index=True. And that's all you got to do to add an index it's incredible. We also may want to ask, you know, show me all the packages this person has written. So, then we'd say index is true, that'll be super fast. Also, you might ask, what are all the packages or even, how many of them are there that have say the MIT license? And, then you could do a count on it or something, right? So, this index will make that query fast. These we'll deal with when we get to relationships. But, these simple little changes here will make it much, much better and this is really what we wanted to define in the beginning, but I didn't want to overwhelm you with all the stuff at the start with. All right, so we have our database over here. Let's go and you know, and we have it here as well. Let's go and run the app, rerun it see if everything's working and if we just refresh this what's going to happen. sad face, nothing happened. Where are my indexes? Where is my null, well, nullability statements things like that. This is a problem, this is definitely a problem. The reason we don't see any changes here is that SQLite will not create or modifications to a table. It'll create new ones, great new tables. If I add a new table it'll create it like uh release it or something, you would see it show up when I ran it. But, once it exists, done. No changes, it could lose data or it could make other problems, so it's not going to do it. Leader, and this is very common, you want this but SQLAlchemy won't do it. We're going to later talk about something called Alembic which will do database migrations and evolve your database schema using our classes here. But, we're not there yet. We just are trying to get SQLAlchemy going. So, for now, what do we do, how do we solve this? We could either just delete this file, drop that table and just let it recreate it, right, we don't really have any data yet. When you get to production migrations, but for now just super quick, let's just drop that table. I'll rerun the app, refresh the schema, expando and look at that, here's our indexes and author/email creator date and license, here's our uniqueness constraint on the id which comes with part of the primary key. You can see those, blue things right there those are the indexes. So, we come over here and modify the table, you can see here's your indexes and your keys and so on. Cool, huh? All we need to do is put the extra pieces of information on here and when we enter one of these packages we'll get in and out and we'll have an index for it and so on. Super, super cool.
|
|
|
transcript
|
4:24 |
Now for the rest of the tables I don't want to go and build them piece by piece by piece. That'll get pretty monotonous pretty quickly. We did that for package and it's quite representative. So let's just do a quick tour of the other ones I just dropped them in here for you. So we have download and of course change the database name the table name to downloads, lower case. And again we have an id, this one is an integer which is primary key in auto-incrementing, that's cool. created_date, most of our tables will have this because of course you want to know when that record was entered. You almost always at some point want to go like actually, when did this get in here? Or all of these or something like that. So always have that in there. And then this is going to represent a download of a package like pip install flask, right, like when that happens if that hits the server we want a analytical record of that. So we want to know what package and what release we hit and we may want to query or do reporting based on that so we'll use an index here. We also might just want to track the IP address and user agent so we can tell what it is that's doing the install. That one's pretty straightforward, what's next? Languages, again wrote in this trick where the name of the language are like, Cython or Python 3 or whatever. That's going to be the primary key 'cause it was very unique and then we also have when it was put there and a little description about what that means. Licenses like MIT or GPL or whatever, same thing. One more, one more ID is the name. Or you can avoid, join potentially and get things a little quicker that way. Little description and create a date, always want that. This is an interesting one here this is for our many to many relationship. We have users and we have packages and a user can maintain many packages and a package be maintained by multiple users. So here's our normalization table we have the user ID and package ID and these are primary keys. Possibly we should go ahead and set up these as foreign key relationships, but I didn't do it. We'll do that over here, so this one hasn't changed we still got to add our relationship there at the bottom. Our releases, this one is going to have a major, minor and build version all indexed. Just an auto-increment and primary key. Maybe some comments in the size of that release and you know, stuff like this. And finally we have our user these are the users that log into our site auto-incrementing ID, the name, it's just a string email. It has an index we should also say this probably is unique. It's true as well 'cause we can't have two people with the same email address, that would be a problem when they want to reset their password. We also, speaking of passwords, want to store that but we never, never, never store just the password. That is a super bad idea. We're going to talk about how we do this but we're going to hash the password in an iterative way mix it in with some salt and store it here. So to make that super clear this is not the raw password but that is something that needs transforming we put hash password. But we also want the created date, maybe their profile and their last login just so we know like who the active users are and whatnot. That's all of the tables, or the classes that we've got. If you look over here, I've updated this. And guess what? We don't need to go change like our db_session or whoever cared about importing all these things. It's all good. Notice also that I put this in alphabetical order. That means when you go add a new class or table it's super easy to look here and see if it's listed and if it's not, you know put it where it goes alphabetically. It'll help you keep everything sane. So let's see about these tables over here we have not run this yet. Notice we just have packages, but if we rerun the app what's going to happen? It did not like that, our package singular. Let's try again. Here we go, and now if we refresh, resynchronize boom, there they all are. So we see our downloads and it has all the pieces and the indexes say on like, package ID right there our license and so on. Everything's great. So SQLAlchemy did create the new tables it did not make any changes to packages. Luckily we haven't actually changed anything meaningful about packages, so that's fine. If we did we'd have to drop the table or apply migrations, right. But it's cool that at least these new tables we're defining they do get created there and then yeah it's pretty good. All right so I think we're almost done we're almost done we just have a few more things to tie the pieces together to relationships and our data modeling will be complete.
|
|
|
transcript
|
7:16 |
The last thing we have to do to round out our relational database model is to set up the relationships. So far we've effectively have just a bunch of tables in the database with no relationships. We're not really taking advantage of what they have to offer so in order to work with these let's go up here I'm going to do a little bit more of an import the ORM aspect to we'll talk about relationships and Object Relational Mappers and so on. So over here, what we want to do is we want to have just a field releases and when we interact with that field we would like it to effectively go to the database do a join to pull back all the releases through this relationship that are associated with this package. So basically where the package ID on the release matches whatever ideas here. So the way that we're going to do this is we're going to go over her and say this is an orm.relation relation just singular like that and then in here we talk about what class in SQLAlchemy terms this is related to. It's going to be a release, that's good and that alone would be enough but often you want the stuff you get back through this relationship to have some kind of order. Wouldn't you rather be able to go through this list say it's oldest to newest or newest to oldest releases? That would be great if you had to do no effort to make that happen right? Well guess what, we can set it up so there's no effort so we can say, order_by= Now we can put one of two things here. We could say I want to order my one column on the release class so we'll just say release and import it at the top. You could say we want to say accreted data descending like this and that would be a totally fine option but what we want to do is actually show, if we go over here we want to order first by the major version then the minor version, then the build version. All of those descending so in order to order by multiple things, we're going to put a list right here like so and let's say we're going to order it by major version minor version, and build version. All right so that means we get it back it's going to go to the database and have the database do the sort. Databases are awesome at doing sorts especially with things with indexes like these three columns right here have. Okay so that's pretty good and we're also going to have a relationship in the reverse direction so package has many releases. Each release is associated with one package. So over here when I have a package for a moment I'm going to leave it empty but we're going to have this field right here. So what we can do is we can say is back populates package what does that mean? That means when I go here and I get these all filled out and I iterate over my get one of the releases off maybe I hand it somewhere else somebody says .package on that release it will refer back to the same object that we originally had that we accessed it's here so it kind of maintains this bidirectional relationship behavior between a package, it's releases and a given release and it's packaged automatically so might as well throw that on there. All right this one's looking pretty good let's do the flip side. How does it know that there's some relationship? I just said this class is related to that boom done. Well that's not super obvious what this is. So what we're going to do is like standard database stuff is we're going to say there's a package_id here and this is a field or column in the release table to maintain that relationship and this will be a sa.Column, SQLAlchemy Column and what type is it going to be? It has to correspond exactly to the type up there. Okay so this has to be SQLAlchemy.string but in addition that it'll be SQLAlchemy.ForeignKey. So it's a little tricky to keep these things straight in your mind but sometimes we speak in terms of classes sometimes we speak in terms of databases. Over here I said the class name for a relationship but in this part, the foreign key you speak in terms of the databases, it'll be packages.id lowercase right that's this thing we're referring to that and the ID. So here we're going to have that foreign key right there and then this we can set that up to be a relationship as well. So again we got to get ahold of our orm orm.relation and it's going to relate back to package. Okay, I think that might do it. We're going to run and find out but we have it working in both directions so here we can go to the releases and then we can go, this will establish that relationship and this will be that referring the thing that refers back to it. Now we've already created those tables so in order for this to have any effect we have to drop those in this temporary form or member migrations later but not now. All right, let's run it and see if this works. All right, it seems happy that's a pretty good sign SQLAlchemy's pretty picky so we go over here there really shouldn't be anything we notice about this table but here we should now have a package and notice in that blue key, even right here there's a foreign key relationship if we go back and interact with this, say modify table we now have one foreign key from package_id which references packages ID, that's exactly what we wanted. Now we don't have any data here yet so this is not going to be super impressive but let me show you how this will work. Imagine somehow magically through the database through a query which we don't have anything yet but if we did, I'm going to come over here I'm going to go give me a package, right? Now I'm just allocating a new one but you could do a query to get to it right? So then I could say print P., I don't know what ID would be the name and then I could say print our releases and say for r in p.releases that will print out, here we go we go through and print them out. All right and we would only have to do one query except when explicit query here to get that and then down here, once it's back this would go back to the database potentially depending how we define that query and then do a query for all the releases ordered by the way we said and then get them back, that's pretty cool. Maybe like notice it says you can't iterate over this it's kind of annoying, let's see if I can fix this to say this is a list of release. Import that from typing, all right. So now it's happy and if I say r. notice that so maybe this is a good idea, I'm not sure if it's going to freak it out or not but I'll leave it in there until it becomes a problem. All right, let's actually just run it real quick make sure this works. Yeah that worked, didn't crash when we did that little print out. There was nothing to print but still, pretty good. So those are the releases. Once we get some data inserted you'll see how to leverage them even for inserts they're pretty awesome.
|
|
|
transcript
|
4:15 |
Before we actually start using SQLAlchemy to insert data and query data, and so on let's talk about some of the core concepts we've seen and some of the fundamental building blocks for modeling with SQLAlchemy. So we started with the SQLAlchemyBase. Remember, the idea was every class we're going to store in the database derived from this dynamically defined SQLAlchemyBase class. You can call it whatever you want. I like SQLAlchemyBase. But there's other, you know, it's just a variable. Name it as you like. So I want to create this singleton base class to register the classes and type sequence on the database. Remember, there's one and only one instance of this SQLAlchemyBase shared across all of the types per database. So for example, we're going to have a package to release a new user, they all derive from this one and only one SQLAlchemyBase type here. To model data in our classes, we put a bunch of classable fields here, ID, summary, size homepage, and so on, and each one of them is a Column. SQLAlchemy.Column and they have different types like integer, string, and so on. We can see some of them are primary keys and even if it's an integer, they can even be auto-incrementing, primary keys which is really, really nice. And we can also have relationships like we do between package and releases. One really nice feature of databases is they have default values. We saw with our auto-incrementing ID our primary key, we don't have to set it. The database does that for us. So here we can pass datetime.now, the function not the value, the function, and then it's going to call that function now whenever a row is created and set that value to be, well, right now. That's super nice. We can also do that up here with more complex expressions. So in the bottom one, we literally passed an existing function, datetime.now but above, we want to define this default behavior in a more rich way. So we're passing our very own lambda expression that takes the UUID for identifier converts it to a string, and then drops the dashes that normally separate it into just one giant scrambled alphanumeric super thing. You can create these default values by passing any function, a built-in one or one of your own making. We also want to model keys and indexes. So primary keys automatically have indexes. We don't have to do anything there. Let's our uniqueness constraint as well as indexes. This created one, maybe we want to sort by the newest users, for example. Well, if we're going to do that, we very much want to put an index on that. As I pointed out, indexes can have tremendous performance benefits, it's totally reasonable to have a thousand times difference performance in a query, if you have tons of data on whether you have an index or not. Indexes do slow write time but certainly in this case the rate of user creation versus querying and interacting with them is, it's no comparison, right? We're creating far fewer users, probably than we are querying or interacting with them. We can also specify uniqueness we didn't do that in our example. We can say this email, we can't have two users with the same email, emails are very often used to reset your password and if you have two users who's going to get their password reset, all of 'em? One of 'em, who knows, none of 'em? So you might want to say there's a uniqueness constraint on the email to say only one user gets to use a particular email and that's super easy to do by just saying unique=True. Finally, once all of the modeling is done we have to actually create the tables. Now turns out that that's super easy. We import all the packages, get the connection string and we can create an engine based on the connection string and then we just go to SQLAlchemyBase to it's meta-data and say create underscore all and pass the engine, boom, everything is done. Remember though, this only creates new tables it does not modify existing ones so if you need to modify it wait till we get to the alembic chapter, the migration chapter or do it yourself or if you're just in development mode maybe deleting it and just letting it recreate itself that might be the easiest thing, that's what we did.
|
|
|
|
52:56 |
|
|
transcript
|
2:18 |
In this chapter, we're going to look at actually using SQLAlchemy. Previously we had modeled all of our data but we didn't do anything with it. We didn't do any insert queries, updates none of that. That's what we're going to do now. And to get started we're just going to jump right into writing some code. And so I just want to point out we are now in Chapter 10 Using SQLAlchemy, working on the final bits here. So let's switch over to PyCharm grab our new chapter and get going. This is the code from before, just carrying on. And what we're going to do is we're going to actually have over here a new directory called bin. Now, this is just a convention that I use. I've seen it in other places as well and this bin folder comes along with our website for little admin tasks and scripts that we need to run and so on. It's not directly involved in running the site but more like maintaining the site. So, for example we're going to do some importing of data. And to do so, we're just going to write some scripts here. They don't actually run normally but they're going to run here. Let's go over and add a Python file called basic_inserts.py. We're going to take two passes at showing how to insert data. First, we're going to write some example data just standard make-up stuff. And then I'm going to show you I've actually got a hold of the real PyPI data for the top 100 packages using their API and we're going to insert that. Turned out that's super, super tricky. There's lots of little nuances and typecasting and all that kind of stuff we have to do to make it work just right. We're not going to do that first we're going to do like a simple example and then I'll show you the program that'll actually generate our real database. So, here it is. We already have our database right here and if we look at it we'll see that we have our packages and releases put together. And, of course, there are the interesting ones. Actually, I'll go over here and show you a little more. Show you a visualization pop-up. It's kind of a cool feature of PyCharm. So we have our packages and this relationship between the releases. That's probably the most interesting part of our database. We didn't actually set up save, like the maintainers and what not here. This should maybe have, like some relationships and so on but we didn't set up all the relationships for our data model, just the really important ones. So, we're going to focus on just those two tables.
|
|
|
transcript
|
1:36 |
Now what we're going to need to do is work with our SQLAlchemy engine and the factory and the connections and all that. And remember in order for that to work we have to go to our db_session. We have to initialize it. So let me just copy over a function here. This was just like the one we worked with before. So we're going to import os. import pypi.org and we can say that's spelled correctly. And we also want our db_session like so. And now it has this global_init. So, we just have to call this somewhere. Before we try to do anything, and just to remind you over here this sets up the connection string initializes the engine, and most importantly initializes this factory right here. So, what we're going to do is we're going to have a def main. Here this is going to be like our main startup. And in here we'll call global_init for the database. And we'll use our main convention at the bottom and just run the main function. Here we go. I guess we can go ahead and test it and see that it runs. Oh, it didn't like that. Let's just use this in here we'll just go up one. That should do. Okay, great. So here we're connecting to final, dah dah dah. It might even be worthwhile to say os.path.abspath. Here we go. Now we have the absolute path, in looks right to me.
|
|
|
transcript
|
1:33 |
Okay off to a good start and we no longer need this so this is good. Now what we need to do, let's just say while true we're going to insert a package. We'll write a little function that will does that. So down here, this can just enter package. So how do we insert a package and maybe some releases that are related to it? Well, how would you create a package if you forgot about the database and you only thought in classes and objects? You would say this p = Package(), like so, and you would import that from pypi_org.data.package. You would set some properties like the id might be, and we could ask the user input package id, name and we could do a strip in the lower just to make sure that is all consistent. What else do we need to set? Well, let's go actually look at our package real quick here. And we can say, what do we need to set? Well this, sometimes we don't have to set the primary key. This one is not auto_incrementing so we do. This one has a default value so that's solid. These could all be set, the releases we'll deal with in a second. So let's go over here and just put a little long comment string to show us what we got to do. So it'll be p.summary = input("Package summary: ").strip() For description I think we'll just ignore that all of those we can ignore. Let's just put author name and license.
|
|
|
transcript
|
3:36 |
Classes model records in our database so all we have to do is go and save this back into the database and that's where this unit of work in the factory from db_session, comes from. So what we'll do is we'll say session equals db_session.factory. So, this is pretty cool. If we come over here and say db_session. notice all the cool things you can do? No, no you don't. There's none. If I actually set the type here. I'm not going to leave it like this but, if I were to import sqlalchemy.orm like this, and set it to a session all of a sudden, we have, oh look autoflush, and commit, and bind and rollback, and all the database things and add, and so on. Let's go ahead and get this set up real quick and then I'll show you what we'd actually do. We'll make this a little bit nicer. There's some stuff down the road. We're going to need to make this better anyway. All right, so, we're going to do some work and then, the way this unit of work works is you say, I'm going to make a bunch of changes in this area create the session, make a bunch of changes. No interaction with the database will have happened until line 26, when we call commit or, if we had entered some kind of query but we're not querying, we're only inserting. Let's do this. Let's come over here, and we'll say session.add. That's it. If we run this, it's going to insert it right away but let's add a couple of releases. So we'll say, r., r is a release. I'm going to import that. Let's go over to releases and see what we got to set. id auto_increment in, we don't need to set. Those, we should definitely set. created_date is its own thing. So, let's just do those three and maybe the size. So, we'll say r.majorversion equals... Now, we're just going to assume that they know how to type an integer and, if they don't, well, it's going to crash, but it's OK. It's just a little example. Minor, and build. And, last one, will be size in bytes. OK. Looks pretty good. Now, how do we let's do a quick print. Release one, something like that and let's do it again for release two. So there's actually more than one release per package, OK? How do we associate this release with this package? There's a lot of ways. We could add each release separately. So we could say session.add each time and this, and then commit it as long as we had set r.package_id = p.id. Now actually, in this case, this would be fine but normally, windows are auto-incrementing IDs. You need to first save the package and then you can set it, and it gets real tricky, right? Like, it's not super simple to do this but, what is super simple is to work with this relationship over on packages. So, let's go to here, package. Remember this, releases? It's a relationship but it kind of acts like a list. Let's just try that. What happens if I say, p.releases.append as if it were a list. You know that's going to work. It is, it's awesome. OK, so we're going to append those and we're never going to tell the session to add it but it's going to traverse the relationships and go, I see you have other records to insert into other tables, and relationships to set up.
|
|
|
transcript
|
2:34 |
I think we're ready to try this. Let's go ahead and run this and see what happens. Off it goes, package name let's go with SQLAlchemy to start. Summary is ORM4 for Python. Author is Mike Bayer. License, let's just guess, it's MIT. The first version is 123. And it's that many bytes. The second one is going to be 2.0.0 and it's a little bit bigger, like so. So that inserted the first one. Let's do one more and say Flask, Microframework for Python. Let's go with Armand and David, right? Armand, originally, David Lord these days. Let's just say this is BSD. I have no idea what it is. And it's 1.0.0 and 1.0.02. There we go, that one can be bigger than one byte. All right, I think we're good. Let's go ahead and stop this. Notice, there were no crashes. That's pretty killer already. That's a good chance that something worked But let's go look in the database. So if I go over to Packages and I say Jump to Console and say, select * From Packages. Moment of truth. Tada! There they are, how awesome? We didn't set some of the values but we did set many of them. You can see everything we typed in there. Pretty awesome, isn't it? What about releases? Run those, look at that. There they are! And you can see what package they come from SQLAlchemy or Flask. That's really cool and that's actually the relationship. So I could go over here and, say, where package ID equals SQLAlchemy? Is it 1? I don't think it's what it equals. Here we go. So, we can go do the query for that and this is when we actually go back and do queries with SQLAlchemy and we touch that releases folder. It's going to do, basically, this query but it's also going to add an order by major version descending. And then minor and then whatever but this should be enough. There we go. So we'll get them back exactly in the order you would want them. All right, so this is how we insert data. Super, super simple, right? We go and just treat these more or less like objects. We create them, we set their properties we click them together through their relationships and we add them to the session, create a session and add it.
|
|
|
transcript
|
1:20 |
I guess, real, real quick, let's make this a little bit nicer. I don't like that this doesn't give us much information about what comes out of it and it's not super easy to get that to happen, so let's do this. Let's define a function called create_session(). That's more obvious. And it's going to return a session object that comes from sqlalchemy.orm and for now it's just going to say return __factory(), like this. Let's tell it that this is global, like that. Okay, this is pretty good. But of course when we now go to db_session. Uou still see it. You still see it at the top and I'd kind of like that to not be the case so let's refactor rename this to double underscore and you see it renamed it everywhere. And now, is it gone? Ah, yeah. We just have create_session and global_init. So where are we doing this factory we don't need any of this stuff anymore. That can all be gone, we just say = DBsession.createsession the type annotation on the return value there should be enough so that when we say session. Boom, there it all is. Okay, that's it. We're all good to go. We clear the session, we make the changes we call commit, beautiful.
|
|
|
transcript
|
5:09 |
Now you've seen how to insert data with SQLAlchemy. We're going to insert the actual real data and it turns out that this data I got is the actual PyPI data I got from, ah, couple of APIs I put together and I have the top 100 packages in all their details in a bunch of JSON files. So what we're gonna do is load those JSON files, pull them apart, do some type conversion and things like that and insert them all into a database that is super into D gritty and it's really not worth going into So let's just skim quickly across that first off to run the program we were going to use to new requirements progress bar to so we can have a cool progress as we're doing our import, which is really, really nice. And then Python Dash date util, which is a really, really nice way to parse dates much better than the built in stuff. So I've already pip installed these, so they're just in the requirements now. So over here at the top of your repository, I have the PyPI top 100 each one of these is just a JSON file. For example, let's look at click circa a little while ago written by Armin Ronacher originally at least now managed by David Lord and the Pallets Project. But for the day that we got, this is what it says And it has the licenses BSD but notice it doesn't just say licenses BSD it has this, like, sort of funky name space style, if you will. It talks about the languages Python and being colon colon three. We're gonna parse that apart. Yeah, the license BSD. It works on Python 2 and Python 3 and so on so you can scroll through and see, like, here's all of our releases All the details about the releases and the dates and wow it has a lot of stuff, right? So we're gonna go and parse that apart and insert it into the database and that's gonna happen over here pretty straightforward. What we're gonna do is we're going to just go and ask really quickly like, Hey, is there any data in this database and the way of checking is are there any users? It could look at all the tables and you just ask. Are there any users? If so, Hey, we've probably already done this, so don't reinsert duplicates. Just don't do anything. Do a little summary there at the end. But if it happens to be empty, go load up those files, all of them. All the JSON files, skim across all of them, find the distinct users, import them, do all the packages and their releases and so on. Pull out the languages licenses like that colon, colon BSD license thing we just saw. And then finally do a little summary. So we're just gonna run this through its Let's just look at the import languages and goes and uses our progress bar, which is pretty, pretty sweet. And it rates over them and pulls out the language classification that the interesting data base part is it says that we're going to, just create session creative programming language, set the details of it added to the session and call commit and then update our progress bar Super straight for right. This is what we did before. It's just all this goo of juggling the JSON Files. All right, so let's go and run this and because it uses the Progress bar It looks better outside of PyCharm. It will run in here. No problem. But let's just make it as nice as possible. So I want to figure out where to activate my virtual environment. That's a long enough directory, don't you think? I will say that. Slash Activate. And then I want to runs a Python. The name of this script here where that one is gonna do the import. One other thing we also need to add sys.path.append to our path. This folder right here because we're importing pipeline, not from PyCharm is gonna totally work smooth, because guess what? PyCharm does that for us right there. But if we try to run this outside without setting this up, it's a package or something like this is not gonna work so great. Now we're ready to run our code here. We're gonna run Python out of our virtual environment pointed at load data. Here goes. So here you can see, it's loading up all of the users. All the projects it found 96 packages said there were 100. I think for some reason, some couldn't be downloaded. So let's go with 96 Top 96. Out of there, it went through, and it found the users found the packages and releases the languages. So in the end we found 84 users. 96 packages, 5400 releases embedded within those documents, 10 maintainers, 25 languages and 30 different licenses. All right, well, that's it. We should now have a whole lot more data over here. And if we go local quick, let's just go to the packages and jump to the console. Say, select star from packages. We run it like that. We had a whole bunch of them. Here's AMQP, Actors, argparse, Flake 8 and so on. We're running for releases, you see a whole bunch of stuff and there related to their various packages over here on the right. Pretty awesome, huh? So now when we run our app, we'll go over and run the actual app itself, click on it, you can see Well, we're not quite using the data yet, but we're going to be able to start using all that data we've just loaded up and dropping it into these locations. So that's gonna be really awesome. We have true, accurate, realistic or even a snapshot in time. real data from PyPI to work with to finish building out and testing your app
|
|
|
transcript
|
2:22 |
One of the core concepts of SQLAlchemy is this Unit Of Work. Let's dig into that. The Unit Of Work is a design pattern that allows ORMs and other data-access frameworks to put a bunch of work together and then at the very end decide to go and interact with the database decide now we're going to actually save this data within a single transaction. So here we have a bunch of different tables customers, suppliers, and orders. They're all providing entities into this operation this unit of work. So maybe we have a couple of customers one supplier, and one order. We've also maybe allocated some new one like we did with package and we're inserting that into the database. And maybe we've changed things about the supplier we're updating those in the database. And the order is canceled so we're calling delete on that. All that gets kind of queued up in this unit of work. And then I'll call commit in SQLAlchemy syntax and that pushes all those changes which are tracked by the unit of work the so-called dirty records the things that need to be inserted the things that need to be deleted the things that need to be updated and so on. So we can use these unit of works like that and the way we create them are with these sessions. So we've seen that we create these engines and the engine gives us this session factory that was all encapsulated within our db_session class. We do this once and then every time we want to interact with the database we create one of these sessions. So we come over here and we call that session factory it gives us a unit of work which is often called a session kind of treat this like a transaction a bunch of stuff happens in memory then it's committed. Maybe we add something, maybe we do some more queries maybe that tells us what we've got to do to add some more. We could make changes to the results of those queries either updates or deletes. Other than the query there's not actually been any interaction with the database. This add doesn't actually add it to the database it just queues it up to be added. When you call commit that commits the entire unit of work. Don't want to commit it? Don't, then nothing will happen in the database there will be no changes to your data. And that's how the unit of work pattern appears and is used in SQLAlchemy through this session factory and then committing it.
|
|
|
transcript
|
5:55 |
Now that we've imported the data into our database I think it's time to start using it. How many projects did we import? Negative one, unlikely. That's not typically a count of real numbers, is it? So, what we need to do is actually go query the database to fill out those sections. We also need to fill out our releases down here at the bottom, but we're going to focus on just this little stat slice as we called it. So if we go over here, and we see right now what we're doing is we're going to our package_service and we're calling a function: get_latest_packages. Well, that's pretty cool, but we could look over here this is just fake data. So let's actually put in here we're going to need to pass more data over to our template. So we go to our template, it's super nicely organized. We're in Home View, so we go into the Home folder and run the Index function, so we go to Indexing. Boom, there it is. Well, that looks like a problem. Let's pass in some data. Now, we might want to just drop the number here like, package count, that'd be okay. Except for, if there's a million packages it's just 1-0-0-0-0-0-0 with no digit grouping. So we could do a little bit better if we did a little format statement, like this. Like so, and to do the digit grouping. Now let's just put that in for the others as well. I have release count, and user count. Of course, for that to work, if we try to run this again we go to refresh it, not so much. Unsupported format type. And let's go pass this data along here. So we're going to need to have a package count and let's just make this fake for a minute. Release. And user count. This should be auto-refreshing down here at the bottom. Here we go, it's active again, super. Refresh. One, two, three, looks beautiful. I was trying to pass None to format in digit grouping. None doesn't go that way. Right, so this is working in terms of the template but it's not working in terms of the data. So let's go and change this down here I'm going to call Package_service.get_package_count Now this doesn't exist, but it will in just a moment. Release count, we're going to do users in a separate service. So we can go over here and hit Alt + Enter create this function, and it didn't really know what to do. It's supposed to return an int. And over here, we saw how to do queries. If we start by creating a session and we're going to import our db so we'll say, import pypi.org. Get our little db_session there and we'll say create_session. That's cool. And then we simply have to do a query so we're going to come over here and we're going to say, I would like to go to the session and do a query, and then you say the type. We want a query package because that's what the count we're looking for. And we might do a filter to say where the package_id is this or the publish date is such and such or the author is this person or that but all we want to do is a super simple count. That's it, that's going to be our package count, and let's going to let it write that as well and we'll just grab this bit. So this one is the same except for instead of querying package, what are we querying? We query release. Clean that up, and then finally let's go over here and figure out where we are. We also want to have a user service. So if I come over here, and just copy paste I can change that to user. Do a little cleanup. All right, that looks pretty good. Now, it might seem silly to just have this one function but of course, we're going to log in, we're going to register there's all sorts of things this user session will be doing. So now if we go back we should be able to go to our import up here. And we'll do user service as user service. And here we'll do user_service.get_user_count. Okay, moment of truth. If we run this, it should be doing those queries from the database, creating our unit of work, our session. Now, it's pretty boring, all we do is do a quick query. We're not, like, inserting and updating data yet but it still should be doing some good stuff. Let's do a Save, which should rerun it. See the little green dot, it's still running so it should've rerun. Moment of truth: refresh. Bam, look at that! How cool is this? So 96 projects, 5,400 releases, and 84 users. That's exactly what we saw earlier. And if we go over to our little inspector and we go to the network, and we say just show us HTML and we do this again a couple of times you can see that the response time even going to the database and doing three queries is 11 milliseconds. That's pretty solid, right? Not too bad at all. So our site's working fast it's using the indexes that we set and it's pulling back the data. Well, it probably doesn't use an index for a count but it would if we were doing the right kind of queries like, for the new releases. So, I think our little stat slice is up and running and that's how we're getting started using this data that we inserted, that we got from those JSON files. Lots more of that to do really soon.
|
|
|
transcript
|
9:03 |
We have our little stat slice working just fine but the pieces here, not so much. Remember, this is just fake data. See the desk, all right, so now we're going to write the code to get the new releases. Let's go over here and have a look. So we're not going to call this test packages anymore we're actually just going to inline it Like that so we're going to go and implement this method right there. Obviously, it's not doing any database work yet, is it. Now, as we talk about this, there's going to be several ways to do this, some of them more efficient some of them less efficient and I want to look at the output, so the first thing I actually want to do is go over to our db_session and I told you about this echo parameter. Let's make it true and see what happens. You can see all the info SQLAlchemy looking at the tables to just see if it needs to create new ones. It doesn't and if I erase this and hit the homepage you can see it's doing three queries it's doing a count, against users against releases and against packages. Where is that, that is that part right there. Okay, now I just want to have it really clear what part is doing what, so I'm going to turn these off and just have them return 200 or whatever, some random number. I'm also going to do that for the user_service. So now let's refresh, I'll clean up this here and refresh, notice there's no database access. That's good because we're going to do database access here and we need to understand it really clearly. All right so let's go over here and work on implementing get_latest_packages. In fact, we were returning packages but what we really want to do is we want to return the latest releases with ways to access the associated packages. If we look at the release, remember each release has a package relationship here. So I'm going to change this around and rename this to latest releases like that and we're going to implement something here. It's going to start like this and let's go ahead and tell it that it is going to return a list of release, release is good, import that from typing. And it's also going to have a limb and that equals 10 or something like that. So if we don't specify how many latest releases we get 10. Okay so we're going to do some work and eventually we're going to return a list right here. Well what are we going to do, well it turns out that this is actually the most complicated thing we're going to do in the entire website. It's not super complicated but it's also not super simple so let's do one more import. I'm going to import sqlalchemy.orm and because we need to change or give some hints to how the ORM works. So let's go over here and say the releases are equal to, want to create a query so we've already done this a few times session query of release, now what we want to do is get the latest ones so we're going to do an order by. So we'll come down here and say .order_by and when we do an order by we go to the type and it's the thing we want to order by and we can either order ascending like this or we can say descending like so. That's a good part. And maybe we want to only limit this to however many they pass in, 10 by default but more, right, that's the variable passed in that's the function it takes and we want to return this as a list. So snapshot this into a list we're going to just return releases. So is this going to work, first of all, is this going to work? I think it will probably work. I'm certain it will be inefficient. Let's find out. So we rerun this and just clean that up here and let's go hit this page remember these are all turned off so the only database access is going to be to derive a little bit, if I refresh it what happens? Sort of works, well it actually worked let's go fix it really quick and then we'll come back and talk about whether it's good. So here we actually had r in releases and I think we also need to pass that in from our view 'cause even though we called this releases this packages so let's make it a little bit more consistent, releases. That's not super, p is undefined okay and now we can fix this. So we have r, now remember r is a package and it doesn't have a name but it has an ID and then r, it doesn't have a version it has a major, minor and build version but it also has a property which we wrote called version text. So if we go check out version text it just makes a nice little formatted bit out of the numbers and that make up it's version. And then here want to go to the r and we're going to navigate to its package and then we're going to say summary. Let's see what we get. Ooh, is it good, it is good, it's super good. We were actually able to use that relationship that we built to go from a bunch of new releases back over to a bunch of packages. Now there is some possible issues here. We could have these show up twice. AWSCLI two versions, but maybe that's okay. We're showing the releases not just the packages. However if I pull this back up, ooh, problems. Look at all this database access. Let's do one clean request. So here we are going in to our releases and then we go to packages and packages and packages over and over again. Why is that happening? It's happening every time we touch it right here, that's a new database query. Moreover that database query is actually happening in our template, which is not necessarily wrong but to me, strikes me as really the inappropriate place. In my mind I call this function database stuff happens and by the time we leave it's done. Well, let's make that super explicit. Let's close the session here and see how it works now. It's going to work any better? Think that's not better, not so much. It's a detached instance error. The parent release has become unbound so we can't navigate its package property. Actually we don't want to do that. It's okay that we close it here, we don't want more database access happening lazily throughout our application. Instead what we want to have happen is we want to make sure all the access happens here. So we can do one cool thing, we come over here and say options, so we're going to pass to this query we can say SQLAlchemy.orm.joinedload and I can go to the release and I say I would like you to pull in that package. So any time you get a particular release also go ahead and query join against its package so that thing is pre-populated all in one database query. So by the time we're done running it we no longer need to traverse reconnect to the database for this. Is it going to work, well let's find out. Hey it works, that's a super good sign. All of the data is there and look at this. Let's do one fresh one so it's super obvious. That's it, so we come in and we begin talking to the database, we do our select releases left outer join to packages and where it's set to be the various IDs and whatnot and a limit and offset and then this rollback here is actually what's happening on line 18. So we're just, we started a transaction when we interacted with it and it says okay actually we don't need this anymore, roll it back. Which is fine you've got to close your transaction either commit or rollback so rollback I guess. We don't really try to commit anything and we didn't want to so this is good. How cool is that, huh? I think this is pretty awesome. So we've done a single database query we've solved the N plus one problem and we've got our latest releases and we used the latest releases to pull back the package names and the package summaries and so on. So that we know our database stuff is working efficiently let's go and put these queries back here. So it's working for real. Go back and pull up our inspect element. Remember we're still running the debugger but we should get some sense of performance here. There we go, 13 milliseconds. What was it, 11 before, so going and get those releases and those packages in that join barely added any effort. Now remember we're running the debugger we could probably make this faster still but this homepage is working super super well. I'm really happy with how everything's coming together. And if we have true indexes it doesn't matter if we have a decent amount of data our queries should still be quite quick. All right, awesome, homepage is done.
|
|
|
transcript
|
9:18 |
The last demo driven part we're actually going to write during this chapter is what happens when you click here. Right now, it's a little underwhelming. So notice, we don't even have a link. But if I were to, you know, hack it in there project/flask or something like that it just says details for flask. Let's compare that against the real one. Huh, well, those are not quite the same, are they? I mean, we've done pretty well on the homepage here going back and forth but certainly not on the details. And if we click it, it doesn't even go somewhere. So that's what we're going to focus on in this lecture here. Well, if we go to the homepage, the index this is easy to change. This is going to be /project/{{ r.package_id }} Let's just get that working now. I can click it and it at least takes us to where we intend it to go. Now, it turns out the HTML here is quite complicated. We've spent a lot of time already putting the design in there and this is just a variation on that design. We have the heroes, we have Bootstrap all the kind of stuff. So I'm not going to go over it again. I'm just going to copy some over and we can just review it really quickly. We're going to focus on getting the data back and delivering it to that template. So, towards that, let's start over here on this page. And right now we just say package details for some package name, but what we really want is we want to get the package from the package service. And we'll do something like get_package_by_id or pass package_name.strip().)lower(). Okay, well, that's not so incredible. I mean, maybe we even want to do a little check here. So if not package name just so that doesn't crash we might do a return flask.abort. Status equals 404. Something like that. Okay, but let's assume this is working. And down here now. And we can go to a query. It still might not be found. So we might say, if not package, again, not found. Right? They could be they asked for a package, abc one, two, three, it doesn't exist. So we don't let that to crash. Now, let's go and have PyCharm write this function. It's going to be package_id, which is going to be a str. It's going to turn in optional package. We're going to import that from typing. It's optional 'cause, like I said you could ask for a package that doesn't exist in the database. Super. Well, how's it start? How do all of them start? They all start like this. And somewhere we say db_session.close probably. And in the middle, we do things like get us the package. And the package is going to be, again, one of these sessions. We're going to create a query a lowercase query of package filter and what we want to do is say package.id == package_id. And again, maybe this one would want to do that test. Actually something like this. It's a bit of a duplication but let's go package_id. Instead of returning abort, we'll return none which will see it as missing then it will abort it. And then here we'll just say package_id equals package_id. That's true. Okay. It's a little bit of data protection because that is user input right there. All right, so we're going to get our package. Now, if we do it like this, we get a query set back. Not what we wanted. All right, we don't a want a query set. What we want is, we actually want one package. So we'll go over here and we'll say first. And that's either going to return the package or nothing hence, the optional right there. Then we return package, like so. And we should be good. We can just do a really quick test here. And let's just do package. So this will show that we're either going to get a 404 or we'll get it back and will show its name when we click on the homepage there. Let's try. Put down, click on boto. Details for boto, woo! We got that from the database. It's pretty cool, right? And so super easy. I mean, seriously, like that is easy. However, our little package details page actually needs more information than what we have here. So we go look through this. You can see we're adding a new style sheet to the top of the page. And we're having our hero section, it has a id and package this and package that but it also has a handful of other things. So it wants to work with the releases. Now this is going to cause a tiny issue that we're going to catch and then improve. So we're going to have latest version is going to be zero.zero.zero to start, okay? We're also going to have latest release is going to be None. And we'll have to say is latest equals true. So the page adapts on whether or not you have the latest version. We're just going to say it is for now. We need to actually have the instance that is the latest release, if it exists and also the text of the version. So we'll say this, if package.releases remember this is sorted in the order of newest first. So we can say, latest release is package.releases of zero and latest version is going to be latest release version text. And we'll just leave is latest is true. Now the other thing we want to do instead of just returning the string is we want to go over here and say, remember to this? And we said, response, this was from long ago. And what was it? Template file is going to be it's going to be where is it in this folder? It's going to be packages slash details. So packages slash details.html. And then for this part, we don't return that. We return a dictionary of stuff. And there's a bunch of stuff that I got to put I here. So I'm just going to copy this over. There. So we have our package, we want to hand that off. Latest version, latest release whether or not it's the latest. Let's make this a little bit more obvious. Pass it through. And of course, a lot of this could be computed in the template. That would be wrong. The template is about taking data and turn it to HTML and not doing all this logic. It's best to get this as much ready for the view as possible. Here, we're going to talk about patterns that make this better later but right now it's already pretty good. Let's just rerun it to make sure we're all good. Over here and refresh. Now, what happened? Why did this crash? Well, if I didn't do that close inside here my package service, it wouldn't have crashed. So you might say, Well, just don't do that. Again, this means that like database query operations and lazy loading is leaking into our template. So one option is, we'll let it leak and everything will work. The other one is, well, what do we do up here, we add in one of these joined loads. We kind of basically need the same thing but in reverse. Let's put the dot here. And not there. So instead of saying I want to go to the release and load the package I want to go to the package and load the releases, plural. It should've reloaded when I saved, and ta-da. How cool is that? Look, it's already working. Yes, I copied over the HTML and the CSS. But that's not the hard part, is it? I mean, maybe it's hard at some point but that's not really the essence of this data-driven app. So here we've got our pip install boto. Here's the version. Is it the latest version? Yes, that's why it's green. You can go, here's a project description the release history. If I want to go to the homepage click on that, it takes me to the Boto3 homepage. Right? All this stuff. Let's see what we get if we put Flask up here. We have Flask, and we have all sorts of stuff like here's the license. We go to the homepage, we go to Pallets, and so on. And we don't have every bit of details in here that the main one does, but good enough for our demo app, right? This is cool, huh? We did some query against our database filtered by the ID, got the first one but then realized, oh, we're trying to navigate that relationship. So instead of doing the in plus one interactions with the database and, you know, leaking and lazy loading let's explicitly catch that by closing it. And then do a joined load to eager load it all in one query. That's pretty awesome. So now things are going really, really well. There might be times when you don't always want to do this and you might have to have a little flag you pass on whether or not you do this just because if you don't want it it's a little bit extra overhead on the database but generally, given a package, we want its releases. So I'm pretty happy to just put this right into the main method. All right? That's it. We have our data-driven package page and our homepage up and running. I'm really happy with the way the site is coming along.
|
|
|
transcript
|
4:03 |
We've written a few interesting queries and before we're done with this application we'll write a couple more. But let's talk about some of the core concepts around querying data. So here's a simple function that says find an account by login. We haven't written this one yet but, you know, we're going to when we get to the user side of things. It starts like all interaction with SQLAlchemy. We create a unit of work by creating a session. Here in the slides we have a slightly different factory method that we've written, but same idea. We get a session back, we're calling it s. We go to our session and we say s.query of the type we're trying to query from account, and then we can have one or more filter statements. Here we're doing two filter statements. Find where the account has this email and the hashed password is the one that we've created for them by rehashing it. And now we're calling one, which gives us one and exactly one, or None, items back and we're going to return that account. So if you actually look at what goes over to the database it's something like this: select * from account where account.email is some parameter and account.password_hash is some other parameter and the parameters are: Mike C. Kennedy, and abc. You'll see that you can layer on these filter statements, even conditionally. Like, you can create the query and then say if some other value is there, then also append or apply another filter operation so you can kind of build these up. They don't actually execute until you do like, a one operation, or you loop over them or you do a first, or anything like that. So here's returning a single record. Also, it's worth noting that the select * here is a simplification. Everything is explicitly called out in SQLAlchemy. The concept is, just give me all the records or give me all the columns. If we want to get a set of items back like, show me all of the packages that a particular person with their email has authored we would go and again get our session we would go and create a query based on package we would say filter, package.author_email equals this email. ==, remember, double equal. And then we can just say, all. And that'll give us all of the packages that match that query. This one's not going against a primary key so there'll be potentially more than one. Of course, this maps down to select * from packages, where package.author email equals well, you know, the email that you passed. Super simple, and exactly like you would expect. So the double equal filter, pretty straightforward. There's actually some that are not so straightforward. So equals, obviously ==. user.name == Ed, simple. If you want not equals, just use the != operator. That's pretty simple. You can also use Like. So one of the things that takes some getting used to is these SQLAlchemy descriptor column field the how you type multipurpose things here is they actually have operations that you can do on them when you're treating the static type interacting with the static definition rather than a record from the database. So here we say, the user type.name.like or N or things like that, and so there's, you know we saw the descending sort operation on there as well. So if we want to do the Like query, this is like find the substring Ed in the name, then you can do .like and then pass the percent to operators as you would in a normal SQL query. If you want to say, I want to find the user whose name is contained in the set Ed, Wendy or Jack, then you can do this .in_ remember the underscore is because in is a keyword in Python, so in_. If you want to do not, not in, this kind of a not obvious but you do the Tilda operator at the beginning to negate it. If you want to check for Null, == None the And you just apply multiple queries. The Or doesn't work that way, if you want to do an Or you've got to apply a special Or operator to a tuple of things. So here are most of the SQL operators in terms of SQLAlchemy. You can do a lot of stuff with this. It's not all of them, but many of them.
|
|
|
transcript
|
0:44 |
Databases are really good at filtering and ordering. Here is a function, find_all_packages and the idea is I would like, ideally a list of all the packages in the database showing the newest ones first and the oldest ones last. So we're going to do a query on package and we don't do any filtering because like we said the in name, we want them all. But we are going do an order_by so we say, query of package.order_by and then we always express these operations in terms of the type, so package.created If we just said package.created it would order ascending by the created_date but we want descending, so we go into that descriptor created and we say .desc we call the function to reverse the sort, and then we just say give us all the packages, here they come.
|
|
|
transcript
|
0:49 |
In order to update existing data we start like we always do, we get a session. And then we retrieve one or more records form the database. Here we're just getting one package. When I get this package back, and if we make changes to it so we set the author value to a new name we set the author email to a new email SQLAlchemy will track within the session that that record is dirty and it needs to be updated because we've changed some fields. And then, when we're ready to actually save it push all the changes back. I could apply this to as many entities as we'd like it doesn't have to just be one. Then we're going to commit the unit of work and it's going to look at the changes do all the changes in a single transaction back to the database. We use the unit of work to do our updates just like we do the inserts.
|
|
|
transcript
|
1:59 |
We saw relationships are extremely powerful and let us imagine as if our code and data were just connected, almost hierarchically the way we would in a regular Python program connected not split apart like we do in a database. The way we define these we add an orm.relationship field to the class so here we have releases so the relationship is against the release type that we're speaking in terms of SQLAlchemy entities, not database and then we're going to do an order_by this can either be a single thing or a list. Probably an iterable actually. And so, we're going to pass that in and then we're going to say it back populates package. What does that mean? We want this relationship to work in both directions so if we have a package we can see the releases and if we have an individual release. We can see the single package that it corresponds to. So, over in the release we're going to do the package_id value to actually store the relationship like we would store any value that's a string or an integer whatever it corresponds to in that other field. And then we're going to say this is a foreign key and in the foreign key part we speak in terms of database, packages.id. But them we also would like to establish that relationship so we say there's ORM relationship for the package type from release back to the package and it back populates releases and it's called Package so you can see the symmetry here not too hard to set these up once you have an example. Put them side by side you go okay, here's where I fill in the pieces for my particular dataset and then you saw that when we load a package it doesn't actually load the releases unless we interact with it. So, if we touch it it'll go back to the database and do the query. We also saw that if we create new releases and put them into the release package.releases well, it becomes a list and commit those changes that'll actually insert the releases. We work in the same but in the reverse as well if we had set the package on a release so it's sort of bidirectional in that sense.
|
|
|
transcript
|
0:37 |
We started off this chapter by demoing how to insert data. Let's actually summarize now here at the end. So again, we're going to create a session which is the corresponding unit of work bit of syntax in SQLAlchemy. Then we're just going to allocate some objects so here we're going to create a package and set its ID and its author maybe create some releases set the release, not package value other properties similarly relates to set its package, we're going to add the package call commit, whoosh! All three that are seeing this because of the relationships get inserted into the database; super easy!
|