|
|
|
10:10 |
|
|
transcript
|
3:36 |
Welcome to Python 3, An Illustrated Tour. I'm Matt Harrison and I'll be your host through this nice trip on the new features of Python 3. Let me just give you an introduction about what we're going to cover in this course. We're going to talk about the changes and new features in Python 3. So if you've been using Python 2 for a while and transitioned to 3 or you've started using 3, but aren't aware of all the new features, this course is for you. Let me tell you a little bit about myself. I am the author of various Python books. I wrote the best-selling Illustrated Guide to Python 3. I have books on Pandas as well as the Tiny Python Notebook. I run a company called MetaSnake and I do Consulting and training for them. So I've trained companies big and small and I'm really used to seeing how people cope with Python and how people cope with the new features. I ran the Utah Python user group for five years. I've been using Python since 2000 and I tweet about Python with my username @_ _mharrison_ _. Who is this course for? Well, it's for old Python programmers or those who have been using Python 2 and maybe have transitioned a Python 3 but are still programming it as if it were Python 2. It's also for new Python programmers, those who are just getting started and want to sort of understand better the features and cool syntax and benefits that Python 3 provides. So in general, this course is aimed for all those who want to leverage the latest features of Python. Let's talk about what we're going to cover in this course. We're going to talk virtual environments how you can make use of Pipenv in a Windows or Unix environment. We'll also be talking about Fstrings and how you can take advantage of those, great new feature in Python 3. We'll also talk about what has changed in numbers since Python 2 some of the things that are happening under the covers as well as some other features that you can take advantage of. We'll talk about classes, we'll dive into Super and learn how that works. We'll also talk about some of the new dunder methods in classes. We'll talk about functions, we'll talk about keyword only arguments and we'll get into some of the fun stuff there. We'll look into the standard libraries some of the new libraries in the standard library, we'll look at the statistics module, we'll look at the enom module. We'll look at the pathlib module and show some examples from those. We'll also talk about some of the new syntax in Python 3 that isn't available and why you might want to use that. We'll look at the new async library, we'll talk about how that functions under the covers, the mechanisms that that's using and we'll look at cool things like asynchronous context managers, asynchronous iterators and asynchronous generators. We'll also dive into annotations and see how you can take advantage of this cool new feature to make your code more robust. In addition, we'll look at unicode, this is native in Python 3 and we'll see some of the features that Python 3 supports and allows you to do with the new Unicode functionality. We'll also look at some of the new annotation tools that allow you to take advantage of the annotation syntax. And we'll also talk about the new features like generalized unpacking and show some examples of that. So in addition to content, which I think is pretty good, there's also a lot of labs for all these concepts and you get to try your hand at these Labs there are some cool self-correcting assignments that you'll get to do. And in addition, there are content walks through all the solutions to those as well as the walks through common errors that people have when they come across these things. It's a great way to try your hand out and learn these new things and take advantage of them. I hope you enjoy this class and I hope that it makes your Python code much cleaner, easier to read and more robust. Enjoy.
|
|
|
transcript
|
0:36 |
I just want to share with you some motivation and some resources. I've taught a bunch of people Python over the years and I've found that most people learn best when they can in addition to just listening or watching, they can try something out. And so included with the course are a bunch of labs or assignments for you to try out what we've talked about. I would advise you not to look at the solution videos which are included in the course until you've tried out the labs, that's going to help you get the most out of the course. Also, I want to give you this GitHub link here. This will give you all the resources for the course. So keep this handy while you're going through the course.
|
|
|
transcript
|
3:53 |
In this screencast, we're going to look at how to install Python 3 on Windows 10. Typically, when I use Python in Windows, I like to make sure that I understand how to use the prompt. So in order to launch the prompt you're going to go down to the bottom of your taskbar and where it says type here to search you can just type CMD and then we'll pull up command prompt and you can run that. Now, you'll note here that when I type Python it currently says the Python is not installed, so we want to remedy that. Let's go to the Python website and download Python 3. We're at the Python website and you can see if you scroll down a little bit that there is a download link. We're going to click Python 3.6.4 which is the current version at the time of this recording, you'll want to use whatever Python 3 version is listed there below. Inside of here, you'll see a bunch of things listing peps and whatnot and you can scroll down and we'll get the files here at the bottom. And typically, you'll probably want to either install a Windows 64-bit or Windows 32-bit, I am going to do a window 64-bit. That should work on most modern machines. There's a couple of different versions here. There's what they call an embeddable zip file. There's an executable installer and there's a web-based installer. I'm going to download the executable installer. So just click on that and download it. This will download for a minute. After that's downloaded, you'll see that there's a file here called Python 3.6.4 AMD we'll just double click on that and that should install Python for us. Now, this is where you want to be careful. You'll see that there are various ways to install it and one thing that you need to make sure is that you click this add Python 3.6 to path. If you don't click that, when I type Python at the command prompt, it won't find it. So I'm going to click that. I'm also going to choose customized installation note that the normal installation is going to put it in this C:\Users\matt\AppData\Local\Pograms\Python\Python36 directory and I'm just going to say customize and I'm going to install for all users. So it will put it in the C:\Program Files\Python36 it's going to ask if I want to install it, I'll say yes, it will think for a little bit and install Python. Okay, it looks like it's installed. I'm just going to close this. Let's go back to our prompt here. Remember type CMD down there and let's type Python. You can see that after I type Python it's now put me in the Python interpreter where I can execute Python code, to get out of this, I type quit and that will put me back into the prompt. 02:39 Note that I can also do things such as type Python -m idlelib.idle and it will launch idle, this is a Python editor that comes with Python. Note that a couple other things that it will do is that if you scroll down here you'll see that there is a Python directory here and you can click on this idle here to launch idle, which will launch idle that way, alternatively you can launch Python by clicking this as well. This will open a command prompt with Python, but I really prefer just to go down here and type CMD to launch Python here and note that we'll talk about virtual environments. When I launch Idle from the launcher here, we're using the system idle and when we start using virtual environments we'll probably want to launch idle or other programs from our virtual environment. So rather than launch it from there, I prefer using this Python -m idlelib.idle to launch idle. Great, hopefully after you've done this you've been able to get Python on your Windows 10 machine working.
|
|
|
transcript
|
2:05 |
Welcome to your course i want to take just a quick moment to take you on a tour, the video player in all of its features so that you get the most out of this entire course and all the courses you take with us so you'll start your course page of course, and you can see that it graze out and collapses the work they've already done so let's, go to the next video here opens up this separate player and you could see it a standard video player stuff you can pause for play you can actually skip back a few seconds or skip forward a few more you can jump to the next or previous lecture things like that shows you which chapter in which lecture topic you're learning right now and as other cool stuff like take me to the course page, show me the full transcript dialogue for this lecture take me to get home repo where the source code for this course lives and even do full text search and when we have transcripts that's searching every spoken word in the entire video not just titles and description that things like that also some social media stuff up there as well. For those of you who have a hard time hearing or don't speak english is your first language we have subtitles from the transcripts, so if you turn on subtitles right here, you'll be able to follow along as this words are spoken on the screen. I know that could be a big help to some of you just cause this is a web app doesn't mean you can't use your keyboard. You want a pause and play? Use your space bar to top of that, you want to skip ahead or backwards left arrow, right? Our next lecture shift left shift, right went to toggle subtitles just hit s and if you wonder what all the hockey star and click this little thing right here, it'll bring up a dialogue with all the hockey options. Finally, you may be watching this on a tablet or even a phone, hopefully a big phone, but you might be watching this in some sort of touch screen device. If that's true, you're probably holding with your thumb, so you click right here. Seek back ten seconds right there to seek ahead thirty and, of course, click in the middle to toggle play or pause now on ios because the way i was works, they don't let you auto start playing videos, so you may have to click right in the middle here. Start each lecture on iowa's that's a player now go enjoy that core.
|
|
|
|
25:14 |
|
|
transcript
|
3:08 |
In this video, we're going to look at how to install the tool pipenv, which is the recommended way to install Python packages and create virtual environments in Python 3. This is kind of tricky to install on windows, so I'll show you how we do it. First let's launch a command prompt by typing cmd into the search box here and we'll see that we don't have access to pipenv right now, but we do have access to Python. Okay, so we have Python installed, but we don't have pipenv installed. So let's install pipenv. Pipenv wraps virtual environment creation and pip utility into one nice little command line tool and in order to use it, we have to install it so we can install it using Python and saying -m I want to run the module pip install pipenv and we'll try and install it here. When I'm running this command, it's installing it into the system Python. It's going to think for a while but it's going to give me an error because it couldn't install it into a certain directory because it doesn't have access to do that, and that might seem annoying or problematic but it can be okay as well because what it allows us to do is sandbox our system install and not have any user trampling on top of it. I want to install it, instead it's doing what's called a user install. So I'll show you how to do that. Rather than saying python -m pip install pipenv, I'm going to add a --user option here and this is going to try and install it again. And it looks like it worked this time. Let's try and run pipenv and we can see that pipenv did not run. Why didn't it run? It's because our path can't find it, because we did a user install the directory where a user install binary is installed is not in our path. We can look at our path by saying echo %path% and we can see also where the path that the user install goes in by saying Python -m site --user-base. So inside of this app data roaming Python is a directory that has our new pipenv guy, let's look at that. It's going to say dir app data roaming Python and inside of Python there's a Python 3.6 directory and inside that, there's a scripts directory and that's where our pipenv executable is. So what I want to do is copy this directory right here I'll just highlight it and hit enter and if I go down here into my search box and type env, that will allow me to update my environment variable. I'll just click at the bottom there, environment variable click on path and say edit and I'm going to say new I want to add a new environment variable path and just paste in what I copied there. I can say edit. Okay. Okay. Okay, now note that pipenv will not work in this command prompt. So I'm going to close it, but I'll launch another one here by typing cmd into the search box. I should have access to pipenv now. So this video showed you how to install pip in a local install and how to update your path so that you have access to it from the command prompt.
|
|
|
transcript
|
10:50 |
In this video we're going to talk about virtual environments and pip. A virtual environment is a mechanism that Python provides to allow per project dependency. When we install Python, we get what we call the system Python installed or if you have a machine that comes shipped with Python there is a version of Python installed and you can install packages into that, but you probably don't want to and we'll explain why. Virtual environment allows us to isolate our dependencies based on a project, and it allows us to easily install and upgrade those dependencies. One example of why we might not want to use our system Python is illustrated here assume that I'm working on a project that requires Django 2.0 and later a year or so after that, my boss comes in and tells me he wants me to work on a new project and I want to use Django 3.4 the current version of Django at the time. If I've installed Django 2 on my system environment. I now need to install Django 3.4 on top of that and that can bring in the whole bunch of dependencies and whatnot essentially making it so my old project won't work anymore, which could be fine, if I'm working on a new project. But what happens when my boss says, oh, I need you to fix that bug in the old project. Well, then you've got to go in and uninstall Django 3 and all the dependencies and install Django 2, it turns into somewhat of a headache. So solution to that is to use these virtual environments and that allows us to on a per project basis create an environment for Python and so we can have one for our old Django 2.0 project and have another one for our new one that our boss tells us to create. Using these virtual environments we can easily switch between these two different versions and use the appropriate one very easily. Here's how we create a virtual environment. I'm going to run Python with -m switch, the -m swicth allows me to run a module that's included in the standard library in the Python path, in this case it's going to run the venv module. And we're going to pass in a path where we want the virtual environment to live. This can be any path and I like to put it in a directory called .venv in the same directory as my project, I'll tell you why in a minute. After we've created this virtual environment, it might take a while. What Python is going to do is it's going to make a directory structure in there that has a binary directory where there's a Python and a pip in there and it's going to make a library directory and it's going to also give us a tool that allows us to activate our virtual environment and when we activate it, what it's going to do, it's going to shim in our path where our new binaries are found into our path variable. So when you run Python, we're no longer running the system Python, but we're running the Python in a virtual environment. And you can see on bash systems when we run this command source with the path to this new environment and then there's an activate script in there when we run that, we can see that our shell will tell us the name of the virtual environment we are in. In this case, we can see that the env matches the env that we passed in to the command line. On Windows, we do a similar thing, we can pass in the full path. If you have multiple versions of Python installed you can use the full path to Python. And again, we're going to do the -m with the venv module, and we give it the path to where we want to create our virtual environment. Once we've created that virtual environment in Windows, because we don't have source we run this bat file here, which is in a scripts directory. And if you run that, you'll see that that updates your prompt as well. Just to clarify the -m swich, this will execute a module that's found in your Python path, why we use this instead of using a pip executable or virtual env executable is it allows us to make sure that we know which version of Python we're using to create our virtual environment on systems where you might have multiple versions installed. this can be pretty handy. Once we have a virtual environment what we do inside of it? Typically we install things, so there's a couple commands we can say pip install foo to install package foo, we can create a requirements file if we want to we can say install -e and that will install our package in edit mode, it allows us to have our package in the Python path, but also update it and when we update it will get live code essentially in our Python path. We can also say pip freeze and that will list all of the packages that are installed in a virtual environment and we can also uninstall libraries, which can be nice. One thing to be aware of is if you've created a virtual environment just running pip doesn't ensure that you're going to install something into that virtual environment, you either need to be using the pip that's located in the virtual environment or have your virtual environment activated so that the pip for that virtual environment is shimmed in the path and that's what's getting called when you call pip, so just make sure that you know which pip you're running. Let's talk about a tool called pipenv, as of post Python 3.6 pipenv is now according to the Python.org documentation the recommended tool for managing dependencies. What is pipenv? Pipenv is a tool that basically allows you to do virtual env and pip in one command line, we'll see some examples of that. Now this is a third party tool, so it's not included in Python 3.6. So you need to install it, again, we're going to use this -m module we're going to say Python 3 -m pip install and we're going to also use a --user option on the command line here what the -- user option says, is it says I want you to install this package, but I don't want you to install it into the system Python I want you to install it into a user directory that your user has access to but other users might not have access to. It allows you to get around having to be root to install packages. Now that might be problematic, because probably wherever Python is going to install this pipenv user package is not going to be in your path and you want the pipenv tool to be in your path. So you're going to have to do some things after that. Yeah, this is a little bit more convoluted and not quite as easy as it could be but bear with me and you'll only have to do this once. You want to know where your user base is or where this user path is you can run this command here Python 3 -m site -- user-base and that will tell you the directory of where your user base is and on Unix systems, if you add bin to that or on Windows systems, if you add Python 3.6 scripts to that that will be the path where pipenv will be located. So you'll need to do something like this on a Unix system in your .bash profile file, you'll need to update that and add into the path this new directory here and then you can source that and you'll have access to your user pipenv. On Windows systems, it's a similar process though typically not done through editing files. You need to go down to your search box and type env in there in the path environment variable, you want to update that and add the user base with the addition of Python 3.6 and scripts on the end of that. That point, if you relaunch the command prompt by typing cmd in the search box, you should be able to type pipenv and have access to it. Here's an example of using pipenv. I've created a directory called blockchain, this is on Unix, but you can do similar things on Windows. I'm going to change into that directory, and now, inside of that directory, I'm going to say pipenv install py.test what that does, is it goes out and because I called pipenv it's going to create a virtual environment for me and it's going to install py.test into that virtual environment. If I look in the current directory after I run this, this directory was brand-new, I just created it, I'll see two files, I'll see a file called pipfile and the file called pipfile. lock. That's what pipenv has created for me. It's also done some other things behind the scenes. It's created a virtual environment for me. Let's talk about pipfile. Pipfile is a new way of specifying dependencies. It supersedes the old requirements.txt file. One of the nice things about pipfile is that it allows you to support a dev environment and a default or production environment in a single pipfile and this basically says if you're developing this library, then you'll want to install the dev dependencies. If you're deploying it for production or whatnot, you'll just want the default dependencies. There's the other file there, the pipfile.lock and that stores the installation details about what libraries you have and it has hashes and versions in there, so you can make sure that when you recreate a virtual environment using this file that you have the exact same libraries installed. When you run this pipenv tool, it's also going to create a virtual environment and on my system, it threw it into this .local\ share\ virtualenvs directory and inside of there, it created a directory called blockchain with a unique identifier after it. If you want to have pip recognize another directory, it will recognize a .venv directory that is in your current project, if you have this environment variable pipenv_venv in project set so you can set that using the set command in Windows or you can just say pipenv_venv_in_projet=1 right before your pipenv command and it will recognize .venv virtual environment if you've got one. A couple commands for using pipenv you can say pipenv run Python and note that my environment here is not activated, my virtual environment, but because I'm using pipenv, pipenv has some logic to know that I am in a directory that has a virtual environment associated with it and so will launch the right Python there. If I want to activate my virtual environment, I can say pipenv shell and that will activate it, note that this command will work in Unix and Windows. A couple of other commands that we can do with pipenv, we can say pipenv --venv and that will give us the location of where our virtual environment is. We can say --py and that tells us which Python it's going to run we can install a package and we can install it with a dev dependency by putting --dev after it. Cool thing that we can do with pipenv is we can say graph and that will create a dependency graph to tell us what our dependencies depend on, we can lock our dependencies by calling pipenv lock. And we can uninstall package as well. I hope that you've learned a little bit more about virtual environments and pip and pipenv. If you haven't tried using these tools, please try them. Again, as I said, pipenv is now the recommended tool to use moving forward so you should get used to using that tool.
|
|
|
transcript
|
2:46 |
In this video, we're going to look at the venv_test assignment. I'm on Windows, so I'm going to start a command prompt and I'm going to change into the directory where I have my Python files installed here. I've got a labs directory here. We're going to do venv_tests so let's just look and see what that says. It says use pipenv to create a virtual environment and install pytest, run pytest on this file. Right now I can't even run pytest because it's not installed and I want to create a virtual environment to do that. One of the things that I like to do is to put the virtual environment in the same directory, and if you want to do that, you have to name your virtual environment .venv I can use either virtual env or I can use pipenv to do this. I'll show you how to do it with pipenv. So in order to do it with pipenv, we need to create an environment variable and the environment variable is pipenv_venv_in_project. So we're just going to say that set that equal to 1, if we want to inspect that we can say echo %pipenv_venv_in_project and we can see that that is now set. And since I have pipenv installed, I can say pipenv install py.test and it will think for a minute and it will create a virtual environment and then install py.test. Okay, so it looks like it worked. If you recall one of the things we can do is we can take pipenv --venv and it will tell us where our environment is and it says it's in this current directory. Awesome. If we want to activate it we can say pipenv shell and now we are activated, we're in our environment here, let's just type pytest venv_test.py and we can see that it now succeeds, it ran. I will also show you that I should be able to import pytest and it seems to work here if I exit out of this guy and I say Python and I say import pytest I get no module named pytest, this is because I'm now using the system Python, I'm not using the virtual Python. And we can see that we have created in our directory, I need to type dir, we have created in here a virtual environment in our directory called .venv simply by setting that environment variable and that's all there is to do for this assignment. You just need to make sure that it runs, it doesn't give you any errors and we have done that so we're good to go.
|
|
|
transcript
|
5:31 |
In this video, we're going to look at the venv test assignment and we're going to do on Unix system so that'll work on Linux or Mac systems. I've got the files downloaded from the labs here. Let's look at the venv test lab and you can see there's the assignment in that comment under the test venv function that says use pipenv to create a virtual environment and install pytest activate your virtual environment and run pytest on this file by invoking Python venv test.py You'll note that this will run pytest because at the bottom there we've got the check for if the __name__ attribute is the string __main__ import pytest and invoke pytest.main on the file. So let's do that, I'm going to create what's called a user install. If you don't have access right to your system or install into your system Python, you might need to do a user install, it has a few more steps, so this is how we do it. We say Python 3 -m pip install --user and we're going to install pipenv. Okay, it looks like that installed. Now what I need to do is be able to access the pipenv command-line utility and because I installed that in a user install, Python installed in a certain place, I'll show you where it came. Python -m I'm going to invoke the site module and say user-base, that says that it put it in my home directory in library Python 3. So in there, I should see a bin pipenv executable. Let's see if that exists in the bin directory and there is a pipenv. So now what I want to do is I want to make sure that this bin directory is in my path. So I'm going to update my .bash profile. I'll just show you how I update it. It looks like that, and once you've updated that you can source that file and you should be able to say which pipenv and it should tell you that it's using the user-installed pipenv. Great, at this point, I'm ready to use pipenv and note that I'm in my directory, where I want to create the virtual environment, I want to do it in the lab directory. If you don't create it from inside the directory you want to you might have problems activating it automatically using the pipenv tool. So make sure you're in the right directory here. All you have to say is pipenv install pytest. So it says it's creating a virtual environment for the project and it's installing pytest. You can see up at the very top it says where the directory is in the virtual environment, it's in my home directory in the .local folder. So if I just list the contents of the home directory, I'm not going to see that because it starts with a period so I have to do an ls-al to actually get the local directory there. And you can see up at the top here, there's a .local directory there. Okay, so inside of that local directory, there's a shared directory and then there's virtual environments inside of there and it created this guy right here, talkpy3 -labs and if you look, there's a bin directory and there's an activate guy in there. We're not going to run this the traditional way, we're going to use the pipenv tooling to activate this. So how we activate with pipenv is we say pipenv shell. And you'll see that it says it's spawning an environment and it says use exit to leave. So in this case, we don't use deactivate which is the traditional virtual environment command to leave the shell we're going to use exit and also note that it updated our prompt here and it said that we're using this environment here. You'll also note that when we ran pipenv, it created these two files here pipfile and pipfile.lock Let's just look at pipfile and you can see that it says that it has installed pytest, we can look at the lock file. The lock file has hashes for all the different libraries that we've installed. So if we want to get specific libraries reinstalled, it's going to check those hashes to make sure that they're the same versions, nice little feature here. Okay at this point, I should have pytest, let's see if pytest is found and it's found in my virtual environment, cool. Let's say which Python to make sure that I'm using the Python from my virtual environment, which Python, and in this case, I don't need to say Python 3 anymore because when we created the virtual environment it made an executable called Python that is Python 3 there. I can also say Python 3, but those should be the same, just to show you if I type Python now it says Python 3.6. Okay, and finally, let's run venv test and it says it ran one passed in 0.1 seconds. So that's how you create a virtual environment and install pytest using pipenv. I'm also going to exit from this. I'm going to say exit and you'll see that now I am out of my virtual environment. So this video showed you how to use pipenv to create a virtual environment and to install files, how to activate the virtual environment and how to exit from it.
|
|
|
transcript
|
1:17 |
In this video I'm going to show how to run the venv test file using idle in case you don't have PyCharm and you want to use another editor, this is how you would do it from another editor. So the first thing I want to do is I want to activate my environment. So I say pipenv shell and that will activate my environment now, I want to launch idle here, so I'm going to say Python -m idlelib.idle. If I don't activate my virtual environment first and I launch idle I'll get the system idle that might not have pytest installed. So I want to make sure that I have pytest installed. Okay, at this point, idle has launched. Let's open our venv test file, there it is and let's just come up here to run and say run module and note that over here in the repl, we got some output and it says it past one in one second. So because we have launched this from a virtual environment that has access to pytest, we're able to run this from pytest. All we have to say is run module.
|
|
|
transcript
|
1:42 |
In this video I'm going to show how to use PyCharm to run the venv test file. I'm going to use the environment that we created using pipenv. So I'm going to say create new project, it's going to be a pure Python project and it's going to point to the labs folder where I have the labs and note I'm going to say use an existing interpreter. PyCharm will happily create a new virtual environment for us if we want to, but we're going to use an existing one, so we have to click the little gear here and say add local and let's make sure that we use the right one. So I'm going to go into my home directory and I'm going to go to my .local and in my shared directory there is labs and note that it's looking for the Python executable there so I need to come down here and click on Python right here. Okay, at this point, I'll hit create and it will say the directory labs is not empty, would you like to create a project from existing sources? Yes, let's do that. Great. Here's the file right here. Let's run this and see if it runs. So to run it, it's going to index, we'll let it index for a while. Okay, now let's run this here. So I'm going to say run venv test, and it looks like it ran, note that it said it used the virtual environment Python to run it and it ran it and the test imports pytest so it looks like pytest is working. This video showed how to use PyCharm to create a new project using an existing pipenv environment and to run a test, note that I can also right click here and say run test again and it will run it again.
|
|
|
|
43:50 |
|
|
transcript
|
15:28 |
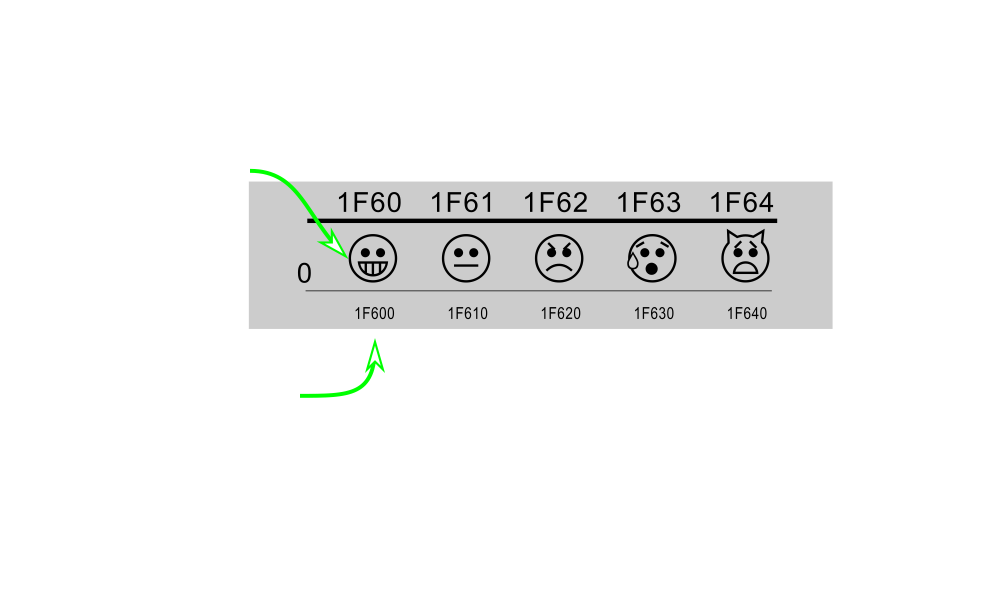
In this video we're going to talk about unicode. There are a few terms that we need to know before we can understand unicode and how Python handles it. So let's talk about these terms. The first term is a character and a character is a single letter something that you would type and it would print on the screen. There's a little bit of a vagary between character and glyph glyph is the visual representation of said character. So if we think of the character A in the English alphabet A is a single letter and there's a visual representation of A actually uppercase or lowercase. So the glyph would be the representation of it, a is the actual character. There's also what's called a code point and a code point is a numeric description of a character. And each character or glyph has a unique numeric description. Typically this is represented as a hex number and this is also where unicode comes from. This is a universal code that represents this character or glyph. Another term that we need to know is an encoding encoding is a mapping, a byte stream to a code point and so we'll understand this little bit more, but basically, you can think of a code point as a universal way of understanding something and when we want to tell someone else about it or tell a computer or send it over the network, we encode that character into some encoding, so typical encodings will include ASCII or utf-8 there are other encodings as well, we'll look at a few of them. Here's an example. So there's a character called Omega and it has a glyph and it looks sort of like a horseshoe Ω you might be familiar with it if you've done some physics, it has a code point, so the code point, we put a capital U in front of it it just stands for unicode, and the code point is 2126 note that that is a hex number. There are also a couple encoding represented here, so one encoding is the byte string consisting of e2 84 and a6, this is the utf-8 encoding for the Omega character or glyph or the 2126 unicode code point. There's also a utf-16 code point, ff, fe&! at the end. Note that these are two different encodings and their byte streams look different. Here's how we do it in Python. One thing to be aware of in Python 3 is that all strings in Python are unicode strings we'll talk a little bit how they're represented internally but if I have the glyph, I have a way to type it I can just type it into a string. I can also copy and paste it from a webpage or whatnot. If I don't have the glyph or I don't want to type it but I do have the code point I can insert that by putting a \_u or _U depending on how long the hex string is if the hex string is 4 characters, then I use an _u or a lowercase u if the hex string is longer than 4 characters then I'm going to put an upper case U and I'm going to left pad it with zeros untill I get to 8 characters. I can also use the unicode name and in this case the name is Ω sign and I put a \N and then I put the name in curly braces. A fourth way to get this unicode string is by passing in this number here and 8486 is the decimal version of 2126. So if I pass that into the chr function that will give me a character from an ordinal number and that's the unicode ordinal. Note that I can print this out to the screen and it will print out the Omega character and I can test if all these characters are indeed equal or equivalent to one another and they are. Another thing that you might want to be aware of in Python is a module included in Python called unicode data. And if you have unicode data, you can pass in a single string character into it and it will tell you what the name is. So in this case, we have the Ω character in there and unicode data.name says that unicode name of this is Ω sign. Let's look at another example really quickly. There's a character called superscript two and that's if you're familiar with math, like you said x2 the squared would be the glyph the number 2 raised up slightly higher is the superscript two it has a unicode code point, in this case, it's the hex characters 178 and we can see two encodings here, here's a utf-8 encoding and we can also see a Windows 1252 encoding. Now, where'd you get these code points? Where do you understand what the master data is? If you want to find them out, you can go to a website called unicode.org. There's a consortium there that occasionally releases new mappings, but they have charts that you can download that map letters to unicode character codes or code points. Here's an example of one of the charts. You'll see something like this. This is for the Emoji chart and you can see that there is along the top, we've got a hex number here and then we've got another hex number here on the left-hand side. And when you concatenate those two you get this hex number at the bottom here, and that is the code point for the smiley face here. And then the next one is the sort of normal face, and then there's a frowny face and a crying face and a surprised face. The chart also contains a table that looks like this that has the code point name and glyph all in one place here. Right here we have the code point 1F600, we have the glyph which is the smiley face and we have the actual name, which isn't smiley, but grinning face, note that it's capitalized and there is a space between it. One thing to note is that the code point for this 1F600 is longer than four characters. So in order to represent that using the code point we need to put a capital U and then we need to pad that with three zeros to get 8 characters in that case. We can also use the name with a \m If we have access to the glyph or keyboard that types Emoji we can put that directly into a string. Note that here I've also got the utf-8 version of the encoding of grinning face. If I have that byte stream encoded as utf-8 bytes, I can decode it back to unicode using the decode method and the appropriate encoding that it was encoded as and I say decode to utf-8, I will get back the utf-8 string for that. Let's talk about how things are stored in Python. Everything internally is stored as two or four bytes and there's internal encodings, these are called UCS2 and UCS4, depending on how your Python was compiled will determine how your unicode strings are stored. So one thing to be aware of because all strings in Python 3 are unicode strings, and these are stored as UCS2 or UCS4 byte strings internally, there's typically a 2X to 4X increase in the size of memory needed to store strings in Python 3 versus Python 2. In practice, that doesn't really make so much of a difference on modern machines unless you're dealing with huge files, but just something to be aware of. Also note that bytes in Python 3 are not the same as Python 2 strings. So bytes in Python 3 are simply arrays of integers. Let's talk about encodings a little bit more, encodings map bytes to code points. A common misconception is that an encoding is a unicode number. So utf-8 is an encoding. This is not code point. This is an encoding of a code point, just to be pedantic about that, utf-8 is an encoding of characters, it is not unicode per se. Unicode is always encoded to bytes and the reverse is always true bytes are decoded into unicode. Note that you can't take unicode and decode it, you encode it. Also, the same with bytes— you can't take bytes and encode them, they are already encoded, you can only decode them to unicode. Here's an example here. We have the string with Omega in it. And I created it with the code point and then if I wanted to encode that as utf-16, I say encode, I call the encode method on that and I pass in the encoding utf-16 and it returns back a byte string, again, note that c is a unicode string and the result of that is a byte string coming out of that. If I want to encode c as utf-8, I simply call the encode method and pass in utf-8. Note that these encodings are different, utf-16 and utf-8 have different encodings. Now, once I have these bytes, I can go back and get the original string from it. So I don't encode bytes, I always decode bytes and here I'm taking the utf-8 bytes and decoding them calling the decode method on them to get back a unicode string. Here's a chart that just shows what we do if we have a unicode string, we always encode it to a byte string, likewise if we have a byte string, we always decode it. We can't do the opposite, the byte string doesn't even have an encode method, likewise, the unicode string doesn't have a decode method. There are some errors you can get when you're dealing with unicode, here's a pretty common one here. I've got the Omega sign here in a variable called c. And if I try to encode that as ASCII, I'm going to get a unicode encode error. And the problem is that the ASCII character set doesn't have an encoding for this character. And so that's what this error means, charmap, codec cannot encode character unicode 2126 in position 0. This is a pretty common error when you start dealing with unicode. So again, what this error means is that you have a string and you're trying to encode it to a byte encoding that doesn't have a representation for that. There are some encodings that have representations for all of unicode, so utf-8 is a good choice, but ASCII does not, it only has a limited number of characters that it can encode. Here, we'll trying to encode this Omega character again we'll call encode with the windows 1252 a common encoding that was found in Windows during the last century and we'll get the same error here. Well, similar error, we are getting unicode encode error and that it can't be encoded into Windows 1252. On the other hand, if we try and encode it into cp949, this is a Korean encoding, we get a byte string. So this Korean encoding has the ability to support the Omega character. Now be careful, once you have bytes encoded, you need to decode them typically. Typically, you only encode them to send them over the wire or to save them as a file or send them over the network, that sort of thing. But when you're dealing with them, you want them in utf-8. So a lot of times, you'll get data and you'll need to decode it to be able to deal with it. Here we have the variable core which has the bytes for the Omega sign encoded in Korean. Now if we have those bytes and we call decode and we say I want to decode these bytes assuming that they were in utf-8 I'm going to get an error here, that's a unicode decode error. And this says I got bytes and I'm trying to decode them as utf-8, but there aren't utf-8 bytes that make sense here. So this is a unicode decode error, typically what this means is you have bytes and you are decoding them from the wrong encoding. Note that we encoded as Korean, we need to decode from Korean as well. Now even more nefarious is this example down here. We have the Korean bytes, and we're decoding them but we're decoding them as Turkish. And apparently the combination of Korean bytes is valid Turkish bytes, but it's not the Omega sign, it's a different sign. This is known as mojibake, that's a Japanese term that means messed up characters, I believe. And so this is a little bit more problematic, you've decoded your characters, but you have the wrong characters, because you decoded them in the wrong encoding, so be careful about your encoding, you want to be explicit here and you want to make sure that your encoding and decoding match up with the same encoding. Here's a chart that represents the various things you can do with characters and the conversions that you can do on the single character. Note that if we have a string here, this box right here is various ways to represent ASCII character T. We can convert that to an integer by calling ord on it and we can go back by calling chr. We can also get bytes by calling bytes with the encoding that we want and we can put our bytes into a file if we open the file in the right binary mode, if we have string and we want to write to a file we need to just call it with the w mode. There are a couple errors that you might see. You might try and open a file for writing with bytes and you'll get an error, that's the type error, you have to use a string and not bytes if you're opening to write it in text mode. Similarly, if I have a string and I open it in binary mode I'm getting an error that says string does not support the buffer interface. So these are errors that you might see with an ASCII character. This chart shows some of the errors that you might see with unicode characters. Here we've got the string here which has Ω and we can see that we can encode it as an integer. We can also encode it as bytes, in this case we're encoding it as utf-8 bytes. Now note that if I try and decode this sequence as Windows 1252 that will pass, but I'll get a messed up mojibake. So again, we need to make sure that this decoding has the same encoding as the encoding call, which was utf-8. We also see some of the other errors that we have if we try and encode with a different encoding that's not supported, we might get a unicode encode error. So Windows 1252 or ASCII, those both give us errors and know that we can't call decode on a string, we can only encode a string. So those are some of the things that you need to be aware of. Typically, if you get these unicode encode errors, that means that you're trying to call encode and you're using the wrong encoding there. So try and figure out what your encoding is. Common coding these days is utf-8. Okay, we've been through a lot in this video. Hopefully, you have some understanding of how Python handles unicode and how we can change these unicode strings into byte strings to serialize or send over the wire. Hopefully, you also understand some of the errors you might run into and how to deal with those errors. If you're sure what your encoding is, that can eliminate a lot of the issues that you might run into.
|
|
|
transcript
|
3:53 |
In this video, we're going to look at unicode test, let's open that up in the editor that you want. I'm going to run it. You can run it from your command line by just invoking Python on the file, or you can in PyCharm right click and say run you should get three errors here. Let's go to the first error. On line 10 we get a name error, so here's line 10. And in this function, it's called test 1. It says the following line is from Yu Lou Chun by Dao Ren Bai Yun. There's a link to Project Gutenberg there, it says convert the line to utf-8 bytes stored in the variable utf-8_txt. So up here we have a unicode string and we're going to convert that to bytes. Let's see how we do that. We're going to make a variable called utf-8_text is equal to and on text, we need to call the encode method. So we're going to encode the string and we're going to encode it as utf-8 bytes so we can say utf-8, and that should give us a new variable that actually is bytes. Let's run this and see if it works. Note that our test here is just asserting that the last five characters are these bytes. It's also asserting the length of the bytes. Okay, so we have one that's passed now. So the thing to remember is that if you have a string, a unicode string if you want to change it into bytes that process is called encoding, you don't decode a string, you decode bytes back into a string. Okay, here's another line or probably the same line convert the line to big5, another Chinese encoding and store it in big5_txt. So big5_txt = txt so we have bytes here and we want to encode those bytes as big5. Let's run that and see if that works. Okay, it looks like it worked, we have 2 passed, one thing to note is the length of the big5 encoding is 74 bites on that same string versus above, when it's utf-8 encoded it's 111 bytes. So there are some compromises that utf-8 makes but in general, utf-8 is one of the most widely used encodings on the internet. So it's a pretty good encoding to use even though it might be a little bigger than other encodings. Okay, test three, the following is utf-8 bytes decode it into a variable result. So we have some bytes here and we're going to make a variable called result and we're going to take our unknown bytes and we're going to decode it. Again, we don't encode bytes, bytes are already encoded for us. Okay, let's run this and make sure it works It looks like we're good to go. So let's just for fun put a little break point here and see if we can see what unknown is. I'll move the break point down one level here Okay, here's result. And if you look at result, it says that snake makes your head and then it says spin upside down. Okay, cool. Thanks for watching this video. Hopefully, you have a better understanding of unicode and bytes and the conversion between those two. Again, if you have a unicode string, you encode those as bytes, and if you have bytes, you decode those to a unicode string.
|
|
|
transcript
|
3:15 |
In this video we'll discuss unicode in files in Python 3. We talked about unicode in Python 3 and that Python 3 handles unicode natively and the strings are natively unicode. One thing to be aware of is that when Python reads in a text file, it's going to use the system encoding to determine what the encoding is on that file. So you can run this command right here locale.getprefferedencoding with faults passed in and it will tell you what the encoding is on your system. Typically, on most systems that's utf-8, if that's not the case, you should be aware of that. And in any case, you should be explicit about what your files are encoded in. Here's an example of being explicit with writing output. I have a unicode string that has the ohm (Ω) character in it. Again, ASCII can't handle this, but the cpe949 encoding can, that's a Korean encoding. And so I'm going to make a file called ohm.core and I'm going to write to it, note that I'm calling the W mode, I'm not saying binary because I'm writing out a string to it. So if you're writing out text, you only open a file in read or write mode not in binary mode. And then I specify the encoding being explicit here and I'm saying that I'm going to encode this string as the Korean cp949 encoding and then with my file, I can call write and write my data out. Now, this is a case where if I tried to read the file without specifying the encoding the encoding on my system again is utf-8 and if I'd simply try and open the file for reading and read from it, I'll get a unicode decode error that the utf-8 codec can't support that byte sequence. That's because there is some combination of characters in the Korean byte sequence that utf-8 doesn't know how to decode but if I specify my encoding here and I'm explicit then I can read that data back and get back my original string. Now, this used Korean, typically, most files you're going to see these days are utf-8. So this just shows us an example of being explicit by being explicit, we can get around these encoding issues. If we happen to have binary data, note that binary data is what we send over the wire or what we write to files. If we have binary data, we don't specify the encoding here. So here I'm saying I'm going to write a binary file and I'm specifying the encoding and Python throws an error and it says the binary mode doesn't take an encoding argument. Again, we want to be explicit here and remember that binary is what we send over the wire over the network on a file and that is already encoded so you don't need to specify an encoding, it's a sequence of bytes. If you open something for binary it's just going to lay down that sequence of bytes. So I hope you understand a little bit more about reading and writing files that have alternate encodings in Python. One of the best practices of Python is being explicit. So when you're writing a text file you want to be explicit about what encoding you're using, especially if you're using characters that aren't ASCII or commonly used characters.
|
|
|
transcript
|
1:22 |
This video will talk about Unicode identifiers. These came out in Python 3, and PEP 3131 introduced them. The PEP states: by using identifiers in their native language code clarity and maintainability of the code among speakers of that language improves. What does this mean? It means that I can use a unicode character such as Ω I can say the Ω_val=10 if I'm talking about resistance or whatnot and then I can ask for that variable and Python 3 will give that to me. Note that Python 2 does not like this and this won't work in Python 2. Still have some issues, you can't start a variable with a number so I can't say to 2Ω_val, I'll get a syntax error there. That's basically all I have to say about unicode variables. I personally haven't seen them that often. I'm in the United States and I mostly deal in an ASCII centric world. One other thing that the PEP notes is that the Python language isn't going to use unicode variables either. So even though the language supports it and an effort to make things simpler and easier for everyone to type and understand it's just going to stick with ASCII variables. So I personally haven't seen anyone using this feature, though it's out there. So if you've got a cool example, I'd love to see it. Hit me up on Twitter or whatnot and let me know of a useful example where this is being used.
|
|
|
transcript
|
7:47 |
This video will discuss string formatting and PEP 3101. Pep 3101 introduced the format method on a string, note that this exists in later versions of Python 2. Prior to that, there was a c-like way of formatting strings so we would use percent and then some character after that typically s means I'm going to represent this as a string. So here I have two variables and then we use the mod operator and pass in a tuple of things that we want to stick into these placeholders here. So %s %s will take hello and stick it into the first place holder and in the second place holder world will pop in. Pep 3101 we make this a method on a string format is a method on a string, and we're using curly braces to specify our placeholders here, in this case the 0 and 1, 0 refers to who's in the zero position and the 1 here refers to who's in the second position. Again, Python is a zero based language, so 0, 1. One of the nice things about the 0 and 1 which are completely optional is if I want to say Hello, Hello, Hello, I could say {0} {0} {0} I wouldn't have to put in Hello three times in as arguments to format. Using the format method, there's a mini language and it allows us to do some things, we can insert some Python expressions. So in this example, I'm passing in a dictionary into the format, and note that I'm doing an index operation here with square brackets here, so I'm saying on what's ever passed in I want you to do an index operation and pull age off and we get 50 there. We can do a similar thing with attribute access, Here I say .age give me the age attribute of my p class and I'm passing in p there and he prints out 50. So we can do some simple expressions there index and attribute access. You try and call a function or do something like that and it's going to bark at you and say that you can't do that. Here's an example of trying to call upper. So we pass in a string and we want to say hey give me the upper attribute, but also invoke it with parentheses here and it gives me there's no attribute upper with parentheses following it. So it's trying to do some things to not allow you to invoke or call arguments there. We talked about position and here's just an example of using position if I want to say na na na na hey Jude, I can repeat na 3 times just by putting the position in there, note that I don't have to repeat na multiple times. Now, there's a whole little language for string formatting here. This is basically what can go where, this next slide here is the crib sheet that tells you what can actually go in the where so I'll go over these briefly, don't try and memorize all this you can refer back to this if you need to but a lot of the times you don't need all these different formatting options. So a fill character, you can specify a fill character the default character here is a space and you don't need to put anything in there. There's an alignment that allows you to center right or pad align things by using one of these four characters here, less than, greater than, equal or the caret. There's a sign, we can stick in a sign here so we can put a plus a minus or a space if we have a plus in there, then we're going to put a sign in front of all numbers. If we have a minus in front of there, then we're going to put a sign in front of negative numbers and with a space we will put a space in front of positive numbers and the sign in front of negative numbers. We can put this hash in there and that just says if I've got a number that's a binary, octal or hex, I want you to stick 0b, 0o or 0x in front of those respectively. There's an option here to do zero padding so we can stick in a zero there and if we have numbers we'll get padding after that, the default there is space so it doesn't stick in padding, but if you want to have zero padding on the left you can do that. We can specify the minimum width if we want something to take at least 3 spaces, we can say 3 in there. We can also specify a thousands separator, there is no thousands separator by default, but if we want to have a comma as a thousands separator we can put that in there. Also, we can put a precision following a period, this is for floating-point numbers. If you want to have five digits of precision, you can put .5 and that will give you the precision. If you have a string that's going in, then this will give you the max length of the string. So if I want to take up to 5 characters of that you can put 5 in there. And finally, at the end here, we have a type. There are various types that we can specify, these are all on the bottom here. The default is s which means just give me the string representation of that. We can also provide r to give us the repr. There are various options that we can use for numbers that are integer numbers and here are some floating-point options we can use as well. So e for lowercase exponent, E for uppercase exponent f for fixed point, g general, it changes between fixed point and exponent to try and be nice to you. And n is a locale specific general version if you're in a different locale and a % sign will convert a floating point number to a percent. So if you have .5 it will convert that to 50, so lots of options and things that you can do in there. Don't memorize this, but you can come back and refer to this if you need to. Here are some examples of formatting a string. Here I say that I want to format Ringo in 12 characters and surrounded by asterisks here. So we put a colon here, anything following the colon is the formatting options. You can see that we have an asterisk, that's the fill character and then we have a caret and then we have 12 so we're going to take 12 characters and center that, caret means center. Here's one here, formatted percentage using a width of 10 with 1 decimal place and a sign before the width padding. And so we see there's a colon, after the colon is going to come our formatting options we're going to use an equal that says put the space after our sign there and we're going to use 10 characters and one character of decimal precision. And then, since it's a percent, we're going to multiply it by 100 to convert it to a percent. And so we see 44 divided by 100 would be .44 but this is going to multiply that by 100. Here's a simple binary and hex conversion. We just put :B and 12 as binary is 1100 12 as hex is c. There's a little link at the bottom here pyformat.info, it's a nice website, you should go visit that and it has a bunch of examples of doing string formatting in what it calls the old school way of doing it, which is using the mod operator and the c-style placeholders and some examples of doing that with the newer format method, great examples in there, nice little resource to know about when you forget the formatting options and want to see some examples.
|
|
|
transcript
|
4:30 |
In this video, we're going to look at format test, open that up in your editor. Let's look at the first problem. It says create a string variable f1 to show a stock price. It should have three placeholders, using the format method to print given data like a name that has a string, price that has a float and change that as a float. It should be able to print a string that has name with the name inserted a couple spaces, then the price with a $ sign and the price formatted as a floating point, with two decimal places and the change format is %. Let's see if we can do this here, f1 is equal to name: we need a placeholder for that, string name, so we'll just put a placeholder there, it looks like we've got some spaces here. So we'll just copy those amount of spaces and stick them down here below. And then, we'll say price and I need to put a $ sign here. And this is going to be formatted as a float. So I'm going to put: with two decimal places and f and put change and we're going to put our change in here. It's going to have two decimal places and it's going to be formatted as a percentage. Let's try this to see if it works, so just hit run here. Okay, and so we've got f2 does not work but this part worked. So we're down to the second part, create f2, it should look like f1 but have 10 spaces for each left-aligned placeholder. So each one of these curly braces is a placeholder just copy this and plop it down here. Let's change this to F2 and if we want 10 spaces in here, so in order to use 10 spaces, we can put a colon here and say left-aligned 10. We just put a less than 10 at the front and that should give us 10 spaces here. Let's give it a try and see if it works. So let's run this again. And it appeared to work. So simply by putting that less than 10 at the front that says I want to make this APPL here take up 10 spaces and whatever's in there I want to be left aligned. Okay, great, f3, it should have 3 placeholders and should be able to create the f1 or f2 strings the placeholders except the formatting string. So this is sort of meta here. So this is saying I want you to create something that could create this or could create this and the end user is going to pass in the contents of this. So, let's see if we can do that here, f3 is equal to a string and we're going to say name colon and then we're going to have a placeholder here. But we want to be able to have curly braces in there because we want the output of the format to have curly braces. So we've got to put two curly braces, if we put two curly braces, then that's considered an escape. So this would show our curly braces. Then we need to put another curly brace pair inside for where we need to put our formatting. And we'll do our spaces here and price and we're going to have to again do our curly braces and change 1, 2, 3, 1, 2, 3. So this is how you include curly braces, you simply use two of them and then Python is not going to use those as placeholders, but rather it's going to just put a curly brace there. Let's try it and see if it works. Okay, it looks like it worked and you can see in the test here it's saying I want you to format on f3 with empty, with nothing, with a float, with two places and a percent with two places. And then with that, I want to call format again, so that should have the placeholders now with the formatting strings in there. And if you do that, we should get back to the original thing that we had back in f1 up above. Hopefully, you feel like you understand formatting a little bit more. There's a lot more to it. Again, you can refer to the slide deck or the website that was referred to in the slide deck for more examples of how to do formatting.
|
|
|
transcript
|
3:44 |
In this video we're going to talk about literal string interpolation PEP 498 this came out in Python 3.6 and this is probably one of the most exciting features of Python 3, or one of the features that people really enjoy using and feel like maybe it should have been introduced quite a while ago. The existing ways of formatting strings are either error-prone and flexible or cumbersome. So here's the progression of the old-school style, which is the c style of formatting with the placeholders as percent as or whatnot the PEP 3101 with curly braces, and then this newer style which is called literal string interpolation. You can see that there's a f in front of the string literal and then inside of these placeholders, we are passing in Python Expressions here. Note that there is no format at the end here. So it's just looking into my name space and seeing that there is a variable called coin and a variable called price and it's sticking those into those placeholders and we get this nice syntax for sticking in variables and having interpolation occur inside of that string. So basically to get this functionality in Python 3.6 you stick an f in front of your string literal and then you can put an expression inside of your curly braces. Here's an example, it just doesn't have to be a variable. Here we are defining a function called to Spanish and inside of our string literal we are calling the to Spanish function here and we are passing in val here in the first placeholder and we're passing in val in the to Spanish call and we're getting a result there. The Python 3 101 format specifier doesn't allow anything other than index and attribute access, but this allows you to put arbitrary expressions in there. So there's a lot of power in there, you can go crazy if you want to but it also allows you to be a little bit more succinct with your strings and string creation. This syntax also supports the PEP 3101 string formatting. So if you put in a colon in there following the colon you can put a format specifier and that will indicate how you want to format whatever was passed in into the placeholder there. So this says val is 12 and we're going to format that with the b or as a binary likewise this one down here, format to this hex. The PEP specifies that you can use these f strings with normal Python strings. You can also use them with raw strings, but you cannot use them with byte strings or unicode literals. Those are the literals that have the u in front of them. Another thing to be wary of is including a backslash in the literal string Python complains about that. So if you want to get a backslash in there make a variable that has that backslash and make a reference to that variable, kind of an uncommon thing there but something that might get you. Another nicety of this is that this is also faster. So I've got some timings here on my machine, but you see that with the old c style you had pretty decent speed this slowed down when we called the format method and then when we put this as a literal string interpolation when we introduced the app, we get some speed up and we're actually faster than the old method. So this isn't going to be a change that if you use this you're going to have to use half as many web servers or whatnot but it is nice that this feature is faster. So I hope you've learned a little bit about f strings in here. Once you start using these, you'll wonder why this wasn't introduced earlier. It's a really nice syntax that allows us to be brief, but also be explicit.
|
|
|
transcript
|
2:31 |
We're going to look at fstring test, open that up. The first part says assuming the variable stock and price exist make a variable res that has Stock and then whatever the stock value is then price and whatever the price value is. You should use an fstring to do this. So long behold here is stock and price. So let's make a variable called res, that's an fstring. So to make an fstring we put an f in front of our string and I'm going to say Stock here and then I want the value of stock, in this case I'll just put it in curly braces here and then price here with the value of price. We could do some formatting here. In this case, it didn't particularly define that we include any specific formatting. Let's just run this and see if it works. And it looks like it worked here. So this will give us a string that looks like that, pretty cool. The next part says assume the variable x exists. And x is defined down here, create a variable answer that has the sin of x using math.sin to 2 decimal places. And so it wants us to say x with the value of x then sin of x with the sin of that, use an f string to do that. So the first thing we need to do is import the math libraries, we're going to say import math here. Let's come down here and we'll make this variable called answer. It's going to be an fstring, so we'll put that in there. We need x and we'll put the value of x there and we want sin of x with math.sin of x and we need to format it. So in order to provide formatting, we put a colon at the end here and we're going to format this as a float. So, I believe we need to say .2f to get 2 decimal places. Let's try that and see if it works. Oh, I've got a typo here, I need to close off my embedding of my expression there. Let's try again. Okay, it looks like that worked. So this shows you that not only can you put expressions in here, but you can put formatting with them as well using the formatting syntax.
|
|
|
transcript
|
1:20 |
This video will discuss explicit unicode literals. These were created in Python 3.3 by PEP for 414 and if you're using Python 2 and porting it to Python 3, these can be pretty important, just in review, all strings are unicode in Python 3 by default that wasn't the case in Python 2, in Python 2 to make a unicode string or a unicode literal, you would put a u in front of your string. So here's a little bit from the pep, the requirement to change the spelling of every unicode literal in an application regardless of how it is accomplished is a key stumbling block for porting Python 2 to 3 efforts. So this is simply an inclusion in Python 3 to ease the porting effort from Python 2 to 3. If you're only writing Python 3 code you can disregard this, but if you're using Python 2 and want to write code that works in both or migrate, this can be something that can be useful. Here's just some brief code. It shows that I can create a unicode string or a Python string by putting u in front of it and I can do the same thing without a u in front of it. and those are equivalent. Python 3 basically ignores the u and allows you to have it there for porting purposes. So this is a brief section but useful for those who are migrating from Python 2 to 3.
|
|
|
|
17:58 |
|
|
transcript
|
1:38 |
In this video we're going to talk about integer division. This came out in Python 3 PEP 238 introduced it. In Python 2 when you divided a number by another number if you divided floats, you'd get back a float as a result, but for integers, you would get back an integer as a result. And this is called floor division. Guido writes in his Python history blog about how this was a mistake and Python 3 attempted to rectify this by changing the behavior of the division operator. So in Python 3 slash does what's called true division there's a __truediv__ and double slash does floor division __floordiv__ So if I divide 2 by 3 in Python 3, I get point .6666, and if I say 2//3 then I get that floor division and I get back 0 as a result. Note that floor division also works on floats if I say 2.0 divided by 3.1, I get .66, but if I do floor division on those numbers, I get 0.0 and because everything is an object in Python, if we want to we can go through the steps to show that you can invoke __truediv__ on an integer and __floordiv__ as well. Now again, you typically don't do this, we typically don't call the dunder methods but they're there because in Python everything is an object and you can call the object methods if you want to. Quick summary, in Python 3 when you divide two numbers, you will get a float as a result. If you don't want a float then use a double divide to do what's called floor division.
|
|
|
transcript
|
1:53 |
In this video we're going to talk about PEP 237, came out in Python 3 and this is the unification of long and integer types. From the PEP it says there is also the greater desire to hide unnecessary details from the Python user when they're irrelevant for most applications. It makes sense to extend this convenience to numbers. If you're familiar, in Python 2 there was a long integer type and a normal integer type. And you could tell one from the other because when you print it out a long type there was an L after it. Now Python supports arbitrary precision in integers it's only limited by the amount of memory you have so you can make pretty big integers if you want to. Here's an example of creating big integers and we're calling the sys.getsizeof on our integers and just seeing that as we create bigger and bigger integers, that the number of bytes required to store those integers gets bigger. And so what's happening here is that Python's doing an automatic transition from the native integers to these longer integers, but it's hiding that from you, you don't notice it. Typically we don't even inspect a number of bytes that we're using in Python, but this just allows us to see that we can make arbitrary large integers and they'll just use more memory, but Python will allow us to do that. If you're interested in the details of this you can look at the c code on Python.org or in the GitHub project and that's in the include/longintrepr.h and objects/longobject.c the details of how this is handled. For most people this isn't a big deal because again in Python, we just let Python do what it wants to do. and if we have an error we deal with the error, but typically, when we're dealing with integers or whatnot there aren't errors with this and the float division that we saw prior a lot of the inconsistencies or warts in Python are hidden away from end users.
|
|
|
transcript
|
2:47 |
In this video, we're going to talk about rounding. Let's read from what's new in Python 3 the round function, rounding strategy in return type have changed, exact halfway cases are now rounded to the nearest even result instead of away from 0, for example round 2.5 now returns 2 rather than 3. So if you're not familiar with this, this is called banker's rounding and we round towards the nearest even number so round 2.5, 2 is even 3 is not even, so it's going to round it to 2. Round 3.5, 3 is not even 4 is, so it's going to round it to 4. And why is this called banker's rounding is because if you're rounding and you're in a bank and you always round up you're going to bias towards the high end and you're biased towards more than what you actually have. If you round towards even, then you're alternating and presumably your bias is going to offset one another and in the end you'll come out more accurate. That's the theory behind rounding towards even. And here's just a slide that says what I just said to the nearest even number is called banker's rounding it tries to eliminate bias to rounding high. One thing to be aware of is this, note in the Python docs it says the behavior of round for floats can be surprising for example, round 2.6752 gives to 2.67 instead of the expected 2.68 this is not a bug, it's a result of the fact that most decimal fractions can't be represented exactly as a float. So what's going under the covers there is that 2.675 if you create a number that represents that it's actually going to be closer to 2.67 than 2.68 and so when you round it to two places, Python is going to note that and it's going to round it correctly, even though to us users, who at least in the US, I think it's a US-centric view that you round up and this is rounding to what's more close, even though 2.675 seems closer to some people to 2.68. Here's an example of that. I can say round 0.5 to 1 digit and round .15 to 1 digit of precision those both round to .1 and that's because under the covers the float number that represents them is actually closer to those numbers than the other option for rounding. So this is something that's new in Python 3. I personally ran into this when I was doing some work on porting some Excel spreadsheets and so interesting behavior here, but again, the bias is towards being more correct in the average term rather than always rounding up.
|
|
|
transcript
|
1:58 |
One talk about another feature in Python 3. This came out PEP 515 in Python 3.6 this is the ability to use underscores in numeric literals. When we say literals, sometimes people are confused or don't understand what that means. A literal is something that is built in into the language and that the computer understands. So the fact that there are integer literals you can type an integer number and Python will know under the covers to make an integer for you. There are also string literals, simply put a quote around characters and Python will create a stream for your under the covers. This is in contrast to a class where you might define your own class, and in order to create your class, you'll have to call the constructor. There won't be a literal way that's built in into the language to automatically create one of your classes by using some special syntax. The intent of underscores in numbers is to be able to group decimals by thousands or hex by words just to make them more readable. Here's some examples, in this case, I have the number 120 million minus 3 million and because I've put an underscores where typically in English you would see a comma, it's very easy for me to say that that's 120 million and 3 million. If I had left those underscores out of there, it would be a little bit more hard to tell that. And in the second example, we have a hex number dead_beef and we put in an underscore there to make it slightly more legible. One thing to be careful of is that Python doesn't enforce where you put these you can put them wherever you want in numbers as long as you don't have two underscores together. So in this case one, two, three, four, five, six, that's not helping legibility by the intent here is to be able to improve legibility. So if you're dealing with large numbers or whatnot consider using underscores, and that will make your numbers a little bit easier to read.
|
|
|
transcript
|
5:52 |
In this video we're going to look at num test, open it up in your editor and validate that you can run it. If you don't run it from your editor, run it from the command line, it should work as well. We see that there is one failure., it's a name error on line 8, so I think we're good to go on my machine. Let's look at this first test here, there are 102 floors in the Empire State Building, if you have walked up a seventh of them, how many whole floors have you walked up, store the result in floors. So the idea here is to say we want to make the distinction between true division and floor division, because we're walking up floors that should be a hint that we should use floor division here which gives us this division or whole numbers, So, 102 and we've walked up a seventh of those. So in Python 3 we use the double slash to get the floor division. Let's run it and see if it works, and I have a typo, I did 107 instead 102, I'm trying again. Okay, so that one looked like it worked. So that's the whole number of floors that we walked up. What percentage of floors have you climbed, store the result as a string with one decimal of precision in the variable per so what percentage have we climbed? I'm going to put it in an fstring here feature Python 3 so need to put curly braces around here. So we have climbed 7 out of 102. So 7 divided by 102 will give us the number of floors. Let's run this and see what it says. Okay. So this is what I got here per do the reverse of it does it equal to that, no, it says it's not. So what's happening here? I am getting a number that's not formatted correctly. So it wants me to format it as a percent. So in order to do that, I need to put a colon here and this says I want one decimal, so I put .1 and then I put percent there to format it as a percent. Okay, in that case, it looks like it worked. It should be 6.9% doing a little trickery here. so you don't just cheat and type in 6.9% Okay, I have (2^64)-1 satoshis, can I divide them wholly by 3. How many would each person get store the result in coins? So again, this is floor division, if we want to do whole division. So coins = satoshis//3 and if we multiply that by 3, if it's integer or a floor division, it should get us back to where we started from. So let's see here satoshis divided by 3. It looks like that is indeed the case you can divide them by 3. The US population is around 326 million, some number after that how many whole coins would eat US citizen get, store the result in US coins. So US coins is equal to and there's a hint, use underscore to make the population easier to read so I'm going to say 326_979_681 so there's our total population and we are going to divide our coins. So whole coins would each person get, we need to divide satoshis. Satoshis divided by that, that should give us the whole coins and let's run that. Okay, that looked like it worked. So again, when we do the double slash that's what we call floor division, that gives us a whole integer number. Okay, I have .5 pumpkin pies and 1.5 apple pies. I want to use Python to round the number of each pie store the result in pumpkin and apple, so pumpkin = round (.5) and apple = round (1.5) So you might think well, I do, I was taught when you round if it's .5 you go up to the next number, but apparently that's not always the case generally. Python 3 actually doesn't do that. It does what's called banker’s rounding, where it rounds to the nearest even number here. So this one should round to 2 and this one should round to 0 and that's why the sum of those is 2. Okay, hopefully that gave you a little feel for floor division in Python 3. And again, this is the behavior just a single slash in Python 2 and the ability to put underscores in number literals just to help you read them better. These are good as commas, placeholders are also good in her and binary literals as well. And also, we learned a little bit about round, how round does what's called banker’s rounding one of the benefits of that is that it eliminates the bias towards rounding high, they should even out if you have randomly distributed numbers, hence that's why bakers like to use banker’s rounding.
|
|
|
transcript
|
2:23 |
In this video we're going to talk about the new statistics module that came out in Python 3.4, this was introduced in PEP 450. From the PEP we read, even simple statistical calculations contain traps for the unwary, this problem plagues users of many programming languages, not just Python as coders reinvent the same numerically inaccurate code over and over again. Here's an example of some of the issues that someone might run into when trying to implement some numerical code. This is a simple function for calculating the variance. That's the change of values over a sequence of numbers how much they vary and here we are just calculating the sum of the squares minus the square of the sums and dividing by the numbers so down below here, after we've defined variance we pass in a list of numbers and we get the variance and we say it's 2.5. It seems to be fine. The problem is when we add a large number to that here we're adding 1e to the 13th and we're getting numbers that still should have the same variance because the difference between them is still between 1 and 5. And when you run that into our calculation here you get a large negative number and this illustrates some of the floating-point issues that you might run into with simple naive calculations. And so the impetus of this PEP is to help deal with some of these issues and provide a pure Python implementation of some common statistical functions that don't have these sorts of issues. Here we're showing an example of using the library. We simply import it, it's called statistics, and inside of there, there are various functions. One of them is variance. We look at the variance of our same data and we get 2.5, we add 1e to the 13th for each of those numbers and we still get 2.5. There are various functions included in here. I'm not going to go over them, but you can look at the function and if you're dealing with statistical problems, you can use this code if you need to. Other nice thing to do is just to use the code to look at it and glean some insights on how you might do numerical processing code in Python and deal with some of these issues. This module is written in pure Python and so you can simply load the module up and inspect it and see what tools and techniques they're using.
|
|
|
transcript
|
1:27 |
In this video we're going to look at stat test. So open that up in your editor. It looks like there's one function in here., let's run it. I'm just going to right click here and say run and I get a name error on line 13. Okay, let's read what the test says to do and see if we can make it so we don't get a name error, so we get a pass here. It says calculate the mean, variance and standard deviation of the data array, store the results in m, v and s. So this wants us to use the statistics library. So from statistics, import and we can say we're going to import the mean and the variance and if we want to put this on another line, we could say stdev. So again, we put parentheses here if we want to have our imports go across multiple lines. So here's data, we want to get the mean of it m is equal to the mean of the data, v is the variance, v equals variance of data. and s equals standard deviation of data, looks good. Let's run it— bingo, we're good. So this is a library that's built into Python and it's good for doing basic statistics. So rather than writing your own, take advantage of this because it's there.
|
|
|
|
20:12 |
|
|
transcript
|
8:52 |
Let's talk about the new behavior for super in Python 3. This comes from Pep 3135. If you're not familiar with super, super is a mechanism that we use in Python to get access to a parent class. So if you have some method in a subclass and you want to call the parent class, you can call super and then pass in the arguments to the parent method and get access to it that way. In Python 2 this was a little convoluted and a little confusing. So the syntax in Python 3 is cleaned up a little bit and we'll talk about that. Just as a review, a couple of things that you might want to do when you're doing object-oriented programming and you're subclassing things. So if you've got a subclass, you can defer to the parent class for a method. To defer to a parent class, you don't have to do anything. You don't even have to implement the method. You just leave it there and when you call the method on the subclass, it will call the parent class. You can override a method or overload and in order to do that, you just implement the method in the subclass. And another thing you can do is specialize or take advantage of the parent implementation, but also add your own implementation to it and super allows us to do that. Here's what not to do, if I've got a class called animal, I've got a subclass of animal called cat, both of these Implement a method called talk for animal talk just return sound and for cat talk does a little bit more, it's going to call the parent method talk and then it's going to add and purr onto the end of that. In the cat talk method, you'll note that we call the parent class. We call animal.talk to get sound, the string sound back. And then we're going to stick that into this placeholder and return sound and purr at the bottom here. Now, this is what you don't want to do. You don't want to explicitly call animal, rather we want to do something like this where instead of calling animal we call super and you invoke super and that will return the parent class and call talk on the correct parent class. So this is how we do want to do that, and Python is smart enough to know that when super is called within a method that it will find the correct class to call it on. Here's a little drawing that shows what's going on under the covers. On the left hand side here, we've got the code for animal and on the right hand side we've got a representation of what's going on under the covers. We've got some objects here, so here's one object and it has a variable called Animal that's pointing to that object, inside of that object, there's an attribute called talk that's pointing to another object. and this is a function down here. This is what's going on in the virtual machine under the covers. Again, in Python everything is an object and this is the representation that Python would do. Obviously there are going to be other attributes in here that we're not showing in this case. We also note that every object has an ID and you can inspect that ID by calling the ID function and objects will also have a type as well. So when we subclass animal we're going to make another object called cat and it's going to have a reference to the parent. It will look something like this. So here we have our prior animal variable and we're going to make a new variable called cat, cat is a subclass of animal and if it's a subclass it's going to have an attribute called __bases__ __bases__ is actually a tuple, in this case, we're just showing it that it refers back to the animal parent class here and we'll note that animal has a talk method and cat has its own talk method. Again, this is the representation of what's going on inside the Python virtual machine, but we can see that there's a relationship between cat and animal due to our bases attribute. We could simplify this a little bit and we could say that a cat is an animal and the relationship looks like this. This will be useful when we talk about method resolution in a diamond structure. There are a couple of useful things for using super one is if you're refactoring your classes and changing the names of them, you don't need to push that code for refactoring into the specialization calls. You can just leave super in there and it will do the right thing. It's also useful when you have multiple inheritance. There's this __mro__ attribute or mro method that you can call that will resolve the order in which classes are called and super does the right thing there. One thing to be aware of is that you need to be consistent and only use super, you can't like I said before explicitly hard-code the parent class in there. If you do that, then your other guys that are using super aren't going to work. So you want to make sure you only use super. Let's talk about method resolution order a little bit. Here's a class A and a class B, and then we have a class C and a class D. If we're going to draw these in our little diagram here it would have A and it would have B. And then we have C here, C is an A, it subclasses A and then we have D, and D derives from both C and B. So this would be our hierarchy over here. And we can inspect the method resolution order the mro by calling the mro method and we see that we get D first, then C, then A, then B, and then object. Here's a diagram showing that, this is the same diagram that I had before but we can see if we want to resolve a method on D first we will look on the D class, if that's not there, we'll look on C and because C is in A we're going to look on A, and finally, if none of those guys implement, it will look on B. That's the method resolution order, pretty straightforward when you don't have diamonds. The method resolution order falls what's known as the C3 linearization algorithm and that's depth first generally, we saw an example of that in the last example, but if you have a diamond pattern, we change it a little bit and we use the last occurrence of repeated parents. Let's see an example of how this works. So here I have a diamond pattern, I've got a class A that is a subclass of dict, So at the top here would have dict and then would have A, the subclass is that, we also have B, the subclass is dict and then we have C, that subclasses A and we have D, that subclasses C and B. So this is called a diamond pattern because you'll see that it has something at the top and something the bottom and it branches out to the sides here. Here's the method resolution order, here's how we do it. We say the linearization of D is equal to D plus the linearization of its parent which is C and B. So I'll just draw what we have before here. We had dict and we had A and B, and we had C and D. In order to linearize this, or find which classes we're going to look up our methods on, first we need to start with D and then we're going to look at the linearization of C and then the linearization of B. So D comes down and since D isn't repeated, we'll use D. The linearization of C is C plus the linearization of A and the linearization of B is B plus linearization of dict. Let's expand that a little bit more. So we're going to have D plus C, the linearization of A which is A plus the linearization of dict plus B plus the linearization of dict and since we've expanded all these out, we have all the classes here, we'll note that there's a repeat, we have this dict here which would just resolve to dict so both this guy and this guy would resolve to dict and because this is a repeat, we're going to get rid of the first one here. And so the final linearization is first we'll go to D, then we'll go to C, then we'll go to A, then we'll go to B, and finally we'll go to dict. That's how the algorithm works here. And if you inspect the mro method you'll see that that is indeed the case, we get D, C, A, B, dict and then object. Object here is because every object is a subclass of object and the result looks something like this which is hard-coded graph of what we just drew out. In here we learned a little bit about super, the main things to remember about super is if you start subclassing things, you want to always use super don't explicitly call parent classes and super will do the right thing if you're calling super, so super is a great tool to have and make use of it.
|
|
|
transcript
|
5:36 |
In this video we're going to look at the super test assignment. Here's the assignment. It has a function called test Mario and let's just run it and make sure it works, right click and say run super test and I get one fail, that's because there's one test here. I get an import error line 26. Okay, that looks okay. I'm going to change my size here a little bit so we can get a little bit more code on the screen. This test has a table that lists people from Mario Brothers, the game. So across the top are Mario Brothers, down the left hand side are various skills and here are their levels or scores for those skills. So it says create a base class called character that has speed, jump and power methods. They should each return 2. Create subclasses for Mario and Luigi that use super to call the parent class method and increment the value by the appropriate amount before returning it and put this function in a module called py3code.py It says function here, it should say put this code in a module called py3code.py There's a py3.code guy right here and it says put your super stuff right there. I'm going to right click on this and say move right and I'm going to adjust my size here bump my fonts down a little bit they are 20, I'll just put them down to 16 for this assignment. Okay, so we need to make a class called character so class character. and it needs to have 3 methods, it needs to have a speed, jump and power method. So to make a method here I say def and I'm just going to call it speed and PyCharm automatically puts itself in there for me and I'll just say return 2 and I'll just copy these, and I'll indent them. And I'll change the name, so this is speed, this should be jump and this one should be power. Okay, so there's our base character and he has certain skills. Let's make a Mario subclass and say class Mario and I put the parent class in the parentheses here. So the parent class is character. And I need to make a speed method and he's going to have self as the first parameter and what the assignment wants me to do is it wants me to rather than just saying return Mario has a speed of 4, it says it wants me to say value or some intermediate variable is super.speed. And this should return 2, and then instead of returning 2, we're going to return value plus 2, that should get us 4. And we'll do a similar thing for the other guys. So this should be instead of speed here, we'll say this is jump, we'll change this to jump. And this one should be power, we'll change this to power. So this shows how we call the parent class method here. We just say super and that gives us access to the parent class and then we call the method on that. Let's run this and see if it works. So I need to run the test code over here, not that py3code. So I'm going to run super test. And I get an import error cannot import Luigi. So apparently, I need to make a Luigi as well. Let's do a Luigi as well. Luigi, and his speed is going to be 1 greater, his jump is going to be 3 greater, and his power is going to be 1 greater. Okay, let's run it again and see if it works now. Okay, it looks like it worked. So let's look at the test here really quickly. It's just creating an instance of Mario and calling the speed method on Mario. It's asserting that character is in the __bases__ attribute of the Mario class. So when you create a class there's a __bases__ attribute the list the base classes. It's asserting that the speed is the correct value and then it's making a little function here called speed that looks like a method and it's monkey patching that m for speed to make the base be return 5 instead of the base speed of 2 and then it's calling Mario again to see that Mario speed now returns 7, 2 more than that 5 and Luigi speed returns 1 more than that 5. Okay, hopefully you understand a little bit more about the super method or super function built-in in Python when you're in a method and you want to call a parent method rather than explicitly saying, in this case rather than saying character.speed, we say super, that allows us to get access to character. but if we change this or refactor it later where character is no longer the base class super will do the right thing.
|
|
|
transcript
|
2:00 |
Pep 465 introduced what's called the matrix multiplication operator this came out in Python 3.5, from the PEP we read: in numerical code there are two important operations, which compete for use of Python's asterisk operator element wise multiplication and matrix multiplication. Here's an example of doing matrix multiplication. If you're familiar with linear algebra, this is a common operation. Here I'm importing the numpy library and I'm creating 2 arrays and then I'm looping over the pairs of elements and multiplying them together and summing the result. This is doing what's called matrix multiplication. It gives me in this case 285 as the result. This PEP introduced an operation to do that and we can use the @ sign around the two arrays and that also gives us the same result 285. Note that this is different than multiplication, if we simply multiply the array in numpy this is going to do what is called element wise multiplication and in that case, it will multiply every element in the array by 10, it won't do multiplication of the whole element by 10 per se. If you want to have a class that implements matrix multiplication you just need to implement the __matmul__ operator. Again, in Python, everything is an object and there are various protocols and if we follow certain protocols, we can take advantage of certain behavior. In this case, if we want to be able to use the @ sign we can Implement __matmul__. This case is pretty dumb example it simply ignores the other that's passed in there and returns 42, but you could do something more smart if you want to. If you're not familiar with dunder methods what's happening is self here would be a and b would come in as other and so inside of that method there, you could do whatever you wanted to with them and you could Implement that operation.
|
|
|
transcript
|
2:02 |
In this video, we're going to look at the mul test assignment and there's a function test mul that says implement a class vector that accepts a list of numbers implement the matrix multiplication operator to return the dot product multiplying each corresponding value, then sum the results. Okay, let's do that. Let's make a class, it's going to be called vector and let's implement a constructor here and it's going to take data, vector has input and we'll just attach that as a member and let's implement matmul guy. Okay, it's going to take another vector presumably so what we can do is we can loop over the pairs of data together how we do that is we can use the zip function. So the zip function takes two sequences and it will loop over both of them until one exhausts. So we're going to have self.data and other.data we're going to need something probably result is equal to 0. And we're going to zip those together so I can say this and that in zip res plus equals this, times that, return res. Let's see if this works. Okay, that looks like it did work. We can do a little bit of refactoring if we want to here, we can put this into a list comprehension and so we could do something like this we could say well we're going to accumulate this, this is a sum operation, so we're going to say sum of the iterable what we're going to sum is what we're accumulating which is this and we'll take this for loop and we'll plop it into here we'll take off the colon at the end and we should be able to say res is equal to that. Let's run this and see if it works. Okay, it looks like we're good.
|
|
|
transcript
|
1:42 |
In this video, I want to introduce an optimization that was brought to pass in PEP 412 Python 3.3. This is called key sharing dictionaries and it's a nice little optimization that will save memory when you're using Python 3. From the PEP we read: key sharing allows dictionaries, which are used as attribute dictionaries or the __dict__ attribute of an object to share keys with other attribute dictionaries of instances of the same class. So let's just understand what that means. Basically whenever you create a class in Python underneath the class there will be a __dict__ attribute which will store the attribute names and map them to the values there. What happens is if you're creating a bunch instances of classes that have a bunch of attributes, these attributes are typically strings and those strings will be repeated and so Python the interpreter would go out and create a new string for each attribute and those strings could add up if you're creating thousands or many more instances of a class. So this is a nice little optimization, what it does is it caches essentially the keys in a dictionary. We also read from the PEP that as a result of this optimization these dictionaries are typically half the size of the current dictionary implementation. Benchmarking shows that memory use is reduced by 10 to 20 percent for object-oriented programs with no significant change in memory use for other programs. So you don't have to do anything about this you get to take advantage of this automatically. Also note that this optimization does not apply to dictionaries only to the __dict__ dictionary in an instance.
|
|
|
|
9:03 |
|
|
transcript
|
4:22 |
In this video we are going to discuss keyword only arguments. These came out in Python 3 PEP 3102. The motivation from this can be gleaned from reading the pep it says one can easily envision a function which takes a variable number of arguments but also takes one or more options in the form of keyword arguments. Currently, the only way to do this is to provide both a varagrs argument and a keywords argument **kwargs and then manually extract the desired keywords from the dictionary. In Python 2 you can't have a *args argument and then put named parameters after you can only put the **kwargs after it. So this PEP introduces 2 syntactical changes that you can have named arguments after *vargs in Python and that you can also use a bare star * and have named arguments after them. Let's look at some examples. Here we have *args here and we also have a keyword argument name is equal to Joe following that, in Python 2 this would be a syntax error, you cannot do this. But Python 3 supports it. We're also using the fstring here and we're just printing out Hey name whatever is passed in for name. Let's look at some invocations here if we call foo by itself name defaults to Joe so there's no change there to the name value. Note that if I call foo with Matt, Matt comes in as a positional argument because it's not a keyword argument. So I also get Hey Joe. Finally here, if I say name is equal to Matt, name gets overridden and the result is Hey Matt. Here's an example using the new star just by itself syntax. Again, this is Python 3 syntax only, it won't work in Python 2. I've got a star there, what that is indicating is that anything following this is a keyword only argument and must have a keyword to update it and because there are no arguments proceeding it, positional arguments or otherwise, if you want to change the value of name, you need to provide keyword arguments. Note that I can also call foo2 by itself and name will default to Joe, because this keyword argument has a default value. Let's look at some invocations here. Here I'm calling it with no parameters and name defaults to Joe. Here I'm calling it with Matt as a parameter, but this is a positional parameter and because I haven't allowed in my function definition to have positional parameters, I'm going to get an error, I am going to get a type error that says foo2 takes 0 positional arguments, but I gave it one, and finally here, I'm going to call it with a keyword argument name is equal to Matt and name overrides the value that is defaulted to Joe and I get hey Matt as an output. Here, I've got another example, I've got a bare star by itself, and then I also have a keyword argument that doesn't have a default value. In essence, what this is telling Python is that I don't have any positional arguments that I will support but you need to require a keyword name when you invoke this, if you don't, you're going to get an error and we'll see here in the calls below. Here I call foo3 with no arguments and I get a type error. It says I'm missing a keyword only argument name so I am missing one keyword only argument. Here I'm calling it with a positional argument and I get an error that says I take 0 positional arguments, but you gave me one. And finally, I'm calling it with a keyword argument and name gets overridden to Matt. So again, in essence, this is requiring any invocation of foo3 to type out name. The motivation for this change in Python 3 is to improve the readability. If you have a function that says send 404, 200 and 100, these are all magic numbers and it's not clear what these mean. If these are positional named arguments, we can provide the names of them if we want to but it's not required. What this is doing is it's forcing us to provide the name to them and one could make an argument here at this second line of code here send code is equal to 404, amount is equal to 200, timeout is equal to 100 is clear and explicit about what the intent of the code is. So if you have code that looks like this where you have a bunch of numbers or configuration parameters and you're not clear what they're doing or when you come back to them it's not clear to you what's going on there, consider using keyword only arguments to make your code more readable.
|
|
|
transcript
|
4:41 |
In this video, we're going to look at keyword test. Let's open that up, open it in your editor. Let's read the first assignment, it says one formula for force is mass times acceleration create a function force that takes to keyword only arguments mass and acceleration and returns the product of the arguments, put this function in the module called py3code. Let's open up py3code here, and it says at the bottom put keyword tests here I can split this if I want to and view both of these. I want to make a function called force that takes mass and acceleration here so def force and it takes mass and acceleration and returns mass times acceleration. Okay, I will save this now and run this guy and see if it works. Okay, and so it looks like I got an error here on this line here, when I call force 10, 9.8 it did not raise a type error and it wants to raise a type error. The reason why that is because I didn't actually make a keyword only function I just made a normal function that takes mass and acceleration. So this will work and it won't raise a type error. The intention of the keyword only arguments is that it makes clear what our numbers are in this case it's not clear necessarily which one is mass and which one is acceleration. So in order to change that what we need to do is we need to put a star right in front of that. And now when we call this force function, we need to specify the mass and acceleration. Let's run it and make sure that it works. Okay, and now I'm on the other problem here so that part appeared to work. Let's go on to the next problem, the quadratic formula solves an equation of the form ax^2+ bx + c = 0 write a function quad that returns a tuple with the solutions make a, b and c keyword only arguments, put this function in a module called py3code.py Okay, so if you remember the quadratic formula, it looks something like this, negative b plus or minus the square root of b squared minus 4ac and then all of this over 2a so there's my attempt at writing this out in some little language here. Let's see if we can implement this as a Python function here and with keyword only arguments so quad, and I'm going to put a star at the front because I want everyone to specify a, b and c when they call this. And because this can return 2 results, it can return the positive of the square root and the negative of the square root, we're going to make 2 results and return that as a tuple of both of those. So what I'm going to do is I'm just going to say, the square root part I'm going to say sqrt is equal to let's say b squared minus 4 times a, times c to the .5 and then x1 is going to be equal to in parenthesis negative b plus the square root portion and this divided by 2 times a and the other solution will be this negative b minus the square root of that and let's return x1 and x2. Let's run our test over here and make sure that it works. Okay, and we got that it did indeed work. So we can see the calling here rather than saying quad 1, 3, 1 here. we have to explicitly say a is equal to 1, b is equal to 3 and c is equal to 1. Note that we can change the order of those if we want to as well. This just allows us to again be more explicit and not have magic numbers floating around but to have some context around them.
|
|
|
|
50:27 |
|
|
transcript
|
5:05 |
In this video we're going to look at a new feature in Python 3 variable and function annotations. There are a bunch of peps that talk about this, briefly discuss them. The first PEP 3107 was a PEP that showed a suggested usage of function annotations but was basically generic, it hinted at some of the purposes of what annotation would be used for in the future but was just thrown out there to test the waters and see what other people are thinking about that. A couple of other peps, 482 and 483 go over the literature, type, theory and what's out there and then we come to 484 which had the first standard for Python. 526 updated that a little bit and gave us variable annotations which didn't exist before that and then there's a PEP in the pipeline 544 that talks about structural subtyping. In typing world there's a couple different types of type checking one is called nominal type checking, another one is called structural type checking and nominal basically says you've got this class and I'm going to confirm that it's a class versus structural subtyping, which one can think of as duck typing for subtyping so I can say rather than this is a list of things that are getting passed in, this is an iterable, that sort of thing. Let's look at some of the motivation, PEP 484 states introduces a provisional module to provide syntax for function annotations and tools along with some conventions for situations where annotations are not available. We'll look at that a little bit more. There's also 526, PEP 526 states this PEP aims at adding syntax to Python for annotating the types of variables including class variables and instance variables instead of expressing them through comments. So PEP 484 had some ways to express types through comments and PEP 526 provides a syntax for that. So if you've been programming in Python, you'll know that Python is a dynamically typed language. You don't have to define what type your variables are and whatnot and these annotation peps somewhat change that, we'll look at how they do it. They allow us to document what the types are in our code. And one of the things to know about this is that these types that we document in our code have no effect at runtime there are annotations, there are hints, but Python the CPython interpreter that you download from Python.org is not going to run faster or slower because of them. It's not going to interpret them at runtime and slow things down, it's also not going to unbox things at run time and speed things up. So it is neither faster nor slower. There are two ways of commonly checking types one is called static type checking and another is dynamic type checking and this deals with when we check the types, do we check them at compile time or runtime typically, so a language like Java, when you compile your Java code it's going to check the types and make sure that they're compliant and typically the Python language will check types at runtime, so when you're running your code, there is no real compile step in Python typically, but some developers in the Python world came from Java or other typed languages and they wanted the static typing benefits. So what are some of the benefits of static typing? One of them is when you get a large code base unless it's extremely well documented and written in a clear manner, it can be kind of hard to understand what the types are that are coming in and out of function calls or constructors or method calls and so annotation can aid comprehension for these sorts of code bases. Another place where they're useful is they can catch bugs and they can catch them early on and if you read the literature about when you catch bugs, the earlier you catch bugs the cheaper it's going to be so you really want to push catching bugs sooner if you can, ideally you don't want to write bugs or have them but if you do have them and you can catch them earlier that's a lot cheaper if you can have some sort of process that finds them right after you write your code that's going to be cheaper than shipping your code and having some end-user find your bug and having to report that back, that sort of thing. Another benefit is auto-completion. Some of these newer editors such as PyCharm can take advantage of the annotations and provide better auto-completion than you get otherwise and also refactoring, they can allow you to refactor because they know about sort of types you're expecting. So PEP 307 says that the aim of the annotation is to provide a single standard way of specifying a functions parameters and return values the use for annotation goes beyond just the inputs for functions and the outputs of functions. You can mark the types for functions and classes and you can also mark variables. Again, note that these annotations that Python supports in Python 3 don't actually do anything, when you run your Python code the annotations are sitting there but Python isn't going to check or do anything with them. In order to do that, we need a third-party tool. And so one of those, mypy is a tool that we'll look at how to use that.
|
|
|
transcript
|
2:01 |
Let's just look at the basic syntax that was introduced in Pep 3107. Here we have a function foo and it's taking two parameters a and b and following that we see a colon and then we see this expression here. So this here is the type annotation here, note that b is a default variable, it has value 5 for the default value and in here we can put any expression, any Python expression in here and we'll see some Python expressions. Note that there's also support for *args and **arguments. So you can just put a colon following them and put an expression in there and there's also a way to specify the return value, in order to specify the return value, this introduce this little arrow operator dash greater than -> and then we put the expression following that and so if you have a function called sum and you want to indicate what it's returning you put that in this expression at the end, note that it's coming before the colon there. One thing to note is that annotations are not supported in lambda functions, so if you're a super fan of lambda functions and use those all over the place, you're not going to get the benefits of using annotations there because you can't annotate them. 526 introduced the ability to annotate variables. And so this is how we annotate variables, here we've got a name variable and we just put a colon and this expression in this case we're saying that this is str, a string and note that this is the string class and that's a valid expression. One thing to note about this PEP is it introduced this construct down here, which is a bare annotation on a variable with no assignment to it. So here I'm saying there is a variable called name2 and it will be a type string, but I'm not giving it a value. Note that if we simply said name2 by itself without the annotation we would get a name error in Python. But in this case, it's going to create an annotation for that variable, note that this variable also does not exist at this point in time. If we say name2 after it, we will get a name error.
|
|
|
transcript
|
0:47 |
So here's a slightly better example, we've got a function called sum2 and it's going to take x and y and note here's our colon here and here's our annotation. In this case, we have an expression and this is just a string, it's the string num and then in this case for y we have another expression there and it's an int, and then at the end here we're saying that it returns a float. Now this might seem a little weird, we're specifying a string and an int and a float as the types here, and again, note that Python isn't going to do anything when you run this code, but what it does do is it adds a __annotations__ attribute to the function and you can look at that attribute and it's just a dictionary mapping the parameters and then it has a special parameter called return there that gives the return value.
|
|
|
transcript
|
0:56 |
So we saw the new style, 526 style of annotating variables. Pep 484 had another style for annotating variables allowed us to do in a comment. So if you put the comment with type colon, and then the expression following that, in this case str, we could use this older style PEP 484. Python 3.6 supports this newer style, and so we can just put the colon and the annotation right after that. One thing to note when we create these variable annotations is that there is a global variable called __annotations__ that will be created and it will be updated with the name and the types in there. Note that, again, this middle variable here does not have a value, it's just an annotation for a variable. And so if I try and reference that here, I will get a name error that middle is not defined, but note that middle is in my annotation. So when I later assign middle, it should correspond with that type.
|
|
|
transcript
|
4:18 |
Python 3.5 introduced a typing library. This is in the standard library and it adds support for various types. We can get support for any, union, tuple, callable, type variable and generic. There's also other types that allows us to specify dictionary and list types and we'll see some examples of those. Another thing to be aware of is if you've got a class that you're saying this variable is going to be a type this class and the class is in the same file as you're referencing it, but the class has not been defined yet, it's going to be defind later, you can just put the class name in a quoted string for a forward declaration of that class. Here's some examples of annotations note that I am using the typing library here and I'm importing capital Dict here, and here in my annotation, I've got a variable called ages and it's mapping a name to an age. So here's my traditional dictionary over on this side here Fred has the age of 10, and here's my annotation here. I'm saying dict and then I put square braces here and then I map the key and the value here. So string here is the key and it is the value. What this allows me to do is specify what the type, the specific type of the key is and what the specific type of the value is. Again, I'm going to harp on this but when you run your code Python is going to ignore this, you need to use a tool like mypy to actually get some information out of this, we'll show an example of that later. If you've got a list of items here in square brackets in our annotation list the list type that we import from typing, note that it's capital List, we see that we are putting strings into our list. So this allows us to type our list and use a specific type in there. Same thing for tuples we can specify a tuple, we're going to import capital tuple from the typing. And in this case we're saying a person has a string, an int and a string. And so those correspond to the individual items in the tuple. So Fred is a string, 10 is an integer, and USA is a string. We can also specify types for callables, here, I have a little function called repeat that takes a function as input, again, Python has first class functions and I can invoke my function down here, I can pass my function around and I can return functions and pass in functions to other functions. And we can say that this function that's getting passed into repeat is going to be a callable. We're going to import callable from typing and here in the square brackets inside of the square brackets, these are the parameters that are passed into our callable and then this final guy here at the end is the return value here. So this callable that's passed in, if we're passing in add it takes two integers and it returns an integer as output. One thing to notice, PEP 526 provided some syntax for typing variables, but it didn't provide syntax for all the variables that can get created in Python, when you use a with statement and use an as at the end it creates a variable called foo and when you use a for loop and you put variables in there, it's going to create x and y. Pep 526 does not have a way to inline those type annotations there but PEP 484 did by providing these comments here. So if I've got a with statement I can put a little type comment at the end that says foo is going to be type int. Similarly, for a for loop, if I want to put a type on those I can put a type there that says x is going to be a float and y is going to be a float as well. This is straight out of the PEP 484. The typing module also has support for typing generators. If I want to type a generator, I can just say this echo_round returns a generator and this first guy here, this is going to be whatever it yields. So we can see that we're yielding round res, which is an integer. The second value that's getting past here, float is the send_type so we can see that when we get input into it, it is going to be a float or it should be a float and we're going to round it, so what comes in should be a float and then this final one here is the return type. So the string that we're returning is going to be a string. So that's how you use the generator type annotation.
|
|
|
transcript
|
3:20 |
Few best practices for typing, if you have a function that you're passing around and you want to add typing information to it using first class functions so you're passing a function into another function, again use that typing callable to annotate that if you want to disregard the type use the typing any why would you want to disregard the type and use this any guy? Well, tools like mypy allows for what's called gradual typing, and it's going to ignore any code that doesn't have types on it. But when you start adding types, it's going to do type checking on those. This is a feature that's built in into mypy, it's intentional and the idea there is that if you want to start adding types to your code you can add them bit by bit and as you add them, the code that you add the types to will start getting type checked and it will ignore code that doesn't have types. Another hint when you start adding these types is instead of returning some complicated, nested structure list of strings isn't super complicated, but one thing to consider is instead of doing that, make a variable called append result that is equal to this list of strings and just use the append result instead and then any place where you have this list of string guy, you can use this append results variable instead, it just makes your code a little bit easier to read especially when you get some of these more nested structures, we'll show an example of that later. If you're using a named tuple, note that the traditional syntax for a named tuple here does not allow for type annotations. So here I've got a named tuple person with a name, age and country, I can't annotate that by using that syntax, but I can import from the typing Library the named tuple class and if I subclass from that, here I'm making a person class and I'm subtyping named tuple, I can put these class variables here with type annotations and add the annotation there. So if you use named tuples you probably want to migrate to this newer way of defining them that allows you to put types on them. Another thing to be aware of is that none can be used all over the place in Python and you don't want to dereference a none per se and try and pull an attribute off of a none object and so a lot of places in Python you'll need to have checks for if something is actually none or not before you do something to it. And sometimes you might return something and you might not, and in that case you're going to want to use this optional from the typing module so we can import optional here and we can say this function find returns optionally a person object and basically it's going to loop over a list and if it finds some person that matches it will return it, otherwise, it will return a none. So if you are optionally returning something, use that optional type. Here's another hint when you're using the mypy tool, mypy tool has a nice little function called reveal_type. We don't even need to import it, we just put reveal_type in our code and when we run our mypy tool it will print out what it infers the type to be. Here I have a function called add that takes two parameters, x and y and it says the x is an integer and y is a float, if I sum those up maybe I don't know what type that returns, I don't know what Python returns there. If I want to find out, I can say reveal types there with the new variable and when I run mypy on this, mypy is going to say I think that this type is this and that allows me to add typing to the res variable if I wanted to.
|
|
|
transcript
|
6:27 |
So let's look at an example of using the mypy tool. I'm going to add typing to a little project I have, it's a markov chain, so you can check out this GitHub repository if you want to look at it, but here's how I do it, I'm in a virtual environment and I say pip install mypy, that's going to go out and fetch the mypy tool and I'm going to clone this GitHub repository that I have, and I'll change into that directory, and in there, there's a file called markov.py, I'm just going to run mypy, which gets installed as a binary when I install the mypy tool and I run that on markov.py and it will return no output. And again, why this returns no output is because mypy supports gradual typing it ignores code that doesn't have annotations and this code didn't have any annotations, so it's not going to have any output there. If I want to get a little bit more ambitious, I can put -- strict after mypy that turns on a bunch of features and I'm going to get a bunch of warnings or errors from the results here, it's going to say this function is missing a type annotation we're calling some other functions in a type context and they're not typed. And so these are the sorts of things that mypy can find for us. Again, note that it also supports this gradual typing and so if we leave off the strict, it's just going to ignore anything that we haven't annotated. So here are a few hints for adding annotations, 2 ways that you can do it, you can start from the outside code that gets called and calls other code and start calling annotating this outer code, alternatively you can start wrapping inside code that gets called and annotating that first. Either one of those will work. What is important for me is if I've got a public interface, I want to make sure that there's typing around it and that it's clear what comes in and out. So I'm going to start annotating something that I think is important and I'm going to run the mypy on some file. It might complain because it's going to start type checking where I've annotated and then I might need to go in and fix things or add more annotations. And if I want to get ambitious again, I can use this -- strict and that will turn on a bunch of flags and add a bunch more checks for me. But basically, after I've gone through this process on my markov file here, I'll have a dif that looks something like this. So I'm going to end up importing from the typing module the dict and list types and I'm going to make a table result variable here or type and it's going to be this structure here. It's going to be a dictionary that maps a string to another dictionary and inside that dictionary, we map a string to account. So this code if you're not familiar with it, it creates a markov chain a markov chain takes input and gives you some output based on what your input is, and in this case, markov chain is typically used in text prediction or if you're typing, predicting what characters to come next and so you can feed a paragraph or a bunch of text into this and it will be able to tell you if I have a, what comes after a, after a comes maybe p because we're spelling apple or something like that. That's the tooling that the markov chain allows you to do. And so here in my constructor here, I've got data that's coming in and I've got size that's an optional value here. And when I annotate that, I'm going to say data is going to be a string, size is going to be an int and my constructor returns none. This is the way that you annotate a constructor. Also note that I've got a variable here, an instance variable called self.tables, and I am annotating that and that is going to be a list of table results. So maybe you can see the reason why I made this table result variable here or type is because it makes it a little bit more clear I would have this nested list of dictionaries of dictionaries and I can just clearly read that this is a list of table results. Here's another method that got type annotated. So predict takes a string of input. So we've annotated that and returns the string that's going to come after that input if we feed an a we should get p out, something like that and you'll note that I annotated just the method parameters and the method what it returns, but there is one more annotation in here. I didn't annotate a bunch of the variables inside of here because mypy didn't complain about those, but it did complain about this guy down here and the reason is because I've got a variable called result that is looping over this options.items collection, and then I'm also reusing that same variable result down later to randomly choose out of my possible guys what comes next because I'm looping over something that might be empty, in this case result could be none and that confuses mypy but what's really happening here is this is actually indicated that my reuse of this variable, this was a bug on my part, I shouldn't have reused this variable name and so mypy said, well, you've either got to type it or change the name. So in this case, I add the typing and mypy doesn't complain about it anymore. But the correct thing to do here would be to actually change that variable name. You could call this, this is the input and count rather than the resulting count there. Here's another example of the annotation that I added this get table function accepts a line, which is a string and the number of characters that we're going to process as input. So we could process a single character after a comes p, but we could also say I want to process a and p and after a and p comes another p for apple or whatnot, if you add more memory to this markov chain, it makes better predictions and can make sentences or paragraphs or that sort of thing. And we're going to also say that this get table returns a table result, recall that I defined this table result couple slides back, which is a nested dictionary here. But again, it's a lot more readable to have this table result defined and reuse that table result rather than throwing this nested code around all over the place table result is very clear and should make sense. So after doing that, I think my code is more clear, it should be more clear and people who are coming to it should have a very good understanding of what is the input and what is the output. I also found a possible bug by reusing the result variable so I could annotate that, in retrospect I should have just renamed the variable but mypy can help you find these sorts of issues.
|
|
|
transcript
|
8:24 |
In this video we're going to look at annotate_test.py. The first thing it says to do is to make a copy of py3code.py to py3code.pyORIG So I've got those files in my documents directory. I'm going to say copy documents talkpy labs in py3code and let's just copy that to py3code.pyORIG You can do this through an explorer window if you're on Windows or from the terminal if you want to, either way. Okay, so there we go. Next thing it says is to use virtual environment and pip to install mypy. So I'm in my directory where my virtual environment is, I've got it activated so I can say pip install mypy here and it will go out and fetch it and install it. Okay, so now I should have mypy in my path and I can run it. Excellent, okay. Next thing it says is to run mypy-- strict on py3code, let's try that. So I'm going to go into my directory where I have the labs here. I'm going to say mypy--strict on py3code, mypy--strict on py3code.py. Okay, and I get a bunch of things, on line 4 we're missing an annotation, line 7 we're missing an annotation, on line 10 missing an annotation, line 15 missing an annotation. So let's go through and see if we can fix some of these things here. Let's open up py3code, line 4 it says we're missing an annotation, that's this guy right here. So it looks like this is returning an integer, so let's add an annotation here to just say return int, and let's run it and see if that fixed it. Okay, and so now I no longer have that there. I'm just going to copy and paste this so I can quickly throw these on here. All of these methods here return an integer. Okay, let me run mypy again and see what it's complaining about now. We're now in line 44, function is missing an annotation on 44. So here's 44, this is our force guy and we've got mass and acceleration, so I'm just going to say that mass is a float and acceleration is a float and those return an int and quad here. I'm going to say a is a float and b is a float and c is a float and this also returns a float here, and we'll change this guy, it should return a float instead of an int. Okay, we got on line 52 incompatible return type got tuple of float float and not an expected float. Interesting, okay on 52 it says that we're returning this guy as a float and this guy's a float. So, let's see, we can use PyCharm to fix that for us, it has the smarts to fixes this for us. Another thing we might want to do is you might want to just say this is a quad result here and put that up here and say quad result here that way if I'm getting these quad results in other places I can reuse that if I want to. Okay, and it says that tuple is not defined, let's define tuple. We can probably use PyCharm to do that, so import this name, and it's typing.tuple. So if you're not familiar with that, there's the typing library and you can import that tuple guy. And the nice thing about using the tuple here as we use these square brackets and we can say that this is a tuple of floats rather than just saying that it is of the tuple class we're specifying what is inside the tuple, kind of cool. Let's run it again and make sure it works. Okay, we're good to go there. Let's go back to our annotate test. Okay, run py3code with this super test and keyword test. Okay, so let's try and do this here. We're going to run py3code with super test and keyword test with ignore missing imports, I'll just copy this. Okay my copy didn't work, so ignore my copy mypy --strict py3code and it says ignore missing imports, so we'll ignore. Missing Imports tells it that if you've got import data that you don't have type information for it, just ignore that don't complain about it. So I wanted this to do super test and keyword only test I believe. Okay, and so if we do this, now we're getting function is missing a type annotation there, keyword test and super tests are missing type annotations. In this case, it's not missing anything extra in py3code. So there aren't any other issues. We could go through super test and we could add annotations to super test if we wanted to here. So let's look at super test, on line 3, it says function 3, 31 and 33. So here's line 3, we could just say that this returns none here, 31 def speed this returns an int and 33, cannot assign to a method. Okay, in that case, it's just complaining, it's just giving us a warning it's saying you know what, you're doing some monkey patching here, you probably shouldn't do that. Okay, 31 is still complaining, it's saying I take a self so this would actually be a character, let's see if that resolves that issue. Okay, and keyword has a couple of things and it's actually complaining about the test here. So in the keyword test saying too many positional arguments for force and quad, that's kind of cool, note that this is our actual test that's calling this. If we were using mypy in the continuous integration situation here note that we're intentionally calling this in a bad way, we would want to probably turn off mypy for this keyword test because this is a false positive here. Okay, so hopefully you got a little bit of a feel for adding type annotations here. It's not too difficult, and we saw that we can do some cool things I had erroneously put float here as the return type and mypy told me that that's not what it returned, it actually returns a tuple. So this is a great feature that's coming out and I hope you can take advantage of it to make your code more robust or find bugs earlier in your code.
|
|
|
transcript
|
0:50 |
In this video, we're going to talk about 3rd-party annotation tooling. These are tools that are useful when using annotations that Python 3 supports. We're going to look at a couple tools here one is MonkeyType, this is created by the people at Instagram and this is a tool that allows you to run your code and as it's running, it will trace it and keep track of the types and then it will generate some type information for you. Similar project is called PyAnnotate, this is by Dropbox and this is very similar, it does basically the same thing. Basically the difference between these two is that MonkeyType is focused on Python 3, whereas PyAnnotate has Python 2 support because Dropbox has a lot of Python 2 code and they want to add types to it. There's another tool called PyType, which is very similar to mypy, it does type checking and we'll look at that as well. We'll also look at mypy a little bit.
|
|
|
transcript
|
1:38 |
In order to use the monkeytype tool, rather than just analyzing your code, you actually need to run it. So you probably need a driver file or some test scripts or something, while it's running, it will drop some information into a sqlite file and then with that sqlite file, you can tell it to annotate code with type information. We're going to look at the same markov file that we were looking at previously and here for monkeytype, I'm going to make a code runner, I'm just going to call it run test.py, it's going to import doc test and it's going to import the markov module that we have and it's just going to run the doc tests on the module and hopefully using that information, It will be able to give us some type information. Using monkeytype is pretty straightforward. I say pip install monkeytype to get it installed and then I rather than running Python on my code I say monkeytype run with the runner file, and in this case again, it's going to run through that doc test and trace the code and remember those types and put them in a sqlite file. And then after I've done that, I can run monkeytype stub markov that will create the stub information. And so this is what it outputs, it just prints this out to standard out and you can see that it has added some types to my functions and to my methods. One thing to note is that it added Python 3 style annotation support so this looks pretty good, if you look at the types that it added for example in the git table function, you'll note that it added this nested dictionary of strings mapping the dictionaries, of strings mapping the integers, so that's pretty good. And it looks like all the type information there is pretty correct and should be good to use.
|
|
|
transcript
|
1:45 |
Let's look at the pyannotate tool, again, this is very similar to monkeytype. We run our code and again we might need a driver file, this is not static. In this case, it's going to click information in a Json file and then we tell it to annotate our code with our type information, very easy install, I just say pip install pyannotate and then I'm going to run a driver file. And then after I've run that driver file, I'm going to say pyannotate - w that means write the markov.py file or update it with the type information. Here's my driver file, I'm going to import doc test and markov and I'm also going to import the collect types from the pyannotate runtime module and you can see all this is doing is it's saying if I'm running this then I'm going to init my types collection and then it's going to have a context manager there that's going to run my code inside of the context manager that collects the information and then it's going to dump that information into a Json file. Here's a diff of the output that comes out of that. We see that it has imported from typing optional and dict so it's got some imports there and we see that it's added some type information here as a comment, so this is the Python 2 style of annotation there and those types look fine, it's also done some typing here. So it says that data in is an optional string that looks okay and note that get table also looks like it's returning this nested data structure of dictionaries, mapping strings to subdictionaries, mapping strings to counts of strings. So all of these types look good. They're just in the Python 2 style rather than Python 3, note that we can use those in Python 3 as well. Again, pyannotate supports Python 2.7 style annotations as of when this video was recorded.
|
|
|
transcript
|
3:49 |
Let's look at mypy a little bit more. I'm going to contrast this with a tool that Google has in a minute here. So mypy supports Python 3 style annotations, it also supports Python 2 style annotations and it supports what are called stub files. So if you have some code that you need to type check or you want to type check against but you can't change that code, such as code in the standard library or whatnot, you can use these stub files, these are pyi files that just have type information in them. Mypy can run against all of these. If you want to create a stub file, if you are using a third-party library and can't push code back upstream or they don't want to include type information, you can also create stub files as well. Mypy ships with a stub gen.py tool to create stub files. And one of the values of having these stub files is it gives a little bit more checking to validate that you haven't had typos in what you're calling and that the methods and functions that you're calling all exist. Here's an example of running mypy, it's pretty easy to install, we just pip install it and then we can say Python -m mypy on what we need to check or we can call the mypy executable itself on the file. And again, this is static type checking, it's not going to execute the markov code per se but it's going to look at it and try and divine what the types are. And in this case, I'm going to get some errors you'll note that the tooling that I just ran previously for pyannotate added some type information to my markov file, and now when I run mypy against it, it's going to complain because it's going to start type checking those things. So it complained about line 38 and line 57. It says we need type annotations for a variable. These are what those two lines look like. We are making the tables attribute in the class instance, and we also have a results attribute this table creation as well. So interestingly enough, monkey type and pyannotate, they didn't create the types for these guys internally, they created the function and method types, but not the internal types that mypy was looking at in this case. Here's an example of removing the errors for the tables guy. I can just do an inline definition here for the type on the variable here. It's that nested guy, and if I was being a little bit more user-friendly, I'd probably define this up above as a table result and just point this at table result instead, make it a little bit more easy, this is a little bit too nested and we're going to use table result in a couple of places in this file, so it makes sense to reuse that code. One of the other things you can do is integrate mypy with continuous integration tools so you can run things like --cobertura-xml-report and that will give you a line-by-line report on how your type information is. It will give it a ranking of it and you can integrate that and if you're interested in tracking these things, this is something that's interesting to you and called quality, then you can measure it and keep track of it with your continuous integration. Another nice little feature in mypy is the reveal type function. You don't need to import it, but when you're running my type against the module, you can just say reveal type of some variable and mypy will try and divine what it is. It does an okay job, sometimes it can't really guess what it is and so it just returns any, in this case, I've got a file that takes an integer and a float and it ads those two and it's asking if I add those two, what's the type of this res variable, and we know that it's a float if we have used Python for a while, but maybe you don't or maybe you've got some other type that you're not quite sure what it is. You run that with mypy and it's going to tell you that this type is a float so you can put your type information in there if you want to.
|
|
|
transcript
|
0:54 |
In summary, these tools, they're all third-party tools, they are not in the standard library, I view a lot of them as works-in-progress. They seem to do an okay job and especially the tracing ones will sort of get you off and running pretty quickly to add type information. Pytype, I saw some errors in there and I tried to dig in a little bit then dig in too far with the errors that it was throwing. Monkeytype, I also had some cases where it would throw errors on me. But remember, these are live projects and most of these have been updated within the past month or so and so people are working on them. Keep an eye on them, they might be useful to add type information if you want them. But again, if you just add types to your Python code, you're not going to get any benefit, you need to use some other tools such as mypy to do some static validation of that.
|
|
|
transcript
|
5:23 |
In this video, we're going to look at annotate3rd_test.py. So the first thing it says is it says copy py3code.pyORIG to py3mt.py and py3pa.py. So here, I've got my directory with my files in it and it says copy py3code.pyORIG to py3mt.py and py3pa.py. Okay, install monkeytype. I'm in my virtual environment, so I just need to say pip install monkeytype here and that should get it. Okay, it looks like it worked. Create a function test_mt that exercises py3mt.py in runmt.py. I need to make a runmt.py, I'm going to say touch runmt.py, run monkeytype.py here and we'll split my view here. Okay, so we need to say create a function test_mt, and it needs to have this code here in it. So let's plop this code in it. Okay, and it needs to say we need to import this code. So we're going to say from py3.mt import force and quad and Mario. Okay, and let's run test_mt at the bottom here. Okay, and it says create a stub for py3mt.py in py3mt.pyi, so we're going to have to use monkeytype to create a stub here. So the first thing we need to do is run a Python script under monkeytype tracing. So we're going to say monkeytype run and let's run this guy that we just created here, which is called run_mt, I got a syntax error, I better fix that syntax error here. Okay, I have now run it and let's see if we can generate a stub here. So let's say stub -h and see what the options are for stub. It says generate a stub and a module path and our module is going to be run in py3mt, so stub py3mt, and this is the stub right here so I can pipe this into py3mt.pyi and there is my little stub. You'll notice what it did, it imported the tuple class from the typing module, and for force, it said that that returns a float and it said the quad returns a tuple of float float, character speed returns an int and Mario speed returns an int. So it didn't type all of the guys, but just a few of them, but that's pretty nice. But note that it did this not by inspection of the code, but by running the code, so if you'll remember in our runmt, we are calling force, we're calling quad and we're calling Mario speed, we're not calling the other methods of Mario. And so that's how it determined what those types are. So the next thing it says to do is run mypy against py3mt.py so let's try and run mypy against py3mt.py, we don't get any errors. And if we call it with strict then we're going to get a few errors here. Note that if we call strict on pyi, we're going to get on line 4 and line 7 it says it's missing a function. So let's just look at line 4 and line 7 and see if we can divine what's going on there. Okay, line 4 it says it's missing some type information here, so that's probably because we don't have float for mass or float for acceleration. Okay, and probably same thing on line 7 here, we don't have type information there either so interestingly enough, monkeytype only gave us the return types, it did not give us the input types. This video showed how to use monkeytype to create a stub file and do some type checking by running some code and creating that stub file, we'll show how to use pyannotate in another video.
|
|
|
transcript
|
4:50 |
In this video, we're going to talk about annotate 3rd and the pyannotate section. So we're assuming that you've already done steps 1 through 4 here. The first step is to install pyannotate, I've got my virtual env active over here. I'm just going to say pip install pyannotate. Okay, the next one is to create a function test_pa that exercises pi3pa.py and sticks the Json output into type_info.json. So I'm going to make a file similar to our runmt.py called runpa, touch runpa.py and let's open runpa.py here. I'll split my screen here so we can see both of these. Okay, so there's py3pa.py, let's open runpa.py. I want this to be similar to runmt, so we'll just copy all this, it's going to be very similar to this, but we're going to change a little bit we're going to change the mt to pa. Okay, if you go to the pyannotate website, it's got some boilerplate here that we can put, we need to make this little context manager here and we need to do our import, so we'll drop in the boiler plate here, and let's do our import from pyannotate import. Okay, so we import this collect types guide, we init the collect types and then we make context manager, with our context manager we run our code and then we dump our stats here and according to here it says that we want to dump it into this guy type_info.json. So we'll do that type_info.json here. Okay, so I think we've got that part. We've got the function test_pa, and it exercises our code, now let's run this, we're just going to run this with Python and then using pyannotate that should look at this type_info guy here. Let's just say Python runpa.py, it doesn't say anything but now it should be a type_info in here, let's just look at type info and it looks like it makes sense, when we call character.speed, it should return an int and it had one sample in there, it looks okay. Force looks like it took an int and a float and returned a float. So looks like that's doing okay, it looks like quad was called with ints and returned floats. So we can call pyannotate, you can just say pyannotate.h it's going to give you a little help documentation. Let's say pyannotate and we have py3pa.py and it says I don't have type_info.json, interesting, we got to change our name here, type_info.json. Okay, and now if we run it, we get this little guy here and it says this is the refactor, this is the diff that it would make and note that it's making Python 2 comments here instead of doing the Python 3 annotations. So this is a supported syntax for Python 2 and at the end it says note that this was a dry run we can use -w to actually write the file. So let's use -w to write the file here. And if we look at py3pa now, he's got the type annotations in the comments here, cool. And it says run mypy against py3pa, let's run mypy against this and see what complaints we get here. Okay, no complaints there, we'll just turn on the strict and see if strict complains about anything else. So that says we are still missing some stuff, and so this shows the gradual typing of mypy that it only checks what's annotated and we could go in and add these other annotations, we saw how to do that previously, but luckily pyannotate gives us a little leg up if we've got tests or something that we can run and get that information in there, that will just give us a little head start to get that running. Another benefit of this pyannotate code again is that it works in Python 2 & 3.
|
|
|
|
20:39 |
|
|
transcript
|
2:33 |
In this video we're going to talk about the print function. One of the biggest changes for Python 3 is the print function. In Python 2 print was not a function, but it was a statement, it was built in into the language and that's changed in Python 3 just to make things a little bit more consistent. Guido wanted to change that into a function. Let's look at some of the features or changes that that brings. In Python 3, rather than calling print as a statement, we call it as a function and so you'll note that there are now parentheses when we call something as a callable in Python, we insert parentheses there. So we're invoking print and we're passing in one and the string one as parameters and note that Python prints out 1 and puts a space in there and then print another one. It also puts a new line at the end here that you can't really see, but it's doing that. Now if we change this a little bit, so one of the things that Python 3 brings about is it allows us to use keyword arguments, And we can use 2 keyword arguments with the print function sep and end, and sep is what goes in between the arguments that we provide and end is what goes in the end. The default sep is a space and the default for end is a new line. You'll note that I change them here and we see that I've changed the output here, it doesn't put a new line at the end. Here's just another slide showing that the sep comes in between the arguments and end comes at the end, if we have multiple arguments sep will be inserted between each one of those. And that's it, there isn't that much to it other than this is meant to be a thing that makes Python more consistent and to eliminate some of the statements in Python 2. I'll just go on a little rant here about print I personally think that you shouldn't check-in print into your code. If you need to print something you're probably either logging it or wanting to log it for debugging purposes. So you should use the logging module for that. And if you want to print something out to the screen, you can be slightly more explicit by calling the write method on the sys.stdout attribute found in the system module, that will write out to the standard out which typically writes out to the screen. I think that's a little bit more explicit and conveys your intention, whereas print, it's not sure whether you want something go out to the screen always or whether you just want it there for debug purposes. So if you sort of draw a line in the sand and say if I need to print something for debug, I'm going to use logging, if I need to print something out to the screen in production code or whatnot, I'll call sys.stdout.write Thanks for watching, I hope you learned a little bit about the print function in this video.
|
|
|
transcript
|
2:42 |
In this video, we're going to look at print_test.py, open it up in your editor. Let's run it and make sure that it works. So in order to run it, I right click in PyCharm and say run print_test this just validates that it's being run with pytest, in this case it is, it says there are 2 failures, let's look at the test here. There are 2 failures because there are 2 tests this one here that starts with test and this function here that starts with test. The description is this comment right here and we need to do what it says. It says print the numbers from 10 down to 0 with a space between them and a new line at the end. And so the default behavior for the print function puts a space between a new line at the end, so let's just try and say print nums and run that and see what happens here. Okay, we still get 2 failures, let's see if the output from pytest helps us at all. We have an assertion, the assertion failed and said that this string here is not equal to this string, the difference between these two strings is that this one has a list embedded in it, and this one does not. So when we print out an object here, it just prints the __stir__ version of that and if we want to make it so rather than the print out a list we want the individual items of the list, we need to use what's called unpacking so we can just put a star in front of that and that should unpack them. Let's try it again, unpack the individual items from that string and it looks like we only get one failure now, so we're good with this first one. Let's look at the assignment for the second one, print the numbers from 10 down to 0 with a - * - between them and no new line at the end. So print, we're going to say *nums here again, and we're going to say sep is equal to - * - and end is equal to a blank string. Let's run it and make sure that it works. Okay, it looks like it works, let's look at the test a little bit and try and dig into what's actually going on here. If you'll notice the import here, I'm importing stringIO this is an object that behaves as a file buffer, and what I'm doing here is patching or monkey patching sys.stdout, I'm creating a stringIO instance, and pointing sys.stdout to it. So when I call print down here, rather than printing out to the screen, it's printing out the string buffer and we're pulling the value from that stream buffer out and checking the value of it. So that's how our little test is working. Hopefully you understand a little bit about print now and again, in Python 3 print is now a function and we can use these keyword arguments to change the behavior of the function.
|
|
|
transcript
|
5:35 |
In this video we're going to talk about pathlib. This came about through peps 428 and 519. So 428 adds pathlib to Python 3, this came about in Python 3.4. 519 adds protocols for paths so that standard libraries that support operations on paths can use pathlib. Pathlib is included in the standard library so you can create a path by importing the path class from pathlib. Here I'm making a path called env in my temp directory and if this path exists on my file, and in my case it does, I can say list env.iterdir and that gets me back at generator and if I materialize that into a list, it gives me back a sequence of all these posix paths which have everything that is in that directory. Now posix path, because I'm running this on my Mac, that's what I get back. If I were to run this on a Windows machine, I would get back a Windows path if temp env existed on a Windows machine. One of the nice things about this path instance or these path classes that we can create is that we can do various manipulations on them. So it has overloaded the slash operator to do concatenation. So if I want to make a file called missing inside of this env directory, I can say m=env / missing and that concatenates missing on to the end and it gives me back a posix path that has missing on the end. Note that / will work on Windows systems as well and rather than giving back a posix path if this temp env existed on my machine, it would give me back a Windows path. I can call .exist and that says does this path exist, and it says false, missing doesn't exist. Also on my path, I can say open and I can pass in if I want to write to it or whatnot. I can put that in context manager that will give me a file handle and I can write to that file. I can do things like say parts and that will give me back a tuple of the various parts of the path, note that it puts this leading / in here for the root, and we can say open again to read from it and read from it. And then if we want to delete from it, we can say unlink. The nice thing about these is these are cross-platform. These will work on Windows or posix systems, so Linux or Mac or other Unix systems. Here are some more examples of some manipulation that we can do, note that in here I'm saying m.parent, that gives me the parent path of my directory and then I'm concatenating on bin and concatenating on activate this.py, and on that py path I can say what's the root there, and it says the root is that, what's the drive there, and it says the drive is that, what's the anchor, the anchor is this combination of root and drive, so drive here, this is Windows specific, and if you're dealing with the c drive or the d drive or whatnot, that will pop up in there. The anchor here is the combination of root and drive. A couple of other things you can do so I can say what's the parent path and the parent path of my py guy, which is the activate file is tmp/env/bin. I can say what's my name and it will give me just the name of my file, I can say what's my suffix, my suffix is .py, I can give it this stem attribute, that's the file name without the suffix, I can say is this an absolute path, it says true. I can do matching against it with simple globbing operators, so does this match *.py, yes, it does match *.py. Pathlib makes a distinction between what it calls pure paths and concrete paths. We mostly deal with concrete paths. These are paths that have access to the file system, but you can also make Windows or posix pure paths on either operating system for manipulation. So if I'm on a server that's a Linux server, but I need to manipulate Windows paths, I can create a Windows path and manipulate it and get the drive and whatnot and it will treat that as a Windows path and do the correct thing for me there. If we have concrete paths, we can do system calls on that. Here I'm on my py path, I can say cwd, what's the current working directory, note that this is a method on this class, but I can also call a class method on path because current working directory isn't dependent on a path, it's dependent on your current process or where you are, in this case, I'm running this from the temp directory. I can ask what the home is on any path, or I can call it directly on the class, in this case, my home is users/matt. I can say give me the stat, this gives me the modification times of my file here. I can also do things like say expand user with the tilde and that gives me where my home directory is, we can do globbing operators here, so I can say I want to get the home path and I want to glob onto that anything that ends in py and I can get all the py files in my home directory. This is commented out because there's a lot of output here, but I can also use a glob operator with **, if you use a ** that does a recursive search. So this is going to search through everything in my home directory that's a Python file. So nice functionality there to allow you to do various operations on a path. So in this video we talked about paths, this is a nice feature that's been added in Python 3. This has combined a lot of the functionality in the OS modul, a lot of people have been using third-party path libraries, and so this is a welcomed feature into Python 3. Hopefully you can make use of this if you're dealing with files and directories.
|
|
|
transcript
|
3:25 |
In this video, we're going to look at path test, open that up in your editor. Let's run it and make sure that our environment is configured. Okay, we have one error, we're not getting failure with importing pytest, so we're good there and we have one test function. Let's go through this and figure out what's going on. The first part, get the contents of the current directory using the path module store the results in cur, the variable called cur. So in Python 3, there is now a library called pathlib, and we can say from pathlib import path and let's get the current module, current equals path and period should be the current guy. If you want the contents of that you say iterdir, and that will give you what is in the directory. Let's run this and see if it works. Okay, so we're only getting one failure which is fine because we have one test and we're getting an error on line 16. So it looks like the first guy worked. So what iterdir does, given a path it gives you a sequence that has all of the results in it or all of the files and directories that are in that. So our test is just saying is path test in the current directory, and because we're in that directory, it is. Cool. Make a path with a file named test.txt, and store it in test file. So test file equals path, and we're going to say test.txt, that should work. I'll just run it and see if it works. Okay, we're now on line 23, so we're down here. Write hello world to test file, we can use this path guy as we would a result of an open in the context manager so I can say with test file and then I can call on that open and I can pass in a mode, so I'm going to pass in the mode write and I'm going to say as f out: and I'll say f out.write, and we'll write hello world. At this point, after we've exited from this, test file should exist, it should have a name and we should assert that hello world is in there. Let's run it and make sure it works. Okay, we're now down to line 32, so we're at this last part. Delete the test file. So we have test file, how do we delete it? There is no delete. Is there a remove? There is no remove. Is there an rm? There's an rm dir. So none of those are the way to delete a file, the correct pronunciation of this is unlink. Let's run this and see if it works. Cool, we're good. So hopefully, this gives you a brief chance to play around with path. You can get the contents of a directory by saying iterdir, you can create a path, you can write to it by putting in a context manager and calling the open method on it, rather than using the built-in open function and you can delete it if you want to as well.
|
|
|
transcript
|
3:18 |
In this video, we're going to talk about the enum library, this came in Python 3.4 with Pep 435. In the PEP we read, enumeration is a set of symbolic names bound to unique constant values. Within an enumeration, the values can be compared by identity and the numeration itself can be iterated over. If you're not familiar with enumerations in other languages, they allow you to hard-code magic numbers and make use of those and you could do that in Python prior by making globals and making all capitalized variable name and setting equal to some value. There are a few features that enumerations have that make them slightly better to use. Here's an example. I'm going to import the enum class from the enum module and then I just define a class in this case, I'm going to define a class called bike and there are various types of bikes. So there might be a road bike or mountain biker or a cross bike or a trike. and maybe I'm going to be switching on these different bike types or whatnot. Inside of my class, as attributes I say road is equal to 1, mountain is equal to 2, etc. And I can define numbers that give values for those. If you want to enumerate all the different possibilities of what are in a bike you can loop over that and you can say well there's road, mountain, cross and trike, you can also do comparisons using the equality operator. So the last bike in the enumeration was trike, and is that equal to a bike.trike, yes, that is the case. Trike is I believe number 4 here so you could say is bike equal equal to 4. That's what we're trying to get around. We're trying to get around magic numbers where you're using number that has a unique meaning for you, but maybe to someone else who's reading it doesn't make sense. So bike.trike is very explicit and makes the code more readable. If we want to access these enumerations, you can access them in different ways so you can do the by attribute, so you can just say .mountain you can also say bike 2, you can call it and pass in 2 and that will give you what the enumeration is. You can also do it by index name. So there's an index operation that says mountain and that gives you back the enumeration. All these are the same. I prefer this first one I think it's the most readable. Identity comparisons also work with enumerations as well. So you can say bike.mountain is bike.mountain and that is true. So it's not going to make a new instance of those. There's an alternate construction that we can use to create enumerations here. This is similar to the named tuple construction. We're going to make a variable here called bike or bike2, camel case because it's class like and then we're going to pass in the name of the class here. And then we're going to pass in the different enumerations in here. And in this case, we don't need to provide the numbers we'll get default numbers for them, so I can say bike2 what's the 2, the 2 was in this case mountain and what is road and that was this one right here bike road, which has a value of 1. This video discussed enumerations in Python. This is included in Python 3. This is just a little library that's meant to make your code more readable. If you're using hard coded numbers all over the place consider using enumerations, or if you have different categorical types that you're using consider using enumerations to make your code more readable.
|
|
|
transcript
|
3:06 |
We're going to look at the enum test file, open that up, we'll see that at the top here we've got a red, green and blue variable defined and we've got a function here that's testing that whatever is passed in is equal to these variables. This is prime candidate to replace with enum. Let's look at what it says to do. Create an enumeration color that has red, green and blue as the different members, use the class style by subclassing enum. And in parentheses, normally these are created at the global level. Let's import the enum class, that's in the standard library these days. I'm going to say from the enum module import capital Enum. And then we're going to make a class called color and it's going to subclass enum. And I'm just going to give it a couple attributes red is equal to 1, blue is equal to 2 and green is equal to 3. It's all we need to do, very similar to the variables. But we're just putting this in the namespace of a class here and by subclassing enum we get some of the benefits of using that. Let's run this and see how the test work. Okay, so it looks like I passed that first part and now it's asking me to do some refactoring. So let's go down and read the next part. Okay, refactor get_rgb to use the color enumeration. So right now get_rgb is not using color, it's using this integer variables that we've defined a pair. So all we need to do is say color.red and same thing here color.green and same thing here color.blue. And presumably whoever's calling get_rgb would pass in color.red or whatnot. Just run that and make sure that works. Okay, we are now good with that part. Let's go to the next part, create the numeration pet that has dog, cat and fish as the different members, call the enum class to create it. So in this case, we're going to call enum rather than subclasses it, it looks similar to the name tuple if you're familiar with that. So we would say pet is equal to enum. It says it has a dog, cat and fish. So the first parameter that we give to calling the enum class is we give it the name of the class that we're making or the name of the enumeration, very similar to name tuple and then we're going to say dog, cat and fish like that. Let's run this and see if it works. Okay, so these are two different ways of declaring an enumeration, one is by subclassing enum, the other is by calling it, passing in the name and passing in the comma separated list of those values.
|
|
|
|
57:31 |
|
|
transcript
|
2:51 |
We're going to look at asyncio, specifically PEP 526 and the tooling that came in Python 3.6. Asyncio came about during Python 3.4 time frame and Python 3.6 added some new syntax to make it nicer to use. Let's talk about some terms first to get these straight what is concurrency, concurrency means that we're sharing resources. One way to visualize this is a juggler who has multiple balls. Each of those balls is a resource and he's juggling them. Similarly, a CPU on a computer juggles multiple resources. It can run multiple things, a single CPU cannot run multiple things at the same time, but what it's doing is it's shifting between those very quickly. Parallelism, which some people confuse for concurrency, but it's different, parallelism means doing multiple things at the same time. So if I have some parallel code, it can run something faster than doing something at once. So an example here would be a CPU that has multiple cores. It can run code twice as fast as that code is run to take advantage of both CPUs. If we're going back to our juggler example, this would be multiple jugglers juggling multiple balls, presumably multiple jugglers who are juggling can juggle more balls than just one juggler, if they don't have to coordinate among themselves per se. A couple of other things to be aware of, one is a thread, a thread is a operating system construct for doing something, a thread runs on a CPU, if you have multiple CPUs and your code can run in multiple threads, it's possible that each of those threads could take advantage of a single CPU and make it run faster. Now, this isn't the case in Python, Python has what's called the gil or global interpreter lock which limits multi-threaded code in Python to only run on one CPU regardless of how many CPUs are on the system. Another thing to be aware of is what's called a green thread, green threads are VM level threads, so they're not done at the operating system level but they're done at a programming or user level and these are a little bit lighter weight, but they don't scale across CPUs. And we'll see how asyncio basically allows you to use green threads or run different contexts across a CPU inside of a VM, but doesn't necessarily allow you to take advantage of multiple CPUs. A couple other terms we'll talk about here, synchronous, synchronous means if I'm going to run something, if I'm synchronous I wait till the execution is done before I run something else. And asynchronous code is where I kick off execution and maybe I have a callback or some way to figure out when it's done and after I kicked off execution, I'm going to move on to some other code until I get this call back or mechanism that tells me that it's done. That's asynchronous code.
|
|
|
transcript
|
0:29 |
Here's an example of concurrency. Here I've got Python running over here and Python is going to paint three pictures. And so I'm going to just do some work and after I've done a little bit work on one picture, I'm going to do some work on another one and then I'll do some work on another one and I'll keep doing that shifting between them until I'm finally done at some point. This is concurrency, I'm juggling multiple paintings with a single CPU or a single Python process.
|
|
|
transcript
|
0:50 |
Python has what's called gil, and gil has a couple bonuses or things that it gives you, it gives you simplified garbage collection. It also allows you to avoid none thread safe code with other threads, but it has some drawbacks, one is that you can only run one native thread at a time on Python. So even if you have multiple CPUs on your computer, you're only going to be able to take advantage of one of them using threading in Python, if you use a library called multiprocessing that gets around it by launching multiple processes, Python processes and each one of those processes can use the CPU. There's a little bit more overhead to that because it's got to pass around the information, it can't share it as easily. Another minus of the gil is that if you have cpu-bound code it's going to be a little bit slower and this sort of relates to the other one that we can't parallelize them easily from Python.
|
|
|
transcript
|
2:25 |
So here's an example of parallelism. We talked about concurrency here, we have three Python processes and each of them is going to create their own painting. And so the first one can do a little bit of work and do a little more work and if I had multiple cores, if I had at least three cores while that one was running this other process could be doing his work and another process could be doing its work, and so we can see that this takes about a third as much time as our prior concurrent version, if we are able to do this in a parallel manner. Now, let's go back to our concurrent way when we have one Python process and let's think about maybe painting a little bit more if you've painted a little bit, you might know that when you're painting you put some paint on the canvas or if you're water coloring you get the paper wet and then you paint on it and then typically you have some period after you've painted where you let it dry. And so we're going to just put on some grey blocks here and this grey block indicates that the paint is drying, now, if you are painting three paintings, it could be the case that you paint and then dry and wait for that drying and then start working on the next one. And this would be a synchronous manner of doing that but you'll note that all this drying time here with the gray drying time, you're not really painting, you're just waiting for it to dry. So that could be wasted time. If we move this to an asynchronous model and the asynchronous model says if I'm going to be waiting on something and I know that at some point it will be done, as soon as I need to start waiting, like I start painting and then I start waiting here, I'm going to say go ahead and wait, but I'm not going to wait till you're done drying, I'm just going to go off and I'm going to start painting on my next guy until he needs to dry, and then I'm going to start painting on my next guy and I'm going to repeat that. And that way I can take advantage of this drying time or whatnot. This grey indicates drying time. This is similar to code in the real world. There is some code where you do some CPU heavy work, but then you have some work that's what we call IO bound where it's going over the network or it's going over the file system and Python is not really doing anything, but it's waiting for data to come back. So this is what we call IO bound and if you have something that's IO bound and you have lots of IO bound stuff, then you can take advantage of this asynchronous way of programming to not worry about IO bound stuff and move on to other stuff.
|
|
|
transcript
|
4:28 |
Here's some example code for painting. I've got a canvas here and I've got a paint method and this is our CPU work here. We're just going to say loop over some number here and do a mod operation and check that at zero and then when you're done with your painting or your CPU work you're going to make a little instance attribute called start and you're going to say I'm going to be done and dry them out after start. So we're going to say two seconds after that we're going to let it dry. And then we have another method down below called is dry that just says if the current time is greater than the end, then yeah, we're done. Otherwise, we're not done, and I'm going to write a little decorator here, this decorator will wrap a function and just tell how long it takes. So I'm not going to really talk about how decorators work per se but just know that it returns a new function called inner that's going to call the original function, but it's going to start a timer before it and it's going to print how long it took inside of there, just for kick so we can have some timing information. Okay, so on my machine, I've got some code here that I'm going to call and I'm going to call paint, a paint function, it's going to create a canvas and then it's going to call paint which is the CPU heavy part. And then it's going to do this little loop here where it's going to wait if it's dry and it's going to say if it's not dry sleep for a half second. So we could say that this is the IO portion it's waiting for something to happen, but it's not really doing any work. And if I run this, and I say I want to do three paintings one naive way to do it is just say run paint and do paint and then paint and then do paint, that will make three paintings or three canvases. If I do this in a sequential manner like this, it says that it takes 6.03 seconds to do that. So a little bit of overhead for the CPU heavy stuff and then some drying time that we've added in there. We can switch this to an asynchronous manner by using this asyncio library. So in order to use this I'm going to change my function I'm going to put an async in front of it and the rest of my code looks very similar, I've still got my while loop but here I'm going to put an await statement here and I'm going to say await asyncio sleep a half-second rather than time.sleep .5 seconds and this is what's called a coroutine. This is an asynchronous coroutine, and it gives us the ability to run code that is interruptible that has portions where you wait for something else to happen or you can hand off control for something else to happen. So I've got a little function that's going to run this. What we're going to do is we're going to make a loop here. We're going to get what we call an event loop and then in this event loop, we're going to call a function called gather. This is an asyncio, we're going to gather three instances of this async paint. We're going to get three co-routines and it's going to return what's called a future here. And this future is something that it can run and interrupt and get some result back at some point in the future when it's done. And then in our loop we just say run until complete future and this will run this code, but interestingly enough, when we run this code on my machine this takes two seconds, even though it does three paintings. So what it's doing here is it's going to say I'm going to start painting my first guy and then I'm going to check if he's dry, if he's not, I'm going to call this await asyncio sleep and when you call await here, that gives it the ability to go off to another coroutine and so it starts going on the other work, and then the other work starts a canvas and then it jumps into that await, and then says okay I can do other work and so it goes into the third one, and then all of them get painted and then they just go into this while loop where it's going to keep calling await every half second and it's going to see if they're done, and if they are done that's great, it will take them off if they're not it's going to say, okay, I'm going to go and check the next one and so it sort of repeats doing that and it can do that at the same time. So this is an example of asynchronous code, the cool thing about this is that it's not written with callbacks. And so if you sort of squint at it and if you got rid of async and you got rid of a wait there, it really looks very similar to our prior code where we're just saying get a canvas painted and while it's not dry sleep. So that's the benefit of this asynchronous code, note that we do have to have an event loop and there's some overhead and construction of that in order to run it you have to schedule these coroutines in order to run them.
|
|
|
transcript
|
1:33 |
Let's look at some of the basics that are required to do this, again, you need an event loop, this manages your work. You need some co-routines. You need to have functions that are suspendable, they have to have an await in there so that they can hand off the work to someone else, they can't just be CPU heavy functions or they'll never hand off to someone else and you'll basically be getting the same throughput that you would be getting by doing this in a synchronous manner. A couple of other things, there's what's called a future and a future is something that may have a result in the future. There's what's called a task, and a task is a subclass of a future that allows you to take a coroutine and basically make it implement this future interface that Python uses. There's also what we call context switch and basically context switch is when we call this await, under the covers this loop is going to switch from one of these co-routines to another one and you can think of this, remember we talked about threading and that you can use native threads, we can think of this context switch that rather than going from one thread to another we're going from a green thread to another green thread a basic thread that's implemented inside of the virtual machine. That's a context switch, and this event loop manages that for us. We talked a little bit about blocking and non-blocking. So blocking is you wait until your work is done before proceeding we talked about that with our painting, you waited until your paint was completely dry before proceeding and non-blocking, we hand off control while running, so if we're doing a non-blocking painting, we paint and then if it needs to dry we go and paint something else, until that needs to dry and then we go pay something else and we repeat that process.
|
|
|
transcript
|
2:43 |
So Python provides in 3.6 these new keywords, async and await, and if you put async in front of a def that makes it a coroutine that you can use in this asyncio framework, and when you want to hand off control of something else you call await. So the benefit of this asyncio library is that it allows you to write asynchronous code in a sequential style. Remember I had that slide where I said if you get rid of the async and the await, it looks sequential. There's other asynchronous libraries in Python and many of them allow you to write asynchronous code but do so with callbacks and if you're familiar with callbacks that can get a little confusing, and Guido van Rossum, the creator of Python who actually worked on asyncio for a long time, is not a big fan of callbacks, and so he didn't really want to introduce callbacks into the standard library, but he wanted something that allowed us to take advantage of asynchronous programming, but make it look as normal and someone who is used to Python programming can look at it and should be able to wrap their head around what's going on there. Why or when would you want to take advantage of this? Again, if you have lots of io, these asynchronous programs scale better than threads or processes. There is overhead to creating a thread in Python, Python threads are native threads, they are operating system threads and there is overhead the order of megabytes per thread. And so if you've got thousands of requests coming in to a web server or whatnot, you've got each of those as a thread, each of those is going to have some overhead to it and a process has even more overhead than a thread does. But if you have stuff that has a lot of io latency such as a server or whatnot, then you can use these native threads or this asynchronous style programming to scale better, but one thing to be aware of is that your whole stack basically needs to be asyncio aware. Once you put code in there that blocks or just takes up the CPU and doesn't allow anything else to run you're going to have throughput that's going to suffer because it's not going to allow other code to run. So you really need to have code that has awaits in it and allows other code to run. So some of the components that you all need, we need a function that will suspend and resume these co-routines. We need an event loop that keeps track of the functions and their states and we'll run them and manage them. If we have long-running CPU tasks, these need to call await. So the other code can run or else we need to use what's called an executor to run those in their own thread so that they don't interrupt or basically block the asynchronous code from running.
|
|
|
transcript
|
6:51 |
I'm going to go through some code here just to give you some insight into how you could make your own asynchronous library and I didn't come up with this, this was from a presentation I saw from Robert Smallshire, and so I'll credit him on this, this isn't his code, but this is adapted code from him, but I really like the approach here to give you some insight into developing an asynchronous framework. Here, I've got a function called map, and if you're familiar with functional programming, map takes a function and a sequence and it applies that function to every item in the sequence. So this should be pretty straightforward. We're creating a result list here and we're just looping over our sequence and we're appending into that. We could use a list comprehension or whatnot for this, but bare with me for a minute, if we wanted to make this asynchronous, then we've got to change it a little bit it's got to yield, it's got to give something else the chance to run and so I'm going to put a yield in here and I'm going to change it to say async map here. So this looks very similar, I just put a yield in there and it says after I do some work, yield give something else the ability to run. So if you're familiar with generators, you'll know that generators in Python allow you to call them and once you call them and they get to this yield point they freeze their state and then when you call next on them, when you're looping over a generator, you can resume the state exactly where it left off. So we're going to change this function into a generator so that we can loop over it and we can call next on it. So here's an example of doing that here. Our function is a generator and we're going to make an instance of this generator, we're going to pass in a lambda in there that just adds to something and we're going to pass in range of 3 so 0 up not including 3 and if you're familiar with the iteration protocol, how for loops work under the covers, basically you get an iterator and then you call next on that iterator. Well generator in Python is an iterator and so you can call next on a generator. So I'm going to call next on it and that's going to say okay, I'm going to apply lambda to the first guy in range. The first guy in range is zero the lambda adds 2 to zero, and at that point it's going to append that and it's going to yield and so it yielded, it appended into our result that guy, the 2 and then we're going to call next again and it will put three in that result and note that it's giving me back my interpreter here. I have my interpreter back, I'm doing this from the console here and maybe I do some other work, I can say 5+7. Well, that's 12, and now I want to go back and I want to do this again. So I call next again and it does some more work and it's going to stick 4 on the end, the iteration protocol when I call next again, I'm done, It's going to give me a stop iteration but note that since I returned the result list that comes in my exception here. So the stop iteration also has my result at the end of it. So that's pretty cool, so I can take that concept here and make a function from it now. So I'm going to make a function called runner that takes a generator and it's just going to go into a while loop and it's going to call next repeatedly until I get a stop iteration and when I get to stop iteration exception, I'm going to say well pull off the value guy because that's going to be whatever the generator returned. And we can run that here and we can see that when I pass in the same code here that I had previously I pass it into my runner function, I get that result out of it. Pretty cool, but what this is allowing me to do is right after this next here, I could work on something else or have multiple generators that I'm working on at the same time. So in order to do that, we're going to make a class called a task a task will wrap a generator, we're just going to pass a generator into it and it will have an ID. So we're going to just take an ID and keep track of our generator as instances in there. The ID is tracked as a class variable here. Okay, so now we have a task, let's make a scheduler, a scheduler is going to take task and it's going to run them. We're going to import from the collections module, let's call the deck or the double ended queue. This allows us to efficiently stick things in the front and in the back and pull them off at either end very quickly. What we're going to do is stick tasks into our deck pull them off the front and then stick them back into the other end as we're working on them. So we're going to have a deck here with our tasks in it and we're going to make 2 other attributes, results and exceptions, those are both dictionaries, they're going to map the task ID to either the result that came out of it or if there is an exception they're going to map the task to the exception. And then we have an add method and add method takes a generator and it just sticks it into our tasks list after it wraps it with the task class. Now, we have the run method, this is where the meat of our scheduler is. It's just going to be very similar to what we saw before here. We're going to have a while loop it's going to have an infinite loop. It's going to say if we don't have any tasks pop out of there. Otherwise, what we're going to do is we're going to get our first task, our T from the left hand side and we're going to call next on it. We're going to print out that we're running it, but we're going to call next on it. So it's going to do some work until it gets to that yield, and it might have other things that happen, we might get a stop iteration. So we might be done with that generator. If we did get a stop iteration that indicates that we're done and we're going to stick into our results dictionary whatever we got for the value there. We might also get an exception, if some exception happen so we can just remember our exception. If our generator is still running, so we didn't get a stop iteration or an exception, we're going to stick it back into the end of this deck. So it's going to come back in the other end and then we're going to come back up to the top here and we're going to get our next task here and we're going to work on that one, and we'll just keep working on these and they're all going to yield or they should yield and allow other tasks to work at the same time. And at some point, all the tasks will be done, we'll break out of this. So let's just look at an example of running this here. I'm going to make two generators async map g1 and another one async map one is adding to the other, one has a lambda that is multiplying by 3 and they have slightly different input sizes, we'll make an instance of our scheduler and we'll just add those two generators to them and then we'll call run and we'll see that run is switching off between the two it's going to say I'm running 1 now, I'm running 2, now I'm running 1, and at some point 1, which is only three long, gets finished and it says this is the result of running that and it keeps working and now it's just working on 2, and then it gets the result of 2. And finally it's done, we can say what are the results of the scheduler and it says well the results from task 1 are this and the results of task 2 are that, but note that it interwove those results. It worked on both of them at the same time. Hopefully, that gives you some insight into how you can yield and allow something else to run and then come back and work on something else. So as long as we have these yields or awaits in Python 3.6 in our coroutines that we're creating, we can take advantage of this asyncio framework
|
|
|
transcript
|
2:13 |
So again, if you're using asyncio, all your code needs to be infected or whatnot, everything a coroutine calls should be async if you're awaiting it, it can call other functions if it's just calling them directly and getting the results. But if you're calling another coroutine, then you need to await that or you need to iterate over the results of those. So if I want to convert this prior code that I have, to use asyncio rather than the little framework I had, what I need to do is I'm going to replace def async_ and I'm just going to put async def and I'm going to create a coroutine and then instead of yield, I had yield in there, if you have yield or yield from I'm going to replace that with await and then I'm going to pass in a future to get back the results. So the code will change slightly but it should be very similar. So we'll see here that I have now acync amap and I'm passing in a future here, but I still have a function and the sequence and then I'm looping over my sequence and I'm appending the result of my function and then at this point, I'm calling await and I'm sleeping for 0 what sleeping for 0 on asyncio effectively does is it says you know what, give someone else a chance to run. And so this is the point where someone else can run their code, and then at the end when I'm done, I'm just going to stick onto my future the results that I got. So I'm going to create an event loop, I'm going to create a future to hold the result of my first guy, I am going to create another future to hold my result of my second guy and I'll pass those in and I'll have to coroutines, one called t1 and one called t2. And then I'm going to call an asyncio function called gather that takes multiple co-routines and gives me a future and then I'm just going to on my loop here say run until complete this coroutine that has both of them in there, and then at that point, when that's done, it will return and I can say f1 give me the result, here's the result from f1 and here's the result from f 2 and I can close my loop if I want to at the end there. So again, there's a few things that you need for your asyncio code. You need to have an event loop, so you create a loop, you call run until complete and then when you're done, you close it. Pretty straightforward, but again, you need to have co-routines and you need to have an event loop that can manage and run those for you. So that's the basic steps that we do for using our event loop.
|
|
|
transcript
|
2:45 |
Let's talk about what's found in a coroutine. Again, you need to declare a coroutine with async before the def any non blocking code, you need to call await before it in Python 3.6 and again, this allows you to do that context switch from one green thread to another you can't call await in functions, they can only be called in coroutines. anything that has an async def. If you want to return a value, there's a couple ways that you can return a value we can pass in this future that we saw and just say future.set result, we can also return from a coroutine. And then when we say run until complete we will get a future as a result and we can call result on that to pull off the result of what's returned. So those are a couple ways to return a value. Typically, I find myself using futures because it seems for me to make it a little bit more clear because you need to pack all these things into the event loop and typically you have multiple things running and so my code seems to have futures rather than just returning the result from the gathered future from every coroutine that I'm collecting together. These coroutines need to be put into the event loop and so to put them into the event loop we can say asyncio wait or asyncio gather or we can just pass in a coroutine directly into that run until complete wait and gather allow us to take multiple coroutines and make a new future out of those to pass into our loop. Let's look at the interface for future and what we can do with the future. So there are a couple ways to create futures. You can call the constructor, but I'd advise against that rather I would call, if you're creating a future loop create future. This allows you if you're using an alternate event loop, they can create their own future that has an alternate implementation rather than hard coding it to the asyncio future that's in there. So there could be some optimizations that alternate event loops that you could plug in as using, but this is the interface for futures once we have a future we can call await on it and that waits until result arrives, we can call set result on it, we can call set exception on it, we can have a call back on it. We can pass in a function and that function will be called with the future when the callback is done. We can call exception to get the returned exception and we can call result to get the returned result. Note that if the future does not yet have a result, this will raise an invalid state error. It could also return a cancelled error if the future was canceled. So typically, we don't like go into a loop and call if f result and try and see if there's an error there rather we use this code right here, result is equal to yield from f and that will give us our result. We don't have to go into a loop or anything. If we want to cancel our future, we can say cancel and we can get the status of whether it's done or canceled.
|
|
|
transcript
|
1:01 |
Okay, let's look at a task. A task is responsible for executing a coroutine object in an event loop, don't directly create task instances use the ensure future function. Let's see why it says that. So again, this task will wrap a coroutine and allow us to use it in an event loop and ensure future is a more general function. It takes any awaitable object and is idempotent so you can call it multiple times, but it does return a task for you, something that you can run. A couple of tips here, use loop create future instead of future to create a future again because you might have an optimized future on a certain loop. Use asyncio gather or asyncio ensure future to create tasks from coroutines. And if you want to speed up your loop or whatnot you can use a third-party loop, uvloop is one that has a faster loop implementation that's not in the standard library. You can also time out a list of co-routines if you want to by calling asyncio wait and passing a list of coroutines and give it a timeout that will run for the given amount and will time out otherwise.
|
|
|
transcript
|
1:32 |
If you want to use asyncio you need to be aware that your code needs to be infested or whatnot. It needs to call await and use other code that allows you to wait and run other code or is interruptable. And so there are a bunch of libraries on GitHub that are compatible with asyncio. Tips for debugging you can use pdb to debug, if you've tried to use pdb with threading, it can be a pain because it may or may not stop and then it may be confusing because Python is trying to run while you're trying to do pdb or whatnot. But in this case because there's only one process running you can use pdb to debug. There's a couple other tools you might want to look into these aren't included in the standard library, but they're there, aioconsole and aiomonitor, these allow you to have a repl that is asyncio aware and allows you to directly call await and async coroutines rather than having to put them into loops. So it's a little bit easier to debug that way. If you're doing testing you need to have an event loop and your testing framework needs to be aware of that so you can roll your own or if you don't want to roll your own you can take advantage of stuff that's already there. So there's one called asynctest, this is on top of the unit test framework and there's another called pytest asyncio which is compatible with pytest. We've looked at a lot in this section. We've talked about asyncio, what it means to be concurrent versus parallel and how you can use non-blocking code to not wait if you're using asyncio.
|
|
|
transcript
|
3:57 |
Test, open that up and your editor and see if we can get it going. So the first thing you're going to have to do is use pip to install pytest asyncio this is a pytest plugin to enable asynchronous testing. Let's run my test here and see if this works. So I'm going to hit run asyncio test. I have not installed asyncio test so I can do that either from PyCharm or I can do that from the command line here. I'm going to do it from the command line. I'm in the directory where my virtual environment is created on my machine and I'm just going to say bin pip install pytest asyncio and that should go out and get that and install it. So that's how we would install from the command line making sure that I'm running pip from my virtual environment. Go back and run this guy again and let's see if he passes that guy. Okay, now we have installed pytest asyncio, let's do the next part here. Write a coroutine add2 that accepts two parameters adds them and calls asyncio.sleep(0) finally it returns the sum. So in order to make a coroutine, we need to say async def and it's going to be called add2, it's going to take two parameters X and Y so it says it's going to add them. So I'm going to say result is equal to X plus Y and then it says it wants us to call asyncio sleep so asyncio.sleep(0) because this is an async call here, we can't just cut like this, we need to say await asyncio sleep and I have an issue here, it says I need to import asyncio. So let's say import that and then let's return the result here again the benefit of calling asyncio sleep in a coroutine is it gives the event loop the opportunity to run something else. So a single coroutine can't hog the CPU run this and make sure that it works. Okay, so it looks like the add2 part is working. Next part says write a coroutine avg that takes two parameters coroutines and size, it loops over coroutines and gets the values from them when it has pulled out size values, it returns the average of those values and says make sure you put in await call in it. If you want a well-behaving coroutine you need to put an await call in it. So we need to say async, because we're making a coroutine, def avg and it's going to have some coroutines. So maybe I say cos and I'm going to say size, after I get values from those, I'm going to average them. So I'm going to loop over my corotines for co in cos, I need to accumulate the results of those. So I'm going to say result is equal to an empty list. I'm going to say res.append await co I'm going to wait on that coroutine in my list of coroutines. Again when you call it coroutine, you need to say await on it. And if the length of res is equal to size, then I'm going to say return the sum of res divided by the length of res and that should give me the average of the first size coroutine results, presumably those are giving me numerical values. And when I run that it appears to work. So again, key here is you want to have that await in there so that you can give the event loop the ability to call another coroutine if it wants to and do some switching between them.
|
|
|
transcript
|
5:52 |
In this video we're going to talk about asynchronous context managers. These were discussed in PEP 492, it came out in Python 3.5. Let's look at the protocol for asynchronicity in Python 3. There's a couple protocols that you can implement. If you want to define your own class that behaves as a coroutine, you can implement the __await__ method that means that you can call await on it and get the results from that. You can also Implement an asynchronous iterator and we'll talk about those, and in this section, we're going to talk about asynchronous context managers. So they have a __aenter__ and a __aexit__ method. If you're not familiar with context managers, let's briefly discuss what traditional context managers look like, again in Python, these are things that you can put in a with statement so I can open a file with a with statement and within the indented portion of that block the file is going to be opened and when I exit out of it, it's going to close it for me. So the traditional thinking about when to use a context manager is if you have some logic you want to insert before a block and some logic that you want to insert after, either one of those makes a good case for using a context manager. And in that case you implement a __enter__ and a __exit__ method. Here's a brief example of doing that. Here's a silly little context manager called runner. We're going to pass an item into the constructor and then when we enter into the block, we're going to assume that the item that we passed in is a dictionary and we're going to set the key running to true, when we exit out of that block, we will set the key running to false. Down here below we can see we're actually running this and you can see that here inside of this block while we are in this block, the running key on item is set to true as soon as we unindent out of that block running is set to false. So right at the start this with corresponds to this __enter__ method and when we unindent down here, right before this guy, we are at the __exit__ method, right there. So that's how you can control inserting logic before and after. On this page, I'm linking to a nice little project. It's a Linux window manager utility, but it allows you to run external processes asynchronously in a context manager. Let's look at some of the content of that and we can see that it implements this context manager for asynchronous context managers protocol. You can see that there's a __aenter__ method and interestingly enough, because it's defined with async here, we can call await within it. So that's sort of the key to the asynchronous context manager is within aenter and aexit, you can call asynchronous co-routines as well. And this _AIOPopen guy who again runs a processed asynchronously is awaitable, so we see that he has a __await__ method defined as well. And in the constructor here you pass in a coroutine, he's yielding from that and returning from that inside of the aenter there. I am not going to dig into much more of what's going on, but I just wanted to make you aware of key difference between an asynchronous context manager and a normal context manager. So if you need to do logic from a coroutine inside an enter or exit block, you would use an asynchronous context manager because inside of there you can call await. Here's another example, we're just going to look at quickly. This is heavily inspired by the async timeout project, I'll link there to the GitHub, but we're defining a class called timeout and we're going to use a timeout context manager to be able to timeout co-routines. Here we're just going to show the constructor we can pass in a timeout value, how long we want to timeout, we'll pass in a loop. Inside of it, we're going to make it canceled attribute that says we have not cancelled what we're running and a handler, this handler will be called if we're going to cancel what's running. Here we see the asynchronous protocol being implemented, we see an async def __aenter__, so that's when we enter the block and you can see that when we enter the block, we're going to get the current time on the loop and we're going to add the timeout to it. And that's when we want to timeout this block. We're going to get a task, we'll show the get task implementation below and we'll set a handler, on the loop we'll say call at at some time when we're going to call our self cancel method and that gives us back a handler. We also have the __aexit__ and you can see that this is very analogous to the traditional context manager, we get back an exception and a value and a traceback if there was an exception thrown from within the context and here you can see that if the canceled flag is set, then we raise the asyncio timeout error, otherwise, if we have a handler we're going to cancel that handler and set the handler to none and we're going to set the test to none. Here we have the implementation of the cancel method. It just calls cancel on the task and sets cancel to true. Down below we have the get task function that takes a loop and returns the current task in the block. Here's an example of running that, we can see when we use an asynchronous context manager instead of saying just with we have to say async with. Here we're saying that we're going to time out after two seconds. We're going to pass in our loop as well, and we're just going to sleep for one second here. So this will not timeout, it should print done and after. If we change this value in here from 1 to say 3 or some value greater than 2, then this would time out and instead of saying done here, it would print timeout and it's going to raise this asyncio timeout error. We can handle that with a try block if we want to and do the appropriate thing at that point. So this is a simple example of using a context manager that is asynchronous. In this video we talked about asynchronous context managers. Again, the key here is that you implement the protocol and the key difference between these context managers and traditional context managers is that you can await from within them.
|
|
|
transcript
|
4:07 |
In this video, we're going to look at async context test.py Let's look at the first test, it says write an asynchronous context manager staller, it should accept a time in seconds when the context is entered, it should pause for that many seconds, call asyncio sleep. Okay, so let's make a staller. We have to define a class called staller and we need to define a constructor __init__ and it needs to take some time in seconds and because this is an import there rather than saying time, maybe I'll just say amount and I'll say self.amount is equal to amount. Now we need to define the implementation for the asynchronous protocol of the context manager and that is defining __aenter__ and __aexit__ and because this is asynchronous, we're going to put an async right in front of that def there. Okay, it says when we enter we want to call asyncio.sleep and we want to sleep for self.amt and we're getting squiggles here in PyCharm because we need to import asyncio there and because we're calling an asynchronous function, remember, whenever we call asynchronous functions, we need to await them. So this is a function that can call asynchronous functions because it is defined with async in front of it. Great, we just also need to define the async def __aexit__ and this doesn't need to do anything, so we'll just pass here. Let's run this and make sure that it works, so I'll just right-click and say run this. And it looks like I'm on the second part here, so this is my staller context manager, it takes an amount that we want to stall and when we enter the context it will sleep for that amount before starting the context. We can look down at the test here just to make sure that that's what's going on. We have a time, we keep track of the time before we go into it, we're going to say we're going to stall for one second and then we're going to enter it, we're going to look at our time and we're going to assert that our time difference is greater than or equal to 1 second, which it appears to be now. The next one says write an asynchronous context manager closer. It should accept an object and call the .close method on it when the context exits. Okay class closer, we need the constructor, and it needs some object here, I'm just going to say obj and let's say self.obj is equal to obj, and we need a __aenter__, __aexit__ async def __aenter__ and this doesn't need to do anything here and we need a async def __aexit__ and when we exit we need to make sure that we call closer here so you can say self.obj.close. Let's run this and make sure it works. Okay, it looks like it worked and we can look at the test down here. The test just makes a class called CloseMe and if you call close on it, it sets an attribute called closed is equal to true and inside of here, we just create an instance of CloseMe and we put it in our async context manager here and we don't do anything, we just assert that after we're done closed is called. Note that nowhere inside of this code have we called closed but we passed the c object into closer and it called that when it exited out of it. Hopefully you have a little bit more understanding how to use these asynchronous context managers the key point being that if you want to do some asynchronous calling you can do that inside of the __enter__ or __exit__ if you want to. Note that closer doesn't do any asynchronous calling. It just closes an object so you can make the context managers like that as well if you want to.
|
|
|
transcript
|
2:07 |
In this video we're going to look at asynchronous iterators. These were described in PEP 492, it came out in Python 3.5. Again, here's the protocol for asynchronicity, we can make co-routines and we saw that we can define those with async def. You can also define a class that's awaitable, if you implement the __await__ method we can make iterators by defining two methods here. We can define __aiter__ and __anext__. These are analogous to iterators in normal Python, in synchronous Python where we define __iter__ and __next__. Here, we're going to show an example of an asynchronous iterator. This is implementing a basic version of range, it's just going to do it asynchronously. So we're going to make a class called Arange, it's going to have a constructor that takes a start and an end and the end is optional, if the end is not set, then we use the start as the end value when we start at 0. We're going to define two methods in here, one is called __aiter__ and the other one is called __anext__ Note that __anext__ is a coroutine, we're defining it with async and aiter, you can see in the implementation of the coroutine __anext__ that we look at our current value of start and if it's greater than or equal to the end then we raise a stop async iteration. This is analogous to stop iteration in non asynchronous land and if that isn't the case, we're going to increment the start value and we're going to return the value there. So this should count up up to but not including the end number. Here's an example of running arange. We've got a routine called run arange and note that we have a for loop here in front of our for loop we have async so because this is the asynchronous iteration we need to put async in front of our for loop we can get our event loop and then say run until complete and this will print out the numbers from 0 up to but not including 5 asynchronous iterators are pretty straightforward, again, you just need to implement that __aiter__ and a coroutine called __anext__ and you can make something that you can use in asynchronous land.
|
|
|
transcript
|
6:30 |
In this video, we're going to look at async iter test, open that up in your editor. The first part says write an asynchronous iterator countdown that accepts a count and a delay, when looped over asynchronously, it returns the numbers from count down to and including zero. It waits for delay seconds before returning the next value. Okay, so we need to define a class called count down and it needs to have a constructor that has a count and a delay so def __init__ and it needs to have a count and a delay in here self.count is equal to count and self.delay is equal to delay. Okay, we need to implement this asynchronous iteration protocol. So the first one is def __aiter__, and this can be defined as asynchronous or not, it just depends on whether you want to do an asynchronous call in this case, I don't want to, I'm just going to return self and make this a self iterating coroutine. Now, I need to define a __anext__ and this does need to be an async call so def __anext__. Okay, there's a __anext__ and inside of here, we want to return count and then delay after each count. So we need to have some little logic there to say something like, maybe I need to come up here and keep track of the value that I'm going to return next. I'm going to say self.value is equal to count, value is what I'm going to return. If self.val is equal to self.count, then let's just return self.val. So the first time we don't want to delay before we return the value, so we want to say 10 and then wait for a second or whatever and then say 9 and then wait for a second and keep going that way. Now, in this case, if self.val what we're going to return is equal to 0, we also want to return self.val and otherwise, we want to say we want to sleep for delay and decrement our self.val. So we want to say await asyncio.sleep for self.delay and then we want to return self.val and we're going to say self.val minus equals 1 and return self.val. Okay, let's try this see if it works here. I'm going to say run async test, it thinks for a minute here and I get an error on line 43. So that's this guy right here, I got an assertion error, so down here we're basically unrolling this protocol here. We're saying get the aiter and then get a start time and call next on it and the first value since we passed in 2 should be 2 and assert the time is less than half a second since we're saying delay of 1 and then we're getting the next and saying that the next value should be 1 and we got the next value was 2 instead of 1, so let's go up here and look at our logic here. So the first time we returned self.val we didn't do anything, so our self.val is just going to still be self.val. So maybe I want to say something like this like val is equal to self.val and if val is equal to self.count, return val. And at this point we're going to say self.val minus equals 1 up here. And let's see if that works a little bit better. So in the first case, we'll say val is equal to self.val which should be the start value. We're going to decrement our instance member which shouldn't affect val and then if we're starting we're just going to return, if we're at the end we're going to return. I think this is wrong, we don't want to return at the end, we want to sleep before that, so we'll just get rid of that and we'll say if val is less than 0 then we want to raise a stop async iteration. So that says we are done once we get 0 so don't do any more sleeping or whatever. Let's run this and see if it works. Okay, I got an asyncio is not defined here. I better fix that and make it defined, import asyncio, let's run it again. And it looks like it worked that time. So it passed, note that it took 2 seconds to run, or a little bit more than 2 seconds, which makes sense because I said I want to count down from 2 and I want to have a one second delay in between there. So it should give me 2, wait for one second, give me 1, wait for a second, give me 0 and not wait after that. Note that the test here, we keep calling next and we assert it, it raises that stop async iteration error. So this is a little bit trickier. There's some logic in here that you've got to sort of figure out but once you've got it, you can see that you have a little asynchronous counter that will count down and sleep in there. Again, note that this __anext__, this is a coroutine and because it's defined with async we can call await in there. This gives anything else on the event loop that wants to run a chance to run at that point in time.
|
|
|
transcript
|
2:55 |
In this video, we're going to talk about asynchronous generators. These are described in PEP 525 Python 3.6 in the PEP it describes some of the motivation for this we'll just read this because I think it's pretty interesting. It says, however currently there is no equivalent concept for the asynchronous iteration protocol async for. This makes writing asynchronous data producers unnecessarily complex as one must define a class that implements __aiter__ and __anext__ to be able to use it in async for statement. So we saw how to implement a asynchronous iterator and we saw that you can do that by implementing __aiter__ and __anext__ if you've done that with normal iterators in Python, you'll note that typically it's a lot easier to do that with the generator and this was the same motivation here. Also interesting to notice this next paragraph that's in the pep. It says performance is an additional point for this proposal in our testing of the reference implementation asynchronous generators are 2x faster than the equivalent implemented as an asynchronous iterator. Kind of cool, you get some speed benefit and it's easier to write. So here's an example of the migration path. We are taking an asynchronous iterator and we're starting to add a generator to it. Here I've got a class called GenRange, and this is, again, similar to that Arange guy that we implemented before you can give it a start and an optional end and if you don't specify the end it will use start as the end. And then we notice that we have down below specified __aiter__ and in there, note that we are yielding the results, we're just looping over range and yielding the result. So we're combining a generator with an iterator. Here's an example of running this we can put it in a coroutine and because this is a coroutine itself we need to put async in front of our for when we loop over it and this will print the numbers from 0 up to but not including 5. Now we want to take that a step further we can do the same thing with normal iterators. We can yield from __iter__ in there, but wouldn't it be nicer if we could just make a generator function that is a generator and we can do that, here we have a function that is a generator because it has a yield in it but it also has an async in front of it. So this is a synchronous generator. And this is the same implementation that we had before but note that the logic is a lot simpler and we don't have to keep track of state because this freezes and comes back to itself like a normal generator in Python would, so here's an example of using it, again because it is a coroutine it behaves as a coroutine when we loop over it we need to put that async in front of our for there, but this will print the numbers from 0 up to but not including 5, so that's how you can make a asynchronous genera tor in Python. Just put an async in front of your def there and include a yield in your logic and you now have an asynchronous generator. Hopefully, you can use these to make your code more succinct and more legible.
|
|
|
transcript
|
2:22 |
In this video, we're going to look at async gen test, open that up in your editor. And this is about making asynchronous generators. So it says write an a synchronous generator countdown that accepts a count and a delay, when looped over asynchronously, it returns the numbers from countdown to an including zero it waits for delay seconds before returning the next value. This should be very familiar to you if you've already done async iter test. So let's make a generator that does this the point of this is to show that generators are typically easier to implement and easier to debug than iterators. So in order to make an a synchronous generator we say async def and it's going to be called countdown, it's going to accept count and delay and I'm just going to go into a while loop here, I am going to say while 1 and I will yield count and if count equals 0 then I will break out of here. Otherwise, I will say count minus equals 1 and then I'm going to sleep and I could just say time.sleep, but that's not going to be an asynchronous sleep. So in order to do an asynchronous sleep, I need to import the asyncio library and then we need to await it. So we're going to call await asyncio.sleep. and we're going to sleep for delay seconds again because I am in an asynchronous generator, I can call await on an asynchronous function here and that should be it, let's give it a test and make sure that it works here. So just run it here, it takes a while because it's doing some delaying here, but it looked like it ran. This is the same test code basically as async iter test and note that it takes 2 seconds to run and if we come down here we say that we're counting down from 2 with 1 second delay. So that should take 2 seconds to run. You'll note that we're sort of unrolling the asynchronous iteration protocol down here and asserting that we raise a stop async iteration error You'll note that we don't explicitly raise that exception but when the generator returns that raises the exception for us, so thanks for watching this video. Hopefully you have a better feel for those a synchronous generators now and you can hopefully take advantage of those and use those in your code.
|
|
|
|
48:58 |
|
|
transcript
|
6:11 |
In this video we're going to talk about exception chaining. This came out in pepped 3134. There are a few new things that this introduces in Pythons exceptions. That's the __context__, __cause__ and the __traceback__. We'll look at all of them here. The motivation for this, the PEP states that during handling of one exception, exception a, it may be possible that another exception, exception b, may occur. If this happens exception b is propagated outward and exception a is lost. In order to debug the problem, it's useful to know about both exceptions, the __context__ attribute retains this information. So let's look at an example here. I'm trying to divide 1 by 0, I'll get a 0 division error that will raise an exception and I can inspect that exception here and note that I'm just printing the string of the exception, the context of it, the __context__, the __cause__ and the __traceback__ and because this is the original exception here, I only have that exception, there's no context no __context__ and no __cause__. There is a __traceback__ which has the __traceback__ for the exception. Now, let's change it a little bit. Let's make a function called divide work that does some division and if there's a 0 division error, it will call log, the log function. And in this case, let's pretend that log talks to a cloud-based logging provider and for some reason this is down. So instead of actually logging it raises a system error that says logging is not up. So now we're going to have a couple errors here if we divide by 0 we're going to try and log that and we're going to get another error that says a system error. So if we look at what happens when we say divide 5 by 0, it gives us a traceback and it says we got to 0 division error and it says during the handling of that 0 division error another exception occurred. We also got this system error logging is not up. Let's try and call our divide work with a 0 division error and see what the exception looks like. If we inspect the exception, we'll see that we got the logging is not up exception. So this means we're getting a 0 division error, which is trying to log that and it's getting the logging is not up error. If we look at the __context__ there, there we see the 0 division error and there is no __cause__ and we see that we have a traceback. So by having multiple exceptions here we can inspect the __context__ and see where that exception came from, in this case, the logging up exception came from having it as 0 division error. Let's look at the motivation for __cause__ it says sometimes it can be useful for an exception handler to intentionally reraise an exception either to provide extra information or to translate an exception to another type. The __cause__ attribute provides an explicit way to record the direct cause of an exception let's look at __cause__ here is some code that illustrates it we still have our divide work function, it's changed a little bit. If we get a 0 division error, we're going to log that and in this case our log will not fail, it's just going to print that out but we are going to raise another exception instead, we're going to raise it an arithmetic error, and we're going to say raise that from the original exception. If we call it here, we can see that we get a 0 division error and it says that the above exception was the direct cause of the following exception, the arithmetic error. So the 0 division error caused reraised the arithmetic error from that 0 division error. And if we inspect the __cause__ attribute of the exception the exception that we get is bad math and it was caused by the 0 division error, note that the context is also the same error there with the same exception, but because we said raise this new exception from the original exception, this is the original exception that we raised from the 0 division error. Let's look at the motivation for adding __traceback__. It says adding the __traceback__ attribute to exception values makes all the exception information accessible from a single place. Python 3 also added __traceback__ to the exception. The reason why they did this was just to make it nice to have around. prior to Python 3, in order to get the traceback you had to import the sys module and try and pull the traceback off of that. In Python 3, they're just going to give it to you so we can look at the traceback by just inspecting the __traceback__ attribute if we need to. This might be useful for low-level logging or figuring out what your issues are, if you need to dig into them. One thing to note is that because the exception contains the traceback and that can have variable state in Python 3, there is an explicit decision to actually remove exception variables following the exception block. So here's the exception block in here and in Python 3 we have access to the e variable inside of that. In Python 2, the e variable sits around afterwards. But in Python 3, if we try to inspect that e following our exception block, that indented block we will not have it anymore, so this is cleaned up to not leak information. Just one thing to be aware of. Let's look at some suggestions for exception handling. Mistake one suggestion is to make your own specific exceptions and this just helps readability and discoverability rather than gripping through a code base with a lot of key error or index error. If you have something that's specific to your code and is named specifically, it makes it easier to find and easier to debug. Another suggestion is to be specific about what exceptions you handle. So if you've got to try statement don't just put any exception after it be very specific about the exceptions you handle. A general rule of thumb in Python is we want to only handle exceptions that we know that we can recover from and so these two sort of go hand-in-hand if we can only recover from certain exceptions, just catch those exceptions. don't be general and catch any exception. So to summarize, exceptions are made a little bit nicer in Python. You can raise exceptions from other ones. You have the context of where the exception happened, and again in Python, we want to be very specific and only handle what we can so we've got a couple suggestions for best practices for exception handling. Hopefully, this helps you be better and make your code a little bit more clear and more robust to failures.
|
|
|
transcript
|
2:58 |
In this video, we're going to look at exception test, open that up in an editor. Let's read about the problem, the first part says define a customized exception color error that subclasses runtime error. This is pretty straightforward, we just make a new class called color error and we're going to subclass runtime error. We don't have to do anything else, we can just pass for the body of that. The reason why one might want to define their own class of exceptions is so that they can handle those in a special way in their application and it makes looking for them and their application a lot easier. The next part says create a function err_wrap that takes a function fn *args and **kwargs. It should call and return the result of invoking the function with the arguments and the keyword arguments if an exception is raised it will use the raise from exception chaining to wrap the error with a color error. Okay, so this is taking advantage of higher order functions in Python and we can pass functions in as parameters to other functions we're going to say def err_wrap and it's going to take a function. It's going to take variable positional arguments, so *args and **kwargs and we're going to return the result of calling function *args with **kwargs here, but we don't just want to return this we want to wrap it and make sure that if there is an exception in here that we catch that exception, so I'm just going to say try except exception as e and then if I actually got an exception in here rather than raising that exception I'm going to wrap it. So I'm going to say raise color error from e, what that will do is it will wrap color error from e and there will be a context in there that will point to the original exception so we can run this and see if it works. It looks like it works, let's take a brief moment to look at the code and see what it is actually testing. Here we're calling err wrap with the lambda that simply adds to numbers and it asserts that that result works. Here we're calling err wrap with a lambda that divides twonumbers and it's doing division by 0 and it's asserting the it raises a color error and then later on the context, the context manager object here has a value attribute which is the actual error and on that there is a context which is zero division error. So the real error was the zero division error, but it got wrapped with color error. Same thing down here below. We're making a function called raise 2 that just raises a key error, and we're calling raise 2 and we're asserting that color error is raised but inside the wrapped context is key error, so hopefully this gives you some insight into how to do wrapping in Python 3. This will help finding errors a little bit easier and you can make them specific to your code if you'd like to.
|
|
|
transcript
|
9:49 |
In this video we'll talk about extended iterable unpacking, it came about in Python 3, this is a nice feature. Let's dive into what that means because extended iterable unpacking is quite a mouthful. Here's a simple motivation from the pep if I have an iterable here, range 5 and we know in Python 3 that range 5 is lazy, it only gives us values as we iterate over it unlike in Python 2 where it returns a list. I might want to say, I want the first and last value but I don't care about the middle values or I want what's in between the first and last values, this PEP allows us to do that, I can say a,* b and then c what this is going to do is it's going to say a gets the first value 0, c is going to get the last value and *b gets what's ever left over, it unpacks those and note that this type here is a list, it's going to put those into a list. A couple of notes here, this catch-all or starred expression is a list, it's not a tuple if you're familiar with *args, when you're invoking functions and you look at the value of your args inside of your functions, it's going to be a tuple, in this case, it's a list. You can only have one starred expression, if you don't have these guys nested, so it's possible to nest them, and then in this little nested guy you can have a starred expression but you can't have a *b *c and then d because it's ambiguous to Python and Python wants us to be explicit. Another thing to note is that this deals with the left side of assignment. So this is unpacking and unpacking tuples or sequences deals with the left side of assignment typically. Let's do a quick unpacking review, if you're not familiar with unpacking or this feature that's in Python, that's pretty cool. This is all Python 2 compliant as well, so all this code works in Python 2 on this slide if I've got a variable a and a variable b, you may or may not know that I can swap them easily simply by doing this, a,b = b,a. What that's doing under the covers is it is saying on this side here, I'm actually making a tuple here and I'm doing an unpacking operation here and I'm saying take the variable a and make it point to whatever the value of b was in this tuple and make d point to whatever a is in this tuple. Now, it might seem confusing, how does it keep track of that, but under the covers what's happening is this tuple has references to the values of b and a, not the actual variables. So it has references to those values and then you're just pulling those out into new variables. Pretty cool. Okay, this next example here, I have a list of names fred, george, luna and harry and I can do something like this where I say first, rest is equal to names 0 and names 1: and this slice at the end here gives me names from index position 1 to the end. When we look at first and rest we'll know that this first guy is a scalar. he's the fred guy, but the second guy here is a list of those names or the sub guys there. This third example here in person, we have a tuple that has a nested tuple in it. So it's got a name and age, some location and then it's got a tuple that presumably is dad and mom so we can do something like this where we do an unpacking on the left hand side where we say name, age, location and then in parentheses here dad mom is equal to person. What that will do is it will create a variable for each of those guys and it will understand because dad and mom is in parentheses there it wants us to unpack that tuple of Arthur and Molly and pull those into the variable dad and mom. Here below, you'll see that I have name and dad and this is actually a tuple because it's got a comma between those and so we see that we have those values pulled out. So that's unpacking, this works in Python 2 and 3. Here's another example of unpacking, this would work in Python 2 were it not for this fstring here, but I can do the same thing you may or may not know that if I'm in a for loop, a for loop creates variables, and in this case, I'm unpacking those variables because I'm using enumerate, enumerate returns the index position and the items of enumeration. In this case, the items of enumeration are tuples fred and age and george and the age, and so if I want to unpack fred and the age, I need to put parentheses around those guys to pull them out as variables. So inside of my for loop here, I have a variable called i that points to the index. And in this case, I told it to start at 1 rather than the default of 0 and I also have a variable called name and age and so I'm just going to print those out, I'm going to print out the index, the name, intense basis and the age here. Okay, so this is the Python 3 stuff that's new. We've got some names again and I'm going to say first and then I'm going to say *rest, so what that does here is it says I want first to unpack the value at the start and star rest to take a list of everything else that's on the end and we'll see that it's putting that into a list here. Again, this is Python 3 syntax, alternatively if I've got this nested tuple like I had before with fred 20 England and then the nested tuple of Arthur and Molly I can say *ignore, I want to ignore or put everything at the front in this ignore list here and then I'm going to unpack dad and mom there, that will give me a variable called dad and mom and we'll actually create a variable called ignore that has the rest in it. I can also use multiple stars here if were nested, like I said here so I'm going to say ignore everything at the start, except I'm going to have some thing at the end which is this tuple, note that what's inside of this tuple here is two strings and in Python, strings are sliceable, and so I can say d first,*d and that's going to take Arthur here and it's going to pull off the first thing of Arthur which is a, so d first, the value of d first is a, d is going to be a list with r t h u r in it, m first is going to be the same, the first letter of Molly, capital M and the *m will be a list with the rest of that in there. One thing that might bite you, you need to be aware of you can't just have a star in front of a variable by itself. You're going to get an error that looks like this that says syntax error, starred assignment, target must be in a list or a tuple. A fix for that is easy, you can just put a comma at the end there and in this case, this is sort of a no op here, but if you wanted to do that you could or if you had something over here that's iterable that isn't already a list, you could create a list easily by doing that. Of course, I would want to be a little bit more explicit if I was doing this, I would say people is equal to list of names. To me that's more explicit and easier to read, but you could do this if you wanted to. We've talked in this video about this new unpacking syntax that allows you to put stars in the left hand side of an unpacked operation, it's pretty cool and allows you to basically clob what's in a sequence into a list. 07:22 Hopefully this is useful to you and you can find places where this will make your code easier to read and use.
|
|
|
transcript
|
5:30 |
In this video, we're going to look at the unpack test assignment. I'm using PyCharm so I'm going to expand my directory here and click on unpack test. We can see at the bottom here that when we execute this file, it will try and run pytest against it and we can see that PyCharm is complaining about various names that are missing. Let's read the assignment and see what we need to do. It says given the tuple person, which is defined right here, unpack the values into name, age and country. So person is a tuple with a string which appears to be the name a number which looks like it's the age and a string which appears to be a country. One way to do this would be to say name is equal to person 0, index position 0 and age is equal to person 1, and country is equal to person 2. Let's run and make sure it works, note that because I just opened this and I had previously run vm.test If I say run here, it's not going to run this file a couple things I can do, I can right click here and say run unpack test. I can also run it from over here by right clicking on the file and running it over there. There's also a command line shortcut, it's control shift F10. Let's try and do that and see what happens when we run this. Okay, so it appears that I got to line 21. There is one failure pytest ran and so it appeared that we made this first part work. Now, we really didn't do an unpack operation what an unpack operation does is it says I know that a sequence contains a certain amount of items and I want to in a single assignment with commas in between the variable names pull those out. So this is how we would do the unpack here. We would say name, age, country is equal to person, let's just run that again to make sure it still works. Okay, we still get the name around the next part. So that's how we do basic unpacking and this works in Python 2 & 3. Let's look at extended unpacking, extended unpacking remember is where we put a star in front of a variable. So it says use unpacking to get the first letter of the name, store the result in first. So one way to do this is just to say name is a string and let's pull off the first character, first is equal to that. If we want to do this using unpacking though or extended unpacking, one way would be to say first, second, third but we don't know how many, perhaps we don't know, in this case we do know how many characters there are but it'd be kind of annoying to type all those out and if the length is dynamic, it's not going to work. What Python allows us to do is put a little star in front of the next variable and just say something like rest and what's going to happen here is first will be the first item of the sequence and rest will be a list containing the rest of the items. I'm going to use a feature of PyCharm here to just put a breakpoint in here and now I'm going to click the bug up here and let's inspect what's going on. I want to look at rest and it looks like rest is a list and it has a length of 0. Let's see what name is or first, first is c. Okay, so it looked like it didn't pull out rest or PyCharm thinks that it's an empty list, which is interesting. Oh, that's because I have an error. I'm going to hit play and just fix my error here. The problem is because I gave it a list of length 1 because I left the 0 up here. Let's get rid of that and let's debug it again. Okay, in this case now rest is a list and it has each of the characters in there. So when you put a star in front of it, that's just going to make a list and put the remaining items in there. And because a list can be variable length in Python this will support arbitrary length of names there. Okay the final assignment here is unpack the characters from name into a list called letters. So one way to do this, you could say letters is equal to list of name and that should work. It appears to work, but we want to use unpacking to this, in particular, we want to use extended unpacking. So let's try and do it extended unpacking has remember that little star in front of it *letters is equal to name. Let's run that and see what happens. I get a syntax error starred assignment target must be in a list or a tuple. So what that means is that I can't have a standalone variable with a star in front of it, Python 3 requires that I put that comma right there to indicate that we're going to unpack this into a list. Let's try it now and it looks like we get the right thing. So hopefully you've learned a little bit about unpacking and extended unpacking in Python 3. This is a great way to pull out either the first or the last of a sequence. Remember that when you use the extended unpacking with a star in front of something, there has to be at least more than one variable or you have to put a comma following it, also recall that when you use extended unpacking with a star in front of the variable name, that variable will be turned into a list.
|
|
|
transcript
|
9:51 |
In this video, we're going to talk about additional unpacking generalizations. This came out in PEP 448 which is in Python 3.5. The PEP reads extend usages of the * iterable unpacking operator and ** dictionary unpacking operators to allow unpacking in more positions an arbitrary number of times. Let's look at some examples here. If I had a dictionary and I wanted to merge it with another one in Python 2 and prior to Python 3.5 I would have to do something like this. I would create a dictionary here called thing_colors which is mapping some object to the color. So apple is red, pumpkin is orange. And if I wanted to merge this into a new dictionary with more colors one way I could do it is create the new dictionary here called more_colors and then I could say update more colors with thing_colors that would insert thing_colors into more colors. And then I could update more colors with other values there, note that in this case apple I'm overriding it with green. This PEP allows us to do something like this where I say thing_colors is equal to apples is red and pumpkin is orange and more_colors is equal to, and then I make a literal dictionary but inside of that I put ** thing_colors in there. What that does is it unpacks the keys and values from that dictionary and copies them into more_colors. After that, I'm going to insert bike is blue and apple is green, note that apple here is a repeated key and so because this apple comes after, where after means further to the right in my literal dictionary here, then this apple mapping to green will overwrite the apple that is red. But note that in more colors here, I have pumpkin as orange in there. Also note that Python 3.6 the order of dictionary insertion is remembered apple was the first key that I put in followed by pumpkin and note that in more colors apple is first, pumpkin is second and then bike is third, because this key was already in there, it stayed in the first position, even though the value is updated. So an unpack can be in any location in the dictionary in the previous example, it was at the very start but it can be at the end or you can have actually multiple unpacks in a dictionary Here I say bike is blue, apple is green and then we're going to unpack thing_colors in there, in this case the apple that's red from there overrides the apple that is green. But note that bike and apple are in first and second position because they were in the original dictionary. Another nice feature of this change is it allows us to have multiple ** operations in function calls here. Note that here I'm calling this function print args, which takes variable number of keyword arguments and I'm saying I want to pass in thing_colors unpacked and also more_colors unpacked. This one didn't work prior to Python 3.5, but in Python 3.5 and above you can do syntax like this and note that I'm putting in another named parameter here with a value in between those. One thing to be aware of though, is that you can't repeat names in a call. So this might be a gotcha here. Here I've got thing colors and I've got apple is red here, I've also got more colors apple is green and if I call this with thing_colors and more_colors with these repeated keys, I get a type error. In the prior example on the previous slide, I didn't repeat that apple key and so I didn't get this error. So this is something you might need to be aware of if you're repeating those. Simple way to get around that is just to merge those dictionaries before calling them in there, that's something that might happen. So that's the ** operation that allows us to unpack into dictionaries and also use unpacking and function calls in more than one place if we want to. Let's look at the single star, single star allows us to create tuples. So here I've got name is equal to Matt. Remember that the string Matt is a sequence of characters here. And if I say *name, with a comma at the end here, it's going to give me back a tuple. Note that I'm not doing this extended unpack operation, there's no assignment here, so this is slightly different than the prior examples where I would get back a list, but this is saying I want you to take what's in the sequence and stick it into a tuple. This is also a case where you might need a comma if I have name is equal to Matt and I just say *name on itself, I get this error here, syntax error, can't use a star expression here. Here, I've got some examples of various ways we can use star expressions and know that by default, these return a tuple and I can actually string these together by putting a comma and use multiple of them and here I have a tuple, note that there's parentheses here with all of the characters from name and last in there, if I wanted to put those into a list, I just put square brackets around those and that puts it into a list. Similarly, I can put it into a set, note that a set is not ordered, so the order comes out a little different than what the order is in name and last. Here I've got a little function called summer that just takes variable arguments and variable keyword arguments and it's going to sum all the arguments that are passed in in positional locations and it's also going to sum all the values so it's not doing very much, it just accepts arbitrary number of arguments and sums them if they are positional or values in keyword arguments, let's look at some examples of calling this, I can call it with 1, 2, 3, any number of positional arguments and it gives me 6. I can also call it with star list here and then a three following that, and that's fine, Python 3.5 and above doesn't complain about that. Note that I can also have multiple stars here and this can be a list here, it can be any sequence here, and I can have however many stars I want to in that, if I want to, and here I'm calling it with a star, a positional parameter unpacking a dictionary here, a keyword parameter here and another unpacked dictionary over here and that works as well. Little bit of the difference between this syntax and the extended unpacking that we showed in another video, here I've got name is equal to the string Matt. I can do the extended unpacking by doing an assignment here on the left-hand side by saying *letters, I need the comma at the end there is equal to name that makes a new variable called letters and it is a list with the individual characters in it. Note that in this unpacking generalization, which is different than the extended unpacking defined in this PEP here, I am not putting this on the left-hand side, I need to put it on the right hand-side, I put a star in front of it, a comma at the end and I assign it to a variable and it gives me back a tuple here. So a little bit of a difference between those two, if you need to create a list you can use this extended unpacking. Note that if I simply put square brackets around that I will also get a list on the second example. This video talked about additional unpacking generalizations, which is pretty cool. If you want to create dictionaries from other dictionaries or merge dictionaries or create tuples or lists or sets from sequences, you can easily do this with this new syntax. You can also pass in multiple unpacking operations into function calls, which is cool as well.
|
|
|
transcript
|
3:56 |
In this video, we're going to look at gen unpack test, so open that up in your editor. The first part says merging dictionaries given the coin value dictionary create a new dictionary, new value, that has the coin value values and has the following keys and values, so BCH entry and ETH entry, use extended unpacking no dictionary methods or inserts. So I've got coin value right here, it wants me to make a new dictionary below it called new value and it needs to be a dictionary that has these new keys and also has the original keys. So in order to get the original keys without calling a dictionary method or using an insert I can do this extended unpacking here and I can just say coin value right there with the ** in front of it, that's going to unpack the dictionary into this other dictionary and then I can say BCH is 1650 and ETH is 1055. Let's give this a run see if it works. Okay, so I'm on the next one, so it looks like that worked there. So again, this is a nice way to unpack dictionaries into other dictionaries. And if you have multiple dictionaries, you can use multiple dictionaries here, it's not limited to just one. Okay, the next part is create a set of the keys from new value by unpacking. Put the result in coins. So we want the keys of the new value guy in this coins guy, so in order to get the keys of this we can use this extended unpacking operator and just say I want * of new value if we treat new value as a sequence, Python treats a dictionary as a sequence of keys. This should give us the keys. Let's run it and see if it works. Okay, it says I can't use a starred expression here. That's because I can't have a star by itself, I need to put a comma there at the end. Let's run it again. Okay, and now I got an error where it said the assertion failed because I've got a tuple that's not equal to a set. Apparently I didn't read well enough that said create a set of the keys. So one way to create a set of them is to put this into a set. Let's try and run this and see if it works. Okay, the next part says create a list of the keys from the new value and the other coins tuple, put the result in all coins. So we want to make a new variable called all coins and it should have the keys from new value and it should have the other coins tuple, what's in other coins, so here's new value if we want the keys from that, we can just do that star to get the keys from the new value and it wants it in the list, so we're going to say * new value, and the other coins tuple. The other coins tuple is defined right here, and if we just want to include that in here, we can just say I'm going to start other coins include that as well. So again, this is a nice little syntax here. I'm saying in my list, I want to include this sequence here. And this is a dictionary, but we're pulling out the keys and we're also including the sequence here unpacking it. This happens to be a tuple but we're going to pull out those guys and insert them into our list. Let's run it and make sure it works. Okay, so we get no failures here.
|
|
|
transcript
|
0:54 |
One of the general themes of Python 3 is laziness and so a lot of functions that returned lists in Python 2 are now lazy and behave as iterators, either returning generators or views or something that is iterable. So map, filter and zip, and range are all examples of this. In Python 2, these returned lists, that is no longer the case, they don't return lists anymore, they are iterables that you can loop over. Similarly, a dictionary in Python 3 has keys, items and views, these same methods existed in Python 2 but in Python 2 these returned lists of what was in there. These are now views, views are slightly special in that they reflect any updates that are made to the dictionaries. So if you're looping over it and it's been updated in the meantime, you should get some values that update as well.
|
|
|
transcript
|
1:35 |
Another thing to be aware of is how Python handles comparisons in Python 3. In Python 2 you could compare an integer and a string and Python would have some arbitrary, well, not arbitrary but to humans perhaps seemingly arbitrary or confusing ordering for those. In Python 3 we're a little bit more strict and Python is going to complain about those if I try and compare those we'll get a type error and it says that that operation is not supported between those two. So if you've got something that you need to compare typically you'll use the sorted function and you'd pass a key function in there and the key function would do some conversion to another type that would allow you to compare these so I could compare these as integers, I could also compare them as floats. I could compare them as string, that sort of thing. In this course, we've talked about dictionary ordering and how in Python 3.6 as an implementation detail in the CPython interpreter dictionaries maintain the key insertion order. In Python 3.7 this is actually going to be part of the language what that means is that any other implementations of the interpreter should follow suit and also sort keys as well. In Python 3.6 they don't necessarily have to but people are taking advantage of that. They like the functionality so that, they like the functionality. In Python 3.7 this will be part of the language proper. We just got an example here of a dictionary that has name, age and address in there note that name came in first and age and address and we would print out the dictionary or if we loop over the keys, we will get them back in the same order of that insertion.
|
|
|
transcript
|
1:04 |
Another thing that Python 3 gave us is the lack of name leakage in comprehensions. This is something you may not be aware of but variables were created during comprehension creation in Python 2 so an example shown here is I've got a variable called x and I am looping over range 5 in a list comprehension using that same variable name x. In Python 2, x after that list comprehension would be the last value of the iteration. In Python 3 that's no longer the case, these variables used in list comprehensions don't go into your local or global name space, they stay isolated in your list comprehension. So x will stay 10 in Python 3, a slight difference there. Okay, that wraps up most of the changes, we've seen in bunch of the other videos in this course, a bunch of the new features and functionalities of Python 3, I just wanted to make sure that we talked about some of the other changes that weren't easily found in peps or whatnot, but are some things that you should be aware of.
|
|
|
transcript
|
7:10 |
In this video we're going to look at other test.py. Open it up in your editor, let's run it and make sure that it runs. Okay, it looks like there's one failure, that's because there's one test function, cool. Let's go through it. Lazy range, get the 100th item from the vals variable, store it in the variable named hun. So we have a vals variable here and it's range from 42 up to but not including two million jumping by 32 and we want the 100th item here, let's try and see if we can slice it off hun is equal to vals 100, let's run that and see if it works. Okay, it looks like that worked, so the range function even though it's lazy in Python 3, allows you to do some slicing off of it, let's do a map, find the 100th item from mapping fn, which is this function right up here, to vals using the map function store the result in hun function. So we say map we're going to map a function fn to vals. And we want the hundredth guy from that. So hun_fn is equal to that and let's see if we can slice off the hundredth guy. We'll run it and we get an error, map is not subscriptable. So even though range is lazy, map is also lazy, but map doesn't support this index operation, so what we would need to do to get the hundredth item is do something like this, seq is equal to the map of that, and then for i in range 100 hun_fn equals next seq let's see if that works and I have a typo here let's change that and run it again. Okay, and so it looks like that works so this just shows you something that you may need to do in this case I need to jump through a little hoop and call next 100 times to get this item from my sequence here because it's lazy. Now there are pluses and minuses to this, in Python 2 map materialized the list for you and you can slice a list but if you have an arbitrary long list it might take a bunch of memory so there are tradeoffs depending on what behavior also I could course this into a list and do that but again, we're going from 42 to 2 million so this is pretty big I might not want to do that. Sorting, sort the nums list as if they were integers store the result in ordered, hint look at the sorted and the keys parameter look at sorted and the keys parameter, so there's a built in function called sorted and it has a keys parameter. Okay, so in Python 2, Python 2 would allow us to sort lists with arbitrary types and a Python 3 wants to be a little bit more explicit. So if we just say ordered = sorted nums, let's run that and see what happens I get a type error, less than operation is not supported between instances of string and int that's because I've got a string in here and I've also got integers in here. So it wants me to sort these as if they were integers so one thing we can do is we can cast them to integers so we could make a little for loop or do a list comprehension and cast them to integers. But they key parameter in the sorted function will allow us to apply an arbitrary function to an item that needs to be sorted and will sort based on that. And this gives us the original ordered will now give us back the original list but sorted as if they were integers. So let's run and see if it works. Okay, it looks like that worked. So this is sorting that list as if they were integers. Name leakage, sum the square of the numbers in nums, store the result in square sum so I'm going to put them right here in this space and note that I've got some variables here that are just floating around that maybe someone created or maybe I created if I'm typing code and if I want to square a bunch of numbers and I've got them in sequence, one way to do that is to use a list comprehension, I can say nums is equal to, or I've already got nums, so maybe sq is equal to num squared for num in nums. And then I want to sum that, and so I'm going to say sq.sum is equal to the sum of this whole guy here. Let's run that see if it works. Okay, I got an error here, unsupported operand for ** a string and an int, again I've got this string in here, so maybe I want to corse these to ints. Let's corse them to ints, and then do that see if that works. Okay, it looks like it worked this might just seem like a silly thing but you'll note that in this case I used num as my variable in my list comprehension here and in Python 2 if I used num here when I get out of this list comprehension the value of no will be the last value of this list comprehension. In Python 3 that behavior is changed and there is no "leakage" of this variable into the surrounding scope here so num stays at 42. So I put an X in here and a num in here in case you used those in a list comprehension. Now if you did these in another way, if you made a for loop and used num in there then you would overwrite this num guy so it's just something to be aware of if you're not familiar with that in Python 2 on list comprehensions, note that generator expressions and set and dictionary comprehensions behave as in Python 3, there's no leakage there but in the list comprehension there is. So this video showed some of the things that changed in Python 3, we have laziness as a general theme so range and map are both lazy they support somewhat different interface so be aware of that. Sorting, when you sort different types, you need to be specific and make sure that they support sorting and so we can use the key parameter of the sorted function to help enable that and there's no name leakage in list comprehensions now.
|
|
|
|
0:36 |
|
|
transcript
|
0:36 |
Thanks for watching this course on Illustrated Python 3. I hope you've come to understand a little bit of the new features in Python 3 and are looking forward to using them in your work. Again, Python 3 has awesome features, asynchronous features, the ability to do annotations, keyword only arguments, unicode, these are all great features in Python 3 and you should be using them where you can. I'd love your feedback, if you have any questions or concerns, again, my twitter handle is @__mharrison__ thanks for watching and best of luck in your future Python endeavors.
|