|
|
|
14:02 |
|
|
show
|
1:44 |
Welcome to the introduction to Ansible Course.
My name's Matt Makai.
I'm incredibly excited to help you learn this tool Ansible that I've been using for over five years which consistently helps me to solve technical problems every single day.
Ansible is a configuration management tool which helps you to automate processes that a software developer or systems administrator would traditionally do manually such as standing up a new server modifying firewall rules, or deploying a web application.
Ansible can automate steps, and do it in a way that is maintainable and easily readable by other developers.
This course assumes that you've never used Ansible before or that you tried a different learning resource but that it did not quite click for you.
You don't need experience in any particular programming language to use Ansible although familiarity with Python is occasionally helpful.
If you're a Ruby, Java, C# or any other language developer though you will do just fine and Ansible will be just as useful in your projects.
In this course, we will cover why Ansible is a great tool to have in your tool belt, what Ansible playbooks are and how you should write them as well as how to configure servers and secure your own data, such as passwords and other sensitive information.
We'll touch upon source control because it's critical to every project and you can work with source control implementations such as Git repositories in your playbooks.
As with any tool there's a learning curve so throughout the course I'm not just going to show you the happy path while live coding but actually make mistakes along the way and show you how to recognize what happened debug the issues, and fix the problems so that you can continue on with what you were originally working on.
We'll learn about Ansible modules which provide the building blocks for almost everything we do in Ansible.
Towards the end of the course we will deploy an entire web application together which will combine all the information you learn in each chapter so you can leave this course feeling really comfortable with using Ansible for your own configuration management and application deployments.
|
|
|
show
|
4:21 |
You may have already set your heart on using Ansible, and so you don't really need reasons why.
But I want to get you even more excited, regardless of whether you've decided you're ready to use Ansible or you're evaluating alternative choices.
First off, after years of working in the DevOps space, I've found Ansible to be the easiest configuration management tool to use.
I had previously been working with Puppet and Chef, and just found that I couldn't keep up with what was going on with those tools.
There is a reason why Ansible exploded in popularity once it was released.
But rather than me just tell you about how easy it is, I want to show you a quick example.
You can get a feel for what you're actually going to doing with Ansible.
I've switched over into my own development environment, and I have three windows here.
The one at the top left has a single Ansible playbook file with two tasks in it.
The right-hand panel is where I've logged into a remote server that I've set up on DigitalOcean.
It's a blank server that has not yet been configured.
And then on the bottom, we're going to run our Ansible playbook.
First, let's take a look at these two tasks on the top left corner.
Both of these tasks use the same Ansible module.
Don't worry if terminology like playbooks, modules, tasks are unfamiliar.
We're going to cover all those in depth in Chapter 3 after you get your own development environment set up.
For now, just bear with me as you take a look at what Ansible is able to do in just a few lines of the markup language, YAML, which Ansible uses for its playbooks.
The first task we have here uses the file module, and we specify a path.
We want to create a directory named matt.
So we specify state of directory and the permissions we want for that directory as well.
What will happen here is that if a directory does not exist, home/Matt, it will create one.
And if not, it'll just let that one be, or it'll change its permissions to match the permissions that we want on our remote directory.
The second task uses the same file module, but it creates a file named hello-ansible.md for markdown.
And the state, instead of saying we want a directory, we want to use a touch command to create an empty file, and we give it some different permissions.
So the gist here is, we want to create a directory, and we want to create a file within that directory.
If we look over here on the top right where I've logged into my remote server, we'll see that no files or directories exist under the home directory.
Let's run our Ansible playbook, and we'll see that that quickly changes.
We're going to run the Ansible playbook command with a deploy.yml file.
We'll specify a private key that is located in my .ssh home directory.
And we'll specify an inventory file which contains the IP address for the remote server that we're working with.
And the de facto standard is to call that inventory file hosts.
We'll kick off our playbook, and Ansible has reported back that it was able to execute three tasks.
First, gathering facts, so gathering all the configuration as it exists and then executing the two tasks that we specified above in our Ansible playbook.
Let's see what happened on our remote server.
We've got our directory named matt now.
We can go into it, and we see we have a hello-ansible.md markdown file.
So in just a few lines, we were able to modify a remote server, and we could actually do that with more than a single server.
We only changed one server here, but we could've run the exact same file against thousands of servers.
And we only used two tasks here.
Tasks are the building blocks for entire playbooks that allow us to set up servers in the exact configurations that we want, do our deployments, and handle thousands of servers if we want using these maintainable playbooks.
Throughout this course, you'll become completely comfortable with this very simple playbook and building much more complicated playbooks for real-world scenarios.
I've used Ansible on applications ranging from side projects that I've built in my spare time to really large organizations, where dozens of developers are working on the same deployments.
Ansible's ease of use allows it to scale, both in team size and in project size, and across many different projects.
So what you're learning here, whether it's for a side project or for a large organization, it'll be relevant in many scenarios.
Ansible's approach to configuration management is to automate what was previously done by hand using Open SSH.
Other configuration management tools use an agent approach, which means that you have to have software running on all of your remote machines, and that can create an additional attack factor that your information security department may say, That's not going to happen.
I gain peace of mind from knowing that Ansible is not creating a new paradigm.
It's taking decades of system administration experience and making that much easier, whether you are a sys admin or a developer who is trying to deploy and configure servers.
Finally, another huge thing for me is I've written playbooks, read them several years later, and immediately understood what they were doing.
I wasn't the biggest fan of YAML when I first saw it, but I quickly became comfortable with it.
And it has major advantages over other markup formats.
|
|
|
show
|
0:32 |
There will be a lot of live coding and working together on projects throughout these videos because I believe that's the best way for you to learn and get hands-on time with Ansible.
However, you're not going to always want to type everything in by hand.
Sometimes you just want to copy and paste or maybe you made a typo somewhere and you just want the code that works so this is the spot for you.
If you go under the fullstackPython on GitHub look for the book-and-video-code-examples repository there's an intro Ansible directory.
That contains all the code that we'll use throughout the entire course.
|
|
|
show
|
3:22 |
Here's some context for who I am and why I'm teaching about Ansible.
My name's Matt Makai and I've been a software developer professionally for about 5 years, the first three of those in Java and then, since then, almost exclusively, Python with a little bit of Swift mixed in there as well.
You can find me on GitHub, or on Twitter @MattMakai and I'm the creator and author of fullstackPython.com just read by over 100,000 developers each month so that they can learn how to build, operate and deploy their Python powered applications.
Python's been my go-to language for both side projects and professional development for over 10 years and that's what originally got me into Ansible because Ansible is written in Python.
It first took off in the Python ecosystem and then, grew from there into other programing ecosystems.
As a Python developer, I first heard about Ansible in 2013 and my own growth as a software developer has paralleled Ansible's growth as an open-source project.
Instead of just showing you a few slides with more about my background let's look at the history of the Ansible project and where I've been able to contribute and where I've been able to learn from it.
Ansible is open-source so it can be found on GitHub at github.com/ansible/ansible.
If you take a look back at the logs the earlier pieces of the project you can see most of the original ones are by Michael Dehaan, who's the creator of Ansible and also co-founder of the company that was eventually sold to Red Hat but still runs the Ansible project.
I discovered Ansible around the 1.0 release back in the start of 2013.
The project was still in really rough shape back then but it worked, and the potential was there.
I must've played around with it on side projects and followed along as each incremental release built out new modules, and fixed bugs; Michael Dehaan and the initial community really built out the project and made it smoother from whence they had started.
In mid 2013, Michael came up to Washington D.C.
where I was living at the time to give a talk at a DevOps meetup about Ansible and this is where I really started to get engaged with the community.
In fall of 2013 I was finishing up some consulting projects and was getting ready to start a new job at Twilio which I began in early 2014.
I took a couple months off at the end of the year before I started my new job after my consulting projects had ended and hacked on Ansible full time to really understand how the project worked.
I created a prototype based on my deployment knowledge having worked with Django for a long time created a prototype project called, Underwear which was a Django module that hooked into Ansible and made it possible to deploy entire Django projects to servers using a Python manage.py deploy command.
In early 2014, I started speaking about using Ansible to deploy Python projects and I wrote my first Ansible module that is now included as a part of the Ansible project.
The Twilio module shipped with Ansible version 1.6 in early 2014.
It allows you to use the Twilio API in your playbooks if you want to send text messages while running your Ansible playbooks.
Ansible put on our first conference in 2014 so I spoke at that then wrote another module to use the centigrade API so you could send emails and that was included in version 2.0 around late 2014.
While all this was going on the open-source community in the Ansible quarantine frequently shipping releases making the project better and better and keeping that momentum in the community.
I used Ansible to write my deployments book and as a part of the Python for Entrepreneurs Course that Michael Kennedy and I did together; huge upgrade to Ansible came in version 2.2.
This is where the Ansible quarantine became much more serious about Python 3.0 compatibility.
It's gotten better and better with each release.
We are going to exclusively use Python 3.0 throughout this course as Python 2.0 is rapidly approaching its end of life.
Ansible continues to evolve on GitHub every single day and as you become more comfortable with the project we'll spend a lot of time in this repository taking a look at the source-code so that you can better understand the how to use modules and how to build your own modules as you get more advanced with Ansible.
|
|
|
show
|
3:25 |
Like any software development tool Ansible pairs really well with strong reference material.
I keep a few tabs open whenever I'm developing my Ansible playbooks.
I'll show them to you now.
You shouldn't need them while you're working through these videos, but if you want to take a breather or want to dive deeper into a subject find out more about a module it can be really handy to keep these open.
We just looked at the Github repository for Ansible at github.com/ansible/ansible.
I bring it up again now because there are a few directories that are more important than the other ones.
Specifically, lib/ansible - this is where the majority of the source code for Ansible lives and in particular you'll want to look under the modules directory because these modules are going to be what's doing the work every time you write a playbook.
For example, if you want to send notifications when you hit a certain step or something happens in your playbook take a look under the notification module and you'll see all the source code for every different type of notification and integration that you can apply in your playbook.
I'm constantly referencing the Ansible source code not because the documentation isn't good but just because sometimes its easiest to read the source code especially if you're a Python developer.
Speaking of Ansible documentation, it's fantastic and you can access it at docs.ansible.com.
It's broken into many areas the one that can be most useful to you right now is under 'Getting Started.' You can read this to get some context about how Ansible works over SSH.
It's handy just in case you want a secondary resource.
Also under 'Documentation,' you can gain additional context about playbooks, inventory files, and developing your own modules.
The one option that I always keep opened though is the module index.
This is the master guide for everything you can implement with Ansible without having to write your own custom modules.
We saw how to create directories and files with an example Ansible playbook.
If you want to learn more about file module you go under 'Files modules,' and select 'File.' My favorite part of the Ansible modules documentation is that it follows a very clear boiler plate pattern you've got a quick synopsis all of the parameters that are available to you some notes just in case there are exceptions or things you need to be aware of with different operating systems and then he handiest bit of all I'm actually surprised every single bit of documentation for every project does not contain this example code.
Example code, you can copy and paste by highlighting, copying, putting it into your playbook customizing it for your own purposes.
If you scroll down a little further you'll see the status of the module.
The main reason why this is important is because stable modules guarantee backwards compatibility.
For most modules, you won't have to worry about this but if you see a new module in a new Ansible release you'll just want to check the status to make sure that it's not going to have some backwards breaking changes.
One more bit of documentation if you want to get a high level overview of Ansible configuration management, deployments web server configuration take a look at the table of contents page at fullstackPython.com.
The 2 chapters that'll be most applicable to you are going to be 'Chapter 5: Web App Deployments' and 'Chapter 6: DevOps,' and where possible I try to give plain language explanation along with diagrams to show you how deployments work or how configuration management tools like Ansible work along with the best resources that I've found to accomplish your objectives.
So the two mandatory tabs github.com/ansible/ansible the second one docs.ansible.com and optionally, if you need a higher level overview the table of contents page on fullstackPython.com.
|
|
|
show
|
0:38 |
This course is sponsored by DigitalOcean.
A big thank you to DigitalOcean for providing $100 in credit for their servers to every viewer who uses this link.
That's do.co/fullstackPython.
Go to this link now, or a bit later in this course when we start spinning up servers to use with Ansible.
This free credit will make it possible to complete all steps in this course without having to pay any money for hosting and all of the videos for this course use DigitalOcean as the hosting provider so you will be able to follow along step by step in each video with your own DigitalOcean account.
Thanks again to DigitalOcean for providing the credit and sponsoring the Introduction to Ansible video course.
|
|
|
|
11:14 |
|
|
show
|
2:53 |
If you're working on Mac then we'll get you to the exact point you need in order to run Ansible.
If you're working on Linux or Windows feel free to skip this video and go to the appropriate video for your operating system.
We're going to use Python 3 to run Ansible.
So the first step is to go to Python.org in your browser.
Click downloads.
Download Python 3.6.5 or whatever the latest release is.
Luckily, other than the Python 2, Python 3 split whatever the latest Python version is that's out there should be able to work just fine with this.
And if not, let me know, and I'll update the videos.
Click on the package and install it.
You'll need to type in your password for root privileges.
That's normal with installing Python.
Once it's all done, click close and you can move it to trash, the installer.
Now we need to test it out and install Ansible.
Open up a new finder window.
Click applications and then scroll all the way to the bottom to utilities.
We're going to work on the command line so you need to open the terminal window.
Assuming Python 3 has installed correctly we can type Python3 and we should see the appropriate version that we installed on our system.
Don't just type Python because that will go to the default system installation.
We really want to work with Python 3 so use the Python3 command.
It's good practice to use a virtual environment that's included as part of the core Python installation.
I have a directory called envs where I keep all of my virtual environments.
And to create a new virtual environment type "Python3 -m venv" and then we give it a name.
In this case, we'll just call it intro-ansible.
To activate that virtual env type source and then the directory bin/activate.
We can tell that it's been activated by the parentheses and the name of the virtual env that we're now working with.
Now we can use the pip command, so P-I-P.
pip allows us to install packages and if we type pip freeze right now we will see that we don't have any packages installed in this virtual env.
Type pip install ansible, and this will go out and grab the Ansible package from PyPI.
Give it a couple minutes and we should see successfully installed and then a bunch of packages.
These packages are the dependencies that are used by Ansible.
For example, Jinja is used for templates.
Paramiko is used for the underlying SSH protocol.
PyYAML is used for the YAML files in our playbooks.
And of course we see the Ansible package itself.
Now we can test out whether Ansible has been installed correctly.
We'll run a command against localhost.
This is an ad-hoc Ansible command.
ansible localhost, for the system we want to run it against -a, for an ad-hoc command and we're just going to run an echo command that says hi.
Press return.
We'll get some warnings that tell us we don't have a host file, but that's okay.
It's going to default to a localhost and then we'll see the output "hi" from the successful execution of our Ansible ad-hoc command.
This tells us Ansible has been successfully installed and now we'll be ready to write our playbooks.
|
|
|
show
|
1:55 |
After installing and testing Ansible to make sure that it runs the next step is to create an SSH key.
SSH keys are asymmetric keys.
Which means that the public and the private key are different.
You can share the public key with whoever you want.
And, in fact, we're going to put the public key on remote servers.
But a private key should never be shared.
When a server only allows login via SSH keys it will use the public key to determine if someone is trying to log in with a private key regardless of the operating system that we're going to be using.
We need to create an SSH key pair.
Let's take a look at how to do that on macOS.
Back in the terminal we're going to run the ssh-keygen command.
If we type it without any parameters it'll just use default settings.
We're going to use a few custom parameters with ssh-keygen.
The first is to specify the type as RSA.
The number of bits is 4096 which is the current standard that most people use.
And we can specify a custom email address which in my case is matthew.makai@gmail.com.
Now ssh-keygen will ask you where you want to save the public and private key pair.
I'll store it in the directory that it's recommending but I'm going to give it a different name because I don't want to overwrite the existing public and private keys that I have there.
I'll call this intro-ansible and press enter twice to not use a passphrase.
And then we'll see a bunch of random art that represents the key's image.
And our keys are created.
So if we take a look under the .ssh directory and then we look specifically using the grep command for intro-ansible we'll see that we have the private key which is just called intro-ansible and then the public key which always has the .pub at the end after ssh-keygen generates those keys.
intro-ansible.pub is the one that we're going to put on remote servers and intro-ansible is the one that is going to allow us to verify that we are who we say we are when we want to connect to those servers.
Now that we have our public and private keys we can write and execute our first Ansible playbook.
|
|
|
show
|
1:29 |
Ansible was originally designed for Linux-based systems.
And while Windows support has gotten much better for managing remote machines it's strongly recommended that you do not run Ansible under Windows as your control machine.
There's simply no support by Red Hat or Microsoft in order to execute Ansible properly and not run into major issues.
That said, a lot of people are running Windows machines.
So here's the two possible routes you can take if you really want to get Ansible up and running and you have to use Windows as your base installation.
My first recommendation is to use a virtual machine like VirtualBox if you want to go the free route or VMware works as well, in order to virtualize Linux on top of Windows.
Right now, I recommend using Ubuntu 18.04 LTS which was released in April 2018 and will be supported for the next five years.
If you download VirtualBox you can then install Ubuntu start that up and then follow the instructions in the next video for configuring your Linux environment to run Ansible.
A much newer way to run Ansible on Windows is to use the Windows Subsystem for Linux.
This is actually going to be similar to running a virtual machine, but it's a new edition of Windows 10 that allows you to install a Linux distribution of your choice and then use it from within Windows.
Either one of these routes will get you to the same destination, which is to have a Linux system that is running within Windows that you can use as your control environment for Ansible.
Once you either have VirtualBox running with Ubuntu or the Linux sub-system running with Ubuntu, take a look at the video for configuring your Ubuntu Linux development environment.
|
|
|
show
|
3:12 |
Whether you're running Ubuntu Linux as your base operating system or your virtualizing it on top of Windows or macOS.
Ubuntu Linux provides a great environment to control Ansible.
Let's first get Ansible installed, test it out and then in the next video we'll create an SSH key that we'll use for the remainder of the course.
I strongly recommend that you use the latest version of Ubuntu which is currently 18.04 LTS as Bionic Beaver.
This release will be supported for the next five years and it comes with Python 3 pre-installed.
So we can even skip a step because we will need Python installed on the system in which we are going to control Ansible.
Although Python 3 is`pre-installed we do need to install the venv package so that we can work with virtual environments.
There's two ways we could install Ansible on the system.
We can install it site-wide or we can use a virtual environment which is what I tend to prefer and what we're going to use in this video.
But before we can use a virtual environment also known as a virtualenv.
We need to install the Python3-venv package.
Select 'Yes' that you want to continue.
Then depending on the speed of your internet connection it should quickly install the package.
We can test out that everything worked by typing 'Python3 -m venv'.
Let's create a directory to store our virtual envs.
Go into it.
Then use our new venv package installation to create a virtual env called 'intro-ansible'.
Then we can activate it.
That'd be source intro-ansible/bin/activate.
Now we can see here by the change in our command prompt that we're in the virtual env and it's been activated as our current Python installation.
We no longer need superuser privileges in order to install the Python package.
I always prefer to run with the least amount of privileges on Linux when possible.
Just remember whenever you open a new term on a window you will have to run source intro-ansible/bin/activate in order to re-activate the virtual env.
Now we can use the pip command to install the latest version of Ansible.
If you haven't installed any other dependencies on Ubuntu you may see some errors about failing to build wheels for the Ansible dependencies.
That shouldn't affect our ability to use Ansible.
But if it bothers you, there are a few development packages that you can install to get rid of that.
For now as long as you see 'successfully installed' and then the list of packages including Ansible we're good to go.
Let's test it out though to make sure that it's properly installed.
We'll run our first Ansible ad-hoc command.
So type 'ansible'.
Then we're just going to have placeholder for localhost.
It's not actually going to use localhost it's going to fall back to localhost when we try to run this ad-hoc command.
-a for an ad-hoc command.
We're going to run echo and just say something like 'hi'.
for 'hello world'.
Make sure to have the single quotes around 'hello world' and then double quotes to end the ad-hoc command.
We can test this out and we should see success and 'hello world'.
What this has done is it executed via Ansible the echo command on our localhost machine as an ad-hoc command.
This tells us Ansible is working and we'll be able to start creating our playbooks as soon as we create our SSH key.
|
|
|
show
|
1:45 |
We need to create an SSH key so that we can properly control from our computer, all other computers that we're going to configure using Ansible.
On Ubuntu, we create SSH keys using the ssh-keygen command.
Type ssh-keygen and then the type of key that we want to create is RSA.
We're going to have 4,096 bits and you can also customize with the -C what you want your email address to be for this particular key.
So I'll just put mine as matthew.makiah@gmail.com Now I typically save.
ssh-keygen will ask you where you want to save both the public and the private keys.
I don't use the default value what I do is give it a specific name that allows me to later reference and understand what that key is being used for.
So for this one, call it intro-ansible and store it under your home directory within the .ssh subdirectory.
Don't specify a passphrase.
And now we'll have two files that have been created when we take a look at that directory that we just specified.
The first one is our private key.
The private key should never be shared publicly.
This is what is going to authenticate you that you have access to a server.
The public key can be shared widely in fact it can even be uploaded to GitHub if you want.
We're going to put this on remote servers because we are the only ones with access to the corresponding private key.
Occasionally we'll also even need to just copy and paste our public key.
And what I do for that is that I use the cat command.
And then you can copy and paste directly from the terminal.
You'll never want to do that for the private key but for the public key, you can share that freely.
And later what we'll see is we'll copy and paste the public key when we're provisioning servers.
Now that we have our environment setup we can dig into the core concepts of Ansible.
|
|
|
|
21:34 |
|
|
show
|
4:44 |
Ansible has a set of terminology and core concepts that are going to be crucial for you to learn and understand because we're going to use them throughout the rest of the videos in this course.
This video is designed to introduce you to those concepts and show how they relate.
Then we'll explain in further depth each of these concepts in turn.
If we think about how a configuration management tool operates, there has to be some way for us to execute actions against the servers that we want to configure.
With any configuration management tool that tool contains some code, and it will expose a way for you to use operations so you can execute your actions.
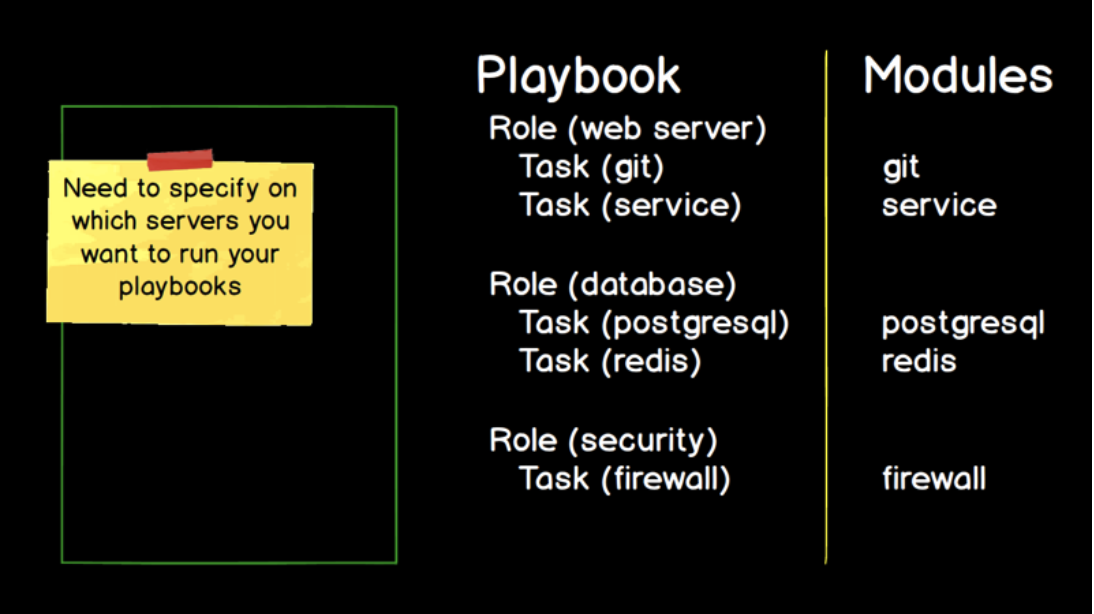
In Ansible's case, these are modules and most modules contain a familiar name.
For example, if you're working with a Git source control system, you're going to be working with a Git module.
If you're trying to bring services up and down on a Linux system, you use the service module.
The database back ends like Postgres or the in memory data store, Redis, likewise.
They have modules named after them.
There's a laundry list of hundreds of core modules that come with Ansible, which we saw in the documentation.
And Ansible makes it easier for you to write your own modules if for some reason what you're trying to do is not covered by the existing modules.
So modules are our first core concept.
This is functionality that Ansible exposes to us but we need some way to use that functionality.
We need a mechanism to specify the modules that we're going to use.
Another way to put this is the modules are the code that Ansible already has, and you need a way to write code or some markup language that will let you use that Ansible code.
In this case, we have tasks.
A task is a specific implementation.
If we need to use the Git module where we will specify a particular Git repository that we want to clone or push our code to, we'll write a specific task like restart the Nginx service.
We'll modify or recreate Postgres or Redis database and we'll enable and disable rules on a firewall.
Tasks are the bridge from the Ansible code that's contained in modules to what you are writing to use Ansible for configuration management.
With any non-trivial configuration or deployment we're probably going to have dozens, or hundreds maybe thousands of tasks.
So we need some way to organize and group these related tasks.
Ansible has two more core concepts here that we're going to use, roles and playbooks.
Roles are a flexible way to express what tasks to apply to one or more types of servers that we're working with.
Think about roles as either being horizontal so they'd be cutting across every single server that you'd have as a part of your deployment.
So if you have common security settings you would specify your security settings as a role.
Or they can be verticals like a web server configuration or a database back end.
Roles are one of the most flexible, conceptual ideas so they often take the longest to wrap your head around.
And many roles are contained within a playbook and we can have one or more playbooks.
Playbooks are the overarching way to organize all of your tasks and all of your roles so that Ansible can execute them.
While it is possible to run an ad hoc task with Ansible most of the time you're going to use the Ansible playbook command, which will combine many roles and many tasks within each of those roles to complete a deployment or orchestrate your server configurations.
The big missing piece here is the specific servers that we want to execute our playbook against.
You wouldn't put specific host names or IP addresses in the playbooks because they wouldn't be reusable.
Instead we have a different concept to describe which servers we want to run which roles on.
This core concept is known as the inventory.
The inventory maps the roles, such as a web server or a database server, to IP addresses and host names that you want to configure.
The separation between what needs to be accomplished that is specified within your playbook and where to run those configurations goes a long way with making Ansible playbooks reusable.
And its also a huge help when you're trying to deploy to a dev environment, a staging environment a test environment, production environment.
You only need to change the inventory.
You don't need to change the playbook itself.
Finally, YAML, or confusingly known as YAML ain't markup language, is how we write our collection of tasks within the roles.
We can also write our inventory in YAML although, as we'll see in a future video we can either us an INI format or YAML and I typically use the INI format.
But just know that YAML is how you're going to write your tasks.
So these six core concepts, the modules, which is the code that is a part of Ansible that we're going to execute.
The tasks which allows us to describe which modules we want to use and how we're going to use them.
The roles, which allow us to group related tasks together for purposes like setting up a web server or a database server.
Playbooks are typically the overall unit that we're going to be executing, and we have one or more roles that we're going to execute as a part of our playbook.
The inventory describes where we are going to execute our playbook against and YAML, which is how we write our tasks and is one way we can write our inventory files.
We've seen a little bit about how these concepts interrelate.
If you're still really confused by what each one means that's why we're going to dive into each one right now.
|
|
|
show
|
4:16 |
We see how each of the Ansible core concepts relates to each other and fills a specific need for how to handle configuration management.
Now, let's take a look at each of these concepts individually, give them a clear concise definition so that we know what we're working with and to take a look at some examples so that in the next chapter when we write our first playbook we at least have enough of an idea of why we're working on each step.
The first concept is modules.
Modules are code provided by Ansible.
Now, they're typically written in Python and in fact, the core Ansible modules that are provided with the Ansible project when you install it, are all written in Python.
So, more advanced topic but they don't actually need to be in Python.
You could write a module in Java or a module in JavaScript, or Ruby.
There's a standard way to call Ansible modules.
But for our purposes in the introduction just think about this as Python code that Ansible provides you to perform a specific action you want to take.
What do we mean by specific action?
Well, for example, if we want to clone a Git repository.
For working on a web application we want to clone it to our development server where we're going to do a dev deployment.
There is a Git module for handling that task.
If we want to enable an operating system's firewall and configure various settings on it there's a module for working with firewalls in various operating systems.
If we want to send notifications let's say, e-mail or text message, or Slack message there are notification modules.
The creators and maintainers of the Ansible project have done a fantastic job of providing modules for almost any purpose you can think of.
And as you can imagine, that's a whole lot of modules.
So, if we look at the Ansible modules documentation it's listed by category.
It can get overwhelming very quickly.
And as I mentioned, there's notification modules.
So, if you click on notification modules in the Ansible documentation it's going to list them all out for you.
If you're ambitious enough to list all of the modules you will be inundated with everything that comes with Ansible.
However, I would say this is a really bad place to start.
I have never used all of these modules as we scroll through we're barely past the modules that come with Ansible that start with C.
I strongly recommend against trying to memorize all the modules.
Instead, throughout the course we'll introduce the most important modules and then you can branch out from there depending on how your deployment needs and your configuration management needs require various modules.
At least you know you can search for all modules on the all modules page.
For know, let's say we want to accomplish an action.
Typically, what I do is go to the specific module.
If we want to send a message in Slack/Slack notification we can click on the Slack module it'll give us any required parameters and it will give us examples.
This is typically where I copy and paste start playing with the module that I've never used before and start using it.
We'll cover how to use the modules when we go over tasks.
But I have to commend the Ansible core developers and contributors for all the great documentation that they provide.
I strongly recommend keeping the documentation up so we know that when we want to accomplish an action in Ansible there's a documentation list by category.
There is also the code on GitHub.
Everything about Ansible is open source and reading the source code is really helpful when you're working with modules.
So, on GitHub, github.com/ansible/ansible we've got the code for Ansible and you're going to want to look under lib/ansible and this is where the modules directory lies and all of the modules underneath.
So, when we took a look at the notification modules if we click on notification this is where the source code to each one of the modules lives if we look at slack.py, we can reference the source code for sending messages to Slack.
So, we've got Ansible documentation so as we start writing our first playbooks we're going to want to accomplish one or more actions we'll use the module's documentation and the module's source code how to use each module properly and philosophically, Ansible modules work well because they abstract all the low-level complexity the previous automation systems like Bash Shell scripts and have really hard time of containing.
One of my first jobs out of college before there were any configuration management systems we used Bash scripts to automate our whole deployment and those scripts were littered with conditional statements if we're deploying to dev, take these steps if we're deploying to staging, to test, to production for deploying one version or another version Ansible modules work well because they abstract that low-level complexity.
So we know where to look when we want to use a module but how do we actually use them?
They are invoked by writing Ansible tasks.
So, let's take a look at how to create our tasks.
|
|
|
show
|
2:09 |
Tasks are Ansible's building blocks for accomplishing your objective.
Tasks are written in YAML and they are in the instructions that invoke Ansible modules to execute an action.
We took a look at how these concepts related in the first video and we saw that there are modules for all sorts of actions we want to take like working with Git or installing and configuring Redis and we needed a mechanism to specify how to call those modules.
That's where tasks fit in.
Here's what a task looks like.
We start out with a - and then a space and keyword name.
And we start with a human readable name.
Think of this as a comment.
Technically you don't have to start your Ansible tasks with name but as these tasks are running having a comment on every single one to explain what it's doing and why is really useful.
So the first line that we start out with on the task is a name what this task is doing, and why.
In this case, we're making sure that Git is installed on the system as this can do one of two things.
First, it's going to check if Git is installed.
If it's installed, it's going to say hey, we're good.
Move on to the next task.
If it's not installed, it will handle installing it for you.
It does this by using the apt module.
So assuming we're on an Ubuntu system or a Debian based installation that has the aptitude package manager we're using the apt module and we're passing it three parameters.
The first is the name of the package that we want to install.
That would be git-core.
The state that we want it to be in.
In our case, we want the git-core package to be installed.
If we said state=absent that would mean we do not want the git-core package to be installed and it would remove the package if it was installed.
And the third parameter that we're passing in is to update the cache.
The cache contains a list of all the packages that can be installed and their version numbers.
And we always want to grab the very latest version of the git-core package.
So this ensures that the cache is updated equivalent to running the sudo apt update command before we check to see if git init is installed and install it.
And finally, become true specifies we want to use our super user privileges because apt requires super user privileges to install our package.
That's what a task looks like written in YAML and there's two ways we can execute this.
The most common is going to be in a playbook where you have a bunch of tasks grouped together.
And the other way is we can run ad-hoc commands.
So let's run a couple of those just so we can get comfortable with how to invoke modules using tasks.
|
|
|
show
|
2:34 |
Let's use this example Ansible task and run it using the Ansible Ad-Hoc mode.
Move over into your Mac or Linux environment where you're planning to work with Ansible.
First we're going to test and were going to see that Git is not installed on our system.
We do want to use Ansible to install it.
Remember that you need to keep your virtualenv activated.
So, use the source command point it to your virtualenv, then activate.
You can use the pip freeze command to make sure that Ansible is actually installed.
In this case, yes it is we're using version 2.6.2 Now let's run a couple of Ad-Hoc commands.
We're just going to run these against our localhost system.
And the first one is just to gather the facts.
Now what do we mean by facts.
A fact is a piece of data that Ansible gathers on the system before working with it.
Ansible gathers a wide range of information.
So that it knows how to take the actions specified in an Ad-Hoc command or in a Playbook.
And we can see all the facts that Ansible gathers.
Use this command: ansible localhost -m setup.
This isn't going to apply any action.
It will only gather the facts about our system.
Now I put in localhost as a placeholder.
We don't have a hosts file.
Ansible will tell us that you couldn't find a host file.
But it will gather the facts for our localhost system.
When you execute that command, you're going to see a whole bunch of information about your current system.
Ansible will do this every time it runs.
For our next Ad-Hoc command type in ansible localhost as we just did, in the previous command and this time with -m specify the A-P-T apt module.
Specify -a and pass in, name=git-core state=present, update_cache=yes specify -b, which explicitly states we wana use our superuser privileges in order to execute this command since we're installing a system wide package.
Specify -K, which will force Ansible to ask you for your superuser password and then one final argument, which is -e where we set an additional variable which is the ansible_Python_interpreter=/usr/bin/Python3 explicitly set as /usr/bin/Python3.
In this case, this is to prevent Ansible from using the default Python 2 installation which does not have Ansible installed.
Once you've got all that typed in, go ahead and hit execute.
Now we're good to go.
We have Git installed, we can use it on our system.
So we just ran a couple of Ansible Ad-Hoc tasks.
For the remainder of these videos we're going to run tasks through Playbooks.
That's how you can run individual tasks if you want to test out a module or just do something quick from the command line.
|
|
|
show
|
2:18 |
Ansible Roles are another core concept that are closely related to Tasks.
Tasks, which we just went over are an atomic unit of instructing Ansible to take some action.
Roles are a way of taking those grouped Tasks and any corresponding variables and using an Anisble-defined, file naming convention and directory structure convention.
So that those grouped Tasks can be reused for more than one server or as part of more than one playbook.
It's much easier to understand this with an example.
In the following directory structure we have two Roles: Common and Web Server.
As well as two variable files: All and Web Server.
The first Role, common, has two files that specify Tasks.
main.yml and git.yml that are stored under the tasks directory of the common directory.
There are also other subdirectories such as handlers and templates that we'll take a look at in future videos.
The subdirectory you'll most frequently use as a part of Roles, is the tasks subdirectory.
Ansible defines that the directories contained within the roles directory are the names of your Roles.
And the directories, and the files within a Role directory such as common or webserver are accessible when you run the Ansible commands that understand this directory and file grouping structure.
In a couple of videos when we run our Ansible commands you'll see that Ansible will automatically pick up Common and the Tasks within it.
The second Role, webserver uses the files, with variables in them stored under the group_vars directory.
Both all and webserver.
And it also has multiple YAML files with Tasks stored within those YAML files.
Those tasks can reference the variables stored under the group_vars directory.
So why would we want to use roles?
The most important part is that they make what we're creating, reusable.
Rather than just having a one-off bash script to handle the configuration of web server we can reuse a web server configuration across many servers and many playbooks.
And when we want to make some changes whether large or small Roles make it easy for us to re-run those Tasks and iterate on our configuration.
Once we get into the meat of creating our playbooks you'll understand how important Roles are.
And if you don't use Roles you're really killing power of Ansible's implicit runtime configuration.
Ansible defines a file and directory structure for Roles to make things easier on the developer.
That structure will become second nature to you after you create a few playbooks.
|
|
|
show
|
1:18 |
Playbooks are the highest level concept in Ansible and playbook is likely the most frequent term that you will hear used when people are talking about Ansible.
Playbooks are the top level collection and every playbook contains one or more roles typically many tasks within those roles associated variables and all the other information necessary for execution such as which servers are we going to execute this playbook against.
Playbooks are run by using the ansible-playbook command.
Just as we had roles to group related tasks together to accomplish various actions we also needed a way to organize and group the tasks, roles and variables.
And that is what a playbook is.
A simplified example of a playbook would look like this, with the following file names and directory structures.
As we saw in the roles video in this case we have two roles common and webserver.
We also have a couple of new files.
The first one, deployment.yaml is the playbook instruction file we'll reference when we use the Ansible playbook command.
Deployment.yaml would contain references to the groups of servers that we'll run our roles on.
So deployment.yaml contains the bridge between our roles and the servers that we want Ansible to manage or handle a deployment on.
There's also a hosts file.
The hosts file contains the list of servers that we want to execute our playbook against.
Hosts is also known as the inventory file which we'll discuss next.
|
|
|
show
|
1:37 |
Let's talk about what servers Ansible knows how to execute your playbooks against.
Inventory is a core Ansible concept where a file specifies all of the servers that you're going to run your playbook against and it's typically grouped by role.
There's a default location for the inventory file which is, by convention, named hosts and Ansible will look for that in the Ansible subdirectory of the etc system directory.
However, I always recommend that you set which inventory file you want to run against with the -i flag.
The -i flag is useful for two reasons: one, if it can't find your inventory file it'll stop and give you an error message so you know you've immediately done something wrong rather than it work off of the default inventory file.
That might be the one that you want to use.
And second, getting comfortable with the -i flag will allow you to use different inventory files for development, staging, local, production however many environments that you have.
Let's take a look at a playbook example with a single inventory file.
We already went over the structure of how a playbook would look with our roles directory in group_vars/ and our playbook file deployment.YAML.
We would also have a host file.
And the host file would look something like this.
We'd have the name of our roles so we had web server and common as two of our roles.
And we might have other roles listed as well.
We can list out one or more servers.
And servers can also be listed many times under different roles.
So for example, 192.168.1.1 is listed under both web server and common so both web server and common roles will be applied against that server.
So the Ansible inventory shouldn't feel like a complicated subject.
It's really just a list of the servers that we're going to be working with explicitly specified in your host file.
|
|
|
show
|
1:56 |
YAML is a recursive acronym that stands for YAML Ain't Markup Language.
That's probably just going to be trivia for you hardly anyone ever says anything other than YAML when referring to this markup style.
This is the last of the core concepts we're going to introduce for now so that we can get started writing our playbooks and getting comfortable actually using Ansible.
There will be other concepts that will be introduced along the way but this is the last of them that we need in order to get started because these are the key words we're going to be using constantly to describe what we're doing.
We've already seen an example of an Ansible task written in YAML Here's what it looks like again.
Let's highlight the important parts when it comes to the YAML format versus the task itself.
Now, on the first line, we have a hyphen and then a space and then a key.
The key in this case is name with a colon after it and then a value and the value in this case is ensure git is installed.
And thinking in key-value pairs is basically the core idea with YAML.
Even on this next line, which looks more complicated the key is apt, and the value itself is just three key-value pairs.
The key of name is equal to git-core that's the name of the package that we want to install.
The key of state and the value of present indicating that we want the get core package to be installed.
The key of update_cache and the value of yes which tells apt that we want to update the versions package in the package manager before we install anything.
And then, on this last line, become true key of become and the value of true indicating that we want to use our super user privileges in order to execute this task.
One thing to note is that spacing is required for the syntax.
It's not just to make our tasks easier to read which it certainly does.
There are two spaces before apt.
There are two spaces before become.
The spacing indicates that the second and third lines are grouped together with the first line.
If you were to indent or remove the indentation from the second or third lines it would no longer be valid syntax for Ansible.
So that's what YAML looks like.
That's why the spacing is as you see it in this example.
And we're going to be writing a whole lot of YAML in all of our playbooks to configure servers and play applications.
|
|
|
show
|
0:42 |
We just covered the core concepts for Ansible that we need to know before we can start writing our playbooks and using Ansible for configuration management.
We took a look at how these concepts relate to each other and how we would take a look at the documentation to see which modules are available for the task that we want to perform.
We'd right tasks in YAML and we'd group these tasks by roles and each of those roles and all the tasks would be put together into a reusable playbook that would use the inventory file which is typically named hosts and the inventory file would have corresponding roles.
They would group the servers we're going to do work on.
Now there will be other concepts that we'll introduce along the way.
These are the ones that we needed to get started.
Come back to these videos and use them as a refresher as we're working through our playbooks in the next few chapters.
|
|
|
|
18:26 |
|
|
show
|
1:01 |
Time to match those Ansible concepts with a specific example, and we're going to write our first playbook together.
This playbook will contain several directories and files and here's the structure we're going to create.
I'll have a project directory named first playbook.
We're going to have an inventory file named host that'll contain the list of IP addresses.
In our case, only a single IP address for server that we want to work with.
We'll have out top level playbook.yml file that will tell Ansible what users should be executing which tasks mapped to the servers.
It's specified in the host file.
We'll have a directory and a few subdirectories roles/common/tasks that will contain YAML files with the tasks that we want to run against the server specified in the inventory file.
main.yml is the entry point for a role so we'll include other files in main.yml like ping.yml and other files that we'll create along the way with tasks in them.
So, we'll build up main.yml by including other YAML files as we go along.
That's the overall structure of the directories and the files we're going to be creating in the next few videos and the purpose of these should become apparent as we start writing our files and then running them against our server.
|
|
|
show
|
1:49 |
Now that we're ready to write our Playbook switch over into your development environment.
I'll be writing this code on Ubuntu 18.04.
If you're working on a Mac you should be able to follow along with the same commands.
And again, unfortunately on Windows, Ansible is not set up to run on Windows as a command machine.
You can control Windows machines from Ansible but executing Ansible Playbooks really doesn't work even for basic purposes on Windows.
First thing we're going to want to do is create a directory for our first Playbook.
Switch into that directory and, of course, it'll be empty.
We need to write a first YAML file.
Throughout these videos, I'm going to be using Vim but if you're more comfortable in Sublime Text or another editor, feel free to use that instead.
Start out with a little note and you can put whatever comments to yourself that'll help you remember what this file is for.
It just is, these are high-level instructions that tell Ansible which tasks to apply to which hosts.
Now we're going to write some YAML.
This YAML instructs Ansible to take every host in the inventory file that we'll write.
We're going to use the root user which, typically, we would not do when we configure a server.
We'll learn how to lock down a server later.
But, for simplicity's sake we're going to use the root user on the server that we provision.
We're only going to have a single role and that will be common.
So what we've said here in this Playbook with high-level instructions, take every host we're only going to have a single host on that hose, use the root user and apply the common role to all those hosts.
Here's how we know which host to apply it to.
Create a host file.
In the host file, specify the role named common.
Now we need to say which server we're going to apply this to.
And we need the IP address, but we don't have a server yet.
So let's go to DigitalOcean and provision a server and then we'll know what to put in here.
|
|
|
show
|
1:08 |
To know what to fill in here we need to provision a server.
The easiest way to do that is to use a hosting company.
Switch over into your web browser and if you've already got a hosting company that you use, that's awesome.
I've been using DigitalOcean for a few years now and I found it really easy, and they have a few features like uploading a public key to lock down your server that are super helpful and we're going to actually use in these videos.
Not all the hosting providers use that but you can go to the following URL that's do.co/fullstackPython, and this will give you $100 credit so that you don't have to pay anything in order to use DigitalOcean servers.
So throughout these videos, you shouldn't have to spend any money on servers as long as you use that promo code.
So you should see a screen like this which will just ask you for an email address and password.
And then you just need to confirm your email address.
Now as soon as you click on the link in the email it'll change the screen, and then you'll be prompted for some billing information.
Pop that in.
This helps DigitalOcean protect against or spambots.
You won't actually get charged.
There'll be a temporary authorization on your card to make sure it's valid, and then we can proceed to provisioning our server.
|
|
|
show
|
1:33 |
First time you sign up for DigitalOcean you're going to see this screen, which is for onboarding.
So let's give this a first project name.
If you have a project name you want to punch in there, go for it, otherwise just call this Ansible Test.
And they're going to ask you some basic information about why you're using DigitalOcean.
I typically put development and, of course, select Ansible.
Feel free to check any of these boxes that are related to what you're working on.
My usual stack is Python, use GitHub Django, or Flask, some Redis, Postgres, Nginx and of course, I always use Twilio in my projects.
And then when you're ready, hit the start button.
So DigitalOcean has a bunch of concepts such as projects, that allow you to organize your servers by application.
We're not going to be using any of that right now.
We just need a single droplet so you can go ahead and click okay and get started with a droplet.
Our case, we're going to bump up the version to 18.04, we want the latest Ubuntu LTS release.
And one gigabyte of memory is plenty for us.
Of course, you got $100 free credit on the account so feel free to bump up to a bigger server.
Especially if you're using DigitalOcean for most Python projects, getting started with a one gigabyte server is usually enough.
So for me, I usually switch the data center region to New York one, just 'cause I'm on the East Coast.
And then this is crucial, we want to add an SSH key.
Now if you created one earlier, awesome.
We can add that here.
If not, let's walk through how to create an SSH key.
|
|
|
show
|
2:24 |
So we want to create an SSH key so, when you click "new SSH key" what they're looking for is the public key.
So this was on earlier videos every SSH key pair has a public key you can share that with whoever and you've got your private key which you never want to share with anyone and your private key is what authenticates you instead of a password, or together with a password.
So switch back over into the command line and we'll save this host file for now.
Reuse the ssh-keygen command, so RSA key we want it to be 4096 bits and then depending on your operating system version it's good to try out "-o" flag.
And that's a lowercase "o".
And some versions of ssh-keygen don't have the "-o" the -o indicates that ssh-keygen should save it in an OpenSSH format that is more secure.
There were previous versions of Ubuntu and other Linux distributions that were saving SSH keys in more insecure formats, so try the "-o".
If it doesn't work for you, remove that from the command and then specify your email address, with "-C".
We'll save it as "first playbook" and we won't use a passphrase.
Okay, so now we've got first playbook and first playbook pub, we want to use "first_playbook.pub" copy and paste this over into digital ocean.
Paste that in as long as there's no error message, should be good if there is an error message that may indicate that you've pasted in your private key by accident.
Click "Add SSH key", and that'll actually be saved for future use whenever you create a new droplet.
All right, scroll down, and if you want to, optionally you can change the host name.
I usually like to change it to something a little simpler and go ahead and click "create".
Now, it might take a few minutes but the droplet will be revisioned and then we'll be able to click into it and get our IP address.
Go ahead and copy that, if you just click on the IP Address it should copy it.
Back over into our inventory file and paste in that IP address.
|
|
|
show
|
4:11 |
Okay so we've now got our SSH key we've got a server provisions we have a hosts file and the beginning of our playbook.
But our playbook needs tasks that are stored in roles in order to have something to do.
So right now we have the following files: we got our private key public key, host file, playbook.yml.
We're going to create a directory within our project directory.
We'll call this roles and we'll store every single role that we create for this playbook.
Now in this playbook we're only going to have a single role and we'll just call that common.
So when you go into the roles directory create another role called common.
And common is typically used for roles that cut across every single on of your servers.
You'll usually want to give your roles more descriptive names like web server or data base server.
When there expected that there only going to apply to certain types of servers.
But I typically use common when I know a task is going to apply to every single server that I want to use that playbook for.
All right so within roles/common create a directory named tasks.
And this will store our yml files with each of our tasks.
Now there is a specific file naming convention we need to use here.
And that is, there needs to be a main.yml file so that Ansible automatically picks up what tasks need to be executed.
Think of main.yml as the starting place for the role.
So create a new file named main.yml and we can give this just a brief comment.
And then we're going to import other files that have individual tasks.
Unless your role is only going to execute one or two tasks you're typically going to want to split out your tasks into multiple files.
The way that you'll handle that is with the include syntax.
In our case, we're just going to have our first file be ping.yml.
So that's it for main.yml so far.
Only one usable line, that is the include line for ping.yml.
But of course we need to create ping.yml So create a new file named ping.yml And the ping command just tries to connect to a remote server and sees if its operational and we can actually connect to it and its responding to us.
And this is going to ping whatever servers that we have listed in our inventory file.
And save ping.yml and we're going to try and run this playbook.
Now you can't run it from within the task directory.
So go back into the base directory for first playbook.
Should be at the top level directory of the project directory.
Now we're going to try to run our playbook.
The way we do this is with the ansible-playbook command.
So if you just try to type in ansible-playbook it'll tell you all the options the arguments we can pass in.
We are going to pass in a few arguments.
We'll specify ansible-playbook and then an inventory file.
That inventory file is the one that's in our current directory and that's hosts.
We're going to specify a certain private key and that is first_playbook.
And then we have our playbook.yml file.
Question is whether this will work just the first time we try to execute it with the single ping command that we've put in place.
And unfortunately it failed on the first run.
Now I actually wanted to show this error because this is something that will pop up frequently if you are working with new servers.
And here's what's happening if you see this issue where there was a module failure specifically, you see this particular key which is usr/bin/Python not found.
What's happening here is that there is no Python version 2 installed on that remote server.
So Ansible is trying to execute commands on a remote server using the Python command but only Python 3 is installed not Python 2.
So we need to tell Ansible don't try to use Python 2 we explicitly want to use Python 3 on remote servers or on specific remote servers that we would specify in our hosts file.
So here's how we do that and how we can fix this problem.
Open up the hosts file and right next to the IP address were going to specify the particular location and file name of the Python interpreter that we want to use on that server.
So by default it was trying usr/bin/Python but we want to specify ansible_Python_interpreter=/usr/bin/Python3.
Save that file.
And lets give our playbook a try again.
Okay this time it was able to execute using Python 3 on the remote server and it looks like everything ran properly.
We were able to ping that remote server.
And this is a good start to our Ansible playbook.
|
|
|
show
|
1:51 |
Ansible told us everything went well when we ran our playbook, after we added the explicit instruction to use the Python 3 interpreter.
What if we want even more output?
Surely there's a lot more happening under the covers, than just a few lines of, okay this was done.
If you're running into an error or you just want to see very detailed information when your playbook is running.
Use the -vvv argument.
This is for the most verbose output.
Now instead of just a few lines of output we're going to see a whole lot more this time.
We got a whole lot of information about the connection, the specific versions of OpenSSH that were used.
Which modules, that output really flew by so one thing you can do, is you can also redirect the output from standard out which is currently sent to your console, into a file.
So if you want to save the output somewhere the way you can do that, is rerun your command.
When you're running your command, redirect the output to a file named, for example ansible.out and when it's finished executing be able to open up that file.
Can open up in our text editor, or we can use the typical Linux commands like grep.
We already saw the four Vs for the most verbose output but there is a middle ground where we can see more information about what Ansible is doing without getting too overwhelmed with what's out there.
And in that case, you can use one -v, two -vv three -vvv, or obviously we already saw four -vvvv So if you take a look at two -vv when we execute our playbook, we see more information about what Python version we're using and which files are being included in our playbook.
So two -vv can be a nice middle ground between getting overwhelmed with all the output and not really being able to see enough.
So as you're working with Ansible if you're running into errors, use fully verbose output, and as you get more comfortable with Ansible, figure out what level of verbosity you're most comfortable with.
|
|
|
show
|
3:34 |
Our playbook isn't doing much at this point so let's enhance it so it's executing useful commands on the remote server.
We have a fresh server where we're logging in via a root user.
Typically, that's not a good safety practice.
Let's create a new user vr_playbook and we'll log in to our server using that new user.
Go into the roles Directory, common/tasks and we're going to modify our main.yml file.
We'll include a second file named new_user, and save that.
Now we'll create the new_user.yml file and we're going to write three tasks.
But first, we'll create a new group, the non-root group then we'll create a user and we'll add it to that group that we just created.
And then third, we'll add a public key for this new user so that we can log in.
For our first task, let's create a non-root user and do that with the group module and the name of this will just be deployers.
In our next task, we'll add the deployer user to the deployers group.
And we want this to exist so the state will be present.
Now if we write re-run our playbook multiple times Ansible will check to see if deployers has already been created.
If so, it will simply skip over the step.
Or if later, we change the state from present to absent it will remove the Deployers group.
In our case, we want it to be present.
The second task is to create a non-root user.
We will use User Module for this task.
We need to call the new user deployer place into the deployers group that we just created and we can set things like the default shell otherwise it's just going to default to sh the old school shell rather than Bash.
And we want the state of this user to be present.
Okay, one more task and then we can try to run this.
We're going to use our public key and when someone is trying to log into this deployer user that they need the private key that matches this public key.
And we'll use the authorized key module to add to the deployer user and at present, we want an authorized key to exist.
And this will be slightly trickier.
What we want is, we want the contents of the public key to be saved in the authorized key file.
So we're going to use some more advanced Jinja which is the templating engine, Jinja syntax to look up the contents of a file and that file in my case is stored under /home/matt/first_playbook/first_playbook.pub In your case, that's going to be wherever you saved the public key for your first_playbook wherever your working project directory is.
So this value instructs Ansible to go look up the contents of the file for first_playbook.pub and we want to save that in the authorized key on the remote server.
All right, I'm going to save this file.
Now let's give our playbook a try.
Move back up to the top level directory.
Looks like everything looks good with these three new tasks.
And now we should be able to log in on that remote server with our new Deployer user.
Let's test this out.
With SSH, first_playbook, we'll use our private key to deployer@, and then you're going type in the IP address of your remote server.
And now everything looks good.
We didn't need a password because we had our private key.
And now we're logged on to our remote server using the new user we just created with our playbook.
|
|
|
show
|
0:55 |
In the beginning of this chapter we set out to create our first playbook and we defined this structure with an inventory file top-level playbook, single roll named common, with a couple of YAML files that contained tasks in them.
And we enhanced our playbook with the new_user.yml file and we executed that against our server in order to ping servers to make sure that they were up and listening to our requests and create new users that allowed us to log into our server not through the root account.
The great part about going through this example is you're actually really well-equipped to use Ansible now.
There's some things that we did here in these playbooks that are not considered good practices, for example hard coding variables.
And we haven't seen how to expand our tasks into many different roles, but by and large this is actually how Ansible playbooks get developed.
You start out small and then you expand upon them over time and you test along the way.
We'll take this kernel, and we're going to expand upon it in the next chapter and add the good practices in that will allow you to scale up your Ansible playbooks across projects, teams, and organizations.
|
|
|
|
17:19 |
|
|
show
|
1:37 |
In the previous chapter, we started our first Playbook got comfortable with inventory files roles, templates, and tasks within those roles.
Now we're going to enhance our Playbook by setting variables that can be reused and greatly increase the maintainability of the Playbooks that we write.
Reading environment variables particularly for sensitive information that we don't want to keep stored in files or that may vary from one server to another and therefore we don't have the ability to hard code in a variables file.
Let's take a look at using templates as a different type of input data than variables but incredibly useful in their own way.
And of course our variables often store very sensitive information that we would want to encrypt so that we can add it to source control but not want to expose it to anyone as plain text.
As we left our last Playbook when ended the previous chapter our first Playbook had an inventory file a top-level YAML file, a single role named common with two tasks files main.yml and new_user.yml We're first going to improve our Playbook by adding variables under the group_vars directory and we'll see how we can add variables to the all file or the files that would be specific only to a single role.
We'll then take a look at how we can use templates to configure services such as the Nginx web server and we'll combine the two using variables and templates as a very flexible way to handle configuration management.
For example, let's say we have a variable named fqdn which stands for fully qualified domain name.
That could be stored in the group_vars/all file and then we would have a template file for the Nginx configuration, and we could use that variable fqdn within the template file.
We'd keep separation between the variables stored in a separate set of files in the variables directory and our templates which can be unique to our roles.
Let's see how this works in practice.
|
|
|
show
|
3:13 |
We're going to modify our existing playbook to use variables instead of hardcoding values and tasks.
This will make our playbooks more maintainable and much easier to read.
Flip back over into your development environment.
We should be in the same directory where we have our first playbook.
Create a new directory named group_vars.
Within group_vars, create a file named all.
In all, we're going to have a bunch of key value pairs and a couple of good ones to start with are the values for our deployer user and the name of the group we have for the deployer user.
So instead of hardcoding deployer or deployers in our task we'll pull that from a variable.
Your first variable, deploy_user.
deploy_user will be named deployer.
A deploy_group as a second key the deployers as the value.
Save the file go back to the route directory of our playbook and into roles/common/tasks and modify the new_user file.
Instead of having hardcoded name deployers we'll use the variable here.
And here where we create our non-root user we use the deploy_user variable and again, deploy_group as our variable.
Keep going down and then under our user of deploy user then we'll save that.
And there's a couple other places where we could use variables.
For example, which shell we would want and this hardcoded path for where our public key is.
But let's give this a try for now just with these two new variables and see how this works.
Head back into the top level directory and let's re-run our playbook.
Same command as before.
Okay, and we ran into an issue and this will often come up if you have hardcoded values and you're placing them with variables.
The spaces are throwing off Ansible.
It can't parse what's happening here so we need to make sure that we have double quotes around our variable names when they're used as values.
So just head back into roles/common/tasks, modify the user and then down here, name, deploy_group make sure to put all these in double quotes.
Cool.
Let's re-run this.
Okay, so I got us past the first error and this is a really good time to take a look at a common error that will come up when you make a typo.
So we had a variable defined deploy_user but in this case, I typed in deployer_user and of course, there is no deployer_user variable.
So let's fix this one error where we said deployer and re-run one more time.
Awesome.
Everything was successful and now as you can see, under group_vars when we take a look at our variables file we now have two variables: deploy_user, deploy_group and their values which we can change whenever we want.
So if I wanted my deploye_user to be named matt do that instead and that would then affect every place that we've used this variable across our entire playbook.
Much more maintainable than hardcoding deployer everywhere.
|
|
|
show
|
2:28 |
Now that we know how to set variables in separate files from our roles we also need to know how to read environment variables.
Those are variables set on the system that wouldn't be hard-coded in any files.
What do we mean by an environment variable?
Let's say you're in your shell and you want to set a variable that you can read across the system.
You'd use the export command and then a variable name and then followed by a value.
Now we can read to this environment variable and using the echo command print it out to the command line.
So we set the value of ansible.out to the key filename.
Let's set another environment variable.
This time it'll be more useful.
In our first playbook we upload a public SSH key as our authorized key and that allows us to log in with our private key but we hard-coded where that key was stored which really should be set as a variable Whether stored in a file or as an environment variable.
Let's set it as an environment variable.
We'll read it into our Ansible playbook and use it as a part of our task.
So we'll say authorized key and we'll give it the same authorized key that we used in the last chapter.
So now that authorized key is set we can read it into our Ansible playbook.
Open up group_vars/all and set a new authorized key variable name.
Now we're going to use the lookup template tag to look up environment variable named authorized key.
And let's actually call this authorized key filename to differentiate it from the contents of an authorized key file.
So now that we have authorized key filename we can go back into our roles common tasks modify new user.
Go down to the key and we'll change lookup file instead of setting this through a string we're going to have our variable name here.
Save that, go back up to the top project directory now we're in our playbook.
Awesome, so Ansible was able to get the environment variable that we had set as authorized key read it in as the variable authorized key filename and we were able to use it in one of our tasks as part of our playbook.
|
|
|
show
|
1:14 |
Variables in our playbooks are useful for more than just customizing our tasks and roles.
We can also use them to create output files using templates.
Templates are Jinja2 files that contain boilerplate text that you combine with variables to produce certain output.
For example, if you want to create a configuration file for your Nginx web server if you want to configure a Postgres database to lock it down against unauthorized access or if you just want to have text file with instructions that are customized to each server so that if someone logs in they'll understand more about the server when they read that file.
As always it helps to take a look an example.
So here's what we're going to do in this video to learn how to use templates.
We already have the following playbook.
This is our first playbook and we're going to add a couple of new files.
First one is going to be right template which will have a new task using the template module to output a template onto a remote server.
And then we have our template itself which will be under the templates directory which is a peer of the tasks directory in a role.
So we separate out our templates from our tasks we can reuse the templates across different tasks if we want to.
We typically use the .j2 extension for templates because they're in the Jinja2 template engine format.
However that's not required.
The files can be named whatever you want.
I'll use j2 in all these videos for clarity.
All right, let's add these files to our playbook.
|
|
|
show
|
3:39 |
Head back to the terminal where we're going to modify our first playbook to add a template file to it and then execute that with Ansible playbook to put that template file onto our remote server.
Go into roles, common, and we currently have just the tasks directory, so create a new directory for templates.
Under templates, create a new file sample template.j2 and we're just going to put some text in here with a couple of variables that use the Jinja2 syntax.
We can have whatever we want in here.
This could be a configuration file for Nginx or another service that we're using but in our case we're just going to have a simple text file.
So, we'll say, this is an example template.
And we set up a user named deploy_user and when Ansible executes instead of having deploy_user it's going to replace this token in the template with the value of the variable deploy_user should be deployer in our case.
And we'll just have a second variable that we've already defined, deploy_group.
So this is how we can combine boilerplate text such as this is an example template with the variables that we have defined like deploy_user and deploy_group.
Save this file, and then we're going to go into the tasks directory.
Edit the main.yaml file.
And we'll include a new file, write_template.
So save main.yml, and then let's create write_template.yml.
It should have a simple comment that this task is going to create an example file from our template.
We'll use a new module template.
I'm just passing two arguments, a source and a destination.
The source is going to specify the name of a file under our templates directory.
So Ansible knows to go to look in the templates directory of the same role that this task is in.
The source is the template that we just wrote.
And we want to write the destination location on a remote server we're running our playbook against.
And this can also use variables, so we can have this right under the deploy_user variable so this will be home/deployer and we can choose to give it a different file name than our template, because most likely we're not going to want to use the j2 extension.
Let's call it our example output.
Okay.
Now we should be able to run this playbook again.
All right, we see that the new task right_example template file was executed, and executed successfully and it changed something on a remote server.
So let's take a look and see if that file has now been written.
We can SSH into our remote server.
And we're ready in our home directory, home/deployer.
We can see our example output.
This is an example template.
We set up a user named deployer, so the token for deploy_user was replaced with deployer and a group named deployers, and deployers replaced that deploy_group token.
So that's how we can use templates to populate files such as configuration files or read.me files whatever we need, on our remote servers.
And we can use our variables as input into those template files.
This is a very common pattern.
We'll use templates extensively in the remainder of the videos for this course.
|
|
|
show
|
1:09 |
The files in your Ansible playbook should always be added to version control.
Just like any code in your application but that also can present an issue because you will typically have sensitive variables stored under your variables directory.
In our first playbook, we had one file that stored all of our variables, all but in more complicated projects you'll likely have many files that store variables under numerous subdirectories of the group_vars directory.
So, how do we handle adding variables to source control without exposing sensitive data like passwords.
That's where ansible-vault comes in.
ansible-vault is a separate command just like the one we have for ansible-playbook.
ansible-vault allows us to encrypt and decrypt files and parts of files, so that we can add the sensitive data to version control without exposing it to anyone who would have access to that version control intentionally or unintentionally.
And by using the ansible-vault, encrypt, decrypt edit, and several other commands we'll see we can then work with our encrypted files and when we're ready to use them in our Ansible playbook we'll pass on the parameter ask vault password so the Ansible playbook command will decrypt the files temporarily while it's executing our playbook.
Let's take a look at the ansible-vault command.
|
|
|
show
|
3:02 |
In our current iteration of our first playbook we have a single file that stores all our variables, all.
Now nothing in this file is particularly sensitive but if we wanted to add a password for a deploy user we'd want to make sure that this file is encrypted and we can use ansible-vault to do that.
So go ahead and add deploy user password into helloworld123.
Now with this file, if we take a look at the contents right now we can see it's all in plain text.
But if we use ansible-vault encrypt we can then give it a password.
If we try to take a look at the file now it's completely encrypted and saved to add to version control.
So that's the first command that you're going to want to use ansible-vault encrypt.
You can also use ansible-vault create if you're working on a new file but I typically work with files in plain text while I'm doing my development and then I encrypt them when I'm getting ready to add everything in my initial commit in version control.
So the file is now encrypted.
What do we do with this?
Let's say we want to make change.
We want to change our password for that deploy user.
We again use ansible-vault and we use the edit command.
We'd give it the password and now we can edit our file with our default editor.
Now for me, I use Vim, so that works for me when I'm using the edit command.
If you want to use a different editor on your system just specify editor equals, for example the Nano Editor or Sublime whatever your editor of choice is.
Then when you open up the file it would use a different editor.
So now let's change our password helloworld1234 we'll write that file, and we'll exit this editor.
The file is encrypted as we would like.
But we can see when we reopen the file it's been saved with that additional four that changes the password for the deploy user.
So now that our data is safe, how do we use it?
There's a couple different ways.
The most common one is going to be is when you're running your Ansible playbook command and we're going to pass in argument ask vault pass.
It'll ask us for a vault password decrypts our variables, and uses them in the playbook.
So now just as we had before when we were running our playbook we can use that encrypted data as if it was plain text.
The one other way that we can use our data we can just go ahead and decrypt it.
It'll ask us for our password and now if we take a look at the file it's back to plain text so it is reversible.
If you want to play around with ansible-vault encrypting your files and then you find out later oh, I actually do want this to be in plain text or you split out the sensitive ones from the plain text ones you can just use ansible-vault decrypt in order to handle that.
So that's how you can keep your data safe and add it to source control and make sure that it's not compromised using the ansible-vault command.
|
|
|
show
|
0:57 |
In this chapter, we learned how to take our static playbooks and make them dynamic using the different forms of data that are available.
Of course, we have variables that allow us to punch in values into our tasks and roles and when we pull any hard coded values out of our tasks and separate them into variables it makes our playbooks and our roles more reusable.
Also took a look at how to read environment variables.
You don't want to store all your variables in files and templates can be input data for configuration files or README files, and these will be incredibly handy as wet set up many services in future chapters such as getting our web server configuration established and much of our data can be sensitive so we want to make sure that we encrypt it so we don't accidentally expose passwords or other important information when we check our files in diversion control.
While we didn't bring these up as core concepts advanceable in previous chapters these are all going to be very important and we'll work with them as we configure a server and deploy a Python application in later chapters.
|
|
|
|
37:30 |
|
|
show
|
1:32 |
We know how to write a basic playbook include variables, read from environment variables encrypt sensitive information, and use templates in order to configure our services.
But how do we take that initial knowledge and scale it up for a more typical but complicated situation.
For example, let's say we wanted to configure a web and database server, two separate servers.
Say we've got two of them on DigitalOcean.
We need to create non-root groups, users for both of them you need to harden the server against malicious attacks.
It'd have to stand up and configure a webserver add certificates for https, make sure that that webserver stays up, so that if for some reason the webserver process goes down that it restarts itself automatically.
We need to install and configure a database on one of the servers and check the database connection make sure the database is configured properly and there's a whole lot of other substeps that we need to take to make sure that we'd setup these two servers properly.
In this chapter we're going to take that initial knowledge that we gained from building our first playbook and scale it up to do all these things.
We'll have a common role that will allow us to take some default servers and set them up properly and then one of the servers will handle the webserver and the other role will configure a database.
There'll be a significant amount of live coding in this chapter, so you'll want to bring up the finished Chapter 6 code which you can find at bit.ly/intro-ansible-ch6.
When you bring up this link, it will contain all the files that we're going to create in this chapter.
There's going to be a lot of hands-on coding throughout the entire chapter but I promise you're going to be very comfortable with a good-sized playbook once we're finished.
|
|
|
show
|
1:07 |
Time to dive back into the command line.
We're no longer going to build upon our first playbook we're going to create a new project so start out by creating a new project directory.
I'll just call this server_config for this chapter and of course this directory's going to be empty.
As you use Ansible for more projects you'll likely have a base playbook that you'll work from something that has your initial scaffolding.
Maybe some common roles that you reuse across many different projects.
A bunch of variables that you typically have for each role.
But rather than start you with some scaffolding I prefer to start from a blank directory for this chapter.
Just as we did with our first playbook.
So now with our empty directory let's create the subdirectories that we know we're going to need.
group_vars and roles.
We're going to need an SSH key.
No passphrase.
And within the roles directory we're going to need three subdirectories.
We'll have a common role, we'll have a database and we'll have a web server.
And we'll fill in those three roles as we go along.
We have our initial public private keys a few directories that we're going to fill in and we'd like to write our inventory file but we don't have servers yet so let's spin up two new servers on DigitalOcean now.
|
|
|
show
|
1:10 |
To provision the two servers that we need log in to your DigitalOcean account.
You get to the account dashboard and now we can create two new servers.
So go up to create, droplets, and we'll just manually create a couple of them ourselves.
You're going to want to choose 18.04 that'll be the latest long-term support release.
One gigabyte is fine for us.
Just scroll down and add an SSH key.
Now, you could use the existing SSH key.
We're going to add the SSH key that we just created.
So go back to the command line and take a look at server_config.pub.
Copy and paste this.
Copy, and we'll paste this in.
Ah, and here we go.
We can do two droplets.
And we'll give them custom names.
And click create.
Give it a couple minutes.
Awesome, now we've got our two servers.
|
|
|
show
|
1:05 |
With these two servers ready to go now we can create our inventory file.
Copy the IP address of the web server go back over to the command line.
Create the hosts file, this in the base directory of the project.
We're going to have four roles here.
The first one will be init_config.
This will just be for getting our deployer and deployers groups set up.
Then we'll have a common role for any tasks that we want to execute on every server.
Our web server.
And database.
For each one of these, we need to specify an IP address.
The first one is 142.93.123.128.
And since we're using Ubuntu 18.04 we want to specify the ansible_Python_interpreter so it's explicitly going to be Python 3.
And then we have our second server.
Now we can copy these down into common.
And then 128 is our web server and 59 is our database server.
Now we're all set with our inventory file and we can get started writing our roles for this playbook.
|
|
|
show
|
6:16 |
We're a few videos into this chapter.
So how are we doing against our checklist of what we want to accomplish?
Well, the first thing was to get a couple of blank provision servers.
Got that.
And the next thing we want to do is create a non-root group and user.
That way we're not logging into the root user into our servers.
Let's take care of that now.
There's a few ways to go about this so I'll show you one way that involves a simple separate playbook to specify an initial configuration.
Create a file name init_config.yml.
And what this one is going to do is just a one-time setup.
When we get a blank server, we have a root user.
We just want to create a non-root group and user.
And then we're never going to have to worry about doing that again for those servers.
We'll specify the root user.
So this will be the only action taken under the root user and then as soon as we have our non-root user, every other action will be taken with that user instead.
And we'll create a role init_config.
Go under roles, create a directory for init_config, create a directory for tasks within init_config.
And then under tasks, create a main.yml file.
We need to create a non-root group first that way when we create our non-root user we can associate the group immediately.
We'll use the group module for this task and the name, the name of the group, will look familiar.
We're going to use a variable here called deploy_group just as we did in our first playbook.
And the state should be present.
So that will ensure a non-root group is created.
Next, create that non-root user.
And we can associate this non-root user with the group that we just created.
And I always like to use the Bash shell so I just say bin Bash for the shell and we want it to be present.
Now, how is our non-root user going to log in?
We want this to only be via private key access.
No passwords allowed.
So we need to add an authorized key that is our public key to that account.
This uses the authorized key module.
You specify the user.
We want this key to be present.
And we want the contents of the file which are stored in a variable.
This should look familiar from the first playbook.
Take note of two new variables here ssh_dir and ssh_key_name.
We're going to have to specify that in our variables file.
Right now our non-root user does not have sudo privileges, which are going to be necessary for most of our deployment, so let's modify the sudoers file to include our new non-root user.
The line in file module is going to change file that already exists.
All right, almost done.
We want to disable the ability to log in directly as the root user.
This is a recommended security practice so that automated scripts that are going to scan and find that you have a server up and running don't know the name of one user which is the root user, that's on your system.
In the SSH server configuration, we'll look for PermitRootLogin and we'll replace that with PermitRootLogin no.
The configuration should already be set so that there are no password-based logins.
We're going to have task here just in case.
So we'll have roughly the same as we just did to disable root SSH logins but instead of PermitRootLogin we're going to search for PasswordAuthentication.
One final step, let's make sure that the SSH server restarts.
This way we know that it's definitely taking our configuration.
Before we exit out, just glancing through it does look like there may be one issue with our two replace commands.
We don't want the caret under the replace line.
We want the caret in the regular expression but not in the replace line.
So let's remove those carets because carets should not literally be placed in the configuration file.
Let's give it a try.
Head back up to the base directory.
And actually we do need to have our group variables.
Go ahead and create a file named all deploy_user, call this deployer, deploy_group deployers plural.
Now replace ssh_dir with the name of your user wherever you have the public key that we just created at the beginning of this chapter.
Save that.
Now we can give this a try.
|
|
|
show
|
2:42 |
We created our initial configuration so let's test out and see how this all works.
One step though, that we do need to take is we want to connect to these servers from our local server and remove the prompt that appears when we're connecting to a new server.
For example, let's take a look at our host file.
If we copy our IP address and we SSH in, that'll be root@ and then paste in the IP address there's a prompt "Are you sure you want to continue connecting?" We'll select Yes, and now this server has been added to the list of known hosts.
We know we can connect to the server and Ansible will be able to run its commands.
Exit out of that one with Control + D and then copy the next server.
Same command, different server.
And again, it prompts us "Are you sure you want to continue connecting?" We'll say Yes.
Now if we were to try to reconnect there's no prompt asking us if we're sure we want to connect because we've already connected to the server and it's listed in the known hosts file which you can find at your home directory .ssh/known_hosts we have two entries in here, one for web server one for our database server.
Now let's try to kick off our script and see what happens, see if we made any typos or if we got it right on the first shot.
So we were able to connect, create a non-root group non-root user, but we did have one issue of adding an authorized key to the non-root user.
So let's take a look at this error here and it looks like a typo where this should have been end parenthesis and then the two curly braces.
Let's fix that in our playbook and it's just a missing parenthesis.
All right, one more time.
Okay, so unable to find the appropriate file.
Now this is most likely an incorrect variable var as all file, and it looks like we need an extra trailing slash at the end of ssh_dir.
There we are, no errors, and now we should not be able to log in to either of our servers via SSH with the root user.
Permission denied, that's what we expect.
But if we use the deploy user all good, and that deploy user will provide the access for the rest of our playbook.
|
|
|
show
|
1:39 |
We've created a non-route deployer user for both our servers.
Now let's get started on the common role which will handle the next task of hardening the servers against malicious actors and setting up some basic configuration that we'll need a web server and the database server.
Go into roles/common and create a new directory named tasks.
Under tasks, create a file named main.yml We're going to create a file named security.yml which will install the security packages except the firewall that we need for our server.
Save main.yml, let's create security.yml.
We're going to write a single so that we can test this out and make sure everything works.
And the first task will just install some packages that we need on Ubuntu.
Use the apt, aptitude module.
We're going to give the apt module a list of items we'll define in just a moment.
We want to update the cache before install any packages to make sure we have the latest versions available.
And we're going to need to use superuser privileges.
We can give a list of items that are the name of the packages that we want to install.
We're going to install some Python 3.0 development packages and Fail2ban which prevents unauthorized access attempts.
Save that file and let's test it out.
|
|
|
show
|
1:11 |
This time when we execute our playbook we don't want to use init_config.
We're going to create a new playbook.
Copy what's in init_config create a new playbook webserver.yml.
The user this time is going to be deployer, not root.
And we're going to apply the common role.
And we'll add web server role to that once we create it.
We should now have everything in place to test out this new configuration.
Okay, so looks good.
Now, that likely took a while for you.
What was happening on the remote server was that we were installing a bunch of packages and downloading and installing that can take quite a while.
Don't worry if it seems like playbook hangs for a few minutes, as long as it doesn't error out, it should be okay.
And eventually it'll finish up.
So now it looks like our playbook is good and we can start building upon it using the deployer user and expand out and use the common role to protect against malicious actors and install the basic packages we're going to need across our systems.
|
|
|
show
|
2:20 |
With our basic packages including Fail2ban installed we next want to set the firewall rules and we'll use the ufw module to handle that.
Head back under roles into common tasks and security.yml.
We're going to create a couple new tasks here.
First, we want to enable SSH within the firewall.
We'll use the ufw module which is how we manage firewalls on Lynx systems.
And we're going to set the rule to allow on port 22 which is the SSH port.
And we will need to become superuser to do that.
Next we want to actually enable the firewall.
What these two rules are going to do first we're going to make sure that we can still login via SSH to our servers so we can continue our configuration.
And then second, we're going to lock down every other port other than port 22.
So this means no incoming HTTP, HTTPS connections any other type of protocol except for SSH.
Now when we create the tasks for our web server we're going to allow additional ports to be accessible in particular, port 80 and port 443 which are for HTTP and HTTPS.
For now, this one should be fine for us.
What we want to do is make sure we can log in before and after running these tasks.
Let's make sure that we can still SSH into one of our servers.
No problem, it uses our private key in order to authenticate us.
Now lets rerun Ansible.
Okay, now if we try to SSH back into the server let's make sure that everything works.
And we're good.
Real quick though, let's make sure that the other ports do not respond.
We can use the cat command to simulate a connection on a port that we want to access.
So for example if we wanted to access the SSH port we'll see that the server at 142, 93, 123, 128 responds back with the protocol.
If we hit Control + C it'll get out of that.
And if we take a look at port 80 nothing there.
443 nothing there.
So it looks like our firewall is now in place and we can grant exceptions based on the type of server such as a web server that requires port 80 and 443 or port 5432 which is the default for Postgres.
|
|
|
show
|
4:24 |
We've handled most of the first three steps that we've set out to do here and next we are going to stand up a web server on one of our two servers.
Couple things to note, one there are many more steps we can take to harden our server against malicious actors.
The purpose of this play book is not going to be exhaustive and completely securing your environment.
These are good first steps but there's a lot more you can learn about how to lock down Linux servers.
In general though these are the first couple steps that anyone is going to take.
Make sure it's ssh key only, log in, use a non root user, set up the firewall to disable any ports other than the ones that are absolutely necessary.
Before we move into standing up a web server and handling the web server infrastructure let's create some tasks with the UFW module.
To start setting up the roles for the web server and the database server.
And go under roles, under webserver and create a tasks directory, and a templates directory.
And let's do the same thing under the database directory.
If we go under common under tasks what I often do, copy in a couple of YAML files as boiler plate.
Now head under webserver/tasks let's modify main.yml modify security.yml, and we don't need to worry about the packages because these are always going to be installed.
We know that the SSH port for 22 will be open for us, we know that the firewall itself will be enabled due to our tasks under common, so let's enable HTTP and that will be port 80, and we'll do one more for HTTPS, and that's port 443 so this will open up, just for the web server configuration port 80, port 443.
We're going to want to do this one more time so copy these two files, and we're going to put them under the database server.
Let's change into the database task directory modify main.yml And we're going to use port 5432 as the default port for Postgres.
Alright, now we want to test all this out again one more thing we need to modify webserver.yml to make sure that we're applying the web server role.
Now we see that it enabled HTTP and HTTPS access as we specified under roles/webserver/tasks/security.yml.
Now if we want to handle the database there's a couple ways we could do this we could modify webserver.yml so that it applies to both the web server and the database server, or we could create a separate file and execute the playbook separately.
I like to keep as much of my configuration in a single file as possible, so we're going to modify this file here and we'll rename it once we get the new configuration in.
So now let's rename webserver.yml webanddatabase.yml and we'll kick this off instead of webserver.yml, webanddatabase.yml.
This will likely take a little bit longer because the database server hasn't had those packages installed yet.
Alright, we can see that it is finished and it has enabled postgres access on the database server.
So now we have our firewall, rules set depending on whether a server is a web server or it's a database server, and we can expand that model how ever many types of roles for servers that we have in our deployment.
|
|
|
show
|
1:41 |
We have our firewall configured, so let's go ahead and start installing some services on our servers.
We're going to start with the web server.
Let's install Nginx and then we'll modify it with a custom configuration.
First step, go back under roles, and we're going to go into web server under tasks, modify main.yml and this time we're going to include nginx.yml.
Save that file and then let's create nginx.yml.
We'll start out with a single task.
This is going to use the apt module.
We're going to want to install the Nginx package.
Now if it's already installed, Ansible will just check to make sure that it's installed and then skip this step.
And if it's not installed, it will go ahead and install the package.
We do need super user privileges for this and we'll save the file.
Let's go ahead and run our Playbook.
Make sure we didn't make any typos here.
Ansible Playbook, typical private key webanddatabase.yml, user host file.
Now it may pause here for a few seconds usually this is the first time we've installed this so it's going to actually install Nginx.
Ran successfully, great, now we can test to see whether it installed or not.
Copy and paste the IP address from the host file.
Flip over into Chrome, and we get a welcome to Nginx so this is because we just installed Nginx and it's using the default, boilerplate for a web page that it displays when we access the IP address.
Now we have Nginx installed.
Now we can go ahead, modify the configuration using a template install https.
|
|
|
show
|
2:32 |
We installed Nginx with Ansible.
Now we're going to create a very simple custom configuration using a template.
And then in the next chapter we're going to use that template as the base for a much more complicated custom configuration.
Head back under roles/webserver/tasks/nginx.yaml.
We are going to write out a custom Nginx configuration.
We use the template module.
The source is going to be nginx_conf.j2 within our Templates directory for this role.
The destination will be the configuration directory for Nginx on the remote servers that we configure.
That's under etc/nginx_conf.d And we'll call it app.conf for now.
Normally, we would configure this with our custom app name but we're not pulling a specific application now so we can modify that later.
We need to be a superuser to do this because that's a protected directory.
and now we can save this file and we want to go under a templates directory.
Currently empty I'll create a very bare bones Nginx.conf.j2 file we're just going to tell it to listen on port 80 which it already does so its not going to change its behavior in anyway but this will at least provide us a basic template file that we can then modify later.
Save that.
Lets give it a try.
How do we know the configuration has been applied on the server we can log in and take a look at it.
SSH with your private key deployer@ and then the IP address of your web server.
We're going to take a look under the Nginx configuration directory now we see when we list the contents of app.conf we get server listen on port 80 and that's our configuration.
Now if we refresh the page its still listening on port 80 so even though we've updated our configuration hasn't changed the behavior of the server at all.
Now we have a very basic Nginx configuration with a template that we can put on any remote server and we can expand upon it in order to add HTTPS or other custom configurations such as if we're going to have it serve as a reverse proxy for a Python web application server we take this as our base and use it for more complicated configurations.
|
|
|
show
|
3:35 |
How are we doing so far on our steps to take a look at some of the modules that we use in order to configure our server?
We said that first we were going to provision a couple of servers off DigitalOcean, which we did.
Create a non-root group and user that'd be our deployers group and deployer user which are set as variables so we could change the names if we wanted to.
We want to harden our server against malicious actors.
We took just the absolute basic steps of updating the system packages, putting in some firewall rules locking down the root user so that no one can log in directly whether it be a password or even with a private key.
Under the root user they can only log in under the deployer user.
You likely want to take many more steps and do more research about how to secure a web server but those are just some of the basic steps that you're always going to want to take.
Next we stood up a web server, installed Nginx and we wrote the absolute simplest custom web server configuration that we could easily expand.
And which we will expand in the next chapter to include a security certificate that we can have HTTPS connections.
To round out the scaffolding for this chapter we're going to install and configure the Postgres database.
And we want to check the database connection just do some very basic set up.
For example, creating a database and creating a separate Postgres user for that database.
Let's give this a try.
We're back in the base directory of our server config project and let's go under roles/database and then under tasks.
Now we already have a couple YAML files here because we set up the firewall roles specifically for Postgres access only on our database server.
Go back under main.yml.
And we're going to include a new file we'll just call this one postgresql.yml Save that and now let's create this file.
We'll start out by installing the system packages that we need for Postgres and if we wanted to run a Python application.
We'll use the apt module again and remember and we're going to list out a bunch of system packages but remember these will only get installed once because Ansible always goes and checks to make sure that those packages are installed and if they are already installed it's not going to do it over again.
So it saves time on subsequent playbook routes.
The name of the package is specified as a token.
And the items that will populate that token are the following packages.
And we'll need superuser privileges in order to install this.
One thing to take note of here it's really easy to make a typo in a package name so always check to make sure that you've typed in the appropriate packages.
I actually just realized I had a h where there should be a g which would cause this task to fail.
Now this looks good.
We want the psycopg2 package.
We could save this, should be ready to run.
Head back up into the base project directory.
Let's give our playbook a try.
Looks good.
We should have these packages installed and now we can customize our Postgres configuration.
|
|
|
show
|
4:43 |
We have Postgres installed.
Now we want to create a new user for Postgres and create a specific database that we can connect to.
This is going involve two steps.
First, we are going to create some new variables.
So go under group_vars.
We can just add these to all.
We're going to have three new variables.
First will be the name of the database that we want to create.
Let's call it chapter_six.
We could always go back and change it later create a new database.
Typically your database name is going to be the same name as your application or something that's easily identifiable.
chapter6 is fine in this case.
Open database user and we are going introduce something here.
We can actually use variables within the variables files.
So we can have our database user be the same as our deploy user.
That will just populate deployer into the database user.
We'll have a database password.
And normally, you'd encrypt this.
We'll just use this in plain text as we are playing around with our files and just getting everything up and running.
All right, with those three new variables in place let's save the file.
Head back into roles, database, tasks.
And into Postgres.
We'll have two new tasks here.
First, we are going to create a new database instance.
And, like a package manager, this will only create a new database instance if one has not already been created.
Use the postgresql_db module populate in our variable.
We are going to want to use the Postgres user in order to create our database.
So say become: yes.
and become_user: postgres.
All right, now we will want to create a separate Postgres user.
In the postgresql_user module.
Now we already have our database configured.
db is for the database name name is for the user that we want to create, dbuser.
And remember if you want to take a look at all the options that are available take a look at the documentations modules page for postgresql_db and postgresql_user.
And just give all privileges for simplicity.
In your case, you're going to want to make sure that you're strict privileges based on whatever user that you're creating.
All right and one typo to fix become_user is the appropriate way to specify different user name.
Let's give this a try.
All right, so this may be a confusing failure message because it says the Python psycopg2 module is required.
But didn't we already install this?
The answer is yes.
But, this is actually another one of those Python 2 Python 3 issues that can come up when using Ansible.
So we installed the Python 2 version of psycopg2.
We really want the Python 3 version.
That way the Python 3 installation on remote machines that we're using has access to psycopg2.
Let's go back under roles/database/tasks and we want the Python 3 version.
Let's try this one more time.
All right, and it looks like that solved the problem.
That's one thing that I really wanted to identify because it will bite you if you're not aware of the fact that some modules which rely on Python packages want to make sure that you install the correct one, whether that's for Python 3 or if you're using an operating system that's still relying on Python 2 you install those packages.
At least now that you are aware of it you should be able to identify these issues if they come up for you much faster than you would if you didn't know about it.
Next, we'll go ahead and test that our database user has been created then connect the database properly.
|
|
|
show
|
0:59 |
We installed Postgres, created a database instance and a new user, now let's test the connection and make sure that everything that we put in place works.
Take a look at your host file for the IP address of the database server, and we're going to SSH into that server.
Once we've connected, use the psql command with the name of the database that we created which in our case is chapter6.
We're able to connect and while we don't currently have any tables in the database we could create one if we wanted to.
So now that we know we have access to the database in this specific instance installed and we could go ahead and configure this database with a custom configuration which is what we're going to do in the next chapter as we deploy an example application using Ansible.
You can quit Postgres with control-D and drop the SSH connection with control-D as well.
|
|
|
show
|
0:34 |
We've completed the last of our steps that we set out to do in this chapter.
Each step was fairly simple.
We get experience with a bunch of different modules that are going to be super handy as we deploy an application.
We're going to take this scaffolding which as a reminder, you can find the Ansible playbook that we wrote in this chapter at this link, bit.ly bit.ly/intro to ansible/chapter6.
Now that we've got our scaffolding in place we're going to expand it and deploy an actual application together.
This is typically what you would do with Ansible when you're just creating a new project.
Take a playbook that is already working for you and you expand it and customize it to your particular situation.
With that, let's dig in and beef up our playbook for a full deployment.
|
|
|
|
48:38 |
|
|
show
|
3:08 |
In this chapter we're going to take all the knowledge that we've learned throughout the course and we're going to put it together into a complete playbook that will deploy an application.
We are going to use a Python web application as our example.
But if you have limited knowledge of how to build and operation Python applications that should not matter to you learning how to use more features of Ansible.
Our example application is a simple prototype Git Commit History Dashboard built with Python in Flask.
There isn't much to this application.
It's a work-in-progress.
It's exactly the type of early application that we'd want to be able to deploy to a server so that we could show it off to somebody and get feedback on it.
Here's what it looks like.
To access the application source code it's all open source under the MIT license github.com/fullstackPython/flaskgitdashboard.
Here's how our deployment is going to be structured.
Some of this is already in place so while there are a lot of pieces here in this chapter we're really just going to be adding the new components, beyond what we had in our playbook from the previous chapter.
As with most applications, you're going to have a bunch of users, which is what it's in the top left corner of this diagram.
They may be accessing your application from phones, tablets, web browsers on their laptops and desktop computers and you're going to have your development environment as well where you are building the application.
So what we need are a way to get the source code on to our remote servers and we need a way for users to be able to access the application via the internet.
Here are the components that we have in place so far and what we're going to set up throughout the chapter.
The first step is going to be getting a URL.
We're going to be use ansibledeploymentexample.com.
We use the domain name system to have that URL correspond to an IP address, which is our web server which we already have set up.
That web server, which is running Nginx while like any good web server should be running HTTP secure, HTTPS.
We'll grab a free certificate from Let's Encrypt and we're going to automate this whole process so that whatever applications you decide to deploy in the future, you can customize your playbook run it again, and every single step is automated.
No manual configuration that you're going to have to do.
Once we have our HTTPS certificate we have to get our source code onto the server.
Now that source code is stored on GitHub which we us our local development environment to create the code, write the code, then push up GitHub.
Then from our web server, we're going to obtain that source code from GitHub.
Once we got the source code we can handle the Python specific configuration that's necessary, along with any static assets that we have that we need to serve through our web server.
Our application will also have application dependencies which we're going to need to grab from PyPI which is the Python package index which allows us to retrieve code library dependencies such as our web framework Flask.
When our application is up and running we'll then connect to the database and we already have our database running from the previous chapter but we need to do some custom configuration to make sure we can connect to it properly and interact with it.
So that's how our deployment is going to go throughout this chapter and we're going to learn a bunch more Ansible modules.
Hopefully regardless of whether you're working with Python web applications or another programming language and your just happen to be using Ansible as your configuration tool all of this knowledge will be helpful to you.
And with some tweaking should be able to deploy Javascript, Ruby, Java and other applications.
To grab all the code from this chapter including the finished Ansible playbook take a look at bit.ly/intro-ansible/ch7.
Let's dig in.
|
|
|
show
|
1:44 |
We want our web application to live under a nice vanity domain name.
So I went ahead and registered, ansibledeploymentexample.com.
You can do this through Namecheap which is the domain registrar that I use or another one like GoDaddy there's a bunch of them out there.
The important part is when you access the domain you go to the DNS settings, the domain name system which is what maps domain name like ansibledeploymentexample.com to an IP address which would be our webserver.
Right now this is set up with the default Namecheap settings which is just a landing page basically says this domain name has been registered by someone so we're going to modify the values of the CNAME record and the URL redirect record so they're pointing to the webserver that we set up.
Now obviously I'm doing this under the Namecheap dashboard but other domain registrars should have similar DNS pages that you can modify with the values that'll correspond to your webserver.
First, instead of a CNAME record we need an A record here.
We're going to point to an address not another domain name.
And then the value should be the IP address of our webserver.
So if we go back over into DigitalOcean or we open up the inventory file we can copy the webserver address and paste in as a value here.
And you click the little checkbox and then under the URL redirect record we're going to be setting up HTTPS on our server so we'll change this to HTTPS instead of HTTP.
Check that and now we should be all set.
The URL redirect record here this is for the naked domain.
So if someone were to type in ansibledeploymentexample.com without the www they would be redirected to the www.ansibledeploymentexample.com subdomain which is where our webserver will be running.
All right, this is all set up now.
And as the DNS records are being refreshed by Namecheap we can set up the rest of our application and get to modifying our Ansible playbook.
|
|
|
show
|
2:46 |
We need to improve our Ansible playbook and get our domain set up cause right now if we try to go to ansibledeploymentexample.com nothing happens and that's to be expected.
Cause there is no application currently running and engine.exe is not configured to handle responding to this domain name.
Let's start modifying our Ansible playbook.
You can either take the playbook that you've been working with so far or if you go into the book and video code examples repository, intro Ansible you can copy configuring servers chapter as a starting point for what we're going to work on in this chapter.
Let's actually copy Configuring Servers to a new folder name, named flask-deploy because we're going to deploy an example flask application.
Move in to the flask-deploy directory this will be our starting point for chapter seven.
I still have all our variables and roles from the previous chapter, let's start off by going under web server.
First thing we're going to want to do is make sure that we have the Let's Encrypt package installed.
You can copy the same lines that we had for entering Nginx installed and use the Let's Encrypt package.
We'll also want to create a directory for Let's Encrypt.
Use the file module for this and with the file module we can say state is equal to a directory.
Alright, let's run this as our first modification to our playbook.
Now one step you may or may not have to take if you are working with your existing playbook you'll have your public and private keys already in there.
If you don't, and you just copied the directory out of the Git repository, you will need to either create public/private keys or use the ones that you are already working with.
We're going to copy public/private keys from our server config directory used last chapter.
Now we'll be able to kick off our playbook and it'll use the private key to log into our servers.
Okay, so the issue here is that we have permission denied, we did not use become:yes in our playbook, let's modify that task for create Let's Encrypt directory so that we are using our superuser privileges just as we did with the other tasks.
Okay so now we should have the Let's Encrypt package installed on our web server only.
We can go ahead, upgrading our web server configuration to HTTPS.
|
|
|
show
|
5:41 |
All right, so we're making our first few steps towards completing our vision of the full deployment.
First step, we set up Namecheap and we pointed it to our web server.
That way when someone accesses Ansible Ansibledeploymentexample.com, the domain name system refers them to the IP address of our web server.
Nginx is not yet configured to handle these requests but that's what we're going to do the next few steps.
We installed Let's Encrypt as a package on our server but we haven't yet gotten a certificate or set up our Nginx configuration.
That's our next step here that we need to do.
Head back under roles/webserver/tasks.
We're going to modify Nginx.
We're going to want to beef up our custom Nginx configuration.
Right now we have that stored as app.conf instead of saying app, which is too generic.
Let's use a variable for our app_name.
Okay, a few other steps that we want to take here.
Nginx comes with a default configuration which is why we had a landing page show up and we go directly to the IP address.
We want to remove that.
We also use a run this step as a superuser.
All right, a few more tasks here.
We use the shell module to execute Let's Encrypt command.
We'll have another variable, fqdn is for fully qualified domain name.
We'll be adding that to our variables file.
We also need a directory for serving up our certificate.
I need an email address associated with the SSL certificate.
Agree to the terms of service.
And we need superuser privileges to execute this.
One more task and we need to generate a key to use as part of this SSL certificate.
Again, We'll use the shell module to do this.
All right, so we got some new tasks here.
Now, the one downside of having some of these new tasks is they could take a really long time to run, especially if we're trying to generate certificates each time that we want to handle our Ansible playbook.
There's a couple ways we could handle this.
We could create a separate playbook that does this, we run once.
So something as part of an actual configuration.
Or we can basically use if then conditionals.
If we've already generated the certificate we know don't need to do that one again.
We can do that with the stat module.
So we'll give this a try.
And we're basically going to gather our own fact about the situation, which is we're going to see if a certificate has already been created.
That way we'll know is whether the path has been created by Let's Encrypt with our fully qualified domain name.
So we're registering a variable named certs that we can check and we do need to be superuser to check whether that path has been created.
And now we can use when, which is equivalent to a if conditional in most programming languages and we can say let's only run this command when certificate does not exist.
We can do the same thing down here.
That actually should say not certs, and again not does not exist.
So these two tasks will be skipped if we've already run this the first time and it's created the files for us.
Super-handy to skip long-running steps in your Ansible playbooks.
With a few extra variables here that we're going to need to include as a part of our playbook so we've go fully qualified domain name got web serve directory, SSL cert email and we have app name.
Let's go ahead and add those to our playbook.
app_name, Ansible appointment example fully qualified domain name is going to be www.ansibledeploymentexample.com.
We'll actually surround this by quotes.
One more web certificate email.
We want to put in your email, matthew.makai@gmail.com.
We'll have several other variables that we need to add in here but this'll be fine for now.
We can also upgrade our playbook.
So we have a more descriptive database name and of course don't forget to change that database password.
We'll also modify these two directories.
And let's actually change the database name.
Has to be consistent here.
Last deploy and app name.
Change of last deploy.
Well, user and deploy group the same can actually ruse the same SSH key as we had before.
And now we just need to get to upgrading our Nginx configuration file before we kick this off and try it out again.
|
|
|
show
|
5:40 |
We added some tasks and variables to our playbook.
We also need to modify the Nginx configuration to take advantage of HTTPS.
Head into roles/webserver/templates and we're going to modify this incredibly simple template that we created in last chapter.
First we want to prepare for an upstream server.
An upstream server is where Nginx serves as a reverse proxy.
It simply passes requests along to a different server running on another port either on the same host or a different server all together.
In our case, we are going to have WSGI Web Server Gateway Interface, that's a Python standard for running web applications.
A WSGI server running on the same server as Nginx.
So Nginx is simply going to serve as a reverse proxy for requests that come in through port 80 or 443 over to the WSGI server on a different port.
So the way that we specify this with Nginx we have upstream and then we say the host which for us is going to be localhost and then we'll have a variable for the WSGI server port.
So these three lines by themselves don't do anything 'til we explicitly specify under our server what requests should be proxy.
First, let's upgrade the HTTP response handler that is running on port 80 so that the only thing that it does is redirect requests to the HTTPS version.
So nothing will be running off of HTTP.
Be immediately converted over into HTTPS traffic.
Use our fully qualified domain name as a server name.
This allows Nginx to respond to requests that come in through DNS.
And we'll permanently rewrite requests that come in to the HTTPS version.
Write our HTTPS section for the server.
Same server name and we're going to be listening instead on port 443 with SSL.
Now we're going to want to specify our SSL certificates which although we haven't created them just yet will be created when we run our playbook.
There could be an entire video course on how to properly set up HTTPS on your web servers.
One shortcut that I take is I take a look at the cipher list.
So if you go to cipherli.st we can snag the appropriate settings for really strong SSL security on Nginx.
We do need to specify a few more things such as where our SSL certificate is located.
And then our PEM certificate location.
Okay we need to specify log settings.
Including our access and error logs.
All right, two more bits of configuration and then we're done with this file.
We're going to have Nginx serve as a reverse proxy which we already configured up top but we need to explicitly specify that we want it to serve as a reverse proxy.
We also want Nginx to serve up static assets.
When we take a look at our completed diagram we see that we have Javascript, CSS, images files like that that we want Nginx to serve up and not go through the WSGI server.
And the way that we're going to do this: any files that are heavy URL with static at the start of the path we're going to search for those files, and if they exist we'll transfer them to the requesting client and if not, we'll pass back a 404.
So we're going to have a new variable that we'll specify the specific directory where we're serving the static assets.
Finally, set up our reverse proxy.
That is how we proxy to our app server WSGI app which we specified at the top of the file.
Okay, we have two new variables: a WSGI server port and sub app directory so we need to specify those.
Save that, and now we'll be able to see how this works.
|
|
|
show
|
3:01 |
Let's kick off our playbook see how it works see what we need to fix up.
Okay, so the error here is that certbot which is what we used work with Let's Encrypt needs to run in non-interactive mode.
Let's add this to our command.
All right, we got past the first error.
Open up our file.
Now, we could use the Nginx plug-in but I'd rather just get past this error so we can just stop Nginx temporarily.
Then we'll restart service when we obtain the certificate Generating the pem file may take a little while so be patient on this step.
Okay, it looks like we got past the previous error message but now we're having a problem having Nginx restarted so open up the templates file and both of those lines need to have semicolons at the end.
One more time.
And one more thing that we need to change.
Nginx is actually not started yet.
Nginx will not restart due to that conditional we put in place because we already have the Nginx files and directory created.
We should make sure that we remove the "when" conditional here because if Nginx is not running this will make sure that it's started.
If it's already running, nothing will happen here.
Alright, so we were able to execute everything.
Now, our server is not yet up and running because it's waiting on an upstream host which is our werkzeug server that we're going to be running but now we can grab our application and we should be able to use the HTTPS connection as reverse proxy for our werkzeug server so let's keep going, grab our source code and get our werkzeug server up and running.
|
|
|
show
|
5:54 |
We're well on our way to completing our Ansible playbook, learning a bunch of new modules along the way, and finishing up our deployment.
Got through a few steps of setting up our DNS setting up the web server even though we don't have an upstream server yet, grabbing our certificate from Let's Encrypt, and now in order to set up our upstream server we need to set up the source control, which is get is the source control implementation we're using and we're going to use GitHub, which is serving as a central location that we can pull down our source code from onto our web server.
There are a couple of steps for us here.
First we're going to create a new SSH key pair and this will just be used for deploying our code.
So it'll be a deploy key with read-only access to the Git repository that we want to clone.
We need to let GitHub know that that's an authorized key and then we need to install Git on our server and actually pull down the code.
So let's give that a try now.
First step, we'll use ssh-keygen, which hopefully you should be comfortable with at this point.
And we'll save this as a deploy key in the current directory.
No passphrase.
Now we can take a look at our deploy key, the public one.
And copy this.
We're going to paste it into GitHub.
So log into your GitHub account and in my case I'm going to do this directly on the full-stack Python repository but you should fork this repository, hit the fork button so that you have your own copy that you can work with.
Go into settings, deploy keys, add a deploy key give it a title that you'll recognize paste it in, and don't allow write access 'cause we don't ever want our production server to be pushing code back to our original repository.
We only want it to obtain the code from this repository.
Confirm your password and now we have our deploy key all set up.
Next we want to ensure that Git is installed on a remote server.
So head under rules/webserver/tasks, and modify main.yml.
And we're going to include git.yml and then create a file named git.yml.
First task will be easy enough.
We already used this many times before.
Want to ensure Git is installed.
apt module, name equals git, present, and yes we want to update the cache.
And we have to have super-user privileges to do this.
Next, create a directory for our deploy key.
It's called git_deploy_key.
That way it's separated out from just our base home directory.
It's under a subdirectory.
Now we need to upload the key that we just generated onto our remote server.
We use the copy module to do that.
We'll have to set up a new variable for the location of the deploy key and the deploy key name.
Just set the privileges on this for our deploy user.
And one last step, we just want to clone our repository that we have on GitHub.
Now, the first time that you work with a repository you will clone it but in our case we want to either have it be cloned if we don't already have the repository on our server or we want to pull whatever the latest code is every time we do a deployment.
Create a new variable for this and a variable for the directory that we want our application to be stored in.
All right, now this should pull our code from GitHub.
We just need to set some variables for this.
There's new variables.
Well, we already have deploy_user but local_deploy_key_dir, read_only_deploy_key_name code_repository and app_dir.
Open up your variables file.
So app_dir is the absolute path to our application.
And then local_deploy_key_dir is on our local system, where is this deploy key located In our case development/flask_deploy.
Remember, if you have cloned the repository you're going to replace full-stack Python with your own username.
Or if you're working with a different project you'll put your Flask application or Python or other programming language application name there, whatever Git repository that you want to clone onto the server.
And our read-only deploy key name is deploy key.
|
|
|
show
|
1:42 |
Let's give our new playbook improvements a try.
Okay, so in this case, we didn't even get to where we were with the new git task.
Let's disable this for now and test the new git tasks in our playbook.
And we can do this with setting a conditional.
Let's try this one more time.
Okay, and we had a typo in there so we did not separate home and deployer.
Let's open that file back up.
Okay, so the issue here is a typo.
The destination here should have home and then deployer and then the Git deploy key.
Let's try this one more time.
All right, so the way we can check whether this worked or not, SSH into our server.
Now we can see that we have our code on the server.
And it was pulled down from Full Stack Python Flask Git dashboard.
Okay, now we can go ahead and start setting up our application dependencies and then we'll be able to run our WSGI server.
|
|
|
show
|
3:17 |
We now have our source code on our web server but nothing is running.
So, what we want to do in the next step is install our application dependencies with pip into a virtual environment, which provides dependency isolation for Python applications, and then stand up our WSGI web server gateway interface server.
Once that's done, we can also test out our NGINX configuration.
Make sure we didn't make any other mistakes there.
We should be able to serve up static assets like JavaScript, CSS, images, those sorts of things.
Let's take the next step to create our virtual environment install our dependencies with pip and then we'll be ready to set up our WSGI server.
Head back up into roles/webserver/tasks.
Modify main.yml.
We're ready to create a new file dependencies.yml.
Now, we want to make sure we've got a couple of packages installed.
One of them Python pip should already be installed but we'll add it to our list here, just in case.
So, there's no harm in adding a package name as a check to see if it should be installed and if it already is installed, it'll just be skipped over.
So, we're going to go back and use the ebt module.
We need superuser privileges.
All right, now we want to create a virtual environment.
We're going to check to see if it's already created.
If it is, we'll avoid this step.
Now, if it's not created we will create a directory for it.
We'll run the command to create a virtual environment.
And we'll create a new variable for VM directory.
Then finally, with our virtual env in place we can use the pip3 command to install the dependencies that our application lists into our virtual environment.
Okay, let's add a venv_dir to our variables.
And this will be outside of our git repository directory.
Okay.
Those should be the new tasks that we need our web server to install the application dependencies for our application.
|
|
|
show
|
2:07 |
Let's see if those application dependency tasks worked.
Okay, it looks like we pointed at a directory rather than core items dot text file.
Let's open up Okay, so we have app directory and we need to look in our project.
And this is what we're trying to install the requirements.txt file.
And we put a dot, which is going to make pip3 look four setup.py, but we want...
A requirements.txt file.
So, we're going to want to try this again but you're probably thinking boy what a pain in the butt to constantly have to rerun every single step over and over again.
So, that's why I want to show you that we can start at a certain task in our Ansible playbook.
We just need to tell Ansible which task we want to start from.
If we take a look at our file here we know that everything before it was successful.
Let's start from use pip3 to install application dependencies and see if we can get that working based on our change.
The way that we do this is we pass in the --start-at-task argument and then we surround by quotes the name of the task which I just copied, we paste this in use pip3 to install application dependencies.
Now, we'll kick this off.
Still going to gather the facts but it'll go right to that task.
And then it'll keep running everything after that.
So, it looks like we were able to install our application dependencies 'cause we can see up here successfully installed and we can move ahead set up our WSGI server, and then put these pieces together to see how it's all working.
|
|
|
show
|
3:51 |
Let's set up our WSGI server, Green Unicorn which will run our Python application and will be able to pull all of the pieces together restart Nginx, actually see our application up and running.
Head back into roles/webserver/tasks/main.yml.
This time we're going to have a new file, wsgi.yml.
Create that file, wsgi.yml.
And the way that we're going to run this is we're going to have Supervisor a system process that is going to start and stop Green Unicorn.
Very standard way of setting up WSGI servers in the Python ecosystem.
First thing we need is to ensure that Supervisor is installed.
And then we need to create a Supervisor configuration.
We're going to create this in a template.
But we'll head into that after we finish these tasks.
And in previous versions of Supervisor on Ubuntu 16.04 there was a bug with it reloading and properly restarting Supervisor.
You needed to explicitly stop and then restart the server.
I'm going to show you this now because we can use the pause module to accomplish this.
This can be handy in other situations where you need to pause the script for a couple seconds to allow something to take effect.
So we'll have three tasks here.
And we use the pause module and specify a number of seconds to pause.
One more concept to introduce which you don't necessarily need to use but can be nice to have in some situations.
This is the equivalent of a signal in the database where we can call something else when a certain action happens.
So we can set notify on our tasks.
We can call another task.
So we're going to call the restart Nginx task.
And we typically store these under the handlers directory.
So one more directory if you move up into web server make a directory for handlers and we're just going to write a single task within main.yml.
This is one way to cut down on boiler plate code.
If you need to restart Nginx all over restart a service, perform some action all over your playbook you can simply add notify and then the name of a handler in your playbook and cut down on the boiler plate code.
And save that file and let's move into templates.
We just need to create our Supervisor configuration template file.
Just name this supervisor_app.conf.j2 'cause that's what we called it as a source file and then we just use the standard Supervisor configuration format.
We have a app name for our program to uniquely identify our program.
We want to run a command.
We reuse our existing variables.
|
|
|
show
|
1:27 |
Let's run our playbook and see what tweaks we need to make.
Okay, so couldn't find the configuration file.
Let's make sure we named it properly and it needs to be supervisor.j2.
And so let's start at this task and see if we can run successfully.
Okay, we still have an issue with Nginx but it looks like supervisor was configured so now we can log in to our server and just see if everything is running on the WSGI server and then we can modify the Nginx side so that it is able to start up successfully and serve as our reverse proxy.
On our web server, run wget localhost:8000 which is the port that Green Unicorn is running on.
And if you get this index, that HTML, save and it is what we would expect Nginx to serve as a reverse proxy for.
Great, so now we've got our WSGI server up and running we can make a few tweaks to our Nginx configuration so that we can get that up and running finish out our deployment.
|
|
|
show
|
3:01 |
Let's make a few final tweaks to our web servers so that we can get that Nginx server up and running.
Head under roles/webserver/tasks Let's modify nginx.
So, a couple things that we want to do here.
Nginx is not currently up and running but one thing that is useful is we can use the handler that we created for supervisor, and add it here.
So, when we update our Nginx configuration we can make sure to restart Nginx.
Okay, so the issue really is in the template.
We have a couple of variables here that are messing up our ability to start the server.
Remove those two resolver lines.
Save the file.
And now, let's run our playbook again starting from the beginning.
All right, so Nginx is still having an issue restarting.
Let's scope out what the current issue is.
sudo -i for interactive superuser mode.
Let's take a look at the log file and I can pretty much guarantee that this is a typo.
It should have been app_server.
Let's go tweak that now.
The one other issue in here, is that we need the upstream appserver_wsgi_app to match what is down here for the proxy.
But there is a typo appserver_wsgi_app.
We can fix it, either place.
Let's, we'll just fix it up here, wsgi_app.
Try this one more time from the beginning so we can make sure that we set our Nginx configuration properly.
We should be able to access ansibledeploymentexample.com.
All right, and getting very close.
There's an issue with the cipher suite but this is a good sign because we have Nginx up and running.
Move back over, and let's just update this configuration.
One thing to note, if you have problems with the cipher suite, use a different set of ciphers.
And copy and paste this bit here.
All right, and we're almost there but we clearly have some 404 errors that are creepin' in that can't be served up.
We just need to fix the static asset serving and the webpage will look as we expect.
|
|
|
show
|
1:02 |
We should be able to identify under the web server configuration if it's pointing to an incorrect location for serving static assets.
Get a 404 Not Found even though this is a static CSS path.
So we have sub-app directory, app name static.
If we take a look at our code we'll see that it's actually app and not the app name itself.
Let's fix that, this should do it.
All right, and now our static assets are being served and the web page is as we would expect.
|
|
|
show
|
3:06 |
We set up the WSGI server and now have Nginx serving as a reverse proxy.
We grabbed our application dependencies from PyPI.
One more step that we want to do to make sure that we can actually have a two-server deployment is tweak our database settings.
Right now, Postgres, very same default settings only allow local connections.
And so, we just want to update the configuration so that our web server can connect to the database server.
We're just going to tweak one line in our Postgres configuration and that will do it for our deployment.
So our web server is set so let's move into roles/database/tasks.
And we'll add one task here.
Allow connections from our web server.
Could of used the lineinfile module and the lineinfile module checks to see if a specific line is in a file and if it is skips the step if it's not I'll make sure that line gets in there.
It's super handy for tweaking configuration files and especially if you don't want to create an entire template file yourself.
First, we specify the path to the file that we want to modify.
And modify the pg_hba.conf Postgres figuration file.
We want this line to be present where we say insert this after this line.
And our line should be and normally you'd set up a variable for this but in this case we're just going to put the IP address of our web server and we're going to trust it.
Course, you should modify this for your own purposes but this is just an example so that you will be able to use the lineinfile module as a task.
Finally, we need superuser privileges so set become yes on this.
Now, I've tested this out and I have two separate windows.
In the bottom window, we're going to log into the server.
Let's take a look at that configuration file.
So when we execute our playbook we are then going to have a line that is inserted here into the default configuration that allows our web server to connect to the database.
We'll just start at the task.
Now we see that using the lineinfile module we can populate text into any files that we want whether that's a configuration file, readme file we don't always need to use templates to accomplish populating information into files.
Again, for your own deployments you're going to want to customize everything that we've done here including adding additional security settings for Postgres.
These examples were really to show you what you could do with Ansible rather than teach you how to configure a Postgres database or set up a Python application.
This was really just an example to learn more about Ansible.
|
|
|
show
|
1:11 |
So we just got done with deploying our application setting up a couple different servers.
One for a web server, one for a database server.
We started out by setting up our domain name system records on Namecheap which then allowed devices to connect to our web server using the IP address.
The web server was able to serve each CPS connections because we got a certificate, yeah, let's encrypt.
Put our source code on our server started running an example WSGI server installed our application dependencies so that our application would run properly and then we modified the database configuration to set up connections between the web server and the database server.
I want to caveat that if you are deploying a real Python web application there's a lot more work that would need to be done here.
The main thing was to use this example application and deployment to teach you a lot of the tricks and workarounds different Ansible modules and show how you're not going to get a playbook right on the first attempt.
You're going to have to run it, tweak it see what the errors are, prove it over time just like you would with any application.
But then, you'll have your entire deployment stored as code and run via Ansible.
You want all the code for this chapter take a look at bit.le/intro-ansible-CH-7.
The completed version is on there so you can play around with these modules and hopefully it will inspire you to see all of the other fantastic modules that are at your disposal when using Ansible.
|
|
|
|
5:12 |
|
|
show
|
2:29 |
We've covered a lot of ground together over the past few hours.
Now that you know how to configure servers and deploy applications with Ansible you've got a strong foundation to be able to do almost anything you want with the tool.
Let's recap a little bit where we've been.
We talked about why Ansible is such a great tool for configuration management how it's made configuration management much easier than alternative tools that came before it.
We worked through the initial concepts like modules, tasks, roles, playbooks and the inventory files as the core pieces that we needed to know about to use Ansible.
As we started our first playbook and expanded upon it we learned to write our playbooks and then run them against the server and perform useful tasks like creating deployer users instead of logging in as a root so that we could perform any step that we wanted to take on a remote server.
Most of our playbooks consist of YAML and we wrote a bunch of it together.
Got our top-level playbook.yml file and then the individual tasks combined together under roles like common, or web server, or database server.
As we got comfortable with writing simple playbooks like this, we learned about working with data adding variables, reading environment variables using templates as our input data and encrypting data as well.
We added a group_vars file and learned how to encrypt it and we learned how to use templates to configure services such as Nginx.
We combined the variables with the templates executed by tasks and Ansible to create our configuration on remote servers.
Encrypting files consist of using Ansible Vault the encrypt and decrypt command and passing in the vault password whenever we run our playbook that contains sensitive information so that Vault could decrypt the data before it is run and then re-encrypt it once the playbook is over so that the information stays secret.
With all of our concepts in place, we work through building a good size Ansible playbook to configure multiple servers.
We had a bunch of common operations we wanted to apply to all servers in our common role.
Then, we separated out the web server and database server roles to differentiate our server types.
You can try to extend this model with your own caching load balancing, and other server roles when necessary for your application.
Finally, we took a simple prototype application combined it with the playbook we built in Chapter Six added enhanced tasks within our roles to deploy the application, to ansibledeploymentexample.com.
You should now be able to use Ansible playbooks as a base for automating deployments of your own applications.
You may need to look through Ansible's documentation for some additional modules depending on what you're trying to do but you're well on your way towards using Ansible for its intended purpose as a configuration management tool.
Remember, take a look at the https://github.com/fullstackPython/book-and-video-code-examples so you can take the Ansible playbook modify it for your own purposes and use it within your own projects.
|
|
|
show
|
2:43 |
You already know enough to handle a lot of scenarios with Ansible but here's a few areas for future research in case you want to move into more advanced topics.
Several years ago, writing custom modules was fairly common because Ansible didn't have the extensive set of well-tested modules that it does today so this has actually become less relevant over time.
But you should still think about whether you need to build a custom module you can't seem to accomplish something with the existing modules or you just believe that the existing modules don't cover an edge case that you're trying to accomplish.
With each of these topics I've include a Bitly link at the bottom of the page so you can learn more about this.
What's nice about the Ansible documentation is that they have a page just asking you the question of whether you should develop your own module.
Now, if you develop a module, you can keep it to yourself.
You don't actually have to contribute it to Core Ansible which is primarily what this page is talking about.
This page of docs does provide a nice thought process for figuring out whether you should build a new module.
Take a look at bit.ly/ansibledefmodules.
Another advanced topic for future research is taking a look at all the modules that exist for other hosting providers like AWS Google Cloud, OpenShift.
Each of these cloud-hosting providers has their own APIs and backend services.
If you're already familiar with them you'd probably be very comfortable with the Ansible modules that exist.
If you're just trying to get up to speed with AWS or Google Cloud or Azure you probably want to play around with those services first before digging into the Ansible modules.
I strongly recommend taking a look at the scenario guides for hosting providers.
They also provide context of here's how you actually accomplish a deployment on AWS.
Take a look at bit.ly/ansiblescenarioguides.
There's actually a whole set of reusable roles that we didn't talk about in this course and they're provided at Ansible Galaxy.
Ansible Galaxy is a hosted service that Ansible provides where the community can share roles that they've developed.
I found this more useful to find out how other people are accomplishing things rather than taking unedited roles because I always want to know what a role is doing and what tasks its using but there's a lot of really great example code here for you.
If you take a look at bit.ly/ansiblegalaxy.
And finally, people often ask about how they test their playbooks and Ansible tries to mitigate the amount of testing you need to do by providing a fail-fast approach which means that the playbook should just simply stop when something errors out.
That way, you know you have to go in and fix it rather than running the entire playbook breaking somewhere along the way and then taking a while to finish up.
Still, there are ways to test your playbooks so you'll want to take a look at the Integrating Testing with Ansible Playbooks under Testing Strategies found at bit.ly/ansibletestplaybooks.
And with that, thank you for joining me for the last few hours in this course.
Hope I was able to show you why I really enjoy using this tool.
I plan to use it for a long time to come and how by just writing some little bit of YAML set of structured files and directories you can quickly configure servers and deploy applications with Ansible.
My name is Matt Makai.
Thanks for joining me and happy coding.
|