|
|
|
8:44 |
|
|
show
|
6:39 |
Hello and welcome to RESTful and HTTP APIs in the Pyramid web framework.
This is your host, author, instructor Michael Kennedy, and I'm really excited to share all the way is that Pyramid makes an awesome RESTful API platform.
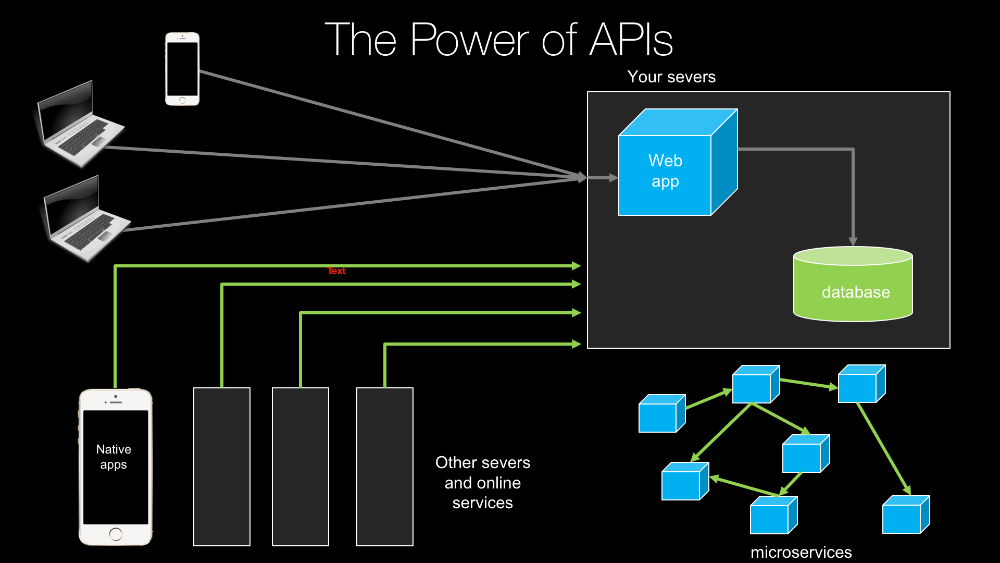
Let's start with a quick overview and big picture of where we're going and the power of APIs.
So we have our web applications, it's running over here in some servers probably has a web app section, probably talks to a database, right.
Now, people are going to come using their browsers and make request to our website so maybe they're over here on the Macbook or they're on their phone and they're going to request directly to our HTML pages, that's going to talk our database, great stuff comes back, right, here's our page, you can watch our courses if this is a course site, whatever right.
Now, however, what if we have a native app what if we have other servers that want to talk machine to machine, technically we could use web scraping but it's really a bad idea, this is not the way it should work- to get at that data; instead, we want to set up a separate channel, specifically for these types of systems.
We want to set up an API, probably http talking json, but as we'll see there's a lot of options here and maybe we want to vary that as well.
So now, if we have this API, our native app can pull the data in a very efficient format and drive the native app itself.
Similarly, our servers might be able to talk directly to our server using this API.
So, this is one of the primary reasons that we want to create APIs is we want to take our website or our data and expose it to things not just for humans, but for machines, for applications, for other machines and so on.
Let's look at another example.
Here we have a big monolithic web app, this big blue cube and it's just one giant web application.
One of the trends these days is to create more smaller services, often refer to as micro services, so maybe we want to break the functionality of our app up into little pieces, maybe one of these is in charge of user authentication and login, one of these little services of separate web app is in charge of charging credit cards, one does logging, one pulls back data from some API elsewhere, things like that; how do these talk to each other?
Well, very much like our native app, they're going to use services to glue these micro services together, so if you want to build awesome APIs using the Pyramid web framework that's what this course is all about, and it's very comprehensive, it turns out that we're going to cover pretty much all the things you might want to do with APIs.
What exactly are we going to cover?
Good question.
Let's start the beginning.
We're going to talk about why http and why the restful principles behind some of these services are useful, and we should follow them.
Then we're going to start by creating our initial web application.
At this point, there will be nothing API specific about it, but APIs run generally inside web applications, they just talk a little bit differently than the standard web app does.
We'll write our first http service, and this is going to be a read only service that exchanges jasn only.
We have a couple of end points and we'll do some interesting things here but we're not going to create new data, we're not going to modify data, things like that, it's just going to be read only.
Then, we'll take a little bit of a diversion from the server side to look at two ways in which we can call these services; we're going to see how we can call the service that we just created with Python, and also how to consume it within our web application using Javascript.
Next step, we're going to build a nearly restful service, and I say nearly because describing something as a restful service or not it's not a boolean answer, it's more like a spectrum, right.
So we'll go most of the way, let's say 85, 90 percent of the way towards what you might consider a restful service at this point.
And then, one of the things we're going to add is the ability to have more than just basic json or HTML responses; what if we want csv, what if we want images, what if we want xml, we'll see how we can take what is built in a Pyramid and extend it to add all these different response types.
Once you have multiple response types, maybe you want to let the client, not the server decide what response it's going to get.
So with content negotiation we can look at what except type, what content type the client is suggesting that they get, so some clients will say I prefer json, we can configure our system through content negotiation to automatically return json objects.
Now if the same services called the same API and everything, but indicating that you'd like to get say image, maybe we'll return an image instead of json, right.
So we'll see how that works in this content negotiation section.
At this point you're going to see that or APIs while working wonderfully are going to be quite busy, there is going to be a lot of stuff going on inside those API methods, with validation, with object creation, with interacting with the stuff coming off the wire, transform it and so on, and we can move much of that to isolated classes that are dedicated specifically to managing this, and we'll have much cleaner separation between our validation and the actual implementation of our API.
So, we'll do that with this thing I'm calling view models.
At this point, we'll have been working with just fake data in memory, but it's time to get real and have a real database with persistence and all those sorts of things, so we're going to be adding sqlalchemy talking to a sqlight database here and doing proper inserts and transactions and all that sort of stuff at this level.
So we'll do a quick into to sqlalchemy and then we'll convert our in memory model to a data driven database model.
In addition to real data, we might want to restrict who has access to do what so we'll see how we can add a level of authentication to our services.
Finally, we probably want to figure out what has happened on our API what are people doing, are there any errors, could I get notified in real time of any server side crashes.
So in this chapter, we'll see all the techniques and tools we can use to make that happen.
So, at this level, we pretty much have a really nice working application but how do people get to it?
Well APIs live out on servers, on the internet, right?
So the next thing we're going to do is focus on deployment, we're going to create a Linux server, set up nginx and micro wsgi to serve this in a very realistic and high performance way.
And once we get everything up and working, we probably want people to consume our API so we'll talk about some of the options and techniques for documenting our operations.
And that's what we'll cover in this course, I think this is quite comprehensive and I hope you find it to be really interesting and engaging.
Thanks for joining this course, now let's get your machine all set up so you're ready to follow along.
|
|
|
show
|
2:05 |
Welcome to your course i want to take just a quick moment to take you on a tour, the video player in all of its features so that you get the most out of this entire course and all the courses you take with us so you'll start your course page of course, and you can see that it graze out and collapses the work they've already done so let's, go to the next video here opens up this separate player and you could see it a standard video player stuff you can pause for play you can actually skip back a few seconds or skip forward a few more you can jump to the next or previous lecture things like that shows you which chapter in which lecture topic you're learning right now and as other cool stuff like take me to the course page, show me the full transcript dialogue for this lecture take me to get home repo where the source code for this course lives and even do full text search and when we have transcripts that's searching every spoken word in the entire video not just titles and description that things like that also some social media stuff up there as well.
For those of you who have a hard time hearing or don't speak english is your first language we have subtitles from the transcripts, so if you turn on subtitles right here, you'll be able to follow along as this words are spoken on the screen.
I know that could be a big help to some of you just cause this is a web app doesn't mean you can't use your keyboard.
You want a pause and play?
Use your space bar to top of that, you want to skip ahead or backwards left arrow, right?
Our next lecture shift left shift, right went to toggle subtitles just hit s and if you wonder what all the hockey star and click this little thing right here, it'll bring up a dialogue with all the hockey options.
Finally, you may be watching this on a tablet or even a phone, hopefully a big phone, but you might be watching this in some sort of touch screen device.
If that's true, you're probably holding with your thumb, so you click right here.
Seek back ten seconds right there to seek ahead thirty and, of course, click in the middle to toggle play or pause now on ios because the way i was works, they don't let you auto start playing videos, so you may have to click right in the middle here.
Start each lecture on iowa's that's a player now go enjoy that core.
|
|
|
|
16:13 |
|
|
show
|
3:09 |
I want to take just a moment and talk about the course prerequisites this course is best if you follow along, if you build these apps along with me or even experiment on something similar, but not exactly the same as what I'm building.
So what we're going to talk about in this video is what you need actually to do that, what tools do you need especially if you want to follow exactly what I'm doing.
So first of all, we're going to need Python 3.5 or above.
Now, chances are any reasonably new version of Python 3 would be fine, but I want to make sure that we have at least that possibility of using some of the 3.5 features, so make sure you install Python 3.5, and after this video, I am going to show you three other videos that show you how to set up this and the other tools on Windows, on OS X and on Linux.
So if that's new to you, then you can follow along on those to see how to get your machine set up, but just know, you're going to need Python 3.5 for this course and for all of the demos and the code which hopefully is a large portion of this course it's going to be primarily you watching or working with me writing code not just a bunch of slides; for those sections of the course I'm going to be using PyCharm, I think it's a very good tool for working with Python, I think it's great at debugging, but it also is really good for web development, for working with the HTML templates and javascript, and things like that, so this is a great tool and as we go through this course, if you're new to PyCharm you'll see why, you'll see all the great things that it has to offer, but if you want to just take them in a go I just want to solve this thing, what really is different about it, I wrote a blog post a couple years ago called "9 reasons you should be using PyCharm" you can follow that link there, and go read them, and that's touching on some of the reasons why it's good for this course, so if you want to fall along exactly with me, you can use PyCharm.
There is a couple options, the upcoming videos talk about it.
When you're working with APIs it's really nice to be able to test them, sometimes your web browser is good for testing them you can put the url into the browser and stuff comes out you might see some json or something, that's fine for like a basic get but what if I want to do an http put request, how do you do that in the browser?
If I want to do an http put request and customize the headers I'm not even sure that's possible, maybe you can with the dev tools but the browser is not really the best way to do it, you can do it in Python but you know you could do something like request or even curl, but there's a tool that records your settings and it's really nice, runs all on all the platforms, called Postman.
So Postman is a free app that you can get, they have a paid version but the thing we're going to use is the free one and you can get it, you can see the download is right there at getpostman.com and we'll be using this to consume the API as we create it.
Finally, make sure your github repo is set up so by the time you watch this video this repository here should be full of all the demos and code that you've seen me write throughout this course, so right now make sure you visit github.com/mikeckennedy/restful-services-in-Python and star and consider forking this so you have all the code that we've written and all the links and resources I put here as a permanent reference for you.
|
|
|
show
|
3:49 |
Let's talk about how to install the various tools in Python on your operating system.
So there is only two tools, two resources you need to take this class outside the source code on the github repository, one is you're going to need Python 3, remember, Python 3 does not come on OS X, Python 2.7 does, but Python 3 does not, so you've got to install that, as well as PyCharm.
So let's go look at these.
I pulled up the websites that we are going to be working with, Python.org, this is where we get Python 3, PyCharm over here on jetbrains.com, we are going to download PyCharm here and I also pulled up the other three options, Sublime Text if you are interested in that, Atom, you've got to watch this video it's very funny, a great little light weight editor.
We'll come over here, download this, quick, just it defaults to the latest of both Python 2 and Python 3 for your operating system, so you pick this, download, save, I've already done that.
So let's go over here and see, if I type Python you will get something, but you'll see that Python 2.7 10 comes up, if I type Python 3, there is no Python 3, so let's install Python 3 and make sure everything setup good there.
So, this is what I got of Python.org, just click through agree to whatever it's going to make you agree to- ok, so Python is installed.
Let's just try a little trick again, we can even do a -- version on the end, excellent, so we have Python 3 installed and it's the latest version.
So, that's off to a good start.
Next, PytCharm- when you just click download, it gives us a choice between what version do you want the professional or the community edition, this is up to you, I love this tool, I paid money for it, I am getting the professional, the community is free, if you are wondering what the differences are, just come back here to the main PyCharm page and you can see, it will show you that actually the Python features themselves there is not too much of a difference, but the web development and Python web frameworks and database stuff that is only in the professional edition.
But, lucky for you, none of that is actually happening in this class so you can pick either of these that you wish.
Once you have it downloaded, you will have DMG, disk image here, I love their little installer, here is the app, drag it over here, wait a moment, and you should have PyCharm installed.
Now, let's finish installing, check that, and we are just going to run PyCharm.
First time it will warn you this came from the internet, beware, yeah, we did that on purpose.
Make sure you get it from right place.
And, here is PyCharm, I've already run it before, but the first time you run it, it will ask you for the settings, I like mine, this dark theme, so everywhere it ask you about colors, there is two places, you can say Dracula if you want the same theme as me, or pick another one.
The other two editors are just Atom, here is Atom, nice and clean, and Sublime text, again, super small, super clean.
Let me show you a technique that will be helpful for opening these projects and basically work with Python projects, in general.
So, here I have Request Masters, I got this off of GitHub, this is the Request package and this is actually the source code, so here you can see, here is all the Python files, just like the project base, if I want to open this in PyCharm, I just drop it on here, this is OS X only feature, but if I drop it like this it will open the whole project, and see here is all the code that we need.
You do a similar thing for Sublime text and you can do a similar thing for Atom.
So, here is all the packages, same thing.
So, that's a really helpful tip, if you are jumping from project to project and you want to just open up this project, open up that after project, open up before project, and so on, I am sure you will find that useful throughout the class.
All right, that's it, this OS X system is ready to roll, ready to work on this class.
|
|
|
show
|
4:08 |
Hello my Windows friends!
Let's get you all setup and ready to work on this class, and I have good news for you- until very recently, using Python on Windows has been actually fairly painful to get it setup and everything configured right, but with Python 3.5 the installer and the setup process is way better.
So let's get to it.
To get started you are going to need two resources on Windows, you are going to need to install Python 3, which you can get at Python.org, and you are going to need to install PyCharm at jetbrains.com/pycharm.
Let's go over to Windows 10, here is a brand new, completely fresh install of Windows 10 I just got from Microsoft, and I've opened up the various web pages we are going to be working with.
First thing left to do is install Python, and as I told you, there is no Python on Windows, if I open setup and I type Python, there is no Python.
So, we have to download Python, and we want 3.5 1 or whatever the latest version of 3 is and I've already actually downloaded it so I won't click here, but you just click that, that's super easy.
The other thing we need to download is PyCharm, so here is PyCharm, it actually comes in two editions, the professional edition, and the community edition, you can pick either for this class, the community edition is totally fine, the things you'll be missing are you'll basically be missing on web development and database management features from the professional edition, and the community for the straight, pure Python has the same features as professional.
If for some reason you don't want to use PyCharm, you want something more lightweight, you can use Atom, at atom.io, Atom is from GitHub it's pretty cool, I really like this editor, you can see there is a little video here, I recommend you watch it, it's pretty hilarious.
Sublime Text is also a super popular light weight editor, and I told you about Visual Studio, so you can get Visual Studio community edition this is now a free, full-fledged version of Visual Studio, and you can get Python tools for Visual Studio plug this together, and you are doing pretty good.
But, we are going to be using PyCharm in the class, so that's what I will setup here.
Let's start by installing Python.
So I've got it downloaded, and when I run it, now it has a couple of options in the installer, let's say if you are going to try to just type Python from the command line or other tools like pip for installing packages, you will probably want to add this to your path.
And let's customize installation just to see what we get, we get documentation, pip which manages packages, we'll talk about that in our apps, and we have the test suite and Py launcher is really nice and we don't need to install it for all the users.
Let's go ahead and precompile the standard library, that will give us a little better perf, I really don't like this big long folder here, so this app data folder is hidden in Windows so it's kind of hard to discover where these are so I am just going to put a Python folder directly in my user profile and then, in case you want to have 64 bit or 32 bit version of Python or maybe different types 2.7, 3.5 you probably want to leave this specifier here.
That seems like a good setup, let's go.
All right, Python was set up successfully, let's close this and let's just find out, if I type Python-- version which we should see 3.5 1 and survey says- success.
Ok, Python is working, last thing to set up is just PyCharm.
So the installer is just a standard Windows installer, just sort of yes your way through, it's up to you whether you associate py files with it, typically, I don't do that, but it's your call.
Ok, it looks like we successfully installed PyCharm, that was easy, let's go and run it.
Brand new, nothing to import, now, normally I would log in with my JetBrains account, but for this purpose I'll just evaluate it, say ok, that's great.
The first time you launch PyCharm it will ask you what theme and keyboard scheme you want to use, I'll say Visual Studio keyboard theme, and I like my code dark, I have the editors dark and the code text to be light, so I am going to pick the Dracula theme, you can pick which ever you like, and there you have it, PyCharm is up and ready to roll!
This brand new version of Windows 10 is ready.
So without further ado- let's move on!
|
|
|
show
|
5:07 |
Hello my Linux friends!
Let's talk about what you've got to setup on your machine to do this class, in the same way that I am at least; you will see that you actually already have Python and Python 3 installed on Linux if you are using something like Ubuntu, so that's pretty awesome, I'll show you where to go to get it if you don't happen to have it, and I'll show you how to install PyCharm, it works wonderfully on Linux, but it's a little bit of a pain to set it up so I'll walk you through that.
So, here we are over in Ubuntu 15, brand new fresh version I literally just downloaded it, and we are on the PyCharm page.
So we can go and download PyCharm, you'll see there is actually two versions, there is a professional and a community edition, we are going to download the professional edition, you can get a 30 day free trial and if you pay for it like I do, then obviously, you can have it forever.
The main difference between the community and the professional edition, the community edition is always free, is a community edition does a whole bunch of cool Python stuff but it doesn't do web or database work, the professional edition does, in addition to standard Python things, web frameworks, type script, database, designer type things.
So, for this course, you can totally get by with community but for a professional work, well, maybe the professional is the thing to go with.
Some of the other editors you might choose if for some reason you don't want to use PyCharm, is you could use Atom, this is a really great editor from GitHub, I really like it and the video is hilarious so check it out, just for a laugh.
Sublime text is very popular, and of course, you can use Emacs or Vim that a lot of people are using.
As I said, Ubuntu comes with Python 2 and 3 but for some reason if you need to download it, just come over here, Python.org, grab the latest version it will automatically find the right thing for your operating system; you could also install it with aptitude, you can do things like apt get install Python 3 - dev, there is a couple of packages that you can install.
So first, let's verify that I actually do have Python installed, Python 3 so I can say Python 3-- version, and we have 3.4.3 plus, which makes it even better than 3.4.3, awesome, and then we have PyCharm, we're going to go download it, it's kind of big, so I actually already downloaded it, go over to my downloads folder, and we have the tarball right here.
So we need to decompress this and copy it somewhere, so I come over here, right click and say extract here, and it will extract it out.
Now it has the version name here, let's make it new location, let's put it in my home, I like to create a folder called bin in my home and then here I'll make a folder called PyCharm and within PyCharm I'll put PyCharm 5.0.4.
Now, if you open it up you'll see there is nothing to run right away but there is a bin folder within there and what we want to do is we want to run this script, so I could double click it, and it will just open in gedit, not the best, so I am going to come over here and just drop it into my terminal and run it.
Now, it turns out, there is a problem, PyCharm is built on the IntelliJ platform, the IDE platform, and that platform is Java based, so we need to install Java, before we can carry on.
So on Ubuntu, we'll just use apt get so we'll say sudo apt-get install open jdk 8.
And I'll put in my password, I'll wait for a moment, go.
03:37 Excellent, well, that took a minute, but now we have Java installed, let's try to run that again, PyCharm shell, now it's running, you can see it says do you want to import previous versions- no, this is a brand new machine so no, not really; normally I would just log in with my JetBrains account but for now, I'll just evaluate it for free, which you guys should be able to do for this class.
When PyCharm first opens, it asks us what keyboard map and visual theme we would like, I am going to leave the keyboard map alone but I like my code, my IDEs and windows and stuff to be dark, not bright, so dark background light code, so I am going to pick the Dracula theme for both the code colors as well as the IDE theme, and I will say ok, and you can't make this change unless you restart, so yeah, let's have a restart.
Excellent, my PyCharm is running, it's nice and dark with its Dracula theme, now the one other thing I'd like to do is notice it's over here, and I kind of like to not be running this shell script anymore straight from the terminal, so let's run it one more time, notice it's gone from the launcher.
Now it's up and running, I can lock it to the launcher, and now this way, when it's gone, I want to launch it again, I can just come over here and launch it straight out of launcher.
Congratulations, you have PyCharm working on Ubuntu, it's time to head on over and build your first app and have a great time doing it!
|
|
|
|
30:04 |
|
|
show
|
5:18 |
In this chapter we're going to look at what makes a service a restful service, what are some of the core building blocks like http status codes, http verbs and so on and we'll compare and contrast restful services with the broader service landscape.
Generally speaking, restful services are services built upon http that follow the restful principles, and you want to think of this more as a spectrum of options, how restful are you, not yes it's restful, no it's not.
So the most important thing is that we're communicating over http, we have a service, it's using http or https and it's explicitly using all the concepts and mechanisms built into the http itself, so http status codes, the verbs, get post put delete, content types both for the inbound data and the outbound data, there are many services that have been built that technically use http as the transport layer but they ignore all of these things, and they layer their own concepts on there, those are not restful services.
Next, the endpoints that we're talking to are URLs and this typically means that when we design our service we're thinking in terms of nouns, so maybe I'm designing a bookstore and I might have /api/books I wouldn't have /api/getbooks, or /api/addbooks or even /api/books/add, no, you just have /books and you apply the verbs, http verbs to them to modify them, do you want to get all the books, we'll do a git request against /api/books; do you want to add a new one, let's to do a post or a put to that, all right.
So you combine these http concepts, codes and verbs, and you apply them to these endpoints, so really the takeaway is when you design these APIs, you need to think in terms of nouns, what are the things being acted upon in your system.
The responses from your request should be cashable not every single type of request that's made you a service will be cashable but in general, when the http verb says it can be cashed, it should be possible for it to be cashed, like a get request against /api/books may be intermediate proxy server should be able to cash the response from there.
We also want to make sure your system is a layered system and what that means is your service clients they cannot see past your API.
If your service is calling through to other services, and it's composing them to basically make up its own functionality that should be opaque to your consumers.
Your services should also be stateless, you should be able to make requests get a response and that's all you need to know, what goes in, what goes out, you don't like log into it and then do a bunch of operations and then log out, right.
If you have to carry that authentication, maybe you have to pass some kind of token as a header value or something like that.
Mini restful services support content negotiation, so let's take our book example /api/books/one might give us book one.
Well how do you want that, do you want that in xml, do you want it in json, do you want the picture that is the cover page?
Well how do we know, you could have a bunch of different end points but typically these restful services will support content negotiation so if I make a request to that url and I specify I want json well I should get a json representation of the book back; but, if I specify one image png maybe I should get back the cover picture for that book, so that's content negotiation.
Finally, we have a thing called hateoas or hypermedia as the engine of application state.
Now, this is used less but some restful services do make use of hateoas, and the idea is I make a request just to the service, in that response maybe I have other URLs that the current state of the service my interaction with it maybe I can follow those further so I go hey book store, what do you got; and it says well, I have /books and I have /authors, and if I follow /authors maybe it says well, here's a bunch of the people that you go look at, you could maybe add a new one, things like that.
So this sort of dynamic response and traversal is very much like the web works now you don't go to like cnn.com/ some long url, you just go to cnn.com and you look around and it tells you what the current news items are, you click on them, you go into them further and you see maybe the related items that's hateoas, but think of that at the service layer.
So remember, I said you want to think of this as a spectrum, the more of these you include the more restful your services are.
You will run into some folks that say if you don't have all of these and maybe something I'm maybe forgetting, then your service is not restful, and that's one way to see the world but I think it's a little too black and white, the more of these that you adopt the more restful that your service is.
You start with a basic http service and you build restful principles into it.
So I would say most services probably make it down to 3 to 5, 6 and 7 are possible, 6 is certainly used some of the time, 7 is used but it's the least used of all of these.
|
|
|
show
|
3:30 |
When building http services, it's really important to make proper use of the http verbs.
Now, there are many esoteric verbs, but the four that appear all the time in restful or http services are get, post, put and delete.
So let's talk about those quickly and then we'll see an example.
So get is the one that happens by default, if you go and type a url into your browser and you hit enter, that's a get request, right, just send me the resource there.
And the idea is that this should be basically read only, it should have no other effect other than retrieving the data.
You don't want to initialize the service this way, you don't want to require that you do a get request to something before you can do something else, this is just a read this property type of thing.
And notice that I have it marked as item potent, and what that means is if I call it once, if I do a get request to some url certain parameters, then I call it again and again and again, it should have no effect, the second, third and fourth time.
So if I apply this operation more than once, it shouldn't change it, that's item potent.
And item potent is super important for services because the item potent verbs are casual, if you do a request and it goes to some kind of proxy server or even cashing in your browser, it can see that you did the get request to this and maybe we don't need to run this operation again, we can just return the cash local copy, because we know it's item potent we know it should have no effect.
Now, the other popular one that you see all the time in web pages and stuff is post.
If you submit a form that typically submits something as a post and the idea with these post operations is that there is some kind of body submitted to the server maybe this is form and coded data, key value, key value, key value like you might have an HTML form, it is also a very common for that to be json, but however it's represented, you basically go into the server and saying I would like you to accept this new piece of data, maybe this new book, I'm trying to create a book in the service or a new user or something like that, and then the service is supposed to respond and say I have created it and you can find it over here, this is the one operation of the popular ones that's not item potent.
If I say create a new book and I give it some information and I ask you to create a book again, chances are you now have two books with the same title or something like that, unless you have good validation, so this one is not item potent and that's important.
And the idea here is, you're going to submit this book, but you don't really know like what the url or the primary key or whatever it's going to be, just hey here's a new book create it and tell me where it goes.
Similar to this, but if you know where it's going to go, like if you're creating a cms say, and like I want to create a new page in this site and the url is going to be the this, well possibly we would do a put instead of a post and we put it to that address to say create this page here and so it's much like a post, you submit a body and the server except it and creates a thing, but you're telling the server you're letting the client decide what is the id basically.
And finally, if it makes sense for an item to be deleted so in our book store we want to delete the book or maybe delete a comment or something like that, we could do an http delete operation against some resource and just like if we put the same data to the same url over and over, it's still the same data, the same url, deleting the thing one or a hundred times, it's still gone.
So these other two put and delete operations are also item potent.
|
|
|
show
|
5:40 |
We've seen that http verbs are super important for the client to communicate with the server.
I would like you to do this type of operation get me the data, get; create an item here, put, and so on.
The opposite of that, the server communicating effectively back to the client that has to do with http status codes.
Now we all know status codes from playing with the web right, 200 means everything's good, 404 means gone, 500 means server broke, whoops, things like that.
But there's actually a much wider spectrum of options and using those wisely means your service is really a proper restful service, and not just something hijacking the http transport layer to move stuff around.
So let's look at status codes and pick out a few of the important ones.
So I'm here in this site called httpstatuses.com, created by a company called Runscope they do like API monitoring tools and stuff, that's not important, what's cool is here we have a bunch of status codes all broken down for us, and we can click on them and see what that means, like everything is going to be ok, 200 ok right, you can see well this means the request has succeeded and you can see the various situations where it might make sense for a get or a post, or a put, something like that.
So 200 ok, this is great for get and things like that.
Now if we're going to do an http post, you don't want to say well that's just okay, remember you need to say we've created an item for you that was the intent anyway, and maybe we need to tell you where it is; so let's look at 201 created.
This means the request has been fulfilled and has resulted in one or more new resources being created, and in fact, the request is probably identified by a location header field if not, maybe there's like some kind of redirect or something like that.
And even have like the Python status codes if you want to try to get the enumeration for them, but that's not so important.
So the two important ones, for 200 are 200 ok and 201.
We also have 202 and 204, these are both interesting so accepted means it's kind of like what you might give for a post operation like hey, you sent me something and I'm working on it, but what if you're using like queuing, and I'm going to put this in a background queue, eventually we'll pull it off the queue and process it but I can't be sure it worked ok now; so this is what you would send to them instead to say I think it's all going to be ok but I can't be sure because we haven't processed it yet.
Also, no content, this is like the servers fulfilled the request and I have nothing more to tell you, this would be a great response to an http delete or maybe even like http put, something like that, right, you've asked me to delete it, that was fine, everything worked, it's gone.
So those are the two hundreds, now if we go into three hundreds, these are the redirection ones, most important one is probably either found, a soft redirect at 302, or a permanently moved over at 301.
So this is like I changed my domain, it's over here, and it's always going to be over here now, it's never coming back.
Then we have client errors, four hundreds, and down here 500, server error.
Hopefully you don't see any five hundreds but it's going to happen, isn't it.
Okay so 400, you can say I have request this is really important for services it might mean you've given me some kind of data, you said it was json but it's malformed, I can't process it.
Or it could even be, you've given me a piece of json but not all the values I require are there, so you could somehow say no, this is a bad request, unauthorized permission stuff right, payment required, we all want to get paid, right but 403, you don't have permission, even if you're authenticated, and 404 not found, this makes a lot of sense if somebody does a get request against like /api/book/72, and there's no book with id 72, you want to return not found, okay, there's no way we can give you this it's not here.
Now, there is one other one, that's really worth talking about here, I guess maybe a couple, we have payload too large for certain things you might be uploaded to large, gone- just gone, timed out, these are all interesting, but I want to direct your attention to a very important status code what we're here anyway, number 418, I'm a teapot, and the official server response is any attempt to brew coffee with a teapot should result in an error code 418, I'm a teapot, I can't brew coffee, the resulting body may be short and stout, so this is actually a joke played with the HTML http team committee, and some kind of joke on April Fools' or something and they decided to leave it in, it's kind of funny.
If you ever want to make somebody laugh and you're doing some testing, just return 418.
And of course, we have the server 500 errors, you really shouldn't be sending these back, right, maybe not implemented internal server error, this is really an unhandled exception you should probably catch the error and somehow return it in some other form, right, if the reason there'll be 500 error is because maybe you tried to access an object but it didn't come back for the database, it was none, so you got some kind of exception there, you probably want to return a 404 instead of letting that crash the server and return 500.
So that's http status codes, if you are unsure that's a pretty good site just go to httpstatuses.com and pull up the detail page for any one of these and try to decide is this the best thing to send back, does this make the most sense for my service.
|
|
|
show
|
3:07 |
One thing you should do as you start to build services like this is look at well established, highly used services and how they are working and how they're doing it.
And you find a lot of examples of bad services and people not doing this well, we're going to look at a couple of services starting with github, that I think are doing a pretty fine job with their services.
So over at developer.github.com we can go around and check out the getting started stuff, so there's all kinds of things we can work with, there's oauth an authorization and what not, but let's look at the issues section here.
So there's different things we can do, we can list the issues, we can get a single issue, we can edit or create an issue things like that; we can even give a little thumbs up or something like that if we want.
Okay, so to get the issues across all repositories that we have access to, remember we're an authenticated user, we can just do get /issues.
Now, if we want to get them for a particular user we could do a /user/issues or for organization we could say /orgs/talkPython/issues and that would show me all the issues that are assigned to this user across that organization all right.
So that's cool, and they give us a nice response, like ok the status code from this is going to be 200, remember, there is get that probably makes sense and here's what this is going to look like, all right, so let's pick another one, let's go down here to create an issue, now issues are associated with a particular repository, so we're going to do a post to a repo who owns a repo, the name of the repo and issues.
So maybe this is /repos/mikeckennedy/pyramid-rest-course/issues and we did a post that would actually create one, new issue for this course, right, whatever, look at the full url right there.
Now, it says these are the things you can send in and they give us an example, these are the inputs, right, I want to create a bug, the body is this, the title is I found a bug and then the response is going to be not 200, 201 created, and again, they give us all the options, let's look at one more.
What if we want to edit one, so these guys are actually using patch all right, patch I didn't talk about, it's not that commonly used, but in this case, they're using the patch verb, and they are going to basically apply that operation with a particular body to the url for that issue exactly, ok, so here's the inputs, here's the response, everything was ok.
Now, it's interesting here to think about what the response code should be, if you're submitting all the details for that issue, maybe it should be 204 accepted but no content.
If they were not sending anything back, but maybe there is some state of that issue that is going to be basically it's in the system but they somehow didn't pass it in, right, they might not roundtrip everything, so they because they send stuff back, they are doing 200, okay so that is the github API and how they have created their API.
You can use this for inspiration, I'll show you another one that is working slightly different but also very well done next.
|
|
|
show
|
3:37 |
The other example of http service that I want to talk about has to do with basecamp.
So a basecamp is like a project management system you've probably heard of it, it is actually most notable for being the thing that was created from which Ruby on Rails was extracted so David Heienmeier Hansson and some other guys created basecamp and they said oh, as part of creating this project, there is this really cool thing that we've created with Ruby and we'll pull them out, we'll call that Ruby on Rails, right, we're not talking about Ruby now, but it is notable for that.
So these guys have been building web apps for a long time and they have an interesting take on APIs and I think it's generally really well done but it's also interesting on how it's different than many other things.
So let's go down here, so here's the Basecamp 3 API, it says well how is this different, every request must end in .json that's interesting, they are also using oauth 2 here, and they've renamed what used to be called projects to basecamps, okay.
Now, notice all of the requests have this access token authorization, bearer and then the value of the token, you can see down here they actually give you an example, well, not much of a token, huh.
But they show you how to store it in your account.
Ok, so let's go look at how they use this API to interact with projects or what they've renamed to basecamps, so we can get a basecamp, we can get all of them, plural, we can get a singular one, we can create, update or trash one.
Now, check this out, so they're going to do a get against /projects they haven't changed the name because I guess that would be too much to ask for people to change their URLs, so /get/projects but they've decided that everything is going to be json and they want to be extra, extra explicit about it, so they've had you put a .json on.
Now, you might say well that's kind of weird, right, that doesn't follow the rules and the thing is when you're making services, there are no rules, that's cool, it's wonderful actually, you get to make the rules, right, they've decided this is how you're going to interact with our web service, here's the rules right.
So what they have decided is .json goes on the end maybe later there's a .xml, unlikely, but possible I guess.
So you do this get and of course you get json back, you get a list of json objects, all the basecamps, projects.
You can get a singular one, these are specified by id really more like this id, but you would get something like this, you would say /projects/projectid.json okay.
That's again a get, let's look down here when I create one I am going to do a post to projects json and this is a minimal amount of data you have to pass through, right.
You might get an error, you will probably get a 201 created, that's solid, but you might get a 507 insufficient storage, in the case where your account is out of projects; one of the ways you pay for basecamp is you buy different tiers, and those different tiers have a different number of projects available to them so instead of just crashing or something, say not ok, they say 507 insufficient storage, and they pass back an error.
That's pretty cool I think, if we want to update one, we're going to do a put to that location, again 200 is returned because they give back the value, if you want to delete it you just do a delete again to that same url, and this time 204 no content is returned if that thing works out ok, if you are able to delete it.
So that gives you a good sense for the basecamp API, I really like their API quite a bit, I'm not sure I'm sold on this .json but like I said, it's their world they are going to make their own rules.
If they want .json, that's what they get.
But yeah, it's a good API, it's here on github, you can check it out just basecamp/bc3-api and you could play around.
|
|
|
show
|
8:52 |
Finally, let's compare how an http service works, some of the benefits and drawbacks of that, to things like soap services, raw sockets, queuing and so on.
So let's start with our topic of this course http services.
We've got our app, it's going to make a request over to our web server and this is just going to do a straight http get, again some kind of uri, a noun, in this case a particular user with id 7 and the response is probably some kind of json, right, here there's something with an id 7 and the name of it is Michael, here are your details.
Ok, so what are the benefits and drawbacks?
Well the benefits, this is universally accessible, there is almost no more broadly spoken protocol than http, so Python, Javascript, .net, C++ whatever you're doing, it can probably talk to this service.
Firewalls are all about letting the web out and blocking many other things, and so it's very firewall and http proxy friendly, meaning it can get out of enterprise environments and things like that.
It's cashable, right, this get is item potent, theoretically it's cashable at the many layers throughout the whole request, at the proxy server, at the client, even on the server side.
You can look at it, it's understandable and humanly legible, right, you can easily read that response, you don't need a lot of training to understand what that response means.
Here's a person or user with a name Michael and id 7, done, this is relatively lightweight, I'm thinking as opposed to like a soap service with an xml payload or something like that.
Now, there are drawbacks of course, it's not self describing, so just because you have an http service that has endpoints it doesn't mean there's like a documentation page or on some of the protocols that actually generate client side things that look like functions and you just treat it like it's a local thing, but it goes to the server right, we don't get that with http services and if you're looking for the highest possible throughput it's not as fast as say binary data over raw sockets, but among the services, this is a pretty lightweight protocol.
So this is what we will be focused on pretty much for the rest of the class, these types of services, but just so you can do sort of a compare and contrast and see the rest of the world what are the other options, what else can you run into, let's look at a few other ways in which services get built.
Almost from the dawn of time we've had this concept of raw sockets you just open a socket bidirectional and you say you 001 and the service might say 1101 and you have to know what that means, right, a lot of times you'll say okay, well the first integer we're going to send is going to be a operation code, and then if it's this operation the rest of the message is this shape, there's like two integers and a string where the first value part actually describes the length of the string; now it's very custom and it's kind of a pain, but it you can create the tightest, fastest possible operations because you are literally exchanging bytes like the way they are on the wire as bytes and there's no extra overhead, right so there's no extra negotiation or encoding, decoding, serialization, deserialization it's just this, all right.
Now, there are benefits of course, it's very fast responsive like you can do basically minimal bandwidth, you can even bitwise or stuff onto a single integer or single byte and then send that along, but there is a lot of drawbacks, you have to come up with these protocols or if these are some platform specific ones like dcom or java rmi or .net remoting, and that means in this platform specific cases, those can only talk to other java servers or clients, they can only talk to other .NET or windows or if you're doing distributed corba type stuff, this is not a very flexible protocol, maybe no standards in the case where it's just truly raw sockets, it's far well unfriendly, it's hard to implement and it's definitely not legible, but we do have that super high performance little latency low bandwidth thing and this is something people do do often.
The other major sort of cross platform service way of communicating was something called soap, simple object access protocol.
And this worked in some way like what you're familiar with, that would do actually http post to some url and it would actually pass this action header to say this is what I'm trying to do, and instead of getting json back we get -- and we passed this thing called the soap envelope here, we've got you can see just a little bit of it, there is actually no data here that's just like descriptive goo that wraps it, and then as a response we get a soap envelop back with the response in it, so you can see this is quite heavy weight, but there are some advantages as we'll see.
It turns out that these services have a way to describe themselves, which is partly why they look so nasty in xml, but the xml says here are the operations, these operations take these types they have these names and so on, so because of that there's actually excellent tool support and certain things java and .net in particular but even in Python there are some tools to work with these and they are easy to work with, provided you have the tools, they are basically impossible to work with if you don't have the tools but they're not http rest services, and the reason is every operation is a post even if it's reading it's a post, you're not using the verbs you are not using the content types, you are basically using the http transport layer to move across this other protocol on top of it, right so http post only breaks this whole internet architecture right, cashing for example is completely out the window as well as a bunch of other things.
Tooling is required, if you don't have the tooling to generate these little clients to talk to the stuff, it's way too complicated.
Another challenge is that these services are often built around functionality so remote methods are usually the focus, log in, create user, things like that.
It's also extremely bandwidth heavy and serialization heavy and even though its words, it's not really legible as you see.
Real quickly if we expand this out, like let's suppose we want to call a function on a server called double an integer, it's going to take an int and return an int.
How much should we have to send back and forth for this to happen, not very much, but here's what it looks like in the simplest version of soap.
Let's send this, and see way, way, way down in the middle somewhere there's the 123 we're going to send, what do we get back for the response, way there in the middle you see 426.
So this is soap envelope exchange is something that happens on the internet, it's much less popular now than it was five years ago, but if you work inside companies, there's still a lot of enterprise systems doing this kind of stuff, the world is better with http services and things like that, but you'll probably run into these, so you should know what they are.
Finally, inside companies or in data centers, you will often see queuing as a way for apps to communicate with each other, although this really almost never happens over the internet, it's still sort of possible, okay.
So maybe we have an app and it's going to say I'd like you to perform this operation so what it will do is it will post a message to this queue, some time later, this other app is going to say hey there is a new message on the queue, give it to me I'll process it.
So this works really well, it could even be the same app by the way with just some different functionality or whatever, pulling that back to process it.
So why would we do this, right, well, we don't use it very often for a direct communication but it does have some real benefits, it's highly scalable in a couple of ways, suppose you have extreme peaks and valleys in the usage of your service for a moment it's really busy and then it kind of dies off for a while and then it comes back; with standard services, you'd have to basically create a service that is capable of handling load at that peak, whereas with queuing, you can kind of say I need a service that will handle the average, as long as it can keep up or maybe if it can't, right, maybe in the evening it goes to sleep or you spend up another server, whatever.
The idea is you can put all that work under the queue and then pull it off best as fast as you can and really long as you handle the average load you will be able to keep up, you can also have things like the server go down for a moment wake back up and just backlog on the queue and it'll pick it up and go so you can handle intermittent processing and restarts and stuff like that.
But, it takes a special protocol, it doesn't really go through firewalls obviously it's not super easy to use across the different technologies and there's no request response like login well what are you going to do, you're like I want to get this information about the user okay well come back later, I'll tell you if I found it, right that's not a great experience.
But queuing is something people often use to create asynchronousy and independence between different parts of your app and different scaling mechanisms at different parts of your architecture and so on.
So these are interesting services as well, but we are going to spend the rest of the class focusing purely on building http restful services.
|
|
|
|
21:41 |
|
|
show
|
4:13 |
Are you about ready to write some code-?
I hope so, because we're about ready to pick a web framework or at least compare them and go with Pyramid, right; go with our web framework and start creating some basic services If you work with Python day to day, you'll know it can do amazing things, but a lot of people, they don't work with Python day to day, and they may think well, maybe I should use some language X, technology X to build these services or web apps.
Let me show you some amazing sites which of course have many web services as part of the built with Python.
So the The Onion, the very funny sort of satired news source, that's built with Python; Spotify, their web app and some other services are built with Python.
Some of the other ones are written in Java, but Python's evolved here, Nasa, Bitly, a lot of Bitly is powered by Python, Atlassian Bitbucket, their web app is written in Python, Survey Monkey, Quora, in my opinion, the best general Q&A site on the internet that's written in Python, and they are very passionate users of Python, they do a lot of writing about performance and things like that, so very interesting to look at what they're doing with Python.
Disqus, these guys handle many many requests, because they get embedded on all these different sites at the bottom so they got to handle a ton of requests and that's done significantly in Python.
Instagram, Reddit, Reddit is largely powered by Python, they use sqlalchemy core in the middle and they use Python for their web app, YouTube is written in Python, handling several million requests per second, we've got Pinterest, we've got PayPal, PayPal has some very powerful services that get called several billion times a day, written in Python.
Dropbox is one of the largest users of Python, they have many core developers including Guido Van Rossum, the creator of Python working there; and of course, Talk Python, almost all of my stuff is written in Python, the web apps and the services that they need, I'll try to point those out when it makes sense during this course.
You will learn more exactly how these sites are using Python, check out this link here at the bottom bit.ly/pyapp-25 and there is a nice article that highlights all of the usages and so on.
So when you're thinking of web frameworks, and when you're building web services, web services are really a subset of web frameworks, right you are thinking of them there is kind of two different types of Python web frameworks, and there's a couple of other distinctions maybe we should make but let's keep to these two for now, so on one hand we have the very small bring the building blocks that you need in very small pieces, it's your job to find them, micro frameworks; on the other we have large what I call building block frameworks, where most of the stuff you need is there, but you have less granularity in how you work with them, kind of take what you get there, and the building block side of things I'd say we have Django, on the small side, we have Bottle, other frameworks down here include Flask, and somewhere in the middle of this world, we have Pyramid.
So we're going to be using Pyramid for this class, and I think Pyramid is kind of the goldilocks framework, it's a little more full featured than Bottle of Flask, but it's not so much so that the conventions and stuff get in the way, like Django comes with its own ORM, and yes you can use sqlalchemy with it, but kind of have to fight the framework to do so, right.
Well not with Pyramid, use whatever ORM you want, you can use whatever formatters you want for your services, things like that.
So Pyramid is really nice, especially if you are going to also have a website component to what you're building, not every service is 100 percent standalone, maybe there's a website and some backend services and the web site talks to the services, and maybe mobile apps talk to the talk to the services, things like that.
So understanding some of the HTML side of the framework makes some sense, because chances are you going to have some part of HTML in your service, not everyone I know, but many of them will have a little bit of HTML as well as their service story.
So Pyramid fits right in the middle here, and I think that's a good place to work with.
|
|
|
show
|
3:29 |
Before we can write our first service, we should have a high level of view of all the moving parts of the building blocks of Pyramid.
I find in web apps in general they are even harder to work with, than say just standard other libraries because a lot of parts have to fit together often via conventions, configuration files, main app initialization files, views, templates, static files and so on.
So we're going to try to cover those things and show you how they all fit together and then we'll start writing some code around it.
So what are these building blocks?
First of all, we're going to need to take a url and map it to some code, some behaviors in our app, so the first thing we can talk about are routes, so routes take a url pattern and map them to views, some web frameworks use regular expressions for these, and I don't think that's a great way to do it, right, these regular expressions can be really tricky, they're powerful but they're also quite complicated and error prone to see why something may or may not map to a particular url.
Thankfully, in Pyramid, there's a really powerful and simple way to do this, and if we need what regular expressions provide, we can add on something like constraints via a regular expression.
Views, so views are the functions or the code that runs once a request has been routed, and figure out which view it's suppose to go to, all the request data is passed to us, that could be the post body that could be the url, a query string and many many more things.
Now notice also have a.k.a controllers, Pyramid speaks in this template view design pattern language, but it very much matches the pattern of what's more generally known as model of view controller, so if you're coming from an mvc design way of thinking I'll also put those words here, so views are the functions that run in Pyramid syntax or nomenclature, and these would be called controllers.
And we also have templates so once the view is run, it's gotten some sort of data, presumably, and it wants to show that to a person or transform that into say an xml rss feed to send off to a machine, or even turn into json.
Templates are a way to take HTML structure and pass a bit of data to it and it will transform it into HTML, we don't use this a ton in services, we use this all the time in web applications.
So if you have a web page for documentation that's sort of the front part of your service, you're going to care about this, if you're just sending json, the thing that we'll be working with is not so much templates but renderers.
And these renderers take our data and transform it just some sort of plain text thing like json or xml or something like that.
We also have models, this is the data taken, created by the view and passed either to the template or to the renderer to be turned into text for the users, and we have static files and a special way to deal with static files again services probably care less about this, but you could theoretically redirect to a static file with all of its cashing and support and things like that, and we also have configuration, any real service has database connection strings, service API strings, things like what's your Stripe credit card API key if you're going to be a credit card service it's going to do some sort of charge for your web application or your web app, so we'll see there's a lot of support for configuration files as well as various use cases for these configuration files, like different settings for dev, test and production.
|
|
|
show
|
3:55 |
The first building block that we want to look at are views or in mvc nomenclature controllers.
Now, these can be individual functions or they can be methods on a class and we can set those up either way in Pyramid.
Right now, we're keeping it as simple as possible, here is just a function called album list and onto this we're going to add a decorator that says this is actually a view method and we state the name of the route, so In this case we are going to register a url and we're going to give it a name called albums and when we return something, we need to tell it how to translate that data.
Often in Pyramid or many web apps, you'll see this being some kind of template engine, Chameleon or Jinja 2 or something like that.
In this case, we're using a custom json serializer called readable json.
So think of it as a json serializer that does indentation, more or less.
So we've set up this function to respond to a particular url, which is possibly passing data to us, in this case it's not but it could be, and we're telling it to render json back to the user.
We'll look at this render stuff in detail, but let's focus on the method.
So all of these Pyramid methods take a request object and this has all the things that you could possible want to learn about the Request- cookies, headers, url query string, user agent, all that kind of stuff.
And now we're just going to return some kind of dictionary that can be converted back into json, so we're turning the dictionary it has one key called albums and in there it has a set basically the value is a list of albums and by default those individual items either need to be fundamental types like strings and numbers or in this case probably sub dictionary, so each album, album 1, album 2 represents a dictionary.
However, we can do more interesting stuff with a serializer or renderer later by default that doesn't happen, so we're just going to return this json object, so somebody does it get requests to let's say /api/albums we return a json object based on this data.
The way it works is we define our view method taking a request object and then we're going to return a model in the form of a dictionary and pass that to some render, in this case a json serializer.
That last view, while representing many of the pieces of what goes into creating a view wasn't very realistic, let's look at a more realistic one here.
So, in this case we're going to let the consumer of this API pass in some kind of id for a car, and we're going to return the details about that car, so again we have the view config with the route name and the renderer, but notice this time we're only responding to get methods, that means if we wanted to let them say update via a put method to the same car with the same id, that could be a separate method, so this one just shows the details of the car.
Now, we need some way to pull that car id out of the url, and when you define the routes, you can put a little place holders, little route cutouts for values that match, and then those keys and values show up in this thing called the match dict.
So here we're asking for the car id, we're going to go to our data layer via the repository and ask for the car by id and notice that if there is no car rather than returning none or something silly like that, we're going to respond the way the web should respond, a web server should respond to something that doesn't exist we should return a 404, and just for a good measure we're going to go and throw in some kind of error message as a json response as well, but, if we do find the car, we're going to return that car back to the caller.
And like I said, unless we go and do something special, this car must be a dictionary or something that's natively serializable to json, but as we get further into this class, we'll see that those can actually be rich objects if we set up the renderer correctly.
|
|
|
show
|
3:35 |
As you saw from looking at the views, the routes are critical this is the first interaction the user has with their web app, they enter a url it's the routes that decide what functionality actually maps to that url.
So when you're working with Pyramid you'll see there is a main start up function that is basically the entry point into your web application.
Now, in real apps, this is probably factored better, but in this example we're just going to put the routing code right here, what will happen is we will be given some settings that come from our configuration file, and we'll create this thing called a config, and then we can use this config to register routes, so the first thing that we want to do is we want to register a static view if you're just doing a purely dynamic API, you can skip this step it doesn't matter, but if you want to return anything that is an image, css, javascript, anything like that you're going to want to set up one of these static folders and register a static route, and by default, none of the files can actually be served off of the server that have to do with your web app, this is a good thing you don't want them to grab like your Python source code or your configuration files with your API keys that would be really bad, but sometimes you do want to serve static files and so you'll put them in this static folder you register here and they have a cash age as well, so they don't keep getting redownloaded, and this cash age is in seconds by the way.
Ok, so once you have added your static view, you can add these dynamic views and in this very simple example we're gonna let you explore some albums and if you hit the home page without going to /api/albums, you're just going to see some basically static HTML that says welcome to the album API, here are the functions you can call, so I named this route docs, and it's just going to live at / that just means it's just the basic, this is the default thing when you type the server.
Next up, we're going to let the user get a list of albums, so if they do a get request or I guess put, they will also get this route as far as the route matches go they can go to /api/albums and and in this case we can return all the albums to them.
If they want an individual album, they maybe want to refer to it by name like maybe that's the way we have structured it in our url so we've got some sort of like slug that is associated with the album so if it's like dark side of the moon it might be all lowercase, dark-side-of-the-moon, so maybe the route we're looking for is /api/albums/dark-side-of-the-moon, so we're going to use this little name fragment here, that will let us actually name a part of the url, and then as you saw in the previous section we can actually pull out the value for whatever goes in there and use that in our query, so this routing matching template thing is really nice.
So you can have either one like the api/album that's just static if you will, or you can have one that's passing data to the view methods with /api/album/{} whatever you want to call it, in this case I'm calling it name fragment, and that's how it will be passed to the view; once you get all this set up, then you tell the system to scan all the Python files that it knows about in the project, it will scan them and see if any of them have that view decorator, the view config, and if they do, then it will wire up that function to the name routes here.
Once you have this all up and wired together, you're ready to just start the app, so you go to the config and say here's the app, run it, and then you're off to processing requests.
|
|
|
show
|
2:39 |
Our next building block is configuration.
Now, these web apps come with two prebuilt configurations a production one and a development one, but you can make as many of them as you like, and just pass them to the start up for the web app.
So here's a typical configuration file, we've got some stuff about running our web application in this case when we created it we called it my_webapp, not very creative, but that's what it was called.
So we can say the main entry point is to use basically the package my web app and then we can have our specific things that we care about in our web application, so maybe we need to be able to specify a different db file for when we're running in debug versus development rather than when we're running in say production or test.
So here we can say db files can be db connection, right in this case we're using sqlight but either way, we can put this key in here we can also put like an API key.
Now a case where this might vary is, if you're using Stripe, so Stripe has both test API keys and production API keys, the test one accepts test credit cards and does not charge you or charge whoever's card you put in there, but the production one you obviously want it to take a real credit card, not test ones, and you actually want it to charge when it says that the charge succeeded.
So you very much might want to have different API keys say for your Stripe keys and so on.
You can also have different includes, here we're using the Pyramid debug tool bar and this might only appear in the development.any but not production.
Similarly reload templates maybe it's false and production to be faster, but true here to be simpler like you make a change to our template file and they just automatically appear, so you don't have to restart the web app.
Now, once you set this up and you run your app, this will be passed over to our __init__ where we have our main entry point again, and inside here we get our config right, this is already set up by Pyramid and we can go to this config and we can say give me the settings that I found, or that you found in this configuration file, so I can go get me the settings, so there is a config.getsettings and from there I can say let's take that db file and get it out, so config settings is just a standard dictionary, and I'm using the safe way rather than the type that will throw a key error if it's not there, so the safe way to get db file, so I'll say .get db file and get none if it's not there.
Similarly API key get me the API key, and now we can just take these and pass them off to whatever part of our web app, whatever subsystem we might need so the db file might be passed to the data access layer and the API key may be to the credit card service and things like that.
|
|
|
show
|
1:21 |
Because Pyramid is effectively a model view controller type of architecture models obviously play a very important role, so the idea is we set up our routes, the request comes into our views, our view method here called index, and then we need to do some processing and return some data back, basically to a renderer but the idea is to return it back to the user with some kind of transformation.
So in this case, you can see I have set the renderer to xml so what is passed here is theoretically going to be translated magically in some way, into xml.
Now, the thing that we return from these methods either has to be a raw response object which we create or it has to be a dictionary list, list of dictionaries and fundamental types, right, so here we have an album, we saw just like before we're going to return the json object or a dictionary rather which is going to be translated often to json, in this case to xml, and it's going to have one top level node called albums and then in there a bunch of subnodes represented by each individual album, has preview, title, url.
So you'll find in almost every view method that you create it's either going to return a model or some kind of redirect result but most of the time, things are going good, you're going to be returning models.
|
|
|
show
|
2:29 |
The final building block that I want a touch on just a little bit but we won't focus very much if at all on it in this course, are templates.
So, we've seen that we can have renderers like json, and that will turn our response in from say a Python dictionary into a json object and that's great for services, but if we want to have some kind of documentation page that we want to have maybe the service embedded inside of our website and our web also has sort of HTML type features, then we will use one of these templates, and Pyramid supports a number of languages, this one happens to be Chamelon, I think Chameleon is by far the cleanest, simplest, most HTML like and HTML friendly of all the various temple languages, but you could configure it to pick whichever one you want, and the idea is we're going to take one of those models and we're going to pass it here, and we saw before we were sending off to the xml, some kind of xml renderer this model that has an albums list in it and within each item in that list, we had an album with a url title and a has preview.
So if we pass that to this template, we would be able to generate a report or display of them like this, so maybe we want to have like a real simple HTML page, it says here's the contents, and it says what we want to do is for each album I want to have a div that contains two URLs, right so we can use tal:repeat, we can say we're going to repeat basically do a for in loop for every a to find in variable a in albums, we are going to generate a copy of this div and then within there, we're going to crab out the url and the title you do that with dollar curly value and put whatever Python expression you want in there and then close that off, and you can also have conditional, so not all of the albums have previews and we don't want to show the preview link if there's no preview available, so we'll say only show that second link tal:condition if a.has preview.
Alright so expressions are written with curly parentheses expression the conditionals are done with tal:condition.
Now, if we were to actually execute this, we want to send that model over to it, obviously it's unstyled, there's no css here, so we come up looking pretty dull, but you would get something basically like this, alright buy digital age kids, that one has a preview, buy freedom songs that one has a preview, buy make money- that one has no preview, so it doesn't show up.
|
|
|
|
41:10 |
|
|
show
|
1:50 |
I think it's time to create our first web service.
What web services we are going to build?
Well we've been hired by a small town auto dealership here, and this dealership is very interested in taking their car sales to the next level and they've decided that if they can add a little bit of European flair plus some technology, some services, maybe people can integrate with their APIs they will be able to take it to the top.
So we're going to add Opel as one of the companies, the brands of cars that we're going to sell, and we're going to expose all of these Opels that people might want to sell or interact with through our web service.
So we're going to be creating basically a service that lets them list the details about the cars that they sell, initially and then later, we might be able to do things like add used cars for sales or list our own Opel to be sold through their Opel dealership things like that.
So, if we look at the operations, we're going to start small, the first thing that we're going to do is be able to just do a get to list all available cars now, they've actually got a pretty big supply cars as we'll see in our database, so we're going to have to limit this somehow, maybe implement some paging or something like that, but we want to be able to get all the cars they have, and once we have the list of cars, we might want details about those cars.
So if we want to interact with a particular car, we could do a get against api /auto/ the id of that car and that will give us a specific details about this car.
Now, we might want this in many formats, but in our first pass we're going to take and exchange all of the data simply in json format.
I hope you are excited to build this web service for this awesome car dealership, it's going to be really fun.
|
|
|
show
|
5:54 |
It's time to create our web app so we can host our services there.
Now, I've changed into this folder that is in our github source code repository, so anything you see me do here I'm going to check that into github and you should be able to get to that when you watch this video.
So the thing that we need to do to get started working with Pyramid regardless of really how we're using it, is to install this thing called cookiecutter.
Now, traditionally Pyramid has used its own internal project generator thing and they've switched to a more general one called cookiecutter.
First thing we got to do is make sure that we have cookiecutter installed, I'm going to do the --user to install it just locally for me.
Alright, it looks like I already have that installed, that's great; the next thing we can ask is which cookiecutter, just so you can find it, sometimes I found that the path to the bin folder where this gets installed sometimes doesn't make it into your path, and then if you try cookiecutter it gives you an error like command not found, so you might have to add this, the user name and maybe change the back slashes to forward slashes for windows adapt that your system, you might have to add that to your path for this to work.
Ok, so once you've got cookiecutter set up and it's in your path, then you are ready to use it, so we just type cookiecutter and it's going to tell us hey you have to give us a template, now where do we get this template- well from github of course, so over here you can see in the Pylons project which is a grouping for Pyramid and other stuff they've got a Pyramid Cookiecutter starter, so let's go with that.
We're going to go over here and we'll say cookiecutter run from this template, now if you've already run this command, you could just type that but if you don't have the template installed and downloaded then you've got to give it the full path, so we'll run it like this, notice I've already done it so it's going to say do you want to get a fresh version, I'll say yes this will be our First Auto Service.
Now it's going to suggest a pretty decent name first_auto_service this has to be a Python package name, so it's got to match some of the rules around package names.
Now, this is good, but I'm going to use svc1_first_auto_service and then that way we can have service 2, service 3, it will be more easy to find the various versions that we've built throughout the class in the course repository.
So let's call this, it will ask us what kind of templates you can choose which one of the three you like, I think Chameleon is best so I'm going to pick that, it doesn't really matter so much.
All right, it looks like it worked, it says welcome to Pyramid, sorry for the convenience, now, it gives us a little bit of guidance here, it says okay we can create we can cd over to where the files are; the next thing it says, you should create a virtual environment, it's true, we should create a virtual environment, you don't have to but this allows you to have a separate clean copy of Python to run and manage the dependencies of this project, so let's go ahead and I will do that, I'm not going to call it env I'm going to call it .
env, so it's hidden and it also matches some rules that make a few things easier later.
I'm also going to add a --copies here, this only matters if you are on Mac and you care to use PyCharm, but taken together there is something about the way symlinks get set up that without the --copies don't quite work right, so you need this to basically use it in PyCharm.
We'll wait a second- everything is ready to go, so notice now here we have a little setup, the last thing to do is set up and basically install Pyramid, install all the dependencies of Pyramid in this project as well as these Pyramid packages themselves behave as Python packages and so the set up here provides another step in that it registers the website in the Python executable environment, the virtual one we just created.
Well, before we can do that we actually have to activate this, so we could say source, or we could just say .
env /bin/activate notice my prompt changes, if I'm on Windows you don't need the first .
( dot ) and this is scripts, and it's activate.
that, so unfortunately those are not the same, but whatever it's not hard to adapt to either.
So now, if we ask which Python, on Windows the command is where, notice we're running the one out of our little virtual environment we just created, that's cool, so we can come over here we can run Python setup.py and don't just run it by itself, there's really two decent options here we could install and now we copy it to the runtime for Python and run it, but we want to be able to continue to work on it and edit here, so we're going to use develop, so we run that, it installs all the dependencies it takes just a moment, and then we'll be ready to go.
Alright, it looks like it installed, everything we can do a quick pip list and you'll see Chameleon, Pyramid, Waitress the dev server, things like that got installed, including our little project itself got registered as a package.
So the last thing we need to do is just to run this, and it comes with a command p serve, which got installed during that setup step, it came along with the install of Pyramid there and we can give it either development.ini, production.ini, we can make up another configuration file, but we give it a configuration file here, we run it, it's serving up right on the localhost.
So now we can have a look and see what we got- ta - da, here's our Pyramid starter project, and you can see it's got the little name that we gave it, and all sorts of stuff.
It doesn't do much yet, it's just a blank site, there's no API section or anything like that, because we haven't created it yet but that's what we're going to do next, we're already ready to go, we've got our site created all the dependencies installed and it's up and running.
|
|
|
show
|
3:31 |
So it looks like we have Pyramid installed, our web app created, registered, and we've been able to run it, but it's no fun to have a web app if you can't edit it, right, and we're going to use PyCharm to do that.
So let me show you how to configure this in PyCharm.
So basically we want access to the directory we're in so I'll say open.
on Windows it's start.
and here's the project structure that got created, and in here, you can't see it, is the hidden.env so on MacOS, I can drop this on PyCharm and it will automatically open it up and understand this project, I believe you've got to open PyCharm and say file open directory on Linux and Windows.
So it comes to life you can see it's thinking about all of the dependencies and libraries that are installed so give it just a second to come to terms with that, and notice it's also automatically detected the project up here as a Pyramid project and it's created what's called a run configuration, this requires PyCharm Pro, PyCharm Community edition doesn't support web apps or any sort of web development really, so we can come over here and we can expand this out and see what we got; Alright, this is what this is generated from our setup we can just basically ignore that, here's our hidden virtual environment, also ignore that, but this is the stuff we really want to edit, here's our views, here's our entry point with our routes, all of those kinds of things.
So I let's just go ahead and run it and make sure everything is working, it is, everything is working, so if we click it it should come up just like we did before on the command line.
All right, that's cool, now in case it doesn't come up like this you may need to do a couple of things, you may need to add a run configuration, so you might need to come over here and say plus Pyramid server make sure you don't do the default you just hit plus and give it a name and you got to browse to the configuration file I'll click here so you see give it a name, browse to either the development or production any set the working directory to be the same and make sure you pick your virtual environment if it's not there, you've got to go browse, I'll show you how to do that in just a second.
One final thing that will make life easier is say single instance only, only one process can list on that port anyway so you just get weird errors if you don't do that.
So the other thing you do is to go to settings, the preferences here and if you go to the project, project interpreter you can see you can actually go here and say add a local virtual environment or even create a new one, but then you've got to run the setup steps again in that new environment.
So if for some reason it doesn't show up, then you can browse over to this, but as long as you follow those naming conventions that I went through .env for the virtual environment that it's in the root of your project here then it should automatically detect it.
We also have a little terminal down here, and the terminal automatically comes with that, that virtual environment activated, so you can come down here and a lot of that stuff that we did with the setup.py and so on, down in this area.
All right, other than that, it looks like we're up and running and ready to go in PyCharm.
So, for the rest of the time working on this, we'll basically be working in this editor.
Oh, one final thing before I go, notice it says that the version control, the route was not registered, so I can come down here, and I can add this and this will add version control support to this project, notice how everything turned red, that's because it's not yet committed, it's not staged in get, so it hasn't been added basically.
So I've got to go through that, and then it will turn to either white or green or blue depending on how I've edited it.
|
|
|
show
|
3:16 |
Let's look at the steps that we had to take to create and run our web application.
Remember, the first thing we had to do was make sure that we actually had cookiecutter itself installed because pyramid is now switched to a cookiecutter template model for all of their projects, so we need to run cookiecutter against their template, that means we've got to have cookiecutter.
So we did a pip 3 the install--user cookiecutter you may have to set the path depending on how is system setup, it may just run, I've seen it sort of work both ways; so we install cookiecutter, once we have cookiecutter working you can pick a template, for the purpose here I think the Pyramid cookicutter starter is totally fine.
There is one that you can pick that has sqlalchemy set up but you'll probably want a lot of control over that anyway.
So we'll do that in the later section, and it will set up sqlalchemy, the data access layer, but here we get pretty simple one page basic website, so cookiecutter space the url to the github repository, not the .
git part, although I believe that would also work but actually just the url to the github repo page.
Cookiecutter asks you a couple of questions before it actually creates the website so here we gave it the name auto service api and auto_service_api for the lower case name and then we chose Chameleon, and it ran correctly and gave us a few steps on hey here's what you might do next.
So you see the next thing it says it's to go into that directory and create a virtual environment, we do almost that we do create the virtual environment, we give it a slightly different command.
So then we go into where the web app was created to its primary directory, we create a virtual environment and we use the .
env rather than straight env, that makes it both hidden but also PyCharm automatically detects and uses that, which is very handy, and we give it the --copies at least on MacOS, because the resolution of the symlinks doesn't quite work right in PyCharm, and possibly other environments as well, this is the one reverend to issues and copies fixes that, so we've now created our virtual environment, but it's still not active, if we do pip or Python is running the system one, notice of the prompt is unchanged, so the next thing to do is to activate the virtual environment, so we say source or .
env /bin/activate like I said, on Windows it's scripts and activate that, source not required and our prompt should change.
Then if you ask things like which or where Python, it will pull up the actual path to the one that's in that virtual directory, so you know it's working.
After that, we need to install Pyramid, all the dependencies of our web app which depending on how the scaffold runs is often beyond just Pyramid itself, things like pyramid debug toolbar and waitress and so on; so to accomplish that as well as register the package itself, remember, pyramid projects are Python packages we run Python against the setup.py and we give it a developed argument and that's going to tell it to install all the dependencies, and install it locally.
After this, we're ready to run, so we just use the p.serve command which comes along as part of that setup process when we install pyramid it comes with p.serve, and t hen we can p.serve development.ini that starts up our web app and we're off to the races.
We have a wonderful new website that we're ready to start adding a web services to.
|
|
|
show
|
2:37 |
So you saw a little bit of the project structure, but let's focus on the individual details, so you can see where to go to configure or write code to affect a certain part of the app.
So I used the tree command, which you can brew install onto MacOS, to give me a hierarchical view here.
So at the top, we have our project root I'm in the main directory that was created, the one that has the setup.py and things like that; over here, you'll see that there are some package management files, there's some read only details that get pulled in as well as the setup.py which is the most important thing that installs the dependencies, that installs the website as a package itself, and so on.
Next, we have our web application root, this is almost always the exact same name as your root directory, your package root but is a subdirectory of that, so here we have auto service api, there is really the root of our service and in here we have the __init__ which represents the entry point to this package, and that is the entry point into your web application.
So this is where the start up and configuration code part of it goes, we've got our static client side cached files here, we have our dynamic view folder, so our templates we're going to pass the models to the Chameleon, Jinja 2 or whatever type of templates and they're going to turn that into pure HTML and those are in the templates folder here, we have a my template in a layout, the layout is like the overall look and feel for the site and my template just brings in what's different about that page.
So you should really look at how those fit together if you are adding more pages along the same line.
We have the code that is going to run our tests, there is some basically starter example code on how to create a test version of your app, started up but not actually run the web server and then make requests, fake requests, and things like that to it.
So if you want to write tests, you definitely want to look there.
And you'll be spending a lot of time in the dynamic view folder, so here's where you write the functions that are your mapping routes to that actually do the work; now it doesn't have to live in this views folder, like I strongly encourage you not to put every single part of your website to the single file, that would be very wrong; we'll see one of the first things we do is organize this into a different structure, but by default this is the structure they use and that's where your views live.
Finally, we have our configuration files here, so we've got our development.ini and our production.ini the idea is you run the development one in development and the production one in production, but it's really just the command line arguments you set up to run.
So now you have a better understanding of all the working parts of your website, it's time to start writing some actual service code.
|
|
|
show
|
6:48 |
Let's do a little bit of code reorganization, so that it's a little easier to understand where we should be putting various pieces, and we'll also do a little bit of design work to get started, we don't want that basic red page, we want something about APIs.
So notice I've copied what we just created, so here is sort of a snapshot of this service starting here, so this is when it was just created and now we're going to keep working on this one which I'll probably snapshot later as well.
So here we have it loaded up, now first thing I want to reorganize is our views actually let's go ahead and do the HTML first; so remember if we run this what we get- down here we have this red pyramid starter thing and I'd rather have a page that says welcome to our API here's the operations that you can call, issue a get request here, things like that so instead of you watch me write that, let me just drop in a little bit of HTML and css okay notice that I've made the color of the page black, I've made the background white, it should not be red anymore, but will it?
So recall over in our start up we're setting this max cash thing here to say cash for an hour, so if I go and I pull this up again notice the words here have changed, and it has these endpoints but the look and feel of it- the look and feel is still the same, like it's not white, so we've got to do a hard refresh which is a little unfortunate, but that's the way it is, okay?
Let me make one more change, so over here, maybe just for this moment while we're doing our dev I'm going to set that to one second for the cash age so it doesn't last that long; There's interesting tricks we can do around cash busting and basically generating a different url any time that that changes, but that doesn't really apply to services very much, so let's just fix it for this homepage and then we'll be good.
Let me also drop in a different layout here, I think we can get a slightly better layout if we do this we come over here, we refresh it, oops it looks like the first auto service notice there is this static url here, we want to just, we could fix it but the stuff kind of makes me crazy anyway, we'll just do like that, all right, so we have our service back and running, we have auto service, a basic restful auto service, well it's not super restful yet, in fact it doesn't do anything but we do have our little operations here, get autos, individual car, we have our github project, which actually goes back just to my account.
Alright, so our goal now that we have some kind of documentation, is going to be to have / api /autos do a thing, right, we want to have this little APi section, so the next organization thing that we want to do here, is to go over and actually reorganize this a little bit, like I said, do not put all of your views, this is our little homepage view, let's rename that to index, so we don't want this to be completely full of every possible request, and I am not sure that this has any value so let's take this off, just doub le check, it's asking can it sh ut it down or rerun it, that's exactly what we want, alright, so yeah, it's not using this so we can clean this up a little bit, now notice right here, this request in PyCharm gets this warning like hey this is not used, and if you have an unused parameter, that could be a bug, but in this case, we just have to have it here for the system to work, and we are not going to use it, so anytime you have that you can out it underscore, and that means I know I am not using this variable, I am naming this thing to ignore it, so that warning goes away.
Alright, so this is all well and good, maybe if we call that home I can call this home.
If the route name is home.
But, let's reorganize this a little bit, let's make a views folder, and let's make an API folder.
So we can keep our regular views and our views that are associated with API calls separate.
So I am going to put this in here, and we will move it there, and let's move it there and then I will rename it, and I don't want vies.view so let's rename this to home page, or something like that, okay, now, we may be able to run his, we may not.
Let's find out.
So if we run it, there is a section here that does this scan, and it is just looking for a thing with a view config, called home.
The uncertainty is will it actually look down inside that view, let's find out.
Let's rerun it, my first thought is no but let's see, yes, no.
We're missing our template, oh it looks like maybe it did find it, but we need to go set our template, okay, so here what we can do is we can actually give it the package name, the package name is svc1_first_auto_service: like this, and it says look at the top of the package in the template folder.
Okay, back to good, so now it's found it, that is all great, let's wrap this around a little, so we've organized our stuff into the views here, and I believe that fact that PyCharm added as subpackage instead of the regular view, a regular directory is why it was found.
The next thing we want to do is we want to have an auto service here, so let's just call this auto API, how's that; so over here, we're going to have very similar code, so let's go ahead and just copy this for a moment, we'll tweak it, so we're going to need the Pyramid view, we need the view config, basically the route name is not what we're looking for, and the renderer is definitely not what we're looking for.
We want that to just be straight up json.
And for this, let' say we're going to have the name of it just autos.
We can go one step further and we can say the request method=get alright, so that means even if somebody does a post, to autos, whatever that url is, we'll specify it in a moment, somebody does a post to it, it's going to come up 404, but if they do a get to it, it will run t his function.
Now, home is probably not the best, let's just call this all_autos or something like that, okay, so we're getting close to having our service here, but, we're not really calling, there is no way to get to this, like what does autos even mean, and it may be an error to try to run it, it didn't look in here, let's add a __init__ to make that a subpackage, try it again, now there is the crash we were hoping for, so, it says, no route named autos found in view registration.
We came over here, and we tried to say we're going to use this thing called autos to map to this.
and Pyramid said yeah, but there is now a thing called autos, so this is broken, there is no way to put the pieces together, kaboom, crash.
Alright, so what we're going to do next, is we're actually going to map that url over here.
|
|
|
show
|
4:20 |
We've seen that we tried to run the website and it crashes because we were referencing a route name called autos and there is none.
So what we need to do, is we need to go to our __init__ for the primary package, the main website and we need to go here and we need to change our routing.
Now, this is not that big of a deal, and that is pretty simple but as this grows, we probably want to reorganize this, so let's come over here and make a function, a method and we're going to call this register routes.
Okay, so now we've got register routes over here and to pull that menu up I highlighted it and hit control t, so control t pulls that up.
So we got our static piece, which I have cranked way down, you wouldn't do this in production, but for this particular example we did, so the next one we're going to do is I want to come down here and have our API, I think I just called it autos, let's have a look because of that name, let's call this API just to be a super clear, so remember those names have to match, so what we're going to do is we're going to map api /autos to this.
Now, one thing that's kind of unfortunate here is autos like this won't map whereas this will, so you can set up a second route to the same one or you can just make sure that you don't put this slash on the end you can decide how strict you want to be about it.
So we're going to map this over there, and let's go in and add one more thing while we're here maybe call it auto api, and we're going to go to / api /autos and we'll have a car id.
How do I know I can call it car id like right here?
Well because you make this up, like you put a name here this little cut out, it gets dropped into a dictionary with a value when somebody goes to that url, and you pull that out so you just have to be consistent here I call it car id, in my view function I'll call a car id, it works great.
Okay, we don't have something to map to this yet but I put it in place, so we're ready; now, let's go over here and we should have this mapped and let's just put a little bit of test data here so test was autos okay so if I run this again, hooray, it doesn't crash, that's already pretty excellent, right; let's pull this up again, if we do get api /autos now this looks kind of funky, check this out let me close all these extra stuff here, we'll come back to this in a moment.
Firefox just recently added like super nice support for json display so we can save or copy this, and this is like an interpreted version if we hit raw data this is what was actually returned, we could pretty print it or copy it and we could also go and see the headers so application.json is the type, servers waitress, it won't be in production but it is for this development bit here.
You saw that we've got the function to be called, but does that look like car auto data to you- no, it's not car auto data, let's go and do another thing real quick, let's add one more function here one more view function that it is the individual piece so the other part of our API, we'll just do another test, I'll put is auto singular, and down here, this is going to be auto API, and now be very careful here, this name and this name are the same the way Python works is that gets stuffed into the module name space, when this runs down here, it's going to eject that function so basically only the other auto api url works now so make sure this is something like single auto.
Now we're going to need to get the request for this one, so I am going to unhide that piece, let's go ahead and run this so if we go back, refresh it so we can still get to this one, was autos and this one, well we give it 123, normally this doesn't work, because we're going to go to the database there might not be a 123, but right now, you can see those two pieces are wired up so our little endpoints are wired up.
What do we need now, well we need autos, we need data, we need cars, there's no data to return, so the next thing we're going to do is we're going to add some temporary fake data until we get to the point where we implement enter actual database integration with sqlalchemy.
|
|
|
show
|
9:54 |
So we have the web exchange part of our API created this doesn't look like a whole bunch of auto data, we need to add some data and that brings us to Kaggle.
Kaggle is a data science competition place, they have many different data sets so here you can see they've got this used car database with over 370 thousand used cars scraped from Ebay Kleinanzeigen so basically Ebay Germany, and it's got a bunch of German cars, including all the Opels that we want to start selling through our little dealership in our small town.
So what I've done is I've taken this, downloaded it, and basically filtered it down just to the Opels and then we're going to use that data in our API.
Now, there's no point in you watching me write this, so I'm just going to paste a little bit of code here, and this is somewhat big bit of code but let's close these all off, now notice, we've got our csv here brand, name, price, year, whether it has damage and when it was last seen for sale.
And notice they're all Opels because I filtered it down, it doesn't have as many, there's still like tens of thousands of Opels but not as many, and then we have this fake in memory database, and basically it's using a dictionary with the id of the car which it generates at runtime when it first load s it up, as well as loading in this the file so here you can see it calls load data, and the load data just pulls those in creates a little temporary primary key thing that we can exchange in our API and stores that car, it's important to note that we're using the dict reader so the things here, this row that it represents an individual car, that is a dictionary, that's super important because that means we can serialize it just by straight returning it from our APIs, if it weren't the case, then we would run into issues; We'll switch to better a real database with real database entities and we'll see to address that, but for now these things get loaded up and returned as dictionaries so that helps us a lot.
So that's really all I want to talk about this, we're going to come back into a proper database part later, but we're just going to look at the two functions get all cars and get a car by id car ids are strings, which is handy because that means that no conversion is necessary that's the way they come off our API or of the url.
Okay, so let's go over here and do this first part here, let's go over here and say we want to get some cars and it's going to be a repository, we can import that, thank you PyCharm and we can call all cars and notice that there is a limit, so we want to set the limit to 25 cars or something to that effect, so what we're going to get back is a list of car dictionaries that are loaded up there and we can just return those cars, ok.
So in a real service, where you have ten thousand cars or twenty thousand cars however many are in that csv file, you don't want to return all of them we'd want to implement some sort of paging, so maybe we'll come back and add paging, you could tweak the url to basically pass like a skip level and a page size level or you could hard code the pages size and just do a page number to implement some kind of paging but we probably don't want to return like everything so we're limiting it to just the first 25 responses.
So let's try the all autos bit, okay it still runs, that's encouraging so we can come over here and if I click on all autos it shouldn't be that little test data, instead what do we get- oh that looks real see Opel, Opel, Opel, and this is a little parser display thing that Firefox just added, let's go look at the raw data, that's not so pretty, it's pretty printed all right so check this out, we've got all of our Opels down here I can bet if you count them there's 25 of them you can see the brand, you can see the name, this is basically what was typed into Ebay, what year, how much they're asking in euros and importantly the id right here.
So this is great, the next thing that we want to implement is going to autos/ that id and now it just say it is an auto, well it told us that function was called but it doesn't tell us anything that's happening, so this was pretty straightforward, right like all we had to do is go to the database and say give me the cars and return it, and tell it hey, you serialize that, you return that as json.
Now, we got lucky that that is json sterilizable, otherwise it would have crashed, we would have to do some work but it's not insurmountable, we can totally fix that.
This one takes a little bit more work, okay so this one is nice, but I'm supposed to get that car id and I can't just do car id that would be nice, Pyramid guys don't do that so the way we're going to get the car ids we have to use the request so we'll go to request, and then there's a couple of things that we can get here; here we can basically do a type annotation, and now you can see all the stuff that shows up here, this works because it's Python 3, right.
So I can come over here and I can say well it's got a get, notice this is a dictionary, it's got a post which is another dictionary that has the post data, get actually is not the url but this is the query string but it also has one called match dict, which is not obvious that that's what you want but match dict is where those little route cutout pieces of data go, so this is a dictionary, so we can call get on it, and the thing we want is car id, because that's what we called it in our route ok.
So, then we can come down and we can go to our repository and we can say car=repository and it happens to have a get car by id, that's not surprising, is it; so we'll pass the car id, now let's just return the car when we make changes to the Python code, we have to re-execute the app so we restarted there, now this is not going to do what we hoped, those ids were randomly generated in our little temporary database, it will be permanent in sqlalchemy, but right now they're temporary, so restarting the app means that probably comes up as nothing, so if we look at the raw data, it's no, sad face.
This is not the desired behavior, we definitely don't want to use null as a return value, I'm going to store that there for a second, let's go over and refresh this, so that we can get an id, let's go and get this one here and it's going to give us our Opel, but we're going to get Opel Signum 1.3 cdti, all right so let's go over here, put that in, now this because this exists in our database should come back and boom, there it is, so we took out the raw data pretty printed here is our nice little Opel, and 4700 euros, maybe it's in good shape I don't know, I'm not sure if it's a good deal, but there is, it has no damage, that's a good sign.
Ok, so now we kind of have our API working but as we saw right here, this is not very API friendly, we're using the http verbs, we're not using the status codes to communicate that something went wrong, so let's go back and fix this up.
So we'll come over here and we'll say if not car, so the way the database works and the way sqlalchemy or a mongo engine or lots of things would work if I asked for a thing that's not there, it's going to return none, I could have my repository layer raise an exception but it doesn't, it just returns none and flows that through.
So we're going to come down here and say if there's no car returned then we want to somehow send a 404, now we could set the headers and all sorts of funkiness but the thing we really want here is a response, we want to import that from pyramid response and notice it takes a couple of things, we can set the body, not interesting we can set the status, let's set the status to 404, okay; now by the way, if I go back over here and I look at the headers the response headers are, yeah, I don't see where it says whether it's 200 or not but you can bet, it is a 200, okay, even though it's empty.
So we're going to say this time 404, and what else we want to set, is we want to set the json body, so here we can pass a dictionary that has the error, let's say there's an error and this can be the message, so we'll create a message, it's going to be the car with id such and such was not found and in case they don't pass one, let's put a little back tick like that, so the car id and creating the response is not enough, we have to return it.
So if we don't find a car in the database, we're going to embrace the http response 404, and we can still send a body by sending some kind of model that represents the error so be sure to rerun, refresh, boom- error, the car with id such and such was not found.
Now if we go over here and look at this, we still don't see the 404, I'll show you in a little bit where we can find that, we'll use something other than the browser to pull that up.
But if we go over to the raw data, you can see now we've got this error.
I might be able to do it if I go to the network, here we go, perfect, status 404, method equals get not found and even though it's a 404 not found, we're still returning a nice message so for example if we're calling this from Javascript, not only do we tell them 404, we have a message that theoretically we could show to the user in the front end, something like that.
So there you have it, we have our two methods written, we don't have our pretty print json we just have the standard minified json renderer but that's ok, we've got our thing that does all the autos and the basic sort of hard coded limit and given an id, we can go back here and we can call this function by passing / api /auto/id and get an individual car, or not, and get a proper http friendly response or 404 with the error message right there.
|
|
|
show
|
3:00 |
Let's review the main concepts behind implementing our API.
We created the Pyramid web app, we went into the __init__ and we configured the routing to define two new routes one called api_all_cars, that maps to this function, this is going to be just /api/autos and the idea here is you do a get request against this and we want to return a json representation of some number of cars.
So, it all begins with going to the database and actually getting the cars out in this case you can see we're limiting it to 25, we don't let that be controlled by the API, but obviously, in a real one, we would; we go to the database, we get 25 cars not 20 thousand cars or whatever in there and we're going to return those and serialize them as json.
And the reason they're going to be sterilized as json is we set the renderer to be json, we're also matching the get verb to this function because later on, we're going to want to be able to let you submit cars to /api/autos via post, we want to make sure that this one only processes the reading of the data, not the writing.
Alright, so once we got that, we can return it to be formatted as json and the reason this works, we have the json renderer and the individual elements in that list are already dictionaries which are easily serializable to json.
Well that's for all the cars, what if we want an individual car?
Well, we're going to come over here and we're going to define another API method, this time called api car for the route, again json a can get so it's only going to respond to get it's only going to return json, but this time, it's a little more complex, we need to take some input from the user as part of the url so we're going to use the match dict, which are where all the little cutouts that we put into the routes, where the keys are the cutout names and the values get dropped in there, so we can go to this request.match dict and we can pull out the string that represents that id.
Then we go to a repository, and we say give us the car by looking it up by id if this was say an integer id, we'd have to do some kind of conversion from strings to int, because the cars are stored by string ids, they could just pass it right along, so that looks nicely.
We got the car back, but we might not have gotten the car back, right it depends on whether there's a car actually matching that id so we do a test to say if there's no car, we want to return an hp friendly response set up an error, return our response object to say 404, there is nothing here with his id, but instead of just saying 404 not found we're going to actually say the problem is there's no car with this id that you passed us and we're going to pass that in as a dictionary to json body which again gets converted to json.
This response object basically skips the renderer set on the overall function, but if all is well, we're going to return just the car object again that's a dictionary, so this is going to work just fine and serialize the individual car as a response and if you don't do anything, the response code is of course 200.
|
|
|
|
29:20 |
|
|
show
|
5:11 |
So we've created a service and we've played with it a little bit with Firefox, but let's look at different ways in which we might interact with it.
Now, this might seem pretty simple, I'll just fire up a request and make a request to it but it turns out some of the more popular clients are not so simple to use, and we'll get to those.
So here we are back in our project, and I just notice one thing around organization that we want to take care of since it doesn't fit anywhere, this test thing, there should really be a test folder like we should have many test files and whatnot; so, let's go and make a folder called tests, and then let's just move that in there.
So now we have a nice clean app all broken into various pieces, we've got our data, we've got our API, we've got our initialization we've got our standard views for basically HTML functionality and so on.
Now, if we're going to call this, obviously it has to be running so let's fire it up again and grab the url, and notice it runs on a particular port, that port is controlled right here in the configuration, so if you want to change the port, notice it's listing in both on ipv4 and ipv6 local host but 6543 if you want to make it listing somewhere else, you can easily change that.
All right, so right now, we're listing in here and we're going to start with one of the simpler but really powerful tools for exploring this, basically we're going to look at three things: we're going to look at using a gui Apytesting exploration tool, we're going to use Python and this could be Python from a client application or this could be Python from one web app, consuming another service somewhere else, it could be your own service, it could be other services, you could be having your service, consume other services to do its functionality, things like that; so we're going to use requests and Python there and finally we're going to look at javascript and interacting with it via javascript.
So let's start with postman, so postman you can get this at getpostman.com I think it's .com, definitely getpostman, you can use this to explore and record and test APIs, notice I've got some say for various APIs I'm working with over here.
You downloaded it, it runs cross-platform, it's an electron js app, it's really nice.
So we come over here and we can enter this url and we can do a get, and notice, it just loads up whatever we got, and it's going to load up this, right, so what we really want to do remember is we want to go to /api/autos, let's do a send there, we get all this data back, and it even gives you the timing here, which is pretty cool, the very first time it has to parse those twenty thousand files out of that csv so it's little slow, 700 miliseconds kind of slow, but if we hit it again, 16 milliseconds, 15 milliseconds and so on.
Now, this is not a great view, so we can see the raw view, we can see the pretty view it knows that it's json, so it gives us lots of things.
We can look it over at the header, what's the server what's the format what's the content length, we can even create some tests but that's sort of outside the scope here.
So there's something funky going on with that json, isn't there; let's have a quick look, I mean notice like, point appears like oh yeah there's definitely there's a weird like a thing here and then this, let's see why that's happening actually.
So we have all of our cars here, I think it might be because of this, I think we don't want items, we want values, that's definitely it.
Ok, so let's do it again.
That looks more appropriate, it was sending the key value, ok so we've got this and that was already pretty nice to actually explore this way, and obviously we could do this in Firefox, that was no problem but I could come over here and I could set up the parameterization, I could set up authorization, I could go over here and what do get if we do a post here- right, and if we're going to do a post, well we need to set the body, right things like that.
So if we do a post, notice we're getting a 404 not found, remember, we're only listening to the get request things like that, so let's go back to get.
So it lets us explore all of these things around this, and then we can save it so I could go over here hit save, create a little collection, notice on the left there is a different little collections, and those actually sync back to my account at postman.
So, we will probably be coming back to this, to play with it when we get to post, and other interesting things, okay, but for now, here is the body we could go and change, we can go and actually enter the body is like raw stuff here and we could just type in the json that we want to post up to them, ok so it lets us control all the things we need around post and headers, and so on.
If you're building serious APIs, you definitely want to take the time to download postmen, there's a couple of other apps that are like it, but I found postman to be pretty solid and enjoyed working with it, and basically there's a free version so it's worth everything you pay for it.
|
|
|
show
|
7:37 |
Now let's focus on some programmatic clients.
Notice, this is the source code repository and I have created a svc_1clients and I've created a Javascript section and a Python section, so we are going to go look at those now in PyCharm.
So I have already opened up that subfolder there, by just dropping it onto PyCharm, and we've got some pre-built HTML, jQuery type stuff going on over here, and we'll get to that last.
So let's add a Python, I'll call this svc_client here, and so this is going to make a request up to our autos, so maybe it'll show you the various ones that will like list them out and ask you which one would you like to work with, and then you can plot the id and they will go get that who knows, something to this effect.
Now, we could use the built in urllib stuff, but when you have something like requests available, why would you do that, so let's say import requests, now notice there is a couple of problems PyCharm says you don't have this installed, so we can just hit enter and it will install it, or we could have opened up here and just say oops, open up the terminal, it's a pip install requests, either one would have worked, you can see PyCharm already beat us to the punch.
Now, when you go to run this code, realize that you're also going to have to manually install requests, there's not like a requirements.txt for this part, there is the setup.py for the main app, but not here.
So let's go ahead and just set this as the thing that runs for now, when I say go, all right, it's doing nothing but it is doing its thing.
So let's go over here and we can make a request, so let's just add a main method really quick, and the standard naming, the standard invocation convention there so first of all, let's list out what ones are available, so we'll say this cars= list cars, something like that so we'll define that and down here in order to get started we're going to need a url and again, this is going to be living at local host, like that, so we'll just grab the url there, again adjust this for however your system is running, and you may be familiar with the requests, if you are not, actually I have a whole class on all sorts of service clients, http clients and various other service clients but we'll just go for the super quick version here just so you can see it in action, now this code could be running in a script on my computer, as it is or it could be running as part of our web application, consuming a service somewhere else right, there is no real distinction between whether this is service side or client side, for the most part.
Okay, so we're going to go here, and we want to do a get against this so we'll say a response= request.get url that's pretty easy right and then we can print a response.status code so let's just run this, 200, oh that's good, it didn't crash, it didn't 404, things like that.
Now the next thing we want to do, we obviously want to check that status code so let's just say if there's a couple of things we can do here we can say raise if there's some kind of status that's an error or we could come over here and we could say if the status is not equal to 200 print error contacting server, and put that out, and we can just bail..
So we won't add too much error handling to this but you know, you get the idea right, we want to add the error handling.
So here will have all of our cars, they are going to be response.
now we have text here, we could parse that out, but we can also call this json transformation function and that will give us all of the cars, so let's just print out cars to see what we get back here and notice we have a list of these cars, and the cars have an id and they have a name, so let's just return the name:id, maybe id:name is better ; so here, we'll return a list of car.get_id, card.get_name and what his car well for car in cars, okay, so this is going to return them back, and we can come over here and do something like show cars, right, we can create a little function here and who knows, we'll just a little quick print, cars from cars for sale Opels, right for c in cars print, and remember this is coming back as a tuple, I guess we could return the whole car, but whatever, we'll just print it like this.
Now if we run this, you can see now we're getting all the cars back and then I guess to a kind of round this out we could go and actually get an individual car we could say car id= what car do you want to see, I'll say car id this and we'll do that as an input, so input here and no error checking to make sure that they didn't enter whatever, we'll just say so car details for a car id and that is the last function that we have to write.
So here we have our list cars, and let's copy this real quick because what we're going to do, I can say get car, singular and car id.
So what we want to do is we want to use a slightly different url here remember, we passed the car id that's how we set up our route, I get this and we get the single cars the json, and we can just return car, and in the case we type in something wrong obviously this will come back as a 404 or something like that so we'll say no, no there was some kind of problem you couldn't get it.
This has got a reasonably good chance of being robust but there's probably more checking that we want to apply here.
Okay, so we're going to show the car once we ask for it, last thing, all right so we come over here, make sure we don't get the colon it says what car do you want to see, this one here is going to be an Opel sinatra 2.2 so that's what we're hoping to get back, and did we actually print it out, no, no, no, we did not whoops.
Alright, so we can all get car but we're not actually doing it, okay so say car= get_car ( car_id ) and then we just print out the car, we could probably do better formatting, but let's just go with that, alright, let's get the same one, boom, look at that, how cool is this, well, let's do one more thing, let's print out a little bit better, we can pretty print it at least, right, let's try this one more time, okay so there's all the cars, we're going to try to get this one by id so give it the id and boom, there it is, this is the Opel sinatra 2.2 so it's pretty straightforward for us to work with this, let's do a little clean up here, I'd love to have the main thing first and then the little like detail methods below it, so this is like you can read that and just understand what's happening.
Okay so here what have we done, let's quickly review we import requests, we come down here doing a get against the url, checking the status code, using the json to convert that from text into Python dictionaries here we're just doing little transformation to get just id and name out and then given an id, we go and use the url we constructed do a get, json again but this time the body is just a single car so we're good to go, and that's pretty much it, of course there's a little extra error handling and checking, but it's a pretty nice little Python client.
|
|
|
show
|
6:17 |
For our final client, let's create a client side Javascript client, so this is very, very common, you're going to create a website, it's going to serve up some HTML, you might put something like angular or Aurelia, or one of those types of front end frameworks into your web app, and it does a lot of the work talking to services that you're creating just like we're learning in this course, so let's real quickly see how that goes, we're just going to use something super basic like jquery but you could use one of the more interesting front end frameworks, for sure.
Now, this is going to start out to seem totally straightforward and easy— until it's not.
So let's look at our little HTML, now this is crazy simple HTML, so that's great, we've got an input and you can input the car id that you're interested in, and click the search button.
Then, some javascript is going to catch that click event and it's going to come down here and fill out the details of name, price, year and whatnot.
So we are going to use jquery and we're including our little site js where we're writing our code.
It seems straightforward, it's not totally done so if we come over here let's look, when the document is ready we're grabbing the form, we're hooking the submit and we're telling it don't actually submit, we got this handled in javascript and we're handling it by calling load car details, that's cool so there's a couple of things we need to do here in order to get this start, but let's just run it so we can see what we got so far; so you can right click on this in PyCharm and say run if you're familiar with web storm, basically PyCharm has all the web store and features built as part of it.
All right, so there it goes, now it's off to run, it doesn't do anything yet when I click this because there is at least three two dos we still have to fill out right, okay so this seems pretty straightforward, and it's good idea to always show the javascript console while you're doing these types of things, it's a little upset that I didn't set the encoding to whatever; so we're going to input some kind of id here and see what happens, so let's go write the code first first thing we have to do is get the car id, so they're going to type that into this thing here, this input box that has the name car id I'm going to kind of cheat and say well there's only one input box so we're going to grab the value out of that so also car id is going to be, we'll just do a little jQuery thing, we'll say give me the input and I would like it a val for input boxes and things like that you get the val, for raw like red only elements you get the text.
So let's just alert car id, so let's run this, go over here and say abc, click, not yet, we haven't hooked click yet, have we, okay or we're doing something wrong, let's look at the console real quick.
Actually, so make sure to click here, let's just say click, all right so we're capturing the click, oh great, great there we go, abc, I think it's the caching, caching, caching, all right so we hit this, all right it's clicked, we're learning abc very, very good so we don't need our little clicked anymore, it looks like we're getting the abc that we typed in correctly, okay, so let's get rid of the to do and just say get the car id, the next thing we need to do is actually build the url, right, so var url, remember if we have the car car id the url is going to be well what we had in Python, so let's just snatch it here like that, so it looks like this, except there is no format there's less rules in Javascript so we're just going to go down here and say plus car id, all right.
Again, not too much error handling, so we built the url it's all good, now, the last thing we need to do is we're going to use jQuery to go and talk to the server, so we'll say $get there's get post delete whatever, I want to give it the url, and then we want to give it 2 call back functions, so we're going to say done, and when you're done we want to have a function here that has the results.
And if you fail, we want to have a function here that has the error, like so.
Alright, so let's just say alert success, alert fail.
Now, this might look like it's going to work, but I do not think it's going to work so let's go over here, refresh again, show the console, and let's try.
So everything's clear, if we hit click, all right abc great, we can get rid of that thing in a moment, now it failed, this url looks right and actually I guess it could have failed because of 404 but that's not why it failed, that's why I didn't pay attention to what the id was, look down here cross origin request blocked, the same origin policy disallowed reading of the remote resource, so here you have to decide, how is your service going to be used in this case, we have one site granted they're both on local host but different ports, they are different applications; this one is our service here, that returns this data, at this address.
We have this effectively entirely different web app running over here running some javascript, if this was running as a page on the same server, this would have worked fine, but because our service is running and wants to be contacted from outside of the web app, right, hopefully you want to build services that many people consume,right and if that's the case, you need to allow web applications javascript apps outside of your domain to talk to it; you want to be very careful here, if you've got like private data and sessions and all sorts of stuff, also on that same web app you don't want to do it, you probably want to separate your service or something like that, but if it's just a pure raw service and it's meant to be consumed from anywhere, you need to find a way to get over this, right.
So what we're going to do next, is we're going to make a minor change to pyramid to basically enable what's called cores, cross origin site scripting, cross origin request security, I think.
Yeah, so you can see down here, reason course header, okay.
So we need to enable cores in particular we need to enable access control allow origin on our service so that then the browsers will let our javascript client or someone else's javascript client talk to you our service.
|
|
|
show
|
10:15 |
Here we are back in our actual server side service code.
And our goal is to add cors support, that is cross-origin scripting support so we could come in here, and actually on every single one of these requests set the various cors headers that are required, that is not a good idea.
We're not going to do that, it's totally not maintainable, it's not centralized, things like that.
There are also third party packages, other packages that add core support to Pyramid but you'll see that really we just have to add a couple of headers in the right location and globally or actually however we want to choose to support it, we would support and enable cors, so I'm just going to show you the raw way to do it, if you want to grab some other package and that does it as well, that's fine, but I don't really think that it's necessary.
So we're going to come down here and we're going to write another function here called allow cors, we're going to need the config in order to do this so we create this will function, and just like all the mains I prefer to have this stuff below main, there we go.
So what we're going to do is we're going to write a function that's going to leverage what are called events in Pyramid, and these are basically filters that run before and after various requests.
So what we're going to do is we're going to hook every single request that comes into our site and we're going to write a little function that for any request that comes in we're going to add the proper headers that allows cors, and then let the rest of the app run and it wouldn't even know that we've done this trick to add cors to it.
So in order for this to work, we're going to need to do a couple of things- we're going to start by coming over here, we're going to write a function that goes to the config and says add a subscriber and it's going to subscribe to the new request event, so we can notice this is from pyramid.events.NewRequest we'll import that at the top, well what is this function?
This is a function that is going to get called every time a new request comes in, so you are going to have to follow me a little bit down the rabbit hole here but it's pretty easy once you see it; so here's what that function looks like, we want to come in and say add cors headers into this response right, so we're going to process that request and as part of the response we're going to add these headers, we can do that at the very end and it's got to come with the event, the reason we care about the event is this has things like the request and response objects on it, so this function here will run at the beginning of the request, and so what we're going to do is use this function to say call one more function that we don't have yet, call one more function after our various API calls, or view calls if I have already processed it, and at the end add in those headers.
So we have one more function here that we're going to write, and I'm just going to copy this over, because you don't want to mess up the headers.
So here, we are going to say cors headers given a request and a response, it doesn't really matter here but the request is we're going to go to the response and we're going to update the headers, allow control origin star allow control methods and so on, so these are the various things and you can of course tune them to the security that you are after, but how does this function get called, well, remember, the function on line 18 runs at the beginning and the goal is to get line 19 to run at the end so when I come here I want to say go to the event request hey request, when you are done and you're generating the response run the function that adds the headers.
So that probably looks a little g narly, a little intense, but here's the thing, you write this code and you never ever think about it again, so let's just add a little print here I'll say print adding headers, if we run this again, if we just click on it, you can see we got three adding headers one of them from our straight request, and one for our css and one for javascript or something like that, you know calling back into this service, maybe even images.
So it looks like that's working, let's do one more thing, let's go back here and do another request; now notice, our headers went from 4 to 9, and there you can see all of the headers that allow cors are now added back in here.
So be very careful, these controls are in here for a reason, you don't want some javascript on some bad form to reach back to your site and grab some private data using a logged in cookie of your user that maybe also visited that site, things like that, but if your goal is to write just a pure service endpoint that anybody can call, then you need to enable cors.
It looks like those are coming back, now let's go and clear this out, let's go and try our other client, this one here; so we can come back to this, and run this again, and now we had one that had it open right, so if I click this, let's erase that do this again, abc oh look at that- 404 not found, well why is it not found- it's not found because there's no car with id abc, this is super cool, so now let's go and, remember, this list is out of date, because I restarted the server, so let's refresh, and let's try to get this Opel Signum here with id that ends in f f.
So when I come over here and paste it, you've got to be very careful I got a quote on the end, so if we hit go, it shows the id, I am going to get rid of that little alert, that part is working- success, see that, success, right, you have an error here but that's just leftover.
All right, so things are looking great, this is fine, let's say if e.error, remember we added that in get alert, error contacting service, like so; otherwise, we'll just say a generic fail, who knows what happened here, like site is down, network is off, something like that.
So that's the fail, but over here that's done one, this is the success so the results remember, we're getting an individual car so the results are going to actually be the car, so let's say populate data, and we'll pass the car which is the results here, I put that in the wrong spot, let's put it where it belongs, all right there so when it's done, we're going to populate the car with the results and this is when it runs successfully, if it fails, well then we get something over here.
Ok so the final thing to do is to just populate the results, and let's go ahead and write that, let's go over here, grab that and drop that in.
So no,we don't want to switch languages to whatever that is, so we're going to come over here and we want to use jquery again, and we're going to go grab all these, so we want to basically do like this at the beginning of every one of these and then drop off the end, put something there to set the value, down here at this part, we want to say .text is going to be car.name, okay, in this case it's name, in this case it's price.
Remember, our service gave javascript json and json are basically javascript objects so we can access the values with dot notation there.
Okay, so, notice we are going to the car detail section and we're fading it out in case it was already shown and then we're fading it in, by default it's not shown initially until you load a car into it, so doing a get when things are done successfully, we're going to call this otherwise there's some error handling, let's go and try this so here we refresh that, click and I got to get rid of this, but look at that, there it is, success, we've done it!
All right, that's pretty cool, so notice there's no errors in the console that's really pretty sleek, and the last thing is there's some alert somewhere that I still have that I want to get rid of.
So let's refresh this, get it again, notice we've got this one, let's go get a different one, this one's going to be the Astra, find little vehicle okay, so let's go check out the Astra, this should go to the server, download it as it starts, it's going to fade out this part and then when the fade out is done, it's going to populate it and fade it in, so it should fade away and come in with the Opel Astra, and not the Signum.
Ta- da, and there it is, okay so what have we learned here?
We've learned, well jquery still works and makes life pretty easy, right, so we come over here and we order the document, and we say give me the form, somebody tries to submit it, instead we're going to use ajax to do that and tell it don't actually submit the form, we can go over here and we do a little bit of grabbing the car id value out and use that to build the url that is basically our api our schema that we want to talk to here, and we use $.get because we're trying to do a get we could just as easily do a post and post the data, but we're not there yet; if it's done successfully, we populate the results, otherwise there's error handling, remember we return like a 404, and we put this error, let's try something else, like let's change 1 to a 2 and see what we get- fail, okay.
So if we try to get one where the idea is wrong, we just get a 404, but of course, if we get the one that is right, it fades in and everything is good.
So everything was pretty straightforward in terms of javascript here, the one thing that maybe was unexpected, depending on how much you've done this, is we actually had to go over to pyramid and we had to add this cors operation or cors configuration on the server side, we had to go to every request and say for this request, we would like to add the cors headers, now of course, this thing here was the request you could look at the request that's coming in and say well, only if its /api/something do you want to actually add the cors headers, all the other requests we don't want javascript to be able to get to that we just wanted to be able to get to /api/whatever right, so you could be more discriminating, more careful than just throwing it on every single request, but we don't really have a use case for excluding it so I'm going to put it everywhere, and you guys can adapt this to your situation.
|
|
|
|
49:13 |
|
|
show
|
5:19 |
So far, we've built a service, an http service that exchanges json when you do an http get to it.
So this is some ways down the road, but not very far towards our fully restful service.
During this chapter, we're going to fill out almost all the remaining pieces to create what I would consider a restful http service; so let's start by examining what we've accomplished.
Well, we've been able to do a get request to / api /autos and that gives us a list of available cars and their details back, if we want details about an individual car, we can do a get against api /autos/ car_id and this will give us the details back about that.
We have done some http friendly things, for example car ids that we request when the car itself does not exist return a 404 instead of just maybe an empty json resolved, or like some kind of message in the body that responds saying car not there but actually it's a 200, now we're using the web and we're saying 404 this thing does not exist.
However, we're only returning json responses and just the default minefield version of those.
So we're not doing a lot of work around the format although if you had to pick one and stick with it json is really, really solid.
What's left to do?
Largely what we will do in this chapter.
So if I'm going to group this into one big idea what we have left to do is make this a read/write service, what we've created so far is really read only, we can read all the car details or individual car details, that's it; what we're going to do is we're going to make this a read only service where we can post new cars to it, we can update cars, we can remove cars by issuing a delete and so on.
So the first thing we're going to do is allow us to create new cars that maybe we want to list our car for sale, so we're going to do a post, http post to / api /autos.
Once we've created one of these, maybe we want to update it like maybe we've changed the price, maybe it ’ s gotten cheaper because it's not selling or we crashed it and has some problem now, we got to update the listing, things like that.
So we will be doing a http put to / api /autos/individual car id with the new details about the car.
And, once we've sold it or we decided we don't want to sell it, we can take it down by doing a delete against api /auto/car_ id Then we also want to support a variety of response types now it's cool that we can give json back to our clients like json is really the most popular and most useful but what if they want csv instead of json for that list of cars or what if they want an image for an individual car, not the json describing the car, things like that.
So we're going to support a variety of different response types through things called renderers and custom renderers we're going to create and we are also going to see that the service ultimately will support what's called content negotiation so I could do an http get again to say api /autos and indicate in the header using the except type hey I want json and the service will automatically determine that and send back json, I could change that and say no, no take that back, I want csv, and now the service will return csv formatted text, as the response.
And ideally, this happens without us changing a code at all just configuring the system differently at the serialization level, so this is all great, however this content negotiation part we're going to do this in the subsequent chapter.
All right, so let's look at the road map, I've given you these different pieces that make up what I'm considering a restful service and we listed them from simple order to more complex or more advanced, let's see how we're doing.
Well are we using http methods explicitly— yes, sort of, we're definitely using the codes, right we're saying a 404 for missing, 200 for success, things like that, there's more to do there, but certainly we're doing this pretty well.
For verbs, we're really only easy get and for content types we've been ignoring that as well, so we're going to look at leveraging http verbs and content types more carefully in our api here.
Are we using endpoints as basically url or uri resources, definitely, api /autos api /auto/ an individual one, I think we got that one down solid.
This is cacheable— yep definitely cacheable, it's certainly a layered system and it doesn't know more about what's beyond it, so that's fine and it's going to stay that way.
I'ts stateless, mostly; now, right now we have a fake database and this fake database like regenerates itself each time we restart the service so it's really not actually stateless, but that's just because it's a fake database.
Pretty soon we're going to implement a real database, and then it will be truly stateless, and the only thing it'll depend on is the database, and we can have as many web front ends or service front ends as we want talking to the same database and we won't have to worry about session and state and those kinds of things.
Are we doing content negotiation— not yet, but we're going to, like I said, that's going to be in the next chapter.
Finally, there's one we're not going to do in this course, so we're not going to use this HATEOAS stuff which is very much how the web itself works, the hyper media as the engine of application state we're punting, it doesn't really apply to this service that we're creating here, so we're having a little bit more strict predefined url structure, and I think that's how most services work and I'm totally fine with that here.
|
|
|
show
|
9:28 |
Before we add the modification features to our api let me just talk really quickly about a little bit of reorganization that I've done for you.
So, the previous service that we created together I put that into its own folder, and I have given it various safe points and now I've created a new service called restful auto service, so you'll be able to distinguish the two first service, restful auto service.
Also, I made a snapshot of exactly what we're starting with and called it like starter or something like that in that folder so if you want to follow along, you can grab that and work from there, it should be exactly what I've started from myself.
Okay, so let' s just run it and remind ourselves where we are; okay, so we have our auto service, basic restful auto service and we we're working with two url structures here so one we can get all of the autos, all the cars here, like so and we are going to do a get against that or, if we have an individual car, we could get its details by saying api /auto/ whatever its id there is.
Now, if we're going to create a new car do we need a new url, do we want to use the same url?
The way this typically works is, if you know the location of the thing that you're trying to modify, we'll use this; so like if we're going to do a put and update it, we'd probably use that url, if we're going to do a delete, we'll definitely use that url but with post, usually the server is the thing that ultimately decides where it is, this is often the primary key or something like that that gets generated on the server side, so we don't know where it would live, so we can't do like a post to its not yet existing location.
So what we're going to do, is we are going to do a post against that url and we're going to submit the details of the car, like its price and whatnot, and then, the server will return back the finally created one with its location and things like that.
Ok, so let's go over here, as you can see if we're starting from this one probably the all cars is a good thing to model off of so let's go over here to the api, and here's the all cars and let's put this modification stuff down below here for a minute, okay so this is going to be all autos, but we're not going to use get that was the one that displayed them, we're going to use post and we're going to keep the same renderer for here and instead of doing this, we're going to do a couple of different things.
The first thing that we need to do is get the submitted body, like what car was delivered to us, so let's go over here and we'll just say for now return nothing, so how do we do that?
Well, here notice there was this request and I gave the underscore to say I don't care about it, but you know what, I do care about it now, so let's put it back and let's even use the type hints, type annotation stuff so that we could get a little help if you're not familiar with this.
Alright, so we'll come over here and we'll say request.
now, there's lots of places data gets submitted to us there is the matchdict, there's the get, the post, dictionaries, but what's coming in here is a body, and it doesn't come in as a form body it comes in as json, and the way we get that is there's a json body property; basically what it does is it looks to json text or it looks at the text in the body and then it uses the json library to pars it into a Python dictionary.
So, this is going to give us our data, now, that's all well and good, but it just blissfully passes this along to the json serialization, deserialization bit and if there's something like there is no body or there is something wrong with it, this is going to crash, so we're going to need to be a little bit careful there.
So let's go ahead and put this into a try except block here, and in case there is an error, we need to, we could just let it crash right, or return something, but we want to be very restful here, so we're going to return a response and the status is going to be 400, number 400 stands for bad request something broke and it's your fault, not the server's fault that it broke.
And for the body, we could put some kind of message like could not parse your response as json, something like that, and we're going to of course return this, all right.
Now, PyCharm has given us a little bit of a warning let me just tell it to leave us alone for now.
Okay great, so we've either told them that what they have given us didn't work or we've now parsed it into a proper object.
The next thing to do, we should probably add some validation here but for the time being, let's just put the validation on hold and let's just try to convert this and save this as a car.
So we have our repository and it has an add, it does not yet have an add car, we're going to write an add car and we are going to have the data, and just add that, okay.
Now, we're going to do something a little bit funny here, so let's rename this to make it a little more obvious— car data, now, this thing where we're adding this value here what we're going to do is we're actually going to take whatever is created by the repository the data access layer, and use that and then we want to return this back as well.
Now, there's another possibility here that something goes wrong maybe we can't talk to the database or something like that, so we're going to do something like this.
Now, whether this should be 400, because some validation at the data layer failed or it should be 500, because we can't talk to the server, we probably should be a little more careful, but for now let's just say could not save car, all right, great, so one of the reasons we might not be to save the car is there's no add car method, let's add that.
All right, so for now, remember we are just using this fake data things we're going to stash it in here, so we'll say cls.car_data of well, we're going to need some kind of key up here notice, we're doing this little trick as we read it from the file to generate one of these fake ids and so it's a key = row the row is what we're after, car data is what we're calling it right now.
And then, let's return that, okay so whether this is the same object we're passing back or we're actually generating a new object which might be the case in the database we're going to go and save this, the most important thing is this now is going to have an id we're going to need that in a little bit.
Okay, so let's go and test it.
If I click here, you'll find it's not the easiest thing so what do I click, even if I put a thing I guess I could put a little form that submits something to test it but that seems a little hooky, so when we get into things that are not get it's a little bit easier to use something outside the browser, I know you can get plug in for the browser, but they're not as nice so let's go over here and look at postman.
So first, we have our get request and let's just run that and make sure it's working, oh it is not— this is very interesting, let's go back and see why this is not working.
All right, so it's not the problem here, the problem is down here; remember the way Python works is when you execute that bit of code when you literally parse this file, it executes this which defines an object like name this, all autos and down here, we are executing this bit of code and it's defining the thing called all autos as well and replacing the value of the previous one, but this time it only listening here, so we need to change the name of this to something like this, create auto or something like that, so it no longer is listening to get it is only listening to post, all right.
So now we got this back, and let's just take the body of one of these because that's going to tell us what we need and we can come over here and duplicate this, alright, so we're not going to do a get, we're going to do a post against that url and we're going to need to supply a body, alright.
We don't want this form data we want to just do raw, do this, make sure it has no id, it doesn't really matter but it's not going to, and this is going to be the opel concept or whatever and 29 thousand euros and I guess this is fine, we'll start out with no damage.
So what we are going to do, so we are going to post this here, it's going to look at the request method as well as the url, together it's going to say okay this function create auto is the one we should run well, convert this to a Python dictionary by calling json body, come back to validation, we're going to assume that we're entering it, right, that's a big assumption and then we're going to go to the repository and we're going to store this into our little temporary in memory database give it a primary key and return it back and because of the renderer is json it's going to convert it back to json.
All right, try this one more time.
So here we got a post, here is our body we'll see the response down here, go.
And look at that, we got 200 ok that's pretty awesome we can look at the brand, the opel concept, it's pretty much the same except if you scroll down, notice it now also has an id so we could go back and just verify this now is a thing that exists in our database, so let's duplicate this again; I want to do /autos/get/ this id here, and look there's our opel concept and the price is 29 thousand, and the year, and all the stuff that we just set is there.
All right, so we've now added this ability to create new things, new automobiles for sale at our dealership.
So, that's great, now obviously we're skipping some validation and we're going to come back and do that but let's work on the other ones as well, throughout this section we'll work on the updating this thing we just created and if we want to take it off we could even delete it.
|
|
|
show
|
3:24 |
Let's review the main ideas behind creating a new automobile via post.
So, we decided that the server was going to be the one that assigns the primary key as is almost always the correct choice, the server is going to decide how and where to create this car, and so that means we're going to do an http post against / api /autos not including the id, and then what's going to happen is we're going to submit the json body to that url, the server is going to take it in, generate it and save it to the database pull out any default values that might have been generated in the database as well as the primary key and then return this new updated version back to us, so let's see how that works.
As always, we start out by adding the view config and we set the rout name to the one that matches the url listed above and then it's very important that we set the request method to post we don't want to handle a get request or put or delete in the same function this one only handles what it means to do a post which is to create an auto and you see, we've even named the function that.
Sometimes you'll see people looking at the request inside the function and saying well if it's get, do this, if it's post, do that and that's almost never the right choice because often these are very dramatically different behaviors of like returning what a car is versus creating and validating the car, things like that, so we've created our own method and set up the disambiguation by adding the request method and setting that to post.
Notice there is no renderer set here, because it's not needed in every case we're doing any sort of return value we're using the response object which skips the renderer anyway.
So, the first thing we have to do is actually get the car data that they are posting to us, and they're doing that in json form that's what we've asked of our api clients so we need to somehow get that out and notice we can go to the request and say request.json body and this will basically decode the encoded bytes of the body and then send those off to the json module to parse them into a Python dictionary; and what comes back, we're calling car is just a Python dictionary of the values they submitted.
Now this might fail, it could feel for a couple of reasons, it could be something— maybe the body is empty, maybe there's a malformed text that's not parsable as json, whatever reason, there could be an exception thrown so we want to catch that here, not let it crash our server, we want to say instead hey there's a problem status code 400 bad request the problem is on your side please check what you posted because we can't parse that, we don't understand that.
Once we've got the car created, then we're going to go to the repository and say add car and if everything works, what we're going to do is we want to return not just the car with code 200, that would be okay it would be better to say use the most precise status code we can which is 201 created in order to return an object and change the status code we can't just return car, that would be returning the car and then doing 200; to get the 201, we have to return the response, set the status code to 201 and then set the json body of that response to car.
So that will return the new and updated car to the client if everything works right, if there's some kind of exception maybe this is a server side thing, if we had a real database we could maybe look on constraints versus can't connect to the server and disambiguate on error type, but for now, we're just going to say 500 sorry something went wrong.
And that's all we have to do to save and create a new car on server.
|
|
|
show
|
8:39 |
Now that we can create cars, we better be able to update them, what if we make a mistake, what if something about the car changes, right, we no longer want to sell it, we crashed it, we want to change the price; so let's make another method here, we just copied the post one because this is actually closest to what we're doing but we're not going to do a post, we're going to do a put and remember make sure you change the name or you'll mysteriously get 404.
So, we want to do some similar stuff for example we want to get the car data out but in this case, we need to figure out what car is it they're actually trying to update.
Let's just pull back our home screen here, pull this us up again, there it is, we're going to do a put against that url so you're going to need to say I want to update this car with this data so we're going to want to actually go and get the car id out here very much like we do in the get details and recall that the way we did that was something like this.
We do the request and here we looked in the matchdict, that's where the route data goes, I'll do a get for car id, that is basically a plain dictionary and we can get stuff out of dictionaries in a safe way like that, and then we could try to get the car, so we'll go to the car and say repository.car by id, car id, and if this is none it's just going to return none so we can do a quick check here and say you know what if there's no car that you're trying to update in our database we're going to tell you— what should we tell you— 404, no car with this id, in fact we already have that code written right here so let's just rob that and put it here, ok so if we try to get the car and there is no car you can't update the car because it's not found so 404, okay.
The next thing we need to do is get the data that they're going to update it with, which is just like this, right, we're going to do the same thing here again validation probably a thing that we want to do are the fields there, are they of the right type, right is it something that could be an integer for the price or do they pass us a list where there should have been a number crazy things like that, or does the field even exist, alright but we'll come back to the validation.
So we'll assume this works, we'll come in, and here we can do an update car which is very similar to the add car except for that it just copies over the values, it doesn't actually generate new ids, and we technically could return this, but we're not going to, let's suppose that we're not going to do anything like that, instead we want to be very careful with the status codes here, let's go back to httpstatuses.com.
So if we come down here we have created, oh we were not that careful before were we, we probably should do this as well so what we want to do is say that's great, you updated it but there's no content, so we're going to return 204 and this is the right one update ok, so instead of returning the updated car here we're going to return a response or the status is 204 and I can go ahead and set the body, but I think sometimes the browsers don't download it when they see a 204 they are just like great 204 in the header we're good but let's say a car updated successfully, there we go.
And while we're at it, let's go and fix, I completely overlooked this before, let's go and fix this as well, so we'll go up here and we'll say this case 201 and what do we put for the body like here we have the serializer, right, for json let's go ahead and put the body here, we're going to say not body but json body is the car data okay, we'll test both of these, because we're going to need to run update anyway.
Okay, so this is looking good, we've got our status codes in place 201 created we'll give him back the car down here and we are saying we've accepted your response there's no more content, but everything was okay and we'll give him that but like I said, you probably won't actually see that if there's some kind of error we'll change that word to update although I think it still applies, let's save, let's go back to postman here, so we come over, do a response, and we get all these various ones here we're going to create our opel concept again, and there it is, that's the key that was generated, and notice importantly 201 created right there, the request has been fulfilled, and resulted in a new resource being created guess what— details are in the body.
Cool, so now that this has been updated, notice there's no damage let's do a get over here, for this new thing that we just created, okay, so no damage, the year and price are this, 29 thousand.
Let's say we're going to update the price because it has to go down since we like scraped the car or something; so here we've got our post, let's do a put to do an update and we're going to update against the exact url here, all right and I don't recall if it looks in here, I think it's a good idea to pass it here as well just to be clear and we should probably check that match or make sure that if it's not in here, that we basically only copy over the values that are passed something like that but just to keep things simple, let's make sure the id is in the body.
So what we're going to do is we are going to make some changes let's say small scratch driver's door, otherwise fine, something like this and even though it is the concept car, we're going to take it down to 28.8 right, instead of 29 thousand.
So what we want to do is go review the flow here, is we're going to do an update I am going to call this function, I am going to match the route, oh it almost didn't work we need auto api, that would be a very bad thing, and here we go, auto api we want to make sure it's going against the one that has the car id not the other one, we want do a put and then we're going to do the response in json although nowhere are we returning that so let's say there's really nothing to go there, there's no place in which we are using a renderer, if you return a response, instead of some kind of object renderers are not involved, you're short circuiting that.
So we are going to call get card id, use that to find the car if there's actually no car to be updated then off that goes and then it does assume the car id is in there so that's kind of important, all right let's rerun this really quick because I had the wrong route there which means we're going to want to run this one again.
And we just need the new url, once we switch to a real database these ids won't be sort of random every time we restart, the ones we create they will stick.
Finally, put this here, like I said, we should probably write the code to make sure that we just copy that id across, but for now, let's just run it like this, let's go over here and do a get just to make sure there's no values, look no damage, price is 29 thousand, we are going to make an update, put to the location, go, 204, no content, everything works, the server successfully processed the request.
Great, now if we go back and say all right, cool, so show me the details about this car, now you can see the price is going down 28800 euros and there's a small scratch on the driver's door otherwise it's fine isn't that cool?
Let's suppose we loaned it to our teenage daughter and now something else has happened to it and there's a dent in the bumper right we can send that update again, go back over here get the details again and now we've updated it once more price has changed again, there is a small scratch and so on.
So you can see how this works, we've gone over here and we're doing a put to the individual resource on the server and the body contains all the details, like we could set it up so that we only pass the things that are changed and we look in there and like do an update that would be nice to do, like if we don't pass the brand that means the brand just stays the way it is, that would be pretty easy to write, but that's not how I wrote it; so you want to be real clear what it means, and of course we use the 204 response code, let's just check if I do like an extra five on the end now it's 404 and you see at the bottom the car with the id such and such was not found but if we look for one that is, here we go, perfect, and as well as if we make some malformed stuff here, could not parse your json 400 bad request, very nice, okay let's put our json back, it looks like everything is good.
|
|
|
show
|
1:47 |
The most complicated method that we're going to work with in our api is the ability to update a car.
So getting cars, pretty straightforward, creating cars somewhat involved, but updating means we have to both get the car back and make the changes to push it in there, so we have to be pretty careful here.
Now, the first thing that we're going to do is we're going to use the request and we're going to go to the matchdict and say give me the id that's in the url, because we're doing a put of a json body to api /auto/ car_id so we need to know what car you are talking about; grab that there, use the repository to make a quick check does this car actually exist, if it doesn't, return 404, like hey there is no car with that id.
The next thing we have to do is parse the body, and as you saw in that last example when I made the json malformed, that can crash, how do we know a crash, because we got the response 400 could not parse your json, your body is json and that's in the except clause there, so you want to make sure that that part goes into a try except unless you're willing to take 500 when they send you a bad request, which is okay, but it would be better to communicate like the problem is on your end, not ours, so please, don't bother us.
Then, we have to actually do the work, we're going to go update the car, and we want to return something, so in this case, there is nothing really new about the car, other than what they have already told us, there is no reason to send additional data back to them and say and here is the updated version, because guess what, they gave us all the updates.
So, what we decided to do is return a 204 status code which means successfully updated but no content.
So, that worked out really well, in the case of the post, we decided to use 201 created which is the best response for the post operation.
|
|
|
show
|
2:58 |
The final method that we're going to write to make our service read/write is the ability to delete a car.
Now this is going to be based on the auto api url not the autos, the singular one that takes the car id so let's duplicate this function, this is the put one when we just wrote and right away say change the name, so you don't forget that and we'll put a delete here, so we're only going to process this function or map this function to a delete request, to that url, not a get or post or whatever, ok so this is good, and we're still going to need to get the car and we want to verify the cars there, but we don't need to send a body do we?
We don't care what else you're saying, if you say delete the car and you give me an id, that car is gone, the only option is either the car is there or it's not, or maybe you don't have permission, but we don't have authentication they're not passing like api token or something so there there's no check really but either way, getting the body here doesn't make a lot of sense and so then the last thing we want to do is just come over here and say delete car, and I think when we delete the car status everything was okay but there's no content is probably the way to go, so this is going to be car id, and let's just say car deleted, I don't really think that go es through, but I will go and put it there anyway.
Alright, so let's go ahead and add this final function here and this is going to be the car id and we'll just want to work with this— this actually, so because this is just an inmemory dictionary for now we're going to convert this to database operations later, but for now, we'll just use the del operation and the key is going to be car id.
So we just want to delete that, and that should do it, super simple, okay, so we come in, we get the car id, we do a little validation just to say yeah the thing you're going to delete actually exists and then we could call delete, we could change this so it raises an exception if it's not there and then catch it here like there's some variations we could apply, but I think this will do it.
So, I'll run this, everything is good, let's go back to postman, and go through these steps a little bit here, so we'll get all the cars they're all loaded up, let's go and create this one, now it has a new id because that's always regenerated the way we generated them here let's go see the details about it, edits were gone which we created so it's back like this, now let's change this, let's actually change this one let's make a duplicate here and say we're going to do a delete to this url, there's no body, there's no headers, there's just a delete request to this, go— alright, what do we get back, status 204, ok that sounds really good in seven milliseconds nice and quick; let's see if we can see the details about this one now, refresh, the car with that id was no longer found, why— because we just deleted it from the database.
Perfect, so it looks like we got our delete operation going very well, like you probably thought it would be complicated, right, not too bad, not too bad at all.
|
|
|
show
|
1:25 |
So how do we go about deleting that car?
What we decided the best way to do it was to a delete request to the actual url that represented the details of that car, api /auto/ car_id, so we're just going to issue a delete request straight to that and submit nothing else, there is no body, so we created this delete auto function, we mapped the route name to the one that contains the car id, the singular auto api, and we have the request method set to delete.
Notice there is no renderer, there is no place where we are like returning anything, either we return an error message or we return just hey everything worked.
So we don't need the renderer, right.
So just like before, we are going to get the car_id out of the matchdict, and then we're going to make sure the car exists, so we'll go to this little step here where we get the car back from the database, we could do something more efficient but remember, it's in memory, this is as good as anything, and we're going to go and just check that it exists, if for some reason it doesn't, we're going to give them a message with a 404 and then we get to the really what we are trying to solve here, so we're going to call delete car by id, this is going to go and delete it out of the database, and then we'll return 204 that worked, everything was great, but there is no content to return, so go for it and be happy.
And if for some reason something goes wrong, again, like I said, you've got to decide maybe this should be 500, 400 we'd have to be a little more careful about the errors we catch, but because this is just an in memory database, we can't be very specific.
So, there you have it, it's actually quite easy to delete things with our service.
|
|
|
show
|
3:33 |
Now let's talk about how we can vary the response type and create different types of renderers, the json one has been really great, but what if we want something like csv or xml or even images or binary data— all of these things are possible in exactly the same way that we're able to render json.
But let's look at the overall architecture and role of these renderers.
Imagine here that we have our car details view method so this is one that returns all the details about a single car given its id and so a request is going to come in an d it says get/api/auto/ whatever the id of the car they're looking for is.
We got to do a little bit of work to juggle things in the web framework like go to the matchdict and pull out the car id and things like that, but pretty quickly we're going to go to our database and return an object, and very likely especially for using an orm or we have a larger application where we've put a proper architecture in place, this is going to be a native Python object or maybe even a full object graph in the sense of like it could be a car, the car could have a list of previous owners, it could have a list of like repair history, it could be quite a complex thing that comes back from the database.
Now we know that the client that requested this wants that back and for now let's say they want it back in json form, we can't just return this object right, you know, maybe pyramid can convert it to a string, but it would just say you know type name at memory address like that's completely useless we need something that converts this potentially complex object graph into proper json type.
We'd also like that thing to maybe set the response type to application/json as well so that's where the renderer comes in, so the renderer is the thing that we're going to hand this object it does its magic and then responds in the actual whatever it's supposed to render as, this one renders as json, so it's going to convert this object graph to json, set the content type, our client gets the response and is happy and everything's working great.
So that's how renderers work.
Now let's look at the few options that we do have as built in renderers.
They fall on basically two categories, the first I would call template oriented renderers, now these are really meant for the web side of things the web site not the web service side of things, so these would include Chameleon, Jinja 2, Mako, right, I'm writing some view method it's going to process a request maybe go to the database, get some stuff and then it wants to return an HTML page to a browser, right so we can set up the renderer to process a Chameleon template or a particular Jinja 2 template and give that model off to the Ji nja 2 engine and then it will do its magic and outcomes HTML.
These are great, they are super important but they're not very relevant for our services in the actual api methods.
Next, we have json, we've played with json exclusively so far and json works great, that one is built in and we are happy to have it we'll see how to configure it in just a little bit we haven't taken it as far as we can, but json is great.
There's also json p which is json with padding it's commonly used to bypass cross domain policies in web browsers but remember, we already set up cors the permissions on our site so we don't really care or need to use that in our particular application, but it's available if you need it in yours.
And that's it, these are the built in ones, right, basically HTML templates and json.
If you want something else like let's say csv, xml, images well, are we out of luck, no of course not, we'll see really quickly how to build our own for each of those types and more.
|
|
|
show
|
1:36 |
Now you might feel like we've done everything there is to do with this json renderer, the built in one, but, there is a really important question we have to address before we move on.
So, using it is straightforward as we've seen, we just set the renderer to json, and don't have to do anything, pyramid already knows about that, that's cool, and then we just return some object that is serializable as an object for the json renderer, so basically if you can use the json module in Python, to serialize this, then it will work fine here, okay.
Now, what happens if that cars object that we were returning from that method and letting the renderer serialize what if it contains some kind of custom type, right, like an entity you might get back from the database or something like that, well, maybe everything will be okay, however, it's not okay; here is what happens if you try to return a type that is some kind of built in, so you can see right here in the error, we're returning a car instance, car object at ox106 etc, it's some memory address and it says this thing is not json serializable.
However, it is very common to have these types of objects, right, if we're using sqlalchemy to get something from the database, mongo engine to get something from mongo db all sorts of reasons we might have our own custom objects even things as simple as datetimes, like datetimes ar not json serializable, what do you there, right, you better hope you don't have a thing that has a date, that's really common.
So what we're going to talk about now is how do we configure the json, the built in json renderer to make this error go away and serialize everything perfectly.
|
|
|
show
|
8:46 |
Let's change our service around just a little bit so that it returns or basically uses rich types in the data layer.
So if we come over here, and we look at this load car bit, you can see right here we're using a dict reader on our csv file here, now this is just a temporary thing, until we get to a real database which as I said, we'll get to later.
So, right now, everything that we're storing is basically straight up dictionaries and Python dictionaries, json super, super similar so those are really easy to serialize to and from.
But, keep in your mind, we want to have a better architecture than just passing dictionaries, and we're probably using an orm which itself works in these rich types, not just in dictionaries, again.
So let me change this data access layer around a little bit so that it works in terms of a car class that I'm going to create, and then we'll try to run the same code and see that we'll run into a problem because we won't be able to serialize it by default in the json serializer.
All right, after a little bit of juggling, I got this all working great, so here you can see I have created a car class, now imagine like I said, this is coming from an orm, like sqlalchemy or mango engine and really the thing that's important is just that it's its own custom type and what we learned here, we can apply to all different situations including orms, so we have the ability to create one of these and it has basically exactly the same properties that we had in our dictionary, right so there's not really a major change there, and it also has the ability to be given a dictionary convert itself and because I use the names to be identical to what's in the dictionary we can use this ** dict you know convert dict to keyword arguments thing here and that will create it nice and easy.
I also taught it how to go in reverse so given one of these instances how do I create a dictionary out of it and this little bit of functionality is going to be super important,.
Next, let's look over here, I made some very very minor changes let's just look at the put update auto method this is basically the same for all of them that work this way.
Recall we were getting the dictionary back, as using the json body here well, now that's not enough because our data layer wants cars not dictionaries, so we just use this car from dictionary thing to convert the dictionary into cars, right, there's still a validation that we're kicking further down the line we'll come back to that later, but for now, this basically is the only change we have to mess with.
Now, how are we doing— let's have a look, so I come over here, great so here's the same code and if we do the same get, remember this gives us a list of json objects it's all the cars, except for now it's not, right this is exactly the error we saw in the slide, this thing is not json sterilizable, So now what do we do?
Well, now we need to start looking behind the scenes at how these renderers actually work, and we'll see they're very configurable and we can plug in new ones, we can create our own, and it's a really nice system but by default, this wouldn't work.
Now just to be fair, if I imported json, so here I go something like this import json and I say json.dumps (car) that crashes, right, it's basically that the json module doesn't know what to do and so pyramid just delegates at the json module what's it supposed to do right.
And we can't call like I said stir on this because it'll just give you basically the type name and the memory address, also unhelpful; but what we do have that's helpful is this method if we could somehow say, hey json serializer, if you run into a car here's how you turn it into a thing that you could then know how to serialize because dictionaries obviously serialize well, so let's look at that.
Down here, we've got our allow_cors, our register_routes, this is basically the setup for the main entry point for our web apps, so let's add one more, let's call them configure renderers and we'll pass the configure, so let's put this down at the bottom we'll do a little def, so we've got our config thing here and our config has an add renderer here, and what we can do is we can give it a name like json and put some value here so we'll call this json renderer and there is already one of these created right we can say json, and our view config says I want the renderer to be this and there's one of these created, but it's just the default one so let's go and configure this a little bit differently; we can come here and there's a thing called json which is part of the pyramid renderers, notice that so we're going to create one of these, now there's all sorts of stuff that we can set here but one of them is the level of indentation, so right now everything we get is minified, maybe I want to have a more readable output so we can set it to indent like that, but the thing that we really need to do is go to this thing and say add adapter, notice how it takes the type and then an adapter and the adapter is a callable function really so the type, car and what can I do to give it a callable that will take a car and then convert it into a dictionary or something like that, let's go like this, let's go given a lambda that passes a car right so a function that takes a car as an input what's the return value car.to_dict like that, ok now this looks like we're pretty much set up and ready to go PyCharm thinks that is misspelled, I don't think so.
Okay, so we're going to, instead of using the built in default json implementation we're going to create a new one, we're going to tell it to do like pretty print basically and we're going to add this adapter so if you ever run into a car, and no matter where it is in your object graph here's how you convert it to a thing you can deal with, this should fix our problem, all right try again, moment of truth, refresh button— oh, two positional parameters, that's right there's not just the car, there's some other contextual information passed here so I don't care about it, I'm going to put the underscore but of course, we do have to have the position all place if we're to go this isn't javascript right, it's a proper language.
Okay, here we go, now look at that— so we come over here look at the raw data, look, now the raw data is like this, like if I do a view source, if I can get it to do a view source, the view source is now pretty printed just to show you what we got before let me turn that off for a minute and refresh this page— now you can see it's the minified version, maybe you want to ship the minified version, but it's probably really not saving you that much, and this is a little bit nicer for people to look at and try to understand so you've got to balance developer friendliness readability versus peer performance of dropping a few back slash ends.
It's up to you, but if you want it pretty printed, we can configure the json renderer to do that, and more importantly, we can add these adapters like hey, if you want to serialize a car, like we give it a list of cars, and for each one of the items in the list, it's going to call this function, pass in the car and some extra info, and then for that car instance, we are just going to use our little to dict method.
So we should be in business.
Alright, so things are looking good over here, now let's take one of these individually, and see what happens if we try to get it, right, if we look over here, make some room, if we ask one individually, it's going to call this, which is going to return a car and it's using the json whatever the name json means, right, we've kind of overwritten that in that sense, go here, we'll try that one, again, it comes out looking great, in fact, it's even pretty printed.
If I click pretty print, it indents a little differently, but otherwise, other than that right, these things basically agree on what pretty printing is, if they could agree on tabs, right.
Awesome, so now we've fixed our problem, we've taken this renderer, and we've added an adapter and we've done some more stuff, but this also starts to unlock some more possibilities, right, so down here, what we did is we created some instance of an object and we registered it, in pyramid to say if somebody says json do this, right, use this, and if we go and look at this object, you can actually see some of the things that it's doing it has add adapter, this is a really important part, callabale, it defines an internal implementation of how it renderers at each step along the way.
So, pretty much that, this callabale, this function, and some initialization stuff, that's really all you need to do to add any sort of renderer.
So we're going to use that concept to add a csv renderer, an image renderer, and maybe even more.
|
|
|
show
|
2:18 |
So as we've seen, if the thing we want to return back to the renderer to the json renderer, somehow somewhere inside of its object graph has a thing that the json serializer, the json module can't deal with, all bets are off, thing crash, right, like it just says nope, we cannot help you.
But, it's also not a big problem to fix.
So, if the object knows how to serialize itself, or if you're willing to write a function that will take the object from what it is into a dictionary or something like that, something the json module can deal with, then you're golden, right; so in our case, I put this method on the car because it seems like a great place to keep it as we add field we just got to update this method, which is slightly error prone, but not super hard.
And then, in our __init__ the entry point for the main app when we're starting it up, we're going to call, we are going to write and call this function register renderers.
And here instead of taking the default one, the default json renderer, we can actually create either a new one or replace the one that is configured at startup by default.
So here we're going to create a json renderer using the json type built in the pyramid renderers, notice I am setting indent=4 that basically tells, passes through to the json module which tells it to do pretty printing and indenting 4, I guess if I wanted Firefox to agree exactly on the pretty printing I could put the number 2 there, but the fact that I am setting indent to something means that it's going to do pretty printing, and then we can also add this adapter, say given a car object, you can call this lambda function and it takes two parameters, the first one is the thing we care about the car and then we'll just call the to_dict, or whatever function it is that transforms the car instance into something serializable.
And then we're golden, and then we just have to make sure we register that with pyramid so we say config, add renderer, and we pass the json renderer and we can pick either json which will replace the built in one, or in this case, we're going to say pretty json, so if you want to call this function and have like pretty printed json, you can put that, just make sure if you're really depending on that, you could also add the adapter to the built in json one.
And that's all there is to it, now we can get a lot more mileage out of the built in json renderer.
But, by looking at this, we also see how we can add new types csv renderers, image renderers, xml renderers, and so on, so that is what we are going to look at next.
|
|
|
|
49:16 |
|
|
show
|
3:39 |
Json is the most popular exchange format 00:05 for these types of services that we're building, 00:08 but there are many other types of data that we might care about, 00:10 so maybe we want to send back pictures, images 00:13 in the form of maybe say png or a jpeg; 00:16 what if we want to send back csv data to be parsed like that?
00:20 How about maybe even xml, right, 00:22 xml certainly had its heyday in the early 2000s, 00:25 but it's still a format that makes a lot of sense in some circumstances.
00:28 Think rss feeds for example; but sadly, none of these are built into pyramid 00:32 so we can't say csv for the renderer, or png or xml, 00:38 I mean, certainly in terms of png like what would that even mean, 00:41 how would it convert something to an image 00:44 if it doesn't have intimate knowledge of the data format.
00:47 So while none of these are built in, 00:49 we're going to see that we can add our own, 00:51 so let me walk you through the major steps of how we might add 00:54 csv rendering as an option to our web app, and then we'll go do that.
00:58 So the way all of these renderers work is 01:02 we create a thing that can create renderers when called upon, 01:05 so we're going to create a renderer factory whose job is to create csv renderers 01:10 something that takes an object or a list or something like this 01:13 and converts it into whatever format it's supposed to convert to.
01:16 So the api we're working against is we're going to start out 01:19 we're going to have a call function, right 01:21 so basically we create this renderer factory, 01:24 it creates a thing that when called returns something 01:26 that can execute and do the processing.
01:29 So in this case, you can see we're basically defining an internal function 01:32 that will be provided every time his runs, 01:35 and so we can create an instance of this class, configure it, 01:38 do all sorts of stuff, and then it will pass off this method.
01:41 What is render, well we're going define that here and it takes two parameters, 01:45 it takes most importantly the value, this is the thing that was returned 01:49 from that web method and we're trying to convert it 01:52 into the format that we are aiming for, in this case the csv .
01:55 Then we have the system which provides access to things like the request 01:58 and other stuff about the state of the web application.
02:01 So inside this renderer, we're going to maybe get a hold of the request 02:05 and set the content type to what type we're passing back, 02:09 in this case we're going to convert to csv, 02:11 text/ csv is the most appropriate content type, 02:14 so the browser can make the most of what you've given it, right.
02:17 Then, we're going to do some magical work that takes an arbitrary object 02:22 and converts it into a set of csv, a string that is a csv string.
02:27 We'll talk about how to do that in the demo, but let's not worry about that now 02:30 we're just going to convert value to what we're supposed to return 02:33 which is a just in memory csv string, now we just return that 02:37 and the framework handles everything else.
02:39 So we are going to create a couple of these renderers 02:42 and you'll see that we'll run into a few more nuance details 02:45 about what if we pass types to this renderer function 02:48 that it doesn't really know how to deal with, right, 02:50 we saw that with our json renderer for example.
02:53 So we'll have a couple of solutions for that, 02:55 and we'll spend the next few videos building this out.
02:58 With this framework, we can add almost any type of renderer 03:00 to our web apis that we want.
03:02 Just the existence of this class, of course doesn't do much for us 03:06 even with our configured adjusted json renderer 03:10 we saw that we had to go and actually add that renderer or replace that renderer, 03:14 so if we want to use the csv renderer, we go to somewhere in our dunder init main 03:19 and we go and say I want to go to the config, 03:22 add a renderer and then you say the name csv in a string, 03:25 that's the string that you put on the view config, 03:28 and then you pass an instance of the renderer factory, 03:30 every time it has to serialize something back 03:33 it is going to call that which will generate basically a reference 03:37 to that render function for it.
|
|
|
show
|
11:05 |
All right let's start adding some custom renderers to our web api.
Now, notice over here, I made a copy of this web app and moved it into content negotiation, so we're going to come up with different contents and then we're actually going to add content negotiation and I try to structure all of that together so if you want to follow along you can start from here, there's a starter copy of the site just as we're starting from right now in there.
So, what do we want to do?
The goal of this first part would be to change that to csv, and have csv comma separated values come out of this method, now we don't want to really lose json I'm going to do this here, we can actually if we really wanted to we could come over here and set the accept type I believe, equal to something like /text/ csv and then only apply that renderer in the case that this type matches, but where we're going is actually going to be a better place than having separate methods so we're not going to do that, and also it turns out that the accept type is more complex, we need some logic not just a string match there, okay.
So for now, I'm just going to switch this to csv, and then we'll switch it back to enable both json and csv as well.
Now, if we run this, how well is it going to work?
It turns out probably not so well, let's find out.
So we come over here, all right, are we ready to get all the autos, we are— oops, we're not, no such renderer factory csv, sad face.
Okay, so our job is going to be to create such a renderer scv so let's go over here and because we're going to make many of these and we care about having a well structured web application, let's make a folder, so come over here and I'll call this renderers and we'll come down here, for now we won't worry about base classes or inheritance or type checking sort of like do an abstract type or anything like that we're just going to come down here, I'll call this csv renderer, let's just do it like this for the file name, and in here, we're going to add a class called csv renderer factory.
Now remember, the api that we needed to follow here is we had to have a call and it just took an info here and then the call has to return a function, and we don't want this to be— we do want to be an instance, and then it will return self._render, something like that, now not calling it, but just return the function, and then we're going to define this and this is going to take the value and the system, remember the system gives us access to things like the request and so on.
Okay, so we'll say something like if not value return nothing let's just say we'll return empty string for our csv if it's the case that nothing is going on there.
It says it may be static but let's just say don't bother me for now, I don't think it can remain static for long.
Alright, so what do we need to do?
In the end, our goal is to come up with a csv string equals something and in the end it will return the csv string, right so that's going to be our implementation, but the question is how do we take this value and convert it over?
So, we need to be a little bit careful here, because we may be given a single object, we may be given a list of objects and it turns out doing this in a super general way is not easy but let's write this function here, assuming initially that we're given a list of dictionaries or a single dictionary and we got to turn that to a csv, that's pretty general, and then we'll see that we can do a little bit better.
So we'll say something like this, if is instance value and it's a dictionary, then we're going to say the value is going to come a list of one item containing that, we'll say if value is not, if not is instance value list, we'll raise value error, something like this; can only process lists, something to that effect, and then we should check, maybe inside there's only dictionaries there's a little bit of annoying tests that we have to do here so what we're going to assume is, we're going to assume that this is either just a dictionary or a list of dictionaries and those are the only two types that we can handle.
Like I said, there should be probably more error handling here.
So the first thing that we're going to do is we're going to also assume that all the types are the same right that the list is homogeneous in terms of the types it contains so the first one is representative of all of them.
Alright, great, so how are we going to do this let's come down, we'll get the headers, and this is going to be- let's save first, now we want to call this here like the value of zero how do we know that this is ok— because if it's a list it's going to be false here and will return nothing, if it's not a list, it's going to be a list of one item, right; so either way this should be okay, there should be a first and in here, we're going assume this is a dictionary so we are going to go and say give me all the keys, this is going to be the header, so we'll say this is going to be the comma separated value of header— now I probably should be using the csv module, but I'm just going to just type it out of here just for simplicity sake, I want to introduce more things.
So what we want to do is come over here and join this on all the headers so we'll put commas between all the items and make a single string out of it, great, then what's next— we'll say for let's call them row in value all right so remember value is a list at this point we've adapted it to that pretty much and each row is going to be a dictionary, so let's come up with the line data so we're going to store all the values and we need to of course store them in the same order, alright, so we'll say something like this, for k in header so we're going to get the key out of the header, and then we'll say line data append, row of key right this is one of the parts we're assuming every entry in this list is going to have all the keys right otherwise this is going to crash, and then we'll say something like this the line is going to be again join this on the line data and then let's store up the rows here, let's go like this, so we'll create this list here and then we'll just store each line and then finally we'll like generate the lines with having the header up here, as well as all of these, so maybe the first thing we want to do is response rows csv string, and let's go ahead and just inline that, all right, so we'll go like this and then we're going to come down here and we don't want this anymore, we want to put new lines after each row so again we'll join and then response rows, there we go.
So I think this is going to do it for a basic version here so we're going to come through and just like this, so we're going to come though and we want to create this list of rows the first row is going to be comma separated values of the headers and then we're going to go through each row and make sure we put in the same order, because dictionaries are not ordered by default so we're going to go through the headers and pull out the value for each one of those and then we'll get to join that to a line, add it to our response generate the whole response here.
Now, the final thing is we're not using this yet, so let's go ahead and let's do that down, I guess we'll do it at the top.
So we'll get the request, we can go to system, say get request then to the request, we can say response— the request always has the response objects on it and then we want to set the content type text/ csv, let's try this again; now it's going to turn out to still not work well, first I guess we have to install it, but let's go ahead and just verify it still didn't do, there is as if no such thing as csv.
So our next step will be to install this in our dunder init, just like where we configured our json, we also want to do another one of these add renderers but not for json but this time for csv, okay, let's make that csv renderer, we're just going to have to import this, allocate instance of it, now that should almost work, it's not going to work you're going to see it's still not going to work but we'll get a different error.
Car has no object attribute keys, remember our data layers now returning rich objects that's good, that's how we wanted to work but it's not so happy about this car thing okay so let me just hack something in here for a minute it's kind of not great, we'll come down here and say if this is car, we're not going to leave this here so don't worry, we'll go like this if it's a car, then it's not to dict, yeah down here we'll go through and we'll say if it's a list, go through each item and convert it, not great, but that's what we're going to do, let's do it like this idx, and we want to enumerate this we can put it back.
So, we can ask the same question, if it's a car set back in that same location we want to set item.to dict this better be item, okay so that's not amazing, so if it's a car, we'll turn it to a list of dictionaries, if it's a list and it happens to contain cars, we're going to turn those into their dictionaries and we know how to do that right there, okay let's see if it works now.
Ready, set, go!
We've chosen to download a csv file, amazing what do you want to do, let's save that, come over here and let's change that to .
csv, we're good now let's see it in excel, you can always see in the preview, it looks like it's going to work; oh would you guys like to see what's new in excel?
Look at this, all right so this is totally working here we've got our price, we've got a year, we've got a little bit of damage yes it has damage, ja, ok so we've got all the pieces that we need represented as a csv, we've got our header at the top and everything this looks great, even when there was no item when it was like null basically, we still generated that correctly so this looks really good.
Now, of course if commas are in our values that's not so great like I said we should really use the csv module but the point is just like keep it simple, right.
That's great, but what if we want to go back, what if we wanted json again?
Well we could, let's go and run postmen against that same url.
We could get this to work with both, but we're going to need to do a few things first we're going to need to fix this car thing because obviously hard coding car into the renderer like what's the point of the renderer then so there's a few options on how we can deal with that, and the other is how do we keep json around; those are up next.
|
|
|
show
|
1:51 |
So we've seen that we're getting csv back, if we'd run this again, boom, there you go, we have our csv data, we have the status, here if you look at the headers you can see the content type is set along with the character set, so we're definitely doing the exchange correctly.
Now, what if we wanted our json back, here is some stuff, we'll get to that later, so what if we want to say I am going to accept, notice over here we can say csv, and we should get the same, maybe we would like to be able to say json as well, send json, alright, so we can come over here, let's go back to our api, here, and we can say accept type= text/ csv, let's go over here and maybe make that csv, application/ json, so I put json back, run it again, oh sorry that was supposed to be just accept, okay, so now, let's try this again, first of all, let's go over here and say csv, we should get the same, now if we put json, now we get json, isn't that cool, here, let's do like this, accept csv, so turn this one off, look at that, turn this one on, and we'll go back to json.
So you can see we have both of these renderers in play in the next chapter what we are going to look at is how to make this entirely controlled by the client and have the server have nothing to do with it, it will just render whatever it's supposed to render, like whatever they ask for, but, for now, we'll have these two types, because I want to still have the json option.
|
|
|
show
|
11:15 |
So we have this csv renderer working super well right here.
However, one thing that is really not nice about it is this bit about, if it's a car right, we should not have to embed into the renderer knowledge about these types, they should be separate they should be disjoint.
So, how do we do that?
Well let me comment this out for a second and just show that it's not going to be so much, okay, let's accept the csv type, you can see that that is not great, right there, right no attribute keys car has no attribute keys we saw this before; so how do we address that problem?
Well,one would be you could just say look the csv only takes dictionaries so in our api here, I could say all right, well instead of returning cars what I'm going to return is we'll just do a little list comprehension here and the list comprehension will convert a list of cars to a list of dictionaries, so we'll say car for car in cars, what are we going to do the car we're going to say to dict, right, that would actually work; so if a rerun this, and re-request it, things should be back to good.
So that's one possibility, like you tell the renderer, like the renderer just has these limitations it only takes dictionaries and lists of dictionaries; on the other hand this is also sort of polluting our api how did we solve this with the json renderer— what we did was we added an adapter, so adding an adapter that given a car it knows how to transform it.
Let's go and add that here, like this.
Let's tell it that it has an adapter and you know what, it's probably going to use exactly the same type, okay, so obviously this method doesn't exist, but PyCharm is happy to write it for us, this will be type, let's just call it class like we're going to adapt from this and this will be a method, okay, so let's go and say this object is going to have initializer, and in here it's going to have a dictionary of things that it can use called adapters.
And down here, we'll just say into this adapter by the type of the object that we're going to pass in so car or whatever, we want to use that as the hash and we got to put in the method.
So you give me a car here's the method to call and get the car back out, you're going to give me some other type, you know, a customer or a user here's the thing to call to convert it to something we can deal with which is either straight up dictionaries or a list of dictionaries.
Now, the next thing we need to do is somehow take this general stuff that we're doing or this specific stuff and make this more general, let's select all of this and make this a method so we'll call this adapt type, it's going to take the value and it's going to return back something and maybe this looks like that's kind of part of this adaptation stuff here ok so we want to come in and we want to say well if it's one of these things now how do we generalize this, right, we have this adapter dictionary and somehow we need to convert it so here this question basically says is that a type that you know how to adapt and then this will say okay we'll convert it to a list of that thing adapted all right let's try to create a generalized equivalent, so we'll say if type of value is in our adapters, that means there is a function that we know how to change this right, so than we'll say value equals now we just need to adapt the value so we'll say self.adapters, make this little simpler up here, like we don't want to keep typing that and keep computing that, so we'll give that, and the adapter takes— actually I think that adapter takes two values and it returns back the adapted value.
Okay, so before we had it hard coded to just the car, and now we have this dictionary of adapters which have a bunch of types, not just car potentially and they have functions which we can call their value is a function which we can call that returns the adapted thing, this is because we want to get everything into a list of stuff.
And then, we are going to do this and now we're going to come here and say okay, same thing, but really this value is basically the same so we want to create the type of the first item and we could even maybe say alright, we're just going to assume the type is the first one and not recompute this but we're not worried about performance, yet, let's just get this working.
So then we're going to ask is the type in there and then how did we have this before, we had a value of index and then we ran the adapter function on item, like so.
All right, so if we run this now and we undo this, just return cars again, what are we going to get, not something amazing, car has no item keys; why did this happen— well just maybe you know in our minds we're like oh we could have an adapter for cars right did we add it, oh it looks like I made a super small mistake here look on line 50, what do you think that comes back as— well on line 48 we know it's a list, and a list is not what we're looking for, we just really wanted to have the first value like what does the list contain so let's make this and call this first, just so it's really clear and let's actually move that outside of the list here that will also be better for performance and we could also say adapter equals, put this up here we'll stay if not, I'll say if adapter, I think that's a little nicer.
No reason to compute that over and over and over again, right, just once and then call it on every item in the list; okay, let's try this again.
Send, key error list, where are we getting this list error?
Oh I just copied this, this should be type of first and we don't need that again, like this, ok try one more time, yes, okay they do want to value there but obviously this is not none, alright, look at that how cool, sorry about the little glitch there but this is working beautifully, if we go over here you can see down here we've got our csv coming through and in the api side, remember what we did was we are just now returning a list of cars we kind of fixed it by letting the renderer be dumber at the beginning but then we said no no let's actually let it return arbitrary objects and long as somewhere in the system we tell it like hey if you have a car here's how you get to a dictionary and once you have dictionaries or lists of dictionaries you can totally deal with that, and the way we taught it was we added this adapter, just like we did for json, in fact, it's highly inspired by the way the built in one works that you can add this adapter it looks it up by type and so on.
We'll see that this is really nice because while you might look at this and say you know this is no big deal, like we can just do that, right, I don't need all this complexity of adapting types and whatnot; it turns out that sometimes you really do need it, it's great to just do it on line 15 but any time you return to car down here, down here, all of these will have to do like this translation and then what if you want to change how that works or something, it becomes you know, sort of something that works its way through all the parts of your api and it's better to just have this one place, right here we say if you need to take a car to a dictionary teach a renderer to do it, it goes there, just like it was really nice to do this here, and then we could return arbitrary objects involving cars or lists of cars and so on and the json renderer would deal with it, same thing here.
So let's just review our adapt type function here.
We're given some type and we may need to change it into another type right, we saw we're given an individual car we need to convert that into a list of cars; if we're giving a list and it's not a list of dictionaries we need to convert it to a list of dictionaries.
So we set up this adapter concept, we can register many things that can be converted to dictionaries, and then we just go through and say look if the type of this thing that we're working with, if it's an individual instance not a list and we could convert it, then we're going to convert it to a list of one item by adapting that value.
But if it's a list, let's go through every item in the list and make sure that it is something we can work with, so here we get the first one and we say do we have an adapter in this case it's a list of cars, and it says yep I know how to convert cars so it just goes through the list assuming the list is homogenous, one thing I suppose would be fun to test is if we go up here to the top again and just show that we can still return other types still show that we can return this list of dictionaries and that somehow won't break the system, I don't think it will, let's find out.
Yes, yes it did break it; where did it break— all right, yes, this seems to be a get, so what do we do wrong here— on this one, we are basically assuming it is in here and of course, why would we test for it, if we were doing that so let's do the more gentle friendly get me this type and then we're already testing for it.
So one more time, boom, we're returning dictionaries and so it's you know, I don't need to adapt dictionaries, you already can work with those.
If we change this to say no, no, return cars, we go return cars, okay.
So now, we have or csv entirely built in a general way right, the csv as far as its work goes, all it really cares or knows about are dictionaries and maybe we want to put some kind of test in here and say you know, I was given some type, I don't know about it and it should raise some type of exception, right, so we have this, maybe let's go ahead and say first equals value of zero say if not is instance first dict, well then we have a problem, it could not convert type or something like that and maybe we'll just say what the type was here all right, a little better error message, we'll do a type of first, so it should still work and then maybe we can send it something that it doesn't expect just to show you know, it's going to be able to detect this so let's return a list of tuples let's say, it shouldn't know what to do with that, let's try this— built in error could not convert type class tuple.
Perfect, so now I think we've got a pretty good system here make sure l put it back for you in a way that works, excellent.
Okay, so we've built this custom csv renderer, we've used this adapter concept to give it lots of flexibility to take many, many different types and not force all the ways in which we use it through our application to know that that transformation is required we just add the adapter in the site setup and we're golden.
So while this is fun, let's actually add one more type, let's work with images as well, so we'll be able to go to the car and say hey car I would like your image.
|
|
|
show
|
8:18 |
Now let's come back and add another type of renderer.
I think seeing this a couple of times you guys will totally have this down, we're going to take two variations on this, one, a kind of simplistic one and another one a little more advanced.
So what I want to add to our app next is this ability to request an image about the car, so let's go over here and see if we can do this, so let's duplicate this and we're going to go ask for an individual car, let's actually run this again, okay, and we're going to ask for an individual car here, close, no, copy like this, so now we have a json one and that's fine, but let's go over here, and we want to accept image/png, well, we're still getting json, we have no renderer that knows about images.
However though, if you look carefully, we have an image, it is right there right, that's the image; somehow what we'd like to do is have our system come along and actually when we get this request with image png say you know what, let's somehow give that image back to them as a png great, so that's what the job of this image redirect renderer is, and the redirect part we'll talk about what that means in a second.
So standard, we have our adapters, right, we want to work in a general way, so the rules around this one is the thing it can get an image from is if the type can be adapted to an individual dictionary and that individual dictionary contains a link under the image key, somewhat restrictive, but it's not too hard to imagine adapter that we can add for almost any type if it has some link, we want to get the request, we want to set the response type, and let's just go over here and we'll do some work with the adapter; so we'll say adapter self.adapters we'll get the type of value now this time, I don't really know how to return a single image that represents like a list of cars so it's only going to work if you pass individual items of the type to ask the image for not in a more general sense, right.
So let's go ahead and say if there's no adapter and the type of the value, let's ask it this way, and not is instance value and dict so either there's an adapter that we can use or the instance is a dictionary, those are basically the two types let's actually do this in reverse, let's say if adapter here and we'll do the adapting and then we'll deal with this in a minute, so we'll say if adapter then value equals adapter.
the value and the way the generalized framework works is we pass in a second item there so we'll just use none, adapters are not making use of this.
So now, now I have to go on the right track so we'll ask if it's not a dictionary then we have no idea how to deal with this, so we'll raise exception, could not convert type whatever, and we'll put the type here, ok, so now our job is just to implement this renderer so we have a dictionary, our rules are it has an image value, right so let's go over here to say image url equals value.get image if not image, then something went bad, so we'll say it couldn't find the url, now it's pretty simple we have an image url here, and we just need to say hey go there, right, so in this one, this redirecting version, what we can do is we can send a redirect response by raising an http found exception this lives in pyramid, http exceptions right, so it's basically hey this is like a soft redirect to 302 moved over there, image url.
Okay, so this is good, and as long as we pass the right adapter we don't want to do this trick here, we'll get the type if the type exists actually we don't need to even do this, do we, here we're just getting the adapter straight, the conversion is so simple, we don't have a method for it.
Okay, I think we're ready, so we'll come in, because we're using a redirect I guess we don't need this, and the new one, I am going to comment this out in the next version we're going to need this, this is the more advanced variation.
So we get the adapter, if there is one we adapted and then either there was an adapter which made it a dictionary or already is a dictionary, if one of those cases doesn't match this is a problem we're out here.
Get the image, and we're going to redirect.
This is pretty straightforward, so let's go up and add this again remember we have to register these, so I'll call this image renderer equals that of course I've got to imports that again, I said it's just png because I don't want to deal with the nuances of all the different content types, right, we could look for something more complex, like image and it could look and say is that image png is it a jpeg, and so on.
But, for now, let's just go over here and let's go to our individual car a single car and make a change there.
So first, I want to request the single car one more time and of course, because we're not using our database, not yet, very soon this problem is going to go away but for now, we need to keep updating that.
Okay, so you see we want to get this url here a and right now we are accepting the png but it's not doing anything, let's go over here and we can say what did I call it png, yeah, we can get png and this is going to be accept equals this all right so this is a more restrictive one, it should do bidding for us, let's try— first of all, let me turn this off to see if we still get json, no we don't because we got to keep redoing this, like I said, this is temporary, it's going to go away, could not convert, yeah that was not so good, was it?
Let me just for now do you like this, like i said, we're going to get a better version of this, where you have to have separate image, right, so well just do that one, ok I guess for this to work I have to set accept type on both of these, that's too bad, but like I said, this is all temporary, we're going to sort of add a more general model so we've got our car going— oh and here's little trick that I want to start using, notice this first here, so instead of putting this, we'll just put underscore first and whatever the first car is we're just going to get that back, it will save us a lot of rework, we'll take this away for a real api of course but for this little development work is nice.
All right, so now if we come over here and we say I do want an image, it's going to crash, it says I can't convert this type for cars so we need to come over and look where we're setting up this renderer, now the csv renderer knows about cars, so does json, but this one doesn't, so the next thing to do is to add to our image renderer this adapter, so now it should know how to adapt cars, so it's good, so we've already seen that if we just go default we're going to get json, if we add this we should get an image, let's see.
Ta-da, there it is, how awesome is that!
It's pretty cool right?
So we said we wanted an image, at this url, give me the first auto, give me an image, I get that, if I go to the first auto and say I want json by default I think it passes json over and here is like what it will accept but anyway we'll get json here, if we go to header, put it back, boom, there is our car again.
Okay, so this is super cool, what's not super cool is all the work to juggle this around up here like this.
Also, maybe we don't have a straight url to point at, what if this is stored as a blob in the database, then how do we deal with it?
We should still be able to get it, but how do we do that?
We need to somehow like embed this as a binary object and then scream it out of the server— which turns out we could totally do and we'll do next.
|
|
|
show
|
5:27 |
So we've seen that our car renderer, our car image renderer works really well.
You can see the image is here, but if you actually look at the network request it goes and it bounces just over to some other web server.
And you know, that may or may not be okay with you, but it's probably not really okay if you've got data as a binary blob in a database because then what's the url for that, right?
So, let's go and write a second version that actually pulls that data in and streams it straight from our server, so as far as the clients can tell, it's our data coming through; regardless of whether it comes out of our database, out of our file system or maybe even off of the internet, from somewhere else.
So let's make image, call this direct renderer, and redirect calls direct.
Now you will know what the redirect part was about there.
Okay, so this is all going to work pretty much the same except for now that we're sending a response directly we're going to need to have this type, so let's go and delete it out of the other.
And because system is not used if you want, you can put underscore and PyCharm will stop complaining and because we started using some pieces, also the static bit is not necessary, okay.
So, we get our request, we send a response type, we're going to try to adapt it, we're going to try to get the image but instead of doing this, we're going to do something entirely different.
So now that we have the url, let's go over here and let's actually download it, let's go and say I'm going to download this off of the internet if this was a binary blob, you would just have the data say out of sqlalchemy or something like that but it's really off the internet, in this case we're going to go and say the response, we'll use request, like who wouldn't want to use request in this class right.
So let's make sure that we've got this registered in our system, anytime you have a dependency like an external package like request you want to make sure that you put it here so we install it in production or somewhere else, on new dev machine it automatically has that, so we could click the button, we could open this up, and notice it's got our virtual environment active so pip install requests, just you can imagine how to click the button, this also happened, just fine, so now give it a second, and that goes away.
So now we have requests, the one we're actually looking for not this pip thing, or we can do a get image url, and then we probably should check so if so response.raise for status if something is wrong raising exception, and then we want to return like a bytes array, some kind of stream that we can use, so we'll say return, and we are going to return bytes io from io, and what are we going to do we're just going to give it the response content, like that.
Now this one should go, have I changed this car one here— let's turn this off for just a minute so we can test it.
Let's click here and let's go get an individual car that's not going to work but if we put first, there, so you can see that we got the car, right let me copy this, google wants to keep changing that around, okay, so if we go there, you can see the car shows up, but notice it redirected, right, there's a three or two redirect to this location, we want to stream it directly, so let's go and switch here, by the way, the reason I commented this out is it's not so easy to set the accept type to png in the browser, right, so we're just having one request, like you can do it, but it's not as easy.
So let's go over here and say I want to get a different image renderer, this is going to be direct, import that, so we can pick, right, which one do you want turn on the redirecting one, turn on the direct one.
So we'll run this again, notice we're using direct one, so if I go back over here and I enter this address, it should just stay here and show us image, it shouldn't redirect like it just did, right, there's the redirect to opel, it stays, why does it stay, because as far as we're concerned we make a request to the server, the server says you're getting png back and here's a bunch of bites, perfect, right?
Go and view the network, reload the page, you can see get right here set domain and when I restart it I got a different car, yeah perfect.
So it's just going straight here, right, it should stay the same now.
Right if we switch this back, one more time so you can see the difference here, hit this again, notice we did this request, we got it through to redirect and then we went over there, right.
So now we're here it's just staying there, but any time we go to this url you can see we're getting this redirect.
Like I said, this may or may not be okay, if you want to stream it straight out the database or suck it through off the internet and stream it back through, then we can switch to this direct renderer and it stays right there.
Now we've got a wide variety of options for our renderers, we've got a csv renderer, we've got these two image renderers let's go ahead and add one more before we kind of call this thing done, let's go ahead and add a json renderer, and you might say Michael, why would we add a json renderer, we already have one right here, a built in one; well, we're going to want to use some ability of grouping these together as a common set of objects, and let the api negotiator determine which renderer is best, so having a renderer that exactly adapts to the same functionality as ours, and we can just of course delegate to this one, it will be nice, so we want to add one more of these in our real app and then we'll be ready to talk about content negotiation.
|
|
|
show
|
3:36 |
So let's go and adjust our renderers one more time here to make them a common thing.
So first of all, let's add another type, we'll call this abstract renderer, so let me copy over this type here, renderer abstract base and notice its metaclass is set to be an abstract based class meta which means we can do things like say these are abstract methods and that means anything that wants to use this type is going to require that it implements these methods, that it implements a call, a can serialize value this is not something we've needed yet, but we're going to need, and this add adapter, which we have done.
So besides this can serialize value, all of our renderers are really already this thing so let's go ahead and make them actually derive from that type.
So, we've got this, we're going to say implement abstract method and it says alright, which one, this can serialize value that's not surprising, we could import this type here but it doesn't really matter, and we don't need to worry about that I just put it in the base class, this type annotation so you can see what we are expecting but we don't need it here.
So, how do I know that I can do this— I'll say whether the type of value say return type of value is in self.adapters or which one of the csv type value is list, let's just say is instance, unless, alright, so if it's a list, we're pretty sure we can serialize it, we could also look through the items and say yes or no but we're just going to go this way and if we could adapt it right so either of these two would work fine, and I really don't like having something other than the initializers the first so let's stick this at the bottom.
Okay, great, so that's our csv one, this image one, let's go over here and make it also— we don't need this anymore make it derive from this thing, like that, and again it's going to have to implement this can serialize value let me copy a little bit over here, put that down; now, whether this one can serialize a value is if it is a dictionary right or it can adapt the type, so that's pretty straightforward and let's go and do this last one here, right same exact thing except for we need the base.
Lastly, let's go he and run this and see if it still works, okay we were able to create it, that means we were able to allocate the things derived from the abstract base types which means they exist, like for example, if we don't have this I don't k now if you've played with this before, if you don't implement all these abstract types you can see right here if you don't implement the abstract types and try to allocate one so in the dunder init you'll see boom— cannot instantiate abstract class because it doesn't implement this right.
So this just basically verifies that anything that wants to be used in our system is going to be one of these known renderer types.
All right, so we've got some structure around our renderers we've implemented a variety of them, the last thing to do is we want to have this built in one here also adapt to our functionality, to our common base type, so we're going to create a class that derives, basically that just models or derives from this.
|
|
|
show
|
4:05 |
So to get the most functionality out of these types we want everything to be at least one of these abstract base render types here, we want to obviously implement the protocol of being a renderer factory and then we have our concept of adding an adapter and then, when we get to using more than one of them you would like to be able to ask hey, can any of you serialize this particular value, so given some value true or false can you serialize it?
Now, specifically that functionality is not part of the built in ones, right and we might as well even though the function already implemented as we've seen we might as well add the constraints for these as well onto the built in one, so let's add a json renderer, and put it here, this is going to be a pretty simple class so we're going to say class, let's call it just like the others json renderer factory and it's going to need these various functions; however, we've already seen there's a built in one over here, that, right so let's go ahead and leverage that, let's say this thing derives from json and that helps, let's import this right, so it derives from this, and that gives it most of the functionality, so you'll see that we could actually come over here now and say we're going to implement one of these, not a renderer abstract base class but one of these and everything should still work, let's see, all right so it runs, that's a good start, if I go over your postman and I say give me all the autos, and I ask for this, look, it is still serialized as json, just fine.
Okay, but if I try to go to it and I say you are also a renderer abstract let me just copy this, a renderer abstract base class and we try to run it one more time, it's not going to work out so well because it doesn't implement can serialize value, alright.
So in order for us to sort of interrogate all of our renderers, we got to be able to ask this, can you serialize this value and right now obviously the built in one doesn't, that's why we're going to this whole exercises, we want this function to exist.
So we'll come down here, we'll implement this but this is just straight up json, like how do we know whether it can serialize it, how do we know whether inside of the json type some adapters have been registered or whatever, right, via the base class here.
So let's just say true, yep, I can probably do this, how do we know, I mean we could try serializing it, but that's going to have a performance cost, I'm going to go with this for now, but maybe there's a better option we'll find throughout this class as we work our way through it.
Okay, so now does it run, does it work, yes let's go over here and get a first auto and we'll get the image, we got a different one, that's a cool classic, now this one should give us json, actually I think I commented that one out didn't I, for the browser, let's go put it back.
Put that back, try again, we should get a different picture of the same one, so there's only a few options, actually let's go over here and add an accept, I think we got to be more explicit, json, there we go.
Alright, so we're getting json for this one and if we go back ok, it looks like our custom json renderer, which is not very custom for sure right it's just basically adding that function and those constraints to the json that comes from pyramid, but it looks like this custom json renderer is working just like it was before, so the next thing we need to do is instead of doing all of this work up here, right, like oh yeah this content type goes here, that content type goes there we would like to be able just to say hey system, figure out what the renderer is and give us the best option that you can, and if you can't support any options that have been requested or any of the defaults, give us an error, so that's what the next chapter is about, right.
So now we have all these different renderers, let's put them together in a way that is basically transparent to all the api methods.
|
|
|
|
27:54 |
|
|
show
|
1:48 |
Now let's see how content negotiation is going to work.
We've seen this picture before, we have our car listing method, we have our database, a request is going to come in but now we have a set of renderers to select from, you can see at the bottom we have a json one, a csv one, an xml one, maybe some others that we're not going into the details about.
So when a request comes in, the request is going to say I am accepting this type text/ csv, whatever, and just like before, our code is going to run unchanged, we're going to do a little bit of work we're going to go ask the database for object we're going to get our Python objects back maybe the sqlalchemy or mongo engine type of object; whatever it is, we have this object.
And now, the system is going to ask do I have a renderer for text/ csv, and we're going to look at our set of renders and say yes, I do let's bring that one into play, feed our object to it and return the response there.
Of course, that renderer sets the content time to text/ csv and gives you all the values.
Okay, so this is really nice, and what's going to be even better is all of this do I have this renderer, what are the available renderers bringing into play, that's going to be transparent to us, we're just going to return that green object underlying system, pyramid is going to work out what renderer it needs to be used.
Now, before we move on, I just want to give a quick shot out to Cecil Phillip, he wrote a nice article called "Content Negotiation With The Pyramid Web Framework" and he and I were talking about these different renderers and he's like you know, does it do content negotiation and I'm like I don't really, I think so, he's like I bet we could make it, and he's right, it's not that hard, he's written a really cool article here, the link is at the bottom, so if you want to go through this in detail, and see what he wrote, he can explain a bunch of it there, and you can see the steps, of course we're about to go through much of what was talked about slightly adapted and evolved but original idea is out to Cecil, so thank you Cecil for that.
|
|
|
show
|
16:14 |
Now let's pick up where we left off with our app previously.
We have our csv, our image and json renderers, we have our abstract base type that enforces some of the common functionality, and notice, this green one, I've now added a new type a negotiating renderer factory, and this is just a totally empty implementation here, we've got our ability to have adapters, we've got our call our renderer, our can serialize and add adapter, this is just basically what we need to be a renderer abstract base type.
So what we're going to do is we're going to apply a design pattern here we're going to apply something called the composite design pattern, so let me just give you a quick background if that's new to you, so the idea is we may work with fundamental types that kind of do individual things, but if we can somehow put the same interface on a group of things and then we could treat that group as a building block in our system as well, so maybe you think of like a gui type of thing, right, maybe you've got buttons, you've got windows, you've got text boxes, things like that, and those all have a common api let's say; well, what if you want to have a frame that can contain many of them; well, if you could add on to that frame object to have basically all the behaviors, buttons and whatnot, but also has a collection of children and somehow could manage those, well then you can treat a frame like you could a button and move it around and position it and render it, things like that.
So we are going to apply the same basic idea here for renderers.
So you can see, the negotiating renderer factory implements the renderer abstract base but we're going to actually have a few more pieces of functionality, so let's go down here and add a renderer, so we are going to add this function where we can pass in a renderer and it will be used when a certain content type is asked for, so we'll ask for the content type, so we could say something like for application/ json use this renderer, for image/ png use this other renderer, and so on.
Now we'll just call this renderer, but we can enforce that this is a render abstract base class.
Now of course, this does nothing right, this is a suggestion to the editor by enforce I mean if not is instance, then we'll raise an exception.
Renderer must be abstract based, must be a based renderer or something like that Ok, so from then on, we pretty much are guaranteed like hey we're actually working with a known type, that we can call on, we can serialize values, we can add adapters, all those kinds of things.
The next, let's do a little bit of normalization on our content type here, so we'll say, so we're going to lower case it and strip it we're going to use this for a key, and so if somebody says capital json versus the system passing the lower case json or something like that we don't really want to have that be a variation right, it doesn't really matter, it's not case sensitive as far as we're concerned.
And now we need somewhere to put these renderers and so well put them like so, in just another dictionary and how are we going to find them, we're going to find them by content type, so just like we looked up adapters by type, and then we got a function, now we're going to look up renderers by the type that they can transform to, like text/ csv, and then we'll have the type which is one of these, this would be like a json renderer or a csv renderer, something like that.
You're going to see that this is all well and good, but depending on the situation the client may not even pass a content type, and so we might want to explicitly say well if the client just says I'll take whatever, what renderer is supposed to handle that situation?
So let's add something like this, like default renderer, or let's say accept all, because that's basically star.star alright, so I have a renderer that's going to come in here and all we're going to do is say self.add renderer, and the content type is going to be */* and this is going to be the renderer.
Okay, this is looking pretty good, now I think we have this kind of generalized thing let's go ahead and integrate it into our system down here, so we've got our json renderer, our csv renderer, an image renderer, and let's go down here and have a negotiate renderer, it's going to be one of these types here, and now we need to basically say hey all of these renderers are available for you in what particular content type are those is going to be; now, you might say well, we still need to have these lines we still want to register them independently, it's up to you, but if you want to be able to say this one is not negotiable, this one is json then you want to leave line 56 for example.
All right, so let's go over here to our negotiate renderer and say add renderer, and let's say application/ json is going to be the json renderer, and also, let's make json the default, accept all renderer, and then for text/ csv, grab the csv renderer, and for image/ png, we'll have the image renderer.
Now, this is configuring this object, but still, the last thing we have to do of course is to register with pyramid.
So it's going to go like that, and let's pick a name that we can put here we'll say negotiate, if we say negotiate, that means we're going to pick this renderer, which actually has this functionality built into it.
Well, it almost does.
Okay, let's go to our API and focus on let's do this all cars thing here, and here we have a bunch of different versions let’ s get rid of this, let's go over here and say okay this one if you do a get we're going to let you negotiate what it is, and we're just going to return the cars.
Now, remember, we've already taught all three of these to deal with cars and so we don't have to worry about anything here, this should just delegate to those other pieces and you'll get cars so if you ask for application/ json, it'll find its way over to here which knows how to deal with the car; if you ask for text/ csv, it will find its way over here, which knows how to deal with the car.
So, as far as what we do in our code it's totally simple, it just return cars.
Now, this is not quite perfect yet, because we haven't finished implementing the negotiate renderer, but let's go and just make a request and see what we get.
All right, do ascend and you can see we get nothing, although it does come back ok, so that's kind of cool, sort of, and why did it come back ok, well, because we just return none.
So now, the question is what are we going to do when we render this, well first thing, let's go ahead and get a hold of the request, the next, we need to figure out what are they asking for, right, so what they're asking for is sent over in the headers, here.
So in this case, I said accept is application json so let's go and actually get the headers and pull those out so we'll say accept headers and this should be accept, like this okay.
You can print out really quick, found accept header, and who knows what format that is, so let's say accept headers like this, so if we run this again, we go over here and click this, what are we going to get, you can see we found accept headers this, so let's take a first pass and say all right, we're just going to like use this as the key it turns out that that's insufficient, but let's go ahead and just say we are going to use that as the key, so let's go ahead and apply this lower case normalization to it and we'll say something like this, we'll say if not accept header, so maybe if they don't pass anything here, what are we going to do we're going to return, we want to get the renderer, so self.renderer, that has */* now this assumed somebody's called that function so you want to be a little careful but it's okay, so we're going to have it render with a value and system who knows whatever that means, okay.
Next, we need to find the renderer, so renderer, let's do it like this we had to come over here and we'll say accept, self.renderer.get, and we'll just pass it the accept header.
This is not good enough, but for the simple request it's going to work, so we'll say if not renderer we'll raise an exception like could not alright, so if we don't find one, we're going to complain and say hey we didn't find one, you asked for say application/text or text/ I don't know, some type that we have no idea about it, there's many mime types and content types.
So then, once we have this, now we're just going to go down there and say if we do have one, let's just return renderer.render, pass the value, pass the system, okay.
This is looking good, let's see, I think we might be good let's go ahead and run this and see if we get, if we got it working yet.
We don't want to see non down here, we want to see a list of json ; and, it has no render, oh yes, yes, yes, okay I'm calling this incorrectly so let's do something really quick here, let's say self.info and down here let's store this, okay, so instead of doing this renderer we need to do the call to get a hold of the object, self.info, and then we're going to get back the render function, and then we'll do this, so yes, that was a little bit off, wasn't it.
Alright, remember these renderers are render factories and so this call right here creates an instance of it by calling this function which returns this render function and then we're calling value, passing value system to the function return there.
All right, try again— there we go, perfect, json.
I think that other code that I wrote would have worked fine for images, for csvs, but because we're using just the built in json 1 for this type with a little adaptation, it doesn't have that _render, let's ask for something else, let's go have a different accept type, and we want csv, look at that, that is awesome, that is great, so we're going to this one function right here, let's look up with api, we're going to this one function, and we just said, I don't care what renderer you get me, you do your best that you can to provide the type that they're asking for, so if we come over here and ask for text/ csv, we get this if we come over here and ask for json, we get this; now if we ask for something that can't handle like image/ png which the individual one can handle, but the list like I said would you make a composite image, what the heck would this be, it'll say error, could not convert type list to an image basically, which I think that's reasonable, I can't imagine we could do much better than that.
So it doesn't mean that it's always going to have a good answer but I think it makes a lot of sense.
Put this negotiation thing in there, and let the client ask.
Now, we can just set the default, like hey, if we don't know what it is, then do json, so for example one adaptation we could make here is right now I'm raising an exception, say look if you ask for a type and we don't have a renderer that maps to it we could just return the default type, right, we could say okay fine give me the one for this, right, this will be the all, the accept all renderer, so that would be a possibility, or we could just say just return json or whatever but we chose to say look, we have no way to deal with this, if it's a type that we haven't preset up, so you can be more precise, more restrictive, less precise, less restrictive by just falling back to json or something to that effect.
Ok, but that is how we work with our renderer, now we don't have to do any of the adaptation stuff because it's already happening, we may want to delegate here, like we might want to say something like this for renderer in self.renderers.values, right, so if somebody calls here is how you move a car over like, suppose I take this off here for now and try, this should crash when I call this function, don't have a converter right, but if I go and I add this adapter to the generalized one now careful, it has to be done at the end, copied a little too much there didn't I, there, now that should add it to all of them, it looks like that little bit here— let's go and fix up that json renderer, add adapter, it looks like I misspelled add adapter, okay, so there we go, now let's just check if I remember this didn't convert because we had no adapter for car, now we've added it back in.
All right, so this is probably a good implementation, where we have this adapter add in for each one of those, but we still need to be over here, if we're going to use it individually we still need to add it on this one as well, so how much value is that, you know it's up to you guys— let's put this back as well, okay, so this is the composite pattern in action, right, this thing really holds a bunch of these, it's made up of a bunch of renderers but in fact acts as its own renderer, which means that we can just go here and say render=negotiate, and however we've configured the system it's just going to handle that for us, and that's quite a cool thing.
Let's go down here and fix up this other one, we have single auto and single auto image, that's super annoying, isn't it, let's apply a little fix here, for this as well; so we have this, we have get, but this accept type can now go away and this is now also going to be negotiate, all right, how about post this one, it's your call, does it make sense to put it here, maybe it does, it doesn't, the renderer doesn't mean you can post like csv, so you have to post json right, from here right, really from right there, but the type you're going to get back does it make sense— I'm thinking for the creating auto since you got to post json, I am going to leave that one alone, the put, this one doesn't have a renderer, it doesn't do anything, same with delete, it doesn't do anything.
So this one I think I'll go and leave this as json like if you're creating an auto, maybe just it's json in, it's json out.
But everything else here is fine, now notice, this one this responds 404 and this json body again, if there's an error, you're getting json back, basically but if there's no errors, you get what you ask for.
I'm okay with that to keep it simple, we could do a lot of work we could actually like somehow work with the renderer here but let's not do that right, error cases, they can just look at the status code right 404 is going to be telling them everything they need to know and that works with all the different formats.
But this one I think is really sweet, right we've added this negotiate and now it can do whatever it wants, let's get rid of this, I think I had copied that from duplicating it somewhere and so on but we don't need the csv, just all autos, right, let's see this one more time, we've added negotiate to the single auto so let's go to that; so here, for all the autos let's start with json, do we have it, we have json for text/ csv we have csv, now we don't have image because who knows how to do that right error 500 internal server error, maybe that's what we want it could be bad request, like we could catch that, determine that, return a bad request, but we're not doing that.
Now, let's get one of these individually, and let's start out with json again, remember my little trick, first, so if we go ask for first, now we get json pretty cool, go up here and ask for text/ csv, name is not defined, what have we done wrong here?
Oh, again, that's supposed to be none, we'll get the bugs out of the system all right try again, so we ask for text/ csv, we get text/ csv, it's just one car but you know, maybe your parser is expecting csv, so here's the one car right, again json works.
Now, if we ask for image, we should get which one do we have configured, I think we have the direct one configured and boom— there it is, status 200 ok.
Let's just double check which one we've got running here we have the image direct factory running, so when we hit this, it goes off to the server, right and sucks it down and then resends it through our web server, pretty darn cool.
Now, again, we can do this against an individual car, we can do not that, but we could do this against all of the cars if I can put that together correctly, because we just said negotiate.
Now, there is one more little catch that we have to be aware of and we'll come back to that next.
|
|
|
show
|
6:28 |
So it looks like we have our negotiate renderer working just perfectly.
If you look down here, one of the key steps was we add an adapter, we add a renderer, we map the content type down here to that particular renderer, and that works perfectly, nothing needs to change here.
However, this part right here turns out to be more complicated, let me show you why.
So as we saw if, I come over here and I do a get, it's working great, content type equals text/ csv and let's go over here and try this in Firefox.
Look at this, that's not so amazing, is it?
What went wrong?
It says could not find a renderer for the content type text/HTML application xHTML, application xml and some other stuff.
Well then, that's a little bit weird right, and then notice down here */* this is the accept all, like okay, fine if you don't have any of those I'll take that.
But the way this really works is for the header you can say I would prefer this, if you don't have that, I'd prefer this, if you don't have either of those I prefer this and I would prefer that with like a certainty of 90 percent ; and then finally, at certainty of 80 percent I would prefer this, right.
So it's going to say like between these two server you can decide you can send me either of those equally, and then this and then this, I think that's how you read it.
So we can't just take the straight text, we basically need to parse this string into something that's better, right, so let's go here, let's say this accept_headers = parse_accept_headers, plural, this function doesn't exist, but let's go ahead and write it.
Ooops, not function, method, so I'll just write it down here if PyCharm won't help me so deaf parse_accept_headers, header value, okay so I'll put this here just to remind you of hey this is what it could look like and what we're going to return, we could even be explicit here and say this is going to return a list, so the system up here knows hey you have a list.
That means this needs to be self and if I had said self, PyCharm would have saved me, but if I go over here now and say this, you can see append, copy, like list behaviors, to remind me of that, so we could do regular expressions, we could do all sorts of stuff, but let's just do a little bit of low end string work here, so we'll say first of all, if not header value return nothing, or empty list I guess is probably a safer thing.
Then, we'll say values= header_value.split and we'll split on the comma.
So we'll get like text/HTML, but we'll also get say */* ;q =such and such.
So then say for value in values, let's make a list here, so accept types, right, so for each one of these we'll come down here and we'll say parts= value.split on this, if length of parts is one, accept types.add, parts zero or just part.
Let's do a strip, add this lower, right, that's what we're looking for before in our dictionary so let's make sure we do that, so if it's one, but if it's actually two, say else, let's be a little bit careful here, if it's two, then what do we want to put in here, not the value, but parts of zero; and we're just going to use the order in which they are specified like you can use this q and you can do some sorting, but I am just going to say that one first, then that one, then that one, and so on, and we're going to do that by the order in which we add here, okay so now we just got to return this accept type and we should be golden, almost, ok.
So we're up here, we don't want this to be static, I guess we could make it static, but we're not going to, okay, so let's come up here, now this bit is not going to work, right, we can't get an accept header by a list those are supposed to be strings, so we'll say this instead for header or more accept type in accept headers, plural we'll do this, we'll set the renderer=this and I think I need to change this let's change this to be if there's a renderer, we're going to grab the first one and return its value.
And now, if we make it all the way to the end, and nobody, let's be a little careful here, still use this type, so we're going to go through each one of these text, HTML whatever and if we can find one, the first one we find, that's the one we're going to use.
If we go through all of the options, and we don't find one then obviously, that's a problem I think we got this working, let's try this now.
So, does it work like it did before— attribute has no value spit, I should hope not where is that— where did I write spit, sorry about that you're probably watching it, oh it's spit, it's spit, it's not going to work, no, it's not going to work, alright, try again.
Okay, there we go, we give it text/ csv, it works fine and we give it json it works fine, we give it images, this is plural it should just crash but that's okay, now the problem that we actually ran into, it's over here the browsers can pass more, but now they don't it says I'll take all bunch of different things, which one did it use— remember it had a whole bunch of stuff, and actually copied it so we can look down here, it said I want text HTML, we say no, don't have that, it said okay, I'll take this, next time do the loop, do we have this, next time do the loop, do you have this, no and then, next time do the loop we said */*, yes, I have */* and the reason I have */* is we've set the accept all renderer to be json, if I set that to the csv one and I run it again, and I do this request we should have csv, and we do, tries to download it, sort of annoying, works fine.
Alright, let's put that back I don't want csv to be the default, but you get the idea, right.
So we went through that list and got the different things.
All right, now I think we have a very solid negotiating renderer factory and I'm pretty comfortable with how it works.
|
|
|
show
|
3:24 |
Time to review the concepts behind content negotiation and using our multiple content renderers to create a negotiating renderer.
The idea is we would like to provide multiple return types from the web API, we return one object and it gets converted based on what we've asked for; so, maybe we go and we ask for application/ json and you can see at the bottom here of postman, we got some kind of json response, exactly what we asked for.
On the other hand, if we ask for text/ csv, well text comes back, and if we ask for image/ png, the image renderer kicked in and it gave us back our image, this is to the same url for each one of these, and it's the negotiating renderer selecting which specific content type renderer was activated.
So creating one of these, it's pretty simple really, it's just the composite pattern applied to these renderers.
So here's a simplified version, we've got a negotiating renderer factory and we have a renderer look up, so we're looking up given a content type what renderer should be used to generate that, so this is just a dictionary and we have the ability to add renderers given a content type in a renderer, we kind of strip off the white space and case sensitivity of it, and map that particular renderer to that content type.
Then we have just this standard call really delegate to the renderer function, now renderer gets a little bit interesting, if we're given a value and we go and get the request and we have to say give us the request, give us the headers and get the accept header, right, what would you like, what would you like us to give you in terms of format?
Now, we saw this was kind of ok, as a single string until it wasn't, until somebody asked, said I will actually take the multiple types like browsers for example, they don't like that so much, so we wrote this parse accept header to generate a list of various types that they're asking for that list may be and frequently probably is one type.
Alright, so then we just go through and say hey do you have a render for the first type, the second type, third type and if we do, great we're going to use it.
And finally, if we go through all the types and we don't have it sorry we have no idea what to do with this, you're going to have to adjust your system a little bit.
Maybe add an adapter, maybe transform it in the API to something that we could adapt who knows, but we can't give you a renderer right now.
Then of course, we need to register this, so to register it, we have to still create all the individual renderers, and create a json one with an adapter, create a car image redirecting one or a direct one where it just pulls it down and passes through, however you want, I want to create a csv renderer, and this one also needs an adapter to figure out how to get cars into dictionaries; and then finally, we'll create the negotiating renderer, we'll set the accept all renderer, so like json is used if you ask */* like if I'll take anything, fine you're getting json.
And then we're going to add the individual content type renderer, so application json goes to json, text/ csv goes to csv, image/ png goes to image, right.
And then finally, this negotiating renderer needs to be installed into pyramid so we're going to say a config.add_renderer, we're going to call it negotiate, right, you make up that string, you can call it whatever you want, but I'm calling it negotiate and then, when we want to use it, we just go to our route and we say the renderer=negotiate, and it's going to figure out given the type that you ask for find the appropriate renderer to turn it back, to send it back to you.
That's content negotiation in Pyramid.
|
|
|
|
28:27 |
|
|
show
|
5:11 |
Let's come back to our auto API and make this a little bit more realistic; so it looks like we've got a renderer stuff working really well with the negotiate stuff, I think we've got the restful components working great with our http verbs our response status codes, things like that.
But, still not very realistic, so if we look here, I think this is solid you ask for all the cars you get all the cars.
Here you ask for a particular one, and if it doesn't exist, you get a 404, great.
But the farther down we go, it gets the less good, like notice this part about validation.
We're taking the arbitrary dictionary submitted as a json object back to our view here, and then we're just going that's probably a good car.
No, that's probably not a good car, we should not be trusting user input here, now to some degree in the database, when we get to the data layer, we can model it such that certain types are required, so for example the price must be a number, right it can't be just anything, right or that the name is required like these things can be modeled in database constraints.
We probably don't want to count on that, right if we count on the database to actually be the validation layer, we're going to get like sqlalchemy errors as the thing we tell them that went wrong, and that's not great we'd much rather say hey, this number that you've submitted has to be between this and this, right this thing must be of this type, and so on, so we need to add the validation and for a moment I'm going to make this method worse, not better by actually putting all the validation here, because right now where does it go, right, maybe, maybe it goes in from the car, right from dictionary bit that parses it and that would not be a bad choice in this particular case, we could put it there, we could have a different exception type that catches the errors to me, let's just look at the car real quick.
The car is, it's really supposed to be the database object, right it's suppose to know what it fields are and so on, and so we model this in sqlalchemy, it's really going to represent the sqlalchemy thing, so maybe even this like we probably don't even want this year, so ideally we take this way rather than leave it here, at a minimum we need to rewrite this because it turns out if the dictionary contains something that's not listed here it's going to crash, as well as if the dictionary omits something like the price for example, it's going to crash as well.
So this needs some work, right and we could probably move that out of the cars responsibility as well.
Let me just go and put some validation here we're going to leave this part in, but for example we want to check that hey, the price is valid we want to check that it has a name and things like that.
Now instead of me typing that all in, let me just paste a bunch of rules here and let's do a little trick here, new car, let's rename this, back to car.
All right, so for example, what can we check, let's suppose we want to be able to give more than one error, like hey these three things were wrong with your submitted post, okay so over here, we're going to say if you did not set the last scene, like this is the date time value for what is supposed to be there, that's required, that's an error, if you don't set the name, that's an error, or if it's empty right, this will also test if it's empty.
If we want a check if it's only not there, like is none, right, we could do something like this if it were allowed to be empty but must be present, but we'll just go like this, the brand has to be there, the price has to be set, the price cannot be negative right, you can't have people pay you to buy the car or whatever; similarly, the year has to be a positive number it's got to be reasonable like 1900 until present plus one year, things like that.
But you can see there's a decent amount of validation here and I would contend that this is just part of it, this is only a little bit of it, now like I said, the database will catch some things that are out of step as well as when we parse it, we'll be able to do a little bit of work there as well.
But now let's just start to look at this method.
This is not amazing, right, I mean it's doing all this work and we really just wanted to kind of do this, this is sort of the point, but so much other stuff going on that it's obscured by that so what we're going to do in this chapter is we're going to add another layer that's at play here, so something I'm going to call view models and the role of these view models will be to take the inbound data whatever that means, right, like this if it comes off of the url that's also a part of it, we could take those things together and do the parsing and the validation and all of that and provide kind of the final result to this method to do whatever it's going to do with it right, like then hand it off to the repository, and things like this.
And that makes it much easier to test, we can test the validation by testing the view models, it will make our APIs much cleaner by having one concise common clear repeatable way to do validation and if we want to add— I would at some point get tempted to go okay no more validation, it's just making this a mess and I don't want this method to be like only validation, alright, but if you move that validation somewhere else, well then you can go crazy and put all sorts of rules over there and it doesn't clutter up the reading of the code.
|
|
|
show
|
1:54 |
It's really important to have validation for our methods you should never trust input that's coming off the internet not for security purposes or validation purposes.
So here you can see that we've added some validation to this particular method and I realize actually it was too simple in my little demo I just did, actually I forgot to return an error in the case which things weren't good right, so there's a little bit more we'd have to add to round that thing up but you can get the idea, we're not going to stick with it anyway, so it doesn't matter.
If we look at this code, notice there's one thing we're trying to do take the car and save it to the database, there's a little bit of work to juggle to get the car and the id but this is basically what we want to do, how clear when we go back is that that's the key thing we're doing here, that's the essential point, I don't think it's not terribly hard but it's certainly not obvious, right, not as obvious as it should be, we want this to stand out more, and we want the validation to be some more separate so we can test it more easily and not necessarily go mock out a bunch of things to be able to do that, so if we look at this, we'll see the majority of the code we've written is actually validation, so all that is validation and a little bit more of this is actually just to take what was submitted and convert it into the car as well, right so this stuff right here is taking the raw data and pulling it back into what we're actually looking for.
So we're going to see that we can move this stuff here all the colored stuff that's not green, we can move that somewhere else in something like I said, testable, readable, more clear single responsibility principle type things where its job is to parse and validate the data.
And then we hand it off to this function, like here's the car they wanted to update, it's valid, or it's not valid, what you want to do with that, right?
So that's what we're going to do next with this concept of view models.
|
|
|
show
|
9:56 |
Now let's return to our create auto, and I've added just a few little tweaks to it down here I realized I had forgot to actually return the error and say bad response, so I am now submitting the errors back to the user if they somehow do something wrong, and it turns out I also need to call to dick here.
Okay, so this is all looking pretty good, like this works, let's just run it and verify so if I came over here, I can get all the autos, and you can see here's the format we're looking for and let's go and create one, so we are going to do a post here that's the create auto function we're working on and let's set this to the year 2020 and we'll call this the Opel concept 2020 and here's all the details about it, right.
Now, notice over here, first of all let's just make this invalid, like if it's just like this, right that's invalid json so this should not submit we can come down here and see could not parse your post invalid character at such and such place, ok it looks like I'm missing like a little space there but that's fine if I take one of these lines out, like let's just take this price out I'll call it x price because it's going to be looking for price and we go over here and we'll see in the validation it's looking for the price, actually I think it might not work so well let me take out the damage, okay, we'll try this notice we get a 400 bad request, unexpected keyword argument x yeah okay, try again, could not parse positional thing require, right so we're not really making it past this, let me do one more and let me just put damage is none, null in this case it turns out none on the other side, and I guess damage was okay to be none, but this is not, alright, so 400 bad request, there are errors with your submitted car, brand is a required field, so this is some of our validation, like this is that part right there and let's just see that some other stuff is working so if I make price like negative, I'll have two errors brand is required, price must be non negative, you can give it away but you can't make people pay you you can't pay people to be buyers.
Alright, so this is working pretty well, and like I said this is good, there's no problem in functionality here the problem is like this is really what we're trying to do here and it's totally obscured and it's hard to test so let's move this to a view model concept, so I want to come over here, and again like all well factored sites while this broken into different pieces, so view models so we know right where to look when we want to find a particular view model here, I'm going to start out with just a flat class, then we'll do a little work on this so I'll call this create auto view model, like so, and in here I want to create a class, create auto view model, I think that's solid, and let's go and import this, so what we're going to do up here, I want to create import one of these I want to create it, and I'll call it vm for view model and now I want to give this a function so this part about here this car from dictionary bit, not a big fan of that, let's get this down to just parsing the json body; now, I would actually push this off to the view model itself but it's too complicated to pass the string of just the body because that's bytes encoded so I also have to pass the request and coding type and it's not worth to try to decouple this in pyramid.
So we're going to leave this part here, but we're going to take this dictionary and we want to go and pass that over here, so car data like that, now we're going to say I could have it actually do all the work right there that's totally reasonable, I'm going to make it a little bit explicit about when this gets processed, so I am going to say compute details and so this will compute the details, the validation, things like that and then we'll just say something to this effect, if vm.errors so it's going to have an errors property, and if it does you can bet that it's going to look like this, all right so if there is an error, vm.errors, say there were errors like this now actually, this construction of the error message here let's change that as well, let's go over here and just say this is going to be vm.error message like so.
I'll leave this here for just a moment, because we'll just copy that over.
Okay, so you can see PyCharm is saying you are passing something where it doesn't belong, this function doesn't exist, this field doesn't exist, this property doesn't exist so let's start to change this, let's go over and say it's going to have init that takes a data dictionary and let's just store it for now.
It's all going to need the self.errors, which is going to be empty list, and let's give it an error message as well, I call it error message, like that.
We'll make that a property, not with a little complete thing and let's go ahead and just copy this bit over here, like so, not quite like that.
And we'll just return message, okay so we're just going to move that over and get it out of the way, get the computation and work on that we'll just say there's an error message and it can talk about.
The next thing that we want to do is we want to work with this method which doesn't exist but we're going to add it so it's going to do some work one of the things that we need to capture here is the car, so we're going to parse out the car from the data dictionary, the other thing is we're going to do this validation so let's take this, we're going to move that down and this I am just going to delete, okay so notice here's vm.car use that car there, we're going to pass that along and let's go back down here and put all of this validation so I'll say to do parse car and we'll do all this validation stuff and here this will be self.errors, and we're going to work with that car in a minute but just to replace this variable here, okay so it looks like that's working, now the other thing we have to do is actually create the car so just to get it to work really quick, I am going to say car= car.from dict, now we're going to improve upon this in a second, but let's go and import that, okay so this is looking good, let's go ahead and run it, and see if it still works the same, let's do one more quick double check over here do a little clean up, so get the body, we're now creating the view model and now this is the fixed guaranteed validation that we're doing the parsing and validation, we basically promised it will never get more complicated than this, other than possibly passing in also a car id which we would have to get from somewhere, so maybe a little more arguments to the initializer, but other than that, like we can have as much validation as we want do you want to pass in different types of data and unit test it, well this is what goes in your test and then you look in errors, super nice.
So let's go and run this and see how it works, notice that this better be vm.car, alright, it looks like it's hanging together, I'll give it a shot okay, so now we're going to try this and we should get the exact same message right, there are errors, brand is required, price must be not negative.
Guess what— it's the same, so let's make price not negative, that's the first thing we've got to do, now it's nine thousand okay brand is required field, like everything in our little dealership, it's Opel, this should work, notice bad request, when I hit this it should say 201 created, oh but it did not, what did we do wrong, cannot parse for json, that's right json is not like Python, it's not a fan of the single quotes, now 500 internal server error, non type has no object attribute id what did we do wrong here, let's see, 500 server error, I am guessing— oh, I see, yeah, I see what we're doing wrong here so we're getting the car back and car is actually what we did want to return right we want to return the one created by the repository but the problem is in complete details, I'm not saying self.car, right there, and I will say car=self.car, okay, right this should work, right pass validation, go— boom, car created and notice, Opeal concept 2020, lets grab the id, so we can go have a look, let's go over here and say we want to duplicate that, and we'll go over here and get this yeah, it sure looks like we created it correctly and maybe you noticed before these were strings, now they're not strings, we've made it a little bit nicer because I had to add some work for the validation, it wouldn't compare a string number versus negative, it's less than zero.
All right, so this is looking like it's working pretty well, so let's just go back and look what we've got, again, this view model thing is doing all of the work and it lets the validation become as complex or when the creation and parsing become as complex as it needs to be without messing up our API, and once you get used to working with these view models you know exactly what those three lines mean, okay.
So this is a really, really nice pattern, it is actually more useful when you're doing HTML stuff, because the templates usually require many pieces of data right, templates want like maybe a car, a logged in user whether there's a sale price, like all sorts of stuff and you can like use the view model to carry all that data over to the template but it is still very valuable even here in this API world as well.
|
|
|
show
|
7:13 |
Okay we got our view model working well, let's go back and look at one more thing though that was kind of annoying to me; if I put something wrong here, watch this— 500 internal server error, it got an unexpected keyword argument, hm, that's not great, where did that come from?
It turns out if we switch back to PyCharm, that's right here, remember I told you this little trick that we did, this */* dict, this is not great, if the arguments and the dictionary values don't line up precisely, this doesn't work well, now you could say Michael, just drop this and do a ** kwargs I personally don't like that very much, the reason is if I come over here ant type car like this, it will tell me exactly what I need to pass, brand, name, price I can even put type annotations, or type hints on there if I put ** kwargs all of a sudden it's entirely opaque, what I need to pass, that always makes me crazy, I'm not a fan of that so I don't want to do that, but I also don't want to do this, ok.
So let's actually move this car initialization bit out, right so for example if I just go and let's just take this out this value instead of x damage, we're taking it damage out, if I try it'll say missing positional argument damage, right well you're supposed to pass a damage and you didn't, do we really want a 500 error, or would we much rather, I can tend to get a hey you're supposed to pass the damage that's a required field, you didn't, right so here you have to like know that the initializer missing an argument damage meant you probably didn't send it correctly, so let's go work on that a little bit, so we're going to take this, and say you know what, forget this, this is out, an we're going to go put that creation instead of doing this, we're just going to put the creation here, say car like that and let's actually switch this, say self.car=this, and we could actually push this, we could do this validation here a little bit above, so we could do things like this I'll go and write this out and then go back over, so here you can see that we've pulled these values out and then we'll go and put them into the car we'll say things like brand, name, price, year, damage last seen image and this one does not take an id but we could go and pass the id, if it's here, so we could say something like car id and it's going to come back none like the default value anyway, so we'll pass the car id.
Now, the problem was, we were trying to call this before we did the validation, so let's do this and put it at the bottom, so now we've got the values, we're going to validate it, and we'll say if not self.errors then we'll go ahead and do this, maybe we wrap this around so it's not huge, I don't know but only you set this and try to call this function if it's all looking as valid as we can tell there is probably more validation, in fact his last seen here notice right now it's just coming back like this but we could do something like this if last seen I want to use another module here so we're going to say pip install Python dateutil, this has a really nice date parsing function, so let's take this and remember any time you use something external it has to go over here, ok, great, so let's go over here, now it should know that we could import dateutil.parser.parse of last seen.
And that will convert the data, it takes a bunch of different formats and so on.
Okay, so we could do validation on this if we want to make sure that it's not in the future or reasonable somehow so Ii think we've done a lot of work here to make this much nicer function let's go and run it one more time, what do we do, we had sent it without the damage now we're not actually checking for damage this time we're getting it, but we're using that right here, which returns none if it's not there and for damage that's okay.
Try this again, datetime, okay, now we've got a new problem this is an interesting problem just with straight serialization because we converted this to the correct type of daytime that oddly, is not possible, in json, that's a Python thing not anything to do with what we're doing here, so let's go and we could just say well we ’ ll have to do some work here but we actually don't, we just need a different adapter, so this will be nice, if we go over here and say look if you see a datetime.datetime what I want you to do is go over here and just return the string representation I don't think you actually need that, let's put a d for a date, isoformat that's what I want, so we're going to get the isoformat here, let's just try that again; Oh, this is a problem here, the problem is that well that's great, this normally would work if we just return the car and yeah, we would need to do that here, this two dictionary thing, this one we need to go ahead and say the year, last seen, we need to go over here and say isoformat like that there we go, because we weren't actually, because we're returning a response object we're not going through the renderer, all right, so here you see now we've got our last seen, but we're going to parse it back into a real object when we submit it.
Okay and damage came back as null, let's go over here and say what if we don't have the price, remember this was crashing and saying actually that may make it worse, when we had the x, what that did before was to say oh this is a problem, right, you're trying to pass that to a constructor, now I realize I made a bit of a validation mistake, over here, let's look at it again, as I said, if nothing put a zero, because I didn't want the int to crash, but let's put negative number so that we have something there, alright, let's run it again, now it says, you can't submit your car, the price must be non-negative, so if you don't have a price, it's just going to tell you it can't be negative, right, we could check to see if that exists, create a special error message, and so on, we can get the same thing for the year, if we take the name out it's going to tell us the name is required, right, so let's put all these back the way it was, so now you can see we have a much better validation, and we did that by moving it all this extra work down into the view model, let's grab all of these things, and then we're going to validate them, and then we're going to use them to create this stuff, if we had left it up here, again, this would like balloon up into a big problem.
|
|
|
show
|
2:13 |
I'd be pretty happy to call this view model done but in a real system, we'll have many of these view models for different situations, there might be an update auto view model that's different than a create auto view model and of course maybe we want to create users and dealerships and like there is just a lot of stuff in practice where you probably end up with more than one of these, maybe more than ten these, so let's do a little bit of work to make this easier to add new view models; so over here, I'm going to add the name will give it all away a base view model.
So we're just going to have a class called view model base let's say, I will just put an empty representation for a minute we'll come over here and say you know what, this thing is going to be one of those and let's go ahead and call the base initializer, and things like this like the errors, pretty much any view model that is worth having is going to do some kind of creation and error checking and validation, there's probably a few that don't, but the majority of them will so let's go ahead and give it, like push the concept of errors and handling error messages down to the base all right, so I got that one and then this for now, there are errors with your request or something like that make this little general, and then this can go down there as well; great, so now any view model we want automatically knows how to keep track of its errors and report all the errors that it has encountered.
So now it's really just down to the car stuff, getting the values we need, validating them, I guess we probably could leave that empty ; But just take the default and we'll put the values in here, test them and of course don't create the car if it's not possible or valid, let's just test one more time that our new base class here is doing this job.
Okay, so maybe we want to omit the name, try to create one, no, your name is required, so obviously we want the errors field to store it in, and the errors message worked, so we put this back do it again, now we've created a new car, perfect, so I think we're done with our view model section.
|
|
|
show
|
2:00 |
We saw that our API method once we tried to add validation and proper object creation, really blew up crazy so it was view models to the rescue, and in the end what we did was we created a view model base class that held a few things, and one is the errors— oh and we could have also, I have it here in the slides for you but we didn't do it in the demo was we could have the error status, so like 400 versus 404 versus things like that if you want to return different values, we'll see how to do that.
So we have the errors, the error status and the error text or error message, we could put all those into a view model base and then, we create our view models based on that base class.
So here we have an update car view model in our demo we wrote a create car, here's what update might look like, so update, you have to have the car you're going to update and the data that you are using, so the post to data dictionary in this case, we are holding the dictionary, the car id and not the car and then we call compute details we're actually going to go and find the car by id and if we don't find it, we'll say hey, we couldn't find that car that's an error message the error status is 404, right because the car wasn't found; then later, we'll go and actually create the car and do validation and say well, if some of the validation fails, that's a 400 error and the various errors in the submitted data that you got to deal with those are the problems right, like the price was required, the year was negative, things like that.
Now with this in place, if we go back and look at our API method you can see it's much, much cleaner, so in the gray section we're juggling a little bit of the inputs we have to in the web framework all of that validation is focused just in that little reddish area in the middle and no matter how much we add to this, it doesn't really expand or grow this and then the thing we're actually trying to do, update the car or create the car happens very clearly here, so you can see you we're using the view model, we're creating it and passing the data it needs to get started calling compute details, if there were errors you respond with the error status and the error text.
|
|
|
|
43:54 |
|
|
show
|
3:01 |
To this point, we've worked with something that acted kind of like a database, we could query it and it would give us things like give me this car by this id we could create new ones that would be there, but that would all vanish when we would restart and that's just because we were basically using dictionaries in memory as if they were databases.
It's time to get real about databases and actually create a real database that has persistence, potentially cross process, access, things like that.
So we're going to look at using sql ite and sqlalchemy to have a persistent back end for our web API.
Sqlalchemy is open source, it's been around since about 2005 if I recall correctly, and it's certainly one of the most powerful, flexible and popular ORMs or object relational mapper for Python, so very, very popular especially if you're not using Django ORM, then it's very likely that if you're talking to relational databases, you're using sqlalchemy.
So, that's what we're going to use here in this course just beware this is not a comprehensive course on sqlalchemy, we're just going to cover just enough sqlalchemy so that you can follow along, just enough sqlalchemy to basically have cars and users in our application in the end.
So we're not doing much with sqlalchemy, but certainly this is a good jumpstart.
So let's look at the architecture really quick; now in Python, we have this thing called the db api and this is just the built in way, the built in API for talking to databases and it's consistent across different types of databases like sqlalchemy, microsoft sql server, oracle, mysql, all these things can be talked to with the right implementation of db api.
Now of course, sqlalchemy itself is built upon db api and talks to many different types of databases, we'll see that sqlalchemy is made up of two parts there's what's called the sqlalchemy core which manages schemas, tables, there's this thing called engine that does connection pulling and translates the queries that you sent to it, into the dialect of the database you're talking to, like for example, microsoft sql server and oracle have different ways to express parameterized queries, when you are in sqlalchemy, you don't care, it translates that into the various styles of sql that each of these database engines use.
And so that's really helpful, and you can work just in the core layer like an example of a website that just uses the core is Reddit, they just use the core, they don't use all the other higher order features of sqlalchemy, but we are going to; we're going to use the ORM, we're going to create a car object and a user object and model what we're doing in our application in sqlalchemy and it will automatically create the tables from this, it will automatically translate queries in terms of the objects to and from sq l, the language, to the particular dialect of the database that we're talking to.
So there's these three levels that you'll be working at and we're going to pretty much focus on the ORM part, but you'll see we'll have to work in the core layer a little bit to get things set up.
|
|
|
show
|
2:16 |
Now in order to use sqlalchemy, there's a couple of things we're going to need to get set up as foundational items before we can model our classes, with sqlalchemy.
The first one is to just indicate that hey we depend upon sqlalchemy now, so it's going to be important for later, when we actually want to deploy this, right, so I could click this button here, I didn't do it last time, I'll do it this time.
We wait a moment, great it looks like everything was installed successfully into our virtual environment, we could of course check if we say pip list, now we should have sqlalchemy right there, apparently 119 is the latest version, ok so we have sqlalchemy here; the next thing we need to do is we need to create a base class, now the way it works basically is for each database that you want to talk to you created base class, and when you derive from that class, it tells sqlalchemy here is a type I'm supposed to manage and then you can do things like create the tables based on all the types that derive from this type, things like that.
So the first thing we need to do is actually create this base type now it's really simple and it is not at all complicated, but I am going to put it into its own file, just so that you know where to go to manage it, it's clear where this base class lives, things like that.
If we have say like an analytics database and a core database, we'd have two base classes, like a sqlalchemy core base and a sqlalchemy analytics base, but, we are not that advanced here.
Okay, so let's go and create a new file, I'll call this sqlalchemy base, alright, so we're going to import sqlalchemy.ext.declarative, let's do it this way, let's say from that import declarative base, so this is like a factory type thing, a function when called, will actually create a type dynamically, like I said, there should be one type per database, that all of your models derive from, and really huge one that I guess could make sense to like have multiple ones if they never intersect with each other, but I always just create one, so we'll call this sqla l c hemy base, it's going to be this, right, so this is like a factory function, factory method that is going to create a type then we can use that type to derive from.
So like I said, there is not a lot going on here, but this is what we got to do to get started.
|
|
|
show
|
3:05 |
The next thing we're going to need to do is do some set up code set the connection string and some of the pulling settings and things like that, so the next thing I'm going to do is I'm going to create this thing called a db factory or db session factory, so in order to work with sqlalchemy, we work with this thing called a unit of work, which is manifest in this session object in the sqlalchemy type system.
So, we're going to want to basically configure this thing and then we'll be able to ask it for sessions, so the next thing I want to add is something I'm going to call db session, let's call it db factory, so we want to come over and create a class and it's mostly going to be static, but we'll say db session factory, we'll go with this, and down here we're going to have a function that does like overall setup for the system so I'll define a function called global init and we're going to call this one time and it's not going to be a self, it's going to be a static method, a static method, class method, it doesn't matter but it's not going to be an instance method.
So we're going to come over here and we're going to do a couple of things, the first thing that we want to do is we want to come up with the connection string, so the connection string of course varies by database if we're talking to mysql, it might be a machine name and something like that; if we're talking to sqlite, with it's going to be file based and we're going to use sqlite here because it's a no configuration database built in to Python, right so it's super easy for you guys to just pick up this project and go, there's no like oh you forgot to set up the database so we'll just go with this, with sqlite, in order to do that we need to have a location that we want to put these files into, so let's do this and make like a data folder, call this db, just four source control so this thing gets created I'm going to create a file here called placeholder.txt once we run it, it's going to basically put a database file right there.
So let's go back over here and we want to figure out that place so we're going to import OS, all right, and we're going to import our own package name which is a restful auto service, okay so we're going to use this things to figure out the past, so we're going to say working folder= os.path.dirname so this will give us the directory, if we give it a file to give us the directory that that's contained in, what file are we going to give it, the root file for our package so that's going to give us this directory here, and I somehow want to take that and combine db as a folder and some file name, so we'll say file, it's going to be equal to os.path.join working folder db and let's just call it dealership.sqlite, the extension doesn't matter but I always like to put sqlite or something like that to like go this is a sqlite file.
Alright, so this is the actual file that we are going to work with, and finally, we're going to get the connection string it's going to be sqlite:/// plus the file so then we have our connection string and we're pretty much ready to go.
So once you have a connection string the next thing you have to work on is the engine.
|
|
|
show
|
5:08 |
So now that we have our connection string figured out let's actually print this out really quick, print connection string, and of course, we're going to need to call this function we want to make sure to not forget that, we want to do it once right, at start up so you can imagine down here into the under init we go and let's add something here that says config or init db, something like that.
Now, we could pass this config file here, we're not actually passing anything, but if we did, so over here if we passed in say like the base file name something like that, then we could store that file name here, we could just add it it's super easy, just like this, like db file, just go ahead and do it, huh so let's go here, db file name, so we can pass that in there and we'll just put it let's make the file name the same, db file name and we just put this here, now it doesn't go in quotes, we'll just put it like this, okay so we can go grab and we make sure this is in production as well, or things are going to go bad later, I'm sure, so I am going to put this here, so we can go grab this value in our dunder init, so we're given a config, you can say settings= config.get_settings, like this in the settings it's a dictionary, so I can say db_file = setting.get (' db_filename '), like this, standard dictionary stuff, and then we'll just call, let me copy the name here, DbSessionFactory.global_init, so import this and call global_init and pass the db file, over here it's going to print out what the connection string is based on the file, so if I run this, everything should be looking good, connection string is really long, oh my goodness look at that, but it's restful auto service db sqlite.
And that's looking really good, notice there's no file over here yet but when we interact with sqlite, if there's no file it's going to create it, so that's not a problem, so we comment that out but that's going to be very, very helpful.
Now the next thing we need to do is basically work with connections to the database.
It doesn't matter what kind of database we're working with we configure it basically the same, right so it's going to create a pool of connections and when things get returned to the pool is going to close them, roll back transactions, things like that so what we're going to do is we're going to create this thing called an engine so we continue to have access to sqlalchemy up here like so and then we're going to create an engine, say sqlalchemy.create engine now there's a couple of things we can pass here, first thing we got to pass is the connection string, again, this makes me crazy * args ** kwargs, thanks for the help folks, so anyway, we pass the connection string, the other interesting thing is we can say echo, here we can say echo=true and now you want this off in production for sure, you probably want it off normally, but if you're new to sqlalchemy and you want to see what's going on, this will basically make sqlalchemy log all of its behaviors, all those sql queries that sends off to the database things like that will spit to the console or the terminal; so this is kind of helpful, we'll go ahead and keep that there.
Now finally, you would think what we need to do is store this engine somewhere so we can use it for stuff, but not really, the idea is we're going to work with these things called sessions and the session needs the engine to do its work, so what we're going to really store is we're just going to store this thing called a session factory and once we have the session factory and we associate the engine to it it will just hold a reference to it, so we'll be golden.
So let's go over here and tell this thing that it has a session factory, that is nothing for the starter here, and we'll go ahead and allocate this we'll need it in just a little bit when we want to do anything interesting so we're going to go over here and we're going to need another piece of sqlalchemy, we're going to need the ORM layer, because this session unit of work business is only an ORM thing, so I'll come over here and we'll have a thing called a session maker now the session maker is going to need things like to know how to talk to the database as part of its session in life cycle so we're going to give it this engine here, right, so this we're going to hold and let's make this a little simpler, make this a class method like so, we'll come down here and say cls.session_factory is this, okay so this we're going to need later and because we're holding it here it's implicitly holding on to the engine which had a connection, so everything will be all wired together and all we have to really keep track of is this session factory, let's go and just do the one thing that we're going to have to do while we're here let's define add another class method, we will say something like create session, and we'll just go to the class, to our session factory, and we'll call it and return that value.
Okay, so the way sqlalchemy works is we want one of these for basically one of those per connection string but every time we create a session, we're going to have to allocate a new one because that more or less represents a transactional set of processing, a transaction in the database.
|
|
|
show
|
8:02 |
Okay so we have the basic foundational stuff that we need for sqlalchemy in place, we have our base class, we've got our connection string, we've got our engine, we've got our session factory, alright that's all like boiler plate, basically it doesn't change at all per system.
What is very unique to this particular app, is the type of data models, right, so let's go over to this car and change how it works, ok so we've got this stuff about parse, we're not going to need that anymore, let's create this car but this time instead of doing this stuff here we're going to leave this to dict, but instead of doing this we're going to want to make this car a database object, basically so we're going to come over here, and we're going to say this will be the sqlalchemy base, we're importing this is the one that we made at the beginning of this chapter so then we're going to come down here and we need to define the things that are associated with this object and the way you do this in sqlalchemy is you basically say you define what look like fields, but they are really descriptors and they basically both tell sqlalchemy what kind of data and how to model it at design time and then at runtime when you can instance of it, it'll become that value, all right, so what we're going to start out by saying is we're going to have an id and this is going to be id just like we had before, this id right here and it's going to be a string, so in sqlalchemy, let's go ahead and import sqlalchemy, we'll come down here and we'll say things like this is going to be a column, then we have to say what type sqlalchemy.string, ok, and I guess I'll leave the name space module name on there for you just to make it really clear where this is coming from, okay.
Now, it doesn't have to be a string, it could be an integer but I think we want to leave it to be a string, so this is interesting, let's say this is the primary key, the id is the primary key now how to get a value, we'll come back to that in just a second.
The next thing we have to have is a name, which is again a string but this time it's not the primary key obviously, damage also a string we're going to have the year, now the year is actually not a string, it shouldn't be a string, anyway, it's going to be an integer, this is like 1973, okay we're also going to have to last seen, which is another type of date that's different, so we'll have last seen this is a datetime, okay, so it's a datetime object here and these are basically the two ways in which we're managing the date, one was the year it was created which is obviously just a number and then the last seen, we might want to sort by these or somehow usually sort by these, or maybe even match like I want to see all the cars of 2001, whatever, right so we'll probably want to consider the kinds of queries that we're going to do there let's go and say we're going to have another one of these, and we're going to have an image, also a string, but unlikely that we need to say index on that or anything.
okay, so here we have our class and let's see if I miss anything oh we don't have a brand, let's do a brand, brand, name, price as an integer, no, price is not there, price, we could say that's a float, but it hasn't been a float yet it's just an integer in our data set, so integer it is, price, year, damage isn't there, last seen, image and id, great.
Okay, so now we've got this object again here, this is good, and the other thing we might want to control is where does it go in the database, like how does it get represented so we can come here and say table name equals and we can put whatever we want like autos or whatever, I find that life is basically easier if it exactly matches the type when you get into complex systems, because you have to talk about relationships and sometimes it refers to the table and sometimes it refers to the object and if they're the same, then you don't have to think about which is which, so that's all good, now the other thing we want to do while we're already here and already doing this modeling is how do we want to query this and how do we generate a key, primary key.
So, let's talk about the queries first, when you're working with databases, it's super important that you think of all the queries you're going to do and that those are almost always— there is certainly times where it doesn't have to be the case but if it's anything that you care about the performance, is that it has an index, some things have to be unique some things have to be just fast, but this is where you're doing a where clause or an order by clause, so let's go through and add the indexes, so you might want to say show me all the brands, right, I want to see just the Chevrolets, just the Opels whatever.
You also might want to sort by brand, if you're getting multiple ones maybe you want to group them by brand, so either way we'll have index=true and that will make both of those operations faster.
Name, it's unlikely we care about quering by the name, it's very funky thing, we referred so far in our API everything by id anyway same thing for damage, image as well, you might want to check, show me all the things that don't have images, maybe, then like having an index might help, but we're not going to add one.
Sort by price, minimum price, maximum price, absolutely so price is going here, same thing I want to find all the modern cars that are less than five years old index right there, and also you might want to sort by most recently seen so let's add an index to make sure the sorts and filters there are also quick.
The other thing that we might care about is that certain ones of these are required like brand is required, name is required, and we have our validation and our view models but we also want to have that validation at the database level in case somehow someone skips that, right.
So let's go here and we'll say this is nullable, equals false by default nullable is true they are not required but if you say this then it's basically in order to insert this object it's going to have to have a brand, a name, damage is optional image is optional, price is required, year is required and the last seen, let's say that's also required, but for last seen maybe like when we first created what we actually care about is is well we are just seeing it now, we just put it in there, so instead of saying you must supply value let's let sqlalchemy actually supply the value for us, so instead of doing nullable = false, let's say default and give it something for the default.
For the default, we can give it a function and it will call that function to generate the default value when it saves it, when it inserts it, so let's go up here and say import datetime and the function I would like called is now, datetime.datetime.now so make sure you don't put it like this, no parenthesis, just the function the default is the function, right so it's going to call that and it's going to set that value and you can imagine that the return value here should be that type and of course it is.
Okay, so this is all good, the other place where we need to worry about how this gets created, how these default values are when we insert an object, let's just have this thing create its own id, if this was an integer, we could say auto incrementing is true and it go 1234 and that would be fine, but it's not so let's use this default thing again here, now the thing I want to use if we come down, let's just go here, I want to use this like that, uuid4, so I want to take this and basically have the primary keys look like that when those are basically what we had already so lets just do that here now, if it wasn't for the string I could just pass it this, right, and that would be cool but I want to call string on it as well, so we can give it a lambda, a no argument lambda that's going to return this and of course we have to import right at the top, right, so here our default value is going to be something that we create in terms of function and down here we just say call this other function that already exists.
All right, I feel like this type is good to go, we're pretty much ready to create this and insert it but again, we have no database, how do we do this?
|
|
|
show
|
2:36 |
So we've modeled our car, and I think we have that thing pretty much dialed in at this point, the next thing to do is actually create the database so that we can start working.
Now, relational databases need the schema builtin, all that kind of stuff, and it turns out sqlalchemy is great for doing that so we can come over here and if we have access to the sqlalchemy base class which if we import it of course, we will, it has this thing called metadata now it doesn't show up here but just roll with me on this and the metadata you can call create all and provided the engine and that line right there will go look at the database if it doesn't exist at all, like sqlite here, it will create the database and then it will look at the tables and create any that are missing, it's important that it will not update existing tables so if I run this then I make a change to my car class it's not going to work right, this create all will not refresh that schema but it will get you started, right; afterwards you have to run migrations or scripts and things like this, or if there's data that was auto generated just delete it and generate it again.
So let's run this and because we have echo= true going on we should see some stuff happen, look at all that, boom, boom, boom, we're doing all sorts of stuff going over here, creating index on year, index on last seen, a bunch of stuffing you can see it's creating the table car that's what we told it, with all of these values, varchar, integer, datetime, things like that, so let's look over here and see what we got notice, nothing here, click, now wait for it synchronize db, ha, there it is, sqlite, how do we look at it, over here we have a database view, I'm going to drop it over here and it's not going to work, by the way the database view only works on PyCharm Pro, the database features are not part of the community edition, alright, so let me drop this over here, and it kind of gives you a squiggly and you open it up and things are not great, so the reason is I've got to do one little bit of configuration to PyCharm, so let's go to properties and notice it thinks this is sqlite, that's pretty solid of it, but it says the drivers to understand this to basically manage this are missing from PyCharm, so you want to install that.
Ok now we've got it downloaded let's hit test connection, just to be sure— success, all right cool, so if we go back over here and we hit refresh, now if we look in there, we have the car and look at all the pieces it's got our indexes, it's got our column types, our primary key all those sorts of things.
So that is solid, but there's no data in it yet so the next thing we have to do is insert some data into the database.
|
|
|
show
|
12:08 |
Ok, so we pretty much have sqlalchemy up and running, 00:03 everything is ready to go, we've got our tables model with our classes, 00:07 we've got our session factory, things like that.
00:10 But we can't really use it yet, so if we try to go 00:12 let's go back to or api here, if we go in here notice, 00:15 all of our data access is through this repository class 00:18 and the cars, they're not really coming out of what they're supposed to 00:23 they're just like loading this in memory thing 00:25 if we go look at this load data it's just like load the csv, which is fine, 00:28 that worked well for us as a temporary solution, 00:31 but that's not where we want to be.
00:33 So let's go and actually convert this to use sqlalchemy .
00:37 So, where are we going to put it, we'll get rid of this in a little bit, 00:41 I'm going to write a function that imports the entire csv into sqlite, 00:44 but for now, let's just assume that we're going to start 00:47 with empty database and go from there, and write these functions.
00:50 So what's that going to look like, so let's start with this simple one, 00:53 this is going to involve our session factory, 00:55 so any time you want to talk to the database 00:57 you're going to create one of these sessions and interact with it, 01:00 so it's almost always going to look like this, session equals create a session 01:03 and then do sqlalchemy stuff, so we're going to go here to our db session factory 01:07 and we'll call the one function we'd wrote create session 01:11 and at the end, we'll say session.close, right.
01:14 Now, in here in the middle, we somehow want to do a query by car id 01:18 and this is where we got to work with sqlalchemy, 01:21 you may have worked with it before and this is all old hat to you 01:24 but if it's new, here's how it works— we're going to go to the session, 01:27 and I want to say create a query of some type, right, we'll create a query of car, 01:30 and we can do things like filter, no intelisense by the way 01:34 which is unfortunate, order, order by, and so on.
01:37 So let's start with filter, that's the one we're looking for, 01:40 we want to say that the Car.id == car_id .
01:46 Now, what that's going to do is it's going to return potentially many cars, 01:50 it turns out that's the primary key so that is going to be one or zero, 01:53 but what we get back from the query filter operation here is a set 01:57 that we have to work with, and if we want, 02:00 if we know we're join just after one 02:02 like a primary key query like this, we'll just say first, 02:06 so we'll say car, now car may be none, car might be a thing, 02:10 but it's either going to be the car we're looking forward it's going to be none, 02:13 so we can go like this and then down here we just return car 02:16 we want to make sure we closed the session before we get out of here, 02:19 we could put that into a try finally but it's not a lot cleaner, 02:23 so I am just going to roll with this.
02:25 So this is kind of how it's going to look, Let's go do the one where we're getting all of the cars, 02:30 we're going to create a session, and later we'll say session.close, now how do we want to get all of them, right, 02:37 so it's going to be very similar to this, 02:40 we are going to start out like this, we'll say query, say query is this, 02:46 so it's going to be that, and we may want to apply this limit 02:51 if it's a number, like if it's 27 or something like that, 02:54 if it's none, maybe you just want to return all the cars, right, but we don't want to just return them raw at the database, 03:00 we probably want to do some kind of sort, so we'll say order by 03:04 and then the way this works is you name, you specify the column 03:07 like this car.
let's say, let's go with the year, 03:11 and we probably want the newest ones first, so we'll say .descending, like this 03:15 so that's going to sort descending.
And now, we can do a cool trick for our paging and skipping and stuff, 03:21 which really is like this limit is a special case of that 03:23 so we could say like this, we could say if limit, right, if there's some number specified here we can say cars is equal to our query and sqlalchemy — it's not actually executed yet 03:34 this is like the potential of a query if I called first or I called all 03:39 there's things I can do that would execute it 03:41 but this is just the potential of a query to execute so we can actually do this, we can say I want to go from zero to limit and do a slice 03:49 and that slice will manifest itself at the database later as paging, 03:52 so it will like only return the first 25 by default I think we're doing.
Down here we could say well there's no limit than cars is query.all 04:02 and that will basically turn that into a list 04:05 which is important, we can't just return the query 04:08 we want to make sure it's totally executed and done before we call close here, 04:12 and then we'll just leave the return cars like we had before.
So this is going to be great, we've got our car by id, and then load data, we're not really going to need 04:22 generate ids, we're not going to need, add car, this one gets to be interesting, so on one hand we're going assume that this is going to be a car object, right 04:32 we could test it and so on, but we want to be a little careful here, right 04:37 because it was just in memory, we're like I'll just stick it in here 04:40 but if this came from a different query, from a session that was detached or whatever 04:45 it might get a little weird, so what we're going to do is 04:48 we're just going to like create another car copy the values over and insert it to the database 04:52 so how does this start, we'll create a session, surprise 04:55 so, of course we always create a session, and then I'm going to say db car equals car like that 05:01 then I'm just going to copy over the values into this 05:05 so we have the inbound car, we have the db car 05:08 db cars we are going to save, so I'll say to do set values 05:12 and then the way to insert is I'm going to go to the session and say 05:14 here's a new object for your database, 05:17 it's going to look at the type an d say oh that goes into the car database and save it, and then this isn't actually do anything, this is done within a transaction 05:25 which would roll back, so we are going to say session.commit 05:28 and then when it commits, it saves a car, it actually generates all the default values 05:34 so the default id, if it was auto incremented 05:37 would auto increment in the database in assign it 05:40 and so this is like after we committed, this is the car that's like cut all of its value set 05:44 so that's great, actually sorry, db car is the one we want to return 05:48 so this is going to work really well, except for now we got to copy the values across 05:53 so we'll do things like db_car.year = car.year, 05:56 very exciting, and we have a lot into set, alright, here now we've set it, 06:01 there's probably not an image set on the car when it comes in 06:04 so we'll set this one, I guess we could do this, 06:07 we could say car.image, if car.image, else get a random one and set it 06:13 okay, so this is looking solid, we're going to add this car 06:15 save it to the database you know, add it to the database 06:19 commit the transaction represented by this session 06:21 and then give back the fully populated value.
06:24 Similarly, we're going to do something over here 06:26 so let me just copy this bit, the difference is with this one, let's get rid of this little part here 06:32 the difference with update cars, we want to update the existing one 06:36 so instead of just saying I'll create a new car 06:39 we're going to run the same code that we ran up here to get the individual car, like this, and then we want to copy those values over 06:52 and this will be a car.id for the car that's coming in, 06:56 we'll copy all those values across, we want to add, we're just going to say commit so how does that work, like when we query the database to get this back 07:05 it knows that this thing came from the database 07:08 and as we make changes to it, it marks this object as dirty 07:11 meaning to be updated, so when we call commit 07:14 it goes oh, this car was modified since it came back from the database so push all the changes into the database, alright.
And then, last thing to do here for delete, 07:22 slightly more complicated because it's basically nothing going on there 07:25 when I get the car, say if not db car return then we'll just say session.delete db car, and session.commit okay so that's all there is to it if we get a car back by id they ask to delete, like we called add, we call delete, 07:46 and then we commit the change that we wanted to delete it.
Ok so now we should be in pretty good shape 07:50 let's run this and see if I left anything out; no, you notice it's talking about the car table 07:57 but it didn't do anything because it already exists, 07:59 alright, try again, okay, click and ta-da, empty 08:04 that doesn't sound very exciting, does it, but it is, it's very exciting, 08:08 it didn't crash like we did that query, notice down here 08:10 select star, all that craziness is star from car order by year descending 08:16 it just happened to be empty.
So, let's go over to postman and see if we can create something now.
08:23 So here we have create auto, we're going to do as post to this body 08:27 Opel, let's just do they get really quick here, look empty array json, okay so if we create this, this thing should exist 08:36 and if we left the image out it should populate it for us, 08:39 all right let's give this a shot, 500 server error, what have we done— oh yes, the way that we were doing this is not so good 08:46 this takes one argument, but nine were given, not amazing, 08:50 all right let's go here, so remember this business right here, 08:53 there's a couple of ways we can create this object and set its value 08:57 but we can't say brand equals brand, 09:01 name equals name use keyword arguments here 09:03 clean that up a little bit, ok, so yeah when we were in our view model we were allocating the car we can no longer create it using that custom initializer we had, we have to use keyword arguments 09:14 or create an empty one and just set the values, let's try this one more time, but the fact we got this far is looking pretty solid, let's try it again 09:22 ta-da, how cool is that, look at this, we created an object 09:25 and here, its id is even set, remember that came out of sqlalchemy, 201 created, let's go and see what we've got in the database; boom, we have one, awesome, let's go and make another, so let's create another one, this will be Opel oldie, and this is going to be 1500 euros for the price and the year is 1988, and I'll just leave it like that, let's take a last seen away, 09:54 let's take the image away and damage away, like these are the required values, so we should be able to go and actually work 10:01 by just running that, so let's see what happens when we execute that create 10:05 oh cannot parse, expected double quotes, did I miss something— oh the extra comma, okay try again, the last seen field is required, well, I actually don't think it's required any more, let's go change that, 10:19 where is our view model, we're already in it 10:23 so remember, the database is now generating a last seen so let's just let the database generate.
Now this car, notice it was last seen on 5.5, this one generated and you can see perfect, it created all the stuff 10:39 and it was last seen there is the time of the recording, right now 10:42 May 9th, 2017, so let's go over here and do a get again, notice, we've got our concept here and then we've got our oldie.
And why was it sort of like this, recall we're sorting by year 10:55 let's add one that should land in the middle of these things, so an Opel, I'm running out of my understanding knowledge of Opel, so this would be 2000, and let's put the year 2001, 11:08 so that should be in the middle right created just fine, now, because we're sorting by the year, I didn't select that, sorting by the year, we've got 2020, 2001, 1988, perfect, 11:20 how about that for adding the data layer, 11:23 now what's super notable about this, I think, in addition to a lot of things 11:27 we did not change this code, like we literally did not change this api, 11:34 any of the api functions here to make querying the autos, 11:38 to make creating autos, you'll see that updating 11:42 also would work the same, there's nothing we had to do here, it's because the creation and validation happened in the view model 11:49 and the repository has taken care of all the rest, 11:52 and so you can tell we have a really well factored application here because each type of change we had to make one talking of the database and one about creation happened those were all isolated 12:04 to a single file, single class whose job was to do that, so I'm really excited that it turned out that way.
|
|
|
show
|
7:38 |
Let's round out this database section by focusing on some core concepts around sqlalchemy ORM.
The first thing that we did was we created a declarative base, remember this is a factory function that will create a type and this type will then be used for all of the base classes of all the models that we want, all the objects we want to store in our database.
So, we come over here and we say sqlalchemy.ext.declarative.declarative_base (), call that function it will generate a type, now this single base type when you derive from it will register that hey here's another type that I'm going to manage so for example, if we have a class car that derives from sqlalchemy base and service record and owner we can go to sqlalchemy base this type we just generated and say create the database structure to deal with and manage and store all the things that you are derived from.
So this is usually the first step in the modeling side of things.
Now, once we want to create these individual classes that model the data in our database, we're going to of course as we saw it derive from sqlalchemy base and then add a bunch of columns here and these column types are both at runtime instances of the value they represent, so at run time the id will be an integer, but at design time or query time they will act more like schema descriptors, ok.
So the way it works is we name all the fields, so id, name, year, price, image and so on, each one of those is a column and then we can configure that column like the id is an integer, the name is a string, the price is a float and so on, we also should indicate which one is the primary key, so id is a primary key, and since it's an integer, we might want it to just be managed in the database so we can say auto increment equals true, as soon as we save it a new id will be stored there for that record.
Notice also we didn't talk about it in this chapter but sqlalchemy represents and models relationships with cascading deletes, lazy loading, all sorts of stuff, so if you need to model relationships be sure to use the sqlalchemy structures to do that.
Now, sometimes we would explicitly set the values and sometimes we would like the system to just generate them; an example we already saw was that auto incrementing primary key the default values, you know, whatever the database decides the next id number it's going to be but, what if we have some other type, for example, what if we want to have a last seen field and if we're updating the car in the database, maybe we want to manually set this last seen but the very first time it's totally reasonable to say well we just put it in the database so we're seeing it now we shouldn't have to explicitly set the last seen value which is if you create a new one, its value is when it gets inserted, so how do we do that in sqlalchemy, we can set a default on the column and that is going to be a function that returns the right type of value.
So here we have our last seen, it's a datetime and we're going to pass the new function, so remember, don't call the function don't say datetime.datetime.now () that will actually just basically give you a default value of whatever the time the program was run, you would like this function now to be called during inserts so make sure you leave off the parenthesis, you can see that it doesn't have to be a built in function it could be like some kind of lambda, so what if we want an interesting primary key that it is basically the uuid4 32 characters or something like that without the dashes so we can specify a specific lambda expression it takes no arguments and returns the right types, here we're returning a string into our id column which we've now adapted to be a string.
We also should add indexes and keys, we've already seen primary key that makes a lot of sense so primary keys automatically have indexes but if we would like to say go to our database and say show me all the cars and show me the ones that are last seen latest, so some kind of sort on the last seen field; or show me the cars that have only been seen in the last week, then we want to make sure we add an index here and all we have to do is say index = true and sqlalchemy will manage that for us but indexes dramatically improve performance when you have lots of data so it's very very important if you want your database to be responsive you have indexes for anything you're going to sort by, or you're going to filter by.
Now we can also enforce uniqueness constraints so we didn't do this in this sample because I'm not sure about the data set but imagine the name of the car somehow had to be unique, right we could have an index that is also a uniqueness constraint by saying unique = true, then if we try to insert a car that has the name that already is in the database it will crash and say no, no, no, you're going to conflict with this, things like that.
The common use case might be e mail address for a user's table.
Right, now once we have it all modeled, how do we create the tables in the database, so one thing that we didn't have to do, it's kind of strange sometimes you have to do this sometimes you don't, it just depends on how you interact with your code before you run this create all step here, sometimes it's important that you explicitly import the types that are going to be modeled in the database, so here we're doing import car, import owner, a bunch of other imports potentially, because if for whatever reason those modules have not been loaded by the time you call sqlalchemy base metadata.create_all you are not going to have that table, it's not going to create it, so you have to kind of show the sqlalchemy base type those things and the most reliable way to do that is just to explicitly import them in this particular file.
Then we need to create a connection string our example use sqlight so we use sqlite:/// some file and if it doesn't exist it will automatically create that, and then we create an engine and the engine is a thing that does connection pulling and things like that; you can say echo = false which makes it quiet, or echo = true and it will spit out all kinds of information about what it's doing, that's good when you're getting started, you're not really sure what happens when, flip that to true, watch it for a while get tired of it, turn it back off.
Once it's all ready to go, you can say sqlalchemy base, go to the metadata and say create all, pass it to the engine so it can find the database and it will go and create all the tables, indexes, columns etc.
And then, you're off to the races, you have a database that maps exactly to your schema.
Now, remember create all only makes new things it does not update so if you make a change to car after the table exists, that change will not be moved to the database, you got to manage that directly in the database.
Finally, if we want to talk to the database, we're going to need to use this concept of a unit of work, in sqlalchemy, the unit of work is manifesting this thing called the session factory so we're going to need to create a session factory and that is created by calling this function session maker and passing the engine, so this is basically where the session factory it will behind the scenes manage the connections and the unit of work and the transactions and all that kind of stuff, so we give it the engine that we just work with these sessions.
So once we have this, we have one of these in the entire program one instance a session factory basically per connection string.
Then, every time we want to do a unit work, a couple of queries and insert an update, and delete and put that all together and commit or don't commit that we need to use this session factory, so we'll say session of factory and call it, it's a callable, and it's going to create an instance of this session we'll do things like ads and stuff, do some queries, maybe add some more things, change some of the items that came back from the query and then when we're ready to push to the database, we just call commit.
If you don't want to commit this work, right if you only did a query there's no reason to commit it back, there's nothing to save you might as well just call session.close, so that's a pretty quick whirlwind tour of sqlalchemy, but it shows you the vast majority of the moving parts and I think you're ready to get started with sqlalchemy.
|
|
|
|
25:47 |
|
|
show
|
6:29 |
In this chapter, we're going to add a type of authentication that is super common among APIs.
Basically what we're going to do is we're going to pass an API key along with our client to send this data over basically to show who we are maybe this is just because we don't want to have a public API that anyone can use for free or just out in the open we want to be able to track who's doing what; maybe the actions are actually modifying things on behalf of a user think of github, if you say create a new repository and you pass an API key, right whose account is that going to be created in— yours, right.
So we're going to talk about those types of things in this chapter.
Now, let's start right away with a demo, so what we're going to need in order to get started is, unless we just want to have one API key for the entire thing, which doesn't make any sense, is we're going to need users, so let's go and add another sequel alchemy type here and I'll call this user, and we're just going to have a class called user and it's going to derive from sqlalchemy base as we've just learned, like so.
Now let's give this— let's go and explicitly set the table name first before I forget, then let' go ahead and give it an id and we are not really going to do much with the id it's just going to be autoincrementing, so we'll have a column, we can import that from sqlalchemy, and it's going to be an integer we can import that, and it's going to be a primary key, and it's going to be autoincrementing true.
So here's a nice simple autoincerementing id and let's also go and record when these users were created, like whenever I have accounts and account behavior, like a little tiny bit of auditing, always good; so we'll go and create a datetime, call him here and we'll set the default to datetime.now.
Remember, don't call the function, pass the function.
Ok, so now we get into interesting things, we probably need a username or an email, often those are actually the same thing in the database, email is name, same thing.
So let's have this be a string from sqlalchemy, let's say that it's nullable, it's false so that we require it, it has to be unique, and we want to be able to index it, we want it indexed, so we can query it, if this is the way you log in with your name then obviously we would like to have that unique, we can't have multiple users.
We're also going to have a password and it needs to be super explicit, this will be hashed password, and we don't need any indexes, or anything that, technically it doesn't have to be unique although you kind of hope it is, so remember never, ever, ever, store plain text passwords you always hash it, use something like passlib working with this is really out of the scope of this project, this course, but if you are going to have a password, hash it and use passlib.
Okay, now we get to an interesting thing that we're actually after, the API key, so in here, it's conceivable that we'll have many API keys and you can expire them and give them different privileges and whatnot, in our world, things are simple a user has a single API key, alright, and you guys can extrapolate the data model if you want to do something more adventurous.
So here what we're going to say is the API key, it has to be a string, let's go ahead and have it automatically generated, so when an account is created that it's just going to automatically be there they might not know about it, but if they go and look in their little section and their user account if we had one, it would say your API key is such and such.
So let's set this to be a function that we're going to call, an empty lambda that's going to return a string representation of uuid4 alright, so that's a decent key there, and we also probably want an index because when our API call comes in, the thing we're going to be given is the key and we need to get the user, so we absolutely want to have this index = true.
Okay, I think that's going to be solid for our code here, I suppose one other thing we could add although the way we're generating it it's not a problem, but this is also like an effective user name, so let's go ahead and set this to be unique, although it's going to be kind of funky to get that generated, there's no reasonable chance of that being duplicated, but maybe somebody copies a value from somewhere and tries to set it somewhere else, so a little bit of protection there as well.
Now, let's look at our database, and in this one we don't have our data so we have car, and we have some management details there, let's go and rerun this, and then refresh this.
Now, notice there's no user, sadly and for whatever reason the system is just not pulling this in, it hasn't been pulled in yet, we could start using it other places and it would probably be ok but let's just do this, let's be really explicit here, let's just say import, so we'll just import the user here.
Now, we're not going to use it in any way, but this will before we call this function here, we'll sort of show sqlalchemy base the user class.
So if we try again, we refresh, magically there's our user, with everything we need.
Ok, so we have our user, let's go and write one quick query over in our repository, so we are going to be doing a bunch of stuff, and down here, we'll ave a class method and let's say what we want to do is get, I'm going to call it something like that, find user my api key, it's just going to take an API key, we could even tell them hey this is a string and it returns a user if that's what we want.
Ok, so then just like before, standard stuff, so we're going to come over here, create a session and then the session is going to be a query of user and the filter is going to be user.api_key == api_key alright, this is why we need that index, right, so that's good and this will be a user and let's say session.close and then just return user and because we're using first, if there's no user with that API key like some of these are passing nothing or they are passing an incorrect one or whatever, it's just going to return none, which is pretty decent representation of no user.
Okay, now we have this in place, the next thing we have to address is how do we pass the data from client to server.
|
|
|
show
|
2:43 |
So, we've got our users modeled here, we've got them created in the database we've got the repository able to query some of them but we still have one thing we'd like to take care of.
If I open this up and I say select star from user and I run this, what amazing users do we have, none, no users, so there's a couple of things we could do we could go and actually manage this like outside of our program which I guess would be okay, but then we wouldn't have some of those defaults run and things like that, so let's just go ahead and add a little bit of work down here, let's write one more function that we can do call just to say hey let's create some that temporary users, so we'll say create test users, actually let's just call it like this, create user and we'll pass in a user, so what are we going to require, let's go look at the non non default things so this we don't have to pass it's auto incrementing this we don't have to pass it's got a default, this we don't have to pass it as a default, this, I don't really know what to set here, we're not actually hashing passwords and it's not required, so we're not going to pass that.
So really, all we need is the name actually that's kind of cool.
So let's go over here and say it's going to take a user name, and so we want to create a session and then we'll say such user equals user like that and then just say name = username and then session.add user and don't forget to commit, and we can go ahead and pass this back and now this should have all those defaults set by the database so that will be handy all right so now let's go in our little init here just for a moment, let's go over here and say repository.add user, create user so this will be jeff chloe sarah and mike, all right, so we're going to create all those so that we can get them back, I guess I get them out with the tools, right we could go and print out there their password or the API key that was generated but it'll be over here, let's just run this really quick now you see it's already done it, so let's comment those out so we don't create the same users twice, that would really crash because the uniqueness constraints, so if we go over here and say a table editor, you can see we have our users and there's their API keys right no password, some of them created, their auto incremented id, their names and so on.
So let's copy that, we're going to work on behalf of this user mike for the rest of the time so after this we need to talk about how do we take this api key and pass this along to our function, how do we get it out, what is the convention that we're going to follow, and things like that.
So now we have for users let's go work on the service.
|
|
|
show
|
6:28 |
Now we have our users, we want to be able to go to our APi over here and when we do a request we want to pull this out, so let's start by saying this is going to be an authenticated request here, the listing of all the autos, so we can add it to all of them, right, we'll see there's a super handy reusable way to do this but for now, let's just print out, so far we've not needed this request, we are going to temporarily need this here, and then we can get rid of it, we are going to printout request.headers, so if I run this, let's go back to postmen and we'll just do a request against api/autos, notice we're asking for application json accept so that should show up in our headers, well that was super unhelpful, wasn't it, let's do it like this, let's do it again, there we go, force it to be standard dict, not something derived from dict, okay so we're passing the postman token which is unhelpful but this you saw us set their accept header right there the user agent is postmen, the encoding and whatnot, right.
So these are the things that we're passing along from our client so let's go and actually figure out how to pass the API key here so I could just try this, I could come along and this to a new key Apytest and we'll send that and let's see, does that show up— it does, right there so we can put arbitrary headers in here ok there's a convention in the web around authorization so there's an actual authorization headering, you see, postman is saying yep, there is one of these and there is some known formats around this, so you'll see things like if it's blank, it's like username password basic c4 encoded I believe, you might see bearer that's often something like this, if you're doing oauth, but what we're going to do is we're just going to say API key is 1 2 3, something like this so we're leveraging a slightly more well known header here let's do this again, and now here's our authorization like that.
So we should be able to go to our headers and say get authorization, if I spell that correctly and restart it, we should just see API key 1 2 3, okay, so now what we want to do is we want to get this, let me write it explicitly here, and then we're going to move this into a much better place right, kind of like with our validation, then moving to view models we're going to do something way better.
So, let's just start by manually doing this, we'll say if not authorization, if authorization is not in rather, request.headers we'll return response status = 403 permission denied, body no auth header.
Now we're just going to make sure that you're passing this, so let's go ahead and say well what happens if we don't pass this boom, 403, no auth header, if we do pass it now we make it past this first step, cool.
Next, notice the format here, we have API key and then something else here so let's get that something else out, alright, so we'll say parts equals this, grab the actual value, a cleaner way to do this might be auth_header =request.headers.get and just go like this, so we don't have to get it twice so now we know we have it, let's go down here we can do a split on the colon API:something that has no colons, we'll say if the length of parts is not equal to two return invalid auth header, something like this, or let's say parts[0].strip is not equal to API key.
Okay, so we can go check over here again, put this as without a dash or whatever invalid auth header, put the dash back, all right, we're still going through, okay.
So the final thing to the look at here is we're going to have the actual API key is going to be parts[1].strip so let's get rid of this little print, now, the goal is to go and get the user, so let's say user = repository find user by API key, and we pass the API key here and we'll say if not user, one more of these return invalid API key no user with this account or something like that, right whatever you want to have here.
And then huuuh, if we pass all these through, we pass the header, it's in the right form, it is the right value, we can find another database we should be golden, right let's test it, this should fail because 1 2 3 is not in the database no user with this account but remember, I copied this, let me past it, get back in the clipboard, let's set it to a real value, right, that's mike and I suppose we could even print out who it is, let's just do a quick print listing cars for, list their name, right that's good, so come over here and let's do this, it should work— it does, this API key is being passed in, and listing cars for mike, not for sarah, not for chloe, not for jeff, for mike, because this was mike's API key if we chose a different API, we would get a different user.
Let's be jeff, alright, so now we should be jeff, still works but now we're listing cars for jeff, okay.
So we're totally passing this across, how do you guys feel about this?
Do you like having this in the front of every one of your functions— I think this is dreadful, if I want to change what I call that header from api-key to something else, there's so many reasons why having this not hidden away as a function is a bad idea.
Also, we don't want to necessarily make sure that people require to call it all at the beginning and if they call it but they don't somehow return, like invalid response or whatever, there could be a lot of problems, maybe forgetting this and having an unauthorized method when it was meant to be authorized; so what we're going to do next is we're going to improve this with a decorator.
|
|
|
show
|
7:29 |
As we saw, having all this header parsing, database querying, API at the beginning of every one of our functions is super bad, now we could slightly improve this by putting this into a function, right, we could come over here and say extract a method and if I grab the right stuff and it didn't really like these return values I could store those values and check it, whatever, right, I could make this work no problem.
But, we can do better than this, so let's go add a new section of our web app here let's go to infrastructure and over in this section, we'll probably end up with a number of other things but for now, let's just put a thing we're going to call auth.
And that method that we wrote, let's say def parse_api_key, so let's break this into two things, request okay, so let's go over here and cut this out for a minute, so what do we have, we have auth header, again, spelling matters, so we are going to get the authorization, if not this, we're going to return, let's make a copy really quick of this, so we're going to return none, no auth header.
Actually, I am wondering if we should maybe pass the error message back as well, so let's go over here and say none and error is no auth header.
Let's go over here and say none, and the reason is invalid here got to import this, this is going to be none and the reason is invalid auth key, and then finally, here we're going to return a user,no error so we're going to say given request let's go find the API key here, so it has to live in authorization thing, there's none of that obviously we have no user and the error is this, if it's invalid, no user error is this.
No user, no user and the error is this, otherwise, we found these and there are no errors, so that's how we're going to use this little bit here.
Now, we don't really need this anymore, the next thing I want to do is I would like to be able to go over here and just go something like this, at require auth, API auth, okay.
So what we're going to do is build a decorator, just a basic decorator that we can wrap on this and it's going to intercept the call here, and it won't even let it get to it, if there's no authorization, right, it's going to manage all the stuff that you saw us do, and we go back here and turn this back off, because we're not going to need this anymore, instead we're going to have this So, how do we do that?
Let's start really simple, so decorators are just functions, okay, and decorators are just functions that take a function, what function are they going to take, the thing that you put them before so in our example here, if I say at this, let's be a little more explicit up here, so let's say this, [typing code] import that as auth, okay, so let's make it kind of explicit where it's coming from @ auth.require.api_auth, okay, so it's going to take this function and that is a function that takes one thing, a request and it returns a response, so we need to tell this thing to return a function which takes a request and returns a response, right, so I am going to come down here and we'll have a def wrapped takes a request and it returns some kind of response, and often this will just be by delegating to this inner function, this wrapped function here, I am going to need to return wrapped, without calling it, now let's just do a print, before the wrapped func and let's go ahead and try to print it here maybe it will tell us what it is func ; okay, so do we have it over here, we do, and restart, before the wrap function and here are all autos at this address perfect, now did it work, did it still run— it did, look, down here at the bottom, we've got all this stuff, and that part happened right here, this is the actual execution of that API call.
So this before part came before, then right, here's where we can do that validation so we'll say user error equals parse api key with this request, and we'll say if error then return response from pyramid with a status just like before, 403, and the body being the error, like so.
Now, maybe this car, remember what we had up here is we had a little print statement, print listing cars for we give a name here, we said .
format( user.name) what is the user, what if we actually need to provide the user, not just make sure they can call it or don't call it, so we can do that step right here, before we call the function but we have already verified there is a user, we can say request.api_user = user.
Now, we could plug into the pyramid all stuff and try to make that user but I kind of feel like just making it super explicit like this is the user; So let's go over here, you can choose to do that however you want request.api_user.name and this has to be again put back request now that we want to use it an the idea is, if this lets the function run there will be a user, if there's no user, this function doesn't run, so you don't need to worry about whether or not this is there, right, it's going to be there; now let's try this again, this should be awesome, are you ready?
I'm over here, who is our user, this is the authorization I believe I got it for jeff and first of all, let's not send it, see what happens, boom 403 forbidden no auth header, so you could say like maybe a nicer message, like you must specify an authorization header, something like this, but whatever the error is, there is no auth header, now if I pass it in, and maybe I get this wrong I'll put an extra f on the end, first of all let's mess this up make the api thing wrong, so it's invalid, make it valid, now it's valid but the value corresponds to no user, there's no user with that account, take the f off, now, so notice, none of this crashed, right, this was never run at all, because the outer shell was guarding it, right this required auth API that we created is guarding it now it should pass through that, and on the way through it should set the API user to jeff, let's try— boom, so it works fine over in our log files, well ''log files'', in our print we have listing cars for jeff, what do you guys think, is that killer or what?
So just to review, we come over here, we wrote two functions one that knows how to suck this authorization header apart, break it into its pieces and give us the API key, and then there's a very very simple decorator that takes basically right here what turns out to be the thing that gets executed, wrapping around the API call, it checks for the user and if there's no user, return error, don't ever call the function, but if it is good, set the API user and call the function.
|
|
|
show
|
2:38 |
Let's review what we had to do to add authorization to our service.
First of all, we have to have users who are going to authorize so we added a user type by creating class user deriving from sqlalchemy base, setting the table name, creating the columns, the id we don't really do anything with so autoincrementing id that seemed totally fine, obviously having idea when these users were created is handy so we added a create a datetime column and we added now as the function to be called during inserts, so that we don't have to think about it just magically the created time gets set; then we have their name, in the code we actually added a hashed password because you got to have some way for them to log in, but it didn't really matter for the example we used, so we have their name which has to be indexable and unique, and we gave him an api key which is also unique and indexable.
And we just used the uuid function to generate a nice long random global unique identifier type of thing, so you can use whatever you want there, but I think that's a pretty solid bet.
Remember we also had to import this somewhere before that table would get created, now in reality, it really kind of depends on how you interact with this code whether or not that's required, but it's a good practice to just explicitly import all of those sqlalchemy types, where you're calling create all on the sqlalchemy base.
So we said let's pass this api key in the authorization header in the slides you have this function parse api key from header and it just grans that and returns a value or none if it's not there so if there's no api key, we're going to return missing api key then we're going to go try to find the user with that api key and we'll say if there's no user, sorry there's invalid api key really like there's no user found corresponding to this api key, it was validly formed but there's no user, and if that worked we have the user back then we set the request.api_user so if we need to work with them later, we can, and we just delegate the call we just pass the call along to that API function called func, and we of course have to pass the request along.
And this is our decorator that we can use to authorize our api calls.
How do we use it— super simple, we just use @auth.require_api_key and this function will never even get called unless we've already made it through the authorization process and along the way we've set the request.api_user so we can do things like request.api_user.name and api_key and so on.
This is definitely not the only way to set up authorization for apis, but it's a very common one and very easy to do, easy for you and easy for people consuming your API.
|
|
|
|
33:08 |
|
|
show
|
3:33 |
In this chapter we're going to add both logging and error monitoring to our web api.
First of all you might ask why do we care about monitoring, right, just our clients let us know, yeah they probably will, but there's a couple of things we kind of want to look for; we want to have extra information so that we can be sure we know what happened, and we like to get notified before people start complaining.
This is a pretty common thing on the internet, ooh our web application is crashed, boom 500 sorry and it's cool to have like a fun error page so at least it doesn't feel so bad, right, but when our application crashes, we want to have all the information that led up to this, what browser were they using, what exactly set of steps did they take what was the url, was there a query string, where they logged in who were they longed in as, all these things are super important, so having that in the log file is great, getting that notification exactly when this error happens like maybe to our Slack channel or to our email would be even better.
So, eventually when the user comes back in contact us about the error and says hey I had this problem, we can say yeah we're already researching it we know what happened, we're going to fix it shortly.
That's the perfect answer if something goes wrong, right.
So, in this chapter we'll see how to do that.
All right, first of all let's look at the log file, so here's the log file from Talk Python training and there's a number of interesting things to see about it I've actually cleaned up some of the data so that we don't have like personal email addresses or the other things like that that maybe shouldn't appear in a public course, but just pulling up this log file shows us some really interesting things.
So, for example, we can see user actions, like here our user is logged in, here's another user action, somebody subscribed to the mailing list, and here's another, this person has logged out at this ip address.
So this is standard application operations, right and we issue this to the log files a notice like these are kind of significant events in the application life cycle, but they're not highly important, right they're just stuff going on.
Now, we also have other things that maybe you wouldn't have expected search engines, so down here you can see the search engines are trying to dig into the actual course videos themselves, they shouldn't be doing that, I don't know why they're trying to go here I don't really care but you can see that there is some four or four type stuff happening around googlebot or something compatible with googlebot, but I'm not sure what the heck that is; there's also other interesting stuff that shows up, for example here's somebody trying to hack the website so they're looking for the wp login php page which is what wordpress uses as its backend to give you an admin access to the site as you probably know, this site is built with Python, IT's a custom site there is no wp login so those hackers can just take off right, nothing really important happened here, but it's interesting to know that someone was actually trying to hack us in fact this happens all the time, it's happening here, and also down here.
So the log file lets us know what's going on in our application and we'll even discover certain things like why are the search engines trying to get to the private videos, I don't know, but having a log file turns out to be really helpful just in understanding how your apps are being used as well.
So this equally applies to web applications as it does to web apis.
Now, if something goes wrong, we want to know about it as soon as possible so we'll briefly talk about setting up Rollbar which is what I use for my web applications you can really easily integrate Rollbar into Pyramid and it will automatically capture all these errors and send them your way.
|
|
|
show
|
1:02 |
In this course we're going to be using something called logbook.
Now, logbook is made by Armin Ronacher, the guy who created Flask and logbook is really nice; Python comes with built in logging, but for some reason it's just not so clean and simple, I don't know why, but not so much fun; Logbook made it be more fun, so here you can see a really simple example of how you might set it up, say we're going to push to standard out, setup a logbook and off it goes, and we'll do this in a couple of different ways in our apis, but what makes this fun, what about getting log messages to your phone or desktop notification system, logbook can do that.
So logbook has got a bunch of cool features and I like it because it's really easy to use, and it works well with layered systems, so different levels of your web app can have different output type messages and so on, so that's really great, it's easy to tell where did this error come from or what was the sequence of events that led to some log message.
|
|
|
show
|
7:22 |
Now let's add logbook logging to our api.
The first thing we have to do is actually install the logbook package and of course set it as a dependency so down here we're going to want to put it there and let's go ahead and this time we're just going to pip install it so we'll say go to the terminal make sure that our virtual environment is active and we'll pip install logbook, great, it looks like that's going to work and we come down here and we're going to say loogbook, right, so when we go to the deployment or we check this out on another machine we will run the setup, it automatically has all the dependencies, right, we don't want to have to chase those down as run time errors.
So we have logbook here, the next thing we need to do is do a little bit of configuration, logbook is very flexible, and it can send the log messages in all sorts of locations, I think what we're going to do is when we're running in development mode we want to send it to the console, so we can just see it come out in the terminal there and in production we want to send it to a particular file so let's go here and give us a key that we can use, or a value that we can look up about where this file is if we should use it so we'll say logbook log file, something like that, now let's just leave it blank here in the development version, and in the production version, let's go over here and we'll just say this is going to be the logfile.txt, something like that remember to not put quotes on these, the green is already like the string value so the quotes will cause trouble.
Okay, so we have this, and let's go and then import this, and now we've got the little init db that is very similar to what we're doing, so let's do an init login, like so, so we're going to get the settings, and this time we're going to have log file and we wanted to just grab that value, which may or may not be empty but we're going to go grab this value here, and then what are we going to do next well, let's create a special single module, whose job is basically to set up all the logging for us, so we don't have to bloat our set of file here keep this nice and clean and readable, so over in infrastructure, let's just create a logging bit and let's import it, in a nice and easy way let's say import restful infrastructure logging as logging so we just say logging, that will keep it nice and simple, so down here we'll say logging.
let's say global this is kind what we did before, just global init, log file, so this global init really means like you call it once at the beginning and that's it, we can use PyCharm to write this function, thank you PyCharm.
So now, over here, we're going to actually work with logbook, so let's begin by importing logbook, like that, so what we need to do is we need to make two basic choices, one, what level are we going to log at, and this might be something entirely reasonable to put into the configuration files and debug, we're logging a trace and in production we're only doing warnings and above or something to that effect; so let's go over here and just set the level so let's say logbook.
we have notice, info, trace, notice in production, probably you would want to run info or notice these are kind of higher level, and sort of the most broad one is trace, so we're going to default the trace if it happens to be that we have a log file here and that would indicate we're kind of in production, then we'll make a different choice for the level.
Okay, so let's actually use the log files presence to indicate whether it's in development mode of production mode, so we'll say if the log file exists, then we want to send this to a file somewhere we'll come back to that, we'll do the simpler one first so if there's no log file, we're going to use this trace level and what we want to do is we want to set up what's called a stream handler so we can say logbook and the stream handler will write to any stream well, what stream do you think we want to use, how about standard out, right, so we're just going to log to where all the other messages go, wherever print goes, so go our messages, we can set the level and let's just actually, let's move this in over here different values in two locations we can just inline this like so, okay, not sure why we have the parenthesis, thank you PyCharm, okay, so this stream handler we're going to need to create it and now what we can do is we can say I would like this particular handler to capture messages from where, and so we use this push thing, we can push it to the thread local storage, greenlets or globally within our application.
So that's what we want to hear is to just say for the application run this and we're going to do something similar up here, but we're not going to use a stream handler, we are going to use a different kind of handler so look at all these different handlers, we got a gmail handler, a file handler, a rotating file handler, a timed rotating file handler and so on.
Even a fingers crossed, which is kind of an interesting one, so rotating would be once the file hits a certain size, make another copy of it, like switch to a new file name, timed is I think a little more predictable like once a week or once a day switch to a new file, so you have a log file for that day, that's what I use and I think it's really important because if you have a popular web service you'll see that these log files can pile up really quickly, like on Talk Python we have gigabytes of text in these log files and periodically we'll go and take the old ones and compress them and get rid of them, right, so having them based on time is really handy.
So we want this, and of course, it's going to have different values here we're not going to send it there, we're going to pass in the log files, the first thing and then we're going to set the level, just like before and this one, let's do this one at info, right, so trace and those kinds of things like really verbose stuff is out, so either info or notice seems like a decent option here.
And then, for the date format, we want this to go something like %Y-%m-%d, something like that, so this is the format of the file, ok, so a timed rotating file handler for, if we have a log file and if we don't, we're going to assume that it's just production.
Ok, so this looks pretty good, let's just make sure app runs and everything we've done so far is hanging together and we'll also do a little print here, print configuring logging with and we'll do the log file, and let's do it like this, okay, so run it, are we actually calling this, that is the question, so we created the function, but no, of course we're not calling it, unfortunately, there we go, now we'll be calling it, great, configure logging with well nothing, right, notice up here that I actually have created a second run configuration, let me pull that up, we have a dev which points at development.ini, and a production, which points at you guessed it— production.ini.
This is super easy to set up, you can go up here and add as many of these as you like, and you just pick the configuration file, the working directory, and the Python interpreter to run it.
So if we switch to production we'll be using the other configuration file and now we're going to be logging with the text file.
So it looks like our grabbing the value is working correctly, the pushing, the stream handlers to the app worked great, now all that is left is to actually do some logging.
|
|
|
show
|
14:39 |
Now that we have logbook all set up and working, let's actually switch back to dev, now let's go ahead and do a little bit of logging.
So let's begin by logging this startup action, so a lot of this sort of system set up a configuration is really stuff you want to register in the system start up log, so for example the core settings maybe you want to save that, you very likely want to save the database connection information like this is the database we're using right now, so we can go back and check that out, possibly stuff about the renderers, and the routes maybe, maybe not, but definitely the db seems like something you'd want; so let's go over here, and let's actually work with logbook.
So, we'll come over here we'll create, I'll just call it a log, so we'll say logbook, it's not imported, this file, until now and we would create a thing called the logger, and these loggers get names, so the name is part of a hierarchical type of output that it gives here, so you'll see that it gives you the time and the level and the location within the app so I am going to call this app start up, something like that, or we maybe make it very obvious, make it all caps, I don't know take your pick.
So then let's go ahead and make sure we turn the log and we will use that above, so we can say log.
now we have things like notice or warn or error or trace, so let's say that this is a info, maybe something like that, e'ill send out this info message and it will say something about the log file and the mode so configured something like that, ok, so configured logbook in so here we'll say dev mode, if not log file else prod mode, something like that, and then the next thing we want to pass is the log file, right, so for now let's just go and let's just run it and see this message come out, so run it again, we're running in dev which means the message goes to the output stream, and here's what one of these messages looks like, configuring logging with, go in here and get rid of that print message, ok so here we got this exact time of the recording, pacific standard daylight time I guess, and we have an info level message from this part of our application, here is the message so we've configured logbook in dev mode with no file, now let's go a and switch it to production, try it again, okay, it's running great, where is the message, message is down here.
So I think I got to refresh this, here we go, so now notice that this message has gone directly exactly the same message saying some time gone to this file here, and notice that the year month day is in here and of course it's going to rotate around as the days change, right, tomorrow will be the thirteenth, so 5-13, things like this.
Now we could have a go both to here and to here but you'll see that when we get to deployment things like the μwsgi log catch standard out and put that in there already so you would basically be duplicating this log message stuff to theμ wsgi bits and you know, you can decide whether you want that but I don't think it works out really well.
So we're going to go like this, let's go back to dev let's go ahead and do a little bit more work so we got our logging here, we'll call this log we could make this like a global variable here but let's go into like this, we'll pass it along there, pass it along here, and now what we can do is we can say something like this, I think we're doing the logging in there right, nope, okay good, so let's do our log here at one point we're printing that out, and let's say that this is an informational thing and based on the way we set things up that means this is going to show up in production, whereas maybe more chatty stuff a lot of the success type things you probably don't want to log so well say configured db with sqlite file like this, and we give it db file, okay, so if we run this again, now we'll see a logbook is configured with no file this one is just really just to show you guys, I'm not sure I'd really log that but this one definitely configure db light with this file or connection string or something like that that's totally reasonable, all right, maybe down here we're also going to do log, and do something like this log.info configuring your image for cors permissions, and spelling is hard, but the tools are here to help, okay, so we run it again, ok, so we are getting our message here now we could have actually gone in here and say you know what, log.trace adding cors permission to request and go down here and do a format request.url, that would be underscore, let's fix that for a moment, now if we come over here and we make a request of this, and do a few of them, click here, must be authorized, sure, so notice, you can see all of this stuff adding cors permission trace, trace, trace, trace, so, this is very very chatty, you don't want to normally log this but maybe you're trying to debug it, so we could have this trace, I'd still find even things this chatty like maybe I'll put that message there, but then, actually not keep it around most of the time, just if I'm like wait, what's up with cors, I thought that was working put that back, right, but you can see we have these different levels, we have informational, we have trace, and we have the app start up let's add one more area where we might do some logging.
So a couple of things to note before we leave this page, so once we've done this global init, throughout the rest of our application we can now just say logbook.logger and allocate one of those, give it a name and use it and it will pick up the settings done in global init, so you really want to try to do this init logging like as soon as possible, right at the beginning of your app.
So even these other start up operations can have logging configured and ready for use.
Okay so this is great, let's go over to our auto api here and do one more thing, let's go and import the logbook as well and let's create a logger here, so we'll say log equals, call this auto api, now if you want to look at, let's go back to the messages really quick, if we were to look at these messages as kind of a hierarchy here right, so we've got the level and then we've got this thing and we've got the message, we could do it like this api/auto and then maybe we'd have other things like accounts or whatever, and this might indicate like these are all part of the api, but this part is the accounts, I don't know, it's up to you; let's go with this, I think there's probably some utility in having it that way if we want to go back and parse the log files.
Alright, so now throughout this, here we have a print message, right, any time you see a print message that should probably be going away, right so it's going to be a log and notice this is kind of informational, this is just hey, things going as usual, we're listing the car, maybe this would be a trace, or maybe an info, I'm going to go with trace on this one.
Down here, similarly let's grab the same thing, this is going to be car details for cars such and such and user such and such, maybe this needs to be car id, like so, ok so let's go ahead and just see that these are working; notice, here's our startup messages and info info info app start up, and if I try to click on this, we're not going to get the message about seeing the cars, maybe we want to have a permission failed type of thing, right, maybe over here in our auth, we are going to have a section where we deny people access to it, we might want to log that.
So that's up to you, we could do it, we'll just probably finish out this one over here, so when we get a single car this makes a lot of sense, now here's where it gets interesting, so we could say something like this log.notice info, how about info, this is sort of a preliminary successful thing like hey somebody is trying to update the cars we'll say we let me grab the user name here so we'll say the user such and such is creating a car, like this, so here's an info message, but when there's a problem maybe we could say something like log.warn, so this is not a problem with our system, but this is a problem with the message sent in by this user.
The submitted json body couldn't be parsed for this person here, ok.
So that's pretty decent, if there's some kind of problem we're going to give you a warning which maybe maybe this is even a trace, I'm not sure, but people modifying data, you probably want to log that but you can decide trace, not trace, whatever, but certainly you want to log like mistakes and errors, right, so down here, you could say submitted invalid car, we can say reasons you're here now we probably want to be a little bit careful with this, because this error message might have new lines and stuff that might mess up our logs, so let's be careful how we put this in here, so we go here and I would like to just comma separate this or semicolon separate it and we'll do that with a quick join like this, okay so let's go and do that, and finally maybe this one is a proper error, right this is our problem, not their problem failed to save car, and at this point, maybe we're just like you know what, we are just logging everything, like this, so just straight up log the exception, in fact we're returning it back which made me not be advisable, but we're doing it there, ok so let's run this and get to where we can actually call this with postman, with authentication, api key and all that so here's our get autos, and we have you can see our authorization key we're doing json, that's cool, so we send that over, trace api listings, listing the cars for jeff, remember that's the api key for jeff that we've been using.
Let's go over here and make another one, and this time let me grab one of these so I remember the format and let's say we're going to do a post to create a car so go set the body to this, we can't have an id this is going to be a very fast new Opel with lots of extras this will be, let's just call it slightly old Opel, not so many extras ; now let's make that json malformed right, and the url is going to be the same that's our model here and I run this, how's it going to work it's good and say permission denied, right come down here you must specify authorization header, so we'll do that, and then it should come up with an error, so we have headers authorization with that value, send it again, boom could not parse json, invalid character here okay that's fine, but let's look in the log files, info the user jeff is creating the car ooh, warning they submitted a json body that couldn't be parsed now we could print out the json body if we really wanted to, like I said that might mess up our log files, we might need to encode it in some way so it is like escaped in the log files who knows; but this at least lets us see like hey there's something going wrong in our api auto section, now finally, let's go over here and make a few more obvious mistakes so let's have some negative prices, and let's get rid of last seen, that should generate a number of errors, it does, there is two here pricing and year and we look down here now we can see warning submitted invalid car price must be non negative, year must be non negative.
Okay, so this is nice it's showing up in our log and so on.
So I guess we need probably one more message to make this all work, so right here when things are all good let's say this log.info and where is my user bit, so and so has successfully created car with some id so here we'll pass in the name, we'll pass in the car and the id of that remember this comes back from the database, so one more time let's go and actually create a valid car here still, we have these problems, let's go back to our body here, and say that's positive, that's positive, put our last seen back try again this should work, error 500, ok that's not great could not save car parser must be a string or character stream not a datetime.
I think that actually might be a real problem we have in here let's go check here, yes I think that the car once we've upgraded it has already converted that to a datetime so it actually had a problem but check this out, we really did save a full on crash in our server, all right so I think we'll be good now, let's try it one more time send it, 201 created awesome, here you can see the car came back with this id that ends in 5b, let's go see what we got— excellent, we have an info in the auto api jeff has successfully created this car such and such, all right so I think we've really driven home this idea of working with logbook and adding the logging.
Now one thing that always bothers me about having tons of logging, is this used to be very very clean and easy to read and now it's just got you know, just more stuff okay, so I don't really know how to solve that, there's not a lot I can do to move that stuff out because every single line is kind of its own unique message and data and whatnot, so I think that's just a fact with having lots of logging, but it does make it a little less nice here, however, when we're running, and we can come down here in dev mode or we can actually just tail our logs or whatever, then you can actually see what's happening in your app and that's really gratifying that you are able to go back and track that down and so on.
So logbook very nice we have the different levels, we have the different outputs, we have the different locations, the error formatting and so on, there's email, there's sms, there's lots of cool stuff with logbook, so definitely consider adding this to your api before you send it off to production.
|
|
|
show
|
6:32 |
The last section in this chapter about monitoring logging has to do with real time monitoring, so what I'm using currently at Talk Python and the various podcasts and the training site is rollbar, and of the various choices, rollbar is a really good one, let me take you on a quick tour and show you how you integrate it into your app, it turns out installing this is your app is like super easy there's a free version, so why not try it on your api, right So the idea is basically you connect your github project, even if it is private, here and then you can tell rollbar when you deploy here's a particular deployment, it'll look back at github and understand the code changes that have been made, and then it will wait for any errors, it'll send you messages about those and then correspond that back to the source code that comes from github, so a really really nice system, let's first talk about how to install it, then I'll show you like what we've got up here for Talk Python actually.
So if you go down to the docs, they actually supported a couple of different libraries and languages and whatnot, so we go to Python, and it talks about how you could obviously pip install it, there's a couple of things you can do, but if you're working with Pyramid you just click here and it says this is super easy, they already have one of these handler type things that listens to every request, before and after a little bit like our cors, the thing that we did, so you just have to pip install the Rollbar itself, and then the contrib sub module or sub package is already in there, so you just basically tell pyramid to use this, in production by the way don't do this, you just have this alone this is only for dev, very important there, and you have to get your api key and stick it in here, and there is a little bit more stuff to do, to set up the logging and the environment, make sure dev says dev, production says production, things like that.
And that's it, you just basically configured develop.ini and production.ini, and you're golden, right, so really easy to get going, let's go and look around the Talk Python back end.
So you can see there's not too many errors, like these blue ones, what is that five or six different types of errors, some of them may actually be repeated the same ones, over two months I'm pretty happy that given how many requests that site gets.
So notice, in the last 24 hours no errors, that's great, nothing has been reactivated or anything like that, there are some that I haven't gone and said you know this is okay I kind of approve this or I acknowledge this error has occurred, so Talk Python talks to a MongoDb server which is on a separate machine at Digital Ocean, internally it's known as Mongo server, although that's not a public name of course, and there was some security patch for Linux so I rebooted the server, and I had not run it in like multiple machine replica mode, so basically it failed to connect right, I mean the machine was only offline for like ten seconds over the last month, month and a half, but still, Talk Python gets so many requests per second that they still generate errors, right, you can see a couple of errors here, so we can go look at this, this is pretty interesting, let's see what we got, I could resolve it and say fix this here, but we can do that in a minute, so here's the mistake that we got right, we couldn't connect to the Mongo server and let's see, we come down here and here's the trace back, so what we were trying to do is we were going to the episodes controller and then this feed view model, and then into the Mongo repository, I am calling a thing called git episodes, and then we were trying to evaluate the query which came back from the database and notice I can click right here and it will actually take me to where we need to go in github to view particular line, right, so this is pretty cool, I can see how often this has occurred for what browsers and so on, we can register people and it can grab that, what's the breakdown by platforms, so these are errors happening when podcast players are trying to grab the rss feed, which they're just pounding away at, see the ip addresses, here is the suspected deploy, you can see all the stuff that I've put out here, it says you know, I think this one right here is what happened, we could go look on github and are there similar items, yes, are there community solutions, sadly no, especially since it involves very specific machine name, so things like that.
Okay so this is pretty cool, and you can actually see the call stack down through Mongo engine, down into PyMongo, and then finally all the way down, So this is cool, let's go and also see the deploys, you can do your own queries, things like that; and let's go look at another one that has a slightly different information.
So if we go to Talk Python, down here, right here at this section what do listeners think, when I first deployed this, I had in my local database populated a couple of these, just test ones for the design and then the plan was I would deploy the site, and go to the back end which also came with those changes, where I could enter these, but initially, right when I pushed go there was nothing in the database, right, because my next step was to go and add something to the database, well it turns out before I could go and do that, I got this error, the home page is not working, what is wrong with it, it's broken, and of course in production it just says 502, or 500, boom, no dice so that's bad, but then I got a quick notification about this, and I came over here and said what is going on, so I looked at this and said ok, see home control or home view model, doing this oh chosen reviews get random reviews count=3, get chosen reviews random.choice on the reviews, and guess what— that was empty, so it crashes, right, the crash was trying to run this line right here, which is pretty cool, and check this out, so you could expose the arguments that were passed to this function, it happens to be passed because of the default, but or maybe I set that, I don't know, but it's passing three for the count, right it's also pass itself and has some local variables down here as well, we can see the various pieces here, so at the time this was running on sqlalchemy now it's running on Mongo, but it doesn't matter, the problem is that with the database the problem is this line, doing choice on a list that's empty basically and so instead of trying to debug this figure out what's going wrong it fails in production but it works on my machine like why is this happening, I would just pull this page up and go oh, I better quickly go enter some stuff into the database at least one thing really quickly, so this doesn't crash, boom, problem solved, it wasn't actually a coding problem, but it was a configuration data problem; so this is the kind of stuff that you get with rollbar, and you saw it's super easy to integrate it, you just basically set up your configuration any file and you're good to go.
|
|
|
|
36:56 |
|
|
show
|
2:43 |
We've reached an exciting point in our class, we've basically entirely created our web api, and we're ready to deploy it to the cloud, in a full on production environment.
I hope you're excited, I am.
So how is this going to work?
Well we're going to start out by deploying this to Ubuntu, that's this big grayish box here, right so we're going to deploy to Ubuntu, and we could have the running across multiple servers, with load balancing a lot of things, but for a simple example we're just going to put it all on the same machine.
So the first technology in addition to Linux that we're going to employ is nginx, so nginx is going to be the front line web server, this is the thing that browsers and other web clients talk to, and as far as they know this is the only thing involved in our web processing, so then, behind the scenes on the server, the thing actually executing Python is going to be μwsgi, μwsgi is implemented in C and is specially built for running Python web applications, so we're going to run that, but we're not just going to have one instance of it, instead we're going to use it in this kind of master emperor mode I think it might be called, where there's one process, but you actually create many subprocesses because Python is not super great at computational parallelism, so the way we're going to solve this is just by having many subprocesses, it does use threads and as we're talking to things like databases, that will do parallelism, but we're going to get additional parallelism by having multiple ones.
So we're going to create a bunch of these, and it's actually in these little sub processes where our Python code is going to execute, so let's see how this request overall architecture is going to work, some kind of request is going to come in from the internet, and hopefully, you'll set this up to use https, it's really easy to make nginx talk https, you just get a certificate, point it at it and say here's your certificate, so a request will come in to nginx, it's going to handle all the ssl certificate stuff, all the static files and things like that but when it needs logic, when it needs to do Python stuff in our application, it's going to send this request internally over to our μwsgi management main process, and this is probably over http or just a local socket, and then this thing is going to decide which one of these is going to actually do the processing and then it will return the response back, so this is what we are going to go now and set up on Digital Ocean we are going to create an Ubuntu Server on Digital Ocean, we are going to install nginx, we are going to install μwsgi, we are going to move our Python code that we've written up there via get, and then we're going to see how to configure these things to accomplish basically exactly what I have here, except we're not going to do the https part, you guys can add that on yourself if you want.
|
|
|
show
|
3:38 |
Here we are on Digital Ocean, you've maybe heard of Digital Ocean, I am a huge fan of what those guys are doing, you probably heard of things like aws and azure, but I'm here to tell you for simpler, not extremely complicated web applications that have to dig into all of these cloud apis, this is a better place to be; it really is better performance and much, much cheaper, and really just simpler.
We're going to use Digital Ocean to go create this Linux server.
Now, let's click really quickly on pricing, just so you guys see like what it is we're going to create, so the pricing is really nice here, we're going to use a standard droplet and pay, we can get hourly price if we want, but really monthly is a better human term to think about what is it going to cost us, they also have like high memory ones, and whatnot, but we're just going to focus down on these standard ones.
So we're going to use a five dollar server, and you'll see that this five dollar server will run our api for many, many requests, I'm pretty sure we could get millions of requests per month for five dollars.
And just to indicate like what a good deal this is, last time I checked the pricing for just bandwidth alone at aws was nine cents per gigabyte, notice you get a terabyte of bandwidth here, so 0.09 times that many gigabytes, that's 92 dollars a month just in bandwidth value that you get with his thing, not to mention you get ssds and all sorts of goodies.
So what we're going to do is we're going to go create one of these, now, I have already created an account, so logged in here you can see my various servers that I used to run the Talk Python and Python Bytes stuff and we're going to go and create a new droplet, so let's go down here and and show you what you get so we can come down, we can pick a variety of different Linux distributions, and pick different versions as well, so let's just go with this one, the standard long term support Ubuntu, there's not a real great reason to choose a different one, I will just point out though that you can go if you want to and get it kind of pre configured, like from my Mongodb server I just went down here and said I want Mongodb running on that version of Ubuntu and boom, it already comes preconfigured, somewhat secure, things like that.
But we're not using Mongo, so we'll use this and pick this size, you'll see that that's plenty good we don't need block storage right now we could get a different data center so I'm on the west coast of the US so I'll pick something in San Francisco and then we just have to create an ssh key, we click go, give it a name, and let's call this auto service server something like that it seems like a decent name, we can have a bunch, I don't want a bunch, I want one, and we'll get going.
So, that's how it will work, we're going to need to do things like create an ssh key, so that we can log in and not have to worry about passwords, and things like that, but we'll do that in just a moment, right.
So Digital Ocean basically lets us create these servers and then we can go over to the networking section which we'll do afterwards and we can basically get it's called a floating ip address, and what that means is there an ip address that kind of we control independent of the machine and we can map our domain to that and then we can do things like hey I need to upgrade the server I could move it over to a temporary fail over server if for some reason I want to just create a new version after six months on a new implementation of Linux or whatever I could spin that up and get it exactly ready and then I could just instantly flip the switch, and it will flip to that new server.
So it gives you a little bit of machine independence, with this networking section, so we're going to do that next, but first, in order to create this, we're going to create an ssh key.
|
|
|
show
|
1:15 |
Now the next thing we want to do is create our server but before we can do that, we need to give it an ssh key that we can use to log in, after it's created, this is a much easier and safer way than just using usernames and passwords.
So click here, it's going to say let's create a new ssh key, and you click this link, it takes you over here and it says the first thing you are going to do is ssh keygen rsa.
Now that's close to what we want, it's not exactly really what we're going to need, so what we're going to do is we're going to do ssh-keygen -t ssh-rsa, not just straight rsa, and it's going to ask us for our files we'll say use/screecaster/ .ssh/ and let's call it digital_ocean_course_demo.key call it whatever you want, I'm calling it that, no passwords and it's all good to go.00:48 Now if we look in here, we'll see we have a couple of these, we have the private key and we have the public key, now I'm going to delete this key from my account afterwards anyway but let me just offline grab the value and put it into where it's supposed to go.
Okay I've taken the contents of the public key and I put it in here where it's asking for the new ssh key details, so that's what we're going to use for creating this server.
|
|
|
show
|
11:49 |
We have our ssh keys generated, we don't actually have them registered in MacOS for now so that is something we'll have to take care of, but let's go ahead and create this Digital Ocean droplet as they call them, so we are going to use the five dollar a month server, just think about that, five dollars a month, that is crazy affordable, we don't need any of the extras, I'm going to put this in San Francisco if you want to hear my thinking on this, like obviously, San Francisco is near Portland Oregon where I live so why not do this one locally; most of my machines live in New York because a majority of my traffic is split between the US, Canada and Europe and so I figured east coast US is as good as I can get to still serve the west coast of the US well as well as Europe.
So I typically would pick New York if that was your traffic patterns as well, but I'm going San Francisco.
So it looks like I've already set this Digital Ocean key, and I've already selected it and I want one droplet, I've set the name, so we click create and how long is this going to take— you'll see it takes almost no time at all.
I think I might leave this in here as real time for you, so you actually see, there's no speeding up.
Done.
That's got to be less than thirty seconds, all right, so now we can go and talk to it, so let's go here and copy the ip address and we'll go over and we can ssh as root that's the account there, and first of all, we've never done this before, and so ssh says are you sure, and we say yes, we're sure.
However, permission denied, we don't have the right public key, we don't have any key really, so what do we need to do?
Well, this is because we did not use the standard name for our key, so we created a custom one, so I can run ssh add, let me just delete this, we can run ssh-add -K to add it to our key chain and what we want to give it is the private key.
Now if we try again, ta-da, we're here, what should we do first— oh you bet, the very, very, very, very first thing we should do is apt update and install any security patches that might still somehow not gotten taken care of, so see if there's anything to upgrade here— there are so, so let's do a quick upgrade, see what this is all about, bunch of built in stuff, let it go, and just to be sure, let's just do a quick reboot, we'll wait about ten seconds, so we can log back in, and then we can get started, while that's rebooting, I want to copy some files, let's see if it's back yet, boom, that was pretty quick right, very very fast.
So over here into our project, we're going to move this up to Digital Ocean on our server, but there's a few things we need to do first, let me put some files here, and I'll explain what we get in a second, I put this etc folder here, and it has the configuration we are going to need for μwsgi, a configuration we're going to need for nginx, and the set of steps that proceed the existence of that so this basically is the set up of the server.
Now, the very very first thing we did if we did our update and upgrade so that in case there is any security vulnerabilities, we're not getting smacked on.
The next thing we want to do, I am just going to copy and paste these there is no sense for you to watch me type them, is I'm going to set up the firewall, so this is uncomplicated firewall in Ubuntu, and we're going to allow ssh traffic, we're going to allow standard unencrypted web traffic and encrypted web traffic and nothing else so we're going to run those over here and it says you could disrupt your ssh connection, basically if you mess this up, we want to proceed because now we're still letting 22 go through.
We can check just by exiting and coming back, yeah everything's fine, we didn't break it, probably you want to check that early.
Also, we can install fail2ban in case there was, if you wanted to log in with the username and password instead you can install fail2ban, I'm not going to do it because we don't have that, but this would prevent like brute force attacks against logging in, I'll go and leave that there.
The next thing we need to do is use aptitude to install, like build essentials, Python 3, git, so we can get some stuff and just a few other things like nload is a handy little thing to have as well, so let's just run through that, and I'll speed up some of these as we go through and just shorten them.
All right so we successfully installed build essentials, it took a little bit, but we'll go and install these next— excellent, now we want to get the latest nginx, and right now I think you get 1.10 if you just apt install nginx, but we can go and register what they call their development branch which gives you a better version, I actually recommend doing this I believe so, go add that, now we want to make sure that we do an apt update so we actually pull those changes before the next thing.
Come back over here, this is Python software properties, we need this as well, then we can actually install nginx, so I said a bunch of stuff's going to be installed and so on, that sounds fine to me, it's what it needs, let's it do it.
All right, that looks like it works, now we're ready to start working on μwsgi, so let's make sure we install pip for Python 3, so right now if I type pip, we don't have it at all, right, if I do what it suggests, it's going to install that for Python 2 I believe, I want it for Python 3, the alternative would be to use the get-pip.py thing and not let Linux manage that at all, this does lag a little bit behind so it might be with considering but we'll just do it this way for simplicity.
All right, pip is set up, now μwsgi takes a long time to install so let's let it go on its own, notice I'm now using pip 3, okay, great, looks like we have μwsgi, let's also check nginx, check its version, that's 1.11.9, that's newer than you get if you don't register the extra aptitude link there at the repository, and here we go, got it right, so we also have 2.0.15 μwsgi, alright, the latest of both, that's good, now glances is just another tool like in load that lets you manage and view your server this is like super, super helpful so I am going to go install this now we type glances and you'll see it gives you this really cool sort of dashboardy view of your server and notice, so far we're only using 18 percent of our memory, and it's the smallest server right, we're doing really well, this little character is using 3 percent, this glances thing so that's what this cpu is about.
I will come back and use that again in a little bit, to make sure things are running okay.
Alright, now let's go and create some log files, or actually rather places for log files to go, so we're going to create some directories, web apps, web apps log, auto service, app log and so on, so in here is where we're going to put our time rotating file logs, whereas we'll just drop the μwsgi log there for example.
Okay, so we got our logs, the next thing to do is we're going to use git and let's set this credential cash so that we don't have to type our username and password in every time, which will make us crazy Alright, so now if we enter our credentials, this is member for what is that, that's a 100 hours, all right, now let's, this is not what we want to get, let me change that url, so over here what we're going to do is we're going to go and download the repository for this, so we're going to do this git clone here and we want to do it in this folder, right, so we're going to have web app/the repository and web app/logs; now in this case because that's a public repo I didn't actually have to type in my username and password, but I think most of the time your service would not be a public repo so that credential helper will help you.
Okay, so now we have this restful thing that's great and let's see what we got, let's go into source, go into deployment, and we're going to need to see where some of these things live, so the restful service, this directory here, this is the root of our project, ok, so we're going to be using that in a couple of places; now what's next, so we want to cd into this location and this right here is that location, so we want to go there, to the root of our thing and run Python 3 set up develop, okay, so now we're there, so we want to say Python 3 set up, auto complete shows it, so that's a good sign, and this will run and install all the stuff that needs to install all the dependencies including logbook and sqlalchemy like right there, as we said, it needs for it to run.
Alright, everything worked well, it might be worth giving us a test so we can do pserve great, and we could give it the development.ini and it's working, check it out, configured logbook with nothing our pyramid cors is working, here is our database and we can actually create another thing that we're going to ssh and we could do w get, actually let's do this, this is more fun, pip 3 the install httpie, I always mess up saying that, httpie, and now we can do http local host:6543, so what do we get, hey that looks like our website, right it looks like our web app is running, so the one is running for development, but it turns out we probably have a little more work to do on the production.ini.
Okay, so first of all let's look at production, here we have the log file, we probably want to put that log file somewhere else, so we'll have a look at that over here, as we had web apps here this right there is the place that we want to put that, so now we got our server configured, let's put this as this and let's just call this auto service.log, something like that ok, so it's going to go there and of course it will put the time on the end, and so on.
So, this is looking good, I guess we can go ahead and run this so we're going to push this back up, ok, so I like source tree, you can use whatever you want, but we're going to push that along with the various configurations up there, so we'll have that to run, now let's see if we can get this to work with production.ini.
Boom, it's working, great, now if we exit and we do go look at the logs, oh it did run, but it didn't put it in the right place, why— I forgot this, now let's try it again, so now you can see we have this auto service log, and let's just go and see what it's about, perfect, so it looks like our log file is working, you can see where it has the log set so we're very very close, so what this means basically, I didn't do http request, I am pretty sure if we get this far everything's going to be fine, what this means is we have our Python code running perfectly, now we have two more sort of outer shells to configure before things run.
The next thing we need to configure is μwsgi in its emperor mode, and then we're going to have to configure nginx to pass the things along to μwsgi, to pass along to our code, and then our web server and our web api will be up and running.
|
|
|
show
|
4:30 |
The next thing to do is work on the next shell in our onion of configuration, and that is μwsgi, so that's what lives over here in this init folder, this auto service.service, so here you can see that we're given a name μwsgi auto service server instance, so you can ask like what services are running, things like that ; and then it's going to run μwsgi, we could double check that this path is good, yeah, it looks like that's right, so we're going to run or μwsgi and we're going to give it the url here, which I need to figure out what my path is one more time, and make sure that production.ini is here, so take this, kind of annoying you got to keep doing this, but you got to have it just all wired together correctly, right, and of course, it's going to run in that same folder, so we're going to put that like this that's really all we need, we need to set the exact start and we need to set the runtime directory, and then everything else is kind of standard, set let me push this again up to our server.
And it's fine, just like this, ok git pull again, notice we got that fixed, so now what we need to do is move that into a particular place on the server where this is going to be used, so hopefully this is all good, first of all, before we try to do anything with μwsgi, in terms of like an auto start service, let's just see that this if I take that command we're putting into that service file and try to run it that it's going to work; that did not work so well, did it?
Oh yes, there's one more thing that we're forgetting, that we need to do, so let's pull this back up here, so the way this works is μwsgi is going to run this code here, but we need a section in this configuration file that says hey μwsgi, when you run, run like this.
Alright, so we'll grab this from a previous example, here's what we going to need to do, we're going to tell it to listen on that port, we need to set the directory, once again I don't know that we really need to set it twice but just to be sure, let's tell it if that is your directory, now here's the emperor mode thing I was talking about it's going to run in master and it's going to have five sub processes, so basically this is a tradeoff between amount of parallel processing and ram in real apps each one of these takes about a 100 megs, 50 to a 100 megs of memory so you can decide how much memory you've got, this should work fine for this simple app five, and then enable thread is true as well, and if things can a go haywire it will kill off its children services, and you know create them again basically force or restart on them.
Now let's go make sure we got this log file path correct here, yeah, it looks like it was right, so we are going to use just at the top level a single μwsgi log, now everything should be good let's push this up one more time, get the latest and let's try again, oh silence is good, why is silence good— because everything is going to the log file, so if you see a prompt again here, that means it's crashing, and that's bad, you don't want to do crash, right?
So let's go and check this out, so if we go to our web apps and we go to our log files and we go to our auto service we've got our μwsgi log here, so you can see it's starting up and it's just running, in fact let's tail this over like that, and start a third one because we don't yet have this exposed to the internet, and do an http local host, now we're running on 8999 so we got this, the data came through, we saw the request, we'll do another request, you can see more of these requests coming in nice, and everything's working, you can run it a few more times it should pick up speed here in a little bit, there we go.
So run that in zero milliseconds, one millisecond, one millisecond, notice the first few times it was slow, this is because the primary master μwsgi is sending this off to the sub processes and the sub processes haven't yet encountered the templates and things like that, but once they do after a while, this should be nice and fast, you can see 1, 1, 1, 0, 1, 0, 1, 1, 0, 1, in the millisecond response time so now they're kind of warmed up, ok, so you might notice like the very first little bit of time there is a tiny bit of a slowdown for this, but it looks like everything is working, so we can get out of here and we can get out of there, μwsgi is working.
The next thing we need to configure, the final thing we need to configure is nginx.
|
|
|
show
|
9:39 |
Okay now let's go ahead and do a little more set up with μwsgi, I realized we forgot one thing, we'll come back to this maybe at the end I guess, we need to set it up as a system service.
So, now what we're going to do is we're going to set up nginx, we already have it installed on the server, and you can double check by saying— oh yeah, we're still running μwsgi here, you can say nginx-v and it will show you the version, okay.
So it's there, but if we actually go to it, if we do something like http local host it'll say something like yeey, welcome to nginx, that is not what we want it to say, we want it to say here's your api documentation and welcome screen, and so on.
So in order to do that, what we need to do is we want to take away the default website so we're going to go over here and remove that and then we want to copy this file that I'm going to show you in a second, we want to copy it down to sites available, so what is that, now over here we have sites available auto service nginx, now, notice it's got a little green thing here a little icon for nginx, that's because I accepted a plugin suggestion that PyCharm had saying hey we could understand this for you and give you highlighted nginx files, and I named it .nginx, so that kind of gave it a hint.
So what we're going to do is have it listen here all right, going to listen on auto_service.talkpython.fm, and I'd prefer that it doesn't give extra information about server, version, stuff like that, right less information for hackers, I'd prefer that it does a lot less still, but this is a little bit of an improvement some random stuff, so we've got our server and we're listening on a port.
Okay, now it gets interesting, down here the static files will no longer go through pyramid at all or μwsgi, these will be served directly from μwsgi, now this path is wrong, let's say cd static, ok that's the right one, so let's take this huge long path and put that here so we can alias/static in the web request to this long thing and say we're going to cache that for a year right so this is great because this means all the static requests for like javascript, css and whatnot, never even touch our server, right.
Now, granted in an api this matters less, but still we'll probably be serving up some form of HTML pages and we want to set it up this way, okay.
And then we want to say local host, just when you listen like straight to / we're going to go down to this area that's basically going to delegate to μwsgi, ok, how do I know— come down here to the final section include μwsgi parameters, sometimes extra information does not get passed along like what is the real ip address, a lot of times it will look like 127.0.0.1 to μwsgi, because it's like coming from nginx on that machine, so you can pass this extra info along and then we'll just do proxy pass over to this that should be very familiar from μwsgi, right, so internally when I make a request here, we could also set up a socket but it's easier just to do it this way, there's permissions on socket files and things like that on sockets.
Okay, so this looks like it's ready to go, I think I have to push those changes up to the server so now we can do a git pull, make sure we got that copied over; okay, so the last thing we need to do is actually put that in a place nginx can find, so I'm going to copy like this, just copied to etc nginx, sites available, okay great, now we want to make sure that both nginx and μwsgi start on system boot, so we can do this here to say enable nginx, or update the files and here we also want to enable μwsgi.
What did I call that, something different— oh, I don't think, I don't know if I've copied this over, let's try I think that's the deal, where is the cp, there we go, so missed the step, I forgot to copy the service definition for system d, for μwsgi, so now that's over there, ok so it looks like we're in good shape let's see if we can first start this, okay, that didn't give us any errors, so that's pretty good we can actually ask for the status and see all the children processes running there this is good right, it looks like it's working, you can see the output log where it got everything going, starting, starting, good.
So it looks like nothing is broken there, so we could also do one more test, do a request against 8999, also working so very good chance that our automatic starting service for μwsgi is working.
We need the same thing for nginx, so now we're going to come over here and say service start, for nginx, okay it may have already been running so let me restart it, in fact it was out already running, so now here's the big test, local host, if that comes up with errors, we still have work to do if that comes up with welcome to nginx, we still have work to do; if on the other hand it gives us our welcome page, from our site we're in business.
It looks like we might have some work to do, what do you think— okay, I realize there's one little mistake I also needed to add here and I needed to copy this configuration over to sites enabled, as well, or instead actually I'm not sure anymore because it's in both, but copy this in addition to sites available to sites enabled, restarted nginx and now if we do http local host ta-da, things are working beautifully, okay, so here is the final, final step, what do we tell nginx, that it's supposed to listen to, let me pull this up really quick, so we told it it's supposed to listen to auto_service.talkpython.fm well you want to try that and see what we get— no way is that working, why?
Because we haven't set that up in dns, now normally, you would go set this up in your dns settings or whatever, but instead what I'm going to do is while we're still in like test mode, I'm going to just jam it down here and actually you can see already did this, I just gave it the wrong ip the address, so let's go over here, now we could go and take this ip address right there and use it— don't do that, go set up a floating ip address, so we'll come over here and we'll say I'd like to create a floating ip, I'd like to take this one, and I'd like to assign a floating ip address, now I'm not really going to do this, because then I'll have to go and clean it up afterwards, but you click this button it gives you an ip address just like this right here, and you just copy it, but because I don't really want to mess up my system I'm just going to go back here and use the real ip address right, but, you understand this is not how you normally do it.
Okay, so now we don't need this, okay, so we should be able to actually leave our server, close this off and now let's try one more time, where do we want to go to auto test let's try it over here, ok so try again, ta-da, look at that so here on my mac I'm talking to you my server I just set up, running nginx, talking to μwsgi, and it's master mode all the way down in San Francisco.
Perfect.
So let's go over here and do a get, I must specify an authorization header well let's go back to postmen and talk to it.
When we have that running, let's go ssh back, now I could use the full name auto_service.talkpython.fm now we're logged in, so let's go over here and we can actually look at the log file, okay, so here it is, I'll clean it up, now when we do these requests we should see those start coming in, so where do we want to go, let me copy the url, and now we're going to go do a post to create a car this is going to be Opel for real, so we should create this one, do ascend, there you go, boom we did a post to the server and we in 57 milliseconds generated the response after inserting into the database, let's go over here and change the url again, actually I'll just create a new one, make a request, and what have we returned, 403 forbidden, right must specify an authorization header, I dropped that let's go get our little auth header here, we should be able to do a get, maybe if I can spell right, authorization, there we go, now we got our response back, do one more time, so check this out, 403, 403, now we generated somewhere a 200, here, it's wrapping, 200 over here, very quickly very nice response time, again let me click this a bunch of times, I told you about the different servers not necessarily being warmed up for this, now 10 milliseconds, 9 milliseconds, that is a very solid response time, we have about 40 thousand cars in there, and so this is going through and finding a certain number of them, it's taking the I think 10 cars or 25 cars whatever it is and doing formatter on it to turn it into json and shipping it across the wire, and there it is, all right.
So hopefully, that seems pretty easy for you to set up the servers here, right, now if you have to come up with all of this on your own, not so easy, if you have the script right, run through this script, copy these two files, fill in the missing pieces, the path and stuff, I can tell you it's pretty easy, I've set up quite a number of servers sort of following along the script and it's worked out really well, this more or less is how I have my main websites that I use all set up on Digital Ocean as well.
|
|
|
show
|
3:22 |
Let's review the various steps we had to take to configure our servers.
We installed a bunch of things via aptitude in order to get our server ready to run what we needed, we installed μwsgi, we installed Python 3, we installed nginx and a bunch of other stuff along there, we stalled the get, command, line tools and so on.
So that's all in that setup_script.txt, I said txt not sh because you really aren't supposed to run the whole thing there's a few steps that require manual intervention and so on.
I guess you could run it once and just sort of realize ok, here's where I enter my username and password for github and things like that but however you want to use it, you can make it a full on proper script; there's a bunch of stuff in there that we'd ran that I'm not showing here, but these are the key configurations for the various pieces set up by those steps.
So first of all, in order, we saw in order to run μwsgi, by pointing it at our configuration file, it needs a μwsgi section so this goes into production.ini, and see the μwsgi section what you want to listen to that could be a socket instead of http, where's the working directory, how many processes, where to log to, things like that.
So, make sure this just goes at the beginning or really anywhere I suspect, but you can put at the beginning of your production,ini.
Then, we have to register a μwsgi as a service, using system d so here we gave it like a description name and a target so we can run as soon as sys log is going, and then the execution path is to run μwsgi with any -paste option pointing at production.ini, and giving it the working directory.
Other than that, you can pretty much just say this is just standard a system d service file; in order for this to do anything, we have to copy it to /etc/systemd/system and then you could just say refer to it as auto_service if you used the service extension on the file you can omit it when you're interacting with it on the command line.
The other thing in addition to μwsgi that we used is nginx.
So here we set up a configuration for nginx, we said I want you to listen to auto_service.talkpython.fm you saw that I removed the default website, so you could also go to this by ip address, and it'll just use the one and only thing it has this, but you can have many different servers and many different server names and things like that, you can just have a different server name here and it'll only listen at that point to that particular domain name, not just the ip address.
So we're listening on port 80, we're mapping static files with a year-long cash to where the static files go, again we copy this to etc/nginx/sites-enabled and then there was some more stuff after the server set up and the static we set the location for \ onward just pass the url off to my application I am configuring below which is to basically do a little bit of setup on headers and gzip for speed, and then say we're just going to do a proxy pass over to μwsgi, to the main masterpiece running at port 8999 locally, could be another machines actually, but right now it's locally, and then that thing will figure out which sub process is going to actually, work or process is going to handle that individual request There you have it, we have our service running very nicely on a nice, cheap, high performance, Digital Ocean server for five bucks a month.
|
|
|
|
10:50 |
|
|
show
|
2:46 |
In this short chapter we're going to wrap up the course by looking at your options for documenting your apis.
If you have a public api, you really should be documenting it, if it's internal, maybe, we'll see.
So, let's take a look at some of these considerations.
First of all, how are we going to go about creating these docs, do we need them at all— maybe, like I said, if it's a public api you absolutely need to have good docs, if it's an internal api and you work at a company with a couple of developers, maybe just the unittest and an example app is good enough, you don't really need to overly document it.
If you work within a large company or you do an open source, you definitely need to document it as well.
Okay, so let's suppose you've decided, yes, I do want documentation for my api, one option is to just host them on read the docs, so you go over there, create an account, set that up, that's an option; you could host them on github, and by that I mean you just have a repository that is a bunch of read me files, or you know mark down files that people can browse through.
An example of this would be basecamp, at the beginning of this course we saw that basecamp has all of their documentation just as markdown files maybe restructured text, one of those two on github, so that's certainly an option.
You could generate them from a static site generator type thing and then just put them up on a web server somewhere, that would be fine; so all these things here, all of these options kind of leave you to your own devices, if you want to go this path they're pretty well documented there.
But in this section, I want to show you how to actually add the documentation to where your api is executing, inside the pyramid web app.
So we could host them right in this application here, or something along those lines okay, so you can read the docs about working with read the docs, and things like that, but if you want to host them within your app and kind of keep it all bundled together then we'll see how to do that, it turns out to be super, super easy.
So we'll add our documentation and we'll have a couple of pages we should probably feature it pretty clearly, put a little nice design on it, things like that, so here's the page that we might click on, see docs/all_autos and this might tell you how to get all of the automobiles from our service, right.
We saw, as you know, we've been doing this for a while now get/api/autos, and that's going to return a json response of this type, actually it's going to return, the screenshot might be a little off, it is going to return a list of those, right so here is the general response, and I think the style, there's not much to it, but also having it look pretty definitely makes it feel more polished and people are more likely to use this api if the documentation looks at least somewhat professional, right.
Now, we'll have another one of these for when we're going to create a car so here we are going to post the api/autos the submitted body is this, the response options are json and csv and they come out like this on the bottom.
All right, so let's see how we add this to our auto service.
|
|
|
show
|
4:59 |
All right, so what we're going to do in this example is we're going to add some extra pages, some extra views to this website and those can function as documentation, in our case things are really simple, we just have a few calls, a few end points and we've decided bundling them together on to our little service here is better than having some other place to maintain, that might not be the best for you, but for what we're going to do, that's how it's going to work.
So what we want to do is we want to come over here and notice we have our home page renderer here and our view and let's add one just called docs, and we have something really similar, so I'll copy this across like so and for some reason our system hasn't found pyramid yet we just got to restart PyCharm, it'll be fine; so here we have our view config all set up and this is going to be docs and let's say all autos, and then every one of these is going to be a get request but some of them are going to describe get, some of them are describe put, and so on, so we'll call this get something to that effect.
Now this template slash my template, not so amazing let's go over here and make this a little bit nicer.
So let's try to organize this, we will create a directory here let's create one to hold our existing thing, I'll say home, let's create one for all the docs templates and then let's create one for things that are shared across them so for example layout goes into shared, that's great and my template is going to go into home, let's do that and let's also rename this to index or home or something like that.
All right, so if we look, I made a copy here so it kind of duplicated that, but let's look at this one, notice how it's sort of refactored it took a really good shot at it and renamed that part but it didn't catch the home here, ok, so that's good let's just make sure this still works, we better go ahead and add that I did want to assess this part, we'll come back to this, okay so now we want to come over here and we want to say /docs/ and what are we going to call this, we are going to call this something like let's go ahead and make the route name and the function name and the template name all match, so we don't go crazy so let's just call this docs_all_auto_get, maybe it will just be all_autos_get.
So down here, let's make a copy of that and make it all autos get ok so we're using this layout, now with this reorganization this doesn't quite line up anymore, so we need a ../shared/ like this on all of our little templates, when I say all I mean the two that we're doing, all right, so we are going to need to say go up and look in the shared folder but this is going to be a much nicer organization in this simple site it doesn't really matter, in a real site this gets massive right so this organization is super important.
Okay, so come over here and let's just put so we could just have I'll put a little something like this will be something like this this will be get/autos and I'm going to put some HTML here it's nicer and we'll talk about in a second right but the idea is all we have to do is have one of these pt files it points to the shared layout, it has a content section, and then we just put straight plain HTML, you could have a dynamic but for documentation, probably not.
Oh yeah, one more thing, let's go fix that.
So we come to our main, we go to register routes and down here we're going to have another one what we're calling it, something like docs_ that and it's going to be let's say docs and let's just say all_autos we can add a get or just all autos, right, this is how you get all the autos.
Let's have one more, in there docs post, and this will be create auto, so these are the two that we're going to work with.
Let's just get this first one going, so we run this, if we didn't mess anything up it should be working, here we go and if we go to /docs/all_autos, boom, there you have it, we're hitting this page now the one all autos create auto, that one doesn't exist; so let's go ahead and do that really quick as well.
So we just want to duplicate this, and notice there's really no logic we're just saying serve up that template, so this is going to be all autos post and so is that, so this all line up great, and let me just put post here ok so if we come back to our home page, here we have these little links where it says, it sends you off there, let's actually send this to the documentation, let's say /docs/all_autos let's have the other one, say create car, we'll call it create autos and this will be post like that and so on.
If we run this, we should be able to at least navigate around a little bit now so here's our home page, if we click this, it takes us to our api get click this it takes to our post.
Okay, so the overall structure is set up and now all we have to do is put the actual contents of the documentation in here and do little style magic.
|
|
|
show
|
3:05 |
So we have a little bit of basic documentation working here we don't have really like a nav bar anything like that but just pure HTML, we can have that.
However, we don't have the actual documentation so let's go over here and fill in this piece that we're going to work with now I am just going to paste this in because you watching me type documentation can't be the most fun; alright, so what we're going to do is we are going to come down here and we haven't got our css yet, but we'll get there and we're going to have a place that talks about all the autos here's a little description, here's that get remember that was green like dark green on light green to indicate a get request and orange for a put and red would be for delete and so on, we even have a cool little try it button here, so you click the button, we're using bootstrap so it gets us button style and you click try it and it'll just go and download this, now, I don't think this is actually going to work here because we've added the requirement that you have to log in you have to pass the api key, but at least we can see it tell us hey no api key for you.
Here's the response formats, and notice we've got a bunch of classes and stuff that we can style and we have our examples here in a pre, ok, so if we go back over here and we refresh boom, this already looks pretty good, it could be better like this part obviously could be better those were like pulled out in little highlights and whatnot, but decent, maybe I should indent this, there we go, indented, looks a little better, so let's go and work on the css, so notice we have already a static/docs css up here, but it just doesn't exist, so let me just copy this one in here we can look at it real quick, so this is from before I just said alright look, when you talk about the request use some sort of monospace type thing, color the git foregrounded and background so it highlights this way the post that way, obviously do the same for put and delete and just generally highlight the code parts and make the fonts a little bigger.
So not a huge thing, but that looks a little bit nicer, right notice how these popped out now.
So we have our little back home, we go back we could check out the post that was not done, we'll do that in a second but this one, this one's done, do you want to try it you must specify an authorization header, right then we could set up like a test one or whatever but for now, this is totally fine.
Okay, so let's just put the HTML in the other one, so just like before, standard HTML here, and let's go back home, now paste that in there, so now we've got our little documentation.
So that's pretty nice, we're back here, we're checking out our service, just hit the url so it would be like auto_service@talkpython.fm from our deployment section you would see this, and then you could go look at the individual pieces, right, this is not really a great set of documentation because I didn't create a whole fancy website just to talk about documentation, you guys totally should have the idea and a little template that you can work with.
So hosting your documentation on github or on read the docs or something like that is totally fine, but you can see that it's super super easy to do if for some reason you want to host it inside the same app that serves up the api itself.
|
|
|
|
16:42 |
|
|
show
|
1:22 |
There it is, the finish line, you've made it!
Nice work, you've got through all these restful http service concepts and because you made it to the finish line, because you probably worked through and followed along with the demos as you were going to the course you now have a new magic power— building restful apis.
So the big question is— what are you going to build now?
So I hope you really enjoyed this course and learned a lot from it, and think about what you're going to build, hopefully you have something really cool that now that you can create these apis very easily and you fully understand them, you really are going to build something awesome; and if you do, be sure to come back and share it with us.
However, before you go, you you want to take the code and the samples with you, so be sure to drop by github.com/mikeyckennedy/restful-services-in-pyramid and star and even consider forking that repository, so you have an exact copy of how it was when you went through this class.
So, if you look into the source folder there you'll see there's actually a lot of different chapters and even different stages like step one, step two, step three throughout the code there.
So I tried to make it so you could pretty easily grab the code from one level and start following along at any step that you like, hopefully it worked out that way, if not, do let me know and I can go back and adjust that for others.
|
|
|
show
|
1:13 |
Now, before we put the wraps on this class and you go off to create your own apis, let's do a really quick review of each chapter; so we started out the course with asking the question what is rest and we said there's a set of principles that these web services can follow and the more of them you follow, the more restful you are, so one is to use http methods explicitly, endpoints are URLs not verbs typically but nouns, you know, api/autos not api/list_autos things like that; it's casheable the get ones at least, it's layered system, so you don't see beyond what you're talking to even if that calls, other services, stateless, at first that wasn't true, but once we switched to the database totally stateless; it supports content negotiation, so that's using the except and content types in http to say hey if you could give me png that would be better than xml, things like that, hyper media as the engine of application state or HATEOAS, this is the one that we kind of pointed on and said you know, a lot of services really don't do this, this is more of a pure web thing, and so this is a spectrum, and I think we've made it more or less to level six not level seven, and that's fine with me.
|
|
|
show
|
1:22 |
Okay, next we came to web building blocks in pyramid.
So we saw that first thing we had to do is create a route and we did this in the dunder init, __init__.py in the main method there and we said we have to set up patterns, not regular expressions, like some frameworks with just patterns with little template holes in them, if you will and we're going to map those over to views.
Views sometimes known as controllers in the nvc world, these are the things that process our requests and decide what to send back if anything at all; templates, these are the dynamic HTML views that sometimes we send back, this was the home page, this was the doc page, things like that.
Models, we had several levels of models, the actual thing we return were often— often, not always, Python dictionaries unless we configure the renderers to treat special types that it knows about.
But, we also had view models in there, which served a slightly different role than the models typically talked about here.
Static types and static files right, so css, javascript, images, we saw that we can map a special part of our web application to serve up files and no other part of will.
We also did a lot with configuration, in the beginning we just played with development.ini, but as we got to deployment, we saw that the production.ini and the ability to have different configurations for locally running our code versus running in production, turns out to be super helpful.
|
|
|
show
|
1:53 |
Next, we created our first service.
Remember, we were going to help out this dealership, they were looking a little retro, they didn't have a good api, they wanted to get in the game and actually start selling some cool Opels, and get a little bit of European flair in small town America here, so we were going to create an api that let them list and sell and generally participate in a technology's way with their Opel cars, all right.
So that was our service, first thing we had to do to create the services is have a web app to run it in at all, so in order to create the project, it's technically not required but it makes life way, way easier, we were going to use cookiecutter, so we had to install a cookiecutter on our machine, and you could even give that a --user if you just want to install it in your profile and then, we're going to run cookiecutter and pick the pyramid cookiecutter starter off of github.
That's going to ask us a bunch of questions and generate the web application with all the stuff set up and ready to go.
Then, we chose the name auto_service_api, at least in this little example here and so we were going to go into that folder, create a hidden .env, virtual environment with the --copies don't forget that, if you're on MacOS that can be very helpful; and then, we want to activate this, we could do this in one of two ways, if you want to continue to work on a command line, you will do it here, in PyCharm, we saw that actually opening the auto_service_api folder it would detect that hidden .env and just cling on to it and make that the default one for the project that's going to create, so either way we'll activate it here or open in PyCharm, and then we need to run the setup.py with the development command, you might normally run it with install, but here we're going to run it with develop so it leaves the files in place, but executes them out of our working directory.
And then we can run it just say p.serve development.ini and we should have our app up and running if we did everything correctly.
|
|
|
show
|
1:22 |
Now we've got our app all configured, it's time to add some api views to it.
So here we are going to create a method that's going to respond to the route api_all cars, that's probably /api/autos, it's going to return its response as json and it's only going to respond to get methods.
So what do we do— well, we just go to the repository and say give me the 25 latest cars and boom— here they are, and this worked because at this current early stage the repository returned a list of dictionaries, not something more advanced like sqlalchemy objects, so we go and get the car from the database return the list, and because the renderer is set to json, it automatically formats that to a list of json objects, if it knows how to serialize them, which it does in this case.
Now, if we want something more advanced not just reading the cars but creating one, we could go to the same route but now we have post instead of get, and in this case we're going to say request.json_body to convert the text that was submitted to us into a Python dictionary by parsing it as json, that might have failed, so we'll send them a response 400, bad request, if that's the case; otherwise, we'll actually try to create the car and we'll get back the car from the database because we want the default values that got created in the database to be sent back so we'll say the response is 201 created, oh yeah and here's the body of the car, if it happens to be an error— well, that's probably on us, 500, sorry about that.
|
|
|
show
|
1:31 |
Returning json was fun, but we looked at returning different types we returned csv, we return json, including parsing custom types as part of the json, and images, so that also was good, but how do we negotiate that, how do we make this something the client can ask for automatically without us being involved?
That's where content negotiation comes in.
So here's how we created a negotiating renderer factory.
Now the idea was this is basically a renderer itself that means that it has a _call, a dunder call method which returns a function, and that function takes a value and a system and then it returns the serialized result or some kind of response of that.
So here we get it set up, we say look, we're going to provide you a bunch of renderers and then we'll key them off of the content type, so will you add these renderers, what content type does his thing render and what is it, so we'll store that here, if somebody calls us to create a new renderer to process a request we just say yeah I just use our renderer function here and then in this one, we're going to take the value, figure out which renderer it should go with, according to the request and then serialize it or crash if we can't deal, so we're going to go to the request get the accept headers, do a little work, because remember, this could be a string of like I'll take this, and if I don't have this I'll have this other one, so we got to take that apart, loop over those, see if sort of highest priority first and say do you have a renderer that'll do this, no, ok, how about another one and we'll just go through them and if they're all exhausted well too bad, I guess we can't help you we'll throw some kind of exception.
|
|
|
show
|
1:50 |
After content negotiation and the different renderers we added validation to our api which was sorely missing up until this point, but once we did, the actual validation code simply overwhelmed the api code and the important code if you will, by just totally filling up so we said let's create this abstraction called a view model whose job is to do the validation, to do the transformation from original object into rich Python objects and so on.
So here, after having a super bloated update auto method, we condensed it back down, so we're doing the standard web stuff in gray so we're getting the request.json_body and we have to do that in the api method because there's not really a good way to do that without passing the request itself so we just go ahead and say fine we'll have to do this here, a little bit of web work and then we create our view model, we give it the initial data, call compute details and then it populates its errors response which is a list of problems that may have encountered and if it has one, it just says hey there's some kind of problem like 400 bad response, 404 missing, 403 permission denied, whatever and it sends the error text and the status back.
All right so that orange line or red line section in the middle no matter how much validation we add it's going to stay that simple and if we want to test the validation, we don't need to do that by mocking of the web request in the database we just give it this object and we can test that on its own.
If we make it through that, then we're really down to what we wanted to do in the first place, take a car, update the database and either say that worked or it didn't.
So here we're returning the error 400, because the repository was doing some validation as well but it could also be 500, we need to be more careful about the exception type that we're catching so like a database exception probably our fault, like couldn't connect, some sort of other validation exception, well maybe we do 400 here.
|
|
|
show
|
1:06 |
Next thing we did is we brought a real database and a real orm into the picture.
We had this little fake repository thing that I created and it worked well enough for test data, it was super simple that was helpful but it was just in memory dictionary really, so it loaded up a csv and then it just held that result in memory, so we said no, no, no this is not really how it works, it really has a database and that database stores its state somewhere else making our service more restful by being stateless.
So what did we do in sqlalchemy— we created a car object and derived it from our sqlalchemy base class that we created, we gave it a database name like table name is car fine if you're doing a lot of relationships that the name of the object, the name of the type and the name of the table matching makes life a little easier but it doesn't have to be the way; then we created an auto incrementing primary key integer, in this case I believe in our real example we gave it like a uuid4 type of thing.
We have a name which is a string, a year which is an integer, price which is a float and so on, we even showed you that you could have relationships like over to an owner object or something like that, although technically we didn't model that in our api.
|
|
|
show
|
1:25 |
And then we said let's provide some level of authentication to our service and we said let's do that with api keys, so we created this decorator called require api key and it follows the convention of our service which is to pass an authorization header and then authorization header has a certain structure which includes that api key and our little function parse api key from header it's not shown here but it goes and it grabs that from the authorization header value.
It says, look, if you don't have one, nope, 403, missing api key.
It then uses that api key to look up a user, and if there is no user there it says no, no just invalid api key, or couldn't find user, or something like that.
And then, if that all works, that means we actually have a user corresponding to that key they pass, so we stash the api user for later use and then we actually call the function that we're decorating which in this case is going to be one of our api view methods.
So here's the implementation, hopefully the decorator stuff didn't freak you out too much and it kind of came across more cool than more complicated but they do take a lot to wrap you head around.
Now, if we want to use this, it's dead easy we can come over here and say here's a view and oh this one requires an api key, and remember all autos will never even get called unless the user is already set and everything works, so we can even come down and know that request.api_user is going to be set we didn't have to check whether it exists because if it doesn't, we're not going to make it this far.
|
|
|
show
|
1:01 |
Next, logging and monitoring, so we did logging with logbook and monitoring with rollbar.
So if we wanted do logging here, we're going to create a logger and we've already set up our stream handler, our time rotating file handler the step that we had to do once at the start and then we can say logbook.logger and give it a name and this is sort of consistent way to do that create logger so you don't have to continually remember its api/autos like this, so put that in function and then throughout our api calls, we can come down here and say for example an update auto we can get the logger like this, do our work and now if something fails, we could warn about this say logger.warn, and give you information about what went wrong.
So in this accept block, we're going to say no, no, something went wrong here then if the view model validation fails, we can warn with details about those errors again, and if everything works great, we can do a much lower level message log.trace which only shows up maybe in development, but not production.
|
|
|
show
|
1:25 |
At this point, our app was pretty much done and ready to go, but it was just on our machines, so we want to get this out on the internet on some sort of cloud cover probably Linux, so we talked about deploying to Digital Ocean, so remember we created this Ubuntu image on Digital Ocean and amazingly it was five dollars for this relatively high end ssd based server which is really awesome and we were going to install nginx, and nginx is the front line web server, that's the only thing that clients actually talk to but nginx doesn't do the Python processing, it just handles the basic web stuff and then delegates that over to μwsgi.
μwsgi itself doesn't want to just run in single process mode it wants to have a bunch of workers to help add parallelism to Python.
Now, it does have a threaded mode as well for each one of the pieces but the more worker processes the better, right, so it creates a bunch of these worker processes, and that is where our Python runs.
Request comes in, hopefully over https, and then nginx decrypts that request hands it off to us internally, and then this thing figures out which of its internal worker processes is actually going to handle the work.
So you have a script, as well as a couple of configuration files that you can adapt and follow the script and pretty soon, you should have a web server up and running.
The first time you do it, it might take a little bit of juggling to get it to work but with those things as your guide you will be quickly making this work and it'll be really easy for you.
|
|
|
show
|
0:42 |
Alright, the last thing we did after everything was up and running, we said, well if this is something public we should add some documentation and we could add that documentation somewhere else, or we could implement it and run it right in our web app.
So we added a /docs section, and this decent look and little documentation for the various things, so if we want to get all the autos, we're going to do a get to api/autos, if we want to create a car we'll do a post to /api/autos, and we'll pass that body we say there, and you'll see the response type and so on.
So, because we only have a few endpoints and a few options documenting inside our app seemed like a really decent choice, if you have a really complicated one, we talked about other options as well in that section.
|
|
|
show
|
0:30 |
And that's it, thank you.
Thank you for taking my class, I really hope you enjoyed it, I had a great time writing this course, and recording it for you, I think there is a bunch of cool ideas bundled up in here, that you can take them and do amazing stuff.
So, I hope to see you online following me on twitter, I am @mkennedy there, listen to the Talk Python To Me podcast, and if you enjoyed this course, please recommend it to your co-workers, to your friends and just let people know about it.
Alright, thank you so much, and I'll see you around.
|