|
|
|
8:51 |
|
|
show
|
2:43 |
As you know, it's a services world out there, almost anything you need to interact with has an API and if there is no API, there is probably a webpage and I am going to show you that the combination of APIs and web pages allow you to connect your app to almost anything.
So we might want to talk to github to work with source code, repositories, automated builds, maybe we want to use Twilio for adding telephony and text services to our app, of course we want to update people through their Slack channel, send and subscribe people to our mailing list via MailChimp charge them money over their credit cards using the Stripe APIs, query some backend business data using Salesforce, send out some emails with SendGrid or even manage and work with our projects offline through Basecamp.
So if we want to connect our app to these types of services, and many more, we are going to need to learn how to work with services in Python.
And that's what consuming HTTP and Soap services in Python is all about.
So, whether you want to talk to github, Stripe, Basecamp or even that old fashioned Soap service that runs the backend of your business, you are going to learn how to do that here, And by working with all this services, you'll see that you can give your app super powers.
I hope you are very excited to explore the world of services from Python with me.
What are we going to cover in this course?
Well, we are going to talk primarily about transports that run over HTTP, Rest, Json over Rest or XML, or a variety of other things, and we are even going to talk about Soap.
So we are going to use Requests, we are going to use urllib2 and we are going to use urllib.requests.
Now, if you are unfamiliar with these, Requests is the most popular way to write Python clients for services, however, sometimes we want to use stuff that is in the box if you will that comes with your Python distribution that everybody already has, because Requests you have to install separately.
So we are going to talk about Python 2's urllib2 and Python 3's urllib and associated submodules like Requests and error and so on.
Now, many of these services are going to require us to authenticate, to log in, so we are going to see how we can do username, and password authentication to access restricted services, we are going to work with a variety of different data formats.
When we talk to these HTTP services, they might want to send us data back in the form of Json, or xml, or super complicated xml in the form of Soap or even binary data, so, we are going to look at how each one of these data formats is managed and worked with in Python and how to use that kind of data from a service, and finally, if there is no service, we are also going to talk about screen scraping.
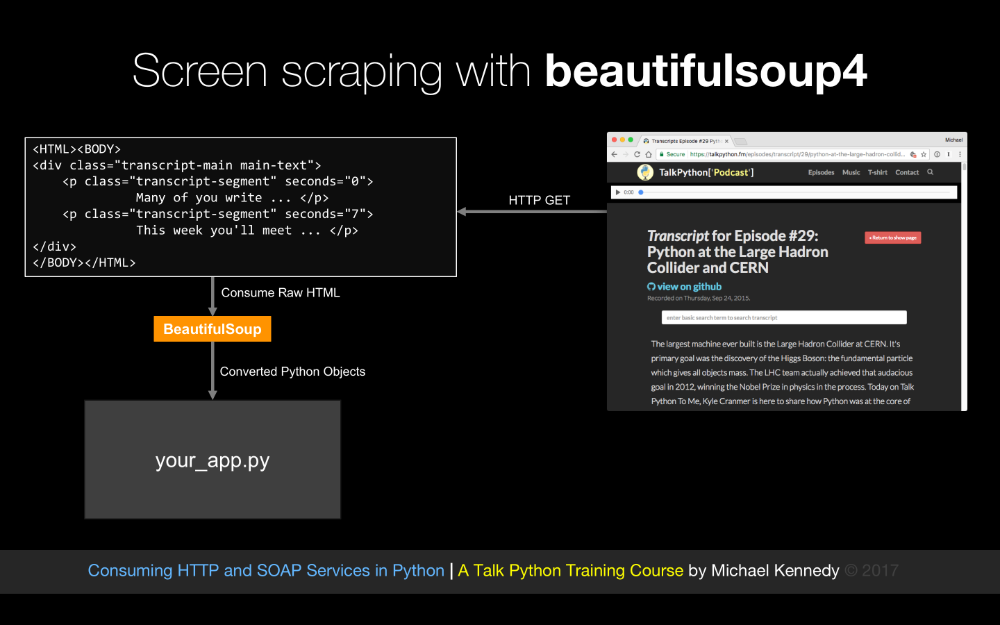
Often we'll have a direct end point that we can contact and use a well known API against, but if the data is on a webpage and there is no API, what do you do?
Well, you do screen scraping, and screen scraping will let you go to a standard HTML page and more or less turn that HTML page into an API or series of HTML pages, so at the end of the course, the final chapter that we are going to cover is doing basically adding services to websites that don't have services by making their webpage themselves the thing that provides data to our app.
So that is what we are going to cover, and who am I anyway?
Well, my name is Michael Kennedy, thank you so much for taking my class, hey, that's what I look like, it's nice to meet you, you can follow me on twitter at @mkennedy and why should I be teaching this course?
Well, I've been working with Python for quite a while, I run Talk Python To Me, the number one Python podcast with over three million downloads, so I've had the unique opportunity to interview hundreds of people who are doing amazing things in Python and many of them have written the libraries that we are actually going to cover here, so when it makes sense, I am going to actually give you a look behind the scenes, at the people behind some of these technologies that we are actually going to cover in this course.
I am also the creator and founder of Talk Python Training, I've written many of the courses and I have over ten years experience teaching hundreds of in person and online courses throughout the world, so I am super excited you are at my class, it's great to meet you and we are going to have a great time working with all of these services.
|
|
|
show
|
1:34 |
The first thing you are going to need to take this course is Python of course, and I am sure many of you are happy to hear it's Python 3, not Python 2, and you might as well use Python 3.6 but if you have 3.5 or something like that installed, that's totally good, if you are on windows, there is a good chance you have no version of Python and you'll need to install Python 3; if you are on OS 10 or macOS as it's called these days, you probably have Python 2 which ships with it, but not Python 3.
If you are on Ubuntu, chances are that both Python 2 and Python 3 are there, so check your system, see what it is that you need, but we are using Python 3 and we are not using neither of the 3.6 features, so if you have 3.5 or 3.4 that's totally fine.
Now, there is a very small segment where we do talk about using Python 2 because the way the built ins work in Python 2 and Python 3 are different, so we do touch on Python 2 just for a moment, if you are on Windows, you are going to need to install that as well, but only if you want to do that little piece, you don't technically have to do it.
Some of you may be thinking oh should we do this on 3, should we do it on 2, I think the debate about Python 3 and Python 2 is pretty much at the end.
If you look at the last several PyCon keynotes done by Guido Van Rossum he always opens up with there is going to be no new versions of Python 2, no Python 2.8.
So I think certainly going forward Python 3 is the place where it's at, that said, the actual differences except for the built in sections are extremely small, so really, it's either way we'll work but the code we are writing is technically Python 3 so you want to have that installed.
|
|
|
show
|
0:59 |
The editor and the IDE that I am going to be using throughout this course is called PyCharm.
In my opinion, this is hands down the best tooling for writing Python applications; you don't have to use PyCharm, if you do want to just go to jetbrains.com/pycharm, they have two basic versions, you can get the community edition which is free and open source, or you can get the pro version which costs some money, it's not super expensive but does cost some money.
For this course, I don't believe there is anything in there that is required that is only in the pro version, so the community edition should be totally fine, for taking this course, if you have the pro version, hey you have some other cool features and that's great.
If you don't want to use PyCharm, that's fine, the code we are working with is not that complex, it's pretty self contained, you can use Sublime text, you can use Visual Studio Code with the Python plugin or extension, you can use Emacs, you can use Vim, but the demos I am doing are going to be in PyCharm so if you want to follow exactly along- get PyCharm.
|
|
|
show
|
0:32 |
We are also going to be using a API exploration tool called Postman, so Postman is a cross platform gui for interacting, analyzing and just generally recording and playing with APIs.
We won't make heavy use of it, you don't have to install it if you don't want to play with it, but I find working with APIs sometimes is great to get a good understanding and play with is and then implement it in code, and you'll see me do that a few times in the course, and we are going to be using Postman so Postman is cool, and free, so it's worth checking out.
|
|
|
show
|
0:58 |
Finally, we are going to write a lot of code in this course.
Well, I am going to write a lot of code in this course, and hopefully you follow along, it would be great when you see me doing these demos, for you to say okay, I am going to take basically the idea that I saw Michael do there, and I am going to write that, all of the APIs in fact that we are working with are public and out in the open.
So, even the ones where we have to modify data are publicly accessible, I've created some special ones for this course, so you should be able to write the code and follow along in examples.
So I strongly encourage you to have your own little projects, your own set of Python apps that is more or less replicating what I am doing here, but I do have the source code of exactly what I typed on the screen available to you here at github, it's consuming_services_Python_demos on my github account, and I encourage you right now to go star and/ or fork that repository so you have it as part of your record.
|
|
|
show
|
2:05 |
Welcome to your course i want to take just a quick moment to take you on a tour, the video player in all of its features so that you get the most out of this entire course and all the courses you take with us so you'll start your course page of course, and you can see that it graze out and collapses the work they've already done so let's, go to the next video here opens up this separate player and you could see it a standard video player stuff you can pause for play you can actually skip back a few seconds or skip forward a few more you can jump to the next or previous lecture things like that shows you which chapter in which lecture topic you're learning right now and as other cool stuff like take me to the course page, show me the full transcript dialogue for this lecture take me to get home repo where the source code for this course lives and even do full text search and when we have transcripts that's searching every spoken word in the entire video not just titles and description that things like that also some social media stuff up there as well.
For those of you who have a hard time hearing or don't speak english is your first language we have subtitles from the transcripts, so if you turn on subtitles right here, you'll be able to follow along as this words are spoken on the screen.
I know that could be a big help to some of you just cause this is a web app doesn't mean you can't use your keyboard.
You want a pause and play?
Use your space bar to top of that, you want to skip ahead or backwards left arrow, right?
Our next lecture shift left shift, right went to toggle subtitles just hit s and if you wonder what all the hockey star and click this little thing right here, it'll bring up a dialogue with all the hockey options.
Finally, you may be watching this on a tablet or even a phone, hopefully a big phone, but you might be watching this in some sort of touch screen device.
If that's true, you're probably holding with your thumb, so you click right here.
Seek back ten seconds right there to seek ahead thirty and, of course, click in the middle to toggle play or pause now on ios because the way i was works, they don't let you auto start playing videos, so you may have to click right in the middle here.
Start each lecture on iowa's that's a player now go enjoy that core.
|
|
|
|
11:51 |
|
|
show
|
2:49 |
Let's begin our exploration of services and consuming services in Python by taking a survey of the various types of services that we might encounter out there in the world.
We are going to do this by focusing on the lowest level services and moving up in abstractions.
So the lowest level service that we could have, the way that we could talk to the service is with using just raw network sockets and just sending bytes on the wire.
So we would open up a socket with bidirectional communication and we would send 00101 over the service and it knows what that means, they will say great, 1101 and so on.
This is the fastest, lowest level, lowest latency way to interact with services, so there are benefits here, it's super fast and it's responsive because we can actually send custom messages tailor made for the types of messages that these two apps exchange, it can be extremely low overhead in terms of bandwidth, do you need to send four bytes as an integer?
Well, maybe you just send four bytes and it just knows an integer is coming, so literally, there is no wasted sort of packaging on the messages, so why aren't all of our services like this, well, there is usually way more drawbacks than there are benefits.
many time this means there is special protocols, you have some app, in order to talk to it you have to use an entirely unique protocol just to speak to that.
And often those don't have standards around them, often those are brittle and just not easy to work with, not easy to get started.
Another problem is proxies and firewalls, especially firewalls.
So packet inspecting firewalls really hate letting traffic out of the firewall, if it's some sort of binary blob.
They would much rather see some kind of HTTP traffic where they can inspect it and make sure that it's all legit and good.
Also, these often run on non standard ports and there can be problems with firewalls as well.
There are some platform specific issues you run into as well, like just above raw sockets, but still more or less sending raw bytes are things like on the Windows platform DCOM or .NET remoting, on Java we have RMI, remote method invocation and these might be sending like in memory representations of some kind of object from one .NET app to a .NET server for example, and that means it's extremely fragile and really inaccessible to Python or Javascript or other things like that, it's like you have to basically have the same technology on both sides.
And also, if you look at the network traffic, can you make sense of it?
I can't, not usually anyway, it's very hard to read just binary blobs, it's also hard to debug if things go wrong because you cannot read it, okay, but we do have low latency, low bandwidth, high speed raw sockets, and that is possible of course in Python.
|
|
|
show
|
5:42 |
Another thing that we might run into, especially little bit older services, especially inside enterprises, inside these big companies, they built a bunch of internet apps that they can connect together, it's very likely that what you are going to run into is a Soap web service.
Now, in the early days of the 2000s, 2001, 2002, Soap services were fairly ubiquitous for intranet communication.
And, of course, as Javascript grew and the internet grew in popularity especially with regard to services, the HTTP services and Json Restful services more or less edged Soap out, but it's very likely that you are going to run into a Soap service if you are working with older systems inside of a company.
So it's really important that we talk about them here because you don't want to have to switch technologies just because you are talking to a old service, right, so what's the deal with these Soap services, how does that work?
Well, it's basically HTTP traffic, the thing that is kind of an unusual is every request, regardless of whether you are getting something or you are updating something, every request is a post which indicates some kind of action, so here let's suppose we want to login and we are going to post to a single location and this action header actually tells the service what to do, and what we are going to send is a big blob of XML.
It looks like this.
And the service is going to respond with another big blob of XML, we are going to parse that apart back in our app.
Now, what are the benefits?
One of the things that is nice about these Soap services is they typically have some kind of UI describing them, and they also have UI that describes them for tooling, so they are really built with the expectation, it's basically required that at least one side of these, the fence, either your app or the Soap service have some really strong tooling support to generate the stuff.
I go so far to say these are the easiest services to create and consume if, and this is a huge if- if both sides of these arrows, your app and the service have excellent tooling support for Soap services.
that's not the case with Python, and these are certainly not the best services, that's why they are not very popular anymore, but they do have a button press generate the server side, and client side tooling support, and that way they make them easy but like I said, I don't think they are the best and I definitely don't recommend using them if you can avoid them.
So what else is a drawback about Soap services, we talked about post, and this post only behavior means that it basically breaks the architecture of the internet, the internet is built around get, post, put, various HTTP verbs, and only HTTP get is allowed to be cashed, and that makes proxies work better, that makes local cashing work better, there is all sorts of scaleability benefits, and other semantics around being able to support HTTP get the most common way to access resources on the internet but Soap services just entirely missed this, they just didn't even understand that HTTP verbs meant a thing on the internet when they were created, so everything is post which means a lot of the infrastructure benefits of being an HTTP service are lost.
It requires tooling, so things like Javascript and Python are the real disadvantage in working with these services, but that said, we are going to cover some pretty cool stuff on working with them from Python if you must, they are often focused on remote methods instead of remote resources, so here we have a log in method rather than accessing something about our user and that can lead to poorly designed services.
These Soap messages they exchange obviously they are bandwidth heavy and while you technically can read them, if you must, they are not really friendly to human beings, they are friendly to computers, and they can be read by humans, but they are not what I would call readable.
Let's look at this Soap exchange, in detail.
So here I have an operation, imagine this is going to be called on a web service that is a Soap service, so I want to take a number, and I want to take a number and I want to double it, I want to take an integer and double that integer, so how does this work?
Well, of course we want to send this as an HTTP post, so what we are going to do when we call this, the tooling that we would have had to use to somehow generate this service, would convert this action and this data into what is called a Soap envelop.
So the Soap envelop is an XML namespace laden bit of XML that is quite dreadful and you should stay away from it if you can.
But like I said, if you have to call these services, being able to do it in Python is cool, so here you can see we have a Soap envelop, and there is a Soap header and a Soap body, the Soap body contains some parameter, and that parameter's value you can see is 123.
So we are going to want to double the number 123.
It's going to go off to the server, via post, via HTTP, some parts you don't see here, the action is actually stored in the header, it's going to process that, and generate a response that comes back to us that is also a Soap envelope.
And this time the Soap body contains a double an integer response which also has an integer and that integer's value is 246.
So you can see, yes, awesome, we doubled the number and you can bet that the value returned from this function very much returned 246 when we gave a 123.
But it took almost a kilobyte of data exchange just send the four bytes over, the 123, and return the four bytes back, 246.
So, this is not very friendly to people, to the network, there is lots of problems with it, but this is how Soap works.
|
|
|
show
|
2:28 |
Alright, next up, the majority of services that you are going to see, are going to be HTTP restful services.
Be careful using the word restful because just certain people restful means very specific set of criteria, that most HTTP Json based services don't actually meet.
Maybe they are 75% restful or whatever, so I am going to try to use HTTP services but these are more or less restful services for their features, even if they are not entirely complete.
So how does this work, well, we have our app, and again we are going to do an HTTP request and again, this is going to go over HTTP but this time it's going to be a get request and it's going to be a get request against something that is a noun not a verb.
And this time we are going to request API/users/7 indicating we want the details about user 7 and what we are going to get back from the server, is going to be a Json message with the name Michael and id 7, presumably, we even get more information, but just keeping it simple for the slides here.
So what are the benefits?
Well, there are many.
This is universally accessible, this service is universally accessible, almost every platform has decent support for basic HTTP string exchange.
This is super easy to do from Python, this is super easy to do from Javascript, as well as C, ObjectiveC, swift, you name it, we can call this function from basically anything that will talk to a network.
Because it's HTTP and it follows the get post put standard HTTP verbs, it's firewall friendly, proxy friendly and for example this request is potentially cashable.
Reading this message name Michael id 7, is ridiculously easy, it's entirely human readable, and while it's not as light weight as the binary exchange it's dramatically more lightweight than what we would get if this was a Soap message, I've put this in the relatively light weight bandwidth story.
There is some drawbacks, it's often that you will find these services that are not self-describing, there is some tooling called swagger that you can add to the server's side and then use some tooling on the client side to help describe and generate proxies and things like that but, generally speaking, these services are not self-describing and like I said, if the thing you are absolutely maximizing is bandwidth exchange, well maybe raw sockets would be that, but if it's got to go over the internet, this is about as good as it's going to get.
|
|
|
show
|
0:52 |
Finally, let's talk about queuing.
We are not going to cover queuing in this class, but if we are taking the survey of the range of possible ways of communicating with services, queuing probably shouldn't be left out.
So queuing is typically done sort of behind the firewall, right, so I've got a set of apps they are running behind the firewall, one of them is going to get some sort of operation, it's going to add some kind of work or message to the queue later on asynchronously another app that might pick that up and do something, so for example, hey I am a web server, will you send an email to this person, and I am going to carry on serving at my web pages.
Some other sort of email work or process might grab that go yeah sure, I will start the outbound email campaign to this person.
That is queuing, we are not going to cover queuing in this class, but just to round down the spectrum there you have it.
|
|
|
|
11:44 |
|
|
show
|
1:27 |
The first type of services that we are going to focus on, not surprisingly are the most popular type, that is HTTP restful services, and we are going to use a very popular package called Requests for our first look at it and then we'll come back later and look at it through the eyes of the built ins.
So where are we in our overall course map?
Well, we are talking about HTTP clients and right now we are focused on Requests.
You may have heard of Requests, Requests or HTTP for Humans as Kenneth puts it is the most popular package for Python, not the most popular networking package, it's the most popular package, it's been downloaded seven million times a month.
So, it's really popular, and you can see that it has a very simple API and the reason this exists is the built in urllib and urllib2 have some really funky APIs and it's generally hard to work with, there is a lot of funkiness and it even gets less good, if you will, in Python 3, rather than Python 2, so the built ins are not super joyous.
There are reasons to use them and we will talk about what those are and when, but for our first look at HTTP services, we are going to absolutely use Requests.
Like most Python packages, we are going to install Requests via pip, so here you can see its projects page on PyPi, this is the newer version of PyPi at pypi.org/projects/requests and it says to install it, we are just going to pip install requests, that's pretty straightforward, so let's go do that now.
|
|
|
show
|
4:06 |
Now, we are going to need to install some packages, during this class, in particular we need to install Requests, we are going to need to install Beautiful Soup, and some of the other foundational or dependent packages there.
Now, one thing we could do is we could say pip install requests or something to this effect, however, if we do, this is going to modify our global system, and there is a couple of drawbacks to that, we don't want to modify our global system because it requires us to run these installers as admin, and this is kind of running arbitrary code off the internet as admin, not super recommended, it also means that we are going to use the same version of the library across every project we run, on our computer, so maybe we want to use the newest request for this, but some other projects it's old and it needs to use an older request because there is some kind of change, how do you manage those two environments?
So the answer of course is to use virtual environments, so let's just ask which pip or which pip 3 is really what we want, so we want to say, see this is obviously the global one, and if we ask it what is installed, you'll see that there is a bunch of stuff installed, so, let's actually create what is called a virtual environment that we'll use for the rest of this class, so I am in a directory called /pyhton/environments, there is a lot of conventions around this actually, there is different locations for different people, sometimes you put it in your project directory, sometimes you put these outside, I am going to put them in this folder in my user profile.
In Python 3, there is a built in way to create a virtual directory, so we can say Python 3, now on Windows, there is no Python 3 just be aware, you just have to have the path to Python 3 versus Python 2.
So that is a little tricky, but on Linux and OS 10 we can say Python 3 and that is pretty straightforward, and we want to run the module, venv, and we want to give it some sort of path, so let's say we'll go to consuming services venv.
Now, this will totally work, however, just one word of caution here- if your are on a Mac, and you are going to use PyCharm, both of these things need to be true, if you are on a Mac and you are going to use PyCharm, there is a problem with PyCharm understanding the type of basically following the symlinks too far when you set up a virtual directory this way, and so what you need to do for the time being, is add a copies flag here to say don't create symlinks, create just a copy of the Python file that we can link to directly in this environment.
So, because I am going to be using PyCharm, I am going to put --copies and I am on a Mac, it's up to you, but, I recommend doing the --copies for the time being.
Okay, great, we've created it, how does this change our pip story?
Not at all, because notice my prompt, it still says Mac Book Pro, just standard prompt there, so what we need to do is we need to activate this, we need to basically change this individual shell temporarily to know only about that Python, so I can come over here and say .
(dot) so apply this what I am about to do to this shell, and I am going to run ./consuming_svc_env/bin/activate on Windows, you don't need the dot and this is activate.patch.
Notice, my prompt changed, if I ask which pip, now it's this one, again, if I ask which Python, it's now this one from this environment.
Great.
So, most importantly, what we are after, we were asking for a clean environment, and here we have a brand new fresh clean virtual environment, with pip and setup tools.
So now we can start installing things that we are going to use for this project, here, so let's say pip install requests.
And it either uses a cash version or downloads it from the internet, and then installs it, and now if we ask pip list we can see, yeey, requests is installed, so let's just verify that everything is hanging together, we'll do a quick little thing here, we can come over and import requests, and because that didn't break, things are looking good, and then we can just make sure that there is actually something reasonable here, there we go.
So we've got cookies, sessions, get, post, those kinds of things.
Alright, so it looks like requests was installed successfully.
Now we are ready to use this environment, this clean environment which does not require admin rights on the machine and is just dedicated to our little project here, we can use this clean environment for the rest of the class.
|
|
|
show
|
1:53 |
So we've been able to create this virtual environment, that's great, however, let's get this into PyCharm, let's load up our project and let's actually register this environment as the one that we are going to use to execute all of our code.
So over here, I actually get cloned the service demos, these are the demos that you have access to on github, and I've actually just renamed them so the name isn't so super long.
And on OS 10 or macOS you can just drag and drop this into PyCharm or even Sublime text or Visual Studio Code, lots of these editors support that.
And it will open the project.
Okay, cool, so here we are, now how do we take our virtual environment which is over here in this Python/environments/consuming_svc/bin, this executable and make it the Python that we are going to use in PyCharm.
Well, we can come over here and we go to settings, and there is a project interpreter, notice right now, it's just the system wide 3.6.0 so what I want to do is add a local virtual environment.
If you want to do this entirely from PyCharm and not use the command line to create the virtual environment, that's fine, you can just use create virtual env, but because we already have one, we are going to go and do add local, now over here, I am already in this directory, because you can see here is the Python so I can just say open.
on windows it's start.
And I could take this over here and say okay, I want to use this, and let's go and drag it down here and say whatever that is that is the path.
So now you can see it's a virtual env at Python/environments/consuming_svc_env, and everything looks good, it looks like we technically could upgrade this here, so we can go ahead and upgrade setup tools and that will happen in a second, great, install a few other things.
Alright, now, when we run some code, PyCharm will now use our virtual environment.
|
|
|
show
|
0:38 |
So let's review installing requests, we had already created a virtual environment, but don't forget to activate it, so .
(dot, space) the path activate on Windows, you don't have to do the dot and this is just activate.batch.
So either way, our prompt will change and then we'll have access to the packaging tools for that environment.
Then of course, we are going to do pip install requests, that is going to download and install it and then just to make sure you can make a quick pip list to see what you've got, and here we can see that requests 2.13.0 that is the latest at the time of this recording was successfully installed and ready to roll.
|
|
|
show
|
2:41 |
Now that we're up and running with Requests, let's make a simple get to a web page.
So first of all, we are going to need the Python script to run aren't we, so let's go create a new Python file and we'll just call this simple get, and PyCharm is asking should this go into the github repository, yes, it should.
Okay, so what we are going to do is we are going to start by importing Requests and that is coming out of our virtual environment that we wired into PyCharm here, and let's just make sure that works, so we'll just do a little print here and we can make, over here there is no our little run button, it's grey, that's because there is no what is called a run configuration, so let's create that by right clicking here, and saying run, and notice it's using our virtual environment Python here, and it just says hello.
And so import, that worked well, our environment is working, everything is looking great so far, so the first thing we are going to need is a url.
And let's just go to talkpython.fm and do a download there, so what we are going to do is we are going to use requests we are going to do a get, we are going to issue that get to a url, we are going to capture that into a variable called response, or resp, now we can come over here and just print out and see what happens, see if this works, so there is a little pause, it actually did the download and we got a 200, that is awesome, so it looks like that worked.
HTTP 200, that is about as good as it gets.
So, let's actually add a little check to make sure this works, so suppose I had something wrong here, we should have a 404 or something to that effect, or even worse, something worse.
Okay, so it looks like the response came out great, so let's do a little test, we'll say if resp.status_code !
= to 200, then something went bad, we'll print error requesting url, maybe we'll put the little response code here, something like that.
And then, I like to return or break, I can do an else here, but let's go ahead and make this a little nicer, I am going to define a main method, which is this, and that is going to be the code, and we'll just run this main method, if and only if it's time, so here we can say return and we'll be out of here, so we'll cancel a lot of this execution if there is an error but if there is not, we are going to print out, let's just print out resp.text.
Now, that is going to show the entire page, you'll see it's screen by, maybe we just want the first 500 characters, just to see the title, so of course we can use a slice on the string, which is nice, here we go, so let's see the title here, talk Python to me podcast- alright, it looks like this works, so super easy, request.get, give it the url, check the status code and work with the text.
|
|
|
show
|
0:59 |
So that was simple, right, the whole promise of Requests is that it makes doing simple operations simple and easy and straightforward, I certainly think that that operation fit the bill.
We start by importing Requests, and then we just do get url to actually download the response, now this is a blocking call, it's not going to return it's we've actually gone to the server, looked up the dns for talkpython.fm done the get, got the response, entirely downloaded it so this is a blocking call, and we have response and it has both the status code set so we also have headers and cookies and things like that and we can access the text property, so here we are just printing out, here is the first 500 characters that we got, just see what this was all about, now this was really cool that we could go do this simple get against the website, but what we want to work with are actually services, things that are meant to talk, computer to computer, program to program, not program to humans or program to browser to humans, however you want to think about it, so that is what we are going to do next.
|
|
|
|
17:18 |
|
|
show
|
0:57 |
While HTML and text is really made for humans, that is not the focus of this course, a focus of this course is to consume data and formats meant for programs and computers.
So, what does that include, well, Json is the most popular exchange format these days, especially around HTTP restful services, back when Soap was popular XML was really important and we saw how XML being passed around or take things like rss feeds, there is a number of older services that still use xml so we are going to work with that, obviously binary data is very often something we want to access and download, think of a zip file or an image or something and then.
Soap, we are also going to come back and look at Soap, but for now, let's focus on Json, so we are going to look at how we consume Json services, obviously, but before we do that, I think the right place to start is for us actually to just do a little bit of work with Json in Python and leave the network out of it.
|
|
|
show
|
5:53 |
So here I have a little bit of Json text.
So, this Json string, if converted to Json or to other objects has a demo field and that says processing Json in Python, and the instructor is Michael and the duration is 5, presumably minutes.
So let's start working with this, let me just print this thing out for a second, now, notice this is still running the old one so I am going to right click and run that and it prints it out and it's kind of indistinguishable from say like a Python dictionary, which actually means working with Json from Python is super natural because the mapping between Json as something in Javascript or text mapped over to Python as dictionaries is nearly one to one, it's not exactly but very close, but let's just make sure that that is actually a string so I'll say what is the type of this things as well, now you could see, okay it is a str, it is, so how do we load this?
Well, Python comes with what is described as 'batteries included' and that means it has a rich standard library including support for Json, you could see that is coming straight out of the library, so we don't need anything external, we don't need to pip install anything, to work with this, so what we are going to do is we are going to come over here and we are going to parse this Json so we'll say data, so there is a couple of things we can do, we can load or we can load s, now, I think the naming choices here were super poor how about load from string, or load from file, or something to that effect, but load you can see fp for file pointer and load s, s for string so much for good variable naming, but the one we are looking for is we have some text in memory, we want to turn that from text in the form of Json into Python dictionaries in the form of data, so we are going to use this and this is the one you are going to use most of the time when you are doing services because you will make an http request and you will have text in memory, so text Json and then we can print this out again, we'll just print out data and if I run this, you could see it looks really similar, it's different it has single quotes instead of double, because that is the way Python dictionaries represent themself, and it's all in one line, again, because of that.
But if I gave you that string there, you couldn't really be sure that that didn't come from some sort of service, so let's go and do type again, here we go, str says it's string, now it's a dictionary and you can see that actually the duration is a number, it doesn't have quotes on it, and that is pretty cool, let's get a few pieces of information here, we'll say in structure= now we want to get information, we want to get something on this dictionary, so that is standard Python, you just do that by indexing in with the key so we'll say instructor and then I'll print your instructor is { }.format, maybe I'll even spell it right, how about that?
Now if we run it, you can see your instructor is Michael, now this is usually good, but sometimes this isn't so good, so for example if this doesn't appear we are going to get something super bad, we are going to get a KeyError, right, it sort of interspersed throughout here but somewhere in here, there we go, KeyError instructor, so we can use a different format, different style of getting the value, so that is probably recommended because the internet you never know, we can say get me an instructor like this and then it just says oh, your instructor is none, or we can even ply a default here saying substitute if there is not instructor presented or we are just going hey look, you are getting a substitute teacher.
Alright, right now it's substitute, so if I go and put that back, now, hey your instructor is Michael, very cool, okay, so that is great, final thing let's make a change to this data, let's say you know what, your new instructor is going to be Jeff, and somehow I want to let's go and just print out the data and see that is changed, oops, don't need that twice, do we, we have your instructor is Jeff, okay, so here we are processing this, instructor Jeff, but this is actually a Python dictionary, right, it's a dict, we want this back serialized as Json, so how do we get this back, we'll say new Json and then we have a reverse of load s to dump s, again, naming is really kind of unfortunate but it is what it is, you can dump Json to a file pointer, or you can dump s into memory for the same reason that we frequently use the load s in services, we are going to use dump s in services as well, and then let's just print out both the type of new Json and also new Json itself.
Let her run, boom, there it is at the end we have class str and now this is the Json, notice the double quotes and our class is still called the same but our instructor is Jeff, same duration.
So that is basically it, working with Json from Python, really it comes down to the Json module, load s, dump s, and then somewhere in the middle, just working with straight up Python dictionaries, one thing that may become some sort of hangup for you and there are ways to work around it, with the Json module is that is there was some kind of date in here, this would not work so for example, if we come over here, and this has a datetime like now, and we'll just put str time or something like that, if we try to run that, it's woow, datetime is not a serializable, so basically, you can register handlers for serialization and you could also just do like a string representation, so you could choose like what string or representation you want, and then we'll store it like that, okay.
But dates themselves are not supported in Json, just be careful of that.
Alright, now you know about Json and working with it from Python, let's go get it from somewhere way more interesting than an in memory static string, let's go get it from a web service, somewhere like gihub.
|
|
|
show
|
1:17 |
So you've seen Json parsing and serialization in action in Python, let's review the key concepts that were in play; so this is more or less the same code that we just wrote and remember we started with importing of the Json module, this is a built in thing in the standard libraries, this is a built in thing in the Python standard library so we didn't have to install an external package to get this support, we just import Json and we're off to the races, so we started with Json text which is just an in memory version of some Json string representation, and we want to turn that into something that we could actually work with in Python, so what we did is we called the load s, load from sting, and we passed the Json text in to be parsed, we got back data, which we saw was a dictionary, so we have this dictionary, we work with it however you work with dictionaries in Python using get, assigning to a key to change the values, things like that and then to get the data back out, to send it off to somewhere to save it to a file of course we just did a dump s, dump to string and what we get back is more text, now, it's worth noting that the thing that came out here is sort of somewhat minified Json, there is no like line breaks or indentation or anything pretty about it, you can set an indentation setting on the dump s method and it will be a little bit nicer text if you care about readability.
|
|
|
show
|
8:35 |
I bet by now you are ready to actually consume some real services, we've made some requests and we played with Json, but we haven't really put it all together and we are going to start by doing that with github, so github is a public API and we can use request issue a get to it and then what we'll come back is some kind of Json document that we can work with in our code, so let's switch over to PyCharm and do that now.
So, I've made a new file here first to work with and let's go ahead and just set that as he run configuration, notice we are running out of our virtual environment and we'll just start by adding a little structure, so we are going to import requests and then let's have a main method, and let's conditionally call this, we can use PyCharm's little template to help us out there, there are live template.
Okay, so we are going to need to get the url here for the API and then of course we are going to do something like this, maybe we are going to need to add some headers, maybe we are going to need to do some other things, but we are going to need to start by knowing what is the API we are going to actually work with.
So let's drop in on developer.github,com and check out through API so if you scroll down there is a little bit of a getting started guide, authentication, and so on, we are just going to go over here and let's suppose we want to work with repositories, so if we want to get information about like say repository here, we could go to twitter bootstrap/bootstrap, we could also go to the github repository for this project, so we are going to access https://api.github.com/repos/ let's get the repo for this course, so it would be mikeyckennedy that's the username and then it's going to be the repo name, so over here, let me paste that, okay so now we have our url, we are going to go to the repo which basically contains well, literally this source code, that is kind of meta isn't it, and we are going to go get our own thing here, now the question is what are we going to get back, we can start by exploring this in a real simple way, we already know how to do this request here and we can just print out the response.text okay, so this is kind of the lowest level, let's go ahead and run that and see if this works, cool, it looks like we've got something here, now I don't know about you, this is a little hard to read, if you look at this scroll bar it's huge okay, so that's not great, we technically could do this, import json.loads and we can give it this, and we could then say json.dumps, this might seem a little bizzare but then of course we could say indent=true, run this and we get at least formated Json, but, let's have a better way to explore this, shall we?
So let's jump over here and run postman.
Postman is great for exploring APIs, see I've got some saved ones, that we are going to work with later for more complex interaction when we get to modifying data on interesting APIs and so on, but we can just put this url in here and notice, we can do a get put post but this is just a get and we could set like headers, for authentication if we needed it but we'll just go and send this off, here we get what came back, so you can see we have information about the full name of the repository, its id, the number of teams, the number of forks, all sorts of stuff whether or not it has issues and so on, okay, so we could print out the get url, the clone url, so let's do this, let's say what we want to do is given the name of a repository and the user, we would like to go and actually get the clone command in order to clone it, or maybe get the url to open its documentation or homepage, okay?
So we are going to be doing that, by going and downloading this, converting to Json and then let's say access the clone url.
Okay, so we've seen we've already gotten the text and we can also parse it like this, but of course we should really check that this works, right, and let's also get some input here so we'll do this.
So we'll write a little function here called get_repo_info and we'll write that down here above the dunder main check, and this is going to get two things, this is going to get the user, it's going to be input, we'll just ask whoever is typing here, what is the username, and then we'll do the same for the repo, and then we'll return user, repo.
Okay, great, so I am going to put this in a comment up here so we always have it, in case you forget what the name especially this right here.
Alright, so we are going to do a little bit of formatting like so, okay so that again is going to get what we need, let's format that a little bit and tell PyCharm that no, my name is not misspelled.
Alright, so let's run it make sure this little step is working, what is username, what is a repo name, this is going to be a copy paste, and it looks like it still works, great.
So the next step is to actually check, because it could have gotten a 404 all sorts of things.
So, we'll do this, we'll say if resp.status_code != 200 then we'll print error accessing repo and then we'll just bale, so if we put in stuff that's wrong, error accessing repo 404, if we put in stuff that's right, everything is working, okay.
So this is great, we've got our information, and maybe we should check that the format is Json, but we are more or less guaranteed through the API that we are going to get Json, so we could avoid this whole step and we can actually avoid even using the Json module whatsoever, because requests actually already supports this, so what we are going to do is we are going to have a repo data and we are just going to go to the response and if we know that the inbound data is Json, we can just say Json and that will actually convert this to a Python dictionary so if I just print the type of repo data and we run this, and we put in something legitimate, we get a dictionary.
So the final thing, what we were trying to do the whole time is we were going to say this, print to clone this person's repo named let's just put a little bit info here, so we'll say user repo print the command is get clone and then whatever the clone url is here, so we'll say format and let's just store this for a moment, so what we need to do to get this if we go back over to postman, is we need to go to the dictionary and get the thing called clone url, so we can just go to the repo data and say either like this, this is a little bit dangerous because who knows what you are going to get, you might get a key error, so we could do a get and this will just return nothing, if it doesn't exist, we'll say error no data, something like that, so we are going to get this clone url, we can get rid of this and we are going to come down here and just say here is the clone url to go.
Alright, so let's put this all together, we are going to run this username is mine, repo name is the repo from this class consuming services Python demos and if I hit go, the clone command is get clone such and such.
Well, let's see if that is going to work.
Get clone that, oh it looks like it works.
I guess our service is working perfectly, so that is how we consume services that are Json based, HTTP services at least read only get pay services with requests, we just do basically construct the url we do a get we make sure the status code is whatever we expect, 200 is not always what is expected, sometimes if we were doing a post and creating thing, 201 would be expected but you check for what is the success code if you will, and then we can call just the Json function right on the response and it converts that straight to a dictionary, it's a not a huge step to save, that we are skipping over using the Json module, but it's just one less thing to think about how do you work with Json from this other thing, we just work with it straight from requests and then, once you have it as a dictionary in memory, well, it's no longer a web service it's a problem, it's just data in Python, go.
|
|
|
show
|
0:36 |
Let's review the core concepts about accessing Json services with Requests, of course we are going to start by importing Request, I have to have the url to the service that we are going to call, in this case we are just going to do a basic get so we say request.get given the url, we get our response back and we've worked with this already, but the thing that is new this time is we now can call .json and that will directly translate the text, string representation of Json into a Python dictionary and then we just work with the data in there in our example we got the clone url for the get clone command from wherever repository we were pointing at in the API.
|
|
|
|
21:02 |
|
|
show
|
0:29 |
Now let's focus on xml as a data exchange format, we are still going to be using HTTP clients, we are going to be using rest in particular although this equally applies to urllib once you get the text representation of xml downloaded, we are going to focus on how to work with xml for basic read only services.
Now this is not Soap, this is just straight up xml, things like rss feed and other xml data sources out on the internet.
|
|
|
show
|
9:37 |
Let's work with some xml data from Python.
So here at the University of Washington, they've got some xml data that we can go grab, and they happen to have something from the course catalogue at Reed College which is fancy university here in Portland Oregon, it happens to be where Steve Jobs went; so we are going to import this xml file and we are going to do something interesting, we are going to be able to answer some interesting questions about these courses using xml processing in Python.
Now, in the beginning, we are just going to read the file, we are not going to do any sort of web service, although technically we could sort of point directly at that xml file, later we are going to come back and do this sort of processing from Requests, calling services that actually return xml.
Alright, so let's go add a file here, process xml, and I happen to have already downloaded that Reed file, this xml data that we can look at it here, it's what it looks like.
So, we are going to just work with this locally, in order to get started with xml in Python, we are going to work with a particular class called Elementary, and it's going to come from xml.etree, okay and we are also going to need to work with the file system a little bit, to get to our file, let's get a little structure, alright, so the first thing that we need to do is actually find that file, so let's go and create a variable called folder, and this is going to be os.path.basename(__file__) of wherever this particular file is.
Okay, dunder file will say the name of this executing Python module, so process.xml is a full path, this will give us the folder where that lives, and then we can reach and sign xml data and lad up reed so we'll say file=os.path.join and we want to give it the folder, the xml data and reed.xml, so this works in a nice platform independent way for example this is going to be like /xml/ on OS 10 and on Linux, but on Windows it would be back slashes, perfect, okay, so then what we need to do is just load this up so we'll say xml text, let's go and just put this a width block, width open(file) as fin: and then we'll just say xml_text = fin.read() that is going to read all of the text, so now that we have that loaded up, we are going to want to load, start working with the xml, just like we used Json before, we are going to use the xml element tree, so we are going to say ElementTree.
now there is a parse, but, again, I don't know what the deal is with these sort of file format modules but they kind of suck in names, again, so parse actually loads like a file type thing, so what we want is ElementTree.fromstring, so it seems to me like there could have been a more clear way to name these things but it doesn't matter, xml text is what we want and then we could just print out the DOM just to make sure that this works, and notice we are running the github one from before so let's go ahead and run this one now.
Not a directory, yes, oh I said base name, I meant dir name, let's try that again.
There we go, element at route and so whatever this is element route if we look you'll see that's this, so what we want to do is we actually want to get these little individual courses here, so you see there is a course, more courses, lots of these courses.
So, we are going to read in these courses, and we want to answer questions like what course is running and Eliot, in this room at a given time or something like that okay, you can see this is not a huge file but it's decent, it's 13 thousand lines, so it's got a lot of data about these courses, so we've already loaded these up and the way that we can access these course pieces here is we can use what is called an xpath expression, so what I want to do is actually say courses, we can say dom.findall and we can just say course.
Now we could find, let's find the course titles, just to show you more interesting, so we have course and then we can navigate down to title, so I could do course/title and then I could do something like this, for c in courses: print (c.text), let's try this.
Alright, so there is all the course titles, we've done a search and we've lost some of the information like what room was that course in, I don't know, its title is Genetics and Molecular Biology, but that is really all I know, so we are going to take a step back and we are going to actually get that entire course node here like this little bit right there, little pop up and then we'll be able to answer questions about it, okay, so this is going to give our courses, and now it's cool that this is an xml thing, I'll call this course_nods, something to that effect but I want a richer container for this, so I am going to import something else up here, we are going to import the collections module and here I am going to create a thing, actually I'll do it outside this method call, although it's called once so it didn't really matter, I am going to create a thing called a course, and I'll create that as a collection.named collection, so normally what we get back is just an xml node and we could maybe stick in the dictionary but a named tuple is much nicer, so we have course and then we just say the variable, so let's say we want the title, the room and the building, those three things, so if we do that, and we come down here we can do something more interesting, I can say the courses are going to be equal to, now we can do this as a loop, I'll write it as a loop first, and I'll do a list comprehension in a minute so I'll say for n in course_nodes, and then I am going to create a course, I want to pass some stuff to it and then I'll say courses.append, of course, now we can just come down here print out the course is, okay, so what goes in here, well first the title, then a room, then a building, so the title like this, back over here we are going to need we are kind of working with an element at this level we are going to need to do another query to get this, one to go to the place and find the building one to go to place to find the room.
So those are the three things that we need, first thing is the title, that's easy, so n.find('title') and we can say text, and let's just print that out, and see if that works, oh it's missing its arguments, okay, no worries, we'll do that next.
The next thing we need to do is we need to find the place, then the room, and then the next one, the last one is building, let's see if they call it room, building room, they do.
So here you go, this is working perfectly, we've loaded up the xml, using elementary.from string, we've done an xpath query, a very simple one but you saw that we could do more interesting ones, like for example the place and then we got a bunch of nodes back and for each node we did a little bit of work to transform that node from just a bunch of xml nodes that we could still work with, down to actual almost a class to one of these named tuples and then afterwards, we can do interesting things like we can answer the question like what are the classes running in the building Eliot, okay, so this is pretty cool, but we still have a little bit more work to do, let's go over here and I'll just print it out, it seems like it's working, let's do one final thing, let's go and say building= and we'll do an input from the user, we'll say what building are you in, so maybe somebody sit in there like wait, what class is running in this room right now, and then we'll ask what room are they looking for, what room are you next to and then I could do some kind of query here so I could say room courses, and we'll just write this as a simple list comprehension, so I'll say c.title for so we are going to say for c in courses, and we are going to pull out the title, but only the c where the building, c.building=building, notice the incompletion here, that's beautiful, and c.room=room.
Okay, so these are the ones we are looking for, so then we'll say for c in room courses, print, let's do a little star like this, see that title, actually we just put in the title, so we'll go like that, alright, so let's go and run this and see if this works.
First of all, I'm in Eliot, I'm in room 414, boom, those are the rooms where this is, not that many, just ten or so, let's just double check, go to xml file here and just make sure if I go find this course that it's actually in that room.
And that there are courses that are in other rooms, so here, so those will be 234, let's try this again, I'm in that room, 234, boom, Topics in French Enlightenment, First Year Russian, very cool, right.
So that's all there is to it, we are just going to somehow magically get a hold of the text, later we are going to do this off of the web but right now we just got off the file system, we are going to create an element tree, we are going to parse it from a string, then we are going to run possibly as sequence or series of xpath expressions, one to find the course nodes and then once we have all the course nodes, to pull the individual pieces of data out of them, right, and then finally, once you have the data like from here on down, this is pure Python, once you have that loaded as a bunch of named tuples, well, it's just a matter or writing code against them.
I did say we can improve this a little bit here, so let's work on this, so I can take that and say okay for n in the nodes, what I want to create and send back is one of these, and that's that, right, so that will simplify that a little bit there, just see that it still works, Eliot, 414 boom- still working.
Okay, so maybe that is cleaner, maybe it's not, I don't know, it's up to you but here is just two nice little list comprehensions working across and in memory xml dom.
Next up we are going to apply this to some web services.
|
|
|
show
|
3:22 |
Let's review working with xml in Python.
We're not yet to the services part, but that's actually the easy part, it's working with xml itself that can sometimes be tricky; so here we've got a little fragment of the data that came from that Reed college course catalogue that was reed.xml, you can see we have a title, we have days, we have building, and room, and if we want to work with this, we go and import ElementTree, and just to make our lives easier, it wasn't technically necessary but it is better to create a named tuple which is more or less a class with fields only and no functions, which was all we really needed it was little data containers, and then we are going to parse that from the string representation of xml into the DOM, the object model, we are going to use the from string method on the ElementTree, and then we start writing xpath, queries against it, so here we are looping over the find all of the courses, and for each course, or each really node that we find in the xml document, we are going to run a set of subqueries on that document, so we are going to query for the title, for the place/building, place/room, and then in this example we're also getting the days that it runs.
Then if we want the courses that are held in Eliot hall, or a building, all we have to do is write a little list comprehension say give me the course for course in courses, these are the transformed named tuple types, where the building=eliot.
Boom, it's done, it's worth considering the trade-off of xml versus json and how it relates back to Soap services.
So Soap is a much more strict and honestly convoluted protocol than simple xml exchange.
So Soap has envelops and headers and a bunch of namespaces, and certain ways in which things must be structured, and xml is just much more general, there can be simple xml or complicated xml.
So what we are doing and what we are going to do, for this section, is all about just working with plain xml data, not Soap services, Soap services require tons of tooling and we'll work on that later, right, we'll see that Python actually has some decent answers to the Soap story if you must use those services, but in this case, we are just working with straight xml.
So, we are just focused on working with xml by itself, now, if you get the choice, if you get to decide whether you have an xml service or a Json service, choose, Json, it much more closely matches the way data is represented in Python and the way it's represented in Javascript, so if you are building a web app and it's got a Javascript front end and a Python back end, Json all the way, but, consuming xml is still not too bad as we've seen.
So, let's go look at another example.
|
|
|
show
|
6:57 |
Alright let's put this xml concept together with requests and work with some real live xml data on the internet.
Real canonical case for xml these days is rss, so we are going to go and get the rss feed from talkpython.fm, pull back and answer a few questions about the state of the podcast.
Back over here in PyCharm I've got a new file consume_xml_service and we are going to start by finding a way to get the data off the internet, you can bet that that is request.
We are also going to need to work with xml itself so we'll do a from xml.etree import ElementTree, now we are also going to do some interesting work with dates, and I am going to need to parse dates, and parsing dates is always super not fun, but, we are going to use this package called Python dateutil, so check this out, I can come down here at the terminal, and notice, that it already has the virtual environment activated, that is super cool, so then we can say pip install Python dateutil and that is going to install it for us and from that, we can say from dateutil.parser import parse and this is going to allow us to parse some dates in a little bit.
Okay, everything is set up, let's add a little structure, we'll have a little main method for now, we'll figure out what to do with that, and like so, there we go, so first we are going to start by getting the xml, and let's write a function this time, so we'll call it dom, say get_xml_dom and we are going to give it url, so let's put that up here, and this is just going to be https://talkpython.fm/rss, okay, let's write this function rather than have PyCharm write it, so here we are going to go and do a get, we will get a response=request.get_url nothing fancy here, and we probably should check the response code, so we'll say if resp.status_code !
= 200, return none, maybe you want to log it or something but for now we are just going to do that, and now we are going to say dom=ElementTree.fromstring, and we are going to give it the response.text and we are just going to return the dom, okay so this little function here, we can put it below, I like having the main method at the top, it kind of orchestrates everything, so we are going to get that, we could even inline this, like so, okay, so we want to get the dom here and then we would like to do some kind of query, and to be honest, this really so far actually this point right here is really whole service story and the rest of it becomes like an exercise in straight xml, let's go ahead and run this, rss element, excellent, okay, so the next thing we want to do is let's define an episode and we are going to do that with my friend collection.namedtuple.
okay so I'll just throw in fields title, link and pubdate, and then here we'll have an episode, we'll say get episodes and we'll give it the dom, alright so this function we are also going to write and what it's going to do is given a dom, it's going to go find all he episodes, so the way this works, we have rss and then inside there we have this thing called the channel and inside there we have an item for each episode, so in xpath you don't name the top element, and we don't need the star, we just going to get more than one back, so we'll get item nodes it's going to be dom a find all, with some parenthesis, with some quotes, and then let's just print out how many items we have, I think if this comes back correctly, we should have 97, let's see, do we have 97- server says 97, fantastic.
It looks like this is working, so now what we can do is we can just return a list of episodes, so we'll say episode of and for something, we'll say for n in item_nodes okay great, so now we are just going to need to do some queries, we can say n.find_title, we have link, and I think it's pubDate, it's the way they say it there and that looks good, let's go back and get our episodes and we'll just print episodes.
Now because these are named tuples we should see the data, bam, actually close but no cigar, so we actually found all these but what we gave as field values is the actual nodes, we just want the text from these.
Okay, very cool, look publish date looks reasonable, the length looks reasonable, the title looks reasonable, super.
So there is another thing we'd like to so is like if we look at the publish date, this is just a string in a certain format that is required in rss, it's not really time, so that is where our parser is going to come in, now normally parsing dates is super hard, because all of the various formats, there is like over 700 different ways to represent dates, it's insane, but this Python dateutils we'll try to parse them and it knows quite a bit of them, so let's just give it a parse and see if it will take it.
Oh sweet, it's a datetime, look at that, so we got the parsing of the date working, and yeah, that looks right to me, let's check the next one, yeah, these are good.
Okay, so here we have our episodes and technically, we have these episodes in reverse chronological order, if we wanted them in another order, we could now sort on this like suppose we want them oldest to newest, like in increasing order, so I'll say episodes = this and then we could return sorted episodes and then we want to give it the key it's going to be a function, a lambda function, that takes an episode and it return the pubDate and that will sort it the way we want it, so we should see one right here at the top, episode zero, here we go over, episode one, episode two, perfect.
Because we were able to turn these into real dates easily, we can actually run sort algorithms and not just do string sorting which wouldn't really help us, okay, let's put that character down here, do a little cleanup, okay, so now we have our episodes, let's just print out the first three episodes, so for e in episodes, and we are going to print out, let's print the number and let's print out the episode title.
Now, let's do an enumerate here so we can get the index and while normally the index would be off by one, we do want to add one to it, my show numbers also start at zero because it's a zero based podcast, come on, so the index itself will work perfectly and here we can say title, and this should give us some kind of report on all of them, let's just do the first five so we can see them on the screen.
Boom, number one, notice, number zero introducing the show, number one- Eve, number two- Python and Mongo and so on, and so on, how cool is that?
So, here we are, pulling live xml off of the site, and processing it in real time using these xml techniques.
|
|
|
show
|
0:37 |
So to review, working with xml from services is pretty straightforward.
Again, because it's the easiest way to do stuff on http, we are going to work with requests, and then, we are also going to use the ElementTree, and we are going to call request.get given url, that is going to get us the response, remember, check the status code, make sure everything worked out okay and then we can get a hold of the actual xml as a string, via response.text and then we are going to use ElementTree and parse it as fromstring, and once we have that, we are off to the races, we now have an xml dom in memory and we just do xpath queries against it as we saw in the previous section.
|
|
|
|
10:59 |
|
|
show
|
0:39 |
We've worked with a number of the text data types.
Now, let's talk about binary data, so again we are going to use requests, but this time we are going to focus on downloading and saving, or even a memory processing binary data, this could be things like zip files, it could be images or a whole bunch of stuff, In the demo, we are going to is actually mp3 files, those are fairly large binary files that we can work with.
So a lot of things with requests are really straightforward, this one is a little less straightforward, but not too bad once you see a couple of techniques that will make this much easier.
|
|
|
show
|
9:40 |
In this demo, we are going to go and access a binary resource off of the internet using requests.
So, I am going to get you a get request, but this time to some kind of binary resource, and what we'll get back is a bunch of bytes, we want to bring this back to our app and while we could work with them in memory, we are actually going to write them down to disk.
Okay, so let's see what's involved in making request do this whole round trip.
Now you've seen me create a number of these little starter file projects throughout this class so far and I decided we are just going to start from something that is kind of already structured, so we are going to have a function called get_episode_files it's going to take a random rss url, this could work for any podcast, I just happen to be picking on my own and we are going to say for file in these files here, maybe file url or something like that, we are going to call this function download file, so there is going to be two parts to this, we are going to go and work with xml, here, right, this is standard xml so we are going to need to add an import at the top, so we'll have our ElementTree of course we are going to use request to download it, ElementTree to parse it, and then we are going to use OS and some other modules we are going to talk about in a moment to actually put it on disk.
Okay, great, let's do it, let's write the download part, now this is not going to download the files, it's going to download the xml which will tell us where the files live, so we'll begin like this, so we'll again do a get request against the main rss url and we should check the status code but you guys know how that goes, we've done it a lot, so we are going to assume that the xml text is response.text and then we are going to load it up into a dom, ElementTree.fromstring(xml_text) and then we just need to write some kind of list comprehension here that is going to say given a dom get me all of the links, so remember, it went channel/item and in the item we had a link, we can just use that as our xpath query, so for link let's say link_node.text for link node in dom.findall('channel/item/link') like that and that should do it, let's just run this bit real quick and we can go ahead and print the file, so run boom, so that is actually not the right xpath query this while decent, this is going to show us the actual episode page what we want is the actual episode rss.
So, I need a different one, let's look at the xml real quick.
So what we actually want is we want this thing called an enclosure, not a link, so then in there you can see we have the url which is an attribute, so we haven't really talked about that, so we are going to do this, enclosure and let's call this enclosure_node here and instead of getting the text, we are going to get the attribute here, which is url.
So we'll do url, let's run this again, see if we got it right this time.
Oh, oops, this has to be attrib, so here we have all of the actual mp3 files, so there we go, now I got exactly what we were looking for, so channel item enclosure, get the attribute from the attrib dictionary called url.
Perfect, So now it's really down to the binary data part, how are we going to download these files once we have them, right, we are passing them off of this download file function, how does that work?
Well, now it's time to start doing the interesting things, so for each file that comes in here, let's just put a little print here and actually let's go say we only want the last three files downloaded, or the last three episodes to be downloaded, just because we don't want this to go crazy and just download a GB or whatever, okay so over here we are going to say given a file I want to download it and let's just go with a naive way of doing things with requests and then we'll do something, but we'll set a few settings to make this work better, so again, we'll say response=request.get and this file maybe we should call it url, whatever, we are going to get it, and then on the response, we have a text, we have a json, but we also have a raw, and the raw is what we can use to get to that actual data, so we are going to get this and we would like to write that to this file, so I'll say dest file = now we need to get a few things here, we need to get just the ending off of this, and so we'll say I'll call it base file, we'll say os.path.basename(file), not sure if that will work with the http on it, we might have to do little string in place but we are going to give it a try and then the destination is going to be path.join, well, we are going to take the destination folder, we want to make sure it's an absolute path so we'll say os.path.absoulte_path(dest_foder), and we want to join that with the base_file, like so, okay, so here is the just the ending like filename.mp3 not the full path, and this is the full path to where on my folder is going which we've set on my desktop in this mp3s folder.
Let's just print really quick, the base_file and the dest_file, I'll just make sure that something reasonable is going to come out of this.
Oh that is not working so well, let me just give it the full path, like notice it's not following those, I think there may be a setting I can give it, that will make that work, but just for now we are going to go like so.
Alright, but look, if you come back here and look, it looks like besides that little squiggly bit that went crazy, we got the base_file, and this should work.
Okay great, I am taking that file and saving it here, it looks like exactly what we want to do, so let's just do a print downloading and saving the base_file, okay, so we can create a context manager, a width block, we'll say open, I want to open up the destination file and I want to write to this as a binary file, and I am just going to say fout.write, I am going to give it the response.raw.
Now, I do not believe this is going to work, in fact, I am quite sure it's not, but let's go and see what happens, so we'll run it, it downloads the xml, and, yes a byte like object.
Now, that is not great.
So, let's take a different approach here, let's come up here and import thin thing called shell util, now shell util has a cool feature, so we can say here copy file object so I want to go through something like response.raw and I want to write it to fout.
Okay, so this will basically handle all the read from this stream, write to that stream business for us.
So let's do it again.
How exciting it looks like it's working, let's go over here while that is dong that, and let's have a look and see what's in that folder.
okay, so it's already downloaded, exploring awesome Python, it's downloaded running grumpy on Python, now each one of these should be around 50 MBs let's see how we're doing.
Oh, zero bytes, really- that doesn't seem fantastic, zero bytes, zero bytes, and I can tell you if we try to play them, not so amazing, what went wrong?
Well, when we are working with binary data, we can't just grab the response and write it, what we need to do is we need to do two things, we need to tell the response to decode the content and say true, okay so we needed to decode the content, let's see how that works, alright, let's see how we did, did it work, no, still zero bytes, there is one more thing we have to do for all this stream stuff to work, so I am going to go ahead and stop it.
The other thing we need to do is just say look, I want you to stream as binary data as you get this request, okay, so stream is true, deco content is true, one more time, let's see what we get- look at that, it's got some kind of a little header thing at the top, and right now we are downloading saving awesome Python and grumpy is not here yet, oh, just in time, okay, let's go look at this one, oh 50.6 MB and if we hit play, you probably can't hear that but I can and you can see all the data needed is right there, again, looking great, it says four minutes, now it knows how long it is, okay, just got downloaded.
But now everything is working, we are downloading our binary data, okay so let's just review what that took.
There was a little bit of work to actually find the link to the binary file, we did that by getting the xml file, parsing it with xpath, doing some list comprehension magic there, pulling off the attribute url, but that is not that important, right, that varies per service, but once you have a link to a binary thing you want to download, here is what we do; we go and we do a request.get on it, and we say stream=true, just stream that from the server, and while you are at it, decode the content, okay, and then we did a little bit of juggling to take the remote name and a local folder and combine those into a destination file, put some downloading message here so we know what is going on, and then we create file stream it's important, it's binary and raidable, and then to save us the work of juggling, reading from one stream and writing to the other, we say shell copy file object from this remote stream to this local stream- boom, we're done.
And that is working with binary files and requests as web services.
|
|
|
show
|
0:40 |
Now that you've seen how we can download binary data, like mp3s and whatnot, with request, let's review he core concepts.
Of course, we are going to have to import requests, and then we saw that we had to enable streaming for this to work, we got weird results, it looked like it was downloading but not really, so we had to enable streaming and turn on decode binary content to true; we also saw that we can save a lot of stream juggling work, that we might have to do, if we use the shell utility copy file object which takes one stream and copies to another so it reads right of the network and writes straight to the file system and everything is taken care of, it's beautiful.
|
|
|
|
38:38 |
|
|
show
|
2:56 |
Let's take a moment and discuss the http and restful building blocks.
So where are we in our course, we are back sort of focused generally on the http clients, so what are the building blocks that make up these http services and to even larger degree restful services?
You'll see that restful services technically are like a specialization of http services, they are basically http services with a certain number of criteria not all http services, maybe most don't actually support every restful principle let's say.
So what are the building block?
Well, obviously, the http or https protocol, these are things that transfer over the internet, over the same protocol that web browsers use.
And they focus on resources, so the way that you describe stuff in your API often is some kind of noun, or set of nouns and we have resources or URLs that point at these resources, so imagine we're basecamp, we might have users /api/users, we might have projects /api/projects, maybe a particular project so /api/project/7 or whatever, and then unlike the traditional remote method in vocation type or services that are made up of verbs and actions, so things like get users, log in, and so on, we'll see that these http services are built upon nouns.
And the way that we perform actions on them is with the http verbs, so we might do a get again, /users/one, that means give me the details about user number one.
Maybe we want to create a new user, so we do a post against /users, things like that, so it's the http verbs plus the nouns that are the resources, that together make up our http services.
Now, most services you run into, kind of stop there, if you are talking about restful services there is a couple more levels we got to go into so you might have resource discovery, so APIs like basecamp and other sort of well known APIs github and so on, they list exactly what their resources are, but certain types of restful services don't, the just say start here and we'll give you a bunch of URLs and then you can explore further, using those URLs, so that is resource discovery.
The other thing that we could do but many services don't, is content negotiation, at a super low level, maybe you've got a /users/one and you have the ability to either access that and get the result back as json or as xml, so if you set the accept type header either in your client or your browser, you are going to get whatever you put there, so json gives you json, xml gives you xml, you could even go so far to say I accept an image and it will give you the profile image back.
But, most services really say you do this request, "you get some json, you do that request, you get some xml", it's a little less dynamic but if you talk full restful services, this is typically part of what is included.
|
|
|
show
|
3:18 |
Let's look at these http verbs in a couple of ways, here we are going to play around with just a generic example and then later, we are going to go look at a public very thought out API.
So imagine we have some service running that someservice.com/api and it has a certain number of resources and its specifications, so users and then users/ some kind of id based on what you are looking for and maybe even /id/picture to get their picture.
also projects and project details, so project 11 and even files about them, so we might issue a get request against projects and that would return let's just say there is always going to be json and give us a json representation of maybe the id and title of every project that you have access to.
Then maybe in there somewhere is project 11 and that is the one you want details at so you could do a get against project 11.
Now, maybe you don't have any projects, you want to create one, well typically the way these http services would do that is we would do an http post against /project and we'll see that that would tell the service hey I would like to create a project and the body of that post, the data in that post would be the required details to create a service, maybe not everything about it, but things like its name, who the owners are, stuff like that.
Similarly, if we wanted to update a user, we might go to /users, we know we want to update user 42, we need to do an http put against that, so you see we combine the verbs with the resources to get all the behaviors that you are looking for, not all services work this way, put and delete is becoming increasingly popular people use these, but get and post those are the mains of http services.
So, how do I know that doing a put against users/42 is supposed to update it and doing a post against users should create a new user in the first place.
Well, if we are following these http services and we are trying to use these verbs to have these meanings, we just have to look at the actual definition of get, post, put and delete.
So if we go over to the Wikipedia entry for the hypertext protocol we'll see we have four verbs that I pulled out here there are actually many more patch and whatnot that could be used but these are the real main players in these services, and notice, only get is what is called item potent.
Item potent means that if you apply it one time, something may happen, if you apply it five more times, it will be exactly as if you've only applied it once, so basically it means you can apply it to itself as many times as you want, whereas post, put and delete applying them a second time might actually have a separate meaning, okay.
So if we look at get, it should only retrieve the data and basically have no other effect, if we look at post, this should tell the server to accept the entity enclosed in the body, and create as a subordinate, so if I want to create a user with id 42, I would do a post of that user to /users and then we theoretically have /user/42 was created as part of that action whereas put is supposed to replace or update the entity at that location, so do a put to /user/42 should update user 42.
And finally, doing a delete against user/42 well, you can bet that user is gone.
|
|
|
show
|
4:07 |
Let's look at a real API, this API is going to be the latest new API, you can see modified just 25 days ago, and and created eight months ago, so it's quite new for Basecamp.
So, Basecamp is a project management site that is pretty well known in the tech, especially the web industry for a couple of reasons, so it was created by this company called "37 Signals" and they were a web design company, and it turned out their product Basecamp was way more popular and profitable and interesting than actually just being a web consulting company, so they basically started selling Basecamp as their main thing, they just built it for themselves internally, and it's also notable because this is where Ruby on Rails comes from, DHH and Jason Fried and the guys at 37 built Basecamp and they said oh we have this really cool unique way of writing web apps let's extract that as a framework and we'll call that Ruby on Rails, so that's all good.
There is no more "37 Signals" anymore because they just renamed their company name to Basecamp, after a while which is pretty interesting, but let's look at their API, this is pretty new, we'll go over here and actually pull up some details that I have already gotten us too, so we can go check out what are called Basecamps, you can see, recently updated by DHH and we can do things like a get request, so there is an API url and they are just going to use the short relative url, so if we want to get all the Basecmaps, we can just do get/projects and they have everything returning json and make it super explicit they say .json, okay.
So what else can we do, so if we want to read data about the projects we do a get, if we want to read specific, here is the list of projects that come back, if we want to get a particular one, let's say one with id 1, we issue a get request against projects/1/json, okay, and then, we get information back here like so, right, so when it was created, its name, its description and so on, and so on, so lots of information about that project.
On the other hand, if we want to create a project, or a Basecamp, just like I said, we are going to use a post to create something, we don't know what its id is going to be, it's going to be generated by the server, but we know we want to make one so we are going to do a post against projects.json and this is the data that we are going to send, just the required data, the name, the description, and then of course, this stuff that is up here will all be generated by the server, and presumably returned to us.
We also might get a hey, error, you are not allowed to create one of these, you are out of space or whatever, the other notable thing to look at is look at the use of the status codes, instead of just always returning 200 and maybe returning 200 response code, with an error that says sorry, they are actually returning status codes that mean specific things, so a 201 specifically means created so you should look for that in this example.
A 507 specifically means insufficient storage, and they are using that to represent the status code meaning of this error and they give you text, just so you also know.
Let's see, there is a few other things we can check out here, if we want to update, no surprise, we are going to do a put against that thing and this will replace the name and replace the description supposedly, this is going to come back with a 200 and say yeah that worked, and again, we are going to do a delete, so we are going to come up here and if we want to do a delete to this thing, and the status code is 204, no content which is typically the agreed upon status code for delete.
So, this is just the project management side of Basecamp or the API for managing projects and Basecamp which they call Basecamps, but there is lots of other pieces, you can scroll down and see what we have here, they have Basecamps, the have comments, documents but the whole API is very restful and it makes strong use of URLs that point at nouns and leveraging the http verbs against those nouns to have meaning.
Alright, so in the next section we are going to work with the surface that I've created that lets us do all sorts of modifications, create stuff, update stuff, delete stuff and so on, and we are going to see how to take this idea and use it on the client side.
|
|
|
show
|
0:30 |
Now we've come to the part of the course where we are talking about http clients doing non trivial service work.
So, as we've seen with requests, it's really quite easy to do a basic get, against an open public url.
However, if we want to modify data, if we want to access authenticated request, things like that get more interesting, so right now we are going to focus in on modifying data using the http verbs.
|
|
|
show
|
3:05 |
Now, one of the challenges of writing this course is if we are going to modify data out on the internet, we are probably going to need to create an account and do all sorts of stuff with various people's APIs and I know that those APIs might change over time and I don't necessarily want to ask everyone to go create a github API and the access key and maybe modify their own github data that might go terribly wrong somehow, I don't know how, but I just don't want to depend on these other services, and it's totally easy to find read only services out there that are publicly accessible without authentication.
But, as we get into more complicated, more realistic interactions, we are going to need something we can binge on without that changing and without that ever becoming a problem.
So I'd like to introduce you to the service that we are going to use for much of the rest of this course, now this service has at least three aspects to it, we have this blog API here and as you can guess, we are going to just model a blog but it could be anything right, the blog part is just something to make it concrete.
Here is an http somewhat restful service and this is publicly accessible, so if I click this we get Json back, now we also have a restricted version, we are not going to talk about authentication now, that is its own section, but when we get to it, you are going to see that this service requires basic authentication and so we'll learn how to do that from Python, how to access that service.
we have not entered, by the way, if you want to see what it looks like, there is username and password it looks like this one, it just won't let you access it without logging in.
So down here I have outlined the various operations, like you can get all the post from the blog like this, you can you can get a particular blog post by going to api/blog/post id 7 or whatever, you can create a new blog post by doing an http post to /api/blog, you can update an existing post by doing a put to that blog's specific resource id or that url that goes to that blog and similarly you can delete it.
Also we have a Soap service here, now we are going to leave the Soap stuff to its own section, just like we are authentication but the same service, the same set of services I guess we should call them, will do Soap, so if we click on here you can see all the crazy stuff, we'll talk about what that means later but you can see that there is a set of operations that we can work with here that are more Soap service like, they work in terms of nouns and actions, and they return rich objects as real objects, we'll come back to that so for now, what we are going to do is we are going to focus on api/blog and these operations.
This is publicly accessible, consumer_services_api.talkpython.fm and you will be allowed without even logging in to modify the data here.
It works in a pretty constraint way, so you can create some post and it won't be shared with other users, and they will expire after a little while, things like that.
But this is a service that you can binge on and will use for much of the rest of this course.
|
|
|
show
|
1:42 |
Let me introduce you to the application that we are going to be using throughout this whole modifying data section and even a little bit afterwards.
And I am calling this the blog explorer.
So it's using this service that we've already seen in the previous video, and this is our blog service and notice I am defining this base url, the reason is we can also run this locally and we could switch this out like a local host version which is included in the github repository with instructions how to set it up and run it and all those kinds of things.
So if you are somewhere without internet, you can replace this with the local version and run that, So the idea basically is it's going to work around this concept of posts and a post is going to have id, title, content, it's going to have a published date, as a string and it's going to have a view count, so what we are going to do is we are going to write a little app, here you can see the made method and it's going to give you four basic options, you can show the post with a list command, you can add a new post with the "a" command, you can update a post with the "u" command and you can delete a post with the "d" command.
Now, just be aware there is some pre existing posts which are shared by everybody who uses the service, and those you can't update, you'll get a message about that, but the ones you create you can update those and delete them, so what we are going to do next is we are going to work on getting this list post to work, you can see there is no real implementation other than this show bit here.
So I'll go and run it and show you we can say I would like to list and it says to do get post soap because the get post is not implemented, there are posts to show, if I do update, or delete, all of those just say look, you got to write this, but this structure is in place for us to go to in the next set of videos, the one thing that totally works right now, you can exit.
|
|
|
show
|
3:56 |
We've seen that our blog explorer is really not very interesting if it can't get the post, so we've already seen how to get http json based data, but let's go and do it just one more time so you become familiar with what the service expects you to send and receive and just to start this project from scratch.
So we are over here in Postman, you can see I am pointing at the public API, we could do a little send here and see what comes back, so notice that we have a list of json objects which we will become very easily Python dictionaries and that the title publish, content, id and view count precisely match id, title, content, published and view count that are in our named tuple.
This is going to save us some work, so let's go down here to get post and it just says to do get post so let's return that, let's get rid of that, let's go over here and what we are going to do is we are going to create the url that we got a colon, it's going to be base url plus api/blog, we'are just going to do a get request of that that will give us what we saw in Postman, so we'll have our response=request.get(url)now, maybe we should indicate in our header that we are expecting a response type of json, but the service only returns that so we are going to roll with this for now.
We'll say if response.status_code !
= 200, we want to print, there is some kind of error, 404, or whatever, something to that effect, and now if we do, if we do have the post, what we want to do is we want to return a list and we can use a nice little list comprehension here because I've created the elements of this dictionary, well that is what we are getting from this service, there is no debating that, but I've created this post thing up here this named tuple, think of it as a class without behaviors, just data, with exactly the same name here, so that lets us write something like I am going to put a thing here for a minute and then we'll say for p in response.json, right remember what we get back here is a list of these dictionaries, so p we could call it post is going to be one of those elements, and what we want to do, we really want to return a post and I'd like to set title=post.get ('title'), and then id=post.get('id') etc, but we can do it just like this, we can take that dictionary and unpack it as keyword values in the post and because there should be if I did this right, a one to one mapping between keys and post and keys and the named tuple it's expecting, we should get exactly what we are looking for, let's find out.
Alright, moment of truth, list, boom, look at that, this crazy number is the id, this is the number of views and then this is the title; if you look at Postman, you see we actually get more data back, we also get the content, now this is really short because I just didn't want to put a lot into it, but this is basically meant to be the body of the blog post, where it's got the title and the publish text and view count and so on.
We are of course working to simplify data model here but I think it's working pretty well, now look how cool that was, like nice little dictionary unpacking, this is great, so we got our data and we are reading it from the service, let's go ahead and go back and tell the service hey I would actually like to be very explicit about that I am expecting you to send me json, so you could do that over in postman here if we go to headers and we could add and accept here and it says the value could be application json right there, application/json, so how do we do that in code, we just go over here and say headers, and we make a dictionary and we say accept and the value is going to be application/json and we say headers = there is headers variable here.
so we can run this one more time, it should work the same, beautiful.
|
|
|
show
|
5:21 |
So we can see the post, that is not really new for us although I do feel like this is a pretty sleek little trick with the dictionary unpacking, it's time to add the post, so over here we are going to do a few things, I've already created the publish date text because that is just not worth you watching me type that, but we still need to get some additional information, from the user.
So, we are going to need to get the title, so we could say just input, okay, once we have all of this information we will be able to create a dictionary on the Python side here, called post data, exactly like the thing we are working with, so we could say like title=title, content=content, we know this is what it's going to expect, view_count=view_count, and published=published_text okay, so you might think that we can just send this over directly as it is but it turns out we got to do one more little step here, we are going to need the url to submit it too so it will be base url plus, remember our API is if we do a post to the general blog collection that will create one and actually even return it as the response body, so that is cool and let's go ahead and add some headers, and earlier we said we'd accept application json but now we are telling it I am sending you application json right, we are going to turn that into json and send that as the body so on the server side, it knows it's not like form encoded data or something to that effect, and now we can send it so we can say the response=request.
not get, but post, right, there is also a put and there is also a delete.
So we'll say post and it takes the url the data, the json and so on, so we'll say url, we'll say json=post data, and headers=headers, okay, that is pretty cool, let's go ahead and try sending this to the server, I think this actually might work, so we'll say if response, now, you got to be a little careful, what does success mean for a post, if you look at the http protocol, it says there is a specific success status code 201 which means created and that is the ideal status code for here so we are going to assume that this service is working right, if you get a 200 back that might also mean it worked, they just aren't being super careful with their status codes, so let's say if it's not over here we'll say print error creating post, and any text that we get back, right, it could be hey like this was not found or it could be access denied you must log in or something to that effect.
Now, if we do see it let's go ahead and do a print, created this, and I am going to do a print whatever we got back, so we should have a post, I am going to actually capture that post, and say response.json, now, if we just sent the data to the server, why would it send it back, that's weird, right, well, remember, there is 5 pieces of data in every blog post in our data model, there is the title, content, view count, published and id, the id is server generated and maybe they also do other normalization like set this to be at least zero, not negative, maybe they do cleanup on this, all sorts of things could have been modified and we want what the server believes it created, not what we asked it to create.
So this post is going to represent that.
Alright, you want to see if it works- let's give it a shot.
Alright, so let's see what's you first, we have three, there is always these three that are static when you get started, I didn't want you to start with an empty set of data, then I am going to add so this is our first attempt to create a post, the title is this is the body, I don't want to write the whole blog post, and the view count is going to be 10.
Here we go, boom, that worked beautifully, now it's important to notice here that we set the json, another possibility up here, is we could set the data, if we set the data we have to set a string representation of the json, if we set the json itself and not the data, it's going to basically stringify that json, so be careful here.
Alright, now let's see how this works, let's list and see if our post is actually there, oh awesome, this is our first attempt to create a post, let's just add one more because we can.
This one has got a lot of views folks, boom, we got it back and then notice right here, the id that we got back from the server it ends in 48 a so when I list this is our success story it ends in 48 a, that is a direct call to the server, we are not holding onto that data.
So that is how we create data using our API, remember, we knew that over here, because it said the way you create a new post is you do a post against /api/blog where it doesn't actually say it here, but I am telling you the body is the actual post content minus the id.
Now we have a much more interesting little blog explorer, we can both list the existing post and create new ones for ourselves, up next, we are going to want to update the post, what if we made a type error or something and maybe even delete the post like no this is old, this is outdated, I'm done with it, goodbye.
Much less common, but still, we want to have all the crud operations in our little explorer.
|
|
|
show
|
2:09 |
To create a post we do an http post, one is blog post one is a verb, an http post against the general blog collection, so we do an http post against api/blog and the body of that post is a json document containing all the details we want to use as part of that post creation, the title, the content, things like that.
Then what comes back is the actual thing that the server created, so it inserted into the database, which generated things like the id and other potential values and it sent that back for us to continue to work with in our application.
Now, throughout the rest of these concepts in this chapter, we are going to assume that we have always written import requests and that the base url is that public url of our service http://consumer_services_api.talkpython.fm that will mean we just have a little less to look at at each of the detailed steps.
Okay, to create a new post, in code, what we are going to do is we are going to create a new post dictionary and set the values that we have control over, title, content, view count and published.
Remember, there is also id but that is server generated so there is no point in passing it or trying to come up with one because it's just going to be created by the database anyway, then we set the url to be the base url/api/blog, not a particular id, just the general collection, and then we are going to do an http post to that url and the body is going to be the dictionary, we say the json objects, the dictionary is going to be converted to json, now, one note is I actually in my code when I did the demos, I set the headers and set the body type, where the content type is json actually if we set the json property request knows that that has to be the case and it's going to set it for us so we can skip that header step it turns out.
Now, when we are done, we better check the response code, the standard response code for some sort of post like this is 201 created, so if it's not 201 that's a problem, but if it is, we can just access the data by calling .json convert our server side post into just a simple Python dictionary and we're off to the races.
|
|
|
show
|
5:11 |
Our blog explorer lets us list post and add new ones, now it's time to make them editable, so I've added just a little bit of I guess you could call this user interface code, like some interaction with the user to ask them show me the posts that you would like basically I am going to list them out and put numbers by them, you tell me which number it is you want to edit and then I give them the option to enter a new title and I use a little conditional here to say if they don't enter anything we'll just use the existing title, we do that for content and for view count.
So, that is going to get us something that looks like this, if we go over here and say update it's going to say alright, these are all the posts, which one would you like to update, let's update our success story.
So it says okay, we could just hit this, alright I could but the view count this thing has gone crazy, it looks like this, and of course, nothing happens because that is the part we are going to write right now.
Okay, but that is what this user interaction bit here is, so we have the data, I'll say post data again that we want to update and I am going to put this into a dictionary just like before, now we don't have published, we are not asking them when it was published, that part can't be changed, so I am going to say post.published and we'll just use the one we got back from the server, here well, we got all of them back from the server and we picked one based on the number they chose, enter a number of post, notice, there is no error handling, we are just assuming this is going to be an int, and anything you build, you know, obviously, error handling is important, so here is the updated data, and maybe they entered nothing and we're just sending the title back, but maybe they updated the content and we are going to send a new version of content, or whatever.
So, what do we need to do to update it?
First of all, we're going to need the url, that's going to be base url plus, what we had to forward is api/blog but in our service, over here, if we are going to do an update, we have to do a put request to /api/blog/the id of the post so let's make that happen, so it's going to be like so, and then we have post.id, like that, okay, now remember, these are named tuples that are coming back from our get post so we can access them just like .id and .publish, we are going to have to use dictionary, okay so we have this, we want to say the response is going to be request.put and again we have url and data now this time I don't think we have a json so we're going to have to be a little more careful, so we have url data=json.dump s so that is going to do the stringification of the post data, and if we had any headers, we could set the headers as well here.
Okay, we want to do this put, and then we'll say if we got to test for success, status code what does success mean, for an update command.
Well, it might be 200 if they are not very careful with their codes, but it turns out that the most precise response from the server should be 204.
So 204 means the server has successfully fulfilled the request and that there is no additional data for you to get, if we've given it the new data, we already know the id, we already have the server representation of the post, if we really want it back we can ask for it, so if it's not equal to this, we are going to print as always maybe there is text, if there was an error, who knows, but if there is not, we are just going to say print, so this is status does equal 204, successfully updated and I'll just print out the title.
Okay, I think that's going to do it, we probably want to consider the headers, but let's go and just run with this, okay, so let's do a list and we still have our data, remember, this is a stateful server, so it has our success story and it has, this is our attempt to create a first post, okay, now, the first attempt, people love getting started stories so maybe it's been viewed a lot and maybe we want to change the title or the body just a little bit so let's say we want to update a post, alright, which number do we want to edit?
We want to edit this one which is 4, okay, this is our first attempt, let's take the default title, say "I knew all along that this demo would work the first time" of course I did, and like I said, that's been viewed 1001 times, I don't know if this demo worked, but the one that created that post, that one I can be sure it did actually work the first time, I think this is going to work, let's see, we've got a request.put data as stringified json and url to the particular post, I think it's going to work, let's give it a shot.
Successfully updated, our first post.
How cool is that; now, if I do a list, we'll know this worked if it went from what it was before, scroll, scroll, from 10 to a 1001, let's do a list and find out.
Boom, 1001, alright, let's do that one more time, we'll pick number 4 again, this first attempt was a winner, and we'll just take these defaults here and update it again, let's do another list, see this first attempt was a winner, it took those values and of course, we are doing a put back to the url specified by that id.
|
|
|
show
|
1:49 |
In our service, to update a blog post, we are going to do an http put to the particular url that represents that blog post, and the body of that post is going to contain the details in json form to replace the value on the server, so we want to do a put/api/blog/id and pass the title and the content, things like that.
The response is going to be just an http status code 204, no content, everything worked, thank you.
In code, what does that look like?
Well, we start by creating a dictionary that is going to be the body of our post, so updated post details, we are going to pass title, content, view count and published.
Now, not all of these necessarily changed, so it's up to you and really up to the API to determine whether you have to pass all the values back or just the ones that are changing, I believe the API we are working here requires all the new values to be passed or it will like null them out on the server.
So, we are going to pass them all but it could be possible if you just want to change the title you might just have to pass the title, that is up to the API.
Then we come up with the post url that we are going to update, API/blog the id of that post, and then what we do is we do a request.put, so we send a put request, or http request with a put verb to that url and we pass the json body as the updated post details, remember, that is going to take the dictionary and convert it to a json string and set the content type of the put to be application/json.
And then of course we want to check the status code, and make sure that worked, in our case, the contract we have with the servers 204 is good, everything else not good, but you might want to be on the lookout for 200 as well if they not carefully managing their status codes in the response, and if that worked, then, yeey, we're all good, now we can just assume that that post was updated as we specified.
|
|
|
show
|
3:23 |
The last thing that we need for our blog explorer to be complete, well, as a silly little command line crud app for API anyway, is to be able to remove a post, so we are going to implement delete a post and it kind of works like it's going to get the post and ask you which one do you want to delete, number of posts to delete and then it's going to say we're deleting that post now the action that we actually have to do here is to implement that.
So the url according to our API if we go back, to our specification is to issue a delete verb to api/blog/id, we have the post right here, so that's cool, and we're going to say it's going to be base_url + 'api/blog' + post_id so that is the url, and we are going to a request.delete against it, the url is going to be that, and I don't think we need to enter anything else, of course, in a real system we might want to add some headers or add authentication in various ways, but, this simple example we are just going to do like so and we want to check that the status code is successful.
Now, all the other status codes have been pretty straightforward, it's not entirely clear what the best status code for delete is, it could be 204 no content that worked, it could be 202 accepted, so this service I believe is going to return a 202, if this is successful, and if it's not then we'll have to say something went wrong.
So if we don't get a 202, we are going to assume that something went wrong and we'll print this out, and if this accepted it, then we are all good, so deleted, and we'll just put the title here, deleted this thing, whatever, okay, so let's go and run this, and let's go and just see what is here, we'll do a list, we have easy breezy Python clients, this is success story, we have this one right here, notice this sucker, this post is doomed from the start, it has zero views, that seems like a perfect candidate to send a little delete to, right, so let's issue our delete command, and it's going to show us that list again and say alright, which one is doomed, number 3, number 3 is very doomed, alright.
And, if we move up a little here, we are going to come back and say deleting this post is doomed, it's going to create the url straight to that post using this id and it's going to issue a delete verb to that url and then we'll just check the status code and see how it comes out, here we go.
Deleting this post doomed from the start, boom, deleted it, successfully, and if we do a list, is it still in the list, no, it was doomed, it's gone.
Let's try to delete one more, just for the heck of it, let's try to delete number one.
Easy breezy Python http clients, what happens if we do this - error deleting, 403, this post is read only.
So, it's really good that we have our status code checking error handling, because, it's not guaranteed that we can delete everything that it's always going to work, but if I add a post here that is going to go away, I can go and delete this goodbye one right here, deleted, goodbye, list, it is now gone.
Alright, so those are the crud operations, and how we do all of this work, with requests and basic http restful services.
|
|
|
show
|
1:11 |
It probably won't surprise you to hear that to delete a blog post we are going to issue an http request to the blog post url with the delete verb.
So this is a very simple request, we are just going to say delete/api/blog/id and the response is not going to be any data just 202 that worked.
In code, again, this is probably the simplest of the 4 operations that we're doing, with working with data here, including get.
So we come up with the url, api/blog/post id and then we're going to issue an http request with a delete verb and we're just going to issue it straight to that url, nothing else is required, and all that is left is to determine did that work, or did it not work, so in our case, the right response code, or the expected response code is 202 from the server, you may also want to be on the lookout for 200s if whoever wrote the API is not super careful about status codes, or 204 is another reasonable response code that could mean success, it's unlikely this will vary over time for particular API, it's just that they may have made a different choice than 202.
So you want to check here and then if you get pass that, that post should be deleted.
|
|
|
|
19:46 |
|
|
show
|
4:08 |
Where are we in the course?
Well, we are still in the http client area, but we are going to be focusing on the builtins, that is urllib2 and urllib depending on whether you are on Python 2 or Python 3.
Actually, there is a little bit of confusion about that, which is better, should I use urllib or should I use urllib2, well, that kind of depends on whether you are working with Python 2 or Python 3, so here we are in the documentation for Python 2 and notice that we have a urllib, it says open an arbitrary network resource by url, okay, that's cool, maybe I should use this to talk to services if I want to just use the built in, oh wait, there is also urllib2 which is urllib but even better, maybe twice as good, I don't know, what the 2 stands for, just the next generation, urllib opening library.
So, this is a weird sort of historical confusion that you might run into just if you are doing Python 2, so we are going to focus on urllib 2 and we are going to basically disregard urllib from Python 2.
Okay, well that said, we are going to see that we are actually going to use urllib in Python 3, so let's compare these side by side to make sense of this.
Python 2 has two versions an older version urllib and the new version you just saw urllib 2, so that is what we should work with, if we are doing Python 2; In Python 3, they made a number of breaking changes from going from 2 to 3, one of them was that is kind of crazy, why do we have all these versions of urllib, we are just going to create a new even better urllib that is the Python 3 urllib, and along that path they actually decided to refactor and break apart the urllib module into a number of pieces, this included urllib.request where you actually will use that to do the request and urllib error for checking for errors and there is a few other urllib submodules as well in Python 3.
Now, the question you might ask is why would I use either of these when I could use requests, what you are going to see, not so much here, but dramatically so as we get in farther down the line, is that these APIs are not as clean and simple and intuitive as the request APIs, so if you got to choose, use request, there is absolutely no doubt about use request, use request, like so many people are making that choice, that is why it's downloaded seven million times a month, but, if you are going to write a Python app or script, and you need to do a little bit of network work, http work or something like this, and it has no dependencies whatsoever, except if you use request that now has a dependency, getting it installed is trickier and so on, if you want to write a script that literally has no dependencies, you might consider using urllib if that is the one thing that would have pushed you into having external dependencies.
That said, it's up to you whether or not you use request or you use this style, I'll show you this in Python 2, I'll show you in Python 3, but if you got a choice, absolutely use request, it's a better API.
Finally, before we dig into the details of these two different APIs, it's worth pointing out that the Python core developers and the language team met and considered whether they might make request actually part of the standard library, they might bring request into here to basically replace urllib in Python 3 and they decided not to, not because it wasn't important enough to sort of stand parallel to the urllib story in Python 3, but they said look we only ship new Python distributions infrequently, and we don't want to hobble the package request and tie it down to these various slow release dates especially because you are working on the network, there might be network security issues or voulnerabilities that you need to quickly roll out a new version of request for and you don't want to wait for CPython to rev entirely.
So it's just interesting to think that the Python team actually considered making request part of the builtins of Python and choose not to so as to keep request live and vibrant.
|
|
|
show
|
2:42 |
Here we are back in PyCharm, and this is something like the blog explorer that we just wrote in request in Python 3, now, we are going to run this in Python 2 and we are going to use the builtins, so we are going to need to do import urllib, there is the two versions, this is absolutely Python 2, so I am going to go with this here, and notice we are even checking to make sure it's running on Python 2 and if I go and run this, you'll see that I've created a separate virtual environment based on Python 2 that we can use here.
Okay, so let's look through the app is basically the same, of course we had to switch raw input for input and print no longer takes parenthesis, but other than that, you'll find there is not whole lot different factors, I don't think there is anything different in this code, so we go down here, what we are going to do is we are going do is we are going to wrote get post again, so we are going to come down, and we are going to create a response just like we did with requests, so we are going to come down here and do something a little less obvious but it's not too bad, so we'll say for this basic get case unauthenticated don't have to do too much, so urllib2, url open, and we are going to pass url, we could pass the data and things like that but we're not going to do that, we're just going to pass the url because this is a get request, now it doesn't have a status code, this is more function driven, there is no properties or anything like that, but we can come over here, and call get code as a function, okay and then again, if an error happens, we'll leave it like it is now, it's going to end up in a big bad crash, so we also don't get the text this way, we say read it's kind of like a stream sort of thing, so if that works, we should be able to get the data, now this didn't look too bad, right, so let's go ahead and try running this.
That is running in Python 2 and let's go ahead and list, oh it has no attribute json, let's jump a little bit ahead, so this is going to have to be post data and we are going to need to do a little bit of work, there is no builtin json here so we need to go and use the json module which we have to import and then we have to have this say load s to parse a string, we've already talked about this in previous videos, and then we give it the response.read text and maybe it's even worth writing this as a separate variable so we can check it out if we need to.
Okay, try again, let's go list boom, easy breezy back to good, well, that seems pretty cool, maybe we can go and write the next one without too much trouble, now one more thing that can be tricky about working with this library is it can keep these sockets open, so it's really important that we close even though it's not in the auto-completion here that we close the socket.
Now wouldn't it be cool if this could be used in the context manager?
Well, it will be, shortly.
But only in Python 3.
|
|
|
show
|
3:17 |
Doing a get to get the post from the API was actually pretty straight forward, so let's see how this works for adding a post.
We're going to use a lot of the same structure that we had before, we are going to get the same user interaction, we are going to get the same data, this time we do need to explicitly set the content type because it's not going to do that for us, so then we're going to come down here and we would like to do something like this, urllib2.urlopen() and we can pass in data, but we can't like pass our headers for example, so in order to do that, we have to create a request type object and I am going to call it req so you don't confuse it with the request, the other external package, so we'll create urllib2.request object, and in here we can pass the url, the data, the headers and so on.
So we'll say url and we'll say data= and I am going to hold off for a second there we'll say headers=headers, so this is not going to jsonify this for us, so we have to say json.dump s of our post data dictionary, like so.
Okay, so then we're going to do that, we're going to post this down here, we'll do a few things down here, say we want to response.close because remember we don't want to forget that, and down here we want to do response.close actually let's do it right here, we could do a try, finally, but we are just going to avoid that for a second, so this should have a p in it, excellent, okay, so this is going to work and it's going to do a post request, how do I know, I am just opening it, well, check this out, down here, we can get the method, if it has data, it's a post, if it doesn't have data, it's a get.
Okay, so the fact that we add this data means we're doing a post request, we can do a get request with data, and we can do a post request only with it, so we can't do a post request without data, I guess that doesn't make any sense, but it's pretty constraining, as we'll see here in just a moment, okay, so we can't do the status code, afterwards, this is more or less the same, we'll say response.get code and we'll say read like so, okay so if it doesn't work we're going to get that, and remember, we have to close it straight away, and then here let's say, or we'll better do this before text=response.read and then here we can say json.load from string the text and that will be our post and hopefully it worked, let's go and run it, let's do a list, alright good, let's add a new post, this post comes from Python 2, Python 2, and the view count is going to be one, how it's going to work, here we go, boom, created, alright, beautiful, let's list it again, alright, now this post comes from Python 2, okay so that worked, let's just really quickly look at the two other options, update and delete.
They are not going to go so well, well, update says in order to update a post we have to do a put to url, well, with urllib2 we can only do a get or a post, so okay call that function, can you, delete similarly, we have to pass the delete verb, we can do a get or a post it has data or doesn't have data, too bad, you won't be able to call that either, well, there is some really string reasons to work with requests from Python 2, right there, huh?
|
|
|
show
|
1:25 |
So we've seen Python 2 and urllib2 in action, let's look at the builtins for Python 3, so here we can see that we've got basically the same code that we use for Python 2 and I am going to just upgrade it to the Python 3 version.
So the first error, well, let me just show you actually, first of all, that we are running the Python 3 virtual environment that we have been for most of this class so the first thing to notice is urllib2 is no longer a thing, now there is a couple of choices, we have the errors that you might encounter, we have the request, we have the url parser, and we have the robot parser as well as responses, what we are going to work with is just urllib.request for now, alright, just like before, the first thing that we had to do was get the post so let's come down here and you can see get post is not looking so hot right now, because there is no urllib2 but let's look inside urllib.request, there is a url opener, it is similar, it's not the same, it's similar, it has more or less the same signature here, and we can open the url, there we go, okay so we want to open it like this and from here on, it looks pretty much the same, so get post is not going to be that different, let's go and do a list here and look, we still have our post and everything, great.
|
|
|
show
|
2:16 |
Well a read only blog explorer is kind of interesting, but really the idea was that we could do all he crud operations, right, so let's work on add post.
So just like we saw before, there is no urllib, but there is a urllib.request which has a request class in it, and here we are going to allocate some data, let's go look at the signature of this one, so you can see we can pass url the data, the headers, the origin host and most importantly, because there is a lot of flexibility we can now pass an explicit method, okay, great.
So we are going to come over here, we are going to do the url, we are going to do the json string, we are going to do the headers but we are also going to set the method to post, explicitly and then again, like before request.url open and it's going to go along more or less the same.
So let's go and create a post, we're going to see what's here, okay, and we have this post comes from Python 2, let's do one it's says that this post comes from Python 3, content, it's going to be viewed 100 times, oh yes, okay so the post data should be bytes, not iterable strings, so that is pretty interesting, how are we going to solve that?
Well, let me take a step back here, and we are going to say data, let's just call it data for now so let's go over here and say data= and this is what we had before, in Python 2 the difference between bytes and strings was not very strong, what we can do though is we can say I'd like to take this string and turn it into a particular byte array based on the encoding that we are expecting, so probably he best choice here is to say I want to encode this using utf8 that is probably our best shot for the right encoding for this server, let's try it again.
Okay, just make sure that we got only our Python 2 one here, so we are going to say something like this, from Python 3 so we are going to add Python 3, this is going to be new content and this is going to be 1002.
Great, so now that we sent a byte array for our data, everything worked great and we got back our newly created object with the server side generated id and we can even list it, we should see it right there along with the other one.
Perfect, and it seems to be turning a little bit higher than the Python 2 version of this post which is kind of cool, right?
|
|
|
show
|
3:41 |
Alright, with our new found power in Python 3's urllib we can get rid of this, sorry you can't do this because it requires web features, we can come over here and copy across the original request version and let's just fix it up so all we have to do here is we are going to use our context manager, right away, we'll say urllib.request.urlopen this url, and the method, again, we are going to need our request, sorry, because we got to set the method, and we are going to set this to delete, now we are going to pass that over, we'll say as response and this can go, that was just older version, of course this is get code, and read, and then, we're done, so let's just do an indent here, alright, beautiful, let's run this and see that it's working, so let's see what's here, alright, let's try to delete something, well, what post is not very popular, I could try to delete two, but that actually should come back with an error saying that one is read only, let's give it a shot.
No, 403, forbidden, okay, that didn't work our very well, let's try a different one, let's try delete, well, actually, let's go and delete that Python 2 version, okay, delete, and did it go away, it did, okay, excellent.
Now, one thing to notice is we actually got an error, we got an error there when we tried to delete that and so just checking the response code, that totally didn't work for us, let's try this again, let's try to delete number 2, and see where the error is, the error is right here, it says no, no, this is not working, what type of error was it, it is a urllib.error.http error, so let's go ahead and add that error handling in here, we have our import here, let's do error as well, so even though we have our cool context manager not enough, we got to do add an exception, and http error as he and then we'll print error, see if we can get out of this, get the message and get the code, maybe switch the word there, huh?
Okay, let's try to delete this, one more time, let's try to delete number one, error, we cannot delete it, it's forbidden, so I don't know, this is kind if annoying, that it doesn't let us even look at the error code, right, the exception is thrown right here, so maybe it's better to use a try finally to clean this up, if it gets created, I don't know, it's a little bit funky but we should add the same error handling to update as well, because we will run into the same type of errors.
Alright, I think we have our blog explorer written in Python 3 builtins working great.
Now, as you'll see, you might think well that's not so different, I am just going to say for get request, well, we are going to talk about authentication as well, and authentications adds some pretty silly jurations to the builtins, whereas it's super simple inside of request.
So, the benefits of requests are still going to build up in a crew over the whole course or this course here, and this is just some of the funkiness like that we have to do a try and then a context manager and so on and so on, and check codes here, check codes there, etc, it's kind of just why does it need to be so complicated, right?
That said, it's not too bad, if you want to use the builtins.
|
|
|
show
|
2:17 |
How do we use Python 3's urllib set of submodules to do basic get request against servers and even more advanced ones like post, put and delete?
Well, if we are going to do a get request we simply create a get request against api/blog and this is going to give us all the blogs back as a json body; In code, we are going to need to import two modules, urllib.request and json and then of course, we construct the url that we are going to work with, and we are going to call url open, just like before, but this time, it's urllib.request.open and the response now supports working with context managers that is the with blocks, so we don't have to be very careful about how and when we close the response, so again, we are going to check the response code, read the text and there is no json feature so we are going to have to use the json module to load that back into a Python dictionary, after that, we're done with the service, we are off to the races with plain old Python data.
So it gets pretty straightforward, but what about put or other modifying data operations, so here we want to update a blog post, we want to do a put against api/blog/the id of the blog and we are going to post as the body the changes we'd like to make to the post and what we'll get back is confirmation details, so in code again, urllib request and json url but now we are going to create a dictionary that has all he data title, content and view count, we are going to convert that to a json string via dump s and then, we need to pass actual bytes not a string, so we are going to give it the utf8 representation of that string as bytes, okay, so that is the post data, let's go an throw in some headers, so that we can say this is json you are going to be getting, and now, this time, instead of actually just calling url open and passing some values, we are going to create a urllib.request.request object give it the url, the data, the headers, and now we can set in Python 3 the method to put, so that is excellent, and then we carry on like before, we issue the request, check the response code read the text, and turn that back into a dictionary, so this is how you work with urllib and Python 3's builtin http capabilities.
|
|
|
|
26:46 |
|
|
show
|
0:21 |
So we are in a new place in this course, now we've made our way over to the data format section, and we are going to be talking about soap clients.
We are going to see how to consume Soap services from Python, and the answer is actually not to bad there, there are some pretty cool projects that we are going to be using.
So I talked at the beginning of this course a little bit about the network, the spectrum of network services, and we put Soap in there, in the really nice to work with if you have the tooling in some ways but also kind of old school and very burningsome if you don't.
So, I just want to reiterate that, if you get a choice between making an http restful service and a Soap service, choose the rest service, if you got to consume one, choose the rest service but we are going to talk about Soap because there are many internal Soap services, if you work in large companies, there are probably Soap services all over the place, and what you'll learn here is how you can work with the existing code, okay, this is not an advocation of Soap, this is just a- we live in a world where there used to be many Soap services, and you may still run across them so how do we work with them, alright, and just to remind you how this went, recall we had this function, doubleAnInteger which we were calling on a Soap service, and what happens is we come in, we call this function, it generates a Soap envelope and the Soap envelope contains things like it's going to run, what the values are, and it's very name space laden to describe all of its types, so we are going to get a message like this, and all of this is really to send two pieces of information, we want to call the thing, doubleAnInteger, and we want to pass the number 1, 2, 3, the server is going to do the work, it will pull this all apart, it will run that operation and it's going to, not surprisingly double that number and send the message back that looks similar, like this.
And here you can see the response came back and the response is 2,4,6.
Okay, so this is the Soap world, and what are the properties benefits and drawbacks really of Soap services, all data is exchanged via http post, now on one hand, you might not really care, like you might not be really into exactly matching the architecture of the internet and the web, and that's fine, but one of the challenges you have with everything being tunneled if you will over http post is that nothing is cashable out, outside of maybe the server in memory cashing in, but the verb post is not cashable and this causes many problems on the public internet.
Next, all the operations target single url, so they might go against server/service and then the action header tells you which operation on that service to run, so it's not again, just kind of not really working the way the internet works, because we're using post, nothing is cashable, xml format especially with all those name spaces is really --- and we don't want to use it, right, we've seen json as better from a bandwidth perspective, better from a human readability perspective and it's just simpler for most clients especially Python because dictionaries and json match so closely to each other.
However, with tooling support, Soap does lead to pretty quick development.
|
|
|
show
|
3:20 |
Now, let's do something that might be a little bit unexpected for this Python class, what I want to do is I want to show you what the expected experience is for the people that created Soap services, like how is this suppose to go, and then we'll see how Python sort of fits into this world that was created for a place that is all about tooling driven infrastructure.
So here we are at the consumer services API talkPython,fm and we have our Soap service and it shows us these operations, although you'll see that we are not really going to need to look at this list because it will completely describe them to us with the tooling, so what you do in Soap is you start out with this thing called a wsdl a web service description language, and let me just pull this up for you here, you can see here that we have here is what all post looks like, this is, it takes nothing as a parameter, for the response it is going to return an array of posts, well an array of posts is a sequence of these things called posts and then where is the post, here is the post right, so you can see this is like well not pretty and full of namespaces and junk like that, it does describe to us basically what is suppose to happen in this exchange, and this is not meant for people, it's meant for tooling so notice I am over here in Windows 10 and one of the frameworks that really popularized this is CSharp and .Net so let me show you what people who created web services expected to happen, and then we'll go actually do this in Python, so I am going to create a super simple little app here, if you don't know CSharp don't worry, we are going to spend five lines of code on it and then we are going to be done, alright, here is our super simple application, and this is what the people who made the Soap expected to happen, you right click and you say add service reference, and this is something called wsf it's kind of nasty so I am going to go to this older add web reference variant here, and I am going to just paste in that wsdl and say show me what you think this wsdl is, okay we found this service, called Soap and actually if we go back here, let me cancel this, if we put it in here we'll even get like a little description of it, so here we have this service and it's a blog, it has a blog service, and here is those pieces I told you about, right, so let's go back and not mess with that wsf stuff like I said, it's overly complicated, it's not necessary, so here I am going to put for the service reference, notice it tries to reverse this, I'll just say this will be service, or svc, something like that.
So, when I press this button it's going to read the wsdl and generate a type from there, it's happening in here, and you can see there is this web service, if I say show everything we can look in here and there is actually this reference thing okay, so somewhere in here we are going to have a blog and this, it turns out it's actually the name of the class that has all the operations on it, so don't worry about that, we are just going to come over here, and let's just suppose we want to get and list the blog post, so I'll say var client=svc.blog, and we create one of those and it knows where the service came from, so it knows how to get back there, so of course new, this is not Python is it, and then I'll say var post=client and then here are all of our operations, get post, get post async, we'll have all posts and so on, right, so we are going to call that and then we'll just say for each and then let's just do a console writeline which is equivalent to print, we'll say something about the post as certain number of views and then here we can just pass in post.title, notice that the thing knows all the stuff that is being passed around, because it looked at that wsdl and it generated it, now this doesn't work in CSharp, but we got to put the numbers here, let me put g0 so we get some comma separated pieces here and I'll just do one more right line here, all blog posts, like this, so let's go and run this and see what we get.
Boom, so look at that, it goes put and it talks to the service easy breezy Python clients has this many number of views, and so on, maybe I wanted an N here, yeah, there is our comma separator.
Okay, so that is the expected experience right, we go over here we run the tooling, the tooling generates all the rich types and then we call them and they kind of look like their local functions that we're calling like client.allpost but in fact, those go to the server.
Next up, we're going to see how Python fits into this world.
|
|
|
show
|
4:33 |
Let's review the core concepts around calling a Soap service with a tool driven generated approach, so what you are going to do is we'll have a Soap web service out there, and it will have a service url and a wsdl url, we'll point some tooling at it, it will generate a proxy, typically this is like generating source code that will be compiled and then, those two things know how to do Soap exchange and you treat the generated proxy or client more or less just like it's a local class, it just happens to be that it needs a network and it does this crazy Soap exchange to get there.
So the expected experience that people created this wsdl soap world was you go to your tool, you'd say add service reference or something to that effect, it would pull up some kind of dialogue, some tooling, that would read the wsdl, and generate a type which knows about all the operations including all the rich type exchange.
Okay, and then we just use this like standard local code, so we'll say blog service=new blog, we'll say create a post and we give it the data that it's going to take, then we can say give me all the posts and for each over those and print them out, we can even update the post, get me the last one of all of them, increment the view count and then update that back to the server, okay so this is what Soap was created for let's see how we can use it in Python.
|
|
|
show
|
1:21 |
In Python, the best way to access Soap services, is to use this package called Suds, you got to love the name, right, Soap Suds, it's beautiful, so it's a great name and you can see, Suds is a lightweight, Soap Python client for consuming web services, and it has things like no class generation, you can just do this in runtime, in runtime it will read the wsdl and it will actually generate all the information it needs for you to work with, it provides an object API which means you create classes and interact with it by calling functions on those classes just like we saw in the tooling example, and it supports a bunch of Soap protocols, so this is great, right, well, if you look a little carefully here and- hm, not so great.
Modified five years ago.
Now, technically it still works but it has problems namely it only supports Python 2 and because Python 2 is end of life, in 3 years, this is unfortunate, so are we just out of luck, well, I mean, obviously this is open source, somebody could come along and fix this problem because whoever created it has kind of left it to wither over here.
But luckily, a guy named Jurko already did, so thank you very much for that Jurko, you can see over here on bitbucket.org/jurko/suds that now we have a Python 3 compatible version of this, it said it's hopefully a temporary fork but given that other one was updated 5 years ago, I think temporary is becoming permanent.
So nonetheless, thank you Jurko, we're going to use the suds-jurko package rather than the straight up suds for working with Soap services in Python especially in Python 3 right.
|
|
|
show
|
1:41 |
Now I don't always do examples of how to install things, like pip install the thing, or go to PyCharm and hit command or alt enter and it will say do you want to install this, you say yes, okay, but, working with suds-jurko is a little bit different, it's not entirely intuitive, so let me just give you this quick rundown, so if we say, first of all which pip are we working with, notice, I've activated our virtual environment and just for kicks we'll say which version this is from Python 3, okay, so Python 3.6.
great, now, if I say pip list what do we have installed, requests, a few other random things that came along with the packaging tools, and that's about it, we have no suds, clearly, suds is not in that list, so if I say pip install suds, and hit enter that would be super wrong, because that is going to install the five year old Python 2 only version, it probably won't even install it actually, but if it does, it's still going to be wrong, so what we install is suds-jurko, okay, so the name of the package is suds-jurko.
Successfully installed, suds-jurko, version .6.
Cool, so let's go over here and run Python, that is my virtual environment Python, if I come down here and say import suds_jurko or something, that would be wrong, I just import suds, okay, the package name has to be non conflicting with regular suds, but other than that, the API and everything is basically old school suds, just made for Python 3 so now we have all the things we want to do with this thing right here.
|
|
|
show
|
1:30 |
I think it's time to start calling some soap services from Python, what do you think?
Over here in the service, if we scroll down we can get to the soap section.
there you can see our operations here, and we have our wsdl, so let me copy our wsdl here, and let's go over to PyCharm here and write the soap suds version of the blog explorer.
Okay, first thing we have to do to get started is we are going to have to import this thing called a client, so let's import like this, from suds.client, we are going to import this thing called client like so, and then we are going to use that and this little function that we are going to use to create the client, and we are going to do a little local cashing because we are not going to want to regenerate this service description or pull down that service description and parse it each time, okay, so this sort of global suds client and if we've already got it, we are just going to roll with that, but we are going to use this wsdl here, that's the same url I just copied, and it's going to be super easy, watch this, client wsdl, let's not allocate that string if we don't have to and for now, let's just print out, well, let's just print out up here, we want to do print client, like so, call create_client, now let's see what we get when we run this, oh cool, look at that, first of all, we're running in Python 3 in our virtual environment, and here is the client that says okay, it's this fedora hosted thing, with this temp uri that comes from the service description, and it says we have two ports, we can talk on BlogSoap or BlogSoap version 1.2, it doesn't really matter which one, and we'll come in and we have 5 methods, check this out, all posts create posts, which takes a title, which is string, content and view count, it has a delete post, it just takes an id, a get post it just takes and id, and an update post, which takes all of the values like this, it also has two types that it exchanges, for example, all posts returns this thing called an array of posts which is super annoying, I'd really like it to return just an array but it does what it does, and then, that's going to contain a bunch of posts which is actually what we want; so, we can actually discover the details about this client by just creating it, pointing at the wsdl and then print it out, okay, so that's pretty cool, let's comment that out, I'll leave it for a moment, I'll comment it out in the end, okay, so let's go ahead and implement one of these, so we are going to go down here to show posts, noting to say there, for get post notice, this is the requests version, this is the http restful version, we are going to construct the url, construct the headers, construct the response, check the status code, and then we are going to need to actually parse these ourselves, I mean, it's not much work because it's a named tuple, and we're doing dictionary unpacking but still, all of that stuff we had to do ourselves, let's do it this way, so we are going to call create client and then, the way we call functions I'll call this like so, we'll say client.
service and then it's going to have all those operations that we saw listed down here, so for example all posts, I come down here and do all posts like this, let me just print out post of zero, okay because what you are going to see, let's just print out post for a minute, first of all, this should work straight away, let me comment out this part right here, and tell it just for now, return something empty, let's see what we get, I want a list so that should call all posts, and check that out, it worked perfectly, it says sorry no posts, because we haven't parsed it yet, so this looks great, post, post, post, rich data type- we have an array of posts, which then has a thing which is posts, so if we are actually going to get a hold of that array right there, we are going to access it like this, which is too bad, let's do a list, alright, so now what we got, it's basically like a tuple the first value that we are going to get is actually the array, so this array is kind of a weird thing, but, what we get back is an array of these post objects, and it's great that they have a nice string representation as well, so what that means is what we really want to do is we want to kind of say posts= posts [0] we should probably do some error handling to make sure that this came back like we expected, but, we could do that, we could also even go like so but that seems a bit too much, right, so if this doesn't work out, I think we are going to get an exception, and then we want to return this array, so what we return is posts, right, that's it, create the client, call the function, return.
Alright, now this is actually pretty clean, right, the network level stuff is nasty, no doubt about it, the fact you can't cash it is nasty, but this, like this is the best version we've seen yet, isn't it?
Okay, so let's go over here and do a list, and it has no attribute id, that is true, because in the wsdl, if you go over here, where is out thing, we have a capital Id, capital Title, capital Publish, this is not a Python service, it's not a Python class so its naming is non Pythonic and so we just have to be aware of that right there, let's to this again, list, ta- da, now we are back in business, updating for the various case differences, working like this, we are going to go like that, okay, so nice and clean create the client, get the post, and return it.
Well that worked pretty well actually, didn't it, let's see what happens if we want to do add a post, okay, so down here, again we want to create the client, the client.service.AddPost, let's see what this is called, it's actually CreatePost, and I am just going to copy this, right here, so we know what to do, this is all runtime, so PyCharm is not going to be able to help us out here, so we are going to call CreatePost and it's going to take a title, it's going to take the content and it's going to take the view count, alright, and what comes back is an actual post object, and this particular API we're not sending that along, but I am going to leave it here just because I want it to be comparable to the size of what you saw before, deleting that would kind of be unfair, okay, so this should add a post, let's see, if we can add a post, the title would be "My service is shiny and clean, it uses Soap!", and the view count is 101, boom, look at that, we created the service, My service is shiny and clean, it uses Soap, and now let's list My service is shiny and clean it uses Soap, 101, okay.
Very cool, right, there is something to these Soap services, even if they are not great in a lot of ways, there is something to be said for the simplicity.
Okay, so we are going to get the post, show the post, update the post, and here we are just going to do this thing again, we are going to say client=create_client, and then I just need to update this, so client.UpdatePost and again, let me get this signature from up here, so it's going to be id, title, content, view count, alright, so that is going to update it, and let's run and update our post here, so if I do a list, we'll see my service is shiny and clean that's number 3, so let's do an update on number 3, and of course post has no title, does it, too bad, let's try it again.
I want to do a list, let's do an update, let's update number 3, and of course I forgot my service thing here, service.UpdatePost, okay, so we have to again adjust for the fact that now our post objects have capital T title not lower case t title, alright, let's run update, we'll do My shiny Soap service take the same title, same content, but now it's pretty popular, let's say it's been viewed that many times.
Well, that didn't work so well, did it, I think maybe because of what I am actually passing here is not the post id, I am actually updating, I am actually sending the function id and of course, it's not going to be able to find a post by that, so last time let's do this update number 3, same title same id but lots of views now.
Ta- da, it's updated that post successfully, do we believe it, let's see, it's had 10 million views, ok, apparently it did take that crazy number I typed into it, cool, so my service is shiny and clean, it uses Soap.
Alright, last thing, if we want to delete a post, okay, so we need to delete the post by id so again, client=create_client() client.service.DeletePost(post.Id) and again the title here, we'll say print delete it, let's create another doomed post, so we'll say add your doomed Soapy, alright, so we can list it, we can see that your doomed soapy is number 3, and it's not getting too many views it's not a good sign, I think it's time to delete it, it says which one do you want how about we delete number 3, deleting Soapy, should be gone and of course, it is.
So that is how we use suds, and the real essence of it is we go down here, we grab the wsdl, we call client and create an instance of the client, passing the wsdl and then we just use that throughout our application, object style as they say, so once we have this object, we say client.service and we start calling functions and it could take even a post object here as a parameter but it doesn't and it just takes basic types like string string and int, but it does return in our particular example a rich type which is the post, alright, I am actually going to leave, this little print thing up here because I think that is helpful for you as you explore this, but that's suds, you see how you can use it to work with Soap services and you can even set up authentication inside of your Soap service and I'll show you that in the concept section.
|
|
|
show
|
9:50 |
So let's look at how we work with Soap services from suds in Python.
It all begins with the wsdl, as we've seen and then we can use the wsdl plus the suds package to generate a suds proxy or suds client.
Now, this suds proxy knows all he structure and schema and operations that the Soap web service wants to call, that the Soap web service provides.
So once we have the proxy, it knows how to do the Soap exchange basically seamlessly to us and afterwards, we just work with this local class that is created at runtime with suds and everything looks pretty easy, in code, we just import the client from suds.client, we have our url to the wsdl, and we just allocate an instance of the client class and provided the wsdl, boom, we're done.
Now it's parsed and understood that web service description language it gives us this client which has a service property, and on there, we can call functions which will map dynamically to the operations on the server.
Now, you may want to know exactly what this client thinks the operations are, so we've seen that we can just print it out and we get a really nice listing of what the operations and rich types are, so if we print this, we get something like this, service blog and it's going to have a couple of ports, these are actually the various soap 1 and soap 1.2 formats that it supports but typically they are identical, and here our example had 5 methods and 2 rich types, that array of posts I'd really like to see that just come back as a list but hey, it's not that big of a deal, alright, so we have our all post, create post, delete post, and these are normally verbs, not nouns like we have in the http restful services, where the verbs are actually the actions we take on the nouns, here these are things like delete post or create post or get me the post, stuff like that.
Once you know what the operations are and the signatures of them, you are going to want to call those functions, right, so we are going to make sure we've already got the client, we've got the client created from the wsdl, and then we just say client.service and we start calling these operations, any time you see an array of thing, you know, the arrays actually contained in the first element of that tuple that comes back there, and then these come back already parsed into post objects, so we can say post.Title and post.ViewCount.
We can also call functions that take parameters so client.service.UpdatePost it takes a post id, title, content and a view count.
|
|
|
show
|
2:33 |
All of the operations that we worked with in our soap service, took fundamental types, strings, integers, that sort of thing, what if the operation, not only returned its own internal complex types, but actually took them as parameters, it's easy to work with them when they come back from functions, they are already allocated you just start treating them as objects in memory, but if you have to allocate one to input it into this method for example, how do you do that?
You can't just call some kind of initializer on it because well, it's created a runtime, what are you going to do, okay, so if we want to use this post object back in this operation, now remember, this is not how ours works but if this were the case, suds has an answer for this as well.
Okay, so what do we do, again, we create the client just like before, but now instead of going to client.service we go to client.factory, and it can create these objects so we say client.factory.CreatePost and that does all the internal runtime stuff to allocate one of those with basically none values for all of the properties, and then we can just set the properties, creating posts from suds is fun, it works in Python 2 or Python 3, and of course, it hasn't been seen yet, it's brand new so ViewCount=0.
Now once we have this rich type, we can use it as parts of our parameters, and our operation so client.service.CreatePost and we are going to pass this rich object which will be serialized into the Soap message just like the contract in this example.
|
|
|
|
1:37 |
|
|
|
15:39 |
|
|
show
|
3:05 |
We've made our way to the authentication section of this course, so most of the services that we want to work with that are really interesting are about personal data or private data, think of the Basecamp example that we looked at, or github or something like that, maybe some of that data is public but the really interesting stuff, especially if you want to make modifications require some sort of sign in and authentication.
So we are going to talk about that throughout this chapter, now, what are the options, for authentication, well, we've seen some really simple ones, we could do nothing that works pretty well, provided that the service didn't require us to log in.
We are going to see how we can do username, password, authentication which is a very common type of authentication, maybe another that is worth mentioning, although it's really simple, we probably won't cover too much on it, is just adding like an access token as a header value as well, so I kind of consider that close to username and passwords, so they are similar but not exactly the same, and then we have other types of authentication as well, we've got oauth, open id, we have certificate based authentication so you can take like an x509 certificate type thing and send that as a client certificate and the server might only let you in if it trusts your certificate, we even have like custom authentication scheme, let's call this function with your username and password, you got a token back and you use that token for the rest of the request or whatever, right, I don't really know how to tell you to work with that one, because that is totally custom, but we've done none, now we are going to focus on usernames and passwords, if you want to look at these other ones, there is some references here like the oauth one, there is a request-oauthlib, this one seems to be active, it works on both versions of Python and so on, similarly, there is a number for open id, number of libraries, and some of them be careful they don't support Python 3, they are only Python 2, and they are kind of outdated, but this one pyoidc seems to be good for supporting both Python 2 and Python 3 and is active, and they say the full implementation of open id also includes as a subset an implementation of oauth, so that one might work well for you and then here is the certificate documentation showing you how to do this with requests, alright, finally, before we get into it, let's just realize that authentication is not all of security, we have authentication, we have authorization and we have auditing, so the three As of security, right now we are just focusing on proving to the server who we are, but it's up to the server to decide well, given that I know who you are, what can you do authorization and logging and auditing of what did you do.
The 3 As while they are great, don't cover everything, be sure to consider privacy running your services only talking to services over ssl and the services if you are controlling them obviously you need to validate their data, anything coming in over our service should be totally entrusted and maybe even to a lesser degree how much do you trust what comes back from that service.
With all that laid out, let's get started to see how we can do authentication in our services.
|
|
|
show
|
1:06 |
So let's work with some services that require us to supply a username and password.
This type of authentication is often referred to as basic auth, or a basic authentication.
Now, you need to be very careful when using basic authentication, the reason is, it gets sent across to the server, if you look at the actual header, it looks like it might be encrypted or something, but in fact, all it is just the bytes basic c4 encoded, and there is no encryption there, you can just unencode it and it turns out it shows you username and password basically in plain text, so for that reason, you should only use basic auth over trusted connections, so ssl or your vpn maybe, or an intranet, vpn intranet those are kind of equivalent to the extent that hopefully, what I mean is a corporate vpn, a public vpn you are still sending this stuff around the internet, it's probably better, in fact, I am sure it's better than like sending it through your local coffee shop wi-fi but still, make sure that this is most of the time I would just say require this to be over ssl or something internal if you trust people on the network.
|
|
|
show
|
2:08 |
You've seen on our service here that we've had the basic unauthenticated http restful service, but you probably also noticed that we have a secured version, and that's a debatable measure, but let's say it requires authentication version, like this one is actually not going over ssl but again, it's not actually protecting any real data, right, but if I do click on it, it says oh you have to enter your username and password, and if I just say cancel, I get a basic auth username, password is required, if I try it again, you can see down here I could type kennedy and super_lockdown because we are all about security here, then it will actually let us in, okay.
So, we can see over here, this is postman, I've made a little request here that is going to go get the restricted blog data here, and it has no authentication setup right now, so I am going to hit send, and same thing, you must authenticate with the username and a password, so we come down here and we say basic auth and we can put the username and the password in, kennedy and super_lockdown and we can update the request, and save, and now, we get our data back, beautiful, right, and you can see these are the responses we got back from the server, and so on.
We can also go to the headers and see what we are going to send across so I could send this authorization and we could not use postman to generate this but we could just literally type in basic and then this, and this is the base 64 encoded version of username:password as a byte array, so as long as we send that across we get data back, we go to the body, if we don't send that across, and we take away authorization as well, none, right, nothing turn this back on, allow authorization to be sent, we're in, okay, so that is how basic authentication works, it just sends that string, which like I said, that is plain text, username and password so be super careful about that.
Alright, so we are going to see that we can do this both in Requests, and we can do this in the builtins, it's super easy in the request, it's super non obvious and not particularly easy in the builtins, but I'll show you how to do it for both.
|
|
|
show
|
2:24 |
So let's add the ability to access the restricted blog service with requests.
So you can see up here that I have updated the base url, I've actually moved this section of the url, up into the top so I tweaked the code just slightly, but you can see most importantly this is the restricted version, so if we come down here to this part where we get post, this should look familiar, I want to come over here and say we are looking for application json we are going to do a get just against that url, and let's see what we get here, so try a list, it says no, no 401 you must authenticate with basic auth, okay, so I am going to show you this in request and it is going to seem super easy, and then when we go look at this at the builtins, you are going to be like oh my gosh, why do they do it that way; so, remember we had our username is kennedy and the password was super_lockdown, alright, and then, all we have to do is come over here and say auth=(user, password) okay, and let's tell PyCharm that lockdown is actually a word, okay, let's run this again, and we'll try our list, boom, ta- da, it's working, of course, we can't delete anything so if I try to delete one, it says 401 you must authenticate, okay, so this is really all that is required, and maybe we would even move this somewhere else, just in case it changes, I could put this up here as global, I could write a function that is going to return it, something to that effect, but let me just copy this over, and we will put in the other one, so here when we are doing a post, again, we just say auth is this, when we are doing a put, we just say the auth is this, and last but not least, when we're doing a delete, we are going to say this, alright, let's try to list again, okay, that works, let's try to add one, we call this doomed post, I am going to try to delete it, okay so perfect, that woks, let's see yeah, doomed post, let's try to update it, I am just going to increment the count so number 2, same, same, view count 1999, try to list it, it was updated, now let's delete it, alright, which one is 2, goodbye 2, 2 is gone.
Okay, so authentication with requests, super easy, auth username:password, but remember, make sure this url is something that is going to keep your data safe, either something internal you trust, or something over ssl.
|
|
|
show
|
0:48 |
Now you've seen how to use requests to access restricted authorization requiring services, so what we have to pass is that authorization header with the basic value set to the basic c4 encoded version of username:password, but remember, it's not encrypted, it's just obscured, so how does this work, of course, everything more or less is the same, other than the authentication, so we import request, we come up with the url, we try to do a get against the service and we saw oh 401, not so amazing, 401 is you didn't log in, you are unauthorized, right, so we just go and set the auth as a tuple, username,password, and then ta- da, everything is 200 ok.
|
|
|
show
|
3:30 |
Now let's look at how we add authentication to the builtin version of the http library which is of course urllib.
So let's go over here and run this new version Python 3 and let's try to do a list again, unauthorized, not the best user experience, was it.
Ok, so I guess we should probably add some try except handling around all those things, but, we are just going to add the username and password for now.
You can see at the top we've got the username and password set here, and on request, we set this every time we created a request we would set the username and password, but this time, what we are going to do instead is we are going to register some global authentication for our app, so if you log in to this url, always use this username and this authentication scheme, okay, so we'll have a register auth, something like that, we are going to call that at the beginning, so what we are going to do is notice, up here, importing urllib.request and in urllib.request we can get a thing called a password_manager, notice, here we have a http password manager one with prior auth, one with default realm, all of those things okay, so we are going to use this one, we are going to create this thing, we are going to say password_manager.add_password, then it wants the realm, this is like the domain sort of thing so we'll say none and then we're going to give it the base url and then we just give it the user and the password, okay, and then we need to whenever we need to work with this, we are going to create a handler that is based on this, okay, so up here, let's have an authenticated handler, and we are going to set that here, we'll say urllib.request.http basic auth handler, and and it's going to take a password manager, okay, you can see this is totally obvious, right, like you wouldn't want to just pass this informational log, okay, and then we can build an opener, right, so we'll say opener=urllib.request.build_opener, I want to give it the authenticated handler, actually I don't think we need to store that globally, okay, and then we'll say urllib.requests.install opener, okay, so we have a password manager, we set the password and the url that we are going to authenticate for, so whenever it sees that url it's going to use that password, we want to create the authenticated handler for that password manager, create an authenticated opener and install this globally, so now, when we go and run this, let's see what happens, let's try to list it, oh, authenticated, now of course, just to show you that it had some effect, if we don't do this, you saw that 401 unauthorized, okay, so this is super non obvious, one of the benefits is you can register this globally, and then just forget about it, but I don't know, that's super clumsy to me but there you have it, so let's try to add another one, I'll call this Py3 builtin doomed post because we are going to ultimately delete it, and put some content, it has one view, great, listed again, there is number 2, it's going to update it, it's got a few more views, see authentication is totally working, finally, let's try to delete it, we want to delete number 2, and is number 2 gone- it's gone.
Well, there is a new number 2, how about that, alright, so that is authentication with the Python builtins.
|
|
|
show
|
1:03 |
Let's look at the concepts behind authenticated basic auth request with urllib, so again, we import urllib.request, this is the Python 3 version, we have our url, and what we did is globally, one time we ran this code, we said we want to set up a password manager, so an http password manager with default realm and then, we came along and added a password, no realm register the base url, and said kennedy and super_lockdown, those are the username and the password, and we created an http basic auth handler with that password manager, and then we created an opener based on that handler, and finally, we installed that opener, and then any time there was a request going to that url through urllib, it used this authenticated http basic auth handler that we had registered here.
We compose this and globally install it and it's done, so that is kind of nice, but, it seems like there should be a simpler way to do this huh?
|
|
|
show
|
1:35 |
If you are working with a Soap service, that has important business data and if you are working with Soap service you are probably doing something internal in an enterprise, chances are it's going to require a username and password, so I am going to show you now how to work with suds and add basic authentication to all of your Soap operations.
So we've seen that the way we get started with suds is we say suds.client and we import suds.cleint and we create a client class from that and we pass the wsdl and then we just start calling operations, like all posts, update posts, and whatnot, well, if we want to add authentication, we have to import suds.transport.http and then from there, we are going to create an http authenticated transport layer, and we are going to set the username and password on the layer, then all we got to do when we create the client in addition to passing the wsdl say transport= this new trends, thing that we've created, and all the subsequent operations will be using that username and password.
Remember you really kind of want to minimize the number of times you create this client because it dynamically downloads and parses the wsdl, so you don't want to do that every single time, right, you are going to probably do this once at the beginning, and reuse this client throughout your app, now, be aware if this was an https transport layer so if the service lived at an https end point, you'd want to import suds.transport.https, you want to create an https authenticated transport, things like that.
So be sure to make that adjustment based on the transport layer of secure versus insecure http, but add this little transport layer and everything works just like before.
|
|
|
|
35:30 |
|
|
show
|
5:09 |
Now we've made our way in the course to screen scraping.
And, the little subtitle I've added here is these are for the sites with missing services.
So, what is screen scraping- well, if there is an API, we've seen there is a specific endpoint url that we can call and things like json or xml or even soap data comes back.
But a lot of data is out there, the majority of data is out there with no API behind it, so imagine we want to learn about stuff on the Python.org homepage, now there is probably an rss feed or something where we can get this information, but let's assume it doesn't exist, let's assume only this web page contains the information that we need, and our goal is to know what the current versions of Python are available for download right here, you can see the two buttons, like in download Python 3.6.0 or I could download Python 2.7.13, so if we want to use screen scraping to get this, what we do is we actually just like before, issue an http get to that url, and what we get back is not some nice structured data but probably malformed, almost certainly malformed HTML, however, HTML does have a few things that we can do, notice that we have a paragraph, it has a class called download buttons, and in there, there is some hyperlinks with text inside like download Python 3.6.0, download Python 2.7.13 so we can feed that to an HTML parser which can deal with the malformed components of xml because it's not usually exact xHTML, it's usually even HTML 5 doesn't necessarily match this like say straight xml so you've got to do a little work to parse that, load it into a dom and then we can use this in our app, we can query this data, either by navigating the hierarchy or even using css, so I could easily write a css selector say .download buttons a and that would give me two elements that return back and those would be the two download links, and the links would contain actually the link to download as well as the texts which I could do some kind of work, some kind of string search to figure out what the details there are.
So that is how screen scraping works, that is the screen scraping workflow, so, it's surprisingly easy, surprisingly effective, however, there are some rules that you should keep in mind.
Basically, try not to rock the boat, be a good citizen, know the terms and conditions for the site.
Many of these sites have things saying basically you can't do like random screen scraping and consuming their data, it is their data after all, so there is what you can't do with screen scraping and there is what you can legally do with screen scraping and then there is what kind of what you should do, and so, be sure that you are on good terms, somebody wanted to work with my data, my transcript data, off of my website in a live fashion, not out of the github repo that I have, and they sent me messages and said hey Michael, do you mind if I screen scrape your source for some like data science analyses of the transcripts- no, not at all, I don't mind, and, I gave them permission to do it, and it's great, they will probably do something like what I am going to show you here.
But, consider asking and getting permission if it's not allowed or at least check the terms and conditions.
Also, be aware that your scraping code will break, if you get an email from a site that you've been doing screen scraping against, and they are like big news, we've redesigned our site, it's beautiful and you can just think okay, you just broke my code, because even what I was just describing before the fact that the thing that contains the buttons had the class download buttons and it was hyperlinks that were the actual things that we're after, if something about that changes, like they change that class or it will become actual buttons not hyperlinks, right, broken.
So, little changes to the layout will break your code, it's not usually to hard to fix, you want to isolate that stuff off one or two functions, but just be aware that these things need care and feeding because of this.
The resulting data that comes back is going to look somewhat nasty, if you look at the HTML a lot of times there will be extra line breaks, there will be new line characters interspersed in there, and so on, so you are going to have to do a little bit of work to take the values you pulled out and actually clean them up, especially the raw data in between like the download Python 3.6.0 text, that might come back really with lots of junk around it.
You are getting attributes and things maybe a little less so, because there is less flexibility there, finally, don't hammer the server, the sites are built to have users come and do a couple of requests a minute, and sort of cruise around, you could just pound this thing with a good cloud based server, trying to do screen scraping against it, so consider adding some sort of delay, some little time.sleep type thing to make it not so intense what you do to these guys, like just be considerate of their server resources and don't do effectively a denial service thing on there, so consider some sort of slow down, I adapted these notes, or these rules from Greg Reda's article which you can see at the bottom, which is a screen scraping 101 in Python, I thought he had some good rules, so this is sort of my adaptation of his, so thank you Greg.
|
|
|
show
|
1:59 |
So let's talk about some of our options that we can use for web scraping.
Certainly you don't want to just load the HTML and do this yourself, so one really nice combination is to use this library called Beautiful Soup and Beautiful Soup doesn't download the content, it just parses the text, you want to make sure request in there actually get the content, and we've seen how to do basic http get with requests, the whole way through this class so that is not a big deal; and we just hand off the HTML to Beautiful Soup and it lets us do things like search by css, and things like that we can also use Scrapy; Scrapy is really nice and there is a whole range of things you can do with Scrapy, so I definitely recommend that you check out Scrapy as well.
Originally I had chosen Beautiful Soup because for a while Scrapy didn't support Python 3, but now it fully supports Python 3, so that is a really great news, and I had started using Beautiful Soup previously, before Scrapy started working with Python3, but Scrapy has actually got some really interesting ways of working and you'll see that it can actually grow a little bit farther than just writing, just bringing this package into your code and writing it yourself.
Scrapy, the founders of Scrapy created this place called Scraping hub which is like web scraping as a service.
So there is all sorts of retry, cashing, staleness, infrastructure, things that you really got to do to do like large scale web scraping, so if that is your goal, check out scraping hub, they've got all of that setup for you, and you take the same code that you would write in Scrapy locally, drop it in here and it runs in their infrastructure.
So that is pretty sweet and I also did an entire episode on screen scraping with the founder of Scraping hub and the creator of Scrapy, Pablo Hoffman, so we talked about web scraping, some of the techniques, Scraping hub, some of the rules around this and so on, so if you are interested in going deeper on this topic, go ahead and check out talkpython.fm/50.
|
|
|
show
|
6:08 |
So let's put this into practice.
Let's pick a real world example of something that there is no API for, that you might want to go and get, and I am going to pick on my own website, so I don't mess with anyone else's.
Alright, so here is the deal, for each one of my episodes, here is the Talk Python To Me website podcast, each one of the episodes, some of the newer ones don't have them because I am a little behind on getting those produced, but let's just go down here to this one, this is a very popular episode, you should totally check this out if you haven't heard what John has to say; but notice, there is a full transcript section here, and I could even search for entrepreneur and you can see there is like five paragraphs here, right, so maybe I want this data, that is available right here, now technically, there is a github repo that has all the transcripts that you could just go get it's text files, but maybe for whatever reason let's just assume you want to get it, through here it's not available and here is the github link, let's assume it's not available directly on github, alright, we want to go and find these.
Now, each episode you can sort of see the structure up here, you could possibly come up with that, but we are going to do something more clever.
Now, because my site cares about showing up in search engines, yours probably would as well, I created a thing called the site map, and that looks kind of nasty, right, but if you look at the actual way it looks without formatting, this has a lot of things that I want the search engines to go find, so you can see I wanted to find like all these episodes that are listed here, if I go down to get past those, notice there is a whole transcript section, okay, so these are all the transcripts that I have created, and what we are going to do is we are actually going to grab this url download this xml and it will tell us everywhere in the site we got to go look to do, to sort of like pull this transcript data, so we are going to this in several parts, we are going to d straight xml against the site map and then once we get to these pages, this is HTML we are going to break into screen scraping mode, okay, so first of all, let's go over here, and w'll just create a new project, we'll say talk_Python_tx_scraper, something like that for the transcripts, right, let me just run it, we can get rid of that, let's go and run this so it's set up, you can see it's running Python 3 on our virtual environment, and I'll give it the site map url, this is what I had copied there.
Okay, so what we are going to do is we are going to download this, and in order to download we are going to use requests, and then we are going to parse the xml, so then let's go and define a main method, like this and at the bottom we'll go and call it.
Okay, so let's go over here and start this process, so what we are going to do is we are going to need to download this, and this should be old, and you should be totally comfortable by doing this by now, so we are going to do our get and we'll go ahead and just to be clear in case people's network are off or something, there is not 200, something is wrong, we'll print cannot get site map, and here we'll just do response.status code, response.text if there is any.
And of course, we'll bale, okay, so now that we have it, we can parse the xml into a DOM, so all we are going to need to do, is go ElementTree fromstring and we want to give it the response.text, and let's just take a moment to see that we got everything working okay so far, let's run this, it takes a moment, and boom, there is an element right here.
Now, notice this name space, if we go back and look at this, up here at the very top, this name space turns out to make our xpath queries kind of not so fun, and instead of we are trying to worry about whether we want to like set up a name spaces correctly, we want to keep this simple, we are just going to say response.text.replace, and it's going to drop that name space, I am going to put like nothing in here, okay, so now if we'd run it, we should just get, oh of course, if I actually parse the correct text, the updated text we should get something that is just the url set, okay, so back here again, the url set don't, in the xpath queries we don't say the name here, we just say the subsequent thing, so the path will be url/location, and so we should be able to really simply not print, but let's do this, let's say tx_URLs and we'll just do a list comprehension here, okay, so we want to say, we want to get a node, so we are going to say n.text, for n in dom and then find all and we are going to do I would like to find a url/location.
So url/loc and then we want to have it only in the case where the word transcript, let me go down the few of these, transcript appears, so let's say /episodes/transcript, so we'll say if n.text.find this is greater than 0 and let's print the tx URLs, okay, I am not convinced this is going to work, but let's give it a shot, look at that, there they all are, all in one enormous line, but if I click this, yeah, that is the transcript page, okay, so that was step one, we were able to actually leverage the site map which a lot of sites have to sort of shortcut a lot of really digging through the data and the HTML, all the stuff that is brittle, the site maps are way less brittle So, this gets us to where we actually have the URLs, and let's actually factor this in a better way, create a method out of this, I'll call this- it doesn't like it because it returned, let me just do this, I'll say get, tx_URLs=get_transcript_URLs, like so, and that is going to be here, and I'll say return nothing if we have an error, otherwise, we'll return tx_URLs, and let's change this, okay, so now we've finished this task of getting the transcript URLs, let me just run it one more time and make sure it's all hanging together, and it is, the next thing that we are going to need to do is parse each one of those, and get the transcript data out.
|
|
|
show
|
3:55 |
Okay, next up, we want to download the actual HTML from each one of these pages.
So, over here, I've created a function called download transcript pages, and I am going to pass the URLs in and I want to actually download the HTML for each one of those and do a little transformation on it.
Now to make that transformation nicer, I want to define two named tuples, I want to define a page and a paragraph, and the page is going to contain a list of paragraphs as well as the title and url, and the paragraph is going to contain the text of the paragraph and the seconds, the timing.
If we go and look over here, at one of these right here, you can't tell yet, but if you actually view the source of this, this is what our application is going to see, you can see that the timing here is on each one of these, the timing isn't super precise for this stuff, it's much better for the courses, but basically we have these classes that are transcript segments and each one of them has a time and some text we got to strip off from the beginning as well as some text, there is just the body of the paragraph, okay, so our goal would be to actually parse these out and turn this into like a list, so we have this text associated with this time and we can ask questions like hey what was said at this time, or if you want to know here this time is, we get to seek to that second in the audio and just start playing exactly what this is, okay, so that is going to be our goal, is to download this whole page or a whole bunch of these pages like a list of these pages, because we got them all from the site map, download these and parse them.
Now, I just ask when you do this, be kind, let's not just completely power over the server, it's not really going to kill it but let's just get, let's say the top 5.
Alright, so we are going to download the top 5 pages, this is 0 up to but not including index 5, and then we'll get them out, so just to keep it a little bit chill here.
Okay, you guys don't want to watch it download 75 pages and parse it anyway.
Okay, so let's go over here, we are going to do this download and we'll say for url in tx_URLs, we've got to download and parse that page, okay so let's say page=build_page_from_url, and give it the url, let's go ahead and add that function as well, and here then we'll just say pages.append(page), okay, so keep that nice and simple, let's change the order to read form high level to low level, so I'll put it like that, now, over here, we're going to say something totally normal, response=request.get url, right, and I guess we could put some sort of error handling, I am going to assume this works in a real app, you put your own error handling here, maybe we could check if this is none, we don't add it, something to that effect.
Alright, so let's assume this works, we'll say HTML=response.text, that's what we're going to get back, and then, we need to do a couple of things, we need to get the title and we need to get all of these pieces here, now let me just stat with regular expressions are not the answer, okay, they are definitely not the answer, so we want to do two things, we are going to find over here somewhere that there is an h1 I believe, there we go, so we have our h1, we have our sort of ems, our spaces, our new lines, our brs all that kind of stuff, but what we are going to do is we are going to get this h1 and that is going to be the title of our page, so that seems pretty straightforward, there is only one h1, if I look that's the only one right there, so we can just go after that one thing right, that is how you should design pages, they should have only one h1, but, how do we do that, how do we get started?
Well, this is why we are going to bring Beautiful Soup into action.
|
|
|
show
|
4:02 |
Okay, so to use Beautiful Soup, we are going to need to come up here, and say import bs4.
And, in order to get that to work, what we need is we need to have Beautiful Soup 4 and if we go over here to the bs, there is none, so we'll say pip install Beautiful Soup 4, now be careful, I think there is a Beautiful Soup that is not 4.
Okay, great, so now a little error over here went away, so now over here, actually we could even write it like this, let's say from bs4 import Beautiful Soup, that's the one class, like etree really that all we're going to do with that one, okay.
So down here, what we're going to do is we're going to parse it, so I'll say soup=beautiful soup and I'll give it the HTML, now, it's going to not love this as much as you might hope, let me out a little print here so we'll say print downloading, we'll say the url and we'll say flush=true to make sure this comes out straight away, so if I run this, you'll see it works and then error, not error, warning, warning, warning, and the warning is no parser what is explicitly specified, so you can do this HTML.parser, or let me just show you can use other ones as well so I could come over here and say I want to use the high performance lxml one here, so let's go update our requirements doc here, make sure we have this and beautiful soup 4, have those there, those are not misspelled, thank you, okay, so let's go back down here and pip install lxml, it's a nice high performance c based one, it takes a moment to install, if for some reason it doesn't install, like this might be tricky on Windows, just use what they specified over there which was HTML.parser I think, you'll see in the error message, okay that took a while actually, and this is a pretty fast computer, but, it's installed so now we have lxml and we have beautiful soup both installed, so if I run this one more time there should be no warnings.
Great, okay so we've downloaded these, none, none, none, none, none, apparently is what we returned from this method, five times, which by the way Python methods always have a return value, it's just none if you don't return anything explicit.
Okay, so now we have this, let's look for the title, let's give this a shot here, so we are going to say soup.find there is a few navigational traversal type things here, there is many finds, as you see, find parents, sibling, next, previous and we also have a select, okay, so let's do this, let's say find because find works on nodes basically, so I can say I want to find h1 and then I come over here and I can say get text, and let me just print the title, just to make sure something is going on here, boom, now look at that, that almost is what we wanted, it's so super close, look, we have this weird new line and whatnot, let me just add a quick function here that we can use to clean this stuff up, so let's go down here, put this at the bottom, so the problem is we have, when we say get text like that br is converted, and then all the white space around like the indentation, the HTML, we can get just exactly what is inside of that section, so if you look over here, this form here to there like that stays in, the br becomes a new line, but still, all that white space in tabs that's there, so what we got to do is have a little function that goes through and says okay, new lines, tabs, all those become just spaces, and then you might end up with a bunch of spaces, so we'll write a little loop to convert two spaces to one space until there is no more two spaces, and that urns out to be pretty much the trick we need, so let's go over here, and we'll say here is our title, instead of doing this we'll say clean text we'll give it that, let's try again, boom, just like we were hoping for, okay, so this is really nice, we're going to use this clean text over and over again, okay, so we're getting the titles, that's really cool, next, let's do something a little more advanced, let's go and get the paragraphs.
|
|
|
show
|
4:40 |
Okay, so that was pretty good, that we got the title out now, the next thing we want are the paragraphs, so we can go over here and we can go to soup, and instead of saying find we can say select, and what we can put in here is a css selector, css, once you get used to it, is a really fantastic way to navigate these pages, especially since we know this is the only time this class up here is on exactly the little data elements we want.
We just say .
(dot) means class and then this, and let's print, look at that, alright, so that looks like that worked, great.
Now we just need to do some transformations on them, okay, so we get these like a list of nodes back that we can work with here, but we don't want nodes, we want a paragraph and I am just going to copy this down here so we can see what it looks like, so what we're going for, is something that loads up into there, so instead of saying paragraphs this way, let's do another list comprehension, so we'll go like so, and we're going to generate, this is going to be the element, we want a paragraph and in here we have to pass the text and the seconds, so how do we get those?
Well, let's say for p in soup.select okay, well, we go to the paragraph and we say get text, like that, and let me just put the number one for now, so if we run this, what do we get back, something that looks pretty good actually, seconds, 111 but again, all this weird space, let's fix that, remember our clean text I am telling you, this stuff is super messy when it comes out of here, what do we get now, oh yeah, look at that, this is looking pretty good, there is a paragraph, and then there is another paragraph, yeah, this is what we're after, but notice, we want to get this number here, and that number is in the seconds, attribute.
So how do we get that?
Well, it's going to come off of p and the way we get it out is the attributes are just a dictionary, so that is going to give it to us as a string, and we wanted as an integer.
Okay, so let’s run this again, oh yeah, look at it rolling out, so you come over here, there is seconds zero, oops, there was seconds zero, the very beginnings don't always have times on them, text is this, here we go, this minute was two, which converts to 120 seconds, now in practice, I need to write a little bit of code that strips that segment off, because it's actually in the text, we could do a regular expression to say find me the numerical sort of time stamp looking thing, at the front and strip that off, we're not going to do that, right, I'll leave that up to you guys, but here, we have our paragraphs, we have our title, let's stop printing them, and instead, what we're supposed to do with this method, is we're supposed to build a thing called a page, a page has a url, copy this number for a sec, so the page has a url, a title and a paragraph.
So we'll just say return page, we have the URLs passed in the title we got early, and the paragraphs we just finished generating.
Okay, let's run it, downloading, downloading, downloading, and bam, there is our array of pages, here is the url, there is the title, and then there is all the paragraphs.
Pretty darn cool, huh, so we can use get text, we can access the attributes like this, we can do find for node discovery, we can do select for working with css selectors, notice there is also a select one so that if we know there is going to be one thing we're selecting by id for example then we can use select one and not have to like treat it as a list but get an element, which is cool; so finally, let's do a little bit of output here, let's just do go back up to this download pages, instead of this print, let me write a better method show pages, I'll pass in pages, create that and I'll just sort of print this out here, no sense in you guys watching me type that, so we are going to go through and say here is the pages, here is the url, it has this number of paragraphs, I am not going to show you the text because it's too much and then, we'll just show you what the text of the first paragraph is.
Alright, let's run that, download, download, download, parse, parse, parse, and ta- da, look at that rich data we have to work with, p.url, p.paragraphs, p.paragraphs.zero.text, just pure Python beauty, so here is the title, and here is the url, let's click and make sure it works, I am sure it looks like that is what we were after, doesn't it, and it has 238 paragraphs in that hour long conversation, and here is the first paragraph in the list.
So that is how you do screen scraping with Beautiful Soup and requests.
|
|
|
show
|
3:41 |
You've seen the screen scraping workflow, we issue a basic http get against the page that we're after, we get the raw HTML back and then we feed it to whatever screen scraping library we want, in this case we've chosen Beautiful Soup, what comes out the other side very much like working with an xml dom is a set of converted Python objects, we feed those Python objects to our app and out pops the real analyses that we're after, in this case, maybe we wanted to do transcript analyses, so let's see all the concepts in code.
First of all, if you have a site map that you can leverage, leverage it, it's super simple, well structured xml that tells you right where to look for so many things, so that's great, and in order to work with that, that's basic xml so of course, we go to ElementTree, and we are going to need to get it from the internet, so request, then we come up with the url, usually /sitemap.xml but I suppose it doesn't have to be that way, we'll do a basic get against it, and we'll grab the xml text, and then we just treat it like xml, like we always have, so ElementTree.fromstring now, if you try to write xpath queries, you are going to have to use name spaces and the name space syntax in the queries, and whatnot, and so, I decided you know what, forget those name spaces, we really don't, they serve like no purpose for us in this case, let's just throw them away, drop them off that route element and then, we can write non name spaced xpath queries, and then of course, we just set a basic list comprehension, a dom.findall url/location, and then we did a substring search, so find all the URLs that point to transcripts, give me their text, boom, those are the URLs that we can go download in a subsequent loop; next, we want to download and parse them, so we are going to use Beautiful Soup and we want to have somewhere structured to store them, so we're going to import collections, and create two named tuples, page which has url title and paragraphs and each paragraph is going to be a named tuple with text in seconds.
And then, we go through each url and we go download it, just like you would expect, and here we have like zero error handling we'll say .text and then we go to Beautiful Soup and we say create an instance of a Beautiful Soup dom based on this HTML text and here you can see we are passing lxml as the parser, remember, you have to install that so realize that that's a dependency that you are not directly importing but you are going to need if you have to run if you use it.
And, after we get it like this, we have our data, in a Beautiful Soup object we just need to extract it with find and select.
Okay, so how do we extract this data, well, we are going to go to the Soup dom and we want to say give me the node that is in h1, and give me the text, so that was cool, we got that back they gave us the title, it should be just one h1, and then we said I am going to do a select, so soup.select.transcript_segments, so that was the class name and .
means class in css, so select by that class, and then for each one of those, we are going to go through some jurations of conversion and cleanup and store it in a paragraph, so p.get text, and then clean that, you've seen how necessary that is, you'd want to apply that to the title as well, and then get the seconds out of the attributes and convert that to an integer here again we're assuming that is going to work.
And then list comprehension generates a list of paragraphs, so use the css selectors, and then we can create our page, which holds the url, the title and all of these well structured cleaned up paragraphs, and we're done.
Remember, clean line is pretty important, because, the way normally HTML disregards white space, but in Python, it regards it, right, it matters what comes out, so you want to basically apply that I don't care about how many spaces there are, if there is a hundred, or there is one, that's just one space, so this clean line more or less does that for you.
|
|
|
show
|
1:50 |
What is a user agent?
As fun as it is to think about like a James Bond type character, the user agent is basically just what your browser sends to the web server to say this is the type of browser I am, these are some of my capabilities, this is the platform I am running on OS 10, or Linux or Windows or IOS or whatever, okay, so this can actually result in you getting different content and it can also result in you getting blocked, so either of those might really matter to you, so I suppose I want to go to my site and I am going to do a request from over here in Chrome, so I'll do request and as part of that request, one of the headers that gets sent is the user agent, so I might say I'm Mozilla 5.0, Macintosh, Apple WebKit, Chrome, 56.
Chrome 56 is the latest version, right now.
So, it's telling you what version of Chrome, the fact that you're running on OS 10 or macOS, things like that, and maybe this website sees that and says okay, I love you, you are one of my users, here, let me give you some data.
The other way in which this could vary is it could say I am IOS so you are getting the mobile friendly version of HTML versus I am at desktop browser so you are getting the desktop version of the site, okay, so that very much might matter on what you get but either way I would say you are one of my users, here is some version of my site.
You can come over here and do a request just with requests, and what is going to send across is Python-request 2.13.0 and maybe the site is going to think, hm, this person is up to no good, I don't know if I want to give them anything, it could also be that they give us the wrong version of the page, we want to act possibly very much like a regular browser, so you may want to control your user agent and you'll see that it's super super easy to do but it's also very easy to overlook, so let's see how we go about that next.
|
|
|
show
|
3:13 |
Here is a website we can use, called whatsmyuseragent.com to actually check what it thinks and pretty much any other web server in the world is going to think we are when we talk to it.
So if we pull that up in Firefox, let me do a request to it, you can see it will say what is your user agent, your user agent is something like this, Mozilla 5, running on Macintosh, Intel running OS 10 Sierra and this version, 51 on Firefox, and here, isn't this cool, I even have a public ipv6 address these days I'm feeling so much like I'm in the future, okay so if we do a request, against that url, it's going to redirect it here, and it turns out that there is a special tag or id on that little section of where it says what our user agent is, so they can style it, hm, I wonder if we could get that back.
So over here, what we're going to do is we're going to do a request, and we're going to do a get, and we're going to use Beautiful Soup, and this time instead of using lxml just to show you you could do the other one, we'll use the built in parser, and then we want to go grab that user agent and get its text, and print it out, so we could do that, and our reported user agent is no surprise, Python-request 213.
In fact, I think we could do this as a select one and drop this zero, get the same effect.
Perfect, that's more like it.
Okay, so how do we control this, well, it's this step where we control what gets sent to the server, so we can do this with headers, because the user agent is just a header, so this is going to be a dictionary, and the value is going to be user- agent and then what we put in here is whatever we want, you want it to think we're exactly what we were with Firefox, fine, oh, there might be a small problem, if you don't pass it along.
Want to be like Firefox, boom we are, we could even have fun with them, so you know, we're Mozilla 7, we're OS 10 32 and we're even Firefox 54, just to show you like we can put whatever we want here, alright, maybe they think some super secret version of macOS is like being prototype down their site, who knows, but see, we're running Firefox 54, never mind the newest one is 51, we can tell it this and it gets sent right along, so there is a couple of uses for this, like I said, it could be that you might want to specifically get the desktop site or the mobile site and you can control whether you look mobile or you look desktopy by setting your user agent, you might also be getting blocked if you look like some kind of robot so you can look non robot like by doing this, yeah, there is a couple of reasons, you also might want to set it to be your own custom thing, so we don't want to do this, I'll save this for you, but maybe we want something else with user agent, maybe we want to say I am super user agent 007 version 0.1, right, maybe you want to pass information say this is actually this application and it's this version that we're working with so there might be a reason you want to pass that as well, so we could be sure user agent 007 version .1, whatever you want, right, there is a couple of reasons and the value you choose might depend on your thinking.
But, it can be important to control your user agent because it determines the HTML that you get.
|
|
|
show
|
0:53 |
Controlling your user agent, comes down to basically setting a simple header when you do the requests, so here we import requests and Beautiful Soup and we just happen to be targeting a website that we know echo back, what it believes our user agent is, but of course, this works for all sites, right, the server is going to see your user agent, it just might not tell what it thinks it is, so we can come over here, and what we're going to do, is we can actually set the header, User-Agent to a string of your choosing, right, it could be saying I'm on IOS, it could be saying I'm on Android, it could be saying I'm a special version of my app, whatever you put here, that is what it's going to get sent and the server can interpret that in a variety of ways as we discussed, then all we got to do is pass that along with the url as the headers when we do the request, and of course, what does the site see, it sees that our agent is Mozilla-7 whatever, Chrome 72 this time, that was fun.
|
|
|
|
3:14 |
|
|
show
|
3:14 |
You've done it, congratulations, you've made it to the end of the course, and you've learned a lot about services, in fact, let's dig into what you have learned; so, remember, we started by saying it's a services world, well, now, these services, these can be your services, you now know how to work with all of these services, and many more and if we want to add these to our application, remember, all you need to know is a lot of the stuff that we've covered in this course- requests, the http verbs, json, xml and so on, but because we've gone through this, we can actually look more carefully and deeper at these, so if we look at the github API, the github API is a proper http API you make request over http and you get json back, Twillio is actually a rest, restful API so you exchange json but you make use of the full spectrum of the http verbs put, post, delete and so on.
Slack again, http json, MailChimp is a very erstful service so again, working with the http verbs in a slightly richer way, Stripe, http and json, very nice, all of these you know and you can do them either with requests or even with the builtins if you are willing to do the funkiness that the builtins make you do.
We have Salesforce, which has an http json API but it also has a Soap API so for some reason if you really wanted to use it, you could, I would stick to the http API but you now, similar services, these enterprise, all legacy apps that are running within your business, if they are doing Soap, you now know how to get to them.
Send Grid http rest, Basecamp- very restful, we actually used this API as our example, when we started talking about a full restful API using the http verbs, not just playing http get and Json.
So, it is now your services world, go out there and build something amazing, using what you learned in this course, and if you do, come back and let us know here at talkPython training, we'll put it up in our student showcase at training.talkpython.fm/showcase.
All of the code that you saw me create on the screen during the course here, is available in github, at the beginning I said hey you should go get this repositories star it, fork it, download it, whatever, well, just one final statement, make sure you go here and at least star this maybe download it, maybe fork it, whatever you want, but, this is all complete, everything you've seen in the videos should be up there and available for you, right now.
Let me leave you with some wise words from our friend Yoda- Do or do not.
There is no try.
So it is time for you to do, really the way you learn programming, is to work through examples, to try things, to explore things, to make them yours, so I hope you've been following along and writing examples and trying out these APIs on your own, without looking too much at what I've been building and looking at the examples only if you get stuck.
If you haven't been doing that, here is one final recommendation, go back and look at the services that we've talked to and write an app that works with each one of them; get yourself some hand on experience and you will be much more comfortable working with these APIs over time.
Alright, that's it thank you so much for talking my course, I hope you enjoyed it, and I'll see you around, bye.
|