|
|
|
25:57 |
|
|
transcript
|
0:44 |
Hello and welcome to Data-Driven Web Apps in Flask! In this course, we're going to take the Flask web framework which is a Python-based web framework and we're going to build some amazing data-driven web applications with it. We're going to use Bootstrap, which is one of the most popular CSS front-end design frameworks to make the web app that we build in Python look great. Of course, almost all web applications access a database. At least the dynamic ones do! And we're going to use the most popular and powerful Python-based ORM called SQLAlchemy to write Python classes and map those to our database. So welcome, welcome, welcome to Data-Driven Web Apps in Flask! We're going to have a great time building some real-world applications and learning some real-world ways to put those into production.
|
|
|
transcript
|
1:35 |
Before we dig in to all the code that we're going to write and the technologies we're going to use and the types of things we can even build Let's take a moment and admire the incredible power of the web. The web is one of the most flexible and certainly most widely deployed and used technologies out there. Think about YouTube. YouTube is an amazing web application. It really has brought video sharing to the entire world. It also happens to be a Python based web app and it handles millions of requests per second. Think about Airbnb. With this web application and a unique sharing philosophy they've literally transformed the way people travel and stay in cities. Netflix uses their web app to re-define TV for many, many people. In fact this web app and their infrastructure account for 35% of all the bandwidth used in the United States in the evenings. That's pretty incredible. Hey, while we're at it let's throw one more in there. You're taking an amazing course and you're going to be learning all about building web apps. So here is another one, Talk Python Training. This site is of course built on Python and has taught a ton of people about Python. In fact many of the techniques in lessons learned in building this site along with some of the others I'm going to bring into this course. So it's not just about looking at what's out there and seeing some incredible web apps built. It's also about taking the pretty amazing web app that I've built and taking the lessons and techniques that I've learned and share those with you. Dou you have an idea? Something you want to build for everyone? Well the techniques and technologies you're about to learn will let you unleash this incredible power of the web and bring your idea to life.
|
|
|
transcript
|
3:16 |
In this course we're going to build what is called a full stack web app. Or at least sometimes it's referred to as that. So what is this full stack idea anyway? Let's talk real quickly about it. So we have a browser, we have the internet we have our server and our server's going to talk to a database. And this browser, it wants to talk to our web app. So magically a request comes in and finds its way through the internet to our server. Our server is going to do some work maybe ask some questions to the database and send a response back. What technologies do we need to know to make this happen? Well, over on the server side we're going to use Python to run our Flask application. We're going to write our code in Python, things like that. We're also going to write dynamic HTML templates in a Python extended version of HTML basically in something called Jinja, Jinja2 specifically. So we need to know this Jinga language we need to know the Flask web framework we've got to talk to a database. We could do that directly through the DB-API and raw SQL, and the raw MongoDB query language but that's really not the most efficient way to do it. So we're going to use SQLAlchemy to map classes over. So we're going to learn SQLAlchemy. We want to deploy our code somewhere on the internet that's the red thing right here in the picture after all. So we're going to put that onto Linux, onto Ubuntu. And there, we need to have something that's going to run our Python code, our Flask application and do all the web stuff like HTTP2 Static files, SSL and so on. So that latter part is Nginx the part that runs our code is uWSGI. So we're going to have all these things in play in the server and then when we talk to the database the database will probably be Postgres or MongoDB and of course it has its own query language like SQL, or the MongoDB query language. We're not really going to focus too much on that because we're going to use this class based ORM style with SQLAlchemy. But, in practice, you would need to know that. You'd also need to be able to migrate this database and evolve its schema as your application changes over time. So you need to know about database migrations and production and backups, and things like that. So that's all from the server side we're not quite done. We have a little more over here in the browser. We're going to send back HTML and we need to know HTML and CSS to make this look good. Probably some frontend framework or we're going to be doing a ton of work ourselves. So maybe Bootstrap or Semantic UI, or something like that. Possibly, at least sometimes in these full stack web apps we're doing a lot of Javascript maybe a front end Javascript framework like Vue.js. The gray out stuff we're not really going to cover too much so we're not going to really worry about that. And you'll see you can build really interesting applications without most of those. At least without very much Javascript or the front end frameworks. Although, often when people do talk about full stack that's kind of included in there. There's a ton of stuff we're going to learn here. This can be pretty daunting in the beginning. You're like, "Oh my gosh, all these things "and not only do I have to get better at Python "I also have to get better at CSS "and databases, in Linux. "I didn't even think I'd have to learn Linux for all this." Right? But, don't worry, by the time you get to the end of this course, you're going to have a really nice concise and tight example of putting all this stuff together. We're going to talk about each one of them separately and you're going to have a great app a great full stack web app, at the end of this course.
|
|
|
transcript
|
1:34 |
This is not an introduction to Python course we do assume a little bit of working knowledge. We assume that you have basic Python programming skills. I would say if you're what you might consider an advanced beginner you're totally good to take this course. We're going to use things like classes and decorators and functions and so on and we're not going to describe what a class is or what a function is or things like that. So, you'll need to have that as prerequisite knowledge. Make sure that you have some basic working knowledge of Python in order to take this course. If you don't, consider taking my Python Jumpstart by Building Ten Apps course that's all about learning Python. So here we assume that you know Python we also assume that you know a little bit of HTML. That if you can look at HTML at least make sense of it you know what say, an attribute is what a CSS class is, things like that, that would be good. We're not going to be doing too much advanced stuff with HTML in fact, I'm not rally sure there is such a thing as advanced HTML but we're not going to be doing too much with it. But of course since this is a web class we're going to be doing a lot with HTML and we do assume that you have working knowledge of standard markup. Finally, we're going to be using CSS and I'll talk a lot about what the selectors and classes and design mean especially when we get to the Bootstrap section in applying that to our website. So we're not going to assume that you know tons of CSS but we're also not starting from scratch there either. Basically, HTML, CSS and Python knowledge that's what we assume you're starting with and then we're going to build our Full Stack web app from there.
|
|
|
transcript
|
2:27 |
Let's highlight just some of the key technologies that you're going to learn as we go through this course. No surprise, we're going to focus mainly on Flask. So you're going to learn all about Flask some of it's main features as well as some of the things that you don't see too often in a lot of tutorials and other places, but I think are super, super important. Flask is great for serving up content but it doesn't help to make it pretty. So we're going to use Bootstrap to make a theme for our site that looks quite a bit better than what we just get out of the box with pure HTML. We're going to need a data backend and we're going to use a relational database for most of our site, and we're going to use SQLAlchemy to talk to that database. So, we're going to take it easy and make set up and whatnot easy on you and use SQLite which is built in to Python and then SQLAlchemy to talk to SQLite. But all you got to do is change the connection string to talk to something like Postgres. Many many sites run on relational databases but some don't, so we're also going to take all the code in a specially designed patterns that we build up throughout this course. We're going to convert our data access layer from SQLAlchemy over to MongoDB, using MongoEngine. Why are we doing this? Partly to offer up another alternative data backend. If you want to use MongoDB, I love it. It's a great database. You can use that. But more importantly even to highlight the real power some of these design patterns that are not specific to Flask but I'm going to bring in to the course things like view models and other certain abstractions that will let us do that switch with almost no effort. I mean we're talking minutes, maybe an hour if you are doing this from scratch right. A really really quick and easy and safe way to switch from a relational database to a non-relational database and I think you'll really appreciate the design patterns after that. Our editor of choice is going to be PyCharm so PyCharm is really great at both being a Python editor and web editor and we'll see that at work. And finally when we talk about deployment we're going to be using Ubuntu. So you're going to learn a little bit about Linux about uWSGI, about Nginx, how you deploy all this stuff on the cloud and we're going to put the web app that we build out there in the internet for everyone to see and enjoy, at least temporarily. Well this is just the highlights of what you're going to learn but I think these are all pretty awesome things to get good at.
|
|
|
transcript
|
5:16 |
Let's take just a moment and talk about what you can build with Python. Maybe you're having a debate with your engineering team about whether you should choose Python or ASP.NET or Java or Go or whatever, and I think it's really important to have comparisons. You can point out other amazing web apps out there that are probably doing way more traffic way more better performing and so on than what you're going to need that are also built in Python, and that gives you really great talking point for discussing what framework you should use and whether or not you should use Python. Of course, I think you should. It's amazing. But, let's talk about some things built with Python. The Onion. Maybe you're heard of The Onion. This is like a fake news comedy site. They make purposefully fake news that is hilarious. Really really love checking them out. They're quite funny to read. Built in Python. Spotify, their web app and some backend services. Built in Python. Pretty awesome, great music service there. NASA, they build so many amazing space things. They're working on sending people back to the moon which I think is pretty awesome, and they had a cool video showing all the technology and stuff that they're using, and they had one bit of code. Know what that code was? Yeah, that's right. Was Python. Bitly, the URL shortening service. You know bitly.com/whatever. So you can shorten these URLs, do a whole bunch of analytics and analysis and statistics around it? Built by Python, of course. Bit Bucket. Competitor to Get Hooked. They also do things like Jira and so on. So, Bit Bucket is a social control, collaboration and issue tracking site. Very very popular. You knew it. Python. Survey Monkey. Python. Quora, what I think is one of the best online Q&A forums for deep, usually deep and thoughtful answers. Really nice, love it, these guys are super passionate about their work with Python. Of course, the site's built with Python. But they do even more than that. They have an engineering BLOG where they talk about cool things they've done in trying to make their apps and their website run better, and tweaking Python and trying to understand it better. So that's super cool. Disqus, the little comments section you can embed at the end of your BLOG or the end of web pages. They've talked a lot about their use of Python and they're doing quite a bit of traffic. Python of course. Instagram, another super passionate set of users around Python. Their web app and services use Python and they handle a ton of traffic so they gave a great keynote at Pycon 2017 about migrating from Python 2 to Python 3, and Django. Onto the latest version of Django doing some really cool tricks. They've done some unusual things, like they've disabled garbage collection, and just recycle their worker processes every 12 hours or something to actually get pretty significant improvements in memory usage and performance. They do a bunch of cool stuff with Python and they actually BLOG a lot about it as well which is great. Reddit, the front page of the Internet, as some say. Built on Python and SQLAlchemy. It's interesting they use a SQLAlchemy core which we'll talk a little bit about as well as Python for their site. YouTube, I already discussed them earlier. They handle millions of requests per second. Built on Python. Pretty great. The brand new freshly relaunched pypi.org Python package index site? Built with Python, of course, but they handle an incredible amount of traffic, and really interesting piece of infrastructure. Built with Python. Pinterest. Python. Paypal. Paypal does a lot with Python. They have some internal services microservice type things that work together and there's one built in Python that's super interesting. It's like this pricing exchange service, and a whole bunch of other parts of the site, and the apps and stuff all need to talk to each other, talk to the service to figure out what is the fractional rate I'm going to charge for this thing or that, and so on. And that service gets several billion requests per day with either millisecond or sub millisecond response time written in Python. Pretty awesome. Drop Box. Huge users of Python. The creator of Python, Guido van Rossum, works there as well as some other core developers. They have over a million lines of Python code, actually. The little client side app that you get is even Python which is quite unusual, as well as a lot of their backend services, so a very big center of the universe at Python. And they just talked about converting all their code over to Python 3, using mypy as well which is a pretty interesting engineering story. So of course, Drop Box is all in on Python, and us. You bet that we're all in on Python as well. All of our infrastructure and whatnot is built in Python and has been so super successful so we're very very happy, big advocates of Python web app because they've worked out so well for us. Now let's use a little Python to actually tell you more about this. So if you want to read more about any of these except for my site, I guess. It's not listed there. But all the other uses we're talking about here you can go to bitly/pyapp-25 and it'll take you to this article that highlights not just all of these users of Python but it exactly how they're using it. That's good company to be in, I would say.
|
|
|
transcript
|
6:04 |
Let's quickly lay out the topics that we're going to cover and add just a little bit of background to each one of them. So after this chapter, we're going to quickly talk about how to set up your machine, make sure you have the right version of Python, the right editor and also all the starter source code or data that you might need to get going. Then we're going to talk about the Flask web framework itself compared to some of the other frameworks like Django, Pyramid, Bottle and so on, where does it fit in that world and what are some of the core elements or building blocks of it. We're going to go and create our first Flask site. Now, we're going to build a pretty involved and very cool app as we get through this course. But let's not start there, let's just create the hello world equivalent of a Flask site and see what all the moving parts are, and then build out something more interesting. We're going to focus on some of the techniques and language features of Jinja templates. The idea with Flask is we're going to code maybe to a database or a service or something like that, pull back some data and we want to render that to HTML. But you don't do that all on Python. Most of the HTML is fixed. You maybe just want to take a list and repeat little elements of it as HTML fragments or conditionally show or hide things like if you're logged in or not logged in. So we're going to talk about the Jinja template language and how that fits in the Flask. One of the first things that happen in these MVC, Model-View-Controller frameworks like Flask is that a URL request will come in both the verb and the URL is going to come in and it's up to this thing called routing to figure out what function is going to handle that request, what Python function. So we're going to figure out how to use routing to map URLs to our view methods. Flask doesn't do anything for making our site look good, it just delivers whatever HTML we write. So we don't want to have to write all of it. We're going to talk about some of the cool frontend frameworks, Bootstrap as well as a couple of others that we could use to make our site look better. And we will use some Bootstrap to make out site look good. Almost all the interesting web applications talk to some kind of data backend, and we're going to talk to our relational database. So we're going to focus on using SQLAlchemy and its ORM to map Python classes to the database. So we're going to see how to define those classes, how to set up the connections, and really do all the queries and inserts and updates, everything you need to do to work with SQLAlchemy. SQLAlchemy is great for creating the initial database structure. I have a packages and class, and I talk to SQLAlchemy and then create packages table in database. But it will not migrate it, it will not change it over time, and if those things become out of sync, your database class and your database schema, and the app will crash and freak out and say whoa, whoa, I can't work with this, this database is incompatible with my understanding of what it should be. So in order to evolve our database, our database schema, as things grow and change in our application, we need to use something called migrations. So we're going to use something called Alembic, which is paired with SQLAlchemy to very nicely and in many ways automatically evolve our database schema to stay in line with our application code. Web apps that show data, well they're fun, but it's way better if you can accept user input, let people search, let them interact with things and so on, create accounts, register, what not. So we're going to talk about HTML forms and how we let users submit data back to our Flask application. We're also going to see that the internet is a dangerous place. People will send us invalid data, either by mistake or maliciously. So we're going to look at a design pattern called view models that abstract the way or isolate a way the validation for all data coming into the server, as well as the data exchange with the template. It's going to be really, really nice. And on the client side, we're going to look at some HTML file features that will, with almost no effort, provide really great validation for at least the browsers. We want to make sure that our web app is working and stays working. So we're going to write some unit tests, we're going to use pytest and some special infrastructure that is baked right into Flask to help us write testable code. You'll see that testing web applications can be tricky. We already talked about it, interacting with the database. But it also does things like interact with the Flask web framework itself. It expects a request to come in properly structured and so on. So we're going to talk about how we can either fake out some of those things or use a special testing infrastructure from Flask to make sure that we can write our tests in isolation the way they're meant to work. Once we get out app all working and we want to put it online, so we're going to deploy this to a Linux cloud virtual machine using Nginx, uWSGI and Ubuntu. You'll see that not whole lot to it and it's really platform to run our web app on. And finally, we're going to talk about converting our web app to MongoDB. As we talked about before, this is interesting because MongoDB is a great choice for database backend and it has some really great similarities to the SQLAlchemy, so it will be quite similar, but it also will show you the true power of some of our various design patterns that we're going to implement, and sometimes we're going to call services, our view models, and things like that. And we're going to be able to completely swap out the entire database style, not just implementation but even relational versus NoSQL or non-relational databases with just changing a couple of files. So it's going to be really great. It's going to be a great sort of way or grounded style and appreciate what we built. Also I'll show you how flexible our data access layer will have become by this point. Well, that's it. This is what we're going to cover. I think this is a great set of topics. Once you get through all of these, you're going to know pretty much everything that you need to know to write real true production data-driven web apps. It's going to be a lot of fun. I hope you're excited. I'm definitely excited to get started on this with you.
|
|
|
transcript
|
0:51 |
Now before we move on to the rest of the course let me just take a quick moment and introduce myself. I'm Michael Kennedy, I'm the author of this course. You might know me from the Talk Python To Me podcast. I founded that and host that as well or maybe even the Python Bytes podcast. I'm also the founder of Talk Python Training. On those podcasts, I've actually interviewed some of the people behind Flask so I've interviewed Armin Ronacher the creator of much of the Flask stack and I've also interviewed David Lord who is the current maintainer and key driving force behind Flask these days. So we'll talk more about that as we get into the course but I'm going to bring some of this experience that I've got from the podcast and creating the training site and bring it into this course and hopefully really put something cool together for you. Hope you enjoy it I'm certainly looking forward to teaching it to you.
|
|
|
transcript
|
2:05 |
Before we get into all the details of Flask let's talk just a little bit about the overall web application that we're going to build. Some courses might build a bunch of little sites but what we're going to do is going to build a proper large, comprehensive application in Flask. And I think the one that we have picked out here is going to be so much fun. It really matches a lot of the web apps that you might need or want to build. So, let's go dig into that and see what it is that we're going to build. I'll take you on a quick tour. Now, if you've worked with Python for anytime this is probably a familiar site to you. You've seen something like this, right? This is where you can go and find all the amazing packages in Python. You want to work with Flask? You get Flask from the Python package index. And down here, you can see there's some popular ones like Gevent or Boto3 or the AWS Command Line Interface. We open this up and we have all sorts of details, right? So, what we want to do is build an application a lot like this, right? Here, we've got our project history. We've got the license. We've got the various maintainers if there are any homepage, all the description, and so on. However, let's zoom back just a little bit. Yes, do you see the URL up here? In fact, this is the application we're going to build. We're going to build a replica of pypi.org. Alright, let's pull this up here. There we go. Maybe the zoom is not quite the same but it's generally the same here. If you go and pull up one of these down here like this one, you can see again, one is zoomed a little more than the other but other than that, these are real similar. So, what we're going to do is we're going to create PyPI the website. Now, of course, it's going to be not all the infrastructure just the main website that shows you things like this allows you to login and register find the various packages and list the popular ones here and things like that. It's got all the elements of most major web applications. It's not super complicated, but it's not a toy app either. I'm really excited to build this with you and I think it's going to be so much fun and I think you'll get a lot out of it to have this as a working example at the end of this course.
|
|
|
transcript
|
2:05 |
Welcome to your course. I want to take just a quick moment to take you on a tour of the video player and all of its features so that you get the most out of this entire course and all the courses you take with us. So you'll start at your course page, of course, and you can see that it grays out and collapses the work that you've already done. So let's go to the next video here. It opens up this separate player and you can see it as standard video player stuff. You can pause or play. You can actually skip back a few seconds or skip forward a few more. you can jump to the next or previous lecture, things like that. It shows you which chapter and which lecture topic you're learning right now. And it has other cool stuff like take me to the course page, show me the full transcript dialogue for this lecture. Take me to the GitHub repo where the source code for this course lives and even do full text search. And when we have transcripts, that's searching every spoken word in the entire video, not just titles and descriptions and things like that. We also have some social media stuff up there as well. For those of you who have a hard time hearing or don't speak English as your first language, we have subtitles from the transcripts. So if you turn on subtitles right here, you'll be able to follow along as the words are spoken on the screen. I know that can be a big help to some of you. Just because this is a web app doesn't mean you can't use your keyboard. You want to pause and play? Use your spacebar to toggle that. You want to skip ahead or backwards? Left arrow, right arrow. Next lecture, shift left, shift right. Want to toggle subtitles? Just hit S. And if you're wondering what all the hotkeys are, you can click this little thing right here. It'll bring up a dialogue with all the hotkey options. Finally, you may be watching this on a tablet or even a phone, hopefully a big phone, but you might be watching this on some sort of touchscreen device. If that's true, you're probably holding it with your thumb. So you can click right here to seek back 10 seconds, right there to seek ahead 30, and of course, click in the middle to toggle play or pause. Now on iOS, because the way iOS works, they don't let you auto start playing videos. So you may have to click right in the middle here to start each lecture on iOS. That's the player. Now go enjoy that course.
|
|
|
|
5:40 |
|
|
transcript
|
2:40 |
Now we're almost ready to start writing some code and talking about this framework. But before we do, let's just make sure everyone's on a level playing field there's a couple things I want to share with you a couple things I want to give you and I also want to make sure you have what you need to take this course. So the first thing I'm going to start with is what version of Python do you need? Well, of course, we're on modern Python that in my mind I guess is probably like Python 3.5 and above. But you're actually going to need Python 3.6 'cause I believe we use some f-strings. f-strings are a new way to format strings in Python which are great. Also it has async/await which came in 3.5 but I believe some of the features that were added are also required a little bit later. So let's just say 3.6 or later maybe even 3.7. Newer is better. You have to have Python installed and it has to be Python 3.5 at an absolute minimum. Could be higher still. You may wonder, "Well, that's great Michael I really want to have Python installed. But do I on this particular machine?" I don't know. Well, you can always ask you can go to you're terminal in macOS or Linux and type Python3 -V and it'll tell you one or two things. Either the version number or you know Python3 not found. If Python3 not found that means it's either not installed or just not in your path. But here you can see I got Python 3.7.2 That's almost the latest just the day I started pressing record here 3.7.3 came out pretty much same. On Windows, Python3 -V sometimes works and you can get 3.7.2. Depending on how you've installed Python you might have to type just Python -V without the 3 and see what you get. And especially on Windows because you until recently could not target the version by the executable name you have to make sure your path is just right. So you can type where Python on Windows I think in which Python on Mac and Linux. If that's wrong you can switch it. It's either which or where to show you where it's come from. And if there's more, it'll show you which is in the path and where you know which one comes first in the path and so on. So if you have a new enough version of Python. Super! Let's rock and roll. If you don't refer you over to realPython.com/installing-Python these guys have a really nice set of steps on given this OS; here's how you get Python there here's the trade offs and so on. And they're keeping it nice and up to date. So instead of showing you how to install and maybe you know, six months or some other way like Windows 10 now just offered Python 3.7 in the store. Which is a better way than maybe get it on Python.org for example. So you can check out what they've got here. This is pretty helpful. And of course you know, get modern Python all set up if you don't have it and let's roll.
|
|
|
transcript
|
0:58 |
Now we could use whatever editor we want but I am a big fan of PyCharm. I think PyCharm strikes a really nice balance of not being too heavyweight it's somewhat heavyweight but it's really not that bad with absolutely supporting proper web applications. So not only does it understand CSS and JavaScript and HTML it knows Python really well and it understands the relationships between your CSS files, your static files your Python files that you're working with that has nice refactoring, all sorts of stuff. So we're going to be using PyCharm. You can get the Community edition which will do most of what you need here. It'll basically do everything except for give you any form of support for the Jinja2 stuff or the CSS editing, all right? But you could still create those files and edit them. I'm pretty sure. But with the free Community edition it won't do autocomplete within them. So we're going to use PyCharm Professional. You can follow along with that or use something else if you prefer but here's how you can get the same editor that we're using.
|
|
|
transcript
|
0:36 |
To get the most out of this course you should go and get the source code. Everything you see me type during this course and other stuff that I put in there for you will be included in this Github repository. So if you want to try out the code that we wrote in Chapter Five before we changed it for Chapter Six that's going to be there. So head on over to github.com/talkPython/data-driven-web-apps-with-flask and star and fork this. Star it so you have quick access to it and fork it so you have it forever. We want to make sure you have all the code and all the data you need to work on our demo app.
|
|
|
transcript
|
1:26 |
Think back when you were younger. Much younger and you had cool stuff like these Legos. And it was so fun to have all the Legos all the little parts and cool things you could put together. Wasn't it more fun to build something? This course is just the same. You can have all the code and you can poke around with it and play with it. I'm going to teach you a bunch of little stuff. But it is much better to build something awesome along the way. We've set up this course for you to follow along. The way you do that is each chapter, maybe not the very first one but all the meaningful chapters that have code that we write will have a beginning and ending version of the code. So let's just take chapter five for example not sure what that topic's going to be yet how it's going to fall out but whatever we did in chapter five there's going to be something called starter and that's going to be the code that we started from in chapter five. Probably that was the finished version of chapter 4 but not always. So there's going to be something we start with and then there's going to be final code. So anytime you want to follow along you go take the copy of whatever chapter you're at and you want to go from there grab that code and you can write the new code that we're working on. Or just, you know, check out what we built in the end. Of course, if you want to take it to another level go and try to create a project that's similar but not the same and follow along over there. But in case you were trying to follow along with the app we're building, which is a good idea and you get lost, just grab the starter code from any particular chapter where you kind of want to resume from. All right, that's it. You should be all set up and ready to take this course.
|
|
|
|
15:41 |
|
|
transcript
|
2:38 |
Now it's time to dig into Flask. And let's just think a little bit about choosing a web framework and where Flask might live on this spectrum of frameworks. In my mind, there's two ends going on here. On one end, we have what are called microframeworks. Microframeworks let you choose exactly the set of libraries and packages you want to use and put them together as you like, without the framework imposing how that works. So over here, I would put Flask here what kind of data access layer do you want? Well, Flask doesn't care doesn't come with one and it doesn't impose any structure there. Maybe you want to go get SQLAlchemy maybe you want to get MongoDBs through MongoEngine or maybe you want to do something entirely different, right? Flask doesn't have an opinion or any implementation along those lines. The other end of the spectrum doesn't have a great term like microframeworks. But what I'm calling these are building-block frameworks. And these are things like Django. With Django, you can create a website create a project and you say Oh, I would like a whole back end where I can just edit the database fields kind of like Excel type of thing. That's like a line in the configuration file boom, that's turned on. I want forums or something like this I want to plug these big building block pieces together. That's really productive and great if that's what you want. But if you don't like the way Django does database access well, sorry, Django does it that way, it's very opinionated. Not to say you can't work your way around it or do something different but you're always going against the grain, right? So Django helps you by giving you a bunch of steps and opinions, here's how you do it, here's the libraries, go which is sometimes okay and great. But if you are the type of person that likes to pick just this library, and just that library and put things together the way you like well, microframeworks are probably better for you. Now Flask is not the most micro of the microframeworks. We have things like Bottle that live way out there that do very, very little at all. And then we have Pyramid which is maybe a little bit towards Django a little bit less microframework but still well in this microframework side of the world. So here's how Flask fits together with all of the others. And I think Flask is a great choice. I'm personally a big fan of the microframework style. Makes me happy to be over on the left side of this graph generally speaking, but I know Django is also very popular. And speaking of popularity Flask and Django are almost identical at the time of this recording with Flask actually growing in popularity relative to Django. So I guess the world is about split 50/50 on which side of this graph they want to live on.
|
|
|
transcript
|
3:31 |
Before we actually start writing some code let's do a quick high-level flyover of Flask and talk about the building blocks of Flask. You're probably itching to write some code, and so am I we're going to do that really, really soon. But I just want to do a quick high-level flyover so you know of all the moving parts and you kind of see what's coming and what's going to fit together and how. So let's talk quickly about those. First of all, we need to talk about routes. These are URL patterns that are going to match incoming requests. They could be things like just forward slash to map over to the main home page they could be /books/7 that'll say show me the book with ID 7, things like that. But we're going to set up these patterns and these patterns are going to be defined as routes in Flask and have little placeholders where part of the URL could be data, pass to our functions that's going to figure out what to do with it like that 7 in my book example. Next the routes are going to figure out which method to run. What part of the code runs for our given URL? So we're going to define these things called view methods and this is where we're going to do the main logic of our application we're going to process the request maybe talk to the database, call a web service maybe, you know, look at the cookies, who knows. But we're going to take the inbound request and do some processing on it and decide what kind of response to send them and things like that. Now, Flask and many other frameworks would be what you might call a Model-View-Controller, MVC, framework so in that pattern terminology these view methods would be called controllers. Once we have some data, maybe we want to turn it to HTML. Well, we're not going to do that in Python that would be a horrible idea. So we want to write mostly HTML files but there's some dynamic nature. Maybe I have a list of books and I want to show them to the user. How am I going to generate that list part? Well, there's template languages like Jinja2, Chameleon and others that we can pass model data to which will look at that, loop over and generate true HTML that goes to the browser. So we're going to work with templates that generate dynamic HTML, and in the MVC world these are views. And finally we have models. This is the data passed from the view method over to the template. In Flask, this often looks just like keyword arguments to the rendered template function as we'll see in a little bit. We might also pass a dictionary when we get to some more advanced patterns further in the course. But the model is sort of all the data that's passed from the view to the template. We also have great support for static content. This is really good and important for development it's kind of irrelevant for production. In production we would use some other non-Python-backed production-level server like Nginx or something like that and that will completely take care of the static content. But, when we get started and we start developing we're going to have static content that's part of our world here and Flask has some nice defaults for that. We also have configuration. Maybe we want to develop with one set of settings, right maybe using SQLite in some local little test database and then maybe we, in production want to use a Postgres server, or something like that. So maybe something like our database connection stream is going to change maybe something like how much logging we do is going to change. We also can have a test mode which will make it run in still a different way. Maybe we don't have a database at all in test mode we going to mock that out, right? So we have these different configuration settings and this can be open-ended and easily extendable. So these are the major building blocks of Flask.
|
|
|
transcript
|
3:00 |
Here's a view method and we're actually going to start by getting a hold of this thing called an app. It's almost always named an app you can name it whatever you want it. It's a variable, but we're going to create an instance of our Flask app like this and this is a singleton so it gets pretty interesting sharing this across files and we'll talk about some cool patterns for doing that. We get this single instance of an app and we're going to go and write a view method and put a decorator on there. So we going to add the app.route decorator. This is going to be a route, talk more about that in a second but notice it defines a category and the category's actually passed in but if there's no data from the route this is just a void method. There's no parameter's or anything like that. We're going to write this function that accepts any arguments from the route, and nothing else really and then in here we're going to do all of our logic. We're going to look at the URL, what this method represents the logged in user, things like that and make a decision. Here we're doing something very simple. We're just saying, there's not a lot to show we're just going to render out the category static HTML and we need to pass one thing to it and the name of the thing we're being passed is called key and the value of it is just value something like that, okay. So, somewhere in the category template it's going to look at that potentially and, you know, show that somehow in the HTML and we're just going to return that back to Flask and then we'll render that as a response to the user. So here we're going to take these values and pass them over to this template called category dot HTML. Now that was cute, but not very realistic. Let's take something a little more realistic here. So we're going to say, here is the method that receives the post request for registering with account. So that means that there's an HTML page there's a whole bunch of details like what's your name, what's your email and so on and there's a button that says register. When they click it, it's going to run this. So there's more stuff happening here. So we're going to come in and first collect all of the data that's been submitted to us from Flask. Here we're saying, go to the form and get the email value and the password value, but there could be other data some from the URL, some from cookies, all sorts of stuff. Want to collect the data and then we're going to do some sort of validation. We're going to check and see if we can create a user based on that and maybe we can because there's already an email used right, there's already an account existing or something like that. If there is none and there's no ability to create this account that's probably some kind of error. So we're going to return a render template. The same template, probably given before and say There's an error, can't create your account for reasons x, y and z," but if that worked then we're going to do something else like we're going to show them a message that says Welcome to our community, or more likely we'll redirect them over to their account page, or some other view. Right, so this is more like what it looks like. Right, we've got a function we get the data from forms or other locations do some processing, and then we either handle the error or we handle the proper happy path.
|
|
|
transcript
|
1:16 |
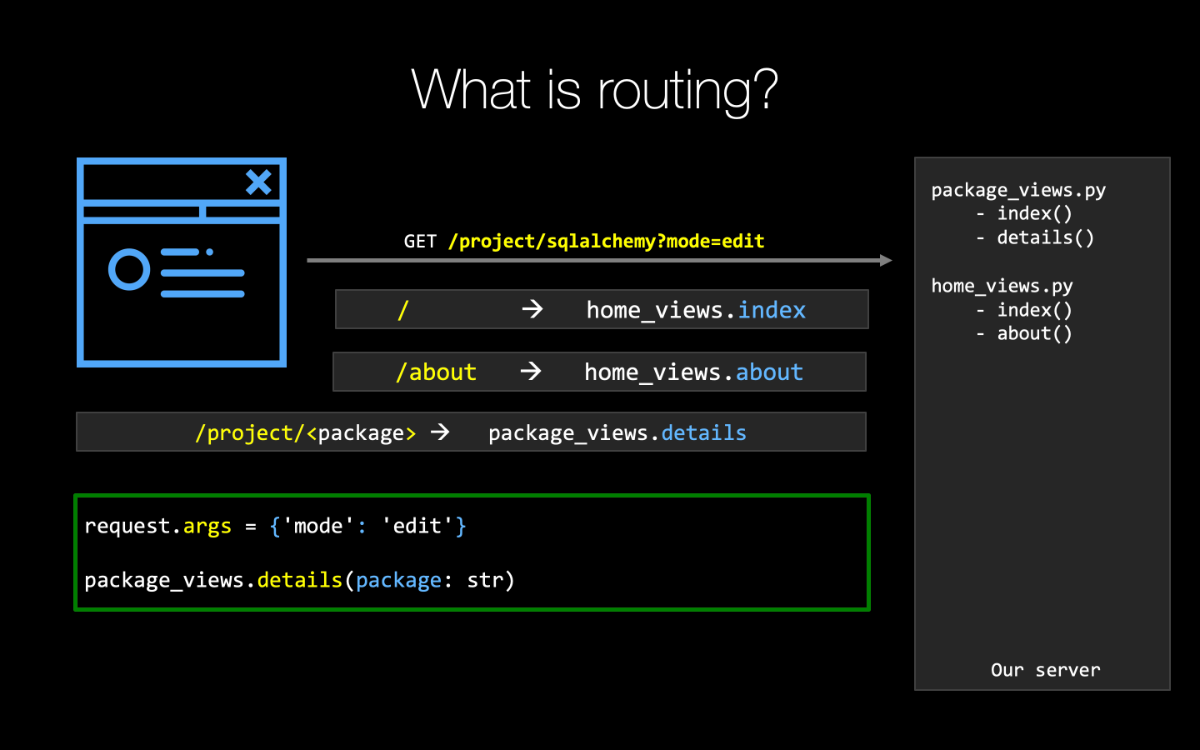
The next core building block is route. Now, conceptually, maybe this should go first but I wanted to show you what the view method looked like because routes go on them. So here we have a route, and it has a URL pattern. We've got /project, that part is fixed. It's always going to be the same in the URL. The part that comes after that, that's actually defining what we want to pull from the database. So like, /project/boto or /project/sqlalchemy That last part, the package name is actually going to be passed in as a string to our details function here. And then we're going to do some processing with that. Of course, you know, go to the database maybe tell them there's a 404 if they try to get a package that literally doesn't exist. Otherwise we're just going to show them the details. So for routes, we use app.route as a decorator with a unique URL pattern, an optional HTTP verb. Here we don't see one but previously in that register example, we said it only accepts post not get requests so only the form submission not the original request. And then some route data like URL packaging. If we want to serve up static files, we don't have to define a route for that, just /static will automatically be used by Flask but of course you can go customize that as well.
|
|
|
transcript
|
1:49 |
Here's another view method. It's going to return the popular packages. This is going to be the most popular packages on PyPI and we're going to have the name and the summary for each one and the URL for each one, and we'll have a list of those. And our template, popular.html, is going to need that list with all those details to generate dynamically some kind of unordered list or whatever it is. So what we're going to do is we're going to come up with this data. Here, we're just kind of hacking it in. But in reality, popular would probably be a query from the database with an order by number of downloads this month or something kind of complicated like that. So we'll somehow, usually database or other API we're going to get the most popular packages and we need to provide that to the template. So here, we say render template, give the template name and then we have keyword arguments packages and then our list here. So in the template, it's going to be a variable to find packages, and it's going to have this value here. And we can pass as many of these as we want or could even have a dictionary unpack it or like I said at the beginning of this chapter there's actually some cool patterns where we would just return a dictionary itself. So this is the model that flows from the view methods over to the template. So here, we're going to pass these by keyword arguments and we can also pass methods or functions. That's pretty cool, because sometimes you want to have a little helper function that convert this to an integer or give me a default value or get the name of this, unless it's not there then just return none, or something to this effect. There's some cool little helper functions that we might want to pass along and if they're in this code or we have access to them in this code, we could actually say helper function a equals just the name of the function and that's also available to our template. This could be data or behavior we need to pass along to our view.
|
|
|
transcript
|
2:28 |
Final building block is templates. And templates are like HTML with a little bit of Python sprinkled in. So here's what you'd call a Jinja2 template and the idea is given a list of packages maybe the popular ones, who knows we want to loop over and create a bunch of little HTML divs and each one of those divs is going to contain a hyperlink, a summary and things like that, if there is a summary. So let's unpack some of these little features here. Here we have conditionals and loops and so on in these {% things. So we say {% for p in packages %} Remember packages has probably passed over as part of the model, something iterable here with an ID and a summary. We define a little looping variable p and all the HTML in there gets repeated. So if there were three packages that div would appear three times in the final HTML. Notice the bottom here, we have this {% end for %} So whenever you open one of these like for p in packages, we have to close it. We also have if summary, end if. Personally, it drives me crazy that this is how its done but this is how it's done. If we want to take a value and convert it to text we would just put it in {{ }}. So here, the id is actually a string which is the package name, like SQLAlchemy or something like that. SQLAlchemy, MongoEngine, Flask, whatever. I want to show that as the link text. I basically want the text of the name of the project to be shown, and I also want to link to it like /project, /flask. So we can do {{ }} both inside the attributes for the URL and inside of the tag to just show the text. We also can have conditionals. Here we can have if there is a summary we're going to show a span. But if for some reason this particular project doesn't have a summary, just omit that whole block of HTML altogether. When you're finally rendered it looks potentially something like this depending on the data we pass in. So here's the request, that's the name p.id as well as the extended URL's going to be /project/request. And that summary is HTTP4, and the next one is Boto3 AWS API is the summary, and so on. Now this is entirely un-styled but we're going to be doing all sorts of cool stuff to make this look much better as we go. We won't spend a lot of time working on templates but I think you'll pick them up pretty quickly. They're basically HTML with a little bit of Python sprinkled on top of them.
|
|
|
transcript
|
0:59 |
Finally, you might want to get the back story. You probably have heard of my podcast, Talk Python To Me. Well, over there, I interviewed David Lord. And David Lord is the person in charge of Flask these days. He helped it go 1.0, he's overseen many of the building blocks of Flask things like Click and Werkzeug and things like that. So, if you want to hear his story around Flask and the update for where it's been and where it's going check out Episode 177 to Talk Python To Me that's talkpython.fm/177 And similarly, if you want to get the back story on SQLAlchemy which we haven't spoken much about yet, but we're going to that's going to be our data access layer I also interviewed Mike Bayer long long ago you can see back in 2015 I interviewed him and you can check that out at talkpython.fm/5 So, if you're the type of person that really likes to hear the personal side of these technologies and the history and so on check these out, they'll help a lot.
|
|
|
|
20:14 |
|
|
transcript
|
2:57 |
I don't know how you feel but I think it is high time that we write some code. I'm itching to work on this PyPI project and get a super cool web application build in Flask and I'm sure that you are as well. Before we get to write in our PyPI app we're going to build just a really simple one off project and we're going to do this in two ways we're going to use the CLI, Command Line Interface just terminal so on and we're also going to use PyCharm. The terminal part is a little bit more complicated only a little, has a few more steps. We're going to do that first so that you can appreciate all the stuff that PyCharm is doing for us and I actually personally prefer to just do things on the command line these days but I do remember when I started I preferred having the help that PyCharm provided. Okay, so, how do we get started? Well we're going to create and activate a virtual environment. It's really important that our development environment and our production and even test environment stage environment, all the different servers and places that we run this web app is as close to the same as possible and in Python, a really good way to do that is to create a virtual environment so you can precisely control what packages and what versions of those packages are installed. So we always start with this create a virtual environment. Want to create the folder structure. Now, a lot of tutorials with Flask say Oh Flask is so easy, all these other ones are complicated. What you do is you create an app.py you type these few lines in there and boom, you've got a Flask website. No, you don't. You've got a silly little tutorial. A real Flask website is like other real websites. You have hundreds of files, mini static files all sorts of stuff going on and you need the proper structure to maintain that. So there's a couple of cool design patterns we're going to bring into place and that's going to drive our folder structure which I'll show you in just a little bit. If you want to see what the Flask folks recommend you can follow that link at the bottom. Mine is different. I like mine better, you can decide which one you like best and just follow that, okay? We spoke about the virtual environment and the requirements the best way in Python to do that is to have some kind of requirements file that we can run. pip install -r requirements.txt is very very common actually like to have two requirements files. We'll talk about what those are and how they fit together but you could be using something like Pipenv or Poetry that actually uses the pip lock file. It doesn't really matter but something that encodes endev version control, these are the packages and the versions of packages that we depend upon that lets us bootstrap our virtual environment. Once we have our little tiny bit of app.py written that's going to create a route and a view in someone we can serve it up and add features and then just iterate and you'll see with Flask you don't even have to restart the server necessarily. It'll detect changes to the Python files or the template files and automatically restart the process. So that's really cool, you can just keep working in really nice fluid style. Sometimes this falls apart if our app, you know, has like bad syntax it might crash and not refresh correctly so then you got to restart it. But generally we can just keep working on our site adding features, fixing bugs. It's a nice fluid style.
|
|
|
transcript
|
5:55 |
Now we're going to both use PyCharm as well as just the command line interface to create our first little demo site. Let's get started by choosing the command line interface. With this way you're going to see all the little steps every single thing that you got to do. With PyCharm, you might check a few boxes and push some buttons, and things that you'll see here will happen behind the scenes. So, this might take a few more steps but it's also going to show you exactly what's going on. So, here we are on my computer. And we're over in the GitHub repository for this course. What we're going to do, is we're going to go into ch04_first_site. The first three chapters had no code. It's time to rectify that for the rest of the course by the way. So, we're going to start at chapter four. And we have first_site final, and starter. Remember, when I talked about following along I'm going to show you, or provide you the code that we start with and end with for each chapter. Well right now, the starting code is basically non-existent but in the future, maybe we've already set up the database in SQLAlchemy and now we want to add some kind of form input or something. We don't want to rebuild the site from scratch so we're going to kind of have these save points along the way and we're going to work over here in final. Now the first thing that we want to do let's go into there, just copy that. See it's empty. So what we need to do, is we're going to go and create a virtual environment, that was our first step. Or what I could do is I could type Python3 -m venv venv That will create it. And then I could activate it. And of course, pip and setuptools are always out of date so we could then go and upgrade those. But what you'll see me do throughout this class is I have a little alias that I've defined, that does those three steps. All right, so I'm just going to run that here. And we can see the prompt changed and if we ask which Python it is now, this one right here. By the way, sometimes people ask me how I get this shell and this little git status tracking and so on. This is Oh My Zsh or Oh My Zshell. Check that out, that's very cool. I definitely do recommend it, but it's not required. Okay, so now we have this, the next thing to do is to go and make our folder structure. So we've got our app right here. Let's suppose that this directory that we're working in actually, we'll just make a directory called first_site or something like that. I want to go into first_site, and in here we're going to have things like templates and a static folder and those are kind of standard. We're also going to have something called views and this is where we're going to put all the view methods. And we're also going to have something called viewmodels. So, this is a design pattern that I really like that I have adapted to the web. And I think it is super, super powerful. We have a whole chapter on it later. Let's just make the structure for it now. And make another one for data, so where our data models go. And then finally, let's not throw everything just into the root of that static folder. You're going to have a lot of static files so let's make a static js, a css and an img. You can make them short, long names, javascript, or js whatever, it doesn't really matter. So now if we look here, we have all the stuff and we upload of it, we have our virtual environment. If we look down here, you can ask for a tree and we can ignore the rich environment we don't want to see that. Here's what it looks like. We have our first_site, we have data we have our structured static file here. We've templates, view models, and views. The other thing that we need to do is we need to have our app.py and probably a good idea to have our requirements.txt I also like to have the -dev. The reason is, I want to put stuff for like, testing, continuous integration other helpful tools for me in here that don't get installed on the server, but, you know I always install this one when I'm working on it and then this is like the production line and the bottom one imports the top one. Okay, so now everything's up and ready to go. We're going to need to edit our app.py. And just so we don't talk to PyCharm yet let's just open us up Visual Studio Code. And we just have to do a few things. We're going to have flask, we're going to define an app from flask, we'll say flask.Flask. I'm going to pass that dunder name in there and then we're going to have a method. That's going to be our view method. So I have an app.route. So we'll just have a quick index method here takes no parameters and it's going to return hello world. And the simplest thing to do is say app.run. There's better things to do in practice but that's what we got. Okay, so we should be able to run this assuming that we've edited or somehow installed our requirements. We'll work on that in a moment. Let's just pip install flask. Now here we are with our app. We can just say Python app.py. Looks like we have our flask app running. Notice it's running in production. We'll talk about how to alter that as we get into a real app. But for now let's just see what we got going on here. Well look at that, hello world. Make it more impressive, I'll zoom it. There you go, hello world. That's our app. So we've got our basic structure here. Our tree that we can look at so we've got our first_site and all that code here. The reason I put this in a sub-directory is we ultimately may want to install this as a package. It makes some of the testing and other things slightly easier when we do that. Slightly easier for her to parts without worring about partial relative paths and things like that. So, that allows us to put the setup.py and other stuff outside of the site itself, that's typically how that goes. So, here's our code. We've got our static section our templates, our view models, our views. Haven't done too much of that yet but this is the general structure we're going to use to get started. We'll put flask in here, maybe pytest in there and whatnot as we go. But this is our first_site, and this is how you do it on the command line.
|
|
|
transcript
|
3:00 |
All right, quickly let's review some of these command line, getting started concepts. So we're going to get started by creating the virtual environment, right there. Python3 -m venv venv, that's kind of a convention for the folder name. Don't forget to activate it. On macOS and Linux you do dot and then you have bin/activate on Windows. Omit the dot and then you have scripts/activate. If we have to update pip and setuptools they're almost always out of date that's always a bummer. So then our virtual environment's ready to go. We're also going to need Flask in order to write our code. So pip install flask going to put that in our requirements file in a little bit. So now we've got our project all ready to run some theoretical Flask app but we don't have one yet so we're going to create some structure and then we're going to write the code. So here, we're going to create a mega site like a megasite.com or something. Use your imagination of what that might be. We're going to create the directory that's going to contain all the content. We're also going to create the tests here I didn't do that in my demo. It's nice to have tests, we'll do that later in a whole dedicated chapter. And in Flask, those typically go as a sibling in the directory there for the main site content and the tests. And then we go into the site folder and we create templates, views, viewmodels and the static, gives the statics and structure create data folder as well. Create an app.py requirements, txt and dev. And then we're ready to go. Here's the structure, very, very similar to what you saw me create before except for now we have also tests. And of course we're going to have the requirements file. This allows us to exactly recreate the environment on other dev machines, and in the cloud or on our server wherever that happens to live. So we'll have our requirements that our app actually uses this is what the production server needs to run. Flask, SQLAlchemy, and passlib theoretically in this example. And then stuff that maybe the developer needs. So Pytest, Pytest-coverage, and webtest. And then we can also include the -r option here -r requirements.txt. So all the production stuff plus these three developer libraries. I really like this pattern and I'm going to use this throughout the course. I use this in a lot of my things. This is a nice way to organize your requirements. In reality, we'd be pinning these versions like Flask 1.0, whatever it is right now. In the course, in the examples I don't want to pin the versions because you'll be taking it later and what I pick here will be out of date. That's a nice practice to follow here. And finally, we created a code here. So we imported Flask, created a simple Hello World function that returns the string Hello World give it the route / and then run the website. That's it, then we just have Python run our app. Just Python app.py, and ta-da! Hello World, your website is up and running in the browser. You can zoom it to have a bigger effect if you like here. A very, very simple site but it's not just the app.py to get started like some people talk about it's the proper structure that we're going to need to grow into as our site itself grows.
|
|
|
transcript
|
3:47 |
So you saw all the steps on how to create a Flask app on the command line, and it took, I don't know something like three minutes, or whatever. Let's see what we can do with Pycharm. So we're going to go and choose Pycharm this time. The latest edition is 2019.1. We're going to say new and we could do pure Python, but we're going to pick Flask. Right we're going to put somewhere I'll say megasite that's com/mega its kind of the way we did it before. So you'll notice it will just automatically create a new virtual environment for us based on Python 3 with a similar name and we've also picked some more settings like Jinja2 as opposed to Mako or whatever and then the templates folder. So all this, we just check those off, we hit go. See, create a virtual environment. It's installing Flask. Its written the app.py, almost the same you want to be the same, change that to index and up here we've got our structure. Now this is just the structure inside of that working directory so I'm not a super big fan of the way that it focus' it but this is what Pycharm does, so off we go and I guess, just to be fair we're going to go and create a few new directories like viewmodels, up here hit command n and we can have views. Here, I think we've got that and the other one would be to have a requirements.txt and here we have Flask. I'll have a requirement-dev, didn't do this before but we'll put -r requirement and let's just say pytest for now. That's not actually something we're going to be using at the moment but there it is. So here's our app, it's ready to go. Its created all the structure and everything we need to do and we had to add on that little bit of extra structure. I guess we still need to do the js and the css and so on here. Here we go, now we're good. Now if we want to run it, we just click this little go button and boom, off it goes. And we click here. Hello world! Again, what a theme. So down here you can see its done a little bit more it set some environment variables the Flask app is app.py and the environment is development and debugging seems to be off right now. So we can go and configure those but right now its using environment variables and a run configuration. There's a couple ways to do that. We're going to see another way that we can do that in code as well. So here you can see we have our development mode we can check off debug if we want to have it running debug mode here we go, we have debuggers active. Super, that means if we make changes, like here and save them, its going to detect that and auto reload. All right so that's how you get started in Pycharm. You basically fill out that new Flask app and go and you get basically the same structure. Of course, if you want to mix and match that's what I do actually, you can go do all the work on the command line interface and then open up the project in Pycharm and continue to work from there. So that's probably what we'll do for the rest of the course. I'll just go over this Pycharm style. I think this really helps a lot when you're new. As you get more experienced with it you want to tweak things just a little bit and it'll be a little more comfortable to use the command line interface. I remember when I was new, I really appreciated all the help that Pycharm gave me, like it did here. As I got better, and got more experienced I kind of wanted to go my own way just a little bit so moved over towards the command line side of things. Anyway, here you go. Here's how you do it in Pycharm. Remember, this actually takes Pycharm Pro. There's a free Community Edition. One of the big omissions from that to help encourage you to pay for it, I guess is the whole side of the web world.
|
|
|
transcript
|
1:25 |
We saw it was super fast and easy to create a new project a Flask app in PyCharm. Most of the time it was just me talking. I think if I just typed it would be like 10 seconds or something ridiculous like that. But none the less, let's review the steps really really quickly. Here we have PyCharm. It loads like this if there is no project loaded. Otherwise, you will have to go to the file menu or something like that. We're going to go over here and hit create new project. It defaults to pure Python but you want Flask, and then remember the steps. We're going to install Flask and other dependencies create the directory structure, and what not. So, right here. New virtual environment, that's checked by default. More settings, Jinja, and a templates folder checked by default. So we're going to install Flask create the virtual environment and it also creates the app.py all at once. Boom, this is what we get. Now you saw we probably want to add a little more structure to the directory layout here. But you can do that along the way as you add your first CSS file as you add your first view model and what not. Here we are, quick and easy, just like that. Then if we want to run it we're just going to click this little button here. It's going to fire it up. Set a couple of environment variables. Flask app is app.py. The environment is development. And you saw if we want to edit that run configuration we can toggle the debug true or false. Off it goes, click the link in the bottom here and ta-da! You now have your Flask app all put together laid out and running using PyCharm, super easy!
|
|
|
transcript
|
3:10 |
In this short little section I want to give you a glimpse into the future of what our app is going to look like. And I've talked a couple of times already in this course about structuring your application as a real app, not just some silly single file app.py or something like that. All right that's just not realistic for real apps with many dependencies, JavaScript files, CSS, etc, etc. So lets look at how I'm going to structure this project. You're welcome to do it this way it's worked really well for a long time for me. You can do it some other way if you want. But at least maybe it will inspire you, okay? So take my ideas and adapt them to the way you like. So here is the final project the one that you saw in the opening chapter. And we've got our Top Level Directory. This one is the project route, but not the web route. Then we have Alembic, this is for our database migrations to help evolve our database schema to match our SQLAlchemy schema, that's automatic. Then we next have our web site content the implementation and the route and all that. Here's some stuff for installing, which we get by installing this as a package, like a local install. Here's some settings to set up the server here's a bunch of unit tests, to test our code. Here's our virtual environment and here's our requirements and our set up file and also some Alembic settings that's the migration stuff as well. Then looking at the website we have a bunch of stuff in here that's pretty good. We've got a bin folder, that's just a bunch of little utilities to pre-load some data and do some reports and whatnot. We have data, that's going to hold all of our models, our SQLAlchemy models. We'll talk about how to define them but these represent our database tables basically. Here we're actually storing our database locally you might not do that in a real one, but for SQLite we will. Bunch of little helper, infrastructure bits like cookie authentication and request dictionaries and some decorators to help us write simple review methods. Then these services, these are not web services but just services to our app these are our database, query abstractions and stuff like that. So here's all the database queries for, say, packages and here's all the ones having to do with the users. Static files, CSS, and so on. We don't have any JavaScript in this app imagine that, a web app, 2019 with no JavaScript. We actually don't need it, but you can add some if you want, it would go in here. We have our templates and our templates are grouped by the views. So we have our views like account, and cms and home. And then we have our views, our Jinja templates for those. So very important to group those in a clean way. And then our data exchange models what data comes from the user and what data is passed to the template and what validation do we have like you have account home, and logon and register view models in there. We'll talk about what those are when we get to them. But then finally, we have our views. These are the decorated functions that run when a request comes in. That's kind of the top level bit there. Then we have our app.py, this is the start up code and registration and database configuration. All that kind of stuff. This is where we're going. A lot of this might not make any sense yet and that's totally fine, we're going to spend a whole chapter on that and we're going to spend a whole chapter on that, and so on. Also, here for example. So we're going to build this up but I want to give you a glimpse of what is this going to look like when its done. What did this project structure for a real Flask app look like? Well, here's my example.
|
|
|
|
44:11 |
|
|
transcript
|
1:24 |
It's time to dig in to the HTML side of this whole web course. We're going to focus on templates and HTML and taking data and turning that into HTML. As well as some patterns that make that very much nicer than maybe the most straightforward way. So, we're going to focus on templates and these common views that share the layout and the overall look and feel across our site. Let's start with templates. So, this is just a standalone example it's not from our PyPI project that we're working on. So, just to keep everything isolated. And the goal is, if we're given a dictionary a list of dictionaries like this. So this is some form of data could have got it from the database we could've gotten it from the web service hey, it can even come from a JSON file, who knows. But we have this data we want to loop over those three items and we want to show a picture and we want to show the category. This is from like a bike example, like a bike store and we have different categories of bikes each category has a picture of it encourages people to click on it. And we're going to render this into some kind of responsive grid or set of divs or something to that effect. It's going to look like this and have little picture and the title. Picture and the title, presumably they're going to be hyperlinks something to that effect. We might not replicate this exactly 'cause we don't want to go too much into the design but this is kind of what we're aiming for, okay? So we're going to see how we do that in Jinja
|
|
|
transcript
|
2:30 |
So let's take this data and put it into a Jinja template and make dynamic HTML out of it. So, here's one little code snippet, not all the HTML. Obviously, there's not the HTML on the head and the body and like, that kind of stuff but just to focus on the essence of it, if you will. So, we have two situations. One where we're given that data but there's no categories; it's like an empty list or something like that. You know, we did a database query and like "Hey, it's not set up," or whatever. So, we want to just show on this page there's no categories. But if there are, we want to loop over them and add a div with two hyperlinks one for the image and one for the name. So, a couple of things should jump out at you right away. Any time we have some kind of conditional or command or loop or something like that involving Python we say, {% we insert some Python and we say, %} to close it off. So, if not categories so we want to show this div at the top that says, no categories, only if there's no categories. And we don't just have the opening block we also have an ending block. So, if you say, if something, you have to say, end if. Notice at the bottom we have for something, and for. So you got to open and close these both with little percent block indicators at the front and the end of the statement but also at the end of the block. So, we have our, if statement, on the one hand we could also do an else if we really wanted but that's okay. We're just going to go with two if's effectively the same. Then we're going to do a for loop. So, we're just going to have {% for c in categories %} that's standard Python. And this is going to define a local variable c. And in here we have some HTML blocks that gets repeated for each c for each little category in for thing there. And we're going to have two hyperlinks and we want to have the hyperlinks contain the name of category. So, like /category/comfort /category/downhill/, or whatever. Then we're also going to have the image. So, we just say {{ or sometimes those are called mustaches or handlebars but call it what you like. {{ and then we say c and we can apply further Python. So it's c.name, pulls out that value of the dictionary and then .lower, lowercases that string just to make sure that the URL is kind of normalized there. Then c.image will get the URL and we want to show the name also in the bottom one without being lowercase so we just say c.name. Pretty straightforward, right? This is, honestly, most of what you need to know to work with Jinja outside of additional just the standard HTML stuff that you're going to be doing.
|
|
|
transcript
|
3:42 |
Before we can jump into our template example we have to do one thing really quick. We don't have a PyPI demo site yet so we're going to actually create that now and then we can add templates and Dynamic HTML to it. So kind of a review from when we talked about creating our first site but we haven't actually done this formally for this project. So let's just take two minutes and do that. So over here in the Jinja template we're going to create a final thing, we have started from scratch so this one has no starter. But when we go over here and we're going to first create our virtual environment. See the command that's actually running at the top but just Python 3 create a virtual environment and activate it. And then we have this here, just, remember what we did we wanted to have the overall part that manages this thing. So we might have like a requirements.txt also had a dev for one of those. We might have setup and readme's and all those kind of things. And then we're going to have a pypi_org or then this is going to be our actual web content. And here we'll have things like the static folder. The views. Templates, most importantly for this one. We had other stuff, but we're not going to add that yet. And let's go ahead and add the app.py here as well. So if we go back we can now open this in PyCharm. And the quickest and easiest way to do this on mac OS is to go to the directory that contains the virtual environment and dragging and dropping that onto PyCharm. On Windows and on Linux you have to go up here and say file, open, directory. But hey we get a little shortcut, that's cool. So here we can see we've got our templates folder that's already kind of detected. We've got our app let's go ahead and add our requirement of Flask. Make sure we've detected the virtual environment so let that go as I've actually get to it. Here you can see, and we can say which Python. On Windows say where, and you see that's actually the one were looking for. So we can install Flask. IP list is empty, install Flask. If we look, all the Flask stuff is here. Okay great. And that's because PyCharm automatically detected the requirements file and so on. So we'll import Flask, this is super quick because you've done this before. We'll say app = flask.Flask(__name__) like so. And then we'll say @app.route /index return hello world. And here we can just say app.run but lets be little bit better about it, we'll say do the main example. So if __name__ == '__main__' and we'll say app.run. We're going to add a whole bunch more good stuff to the startup here. Little cleanup, let's just run this and make sure that everything runs. Also, let's mark that as a sources route so these are all relative to each other. I pressed a bug, didn't mean to but whatever it also works so it says we're running production because we're not setting a couple of settings which we can do. Let go and run it. Hello world. Looking good huh? All right. So we can mould our app and say, debug=true for now. Of course you want to put that in a configuration. We rerun it. You'll see now, the debugger's on which is nice 'cause if we make a change, it automatically detects and reloads this, so. All right so we're in good shape, we're not quite done but we're making progress for getting our app up and running. Now, we're going to actually start working with data and using these templates to generate Dynamic HTML using Jinja 2 and our models and all that good stuff.
|
|
|
transcript
|
8:10 |
Let's start using our first dynamic HTML Jinja2 template. And we're just going to do that quickly here in PyCharm. Now, these Jinja templates, they're basically HTML with a little bit of Python Jinja syntax sprinkled in. So, we're going to start by defining the homepage for our PyPI site. Now, it's going to have no styling it's not going to look good, that's okay we'll get to that. Let's go over here and we're just going to say new HTML file. And I can just say new file and start typing but this will help with some of the boilerplate stuff. So, I really like to call these the same as their view method here. So, view method index is going to have the template index, that HTML. As we organize our site better later on we're going to have sub directories that have more to do with the name, as well. But for now, let's just go with this. So, you see we get this Doctype HTML written for us here this will go in Python package index and I'll put demo 'cause it's just a knock off this is of course not the real site. And here we can just put h1 hello world, woo hoo. Now, let's go back and teach this thing there's a view here to not return text but rather to use that template. I'm going to go over here, I'm going to do a multi step thing here. We're going to start out by doing the manual explicit way and then I'm going to show you we can a decorator that's really nice and it's going to do a little bit better for us here. Okay, so what we're going to do is we have Flask imported at the top up here and we can go to Flask and say flask.render_template and then we have to give it a template name and the template name is relative including directories to this. So, we don't say templates we just say index.html. Notice that right there. Hold up, what just happened? So, PyCharm is saying, hey we know about the templates folder that's why it's purple PyCharm detected that it's supposed to be a Flask template folder. And now it's trying to help us and flask.render_template figured that out. I think that's pretty killer. And then also, right here we can now jump to that. So really, really nice integration here but that's not so much the point although it is to be appreciated. Let's go click on this, see what we get. Hello, world! Now, that kind of looks like before but if we view page source this is the HTML edition. Let's change it. Let's go here and this will just be Python package index, like so. And then down here I'll put in h2 packages and then a to do show packages. We refresh it, ah there we go. It feels like we're right back in nineteen ninety four these terrible looking websites. We're going to work on the design in a moment. But let's just focus on the templating for now. Okay, so what do we do for this? Well, remember we talked about the model view controller? This part is the controller bit often referred to as view methods as I've been calling it. And this is the view or the template that we want to give it to. The other part that we haven't seen in action just yet here, is the model. So, what we're going to do is we're going to pass in things by key value here. So, packages will be test packages or something like that. Where did we get that? Well, you just type it out and this could be package one two and three. And notice the hot key little highlighter here so I use hot keys a lot but it'll show you what those were so you know what's happening. So, down here we could just take our packages remember the keyword is going to be the name that we refer to in our template and this going to be the value, whatever that is. Shall we use packages over here? And let's just say insert in a little br here, boom. And then to show the item, we're going to do just like that, double curly brackets. If we refresh this, look at that. Package one, package two, package three. Lovely, right? Okay so, that's kind of cool. That's just doing the string representation of packages. That's not really what we want to show but notice that's also not very rich data. Maybe the package has a name and a version so let's upgrade this a little bit. Also, when you just hack it in here know you would get it from the database. Now, we don't have a database yet but let's just simulate by having a function called get_latest_packages. That we can call and it's going to return a list and each list element is going to have a name and it's going to be let's say flask and a version, let's say 1.2.3. Like so and then we'll have another one this will be a sqlalchemy. So 2.2.0. And let's throw in another favorite of mine passlib, we'll see that appear later. This is going to be 3.0.0. Now PyCharm says these are misspelled and they are not, so you can tell it please don't do that. Then down here we can go and just get the test packages and say get the latest. You could even in line it here but I'm not a big fan of that you can if you want. Now, when we saved it down here it reloaded again and detected the change there so we don't actually have to rerun it. Unless we mess up the syntax and then it crashes, then you got to rerun it. So, let's see what we get here. Different data, same display. We're just showing the string representation. So, the last thing we want to do here is we're going to go over here and do this little to do thing, but let's do a loop. So, we'll say go back %% { like so. So, what we're going to do is we're going to loop over each of the packages. So, let's say for p in packages and then remember every time you have a start you got to do an end. for and then let's just put p like this try it again. That's closer. Right, notice it looked different. If you actually view the source it's on multiple lines there. Right, like so. Doesn't look great but that's all right. We're going to make it better. Let's put that into a div, like so. So, we want a span that has a class title. There's a cool little trick we can do here so if we say . in CSS . means CSS class so watch this, if I hit tab it expands out into a span with the class set to title. And for to this, we can set this to be p.name and then let's just have another span and let's give it a class of version, like so. p.version. Cool, now let's see how that looks. Ooh, looks nice in here, right? Close this off. Boom, looks like we have a stray ( running around somewhere, that one right there. Cool, so we have our Flask showing here we can even style this up a little bit it wouldn't really do this, put it in here but we're going to do it for just a moment. Title. We're going to say something like font weight is bold. Like that. There you go, and you see our nice packages listed right here. So, this is our first pass at working with these Jinja templates. So, we do our %, our % Python statement so a for then close the for then in here we just put standard HTML blocks so like a div containing a span which has classes and so on. Get the string out like this we could do like string operations or other Python operations on it like this. You could also do that in CSS but just to show you can call Python functions on the Python objects. Like, on a datetime, you can get an iso version or other interesting things like this. So, really really nice here. We could clean it up I guess a tiny bit like so. Yeah, so this is it. This is our basic Jinja2 template to render our data and just 'cause it came from this fake function, don't get fooled. It could come from a database or somewhere else and it would be treated exactly the same. So, let's do this. There we go. There, there's a pretty real version. We won't talk about what that ... has under it.
|
|
|
transcript
|
1:42 |
Let's review this Jinja template HTML file as a concept. Here are the basics, we've got standard HTML and in here, we've added a couple of things. We have the {%. And that indicates small bits of Python sprinkled in here. And then for each one of those we need a closing block. So, we have a % for, and a % endfor. And we have a % if, so we have a % endif. The first thing that we wanted to do was loop over all packages. How do you do that in Python? You say for thing in container. So we do the same thing here except for that we don't include the colon at the end. The percent stuff does the block for us. And we have the {% on both ends. We also wanted to get some of the text out and just drop that in the page as HTML. This is what it looks like as static data for the users viewing this page. So, we want to put the project ID here. Which is going to be the name. We get to the database, the name is the ID. So we don't have a separate field for that. So we say that by {{ expression here this can be either just a straight value or as you saw you can even call functions here. Also, we want to have an if statement. So at the bottom we're going to say only show this span with a summary if the summary is actually set. We didn't do this in our demo, but you get the idea right? So, we can say we only want to show this bottom part by doing some Python evaluation on the % if. Pretty straight forward, right? We run this with some set of data it will come out looking more or less like this. We have little hyperlinks, and then the summaries that kind of trail off so we don't show you all the text. All right, so, pretty straight forward. These are the main working elements of the Jinja templates.
|
|
|
transcript
|
3:20 |
We've seen how to create individual templates. But as you'll see as we build up this application, that's not enough. What we want to make sure that we do is share the exact same look and feel for the entire website across every page we make. And ideally, we would like to just add the Delta we want to just create what is special about that new page, that new view that we're creating and have it adapt to the existing ones. So we're going to talk about shared layouts with common templates. And let's just see why you might care about that. So let's just use a common website that you may know of, as an example here, this one talkpython.fm. There's a lot of web design going on. But there's also analytics. There's also things like indicating the RSS link for the podcast on every page all sorts of stuff like that we got this top nav bar, the scroll bar section and so on, we want to have that shared across every page so not just on the homepage. But when you over to the episode list you want to see that same look and feel When you dig into an episode you want to see the same look and feel. So you can imagine that this website the one I built here, uses exactly this concept. It has a layout, common page that defines things like the CSS the order in which it's included all those kinds of things the nav bar and whatnot. And then each page punches a hole into that and fills in its specific content. So this is super important. It's not just about look and feel though it's other things like making sure we have a consistent set of information. The top we might have a description we might have a title, we have CSS maybe some fallback CSS for older browsers that's becoming less important. But still all that stuff at the top you want to make sure that's consistent. We want to have the same CSS and same JavaScript files. Often we organize these very specifically like the CSS is at the top. And because they're Cascading Style Sheets the order very much matters. If I include something that maybe changes a Bootstrap style and I put my CSS and then Bootstrap well, Bootstraps going to ignore that or basically erase that things like that. So the order is super important. Also, we might put the JavaScript files at the end so that the page gets a visual load quicker and then brings in the JavaScript files. You know, the first time a little bit slower but then of course, it's cached so it'll fly. But also analytics, we want to make sure that we have our Google Analytics or get Clicky analytics little JavaScript tag on every page, if you want to add analytics your site. But if you do, you don't want to have to think Oh, I added a new site did I remember to put the analytics on there? Or if you change something about it remember to change it for, no you put it in this one common layout, and then you share it. We also want to be very careful about how other pages change the CSS and JavaScript definitions. Like we maybe want to make sure that they can only go after the pre-included JavaScript or after the pre-included CSS. Maybe one of our pages is a front page sort of front-end framework type of JavaScript thing it uses Vue JS, well, you want to make sure that that gets included but just for that page. So you want to create ways in which the pages can push back to the common layout to inject those but in a controlled way. So there's this and way, way more you want to create these shared layout pages for and luckily it's super easy and Flask and Jinja.
|
|
|
transcript
|
1:12 |
Now you may have picked up on the fact that PyCharm was not treating our Jinja templates with as much love as maybe you'd expect PyCharm to treat it with. Like here you can see there's no highlighting in here. It says that end for is broken. If I type that there's nothing nothing that's helping me. Right? No completion. The reason is, this version of PyCharm is a separate clean copy that I have just for recording this video. So it has to be activated for that. So if you go over here to your Language and Frameworks, Python Template Languages the way it was set was, language was none. Here you can set the default one. I'm going to say Jinja2, pick Chameleon or whatever. Whatever it is you want to work with? I'm going to go with that. Say okay. Now, notice we get this auto complete here. We go like that, it auto completes. We can say for p in packages. We could do a double like that. It'll expand it out. So, very much nicer. So for the rest of this class just make sure that you have your template language set to Jinja2 for this current project. Okay? So if we have that, everything should be good and we'll be getting a lot more help and less pushback from PyCharm.
|
|
|
transcript
|
5:20 |
Let's remember what our app looks like. Click over here and run it. Well, not super interesting. It doesn't even have a single hyperlink or anything like that. So, what we want to do is we want to add a second page and use a common layout between these things to make it be able to look the same across all of our views. So, let's real quickly here, come over and let's just do an about. It'll just say about this thing and so on so come down here. Just say about here and, obviously we're not using any layout yet. We're going to get to that in a second. Here we go, so, that's not quite enough. If he had to show it, we got to go over here into this section and add a route. So, we'll say /about. Now, be careful, we must change that as well or we'll get an error. Luckily, it's an error. Actually, when we try to run this, you'll see there's already a view mapping over to something called index because in some frameworks, that just silently erases that which is even worse. So, about, we don't care about this. We're just going to render our other template about. Now, if we go look at that, that's good. If we go to about, looks like that, decent. It's completely ugly and has no design yet. We're getting there, but it does have at least two pages. Let's add just a little bit of navigation here. And, in our nav, we're going to go and we'll just have a home. And, this can be a hyperlink like that. And, we have one for about which would be a lowercase about like that. And, it's not terrible, honestly. We have home, we have about, but, of course it's gone over on about. Ah, that's frustrating. Let's go ahead and bring in a little bit of design here. A little bit, we're not quite there yet. But, let's go and put some of our Bootstrap in here. So, for the top, we're going to have the Bootstrap stylesheet. Maybe I can wrap this a little bit so you can see it. The latest Bootstrap, whatever that is. And, at the bottom, down here we're going to have our JavaScript. This is going to be the Bootstrap one as well. And, it says, If you're going to use this go back to this page you also need to use these first. Well, let's just hit copy there. So, in order for that to work we need to make sure we have jQuery we have Popper, and we have Bootstrap. So, already, that should make our index page look a little bit better. Let's give it a try. Oh, it does look better. It looks so much better. The padding is a little bit off we need to do some CSS stuff, so let's go and add a directory here called css. And, while we're at it let's add a new directory called js and a new one called img. And then, here, let's add a stylesheet, if I can find it. It's called site. And, we're just going to do something super simple. Let's go over and say that this section here that section is going to be a div of main content like so. The reason is we want to indent this stuff but not our nav and we could also move this style finally out of here, now that we're going to have a stylesheet. So, I have main content, love the auto-complete. Let's say padding is 20px. Now, that looks great, except it's not going to work so well because it's not included, is it? So, let's go over here. Okay, now, there we go, there's our padding that we were looking for. And, we could even set the background color of our nav in our CSS file there. Say nav, background color is 000 and let's give it some padding. That's maybe a bit much. Let's go with 10. Font size can be 20px. How are we looking? And, how about color. Let's set that to white. Now, that might sound like it's going to work. It's not going to work because we actually need to do nav a. Color calling white 'cause this is applying to the hyperlinks. There we go and they still kind of do hyperlinky stuff but I feel like that's good enough. Say margin right is 10px. Okay, so not super impressive but we have a little bit of design. Why did I do this? 'Cause I want to share this design that we've created across the pages. So, how do we get it over there? Well, we're going to work on that by adding a common layout page and then inheriting each of our individual pages from that.
|
|
|
transcript
|
5:08 |
Now that our site has a little bit of design. Let's have a look. See on this page we have a little bit of navigation on the about page. Eh, not so much. We're not including Bootstrap we don't have our nav. All those sorts of things. So we want to move that out of our index.html into a place that can be shared. So let's see how we go about doing that. Now, probably the easiest way at this point is to just take one that is representative. This one is the one that has all the navigation stuff. Copy it and then figure out where the little holes should go. So we're going to Command+C that and then Command+V it and we'll call that _layout and I'll use an underscore to riff off of Pythons like hey this is private, leave this alone angle. And that means don't try to serve this up directly. Alright so up here everything's going to look pretty much the same except for in here. What we're going to do is we're going to take all of the stuff that may, we had from the home page. We're going to put a little thing called a block here. So we say % + Block. This is a piece of terminology from Jinja. And then we give it a name like Main content. It has no relationship to the class above it but it'll help and then you have to actually close this off as well and block. K, now when we have this other pages like let's adapt the about page first. You can go over here and say if you get all the common stuff normally it'll be a lot more and it can just say this extends and use quotes, this will be _layout. Nice little auto-complete there. And then we have to define the block again but this time to fill it so we say % + Block main content, love the auto-complete and then down here we can say we're actually done with and Block. There we go. A little formatting a little bit of clean up and I think that may do it. Let's go and have a quick look. So if we click on this it should now look like this page not because they have the same layout yet but because I copied one from the other. Here we go. Cool. How's that look? Oh I don't like this big Python Package index about. Maybe we can make it About Python-Package index something like that. Here we go this is our demo app for the course. We go back and forth. We hid it really nice, right? But of course the home page is not using the sether so let's copy that little bit. Go to the index and say all this stuff is out. Doctype, everything. Down here there's your content and then and block, like so. Try it again. Hey! It still looks the same. Kind of underwhelming right but it is working. It did take all those changes. If we go over here, we going to save new source. You can see it's got all the stuff that it needs here. So we've got our Python Package index we've got our style sheets we've got our nav and then here's a little tiny bit that the about.html injected. And it doesn't have to be just one of these blocks. You can actually go over here let's copy this. Maybe we want to make room for them to insert additional CSS so we come over here and say this is going to be additional CSS. Like that and then, they can fill in that and then down here this is going to be additional js for Javascript. So let's pose this one. It's going to come down here and just say still comment right? Let's have a look one more time. It says, you can see up here at the top About, Let's do a refresh you can see it's injecting that additional CSS right in the correct location. Down here where we did not do anything for the Javascript. It didn't crash it just didn't put it there. So, of course if we redefine it like that. Everything's good. We might want one more for the title so it can set the title. We can do that up here. Imma just call that Title and over here it will probably makes sense to do that at the top, right? This will be PyPI. There's probably a better way to do this where you have like a some part of the title is the same and some part is extended or something like that but for now this will just show it off like you can see About PyPI demo and package index. So we can create multiple one's of these little blocks. Here we have one for the title. We have one for additional CSS. We have the most important one the main content and then one for additional JS. And that gives us a huge amount of flexibility from within our pages to get content into the right places. We can change the title we can change included CSS. We can change included Javascript. All of it done in the right location and most importantly we can change the core content of the page. Alright, so that's it for this short lay out. Pretty easy, right? but super powerful.
|
|
|
transcript
|
2:02 |
I'm not a huge fan of piling all your templates in here, no. It might seem like it's just no big deal it's all going to be fine because we have three only two real ones and one is the shared one right? But if you look at something like training.talkpython.fm we could have like 62 separate templates and they under different circumstances look real similar like index. Now it could be the main index or it could be the index for your account home or things like that. I really don't like having them all crammed in here. Let's do a little bit of work ahead of time to get this organized better. Now there's not really enough going on here to make this super obvious. Still I think it will be, you'll get the idea. So let's go here and make a directory called shared. You know what goes in shared? That's right, that goes in there. And then we're going to make another one let's suppose we're going to have some home groupings stuff about the home page and what not so like home about contact, those are all going to go in there. Now that seems pretty cool right? But there's going to be a load of problems. How did that run? Did that get... Let's see if that got changed. Look at that! That is so incredible. Sometimes I forget PyCharm's just awesome. So what happened when I dragged that in there is it said oh we were using this but now where you've moved it around so in order to fix it so it doesn't crash 'cause it would have, it's going to put it put the directory name there. So that's super cool that PyCharm fixed that and it also did that up here. Look at that when we put that in shared. So, okay, I'm impressed. I was able to drag those all around and actually PyCharm fixed everything. But you would have to make sure that you did that. Now let's just double-check one more time. Everything's still working. Home page, fancy fancy about page, all right. It's all working just fine and it's using our nice new organization. You don't have to do this but trust me on real sites with 50 or 100 templates you will thank yourself over and over again for this organization.
|
|
|
transcript
|
2:28 |
Let's highlight some of the concepts around these shared layouts. We'll focus first on the base view or the outer shell, if you will the common view that is shared across all of the different ones. This is going to be in the templates folder in the shared subdirectory called _layout.html cause we got to refer to that in our other pages so it's good you know. Now, this can be really whatever you want it doesn't exactly have to be HTML you could probably generate xml fragments and stuff like that, as well but generally what it's for is HTML so you want to have a doctype HTML for HTML5 and HTML block, tag, head tag, body tag and so on. These are just standard HTML Jinja2 files there's nothing you have to do special to indicate it's going to be used as one of these layouts other than define some blocks where code can go. So, here we're defining the main content block and providing a default value, no content if they don't fill it out. Okay, so here's a nice block, this is one pretty much every single page is going to be used and if not, you can put a little warning here. And also, because these blocks are optional they don't burden the consumers with them. So, it's not like if I have five blocks you've got to fill out all five little sections and if you get it wrong it crashes no, you can just ignore the stuff you don't use. Because of that, it's generally better to have more rather than fewer sections that these pages can punch holes in. You saw in our example we had the title we had extra CSS at the top, JavaScript at the bottom and we had our content block. Maybe you have even more that you want to make available or something like that. Be sure to think about how the pages might extend this shared layout and where those holes where they can punch common content might go. So, this is the shared layout, the outer shell often you can think of it as. And then, if we're going to consume it here we're in the index.html file from the home view. First we start by saying this extends the "shared/_layout.html" in quotes don't forget the quotes or you'll get weird errors there. Saying that it extends and then we just fill out these blocks here and there, and we say we're going to put some content you know, whatever the content of the index page is and this page happens to use Angular, so Angular 2. So, we want to make sure that we're including the Angular 2 JS stuff at the bottom. Not super practical or real, but you know it gives you an idea. Like, here's some additional JavaScript that this page needs to run that other pages don't so it's going to use this extra little hole this extra block in the layout page to fill it up.
|
|
|
transcript
|
1:34 |
In this last section we talked a bit about organizing our templates folder and grouping those by where their related views lived. We're not quite far enough along in our creation of our site to really see that manifest. So let me show you. Let me walk you through what this is going to look like at the end so you can appreciate it a little bit better. Over here is what our site's going to look like at the end. Notice we have our views folder. This is where our HTML view methods live. So in the account when we have stuff to do with account and home we have like the home and about and packages. It'll be like details and popular and so on. We're going to organize all of our related templates by their view that they come from. So over here we're going to say all the stuff to do with packages is going to be in a sub-folder called packages. So we have two views that require HTML. Change it to templates inside the packages views. One's called details and one's called popular. Those are the names of the methods. So it really helps us understand where those go. And most of them are going to use this shared layout. So we also created a shared folder and we gave the file name a underscore at the beginning to say, "This is not meant to be used directly." Now it's supposed to be consumed by all the other ones. So again, our site's really simple. You might not need this yet but when you have fifty or a hundred templates and many many view files and what-not it's really confusing to know "I want to change this page real quick, how do I get to it?" This will make it so much easier. So I definitely encourage you to organize your stuff this way. But you know, not required by Flask more suggested by Michael.
|
|
|
transcript
|
3:37 |
Now lets look at our views so far here we've got our index, and we've got our about I'm not a huge fan of calling flask.render_template all of this, all the time. What I'd rather do is just say do something like this, return packages, test-test packages. Just return some kind of dictionary that we can get from some model classes or other sorts of transformations that we want to make. And just send those back and have it just somehow know, use index. Would be nice if that was named home and that's named index, it would just magically find it. You know maybe we could actually write some code that'll work, and do that. But we're going to do a little bit of a, change here. So if you go and look at the Flask documentation they talked about different ways in which to do this. And here's one that I came up with and they talk about it about it as well. And what I'm going to do is I'm going to use a decorator to specify, like @response. And then I'll say, you know something like, that right there. And then we're just going to return this. Okay, so, come down here like so. I know what I want to do is I want to make a folder, that holds a bunch of these little utility pieces and whatnot. So I'm going to call this, actually going to go up here, and run that. Create a directory called, infrastructure. Like so, and this is some pretty touchy and not fun to write code. So let's go just copy and paste and have a quick look at it. So here MIME type is just a variable name that PyCharm thought was misspelled, it's not. There's a little diagnostics for you. So what we're going to do is we're this decorate called, response. And it takes only keyword arguments that means you cannot pass positional arguments. And it's a function we call that returns a decorated that just wraps any function that takes any arguments, using itertool wraps so you get the right error error handling, error reporting and other info. And then it's going to go in it says "Look if it's a response just return it. But if it's a dictionary then we're going to go and actually find the template file and just do render to template, back." Also lets you set the MIME type because that's not super easy to do as well. We're going to go over here and now if we just import this, at the top let me see if I can have it all with that thing. Now we can say response, and this has a keyword only so if you do it like this and let's go down here like this one. And say this one is just home-about. There's nothing interesting going on to that one. And then we can just say "Return, empty dictionary." You may like this, you may not like this, right? It's up to you I personally like to specify this is the page and then only return the data. You'll see in a real page like you'd have this repeated three or four times potentially. In, more complicated ones. So I don't like that, not much at all. So this is the way I'm going to do it. Maybe I'll leave this one here well at least in this chapter so you can see. So let's see if I broke it or if it still works. That's the first one to see if it's a good idea. Hey look at that, that looks a whole lot like that homepage that looks like the about page. Pretty cool, huh? Well I feel like this definitely simplifies this. Like I said it's again a little simple to really appreciate it But when you have like, some conditions and some tests, you want to return you want to render that over and over but with different data like "No you didn't submit the form right. Here's the same page but different data." So like with an error message or something. This mode here can get super tedious. So I'm a fan of this, optional but if you like it it's going to be in the code and you can take it with you.
|
|
|
transcript
|
2:02 |
Let's review the concepts around render template and create a decorator to make that a little bit nicer. So, personally I find it much nicer to save. This page has this one and only view this one and only template and we're going to past potentially different data to it. Or we're going to redirect it to a different view. That actually has a different template. We'll talk more about this when we get to the form and user input and the thing called the get post redirect pattern and so on. But this pattern here, having a decorator of the template file actually makes that much cleaner and easier. So, here we can just create this response decorator and this isn't officially a Flask thing. This is just something I wrote that I feel like is a lot nicer. So, let's reset the template file and the mime type, uphere. And then, all you have to do is past the data in the form of a dictionary or list. Something to that affect. So, this is super nice. The code to make it happen, not so much. Not so nice, but here you'll have this code inside the demo app. So, no worry you don't have to like type this in or anything. But it's one of these, sort of decorators, that takes an argument. So, it's like a double decorator and you got a function with an inner function, with an inner function. And then it just goes through and it looks at the data that was passed to it. When it runs the data actually gets back, when it calls that inner function, it says if it's a response we're just going to let whatever you create flash response. We can't mess with that we're going to let it go. But, if for some reason you created, you want to say a useless template file, you have to pass a dictionary. And it's going to pass that data along just like it would before and also it allows you to set the mime type on the generated response error. Which is also helpful. Sometimes, you want to return like text or csv or something like that. You can also use a template for that. Okay, so here it is. This I think, for me this is an improvement on the render template style that Flask uses. If you don't like, you know it's completely optional but I prefer to see code like this. Then a whole bunch of render template all over the place.
|
|
|
|
33:08 |
|
|
transcript
|
3:52 |
In this chapter, we're going to talk about mapping URLs to our action or view methods. And this is super important to think about how we structure the URLs and exchange data throughout our application. When you think of the URLs they're often not just things that are behind the scenes in a hypertext and you click on them and whatnot in HTML but often users perceive the URLs as almost like a command line interface to your application. They look up, they see the URL they try to maybe play with it if they can't find their way around, stuff like that, right? So you want to have a super clean set of URLs both for you 'cause it helps you organize your code and group it, and so on, but also so that users have the cleanest possible interaction. You might also think about SEO or search engine optimization. One of the big triggers or cues to Google on what this page is about is what is in that URL. URLs are super important and luckily, Flask makes working with them pretty easy. Now, let's visualize how this routing or routing if you prefer your British English, works. So the idea is we have our web browser on the left that some client that wants to get to our website. We have this kind of funky visualization of our server and our views and their various methods that we're going to map URLs over to. So we have our package views and our home views. We've broken those into two distinct areas to do with PyPI packages and views. We're going to get to that real soon. And then each of those have a couple of methods that could be called here. So request can come in and HTTP GET request is going to go to project/sqlalchemy and with a query string,?mode=edit. So it's up to the routing to figure out do I have any of these view methods on the right that match and which one should it be? So we've registered some routes with the app.route decorator. So for /, we said that goes to home_views.index, that function. So Flask is going to ask is this a match? And in this case, it has to be an exact string match up to, but not including, the query string. So it's /project/sqlalchemy, no so I'm going to skip over that. Next, I'm going to have is /about. Also, because there's no variable component here this has to match the root part of the request. Nope. /project is not /about. The next one we're going to define is /project/package and notice the angle brackets there. The angle brackets mean this part is some variable component. So in our case above, we have /project/sqlalchemy and here we have /project/ something. And we're giving it a name so that we can actually work with that value. This one turns out is a match so it's going to go and prepare the request and then call package_views.details. And Flask is really nice because what Flask will do it will take all of the arguments or values that are in the route, in the URL here, so package for now and it will pass that as a parameter into our function. And we can even define some of them as strings and some of them as integers, and things like that. So really, really nice. It will take those variables that are in the URL and pass them through. It will also gather up the query string and put that onto request.args. Remember, request is like a ambient global thing. It doesn't get passed in the method. You say flask.request and it has whatever request is running. So mode is edit. So that's it. That's the general idea of routing. We're going to define a set of URLs. Sometimes they're static like the first two. Sometimes they have variable components in them like this last one. And then we're going to associate those with various view methods and Flask will look at each request figuring out which one to router to, and then call that one. Or if there's none that match it will just return a 404, Page Not Found.
|
|
|
transcript
|
1:23 |
Let's dig into our project for this next chapter. So over here we have a new folder, Chapter 6 Routing. And again we're going to have the code we're starting from and the final code for this chapter. Right now they're the same. They're both the final code from the Jinja template one but that's not how it's going to stay. So let's go over here and set this up. We won't do this every time But I'll do this a time or two, do it this time so you get used to it. Come over here and you can see where our requirements are and stuff like that. Now let's go and create a virtual environment. I have a little shortcut you can see the little command at the top. So that's activated and lets load this up in PyCharm. All right, we have our project all setup. Let's just check again that our template is set right. Python template languages, Jinja2. Okay, good, that is all set up. Now, it looks like our app is about ready to run. Let's go over here and just try it real quick. Of course we do have to install our requirements. Good that PyCharm is keeping us honest. Looks like it was installed. So we should be able to just go over here right click and say run. Super, it looks like our app is back in business. There's not a whole lot going on that's interesting there yet but it is getting there. Hide away our fake data for now. We'll get back to that. So that's it. Our app is up and running. Time to add some features.
|
|
|
transcript
|
9:12 |
So here we are in our Flask app. And it's pretty standard, right? This is like how they tell you how to do it in Flask. Import flask, you create your app and then you create your view methods. You put your app.route on them. Well, okay, that's how you get started maybe sometimes. But this is a terrible way to organize real applications. It definitely encourages just cramming your entire web app into like a single file. Bad idea. And it's bad because Flask has a really super cool way of organizing your views that you don't have to do much at all about. You just change basically a one word right there and you're good to go. So what we're going to do in this little short segment is we're going to reorganize our code not because it's really that long you can see it's actually short but so that it's ready to grow as we build up this real application. So let's do a couple of things. The first thing I want to do is actually deal with this fake data. We're going to have a real database with lots of interesting stuff going on. So I want to create a special part of my application just for that. I'm going to call that services. Not web services, but services that are provided through our application like stuff that deals with packages stuff that deals with users, and so on so we can isolate that over here. So I'm going to create something called package_service. Like so. And then let's just take this code and put it over here. All right. Not super interesting. Remember, we don't have our data yet. We don't have our database. That's coming later. But, we can get started this way. So we're going to come here and say import pypi.org.services.package_service and let's say as just package_service. I noticed there were some errors down here so we can come and say .get_latest_packages. Just like that, I think that's the only place it's used. Okay, let's just make sure real quick that we didn't break it. We did not, okay super. That's what I expected. So, that organizes it a little bit gets some of the data access out of here. But this, this is the ultimate problem right there. However, it's tricky to reorganize it as is. So this needs to be created and then it needs to be used to start the app in this main app.py. And yet, it has to be available at the time that these are parsed so that we can apply the route. So, that can make it really tricky. There are patterns that allow you to share this across the file, different files but because Flask has this built in thing called Blueprints which are ways to predefine these routes and then later apply them after the app is created, we're going to use that. It's really nice. So, let's go down here and create a folder called views. And in the views folder, we're going to create let's start with two things we'll have a file called home_views keep adding that to get up. And we'll create another one called package_views. We don't really directly work with these often so the name isn't super important. Okay, so what we need to do is we want to take this is going to be the home stuff and we're going to put it over here. Well, immediately you can see the problem. Some of it's just an import problem, that's easy. Let's go up here and grab that 'cause of my renaming. Okay that was easy, but the one that's left here hmm not so much. So, we're going to use this thing called a Flask Blueprint. And the way it works is we're going to come over here and we're going to say Blueprint you can also call it app if you want but let's not confuse things here. So we say Flask, which we have to import at the top we say Blueprint and in here we're going to give it three pieces of information. A friendly name, so in this case I'm going to call it home, 'cause it has to do with the home_views. And then for the import name I'm going to give it the __name__ which is the name of this file, home_views. And then we want to set the template folder to templates. And then all we have to do is go down here instead of doing @app.route we say @blueprint.route. So, we just replace app with blueprint like so. Now, this sort of works this will sort of add some features here. And we go and run it let's see what's going to happen. We don't need this anymore. So, let's see if we run it is it going to be amazing? The chances are it's not going to be amazing. That didn't work. But remember, potentially these these are created before the app is there. And how does the app instance know about it? Well, we can do, there's a couple of things we can do. But, let's define, let's do a little bit of work here. Let's define a main and move that up. Now, before we do this let's call another function called register_blueprints or whatever we want to call it. Like so and then all we got to do is say so import home_views and then we can go over to the app this is the one that now exists here and we can say register_blueprint, like so and pass it in home_views. And that's it, that basically goes back and tells the app about the few routes and methods and what not are defined over here. It should work, let's give it a try. And it did not like that. Oh we can't aim for home_views, we have to aim for, register home_views not blueprint. Let's try that again. All right, there we go. So, looks like it's running but does it work? Moment of truth. Of course it works. Of course it works. Isn't that nice? So that lets us break our code apart. Our view code into these more specialized pieces. So, it might not be convincing to you yet how amazing this is, so let's go and add another one here for the package. So, for packages we're going to have a couple of things and I'm just going to copy a few bits here to start out. So, we're going to have a blueprint and it's going to be packages, that all looks good. And this is going to be packages what we want to have is maybe a details. And we're not going to do anything super interesting yet let's just return package details for some package. And here do we get to define our first interesting route, I guess I would say. This is going to be, let's remind us what that's going to look like. pypi.org, the real thing click on this one, it's going to be /project/<package_name>, okay. So that's what we want there so here we say package, let's do package_name. Like so. Now, notice start away that PyCharm is saying whoa, whoa, whoa there's something wrong with this part of your route. What is wrong? A function index does not have a parameter to take it. That's so cool. So, we just go in here and say it takes a string, now it's happy and we can actually put that there as well. Okay. Let's omit that out for a moment. So, we should be able to run this. Let's change the name, let's call this package_details. And the blueprint, we're also going to have to register this blueprint for it to work. So, last thing, I need to go down here to import package_views like so and then we can import it make sure everything's nice and cleaned up. Did it rerun? Probably it did rerun. Make sure, there we go. So, we've got our two things here but if we go to /project/abc boom, package details for abc. Okay, so we've defined our first interesting route but maybe even more importantly for the moment is we found a way to take our single super mega monolith file that was defining our application imagine there's fifty of these methods and breaking them apart by category. So, here we have home, these are the things to do with like home and about. And we'll have package and we'll have some other package things going on here as well. Of course we'll use that again in just a minute. And then in our templates folder I told you I was organize these with this in mind so here we have home we're also going to have a new folder called packages in which case we're going to put our details.html. So, let's just rob this one and call it details.html, of course, it doesn't have all the details yet, but it's going to. So, this organization here is directly tied to this organization that we did with blueprints there so, I think this is a great way to organize your code nothing about Flask encourages you or suggests that you should do these types of things, it's just a recommendation from me you don't have to but I think it's going to be really, really great as your app grows.
|
|
|
transcript
|
1:21 |
Before we get to the rest of our routing let's review this idea of factoring our view methods into separate files with Flask Blueprints. So there's two parts here first we work on the file that contains the view methods that we're breaking a little bit of our web app out into. So here's let look at views/packages.py okay we're going to import flask, but instead of saying flask.app we say flask.blueprint give it a friendly name we give it an import name and a template folder. That creates a blueprint and just like before we say blueprint.route and from there on it's pretty much exactly the same just use the word blueprint instead of app. But don't forget, we also have to now go back and register these after the blueprints have been created. So in our main start-up code in our example, which is app.py we're going to import that module that contains the extra functions. I'm going to create the app just as normal and then we're going to register the blueprint so app.register_blueprints and give it the blueprint from that other module. We can do this with as many pieces of we want to break it up into and then we just say app.run. I really love this pattern. It drives me crazy when applications are crammed all into one file. This helps you organize your codes you can quickly find the view methods the templates all the stuff that is related to one part of your website so I highly encourage you to use this.
|
|
|
transcript
|
3:42 |
Now let's go and add the rest of the routes to our application here. So we've got our home_views with index and about. I got packages. Let's go and create another one of these. So we have our blueprint for project details. But what I want to do is just get the popular ones. Now I want to do something really cool with this so let's just have this return. Details for most popular package. It's not going to be exactly perfect but now I'm going to pass in a rank and it's going to be an integer like so. How do we do that in the URL? So what I want to do actually is I'd like to be able to come over here. Is this going to work? let me just make a quick change here. Now it should run. What I want to do is something pretty awesome. So if we go over here and we say /about we get this. If I say /project/something I get something else. But I want to say if the thing happens to be a number like 7 or 5 or 4 or whatever I want to run just this function. Now if it was abc I still want it to do 'not found'. But if it's just the number right like show me the fifth most popular one I would like to pull up that package details. I'll give you an example of that as well. So if we go over to talkpaython.fm website podcast and you go to the episode you can see they have great long URL names like /episodes/show/206 and then a shortened sort of friendly version of the title. But sometimes it's nice sometimes you just want to share really quickly oh like hey that was show 206 like this. If you click that and check that out it goes right over. Want to know what show 205 was? There you go, that's what it is. So there's this cool way to capture only integers. There's other stuff that shows up there. Like if I go to just /episodes that matches but I want to say if it's an integer we're going to pull it from the database. So let's see that over here. And there's a pretty slick way to do this. I'm going to go and just say we're going to have a /<int:rank> and this is going to be a variable. So we want to say this but only in the case that it's an integer. So there's a way to do that in Flask. You just say int:rank. And now if we go and run this and we go I want to go to about we get about. But if I want to go to /7 details for the seventh most popular package. /5, fifth most popular package. But we can still go to all the rest of our site is still working just fine. Isn't that cool? So anytime you want to have some sort of constraint like this we can put the type in front and also let's just do a real quick print type of rank and the value of rank real quick there. And let's look again at 11. See that Flask already converts that to an integer. So it's not like working in string but it could be an int. No it's actually converted to an integer for us which is pretty cool. And if it goes abc it doesn't match that route so it just says 404. If we didn't have that integer constraint you know potentially that would hit and cause a problem right. So if we don't have that here for example now I can see details for the abc-th. That doesn't even make any sense right. So we can say only match this short sort of Flask / some value if it happens to be an integer. Really cool we're going to add the popular route that way. Now the details are not implemented yet we'll get to that. But a pretty cool way to add this specific route here.
|
|
|
transcript
|
2:59 |
Now let's go ahead and round out most of the other routes and structures. So that we can just build them up over time. In our application we're going to be able to view packages we're going to be able to go the homepage and we're going to have an account. There's actually a couple other things we'll add but let's just focus on those for now. So let's go in and add a Python file called account_views. Now there's a bunch here I'm just going to copy them over and then we'll talk through them 'cause you've seen me write plenty of MDV methods so far. So, let's go up here and look. So again we're using blueprints, this one is called account. Now we're going to have a couple things you can go to your account page and just view details about your account. It's going to be not super interesting I'll just say basically you're logged in as so-and-so but we're going to show that. We need to go to the database and pull your account out things like that. So for now we're just going to have it empty it's going to be /account that makes a lot of sense. Register is more interesting how do you get an account? You register on the website this gets us to a really interesting design pattern that we're going to talk about more later. But I find to be quite helpful and a lot of times, I see people doing it suboptimally let's say I'm not sure I'm going to call it entirely wrong but it's definitely suboptimal. And that is I need to show a form initially I need to get that form in front of the user so I'm going to have an HTML static page and show it to them. But then I also need to process their submission of that form. Those are very different things those are not usually even closely related to each other. Often though some people will write one function register and check the method on their request. If it's GET, do this. If it's POST, do that. And they really should have two separate functions and the routing lets us do that automatically. So what we can do here is we can say account/register and then only handle GET requests on this method. Over here account/register. Same URL but only handle POST methods here and usually we won't even use the template in this response we'll do some kind of redirect in the end unless there's an error like "Oh you tried to register an account that already exists". So we need to like pass that back to that template. Also you'll note that we have to call these different things register_get and register_post is what I like to use but they can be whatever all right? They're just Python functions they're not really involved on the user side of things. Here we're going to figure out what details we have to show that could be none, it could be just like this or it could be more. Here we're going to process it validate it and so on. Login is exactly the same login_get shows the form login_post checks to see if they're there and redirects them to their account or wherever they're trying to go. Logout pretty straight forward that's just going to log you out and redirect you to the homepage or something to that effect. So here we have our account_views and the most important takeaway here is filtering the request out by the various HTTP verbs one for GET, one for POST. Most important when you're submitting forms and doing that kind of user input.
|
|
|
transcript
|
1:28 |
Let's really quickly review how given a URL we're going to define a view method and a route in Flask to match that. So suppose we're going to go to /help/topic maybe there's some kind of Help System /help/faqs, /help/gettingstarted, I don't know and those are going to return different bits of detail. So how do we create something in Flask to handle that and pass topic to that function? So we're going to add an app.route decorator as you do for all the view methods. I'm going to call this Help 'cause that seems reasonable to me but you can call the function whatever you want as long as it's distinct. Then it's going to be /help/, that's the static part it's always like that, no variables are passed there. No data is being passed there. But then, the part that goes on the end /summary /gettingstarted, /faq we want to pass that into the function so we put in <topic_name> So that defines a variable that gets passed into our function, topic_name and I like to give them type annotations 'cause sometimes, as we say you can make them integers and what not. So we're going to pass that in and then you just do your work, right? Go to the database, call the service whatever you got to do to render, to display that content. Super nice and easy to work with routing system you don't have to work with regular expressions or other crazy stuff that some other frameworks have you do. No you just put stuff in angle brackets and that gets passed along as parameters to your methods. Couldn't be easier.
|
|
|
transcript
|
7:54 |
I want to round out this chapter by showing you just how incredibly powerful routing can be, and I also want to dispel a myth. Often, when people think about building web applications, it's a decision between should I use a CMS, a content management system, something like Drupal or WordPress, where I got an editing backend and I can type in the pages, and it's just super easy for everyone. Or should I create a data driven one like our example here. We have a lot of packages in the data base and each package gets it's own page. Things like that. And it's often presented as an either/or. Either you have a CMS, or you have this data-driven web app. I want to show you how we can use routing to build a CMS in under 10 minutes. I don't know how long it's going to actually take 'cause we're going to do it now live, but it won't take very long. By the time you've had the debate, the thing could be built. That's not to say WordPress doesn't have it's place, and there's not more to do with what we're going to build here, but just to show you, there's a lot of flexibility. So, let's get rolling. Let's go over here and add a new file called a cms_view, views plural, I guess, to stick with the others. And then let's go over to our service and we'll have a cms_service. So, this is going to have the various data. So, what I want to do is I'm going to define some fake data here. So, imagine I want to find two pages, company/history, that's going to show me details about my company history, and company/employees, it's going to be our team with pictures, but you can easily fill this out. So the way that it would really work is you would have a database, you would create these, maybe this is the primary key and then you would fill out the details with some kind of editing form you'd have to build. So yeah, you couldn't do it yourself in practice in 10 minutes, but it would be pretty close. So what we're going to do is we're going to use this, I'm going to have a function called get_page, and it'll take a URL which is a string, and it's going to return let's say a dictionary. So the way it's going to work is it's going to be pretty simple, we'll say if not your own return None, I guess that makes the dictionary, something like that. Anyway, so we'll return that and then we'll say a page equals fake_db.geturl. Maybe URL equals url.strip.lower, and do a little normalization here. And then we'll just return page. And let's put an empty dictionary here as well for our default value. Either we're going to get that dictionary, or we're going to get that empty one, so it's the same as that. Okay, so we've written this cms_service, now what we want to do is that we want to go to our CMS view, and let me just rob that from here, something like that, so we're going to import flask, we're going to say cms, that's all good, this'll just be CMS page, and this'll be CMS page. So of course we need to be able to display what we get back here, so let's go and create a new folder over here, with cms, and let's just borrow the about, like so. Content here, it's going to have a page title and a page details. So the page title goes there, and then maybe throw it into a div, page, just copy to be sure, page details. And don't care about that. Okay, so there's the page that would display it, maybe you want a little bit more, but it's okay, we don't need this, and then we need to go to our service, which we're going to go over here to our cms_service, and we'll get this. We'll say CMS.get_page from the URL, what's that going to be? Now we might not get a page back, or maybe we will, so let's just return page here, that's our dictionary, but we want to say if not page, we've not talked about this, how do you tell flask, or how do you have flask tell the user 'Hey, this page or this thing is not here' So it's super easy, we say flask.abort and 404, page not found. And let's return that, so we return flask.abort, and well this actually pretty much is it, except that for the routing component, remember that's what we're focused on, so remember we were able to define stuff like, I could come over here and say URL or something like let's call it full_url, and if I want that to be passed in, I say this, well that doesn't match things like a/b/c, it would match just like that little element right there. We saw before that we could say int and that would make full_url and integer, it's colored like this 'cause it's not being passed in. But we don't want it to be an integer, we want it to be a string, we want it to be the whole path, so the way you can do that is you can say the type here is path, okay, so let's just print beginning and CMS page for, well I think maybe that's it, we do have to register this blueprint back in our app, so let's do one of these, and one of these, and that's ready to go, let's try running it. I think it may work, unless I've made a mistake while I'm talking and coding and all that. So here's this, and we got our about, we got our home, and these are all working, but what if I go to company/history? It's the moment of truth, what are we going to get? Ah, not found, not found. Getting company/history, and the reason is, I remember we have the forward slash there so let's do this, url = '/' + url.lstrip('/'), left strip. Okay, so in case there's a slash there, we'll just leave it, otherwise we're going to have it, so now we try one more time, company/history, give it to me! Oh look at that, and employees. Our team, company not there, 404. 404, so if you actually look at the request that came in on the network or HTML, 404. So not only is it give us this text, it actually is giving the right status code back. So if we go home, home, about, perfect, we have our company, which is not specified in the CMS, quote little baby CMS, history, like so, that went and pulled it out, so you can see, it's going for company, but then it returned 404, I typed that in wrong, then it got this one and said yeah, that's a 200, here's your page. Look at that, look at how ridiculously simple this is. What is that, that's like eight lines of code there, we of course have the database, right, the databases I jammed in here, but whatever, it's not much, we had one line, or two to register the blueprint, 'cause we are not jamming it all in the one file, and then we had one endpoint right here. So, taking it in total that's like thirty lines of code, plus a couple of lines of HTML, and that's it to build this beautiful CMS. And we just have to build a little backend that lets people edit; like here's the title, here's the URL, here's the content. Right, we could easily do that, grab some open source HTML editor, or better, markdown, let them enter markdown, something like that. This shows you both the power of routing, and also if you're thinking about do I need a CMS or do I need a data driven web app, it's not necessarily one or the other, you could have a little of both, like this.
|
|
|
transcript
|
1:17 |
As you saw we can use routing to actually capture arbitrary URLs. Use our Jinja templates and our common layout to actually create a very simple CMS with almost no code. Here's most of the implementation honestly right here. So we want to create a route and instead of just having slash some variable we're going to say this variable is of type path and that means it's going to capture not just stuff between a given set of slashes or on the end of a URL but the entire thing after a forward slash. So that lets us grab the URL in case none of the other ones already match and then what we're going to do is just go to the database and say "Hey if we entered something for this URL and if so let's get a page title and a piece of content and just show it wrapped up in our common layout." How cool is that? And it took us definitely less than 10 minutes to build it from scratch. Now we didn't build the editing backend that lets you type in the title, the URL and the page content probably is marked down and rendered as HTML. Y'know that is a simple exercise it's not a ton of work for you to do that. This is enough to get you started. This is the hard part technically speaking this is the part you have to understand that's tricky and then from there on out it's pretty straightforward. This shows you some of the power of routing in Flask.
|
|
|
|
38:04 |
|
|
transcript
|
0:53 |
So far we've kind of ignored design for the most part and we're not going to go deeply into design in this course. It's not a course about CSS and HTML and web design but we should cover enough that you understand the design tools that are in place as well as be able to bring in extra things like themes and stuff that are really easy wins for making your site look better in a hurry. So let's briefly talk about what we'll learn in this chapter. We're going to do a quick survey of what are called frontend frameworks or frontend CSS frameworks. These include things like Bootstrap and Foundation but there's actually many of them. Because we're going to use Bootstrap it really is the most popular one we'll go ahead and use that. So we'll do a quick introduction to what Bootstrap is. A few of the features are super important to know and really helpful so we'll talk about grid layout and a few of the controls like buttons and widgets.
|
|
|
transcript
|
2:02 |
Now before we start working with Bootstrap let's do a quick survey of what's out there. So, Bootstrap probably is the most popular frontend framework frontend CSS framework, that's out there. And that has a lot of benefits. It means, one, there's a lot of tutorials and demos but also there's a lot of themes and other sort of add-ons and extensions. So, popularity does matter, especially if you want to get into the theme side of things. But, it's not the only thing, right? Maybe there's another one you like better. Like I said in the opening of this chapter we're going to use Bootstrap, it's pretty popular. You see at 125,000 GitHub stars, there's a nice url you can go to, expo.getbootstrap.com and there's a bunch of sites built with Bootstrap that you can click around and get some inspiration from, you know it's always a free source you can even borrow it to build your own site. Another one that's really popular is Semantic. So, Semantic UI is a nice framework for building clean web apps, and this one has 41,000 stars, definitely consider that. Foundation, Zurb Foundation is really really popular. This one is a little more popular among, what I would call the professional designers. The people who really do design for a living. It does a little less hand-holding it's more of a foundation upon which you can build your design. Hence, I guess the name Foundation. So, if that describes you a little better maybe consider checking out Foundation. There's Materialize, and here's an example of an app built with Materialize. Nice and clean, looks really great. And there's a whole bunch more actually a really great article is this one here at KeyCDN "Top Ten Frontend Frameworks of 2016" Yeah it's a 2016 but many of them are still relevant. And it's nice because it gives you actually a little bit of the tradeoffs. Like, Bootstrap is good like this but it's not as good as that, this other one Materialize has this advantage so consider it. So if you are actually shopping for what frontend framework to use you know give that a quick look. If you don't know, Bootstrap, it's probably the way to go.
|
|
|
transcript
|
4:50 |
Alright, let's start doing some design with Bootstrap. Now over here in our repository you can see we now have a chapter 7, and it has a final and a start set of code. Well HTML, let's, let's not stretch it too far. Of course, these are the same now we're going to start with final here, but we're going to get it going we're going to involve it and it'll be what we write at the end when we check it in. So let's go ahead and open this in PyCharm now you don't really need PyCharm I mean, it is just basic HTML. But it's a nice editor for that, as we'll see. So over here, let's just start with something I would consider kind of scary. As a designer, not as a developer, let's say. But I open this up and I have this truly bare empty, unstyled HTML file. And if somebody says, Michael, take this file and make it look amazing and put a cool layout on it, and stuff. I could do it now but for a long period of time that would have been like, Whoa, I have no idea where to get started on this. So this is, as you can see here just a pure, plain HTML file, right? It's got a head, just a title and a few basic elements here some lorem ipsum, some empty links, stuff like that, right? So we have this and let's go ahead and make a duplicate of it just so we can compare. And what we want to do is we want to install Bootstrap into it and there's basically two ways to do that. One, we could link to a CDN. There's some benefits to that. I'm not a huge fan of using CDNs because if I want to do any development offline well, it's not there, right? I've got to have access to the CDN. Say you're in a plane or a coffee shop or something like that. Also, you're now depending on something external to you you could just as well include this in your site. So I prefer to use like npm to install Bootstrap locally. But just to keep things simple, we're going to link to it. So we can just go grab, install Bootstrap CDN. Coming down here and we can just copy we only need the CSS at the moment, we can use 4.3.1. That's the latest at the moment of the recording. We could use bring in the JavaScript stuff as well which is down here but we're just not going to need it for this example so we're not going to talk about it. So it's installed, do a little wrap here. It's got some integrity on it you can use that or not use it, it's up to you. But here's the important part, we've got a style sheet that links to the latest Bootstrap min. Now by dropping this in here a couple of cool things happen. We come over here and if I just refresh this page fix your eyes on it, how's it going to look now? So much better. Yeah, sure, the body could use a little padding. But if you just go back and forth which one of those feels modern and clean with a little more space a little more airy, a little more white space, right? Look how tight the letters are together and stuff over here. So Bootstrap brings in a bunch of features but it automatically apply some fonts and some other settings here. So this is looking pretty good. It's already just the act of putting Bootstrap here has made our site a little bit better. You notice the hyperlinks are no longer treated like documents, you've read this document don't go back to it, right? Like when how old is that philosophy? But no, no, there it is. Okay, so this looks pretty good. The other thing that this does, adding in Bootstrap or many of these front end design frameworks is it includes what's called an Reset CSS you might have heard that designing for the web is or can be hard and why is that? Usually the difficulty with designing in the web is not that working with HTML and browsers is hard. But they're inconsistent. How does that looking Edge versus Firefox versus Chrome? Chrome was getting to be a problem. It's really, has some very some sites have a lot of peculiarities that depend upon Chrome. The problem is that if you don't explicitly set a style on, say, hyperlinks, it's up to the browser to decide what style it's going to have, right? And if the browsers say Firefox and Chrome, for example decide that the padding on a button should be slightly different well, then the layout's going to look different and the lineup everything's going to be a little bit different. And you're going to have to battle that inconsistency. So how does Reset CSS fix this and Reset CSS sets every possible property of every possible element, to something. Usually what the default of the browser would have been but by setting it explicitly the browsers no longer guess. And that means if they differ in what they assumed the default value is, well, that goes away because it's all now explicitly set to be the same. It doesn't solve all the problems of cross-browser different multi-browser support but it definitely solves some of the annoying ones that you might have run into. Okay, so we've got a better site here. It looks better, obviously. But it's also easier to design for the web now because it's had this Reset CSS that comes along with Bootstrap, applied to it.
|
|
|
transcript
|
1:00 |
Now it great to just double click the index or bare.html file and have it load up in our browser. But sometimes it makes more sense the way our HTML's put together and what-not to actually run in a browser. Anytime you might have something like forward slash, whatever. Basically that doesn't work. Also, javascript cors that can also cause some issues. So let's go back, really quick, to our app here. And what we had been doing is just double clicking that file but in PyCharm or Webstorm you can come over here and right click and just say run you don't have to set up project or anything like that. You just run it and notice now it's running on a real server. So you can do things like come down here and inspect element and look at the network. So for example, if we go to all you'll see, you know, the request for say, the static files. Which you don't actually see if you load it off the file system and the dev tools a lot of times. So if you need to run your HTML file in a browser super easy to do with PyCharm or WebStorm. Just right click and say run it, and it'll run right there.
|
|
|
transcript
|
2:53 |
Before we get into the grid layout and working with it in Bootstrap I think it's good to see it in action. And what better place to see it in action than the Talk Python Training site. So here's Talk Python Training, circa 2019. And let's look at a couple of things. So you can see here, some interesting grid stuff happening. It's kind of like a table, with three columns. But it's not a table. Tables are bad ideas in web design unless you actually have tabular data. So here's something that looks like a table with three columns but actually is a grid layout. Here you can see some of the selling points of the courses learn online, lifetime access and so on. That's also this sort of three column thing going on. If we change the size of our viewport here then as we shrink this, you'll see that eventually it will get small enough and that happens pretty soon maybe too soon, but that's okay. Eventually the layout will decide this is too compact to be columns and it should instead break into three vertical slices. So as we shrink this here, you'll see it's done that already. As you get it smaller, the images actually shrink. Something like this. So now, we're in this phone mode here where these no longer are columns but have been wrapped into sort of vertical slices. The same thing happens down here. Right now it's like this, but eventually as it gets a little bit bigger trying to keep it in line here It's big enough it decides oh we have room to put these side by side. So that's the grid layout in action right there. Now another thing that's pretty interesting although I did just notice at just the right resolution there's a little bit of a glitch. Up here, notice that we've got a bunch of stuff. We make it full size, we've got course, apps pricing, business, and so on. But as it gets smaller, we might not have room for all of these things, so we also have some responsive design going on here. Notice that the podcast goes away as soon as we start to run out of space. My resolution is pretty small so that happens pretty quick even though it's wide on my screen. So if I keep going smaller and smaller there's that little glitch and before it gets totally small it decides eventually, hey there's not enough room here so we're going to turn that to this drop down menu, like so. Now, that is a Bootstrap responsive layout thing nothing to do with the grid. Also, you might have noticed down here as we change the size of these things the actual images themselves were changing size. Also not part of the grid layout but Bootstrap's interaction with the grid layout. So, if we look at this, for example you can see this has the two classes image and image-responsive. That tells Bootstrap it should basically take up as much space as it can in the container and it'll be shrunk down as it interacts with the grid. Right, so you can see as it gets bigger and smaller that's the responsive bit. Okay, so this is the grid layout. It's really, really nice for putting together sites that look good on desktops, but also on mobile browsers and various resolutions.
|
|
|
transcript
|
1:12 |
Last example, you saw me come over here and start resizing Firefox saying, oh when I resize it like this it's probably like a phone. If I resize it like this, it's probably you know, something else. However, we can be way more precise about that. If we come down here to Tools, Web Developer and switch into Responsive Design Mode or hit Alt + Command + M, whatever you want. It'll actually pull up a little, simulated phone type thing. So here, we're in iPhone 6, 7, 8. Notice it's basically how it looks on iPhone 6, 7, 8. We navigate around, we route our courses things like that. We could also switch to, what do you want to do? Kindle Fire, something else, right? So we could go to an iPad, here's an iPad let's switch back to the phone real quick. How's it look when you hold it sideways, for example. You can see, well, this is how it looks when you hold it sideways. Kind of, maybe those pictures are a little bit big. But you get that idea, this tools are really, really nice. You can even say, I would like to simulate a good 3G or regular 3G connection as you interact with it. Okay, so, when you're thinking about playing with these grids and other responsive elements leverage the design tools inside your browser.
|
|
|
transcript
|
1:35 |
Let's dig in to how we create grid layouts with Bootstrap. So here you can see in our repo we have a grid layout set HTML file. We're not going to write much here we're just going to get started playing with it. So if we open it up, you can see it has this gray tabular looking thing going on here. We have some column mediums, some column smalls and column larges here. And I'll tell you what all that means in just a minute. What I've done is I've taken a grid layout and I've set some styles so they appear gray. Normally, they don't have any visual style they just wrap content. But so it's super obvious for you see I made them gray with borders. Now here's the way this works. We already saw the grid layout in action. As it gets smaller and smaller, the layout decides actually we don't have enough room to be in tabular form anymore let's break into slice and stack vertically. So if we do that, what you notice first is that LG ones will break right there. But the MD and SM ones are still there. So what gives? So these descriptors that we're using here say I would like to act like table or a grid, horizontal grid only on a large or larger screen, extra large whatever, screens larger than a certain resolution defined by what large means. These others say, I'd like it to be like a grid on a medium sized screen. This one, stay grid like all the way down to small screens. And you could even go to extra small. So let's make this a little smaller and we should see the mediums wrap pretty soon. Bam, there they go. But the smalls should still be there 'til we get you know, below small. And I'll show you a little table of what small, medium, large, and what not is. So that's how we define our work with, these grid layouts.
|
|
|
transcript
|
3:25 |
Let's open up that grid HTML file over here in PyCharm. We're going to dig in real quick and just see what it's like to actually write this grid layout. It's super easy to work with. So the way it works is we have a div here that is a container. Within the container we have a bunch of rows. Within each row we have some other elements some other divs that are broken into columns. Now, the rule with the grid layout is that you have to have 12 columns per line. Either it's 12 across, or it's all broken vertically as you saw, right, when it gets too small. So here, for example, we have one that's eight and one that's four, and that adds to 12. Here we have 12 that are one and if we open up this one here you can see we have three that are four. All of those combine to being 12 total segments. So that's pretty much it, it's really, really simple and then just put your content in here. And the content we had was just the class name for each section so that it was really easy to show you and you can play with it, and so on. Let's go through this and add one more real quick. Come over here and add a little header for each part. We're going to save the old section and generate a new one. Original section. Now here we'll just have another one. Just hit Tab to expand that. So we can do section. So the way we're going to do it is we're going to have a div which has a class container containing multiple, potentially multiple, rows in each one of those rows, some number of these columns that add up to 12. Now, they could be uneven or they could be totally even, like this. Now, PyCharm has this really cool feature called Emmet, or Zen Coding or we can use CSS-style shorthand to generate this stuff. Sometimes its helpful, sometimes it doesn't help so much. But if I had a div and I wanted to say this has a a class container, in CSS I would say .container and then if I wanted to say it immediately contains I'd say arrow, and I'd say a div was class row and then it immediately contains a div let's say col, medium, four and I want three of those, so you can say times three. If you hit Tab, check this out. Sweet, right? Thing one, thing two, it even navs you through the little section there. So let's go ahead and see what this looks like now. So now we have our new section. Thing one, thing two and thing three and because we chose medium, it's going to wrap when it gets down to medium sized stuff. Let's add one more bit here just to show you what we can do. We'll have a row, and this time we'll have some small sections. Let's have one, just put one, four and then what do we need for the balance? Seven. Here we go, one, four and seven and you can see how we can break this out and make it a little smaller. Because it's small, it hangs onto its grid a little bit longer, and then it breaks out. So there you have it. Super easy to use this, right? If you can just drop in a container with some rows and then add the column values and of course in PyCharm you get sweet auto complete on that. A little rmg, you can flip through those extra large, small, and so on. That's all there is to this grid layout. Pretty easy to implement, you don't need any Java Script, it's pure CSS and it really makes laying out your page in interesting and yet mobile friendly ways, really nice and easy.
|
|
|
transcript
|
1:43 |
Let's talk about the grid layout concepts really quick in review here. So we saw this grid layout with some very egregious styles to make the grid elements in the borders and stuff stand out super strong. As you saw on the training site none of this actually shows up unless you want it to. Right, it's more about controlling your content like here as a teaching tool gray with grape order is what we get. And what we do is we define various rows each row has 12 slices and those can be broken into: three elements of four or 12 elements of one or two elements of six as you can see. We also specify the size: small, medium, large, extra large things like that. And in HTML it's super easy. We have a container - the container has rows. Each row has divs of classes of column minimum grid size and then the number of columns each one of these represents so call medium eight. So here you can see there's column medium eight and there's column medium four. I also said I'd give you the exact numbers for what define small, medium and so on. Things that are less than 576 pixels are defined to be extra small between that 576 up to 768 is small then medium starts there and large at 992 and beyond 1200 that's extra large - definitely call that an extra large display. So, here's the actual numbers that are used to define when these grids break from grid tabula style into horizontal slices stacked vertically. That's it. Totally recommend using the grid layout. It's very easy and very very helpful especially if you're going to support things like mobile devices and why wouldn't you support mobile devices right?
|
|
|
transcript
|
1:15 |
Another really visible aspect of Bootstrap are buttons and, related to that, forms. So let's take a look at them. Here's Wistia, the sign-up form where you can create your account on Wistia. Now Wistia is a video hosting company. I don't really use them for anything but they're a pretty cool company and it's a decent login page. It's kind of nicely styled and somewhat unique. And notice, there are a couple of buttons here. We have a button down at the bottom which is going to submit the form in HTML. That's actually a button in HTML as in angle bracket button. Probably has type equal to submit or something like that. So this is actually a button that HTML itself knows will submit the form. Up here, we also have a button. But that's not actually a button. It's just a hyperlink. These could look exactly the same. Or they could be slightly different like they are here. But the idea is we have this concept of a button. I click on this big thing and it does button-like stuff. It does some action. Whether or not that's buttons or links in HTML doesn't really matter. My rule of thumb is it's a button if submits a form otherwise it's a link. That's pretty much the way it goes. But the visual aspect and the conceptual aspect of a button and whether or not it's actually a button or a hyperlink in HTML those are separate. And Bootstrap lets us easily style both hyperlinks and buttons in this way.
|
|
|
transcript
|
4:47 |
Let's open up our project again and now we're going to create some kind of login form using all the Bootstrap things. We're going to use the stuff to style forms in Bootstrap and the stuff to create buttons, of course to submit those forms and navigate around. So, just go over here and create a new HTML file call it buttons, here we go. Now, let's just go and make a little room here and we're going to have a form, and in the form it's going to have an action that posts back to this page so that's going to be fine, and the method will be post. In our little form here, let's have a couple of inputs. One of type = texts, we could set the name to be email, so it'll get submitted back and let's do another input, type password the name, you guessed it, password, like that. And let's have a button here and on the button I'm going to have type = submit and the message will be login but also maybe if you don't have an account we'll just have a button that says, or hyperlink for the moment, that says register. So, we'll call this register.html we can make that in a second, and this'll just be register, create an account, you know, whatever. Let's really quickly create that. We won't do anything with it, but just so it works when we navigate over to it. Let's see this beautiful site that we've created how are we doing here? Oh, that's good looking, isn't it? Well, I guess it's good looking for 1995 but no, it is not. However, our form is in place and we can submit it, you see the little flicker right there, or we could go over and register. So, it's kind of working. I don't know what those are, right maybe that's an email, username, I don't know something like that. So, let's do a little more work here say a placeholder, this is going to be email we'll do a placeholder and this'll be password and then let's make them both required. Here we go, that looks a little bit better when we try to submit it, say that it's logged in and we could even do one better here instead of being type text, this could be type email. So now, if we just put stuff in there it'll say no, no, no, that's not an email address. Super, okay, well it looks terrible. Let's make it look better with Bootstrap. So, the first thing that we're going to do is we just have to include Bootstrap in our page. Now, normally this would happen, kind of automatically in Flask, right? We would just be using our common layout theme and we'd wrap up our little content in that so this would happen automatically but for this one, we've got to do this and just doing that, let's have a quick look and see how it looks now. Well, maybe without the thing. So, it already looks better, you know there's still more to do, it doesn't look like a Bootstrap form, these aren't buttons from Bootstrap but it does look a tiny bit better. Let's add just a little bit of style here we would normally put this in a style sheet but I'll just put it in a style tag just so it's all together and simple right here for this super simple example. So, let's go to our inputs and say that they have a margin of 10px. Here we go, that looks a little better. And then, let's say that we have a form and the form has padding of 20px. Still looking kind of boring, but a little bit better. The last thing to do, let's focus on the buttons. Right, that's the primary part of this what we're trying to focus on right now. So, we have two things here. Like I said, they haven't taken on any Bootstrap styles cause we need to add certain classes to them. So, in order to get this to work, we need to say that this has a class of btn. Now, Bootstrap likes to have these, sort of category and then modifier classes so we would say btn, and then what kind of button btn- we could have danger, we could have dark we could have success, we could have primary things like that, okay? So, let's go with success here, and just see what happens. Do a quick little refresh, ooh. That's looking a lot nicer. It's a little bit bigger than the form so we can also form input, so we can say it's a small button. It's not perfect either, but I feel like that's slightly better. And we also have this one, so this is actually an HTML button, right, this one is a hyperlink. But it doesn't matter, we can apply the same basic class to it. But instead of doing success, let's say this one is danger, now, we don't really mean danger but it makes it red, and red tends to convert well or get attention, or so on. So, here you go, just as simple as that we have a true button that submits the form or attempts to submit the form and then one that's also a hyperlink that just navigates us away.
|
|
|
transcript
|
3:31 |
We have our button style but would you accept that as a login form? I don't know I guess maybe in 1995 you would you would not accept it now. But we're actually so so close to making this beautiful. Lets just do a little tiny bit more work here. Over on this lets go to the body and set a background color. It didn't matter what I pick, I'm just going to use this little feature here that lets me kind of pull and grab cool like, lets go for a light blue but then lighten it up. That could be a cool one and then for the form I say background color is white. How we doing? Okay, next lets have this kind of float in the middle so we're going to say max width is going to be 450 px. Better, getting there. Now I'd like that to be down and centered. Right how do we do that? Well we can set the margin left to be auto and the margin right to be auto and that puts it right in the middle you can see it centers, that's a pretty cool little trick and then lets say margin top is going to be 50 px pretty good and hey while we're at it lets do border radius to be, I don't know, 10 pixels. There we go, beautiful. Next lets come down here and we'll put maybe an h2 login here we go and lets have that centered as well do a couple of things, also want to center those buttons and put them on their own line so I'll put them into a div. I'll add a class of actions up here we'll say the actions and the h2's have a text line of center. There we go, a little bit better. The only thing we have left to work with are those two things right there. Now that turns out to be pretty easy. We can come over here and say that these do we have a class, no classes yet so we'll say it has a class and it'll be a form control, this is a bootstrap thing. Ready, look at that, looks pretty awesome. I really like the way this looks, it kind of lights up when you go in there, its got the cool rounded edges if you make a mistake that rounded edge turns red really quite nice. Now one thing that is a little funky that seems to happen here always is a little too much padding on the right so lets just go to the form, say "padding right" it's going to be 30 px, lets try that. There we go, good enough maybe 40 something like that. Here we go, I feel like that's pretty balanced right there. So there's our login page. We used the bootstrap form control there and the button style right there and you know there's a little bit more work to do. So I feel like our little login form is looking really good, we used the styles. One thing to note if we didn't set this width here like so, they actually look really bad and bootstrap is kind of mobile first in its style it look okay like that but it looks terrible like this. So you want to either constrain the size of these things or just put them into something that is itself constrained like this and then it will look really good. That's it. Hopefully you like this little log and form we built and you saw how incredibly easy this was. Had a couple of classes on form elements make our buttons button style and off we go.
|
|
|
transcript
|
1:30 |
Let's review some of the core concepts here. We saw that buttons in Bootstrap are easy. Here's a button and this one actually submits a form right on the homepage of Talk Python Training. So, in HTML we have a form, it's going to post back to get notified, it has method post and some inputs and so on. And then here we have a button and the class is btn and then btn-danger that tells Bootstrap to make it this red color and round it and look like all the other Bootstrap buttons. We also saw that links can be buttons just as well. On the homepage of the training website as it is today at least, if you scroll down there's a link that says go check out the podcast and I want that to look like a button just like the get notified, but in fact in HTML this is a hyperlink. How does this change from being a button to a hyperlink? Well, all you do is put exactly the same CSS classes on there, btn and this time btn-primary to make it blue by default. There are actually six types of buttons the default one which is you don't say default you just don't have any modifiers there. Then we have primary, success info, warning, danger and then nothing at all which is just a link. So, you can choose among these you can even create your own extensions but the idea is that you don't say blue green, orange or whatever, you put some kind of category on it and then you style around that category with modifying themes and so on. So buttons, whether they're true buttons or just hyperlinks are really, really nice and super easy in Bootstrap. So make sure to use them plentifully.
|
|
|
transcript
|
1:43 |
Themes are one of the things that make Bootstrap super, super awesome. Every now and then you'll hear people say negative things about Bootstrap. Oh you shouldn't use Bootstrap real designers don't use that. Or whatever, yeah, but what you're going to see in this little section here is going to jumpstart your project so much that you know what, let people say you shouldn't use Bootstrap. All right, I think it's wonderful. We also talked about Bootstrap being more popular and this is one of the benefits. There's not nearly as many themes around Materialize or the other, less popular front-end frameworks. Because this is the most popular one there's not just themes, there are sites entirely dedicated to open source themes, even selling you themes for relatively affordable prices. So let's dig into that. So remember, we started out with this dreadful page. This is a truly, un-styled HTML page. Should be scary to anyone who needs to make it look pretty except for those who have decent amount of experience with web design. However, dropping just the Bootstrap's CSS on the page made it feel like, okay, yeah this is looking better. Yeah, yeah, we're making a lot of progress. But the next step, is much bigger, much bigger. So if we go to one of these Bootstrap theme sites and we grab a theme and we drop it here it goes from terrible, to decent, to incredible. Right? Look at the difference. These are not even in the same category. We're going to be able to find themes like this last one here that are beautiful and you know drop it into our common layout in our template and just, boom, our site is going come alive. So you definitely, definitely want to at least tour or look through some of these theme sites and see if there's something that really catches your eye. A lot of them are free and open source. And if they're paid, they're usually super, super affordable.
|
|
|
transcript
|
5:45 |
Let's have a look at some of the themes that I found on the internet for Bootstrap. So there's two sites I want to highlight for you: Start Bootstrap and Wrap Bootstrap. So, Start Bootstrap mostly has free themes although I believe they also have some paid ones whereas Wrap Bootstrap mostly has paid themes. So, let's go through a couple that I've found here. This one, from Start Bootstrap, is pretty awesome. It's very similar to that one I showed you on the screenshot just a minute ago. Look how nice this is. You know, as you scroll down notice the nav bar goes solid but at the top it's transparent. Oh my gosh, this is smooth, smooth, smooth. So you go through here, you can see we've got what you need. These buttons are restyled. I like this rounded edges here. Really simple call to action, why you care about us. And then these little sections that tell you more about it. That's really great. Some more download. Click that takes you to Get Up. You get all the source code and whatnot. That is a super, super good-looking theme. I really like this one. So much that I actually built something with it. Check this out. So, here's a site that I made at freemangadvcourse.com and you guessed it: it's for my free manga DV course. But I took that theme and applied it here and adapted it. So, I would say it took me about a day to come up with all the images. The hardest part is to figure out what you want to say on here and so on but notice it's distinctly mine but also you should see a lot of similarities. Like this button right here, obviously, right? Very cool. So here it comes in, tells you why you care about it, right the simplicity of scaling and so on. You can take the course, a little call to action. A little video, all right, the intro video there. We again have those cool highlights but these highlights sections from the course, right? Things that are covered there. Come on here and get the source code some stuff about students all that stuff about what's covered. All the stuff, the student stuff here, the stuff right here this is actually data-driven off of some APIs we have so it's pretty cool, pretty nice but we took this theme and we wrapped it up. I don't think, if you look at this site like, oh, this is someone else's site or some common theme. It looks pretty unique. But you go back to what we started with, right? You can see pretty easily where it came from and that's no problem; I don't mind. I don't have to be a snowflake. I just want to have a really pretty site that people love when they get to it. There's an example of actually using one of these. Here's another stylish one I like. Has a lot of bold pictures and whatnot. So you come in here, you can see what it has to offer. These big, bold pictures, like with that scissors and whatnot here, the projects that they work on nice little animations when you go to them. Cool little map. Speaking of bold photos. One thing you can do to make your site look really, really good is have proper graphics, nice, rich graphics. Like, you saw that on this theme all over the place at the bottom and at the top and a lot of people pay for stock photography but you should go to unsplash.com, down here. If you want something of like the sunrise something to do with the sunrise they've got all these cool pictures and every single one of these is royalty-free attribution-free. Wonderful. So check out unsplash as you're going. All right, let's switch gears a little bit. Maybe not a cool marketing site but maybe a dashboard like an analytics reporting type thing. So here's a cool little one. You've got like this nice little live chart. Check out those animations. That's so cool. And we can go down here and we can have these little cards and stuff. Here's like a nice login template. Not incredible, but it's fine. Here's some charts. Here's some tables, and so on. So I really like this one. And you just grab this and start using it. Pretty cool, huh? Here's another simple one. It looks like, at least here it looks like there's nothing here, what is this? Or really hardly a theme at all. There's this cool little sidebar that comes in and out so if that works for you, go for it. So that was all Start Bootstrap, very, very cool. Here's the Wrap Bootstrap ones that I chose, also great. So let's scroll down here. I told you these were paid, right? You got to pay for them. A lot of people are against paying for designs and graphics and whatnot but I want to just show you how awesome some of these are and how cheap they are. So, for example let's suppose you want an e-commerce template here. If you could pay $24 and go from zero to nearly designed website that is a seriously good deal; take it. So as you can see, $15, $10, $30, right? No problem. These are not, like, expensive, but they do cost money. All right, so check this one out. Look at this admin page. Like, that admin page I showed you before was cool but this one, wow. And if you refresh it it has these cool animations down here and stuff. So you've got this great dashboard little tabs you can switch through. Let's see, it has like an email-looking thing in it. Yeah, email, right in there. That's pretty awesome. I mean, not real email, but design, right? You got these cool different charts that you can throw on. Really, really nice. That one's a great one. Let's see, go to projects. You got a gallery. If you want to build a site that has this kind of stuff in it all right? This, I don't remember what this was. I think it was like $35 or something. This is totally worth starting from instead of starting from scratch. I really, really like that one. Two more real quick ones. Here's another one for designers that has these cool, like fade-ins as you go so as you scroll down they all fade in. It doesn't quite work so well with my resolution, I guess but maybe adjust it a little bit. But those are really cool and then over here another one that does a similar thing. You can see clearly the grid layout happening here. Little animations, the stuff fades in as we scroll to it. Pretty nice, right? So, maybe some of these resonate with you, maybe they don't but there are a ton to pick from. Go look at the popular ones and see what one works well for you. So here's just one of the benefits of using Bootstrap. You can grab one of these pre-built themes and you are so much farther down the road on web design than if you started from scratch.
|
|
|
|
28:42 |
|
|
transcript
|
3:14 |
We've seen what cool stuff we can build with Bootstrap and how nice we can make our sites look. It's time to actually make our pypi.org site our demo site that we're trying to build look like it's supposed to. Well, here's what it looks like now. Let's see how close we are to our goal. So, we have some packages listed here that's pretty close, probably. Yeah, no, maybe not. So, see this is running on a localhost this is also the Flask final product and what we're going to build. We do have a list of the popular packages so that's kind of in line with it. Here we have a login screen and a registry screen. These should look pretty familiar after what we talked about with Bootstrap in forms and buttons. And then if we go to one of these you can see we have the details here we have the version we have some instructions on how to install it what's going on the licenses it uses and so on. So, this is what we want to build this is what we have and what we're going to do is, basically rip the stuff out of here to get started. So, we're just going to go and start applying, step-by-step the designs and elements that we see here until we get it actually running together. So, not everything we're going to entirely implement at this point. For example, we don't have a database so a lot of the data-driven stuff won't be there. We'll just keep using our fake data but we're going to get the design as close as we can. So, we're going to start by just focusing on this page the Homepage here. Try to get this section this big thing up here is typically referred to as a Hero Section or a Jumbotron or something like that. Get these little bits here about the number of releases and the stats and then these lists of our recent projects. Okay, so our goal, at first, is just to get that in place. Let's go over here and do a few things around organization before we actually get started. First of all, we don't want to just have just everything in static. So, let's do a little more work here. We're going to say, "Create a directory called images." Or imj for short. Kind of like that. And then over here, we'll have a JS. We probably won't even have any JavaScript for real but this is a pretty good organization to start and maybe even sub-directories within images and so on. We also have a little site.css we've included that over here and you can see that that's doing a little bit of work for us, right? You can see it's basically coloring our nav bar and stuff like that. Let's just double check that it's working. I've got a cool little thing that'll work with h1 tags let's see. Yep. So, you can see changes to our static-style sheet are doing something there. That's terrifying, isn't it? That you can still do the blank tag. And, of course, if we go over to our shared layout here you can see we are including our style sheet. That's good news. And we're also just need to work with this. So this is going to get a whole lot simpler we'll just change this to Home for now and all of this stuff we can get rid of. Great, that blinking thing is gone and, in fact, we're also are not going to need the nav in the form that is right now up here. So we can just comet that out maybe leave it for an example a little bit. So now we have a nice, simple starter page and what we're going to do is we're going to start moving these elements over top to bottom. Well, we're going to skip the nav first then we'll get back to the nav. Okay, I think we're about ready to start writing our homepage.
|
|
|
transcript
|
5:12 |
The next thing that we need to do is we need to get our HTML elements in here. Before we can style them we need to get this basic design in. Now, sure I could go view source on this and just copy it over, but let's build it out so you can see how the process might go. So in this hero section we're going to define basically a div that represents all of that and this is going to be an h1 this is going to be an input box and then here, obviously just some simple text. Then here's going to be another little slice with some values you could use some grid layout on that potentially. Before we get to that let me just put a little bit of clean up in here to set the colors to almost black, background white. Things like that should really not have much effect but yeah, there we go, just sets that to be really clear. Now let's start by working with this piece here. So we go over, and the layout is going to drop it right there into our main content and our main content we need to have margin and padding set to zero. That's going to mess up our hero thing if we don't do that. Okay so in this, we want to have a div I'm going to call it hero and we're going to have our h1 inside there, so that's cool and the text is going to be this which I just borrowed directly from there. Let's see how this looks. It's not going to be so impressive yet. Getting there, sort of, slowly. So the next thing that we need to do, in here is that we're going to have an input of type equals text with a placeholder. Let's see what we had before. Search projects, the space, search projects and it's going to have a class of form-control. Okay? Good, sort of. The next one we had, below here, is down here we had a Or browse projects, something like that yep, coming along so the HTML is flowing, we're getting this in place the next thing we had is this section here and I want to put some styles on this so it's really easy to get to. So what I want to do is I'm going to have another div and it's going to have a class called pypi-stats and then within there we're going to put three things called stat. Now of course I could type it all out or we could use Z encoding, so I'll say PyPI-Stats contains a div with stat times three. Perfect, and what goes in the first one let's just say minus one projects next one was the releases, so minus one release I'll put minus one rather than zero so that we can tell when it's actually getting real data even if it's empty. Minus one users. How's this looking? Oops, this one; how's it looking? Not exactly what we were hoping for it's not a horizontal slice, but remember CSS can do that. This next one we want to set up a little bit of a grid layout, so we're going to have a div which is a container, remember, that's how it goes and it has a div, and it has a row and then it has a div, then it has a column let's go with medium, and I'll say four cause we want three of them, expand that out and then what I actually really wanted was not to have it equal value here I'm going to set this to be three, that to six and that to three, because that adds to twelve, remember? And then here, we're going to have an H2 which will be new releases, like that let's just see how that's coming along. Mmhmm, looking pretty good, pretty good and the last thing in here is we want to have remember, over here, we want to have or have hot off the presses, we can add that and then we want some of these little blocks for each one we're going to do a repeat on that, so here we can have a SPAN, maybe a div, with that hot off the presses and then in here, what we want is we're going to have a div that's going to represent each project or package. So I'll say project, contains a div with a title which contains an a, hyperlink I'll just put that like that, can just be proj for a moment. Okay that's good, and then also, in here we want a div that has a description and we'll put description. All right how's it looking? Looks good over there, well that's okay but remember what we wanted before is we had a really cool loop here and I'll just show you a cool trick I could obviously just type it in, but this is kind of fun I could go over to the local history and say, what was our loop? Remember we had this, here? So if we wanted to mimic that, of course we could come in and say for each one of these projects like that, and now we should have it three times and if we actually go in, we could say p.name, p.version, just the description until we have more details. Woohoo, look at that, we got our releases sort of back of course did not get them from the database but it's all coming in. So, how are we doing? Well, they don't look at all the same. But in fact, I think we basically have the HTML in place we might need to tweak and add a style or class or something here or there but I think that pretty much defines the homepage without the CSS.
|
|
|
transcript
|
5:22 |
When I was new to web development this would have been a scary proposition to be given this and said yeah make it look like that one because to me they don't look at all the same. However, you'll see we can do some really cool CSS tricks to get there, quite quickly. So, I want to focus on this big blue section, in this video to get this hero section all designed. Let's go back over here and we're going to say .hero and notice how cool that PyCharm finds this anywhere you use a class in HTML, it's like oh, you probably want to style that so, we're going to auto-complete that, here. And the first thing I want to do is set the background color. I'm just going to paste the value I got from before. I've just grabbed it with some design tools. Here, you can see we can go find it. That's in hex and it's going to go and set the background there. Good start, right, good start. Color's not so amazing, so let's do that. Color is white. Here we go. Hey, that's even starting to look like it, right? We also notice here this hyperlink was supposed to be white so, let's style that, so we can say, .hero a color is white. Here we go. Do we want underlines? I think we do, so let's add a text-decoration to be underline. Here we go. Which are good. font-size is not quite there so, we want to change the font-size a little bit. So, let's go and make the font-size let's put 14. There you go. I feel like those are pretty good. The font-size of that thing is much, much too big. So, let' style that really quick here. Let's put 28. Here we go, close. They're not exactly the same fonts that's why there's a little bit of a discrepancy I think that's okay. We'll get to the font. We also have our search box but the thing I think we need to do next is focus on getting it to be big and airy like the space that we have here this is nice. Just cram it up there like that not nice. Let's do that next. So, here we can set the padding to be 50px and 0px see if that was the way I want it yes, perfect. So, padding on the top and bottom not on the side. Let's say text-align center. Closer. Yeah, I think this does it more or less for that except for, notice how this is much smaller and so is this. So, let's go set some styles on those things. Maybe we could do a little better by actually putting them into a container. Lets call it hero-inner or something like that and we'll just go set the style of that sucker here. So, come down here and say hero-inner and what do we want to set it to? Let's say max-width not really sure what we want. Let's put 500 or make the font smaller. Yeah, let's make the font smaller. So here, let's put 24. There we go. Feel like we're close, we're close and we also need that stuff to be in the center. So, let's do that again and then we'll say margin-left is auto margin-right is auto now, it's in the center. There's a little more space around each piece, right? So, browse projects it's got more room below it. Let's say margin-bottom is going to be 30px. That's pretty good and maybe let's say hero h1 we'll say margin-bottom is also 30px to put some space between the search box. All right, pretty close. Let's un-highlight you got to remember that bar at the top that's not, that's not there and this other one I guess we can go and add that really, really quick just as a placeholder. How large is it? Let's see. It's 85 high, so we could just add a go back and add our nav up here at the top I guess. Let's go to our nav and set the height to be 85px and just see where we get with that on terms of the other one. Think it's a little bit high because it has padding. Let's put that 65. There we go. I think they're basically the same size but the color is wrong. So, let's just set the color real quick. I don't think we actually want it to stay this color. There you go. Looking pretty good don't you think? All right, so our hero is more or less in place. We need to change the fonts and maybe change the border-radius on those so they look a little bit more like what they do on PyPI and less like standard bootstrap but I feel like we're quite close close enough in terms of calling our hero done for our first pass.
|
|
|
transcript
|
3:20 |
The next thing we want to style is our stats slice as I call it here. So you can have these number of projects and releases and so on and it's supposed to look really cool like this all laid out and in the center with gray and a little stand out border at the bottom and top and yet it looks like this. So let's go work on that now. Should be actually quite easy. So the first thing we want to do is you know see what those elements are. It's going to be PyPI stats here and within there we have a stat. So let's say PyPI stats then .stat like that. And the first thing we want to do is have them go horizontal instead of vertical. So remember that display. In line block it could be inline. It would also go horizontal but you couldn't set the box style like padding and stuff. All right kind of good. Let's set the color. Over here we have this gray and so let's go up here and say .pypi-stats. Set the background color to be this thing I've just copied because I just grabbed it from over here. There we go all right. That's some progress, some progress. So let's give it a little more room here. Let's say padding is 10 PX and zero. So top and bottom 10 left and right zero. Little bit better. And let's also say text align is center. Okay well it's in the middle. That's pretty good. Let's focus on these for a minute. There's a few more settings I want to set like border and whatnot here. But let's go over here and set this. On this I want to set a minimum width so they have that spacing around them and I'll set that to be 170 PX. Found that just by playing around with it. There we go. Now they have that little bit of space there getting better. Let's set the padding around them to be 10 PX. Little more room. Yeah starting to look more like it. Okay font side let's set that at 16 PX. How we doing? Mm-hm. Let's set the color. And there's the color I just grabbed from pypi.org. Let's see what we've got. Okay there's the color. Oo looking quite good. There's still little nice borders and stuff on the other one I'd like to add. So let's go over here. Save border at bottom. Make one PX solid. And let's use that color right there. And we'll do the same for the top. Have a look. Yeah it's not super impressive but I like that little line just a little more dark gray than what we had there. Yeah I think it's looking pretty good. The fonts are looking a little bit different. I did go and figure out what fonts were being used on this page. So let me just show you that real quick. This is actually a Google font that we're using. So we're linking over to fonts at googleapis.com to source sans pro and using that way up at the top setting the family like that. Okay so that's why those look a little more similar. Also set the border radius on the input so it looks more like PyPI. Okay I feel like you know these are not super exactly identical but they're close enough for what we're doing so far. So yay stats slice is done.
|
|
|
transcript
|
3:48 |
Now we're getting to the heart of this page. What are the new releases? At least the heart of the data on the page. So here we have these cool little boxes and we have a link, and a title and a little description there and so on. We don't have all that data but you did see that here we have at least some elements we could stick in there and we have this fake data. So let's go and convert this bland section at the bottom to something more like that. Turns out it's pretty easy. So I did add a subtitle to this little hot off the presses, so we can style that and let's just go do that real quick. So. The other thing we want to do, actually is say that this is not just a container but this whole section here is also a project list. This is where it contains the projects and so on. So that way I can say .project-list and then all the h2's in there h2's sorry sub, .subtitles font style to italic. There we go, I think if you notice over here that it's italicized and now this also is right there. Okay, that's a good start. Let's work on that big subtitle there so top project list, h2, let's set the font size to 24px and the font weight to bold. Probably won't make a huge difference, but a little bit. There we go new releases like that. Perfect. Now, we're going to get to the main part these little gray boxes here. So, if we look over at the CSS layout here we have, project, which is contained within a project list and then we have some titles and descriptions. So I'm just going to paste some stuff. So for the projects within the project list don't have a border, some padding, some color minimum height, and margins on the top to separate them from each other and same on the bottom. Let's go refresh that and see where it takes us. Ooooh, that's pretty good right? Already looking quite nice. For the next thing let's work on the little title here. I don't actually know why that that is bold. Let's see. Is it bold in the other one? No, I don't think so... That was from, I think that was from us doing the design earlier. There we go, that looks a lot better. Okay so now, the think we're going to work in the project list, top project and then let's work on the title there. We could have set this as well and it would have overwritten it. So that'd be font size 20px make that a little bit bigger there we go. Like that, and then we want to make this little subtitle thing there in the description to be italicized. Go here and set the description let's set those back to 16 like so. Font weight is normal. And font style, this is also italic. I mean, how close are we now? Okay that's looking better. Ooooh, getting pretty close, notice the color of the links is off for the project. So let's go and set that. Come over here and install the a's better contained in here. Here we'll set the color to, 006D again just figure that out with some design tools. There we go, alright so I feel like we need a little margin right there as well. Let's do that by putting that on the bottom here some margin bottom that's 30, 30px let's say. Ooh, alright that. What do you think folks? That is a pretty decent homepage, right? And it has no NAF yet, granted, but we'll get there. But it, you know looks pretty darn close. I'm pretty happy the way that came out.
|
|
|
transcript
|
3:49 |
The next major design element has got to be the navigation. Up here, we just have home, except for here we have a whole nice little navigation. This was the home that I left into the nav and it works, but it's not this. So, we're actually going to need a couple of these graphics. And, I'm just going to copy them over right there. So, we've got these cubes and whatnot. So, that's going to give us that little cube and then some others that are used elsewhere. I want to put the nav up here and this is going to come from Bootstrap. And, just let me tell you, the Bootstrap nav is not obvious how it's put together and it's super touchy in terms of styles and IDs and things like that. So, I'm just going to copy this over. But, the way I got it was I went to the Bootstrap documentation and I just said I've got a little example. There's even a button to say, Click to copy this and paste it into your site. So, I'm going to paste it in and then talk about it real quick. So, over here, we have this little nav and we are using the HTLM5 nav and that was fun but here's the Bootstrap one. Boom, so you can see that there is a bunch of stuff going on. Let me tell PyCharm that's spelled correctly. So, we have a toggleable darkened nav bar that is expanded up to the medium size and then it collapses. And, we have a brand section. This is our little picture I talked about. And then, here's the thing that is going to let us expand us expand it again when it collapses. This, actually I had to add these in. There's some weird thing going on where I can't get this to appear. It's supposed to have an icon and maybe there's some missing include I'm doing somewhere. But, I didn't think I missed anything. And then, here, we get to the real content of the menu. We have a link item for donate, one for help one for log in, and one for register. Log in, register don't exist really yet in any meaningful way but at least we'll have them there to play with. So, let's see what effect this had and it won't be perfect, but it'll be close. Decent, we got that up there. Those are technically there. Their size is weird and so on. So, we're going to need some styles. We're going to need some styles to fix that. So, we have our nav up here and I dropped in some styles and it's going to make it a lot nicer. There's actually a bunch of styles here. I'll just scroll through them real quick. I put them into their own nav stylesheet. It's not really worth going through here and talking about all the details here. You can adapt it to yours or you can just restyle it from scratch. But, I want to make it look exactly as close as I thought was reasonable to what was on pypi.org and not what Bootstrap wanted to suggest for it so I had to tweak it a little bit. If we go over here, you can see as I cycle back and forth those are pretty darn good. The font size on this part maybe is a little bit off but neither of them perfectly match PyPI, so it's okay. I think our nav bar is pretty much perfect. One other thing we do have to do here. It's perfect in this form, but if I shrink it, watch this. Notice we have this little bit of weirdness going on where that icon doesn't show up. I'm not really sure why that is. But, we need to include one more style here and this is to style those little Expando elements I added in. Now, if we go back and refresh it, ah, there we go. And now, we get our expanding menu. I guess we got to set the background color as well on that, probably, but it's pretty much working. So, just because of that transparent background weirdness I decided to throw in a little style here. Let's have a quick look. So, we go click on this. Now, it has a background color. So, that's a little bit nicer. We don't have our log in page yet but, like I said, we're getting there. So, our navigation though, is working really nicely.
|
|
|
transcript
|
3:57 |
The final element before we call our over-all design done is to add a footer. If you look over here, you can see at the bottom there's this cool footer that says this is a fake site you should actually go to www.pypi.org if you really want a package and it's from Talk Python Training. So we want to have that on our site over here but of course we don't. So let's go and add that real quick. We'll have a footer, I'm going to use the HTML5 footer tag which is ideal. Now there's a bunch of texts that you don't need to see me type so why don't I just paste that over. Here's our this is a fake site and so on let's see how we're doing in terms of how this looks. Hmm, let's go do a little bit of style over here in the site and then I'll say we're just going to target the footer tag, we'll have a padding of 30px text align center, it'll help. Hmm mm. Good good good. And then we can set the background color, 00d now check how cool that is. It actually is auto-selecting. I've used this color before and it's automatically discovered it. Specific color, we have white as well. Then we go PyCharm, so there we go. That's actually pretty good. The hyperlink is not quite there. Let's see what that little think is in terms of color right there we go. Refresh, all right that looks pretty good. Tiny bit of line height difference there but you know, it doesn't really matter. Now this looks pretty good. But remember we have some other pages like about and now a couple of problems here. One, I feel like we could use some more spacing up there to push this footer down. So let's say margin top is 50px, that's pretty cool but it also looks really weird with this at the bottom so what I'm going to do is actually take the background off of this and set the entire site to be that and then just style the main content have a white background. So, I get off of here, and we go up there that's why I had that hanging around and then I'm going to take that and I'll put it there. I think I'll just do this at the top we'll have .main-content, it's background color is that there we go. That's pretty sweet right? So maybe also in this main content maybe we should set padding bottom like 50px as well. Looking good, looking good. I feel like our site is coming together. Yeah we definitely need some padding on that section as well. I like that so main content, oh I just realized right there that we have this, let's combine these together like so get rid of that, do a little clean-up. I guess I'll let PyCharm shorten that up. There we go, this is looking a lot better. If we go back to our about page, yeah it still could use some padding on the left or right I guess. If we go messing with the left and right padding it's going to go messing with how this thing looks. So, I'm a little hesitant to go moving around we'll just style the other pages to have sort of smarter elements that fit in there. Cool so I think this is looking really great. We've got our top nav, we've got our Hero we've got our stats lights, we've got our new releases and at the bottom we have this very cool footer. There's one other page that we could style. Remember we have /project/flask and this has nothing here. I don't want to work on the design for this. We don't have enough data to do anything. If you look over here, let's say this one there's a ton of stuff going on here and it's not, we don't have anywhere near enough data to do anything meaningful yet so let's just wait to will get to the SQLAlchemy section. We'll have real data and then we can finish out the design of this page. There's actually not that much more to do.
|
|
|
|
54:50 |
|
|
transcript
|
4:07 |
One of the absolute pillars of web applications are their data access and database systems. So we're going to talk about something called SQLAlchemy and in many, many relational based web applications this is your programming layer to talk to your database. SQLAlchemy allows you to simply change the connection string and it will adapt itself into entirely different databases. When you use a local file and SQLite for development maybe MySQL for testing and Postgres for production I'm not really sure why you would mix those last two but if you wanted to, you could with SQLAlchemy and not change your code at all just simply change the connection string. So SQLAlchemy is one of the most well known most popular and most powerful data access layers in Python. SQLAlchemy, of course is open source you'll find it over at sqlalchemy.org. It was created by Mike Bayer and his site is really good. It has tutorials and walkthroughs for the various which you can work with SQLAlchemy one for the object relational mapper one for more direct data access, things like that. So why might you want to use SQLAlchemy? Well, there's a bunch of reasons. First of all, it does provide an ORM or Object Relational Mapper but it's not required. Sometimes you want to programming classes and monitor your data that way but other times you want to just do more set based operations in direct SQL. So SQLAlchemy lets you work in a lower level programming data language that is not truly raw SQL so it can still adapt to the various different types of databases. It's mature and it's very fast it's been around for over 10 years some of the really hot spots are written in C so it's not some brand new thing it's been truly tested and is highly tuned. It's DBA approved, who wouldn't want that? What that mean is, by default SQLAlchemy will generate SQL statements based on the way you interact with the classes. But you can actually swap out those with hand optimized statements. So if the DBA says well, there's no way we're going to run this all the time you can actually change how some of the SQL is generated and run. Well, the ORM is not required I recommend it for about 80%, 90% of the cases. It makes programming much simpler, more straightforward and it much better matches the way you think about data in your Python application rather than how it's normalized in the database so it has a really, really nice ORM or lots of features and this is what we're going to be focusing on in this course. I'll also use this as the unit of work design pattern and so that concept is I create a unit of work I make, insert updates, delete, etc. all of those within a transaction basically and then at the end, I can either commit or not commit all of those changes at once. Cause this is an opposition to the other style which is called active record, where you work with every individual piece of data separately and it doesn't commit all at once. There's a lot of different databases supported so SQLite, Postgres, MySQL Microsoft SQL Server, etcetera, etcetera. There's lots of different database support. And finally, one of the problems that we can hit with ORMs is through relationships. Maybe I have a package and the package has releases. So I do one query to get a list of packages and I also want to know about the releases. So every one of those package when I touch their releases relationship, it will actually go back to the database and do another query. So if I get 20 packages back, I might do 21 overall database operations separately. That's super bad for performance. So you can do eager loading and have SQLAlchemy do just one single operation in the database that is effectively adjoined or something like that that brings all that data back. So if you know that you're going to work with the relationships ahead of time you can tell SQLAlchemy, I'm going to be going back to get these so also load that relationship. And these are just some of the reasons you want to use SQLAlchemy.
|
|
|
transcript
|
1:35 |
When you choose a framework whether that's for a database or a web framework it's good to know that you're in good company and that other companies and products have already tested this and looked around and decided Yep, SQLAlchemy is a great choice. So let's look at some of the popular deployments. Dropbox is a user of SQLAlchemy and Dropbox is one of the most significant Python shops out there. Guido van Rossum and some of the other core developers work there and almost everything they do is in Python. So the fact that they use SQLAlchemy that's a very high vote of confidence. Uber. Uber uses SQLAlchemy. Reddit. Reddit's interesting in that they don't use the ORM but in fact they use only the core. At least, wow, hey we're using only the core aspect of SQLAlchemy, that's pretty cool. Firefox, Mozilla, more properly is using SQLAlchemy. OpenStack makes heavy use of SQLAlchemy. FreshBooks, the accounting software based on, you guessed it, SQLAlchemy! We've got Hulu, Yelp, TriMet, that's the public transit authority for all of Portland, Oregon. The trains, the buses and things like that so they use that as well. So here are just a couple of the companies and products that use SQLAlchemy. There's some really high pressure some of these are under. You know if it's working for them it's going to work well for you, especially Reddit. Reddit gets a crazy amount of traffic, so pretty interesting that they're all using it and we'll see why in a little bit.
|
|
|
transcript
|
2:14 |
Before we actually start writing code for SQLAlchemy, let's get a quick 50,000 foot view by looking at the overall architecture. So when we think of SQLAlchemy there's really three layers. First of all, it's build upon Python's DB-API. So this is a standard API, actually it's DB-API 2.0 these days, but we don't have that version here. This is defined by PEP 249 and it defines a way that Python can talk to different types of databases using the same API. So SQLAlchemy doesn't try to reinvent that they just build upon this. But there's two layers of SQLAlchemy. There's a SQLAlchemy core, which defines schemas and types. A SQL expression language, that is a kind of generic query language that can be transformed into a dialect that the different databases speak. There's an engine, which manages things like the connection and connection pooling, and actually which dialect to use. You may not be aware, but the SQL query language that used to talk to Microsoft SQL server is not the same that used to talk to Oracle it's not the same that used to talk to Postgre. They all have slight little variations that make them different, and that can make it hard to change between database engines. But, SQLAlchemy does that adaptation for us using its core layer. So if you want to do SQL-like programming and work mainly in set operations well here you go, you can just use the core and that's a little bit faster and a little bit closer to the metal. You'll find most people, though when they're working with SQLAlchemy it will be using what's called an Object Relational Mapper, object being classes relational, database, and going between them. So what you do is you define classes and you define fields and properties on them and those are mapped, transformed into the database using SQLAlchemy and its mapper here. So what we're going to do is we're going to define a bunch of classes that model our database things like packages, releases users, maintainers and so on in SQLAlchemy and then SQLAlchemy will actually create the database the database schema, everything and we're just going to talk to SQLAlchemy. It'll be a thing of beauty.
|
|
|
transcript
|
3:10 |
When you're trying to model something like PyPI a website with a database the clearer of a picture you have the better you're going to be. So let's look around this running, finished version. Remember this is not even though it looks very much like what we built this one is actually the finished one that we're going to be sort of be aiming for. Alright, now we're not going to look at the code but we'll poke around what the web looks like and we could just as well look at the real one but let's look at this. So on any given package this is pulling up the package AMQP and apparently that's a low level AMQP client for Python. Okay, great, actually I've never used this. We have a couple of things going on here. We have the name of the package, the version bunch of different versions actually a description, right here. We actually have a release history so each package has potentially multiple releases. You can see this one had many different releases and we can pull up the details about different ones. Jump back there. We have downloads, we have information like the homepage. So, right over here we can go to GitHub apparently that has to do with Celery. We could pull up some statistics about it. It has a license, it has an author. So remember, up here we have a login and register so we could actually go login to the site or create an account just as a regular user and then we could decide as Barry Pederson apparently did, to just publish a package. And then there's a relationship between that user and this package as a maintainer and it's probably a normalization table. We also have a license, BSD in this case. If we want to model this situation in a relational database let's see how we do that. PyCharm has some pretty sweet tooling around visualizing database structure. So, here we're going to have a package and it's going to have things like a summary and a description and a homepage license, keywords, things like that. It has an author, but it's also potentially has other maintainers. So we have our users, name, email, password things like that. And then I don't have the relationship drawn in this diagram but there'll be a relationship between the user id and the user id and the package id and the package id there. So this is what's often referred to as a normalization table for many-to-many relationships so that's one part. And then the package, remember, it has releases. So here, each release has an id it has a major/minor build version a date, comments, ways to download that different sizes as it changes over time. We also have licenses, that relate back there and we have languages. So here, this is going to relate back say to that id right there. Finally, we're not going to track any of this but there actually are download statistics about this about downloading all these packages and the different releases and so on so we went ahead and threw that in there. So this is what we're going to try to build but we're not going to build it in the database. We're going to build it in SQLAlchemy and SQLAlchemy will maintain the database for us. Think the place to get started is packages so let's go on and do that.
|
|
|
transcript
|
8:31 |
Let's start writing some code for our SQLAlchemy data model. And as usual, we're starting in the final here's a copy of what we're starting with. This is the same right now, but we'll be evolved to whatever the final code is. So, I've already set this up in PyCharm and we can just open it up. So, the one thing I like to do is have all my data models and all the SQLAlchemy stuff in its own little folder, here. So, let's go and add a new directory called data. Now, there's two or three things we have to do to actually get started with SQLAlchemy. We need to set up the connection to the database and talk about what type of database is it. Is it Postgres, is a SQLite, is it Microsoft SQL Server? Things like that. We need to model our classes which map Python classes into the tables, right, basically create and map the data over to the tables. And then, we also need a base class that's going to wire all that stuff together. So, the way it works is we create a base class everything that derived from a particular base class gets mapped particular database. You could have multiple base classes, multiple connections and so on through that mechanism. Now, conceptually, the best place to start I think is to model the classes. It's not actually the first thing that happens in sort of an execution style. What happens first when we run the code but, it's conceptually what we want. So, let's go over here, and model package. Do you want to create a package class Package? Now, for this to actually work we're going to need some base class, here. But, I don't want to really focus on that just yet we'll get to that in a moment. Let's stay focused on just this idea of modeling data in a class with SQLAlchemy that then maps to a database table. So, the way it works is we're going to have fields here and this is going to be like an int or a string. You will have a created_date which, is going to be a datetime. We might have a description, which is a string, and so on. Now, we don't actually set them to integers. Instead, what we're going to set them to our descriptors that come from SQLAlchemy. Those will have two distinct purposes. One, define what the database schema is. So, we're going to set up some kind of column information with type equals integer or something like that. And SQLAlchemy will use that to generate the database schema. But at runtime, this will just be an integer and the creator date will just be a datetime, and so on. So, there's kind of this dual role thing going on with the type definition here. We're going to start by importing SQLAlchemy. And notice that that is turning red and PyCharm says, "you need to install this", and so on. Let's go make this little more formal and put SQLAlchemy down here's a thing and PyCharms like "whoa, you also have to install it here". So, go ahead and let it do that. Well, that looks like it worked really well. And if we go back here, everything should be good. Now, one common thing you'll see people do is import sqlalchemy as sa because you say, "SQLAlchemy" a lot. Either they'll do that or they'll just from SQLAlchemy import either * or all the stuff they need. I preferred have a little namespace. So, we're going to do, we want to come here and say sa.Column. And then, we have to say what type. So, what I had written there would have been an integer. And we can do things like say this is the primary_key, true. And if it's an integer you can even say auto_increment, true which, is pretty cool. That way, it's just automatically managed in the database you don't have to set it or manage it or anything like that. However, I'm going to take this away because of what we actually want to do is use this as a string. Think about the packages in PyPI. They cannot have conflicting names. You can't have two separate packages with the name Flask. You can have two distinct packages with the name SQLAlchemy. This has to be globally unique. That sounds a lot like a primary key, doesn't it? Let's just make the name itself be the primary key. And then over here, we're going to do something similar say, column, and that's going to be sa.DateTime. I always like to know almost any database table I have I like to know when was something inserted. When was it created? That way you can show new packages show me the things created this week or whatever order them by created descending, who knows. Now, we're actually going to do more with these columns, here. But, let's just get the first pass basic model in place. Well, it's going to have a summary. It's going to be sa.Column(sa.String we'll have a summary, also a description. We're also going to have a homepage. Sometimes this will be just the GitHub page. Sometimes it's a read the docs page, you never know but, something like that. We'll also have a docs page or let's say a docs_url. And some of the packages have a package_url. This is just stuff I got from looking at the PyPI site. So, let's review real quick for over here on say SQLAlchemy here's the name. And then what, we're going to have versions that's tied back to the releases, and so on. Here's the project description we have maybe the homepage we'll also have things like who's the maintainers what license does it have, and so on. So, let's keep going. Now, here's the summary, by the way and then, this is the description. Okay, so this stuff is all coming together pretty well. Notice over here, we have an author, who is Mike Bayer and we have maintainers, also Mike Bayer, right there and some other person. So, we have this concept of the primary author who may not even be a maintainer anymore and then maintainers. So, we're going to do a little bit of a mixture. I'm going to say, author name it's going to be one of these strings just embed this in here and it will do email so, we can kind of keep that even if they delete their account. And then later, we're going to have maintainers and we're also going to have releases. These two things I don't want to talk about yet because they involve relationships and navigating hierarchies, and all that kind of stuff we're going to focus on that as a separate topic. The last thing we want to do is have a license, here. And for the license we want to link back to a rich license object. However, we don't necessarily want to have to do a join on some integer id to get back just the name to show it there. It would be cool if we could use somehow use this trick. And actually, we can, we can make the name of the license the friendly name, be just the id, right. You would not have two MIT licenses. So, we'll just say this is an sa.Column(sa.String which, is an sa.String. That's cool, right, okay, so here is our first pass at creating a package. So, I think this is pretty good. It models pretty accurately what you see over here on PyPI. There's a few things that we're omitting like metadata and so on, but it's going to be good enough for demo app. A couple more things before we move on here. One, if I go and interact with this and try to save it into create one of these packages and save it into the database with SQLAlchemy, a couple of things. One, it needs a base class. We're going to do that next. But, it's going to create a table called Package which is singular. Now, this should be singular, this class it represents a single one of the packages in the database when you work with it in Python but, in the database, the table represents many packages all of them, in fact. So, let's go over here and use a little invention in SQLAlchemy to change that table name but, not the class name. So, we'll come down here and say __tablename__ = 'packages', like so So, if we say it's packages that's what the database is going to be called. And we can always tell PyCharm that, that's spelled correctly. The other thing to do when we're doing a little bit of debugging or we get a set of results back in Python, not in the database and we just get like a list or we want to look at it it's really nice to actually see a little bit more information in the debugger than just package, package, package at address, address, address. So, we can control that by having a __repr__ and just returning some string here like package such and such like this. I'll say self.id. So, you know, if we get back, Flask and SQLAlchemy we'd say, angle bracket package Flask angle bracket package SQLAlchemy. So, that's going to make our debugging life a little bit easier as we go through this app. Alright, so not finished yet but, here's a really nice first pass at modeling packages.
|
|
|
transcript
|
1:51 |
Νow we defined our package class we saw that it's not really going to work or at least I told you it's not going to work unless we have a base class. So what we're going to to, is going to define another Python file here and this is going to seem a little bit silly to have such small amount of code in its own file but it really helps break circular dependencies so totally worth it. When I create a file here called model base. And you would think if we're going to create a class it would be something like this, SQLAlchemyBase. Then we would do stuff here right? That's typically how you create a class. But it's not the only way and it's not the way that SQLAlchemy uses. So what SQLAlchemy does is it uses a factory method to at run time, generate these base classes. We can have more than one. We can have a standard one. We can have a analytics database one. All sorts of stuff. So you can have one of these base classes for each database you want to target. And then factor out what classes go to what database based on like maybe the core database or analytics by driving from these different classes. We don't need to do that. We're just going to have the one. But it's totally reasonable. So let's go over here and say import sqlalchemy.ext.declarative as dec add something shorter than that. And then down here instead of saying the class then we say the dec.declarative_base(). That's it, do a little clean up, and we are done. Here's our base class and now we can associate that with a database connection and these classes. So we just come over here in the easiest way and PyCharm is just to put it here and say Yes, you can import that at the top. So it adds that line rewrite there, and that's it. This class is ready to be saved to the database. We have to configure SQLAlchemyBase itself a little bit more. But package, it's ready to roll.
|
|
|
transcript
|
6:01 |
Before we can interact with our packages and query any or save them to the database or anything like that, we're going to need to well, connect to the database. And a lot of the connections and interactions with the database in SQLAlchemy they operate around this concept of the unit of work. Construct inside SQLAlchemy that represents the unit of work is called a session and it internally manages the connection. So with that in mind, let's go and add a new Python file called db_session.py. So in this file, we're going to get all the stuff set up so that you can ask it for one of these sessions and commit or rollback the session and so on. So we need to create two basic things. We need a factory, and I'll just say None for the moment and we need an engine. Now the engine I don't believe we need to share but this factory we're going to need to somehow keep this around right this is kind of we'll use the engine to get the factory and so on. So let's go and let's create a little function here called global_init(db_file: str) and we're going to use SQLite. It's the simplest of all the databases that are actual relational, you don't have to set up a server, it just works with a file but it's a proper relational database. The way we do that is we pass in a db_file which is a string. So what we want to do is work with this and see if, this has been called before we don't need to run it twice so we'll do something like this. We'll say first let's just make sure that's global factory - we'll say if factory: return. No need to call it twice, right? But, if it hasn't been called let's do maybe some validation here. We'll say if not db_file or not db_file.strip() it'll raise some kind of exception here, like right, something pretty obvious. You have to pass as a database file otherwise we can't work with it. Then we're going to get an engine here. The way we get the engine is from SQLAlchemy so we're going to have to import sqlalchemy. Maybe we'll stick with this as sa so here we just say sa.create_engine. Super simple. Notice the signature here though *args, **kwargs". I utterly hate this pattern it means, you can pass anything and we're not going to help you or tell you what could possibly go in there. In fact, there is a known set of things you can pass in here, so they should just be keyword arguments. Well, anyway, that's the way it goes. So, we're going to pass a couple of things. We need to come up with a connection string and when you're working with SQLAlchemy what you do is you specify the database schema or the type of database that's part of the connection string. So we'll say sqlite:/// and then we just add on the DB file like this. Maybe just to be safe we'll say "strip", just in case. That seems like that's a pretty good one and then here we'll just pass the connection string as a positional parameter, and then we also may want to set this, so I'll go ahead and like prime the pump for you. I'll say "echo=false". If you want to see what SQLAlchemy is doing what queries it's sending, what table create statements it's sending, stuff like that you set this to "true", all the SQL commands sent to the database are also echoed out both just standard out, and standard error, I believe. But I'm not going to show that, but just having this here so you know you can flip that and really see what's going on here. So we're going to set the factory here but what we need is we actually need import sqlalchemy.orm as orm So we come in here and we say orm.sessionmaker session... maker. So this is a little bit funky, but you call this function and it creates a callable which itself when you call it, will create these units of work or these sessions. So we got this little bit of a funky thing going on here, but then we also come in here and we say "bind=engine". So when the session is created it's going to use the engine which knows the database type and the database connection, and all that kind of stuff. And that's pretty much it! We're going to use this factory after everything's been initialized. We're actually going to do a couple of iterations on this file to make it a little bit better and better as we go, but let's not get ahead of ourselves. I think this pretty much does it so let's go ahead and call this over here. Let's go - here we are, register_blueprints like, setup_db(), let's have just a function down here... So let's go ahead and create a data folder not a data data, but a DB folder. In here is where we're going to put our database file. So what we need to do is work with the OS module and we're going to actually figure out where this is. So we want to say "dirname", "path.dirname" and we're going to give it the dunder file for apps. So that's going to be the directory that we're working in so right now we're this one, and then we need to join it with DB and some file name. Let's say "DBFile" it's going to be "os.path.join" this directory with "db" with some database file. Let's just call it "pypi.sqlite". The extension doesn't matter but, you know maybe it'll kind of tell you what's going on there. And then we can just go up here. import pypi_org.data.db_session as db_session and come down here and just call our global_init(). Pass the db_file, and that's it we should be golden. Let's go ahead and run it just to make sure everything's hanging together. Ha ha, it did, it worked! Off it goes. There it is up and running. Super super cool. Did anything happen here? Probably not yet, no, nothing yet. But pretty soon when we ask SQLAlchemy to do something, like even just verify that the tables are there, you'll see SQLite will automatically create a file there for us. Okay, great, looks like our database connection is all set up and ready to go.
|
|
|
transcript
|
6:26 |
Well, we've got our connection set we've got our model, at least for the package, all set up we've got our base class. Let's go ahead and create the tables. Now, notice we've got no database here even though over in our db.session we've talked to the database. We haven't actually asked SQLAlchemy to do any interaction with it, so nothing's happened. One way we could create the tables is we could create a file, create a database and open up some database design tools and start working with it. That would the wrong way. We have SQLite. We've already defined exactly what things are supposed to look like and it would have to match this perfectly anyway. So, why not let SQLAlchemy create for us? And, you'll see it's super easy to do. So, you want to use SQLAlchemyBase. Remember, this is the base class we created. Just import that up above. This has a metadata on there. And here we can say create_all. Now, notice there wasn't intellisense or auto complete here. Anyway, some stuff here, but create_all wasn't don't worry, it's there. So, all we got to is pass it, the engine. That's it! SQLAlchemy will go and create all of the models that it knows about it will go create their corresponding tables. However, there's an important little caveat that's easy to forget. All the tables or classes it knows about and knows about means this file has been imported and here's a class that drives from it. So, in order to make sure that SQLAlchemy knows about all the types we need to make sure that we import this. So, because it's only for this one purpose let's say from pypi.org.data.package import package, like this. Now, PyCharm says that has no effect you don't need to do that. Well, usually true, not this time. Let's say, look, we need this to happen and normally you also put this at the top of the file but I put it right here because this is the one and only reason we're doing that in this file is so that we can actually show it to the SQLAlchemyBase. So, first of all, let's run this and then I'll show you a little problem here and we'll have one more fix to make things a little more maintainable and obvious. So, notice over here db folder empty. We run it, everything starts out well and if we ask it to refresh itself, oo, look! There's our little database, and better than that it even has a database icon. It does not have an icon because of the extension it has an icon 'cause PyCharm looked in the binary files and said that looks like a database I understand. So, let's see what's in there. Over here we can open up our database tab. This only works in Pro version of PyCharm. I'll show you an option for if you only have the Community in a moment. If we open this up, and look! It understands it, we can expand it and it has stuff going on in here. If, if, if, if, this is a big if so go over here, and you say new data source, SQLite by default, it might say you have to download the drivers or maybe it says it down here it kind of has moved around over time. Apparently, there's an update, so I can go and click mine but if you don't go in here and click download the drivers PyCharm won't understand this so make sure you do this first. Cool, now we can test the connection. Of course, it looks like it's working fine because we already opened it and now here we have, check that out! There's our packages with our ID which is a string create a date, which is the date, time all that good stuff, our primary keys, jump to console and now, I can say select star from packages, where? All through email, homepage, ID, license there's all the stuff, right? Whatever, I don't need a where clause and actually it's not going to be super interesting because it's empty. Obviously, it's empty, we haven't put anything in there but, how cool! We've had SQLAlchemy generate our table using the schema that we defined over here and it's here up in the database tools, looking great right? Well, that pretty much rounds it out for all that we have to do. We do have some improvements that we can make on this side but that's a pretty awesome start. I did say there was another tool that you can use. So, if you don't have the Pro version of PyCharm you can use a DB Browser for SQLite that's free. And if I go over to this here I can open up the DB Browser here and say open database, and give it this file. And check it out, pretty much the same thing. I don't know really how good this tool is I haven't actually used it for real projects but it looks pretty cool, and it definitely gives you a decent view into your database. So, if you don't have the Pro version of PyCharm here's a good option. Alright, so pretty awesome. I did say there's one other thing I would like to do here just for a little debugging now let's just do print connecting to DB with just so we see the connection string when it starts up so you can see, you know a little bit of what is happening here, and that will help. And the other thing is, I said that this was a little error prone, why is this error prone? Well, in real projects you might have 10, 15, 20 maybe even more of these package type files, right? These models. And if you add another one, what do you have to do? You have to absolutely remember to dig into this function, and who knows where it is and what you thought about it, and how long? And make sure you add an import statement right here and if you don't, that table may not get created it's going to be a problem. So, what I like to do as just a convention to make this more obvious is create another file over here called __all_models and basically, put exactly this line right there. And we'll just put a note, and all the others all the new ones. So, whenever we add a new model just put it in this one file. It doesn't matter where else this file gets used or imported, or whatever, if it's here, it's going to be done. So, to me, this makes it a little cleaner then I can just go over here and just say import __all_models and that way, like, this function deep down in it's gut, doesn't have to change. It should still run the same, super cool. Okay, so that's good. I think it's a little more cleaned up. We've got our print statement so we got a little debugging and then we've got our all models so it makes it easier to add new ones.
|
|
|
transcript
|
5:00 |
Let's return to our package class that defines the table and the database. I said there was a few other things that we needed to do and well, let's look at a few of the problems and then how to fix them. created_date. created_date is great. What is it's value if we forget to set it? Null. That's not good. We could say it's required and make us set it but wouldn't it even be better if SQLAlchemy itself would just go right now, the time is now and that's the time it's created on first insert? Super easy to do that. But, we've got to explicitly say that here. We're here in the emails. Maybe we want to be able to search by author/email. So, we might want to have an index here so we can ask quickly ask the question: show me all the packages authored by the person with such and such email. Boom. If we had a index, this could be super, super fast. The difference in in terms of query time for a query with an index and without an index with a huge amount of data can be like a thousand time slower it's an insane performance increase to have an index. Helps you sort faster, it helps you query faster and so on. So, we're going to want to add an index on some of these. And maybe the summary is required, but the description is not required. So, we would like to express that here as well. So, SQLAlchemy has capabilities for all these. So, let's start with the default value. So, pretty easy, we're going to set defaults here and it could be something like 0 or True or False if that made sense, it doesn't for datetime. Well, what would be the value for a datetime? Well, let's use the datetime module and we can import that at the top. And use datetime.now. Now, notice if I just press end and then enter bicharm is super helpful and it puts parenthesis here. That is a horrible thing that happened. What this will do is take the current time when the application starts and say well that time is the default value. No no. That's not what we want. What we want, is we want this function now to be passed off in any time SQLAlchemy is going to put something in the database, it goes, oh, I have a default value which is a function so let me call that now to get the value. So, that will do the trick of getting the insert time exactly as you want. Here we can say, nullable=False you can say, nullable=True. Not all databases support the concept of nullability like, I think SQLite doesn't, but you don't want to necessarily guarantee that you're always working with that, right? We may also want to say, all like, all the packages or the top ten packages are the most recent ones. And, for that you might want an index cause then that makes it really fast to do that sort, so we can say index=True. And that's all you got to do to add an index it's incredible. We also may want to ask, you know, show me all the packages this person has written. So, then we'd say index is true, that'll be super fast. Also, you might ask, what are all the packages or even, how many of them are there that have say the MIT license? And, then you could do a count on it or something, right? So, this index will make that query fast. These we'll deal with when we get to relationships. But, these simple little changes here will make it much, much better and this is really what we wanted to define in the beginning, but I didn't want to overwhelm you with all the stuff at the start with. All right, so we have our database over here. Let's go and you know, and we have it here as well. Let's go and run the app, rerun it see if everything's working and if we just refresh this what's going to happen. sad face, nothing happened. Where are my indexes? Where is my null, well, nullability statements things like that. This is a problem, this is definitely a problem. The reason we don't see any changes here is that SQLite will not create or modifications to a table. It'll create new ones, great new tables. If I add a new table it'll create it like uh release it or something, you would see it show up when I ran it. But, once it exists, done. No changes, it could lose data or it could make other problems, so it's not going to do it. Leader, and this is very common, you want this but SQLAlchemy won't do it. We're going to later talk about something called Alembic which will do database migrations and evolve your database schema using our classes here. But, we're not there yet. We just are trying to get SQLAlchemy going. So, for now, what do we do, how do we solve this? We could either just delete this file, drop that table and just let it recreate it, right, we don't really have any data yet. When you get to production migrations, but for now just super quick, let's just drop that table. I'll rerun the app, refresh the schema, expando and look at that, here's our indexes and author/email creator date and license, here's our uniqueness constraint on the id which comes with part of the primary key. You can see those, blue things right there those are the indexes. So, we come over here and modify the table, you can see here's your indexes and your keys and so on. Cool, huh? All we need to do is put the extra pieces of information on here and when we enter one of these packages we'll get in and out and we'll have an index for it and so on. Super, super cool.
|
|
|
transcript
|
4:24 |
Now for the rest of the tables I don't want to go and build them piece by piece by piece. That'll get pretty monotonous pretty quickly. We did that for package and it's quite representative. So let's just do a quick tour of the other ones I just dropped them in here for you. So we have download and of course change the database name the table name to downloads, lower case. And again we have an id, this one is an integer which is primary key in auto-incrementing, that's cool. created_date, most of our tables will have this because of course you want to know when that record was entered. You almost always at some point want to go like actually, when did this get in here? Or all of these or something like that. So always have that in there. And then this is going to represent a download of a package like pip install flask, right, like when that happens if that hits the server we want a analytical record of that. So we want to know what package and what release we hit and we may want to query or do reporting based on that so we'll use an index here. We also might just want to track the IP address and user agent so we can tell what it is that's doing the install. That one's pretty straightforward, what's next? Languages, again wrote in this trick where the name of the language are like, Cython or Python 3 or whatever. That's going to be the primary key 'cause it was very unique and then we also have when it was put there and a little description about what that means. Licenses like MIT or GPL or whatever, same thing. One more, one more ID is the name. Or you can avoid, join potentially and get things a little quicker that way. Little description and create a date, always want that. This is an interesting one here this is for our many to many relationship. We have users and we have packages and a user can maintain many packages and a package be maintained by multiple users. So here's our normalization table we have the user ID and package ID and these are primary keys. Possibly we should go ahead and set up these as foreign key relationships, but I didn't do it. We'll do that over here, so this one hasn't changed we still got to add our relationship there at the bottom. Our releases, this one is going to have a major, minor and build version all indexed. Just an auto-increment and primary key. Maybe some comments in the size of that release and you know, stuff like this. And finally we have our user these are the users that log into our site auto-incrementing ID, the name, it's just a string email. It has an index we should also say this probably is unique. It's true as well 'cause we can't have two people with the same email address, that would be a problem when they want to reset their password. We also, speaking of passwords, want to store that but we never, never, never store just the password. That is a super bad idea. We're going to talk about how we do this but we're going to hash the password in an iterative way mix it in with some salt and store it here. So to make that super clear this is not the raw password but that is something that needs transforming we put hash password. But we also want the created date, maybe their profile and their last login just so we know like who the active users are and whatnot. That's all of the tables, or the classes that we've got. If you look over here, I've updated this. And guess what? We don't need to go change like our db_session or whoever cared about importing all these things. It's all good. Notice also that I put this in alphabetical order. That means when you go add a new class or table it's super easy to look here and see if it's listed and if it's not, you know put it where it goes alphabetically. It'll help you keep everything sane. So let's see about these tables over here we have not run this yet. Notice we just have packages, but if we rerun the app what's going to happen? It did not like that, our package singular. Let's try again. Here we go, and now if we refresh, resynchronize boom, there they all are. So we see our downloads and it has all the pieces and the indexes say on like, package ID right there our license and so on. Everything's great. So SQLAlchemy did create the new tables it did not make any changes to packages. Luckily we haven't actually changed anything meaningful about packages, so that's fine. If we did we'd have to drop the table or apply migrations, right. But it's cool that at least these new tables we're defining they do get created there and then yeah it's pretty good. All right so I think we're almost done we're almost done we just have a few more things to tie the pieces together to relationships and our data modeling will be complete.
|
|
|
transcript
|
7:16 |
The last thing we have to do to round out our relational database model is to set up the relationships. So far we've effectively have just a bunch of tables in the database with no relationships. We're not really taking advantage of what they have to offer so in order to work with these let's go up here I'm going to do a little bit more of an import the ORM aspect to we'll talk about relationships and Object Relational Mappers and so on. So over here, what we want to do is we want to have just a field releases and when we interact with that field we would like it to effectively go to the database do a join to pull back all the releases through this relationship that are associated with this package. So basically where the package ID on the release matches whatever ideas here. So the way that we're going to do this is we're going to go over her and say this is an orm.relation relation just singular like that and then in here we talk about what class in SQLAlchemy terms this is related to. It's going to be a release, that's good and that alone would be enough but often you want the stuff you get back through this relationship to have some kind of order. Wouldn't you rather be able to go through this lesson say it's oldest to newest or newest to oldest releases? That would be great if you had to do no effort to make that happen right? Well guess what, we can set it up so there's no effort so we can say, order_by= Now we can put one of two things here. We could say I want to order my one column on the release class so we'll just say release and import it at the top. You could say we want to say accreted data descending like this and that would be a totally fine option but what we want to do is actually show, if we go over here we want to order first by the major version then the minor version, then the build version. All of those descending so in order to order by multiple things, we're going to put a list right here like so and let's say we're going to order it by major version minor version, and build version. All right so that means we get it back it's going to go to the database and have the database do the sort. Databases are awesome at doing sorts especially with things with indexes like these three columns right here have. Okay so that's pretty good and we're also going to have a relationship in the reverse direction so package has many releases. Each release is associated with one package. So over here when I have a package for a moment I'm going to leave it empty but we're going to have this field right here. So what we can do is we can say is back populates package what does that mean? That means when I go here and I get these all filled out and I iterate over my get one of the releases off maybe I hand it somewhere else somebody says .package on that release it will refer back to the same object that we originally had that we accessed it's here so it kind of maintains this bidirectional relationship behavior between a package, it's releases and a given release and it's packaged automatically so might as well throw that on there. All right this one's looking pretty good let's do the flip side. How does it know that there's some relationship? I just said this class is related to that boom done. Well that's not super obvious what this is. So what we're going to do is like standard database stuff is we're going to say there's a package_id here and this is a field or column in the release table to maintain that relationship and this will be a sa.Column, SQLAlchemy Column and what type is it going to be? It has to correspond exactly to the type up there. Okay so this has to be SQLAlchemy.string but in addition that it'll be SQLAlchemy.ForeignKey. So it's a little tricky to keep these things straight in your mind but sometimes we speak in terms of classes sometimes we speak in terms of databases. Over here I said the class name for a relationship but in this part, the foreign key you speak in terms of the databases, it'll be packages.id lowercase right that's this thing we're referring to that and the ID. So here we're going to have that foreign key right there and then this we can set that up to be a relationship as well. So again we got to get ahold of our orm orm.relation and it's going to relate back to package. Okay, I think that might do it. We're going to run and find out but we have it working in both directions so here we can go to the releases and then we can go, this will establish that relationship and this will be that referring the thing that refers back to it. Now we've already created those tables so in order for this to have any effect we have to drop those in this temporary form or member migrations later but not now. All right, let's run it and see if this works. All right, it seems happy that's a pretty good sign SQLAlchemy's pretty picky so we go over here there really shouldn't be anything we notice about this table but here we should now have a package and notice in that blue key, even right here there's a foreign key relationship if we go back and interact with this, say modify table we now have one foreign key from package_id which references packages ID, that's exactly what we wanted. Now we don't have any data here yet so this is not going to be super impressive but let me show you how this will work. Imagine somehow magically through the database through a query which we don't have anything yet but if we did, I'm going to come over here I'm going to go give me a package, right? Now I'm just allocating a new one but you could do a query to get to it right? So then I could say print P., I don't know what ID would be the name and then I could say print our releases and say for r in p.releases that will print out, here we go we go through and print them out. All right and we would only have to do one query except when explicit query here to get that and then down here, once it's back this would go back to the database potentially depending how we define that query and then do a query for all the releases ordered by the way we said and then get them back, that's pretty cool. Maybe like notice it says you can't iterate over this it's kind of annoying, let's see if I can fix this to say this is a list of release. Import that from typing, all right. So now it's happy and if I say r. notice that so maybe this is a good idea, I'm not sure if it's going to freak it out or not but I'll leave it in there until it becomes a problem. All right, let's actually just run it real quick make sure this works. Yeah that worked, didn't crash when we did that little print out. There was nothing to print but still, pretty good. So those are the releases. Once we get some data inserted you'll see how to leverage them even for inserts they're pretty awesome.
|
|
|
transcript
|
4:15 |
Before we actually start using SQLAlchemy to insert data and query data, and so on let's talk about some of the core concepts we've seen and some of the fundamental building blocks for modeling with SQLAlchemy. So we started with the SQLAlchemyBase. Remember, the idea was every class we're going to store in the database derived from this dynamically defined SQLAlchemyBase class. You can call it whatever you want. I like SQLAlchemyBase. But there's other, you know, it's just a variable. Name it as you like. So I want to create this singleton base class to register the classes and type sequence on the database. Remember, there's one and only one instance of this SQLAlchemyBase shared across all of the types per database. So for example, we're going to have a package to release a new user, they all derive from this one and only one SQLAlchemyBase type here. To model data in our classes, we put a bunch of classable fields here, ID, summary, size homepage, and so on, and each one of them is a Column. SQLAlchemy.Column and they have different types like integer, string, and so on. We can see some of them are primary keys and even if it's an integer, they can even be auto-incrementing, primary keys which is really, really nice. And we can also have relationships like we do between package and releases. One really nice feature of databases is they have default values. We saw with our auto-incrementing ID our primary key, we don't have to set it. The database does that for us. So here we can pass datetime.now, the function not the value, the function, and then it's going to call that function now whenever a row is created and set that value to be, well, right now. That's super nice. We can also do that up here with more complex expressions. So in the bottom one, we literally passed an existing function, datetime.now but above, we want to define this default behavior in a more rich way. So we're passing our very own lambda expression that takes the UUID for identifier converts it to a string, and then drops the dashes that normally separate it into just one giant scrambled alphanumeric super thing. You can create these default values by passing any function, a built-in one or one of your own making. We also want to model keys and indexes. So primary keys automatically have indexes. We don't have to do anything there. Let's our uniqueness constraint as well as indexes. This created one, maybe we want to sort by the newest users, for example. Well, if we're going to do that, we very much want to put an index on that. As I pointed out, indexes can have tremendous performance benefits, it's totally reasonable to have a thousand times difference performance in a query, if you have tons of data on whether you have an index or not. Indexes do slow write time but certainly in this case the rate of user creation versus querying and interacting with them is, it's no comparison, right? We're creating far fewer users, probably than we are querying or interacting with them. We can also specify uniqueness we didn't do that in our example. We can say this email, we can't have two users with the same email, emails are very often used to reset your password and if you have two users who's going to get their password reset, all of 'em? One of 'em, who knows, none of 'em? So you might want to say there's a uniqueness constraint on the email to say only one user gets to use a particular email and that's super easy to do by just saying unique=True. Finally, once all of the modeling is done we have to actually create the tables. Now turns out that that's super easy. We import all the packages, get the connection string and we can create an engine based on the connection string and then we just go to SQLAlchemyBase to it's meta-data and say create underscore all and pass the engine, boom, everything is done. Remember though, this only creates new tables it does not modify existing ones so if you need to modify it wait till we get to the alembic chapter, the migration chapter or do it yourself or if you're just in development mode maybe deleting it and just letting it recreate itself that might be the easiest thing, that's what we did.
|
|
|
|
52:56 |
|
|
transcript
|
2:18 |
In this chapter, we're going to look at actually using SQLAlchemy. Previously we had modeled all of our data but we didn't do anything with it. We didn't do any insert queries, updates none of that. That's what we're going to do now. And to get started we're just going to jump right into writing some code. And so I just want to point out we are now in Chapter 10 Using SQLAlchemy, working on the final bits here. So let's switch over to PyCharm grab our new chapter and get going. This is the code from before, just carrying on. And what we're going to do is we're going to actually have over here a new directory called bin. Now, this is just a convention that I use. I've seen it in other places as well and this bin folder comes along with our website for little admin tasks and scripts that we need to run and so on. It's not directly involved in running the site but more like maintaining the site. So, for example we're going to do some importing of data. And to do so, we're just going to write some scripts here. They don't actually run normally but they're going to run here. Let's go over and add a Python file called basic_inserts.py. We're going to take two passes at showing how to insert data. First, we're going to write some example data just standard make-up stuff. And then I'm going to show you I've actually got a hold of the real PyPI data for the top 100 packages using their API and we're going to insert that. Turned out that's super, super tricky. There's lots of little nuances and typecasting and all that kind of stuff we have to do to make it work just right. We're not going to do that first we're going to do like a simple example and then I'll show you the program that'll actually generate our real database. So, here it is. We already have our database right here and if we look at it we'll see that we have our packages and releases put together. And, of course, there are the interesting ones. Actually, I'll go over here and show you a little more. Show you a visualization pop-up. It's kind of a cool feature of PyCharm. So we have our packages and this relationship between the releases. That's probably the most interesting part of our database. We didn't actually set up save, like the maintainers and what not here. This should maybe have, like some relationships and so on but we didn't set up all the relationships for our data model, just the really important ones. So, we're going to focus on just those two tables.
|
|
|
transcript
|
1:36 |
Now what we're going to need to do is work with our SQLAlchemy engine and the factory and the connections and all that. And remember in order for that to work we have to go to our db_session. We have to initialize it. So let me just copy over a function here. This was just like the one we worked with before. So we're going to import os. import pypi.org and we can say that's spelled correctly. And we also want our db_session like so. And now it has this global_init. So, we just have to call this somewhere. Before we try to do anything, and just to remind you over here this sets up the connection string initializes the engine, and most importantly initializes this factory right here. So, what we're going to do is we're going to have a def main. Here this is going to be like our main startup. And in here we'll call global_init for the database. And we'll use our main convention at the bottom and just run the main function. Here we go. I guess we can go ahead and test it and see that it runs. Oh, it didn't like that. Let's just use this in here we'll just go up one. That should do. Okay, great. So here we're connecting to final, dah dah dah. It might even be worthwhile to say os.path.abspath. Here we go. Now we have the absolute path, in looks right to me.
|
|
|
transcript
|
1:33 |
Okay off to a good start and we no longer need this so this is good. Now what we need to do, let's just say while true we're going to insert a package. We'll write a little function that will does that. So down here, this can just enter package. So how do we insert a package and maybe some releases that are related to it? Well, how would you create a package if you forgot about the database and you only thought in classes and objects? You would say this p = Package(), like so, and you would import that from pypi_org.data.package. You would set some properties like the id might be, and we could ask the user input package id, name and we could do a strip in the lower just to make sure that is all consistent. What else do we need to set? Well, let's go actually look at our package real quick here. And we can say, what do we need to set? Well this, sometimes we don't have to set the primary key. This one is not auto_incrementing so we do. This one has a default value so that's solid. These could all be set, the releases we'll deal with in a second. So let's go over here and just put a little long comment string to show us what we got to do. So it'll be p.summary = input("Package summary: ").strip() For description I think we'll just ignore that all of those we can ignore. Let's just put author name and license.
|
|
|
transcript
|
3:36 |
Classes model records in our database so all we have to do is go and save this back into the database and that's where this unit of work in the factory from db_session, comes from. So what we'll do is we'll say session equals db_session.factory. So, this is pretty cool. If we come over here and say db_session. notice all the cool things you can do? No, no you don't. There's none. If I actually set the type here. I'm not going to leave it like this but, if I were to import sqlalchemy.orm like this, and set it to a session all of a sudden, we have, oh look autoflush, and commit, and bind and rollback, and all the database things and add, and so on. Let's go ahead and get this set up real quick and then I'll show you what we'd actually do. We'll make this a little bit nicer. There's some stuff down the road. We're going to need to make this better anyway. All right, so, we're going to do some work and then, the way this unit of work works is you say, I'm going to make a bunch of changes in this area create the session, make a bunch of changes. No interaction with the database will have happened until line 26, when we call commit or, if we had entered some kind of query but we're not querying, we're only inserting. Let's do this. Let's come over here, and we'll say session.add. That's it. If we run this, it's going to insert it right away but let's add a couple of releases. So we'll say, r., r is a release. I'm going to import that. Let's go over to releases and see what we got to set. id auto_increment in, we don't need to set. Those, we should definitely set. created_date is its own thing. So, let's just do those three and maybe the size. So, we'll say r.majorversion equals... Now, we're just going to assume that they know how to type an integer and, if they don't, well, it's going to crash, but it's OK. It's just a little example. Minor, and build. And, last one, will be size in bytes. OK. Looks pretty good. Now, how do we let's do a quick print. Release one, something like that and let's do it again for release two. So there's actually more than one release per package, OK? How do we associate this release with this package? There's a lot of ways. We could add each release separately. So we could say session.add each time and this, and then commit it as long as we had set r.package_id = p.id. Now actually, in this case, this would be fine but normally, windows are auto-incrementing IDs. You need to first save the package and then you can set it, and it gets real tricky, right? Like, it's not super simple to do this but, what is super simple is to work with this relationship over on packages. So, let's go to here, package. Remember this, releases? It's a relationship but it kind of acts like a list. Let's just try that. What happens if I say, p.releases.append as if it were a list. You know that's going to work. It is, it's awesome. OK, so we're going to append those and we're never going to tell the session to add it but it's going to traverse the relationships and go, I see you have other records to insert into other tables, and relationships to set up.
|
|
|
transcript
|
2:34 |
I think we're ready to try this. Let's go ahead and run this and see what happens. Off it goes, package name let's go with SQLAlchemy to start. Summary is ORM4 for Python. Author is Mike Bayer. License, let's just guess, it's MIT. The first version is 123. And it's that many bytes. The second one is going to be 2.0.0 and it's a little bit bigger, like so. So that inserted the first one. Let's do one more and say Flask, Microframework for Python. Let's go with Armand and David, right? Armand, originally, David Lord these days. Let's just say this is BSD. I have no idea what it is. And it's 1.0.0 and 1.0.02. There we go, that one can be bigger than one byte. All right, I think we're good. Let's go ahead and stop this. Notice, there were no crashes. That's pretty killer already. That's a good chance that something worked But let's go look in the database. So if I go over to Packages and I say Jump to Console and say, select * From Packages. Moment of truth. Tada! There they are, how awesome? We didn't set some of the values but we did set many of them. You can see everything we typed in there. Pretty awesome, isn't it? What about releases? Run those, look at that. There they are! And you can see what package they come from SQLAlchemy or Flask. That's really cool and that's actually the relationship. So I could go over here and, say, where package ID equals SQLAlchemy? Is it 1? I don't think it's what it equals. Here we go. So, we can go do the query for that and this is when we actually go back and do queries with SQLAlchemy and we touch that releases folder. It's going to do, basically, this query but it's also going to add an order by major version descending. And then minor and then whatever but this should be enough. There we go. So we'll get them back exactly in the order you would want them. All right, so this is how we insert data. Super, super simple, right? We go and just treat these more or less like objects. We create them, we set their properties we click them together through their relationships and we add them to the session, create a session and add it.
|
|
|
transcript
|
1:20 |
I guess, real, real quick, let's make this a little bit nicer. I don't like that this doesn't give us much information about what comes out of it and it's not super easy to get that to happen, so let's do this. Let's define a function called create_session(). That's more obvious. And it's going to return a session object that comes from sqlalchemy.orm and for now it's just going to say return __factory(), like this. Let's tell it that this is global, like that. Okay, this is pretty good. But of course when we now go to db_session. Uou still see it. You still see it at the top and I'd kind of like that to not be the case so let's refactor rename this to double underscore and you see it renamed it everywhere. And now, is it gone? Ah, yeah. We just have create_session and global_init. So where are we doing this factory we don't need any of this stuff anymore. That can all be gone, we just say = DBsession.createsession the type annotation on the return value there should be enough so that when we say session. Boom, there it all is. Okay, that's it. We're all good to go. We clear the session, we make the changes we call commit, beautiful.
|
|
|
transcript
|
5:09 |
Now you've seen how to insert data with SQLAlchemy. We're going to insert the actual real data and it turns out that this data I got is the actual PyPI data I got from, ah, couple of APIs I put together and I have the top 100 packages in all their details in a bunch of JSON files. So what we're gonna do is load those JSON files, pull them apart, do some type conversion and things like that and insert them all into a database that is super into D gritty and it's really not worth going into So let's just skim quickly across that first off to run the program we were going to use to new requirements progress bar to so we can have a cool progress as we're doing our import, which is really, really nice. And then Python Dash date util, which is a really, really nice way to parse dates much better than the built in stuff. So I've already pip installed these, so they're just in the requirements now. So over here at the top of your repository, I have the PyPI top 100 each one of these is just a JSON file. For example, let's look at click circa a little while ago written my Armin Ronacher originally, at least now managed by David Lord and the Pallets Project. But for the day that we got, this is what it says And it has the licenses BST but notice it doesn't just say licenses BST it has this, like, sort of funky name space style, if you will. It talks about the languages Python and being colon colon three. We're gonna parse that apart. Yeah, the license BST. It works on Python to and Python three and so on so you can scroll through and see, like, here's all of our releases All the details about the releases and the dates and Wolf has a lot of stuff, right? So we're gonna go and parse that apart and insert it into the database and that's gonna happen over here pretty straightforward. What we're gonna do is we're going to just go and ask really quickly like, Hey, is there any data in this database and the way of checking is are there any users? It could look at all the tables and you just ask. Are there any users? If so, Hey, we've probably already done this, so don't reinsert duplicates. Just don't do anything. Do a little summary there at the end. But if it happens to be empty, go load up those files, all of them. All the JSON files skin across all of them, find the distinct users, import them, do all the packages and their releases and so on. Pull out the languages licenses like that colon, colon BSD license thing we just saw. And then finally do a little summary. So we're just gonna run this through its Let's just look at the import languages and goes and uses our progress bar, which is pretty, pretty sweet. And it rates over them and pulls out the language classification that the interesting data base part is it says that we're going to, just create session creative programming language, set the details of it added to the session and call commit and then update our progress bar Super straight for right. This is what we did before. It's just all this gu of juggling the Jason Files. All right, so let's go and run this and because it uses the Progress bar It looks better outside PyCharm. It will run in here. No problem. But let's just make it as nice as possible. So I want to figure out where to activate my virtual environment. That's a long enough directory, don't you think? I will say that. Slash Activate. And then I want to runs a Python. The name of this script here where that one is gonna do the import. One other thing we also need to add system dup half upend toe our path. This folder right here because we're importing pipeline, not or in PyCharm is gonna totally work smooth, because guess what? PyCharm does that forest right there. But if we try to run this outside without setting this up, it's a package or something like this is not gonna work so great. Now her ready to run our code here till gonna run Python out of our virtual environment Pointed at a low data Here goes. So hearing see, it's loading up all of the users. All the projects it found 96 packages said there were 100. I think for some reason, some couldn't be downloaded. So let's go with 96 Top 96. Out of there, it went through, and it found the users found the packages and releases the languages. So in the end we found 84 users. 96 packages, 5400 releases embedded within those documents, 10 maintainers, 25 languages and 30 different licenses. All right, well, that's it. We should now have a whole lot more data over here. And if we go local quick, let's just go to the packages and jump to the console. Say, select star from packages. We run it like that. We had a whole bunch of them. Here's am Q P. Actors are pars, flake8 and so on. We running for releases, you see a whole bunch of stuff and there related to their various packages over here on the right. Pretty awesome, huh? So now when we run our app, forgive over and run the actual app itself click on it, you can see Well, we're not quite using the data yet, but we're going to be able to start using all that data we've just loaded up and dropping it into these locations. So that's gonna be really awesome. We have true, accurate, realistic or even a snapshot in time. RealD data from PyPI toe work with to finish building out in testing your app
|
|
|
transcript
|
2:22 |
One of the core concepts of SQLAlchemy is this Unit Of Work. Let's dig into that. The Unit Of Work is a design pattern that allows ORMs and other data-access frameworks to put a bunch of work together and then at the very end decide to go and interact with the database decide now we're going to actually save this data within a single transaction. So here we have a bunch of different tables customers, suppliers, and orders. They're all providing entities into this operation this unit of work. So maybe we have a couple of customers one supplier, and one order. We've also maybe allocated some new one like we did with package and we're inserting that into the database. And maybe we've changed things about the supplier we're updating those in the database. And the order is canceled so we're calling delete on that. All that gets kind of queued up in this unit of work. And then I'll call commit in SQLAlchemy syntax and that pushes all those changes which are tracked by the unit of work the so-called dirty records the things that need to be inserted the things that need to be deleted the things that need to be updated and so on. So we can use these unit of works like that and the way we create them are with these sessions. So we've seen that we create these engines and the engine gives us this session factory that was all encapsulated within our db_session class. We do this once and then every time we want to interact with the database we create one of these sessions. So we come over here and we call that session factory it gives us a unit of work which is often called a session kind of treat this like a transaction a bunch of stuff happens in memory then it's committed. Maybe we add something, maybe we do some more queries maybe that tells us what we've got to do to add some more. We could make changes to the results of those queries either updates or deletes. Other than the query there's not actually been any interaction with the database. This add doesn't actually add it to the database it just queues it up to be added. When you call commit that commits the entire unit of work. Don't want to commit it? Don't, then nothing will happen in the database there will be no changes to your data. And that's how the unit of work pattern appears and is used in SQLAlchemy through this session factory and then committing it.
|
|
|
transcript
|
5:55 |
Now that we've imported the data into our database I think it's time to start using it. How many projects did we import? Negative one, unlikely. That's not typically a count of real numbers, is it? So, what we need to do is actually go query the database to fill out those sections. We also need to fill out our releases down here at the bottom, but we're going to focus on just this little stat slice as we called it. So if we go over here, and we see right now what we're doing is we're going to our package_service and we're calling a function: get_latest_packages. Well, that's pretty cool, but we could look over here this is just fake data. So let's actually put in here we're going to need to pass more data over to our template. So we go to our template, it's super nicely organized. We're in Home View, so we go into the Home folder and run the Index function, so we go to Indexing. Boom, there it is. Well, that looks like a problem. Let's pass in some data. Now, we might want to just drop the number here like, package count, that'd be okay. Except for, if there's a million packages it's just 1-0-0-0-0-0-0 with no digit grouping. So we could do a little bit better if we did a little format statement, like this. Like so, and to do the digit grouping. Now let's just put that in for the others as well. I have release count, and user count. Of course, for that to work, if we try to run this again we go to refresh it, not so much. Unsupported format type. And let's go pass this data along here. So we're going to need to have a package count and let's just make this fake for a minute. Release. And user count. This should be auto-refreshing down here at the bottom. Here we go, it's active again, super. Refresh. One, two, three, looks beautiful. I was trying to pass None to format in digit grouping. None doesn't go that way. Right, so this is working in terms of the template but it's not working in terms of the data. So let's go and change this down here I'm going to call Package_service.get_package_count Now this doesn't exist, but it will in just a moment. Release count, we're going to do users in a separate service. So we can go over here and hit Alt + Enter create this function, and it didn't really know what to do. It's supposed to return an int. And over here, we saw how to do queries. If we start by creating a session and we're going to import our db so we'll say, import pypi.org. Get our little db_session there and we'll say create_session. That's cool. And then we simply have to do a query so we're going to come over here and we're going to say, I would like to go to the session and do a query, and then you say the type. We want a query package because that's what the count we're looking for. And we might do a filter to say where the package_id is this or the publish date is such and such or the author is this person or that but all we want to do is a super simple count. That's it, that's going to be our package count, and let's going to let it write that as well and we'll just grab this bit. So this one is the same except for instead of querying package, what are we querying? We query release. Clean that up, and then finally let's go over here and figure out where we are. We also want to have a user service. So if I come over here, and just copy paste I can change that to user. Do a little cleanup. All right, that looks pretty good. Now, it might seem silly to just have this one function but of course, we're going to log in, we're going to register there's all sorts of things this user session will be doing. So now if we go back we should be able to go to our import up here. And we'll do user service as user service. And here we'll do user_service.get_user_count. Okay, moment of truth. If we run this, it should be doing those queries from the database, creating our unit of work, our session. Now, it's pretty boring, all we do is do a quick query. We're not, like, inserting and updating data yet but it still should be doing some good stuff. Let's do a Save, which should rerun it. See the little green dot, it's still running so it should've rerun. Moment of truth: refresh. Bam, look at that! How cool is this? So 96 projects, 5,400 releases, and 84 users. That's exactly what we saw earlier. And if we go over to our little inspector and we go to the network, and we say just show us HTML and we do this again a couple of times you can see that the response time even going to the database and doing three queries is 11 milliseconds. That's pretty solid, right? Not too bad at all. So our site's working fast it's using the indexes that we set and it's pulling back the data. Well, it probably doesn't use an index for a count but it would if we were doing the right kind of queries like, for the new releases. So, I think our little stat slice is up and running and that's how we're getting started using this data that we inserted, that we got from those JSON files. Lots more of that to do really soon.
|
|
|
transcript
|
9:03 |
We have our little stat slice working just fine but the pieces here, not so much. Remember, this is just fake data. See the desk, all right, so now we're going to write the code to get the new releases. Let's go over here and have a look. So we're not going to call this test packages anymore we're actually just going to inline it Like that so we're going to go and implement this method right there. Obviously, it's not doing any database work yet, is it. Now, as we talk about this, there's going to be several ways to do this, some of them more efficient some of them less efficient and I want to look at the output, so the first thing I actually want to do is go over to our db_session and I told you about this echo parameter. Let's make it true and see what happens. You can see all the info SQLAlchemy looking at the tables to just see if it needs to create new ones. It doesn't and if I erase this and hit the homepage you can see it's doing three queries it's doing a count, against users against releases and against packages. Where is that, that is that part right there. Okay, now I just want to have it really clear what part is doing what, so I'm going to turn these off and just have them return 200 or whatever, some random number. I'm also going to do that for the user_service. So now let's refresh, I'll clean up this here and refresh, notice there's no database access. That's good because we're going to do database access here and we need to understand it really clearly. All right so let's go over here and work on implementing get_latest_packages. In fact, we were returning packages but what we really want to do is we want to return the latest releases with ways to access the associated packages. If we look at the release, remember each release has a package relationship here. So I'm going to change this around and rename this to latest releases like that and we're going to implement something here. It's going to start like this and let's go ahead and tell it that it is going to return a list of release, release is good, import that from typing. And it's also going to have a limb and that equals 10 or something like that. So if we don't specify how many latest releases we get 10. Okay so we're going to do some work and eventually we're going to return a list right here. Well what are we going to do, well it turns out that this is actually the most complicated thing we're going to do in the entire website. It's not super complicated but it's also not super simple so let's do one more import. I'm going to import sqlalchemy.orm and because we need to change or give some hints to how the ORM works. So let's go over here and say the releases are equal to, want to create a query so we've already done this a few times session query of release, now what we want to do is get the latest ones so we're going to do an order by. So we'll come down here and say .order_by and when we do an order by we go to the type and it's the thing we want to order by and we can either order ascending like this or we can say descending like so. That's a good part. And maybe we want to only limit this to however many they pass in, 10 by default but more, right, that's the variable passed in that's the function it takes and we want to return this as a list. So snapshot this into a list we're going to just return releases. So is this going to work, first of all, is this going to work? I think it will probably work. I'm certain it will be inefficient. Let's find out. So we rerun this and just clean that up here and let's go hit this page remember these are all turned off so the only database access is going to be to derive a little bit, if I refresh it what happens? Sort of works, well it actually worked let's go fix it really quick and then we'll come back and talk about whether it's good. So here we actually had r in releases and I think we also need to pass that in from our view 'cause even though we called this releases this packages so let's make it a little bit more consistent, releases. That's not super, p is undefined okay and now we can fix this. So we have r, now remember r is a package and it doesn't have a name but it has an ID and then r, it doesn't have a version it has a major, minor and build version but it also has a property which we wrote called version text. So if we go check out version text it just makes a nice little formatted bit out of the numbers and that make up it's version. And then here want to go to the r and we're going to navigate to its package and then we're going to say summary. Let's see what we get. Ooh, is it good, it is good, it's super good. We were actually able to use that relationship that we built to go from a bunch of new releases back over to a bunch of packages. Now there is some possible issues here. We could have these show up twice. AWSCLI two versions, but maybe that's okay. We're showing the releases not just the packages. However if I pull this back up, ooh, problems. Look at all this database access. Let's do one clean request. So here we are going in to our releases and then we go to packages and packages and packages over and over again. Why is that happening? It's happening every time we touch it right here, that's a new database query. Moreover that database query is actually happening in our template, which is not necessarily wrong but to me, strikes me as really the inappropriate place. In my mind I call this function database stuff happens and by the time we leave it's done. Well, let's make that super explicit. Let's close the session here and see how it works now. It's going to work any better? Think that's not better, not so much. It's a detached instance error. The parent release has become unbound so we can't navigate its package property. Actually we don't want to do that. It's okay that we close it here, we don't want more database access happening lazily throughout our application. Instead what we want to have happen is we want to make sure all the access happens here. So we can do one cool thing, we come over here and say options, so we're going to pass to this query we can say SQLAlchemy.orm.joinedload and I can go to the release and I say I would like you to pull in that package. So any time you get a particular release also go ahead and query join against its package so that thing is pre-populated all in one database query. So by the time we're done running it we no longer need to traverse reconnect to the database for this. Is it going to work, well let's find out. Hey it works, that's a super good sign. All of the data is there and look at this. Let's do one fresh one so it's super obvious. That's it, so we come in and we begin talking to the database, we do our select releases left outer join to packages and where it's set to be the various IDs and whatnot and a limit and offset and then this rollback here is actually what's happening on line 18. So we're just, we started a transaction when we interacted with it and it says okay actually we don't need this anymore, roll it back. Which is fine you've got to close your transaction either commit or rollback so rollback I guess. We don't really try to commit anything and we didn't want to so this is good. How cool is that, huh? I think this is pretty awesome. So we've done a single database query we've solved the N plus one problem and we've got our latest releases and we used the latest releases to pull back the package names and the package summaries and so on. So that we know our database stuff is working efficiently let's go and put these queries back here. So it's working for real. Go back and pull up our inspect element. Remember we're still running the debugger but we should get some sense of performance here. There we go, 13 milliseconds. What was it, 11 before, so going and get those releases and those packages in that join barely added any effort. Now remember we're running the debugger we could probably make this faster still but this homepage is working super super well. I'm really happy with how everything's coming together. And if we have true indexes it doesn't matter if we have a decent amount of data our queries should still be quite quick. All right, awesome, homepage is done.
|
|
|
transcript
|
9:18 |
The last demo driven part we're actually going to write during this chapter is what happens when you click here. Right now, it's a little underwhelming. So notice, we don't even have a link. But if I were to, you know, hack it in there project/flask or something like that it just says details for flask. Let's compare that against the real one. Huh, well, those are not quite the same, are they? I mean, we've done pretty well on the homepage here going back and forth but certainly not on the details. And if we click it, it doesn't even go somewhere. So that's what we're going to focus on in this lecture here. Well, if we go to the homepage, the index this is easy to change. This is going to be /project/{{ r.package_id }} Let's just get that working now. I can click it and it at least takes us to where we intend it to go. Now, it turns out the HTML here is quite complicated. We've spent a lot of time already putting the design in there and this is just a variation on that design. We have the heroes, we have Bootstrap all the kind of stuff. So I'm not going to go over it again. I'm just going to copy some over and we can just review it really quickly. We're going to focus on getting the data back and delivering it to that template. So, towards that, let's start over here on this page. And right now we just say package details for some package name, but what we really want is we want to get the package from the package service. And we'll do something like get_package_by_id or pass package_name.strip().)lower(). Okay, well, that's not so incredible. I mean, maybe we even want to do a little check here. So if not package name just so that doesn't crash we might do a return flask.abort. Status equals 404. Something like that. Okay, but let's assume this is working. And down here now. And we can go to a query. It still might not be found. So we might say, if not package, again, not found. Right? They could be they asked for a package, abc one, two, three, it doesn't exist. So we don't let that to crash. Now, let's go and have PyCharm write this function. It's going to be package_id, which is going to be a str. It's going to turn in optional package. We're going to import that from typing. It's optional 'cause, like I said you could ask for a package that doesn't exist in the database. Super. Well, how's it start? How do all of them start? They all start like this. And somewhere we say db_session.close probably. And in the middle, we do things like get us the package. And the package is going to be, again, one of these sessions. We're going to create a query a lowercase query of package filter and what we want to do is say package.id == package_id. And again, maybe this one would want to do that test. Actually something like this. It's a bit of a duplication but let's go package_id. Instead of returning abort, we'll return none which will see it as missing then it will abort it. And then here we'll just say package_id equals package_id. That's true. Okay. It's a little bit of data protection because that is user input right there. All right, so we're going to get our package. Now, if we do it like this, we get a query set back. Not what we wanted. All right, we don't a want a query set. What we want is, we actually want one package. So we'll go over here and we'll say first. And that's either going to return the package or nothing hence, the optional right there. Then we return package, like so. And we should be good. We can just do a really quick test here. And let's just do package. So this will show that we're either going to get a 404 or we'll get it back and will show its name when we click on the homepage there. Let's try. Put down, click on boto. Details for boto, woo! We got that from the database. It's pretty cool, right? And so super easy. I mean, seriously, like that is easy. However, our little package details page actually needs more information than what we have here. So we go look through this. You can see we're adding a new style sheet to the top of the page. And we're having our hero section, it has a id and package this and package that but it also has a handful of other things. So it wants to work with the releases. Now this is going to cause a tiny issue that we're going to catch and then improve. So we're going to have latest version is going to be zero.zero.zero to start, okay? We're also going to have latest release is going to be None. And we'll have to say is latest equals true. So the page adapts on whether or not you have the latest version. We're just going to say it is for now. We need to actually have the instance that is the latest release, if it exists and also the text of the version. So we'll say this, if package.releases remember this is sorted in the order of newest first. So we can say, latest release is package.releases of zero and latest version is going to be latest release version text. And we'll just leave is latest is true. Now the other thing we want to do instead of just returning the string is we want to go over here and say, remember to this? And we said, response, this was from long ago. And what was it? Template file is going to be it's going to be where is it in this folder? It's going to be packages slash details. So packages slash details.html. And then for this part, we don't return that. We return a dictionary of stuff. And there's a bunch of stuff that I got to put I here. So I'm just going to copy this over. There. So we have our package, we want to hand that off. Latest version, latest release whether or not it's the latest. Let's make this a little bit more obvious. Pass it through. And of course, a lot of this could be computed in the template. That would be wrong. The template is about taking data and turn it to HTML and not doing all this logic. It's best to get this as much ready for the view as possible. Here, we're going to talk about patterns that make this better later but right now it's already pretty good. Let's just rerun it to make sure we're all good. Over here and refresh. Now, what happened? Why did this crash? Well, if I didn't do that close inside here my package service, it wouldn't have crashed. So you might say, Well, just don't do that. Again, this means that like database query operations and lazy loading is leaking into our template. So one option is, we'll let it leak and everything will work. The other one is, well, what do we do up here, we add in one of these joined loads. We kind of basically need the same thing but in reverse. Let's put the dot here. And not there. So instead of saying I want to go to the release and load the package I want to go to the package and load the releases, plural. It should've reloaded when I saved, and ta-da. How cool is that? Look, it's already working. Yes, I copied over the HTML and the CSS. But that's not the hard part, is it? I mean, maybe it's hard at some point but that's not really the essence of this data-driven app. So here we've got our pip install boto. Here's the version. Is it the latest version? Yes, that's why it's green. You can go, here's a project description the release history. If I want to go to the homepage click on that, it takes me to the Boto3 homepage. Right? All this stuff. Let's see what we get if we put Flask up here. We have Flask, and we have all sorts of stuff like here's the license. We go to the homepage, we go to Pallets, and so on. And we don't have every bit of details in here that the main one does, but good enough for our demo app, right? This is cool, huh? We did some query against our database filtered by the ID, got the first one but then realized, oh, we're trying to navigate that relationship. So instead of doing the in plus one interactions with the database and, you know, leaking and lazy loading let's explicitly catch that by closing it. And then do a joined load to eager load it all in one query. That's pretty awesome. So now things are going really, really well. There might be times when you don't always want to do this and you might have to have a little flag you pass on whether or not you do this just because if you don't want it it's a little bit extra overhead on the database but generally, given a package, we want its releases. So I'm pretty happy to just put this right into the main method. All right? That's it. We have our data-driven package page and our homepage up and running. I'm really happy with the way the site is coming along.
|
|
|
transcript
|
4:03 |
We've written a few interesting queries and before we're done with this application we'll write a couple more. But let's talk about some of the core concepts around querying data. So here's a simple function that says find an account by login. We haven't written this one yet but, you know, we're going to when we get to the user side of things. It starts like all interaction with SQLAlchemy. We create a unit of work by creating a session. Here in the slides we have a slightly different factory method that we've written, but same idea. We get a session back, we're calling it s. We go to our session and we say s.query of the type we're trying to query from account, and then we can have one or more filter statements. Here we're doing two filter statements. Find where the account has this email and the hashed password is the one that we've created for them by rehashing it. And now we're calling one, which gives us one and exactly one, or None, items back and we're going to return that account. So if you actually look at what goes over to the database it's something like this: select * from account where account.email is some parameter and account.password_hash is some other parameter and the parameters are: Mike C. Kennedy, and abc. You'll see that you can layer on these filter statements, even conditionally. Like, you can create the query and then say if some other value is there, then also append or apply another filter operation so you can kind of build these up. They don't actually execute until you do like, a one operation, or you loop over them or you do a first, or anything like that. So here's returning a single record. Also, it's worth noting that the select * here is a simplification. Everything is explicitly called out in SQLAlchemy. The concept is, just give me all the records or give me all the columns. If we want to get a set of items back like, show me all of the packages that a particular person with their email has authored we would go and again get our session we would go and create a query based on package we would say filter, package.author_email equals this email. ==, remember, double equal. And then we can just say, all. And that'll give us all of the packages that match that query. This one's not going against a primary key so there'll be potentially more than one. Of course, this maps down to select * from packages, where package.author email equals well, you know, the email that you passed. Super simple, and exactly like you would expect. So the double equal filter, pretty straightforward. There's actually some that are not so straightforward. So equals, obviously ==. user.name == Ed, simple. If you want not equals, just use the != operator. That's pretty simple. You can also use Like. So one of the things that takes some getting used to is these SQLAlchemy descriptor column field the how you type multipurpose things here is they actually have operations that you can do on them when you're treating the static type interacting with the static definition rather than a record from the database. So here we say, the user type.name.like or N or things like that, and so there's, you know we saw the descending sort operation on there as well. So if we want to do the Like query, this is like find the substring Ed in the name, then you can do .like and then pass the percent to operators as you would in a normal SQL query. If you want to say, I want to find the user whose name is contained in the set Ed, Wendy or Jack, then you can do this .in_ remember the underscore is because in is a keyword in Python, so in_. If you want to do not, not in, this kind of a not obvious but you do the Tilda operator at the beginning to negate it. If you want to check for Null, == None the And you just apply multiple queries. The Or doesn't work that way, if you want to do an Or you've got to apply a special Or operator to a tuple of things. So here are most of the SQL operators in terms of SQLAlchemy. You can do a lot of stuff with this. It's not all of them, but many of them.
|
|
|
transcript
|
0:44 |
Databases are really good at filtering and ordering. Here is a function, find_all_packages and the idea is I would like, ideally a list of all the packages in the database showing the newest ones first and the oldest ones last. So we're going to do a query on package and we don't do any filtering because like we said the in name, we want them all. But we are going do an order_by so we say, query of package.order_by and then we always express these operations in terms of the type, so package.created If we just said package.created it would order ascending by the created_date but we want descending, so we go into that descriptor created and we say .desc we call the function to reverse the sort, and then we just say give us all the packages, here they come.
|
|
|
transcript
|
0:49 |
In order to update existing data we start like we always do, we get a session. And then we retrieve one or more records form the database. Here we're just getting one package. When I get this package back, and if we make changes to it so we set the author value to a new name we set the author email to a new email SQLAlchemy will track within the session that that record is dirty and it needs to be updated because we've changed some fields. And then, when we're ready to actually save it push all the changes back. I could apply this to as many entities as we'd like it doesn't have to just be one. Then we're going to commit the unit of work and it's going to look at the changes do all the changes in a single transaction back to the database. We use the unit of work to do our updates just like we do the inserts.
|
|
|
transcript
|
1:59 |
We saw relationships are extremely powerful and let us imagine as if our code and data were just connected, almost hierarchically the way we would in a regular Python program connected not split apart like we do in a database. The way we define these we add an orm.relationship field to the class so here we have releases so the relationship is against the release type that we're speaking in terms of SQLAlchemy entities, not database and then we're going to do an order_by this can either be a single thing or a list. Probably an iterable actually. And so, we're going to pass that in and then we're going to say it back populates package. What does that mean? We want this relationship to work in both directions so if we have a package we can see the releases and if we have an individual release. We can see the single package that it corresponds to. So, over in the release we're going to do the package_id value to actually store the relationship like we would store any value that's a string or an integer whatever it corresponds to in that other field. And then we're going to say this is a foreign key and in the foreign key part we speak in terms of database, packages.id. But them we also would like to establish that relationship so we say there's ORM relationship for the package type from release back to the package and it back populates releases and it's called Package so you can see the symmetry here not too hard to set these up once you have an example. Put them side by side you go okay, here's where I fill in the pieces for my particular dataset and then you saw that when we load a package it doesn't actually load the releases unless we interact with it. So, if we touch it it'll go back to the database and do the query. We also saw that if we create new releases and put them into the release package.releases well, it becomes a list and commit those changes that'll actually insert the releases. We work in the same but in the reverse as well if we had set the package on a release so it's sort of bidirectional in that sense.
|
|
|
transcript
|
0:37 |
We started off this chapter by demoing how to insert data. Let's actually summarize now here at the end. So again, we're going to create a session which is the corresponding unit of work bit of syntax in SQLAlchemy. Then we're just going to allocate some objects so here we're going to create a package and set its ID and its author maybe create some releases set the release, not package value other properties similarly relates to set its package, we're going to add the package call commit, whoosh! All three that are seeing this because of the relationships get inserted into the database; super easy!
|
|
|
|
27:46 |
|
|
transcript
|
3:47 |
Relational databases are very powerful. But one of the problems that you have when working with relational databases and this is exacerbated by when you're working with ORMs is this ability to have say SQLAlchemy create all the tables and the structures and relationships automatically is awesome except when you need to change things over time. Once it's already created those tables we saw it will not change them your database is somewhat calcified and it becomes hard to change. So we're going to talk about a subject and the set of tools and techniques to keep your database evolving as your code evolves. And this, I think, is one of the biggest challenges of running a relational database and is why some of the NoSQL databases with their more flexible schema has some advantages in this situation. But you'll see the tooling for SQLAlchemy to actually evolve your database is pretty sweet. So let's get started. What is the problem? Here's what happens. We have a wonderful running site. Here's our fake PyPI, it's doing its PyPI thing running working in this database then we decide oh, you know, things would be nicer if we could track something else on the package if we had a last updated field. So we could do simpler queries and maybe make this page a little bit faster, who knows something like that. We make that change in SQLAlchemy. And then we want to run our code. Well, what happens, something that will send shivers down your spine, if you see this in production OperationalError, no such column package keywords in this case, we added the database schema doesn't exactly match the schema of SQLAlchemy at least if the SQLAlchemy schema is not a subset of that and will contain all the required fields you're going to get something like this and it's going to be super bad. So here's the thing, you make some changes you push your code out to production instead of your site becoming more awesome. It just goes 100% offline, this is any page that touches anything to do with packages will never ever run. That's a problem. How do we fix it? We keep our database exactly in sync with our SQLAlchemy code at least two ways to do this. One way is to manually create an update script every time we need to make a change to the database we'll do that update script and we'll apply it to production or staging or some other developer's database, right? It's not terribly hard when using SQLite like we are because that's actually just a file. If you have live data going into it you have to stay in sync with that. And that can be a challenge. But the real problem is if you have separate databases like Postgres or something, and different people are connecting to different databases that are out of sync right or different, you know, production versus development things like that. So this is a big problem. So the one way we can do is manual. Another one is we can use something called Alembic. Alembic is from Mike Bayer, the same guy who created SQLAlchemy and maintains it himself. So these are quite closely tied together. And Alembic is a database migration tool that will track the versions of databases. So maybe your production database is the latest maybe you're staging databases, some intermediate thing and maybe production is the most behind and long as you continually to evolve it with Alembic. You can have Alembic catch it up to whatever version of code that you ship with, it's really, really nice it doesn't solve every single problem but it solves most of the problems and it gives you some plugins for sort of adding the final bits. And we're going to use Alembic to help evolve our database over time as we evolve our code.
|
|
|
transcript
|
2:32 |
Now as we get started in our Alembic chapter we've moved to another section of our source control. So, let's just talk about that real quick and sync up. So now we're over in Chapter 11, migrations and we're going to be working on final and we're leaving you this copy of starter. Right now they're the same as always but in the end they're going to be different. And the way we got that was just taking the final code from the SQLAlchemy chapter. So, that's where we are. And I've already loaded this up in PyCharm. Here is our migrations project that we're going to work on. And if we run it, everything should be running just fine. Here you can see we have our new data driven version that we got from SQLAlchemy. Everything's working great. Now in order to use Alembic, we have to first install it. So, let's go over here and put it in as a development requirement. So, this is actually our first one that we're going to have. The idea is we take all the run time dependencies plus one more so we have Alembic. Here is another one so that's good. And then we're just going to go to our terminal make sure the virtual environment is active. And we say pip install -r requirements-dev.txt Uou can see we're downloading everything we need to run Alembic. Now, the next thing we need to do is we need to run an Alembic command to create the initial structure kind of a scaffolding type thing. So it's going to generate a configuration file some scripts that we can run some scripts that will be generated in particular for our application and so on. So, what we want to do is make sure that we're in the folder that contains our web app. So, we're basically in the top level folder next to this one. And the way we do this is we're going to run alembic and we're going to tell it to initialize the project. We do this once and only once then we store what is generated into source control. And we're going to set a folder here and the convention is, this is also alembic. So we say alembic init alembic. We run that, a bunch of stuff happens. It says, hey, before you can do anything you're going to need to edit this ini file. We will do that in a moment. Let's just look at what happened over here in the left. So now we got an alembic folder and we got an alembic.ini. And within the alembic folder, we've got a script some other details and these versions. As we make revisions to our database they're going to be stored as scripts as Python files in there. So, that's how it's going to work. We're going to edit this thing to get started and then also we actually need to work with this if we want to take full advantage of what we can do with Alembic.
|
|
|
transcript
|
9:16 |
Now the first thing we have to do before we can use Alembic at all is to set up the sqlalchemy.url in the alembic.ini. If we try to go over here and run something like Alembic current to ask what is the current version It's going to go "Aaah, I have no idea what this thing is." Over here, this driver thing. So we need to give it the SQLAlchemy connection string. Well, we basically already did that. Remember over here in our db_session? We came up with a connection string to be sqlite:///, then the file name. It turns out that what we can put over here is exactly that. And then, we can put the relative path. And it's a little, there's a lot of slashing going on here. So I'm going to make a space and then take it away. So I'm going to say the current directory which is going to be here and then we want to have our database. So we go over here and can say copy relative path and paste this there. That's what the path needs to be. Now, of course there's no spaces. So like I said a lot of funkiness going on but that's the connection string. It's a SQLite database and it's a relative path from the top level directory down to our database file. Let's see if we can run this again. Ah, there we go. Well, what happened? Nothing happened. Nothing came out here. And like there's a couple of info tracing statements but effectively, nothing came out. So rather than saying like there is no version num whatever which would be nice it doesn't, it just does nothing. So when you see, normally you would see like the version is something and if you don't see that, it's not configured at all. We can actually go look at the database here real quick. If we expand it out, by virtue of running that we now have this table here. And we go over and say, jump to console and say select * from alembic. Run that, and notice there's zero rows. It just has a version number. And when it's working it'll just have a single row and a single column which is the version number. So that's it. That's all there's going to be to it to keep track of it. Right now there's no results so that's what we get. Now this is good enough if we just want to make manual changes. If we want to generate various changes then they go hard code them write them up in Python by hand. We don't want to do that. But before we see the next step that we have to take with Alembic let's just visualize the problem real quick. So let's suppose we want to go over here and make a change to our database. Let's suppose that we, in addition to having a created_date on a package we would like to have an updated_date or last_updated, something like that. Now, it could be basically the same thing here. Initially, it's updated when it's created but then, right we can change it along the way. So this is cool, all right we want this last_updated date and it's nice that it's here. So we're going to be able to do simpler queries potentially, you know, theoretically. So let's go in runner app and see this awesome new change. Ooh yikes, not so awesome is it. That's not what we want. What is the error? No such column last updated. I see. No such column last_updated. Okay, well what that means is the database has gotten out of sync with SQLAlchemy. And the response is Aaah! We don't understand this anymore. Crash. That's unnerving in development but it's really, really frustrating and nerveracking in production. You were deploy this code your website would be down, right? 500 site unavailable, really, really bad. So we don't want that and how do we solve it? We use Alembic to solve it. So we could go and generate a change for this by hand or we could do this really cool thing and this is definitely the way I recommend it is we can go over here, in say, alembic and we can say, I'd like to create a revision. I want to --autogenerate. That means SQLAlchemy will look at its classes it will look at the table and go Oh, here are the things that are new. Okay, and then this is a name to kind of just describe to basically name the file of what the update is. So we go run this, it's not going to work because we have one more step to teach Alembic about our SQLAlchemy models. But let's see what happens. Failed, we cannot proceed with autogenerate because the metadata object was not set. All right, so that's the last thing to do to make this work. So we come over here and depending on the type of project you're working on this can be super easy or can be a little bit tricky. So what we need to do is change this one line. We need to set it to SQLAlchemyBase base, remember that? And we need to set the metadata here. So we're going to try to import. Here let's move this down you're going to see why I want it down here in a minute. Let's put this right here. Well we're going to do this. Now, remember for this to mean anything we're also have to show SQLAlchemyBase all the other ones. So we can also say, import pypi.org.data.__allmodels That's good enough. And tell PyCharm that this has meaning at the moment. So looks like this will work. However, the context or location that Alembic runs it's not going to know about this directory structure. So we got to do one quick little thing there. So let's try it again. Should get at least at a different error. Boom! No module pypi.org. Well, that's frustrating because right there is pypi.org isn't it? It's okay, we can fix this. All we have to do is, we have to go and for this particular execution of this script we have to add a folder, namely that folder to the Python path explicitly so Alembic knows about that. Remember, that's what this is doing here as well right there okay? So we just have to do that manually and it's pretty easy to do. And I think we've done it before as well. So what we're going to do is use os and then we're going to create the path based on this file get the folder, so this file, this folder. Then we'll go up one, turn that into an absolute path and it's going to have this right there so we can import it. Whew. Alright, so now when I run this now the magic is going to happen. Are you ready? We'll be able to import this so we'll be able to get the models and set the metadata. And then, what's going to happen here is Alembic is going to look at the database it's going to realize there's this last updated added and it's going to generate what we need to make that change. Awesome. Look at that, generating this file right there in alembic/versions. Let's go see what was generated. So, go in here. Alright, here we have it. So, this is the revision. There's no base revision. These chained together but right now since the first this is like the end of that tree or whatever. And to upgrade, it's going to add a packages last updated and it's going to add an index to it. Now if we want to downgrade then we're going to do the opposite we're going to take that away. Alright, so lets see if Alembic can help us. Now notice, when we rerun this nothing is better. Our app is still broken. This command we ran over here it didn't actually change the database. All it did, literally was to generate that single file right there. But what we can do is then apply that change over to the database. So we say alembic upgrade head That means, just go to the latest and whatever steps you've had to take if there's three or four migrations that have to happen that's great. Do it. So we do this. This is running an upgrade from nothing to five five etc. Added last update. Updated. So now, if we go over here, to our packages folder and we do a refresh there's our last_updated and if we refresh, most importantly if we refresh our app, the database should now be in sync with SQLAlchemy. Tada. We're back. Things are working. Our app is back and running, just like it was before. So we made some changes to our SQLAlchemy code our classes, and then we generated automatically an Alembic migration and then we applied it here. This works with taking away columns this works with other things like if we say added a table, all sorts of stuff. Indexes, foreign key constraints all the kinds of things that you care about happen happen when we do this. So this is really, really good. Now these should all be stored in version control as well and obviously those changes we've made. So let's just do that right away. So we've got just some dictionary stuff that doesn't matter but on version files, we want to make sure that goes into source control. And this will help us move, like say upgrade the QA database, or upgrade production or upgrade all of the developers as we all make changes so our databases are always in sync. There we have it. Our project has been brought back to life and evolved using SQLAlchemy and the auto generate feature. Super, super nice.
|
|
|
transcript
|
5:28 |
Let's make one more change so we can see the changes chaining together as you will appear as we are going. So let's add a new table. Let's suppose we want to do some auditing like, this user logged in or whatever. So we're going to go copy and paste one of these model files. It's usually the easiest, so we'll just say audit. And what we'll want to do is just tell it, your name is Audit your table name is Auditing, or something like that and id and date is probably good and then description, for now that's good enough. You know, we probably want the user, the IP address the action, things like this but, for now just for this example, this is going to be more than enough. So we want to have Alembic detect this table's added and create it. Now you need to be really careful. If you run this app now, run the web app it's going to actually SQLAlchemy will see this table doesn't exist and create it. But if you want to make sure that Alembic is managing it, don't run the app or it's already going to exist and it'll think there's no changes, everything is totally in sync. And this gets even a little trickier in debug mode for Flask because Flask will notice this file had changed and it will restart the process. And the restarting the process will generate that table. So be super, super careful about the web app running. Basically, have it off if this is something that you want to record into Alembic, right? Maybe there's relationships between the auditing table and the user's table and you want to make sure that also gets set up right like, foreign keys and whatnot. So just turn off the web app, or the auto reload may actually create it which Alembic will not then detect it. All right so let's go over here. You can ask the Alembic what is your current version? It'll say it's this one which is actually the head, the latest. Now let's go and then ask it to autogenerate adding the auditing table. Now this is not going to work, I don't think. Maybe, maybe not, let's see. So we run it, it's generated the file, no doubt. But let's see what's in it. We go in here, notice it says pass. Well, why did it say pass? Let's double check over here that our table does not exist. Nope, no table. So, is Alembic broken? SQLAlchemy broken? No. What's going on? Remember our convention here, in this __all_models this is how we're telling SQLAlchemy here, we're telling it all the models that we're going to be using exist in here. So we're just going to go and have to add it. Don't forget, when you add a new one of these always do something like that. Okay so this actually did nothing, let's delete it. And we'll just generate it again. All right, so current is still this, generate the vision. Now it's generated it, let's see what we got. There we go, now we got something meaningful. So it says that revision is the one it created and its down revision or the one that needs to be run before it is a 55, etc., etc. What it's going to do is create a table it's going to create a bunch of columns in there it's going to create a primary key, and an index. And to get rid of it, it drops the index and drops the table, okay? So it's super simple. Now though, if we go over here to our terminal and we ask Alembic current, it's still the same version but that's no longer the head. So we want to get the new one. We can easily do that again by just going, upgrade to head. Run that, we ask what current is. It's the new one, now it's head. And of course, over here in the database if we refresh, we now have our auditing table exactly like you would expect. How cool is that? So Alembic let's us just keep evolving our database; however, our SQLAlchemy classes evolve we're just going to make sure the database does that same thing, which is pretty cool. And again, I want to make sure this is in version control so let's right away just do an Add so we don't forget to commit it. We definitely don't want to lose one of those. All right, well, now we can just keep going with this process, over and over. Remember, adding classes, which add the add models, which add the tables don't forget to add them to all models in our convention or find another convention and, you know, just keep saving the changes. Now, there's one other little utility I want to make sure you have access to. We're not going to use it, but it could turn out to be helpful. We'll talk a tiny bit about it in the concept videos. So over here I'm going to drop a file called Alembic Helpers and it just for now has one item, but you can have more. So basically it gives you a function that let's you answer the question does a particular table have a particular column? And you can see it's using the reflection from the engine to go look at it, and things like that. Now go look at the tables, and the idea is that you know, maybe over here one of these revisions you would like to ask let's pick the other one where we have a column you'd like to ask, I only really want to do this operation if the column doesn't exist. Maybe you want to just ask first, like hey, does this column exist? Then I'm going to add it. Because what happens if a column does exist and you try to run this, it's going to crash. It's going to go, ah, I can't create the column it already exists, et cetera, et cetera. So, you know, some little utilities like this can go a long way to make your migrations a little more durable and fault tolerant.
|
|
|
transcript
|
1:44 |
Let's take a moment and review the core concepts of using Alembic. And I think the place to get started is getting started. The way we're going to get started is we have to make sure we have Alembic. We simply get that by pip installing Alembic. Make sure this is the virtual environment that you want it to be in, okay? So that works great, let's go into install. Then we need to initialize the project structure just once. So we say alembic init alembic. First one is the command, last one is the folder. And then it's going to go through and create all the structure. And says, don't forget you have to set your connection string in alembic.ini or this isn't going to work. Afterwards, you have a project that looks a little bit different. You've got an alembic folder, and here we have versions. It's going to be initially empty but as you apply as you create revisions they're going to be stored in here and chained together as we saw. Some scripts that are used to generate the SQL and run Alembic. So environment does things like tells Alembic what your SQLalchemy models are the scripts stop.py and .mako is actually going to generate the SQL structure that's going to be sent to the database. Things like that. Then finally we have our alembic.ini that configures how Alembic runs. In order to use Alembic you have to configure it. So there's a whole bunch of settings in Alembic.ini but the one that you probably care about first is sqlalchemy.url and then you just set it to whatever your connection string is. We're using SQLite so it's sqlite/// the name of the file and were able to use a relative path. I think this may only work if you run Alembic from the right location, so do that. Turns out that's pretty easy from PyCharm cause the terminal always opens in the right place.
|
|
|
transcript
|
3:09 |
We've seen there are two ways to make Alembic do changes to our database. We have the SQLAlchemy class-based changes and just straight-up manual changes. I didn't show you the manual changes but I did tell you about them. I'll show them to you now so you can see what the whole set of steps are and appreciate a little bit better what the SQLAlchemy version, the autogen version is doing for ya. If we're going to make change we're going to record a revision the main way we're going to get started by creating the pieces by running alembic revision and then give it a comment -m add keywords to the column. This is important. It's going to show up when you apply it it's also going to show up in the file name that stores it. So, we do that and it'll generate some hash and then a file name friendly version of your comment. Done. Then we go and open that file and we see it looks like this. It has a revision, the first one will have no down revision no relationship but as you build upon them of course they do and then it has an empty upgrade and an empty pass. So, your main job in the manual version is to actually implement those things. That may or may not be something you want to do. It's not too hard. Here's another one we can do. We can come and say we'd like to do the op.add_column to the packages table and just pass in a column like you would in your SQLAlchemy class, right? sa.Column, keyword string nullable and so on. Then downgrade of course is drop column. This is pretty straight forward but it can be a little bit tricky. One thing you may want to do is double check that this column does not exist before you try to add it. If it does, this migration will fail and everything that depends upon it will subsequently fail as well and that won't be great so I'm going to leave for dropping it. I talked a little bit earlier about the Alembic helpers. There's this function that I got called table_has_column and give it a table and a column and it'll say yes, I have it. So, it'll go and do some funky introspection on the table and tell you whether or not that is there. The way you import it is a little weird because where we run the code from and where it lives is not exactly the same place so the way Alembic runs these it's a little bit funky so you got to do this weird import to get it but once you do, then you can ask questions like if the table doesn't have a keyword column then add it, things like that so this may be helpful to you. We could also ask Alembic current. By default it'll just say nothing which means there's no version although it does when you run that create the table, just there's no version put into it. And then we say Upgrade and it's going to apply whatever upgrade so in this case, we ran it on a database that had revision 078 and we upgraded a 689 and that was adding the keywords column. Now if you ask Alembic.current it'll say we're on that 689 version that we just upgraded to and by the way, that is the latest. And of course as we saw this version is stored in your database so you have an Alembic.version and if you go do a query on it you'll see 689 the one column with one row which is just that string super easy to check you might just open it up in your tools and go what version is this in even if you can't run Alembic directly on it.
|
|
|
transcript
|
1:50 |
The best way to use a Alembic I think is to let SQLAlchemy at least pre-build the various revision changes for you and then you can edit them still if you like. In order to do that, you have to edit the env.py file, and you have to set the target metadata to the SQLAlchemyBase.metadata and just like before, it is super important that that SQLAlchemyBase thing sees all of your various models. That means you have to do some form of import like this from pypi.data import * or something to that effect, to make sure that everything is loaded up. But adding these two things will connect SQLAlchemy and Alembic so that Alembic can use your models to generate revisions and that is way, way sweeter. So just simply setting this target metadata is all we have to do to connect our ORM models to Alembic. And then to make a change, we just add the auto generate, like we had before but now we say auto generate this change. It's going to go detect the various changes and then it's going to create another one of these files. We open up that file and now it's better. We have this little section in upgrade. Instead of pass, it says these were auto generated by Alembic, please review them and if you're happy just leave them or if you need to, make changes. Nothing happens when you auto generate this but it generates the file as it can guess and then you edit it to do what it needs. Finally, you just apply it again and it's going to apply that auto generated revision change, rather than the one you had to manually write, and that's Alembic. A very nice way to keep evolving your database structure, along with the evolution of your SQLAlchemy models and for the most part making that automatic.
|
|
|
|
49:19 |
|
|
transcript
|
3:14 |
The next two chapters are all about accepting input from the internet, mostly from users letting them submit forms. In this first chapter we're going to focus on just creating HTML constructs and working with Flask to do that data exchange. And then in the next one we're going to talk about input validation, the internet is a dangerous place. We've got to make sure everything's validated either because people make mistakes or because somebody's trying to maliciously do something. So we're talking about validation both on the client's side and server side and some really sweet design patterns that are going to take the code that we write here that kind of clutters up what we're doing and put it into a super nice, testable little package. Not Python package, just conceptually package that we can work with that will clean up our code around data exchange with HTML forms. So let's begin with a super quick review of the actual HTML that we got it right in order to do this data exchange. So we're going to look at the basics of an HTML form and the various contents that go in here. So you can see on the screen we have a form a form has an action and it has a method. An action here might look like it doesn't do anything but in fact this is the most common action. All it means is the URL you're going to submit this back to is the page that you're currently on. So we're going to be on a page we're going to make some changes submit it back to that page and potentially do something with that. So we can also have other information here we could pass along to another URL we could have query strings, all sorts of stuff. But for now we're just going to submit back to this page and we're going to do this with the HTTP verb POST. We could do a GET, we could do other things but almost always what you want is a POST. And that's because the HTTP protocol treats POST special. It knows that it cannot be cached and that your browser warns you if you try to resubmit it. If you've ever tried to refresh a page that's done in HTTP POST, it'll warn you like Hey, we're going to resubmit this form are you sure you want to do that? You might buy this thing twice or sign up twice, or whatever. So POST is almost always what we want here. And then we're going to have some input elements. Here you can see we have an input element of type text that's going to be our email address. And we have an input type of password so we're going to let people type in their email address type in their password, and then sign in, right? Like, this is some kind of login form here. We also have an error message thing we're going to show some kind of error. They say, fail to login, right? Like, they try to sign in but their username and password are a mismatch, or the account doesn't exist we can show that in that error field. But that's technically outside of the form here. So these input elements, they have a type like text or password, or even email, which we'll use later. And optionally, some kind of value. So here, we're passing along a value like email_address and password but they might be empty so then the text box will just be empty. And importantly, they have a name. That name that's set is actually what you use to get it back out on the server side. So this is a super basic form, really. This is all the HTML that we need to create a super nice, interactive login form. We don't need Javascript, we don't need Angular JS we don't need any of that stuff. Just this and a little bit of logic on the server side and we'll have something super nice.
|
|
|
transcript
|
2:36 |
Before we actually start writing some code let's talk about this thing called the get/post/redirect pattern. Now this is a super common pattern that you see on server side web frameworks and it almost entirely eliminates that weird problem where you see things like Hey, this forum has been submitted Are you sure you want to resubmit it? If you refresh the destination page or other weird stuff like that. So it's a really nice pattern, its super clear and its easy to implement in HTML and in Flask. So let's go through the concept here so our server side we've got our server and we've got a database and then some body wants to talk to our website so here they are on their laptop running whatever browser they run and what they going to do is they going to go and request a page on our site. So let's imagine they went to register so they will go over here and they'll do an HTTP GET that is just click on the link for /accounts/register and that page will display an HTML form it'll ask them questions like What is your name? What is your email address? What password do you want to use? so your going to type that out and edit it locally. So they've done the get and they're making their changes and when they are ready to register they click submit on that form. As we saw that's often a POST so it's going to do a HTTP POST with that form data back to the server will do a little validation and says Super, new user I save them to the database. Now what what do we tell this user? Do we just leave them on this register page? No, we want to take them somewhere to their account page, to some kind of welcome to our site. So we're going to send them a 302 redirect a temporary redirect to /welcome. And that's it that's the get/post/redirect pattern we do a GET to get the form, we edit it we do a POST to submit that data, to save it and then the server does a redirect to where you actually want you to be. And on the /welcome if we hit refresh it doesn't go Warning! Warning! You submitted a form. No, it just goes, Alright well we'll refresh the welcome page. Really, really nice pattern, its super easy to implement in Flask as we will see and I totally recommend you adopt this. Now if we go look around like say on Wikipedia you'll find some thing like this but named differently they call it the post/redirect/get pattern so you can look that up here, the URL at the bottom. I don't like it because the thing that starts the whole process is not the POST the thing that starts this process is getting the form you fill it out and then you do the POST and then you do the redirect, hence get, post, redirect. They call it post, redirect, get. I guess it depends on where you put the focus but it's effectively the same pattern and you can learn more about it here on Wikipedia.
|
|
|
transcript
|
3:13 |
Now in this next section what we're going to do is we're going to create a login form and a registration form that will let us register for the site and then later log into it. So we would have user management in our web application as well as these forms. So we're going to put these two things together and actually tackle them at once. So if we run our app, you'll see over here it's running right here. And if we try to click on register or login we're going to get a sub-standard experience. As in, error, URL was not found. However, we actually did put a little bit of work in here but what we haven't done yet, is we have not yet gone and imported the blueprint. Remember for each one of these view sections we got to import their blueprint so we're going to go and get the blueprint out of here. Alright so now if we refresh that now we just get, hooray, there's no template. Okay, well, it's a little bit better. What we need to do is go over here our template section and we need to create a new directory called account. Remember that's how we're organizing stuff. all the operations inside account views are working with templates in here and honestly, the easiest way to just create another page is to copy exactly what we have and about as, about as simple as it comes. So let's go and call this register maybe you want to login, as well. Now, let's just see if we got this working. We refresh. Alright. This is about our site well not really, but the registry thing is working so that's a good bit right here. So this will be Register at PyPI This will be our form. I'm actually going to use this little CSS section as well so this is pretty good. If we look over in the account view here the account view methods. We actually already put the get/post/redirect pattern well at least the POST and GET part in place. So we've got our index, that just returns. Here's your account, there's no data access. There's no data exchange at all. This is just, you know the skeleton pieces but it's here. So this is going to be, I want to see my home page. Maybe we send them here when they log in. Here's the login and we going to do a /account, /login for both these methods but this one, here's the important distinguishing part inside Flask for the get/post/redirect pattern. This one only responds to GET requests. This one only responds to POST requests. A lot of times what you'll see is people will just have like a login function and they'll say if the request, you know Flask request is GET sort of thing. We'll do something else, we're going to do something else. This is so bad folks. It's really, really not good to like have these branching statements and these functions doing two things. So we can just use this little methods but here to determine which function gets run and when you're doing this make sure that this one is called _get and this one's called _post. They don't have to match the HTTP verbs but what they do have to do is be distinct. You can't have both two login functions that will be a RuntimeError inside Flask.
|
|
|
transcript
|
1:43 |
The login and register out's in place. Let's go try to register. Well, there's not a whole lot going on over here that we can use yet is there? Like our registration form is non existent. So let's go do the HTML side of things to add our registration form over in our template here. Now we've got this little div action and actually that should be a form right there. Let's go ahead and put this on the inside and then we have a couple of inputs. So we have an input type equals text and we're going to have an input type equals password. We'll have another one of those. And then we'll also have a button and it'll say register. Okay let's see how that's coming along. Yeah, that says okay. You know what goes in here? I don't, not yet. So let's go ahead and we could either add a label but as you've probably already noticed from me I prefer placeholders, so we'll say your name this placeholder will be your email address this placeholder will be your password. Now oftentimes on registration you'll see password and confirm password 'cause oh my gosh what if you type in the password wrong and you can't login? In any real site, what you're going to have to do no matter what, is have a reset your password option where you send them an email and they reset their password. So if they get it wrong they can just do that alright. We don't have to actually double that up here. And let's go and set the type on this to be submit How are we doing? Better, not amazing, but better. Can we submit our form? Let's go find out. We click register, here you can see it's actually posting back. We do a get, it's posted here and then it's posting here when we submit it so this runs when we request the page but this every time I click the button, it's running.
|
|
|
transcript
|
4:45 |
Now, it's great that we can click here and submit our form that we can type in here our little placeholder goes away but this page does not encourage me to actually give my personal information away to whoever runs the site. It looks terrible. So let's go and do the design real quick. So over here we're going to make this a little bit nicer and we're going to start by just adding a class to this to be an account form like login or a register. And the other thing we want to do is let's create a CSS file that's just for the account interaction. Go over here to start it, CSS. Now do we want to include this on every single page? No, just on those, so let's go back to our shared layout real quick here and at the top we've got this block right there. Remember how we added these blocks the pages can then inject stuff back into. So that's what we have right here we're just going to use that. So what we need to do is get a style sheet type of thing going on here. All right, now we have our account CSS file in there. Now all we have to do is go and put in our stuff. So we have form .accountform. And let's just style the overall form itself. Let's add the margin top to be 50PX. What I want to do is create a little box kind of floats in the center of the page. So what we can do is we can set the width and then we can set the left and right margins to be auto. Like so. And let's see how it's looking now. Oh, we don't want to do that. We want to go here. All right, looking a little bit better Ah, don't really want that up there. Ah at the...that way. So, let's wrap the form in this div here and I'm going to set the padding on that to be 50. So it keeps the background color something funky goin on there and then we're going to set the top 350 in the margin, left right. And let's set the background color of this one so we can see and I'll just set it to white but then let's use our little selector to gray that out just ever so slightly til we get happy like right around there looks good. And then let's also set the border to be 1PX solid gray. And border radius, we need 5PX. All right, let's see how it's coming along. Whoo, looks pretty good I feel like it could use some padding for sure. All right that's better and then we want these to look a little bit better as well. So we can use some boot strap styles on that. So we can come over here and each one of these can have a class form dash control and that's just a boot strap thing. Makes these look a little nicer behave a little nicer, so we refresh that. Looking good, and then finally this should look like a proper button. So this should be a btn and a btn-danger let's go with danger. Here we go, that's getting quite close I like the little glow these get when we click in there. And our registers button, we want that over here we also want a little more spacing. So we can do that pretty easily. Go, I'd like everything that is directly contained within here to have a margin top 5PX and a margin bottom be 5PX. Let's see how that looks. Oooh looking pretty solid, maybe those weren't borders rounded edges probably that we want centered. Do a little bit more there. That'll center this, and then let's push that to the right. Let's see if that does it Oh, close, close, but remember this is breaking out so the last thing we've got to do is down here, have a div and say Style clear:both. How are we doing? Oh perfect, I think this is looking pretty good in fact let's take away some of the padding on the top there, some of the margin. That one. Okay well, is it absolutely perfect is it glorious? No, is it good enough for now? Sure, so here you can see our form is still working I can type stuff, uh our form is doing pretty well at this point. I'm happy enough to call this done of course in a real site this is a super important part of your sites. You may optimize it further, but I think our design is coming along pretty well.
|
|
|
transcript
|
2:43 |
Now our form is looking good but to submit it back we have a little bit more work to do. Let's go over here. When the browser takes these forms and it submits it back to the server what it does is it takes the name not the id but the name, of these various elements and sets those up as a key value pair. So we have to make sure we set the name of each of these. And this one is just, name is name like your name, so would be name equals email. Right, now with that in place what we can do is we can go over here and actually see the data that's coming in. At the top we have flask imported and what we're going to do is we want to get to the request. So we'll say, r equals flask.request. Like so, lowercase one. And then let's just for a moment print out the various values. So, we could go to r. and we have a couple of places. If we have a query string, that is the question mark keyword value stuff in the n way of args we form, we also, we saw if there's data right like slash mode, right, mode is edit new user or whatever, we pass that in here as a string, str whatever it happens to be. So that gets passed in this way from the URL not having any of that. And then the other one that's a little more subtle is the headers, so we could have query string we could have the form, we could have the actual arguments and we could have the headers. So let's just for now print out r.form and see what's coming in. And let's just put some various info in here. All right, if we submit this form what do we get let's look over here. Uh-huh, perfect we get a immutable dict, with a name as Michael Emails at our values from our form are all been passing here, just like we'd expect. So lets go ahead and get those values real quick so we'll say something to like the effect of name equals r.form.get.name all is in now let's do a little bit extra here so maybe we don't want to deal with, values are maybe there fine but you going to normalize the email so we can put a default value of empty string if nothing comes in here then we can say lower.strip like this, that way when we save it to the data base regardless whether they type in upper case email or lowercase it's always going to be the same. And then maybe here we just do a strip maybe we don't want to allow spaces on the end of the password. So let's just see how this works one more time. Okay, type this out again one more time. So what we get, we get the name is Michael the email is that, and the password this time was abc. All right it looks like we're getting our data from the form now it's a matter of actually doing something interesting with it.
|
|
|
transcript
|
5:08 |
Now, things are going really well with our login form here, but there's a couple of things we notice. First, if I click it right away it just seems to submit. It doesn't tell me anything went wrong and actually nothing has gone wrong but we need to validate that. And, if I have some values in here like if I had my name there and I typed in some other stuff but then I hit submit and maybe I need to come back and fix this, all the values are gone. That's super annoying, so need to work on round-tripping the values and also just using them in terms of some form of validation. So, those are both super easy here. So, what we can do is we can say, when these values are submitted, we don't need to print them anymore. We'll do a little test. So, we'll say, if not name or not email or not password any of those things, we're going to return some kind of error. So, the way we're going to do that is use a little response conversion from a dictionary over to the values and what do we do? Well, we're going to go in here and have an error and say some required fields are missing. Yes, we could do better client-side validation and we will in a little bit, but we still no mater what, need to do server-side validation. Now, how do we show this? Let's go over here and at the bottom it'll have a little div. And, we'll say if error. We'll have a div here like this. That just shows the error. And, we'll have a class error message. So, let's go and first set that in our CSS in our site. Our color is red, but not quite that red. Let's darken it a little like so. And, let's see how this works. Well, if we come over here and we say, Michael. I click this, some fields are missing and if I do hard refresh, we now get our CSS refreshed and now that's the right color. But, watch this. Click over here, it's not quite there, so that's okay. We have our little test and it looks like it's okay. So, when everything's all right, not fine but if we try to submit something some errors are missing here. And, maybe let's go to our account and just do a not. Center just for this particular form. There we go, so our error feedback is good. Maybe even should be above the button but I think this is okay. The other thing is if I type in some of the values and hit enter, oh, that's not so fun. So, we can fix that real quick as well. What we can do over here is way at the end we can say, value equals double curly. We scroll over, you can see this is going to be whatever we pass for the name. And, you guessed it, same for email and password. So, let's go over here and register. Everything looks fine when we request it but we need to still pass those values back. So, they're submitted here and we have them but what we need to do is also submit the name as name and email as email is on. All right, let's try again. Still some errors if I say Michael and submit. Ooh, some are missing. We're getting close. So, this and then if I put the letter a it should pass the validation, which, eventually will do something interesting. For now, we're just going to refresh the form. Boom, all right, that's working really well. So, we're coming here, we're doing some validation. We could do better validation like your name is required your password, and so on. But, again, we'll do some client-side as well. Finally, the question is if we pass the validation we have all the info, what are we going to do? Well, we need to do a few things to create the user in the database and to login browser as session. So, some kind of cookie that says, anywhere you go on the site, this is the current logged in user. And, what do we do when they're logged in? Well, we don't leave them on this form. That's kind of silly. We're going to go over here and say flask.redirect over to /, let's say, just send them to their account. They're logging in, maybe they care about their account details. All right, let's try one more time. Michael, no, some fields are missing but my value's still here. Now, it should pass, we're not going to actually create the account but it should pass all the validation if I put a password in here. Ready, set, go. Boom, just like that, we're redirected over to our account page. So, that's how we're able to use our values over here that we got from the form post. So, we got name, password, and email. We make sure they're valid. If they're not, we send back an error message and we also roundtrip the values. Eventually, we're going to create the user. That's a little bit separate, we'll get to that in a moment. And, we're going to set a cookie so they're logged in and redirect them. But, other than these little to-dos we have our whole user form story completely written.
|
|
|
transcript
|
6:59 |
Well we've almost finished the registration process and our interaction with forms are working really well. But, let's go work on this other bit here. Let's actually go and create the user. So let's do this. Let's say the user's going to be our user_service remember we're doing lots of stuff with the database and users, so we created our user_service over here. So we can just import that. We're going to add a function, not get_user_count but create_user. We're going to have a bunch more things as well and we can just pass the values: name, email and password. Now, this doesn't exist yet but, you know what, we can have PyCharm write it for us and this can be a string and a string and a string. And let's actually tell it here that it's going to return not a user but an optional user. Why optional? Well you'll see in a second. But we definitely want to return some kind of user here. That's just the end of the line, okay. Cool, cool, okay. So what we need to do here is we should also do some validation on name and email and so on but we're doing that at the top as well. Let's just trust it for the moment but in a real site we would add that. So how do we do this? We're going to create a user, like so. And we're going to set some values. Now, be super, super careful here. Do you do this? Maybe? No. Bad, bad, don't do that. You never, ever, ever want to store your password directly in the database. It's such a bad idea to store the password in plain text. If for some reason you have a SQL injection attack or your database gets lost, or whatever all sorts of bad things are going to happen. So we never, ever, ever want to do this. So instead, let me show you how we're going to handle passwords in our app. So come over here, and let's check out this thing called passlib. This is one of my favorite of all time modules for Python because it just takes this tricky problem and makes it super, super nice. So the way that it works is this thing will go you can import it and it will go and hash up some kind of thing like, I don't know, a password. And then it will verify it. Now, of course you could use MD5 or SHA512 or whatever but this does a lot more. It also creates random salt, that is like words that are mixed in with the password. And it folds it many, many times. Now what I mean by that, instead of just taking the value and hashing it it takes that result and hashes it again and then it hashes it again and hashes it again like 150,000 times. So this is a much, much harder to break password if for some reason someone were able to access your database and get a hold of the emails and the passwords. So this is pretty easy for us to use. We have to add passlib to our requirements down here like so. Make sure those get installed. So this is all good and then up here at the top we need to go and import some stuff. But we're going to go over here and we're going to say from passlib.handlers.sha2_crypt import sha512_crypt as crypto We're going to import SHA512 and let's do this as crypto. That way when we use it below if for some reason we decide we want to change our handler or something we can do that pretty easily. So now I'm just going to drop two functions down here. One is to do the hashing and one is to do the verification. Okay? So we have hash.txt, which takes plain text and encrypts it and we're setting the rounds to be something kind of random but really high. 171,204 iterations, that's going to make it extremely computationally challenging to break. And then we want to go and verify it. You can't directly compare these because each encryption result results in using random salt but once one of these strings exists it knows how to verify it. So what we're going to do here is just a super simple hash.txt and give it the password. There we go. That's much better. And now we're going to need one of these sessions, like so. I'm going to say session.commit when we're done and we're going to return the user. All right, and then before we actually call commit we need to do session.add, remember that? And that'll add it here. Now, this all looks pretty good. There's one other issue, we may have a problem here. So let's just write one more function and you'll see why. Def find_user_by_email. And it's going to do something super simple but it's going to come down here and say return session of query. And so what we're going to do is find and see if somebody's already registered with this email address because that would be bad to re-register them, right? All right, so that's going to just give us the one user back and let's say if find_user_by_email this email address, return None. So we don't want to create the user otherwise this user has not registered with us yet we're going to create their account we're going to set their values, hash their password put them in the database, commit it and return it. Phew, all right. So that seems like a lot, but I think we're good. Let's do a quick test, if not user that meant we couldn't create it. Let's do something like this. Here we go. So if for some reason the thing already exists we're going to bail, otherwise we'll redirect. Let's go and actually do a quick query, look in our database and see if this user already exists, or not. It shouldn't exist. Go here. Say select star from users. What your email is, michael@talkpython.fm. We run that, look, zero rows. All right, now, now let's go try to run this, here. Make sure everything's working, good, good. Now let's go try to register again. So I'm going to be Michael. Right, here we go. It should go through, actually let's not put the password yet. Some fields are missing. Let's go and try to register. Boom, it went through. It didn't crash. All of these are really good signs. Let's go to the database and ask that question again. Look at that, user 85 is now registered. Michael, michael@talkPython. Here's that crazy password. Like, that's really not very much at all like what I typed, right? That's not the letter a. Down here we have our logins, our created_date we didn't set the profile image, that's all fine. Let's do one more test. Let's go back and try to register again. I'm Jeff. And my email address is that. Let's try again. A user with that email already exists. Okay, great, I think our forms and our user interaction is pretty good. At least on the registration level.
|
|
|
transcript
|
1:08 |
So, it looks like register is working well How about Login? Well, you know, not so much it looks more like the about page. Even though, yeah, it is a login. We haven't created the form for this one either. And in fact, it's so super similar to what we got going on over here just varies by a tiny, tiny bit that we're just going to grab a bunch of this and copy it over. So there we go, this is all the same except for we don't need to ask for their names just email and password now for them to login. We still need our arrow bit and, oh look at that. I think actually we're pretty much good. Let's try our login again. Maybe not so much. One more thing. Go over here and we'll say login to PyPI and then we can also add like a little gray thing that says don't have an account. Go over here, forgot your password, go over there. But you know, you can add that later. So, login to PyPI. I do this. Submit. It's now posting back to the login. POST method and we're going to have to fill that out. Kind of like we did before, but this time it's going to be a lot easier.
|
|
|
transcript
|
3:20 |
With our login form in place let's go write the code. So, this is really all we need for that initial part. But the bottom is actually so much like Register. We're just going to grab what we did up here and put it down there. So this part comes like so. There's a few things that we can skip. We don't need to get their name, that doesn't matter. We don't need to validate the name. We're actually going to use a cool pattern that moves this validation elsewhere. So that's going to be real, real nice. Do this, we're going to validate get the user something like that. Here we're going to say, login_user. And we don't need the name. So that's another function we have to write. And then, let's just add a quick message if you can't login. Something like that. All right, then we still need to do our browser login we'll deal with that in a little bit. But let's just go right of this function here. This is going to be a string, and just like before it's going to return an optional user. Super, okay so what we need to do, it looks a whole lot like up here, we're going to go and create a session and then we just need to return the user that we're going to query for. Actually, it seems like you could create for but actually no, the way the password works we can't quite just query. so what we're going to do here is we're going to go to the session and we're going to do a query of user and do a filter, with a user email is this email, now first. Now it seems like you might say well and the password equals such and such. But remember what we're storing is the hashed version. And we can't recompute the hash ever. Once it's computed, it's fine. But we can't recompute it 'cause this randomly mixes in different result every time. So it'll never give you the same answer. But we can verify it. So the way we have to do this is get it back first check there's no user, return None or the user would be the same. And then we have to validate. We can say, if not verify_hash. What does this take? It takes the hash which would be user.hash_password. And the plain text which would be password. So that's not the case, also none we don't find the user by email or if we do find them but they have the wrong password we don't give them back, otherwise, we return user. Make sure you don't forget any of those steps that would be super, super-bad. Right, so now we've got to user we send it back. Looks like everything may be good. Now what do we do? Then we're going to validate the user we're going to check their password and either make sure that account exists and the email's right. We still got to do this little login. Then we're going to go to our account page. We should be able to test that real quick here. So let's go back to our login page. And we'll just do that. Let's just try empty. Ah, some required fields are missing. Put the letter a, tries to get to it. Account does not exist. Put the real password. if this passes gets the user back it should redirect us over to our account page. Bam, it does! All right, so. Login, that was quick and easy, right? Starting to get the feel for these forms in this database interaction.
|
|
|
transcript
|
7:16 |
Super close to having both login and register complete. In fact, they're doing everything except for remembering the user, logging us into a session. So, the way we're going to do that is we're going to set a cookie. Now, setting cookies in Flask is quite easy, actually. But combining that with a redirect and combining that with our little response helper makes it a tiny bit trickier. So, we're going to see it takes a couple of steps to actually set the cookie in the response but no big deal. However, the other thing we want to do is make sure that we can create a cookie that cannot be tampered with. Like, let's say they login and we say well in the cookie, we're setting the user_id to 7. What is going to stop them from going and editing that and going, well actually the user_id is 92 or whatever, right? We don't want to change that and let them hack it so we're going to make these tamper-proof cookies which is pretty easy. We can just use some hashing and validation but it's a little more involved than worth actually creating from scratch. So I'm just going to create a new file over here. cookie_auth.py, like that. I'm going to drop some code in here so let's go over here and just see what we've got. So we've got a function called set_auth which takes a Flask response and what it's going to do is take a user_id and actually hash it up into a bunch of scrambled stuff. And then, it's going to actually go over here and set the value like 7 or 85 I guess is my user_id now and I registered. But then also, this other scrambled thing very much like our password thing we just did to say, This is the validation of that. So you could theoretically change that but you won't know what to change this to so the system will still think the integrity is there. All right, so we're adding this like super something super simple in terms of this hash. Change it a little bit, do a quick hash on it and throw that back. Then what we're going to do is we're just going to go and either set the cookie by name, age and then we're going to say it's going to time out after 30 days. You could make this whatever you want. And then what we're going to do is like when they come back we'll ask what the user_id is based on inbound cookies 'cause the browser will roundtrip them. So we split that apart. We get the user_id and the validation and then we just verify that it was not tampered with and we do this little convert to integer and either we get nothing or we get a nice user_id back. So optional event. Whoo! All that makes this sound like a lot. Using it turns out to be super simple. Here we go We're going to go down here and use our cookie off. So where it says you need to set a login here we're going to say cookie off, set off. Now, here's where it gets a little tricker because we're doing a redirect and whatnot. So, sure we can set it, but we have to provide a response. Well, the user_id is just user_id. That's simple, but how do we get the response? Well, what we want to do is create a response that will redirect us over this place, like here. Actually, possibly we could do it like this. Let's see if this is going to work for us. Try to put this as much together as possible and then down here, also in this one I'll do the same thing. All right, let's give this a shot and see if it work. So, we're going to come over here and notice we're not logged in right now. I'm going to come in and we're going to try to log in. Kind of do a quick test. The account doesn't exist. Use the right password. All right, here we go. Awesome! Off it goes. Well, it looked like it logged in but did not actually get us the right thing did not get us our cookies and so on. So we go over here and do a request and come back and look at just the HTML Look at the cookies, Whoohoo! Look at that! There it is. 85 and then all that scrambled mess on the other side that's actually good. That's the validation, right? Like, you couldn't figure out what it's supposed to be without seeing the code. Okay, super. So it looks that's actually working. Now, what we need to do is just have our account understand that. This also makes it super easy to logout. So I can come over here and say something to this effect here. When we log out, what we're going to do is we're going to redirect to maybe just home and here, we're just going to go to log out. And log out simply deletes that cookie from the response. So, it sends the message back to the browser like Hey, your job is to delete this so we'll able to go and log out and I think that pretty much does it but let's go over here and do a quick test. I have user_id, cookie_auth.get_user_id_via_auth_cookie. flask.request. So it's going to come in and then we can say we can check for it we can say user equals user service. We have find user by email but we don't have one for by id, yet. Super easy to write, as you will see. I'll say, "If user, if not user we need to return a flask.abort forward to /account/login, right. So if you come in and you're not logged in for our cookie, then you have to go login. Otherwise, we're going to return. User is just going to be that user. So we can say something like, Hey, welcome so-and-so but first this must be written. And its super easy. Sticks an int and it returns and optional of user, as many of these do. You know what, it looks a whole lot like that. So were going to go and write this bit. So instead of email, I need ID, his double equals, user_id. That's it. Now we just need to return user and we're all good. So right now, one more thing let's go ahead and just round this out. By having our home page, no do this. Just say, Welcome your account. Something like that. So come over here, refresh it look at that, Welcome to your account Micheal. If we go and we try to logout we don't have that written in terms of the navigation yet we'll do that in a moment. Now we're logged out, we went home now if we try to go back to account work before and it says ohh strings not callable oh whoops, I didn't mean abort I meant redirect to there. Here we go, and I didn't mess up the bottom did I? Redirect, redirect. No we're good, okay. Sorry about that. So we come over here and we try to go to our account cause we've logged out, were does it take us? Straight over to login cause we no longer have that cookie once we login again takes us over here, we now have the cookie Welcome to your account. Do a quick logout and we'll be gone again and that's the flow. Super Easy. Final test, go back to account. Nope, there's no account, not yet. Got to login. How cool is that. So we can create these tapper proof cookies and save them to the session use them to drive or manage the session, within the browser.
|
|
|
transcript
|
2:54 |
I'm actually logged in, can you tell? Of course you can tell, it says login and register. Normal science once you're logged in it says here's your account, logout, sign out something like that. But you can tell that I actually am logged in if I go here. So, what gives? Well, we need to control this navigation based on whether or not we're logged in and luckily we have one and only place we got to do that over in our little shared layout here. So, up here we have these bits that have to do with navigation and account and so on and so, let's go actually over here and let's say if user_id and if. Okay, these all look pretty good and up here we want to have if you have a user_id it's going to have your account. I also have a logout. And that'll just be /logout. All right, so theoretically this'll work. Let's refresh it and see. Now why is this not changing? It's not changing because here's the bad part every single view method has to send the user_id across. Super annoying. What we're going to see in the next chapter is some really awesome patterns that will make this go away. Let me fix it the hard way now. We'll see that it works and then we'll refactor it to a pattern that you can just appreciate more because it also solves this problem. So, what we got to do is all the places, when I go in here let's just work on the home, for example down here in the views. In addition to all this stuff we have to set user_id to be cookie auth. Get user and I say flask.request, lowercase request. Like so, so we got to put that everywhere. We got to put it here, we got to put it into about and there's no need for you to watch me write this a bunch of times. So, I'm going to go do that on every single view method and then we'll come back. All right, I put it in every single view method and I'm going to refresh this page. Now every view method passes back the _user_id if it's there and none if it's not. So, let's refresh the page and see what happens. Whoa, account, all right. Awesome, account is there, welcome to your account, Michael. I can go all over, I come over here even go to one of the packages you can see account and log out so we can go to our account and if I logout, I'm now logged out I can still cruise around the site can see this is keeping track of what I'm doing, right? If I try to go to account still it's going to redirect me. Right, so that's working super well. It was actually really easy to do just tiresome that we got to put it everywhere and if it's not there then that page will just basically think we're logged out. Like I said, we're going to work on a pattern called view models that just completely solves this problem for the entire site. For now, I've got to do this more manual but you can see it's not super hard, right? I log in. Boom, navigation changes right up there across the site.
|
|
|
transcript
|
4:20 |
And you seen our forms are working really well. If we log out, we can go back to our register and this data exchange is working great. But we also saw that sometimes it comes from the form it can also come from a query string, right? Or if we're over here, it could actually come from the URL. Now, there's data coming from all these different places I don't really love it, and I would really like to have one place to go and just ask, like Did they submit an email? I don't care how, did they submit it? I want to see it. Alright, we're also not talking about headers but that's another place or way the data is passed in. So what I want to do is add a little utility class that creates, instead of just one dictionary for the form one dictionary for, say the query string. Just a unified place, a unified sort of merged dictionary where I can ask, What value did they put for their name? What is their email? I don't care where it came from. Things like that. So, let's go and do that real quick. So that seems like that belongs under infrastructure. And I'm going to call this request_dict something to that effect. Now I'm going to copy and paste some stuff cause there's that few little tricks that are not worth seeing me recreate. So what we're going to have a factory method here called create, and it's going to take a request and it's going to take a bunch of route arguments. Remember Flask lets you pass variables, arguments into the method. So we would need to carry those along. We want those included in this. I want to say that first thing that we could look at is the query string. Now, it's super hackable, you can just type in it. So that has the lowest priority. So like, for example, if the URL has a value and the query string has it the URL is going to override that. Similarly, the form is going to take higher priority over those as well. So basically it goes from least to highest priority. The query string, then the header, then the form values and then the URL routing mechanism. And it's going to create the single dictionary that we can just work with and ask values about. But it's not a regular dictionary it's this thing I'm calling a request_dictionary that I created. So that you have a cooler way to access it. So if you had one of these, ours a request_dictionary I could say our .value and either I get a None back or I get the value I don't have to do like a .get a quote value like this. Or the crashing way of value. I can just say .value, more like Javascript or something. So really nice of a little addition there for us to work with, and that's what this creates. So, it's like a, you know, derive from a dictionary. So, let's go and just look at how we might change our registration method on this and then I'll tweak the rest aside out of sight. So over here, wouldn't instead of doing all these stuff we can say, the data is going to be a request_dict which needs to be imported, create and what are we going to pass. We'll pass the request of plus before I start a request in fact let's make an event change to this. So didn't even tick that. And just say, request=flask.request. Like so. Alright, so then, we would potentially pass arguments if there weren't any, right, like coming from up here but there are none, so we just say data sort of form and .get, we just say .email and maybe we want to set some kind of default value. Like we were here, but we could just do like this for now. And we'll just do data.password. Now, obviously it looks nicer and cleaner right, and simpler, I think. But it's also important that, you no longer care how this data was submitted to you. Did it come from a header? Great, you got it. Did it come from a form? Great, you got it. So let's just make sure that I can still log in that's still not what we just changed. But we're going to log in, and if this still works everything is great. Okay, I guess we should also do the error handling. I could log out really quick. Go log in, just try to submit nothing some fields are missing, right, working just like before. But, now we don't have the cognitive overhead of worrying about your real data, form data other kinds of data, query strings and so. We'll just say I need the email, give it to me. So I really love this pattern. It's totally something I built on top of Flask so use it or don't use it. It's your call.
|
|
|
|
33:30 |
|
|
transcript
|
2:50 |
In the previous chapter we worked with HTML forums and user input and exchanging data between the view methods and the templates. And all that worked well but it wasn't that pretty and we were actually skipping over a lot of stuff. There were certain validations I didn't add or were not fine-grain enough checks on the server side because it was going to just blow up the view method with mostly validation, mostly checking and then a little bit of work and it would have taken away from what we were trying to do. But in real apps you don't omit validation just because, Hey, it's going to make this method messy. No, you've got to actually put it in there. So what we're going to do is we're going to look at a design pattern that is not promoted by Flask or special to Flask can be used with other web frameworks called View Models. Now this is just something I'm adapting to Flask and I think is super, super valuable. I'm going to make a case for that as we go through this chapter I think most of you will agree as well but it's one of these patterns that helps with organization you can use it or not use it. Now I've already moved our data over into chapter 13 validation as you can see up here at the top so I've made a copy of what we had in chapter 12 with the forms and this is starting with exactly that code and of course there's a starter version as well. We're going to evolve this to be better. So let's go over here and just look at our views and account one is probably the best place to start to highlight this. So even over here when we're just trying to show the index page let me remind you what that looks like. Over here we can login we have to pass a couple of things across. We have to pass what the account is and whether or not they're logged in or logged out. That's used by the shared layout and this is used by the individual template. So we've got to pass that along here and there's a couple of things we're doing. We're checking to see that there's a user here and we have to pass both the user and the user id class across. But this is a simple one let's look at something more complex. So down here we have this post. Now what we have to do is we have to actually get data from the form we have to validate it. If it's not valid we have to send a ton of information we have to round-trip their data they've entered we have to send an error message and the user_id. The user_id is used by the outer container template and this is used by the form. Again we're going to do some more work do some more validation and so on. So this is really not fun this is error-prone code and we should be actually doing more checks like instead of just if there's no name or email we should also do a strip on the name and email so space doesn't work we should have different error messages for name and email like, Your name is required The email is required not just like, Hey, stuff's missing! That's always frustrating. So we're going to see that while this is a little bit messy it can be massively simplified with view models.
|
|
|
transcript
|
4:15 |
The key thing to wrap your mind around as your work with these view models is that the data exchange is deeply tied to the HTML template, and what this view method has to pass to it. It's going to be solely the job of the view model to know how that data is exchanged, how it is being passed back and what kind of validation we need. So it's all about this data exchange and validation. What you'll see is that every view model is different and it's in particular tied to this template and this method. However, there's certain common functionality that we have to use, like every single template has to have this for the shared layout. We'll also see that most templates and anything that has a form really has to have some kind of error message like this as well. So, these kind of things will be great to put into a base class along with some of the behaviors that every view model's going to need. So let's go and do that real quick here. Create a folder called viewmodels. Because very much like our templates here we have some organization, like this account has these three views, right? CMS style also has an index but that's not the same as an accounts index, right? Very, very different. This organization equally applies almost exactly over here because remember the view models are tied to those templates with that very same organization. So let's go over here and create shared one and over here and create an account one. So the shared is where we're going to put our base class. Called ViewModelBase. ViewModelBase, like so with no, nothing derive from it. And it's going to use some stuff from Flask as we'll see. So what we're going to do is have an initializer, a little constructor here and in here we're going to store the request. So we're going to get the request because we need to do certain things with it and we could also define this as a request from Flask, so that when we say self.request. we get all sorts of good stuff there, all right. The other thing we might want to have is we might want to have a request dict or something like that. Remember we had for this request dict library that we created that will unify where all the data is coming from so we want to take that and say create and we're going to give it a default value. I guess could be like this. And we don't have any route args here not yet anyway. So that's going to go and create our dictionary here. And then we also have some common data we had our error which is an optional from typing, Optional string that's equal to None. We have our user_id which is an optional. And this one we can go to our cookie_auth. Here we're going to say get_user_id_via_auth_cookie what's it going to take, it's going to take self a request. Perfect, so that's going to give us some back, either the user, or not. And then we'll see that classes can derive from this ViewModelBase and they can add additional fields. This is great but, what was happening over here? We were creating a dictionary and sending it back. Well, we're going to want to be able to convert from this class from an object, into a dictionary. So let's add a little function here as well. To dict and it's simply going to return the simplest possible thing for now. It's just going to return the dictionary that backs the storage for all the fields in the class not for the view model base but for the instance of whatever it is. So a extra view model, or a package view model whatever the things are that we're going to create. So here's going to be our base class and this is going to provide a lot of functionality for working with this data exchange and the validation and so on. However, to really make it useful we have to create individual, specific ones tied to these views by creating classes derived from our ViewModelBase.
|
|
|
transcript
|
3:18 |
Now with this view model base in place let's go and actually see how we might use it. This is what is actually calling for the view model idea the most. But let's start with something simpler. Just this index, like all we want to do is simply show the user details on the screen. So we've got to get the user_id and potentially, the user as well. So, let's go over here to the account and we'll have a index view model, something like that. We could call it AccountIndexViewModel but I'll leave it up to you how you want to name these. And it turns out to be really straightforward, what we need. We'll come over here and say IndexViewModel. And it's going to derive from ViewModelBase. So let's import that. And actually, I'd like to name it slightly differently. Something like that, so it doesn't conflict with our class name which what we actually care about. So we're going to have another initializer here and it's not actually going to take any arguments 'cause we're not getting any arguments here or anything like this. So we're going to come down there and the first thing we have to do is PyCharm miscellaneous add a call to super so it'll write this or we could write it ourselves. And then, let's look at what we're exchanging. Well, this part right here we have to get an exchange for that and that's actually happening already. We also have to go over and get the user. So let's try that. We'll come over here to our IndexViewModel and well say self.user is user_service got to import that. What do we pass here? Remember the base class is already setting that up and that happened already there so we'll say self.user_id, super! And this may or may not come through Now what else do we have to do? Let's actually go back and find out. So we're going to go over here and create a vm which is a IndexViewModel, like so. Create one of these. Now this already happens, and so does this. So all we have to do is go down here and say vm.user and let's go ahead and check that actually the query went down to the database and found a real user, 'cause maybe somehow they deleted their account or whatever. All right, if we can't actually get a user from the database they have to go login. Look how that got simpler, that's nice. Now remember, over here we had to do this as well. Now what do we return? All the fields and stuff contained within this view model. There is this extra error thing but it doesn't matter, we're just going to not use it and we'll just say to_dict, and that's it! Look how much cleaner this is become. And as we add more information to be exchanged this part here gets no more complicated. It's this data exchange bit, and this is pretty simple but we're going to get more interesting stuff as we move down the line here in this file. But already this has gotten better. Well, I say it gets better, it's actually going to be better if it really continue to work but have a better style serve. All right, it looks like it restarted. Let's go and see that it still works. All right we're still logged in, ta-da! There we go, so we got up here, the user_id info we got here, the actual user object and then we pass some other information that we technically don't need. Cool, huh? So here's a simple version of using a view model.
|
|
|
transcript
|
10:24 |
Well I think you'll agree that this index method is now simpler than it was before 'cause we've moved the specific type of behavior operation we had to do there over into this class. It's not super compelling. Let's look at something that is going to make a big difference for our world. So over here, we are going to have a register operation and we've already implemented this, right but just not as nice. So here it's definitely going to need a User ID, passed across. And down here, we have to actually go and get the data. And create this data dictionary thing, get the data out. Normalize it by lowering and stripping things like the email. Doing some validation, if the validation fails we have to return the data they have entered in order to round trip it. That's pretty important. And then we're going to do some other stuff some other validation, to try to create it and also round trip the data if that fails with the new error message. And who I set it on so let's make this a lot, lot simpler. So I'm going to do that by going down here to my view models. My Account, and I'm just going to copy and paste to make this as easy as possible. We'll say Register. Like that. And I'm going to change the name, of course. Register view model. Now, we are not able to query the user in this case. What we want to do is this is what they're entering to create the user. So, go and bounce back and forth a little bit here so first, we're going to come down here and say the view model is this and we got to import that as well. Now notice, we're creating this data dictionary thing here and we're actually passing the default value which, if we go down to the Base Class. I think we're, yeah, passing exactly the same default value so this should work completely fine there. So we don't need this data thing, and in fact this part is going to be part of what our view model does is capture that data, and normalize it. Okay, so we can just move that into the view model. And this will be, we don't need that part. 'Cause it's hopefully not going to work. There we go. And this will be, request_dict. Okay, super and because the default value of this shouldn't fail even if it's missing for some reason. Alright great, so that's working. Now, instead of doing this validation here let's say. Somethin' like this, we can say. vm.validate. That doesn't exist yet, so let's go and let me borrow that real quick. And we'll go and write it. Let Pycharm write the first bit there. So what do we need to do, we need to say... And we'll just leave that there for a second we'll say if, if not self.name. Or not self.name.strip(). Right, we want to make sure space isn't counted. Then what we got to do is say self.error. Remember the error is coming from the base class. It is something like, You must specify a name. We can say elif. What do we want to do? Well, let's do the same thing for the email. It's a little bit tedious down here, but you know what? It's fine, because it's just jammed into this class that we don't have to think about it it's not going to mess up the rest of our method so, we must specify an email maybe we'll put periods on those. And then password, as well. Right, so if there's no password you must specify a password and we could even do additional stuff like let's go down here and say. Else If the length of password. Is less than five. Say you have to have five characters. Well I could even do a strip on it as well. That's a lot better than just Some fields are missing. Right? So how are we going to use this back here? So, we're going to go validate then we just do one test no matter how complex the validation gets we just have, is there an error? If there's an error, we have to do this we have to round trip all the values they passed in. That user ID that may be coming from the cookie things like that. Well, it turns out that's bundled up in the view model already so all we got to do is say vm.to_dict. That's it. Cool huh, and then down here we're going to use this data so vm.name. Email and password. And if for some reason we can't create it. Something goes wrong here, instead of all this again, this just goes. vm.to_dict. And if we change the template and more data has to be exchanged. No big deal, we're still just going to do the same thing. Look at this. To me that looks way, way nicer. And in fact, there was a test that we forgot. We forgot, over here that we should probably check that the user doesn't exist. But let's go ahead and see if this is working and then we'll go add that test. So I'm going to go log out, and try to register. Let's go Register. My name'll be user2. My email address will be user2@you.com. Give it a password here. Should register. Oh, now look at this. I don't think we've run into this before. But this is something that's really tricky with SQLAlchemy and I could of course just edit this out and fix it but I want you to see it. Remember back in the SQLAlchemy section I said, We need to make the factory a little bit nicer that session factory a little bit nicer because, we could run into this case where we insert something in the database commit a transaction and then the object becomes out of sync with the session. And that's what's happened here so let's go fix that real quick. Bit of a diversion, but it's certainly worth it 'cause when you see this, it's like, Oh my goodness what do I even do with this? So let's go over here, the data bit is all we need to work on. So this db_session thing here. So we have this session, create_session and this is what we're calling to get this factory. But we come over here. And do a little work on our session first we can see the session is this and return of the session and that's like a simple refactoring. And we can say that this is a session. Which comes out of SQLAlchemy. So we can say session.expire_on_commit. So normally, SQLAlchemy tries to be as safe as possible. If for some reason you commit some data you can no longer work with it. Because, for some reason it maybe has to be requeried from the database to do with transactions and whatnot. So I can come down here and say You know what, that's, in this particular case we don't have this problem. Right, we're fine just showing what we just saved to the database. So we can say session.expire_on_commit = False. Which will make this issue go away. So let's go back here and just change this. Set a password here and let me just make sure it's restarted. It's still running so it will have. Now, let's do the same thing. Boom, fixed. Okay so, if you run into that, session has been detached. Think carefully, if this is okay for your application. But if it is, this is the fix. Okay, just go and say Session, it's okay to still let me look at the values of an object after it's been committed and inserted into the database. Alright but, that sort of overshadows the fact that our view model is doing its thing let's actually log out and just do a little bit of the validation here so if I just go Register, I must specify a name. Before it just said fields were missing, right so if say My name's Michael. We try it again, now my email must be specified. Let's see. Put that one. Now I'm going to specify a password how about the letter a? Nope the password must be five-character. ABC, how about A one two three four five six times? Now we're back here, what was the error what was the problem? Actually, we missed something really quick if we look over here 'cause it didn't tell us what the error was it just didn't let us continue. And here, what we need to say is that the error is, The account could not be created. If we try again, now we get The account could not be created. But it would be better to say A user already exists with that email address. Did you want to sign in? So let's add one final test over here and we're going to add a test and it's not going to change a single line, here because, we've moved that validation somewhere else. So this was just testing the values in memory but we could go further. We could say something like this. If user_service.find_user_by_email(self.email) If that exists, this is an error. Self.error= A user with that email address already exists. And we could go ahead and even make this an elif. Here I suppose. Okay, so we have our sort of standard data validation and we have deeper validation checking with the database and whatnot. So let's try again, instead of getting this error message that's like Whoa, Create failed. Now we get A user with that email address already exists So how about Jake? Over at Talk Python. Is that going to work? Yep. Let's see. That's probably not so good 'cause I should have set my name, up here, to be Jake. Right, that's why it said Michael. Little confusing, how about Sarah, and I'll do Sarah. Here we go, welcome to your new account Sarah. Everything is looking great. So let's just review real quick here. How this made this a lot simpler, so all we had to do is move all the data exchange into this section. The validation here. Let me just check if there's an error. That's it, this is almost the entire behavior that we needed, but now it's over here in a nice, isolated testable way. I guess the final thing that we could do kind of round this out, is up here we also have to do this business here. So let's just say vm = RegisterViewModel and here we'll say vm.to_dict because maybe eventually, they'll be like dropdowns or other stuff that are populated in the constructor there. So this'll help future-proof that. So, you can see how the view model is super massively simplified both the data exchange, and the data validation. Hope you like this pattern once you get used to it, I think you'll really love it it's absolutely powerful both for creating forms with proper validation as well as testing because now you don't have to call the web method you just interact with this object like a standard Python object, which is cool.
|
|
|
transcript
|
1:40 |
You've seen view models in action let's review them as a general concept. So here's a mock up of a web browser some sort of architectural view of our server and the user of the web browser submitting a form. Here they're doing their HTTP POST for the register action form page. And they're submitting some form data which we didn't elaborate too much on here but you see some sort of form data is being submitted. Now, the way that Flask encourages you to handle this in general, and a lot of the web framers do is to just have some super complicated view method. Why? Well, there's no other pattern to tell you it doesn't have to be that way cause you have to do all the data acquisition the data normalization like stripping and lower-casing the email, stuff like that. You've got to do the validation you've got to do lots of testing like does this user already exist? Typically, here's the function where you do that. Go to town, sorry it's 200 lines. All right, things like that. But it doesn't have to be that way. We saw the view model pattern takes the data exchange the data normalization, and the data validation and it pushes it somewhere else that can be tested separately, maintained separately. And our view method only has to process the essence. It gets the data, maybe it creates the user and it doesn't redirect, or something to that effect. Sends them a welcome email, things like this. So we can exchange this yellow box for a much smaller, more maintainable version and instead of writing all that validation and exchange data, we create a view model and we just work with that view model over here. Now this is the general idea of this view model design pattern.
|
|
|
transcript
|
1:23 |
We saw that the real value of these view models is they let us write simpler view methods or action methods. Here's our register story that we were working with. Notice how simple get is. No matter the data that has to be exchanged like we have a country dropdown we got a populated country list out of our database. It doesn't matter. The view model is going to take care of that. All we do is create the view model, send it along. For the post one, there's a little bit more going on and we got to get the data from the form, do the validation and so on. But still, it's much simpler. So we're going to create this view model. We're going to ask it to validate. And if it sets some error, well we need to show that error to the user. What data has to be exchanged? It doesn't matter how big the form is or how complicated, the view model knows how to exchange that data. So we just say hey, send that data back. Return vm.togit. And it takes care of all that. Now, if you make it through here all that rich validation you've added has passed. You're probably good to go. So here we're going to say, if we were unable to register with their email and password that the vm got ahold of, we might still need to send a message, so we're going to set like an error and send it back. Otherwise we just do a redirect over to either / or /account. Wherever we want to send them to we've done it. Now isn't this clean and concise? Imagine how complicated a realistic registration method here would be in actual code. Well, using view models, it doesn't get much worse than this.
|
|
|
transcript
|
1:44 |
Few models provide two basic services. They provide data exchange and normalization. And they also provide validation. So we saw this way of taking a request and converting it into a dictionary through the view model was super valuable. So let's see how that goes. We're going to have this view model based class and all of the models will derive from it it's going to have this constructor. And here we're going to initialize the standard shared data maybe everything wants to get a hold request we're going to have an error set just in case or at least an error present, not central value but it'll be present in the dictionary as well as what the user ideas and our actual code we actually went to the cookie often got that out. So it was passed back through a cookie was automatically set here. Now how do we get these fields and all the one set by the derived classes over as a dictionary, super simple we just call self.to_dict. So the concrete view models like the registration one and package management one or whatever ones we create are just going to set fields than the standard dict is going to have all those fields and it will just pass them along. And that's how we do data exchange. Now in the concrete view model so when they derive from the base that are actually modeled for a particular view we're going to do something a little bit different. So over here, we have our RegisterViewModel derived from ViewModelBase itself going to have this constructor and it's going to call the super's initialization or constructor that's going to set all the base stuff and then it's going to go to the request maybe go to the form, get the name do the normalization and store all of these things right here. That way when we return the __dict__ out of the ViewModelBase it's going to have first_name, last_name, email password, full_name and all the stuff that the base class set as well. It works like a charm.
|
|
|
transcript
|
1:36 |
The second core service that view models provide to our application is server side validation. So we've set all of these fields here in our initialization. This is the data exchange but sometimes, not all the time, sometimes we need to validate it. If we're just getting, doing a standard get and showing the data, there's rarely a validation but if we're working with forms in the post side of things then we do want to validate that. We could do that in the view method but it's going to get all messy and why would we do it there? We're going to move it down to a validate method. So here, we're going to say if the first name is not set or the last name is not set we'll give an error, like hey you have to specify a name or an email is not right, you got to specify an email. Same for the password. We saw lots of interesting validation that we could do here. You can imagine we could make this nicer, right? Regular expressions on emails and so on. We also could see that we did richer types of validation not just here's a required field, but we go to the database and we say, someone's trying to register with this email to somebody already exists who has registered with that email. Remember there's a uniqueness constraint and it's going to actually be some kind of error if we try to save it theoretically and we want to give them a friendly message instead of a crash that says hey that didn't work for whatever reason. So we can tell them really nicely hey that user with that email already exists. And even suggest, would you like to try to log in or reset your password? If you're trying to register, maybe you forgot what your account is. Things like that. So there's validation, it's really, really nice. What's cool about it is, we can add tons of validation here and it doesn't make our view method any more complicated. This validate method just bundles it all up and it's great, right here.
|
|
|
transcript
|
4:54 |
Well the view model sure cleaned this up, didn't it? And what I really like is it can continue to grow and it really doesn't get a lot worse here. A lot of that growth happens down in the view model. But it would be nice if this was a better experience. Let's go over and try to register again. Now, notice over the top you'll see a little refresh. If I try to submit this, we do get this great little error message like hey you got to specify a name. And if I fill out the name it'll say you got to specify an email address. But notice, every time this is going back to the server. It's super super fast. Like a couple of milliseconds right now. But if we have a long ping time or a slow connection that could be annoying, right? And also wouldn't it be nice if we use a regular expression to say validate the email. We'll see that we can actually use Client Side Validation like we don't even need to have the server stuff open. Let's go over here to this register form and see what we can do. And let's, while we're at it let's add one more thing like their age. so that is text for a minute. We'll just say your age in years. If we're going to add a field here in order for this to round trip we do have to add that to our view model. Age like this. And, just put Age. Like that. This is just going to be a string. On the serverside. We convert to an integer and so on. But let's just go ahead and have a look and see how this is working. We go open, load the page again. My Age In Years, we're not validating that on the serverside, but, it's okay. We're just going to see the validation here. So, it would be great if we could do this on the client side. And with HTML5, it's super super easy. So we go over here, and you want to make this field something they have to fill out. All you got to do is say it's required. They don't even have to actually enter, like a value like required equals true. Just the presence of this attribute is sufficient. So let's just say everything is required. That's a good start. Now if we come over here and pull this up again and I hit start. I hit go. Notice they all turn red, and it says you have to fill out this field. Ah, I didn't realize that. Got to fill out your email address. Okay, there's some junk, and so on. But still a little bit better. So we can come down here, to this one and say instead of just being text, there's actually a lot of options in here, like datetime or checkbox or Numbers, or Passwords or whatever. We're going to just do email, and if we do this again. And here I put some stuff there. And if we just say my email is Michael it say's no-no, you have to enter an email address. How cool is that? So we come down here and, make it a little further. Now these are, of course required. The Password one is good. This Age In Years could definitely be better. Let's suppose you have to be 18 to register on our site. We come down here and say, the min is equal to 18 And the max, I dunno, 120 or something. Just so it's not crazy, right? Let's try this again. So, Michael, email address, a real one. Password, abc, and now if I just say Go. It says please fill out this field. Try again. Ah... We haven't let's do one more thing. So we're sending the values, but this is still text. Let's set this to a number. There we go. And go to typing out stuff, one more time. Your email address is going to be this. Password is abc. And now notice it has this. So we really want it here so we don't want to set a value at all, for now. There was something weird with actually this numerical control with the form control class? It wouldn't let me interact with it. And the placeholder wasn't working. So I just took that off. There's probably some CSS issue. Don't really know what that is, come back to that. But now if we come down here and try to register. It doesn't actually do the validation there. Let me go... I took the required off. I'm going to put the required back. So now it says you have to enter a number. And if you try to enter this, it says no-no, a number. Try and put in number five, it says the value selected is less than 18. And in fact, if I go in here and just hit the up arrow. It automatically selects 18 as the minimum value. And it can't go below it. So that's great. You know maybe it's an age, and it only make sense for adults to be 18 to... I don't know, you can put something crazy like 200. Whatever you're going to put here now we have proper validation. So we can see we can add HTML5 validation to our forms. This does not remove the need to have serverside validation for a couple of reasons. One, people can always skip the validation and just do direct post. Try to mess with your site. The other one is, some of the validation can't reasonably be done on the client side. Like "auser@thatemail" already exists. Sure you entered valid data, but that doesn't matter. It's not going to work. The user already exists right? That could use AJAX and whatnot, but it's better to sometimes let that happen on the serverside. Do the quick and easy stuff. And then do this kind of validation. It's kind of a blend.
|
|
|
transcript
|
1:26 |
We saw that we can add client side validation and make the user experience a lot better. The browser will, in real time, without putting extra load or effort on our server help the user get the data mostly right. And in order to do that we can just do a couple simple things. We can add the required attribute and we can also set different types. So here we're setting the email type to be actually email rather than text. And that will tell the browser, when it's required that hey, it should validate this stuff. Some of the late for the password we can say it's required we have the numerical one as well and we can set a min value and a max value and so on. So it's super easy to just leverage HTML5 form values or attributes, things like required in different types of input to make most of the validation happen before you ever see any form of submit for the form. If they go and try to submit this without actually putting in an email address it'll say, hey it looks like you typed something but it's not an email address an email address has an @ in it and so on. So would you please create a proper email address maybe you thought was a username or your real name or whatever. Just remember this in it of itself is not enough people could skip this in so many ways. So you got to do the same validation on the server it's why the view models are such a thing of beauty but this definitely makes the experience for the users nicer.
|
|
|
|
53:04 |
|
|
transcript
|
2:09 |
Our web app is basically built. All we have left to do is test and deploy it. So let's talk about testing web applications. Now this is not a chapter on unit testing and all of it's benefits in general. The goal is to focus on testing web applications. Addressing some of the challenges that we'll see that can be hard of working with web apps in terms of testing. For example, how do we like set up the web framework around it if it depends upon things like request object. And what are some of the techniques we can use to take advantage of stuff the web app already provides us like the URL structure and so on. Let's begin by asking the question, why test? Why should we write tests at all? Well, your first response is probably So that we can find our bugs. There surely are bugs in our web app. Let's make sure we find them and then get rid of them. And that is great. That's not the only reason to write tests. These days in modern software development we have a lot of infrastructure in place to help with things like continuous deployment and checking code and verifying that we don't step on each others feet if we're working on a team. Things like that. And testing for Python web apps is really one of the few verifications that we have that we can work with. Let's suppose that we have continuous integration which is a system like TeamCity or Travis CI that looks at our GitHub repository. Watches a branch or watches for PR's. And when a change comes in it will automatically check it out and build our project. And that build probably includes running tests. But if we don't have tests that build passing, what does that mean? I actually don't know what it means, in term of Python. Maybe we could install the dependencies register the website. That might be about it. Because Python doesn't even have compiling. So this testing in place means that when our automatic builds pass that actually says something about the state of our web app. If we're going to go farther, and go with continuous delivery and automatically deploy our site when we put it onto a branch in the build passes when we really need some sort of verification with our tests. So these tests are important foundational items for so many things that we might do around our project.
|
|
|
transcript
|
2:32 |
And you'll see that there are some special challenges to testing web applications. They often have more dependencies and other systems tangled up in their code than most. Here is the register_post method. This is the method that we roughly wrote when we want to have a user come to the site and create an account. They're going to go to the form where there's a get version that shows in the form. They're going to fill it out and they're going to hit post. This code is going to run. What if we want test this behavior? Or if we want to verify that its user can register for our site if that account email address is not already taken and all the details are filled out. Let's say if the email is not even filled in then we get the right error message and so on. We want to test this code. What are some of the challenges here? Well, look carefully. Over here in RegisterViewModel remember it imports Flask inside and it goes flask.request. So, implicitly it expects request to be there and to be setup and to have values and not be empty. Things like that. Wen we call vm.validate we see it as actually going to request.form and we then get to pull out things like the full name and the email and so on. We need that to be correctly populated. In this user service when we try to create the account it's probably going to the database just like Validate also would when it wanted to verify that the account didn't already exist. This is going to go to the database and maybe insert some data if that worked. It might also do some other kind of check as well here. Maybe it does other things like maybe it registers the user at some other API like for example, adding the user to our mailing list or sending them an email. We don't want that to happen. We don't want any of those things to happen. We want to test in isolation. We don't want to depend on the database. We don't some random user to get an email every time we run this automated test. Things like that. We want to avoid those. Here, when we call login this is probably working with the response object and calling set_cookie. Finally, at the end we're doing some kind of redirect with Flask. What does that need set up to work? So, as you can see there's a relatively simple function has all sorts of tangled interconnections with the web framework with the database and potentially other services like email and external APIs. How do we test this? We'll see that Python and the test frameworks have everything that we need to make this work. But, it's going to take a little bit of special attention and some cool techniques.
|
|
|
transcript
|
3:08 |
Now we're going to group our tests into three rough categories three types of tests that we're going to have when we're testing our web application. Now recall I did mention this is not a general course or chapter on unit testing it's specifically focused on testing the web applications. So there's probably other types of tests but in our world of testing our web app these are the three that we're going to focus on and I'll touch on a few more just really quickly. So at the lowest, simplest level let's start there we probably want to test our view models. Remember view models are central to the data exchange with the user with the template, with the view and a lot of the validation that we have the data validation that's in there resides hopefully in these view models. So what makes testing them special? Well remember internally very often they implicitly use a request object. So somehow we have to provide this view model a fake request or a pre-populated request with the data that we need it to work with. So this is pretty straightforward. We'll also see that sometimes these view models talk to the database that might be a problem. Typically we want to test in isolation control very carefully what the database would have said and then make sure that the view model responds accordingly. So we're going to address that as well in these tests. Moving up in a richer, testing-more-at-once side of things we might want to test the view method. This is the actual thing that has the app.route decorator or the blueprint.route decorator we'd like to call that as if it were a web request not through the whole system but we'll just call that function. It is a function, we can call it. But remember this also works with requests maybe even with response it might also talk to the database. It has a bunch of stuff going on working with Flask so we're going to need to carefully spec that out or provide it something that will work in the way that it expects. We also might want to create the entire web application let the register blueprint, the database init all that kind of stuff get up and running and then we're going to feed to the overall application a particular URL make sure that it finds its way to the right view method and that it does the right thing. So we'll see that with the testing infrastructure from Flask we can actually create a fake request as if we were actually running the web application we're not going to do it not really firing up a server going to create a test version but then we can simulate a browser sending requests to it and make sure we're getting the right behavior there as well. So these are the three core types of tests that we're going to focus on in this chapter. On the left in terms of even simpler we might have algorithmic tests and tests working with other parts of our application that are not particular to the web framework. And on the right we might even go farther and actually deploy our web application to say a test server QA server, something like this and then use Selenium to make legitimate requests against it and even run the JavaScript and interact with it that way. So there's lots more we could do but these are the three that we're going to focus on in the unit test world around web applications.
|
|
|
transcript
|
2:59 |
By now, you know that I'm a little bit obsessive about organizing my code. I really, really don't like having everything just jammed into one file, or thrown a bunch of files thrown into one directory. It really helps take the mental load off of where do I find that thing if you have a nice organizational structure. So when we're testing our code we also want to apply something like that. We want to have some organization that tells us right where to go to look to test a particular thing. Now, you can organize your code and your test however you want, but please think about it. And I'll show you what I use for my test. If we look over here at the views we already have them grouped by the type of view that they are. All the stuff to do with the account is in the account view file, the CMS page stuff is in CMS package stuff is in packages, and so on. So I'm going to group my tests in exactly the same way and it's also the way we're grouping our templates. So it makes a lot of sense to just keep going with that. So here, we're going to have an account test file in a test folder, and it's going to have all the tests that have to do with accounts. So it's the register, the login, the view models as well as the high-order tests like the integration test. Have one for home view, we'll have one for packages. So we haven't written any for CMS, we probably should. In my little example here, we don't have that yet. So you can see, we'll do this grouping here like that. Now, another thing that's super, super helpful is if we have a site map, that is an XML file, that's a standard on the web that talks about all the various links on our site. It's originally intended to help search engines like Google and Bing find all the content in your site. Make sure that, even if you don't link to it somewhere if you want it to show up in a search engine it'll show up there, so it basically has a link to every single, at least public, URL on your site. And what we can do is we can actually use this site map go make a request to it, a dummy request to it to get the XML document back and then just go and request every single page. That actually covers a huge, huge swath of what you need to test. Because what often happens is it's not like there's something super minor that's wrong on your site. If something goes wrong, a lot of times it just goes really wrong and crashes the page and is a 500. So like, think about the packages details page. If something's wrong with that query and what we get back is none instead of a package it's not likely just going to work. It's either going to give you a 404, which is an error or, if you try to render the template you're going to get a 500 because it's going to crash with a error, attribute error. None does not have whatever thing you're trying to get at like the name or the version or whatever. So actually requesting the pages, you'll find a lot of times, if something goes wrong you'll find the page will actually crash. And the site map test is going to uncover those types of errors, basically with no effort on our part. It's really, really beautiful. So here's how we're going to organize our test for our project.
|
|
|
transcript
|
3:45 |
Now, it's time to start writing some code and getting our tests in place. So, let's go and open our new project. I've copied this over as you can see into Chapter 14 testing. We're going to work here. Now, probably the first thing that we want to test is this register thing. We've already talked about that it's kind of tricky. I think it's a good example. We also have this register_get. Now that doesn't really do anything. Theoretically, our view model could come up with like a list of countries and do a bunch of cool stuff to verify that it's going to give you drop downs and what not. It doesn't do any of that stuff So we're not going to test it. We also have this index one which doesn't really do anything, just verifies the user. Now, that would be great, and we can test that. But I think the most instructive part will be to test this part of our application here. Now we have a couple of options. Recall, we talked about testing the view model that would be this part talk to about testing the view method that would be directly calling this function. And we've also talked about an integration test where maybe we fire up the web app we issue a request in this URL with a post. And it will figure out what parameters have to be passed to the method and so on. So we're going to start by doing the simple thing working with this RegisterViewModel. Now, let's get going by creating the section for our tests. So, we're going to create a new folder for organizing our tests as we already talked about, over here. I'm going to put it next to our project. And in here, again, we're going to do some organizations. So I'll have account_tests, plural. We're having more than one test. Now we could test this with a built in unit test framework we could build it, test it with pytest we could test it with something like Nose or you know, other ones. However, in the flask documentation all the examples are using pytest. So we're going to use pytest as well. So, in order to use pytest, we have to install it and say that it's a requirement. And actually, there's a few things we might want to use. So I'm going to come over here. And in our development one, this is only for dev it's not a production thing. I'm going to put 4 libraries, pytest pytest-cov, webtest and clarity. And then we're going to go down here to the terminal and make sure that we pip install those. All right, looks like I already have them, that's great. So, those are installed for our project and ready for us. When we're writing tests with pytest what we've got to do is come over here and just create a function and has to start with the word test_ underscore and be a void method. So, we can put whatever what. Let's put an example here like this and then we could print test test example, like so. And then the way you test with pytest is you say assert and then you could assert something like one plus two equals three. Now, how are we going to run it? So we come over here and we'll right click and we say run, says run pytest in there. Now sometimes it won't say that. Sometimes it will. We run it, looks like it's working great. If it doesn't, you can come over here and say Edit add Python tests, pytests, and then swipe the script path and then script, swipe that. Okay, so that's what you could do but it looks like it already discovered it for us. So here you can see in our example. We printed out test example and just look at all the results. It looks like it passed. And you should always verify that if it's not passing you're also detecting that. So here you go. When I had it wrong, it says it looks like we expected three but we got four, not the same. Alright, so I'll put this back. This is not really our test. This is just a super, super simple example to show you how to get things set up and running with pytest. But I'll go and leave it here for since it's a course, I wouldn't leave it in a real lab.
|
|
|
transcript
|
5:49 |
So, let's test this register view model here in the form of the post. So basically we're trying to simulate the essence of this register post here. So, we're going to define another method called test and then, these methods they're never interacted with directly by other programmers they're only called by the test framework which means they can be really descriptive because that will help us in our reports. So, let's make this register validation when valid. Okay, so something like that. We want to test the registration view model that it's working when the right validation when the right data is passed to it. Now, this whole test here is going to come with quite the challenge that you may see coming you might not see coming but there's couple of things we have to run into. Working with Flask as well as some other stuff. Now, I like to be a little explicit when I write my tests and typically I want to use this little pattern that's nice and mnemonic on organizing the code within your test don't have to write it out usually but I find this helpful. So, it's called the three A's of testing. I'll put it here. So, the three A's are arrange, assert, and act. So the first thing we're going to do is arrange and what that means is we want to get everything setup the way that it needs to be. So, we're going to create some form data and then we're going to do an act. That is, try to do the actual login. We're also going to need our view model up here. So we'll say vm = RegisterViewModel. We need to import it like so it's not imported at the top. That's good, but here, we run into the first challenge. Remember how the registration view model works. It's nice and simple, but dig into it you can see the first thing that it does is it starts going to the request dictionary and asking for the name. Oh, well, how do we even get that into Flask? How's this going to work? So, this actually takes a little bit of reorganization and a little bit of extra work here to make this happen. So what we can use is this context manager. We're going to go ahead and say with something we're going to create this view model and it's going to pull that data back. How is, what do we put here. Well, this is where we get into one of the challenges of testing the web. So, what I'm going to do is I'm goin to define another file over here that's going to hold some of this data for us I'll call this test_client. It's going to have a couple of things and this actually talked about over on the Flask documentation and what I'm going to do is just drop some code in here that sort of pre-configures Flask and we'll just talk through it real quick. In pytest you can create what's called a fixture also, that if you pass a variable called client it will actually run this function and give back this object. So, we're not actually working with this here yet. We're just going to work with this part but we'll need them both as we go through this class. So here, I'm going to say flask_app I guess I have to type it up here from tests.test_client import flask_app We're going to get this and we're going to come down here and with this thing we can say Okay, we'll say request_context and then here, what do we want to set. We basically want to say that the URL they're requesting is account/register so, if we look at the URL it looks correct. Then we can say the data is going to be form data. Now, within this context manager when this view model goes and says give me the data back get all of the data out of the form guess what? It's going to think that this is actually the form that's being submitted. So, this should make everything work that we're hoping for. Then we go down here and say validate. All right, that's the action that we're taking and then the assert is the third thing. The assert is, once we've set up everything we've done our action and then we want to verify whatever test we want to test but this is where we do it. So, we're going to say assert vm.error is None. We're going to say there's no error in this case. Why, because we provided all the data and theoretically, this is a unique user. Now, it actually exists in the database but that's not a problem. We're not talking to the database. Are we? Let's find out. Hmmm. Looks like that test failed. Let's go look and see what went wrong. register.failed TypeError. Oh, I used the wrong thing here. This is not request_context, this is test_request_context. There we go. Let's try again. Now, we got another error. Now, what's the error? The error is oh, the password must be five characters. I guess this is not going to work be super explicit. There you go, six. Six a's. Now, we're getting to a different error here. What is the problem? NoneType is not callable. That sounds like a problem. We're going to create this session here what are we doing? We're talking to the database and then we're calling the factory but the factory itself remember we're trying to call this sessionmaker factory to create a session and we're going to return it but we haven't setup the database on purpose. We don't want to talk to the database but here we are confronted with this error trying to talk to the database. So, while everything looked like it was going pretty well it turns out that even though we're running our test we need to do a little bit more work to make sure that we don't actually talk to the database. Let's make that happen.
|
|
|
transcript
|
3:26 |
All right, so there's a problem trying to write this test and it's getting hard. So, we try to run their test and the problem is way down here we're trying to create a database session. Why are we trying to create a database session? Well, over here we're trying to find the user by email. Why are we doing that? Because the view model wants to make sure that you're not already registering as a user that already exists. But what are we going to do here? Do we have to just enable the database for our test? No, hopefully we don't. What we can do is we can actually go to this method here and we can replace it with another one. There's a bunch of options for this but there's a really slick way when we're doing a unit test. Let's go over here and say import unittest. This is the built-in one we're not actually using its main features but we're going to use this mock feature here. What mocking does is it says I would like to replace a function's behavior with another function that I'm writing. or something along those lines. So, what we can do down here is we can say with. Actually, let's set up the target. It's going to be, well it's going to be that function that we tried to call over here. It's going to be, where is this? pypi_org.services.user_service.find_by_email So we just got to type that out. pypi_org.services.user_service or we might be able to find it in our errors down here. If we scrub that will be a little bit of a help but anyway we can type it out here. And what we do is we say, with unittest.mock.patch and we're going to replace this function and we say the return value is going to be none. And then within that context manager when I call this function. So only will we change the behavior of find user by email right here soon this context manager is with block it goes back to talking to the database. So this means we don't permanently change it maybe alter the behavior of other task writes only isolated right here which is perfect. Let's try this now. This test should work unless I've messed that up. Tada! Look at that. It works when the user is there. Now what if we told it to return found, right. Some other user obviously, it's the wrong type but it will still crash and say something to the effect of a user with that email address already exists. See how cool it is. We just control what the dependencies are trying to do from the outside. We could do this if we're trying to talk to an API like Stripe for charging a credit card we could do this for other APIs. All the stuff that we were trying to call as long as we build our code up in a decent way we should be able to get in here change just a function or two and make it work. So this is great. We're able to run our tests in complete isolation, right. Our tests are passing and the meaningful one here is working. What we're doing is we're creating a fake test context so the view model thinks the request is happening within Flask and then when it does its operations we're mocking out one of its dependencies the database to control how it behaves. Now we have a nice test in isolation.
|
|
|
transcript
|
2:25 |
So test our registration view model when all the data is valid makes a lot of sense and it works. However, one of the important roles of testing this is to make sure you're doing all the validation in the way that it should be done. So in addition to testing this happy path when everything's typed in well we should write a handful of tests for when the name is not there when the email's not there, when the password is not there when the password is not the correct length or all the various things that we care about. And I'm going to do just one more test here just to show you but of course you should write more than this. So we'll say test registration validation for existing user. So what we're going to do is we're actually going to do basically the same test but instead, we're going to come over here and control this. I want to say the user exists. So let's go over here, and this is going to be a user. Now where does a user come from? It comes right there. Now we could set things like email equals form data. I get email, so it's exactly the same and things like that. But really, the way that it behaves it's not actually going to use that property but we could pre-configure this and maybe I'll make it a little more obvious here. Then we can come over here and do a refactor create a variable, call this test user. Except. Just to be super explicit. Now instead of asserting the error as none what should the error be? It should be it is not none. Then the other thing we're going to test for that is existing is in that string. So there should be an error and let's say existing user, something like that. Let's go ahead and run this test. Oh, what did we get here? Something's wrong. A user with that email, all right. Let's just say already exists. We'll search for that. Right, so we're looking for already exists. Perfect, that test passes. And it passes because we're able, again to control what that return value is and look for a control inside the machine inside of what this thing thinks the world looks like, right? Perfect. So you should go write a whole bunch more tests. This is just a class, not a real application so I'm not going to go write 100 more tests but in a real lab of course this is important and you should test it.
|
|
|
transcript
|
1:34 |
Let's review testing view models. They're the simplest of the web framework integrated pieces that we have to test. So, we saw that we need to provide some sort of request data, set up the flash request and other flash features for the view model. But other than that, it's just calling the functions of the view model. So here we're going to test that if we try to register with no email then we're going to get an error saying, you have to have an email. So, how do we do it? We have the three A's of testing. We're going to arrange, which means we're going to import our registration view model and set up the form data. Notice here, there's no email. It's just an empty string. And then, in order for us to work with that data we have to pass it through this test request context in a context manager using a with block. So here we say the path is /account/register and the form data that's submitted is email empty password the letter a. Second thing is to act. We're going to validate that form data which is going to look and say, oh there's no email you're going to have to have an email. It's going to set an error saying that's the case. Then we're going to assert at this error set and that email is in the error. Right? You don't want to be too specific. Just specific enough to verify like that case is happening. But not so much so that if you slightly change the wording then you've got to rewrite your test. All right, so here's a basic way to do the test. Why are we not using mocking and mocking out the database call? Because this validation is more simple. Right? We never made it down to the database validation layer, so we don't need to.
|
|
|
transcript
|
5:27 |
Now it's time to move one level up in our testing. What have we tested so far? We've tested that part right there. However, I would like to test that if we go to this registration process successfully we get redirected back to the account page and if not, maybe we stay in the same place something to that effect. What we're going to do is we're going to import this function and call it. Now you'll see there's a couple of other things that are going to be happening so here when we have create_user we're going to have to make sure that actually get called in the same way. So, let's get started on that and I'm just going to duplicate a little bit of this here. Test registration view new user. Something to that effect, okay? So, we're going to come down here and we're going to say from pypi_org.views account_views import register_post and our goal is going to be just to simply call that function. So, I'm not doing this here We're still passing in this data but we're just going to try to call that function. If we look, it doesn't take any arguments it may, sometimes it does like in the case of our package here. We might have to pass that but in this case we're just calling this one. It doesn't take any argument. Everything is passed through the form. So, theoretically we have our data all set up to pass the validation. We already have to say hey, unittest what we're going to do is we're going to return none for the user here and we don't need to do validate but we do need to do this up here like so. We need to say hey when we do this test here we would like to make sure and before we call this function we want to make sure that if that function happens to have all find user by email it's going to return none. We also need to do another one here. Now this is going to look a little messy we should be able to clean it up in a sec. User service, what is the other user service function we're calling? Create user, so if we're calling create user we want to have it return an object. Now if you look over here it says if it doesn't get back a user there's some kind of problem so we need to make sure that we get back a user here as well for this particular one, okay? So, that's a lot of with blocks here. Maybe we can clean it up. We'll see but we're going to do our post this will be are our act here. I want to get a response and this is going to be a response object. It'll help us work with it. If we come down here and we import flask response here and we're going to assert some stuff about it so we could go here and say that the location is /account so I feel like that's probably what we're looking for when we're coming down here we've gone and we've gone and done this. We've redirected over to there so that redirect action is to set a location header to be /account. Whoa, all right, let's see if this is going to work. We can try our test again. It looked like it works, beautiful. Let's just verify that it does. So, we can come over here if this part failed, we would see of course it comes back and says do we get this error? No, the expected was /account but what we actually got is something down here the left was none, we expected this to be /account. The reason it's not is it's actually an HTML response not a redirect response. Cool, so that worked over here. And of course if the user can't be found again we get some kind of thing where it's showing that hey, the user couldn't be created as an error. Super, now I had this nesting and nesting and nesting and with blocks. I'm not a big fan, so let's go do this. So, we'll say and do a quick little organization here like that. Move this one up and so, we can create user. Let's just call this find user and then this will be the request. And then we can do a much simpler version of find user, rate user request. So, deindent that so it's not so terrible. Is that better? Oh, you decide here. It's just kind of messy and sometimes that's just how it goes but let's just see that it still works. Yeah, it still works like a charm. So, we can at least not go super indented here by creating all those things and then usually in a single context block for all them. So, that's how we test these view methods and we've already verified that that part works so we don't have to write too many of them. We probably want to check that we do get the right error message back here and here in those two cases and then in this case we're already testing that we get this redirect. Beautiful.
|
|
|
transcript
|
3:47 |
Now let's move up one level in the amount that we're testing at once and the part of the application that we're testing. 'Cause we're using view models we can basically assume that all the validation is working just fine and the data exchange is working fine as long as we test that but what we do need to test is that the view method is working with the view model's response correctly. If an error comes back that it actually shows the page with an error rather than just ignores it or that if it uses that data to try to create our user if that user can't be created it still shows the error instead of just redirecting you. Things like that. So, that's the layer we just tested and we're going to review right now. So, we're going to test the home page and we're just going to ignore the database aspect for just a moment. We'll see a more realistic one in a second. So, let's imagine that we don't need to talk to the database we're going to come in here we're going to import the index view method from home views and we're going to create a context manager that is a test request just to slash. Then we're going to do act which is simply to call the function and capture the response so what we get back from these Flask methods is always a response and then we want to do some kind of assert like that the status code is 200 and that the model contains packages and that the length because that's a list, the length of it is greater than zero. Right, that part actually probably came from the database so keeping it simple right now. But this is a totally reasonable test that we might write for the index home page. One quick side note that model on the response, that is set by the @response decorator that I created for this course where you automatically have it pick up the view template. If you don't do that you have to find another way to capture that data. You can look in the decorator, see how it's done there and so on, all right? So, we have this and it looks like it's working. It does work just fine but if we want a more realistic version well, we need more space because this time we don't want to talk to the database and we're going to talk to a fairly complicated function. We haven't seen this test written yet so imagine we want to test if we go to our package details page. I want to go to like /project/sqlalchemy and see what comes back but actually not talk to the database. Come over here, we're going to import project the method project from the package views and we're going to import the Package object itself because we're going to have to create some test data that we can then mock out so the project view gets that from the mocked method calls. Then we're going to create our test package I'm going to set the id to sqlalchemy we're going to give it a couple of releases. The reason we want a beta release is because the basically that package method assumes that there are releases. And then we'll going to mock a bunch of stuff out we're going to say if you call package package_service.get_package_by_id, you get this test SQLAlchemy package. If you all releases for package you get the releases that we set here and the context is going to be set to /project/sqlalchemy. The next thing to do is act. We're going to call our project function and remember, in Flask, it takes the argument right, it's up to the Flask infrastructure to pass that along but we're calling it directly so it's now our job to pass that along and internally, that's going to be calling get package by ID form package service and all the other stuff that happens inside. That's why we had to mock it up. And then we can just assert. I say the web package, the one that we got back inside the model we're going to capture it and I'm going to ask some questions. Is the package.id actually sqlalchemy and does it actually have two releases? So, like this, we can do legitimate tests against complex methods that interact with the database and inbound arguments, all that kind of stuff.
|
|
|
transcript
|
5:39 |
It's time to do a full test part of our application the so-called integration test. Where we fire up all of Flask, run all of our application send a request through the Flask infrastructure into our view methods, do the process in there and get the result all the way back out. And I'm going to do one test method here a test of a single method here so that you can see how it works. We're going to test this index for the account. So there's two scenarios. One, if there is a user around then they should be able to see their account page. If they don't have a user logged in remember, what it's going to do is, over here it will redirect you to account/login. So that's the kind of thing that we want to test but we're going to do it in the full-featured way. Now, how do we do that? Let's go down here, I'm going to define another test method. And I'm, did a little renaming here. I started calling these tests test_vm and then down here for just the views test:v, then off test:int for integration and then what we want to test is account home, let's suppose you are not logged in. Okay, so that's the test we are going to do first. How do we do that? Can we just go fire up, you now import the app and call run? No, it's not going work. It'll actually really run flask, we don't want that. So this is where our cool little fixture our pytest fixture comes in. So we're going to go over to this thing and we're going to say that this here takes a client and that corresponds this right here. And what it does is, when you pass it as a variable it's going to pass the return value, here, in there. So we're going to go in and get our test client from our flask_app and we're going to register the routes the blueprints, set up the DB maybe in the end we don't really want to use it but sometimes you'll see we do want to use the database and then we'll yield out a client here. So then what we're just going to do is something super super simple. We're going to say a response which is a response = client.get that's it. What do you want to get slash account. Which can get slash account. Then we can make various assertions. Like we can assert that response dot status code is let's say, 200. Now, is this going to work? Is it going to let us go in there? It's unlikely we're not going to be logged in it should probably be a three or two redirect. So let's just run this, see that's actually operates gives us error and then we'll switch it over to the right redirect code and check the location. In order for this to work we have to import client appear like so. Alright. Let's run this again. ohh, what did we get? There's an error. It sent us a three or two that's a redirect code. Where do they want us to redirect to? Well that's kind of what we wanted. So let's say this is task code direct two and we'll say location is going to be /account/login. This should pass. It doesn't. What have I messed up here? Ahh, HTTP localhost login, okay. That's not quite what I was hoping for but it's going to be just fine. But that is the effect we were looking for. Let's run one more time. There you go. Perfect. So now we've done a test all the way through. However, did that run, did that hit the database? Well, no, but it might have. It might have tried and why would it potentially try? Because if we go over here it's going to this IndexViewModel which is going find user by user_id. So I guess it probably did hit the database, yeah. It didn't get a result back because we didn't pass some kind of user_id but nonetheless it probably did try to go to the database. So here we need to mock this out if we want to make that not happen. So I guess the last thing that we should do here is go ahead a do with unittest.mock.patch target and return of value that is none. And the target going to be, let's see pypi_org.services.user_service.find_user_by_email okay so this probably won't look any different to you but the actual behavior is different. Let's do one more. Let's supposed that we do want to test the case when they have a login. Say with login. So here what we want to do is create a test user which is going to be a user and the name is going to be Micheal and the email is going to be michaeal@talkpython.fm. And so when they ask for the user we're going to send back the test user and we can go ahead and run this this will fail because it's no longer redirect hopefully fails because the left is 200, just like we hoped. So we can again check that but we can also check in data we can go and assert that, something like Micheal remember it says, "welcome Micheal" or something like that is in response on data. Now this gets a little trick cause that's binary so we have to put a b here. Let's give a shot and it still passes. All right so these two right here show us how we can use the client pytest fixture to do integration testing with our app and we can either as we saw in this first case choose to let it hit the database or if once we applied our mocking and definitely here, once we applied our mocking it actually no longer hit the database. So most cases you don't want to let it hit the database but when we get to this site map testing you might actually want to let it do that there.
|
|
|
transcript
|
2:28 |
Now there's more tests to write for this application of course there are. I added a few more, I wrote them earlier and just dropped them in for you. You've already seen all the three cases that we're going to use and it would just be more of the same but I want to give you a little bit more to work with. So here's our account test that we've been working with we've got out vm test, our ViewModels test we've got our view test, and now we've got our two innovation tests down here at the end working with our pytest ficture. So nothing changes there, but I just added some more. Remember that test for the package details in the earlier section? Just in concept. So, here it is in code. So here is one that, we'll find a successful one. We'll simulate it actually existing in the database called sqlalchemy and we're going to run through it here and mock out the database interaction but then we're going to get that data and process it here. Right, get a response and verify that SQLAlchemy is in the data. We're also going to do a missing one. This is important to test. We want to make sure that if for some reason we try to get package by id, but it's not there we get a status code 404 as opposed to crashing or just trying to show something that's not right. Over to the home test, super simple we're just doing integration type tests here. On the first one, just making sure that the title's in there and then here we're directly calling a function so this should help power the Int and this should be much more V with our naming commission here. And this is verifying that the model that we get back is what we expected. We also have a sitemap test one. I'm going to save that for later, but let's look at this as well. So far what I've been doing is saying running the test here and it would be nice if I could just say run all the tests. One way that we can do that as well as configure a couple of things to work better, as we'll see is create this all test. This is very, very analogous to our all models up here. In fact, it's basically doing the same thing. So it's going to import all the tests into one file and then we just point pytest at that and that's a simple and easy thing to do. So let's go down here and we'll see we're just importing star from all the tests. And then I pointed our run configuration to run that file. Okay, so now if we run it you'll see we have a bunch more tests that run. How cool is that? So a bunch of stuff is happening there. It's going to be fun to dig into it with you but just run it like this. This imports of 'em, remember if you add a whole new category of tests, so in a file be sure to throw it in here as well.
|
|
|
transcript
|
2:10 |
So it looks like everything is working great. We just run pytest against our _all_tests.py file here and everything is super. Let's just see how this might go if we, say, weren't inside a PyCharm. So let's go over to the directory here and make sure we activate the virtual environment so everything's going to work that's of course required. But now I should be able to type pytest _all_tests.py and let's just disable the warnings there's some lower level libraries we can't fix that are issuing some warnings so just let's see what's going on. This should work just the same as if I go over here and press this, right? No. No module named pypi.org. So we have a couple of options. One, we could actually convert our website into a package, and then install it and that problem just goes away. The other thing is, we can just add a little line of code here to fix this. So why does it run here, and not there when basically the same command is entered? It's because if you look at the run configuration the content routes and source routes are added to the Python path. Namely, this folder up here is added to the Python path, so pypi.org and test and so on, exist and can be imported. Well, that's actually pretty easy to do. You had to do it earlier but I tried to avoid talking about it before, right here. So this is really all we have to do is we add this little block of code that says go and find out what the containing folder is and then add it at the front of the Python path. So if we go over here to our all models and we put this at the top, like so it doesn't quite look as nice it makes us get a little grunt in here but you know what? Now, if we try this again, beautiful. It's working great. And of course it's sill going to work inside PyCharm, just like that. So it's a little bit frustrating the way that wasn't working before but as you can see we could either make this a package and then install it for development which is not a big deal but a little complicated or we just put this one line here so there's no action other than running this file necessary. There's probably other options I'm sure there are other options but here's two that'll work pretty well.
|
|
|
transcript
|
1:02 |
That last set of tests we wrote were the full integration tests. We fired up the entire web app the blueprints, the routing, the view methods the view models, all at once and we fed URLs to it and we checked what happened. Ideally, those go to the right view methods that we were intending and then generate the right response. But that's what our tests are meant to check. There's a lot of setup to make that happen. Not a lot, but some that you don't want to repeat. So we created a pytest fixture called client that would put the app in the right configuration it would create a test client register the blueprints things like that and then pass off the actual object that we're going to use. Then, when we want to write a test here we want to test the home page, it's super easy. The arranged part is just a no-op because that's what the pytest fixture does. Basically, that's the arrange. And then the act is just to issue a git to forward slash, capture the response and check that the status code's 200 and that the title we're expecting is in the data for the response, that's it.
|
|
|
transcript
|
4:44 |
Let's look at one more thing that will catch a ton or errors for us and it's something you want to have anyway. That's a site map. So if we just run our application and pull it up over here I've now added a site map. As I mentioned at the opening, site maps are here to talk to search engines. Say here are all the pages I would like you to search and discover on our site. And some of those are static like here's the home page, here's an account login and account register and then there's all the data driven stuff. Here's the AMPQ project and apters and argparse and all you know you would have all of them. On the real pypi.org you would have 140, 160 whatever the number is now thousand packages listed here. So this is something you may want to cache somehow, right. This could be kind of intense to generate this but none the less if it exists and you want it to exist so that you can use it for search engines we can use it for testing. And the idea is that if we just request, say, this if that page comes up, there's a good chance that everything worked. If there's a problem, there's a good chance that this is going to result in a crash 500 error so on. So by simply just going through and requesting every URL on here, we're doing sort of a smoke test. And it turns out a lot of times web apps break hard, not soft right. If somethings wrong its not a little bit wrong it's BOOM you know. None type does not have this attribute type of crashes, things like that. So were going to go and use that for our test. Now let me just show you real quick. I just added these in here so that you don't have to go and generate them. So here's a simple way to do that we'll create a site map and remodel. Its going to come in here and get a just a call all packages. I've passed the limit, in reality you probably don't want to that but just I don't want it to go crazy if you have too much data. So anyway, we're passing in this limit here. I could probably make the updated text a little bit better. There we go. So this is just going to be telling part of site map has to talk about when it was last updated. So we can figure out what would a reasonable value be there. But this is just going to be a fallback text just for simple version, we're not actually updating the data. So we'll get our packages back and we're just going to feed it through a template, over here, like so let's go in and just interrate over all the packages and generate them as well as have the base static files. All right. So with all of this in place we can go write some tests against it. Let me just show you that. We're not going to write them from scratch we'll just have a look. Over here in our in our test we now have site map tests. And what we can do is we can come in, and say let's just test this site map URL. First we're going to get the text of the site map. We're using the integration style here and we're even letting this one hit the database. Because we actually want the data to drive what the packages are, for example. And then we're going to use the XML features in Python to do an x-path query to find all the locations, this is going to be all the URL's. Actually we want to request a relative path so we're going to do a little replace on them here and then we're going to get our URL's and finally we're going to just loop over every URL and just call client.get. Now do we need, we have 140 thousand packages do we need to call that function, that that view 140 thousand times? Probably not, if it's totally broken it's probably going to crash for most of them. So what we do is, we say we're actually going to only request one project and then we're going to bail out. So if you've got like say a thousand categories You might just only get one category. You've got a thousand books if your a bookstore only request one book. Things like that to kind of speed it up. In reality, to get the site map text is super easy we just do a get against the thing you just saw. But we do a quick text replace on the name space, I think Exemel names spaces Suck and it makes the x-path queries up here harder so we can just drop that before we get back the text, okay. And that's it. I've already added this over to our _all_tests here so when we run our _all_tests we should see down here, that, that's running. Right there. So see we tested /account/login, /account/register and an AMPQ. That's because I told it to bail out and not hit all the other packages. Well that's it for testing. You saw that we have three main categories of testing in our web apps and of course there's others as we also noted in the more prod unit test world. But testing your web apps is important. If your not going to do any testing I encourage you to at least do the site map testing it's going to actually catch a lot of the errors that you would run into.
|
|
|
|
40:10 |
|
|
transcript
|
3:45 |
Now that we've built our web app it's time to share it with the world right? It's great to have a little app that we built but it's basically useless if we don't put it on the internet. It is a web app, after all. At least put it on an internet for your internal company, right? So that's what this chapter's all about. We're going to see how to deploy our web application onto a standard Linux server in the cloud. I want to be clear that this is not the only option. There's certainly other ways to put our web app out there. We could go use something like Heroku and just configure Heroku to grab our stuff out of our GitHub repository and launch it into their system. Those to me seem easier. They're less flexible and often more expensive but they're easier. So, what I want to do is show you how to deploy to a standard Linux server run it in some cloud VM somewhere and you can adapt that from Digital Ocean, Linode AWS, Azure, wherever you want to run it. So we're going to do that in this chapter. And that brings us to our overall architecture and topology. One of the things we're not going to focus on here is setting up and configuring a database server. I consider that a little bit outside the scope of this course and you can pick the database server that you want and then configure it. So you'll have to fold that in here. Right now, we're choosing SQLite which means as long as that file comes along we have our database. So with that caveat, here's how it's going to work. We're going to go get a box in the cloud which is going to be an Ubuntu Server, probably 18.04 that's what that little icon in the bottom left means. On here, we're going to install Nginx Nginx is the thing that people will actually talk to. This listens on Port 80 and on Port 443 for regular HTTP and on 443 for HTTPs encrypted traffic. A request is going to come in here but this does not run our Python code. It serves up static files and it delegates to the thing that actually runs our Python code. That thing is called micro WSGI, uWSGI muWSGI, I guess it should be. Now uWSGI, when we run it will handle our Python requests. However, we don't want to just run one of 'em. Remember, you may or may not be aware that Python has this thing called the GIL or Global Interpreter Lock which inhibits parallelism within a single process. And a lot of the ways people get parallelism in Python is to actually create multiple processes. This also has great benefits for failover something goes wrong with some process running one of our requests we can kill it and have other processes deal with it. It's not the only way to get parallelism but it's one really nice way. So we're going to do that and have uWSGI spin off a whole bunch of itself. This will actually run our Python code. It's going to host the Python Runtime and it's going to launch and initiate a bunch of copies of our website running in parallel. Here we have it configured to run six worker processes. So here's what's going to happen. Request is going to come in, hopefully over HTTPS right, you want to set up some sort of encrypted layer here right, that's the way the web's going these days. And once we're inside the server we no longer need encryption so we'll just do a regular HTTP request over to uWSGI itself. uWSGI will decide which of its worker processes is ready to handle it. This time that one is. Maybe next time, this one's free, or maybe that one. It'll find one that's not busy, or less busy and then pass that request off and then return the response back through Nginx back out over HTTPS to the client. So this is what we're going to set up an Ubuntu Server with these things along with Python 3 and our web app ready to roar.
|
|
|
transcript
|
5:15 |
Now, the first thing we need to do to get started with our deployment is have somewhere to deploy it to. We could deploy to Heroku, or Azure, or AWS or some other Platform-as-a-Service thing but what I want to show you is how to deploy to Linux. 'Cause if you know how to deploy to Linux all those other things, maybe skip some steps and are just easier. But this gives you the most flexibility to run your code, your web app, wherever you need and with the most configuration options available. We're going to use Digital Ocean for our host. If you use something like AWS, EC2 or Lightsail, or Linode once we finish going through the process in this cloud portal it's going to be, basically, all the same. So those are all recommended places you might check it out, you might try this but I'm most familiar with Digital Ocean so I'm going to do that one here. So let's go and get started by creating a droplet. We go to the market place and pick prebuilt machines like, I want to run a Discourse server on 18.04, and so on. But I'm going to just focus right here on this. Now the default is the latest longterm support, Ubuntu. Alright, this is the latest. But this is the latest longterm support and I recommend you keep a longterm support version. It's still pretty new. So, let's go down and then choose our plan. These numbers might look big but if you just scroll over we have some pretty sweet ones. We could choose the $5 or the $10 a month one and we'll just go with $5. With this server, we can handle several million data-driven, Python-backed requests per month. No problem, for $5. And if you need more, you know go crazy, spend 10 dollars. But this is the one we're going to do. We're going to not add backups block storage is like an external drive that you can have that's independent of the lifecycle of your server. Like, you could destroy your server and still have this drive around, we don't need that. I'm going to choose San Francisco, 'cause it's near me so it'll be nice and quick. If this was a real deployment I would choose New York, probably. Because most of my customers would be either in the U.S. or Europe. And the east coast of the U.S. is a pretty good compromise, say for people in California and people in Germany. Alright? We don't need extra stuff you might turn on monitoring here. I'm going to check off a couple of the SSH keys that I have around. So a lot of SSH in and disable log in with the password so it'll be, basically, impossible to brute force attack trying to log in. Let's give it a name like pypi-server maybe with a dash, something like that. And, I think we're ready to go. Let's just click create and see what happens. Alright, the server is created. I think it's just now starting to start up. So it might take a moment. We can click here, and click copy the IP address. And put this away and now what we're going to is let's just try to login. So we come over here, we want to SSH as the root user over to that IP address. Now on MacOS and Linux, SSH has been around for a long time this should work in the terminal no problem. On Windows, it's just recently been added to the command prompt, I believe. And I think it might have been a part of PowerShell before so you should be able to run it there. Let's try to SSH into it. It says, The first time, you've never seen this machine and are you sure you want to exchange your keys with it? Yes, I do. And, it takes a moment we should be logged in. There we go, perfect! Our machine is up and ready and we can do amazing things like ask what files are here or what directory we're in, things like that. However, note there's a small little problem. Our server has come to life with 19 security updates and 41 updates. Very first thing you should do, right away like immediately when you create this server is make sure you get the latest software patches and install it. You do not want to run something on the internet that has security vulnerabilities. You want to minimize that. So let's go do that now. We'll say apt update. That, okay, that's the latest software versions and it'll say apt upgrade to actually apply them. So it's okay, we're going to do all this stuff here. And we're going to install when you see something like this we're going to install 4.15.0.51 the new kernel for Linux, so that's kind of a big upgrade and there's a bunch of other stuff going on here as well. There you have it. It took maybe a minute and a half but, due to time shifting I was able to make that seem really short. So everything's installed and if we log out, we can come over here and log back in and you'll see we have zero security updates but now a reboot, a system restart is required. So don't forget to this step. We'll come over here and do a reboot. Notice right now we're running on what version? 4.15.0.50. And when we come back, we should be on version 51 along with a ton of other updates. Now, because this is a full kernel update it might take a few seconds longer but, you know, ten to fifteen seconds is what you should expect for, you know the upper bound of how long this takes. Yes, perfect! Here we are, we have a brand new server a brand new server running on 51 zero updates, no reboot required and we're ready to go. So our server is up and running. Now it's up to us to configure it to be a web server and to deliver our cool PyPI app.
|
|
|
transcript
|
3:12 |
Now it's time to start working with our code. We're in another chapter in our GitHub repo Chapter 15_deploy and of course I made a copy of the code we have starter and a final and these are actually not super different but there's going to be a few files that we change. Now, in order for us to get things to work in Linux what we have to do is create a couple of configuration files. We need to talk about how to run uWSGI which is going to run our Python code and how to run Nginx which is going to be the frontend server that's going to communicate through some back channels to uWSGI how are we going to set up the server, and so on. Watching me type that's not super interesting so I'm going to paste in some files and then we'll talk through them. So we now have a server chapter located next to pi, pi_org, and it has three files. It has an Nginx file and this is going to be our Nginx server configuration. We'll talk through that in a minute. It also has a unit file here. A unit file is like a background daemon or service. It's like a Windows service if you're coming from the Windows world. It just runs when the system starts. When Linux boots up this is just always going to run this code. So, this is going to have the configuration to run uWSGI and all the stuff we need to run our web app. We'll talk more about that, as well. The first thing we're going to work with is going through the script that we have here. So, this script, basically, is all the steps that you need to apply to the server in order to get into a nice working state, get all the dependencies set up firewalls, and some other things like that. So, what we're going to do is we're going through this step by step. Now, you mostly could run it. I think there's a couple of lines that you have to be a little bit interactive and also, down here you have to fill out your details and so on but, more or less, you could just run the script. We're not going to do that. We're going to talk through it piece by piece and you probably want to run it piece by piece, as well to see if anything fails, but it's all in one script here. So, this is going to be real helpful for us to get all set up. Now, final thing: the way that our code is written so far does not really make uWSGI, this one does not make uWSGI happy. The way that it imports stuff it tries to our project and it just imports the application out of the module. It doesn't run the module. So, what does that mean? Over here, under app.py we have some code that comes along and it says, really, down here at the bottom what we had before is just this and what it was doing, it says, If you run this file as we have been the whole time, then run the main. Otherwise, do nothing. Just import it. Well, uWSGI doesn't work that way. What it does is it's going to import this thing basically, import this file and then grab hold of this and run it with its own settings and that means this configure bit isn't getting called here. So, in particular, the blueprints and the database are not getting set up under uWSGI. So, what we can do is we can say If you run it like this, actually start the program start the server, the dev server. Otherwise, just configure it. So, this little tweak that I added here is necessary for running our code under uWSGI. There's other ways, as well, but this is how we're doing it.
|
|
|
transcript
|
7:47 |
Now it's time to start working through our little script here, and configure the server. The first thing I actually want to do is commit these files. So let's do a quick commit here and say Commit and push those over. The reason is, we're going to use get to get our files onto the server. And if these are not checked in then obviously they won't show up and we won't be able to copy them to the right location. So our goal is going to be basically to work our way down this file. Like I said, don't run it all at once 'cause in case something fails you might not notice it or whatever. So we've already done this. This was our right away, log in and do our update. The next thing, let's go ahead and log in over here. That looks like we are. Let me just log out and log back in real quick. So, notice our shell here. We're using Bash. Now Bash is okay but I actually don't like it all that much. I like Oh My Zsh so much better. So I'm going to install Z-Shell and then on my Z-Shell, get those. Again, it's not required but it just makes working with the server nicer. Here we go. Notice our cool prompt has changed and we get better history of commands we've run so we can more easily rerun them and find what we've been up to. Now, with that in place let's just start going through and installing some dependencies. So first we're going to need build-essential for installing some packages potentially. We need get to get our files there having zip is always nice. Nload is a utility we can use. We're looking at network traffic to see that requests are coming in and out. And tree is just a way to look at directory structure. So we can run those. All right, super. It looked like that succeeded. Now we need to have there's simple things that are not here. Like if I try to type pip3 it's like well, sorry. pip3 is not a command. pip as well. Having the ability to pip and solve something that seems pretty fundamental so let's go and add stuff like that. There we go. It looks like pip does something now. Cool. Now we're also going to want to have Nginx. Nginx is a system-wide thing installed by app so we're going to do that. Now, this next set of dependencies here that we're going to install this is so that we can able gzip support in uWSGI. This let's us compress some of our files and make the response a little bit better so let's go ahead and have that in there. All right, so that's pretty much it for the dependencies. The next thing I want to install is something called Fail2ban. And when we check the box for using SSH certificates when we set up the server in Digital Ocean that disabled logins with a password so this might not technically be necessary but what this will do is it'll watch and if people try to log in over SSH and they fail we're going to eventually blacklist them and not let them even attempt to log in. All right, so we could potentially accidentally turn that feature back on or they could start trying to send certificates over or something like that. So let's set this up to make sure that people who try to pound on the server get turned away. At least for SSH. Next, we only want to expose the ports that are necessary so SSH so we can manage our server. 80 for the base request, and 443 for SSH. So let's go use this thing called uncomplicated firewall to enable those and then it's off by default so let's turn it on. Now it says, warning, you may not ever be able to come back if you forgot that line. We didn't, so we should be okay but let's just double check here. If we go and log out, and then log out of both shells just that one time. So if we go back, hey we can get back in our Z-Shell is here too, that's good. We can get back in that means the firewall is letting us through. That's all good. Now, we're going to use get and we're just going to type in our password in the server. So, in order to make sure that we have to do that as little as possible I'm going to set up this command that says basically remember my login credentials for a month under my account if I log in and type them in. So that's good. And then the other thing is if you ever try to push back, do a push from your server it won't let you unless you set these two things. Let's go ahead and set your email like michael@talkpython.fm And we also have to set our name. Here we go, those two are set, that's good. So now, get is up and ready to go. We're also going to want to have a place where we put out web app of course so we're going to make this structure here under /apps/. We're going to do a clone there. We're also going to have a log section. We didn't actually set up logging in our server so it's not. I'm putting them here for you to add logging to your server and write them there. We're not going to make too much use of 'em. But over here, we now in this little section, like so. That's cool. The other thing is we're going to want to create a virtual directory. Now, the server is dedicated to singularly dedicated at the moment to running this web app. So you could say, maybe we could just update the system Python and system packages by using a virtual environment. If something goes wrong, it's easy for us to delete that environment, recreate it rerun the dependencies, pip install -r requirements.txt. Things like that and it will just come back to life. So this means it's easier if we do something wrong to recreate what what we need. So let's go ahead and create this virtual environment here. Let's activate it. Like so. Notice our prompt changes. And if we ask which Python it's now this one so that's good. And we can go ahead and install some tools like so. All right, so we want to make sure that we have the latest pip and setuptools because notice we had a incredibly out of date pip 9 and now we're in pip 19. How ridiculous is that I really just don't get why Python doesn't upgrade this for us when we're creating a virtual environments. But it doesn't, so make sure you don't forget that. That way, we're all good. Now, we're going to install a couple of utilities that are Python based so they go in our virtual environment not through apt, is httpie. This is kind of replacement of recurral, or wget. It let's us test our web app and it's just nicer and it happens to be Python based so we put it over here. Glances is a cool GUI light program that let's us understand the apps that are running our server. So now we have this, we can run Glances and have a better look at our server. This is cool. So here you can see the CPU load. Looks high, like Glances was, figuring out what's up. But now it's super low. Our memory usage is really good. We're releasing 280 megs. We got 700. We can sort by memory, by person m's, c, cpu by pressing c. And over here we have things like Glances, Fail2Ban. Stuff that you would expect. Our web app is not here, of course. We haven't started it. We'll get there in a little bit. We also need to install uWSGI. This is a Python thing. When you install it, it actually takes a little awhile. It does a bunch of compilation and stuff in the setup.py. So this takes awhile, but then eventually it will be set up inside our virtual environment. And there you have it. The server is ready to go. You can type WSGI just to make sure that it's there. Obviously it won't start. It's like, give me no configuration. I don't know what to do. But it looks like we can run it and everything we need is now on the server. It's just up to us to get our code there and configure uWSGI and Nginx and get them running.
|
|
|
transcript
|
1:44 |
Here we are in our server and if we ask things like, which Python? We have our virtual environment listed or active and we do a pip list, you can see all the stuff we like client's list and httpie uWSGI are all set up and ready to go. However, if we log out and we log back into the server we ask the same question, which Python ugh, well, it's not the same one. There's a cool little trick that we can do to help us always have the right environment active. When you log into the server, what is the chances that you want to change the system Python? Pretty low. Or the chances you might want to upgrade your requirements for your web app or install some other packages it's going to need very high. So on this server we're going to actually set it up so that when we log in, it automatically activates that virtual environment. So let's see where it went. It was over here in venv/bin/activate that's the one so what we can do to make that happen it's super easy. We're going to edit our .zshrc, with Bash then that would be .bashrc. Down here at the bottom we're just going to tell it to source that command okay? That'll effectively activate it right when we log in before we even do anything so let's log out log back in. Tada! There it is, and we ask which Python or pip list. We're all good to go so that's a nice little trick technique that you can add to make sure we're always focused on our web app and not messing with the server. Of course, you can deactivate. Deactivate if you need to and get back to, like, the system Python. But, honestly, you almost never need to do that. So this activate virtual environment and login nice and handy.
|
|
|
transcript
|
2:51 |
We've got our server all ready to go. The next thing to do is to get our code on there and get everything set up like our requirements and so on. Let's go over here and we're going to SSH back to the server and notice we have our virtual environment already activating itself, that's pretty sweet. We're going to go into the apps directory and here we're going to clone our repo. So the command would be git clone, here's the URL. But notice I'm going to put a different ending here so I don't have this great long file name in all of our paths. It'll make it a little easier to fit it on the screen for you. You can do this or not do this. Now this is asking for my password 'cause during development this repo is private but of course it'll be public if you've run this before you won't need a username and password. However you might for your personal stuff maybe what you're creating is not open source for example training.talkpython.fm, not open source. So here we are, we've gotten our code here we've seeded the app repo, what are we going to get? We're going to go here and see the app and if we go into Chapter 15 down here here is our project that we're working with, so. We've got our server project that we want to copy over and we've got our regular app. Now before we actually try to make it run inside my Nginx, you definitely want to make sure that just the simple case of it runs. So, we're just going to try to run it right here. Now, if I ask which Python, it will have the right one because the virtual environment but if I try to run this, it'll say No no, you can't run this because there's no flask. Well, first thing we've got to do is install our requirements. And so far we've been using this one but now we're going to use our server one which has things like flask and SQLAlchemy but not say the testing tools and other stuff a limbic for example, that we don't need here. Actually, we might want a limbic here, but anyway. We're not going to install that for now. We're going to say pip install -r requirements.txt Just like that, it's all done. Now, if we try to run it again look, it's running great. Now, let's open up another terminal. Come up here and let's just do http://localhost:5006 What port is it running on? 5006, let's give that a shot. Hey hey, that looks a whole lot like our little thing we built during the course, all right. So, we got it working, that's great. We've got our virtual environment set up and it looks like it's working great over here. The next step is to get this to run under. And then kind of work our way out of this onion layer of things. And we got the basic app working then we get it working in. Then we get it working in Nginx and at that point we'll be good to go.
|
|
|
transcript
|
3:28 |
We saw that we have our code on the server and that it runs, if you just run it straight with Python in the development server basically. Now the next step is going to involve uWSGI. Remember, uWSGI is the layer that actually in production, properly runs our code our Python code. So what we're going to need to do is we're going to work on this file called a service file or a unit file. So if we go over here and look at it what it does is it basically has a title. This is uWSGI PyPI. It's going to run the uWSGI command with the virtual directory in this run in four processes on port 500 and so on. It's going to run in that folder and it'll restart if there's an error, things like that. So what we want to do is copy this file over and run it. the best thing to do however though is not try that right away because if it doesn't work you're hunting around for log files and other weird stuff that you're trying to figure out what's going on. So the best thing to do is just copy this right here. This is the command we're going to run. It's going to run with that in the path. And it's going to import somebody called WSGI which we need to create that really quick. So over here at the top we're going to create a file and it's going to say from pypi_org.app import app. We're also going to need main. And here we'll just do our little main trick will run main. But only if we're happening to run it as the app. We're not going to run it that way. What we really want to do is just export this. So let's commit this really quick. All right, perfect. Now over here we do an we'll see you that it's not here yet but it would do a get. Should come down and here's our WSGI. So we're going to go to there and import the app instance from there. And we're going to just mount that to / okay. So what we want to do is just run this command over there and make sure that it works while we're in this directory. So we're in the right directory. Now we're just going to try the command and either is going to work or we're going to get an error. Let's see. Oh, pretty good. It looks like it's working. Here we can see our app. We put some little printouts. It's configured in the flask app and registry and blueprints and so on. So this is all good. How do we see if it worked? Well, we have to go do a request against it and we can't do it here 'cause if we exit out it's going to stop it. So let's create another terminal. Go in there. All right, let's use our little HTTP utility that we created. I'm going to go against localhost:5000. Remember our command that we issued over here we're listening on port 5000 not 5006 like we were in our devops. So let's see what we get. Oh it would be super If I could spell correctly. Here we looked like we lost in H on the way. Makes a request what do we get? Yes, all right. You can see over here, the request came in. I went pretty quick for the first time and the response code is 200 right there. That's good. And of course, we can see our content. Here's our little fake site. So it looks like running uWSGI outside of the system daemon just directly with that configure we pass along is working. That's a super good sign and definitely something you want to do before you try to actually run it as a system daemon.
|
|
|
transcript
|
2:03 |
You saw that we could copy this command and run it. And that is super good news. Because that means we're basically having this work. However, there are plenty of times when our system unit here won't run even though that works. There's weird things about like the working path and other stuff. So what we need to do is get this so that when we start our Linux server this automatically launches that and just runs. And if there's some kind of error it will restart our service. Things like that. And basically to make this happen we just need this file copied into the correct location. So I have a little command here that's going to say, copy that over to etc/systemd/system and let's try that. Alright, that worked. Pretty good. And then what we can do is we can issue commands to systemctl. We can say, start we can ask for the status we can say, stop. Let's try start first of all here. It's pretty good. Let's look at the status. Looks good, looks good. Alright, things are running we probably shouldn't run as root. Don't do that. Now, over here, we're got our four worker processes running. That's all good. Let's get out of here and just try our HTTP again. Alright, it looks like it's working. Everything is great. However, if we reboot, it's not going to persist. Why? Because we have to run this enable. This tells it to run. Now, it's going just prove it let's do a reboot real quick log back in, and see that we can still access it. Alright, that's probably long enough. Let's try to go back. Let's try to request a page again. Beautiful. Still working. Now we can't access it yet outside the server. Remember, only ports we're exposing are 80 and 443 as far as the web's concerned 5000 properly blocked off as it should be. But now we have it running in uWSGI as a system service and whatever the lifecycle of the server is it's going to keep our app running. I'm just going to start it up whenever we turn it on we turn off, obviously it turns off with the server. So this is perfect. Just leave it like this and let it go.
|
|
|
transcript
|
3:29 |
The final thing we have to do to get our server up and running is we have to configure Nginx. When you talk to the server when you make a request to it in your browser or anyone does what you're actually talking to is Nginx. It does all the static file serving, the SSL translation, all that kind of stuff. And then internally it will make a request over to uWSGI, get the result and stream that back to you. So as far as the public is concerned Nginx is your web server. They don't know uWSGI is doing the magic behind the scenes. So we still have to set that up. Now let's just figure out what happens if we request a page over there. If I put in the URL here, we get "Welcome to Nginx". You see, it's already running, so that's cool but it's not running our code. So let's make it run our code. That brings us back to our little script here. We've already got Nginx installed. That's cool. But what we need to do is remove that default page that says, "Hey, Welcome to Nginx. Good job setting it up". So we are going to remove that and then the next thing we need to do is copy our Nginx configuration over to sites enabled. Now let's just quickly scan over this. Since we are listening on port 80 we are going to listen for fake_pypi.com I'm going to change that actually in a minute but we could just hack that into our host or what you would really do is put your site like training.talkpython.fm by or www.google.com or whatever your domain is, you put it here. And this allows you to have many different websites served out of the same Nginx. So I have one server that has six or seven different Nginx files and configurations for different domains. And this is how you specify that. Don't pass back the version of the server. Let's see, we have our static files and those are not processed by Python anymore. They are now exclusively handled by Nginx. So we say when somebody's asked for something /static you'll look over here. All right. And those are cached for a year. That's good. And then it says otherwise go to your application and your application, does this local call back over to 5000. I like to use http. You can also use Unix sockets which is a little better performance but not a huge amount I don't believe. This way, I can actually test if anything is going wrong I can test my code. With the sockets, it's not so much. So I'm going to leave it like this. And we're just going to copy this file over to where this needs to be configured which is this line right there. That worked. Good. And then we're going to enable Nginx. I believe it's already enabled, but just to be sure. And we're going to restart it so it detects the configuration change. All right, super. Let's see what happens when I go over here. Refresh. Moment of truth. Ta-dah! How awesome is that? Cool. Our site is online. It has a couple of problems, which we're going to fix. Problem number 1: it's not SSL. Connect is not secure. These days you really kind of want to have your connection over https. It helps with search engine optimization even if you don't care about being truly secure. The other one is look here how many projects, releases, etc. We have no data. So, remember we had that script if you remember that far back? If we go into pypi.org and we go into bin remember here we had this load data? So we just say Python load data. This will go and actually import all that data build it up. If we come back here one more time and do a refresh... Ta-dah! There's our projects and now these show up down here as well. Perfect, right?
|
|
|
transcript
|
3:57 |
It looks pretty good over here. We put in the IP address you can see that we actually get our page back and it has data. This is really cool. The whole site is now working except for well, you probably don't want to just have an IP address. You might want a I don't know, domain name. Also you would like this to be secure and not insecure. All right if you go to say this login page you get a big warning like, Warning warning this is not secure and you do want to protect against that. So I've done something really quick. I've gone to my DNS and I've created a temporary which I'm going to remove but temporary domain mapping over that server. Why did I actually do it in my DNS and not hack my host name? Well you'll see that Let's Encrypt actually does a look up on the domain and only then will it work. So we actually have to have it working on the internet. Now if we look over here you can see I've created this fakepypi.talkpython.com not fm .com, and this one if we actually go to it I've copied this over and restarted Nginx. So, we've gone over here. Hey, look at that. It's listening. How cool is this? So it looks like everything is working for the domain but again, still not secure. However, now that we have a domain some name that resolves here, I can actually go and set up Let's Encrypt. It turns out, it's super super easy to use Let's Encrypt. You know, there have been a few sights little minor things that I had been running and I didn't install SSL certificates because I'm like ah, what's it matter? Who really cares? It's going to be a lot of work. It costs money for SSL certificates, right? Well, the last couple years, that's not so true and it turns out to be super easy. So there's a nice article on Digital Ocean none the less talking about how to set up SSL using Let's Encrypt on Nginx. It basically comes down to three commands. We need to register the right package authority here. So when we do this it says, Do you want to do it? Yes we want to do this. Now with that in place we can then install Python-certbot-nginx. certbot is the thing that does SSL. It happens to run on Python. That's kind of cool. Okay. It's all set up. Now we should be able to issue commands to certbot which is a Let's Encrypt automation. We say, we're going to set up Nginx, with this domain and it's going to go look through all the configuration files for Nginx find the one that's listed on this domain and configure it. That's it, let's try. Just kind of come down here and it says You have to have some stuff in your SSL certificate. So, I'll do that. Let's do michael@talkPython. Do you agree to the terms of service? Sure, why not? Do you want to be contacted by the EFF? I think you've already said yes a bunch of times. I'm going to say no this time. All right, it's gotten everything set up. Now it has one final question before it can make a change. This is important. You almost always want to say 2, not 1. So if someone requests the non SSL domain or the non SSL domain, do you want it to redirect to SSL? So, do you want to support fake pypi.talkpython.fm and htps fake_pypi? Of course not. You want to have it just all redirect to SSL. You say two, and that's it. If we go over here and look at this again you'll see that it's now put in some stuff that's managed by certbot and about redirecting if it it's just the raw host on port 80. Things like that. So let's just go over here and just refresh this. Ta-da. Look at that. Now we have our SSL secure connection and even better, if we go to login no super spooky warnings. Of course it's safe to login here. Who wouldn't want to login? Or register? Or whatever, right? So our site is up and running, using SSL. All we have to do is set up either a cronjob or you'll get an email to the email that we put in and eventually we need to run a renew command on the server to get a new copy, basically a new certificate. These are good for I think, 90 days for three months, something like that. All right, that's it our server is now secure with Let's Encrypt and SSL.
|
|
|
transcript
|
1:20 |
Let's quickly look at what we had to do to get our code running under uWSGI. Basically, what we had to do is come up with this command that would just launch uWSGI. So this exec start command here notice that's actually one line that's wrapping around. It's basically the two lines there are one individual line in a file. So, we're going to go and run the uWSGI out of our virtual environment. We're going to say the home is the virtual environment so it knows to use that for Python. Master mode, we want four processes, two threads. I suspect we could have actually a lot more threads per process. Listen on HTTP port 5000. Set the Python path to where our project is. And then we created the wsgi.py file it just imported the app and we're going to mount / go into the wsgi module, get the app variable out and that's what Flask is going to use here. And that's it. It's off to the races, it works great. Also set the runtime directory. I think the final / there is super important. I think if you omit it it reports it as an error. So we just set this up and this is a systemd unit file and it just runs this command and keeps it running if there were some reason it crashes. That's all we got to do to make sure that our app runs under uWSGI. But remember, it's best to take that exec start command run it separately, make sure it works and then come back and try to set it up as this daemon process here.
|
|
|
transcript
|
1:19 |
Finally, we needed to setup Nginx as our external server that would internally speak to uWSGI. So here's how we started. We said we're going to listen on port 80. Our domain is what we came up with. It was fake_pypi.talkPython.com. You'll have a better domain, I'm sure, than that. But whatever your domain is, here's what it is you have to set that up in DNS. And then we map the static files with caching and gzip and all that stuff over from where it is on the file system to /static and we set the cache for 365 days or one year. All right, so this is the first part of the file. So this is the static stuff and listening. We'll copy this file over to /etc/nginx/sites-enabled. And then, in addition to that we're going to have a location for / that's going to take the url and try it against our application. Which is just to say pass all the right parameters over as well along to uWSGI. And the way you get to it is through proxy_pass localhost:5000. That's it, we copy that file over we restart Nginx and off to the races. We're ready to talk to that domain. Last thing we did was use Let's Encrypt which rewrote this file to listen on port 443 and do a redirect from port 80 over to 443 so we have SSL as well.
|
|
|
|
42:08 |
|
|
transcript
|
1:42 |
We've built our app. We've deployed it. It's basically done. But let's take one more look. Let's try one more version of our application. So we're going to rebuild our PyPI demo app this time with a NoSQL based document database called MongoDB. It's the most popular of the document databases but the idea is it'll be pretty similar across the board. So the first question is why are we doing this? Why do we have this MongoDB version? Well, there's two basic reasons. The first reason is many people prefer document databases over relational databases. The whole thing about migrations whole lot less of that when you're doing document databases and things like that. The running of it is easier a lot of times. And also the performance can be better. So that's one reason. People might just want a MongoDB version. The other reason though is we've talked a lot about some amazing design patters. We've organized our code in really nice ways. We have these data access services that group say the user queries and data processing, the package processing, and we have our view models. So what I'd like to show you the main take away here is the power of these design patters that we've employed. What you'll see is we'll be able to change a very few set of files and actually completely switch not just the database but entirely the style of underlying data all together. So, it's going to be really quite easy and quite awesome. If you're not interested in MongoDB feel free to skip to the end. Skip over this chapter but if you are or you want to see the power of these design patters to allow us to evolve our application as we build it so we don't have to design it all perfectly up front 'cause you never do, you'll get to see that in action during this chapter.
|
|
|
transcript
|
0:55 |
Now I want to just set expectations before we get into this. This is not a full MongoDB course. I'm not here to teach you absolutely everything about managing, deploying, and working with MongoDB. I actually have two courses on that. I have a free one called MongoDB Quick Start with Python. And then a paid nine-hour one, seven hours quite long and involved, MongoDB for Developers with Python. Either of these courses would be great if you really want to dig into Mongo. The free one gets the basic ideas in place. The paid one definitely covers the whole lifecycle of working with it and using it for your app. So this is not going to cover everything. We're going to cover just like a sliver, like just enough really lightly for you to see how to make this change and evolve our code, and more or less appreciate the design patterns, okay. So we're going to go quick and we're not going to cover everything. If you need more resources, here are two good ones.
|
|
|
transcript
|
1:14 |
I did say that we're not going to make this a full MongoDB course but I want to give you just enough of a foundation of how these things work so you can sort of appreciate what we're doing. So the way we model data in document databases is very different than relational databases. Relational databases we have, say, packages and we have users and we have a maintainer's table which is a normalization table between them things like that. And document databases, it's much closer to actually being the same shape and style as you have in memory, hierarchical, as you do in the database. So for example, here is a chapter from one of my courses in MongoDB. The green stuff here is the same as you would have in SQLite, Postgres, whatever, right? It's just straight comlumns but notice those lectures. These are, it's an array, in JavaScript and then that's an embedded series of objects. So these are embedded in here and you can think of this as like a pre-computed join one of the reasons these databases can be so fast. So the big question is, Can you actually query deeply down into here? Can you still answer the question, What chapter has Lecture 10106? And could I get it back? Luckily you can, and you can do that with an index and it can be incredibly fast. So we're going to ask and answer questions like that throughout this chapter.
|
|
|
transcript
|
4:55 |
Well, let's get started writing code for our mongodb edition of our app. So, over here we've got, in our final just as we've had before and this time on Chapter 16, final code. So, we've got a couple of interesting things to do here. The first thing we want to do is we want to start out by having a new requirement. Now, eventually we'll drop the requirement for SQLAlchemy but at the moment, we want to be able to copy from SQLAlchemy's database, the one it's managing over into MongoDB. So, we're going to keep them both around. Now, just like before we didn't say, let's just start writing raw SQL queries against SQLite, or whatever database we want to use. We said we're going to use SQLAlchemy model of classes and have a higher level programming model to talk to our database. We'll do the same thing in MongoDB and we're going to use this thing called MongoEngine, like so. So, we can install that I guess maybe the most formal one would be down here but, we'll just pip install -r requirements.txt like so And we're installing MongoEngine which depends on the core library PyMongo to talk to it. Okay great, these are all good and can tell not misspelled if you want. Super. Now, just like before we have this data folder and we have a DB session file that we've created. If I was starting entirely from scratch I would probably just create a folder called data and start working there but, because I want to have both the SQLAlchemy version and the MongoEngine version around for a little while I'm going to create a different folder. It's called nosql or something like that. And in here we're going to create a file called mongo_setup.py Something like that. Now, getting started I'm going to write the simplest version that would actually entirely work for this demo. Then I'm going to replace it with what you'll actually need in production which is a little more complicated. We're just going to paste it in we don't need to talk about it. From the function called global_init just like we did for SQLAlchemy, we're going to pass in the db_name and we're going to default this to pypi. Now down here what we have to do is we have to import MongoEngine and we just call one simple function. So we say MongoEngine and we import that up there and we say register_connection. Now there's a few things to get passed the important one that we're going to work with is something called the alias. In our database entities we can describe which database connection it should use and we have a core one an analytics one, a reporting one I don' know whatever, backup, you name it. So we can put a name here and then this is going to be something we can reference in our models. The other part that's interesting is we're going to go down here and set the name to be equal to the db_name. Like so. That's it, this is all we have to do for our getting started version. Do a little clean up and it should work. Now in practice what you need to do is specify your server, maybe a port, a username, password authentication mechanism, all sorts of messy stuff. So I'm going to replace that with a more complicated version that has a bunch of defaults that default to the localhost version, has the same database name. But if we specify username and password it's going to go create a dictionary with all these settings down here otherwise it's just going to do that little bit that you just saw me write. So this is all good looks like everything is going to be working great here. Now, where do we call this. Over here in our app we'll recall we had this configure DB stuff, like this. So this is actually going to get a lot easier. All we have to do here is say mongo_setup hit import that and say global_init. That's it, just take the defaults. So all this stuff about getting the file and what not we don't need it here. In practice maybe we get the username, password, etc. from the environment or from a configuration file or something like that, right now we don't need to do this. Okay so it looks like the connections probably going to work. Everything's set up. However when I run it, it's not going to work so super well. Let's go over here and run the app. Looked all right didn't it, registered the default connection, that's good. But we talked to it None type is not callable. Well why is that, that's because down here in get latest releases we're actually trying to work with SQLAlchemy still. However what we did was we used some really cool design patterns here to separate our database code from all the other stuff. Notice it didn't crash in the views or in the template or anything like that, it crashed just right there in these couple of files that are responsible for database access. What you'll see is that we'll pretty much be able to interact with just those files and swap out the data access there in a super simple and convenient way. And then our apps just going to start working again it'll be great.
|
|
|
transcript
|
3:41 |
SQLAlchemy and MongoEngine have a lot of similarities and that's good because we've already set up everything in SQLAlchemy and you'll see it's easy to do this as well in MongoEngine. So over here in the SQLAlchemy version we have a users file, so let's go create one like that here. And then in this one we have a class. It derives from SQLAlchemyBase so the table name has some columns. Let's just copy this over here and then work on it. So it turns out we're not going to need those but we're going to need to import mongoengine. Now, how does this change if we move to MongoEngine instead of SQLAlchemy? Well, the Base class changes. We're going to derive from a document. If you're doing embedded objects embedded within larger documents you can do embedded document here but we're just doing a document. These are the top level ones. That part doesn't make sense anymore. Now let's see, here we have a auto-incrementing primary key and this is basically an auto-generated ID in SQLAlchemy. MongoEngine documents already come with a primary key that's set up that's kind of a good thing. It's called an ObjectId. So if we just omit that it's going to create its equivalent of that. Now it gets interesting. Now we have a name and this is a column of type string. How does this look in MongoEngine? We're going to come over here and say mongoengine.StringField like so. And here it's nullable is True so we could say required is False but that's the default behavior. So only if nullable or False will we have to say required is True. It's kind of opposite. But it turns out that these two are equivalent so just drop that line. And it's going to be pretty similar here as well. So we have our string. Have this. I have some other things here nullable as true so we can leave that apart. Unique. It's True for this one. And we're also going to have an index. Okay, so we can't put indexes in the columns we put them in a different spot so I'm just keeping those as a little note right here. Let's see about this one. All that's good, and I'm just going to remember that this requires an index. This one. This is a couple cool interesting features. It's a Datetime. It has a default value and so on. So let's go over here and say this is a mongoEngine.DateTimeField and guess what it also has a default just like this. And it's also going to have an index but not right there. These last two we didn't use, so I'm just going to drop them. All right, looks like we're off to a pretty good start. This is a little bit of wackiness here so let's do a little clean up. Now, we want to specify the indexes. We also want to control the table name to be lowercase users. So we just do that differently here. So we have a meta dictionary. And over here instead of having a table we have a collection. And this is going to be users, like so. And we have a db_alias. Remember, here where we say core. We want to set that here. All right, this is how you select the connection it's going to use. Or even the server, and the database all that stuff. Okay, so we've got that. And then final we want indexes. And this can be a list of either strings or dictionaries that contain, like, from composite indexes things like that. So we want one for email we want one for hashed_password and we want one for created_date. Okay, then that means we can remove these little notes. And this should be entirely done. Is it exactly the same as our other user? No. These two are definitely different but you can see they're strongly similar. So is the way in which we query them and insert them, and so on.
|
|
|
transcript
|
3:24 |
With our user class defined let's see how we might use it. Now, we don't really have a whole flow put together just yet so let's just go cram it into a place that it really doesn't belong but it will let us see how it works. So, after this, we'll be able to create users and save them and even be able to create them from the database even though none are there yet. So how would we go and work with this if we wanted to create a new user and save it? So, going on, say user, user. I'm going to import this temporarily from the right one and then, we just set the values, like name is Michael email is what my email is. That all looks good. We probably should set a password when we're ready to do that but we'll go through the registration on that side and the rest has default values. So, once we've created this object, how do we save it? Well, SQLAlchemy had this unit of work. We go get the unit of work, we create a session we add stuff, we do a bunch of work, and we call commit. We don't do that in Mongo engine. It's active record style so each record can just directly be saved, which is simpler. Maybe not better, but simpler. May or may not be, it's up to you. And this is it. That's all we got to do to go to MongoDB create the database create the collection equivalent of the table set the effective implicit schema, enable the indexes and then, save this into it. All this is basically done just by those four lines. So let's try again and see what we get. Oh, I guess it restarted itself once and already worked. So, this is unique and it's pretty cool. We cannot have the email inserted twice so let's do, put something here. I'll just do a save and the app crashed. Okay, that's fine. All right, well, let's just go look at the database see what we've got. It should be inserted. In the second time when we say the bug is true Flask restarts this and that's why we're getting the error. So, how do we look at MongoDB? There's a bunch of ways. I want to use this thing called 3T, Robo 3T. This is my favorite way to work with MongoDB. Come over here, we're going to talk to localhost and notice, we now have a PyPI database that has just one collection for the moment. We've only defined one entity. And here are indexes, like our email is unique and things like that. If we just go look at the documents we should have a couple the two that successfully got inserted. The first one here and then, this is the second one that I made up. Again, Flask, when it sees it, a debug flag it restarts itself in debug mode and so, that's why you got that error both times but these are working right? These are getting inserted. How cool is that? You can even see the default values are working as well as the implicit id. Now, over here, _id, just say that it gets added by the system, but in MongoEngine you just say .id. It sorts of omits that _ID. Okay, so that's it. We've done a simple insert. Now, of course, it doesn't make sense to have this here at all, so I'm going to get rid of it. We're going to rewrite this system so the entire website works with MongoDB but there we have it. Just make sure our app still runs. Hey, look, now it's good. So, that's it. You can see it's really, really easy to use MongoDB and we want to get going. I guess implicit in all of this is I already had MongoDB running in the background on my computer. Just Google how to install and run MongoDB. It's pretty straightforward but there're a few steps you got to go through and it's not too bad. And just get the opensource community edition run it, and then, that's it. You can go and run this code as well.
|
|
|
transcript
|
1:44 |
Over here in our NoSQL folder we have our setup and we have our users. But there's a bunch of stuff we need like packages and maintainers and licenses. You saw how easy it was and how similar this was to SQLAlchemy for users. Let me just drop in the rest. There's no reason to watch me type it all out. So we can go through. And here we have the downloads which are straightforward. I guess we don't need table name anymore. We've got package_id and release_id and all these things. And of course we're setting up indexes on them. Languages, this is again similar to what we had before. Licenses also. You are overwriting the type of key which is certainly possible something you can do just like we are in packages. Over here, we're setting the string field to be a primary key. This, let's just store a string instead of that object ID type of thing. And everything along here looks pretty much the same as it was in SQLAlchemy but here's where we start to leverage the hierarchical aspect of document databases over tabular stuff say, in relational. Here's our maintainers. Previously, we had a maintainers table and what it stored was project ID, maintainer ID and it was just the normalization table for the many-to-many relationship. We don't have to do that here. We can store, actually a list of all the maintainer IDs which then are relationships navigating back keys back to the user table. So we don't need that normalization table we know what project we're on and these are all the IDs that are maintainers of it. And we can do super nice queries down into this list and all sorts of stuff like that. So we're not leveraging too much among it to be here but here's one interesting part of it right there. Right, so that's all the other entities that we might want to work with.
|
|
|
transcript
|
6:00 |
Now in this section, we get to see the power of our proper factoring of the various aspects of our application. It's totally possible that people go and start writing actual queries right in here, right. Right in the view method. We made a point not to do that. We're using the view models to make sure the data exchange is clean and inside those view models, like this one here we're going to our services our package service for example on calling Get package by ID where we're passing a name along. So, when we go and change the queries we need to rewrite them from using SQLAlchemy to using MongoDB you'll see that really, for the most part we could just change only those three files little services, that are dedicated to database queries and nothing else at all. It turns out the base view model, it's cookie management is exchanging an integer and we're later going to need to change that to a BSON ObjectID but other than that, we won't have to touch anything. So let's go and get started. I guess probably the most important one is to go to this package service one. This is the one that was crashing. So let's go down here and look at all packages. Remember, the way it works is SQLAlchemy creates a unit of work, a session we do some stuff and then we have to close out that session. It turns out it's way simpler in MongoEngine. So let's get rid of all that stuff. And we come over here and we still want to execute this as a list but instead of doing a session query we just go to the package thing and we say, dot objects, as long as we import the right one at the top so we're going to change data to nosql down here now we can say objects(), like this and it's just going to pull it in and go. This is it! That's the entire query, we also have a limit in MongoEngine, just like we do on SQLAlchemy. Up here, again, we want to get a package by ID. This looks kind of complicated we've got our validation, that's all fine. This stuff, we don't need any of that this stuff, we don't need any of that and remember, the session query just goes to package.objects(), so we don't have joins here so that's good. And then when we do this filter we could either do it here, we could actually just put it inside of objects. We don't use the type name in double equals we just use the field name and single we just assign the value. So literally, that's it. get_package_by_id just got simpler didn't it. Let's keep going. Well it's not going to take long at all to finish this up so we do that business, over here convert this release to release.objects, like so call count, done, send them away, just keep going. Package count, package.objects().count(), like that. All right, get latest releases what was that, in a second? Yeah this is the last one so let's go ahead and write this one we can drop that clean this all up change a release here, one more time just say dot objects, like so, don't have joins. We do have order_by, do have limit and we do have all however, again remember, we don't say when we're doing a order_by, just like with a quality we don't say the type name. This one I don't like as much I prefer SQLAlchemy's but what we're going to do is we're just going to go down here and put as a string, either, like this for ascending or a minus, here, for descending for the order by. And that's it! We've completely changed all the package queries theoretically, I haven't tested this yet but theoretically work under MongoDB. Let's go quick and do user_service One as well. That can go, this one becomes a nosql can one come over here, just change this. It's kind of a little bit annoying but I want to go through the entire process of changing everything because it's actually just going to take like five minutes to rewrite all the queries. So let's just spend those five minutes so you can see what the whole experience is like. And objects in the filter, we just change this to email the field equals email the value done. Look at, not only is this easy most of the time it's cleaner an simpler love it. Okay, same thing here, we create the user we set their values but in order I hope I don't mess them up. But instead of doing this, all of this stuff here we just go and say, user.save() remember active record, and we return it. It's going to return with it's primary key set and all that. Okay, all this is looking pretty good here. And go login_user now actually down here we have a, find_user_by_email and that's what we're trying to check so let's just not do this, let's call this function here and it's going to be smarter. Whoops, we want the email in, that's good. And then, last one we need to rewrite this. Here we Have it. So I think we've rewritten this one as well. Let's run our site and see how it's working if we're lucky we'll see the home page if not, we'll see it crash. TADA! Look at that! And is it working? Well there's no releases, that cause we haven't imported any data, there's no projects but check it out, there are two users those are the two users we inserted, so yeah it look's like it's actually using our data our queries to go to the database and pull this back. How cool is that? Yeah it was a little bit tedious to do this but we completely re-wrote the data access layer from my relational to a non relational document data base in a hand full of minutes, it's amazing.
|
|
|
transcript
|
2:26 |
Now, let's go try to log in. Actually, before we even try that let me do a quick cleanup here. Remember we put those users in and they don't have things like hashed passwords and so on and that's going to cause some trouble. So let me just go over here and we can just say remove all documents. The only way we really want users in here is they go and register. So let's try that. Let's go over here and try to register. We'll put our name, our email, our password and then I guess we still have this around here. I'm not really 57, but whatever. Oh, that's a problem. What's going on here? So, apparently zero is not a valid ObjectId. Where is this error happening? Way, way down here on this query right there. So when we're trying to find the user we're passing in an integer and it's expecting an ObjectId. Well, why is that? What is happening here? It turns out, it has to do with the fact that we're using a cookie for the user_id, remember that? What we're putting in here is an integer and what it needs to be is an ObjectId. So I'll say bson comes from a Mongo PyMongo, technically. We want an ObjectId like that. This is what we want this to return and it doesn't yet, but it's going to in a moment. One of these, I'm going to come down here and the part that's problematic is this. So let's just say try to do this else. Return. And then we have it. That should actually do it. So we should be able to come over here rerun our app. Here notice the login actually worked and it tried to redirect us to our account and now, guess what, our account works. We logged in, this is great. Let's log out and just show that we can login again. We went through the register before. But look; login, logout. Works beautifully. So we had to make that little tiny change because we're now using a bson.ObjectId as the primary key. We want to store that instead of just using an integer before. Okay, so this little minor change was just all we needed to do to sort of sync up with the data types and I guess we could have gotten around it but it's really better to leverage MongoDB's ObjectId for the ObjectId's if you don't care. But if they're auto generated, go with this. This is nice.
|
|
|
transcript
|
3:21 |
It's looking like our app is working pretty well. If we go and run it, try to pull up the home page here you see, hey it looks like it's working. It turns out when we have actual data there's a few minor tweaks we're going to have to change. That's not a big deal. The bigger deal is that, well, there's no data here. We have zero projects, zero releases, zero users. How do we get that data in there? We did have this load_data here where we took a JSON file and imported into SQLAlchemy but that's not what we're after. What we want to do is take the data that's in SQLAlchemy and put it in to MongoDB. So I'm going to show you a cool technique how you can take any database you connect to through SQLAlchemy, go query all the data and then transform that into MongoDB MongoEngine classes and save that into MongoDB. Basically, migrate data from one database type to the other. So let's go create another script here. So we have this file, now it's a little bit complicated and not really worth you watching me type it in so I'm going to paste something here and we're going to talk through it real quick. So we're going to go and initialize both database connections. One to MongoDB, as well as SQLAlchemy. Because we need to read the data from SQLAlchemy or SQLite and then push it into, save it into MongoDB. And then, these three functions here, they all work basically the same. The first question is, are there any users? If there are, we probably already run this don't have to do that. So be careful of the start with zero but then it will not override it. Then we just go and do a query against SQLAlchemy for all the users. Get them all and then we loop over them, one at a time we create a MongoDB user, set the properties and then call save. Hash password is SQLAlchemy's hash password. Name is SQLAlchemy's name. And that's it! If you have a ton of data insert, doing a save one at a time can be pretty slow, so you can do bulk inserts as well with MongoEngine and what not we don't have that much data. We're not doing it. All the others, they're pretty much the same packages, and releases, and so on. So I want to show you a quick trick we're doing up here that's kind of cool. We're working with package, right? So here's a package class and here's a package class how in our code do we know which is which? Well this one is the MonogDB one and this one is the SQLAlchemy one. So we're importing is as SQL package Mongo package or SQL user and Mongo users. That's just a cool technique to help you remain sane while you're trying to run this. So let's go ahead and run this and see what happens. Takes a second, it's doing some work, and it's done! So let's go look over here and we can do our query again. Go show me all the packages. Ta-dah! There they are. How cool is that? We're got our ID name and email created. We didn't copy over maintainers, because it turns out we we're storing them in SQLAlchemy, so there's really no way to copy them over. Also, MongoEngine does not insert unmodified values. Okay, so notice that some of the values that are not here they're simply just not in there. This is the package we want to move on but still, we don't have the maintainers copied over. Right? You can see it's just the values that we've set. These times are the ones that come out of SQLAlchemy not just the default ones, right? So we copied all this over, saved in and it's good to go.
|
|
|
transcript
|
4:51 |
It looks like our web app's working but if we run it after we've imported data let's see what we get. It's not going to be as fun as you might think. No, that's not so good. Remember we had a relationship on our releases package our releases object in SQLAlchemy that you go back to the package and we had done a join and you know we don't have this relationship we could set up something in that style, in MongoDB but it's probably not the best practice we don't have loading and things like that. So what we're going to do is just change how we're doing this. So lets see what is the problem. The problem is actually down in the template here. So if we go to the home to the index you can see down here that we're seeing for each release I want to navigate that relationship to the package and then get it's ID. And go to the package and get a summary. So what we want to do is we actually want to just have some way to get the package. Now there's a ton of ways we could implement this. Let me try to do it in a relatively efficient and fast way. How do we exchange data with this template? Well of course we use our view model, so let's go over here. So we have the releases and we could just come up with self.packages and how do we get those? Well we go to our package service and we could say well give us all of the packages that would be super inefficient. We could say for all the releases here give us all those packages. They come back as a list, that will work but then how will we figure out which is the right one? What we're going to do is we're going to come up with something we're going to call a package look up. And this is going to be a dictionary that given a package_id will give us the package and the goal would be to go with these releases and find all the packages they correspond to it. So let's go over here and say packages and when we get a list from our package_service this is the one we have to write right now. We would get_package_by_id and we want to get_packages_by_ids. What ID's are we going to put in there? Well let's go like this, package_ids. It's going to be a list comprehension. So we're going to say are not package_id for r in self.releases, that's cool. And then we're just going to pass this along. This will be a simple in query as you'll see in just a second. So let's go and have to write that. This is going to be a list of str and what we get back, say, list of package. Now down here, this turns out to be a super simple thing. I'm going to go ahead and use a list to make sure that we convert that all the way to a list not some kind of partial executed query. And we go down here and say, let's see, we want packages. So we're going to Package.objects(id__in=package_ids) That's it, we just want to get all the packages that happen to be in this set. So we're going to pass in like say and you know who knows, some other thing past that. We want to get all the packages who's ID is one of those. And that's it, make sure we close everything off quickly. Yeah it looks good. So if we write this function, now we can come over here and say okay we have these packages but that's again not a clean way to look up things. That's a flat list, so it'll be slow and cumbersome. So we're going to create a dictionary a little dictionary comprehension. We're going to say p.id:p so given an ID we want the package for p in packages. That's it, that's all the code we have to write. It turns out it's a super fast query. Now, how do we use this? Well we have our little lookup here. We're here, we've not talked about this but you can actually create variables in Ginga. So we can say set package=package lookup.get R not package ID. Something like this. So we know that the package is going to be there because we generated it right. We've gone to the releases and said give me all the packages where the ID's are this. So now we can just go over here and say put package, package, package, like so. Let's see if that fixes it. Make sure we run it, here try again. Tada! And did it work? Yes of course it did. There they are, so the home page is now fixed. Now the question is, is that super slow like is this going to be a big problem going to the database twice instead of once? No, we're actually going a couple of times going to the account going to make a couple calls here for these we're going to do, you know to load the rest of the page we're doing 2 queries. Email literally says, and then for those releases give me all the packages. Yeah it's a little bit, but let's see what the cost is. If we go over here to our network and we load the page a few times now there's 6 or 7 milliseconds, that's pretty awesome. So, I'm totally happy with the speed of this page. If you're page is 6 or 7 milliseconds you should be happy, that's going to be really fast.
|
|
|
transcript
|
3:31 |
We've cleaned up the homepage. Now let's just click on one of these and see how amazing this is. Oh, darn it, not so amazing. Remember we had the relationship from release over to package. Well now we're running into the issue but in the other direction. We will go into a package and asking for its releases. So we just need to change a little bit how this works in order to match with our new data model. So what we need to do is let's close these off and it turns out that the error is actually right here. We can go show you that if we just scroll down and click right there. It's this, it says, hey, we don't given a package it doesn't have our releases. Well, what are we really trying to do here? We're trying to go to this and say well, if there's a package, go get me its latest release so we can set the latest release in the latest version text. So let's just change how this works. Let's say self.latest_release = package_service. get_latest_release_for_package(self.package.id) Like so. Now, this function doesn't exist yet but we're going to write in a second. Now, let's just fix this up really quick here. So the goal over here was to say, go to the and get us the latest release that's already done and then it's here's to say what is the text for that latest one. We probably want to add one more check if there is actually a latest release, okay. If we make this change and we write this function this page, this package details page should be back in action. So let's go write this. It's going to be package_id, which is a string. What's going to give it? What are we getting back? We're getting an optional of release. Okay. We want to do a query on releases, super easy. We go to release, we say objects and we don't need to use filter here. We can just put it right inside of object and say package_id equals package_id that we're passing in and we want to do an order by. What do you want to order by? Let's go over here. created_date. We want the latest one, remember? So we say, - that and then here we say .first. Give us one or None and that's it. That will fix this or go to the database, do a query get us the latest release for our package. And here you can see we have an index on created_date and the thing we're sorted on as well as the package_id. So this should be really, really fast. All right, let's go and see how this works. Try again. No, what have we missed? Oh we still are doing this test even though it doesn't make sense anymore. Try again. Tada, there we go. Our site is fully back in action and we can come down here and see all the details here you can see we got our latest release for that one on 2018 in May 30th. Super. So we've now done a little tiny cleanup that we had to do based on the change in the structure and the data model and now our app is back and working and that's it. We've converted this app over to MongoDB. I've done a lot of talking and not that much typing. If I just went and heads down and started converting and converting you can see this would go pretty quick. We did come with the MongoDB data model already done so I don't know. What do you think? An hour, two hours to do this conversion. That's not a ton of work and why is it not a ton of work? Because we were able to change just these couple of files 'cause all of the data access was there and because we're using MongoEngine it was very similar in the way we wrote our queries and got objects back to the way that we work with SQLAlchemy. Super cool on both counts.
|
|
|
transcript
|
4:24 |
Let's close out this chapter by reviewing some of the concepts that we discussed while going through our conversion from SQLAlchemy to MongoDB. First thing, we have to register connections so pretty straightforward, we just pass an alias and a name for the database and off it goes. So here we said core and PyPI demo and we call mongoengine.register_connection. As long as our entities use the same alias which is called db_alias in their little meta data thing as long as they use the same one it just uses this connection, it's this ambient way to get to the database so you don't have to go through that session stuff. The classes that we map to the database derive from a built in base class, mongoengine.Document. Everything that's going to be saved to a top level collection is a mongoengine.Document. Here we have a package, in this one we're changing what the id is, like we did we used a string instead of an auto incrementing id. If we want to take a bson, auto generate a bson id we could just omit that line but this one we want to make sure it's a string which is that unique, I guess we don't say unique here we should say unique but that's a feature but it's not one that we set. Anyway we want to make sure this is a unique thing and that is just the name of the package and we have datetime fields, string field and so on pretty straightforward. What's really powerful though is that we don't have to limit ourselves to just tabular data. We can have things like name, summary and homepage that would be tabular but then we can embed stuff. Normally in a relational database this takes other tables to manage these many to many relationships. Here we just have maintainers and we're just embedding a list of items. If we look at the record in the database it looks like this, we have our id the date, the summary and then we have a bunch of maintainers that were put in there. And this is just the id, this is like a relationship back to the user table because it's many to many. We're not embedding users in here right but we can avoid that maintainers table that is the normalization table. If we want to do a simple query so easy, just package.objects column equals value for direct equal and then you want one you say first, if you want to do all of 'em you just iterate over it or you say .all(). Things like that. So we're going to filter on one or more of the fields. If you want to filter on more than one and do an and and just comma separate them like any keyword arguments. So in this case the id must match the name of the past package name like requests or SQLAlchemy. We call first and this actually triggers the execution of the query. If we didn't call that we'd have to loop over it or something, until then we could keep adding to it. And now it's going to return either one or none. Let's imagine a world that we haven't been working in yet That's a little bit more complicated. We're doing a hotel or an Airbnb or something and we have hotel rooms, those rooms have bookings and the bookings store which guests are in them. So we have a booking object, it has an embedded object called guest, that embedded guest object has an id, if we want to answer the question of show me all of the bookings for a given user or a given owner we come through and say, go find that owner it would do a simple query to get them and then I can go to the room and say go to the room's bookings, this double underscore right there says navigate the hierarchy. We have bookings, this is a list of guests or something like that or an embedded singular object called guests and it has a guest id. So we're going into the bookings list or embedded item, say go to the guest id and then we want to do an inquiry which is a list of ids. So show me the guest, find me all the bookings who have a guest who is contained within the owner's family ids. Pretty awesome that we can do this and the way you do it is the double underscores both navigate hierarchies and they apply operators like in, so double underscore in that's the operator that's being applied in the query. Now one of the patterns that I like to use is make sure there's no data access outside this function. We could return a prepared query that's not actually executed and then if we run into an error that error might happen in a view model, even maybe in a template. So my best practice for you is to make sure all the data access is done by the time you leave this function, in this case a real easy way to do that is convert this to an in-memory list, that means the whole thing is accosted and we're not using data access anymore, we're just now working in memory.
|
|
|
|
15:12 |
|
|
transcript
|
0:41 |
There it is, you've just blown past it. You're done, that's the finish line. We're now finished with the course and you possess many of Flask's superpowers. I hope you like Flask. I hope you feel like you now have a really good understanding and can go build amazing websites with it. Certainly there are incredible web applications in the world that, some we know about some nobody's published that is turning on Flask but of course it is. So, hope you go build something amazing with Flask as well. In this final chapter we're just going to quickly review what you've learned. So we're going to talk about all the building blocks of Flask. And I'll put them into separate little videos so you can use them as reference, quick and easy.
|
|
|
transcript
|
1:00 |
Well, the first thing we had to do to get started with Flask was get started with Flask! And we saw that we could do that by creating a virtual environment pip installing Flask, it would take along the dependencies and probably we want SQLAlchemy in there as well. So we're going to do that when we get started and we saw there's two core ways. Of course, we can always use the command-line, right? Create a directory, create a environment activate it, pip install flask and sqlalchemy create a file and just start editing, you know. Typically that first file is called app.py. We saw that you'll benefit from much more structure than the standard Flask tutorial 'Hello, world' type thing would imply you would ever want. But hopefully, going through this whole course and seeing this app put together you'll build a more structured thing than that. So you could always start with the terminal and just go that way, or we saw on Pycharm you could say New project, Flask. Go and create me a virtual environment while you're doing it. So either way you want to do it, totally fine. And that's how we got started.
|
|
|
transcript
|
1:43 |
Unless you're building, purely, some sort of API endpoint you're going to want to have dynamic HTML and even in those endpoint stories you probably want to have some landing page that say Here's our API and go over this GitHub repo for the documentation, or something like that. So let's talk about Jinja2, right. That's the default dynamic HTML language for Flask. And it works like this. It's mostly HTML, but with these curly-brace percent blocks where we sprinkle in Python, and these double-handlebar double curly-brace things where we stringify things we take the value, some expression and we print out the string value right there. For example, we're looping over the packages and we're going to replicate this div block, three times for three packages, or five times for five packages. However many we pass in, we want to have one of these blocks for each one of those, so we just have for p in packages. Notice there's no colon, that's handled by the endfor down there. If we want to have just string values as I said double handlebars, and some kind of expression. You can call Python code here, and methods and whatnot but ultimately the return value is going to be just printed out as a string. We also saw that we have if statements. So we want to conditionally show the summary only if there is a summary, we'll do it this way. Of course, all those blocks have to be closed with an endif, or an endfor, and so on. If we run this, how's it going to look? Let's say we pass three packages requests, Boto and SQLAlchemy. It'll look something like this. The style, the web design, not overwhelming, is it? But, you know, this is just getting started, right? This is just the barebones Let's show the data in HTML. This is how we do it with Jinja2.
|
|
|
transcript
|
0:57 |
We saw that when we create our HTML page we've got a bunch of CSS, JavaScript other settings, meta tags, all that kind of stuff maybe even navigation bars and footers. We want that shared across all the different pages. So instead of replicating it which would be a terrible idea we saw that we can use the extends and create these blocks and fill them in. So we can create a Jinja2 template and we can say that our page template extends this shared layout template. Remember how we organized our template files as well? We had a template folder and then there're a folder for each view module that we're going to put together like account and packages and so on. Then we also had a shared one and that's where we put our shared layout. You don't have to do that, but you know you probably should. It will really help you in the end. So anyway, you definitely, definitely want to make sure that you use this share layout. It makes maintaining the site really much easier and it's great. Definitely do it. Very easy in Flask.
|
|
|
transcript
|
1:35 |
Once we have our view methods in place and the templates that are going to show their HTML we have to figure out how our URLs map over to those view methods and that's where routing comes in. So we can simply refer to the static folder like /static/css/site.css and we don't have to do anything for that to be mapped. Flask will already do that for you but maybe we want to go to one of our view methods and say this one is going to respond to / and this other one is going to respond to /about. While these pages themselves what's actually shown in the HTML may be not be totally fixed and static the actual route will. We're not passing additional data along the route. But sometimes, you do want to like in our package, we want to show different packages, and that's actually part of the URL. So we could say we want to map /project/<package_name> and what we put in angle brackets here will become variables in the view method and that will be passed along whatever value gets put in there automatically by Flask. We can even have constraints. Remember we did our popular packages there? Is that if you do a /number, like /1, /7, whatever we want to go and actually call this popular route. However, if for some reason, you pass /about it's not going to match that, right? And that's because of the int: there in that screen. That's it. It's also a good idea to define these from more specific to more general so Flask is going to hit the first one that it knows about and just call that method, so you want to do that as well. by the order in which you register blueprints and things like that.
|
|
|
transcript
|
0:44 |
We saw that using Bootstrap in our page made it look a lot nicer. You don't have to use Bootstrap, you can Semantic UI or some other front-end framework. There's a bunch of decent ones these days. However, Bootstrap is really nice because there are a ton of themes, and because we can just take those themes and plop them into our shared layout include a few CSS and JavaScript files and images we can go from this really bad page to including just Bootstrap.CSS to make it look a lot better and then dropping in one of these themes to making it look, honestly, quite incredible. Don't forget to check out the themes remember we talked about places like Start Bootstrap and WrapBootstrap and whatnot, or you can go and check out the themes they have them all gathered up some are paid, some are free. Definitely take advantage of these if you can.
|
|
|
transcript
|
1:09 |
We saw how nice and powerful it was to model our database in terms of Python classes and then use SQLAlchemy to run queries against that. So, here we have a find_account_by_login. And we're going to get an email and a password. And in this in case, we're not doing the path load stuff probably not the way we should do it but just in this little example we can directly compare the hashes. So we go and create our session. Remember, we use the unit of work design pattern. So we do that by creating the session and then we go to the session create a query based on a class so we're creating an account query. Then we say we'd like to do a filter where the class.email == the passed-in email and then we're chaining on an "and" condition another filter where the password hash equals the hash. What we'll see at the bottom is something roughly equivalent to select * from account where account.email equals what were push parameter, and account.password_hash is second. And the params are michael@talkpython.fm and my favorite password, abc. We thought it's actually a little bit more complicated. It states out all the columns and whatnot but that's roughly the idea and this is how we use SQLAlchemy. Highly recommended.
|
|
|
transcript
|
0:38 |
ORMs are great, SQLAlchemy is great except for once you're in production if the database doesn't exactly match what your SQLAlchemy classes think they should be remember, it will crash. Operational error, or some column doesn't exist something like that. So how do we solve that? Manually syncing the database for every change we did? No. We set up Alembic. And we told Alembic to automatically look at our classes and remap our database schema with migrations to make that happen. So there's a couple manual steps you got to do here but once you get it set up it's pretty easy, you just run a command apply that change by saying alembic upgrade head.
|
|
|
transcript
|
1:16 |
The next important idea that we talked about was HTML forms accepting user input. Switching between different view methods based on the HTTP verb like one for GET and one for POST and all of that really evolved around this get/post/redirect pattern or post/get/redirect if you believe Wikipedia. And the idea was that we're going to go and do a GET a user with their web browser and their laptop here is going to do a get for accounts/register. The servers are going to respond with just that form probably not filled out at all. Then they fill that out with my first name's this, my last name's that my email I'm going to use this such and such and so on and then they press save or create account or whatever and it does a post back to the same URL. It's a different view method. We're going to save that validated data to the database and if we're all happy then we're going to send them a redirect to some page. Like redirect to welcome or redirect to slash account or whatever it is they're signing in for. And this avoids that weird error where if you try to refresh a page it says warning you're going to resubmit it. It just makes everything super nice and clear and this definitely a pattern you want to apply. It's really easy with Flask and the decorators to distinguish between the different steps with different methods just using the methods part of the decorator in blueprint.route or app.route.
|
|
|
transcript
|
1:29 |
When we were accepting user input we saw that there's a lot of validation a lot of data exchange and other things we have to do. And that's not so much fun. And the exact data and the format of the data that we want to pass back and forth also takes a lot of work. So we decided to apply this design pattern called view models. And the idea is the view models are tightly tied to the HTML form that they're exchanging data with. They know how to get the data from the form and provide it back to it or things like drop downs and where it needs it and roundtrip it and so on. It also knows how to do all the validation. And that can be basic validation like Hey, we require that you type in an email address here, or, This has to be a number, or, It has to bigger than five, and so on. But it can also be richer, deeper validation like Sorry, you can't register here. You can't create an account with that email 'cause that email address is already tied to another user. Maybe you should just try to login and reset your password. And it's both made testing easier 'cause we can test the view models directly and just do validation there. Don't have to involve Flask and HTTP infrastructure, and so on. It also made our action methods and our view methods much simpler, right? They don't get larger and more complex as we add more validation. Just the one place where validation goes the view models, does. But that's okay. That's its job. Strongly recommend this pattern. There's some other add-on libraries for Flask and stuff that you can use for forms and whatnot. But I really like this pattern because you have complete control over it and it's super straightforward and good for testing.
|
|
|
transcript
|
1:03 |
Three different types of tests that we might write for our web applications. Testing the view model, as we just talked about. Calling those view methods. Which presumably are using a few models but not all of them, I guess. But testing what does it actually look like if we call the entire method and what kind of response do we get back there? Or almost an integration test where we fire up a test fake web server as running our application it's done all of the initialization. We give it a URL and then it goes through all the routing infrastructure and everything that Flask does actually go and find the right location and then run the method which probably works for some kind of view model. These are the three. We have even higher level test we could write Like automated tests against a server like with Selenium or other types of smaller unit test but these are the three we focus on. Specifically to address testing web apps. We also talked about the Pareto principal or the 80/20 rule with testing by just calling every URL in the site map. That works pretty well actually.
|
|
|
transcript
|
1:18 |
Once you write your app it's no fun to have it locally. Web apps are only cool if they're on the internet and everybody can use them. That's why they're so awesome. So we talked about how we would deploy our web app our pypi_org over to an Ubuntu server running Nginx and uWSGI. There are other options like you could use Heroku or other Platform as a Service or something like that but this is probably the most involved and complicated one so understanding this, you can understand the other things like if you switched to Docker or Heroku. So we set up Nginx, which is the front-end web server. That's the thing browsers talk to when they attempt to talk to our website. But when it comes to a Python request something within our web app Nginx behind the scenes delegates over to uWSGI uWSGI is running this Emperor mode where it's actually managing a bunch of little worker processes to improve responsiveness and scalability and whatnot. So then it's actually passing that on to one of the worker processes get a response and it flows back out. This is pretty easy to set up once you've done it once or twice. It's pretty daunting at first. However, you have all those scripts and all the configuration files you need are right there so you can go and check those out. They're included in the source code and that should help a lot. Spend five bucks, get some kind of server that runs Ubuntu like this dedicated to you, you got a pretty good site.
|
|
|
transcript
|
0:54 |
The kind of final wrap up. We said what if wanted to take this web app that we created and completely replace the database backend? Not just switching something from like MySQL over to Postgres, but no something that's really different like MongoDB that's a document database that doesn't even have the same data style of programming. And it turns out the design patterns we use those services for talking to things like the database the view models, and all that I mean we could just change a handful of files really easily, rewrite a couple queries and we are off to the races, talking to MongoDB. We use mongoengine which is a pretty close match for SQLAlchemy, a little more modeled on the Django ORM, but those things are also quite similar. So that was mostly to show you just how awesome the design patterns and everything we put into place are but if you want to use MongoDB you also have a cool MongoDB version, which I do recommend.
|
|
|
transcript
|
0:23 |
As a final reminder everything you saw created during this course is on the GitHub repository with starter and final code for each chapter to help you follow along. So don't forget to get the source code. Go over here to GitHub, make sure you star it consider forking it, at least download it. You can download as a zip file or you can clone the repo. However you want but make sure you take this code with you in case you want it that way you'll have it as reference material.
|
|
|
transcript
|
0:22 |
Well, that pretty much wraps up the course. Thank you, thank you for taking it. It was a joy to make it for you. I hope you really got a lot out of the course. Follow me on Twitter, I'm over there @mkennedy. Listen to Talk Python and Python Bytes and, of course, keep an eye on Talk Python Training where we have some more courses. Of course we're always working on them there. So thanks again, glad you were in my course. And I'll see you around, bye.
|