|
|
|
12:07 |
|
|
show
|
4:28 |
welcome to the course.<br>
Thank you for considering adding a CMS to your Web app as one of the courses that you're going to study.<br>
Now let's dive right in and talk about data driven pages.<br>
And CMS Page is understanding the difference between these two things will show you the value of this course and what you're gonna learn during most Web applications we build.<br>
These are data driven Web APS, and what I mean is the page always looks the same, no matter what thing you're looking at.<br>
Here, for example, is Pipi.<br>
I i p I don warg and we're looking at the AWS seal I package the command line interface were working with AWS in this page.<br>
It's always gonna look like this, but little elements will be filled with parts of the data from one or more tables from the database.<br>
For example, here we have the name of the package and its version.<br>
Here we have how to pip install name of package.<br>
Over here we have whether or not it's release is the latest release.<br>
And when that was, here's a little summary that comes out of the database.<br>
Some details about links and information the project description all of these things.<br>
No matter what package I look at, it's always gonna be little cookie cutter stuff that fills in these pieces of information.<br>
Another example might be Amazon.<br>
You go and you had a category, then you pull open item and it showed you a picture and has the reviews in the price and that kind of stuff.<br>
Those are the data driven world.<br>
They're very, very structured.<br>
They're HTML template is all built around having this little holes where you plug in the data in.<br>
It's the data that varies.<br>
On the other hand, in the much more freeform world, we have things like WordPress and medium and other sites.<br>
Jumla, you name it.<br>
There's a bunch of these that are much more.<br>
I'm going toe log in, get a text editor.<br>
I'm gonna type information that's going to create pages and blog's and articles and all that kind of stuff for reward press.<br>
We could come here with that log in, and we would get something that looks like this is my personal blogger WordPress here and notice It's not just a block, it has pages.<br>
It has a navigation it has Bobo's.<br>
Of course.<br>
Here's some of the pages, and if I want to go edit him like, for example, that contact Michael one.<br>
Unlike a data driven app, I don't go and start editing source code and redeploy the website.<br>
No, I can go and pull this up and set the title and right arbitrary HTML.<br>
And here and notice on the right have a bunch of capabilities toe change the layout to change the URL toe published or unpublished this page and so on.<br>
And then eventually, once I write and publish it, you can see here is the page that you saw in that editor.<br>
This is very different than the data driven world.<br>
You basically have a freeform editor that creates all of this content.<br>
But the most important thing is sometimes you want this behavior from the CMS, and sometimes what you want is that data driven behavior, most e commerce or other types of abs along those lines.<br>
There the data great driven kind.<br>
They've got categories, they've got details and so on.<br>
But you probably want a little bit of this CMS stuff as well.<br>
And the big challenges should we create our site in a CMS like WordPress, Or should we create our own data driven site and just suffer the deficiencies or require that developers set up the landing pages and stuff like that?<br>
And what we're going to find in this course is that it doesn't have to be either or we're gonna take carpet Web.<br>
Apple will have data driven pages and CMS pages.<br>
The data driven pages will be powered by the database with their very close structure.<br>
As you see over here, the other pages will be more like landing pages, marketing people support people can log in into a very rich editor that we're gonna add and they're going toe just right, content that's going to generate our site.<br>
But the important thing is the CMS side of this story over here on the right will still have the capabilities of our website, for example, notice in the top.<br>
This site will still know that were logged in.<br>
It will still have access to a lot of the functionality that is this rich Web application that we built.<br>
So it's not like, well, half of the site is now this weird, disjointed CMS thing and the other half is the proper Web app know they're the same thing and we're just gonna learn how to add this cool seem s capability that's gonna be high performance.<br>
Has rich editing all sorts of cool capabilities plugged that into our existing data driven web app without interfering with what's happening there, but adding this great capability that non developers can contribute to the content of the site
|
|
|
show
|
4:37 |
So what are we gonna cover during this course?<br>
One of the specific lessons and chapters we're going to start by focusing on routing how we describe and control which your URLs or Web site responds to.<br>
And what part of our Web app those Urals our map to?<br>
You'll see that routing is the very center point of the CMS capability.<br>
Not super complicated, but it's going to be in this one place after all the data driven stuff has happened.<br>
Or we're gonna lock in and grab onto the euro and get a chance to decide if this virtual idea of a page or a redirect or something like that belongs to our CMS or it really is just a bad request and it's a four a four.<br>
So we're gonna talk about routing specifically around how we add the capability to add CMS requesting basically catch every single request of the site.<br>
Then we're going to start from an existing app.<br>
The ideas were taking a data driven Web app as I showed you in the beginning and we're going to add the CMS functionality to it.<br>
So we have a rich, powerful Web app that we've already created, and we're going to do a quick tour of that.<br>
So you're able to understand it and work with it and completely know what we're working with as we start building on top of it there won't add to core CMS capabilities First is we're gonna create some kind of redirect service, something like Billy.<br>
So, for example, if you were to go to talkpython.fm/ YouTube, that's going to redirect you over to YouTube with some huge, terrible girl that I honestly can't remember.<br>
It's like 20 random characters.<br>
So what we'd like to do is one of the features of our CIA masses.<br>
Have the ability of simple, short, memorable your l's that we can share on social media that we can put in other places and to say, like signature of an email, something like that.<br>
And then it will actually take you to the real page, either somewhere else on the site or somewhere even external.<br>
So we're gonna take our first step into the CMS world by adding this redirect feature to this app and then more in line with Brian what you're imagining.<br>
We're gonna add basically the capabilities of WordPress to our site.<br>
And what I mean by that is the ability to create arbitrary landing pages with rich formatting with a rich editor.<br>
Control the or Els determine whether or not their public or hidden those kind of things.<br>
So we're gonna have these redirects, and then we're gonna add the's pages now.<br>
Actually, having them displayed in our site is pretty straightforward.<br>
But having the admin section to properly work with them and edit them, that's gonna be a lot of what we're gonna focus on Chapters three and four Of course, we want to save this content to the database.<br>
Up to this point, we're not actually gonna worry about the database, which is going to use, like bake in memory structures that will stand in for the database.<br>
But eventually we're going to say, Let's stop for a minute and store this into our database using sequel alchemy.<br>
I'll show you how to do that.<br>
We also have an appendix on sequel alchemy.<br>
If you're not familiar with it, you can check out the appendix, but we don't go over in the course proper.<br>
Each team Els Ah, decent format, but it has a lot of problems.<br>
It's hard for people to make sure they make no mistakes.<br>
They close every opening Div as a closing div and so on.<br>
So for the most part, we're gonna leverage mark down.<br>
But we're also going to see that we can bring in little bits of HTML of you need fancy formatting like a giant image that spans the top of the page or something along those lines.<br>
We also want to have a rich editor.<br>
We're gonna need a really nice editing experience, both for beginners who are not familiar with HTML a markdown, but also something with cool hot keys and highlighting and color hints and whatnot for people who know what they're doing but just want to have a much better experience.<br>
So we'll see that what can bring in some really powerful back in editing tools for our pages.<br>
And then we're gonna bring in a library that lets us reuse parts of mark down within other pages.<br>
It's dramatically, dramatically, faster.<br>
You'll see.<br>
We'll get, like, 100 times speed up by going from standard mark down to this advanced markdown system and so on.<br>
So we're gonna use this other library that take some of the ideas here but makes them very high performance, more reasonable and just gives new capabilities to our whole CMS.<br>
One reason mark down and HTML.<br>
And finally we're going to add a little bit of logging to make sure that we get good visibility to what's happening in our application.<br>
And so this is what we're gonna cover.<br>
I think it's not super hard to build, but it adds an incredible capability to our Web application that's gonna pay off for years and years as other people can log in work with our Web app.<br>
In a lot of the pages that were creating or managing, don't require developers to go change code and then redeploy it.<br>
That's just more like WordPress.<br>
You log in and you edit the page,
|
|
|
show
|
2:22 |
So let's talk quickly about what we expect you to know before used to get started taking this course.<br>
Obviously, matching the expectations mean you'll be able to follow along and keep up and understand everything as we expect.<br>
So it starts with Python.<br>
This is a Python Web course extending and Python Web application, and you can bet we're going to write plenty of Python code.<br>
Now.<br>
I do want to point out we're not writing super advanced deep Python here We're using things like classes and functions and standard condition.<br>
ALS.<br>
We're not doing in saying like meta programming anything.<br>
So you don't to be a master of Python, but you should be barely comfortable with the language, right?<br>
We're not going to introduce the concepts of Python here.<br>
We assume that you know that because this is a semi advanced Web course or a Python Web framework speaking Web frameworks speaking Web frameworks.<br>
This is a flask course, So if you know flask, you'll see how to extend a flask Web application and build onto it.<br>
Now, if you don't know flask, maybe, you know, Pyramid.<br>
Maybe.<br>
No, Jingo, honestly, flask is incredibly simple.<br>
So understanding how it works.<br>
There's really not a whole lot to it.<br>
And we will talk about the features of things like routing and view methods and how to work with him.<br>
Basic knowledge of flask.<br>
I guess basic knowledge of Python Web frameworks would not hurt.<br>
If you have none, probably will be OK, but it'll be a bit of ah, tough go because you have to figure out some of the stuff when you get started We do talk about the details that we use, though this again is a Web course.<br>
So things like HTML and CSS are absolutely foundational.<br>
We don't do a ton of Web design, but we do create some HTM of forms and the admin section, and we do that using HTML and Jinja to templates, and we write a tiny bit of CSS.<br>
Honestly, the Montecito assesses very, very small.<br>
But having some HTML experience is certainly going to help you take this course.<br>
So that's what we expect of you.<br>
That's what we expect for you to be able to get a lot out of this course.<br>
No ah, modern amount of Python basic flask, a little bit of HTML, or be comfortable with HTML and a little bit of CSS, and that's it.<br>
You know these things, you'll be ready to take this course.
|
|
|
show
|
0:40 |
finally let me introduce myself.<br>
I I'm Michael Michael Kennedy.<br>
I'm the author of this course as well as a couple other things that you can follow me over on Twitter, where I'm at M.<br>
Kennedy.<br>
I'm the founder and host of the talk by Thunder Me podcast.<br>
I also in the co founder and co host of the Python Bytes podcast.<br>
Both of these, I get a great view into the Python ecosystem, some of the experts creating the tools that we're talking about here.<br>
So it gives me a good perspective on what to recommend and whatnot Teoh.<br>
And also, I'm one of the principal authors and founder of Talk Python Training.<br>
This is me.<br>
Welcome.<br>
My course.<br>
I'm really, really excited to have you here.<br>
I know you're gonna have a fun time, and I'm looking forward to the journey together.
|
|
|
|
5:27 |
|
|
show
|
2:05 |
it's important that you follow along in this course and that you, Brian the code and explore these ideas on your own computer.<br>
In order to do that, you got to make sure your computer is set up to run all the code and work in the way that you're going to see us working during the course.<br>
So that's what this chapter is about.<br>
Would you be surprised to hear that you need Python for a Python Web course?<br>
Of course not.<br>
But specifically, you're going to need Python 36 or higher these days.<br>
That's pretty common.<br>
Most systems have had bite on 36 for a while.<br>
It's been out for a couple of years, but if you have 35 or lower, some things might not work.<br>
Some of the syntax that has been introduced is really nice and will probably end up using it things like f-strings and so on.<br>
You want to make sure that your Python 36 so you can go to Python dot org's Get that?<br>
How do you know whether you have Python or private on what version of Python do you have on macOS and Linux?<br>
You can heip Python three dash capital V Not lower case Capital V, and it'll output the version Something like this.<br>
It will say Python 381 on windows.<br>
Depending on how you installed Python, you may be of the type Python three dash capital V, but not every way you install Python A Windows has that feature.<br>
So you might have to say Python bash Capital V.<br>
Now, depending on your path is set up in which versions of Python you have installed you might have pipe on two and three and whichever one appears in your path burst is the one that's gonna run here.<br>
So you could say where Python on windows and I'll show you all the things got installed.<br>
You can adjust your path to have the right one.<br>
So three it is great.<br>
If 39 is out By the time you're watching this or some version down the road, that's fine.<br>
Newer is better.<br>
No problem there.<br>
Just make sure you have 36 or above.<br>
Finally, if it turns out you have an older version of Python or you don't have Python and you need to get it well, this visit real Python dot com slash installing Dash Python.<br>
They've got a list of how you could install Python and the preferred ways of doing so for all the different operating systems that would check out that article if you need
|
|
|
show
|
2:16 |
if you're going to fall along, probably the best thing to do is use exactly the same tools that I'm using during this course, and I'm gonna be using the editor High Charm.<br>
This by far, in my opinion, is the best editor or Python in general and really specifically for data driven Web app because it has awesome database tools, really good Web support as well as Python itself support.<br>
So I recommend that you're going to use Pine Charm for this course.<br>
The best way to get PyCharm is to get the jetbrains cool box app, because then it lets you automatically choose between different versions rollback versions.<br>
If you need to, it will auto update for you and things like that.<br>
It's the free little extension You might have to create an account, but then you could just install things.<br>
Now.<br>
High Charm has two versions, has the Community Edition, which is great for regular Python code.<br>
In the professional version, which is actually what's needed for Web development, the database tools and the Web tools are only included in the pro version.<br>
So your choices here if you already own Hi John Pro good use it.<br>
If you don't, there's a trial you can use The trial of you've already used up your free trial.<br>
You can buy pie Charm pro by the month.<br>
It costs $9 for regular users per month, so you could pay $9 once and while you're taking this course, or if you're a student, you get it half price 04 50 for a month And if you have an open source project, you can get it for free.<br>
Visit the site under buying their special offers and individuals and monthly payments and all that So the point is, it's either can be gotten for free or very, very cheap, like 4 50 a month of your student and so on.<br>
However, if for some reason you don't want to use by charm, the other editor that I recommend is Visual Studio Code, So Visual Studio Code is really, really nice.<br>
It's just not as nice as PyCharm, in my opinion.<br>
But if you do get it, make sure that you install the Python extension.<br>
It's the most popular one, so it should be right at the top of the list of extensions here.<br>
But you're gonna want to click that little tab, and then it will open up this thing.<br>
You can install Python because you're gonna have to have Python.<br>
Of course, in order for you to do stuff with it for the Python code All right, so that's the story with editors.<br>
I would recommend use pi charm professional if for some reason you can't or don't want to do that Visual Studio Code is a great fall back.
|
|
|
show
|
1:06 |
to work with this project, take this course and follow along, writing the code.<br>
You're absolutely going to have to go and get the starter project This is a non trivial, data driven Web application that we're adding a CMS, too.<br>
So unless you want to go and create the whole thing or, you know, maybe all along but add it to your own app you wanted to fall on exactly.<br>
You really want to go over here and get the code, download it and have it locally to start working from.<br>
And as we work in Chapter three and four and five, you know, take the starter code for three and might work it over till it's what it should be in four and then to five and so on.<br>
Do you want to go to the get have repo here on the screen is also listed in your course page, your student page and the course training site.<br>
So you just click to get a repo right there, and it will take you straight to the ghetto repo, so that's the easiest way to do it.<br>
But make sure you either clone or download as a zip file this also, Starrett on even consider for Kinetz here on account so that you have it saved forever All right, So don't forget to get the source code.<br>
We're actually gonna see how to do that, coming up soon in the next chapter.
|
|
|
|
13:16 |
|
|
show
|
2:37 |
Let's take a look at the Web application that we're going toe add our CMS to After all, the whole point of this course is to take an existing blast Web app and add this content management system capability to it.<br>
So we're gonna take a nontrivial Web application, and we're gonna upgrade it to be so much better and easier to maintain.<br>
Add features to add Pages two and so on using our CMS.<br>
So let's take first a look at the Web app itself, and then we'll look behind the scenes behind the curtains and look at the source code and how it's put together.<br>
And finally, we'll get you up to speed and running on the APP.<br>
Make sure you can download it, install it and get it going.<br>
As Python developers, you very, very, very likely been to pipi i dot org's.<br>
This is the central location for managing, finding and installing all of the amazing libraries that we haven't Python here, you can see there's 225,000 different projects that we can use the pip install project name over here.<br>
We can see that we've got this landing page we can log in We can register.<br>
We go down and find some package, click on it and get details.<br>
This you can see appear in the top.<br>
You have the package name?<br>
We've got things like release history links over to the home page and what not.<br>
So this is really cool.<br>
All right.<br>
You can see some info about a here.<br>
You see the latest version when it was released and so on.<br>
So if you work with Python, of course, you've been over to Pipi.<br>
I right.<br>
Well, let me show you a slightly different version.<br>
We can come down here and find a project.<br>
Say AWS Eli here, we got our page.<br>
You can see When it was last released, the information about it, it's home page.<br>
We could go visit his home page as well, but notice something a little bit different about this one.<br>
Look, where is living?<br>
This one is running on our local machine.<br>
That's right.<br>
These two projects one is the rial Pipi I and the other is gonna be our demo application again.<br>
We can log in, we can register, we can get help with it.<br>
And so on to this is the app that we have to work with and then we're going to extend it.<br>
We're going toe and features to it.<br>
For example.<br>
You'll see some things are missing.<br>
Like help Not there, donate, not there yet featured projects, not there.<br>
A couple other things.<br>
It would be nice to be able to create those.<br>
And instead of going and writing new parts of our website as source code, as developers, we'd like to be able to use our CMS to create, like, the help page in the donate page and the future projects in way more than that.<br>
This is the app that we're going to start from and we're gonna add all those capabilities to during this course.
|
|
|
show
|
6:45 |
Now you've seen our Web app running.<br>
Let's pull back the curtain and have a look at the source code how we built it, some of the patterns that we're using so that you can get in here and work with it yourself.<br>
We're gonna go pass after pass after pass, making this better and adding features and so understanding the overall structure is important.<br>
So we've got our project.<br>
We're using a limbic for sequel.<br>
Alchemy.<br>
Migrations.<br>
If we change the database, we won't be messing that without much.<br>
But that's here for when we do need them.<br>
Then this is the main section of our site.<br>
This is where most code is.<br>
We have some server set up for deployment and then also some unit tests.<br>
We can run.<br>
You dig in here, there's a couple of files.<br>
There's some stuff, especially this load.<br>
Data one will take the source data and import into the database For starters, you won't need that because we're using sequel light.<br>
And I'm gonna include that right here.<br>
That file for you and you won't need it.<br>
But if you want to import this into a more proper database, you can run this and change the connection string and it will go there.<br>
Speaking of sequel alchemy.<br>
Were using that over here.<br>
And so we have things like the packages and the languages.<br>
Let's just look at the packages for a moment Over here.<br>
We've got our package.<br>
It drives from this common sequel Alchemy Class.<br>
We just have all the columns here.<br>
I, for example, have an I D, which is a primary key, but it's a string that happens to be the package name, and we even have a relationships between the packages and the releases.<br>
We're not going to do a whole lot messing with the existing sink welcoming, but we will need to add some stuff.<br>
Years.<br>
We'll come back to that.<br>
Let's go look at our views.<br>
Next, I suppose.<br>
Let's go look at this package to remember.<br>
We were looking at that, a WSC ally, and it had details about when it was released.<br>
It had its description, its home page and so on.<br>
That is, this section right here.<br>
So were using a lot of organization.<br>
As you'll see throughout this whole project, we've our views.<br>
They hold view, implementations, categorized, buys a package home accountant.<br>
So on.<br>
And then we have details and we have popular and we'll have a bunch.<br>
More pieces were adding.<br>
Then over in our template section, you can see we have for our package views.<br>
We have a package folder and then we have a details.<br>
And if we actually had a thing we rendered here rather than just a string, we would have a popular about HTML as well to in here.<br>
We're going to the database, and we're checking for the package and seeing if there is a package.<br>
But we're going to give the details back, and there's not We're just going to say 44 page not found in our flats cap We're using this custom response decorator that takes let's a specify a template file and map a dictionary to it instead of using flask.<br>
Render template.<br>
Think it's a little bit cleaner.<br>
So we're using that were also using blueprints to help categorise your organize our code into these different sections here, so that we don't have to try to juggle specifying the routes.<br>
So we'll come back and play with that when we create these new view sections for like CMS and admin.<br>
And why not?<br>
Finally, I guess one of the things that's interesting here that is somewhat unique but is a pattern I really, really like.<br>
So I think it massively makes testing easier.<br>
And it makes it more possible to clean up your code around these view methods.<br>
Here is something I'm calling the view model pattern.<br>
So notice here.<br>
We're creating this package details view, model, and we're passing the data that comes in here to it.<br>
And in our view model section, just like our templates and other things, we have the same type of organization.<br>
So here's age details for a model.<br>
I think it should be called package details.<br>
And rename that for you.<br>
I don't know how it got called that package details So we've got this view model here and wouldn't we created its job Its purpose of all these view models.<br>
Maybe a more interesting one to look out for.<br>
This is this log in one.<br>
The job of this is actually you manage the data exchange between the view method in the HTML file.<br>
So, for example, when you log in, gonna have an email field in a password field, you might also need to show them an error.<br>
So what we're gonna have this thing do is it's gonna go and figure out what the values were submitted and then what validation needs to be done like, Hey, you must have an email if you're trying to log in or you must set a password if you're trying to log in.<br>
So it basically takes all the data access and data exchange with the HTML side of things away.<br>
If you want to test it, it makes it a lot easier because you contest this outside of the Web.<br>
App basically got to do a little bit of something to mock that out.<br>
But other than that, it's pretty simple and straightforward to dio now the final thing in terms of organization and patterns that we use that's pretty cool.<br>
Is this thing called services?<br>
Not like AP eyes not like Web services, but just this concept of taking all the data access and data, juggling stuff and organizing again by category.<br>
So, for example, here we're talking about getting packages, and so we're using this thing called the Package Service.<br>
Now the package service.<br>
If we go to it now here it's Job is to have all the data access and other behaviors around packages.<br>
So get the latest release just in general.<br>
Tell me how many packages air in the database.<br>
Hominy releases.<br>
Given a package, I d give me the package details and you can see this is just standard sequel alchemy.<br>
Here they were going through, creating a D V session and then doing a query and then closing it out.<br>
And we also just ask for all the packages.<br>
Super straightforward.<br>
But that's over in this section, we have one also for users.<br>
How many users are there?<br>
Find me the users by email.<br>
So on, we're gonna have a couple more of these that we add one around probably administration, like creating new pages and whatnot and then one around just working with the M s request directly.<br>
All right, well, I think that pretty much covers it.<br>
One more thing, I guess if you look at all of these pages here like let's look at the long and page, you'll notice that they all extend from this common lay out here.<br>
There's really not very much on this page, even though if you look at it, It's got all the navigation, everything.<br>
And that's because down in this shared section is where everything is really happening.<br>
And then we're just dropping in a little bit in the middle of whatever that page has to contribute, right?<br>
You're the footer down here.<br>
We have all the navigation up there, so it makes it really easy to just add the essence of what each new page needs.<br>
And so we're also using this relationship between those things.<br>
All right, that's it.<br>
That's the site that we're gonna be working with.<br>
You see, it's not super complicated, but it's also not a toy app.<br>
It does quite a bit.<br>
It has a lot going on.<br>
And so adding the CMS major to this is gonna be really cool because it lets us take all the work in all the power of this great application and then and this other aspect to it, where we can create pages without going through all the details of this work.<br>
But just here's some standard HTML content that we want to have in different sections, like the help page and the Donate page and so on
|
|
|
show
|
3:54 |
Now you've seen the app.<br>
You've seen the source code.<br>
Let's make sure you can get it checked out from source control and get it configured in PyCharm or whatever editor you're using and get it running.<br>
There's not a lot to it, but let's go through it quickly anyway.<br>
So here we are at the github repository, And I'm just going to copy just the base.<br>
You're all here and I'll just throw it onto the desktop for the moment.<br>
I'm not a big fan of that in general, but just so you can see it.<br>
All right.<br>
Here, let's just do that.<br>
I'm gonna do a get clone this.<br>
Now, this is gonna be the folder name in that super long.<br>
So let's make it shorter.<br>
Owns.<br>
Call it CMS course or something like that.<br>
Great.<br>
Here it is.<br>
You go to the code section.<br>
You can see there's a pyramid and flask version in the class course.<br>
Surprise.<br>
Surprise.<br>
We're only gonna be in the flask version.<br>
But if for some reason when compared against pyramid, go for it.<br>
So what we're gonna do is we're actually going to be starting on chapter four.<br>
We have Chapter three, which is the starter code.<br>
And maybe you want to.<br>
Actually, you probably want to start from there, so we'll go and do it there.<br>
But chapter three is gonna be the starter code.<br>
Chapter four is gonna take Chapter three, hobby it over, and then at all the changes we're gonna do during the videos and four and that will be the final stuff from four chapter, if I will be the final from five and so on.<br>
So let's go in here and notice there's a sub folder and this one that has the requirements dot Txt.<br>
So this folder is where we're gonna be working from and we're going to go on open a terminal there, have a cool extension that will do that.<br>
See right there.<br>
And what we want to do is we want to because we're gonna install Aton of things here.<br>
We want to set up a virtual environments will say Python three, ash, M, V and V, V and V now on windows.<br>
Remember, you might not have the bite on three command might just refer to it without three, and it's gonna create this folder year and on macOS and Linux The way we get this active, as we say dot or source and then the envy been activate notice are prompt changes And if we ask which Python we get, the one they're on windows.<br>
It's VND scripts activate dot bat.<br>
Your prompt will change as well.<br>
You can't type, which being type of wear Python and you'll get basically the first one hopefully shown there.<br>
If you've done everything correctly now that we have that up and ready, we've got our requirements for the server in our requirements.<br>
Dev What?<br>
We're gonna install both the requirements forward server to run as well as we're developing it.<br>
As you can imagine, you want to say hip, install Bashar.<br>
This we wait a second.<br>
As is almost always the case when you create a new virtual environment, pip is out of date.<br>
I feel like that's a shortcoming, a Python.<br>
But that's how it is so weird.<br>
Upgrade that as well.<br>
All right, Super.<br>
So now we've got our virtual environment and we should be able to run of the app dot p y file.<br>
Here.<br>
You can also use blast run, but that's not my favorite way of doing it, though you can.<br>
You start the way you want.<br>
But I'm going to go in there and run this APP file and we should be able to go and request it and see everything working.<br>
Let's give it a shot.<br>
And there it is again.<br>
Here's our cool little app that we're going to start extending, so it's up and running.<br>
Everything's working.<br>
The last thing to do, really, is to go and open this in PyCharm.<br>
And on macOS, you can grab the folder and drop it onto the dock icon, you know, open on Windows and Linux.<br>
You have to say file open directory and browse to it.<br>
So here it is again, notice.<br>
There's no run configuration, though.<br>
I'm gonna go with a right click on app and say Run!<br>
And just like before you see the same output, we quick on it Once again, it's up and running.<br>
There it is that we have our app checked out from Get Hub.<br>
We've got it somewhere on a computer.<br>
We've set up a virtual environment, installed the requirements, opened it in my charm.<br>
Now we can just work here throughout the rest of the course of.<br>
Whenever you want to run it, just click the little play button off.<br>
It goes perfect.<br>
You followed along.<br>
You're ready to start taking this course and adding the cool Seamus features that we're going
|
|
|
|
37:14 |
|
|
show
|
4:24 |
in this chapter, we're gonna work on routing or rooting if you're a fan of UK English and in routing.<br>
What you do is you specify different Urals or Euro patterns with some replacements that map to different parts of your Web application.<br>
Traditionally, this is much more structured.<br>
If, for example, in our Pipi I won, we say, if we're gonna go to a package slash package name that goes to the thing that shows the package.<br>
But with CMS is, it's different.<br>
What we want to do is if we want to say anything, anything you request from our side that's not handled by some other part, we would have a look at it and think about it and then either decide yes that this euro represents a page and we'll go say to a database and pull back the information and show it to you.<br>
There might be no real page at all, but conceptually there's a page.<br>
We want to look at that and decide that's the case.<br>
Or maybe not right.<br>
They could make a request to something that we don't think is part of our site and we'll say no understanding.<br>
Routing is really foundational.<br>
It's the thing that lets us get into the rest of the website and make this CMS idea happen.<br>
So what is right?<br>
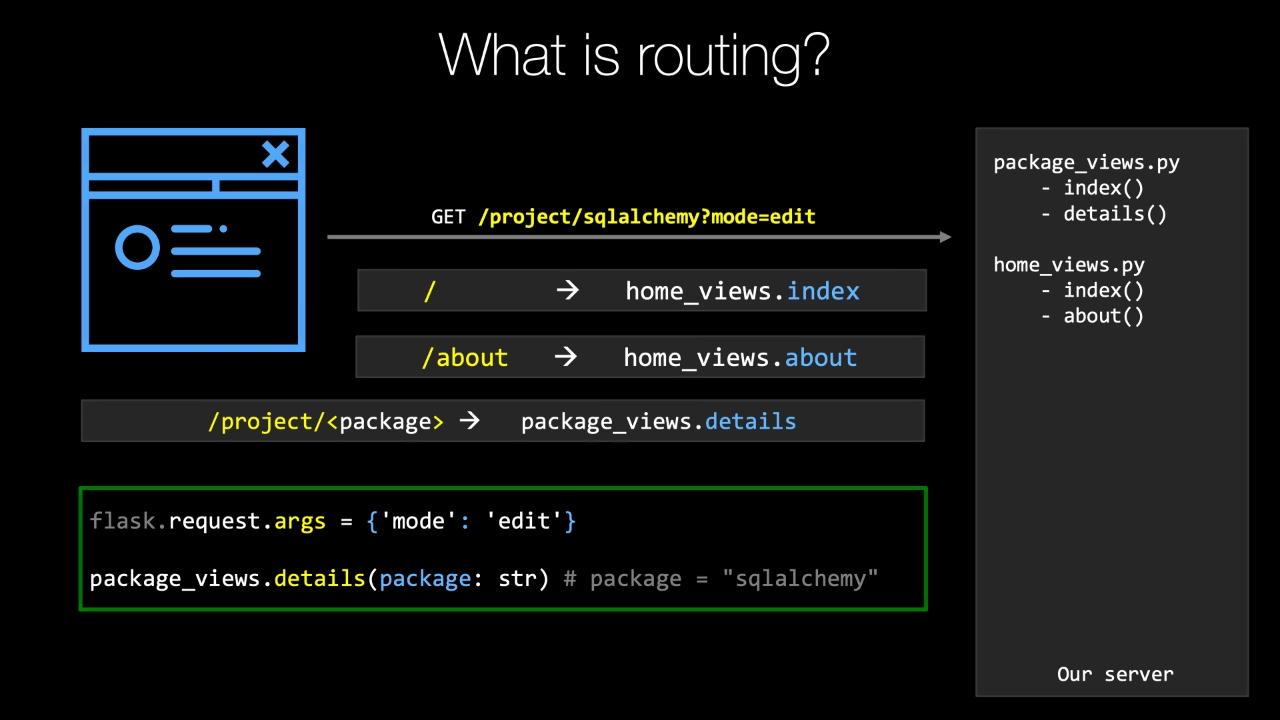
Anyway, let's do a quick, quick review of it Now, over here on the right, you can see I have two files to view Python files, and each of them have two methods.<br>
The package views contains index and details and home views.<br>
Contains index, which is like Ford slash for our site and then about which is you know, maybe slash about.<br>
I don't know what we've mapped it, too.<br>
So let's imagine that on the left we have a Web browser on the right.<br>
We have a server that's set up something like this.<br>
A request is going to come in.<br>
The browser is gonna click a link or hit a book, marker search or whatever to come up with trying to request slash project slash sequel alchemy Question mark mode equals at it what that means in our sight.<br>
It's not super important, but what the goal of what we're gonna do is try to figure out which of these functions on the right, if any should be called based on the rounding So when we create index, we put an app dot router blueprint that route on the method as a decorator, and it has a euro in there in the index, one on home is just slash so you can see that maps the home view stock index well does slash match This URL A came in as a pattern.<br>
No, they're not even close to the same thing.<br>
So we're not going to call that one.<br>
We're going to go to the next registered Earl, which is slash about this has been mapped to goto home views thought about also not a magic a slash project and slash about.<br>
These are not the same things over in the package.<br>
One under the details we've said if something goes slash project slash some replaceable piece of data.<br>
That's what this angle brackets mean there and we're gonna call it package, but it doesn't really matter what it's called.<br>
Slash project slash some replaceable piece of data Does that match slash project slash sequel Commie The query string question mark mode equals something is not factored into the routing that's sort of applied afterwards, So yes, absolutely, it does slash project slash sleep, welcoming his slash project slash something.<br>
So what's gonna happen is Flask is going to call package views dot details, but before does it's going to set up the request.<br>
It's gonna go over here and safe.<br>
Last out requests dot org's is the query string, so it has a key of mode in a value of edit.<br>
If there are more things in the query string, that dictionary would have more things.<br>
And then it's going to call package use, dot details and pass in the pieces that we've said our variable elements in our route So we said, There's a package, it's a string of dysfunction and it's gonna be obviously passed sequel Alchemy Right when Blast called, Our function is going to set the value to seek welcome, eat and pre prepare the request.<br>
With the arguments set like this, we're submitting a form it would have request stop form set with a bunch of the values from the forum and so on.<br>
So this is how ratting works in general.<br>
We're gonna be ableto leverage this system to add a CMS type of capability that I described that gets a chance to look at every euro That's not already handled by something Say here on the right in.<br>
Decide if we're gonna return a page or tell them it doesn't exist.<br>
So understanding this flow of house routing works and how we can get in there and work with it is super important as a foundational idea.
|
|
|
show
|
4:47 |
Let's look at a couple of examples of route we could specify in flask.<br>
First off, it's good to know that there's an implicit, static route.<br>
Most things that happen to live in the root of your website or so cannot be returned that super super important.<br>
We have Python files there have things like possibly keys for talking to stripe, which would be our credit card processing or A W s or things like that, or even just the logic of our application.<br>
We don't want people to go and request like slash AP top.<br>
You try and get the contents of our site.<br>
Luckily, they can't to.<br>
In order to get a file off the file system you have to have what's called a static route in.<br>
Flask implicitly has one of these four slash static, So anything in the static folder like slash static slash images slash michael dot j.<br>
Peg.<br>
They could get that, but they couldn't get something outside of this folder.<br>
So there's an implicit route to just get everything out of the file system in slash static.<br>
So on our home page, when you just do a request to the server to the domain name like Talk by Thunder FM.<br>
What comes back is what is mapped to the Ford Slash route.<br>
So this doesn't communicate any information.<br>
It doesn't say, like what stuff on the home page you should show it just says, Show the default page, whatever that means.<br>
Whatever you generate, when you run code there could randomly get different things and show it or based on your user that's logged in and could show you stuff.<br>
The girl doesn't communicate any of that information.<br>
We could also have another static one slash about, and this would dio and show presumably something about our product or company, whatever.<br>
But again, static.<br>
However we saw just before that we can have routes that map data, so slash project slash package Names of those variables go into angle brackets in flask away have angle bracket package underscored name.<br>
That means the wool map anything that slash project slash one things so slash project slash flask slash project slash seek welcome me.<br>
But it wouldn't map Flash project slash blast slash releases.<br>
Right.<br>
More slashes in there.<br>
It doesn't match if you just want to get one piece of data.<br>
Here's how we pass it in the room.<br>
We create the function.<br>
The deck that we're decorating this with this round here is going to take a variable.<br>
It's gonna have a variable called package name and flask is gonna get this value out of the euro and pass it through automatically.<br>
In fact, good editors like Pipe charm will warn you if there's a mismatch between the Euro variables and the function variables, which is super super cool, we can also have constraints.<br>
What if we want to be able to say our site like Pipi i dot org's slash seven and see the seventh most popular item?<br>
Well, if we just said slash, angle, bracket numb, well slash, anything would match and in fact potentially about would be passed it the value for numb And it wouldn't go to its respective thing, depending on the order in which those got registered.<br>
So that's not great.<br>
But what we can do is you can see here we have a constraint.<br>
So int colon numb means this will match slash seven.<br>
It'll match slash 15.<br>
It'll match slash negative three, but it will not match slash about because, you know, what about is not an integer Kuhan, so it's super easy to have these constraints as part of these variables as well.<br>
Now, final thing to remember is it's really important in the order in which you registered these.<br>
I have to go for a most specific to most general.<br>
Why is that like, Let's imagine we didn't have our end constraint here.<br>
If we put the popular thing at the top and it doesn't have the energy constraint the way flask works is gonna go.<br>
What's the first one doesn't match.<br>
What's the second one doesn't match well, that slash numb one would match for, say, about as you need the most specific stuff that has to exactly match.<br>
And then it can be more general as stuff falls through those cases, and then you're going to get to him in the main take away here is when we work on our CMS route and that kind of thing that's going to go at the very, very bottom.<br>
So we want to let our current website, with all of its capabilities, every single bit of it take a shot at matching that pattern and doing its specific magic, so like slash Project slash Welcome here.<br>
We want to let that get handled by the package details view, not the CMS.<br>
But if nothing else is going to catch it down at the bottom, we're going to have a look at it with our CMS in the routing and decide if we want to give them back a page or say, you know what, no page.
|
|
|
show
|
5:56 |
so very soon we're going to go work on our CMS routes and add that capability that I've been describing over the past few videos.<br>
But before we dio, let's take a look at the routing that is already in place because remember this website here it already does quite a bit.<br>
We managed to get it open here.<br>
You can see this is our home page.<br>
We have ah, log in section we have a register section to go back home go see our boat Okore and so on.<br>
Looks like something's missing about our Siham are CSS, but never mind you get The point is we have all those existing routing that's happening here, so let's quickly see how that works because we want to plug into the whatever technique or pattern were using their Let's go look at good again.<br>
Now, in a nice, nicely factored, nicely organized flask application, there's two general places you need to look for the Orioles If you follow the super simple getting started, dump everything into the APP top people I file.<br>
Well, there's just one, but that's not the right way to do it.<br>
So, first of all, here's a copy over to chapter four of our flask code.<br>
See, there's a code is we're starting from.<br>
We're gonna edit this and add the features of the first place to look is in the view files.<br>
So we're using this concept called Blueprints right here were created one and blueprints let you organize parts of your views.<br>
Part of the methods that handle your l requests in flask into different files like, Hey, guess what?<br>
Everything that city with accounts goes in here and everything else to do with packages goes into this file instead of cramming it all together.<br>
And we're gonna leverage these blueprints to do that.<br>
Over here, in the home view, we say, Here's an index method and it's going to be four slash There's the amount method it's gonna handle slash about and normally you would say apt out route like this, But notice we're not doing that.<br>
We're seeing Blueprint that route because we want to organize things a little bit better, right?<br>
So, blueprint or app, depending on the style of your doing, So here, this is gonna give it the name home.<br>
It knows the words templates lived.<br>
So when you say slash home slash index It really means templates slash home slash index All right, so we're gonna go here.<br>
Just have these two static routes.<br>
This is not super interesting.<br>
Let's go look at the account view one.<br>
So if you go and just you're logged in, you say slash account that will show you details about when you're logged in.<br>
But if you're not, it'll send you over to slash account slash log in.<br>
So if you want to register, have accounts last register and account slash register.<br>
But we have either get or post Some people musch this together and like a one giant function that handles both showing the form and handling it don't do that.<br>
Just have these two separate methods that have these two jobs Same thing for log in account slash Logan account slash log and getting post.<br>
And then you could just long out.<br>
These are all super simple over in packages.<br>
This is slightly more interesting.<br>
This is where the interesting routing is anyway.<br>
But here we have our slash project slash package name.<br>
Now I click here, notice that this part and this part is also highlighted.<br>
If I move away see how that hi charm knows that this variable and that variable those things go together.<br>
Okay.<br>
And if I put something out of place there, notice that this gets a warning that says the function package details does not have the prime merger package name.<br>
Now it does, right?<br>
So it's super cool.<br>
Those things get together.<br>
But that's how we specify passing in the data from the euro into Yeah, I'm also we have our into drink and then who were passing in our integer, which is an energy that's pretty awesome.<br>
It automatically takes care of that force, and that's being passed over.<br>
And we're not really doing much useful or just saying Here's the whatever most popular package.<br>
It's funny when you put the like, a two or something.<br>
But this route, this popular one will handle just that.<br>
Mapping under s CEO.<br>
We just have a few things for, like, site map.<br>
So if you request site map dot xml, you don't really get a file.<br>
You get that computed on the fly and again or robots a text.<br>
It just returns robots dot tax there.<br>
Well, that's pretty much it for all the blueprints and each one of them they're defined.<br>
Appear the top called Blueprint.<br>
Now we need to put this all together over in our main application file.<br>
Over here, there's a bunch of stuff is happening.<br>
This is running it.<br>
And we're also and figuring it will see the bottom how that comes together, what?<br>
Configuring it here.<br>
And then we're starting it, or you just configure it.<br>
So over here we have our logging.<br>
We have our blueprints, and we have worked database.<br>
So the part that we care about is down here, this register blueprints.<br>
So in this section, we're gonna go in or say Give me the home views and then I go APP register, blueprint register, blueprint, home views blueprint.<br>
And then saying for package, we're gonna register all of its stuff all of its routes from the blueprint count.<br>
And then this s E o thing.<br>
And so what we want to do is but our CMS routes here.<br>
Okay, so we're agreed.<br>
Something kind of like this would have a CMS views but have a CMS blueprint.<br>
The CMS blueprints gonna have routes, and they're gonna get registered right there.<br>
Why?<br>
Because that's at the end, Remember, Specific to general.<br>
So that's how we're gonna do it here, and that's it.<br>
That's the way the routing works in the current application, and then we're going to plug into that and just add our routes onto this model
|
|
|
show
|
5:58 |
Well, we've talked about this CMS around for a while, and if you look at all the stuff happening over here, we have a bunch of different things.<br>
There's all these different routes and methods and Ural patterns and what not that we're doing and what's ironic or what we're doing in this course, the entirety of this concept of the CMS.<br>
We just need one girl.<br>
That's it.<br>
It's going to catch everything, and we have to decide what to do there.<br>
Now, technically, we're also gonna have an admin section so that we can go and edit our site, live in the database and things like that.<br>
So that'll technically take a few more you or else.<br>
But as far as the seam that's concerned is concerned, it's really just one.<br>
You're l.<br>
But let's go in and do that nonetheless.<br>
Over here we have our views.<br>
We're gonna have a new I've on file and let's call it CMS views.<br>
And in here we're going to need to go in, create a blueprint.<br>
Let's just grab that little bit from right there.<br>
Make sure we import flask with out of the top now packages.<br>
No, CMS, yeah, that's what we're gonna call it.<br>
You would have a function, and this is gonna be Just call it.<br>
See mass request.<br>
So this function is going to handle whenever there is a request to the CMS.<br>
It's no matter what it is, even if it doesn't exist, it's going to call this function and then we're gonna decide.<br>
So let's just have it first.<br>
Say hello, CMS Kinda like hello world.<br>
But for the CMS, after this to work, we have to give it some kind of euros.<br>
Will say I'm blueprint dot route And then what is the rule gonna be?<br>
Well, let's say we want this to be a variable because obviously it's gonna be a variable.<br>
And let's just say it's the full girl now, Sam, morning.<br>
You're not having that is not going to write it for us But you're not adding that over here.<br>
Well, now we've added this.<br>
This maybe is OK.<br>
Well, it's not gonna be enough, but let's just see that That's the case first.<br>
So let's go over here.<br>
We import our CMAs views and, like our little comment, says, where to go down here and register the blueprint so Let's run it and see if it works.<br>
I closed the other app that was running on the same five years or six.<br>
Port.<br>
Also, there is some weird CSS class that got in somewhere, so that's what that pattern was about.<br>
It's all better now, so let's suppose we want to be able and get things like slash Donate.<br>
Oh yes, our CMS is now working.<br>
Remember that failed or featured projects?<br>
Oh, that one doesn't work.<br>
Let's try help.<br>
Help?<br>
Yes, help works What's different between help donate and featured projects.<br>
While these have a slash something and this one has a slash something Slash something.<br>
Let's make it a little bit more clear if we come over here and we say it's an f string.<br>
So you requested for your URL and we run that again This doesn't work, but let's try donate you requested.<br>
Donate.<br>
We could make it even a little better if we put like that.<br>
Have a go now it's slash donate.<br>
The problem is like I said before, though that only matches like this bit.<br>
What about the rest?<br>
What about the rest of it?<br>
There is part well, what we want to do.<br>
I mean, I guess we could have a whole bunch of complicated ones like level one, level 2/3.<br>
But what we can do with flask, remember, we could say into to make that an integer.<br>
We can also say this is a path in the path.<br>
One is what we're looking for.<br>
So let's save that should see the bottom.<br>
It just restarted itself.<br>
Let's see if our donate works.<br>
Yes, you requested slash Donate.<br>
But what about featured projects who?<br>
Look at that.<br>
You requested blast featured slash projects.<br>
And this could be slash.<br>
Anything?<br>
Anything we want.<br>
It doesn't matter.<br>
It doesn't matter what we're requesting.<br>
Anything on the site is now good.<br>
Okay, It's now good, obviously.<br>
So the way we set it up is stuff that we had before still works so we could go over here.<br>
We're gonna go log in.<br>
We could go to the aws cli We could go to register all those things, but stuff that didn't exist like help donate.<br>
I help.<br>
You're back.<br>
Here are featured projects or anything else we type.<br>
Every bit of that is now coming into this function.<br>
Look how simple that is.<br>
So what do we have to do to make this meaningful To make this actually do something to add this cool CMS capability to our website Well, what we need to do is we need to first check if the URL or will see it like this matches some page or redirect.<br>
We're gonna have to things we can do.<br>
Want to show a page?<br>
The other one is Have a short girl that will take you to somewhere else much farther away, as you'll see.<br>
So we're going to check whether it matches either a page or redirect.<br>
if it does great.<br>
If it doesn't, they were going to say sorry.<br>
No page found and basically do what we were doing before just giving them a 44 But Glass was doing it for us on us.
|
|
|
show
|
7:35 |
remember when we did our quick overview of our Web application?<br>
We said, we have this idea of these services, that group working with different kinds of data, whether that comes from Web services or the database or whatever.<br>
And we have one for working with package data and one for user data.<br>
Well, guess what?<br>
We should have won four working with CMS type of data as well, either from a read only perspective like we have right here or from the admin side of things like create a CMS page or create a redirect.<br>
So we're gonna follow the same pattern and say we have a CMS service here is just gonna have a couple of functions to start to get page and this could have a shot of base.<br>
Well, the string And for now it's going to return Either a dictionary or nothing's will say an optional dicked like this and this.<br>
We could put more details about what's contained within the dictionary, but this is good enough for now.<br>
And let's have one for redirect.<br>
Yeah, that'll work.<br>
Well, where we're going to get this data in the long term, we're gonna put it into a database like post dress or something like that or mongo db We're gonna make a query over to the database, but I don't want to worry about that now.<br>
I don't want to work with the complications of that right now, so we're gonna get to that in a little bit.<br>
But for now, you look over in this DB section.<br>
I have some very fancy.<br>
Did you know that we can use this bake data It has some pages.<br>
There has, like a euro like a thing.<br>
And then it has a title and contents, right?<br>
Here's the donate and here's some contents about donate.<br>
Also, we have redirects, which has a little short You're ill as well as the destination.<br>
So let's go over here and we're going to say something like this If not base, you're also if they pass nothing or not base where all that strip.<br>
So if you take away all the like a white space, whatever.<br>
If there's nothing there, we're gonna return.<br>
None also return.<br>
This may be safer about my saying none and then we'll go over here.<br>
I'll say based your all equals base year old dot strip.<br>
Take away white space on the end and make sure it's a little case because we don't want to keep track whether they say Capital C courses or Capital C company versus Lower Case C company all the same to us and then we're just going Teoh say Page equals big data get and we'll get rid of this in a little bit.<br>
But But it here and get the base euro and return that like so that's pretty straightforward.<br>
And you know what?<br>
It is incredibly similar down here.<br>
So it's just to rob that.<br>
And this, instead of be pages, is gonna be redirect and calling That page is kind of misleading.<br>
Let's do a rename and PyCharm.<br>
A call that a redirect like So you All right, Let's go and try to use this year.<br>
I guess we can leave that comment for a minute.<br>
So here will say Page equals CMS service and let pie Charm import that at the top.<br>
Thank you, and let's go in here and say, Get page full Euro.<br>
I'll say if there is a page that they gave us we'll get just gonna return something like this year.<br>
Well, say title is here on tents.<br>
Go here and let's a quick peek back.<br>
So the titles Lower case title in the contest is lower.<br>
Case contents.<br>
Those to be page not get title is get on dense.<br>
If we don't have this is going to return, we'll ask, not abort statuses or afford just for a minute.<br>
Let's stick with that.<br>
So over here and went to a quick test.<br>
I'll try.<br>
Our featured projects doesn't exist borough for But I think the donate one did.<br>
Yeah.<br>
I don't donate to the psf.<br>
Did you know you can actually use their donation link right there?<br>
Where did that come from?<br>
That came from the fake data right here It went and found that entry.<br>
And so it returned that tour view method RV method, grabbed the title in the content and then showed that back in the email page Cool right?<br>
We could ask for donate.<br>
We could also ask for a company slash history or employees and those are the three things we can ask for.<br>
So we could come here and try this.<br>
We get that right, that's working.<br>
And we could have imprint.<br>
Oy, ease.<br>
Let me get this, but not not employees.<br>
Singular is that's not something in our big data database.<br>
Cool Right to the other thing.<br>
Weaken Dio Why we're here.<br>
It's Let's go ahead and try on a redirect thing We'll do a lot more of this in the very next chapter.<br>
I will say, if reader act, turn off last Ott redirect to redirect and I get It's your own.<br>
Let's double check.<br>
That's true as we have slash courses short euro, which is supposed to go toe that euro, which, yes, is it or slash bites goes a Python bites.<br>
Let's dry that here is well, so this still works.<br>
This should still for a four.<br>
Our website should still be working and it does going here, for example.<br>
But if we go over here and we say slash courses, what's gonna happen?<br>
Well, it should find it not as a page, but is a redirect and send us over to training dot talk by Thunder FM.<br>
Try it.<br>
Oh, yeah, How about that senses to the courses over there.<br>
If we do slash and bites, it's just send us to Python bites.<br>
And if we do talk would say may wouldn't go to talk about it on.<br>
Is it there?<br>
Nope.<br>
Not found.<br>
It's not a page that redirect so not found.<br>
Cool.<br>
Well, that was not a ton of work, was it?<br>
And I guess more self explanatory.<br>
Weaken.<br>
Drop that.<br>
Now.<br>
Check for a page check for redirect one of those we're gonna show them otherwise for four.<br>
Well, this might seem like we're basically done like there's actually a whole lot more to this course that we're gonna be working on.<br>
We're just getting started.<br>
You might look at this and say, How much more is there really?<br>
Well, where we're going is we're gonna have a whole awesome admin section with, like, rich editors and softer create manage these pages.<br>
We're gonna have ways to show them.<br>
So they appear as if they're part of our website and similarly admin section for this There's a lot of cool stuff that we're gonna be doing, and then on top of that performance and different types of formats, And so is it a lot to do, But in terms of this function, not a lot to do.<br>
It's actually pretty straightforward, isn't it?<br>
Super cool.<br>
So we've got our basis of our CMS built.<br>
So every request that the CMS you gotta process a page or redirect is going to flow through this one simple little place here, and it's because we said that this is a variable and it is a path type
|
|
|
show
|
1:39 |
let's review taking arbitrary Earls and handling them with our flask app with the ultimate goal of returning some as conceptual pages we've created and others just saying they don't exist.<br>
So let's start with slash some slash arbitrary slash URL and we wanna handle this in our sight.<br>
Remember, with the routing having just slash some variable is not enough that would just catch Well, some we need more than that.<br>
So what we're gonna do is we're gonna create some kind of method, he recalled.<br>
It paid you could call it, see a mass request, whatever.<br>
We're gonna give it a route, and the route is gonna have a variable full euro.<br>
That's what the angle brackets mean.<br>
But notice it has a constraint.<br>
And unlike inner jersey or strings or something like that, this one is a path and path means something special to flask.<br>
That means match everything with all the slashes and what not voidable to capture this request for slash some slash arbitrary slash.<br>
Well, assuming they're not some other route in the system that's taking precedence over this so then we're gonna pass that into our method as a string.<br>
We're gonna go to the database and say, Do you of a page for this Euro?<br>
Yes or no?<br>
If you do return it as we're showing here, we'll have a simplified version on the screen.<br>
You know, I want to say, if you don't have it, you want to do a flask, not abort 404 and say No, no, no, that's not found.<br>
I don't know what it is you're looking for, but we don't have one of those, and that's it.<br>
This is really the entry point where we're going to get our CMS started in our flats cap, and we're gonna expand and enhance it as we go.
|
|
|
show
|
1:33 |
I want to show you some fun stuff on the Web and then how our app is very much not fun.<br>
Right now.<br>
Let's make it fun.<br>
If somebody comes to our site and requests something that's not there, for example, Help is not currently implemented.<br>
If we click on that, we get this boilerplate plane not found.<br>
There's no help.<br>
There's no like other navigation and there's nothing like that, right?<br>
So that's not very fun.<br>
What's fun is have a really cool and playful for a four page.<br>
So let's check that out over here.<br>
There's some examples on this page.<br>
If we come down here little bit, here's the first one from Pixar and says, Ah, don't cry is just a 404 error.<br>
That's pretty cool.<br>
Here's one from Edward Scissorhands.<br>
The pages in here, Please don't stare.<br>
Maybe you were looking for Edward Scissorhands.<br>
Come down here.<br>
This one's pretty cool from Marvel.<br>
This page could not be seen, not even the eye of a watt to seize your request.<br>
And you probably typed in something wrong.<br>
Go somewhere else.<br>
You still have the navigation across the top.<br>
You've got what would have been a very negative experience.<br>
I try to go somewhere and it literally didn't work.<br>
Kind of mapping, laughing.<br>
I looked at it like, Yeah, that's cool.<br>
Now let's go see if I can find what I was actually looking for.<br>
So what we want to do is we want to add this capability, this playfulness to our web application.<br>
And what does this have to do with our CMS?<br>
Remember, over here, when you make a request, you either get a page, you gotta redirect or you get a 404 And so I want to take this idea of returning this for four here and make it much
|
|
|
show
|
5:22 |
as you saw from those examples, having a fun and playful for four error page and you probably 500 from the server crashes as well.<br>
But having one of those fund runs requires a little bit of design, a little bit of HTML, a little bit of creativity.<br>
I've already done some of the work.<br>
Let me just show you what I have done here instead of having you watch me do it.<br>
So I added a little bit of CSS styles.<br>
I've added an error page here, so just like all the other pages, it used the layout.<br>
That means it's going to keep its header in its footer and all the other stuff that happens, and except we're gonna have a little message that says we can't find it.<br>
And now there's this four or four error right here.<br>
We dio static image and it's this broken set of boxes will talk about what that's about in just a second.<br>
I've already done those things, and so our goal here is going to be to basically plug in this error handling into our Web app, and we're gonna leverage those things that already exist.<br>
Good interviews and we're gonna have something.<br>
Let's just copy this and paste it.<br>
That's easiest civil to say.<br>
Error views.<br>
And down here what we need We don't need the CMS.<br>
This is gonna be errors.<br>
That name has to be unique working and not do a blueprint route.<br>
But let's put it error 404 here for three or three.<br>
What do you think now for four?<br>
I want to put something up there.<br>
And then what we're gonna do is we're just gonna basically show a static page.<br>
I want to say go here to flask and say Render template.<br>
I wouldn't give it based on the template folder when say, errors.<br>
Look how awesome PIJ arm is.<br>
It's detecting the blueprint, and it's looking over there.<br>
Okay, on what we want is for a four, and we can give it an empty dictionary, or we could actually just leave that blank.<br>
I don't think it needs it.<br>
And then what we want to do is we're gonna return that response now.<br>
This might look like what you want to dio, but what you need to do is you need to communicate back to the Web browser and maybe even more importantly, to search engines like No, no, no, This does not exist because by default it's going to return what say called a 200 status code, Which means, Hey, everything's great.<br>
We don't think everything's great.<br>
So we can alter the response code by putting as a second return value or, more accurately, creating a two bowl where the first thing is the response.<br>
And the second thing is the status good?<br>
Not my favorite way of doing it, but so it is.<br>
It's also going to take an error argument.<br>
We're not using error and notice that PyCharm warns that it's not using gold thing over here.<br>
So I thought what you can do is put an underscore to say Yeah, yeah, I know it takes a thing.<br>
I don't care about what that thing is.<br>
Please, just make it work, Okay, this is close, but let's see where how far we've gotten here if we go back here was thes off, click on help and know no better was wrong.<br>
Well, how do I have a flask?<br>
You know it's supposed to use this error here.<br>
Well, it doesn't.<br>
So what Weaken Dio as we can go over here and use our blueprint just like before and register it.<br>
Careful, Careful.<br>
Careful here.<br>
If you say air handler, what you would put is the status code or the exception to in this case we're handling, not found, which is a 44 You would think this would work.<br>
Blueprint on air handler does not support for four and yet gives no warnings and no errors.<br>
What you need, which is not obvious sometimes is app.<br>
You're a handler for 44 Okay, with that in place, let's go register this just like we can before we're gonna have air use and let's put it was put home up here.<br>
I have AP register.<br>
Blueprint.<br>
A reviews on Blueprint.<br>
Try this again.<br>
Over here.<br>
See?<br>
Their home page still works.<br>
I log in.<br>
Still works.<br>
But what about help?<br>
Wait for it.<br>
Yes.<br>
The hairs are cool.<br>
Arab age four of or we just can't find that page.<br>
Sorry.<br>
Maybe you should head back to the top of the site.<br>
Isn't that a better experience?<br>
And I think that fits a little bit with our dynamic nature of our CMS and our pages.<br>
One more thing.<br>
What's the broken blocks about?<br>
Well, if this over here is the logo of the working Pipi, I Well, this feels to me like broken pipe ei.<br>
So I came up with this little picture based on their logo.<br>
Right?<br>
You guys can come up with whatever you want for your site, but knows we solve the footer down here.<br>
We still have the navigation, the design, But it is a proper for four final thing.<br>
Go inspect element.<br>
Got a network, said it to Joe.<br>
Just HTML.<br>
And you dio, click again.<br>
Notice.<br>
We're getting 404 for the document right there.<br>
That's super important.<br>
That tells things interact with the site.<br>
No, this doesn't exist.<br>
And yet things like log in come back as a 200.<br>
Don't need to persist.<br>
Logs and slash comes isn't is 200 but help.<br>
Comes is a 44 perfect.<br>
We have a beautiful and playful 44 page, and it conforms to Web standards communicating that it actually wasn't found there.
|
|
|
|
1:19:11 |
|
|
show
|
1:42 |
We're going to add a cool little feature that turns out to be pretty simple but very useful and a great building block along our way towards a richer, full featured content management system in our Web app.<br>
And that's redirects.<br>
So what are we talking about?<br>
We want to be able to use short little Urals that redirect to a much longer more complicated one.<br>
Either on our own website or external websites will use it for both.<br>
So, for example, over here, a talk Python, the podcast website.<br>
Maybe you want to talk about our Python for absolute beginners course So we get enter talk by thunder out of M slash beginners on that site Internally, it knows about this.<br>
You're on It says they were going to send that over to this much longer.<br>
Ural Training dot doc by found out of him slash courses slash explored beginner slash some great long mural that's on the end of that.<br>
That's faded out in Firefox there.<br>
So this is the kind of feature that we're going to build into our CMS in Tora Web app.<br>
Now you might think, OK, this is pretty simple.<br>
We're going to keep track of just like slash beginners and the destination rural and that's it.<br>
And it done.<br>
Yeah, The actual act of doing the redirect is simple.<br>
However, we're gonna also do our first pass and a really important aspect of our CMS.<br>
And that's having a back end admin section where people who want to edit stuff about the CMS in the database can log in and create things like thes redirects They can type it in.<br>
Hey, if somebody type slash beginners go over to this place and keep track of it, that's gonna be really important for allowing people to create and edit CMS pages We're gonna start with the simpler idea bursts because it'll give us a good foundation
|
|
|
show
|
7:43 |
Now let's jump back in here and quickly review our CMS and specifically how we've done redirects.<br>
So remember we threw a really quick example of we have some data of redirecting while we're doing the pages.<br>
Let's just throw that in and you might be wondering, Well, Michael, why is there a whole chapter on redirects If we're basically done As you can see here we are technically doing the redirect.<br>
There's more work to do here to make it really rich and full featured two things in particular, but nonetheless it's basically done.<br>
So what's this chapter about?<br>
This chapter is more about the content management system side of things rather than redirects itself in our CMS, we're going toe, have the ability to create and manage two types of things.<br>
Redirects and pages redirects are pretty simple.<br>
There.<br>
Start your old neural on a name.<br>
And so having in management system around those read Rex is simpler than, say, pages with cashing in multiple formats like markdown versus HTML and all this kind of stuff.<br>
So we're gonna focus in this chapter on building the management side of our redirects.<br>
But before we dig into that, there is something missing and I want to work on that.<br>
So let's go over here and have a look at our site running and remember that we could type slash bites and this would take us over to the Python Bytes podcast And it does recall that request comes in.<br>
We're using our path.<br>
The very end of catch all the requests it comes in here says they're a page called bites.<br>
Nope, nope.<br>
Age.<br>
So we skipped out here.<br>
Is there a redirect called bites?<br>
Yes.<br>
So it's blast, not redirect over to the stored Your l Here.<br>
This is cool.<br>
However, there's some problem.<br>
What if we're running Pipi I and the podcasts by them bites wants to run an ad over here or some kind of promotion, Or somehow we want to communicate from our site additional information to them.<br>
So we might do that like this with a query string.<br>
So if this was let's just say it's an ad, it should be you tm source equals maybe bake pie p I and we want to send this over to Python bites, right?<br>
Copy that, because it's not gonna work.<br>
We're gonna need it again.<br>
So if I hit go, it's gone.<br>
What we expected what we wanted was that when we sent that information there, this could come across like that.<br>
So then on their side, that destination site, they would know they received a request from us.<br>
But that didn't happen, did it?<br>
It just went there.<br>
And it just strip that off just like this.<br>
So what we want to dio is we want to update our system to carry this query string forward.<br>
Turns out that's not too hard to dio.<br>
So what we can do is come in here and say, If there is a redirect, we can create a destination to be just that right there.<br>
And then we can ask if flask not request, not query strength.<br>
If there is a query string, we wanna add it on to the destination.<br>
So if we have a query string here, carry that forward.<br>
So we'd say the destination is when I create new F string here.<br>
Say it's the destination.<br>
Question Mark.<br>
We'll ask that request that queries drink.<br>
Maybe we want to shorten that or something, but that should do.<br>
All right.<br>
Hopefully I got that right there.<br>
I think so.<br>
Let's give it a shot.<br>
Let's save flask should rerun.<br>
Yeah, it did.<br>
So come over here.<br>
Give it a shot.<br>
Will it carry through?<br>
And will it come through correctly?<br>
Oh, whoops.<br>
I forgot that.<br>
That's a bite, not a string.<br>
So let's go over here and fix that really quick.<br>
Let's just turn this into a variable cause this is getting longer longer.<br>
It's called that query.<br>
I'll say we were actually went to query to not be just the bites will say query equals query dot decode and I got to give it the format.<br>
Utf eight or something like that.<br>
Here we go.<br>
So now it comes Bites turns into a string.<br>
Utf It's a pretty safe bet.<br>
Let's try that one more time because we don't have this b and these quotes.<br>
That's wrong.<br>
All right, so it would come up here and just do bites like this.<br>
Are you tm source Perfect.<br>
Look at that.<br>
It passed it along with Got our question mark And are you tm source equals something.<br>
Let's do one more test.<br>
Let's go over here and say I'm sure we can carry multiple values.<br>
Cory strings can have more than one key equals value.<br>
So let's say you tm campaign equals pi p I something like that.<br>
Okay, so we want to make sure that both of these get carried across and of course, they dio final thing to test.<br>
To make sure that we have here is Well, you want to just request it directly like this with nothing.<br>
We want to make sure that, like the question mark doesn't come across with an empty query string or something like that Let's give it a shot.<br>
Perfect.<br>
So it looks like our redirect keeping the query string it exists.<br>
Assuming you want to do that, I think that you probably would almost all the time we dio and so we're going to do it here.<br>
So this is really great.<br>
And, you know, it's you may be wondering, like, what is the real value of this?<br>
There's a couple of things that you can dio one.<br>
It allows you to have much, much simpler Urals.<br>
You can use thes for like social media.<br>
You can use them on places where you might have to write something down.<br>
So, for example, over on talk Python dot FM If we want to talk about our YouTube channel, we can just lay slash YouTube like this and it takes us to some terrible Earl that you would never, ever never expect someone to type that in.<br>
You wouldn't say youtube dot com slash channel slash capital u Capital Seacat, right?<br>
You just wouldn't do that.<br>
So it's very easy for us to say Talk by fun that offense last YouTube and talk about it.<br>
So this is really valuable.<br>
The other reason that having these redirects is great is you can every time somebody runs of this part of code here, they make a request that is a redirect.<br>
You can record that that your l was requested.<br>
So, for example, over on talk by thought Donna fem or buy them bites we have ads.<br>
We have companies sponsoring us, and we want to make sure that we can give them reports about how many times people visited there.<br>
You, Earl, whether we just spoke it out loud on the podcast or it was in the ad image and they clicked it, or if it was shared on social media and clicked it.<br>
What we also do over there is we record into the database that one of these Urals whatever one to come up for this redirect was requested.<br>
We record things like what?<br>
operating system people are on or things like that.<br>
So really, really nice.<br>
A lot of features you can pack into this bit here are active, doing the redirect is done, but this chapter is just getting started because what we're really building in this section is the first part of the management system, right?<br>
These redirects that were requesting they're coming from hard coded stuff that's in the source code.<br>
What we want is users marketing people and other folks toe log into the website, type into it, and then we have additional redirects for additional pages that they can go to, right?<br>
So that's what we're gonna dio.<br>
From now on, we're gonna allow people to create and manage these redirects without getting
|
|
|
show
|
2:02 |
Now, before we move on, let's take our code that we've written and make it better make it easier to test and make all the different parts that we work with more focused.<br>
And we're gonna do that following this thing called a view model pattern.<br>
Now the website, the data driven website, has been using view models all over the place because that was how it was built But we just started from there and we had it on the CMS thing.<br>
So you might not have noticed this idea of a view model.<br>
So what is this?<br>
Well, it's most useful when you're accepting user input.<br>
You have an HTML form.<br>
People are filling it out.<br>
They hit, save goes back to the website.<br>
That data has to be synchronized back to Python.<br>
You know what they type into the form Are all the required fields there?<br>
Maybe there's conversions.<br>
They typed in a string.<br>
You got to convert it to a number or a date or something like that.<br>
So the idea of the view model is we're going to take what would otherwise be a really complicated and long method here.<br>
This is like our CMS requests that we were just messing with.<br>
And as we add more validation as we add more logic, this just gets longer and longer and it's more complicated and it's harder to test.<br>
So what we're gonna do is we're gonna break it into two things.<br>
The view method that actually handles the request that works with the Web.<br>
Bremer returns the responses, and then this thing we're calling the view model, this is what we're gonna build.<br>
This is a separate Python class that knows what data should be exchanged, what is valid, what is invalid.<br>
What is the logic to do all that stuff.<br>
So instead of having that among you method all in one, we're gonna have a view model that it's created by the view method.<br>
It gets all the data and validates everything and then, as comes back and just helps the view method do its magic.<br>
Also, this is gonna help with testing if we want to write tests, because it's easy to test the view model outside of the Web framework, it typically doesn't need much in terms of what's going on there.<br>
Where is maybe the view method is much more complicated gotta start of the website of the Web app and get it all up and running before it can actually do its
|
|
|
show
|
8:51 |
let's begin exploring this idea of a view model by improving this with RV model.<br>
Now I want to be really clear and upfront here.<br>
This is not that important of a case to apply this pattern here because it's not that complicated.<br>
But when we get into the CMS side, where we're creating things and editing them and there's get methods and post message post methods and there's all of data being exchanged in the form, it gets super complicated with the validation and data exchange and conversions and what not So that's where the real value this will come from.<br>
But let's take a super simple crack at it here first.<br>
Now, remember how we talked about the organization of the views in the templates.<br>
So, for example, we have our views than account views and say, in here we would have like an index or a register big over our templates.<br>
We haven't account Holder, and then we have a register and we haven't index and so on.<br>
A few models are gonna be organized in the same way when have for example and account folder and an index view model in a register of your model just give you a sense like this is a decent amount of validation happening over here.<br>
In order to add one for our CMS, we want to create that same structure.<br>
Let's go create a directory called CMS, and then we could just create a blink.<br>
Pylon file is not that complicated, but there's a few things going on about driving from a certain based type to share things.<br>
That's one.<br>
So it's easier to just copy one and then change it to this.<br>
So this is gonna be the CMS request view model.<br>
And I was calling request view.<br>
Monica, that's in the CMS folder.<br>
Okay, Great.<br>
Now what we want to do is we want to go back over here and see what's going on.<br>
What's happening?<br>
We wouldn't simplify this a bunch.<br>
So we're gonna be getting the page or checking that.<br>
So let's copy that over.<br>
Okay, This stuff, we want this and we need to import peace, and we're gonna have to get the fool you Earl from somewhere.<br>
The way flats works is that's being passed in.<br>
So we're going to want to pass it and to review models.<br>
So let's get started.<br>
Like this.<br>
Come over here and say this is a request view model.<br>
Now if I hit command space notice, nothing is happening.<br>
Pyjamas, as I have no idea.<br>
We're talking about What if I had a second time, it says, Oh, actually, if I look more broadly, would you like me Toe Do all the code to import that and write the import statement up here?<br>
Yes, I would.<br>
Thank you very much.<br>
Let's go over here and pass the full you, Earl.<br>
And we can change the signature here so it automatically adds this if we want or it's just honestly is quick to just go type it.<br>
But now if we jump back over here, you can see there's the girl like this.<br>
So it's store that you are all actually and then also store the page.<br>
Well, something similar for the redirect.<br>
Get it from there like that with the euro.<br>
And then remember, we also have this funky thing we were doing with the redirect URL because maybe want to keep the query string so we could set that hearsay self that redirect.<br>
You're l equals for the moment.<br>
We're gonna say it's nothing, but if there happens to be a redirect.<br>
Then we'll go work with, say itself, not redirect.<br>
And then I'm just gonna copy.<br>
This could cause you know what?<br>
It's the same, like this import flask.<br>
OK, we'll come down here and say the destination is going to be that The question is this the final destination?<br>
It's this and we'll see itself, not reader act.<br>
Euro equals test.<br>
Or we could just in line that however you want to do excellent.<br>
So this is the code that we need to write to move to a simpler mode Now, why is this better than just sticking over here?<br>
Well, when you get to the CMS side, that would be massively complicated with all the validation, all the data exchange and whatnot.<br>
So it's going to make our life much, much better.<br>
But also imagine weaken, Just test, create one of these classes and just test it right.<br>
It would be a lot easier for testing.<br>
Enough did lean so heavily on the flask framework and so on.<br>
Okay, so let's put this into use instead of that.<br>
We don't need that anymore.<br>
We'll just say if you have not page wherever we had Page.<br>
We gotta stick this bid.<br>
Then we have.<br>
If there's a redirect, all of this is gone.<br>
Where is going to send you over to via not redirect your ill?<br>
That's it.<br>
A little more cleanup.<br>
Look how nice and simple dysfunction is now.<br>
You don't even have to give it like comments or anything to say what's happening.<br>
You get a request, there's a page, you show the page and this went the way.<br>
We're gonna do something better soon.<br>
If there's a redirect, you take them there.<br>
Otherwise, for four pretty awesome.<br>
It would be awesome if it works.<br>
Well, let's give it a quick test.<br>
If it doesn't work, it doesn't matter how clean or nice it is over here to make sure our site still working and go to the old places.<br>
If we go somewhere, it doesn't exist.<br>
Oh, no, This one doesn't.<br>
This this is one of our pages, right?<br>
We go to one that doesn't exist.<br>
We get a four or four.<br>
And if we go to somewhere like we had before, like bites with our query string and everything perfect, it's taken us over there.<br>
Let's just one more time just make sure without a crease string, we end up on the other side correctly.<br>
All right, that's this is really nice.<br>
One really quick comment here.<br>
You might look at this and think OK, well, this is an improvement, but it's actually hitting the database.<br>
Quote database.<br>
Eventual.<br>
Have a real database.<br>
It's hitting the database for a page in a redirect every time, even if there is a page.<br>
So it's a little bit of extra overhead.<br>
Whether or not you want to deal with this really is up to you.<br>
It may be like one millisecond.<br>
It doesn't matter.<br>
Who cares?<br>
But if for some reason we wanted to re factor this, we could come over here and create a property called Page like this in on Lee we went on to set us, but only go and do the database thing.<br>
If somebody actually asks for that, we could do the same for redirect.<br>
Maybe call it something like that and we don't need this redirect.<br>
You are ill.<br>
Yes, Will you?<br>
Let's go over here and just get this and we'll say self not you are ill Return this and then the last thing of a property for the redirect Turell as well.<br>
I'm not necessarily advocating this.<br>
I'm just saying.<br>
You may, you may care, Are you may not care about this.<br>
If there's a redirect, then we're going to go and compute this.<br>
Don't need a story like that.<br>
Will just say return.<br>
URL or destination.<br>
Perfect.<br>
Okay, I think this will probably still work.<br>
And this way we're on Lee, really computing the page of the redirect if we ask for it.<br>
So, for example, if there's a page or not gonna ask for the redirect now, I don't think I would go and do this, but, you know, maybe things were slow.<br>
So let's go check.<br>
Donate.<br>
The page comes back.<br>
Hope for a four and bites takes us there.<br>
All right.<br>
Works the same way.<br>
A little bit more work.<br>
Now, of course, we may be calling this twice, so we want to put a little cash in here, right?<br>
There's there's layers of what we're getting ourselves into, but I'll stop here.<br>
We just give you a sense that we could make this a little bit better if we actually cared, too.<br>
But I think honestly, I would have written the first one and just been happy with that, because most the time someone's going to request a page it it's not that big of an overhead.<br>
So anyway, we've got a much cleaner CMS request view method here by using this view model and you see weaken rework how our internal view model is working.<br>
Teoh optimized for different things clean code performance forever.<br>
We also test it more easily in isolation outside of the full Web requests of flask and saw.<br>
All right, there's gonna be a pattern that we're gonna use as we get into our CMS, especially the view edit data type of scenario.<br>
We're going to see a lot in the CMS.
|
|
|
show
|
1:19 |
We started this chapter by taking a couple of pre greeted fake database backed redirects and wiring them into our CMS.<br>
Now, if we type slash bites that takes us over to the Python bites site, if we type slash courses, that takes us over to the courses at talk about on training we even saw how to carry on marketing extras like you tm source and other query string information that we might want to pass along over there.<br>
Well, that's all good.<br>
But really, what we need is a system in place so that we can edit and create these read Rex.<br>
We'd like to be ableto be sitting our computers A Hey, I'd like to have another redirect on our site log in and without messing with the source code without touching the database.<br>
Just start typing on the website and have additional euro read.<br>
Rex happened.<br>
And ultimately we're gonna use the same technique or CMS pages which will let us edit the content of the site directly.<br>
But we're gonna focus on reader experts because they're simpler.<br>
So this is what we're gonna build something that looks like this a little back into admin section that Onley admin users get access to and over in the section we're gonna have to.<br>
Things were gonna be ableto list and edit redirects in the list and edit pages.<br>
It said in this first chapter just redirects.<br>
But that's where we're headed, Okay?<br>
And we're gonna get started by building this page right here.
|
|
|
show
|
10:35 |
it's time to start building the actual CIA mass, the management system or the admin backend for us to work and manage the content in our CMS, Remember, we're gonna focus first on redirects, but we need to kind of build the overall structure, and then we'll get into the redirect side of things so we could stick that into the sea mess views.<br>
But I feel like I kind of want the admin side in the consumption side to be two different concepts.<br>
And so because of that, I'm gonna copy this and create an admin views.<br>
Call this admin views change That name is it's kind of a unique Now here such is gonna be slash admin.<br>
And let's just call this index with no input.<br>
All right, so this is the page that you're gonna request when you go to the admin section and what I think it's going to do this just going to show a really simple and basic page that says, There's two things you can do in the admin side A.<br>
You can view the redirects and B you can go view and edit the pages.<br>
So we weren't just set up a quick little template for that.<br>
We look over here, you can see that we've got this decorator that we're using throughout the rest of the site to talk about what Jinja template were using.<br>
So when you go around here and this is going to be admin Index, okay and we do need to import that at the top.<br>
So let's go over here and make an admin boulder there.<br>
And let's say something super simple like this about Paige and put it here as the index.<br>
All right, so let's put just some, like Admit home.<br>
We'll comment controlling update the website from here.<br>
We're going to have some additional CSS that we can include over here.<br>
Let's see we confined wind.<br>
We have something going on here at the bottom.<br>
Now, we're not using any extra there, but over in this one here, you can see that we're using an additional CSS file.<br>
This is injected back into the overall template.<br>
So let's just go.<br>
But that here and notice that we have an at men dot CSS over in our CSS file.<br>
I've already done the CSS.<br>
We don't really need to do the Web design for it.<br>
It's not super inspiring.<br>
It's just some real basic stuff in this admin block.<br>
I also realized we need to have a text a line of left here to get this to work.<br>
Okay, so we're gonna include our admin, CSS, and we're gonna have our content here.<br>
Let's say that this has the class admin block.<br>
Put that into an inter Div.<br>
One of our two things.<br>
That's an A nordle ist over here.<br>
We're going tohave Ah, hyperlink, which is going to slash redirects This will be Do you read a rex?<br>
Guess what?<br>
The other ones?<br>
The same, but for pages And I'm guessing that should be admin slash redirects and admin slash pages.<br>
All right, Super Well, it looks like this is kind of in place or inherited from the layout.<br>
This is the title we months to be.<br>
So you must add man or something like that.<br>
A little header appear are am unblock our CSS.<br>
Okay, I think the HTML side of things is done.<br>
So we've already linked that up here.<br>
We could almost make it work.<br>
We could give it a try.<br>
If we go to slash admin, you're gonna see It's not as amazing as you might hope.<br>
Let's try.<br>
Wait a minute for a four.<br>
What's going on?<br>
Remember, in order to use these views, these blueprints, we have to register them in the sight.<br>
So let's go down here and we'll just do the same thing as we had before from views were gonna import admin views and down here or that will register the blueprint for that one.<br>
All right, let's see if that's gonna do the trick.<br>
Perfect.<br>
It's sort of working.<br>
Except there says you gave us a string and we expected a dictionary.<br>
That's from our decorator right here.<br>
It says, Hey, we're gonna pass a dictionary of data over to that.<br>
So let's return an empty dictionary and see if it like that rerun.<br>
Yes, it does.<br>
And it does do this, sort of.<br>
But there's something going on here.<br>
If I'm over here and I log in, I log in and I go to the admin section.<br>
Wait a minute.<br>
What happened in my account?<br>
Where I go, I thought it was logged.<br>
In a way, I'm logged him in the admin section.<br>
I'm not locked in weird What's going on?<br>
Well, it turns out that the view model based remember all these other pages that we had, like over here, we're turning some kind of view model, and that view model drives from view model base.<br>
Here.<br>
The view model base is the thing that initialize is whether or not there's a user and passes it along to the underlying view template.<br>
So we can just do a real simple fix.<br>
Here we say there's a view model, which is this we don't actually care about any specific one.<br>
Just have the base one, and we can say to dictionary here.<br>
If we do that, it will carry across the user information like you expected.<br>
And now we got our account info appear.<br>
All right, so that's pretty good.<br>
We got our admin home shown.<br>
If there's a small problem and it kind of was hinted at a little bit of their If we go over here even in a non authenticated unlock, then view.<br>
Ah, how do you feel about the slash admin having no restrictions Anybody on the Internet that decided to go to slash admin can just view.<br>
It's here.<br>
Maybe the subsequent operations have restrictions.<br>
Who knows We haven't created those yet, but I'm not a fan of people just being able to see this if they're not logged in.<br>
So let's go over here and add one more technique.<br>
So what?<br>
We could do it.<br>
I could come down here and say some like this.<br>
If not VM don't user or not?<br>
VM not user dot is admin so in the user object.<br>
If you go look over here in the database, there's an admin value set.<br>
Right now, it happens to only be set for, well, me.<br>
Let's Gol and throw this into PyCharm and open up the database.<br>
Here we go.<br>
Have a quick look at users good under the very bottom.<br>
That's where I am.<br>
Notice that I have this set.<br>
So what I want to do is I want to check that if this is set I can get in.<br>
If it's not set, can't get it.<br>
Obviously, if there's no one there as well, we want to make sure that we're testing for that.<br>
We could do this like so we could say Return last abort or three, something like that.<br>
So let's try that again.<br>
So over here we started.<br>
If I go my private window over here and see it's doesn't allow me in.<br>
But if I go with my logged in window, it does let me lock.<br>
It does allow me.<br>
And so for three vs.<br>
Hey, you are an admin.<br>
You're logged in.<br>
That's good.<br>
That's what we wanted.<br>
I should check that if I have a user, but they don't have the admin property won't let us in.<br>
But that's gonna work now.<br>
This is a little tricky.<br>
It's like stuck in the middle of this page.<br>
It's a little weird.<br>
So what I've done is I've created something much better.<br>
We have another decorator here call under this permission section can have more, but right now it's haven't admin.<br>
So what we can do is we can just wrap original function with this, and it's going to check.<br>
Get a view model, all right.<br>
The good we just wrote are turned.<br>
It's either going to return flask aboard, or if it does pass, it's going to call the function that we're decorating the view function.<br>
Okay, so this is very easy to use.<br>
You haven't built decorators.<br>
Don't worry about it.<br>
It's just how it works.<br>
Come over here.<br>
And we just have to say at her mission, Import that.<br>
And then we can just say admin like so And that allows us to take that whole thing away right there.<br>
Let's rerun it and try again.<br>
Make sure it still works.<br>
Can I log in?<br>
Is me?<br>
Yes.<br>
What happens if I hit it without an account or not logged in with the right one?<br>
Oh, whoops.<br>
It's not supposed to let us in.<br>
I think the blueprint has to be on the outside for this to work.<br>
Let's give it one more try.<br>
Here we go.<br>
Not allowed.<br>
And this one still less It's in perfect.<br>
But just like before it's blocking that.<br>
Maybe we could put it as far inside is this.<br>
It works the works, right?<br>
Just got, remember?<br>
But the blueprint first.<br>
OK, but I feel like this a little bit cleaner.<br>
You can look up here and see the permissions on this.<br>
So we're gonna use this permissions view decorator, and that's pretty much it.<br>
We have our base of our CSS admin section over here.<br>
We can be on the home, and if we're logged in as an admin.<br>
Let me just show you by changing that really quick go down here and I uncheck that look away and there's a button that's hiding this.<br>
Push the changes to the database.<br>
Refresh it.<br>
The admin section is gone.<br>
If I try to get a admin, even is, this doesn't work.<br>
But that Mac push those changes now we get back in.<br>
So we have our admin section and Onley logged in users.<br>
Or also add mends in the database.<br>
Get access to the section.<br>
I think that's a great start.
|
|
|
show
|
9:35 |
Well, let's see how we're doing with our admin over here.<br>
Now, we're working on the redirect side and let's go view the ones we already have in the system.<br>
Yeah.<br>
No, this is not what I was hoping for.<br>
I was hoping for ah, list of existing redirects, the ability to test them, edit them, maybe create new redirects.<br>
Yeah, so let's go work on that functionality.<br>
Right now.<br>
It turns out to be not too bad.<br>
There's a couple of pieces we have to address.<br>
We're gonna do the H T mail.<br>
We got to do the views.<br>
We got to do the data access.<br>
Let's do HTML first.<br>
So this one we're just gonna call redirects it is gonna be slash admin slash redirects.<br>
So, in the admin Boulder reader Rex cool, we'll change the title.<br>
What changes to be redirects appear was just add a little way to get back.<br>
Once we're down inside this redirect lis, we want a bill to get back to the admin section.<br>
So there's to be admin, and we'll put a little zero going back so we can do that with ampersand hash.<br>
171 Cynical and back to Edmund home.<br>
Let's make this a button.<br>
All right, so that should have ah, hyperlink back now, over in this area, we're gonna have a couple of things.<br>
I'm gonna start out here having an unaltered list of various items and we're gonna have one section that lets you create new redirects will just have a hyperlink in here.<br>
Let's let's see admin slash and redirect something like that that doesn't exist yet.<br>
But we'll get there now.<br>
We're going to get to the more interesting part.<br>
We went for each redirect.<br>
We want to have a little block of HTML that starts out as a list item and we wanna have, Ah, hyperlink here.<br>
That lets us test it.<br>
So we're gonna have something in here, and then we'll just say test and let's go to make this look nice as well We'll make this bootstrap button so it would be a button.<br>
Make it a small button, and to test it, that seems like us Easy, safe things.<br>
Let's say success like this.<br>
We're also gonna have one for editing.<br>
So this will be admin slash and it redirect slash something and editing could change it Maybe that's dangerous.<br>
So those two are good, and then we're gonna have a couple of spans here.<br>
Will have the name or title.<br>
Then we'll have the URL.<br>
Let's put the oil first.<br>
Like this.<br>
Now, where are we gonna get this data from?<br>
Of course, we're going to do a loop in Jinja here.<br>
So the way that works, we're here, and we say four are in Gonna pass a collection of redirects.<br>
We haven't done that yet.<br>
We haven't created yet.<br>
That's next.<br>
But let's assume we're given some redirects like this.<br>
We want Teoh run that code and then in the loop there.<br>
So for each one of these redirects were given, we're gonna create little copy a block of HTML over here.<br>
What are we gonna put?<br>
Well, for this thing?<br>
We want to put the just the short euro.<br>
So in Jinja, the way we get string data out into a smell was we just say double curly race or dot and then what are we gonna put?<br>
We could put the full euro or the short you're off.<br>
We put the short one.<br>
When you click it, it'll run through the whole CMS process.<br>
So Let's say short you are l for the moment.<br>
Now down for this one.<br>
Let's go look at our data real quick.<br>
Notice each one of our redirects has an i d.<br>
Here.<br>
So let's go and use that.<br>
It's gonna be are not I d.<br>
Now it's good.<br>
Start out with something that's not quite right, but as seemed rights will put the short you are all here.<br>
And then if we look at the data, there's ah, are not name.<br>
Okay, This would work if we had a view function to go to and we could send the state into it.<br>
So the next thing, I guess.<br>
Let's go and add that view method over here.<br>
It's kind of decorators piled all over it, but that's good.<br>
That's what we want.<br>
This will be admin reader Rex and this v slash admin slash redirects.<br>
That's cool.<br>
It's the euro.<br>
It's easy to forget, but that index method name needs to be a reader X right.<br>
Those have to be unique.<br>
And then over here we're gonna need a little more information than the base stuff.<br>
We're gonna also need the list of redirects.<br>
Well, let's call this something like that Say redirect list, view, model.<br>
Now we need to go and make that and again, the easiest way to do this.<br>
Well, over here we're gonna need our directory because we don't have an admin said of you models.<br>
Yet we're going to be plenty.<br>
Well, let's just copy this one we already made and make this a redirect list view model and up here as well.<br>
Okay, there's a bunch of stuff going on here that we don't need to worry about.<br>
And what we need to dio here is pretty straightforward.<br>
Actually, we just need to have a list of the reader Rex, so you almost don't need the View model.<br>
But remember the view model bases passing across things like the user, whether they're an admin, whether logged in, it's better to just go with the flow, even for simple steps.<br>
So of redirects this bit is the things passed to our Jinja template.<br>
We just looped on, and we're going to say that that is equal to what it's gonna be the CMS service and we would have Well, we have get individual redirect, get Page.<br>
We want a all redirects yes doesn't exist does it.<br>
So let's let PyCharm right it over here.<br>
It's gonna have it all redirects.<br>
And what's it gonna dio?<br>
It's going to turn a list of dicked because that's what our read Rex turned out to be.<br>
Pretty straightforward.<br>
But if you look over here, we've got our fake data redirects, and it's almost what we want.<br>
We want a list of that and then one of those, but not with the keys, just the values.<br>
And luckily and Python, that's pretty easy.<br>
You just return a list of the redirects values that's it.<br>
Super easy to write.<br>
In fact, we're gonna need this for pages as well.<br>
So let's just go ahead.<br>
And while we're sitting here, do one for pages.<br>
So now I have all pages in all redirects in just four lines of code Super easy.<br>
So that means over here we can call this function really races just about a one in a blank line at the end there.<br>
So it looks like this thing is ready to roll.<br>
And if we were to import it and they work, this thing might be ready to work with, run it and see where we are okay, would click on it with her admin section fingers crossed.<br>
What's gonna happen?<br>
Wuss.<br>
We look at that.<br>
This basically worked here.<br>
Zarb, Actor, Admin Home Super.<br>
We've got our read Rex.<br>
Here's our add new redirect.<br>
No, just that doesn't exist yet, but we're going to write it.<br>
We can edit one and it redirect one for the edge of the other one.<br>
Redirect to again doesn't exist yet, but it's going to we should be able to test them.<br>
So if we go toe slash courses, notice This doesn't really look like a your l but I'll get there.<br>
We go to this one.<br>
Hey, look at that.<br>
Probably make that open a blank window, But let's try one more by them bites.<br>
Oh, yeah, These are working so tiny.<br>
Bit of clean up over here on this section's gonna be rocking.<br>
First of all, this one right here, let's do a target equals link that looks good.<br>
And this one is the girl, but it doesn't look like one, so let's put a little slash here for starters.<br>
Then we go.<br>
Let's give it a class equals link like that and goto our CSS for our admin and and at the bottom to a link.<br>
Give it a little getting type it properly not wait equals bold.<br>
That should do it.<br>
Here we go.<br>
So now it's called courses.<br>
It goes to slash courses, and if we test it, it opens in a new page.<br>
A new tab, exactly where we were hoping it would go.<br>
All right.<br>
So our listing of read Rex, I think it's done.<br>
Not too bad, huh?<br>
Course we got a implement.<br>
Add and edit those turn out that basically be the same thing.<br>
But that's pretty much what's left on the redirect side of our CMS from the management
|
|
|
show
|
2:29 |
before we get to writing the code.<br>
Actually, edit are re drinks or for that matter, are pages as well.<br>
I want to review this design pattern this concept that you may be familiar with, but you might not be.<br>
And it's super nice for how we organize your code.<br>
I still see lots of Web apps out there not explicitly using this and there way harder to understand and work with because of it.<br>
So the idea is we're going to use this get post redirect pattern to edit are things.<br>
How does that work?<br>
Well, we have our server, and we have our database out there somewhere.<br>
There's, ah, user who wants to talk to our site in the assumption here is they're going toe edit one of these redirects, or they're going to create an account or something like that.<br>
They're gonna register for an account.<br>
So the first thing that they need to do to get started as they need to see that page that has the form like we're gonna register.<br>
So what is your name?<br>
What is your email?<br>
What do you want your password to be things like that.<br>
So they're going to do an http get requests against the server for slash accounts, slash register, and that's going to show the form on their page.<br>
And then they're going to say, Well, my name is Michael, and my email address is Michael a talk by then Daughter Fam and so on.<br>
And they added that locally, and then we're gonna save that back.<br>
So too, do the saving into an HDB post back to the same euro.<br>
The server's gonna look at that.<br>
Go.<br>
That means they want to save stuff.<br>
Let's validate it.<br>
And then if it works, we're gonna save it.<br>
And then finally, instead of leaving them on this page, they've just registered.<br>
They've just created account.<br>
What do we want to do?<br>
Probably send them to slash accounts or some sort of welcome page.<br>
We're going to send them a redirect request and http found as we've already been doing two slash Welcome, Welcome your account.<br>
Here's what you gotta do to get started using our service.<br>
So it's a get post redirect that is very typically the way that this works.<br>
If for some reason the data doesn't validate, they're going to stay on step 2 to 3, they're gonna get a message that you have to read it again.<br>
Post this back again.<br>
And then eventually, when it's valid, they move on to the redirect stage.<br>
This is how I think of it.<br>
I get the form I edit the form I save the former.<br>
I go on, This is actually a well known pattern mentioned on Wikipedia.<br>
But they have it wrong.<br>
In my opinion.<br>
They call it post, then redirect, then get well, what do you posting?<br>
You got to start to get the thing, Teoh actually post so anyway, they call it Post Re drag, get.<br>
But it's a very well known pattern around organizing our code and the way that we process people editing data on the web.<br>
So we're going to use this for our admin section,
|
|
|
show
|
5:31 |
Well, I hope that you really love the redirects that are already built into the site because we can't add any new ones.<br>
But click over here.<br>
We just get four or four.<br>
Guess you don't have that functionality.<br>
You can just use the ones that are hard coded.<br>
Of course, that goes entirely against the whole purpose of the CMS to let us come here and edit the content without changing the source code.<br>
So this is what we're gonna focus on now.<br>
We want to work on this girl slash admin slash redirect.<br>
Now, this is this is where the view model idea and the routing and all that.<br>
It's a little bit more interesting.<br>
So let's go over here and we're going tohave.<br>
There you go.<br>
We got this ad redirect, and let's go ahead and change this method name.<br>
And that would be totally reasonable to put add redirect here.<br>
But it turns out that add and edit are the same thing, and add is like a simpler version of edits.<br>
So let's just reuse the edit template that we're going to need for go back here for this button right there.<br>
Okay, so we're gonna use an edit instead of an ad.<br>
Now there's one other thing that we've got to focus on here that's gonna get interesting Let's divide this a bit here like this.<br>
And notice views.<br>
Plural.<br>
Okay, so one of the things that I see some people doing it will come down here And I will say, if flash not request the method is get we're going to do this else.<br>
LF blast not request, that method is post.<br>
We're gonna do something else.<br>
No, no, no, please don't do this.<br>
This is not the way you want to do it.<br>
One.<br>
This makes this method do two things.<br>
Not one thing which violates one of the core design principles of writing clean code into it means every single thing you actually work on is just mawr indented than it should be.<br>
What you really want to do is think of how do I show them the form?<br>
How do I process them submitting the form?<br>
Those are two different things.<br>
So luckily, we can come over here and use the routing infrastructure very easily with commissioners say the methods is an array off.<br>
Http Methods were willing to accept.<br>
Guess What one do we want for here?<br>
Get That's it.<br>
And they would have another one like this.<br>
That is for Post.<br>
Now again, we saw Got to change the name here and here.<br>
So let's change this to underscored get And this one to underscore Post.<br>
It doesn't matter.<br>
We could call this zebra.<br>
Whatever.<br>
It doesn't matter.<br>
The thing that users see is described, right Here's slash admin slash add re direct and that's the same here and here.<br>
But the verb the to be verb is different.<br>
So this is just for us to understand what's happening.<br>
All right, so this one needs some work here and some spilling.<br>
Lots of spelling, apparently.<br>
But this one is pretty close.<br>
What we're gonna do is we're going tohave and it it redirect view model.<br>
Why not add?<br>
Well, exactly same reason is this right?<br>
The view models job is to exchange the data and do validation and version like strings integers from the HTML form.<br>
Because the former they're saying we should be able to use a common view model as well.<br>
So gonna try that it doesn't work will unwind it.<br>
So it's coming out here is gonna be an edit.<br>
Redirect D.<br>
Amato, Major Active, you model.<br>
And let's just leave it empty for the moment.<br>
If we import that, that's a good sign or, more likely to need this one here.<br>
Okay, well, let's go ahead and give this a run and see if we've got it.<br>
Sort of working at least that we can quick the Lincoln.<br>
It's going to say this doesn't exist, but I'll see if we get that far.<br>
All right?<br>
Can we edit it?<br>
No, no, we can't because we only wrote the ad.<br>
Let's try adding, there we go.<br>
That looks like an error, but to me it feels like success because we got our function to run.<br>
It just says, Well, now your job is to write the HTML, so that's the next up.<br>
But we've created this nice separation here for our get post redirect pattern.<br>
So we have our get.<br>
Then we do our post with validation, save it to the database, possibly return errors, and then at the end, instead of doing this bit right here, we're gonna do a redirect with flask.<br>
So that's what's coming.<br>
Assuming that there are no errors.<br>
Okay, So here's our ad redirect view.<br>
You know why?<br>
Pyjamas unhappy with this?<br>
But I guess it just write it this way, and then we'll be happy enough.<br>
I'd rather not see it upset there.<br>
Okay, Super.<br>
So this is the view side of the story.<br>
And first little touch on the view method view models as well.
|
|
|
show
|
6:19 |
well, we have our view methods for the get the post and eventually down here The redirect pattern to add in your redirect and the kind of looks like, Well, maybe that's good.<br>
Does say, needs work.<br>
But let's see how it's doing over here.<br>
Try to add a new re drinks.<br>
Oh yeah, that's right.<br>
We need to actually have the HTML that corresponds to it.<br>
So that's what we're gonna do in this video and remember it it an ad are the same thing besides one very, very minor detail, right?<br>
It's like add is ah, simplified case of editing.<br>
So we're going to just use the same HTML template for both.<br>
Now let's just go on copy.<br>
This one remembers almost always easier to copy, cause you got all that like this template inherits from that template.<br>
Business doesn t edit redirect over here.<br>
And let's just do a quick move around, but sent here to be edit redirect are actually are working on ads was to add then remember over here he would have the ability to like a rollback a step here and say, We want to go back to that me.<br>
And this time we want to go back to redirects, so wherever you are going to go a step back redirects Okay, this is looking good.<br>
We don't need that bit.<br>
We want to change this to a form that's nice and easy.<br>
And there's two things we have to set first.<br>
The action I said it to It looks like nothing.<br>
But what it really means is don't modify the URL.<br>
Just leave it where it is and send it back to the same place.<br>
And the method is to be post.<br>
Okay, well, that's good.<br>
Now we're gonna need ways to put data in Tory semaphore.<br>
So let's have an input and have the type equals.<br>
Text is good.<br>
The class from boots drop, it's gonna be form control.<br>
Now, let's set a few other things we're gonna need to set the I.<br>
D.<br>
In the name.<br>
Technically, I think ideas optional, but let's just set him a case.<br>
We want to do any CSS against them.<br>
This is gonna be the name.<br>
Remember, Our redirects have three pieces of information.<br>
The name that describes them, the short euro like slash bites and the destination rule like https by them bites out of him.<br>
So this is the name and that makes sense that here.<br>
But this is a little weird.<br>
Name equals name.<br>
What is that about?<br>
Well, this name attribute tells you the key that you're gonna receive the value of the name of the variable you receive on the server side.<br>
And then the value in this text box is gonna be the value so later will have, like short your own.<br>
That name equals four year old.<br>
That's normal, but name equals name is weird, but in the last 30 is one of a placeholder.<br>
So if there's no tax, this will tell people what to type.<br>
And then if there's text there, the placeholders gone so we wouldn't be able to hover over that and, like, have a title pop up or maybe of a screen reader or something.<br>
Show it, then.<br>
Finally, we want to have this required so that people enter it.<br>
All right, well, that's it for this one.<br>
The short your ah, longer all they're all gonna be the same.<br>
Great.<br>
There we have the three pieces of data.<br>
Now, what's not obvious is we're also gonna need to pass around something that doesn't change this more matters in the edit mode, but more were working out.<br>
Let's go ahead and do it now we're gonna pass around an I D bypass around the i.<br>
D.<br>
This will let us change all three of these pieces of information at once and still get the same thing back in and save its one of a input type equals hidden name equals I d.<br>
Then this is the weird one.<br>
This time I d equals I d.<br>
Okay, and I finally just submit it will need a button type not a but Tom Thumb, but a button and the type will be submit.<br>
Let's give it some cool look with some classes.<br>
BTM, VT.<br>
And Dash Danger for a nice red button.<br>
This will be add.<br>
Redirect later, edited again like the title above will fix this.<br>
It's pretty close to being done.<br>
Let's do one more thing.<br>
While we're just typing away over here, there might be some kind of error like they tried to create.<br>
I redirect with a short girl and then already existed, So we're gonna have to tell them you can't great that already exist if you want to edit it.<br>
You're gonna have conditional here.<br>
So it's gonna be an error that we may wanna show.<br>
If we do, we'll have a div with class error message.<br>
And in it we just put air.<br>
Okay, I think that this might do it.<br>
Let's go try to refresh.<br>
We're here.<br>
Yes, sort of.<br>
I would prefer that to not be stuck there.<br>
Let's go fix that.<br>
And I'm gonna fix it by just putting it on top The very, very top if we go back.<br>
Perfect.<br>
Now we can add Excellent.<br>
And we put stuff, you know, Let's go and make a quick change here.<br>
And let's just print, got data into this one.<br>
We have the view model, which has a request dictionary, which it gets all the data from the headers from the cookies from the forms from the Urals.<br>
All that stuff so we can just see kind of a unified view of all the stuff that's getting submitted back.<br>
Let's put some stuff in here.<br>
So we're gonna go to talk.<br>
Python could be talk and talk with them like that.<br>
See what happens.<br>
Okay.<br>
What just happened?<br>
The data one away, actually, When it did is a request back to the server.<br>
It processed it and then it just stayed here.<br>
That's fine.<br>
We'll deal with that in a minute.<br>
But let's see what the output waas.<br>
So down here, we got our requests.<br>
Come in.<br>
And then look at this right there.<br>
All this date is coming in with a way to the right.<br>
This is the data that we actually care about.<br>
We've got the name is talk with on the short girls talk, the destination urinals.<br>
This and the idea is empty cause it's a new one.<br>
Not one being edited.<br>
That already has an i.<br>
D.<br>
Awesome.<br>
It looks like our HTML form is working.
|
|
|
show
|
10:19 |
well, we have our form in place to give us the data.<br>
The next thing to do is to work on our view model.<br>
Remember, the View models job is to take the data from the form validated, transform it and then say Yes, everything's okay.<br>
Here's the data or it's not.<br>
And here's the problem.<br>
So let's go do that now.<br>
So we just copied this.<br>
Remember, from the all redirects one.<br>
Give it a new name, but, Graham, that data that we had submitted over So let's wrap this around These are the things.<br>
These are the things that we gotta get from the post.<br>
So remember, we write things like that.<br>
Self dot name equals self, not request addict dot Get dictionary.<br>
Right.<br>
That's where this coming from name.<br>
And if it's not there, we don't wanna have none.<br>
We want to just have it like this.<br>
Then we're gonna do the same thing for you.<br>
Well, and you are l But writing this over and over comm get tiresome.<br>
So let's create a little temporary variable here.<br>
Just call it D.<br>
Normally don't like short variable names that are not descriptive, but in this case, I'm gonna get with it.<br>
We also want to make sure that we don't keep like, the weird white space at the end.<br>
If that was, the things will say strip and we want to short you, Earl.<br>
And this one, we're also gonna make it lower case because we don't wanna have upper case and lower case be a different thing.<br>
That would be weird.<br>
And then finally, let's Graham the I d Call it read Dry, wrecked I d.<br>
That was just coming in as I d Now this we don't care about stripping, but remember, everything that gets submitted to the website is a string and kind of see that here as well.<br>
When it comes back, it's gonna be a string as in like if it was a number to be Quote seven, not the value seven.<br>
But the database wants riel numbers, not strings that contained numbers.<br>
So we're gonna use this numb convert library here that has a try to convert to energy.<br>
And what it does is it tries to parse this as an energy, and if it fails, it returns zero.<br>
I think there's a way to set the default on default here toe be like whatever it is you want, so it's either going to give us a number back or it's going to give us something that is false, which is exactly what we want now.<br>
One other thing that's gonna be helpful later is when we're editing.<br>
We would like to actually have need tohave the redirect data to work with.<br>
So let's say self doubt redirect itself is going to be CMS service.<br>
Don't get not a dictionary.<br>
It has the ability to get a redirect.<br>
But by your URL not, but I d So that's right by I d and how self doubt requested he redirect 80.<br>
There we go and we'll go.<br>
Let my charm right that perfect.<br>
This is gonna be an integer and it's gonna return an optional Dix name.<br>
Cool.<br>
Now, if you look at the data over here the fake data it was easy to get stuff by short by the Earl because those were the keys.<br>
But we don't have that here.<br>
We get to real databases that's going to get better.<br>
But I gotta write some clumsy code to make this happen.<br>
It will say for you're a redirect in items like this, we can go and get the redirect and the euro.<br>
We don't really care about the girl, but the redirect we dio will say if reader act don't get i d Is this redirect idea we're looking for and we returned the redirect.<br>
Otherwise you return Nothing.<br>
Perfect.<br>
Now it turns out this is identical to what we're gonna need for pages later.<br>
So why we got in our mind?<br>
Let's just right the pages by ideas Well, and these little re factoring magic page page So they pages.<br>
And today either we have the pages one as well.<br>
Okay, so this is working.<br>
We could do a little bit of work here and say this is none.<br>
Say something like, if self taught redirect i d Then call this function right?<br>
That'll mean that in the ad mood, we won't be hitting the quote database for nothing.<br>
But it's not a huge deal.<br>
It's admin section, after all, but it's a little bit better, so we'll do it like this.<br>
All right, I think we're in pretty good shape.<br>
Let's go over here.<br>
And now we can show just the data that weaved, parsed out, which is a little bit better if we refresh it and resend it you can see we got the data requests and for the things that don't matter But here we go.<br>
Here's a short your URL the redirect i d.<br>
The redirect is none.<br>
All of this stuff is coming out of that view model so it got it correctly, All right.<br>
Last thing to do is we need to know.<br>
Did this work?<br>
Does it have the right data, or should we keep them on the Forum and tell them that there's an air?<br>
So let's have a function called VM Don t validate like so if it's not the case we're going after, not here.<br>
If there's some kind of error, we want to reload the data.<br>
12 Do Nosek and we want to stay on the same page.<br>
Otherwise, we want you to print would have some like this would have created your own, and then we're gonna take them somewhere.<br>
This is the redirect.<br>
Get post, redirect where we're going to send them.<br>
Let's send them back to admin slash redirects.<br>
They just created this new redirect and then working with a list of redirects.<br>
So this will just take them back that list that right at the top, they could go edit it, test it, whatever they want.<br>
The last thing to do is write this, and the idea is we want to make sure that they submitted a name and you are ill and that the redirect i d makes sense and things like that, you might say, Well, name is required.<br>
Why do we have to test it?<br>
They don't have to have their browser obey.<br>
What are HTML was that might not even be a browser That might be some like script or something.<br>
So we need to check them on the server.<br>
Always both you that.<br>
So we'll check to see if the name is there or if it's just empty white space.<br>
But other than that, it's empty.<br>
That's true.<br>
Will say you must specify name.<br>
We're gonna do the same for your l and short euro.<br>
Well, those are the three obvious ones, but we also want to check to other cases.<br>
If there is a redirect idea, better correspond to an existing redirect, and when they're creating a new one, we want to make sure that they're not trying to create one where there's already going to be a short girl.<br>
That would be a conflict.<br>
So we don't want that.<br>
We want to check those two cases as well.<br>
So in this case, there's an I D that makes they passed along.<br>
But we couldn't find its corresponding redirect.<br>
So that's a problem.<br>
Okay, and then the other one is the opposite.<br>
So there's no I d.<br>
And yet, so there's no idea that means there's added a new one and yet were able to find a redirect by the short girl.<br>
So the redirect with the Royal short Girl RV exists.<br>
Now all of these needs a indicate and whether or not this was good or bad will say false else.<br>
It wasn't okay.<br>
Not okay.<br>
None of these were okay and here will return.<br>
True.<br>
We can be a little more explicit in saying this returns a pool.<br>
Okay, I think those are the cases.<br>
Let's go over here and just check one more time that everything is hanging together.<br>
Try to repost this and remember, it's talk is what we're after.<br>
Yes, So we would have sent talk over to talk by fun.<br>
They're so Let's try one more time and get some more validation test.<br>
This is gonna be bites.<br>
Remember, there's already one for bites.<br>
So this will be not the bites because it's not gonna work at redirect boom.<br>
Redirect with your URL bites already exists.<br>
Perfect.<br>
We could make it high any tiny, bit better if we just put last year.<br>
So it's clear that that's the euro.<br>
All right, well, I think that does it.<br>
The one last thing that is annoying is if I repost this all the status here is gone so we can fix that super easy Over here, we just say value equals.<br>
Pull the data out for name and do that for short your islands on.<br>
All right, so if we try again, check it out.<br>
Test bites, not the bites.<br>
Bring and put a bites to this.<br>
Should work should redirect us over to the list, which is not yet getting populated.<br>
But it will soon it will soon.<br>
Ready, Set, go.<br>
Yes, Validation past.<br>
So it decided we could go on and you'll see it sent a little message at the bottom device to we're now gonna go here.<br>
Awesome.<br>
So our view model in our data exchange and all of our data validation The super simple stuff like name has to exist in the more interesting stuff like you can't duplicate short your ills.<br>
It's all in place and it's all working.
|
|
|
show
|
3:36 |
what was very neat.<br>
But I sure don't see our new redirect here.<br>
And that's because we're not done.<br>
I'm over here.<br>
It says we get all our date, exchange and transformations.<br>
We did our validation and we stayed on the page If there's there and we did a redirect, but here it just said, Oh, yeah, we would have done something with this But you know, we don't We're not sure what to do.<br>
So now it's timeto have something to do.<br>
We can import the CMS service and we can say create redirect and what we wanna pass in about v m dot name v m dot short your l and V m That's it right in there.<br>
Cool.<br>
How the view models are just got that data.<br>
You know that, like this is already trimmed and lower case.<br>
Don't worry about that.<br>
This is already trimmed.<br>
Everything's good.<br>
Let's go and create that and say it's gonna take a name into the string.<br>
Sure, you know how much the string and that which is Ah you know, string.<br>
I guess we should have a little test.<br>
So we'll have something like if get redirect.<br>
I short your l we'll raise an exception.<br>
It's not likely cause we've already tested it.<br>
But people mess with a view model, they mess up that validation.<br>
We want to just have one more check here.<br>
So the data that we're gonna have let's go and look at our fake data.<br>
It's gonna be this type of stuff right there.<br>
That's the structure we need.<br>
The data is gonna look like this.<br>
I d Let's just do a random I ran into from 100 to something bigger.<br>
The euro is going to be, well, the euro, the short your l is gonna be the short euro.<br>
And what you guys think the name is gonna be.<br>
Yeah, Not a lot to that, is there?<br>
Yes, we have this data.<br>
Then we just say fake data of a reader.<br>
Rex short Euro is data, and that will put it back into that dictionary.<br>
Fake in memory database.<br>
Exactly.<br>
Is all the others are cool, huh?<br>
All right, let's run that once again.<br>
Take this through the entire loop of its life cycle.<br>
So over here in that man over here, we're gonna build a now, add a redirect.<br>
Let's say we'll have on for talk Python and this would be talk and as this now that you created and look at that boom, it does right there so we can test it.<br>
Notice at the bottom.<br>
The left the world's gonna request is Locos slash talk.<br>
Where do we end up?<br>
Yes, exactly.<br>
Our new redirect was created, and then now it's working, just like as any of the other ones that were there.<br>
Let's go and add just one more just for the fun of it.<br>
Let's call this Google.<br>
Guess you need a short way to type Google.<br>
You just type G here.<br>
First list trying to have talk?<br>
No, we just out of that that already access.<br>
Well, I guess that's a weird name for Google.<br>
Let's try G gold now exist.<br>
Test it perfect.<br>
Google is working just like you'd expect.<br>
Now we can add these reader X dynamically there saved in our big little database.<br>
Remember, student of a real database.<br>
But for now it's just a little in everything, and it looks like our adding new read Rex is totally nailed.
|
|
|
show
|
7:20 |
Well, we got the ad work.<br>
Let's see how and it works.<br>
So we got this year.<br>
Let's try to edit this one.<br>
I'm not as amazing as I was hoping for a four cause we obviously don't have anything for that.<br>
Your girl And what we're gonna do is it's gonna be nearly identical to this, and it redirects Let's go over here and change all of the ads.<br>
Edits What's the euro gonna be?<br>
Not just it it redirect, but remember, it has the redirect I d over here and we'll go ahead and explicitly say This has to be an integer and let's copy.<br>
That's over.<br>
Well, it add that No, it won't out.<br>
It would be cool.<br>
Major act I d and cool.<br>
All right, Great.<br>
So let's pass this over.<br>
Remember, this has to get to our view model.<br>
Go here and check this out.<br>
So let's do it like this Private bus.<br>
Twice we go and say there is this reader act i d, which is an integer which starts out as none say it starts out at zero, and I guess we don't really need to get it this way, do we?<br>
Because not really coming from that dictionary.<br>
We're just passing it, so ah, mistake that I put it that way, but we still want to hold it So we'll say self dot Redirect I d Well is the redirect, Eddie?<br>
Perfect.<br>
So now we've got this being passed over because it has a default value When we don't pass one up here, it's gonna be OK.<br>
But when we do down here, it's going to take it super.<br>
All right, So I think this should be working.<br>
And what else do we need to dio we need?<br>
I guess we could say really quickly here.<br>
If not v m dot or redirect right?<br>
You try to edit something doesn't exist.<br>
It's good and say you're never gonna be able to edit that, so we'll put it there.<br>
Nice.<br>
And for this one gonna validate it instead of create.<br>
We want to do an update.<br>
And over here, we're gonna need to pass the vm dot i d redirect idea as well.<br>
That looks actually like all we really need.<br>
We just gotta create this function, which is gonna be not terribly different, this one.<br>
Lets see.<br>
So this is gonna be kind of the opposite.<br>
So we'll have redirect equals get redirect by I d like so then there's this little weird educates we're gonna have to deal with, Like, you might think we could just do this and we can We can come over and say, All right, we're gonna change the redirects short URL to be the short euro fine and the euro and the name that's actually gonna change it in the database.<br>
But the one thing that's a big problem is if we changed the short, you're all remember, it's still stored in this larger dictionary, this thing as the short girl.<br>
So we got to do something a little bit funky like this to say, Remove whatever it It's current.<br>
Short.<br>
You're Ellis.<br>
So I want to take it out of the database, change it, and then we're gonna put it back.<br>
Looks like a little bit extra work that seems unnecessary.<br>
But if you change the short euro, you would end up with a copy of the same data the new 100 old short euro and the current one under its new short euro.<br>
Right, So I know that I ran through this once and it was weird.<br>
Okay, so this should update the existing one.<br>
I guess we kind of want the opposite of this is Well, we want to have a check to make sure this makes some sense.<br>
Well, if not redirect, cannot update didn't exist.<br>
Let's go and try to edit some stuff.<br>
This is where it should all be coming together.<br>
First of all, yes, close.<br>
So close.<br>
Well, if those were filled out, that would have been amazing.<br>
But it's not.<br>
And there's one more thing we're missing here, so we're gonna go and get this back.<br>
But we want to say, basically, if there is a redirect, we need to pre populate it with the data because in the initial load, this is all gonna be empty.<br>
But what we need to do is say, Look, if there's a redirect, were editing Self dot Name is self, not reader acted.<br>
I get name and so on.<br>
All right.<br>
Not much of a change, but that should get our form looting right off the bat, just like that.<br>
Perfect.<br>
So let's go back and start over.<br>
So add a redirect this talk Python one.<br>
Now it's here Let's see if we can edit it.<br>
Fingers crossed.<br>
Oh, yeah.<br>
Look at that.<br>
It is.<br>
Call it.<br>
Talk Python To Me and let's make it talk, Python.<br>
Something like that.<br>
And I guess we can just edit this just to make sure that is taking all these into account.<br>
All right, so talk Python.<br>
No, it didn't do that, did it?<br>
What has gone on here?<br>
We missed something.<br>
Ah, I know what we missed.<br>
What we did here is ah, we accidentally threw away the data that we've loaded from the form.<br>
So we're going to change the order here?<br>
Sure.<br>
So let's make this a separate function.<br>
Death.<br>
We still need to have these in here just for Pythons.<br>
Sick as nothing.<br>
Otherwise it might not work, as we're expecting.<br>
You know, we might expect that variability there.<br>
That's a good commission.<br>
But that means over here in these two form places where we have to say process form in the two posts.<br>
All right, one more time through this adventure, let's see if we can do it.<br>
Over here go the read rex at a new redirect dot Python talk.<br>
All right, it's there.<br>
It works.<br>
now edit it.<br>
Okay, It's loaded to me.<br>
Talk to and Mr Mark.<br>
Source equals seven.<br>
My seven eagles seven.<br>
Whatever.<br>
Yes.<br>
Look at that.<br>
Now we're able to edit it.<br>
It's like that back tested the sources up there, just like you would hope.<br>
All right, let's put it back cause that's wrong.<br>
It's this and the source thing is not here.<br>
But it's so cold.<br>
Talk with onto me.<br>
Perfect.<br>
Looks like we got our edit as well as our create working.
|
|
|
show
|
1:50 |
we pretty much have this working.<br>
We're over here.<br>
We can had a new one.<br>
Let's add redirect, hampered her stuff and click the add redirect button.<br>
And we can edit one over here where we wait a minute.<br>
What is this?<br>
We have add, even in our edit.<br>
So we need some way to indicate Is this and edit mode or is it in ad mode?<br>
And the trick will be whether or not we're passing along one of these redirect i ds.<br>
So let's go down here and look at this.<br>
It turns out that I made a little bit of an error in this one.<br>
That should be redirect I d.<br>
It was passing I d over and some circumstances, but not all of them.<br>
Actually, you know, it's in the euro we don't even hear.<br>
So what we do need to know, though, is whether or not there's an I D.<br>
And that's by using the redirected e.<br>
So here, check this out.<br>
We have add, could have edit and and flask weaken more like more specifically in Jinja to come over and say, we're going to have edit.<br>
If there's a redirect, my dear, that's not empty else.<br>
We're gonna put ad right there and then we could do this in the button down below as well.<br>
So change this ad, Teoh.<br>
Sometimes that it sometimes add make that lower case to be consistent.<br>
Now we come over here and we refresh that we edit the redirect, and here it's a edit or save or something like that.<br>
Now here, if we want to create a new one, it's an ad ad.<br>
And if we want toe edit an existing one, it's at it.<br>
And at it, super, super easy.<br>
Just this basically that little bit of text instead of just add and we're off to the races that pretty much wraps it up.<br>
Our edit, CMS said, Well, basically are redirect CMS is more or less complete.
|
|
|
|
34:38 |
|
|
show
|
3:39 |
Well, I'm pretty excited because we've come to the chapter where we really get to focus on what you probably consider as the core feature of a CMS, or content management system, that we're plugging into our Web app here.<br>
But what are we talking about with these CMS pages?<br>
Probably the best way to understand it is to compare them to traditional data driven pages And I was just looking at an example, and then I'll make sense of these two for you.<br>
If you're not sure what I'm talking about.<br>
Here's one page from our website Weaken.<br>
Go and dig into the details about a package.<br>
This one is the AWS Seal I, the Amazon Web service command line interface.<br>
Here's another one where we're getting help.<br>
We haven't created this one yet, but we're going to create this one pretty much as Is this what you would get if you click that help link in the top of the navigation?<br>
At first glance, they look kind of the same, right?<br>
They have the same shell.<br>
The CSS style is definitely the same things like that.<br>
However, they're very, very different.<br>
One on the left is a data driven page, and what I mean by that is in the database, there are multiple entries or models that have certain pieces of information.<br>
In the job of this page is to in a very structured way, pull out the specific version of that model from the database.<br>
So, in this case, plus a WSC Allies settings and fill them in all over the place.<br>
Like right here We have the name of the package in the current version that's shown on this page, and we have the command to install that package.<br>
Do we have whether or not it's the latest version?<br>
And when that version was released till we pulled the package details from the database and a list or collection of releases from the database?<br>
We also have the summary of the package.<br>
Here we have a bunch of links that will take you they over the project description or the release history or the condemn mod files from this all has to do with this particular package links at the bottom like you barely barely see home page down there That's of course, set in the database in this description as well.<br>
Everything about this, his just I'm gonna have exactly this structure, but very by the piece of data that working him back a good example to think about this also might be Amazon, right?<br>
Like I'm looking at a book that looks the same for every single book It just happens, have different details filled in on the right.<br>
The CMS page is very different.<br>
It's probably stored in the database technically, but for all purposes, it's just a blob of text that's dropped on the page Right this.<br>
Hello, this help with Pipi, I do you need help?<br>
It's on the package.<br>
That whole section, there's no structure.<br>
It is.<br>
Here is the text boom.<br>
Whatever they typed in its that this is great for landing pages for these help pages for other parts where people just need to write informational stuff on the Web.<br>
But it's not exactly structured with a whole bunch of different things.<br>
Coming out of the database like this one on the left is Do you might ask Why do I need to put that in the database?<br>
I could just create static files.<br>
I could go and create mark down.<br>
There's even whole things like Pelican, that will actually go on a problem.<br>
A bunch of static files generate these Web pages that would look like the thing here on the right.<br>
Well, that works for the Corbett.<br>
But there's also other dynamic things.<br>
Notice.<br>
We still have the fact that you're logged in or you're not logged in whether or not you're in admin.<br>
There's a lot of stuff going on that still needs the smarts.<br>
Needs the behavior of our data driven Web app.<br>
It's just this page.<br>
Why do we need to go right source code to create it.<br>
We don't My show, Bill.<br>
Just log into an admin section, type some stuff out, and now we have a help page on our website.<br>
So that's what we're gonna focus on this chapter building the thing on the right Basically, the white part of the right page wouldn't be a lot of fun
|
|
|
show
|
7:46 |
it's time to improve how we show pages to our users.<br>
Remember our CMS request.<br>
This is the one and only view method that gets to handle basically all the requests that show anything or respond to a user in any way with regard to our CMS.<br>
So we've got our view model and then we say If there's a page, we're gonna return just this string.<br>
That's not ideal.<br>
And if there's a redirect, this is pretty good.<br>
We're going to just return the redirect your l That we made sure carries over things like the query string and what not?<br>
And if we don't have a page, we don't have a redirect.<br>
Must be something we don't think is any sort of object in our world.<br>
So we're gonna say it's for four not found.<br>
This is where we need to focus for now.<br>
We want to render whatever page content is in our CMS as if it belonged in the page.<br>
It's not doing that right now.<br>
Let's see what we got.<br>
Don't go anywhere.<br>
Yes, and it just has title Is this and then just the each team l like it.<br>
We've you know here in view source on this That does not look like Well, any other part of the site does it right.<br>
It doesn't look like this page.<br>
It doesn't look like this page and so on.<br>
So the goal is to use a proper template that has the same shared layout and all those features about whether or not you're logged in on this page.<br>
We're gonna focus right here for the moment.<br>
Now, if you look at the other view methods, we have this response.<br>
Decorator, this is something we created specifically for this site.<br>
I'll go and copy while I'm here.<br>
Let's put it up here.<br>
I'll show you what it does in a second.<br>
Let's just set up the right Uriel before I forget.<br>
So this is gonna be in the CMS, right?<br>
Because we're in the Seimas views.<br>
There will be a CMS folder, and then let's call it something like Page.<br>
Traditionally, we've called it the same name as we had here, but it's only really processing the situation when it is a page.<br>
So I'm gonna be specific and say, Here's the template for wouldn't were given page, Right?<br>
So what the heck is this?<br>
There's other ways in flask like last that render template and so on.<br>
It's fine.<br>
You can use it.<br>
But one of the thing that's I think is much better about some other frameworks is the ability to just return a simple set of data here.<br>
Simple dictionary.<br>
Like we could say a equals B right?<br>
We could say not equals colon.<br>
Maybe we could say title Colin pays.<br>
I get title, etcetera.<br>
Vienna Pidge, what happens if we do this over here?<br>
Make this request.<br>
Now we get Jason response.<br>
No, not what we want.<br>
We want to pass that data over.<br>
So that's one of the things this response template does.<br>
And it turns this dictionary into data that's passed over.<br>
It's probably won't run if I do it this way.<br>
But if I send over the m dot get the dictionary that they will, this will return the dictionary of all the values that are in the request.<br>
Few model.<br>
It's over here like the your l and so on.<br>
Looks like we need to import this.<br>
There we go.<br>
All right, Now, is this gonna work?<br>
No, because we don't have one of these pages, so Let's see if it will do anything.<br>
Nope, I guess I got to rerun it.<br>
That's not the error.<br>
Is expecting this one.<br>
Simply not found.<br>
All right, so we got to get our CMS page in place.<br>
As usual.<br>
There's a lot of structure already here.<br>
That's it.<br>
Would like the title and the main content blocks.<br>
And it's just so much easier to copy and paste, so we'll just call that page h t mail over there.<br>
Now, what do we want to put in?<br>
Well, a lot to work with here already, remember were given the view model, which, if we look at it over here, these various things, you know, I think I want to go back.<br>
I had done this and said it would be fun.<br>
Toe put this as a property.<br>
I'm gonna put this back.<br>
All right.<br>
Well, that's all well and good.<br>
Now, over here, when we get that wouldn't have a page that's passed over and let's go and just do the simplest thing first.<br>
Let's put the title in here.<br>
Well, say page dot Title in over into this section, we could have our content.<br>
We could either just drop it in like this or we could put it inside a div.<br>
Yes, I'll put inside a div page dot Going like the page is gonna have content over in our fake data pages.<br>
Right here.<br>
You see, they have content.<br>
And here, this is the most interesting one.<br>
We have these HTML content, so we want to put those there.<br>
Let's see how this goes.<br>
We try this one, let's try a different is not gonna come out is good.<br>
Our company employees first.<br>
Yes.<br>
Look at that.<br>
That is so much better.<br>
We have employees.<br>
We have history, right?<br>
That looks pretty good.<br>
We've got a little bit more work to dio to make it.<br>
Ah, little bit better as it will see, Like the donate ones Not quite gonna work.<br>
And the more complicated that we make these pages not quite gonna work the way that we expected.<br>
But this like this, this looks pretty legit.<br>
I feel like we're doing a good job making this feel like it looks like the rest of our site.<br>
If we cycle between those, I mean, that's pretty awesome.<br>
The only difference here is the really the scroll bar and That's just cause it's a bigger page one.<br>
Quick fix, though.<br>
One quick update before we move on.<br>
Right now, we have this as plain text in those two that I showed you in the donate.<br>
When we have HTML later on, maybe want to store this in another format as, say, mark down or something like that and then render it as HTML on the server side before we show it.<br>
So let's make one quick change to make this more flexible.<br>
So I'm gonna say self dot HTML equals nothing.<br>
But if there's a page, we're gonna get the contents and just put it into the HTML.<br>
It may seem silly and not really valuable at the moment, and that's pretty much true.<br>
So I gotta call this h two males.<br>
Make sure it still works black.<br>
Refresh it.<br>
Yep.<br>
Works just exactly the same.<br>
But this will give us the flexibility to store data in a one content and then render it in another, which is gonna be really valuable as we switch over to things like mark down and allow you to have more flexibility there.<br>
All right, that's it.<br>
So we've gone updated this to use a response template in the case that we return a dictionary.<br>
It automatically maps it over to this page in the page or showing the title here and the HTML here.<br>
01 thing I did overlook is Let's put the title of here.<br>
How about Hi, p I this Let's just go back and see that that works appeared in si about the demo.<br>
If I refresh this FBI company history, we got employees.<br>
I p I colon, our team.<br>
Perfect.<br>
So now we're even setting the title of the page.<br>
Not just the better of the patient.<br>
Right?<br>
Looks pretty good.<br>
We're off to a great start on this one.
|
|
|
show
|
3:25 |
so you can see that our page looks really good.<br>
It completely adopts a navigation.<br>
I could even log in and go back over here and I can see it respects whether or not I'm logged in exactly as we described at the top of the chapter.<br>
This is great.<br>
However, I've been sort of skirting around one of the issues that were going to run into here, and it's time to address it.<br>
And that is the fact that there's no riel true content specified in the CMS For this page.<br>
What we have is just plain text.<br>
If we go to another page like this one that had HTML in there.<br>
Move, boy, What is this?<br>
What is going on here?<br>
This is this is not ideal.<br>
Here's a hyperlink.<br>
I can't click it.<br>
Obviously, there's no format.<br>
So what's happening?<br>
Well, this is Jinja to trying to make sure that we don't get hacked.<br>
What?<br>
What do we mean by that?<br>
Imagine we're running a forum like stack overflow or something like that.<br>
People users can come create account, and then they can type in content that will then be shown back to other users If they type something like, Did you know you can donate to the PSF?<br>
Here's a link that's great.<br>
But if they type slash script, here's some evil JavaScript or other types of militias.<br>
HTML.<br>
And it were to just show it back unmodified.<br>
If we let them type anything in here, they could basically do cross site scripting and other types of attacks against all of our users and take over the page and redirect people to weird places all sorts of stuff we don't want.<br>
So by default, Jinja will not show raw HTML and knows that that's a pretty bad idea.<br>
But in this case, remember the point of allowing people to type and content here We got to think of who is going to be typing that content.<br>
It's not random user off of the Internet.<br>
It's somebody at our company, somebody that already controls the website and admin user where they come over here.<br>
Well, we're not quite there yet where they go over that section and they can type into there, and they can specify what goes here, right?<br>
So in that restricted case, this is safe.<br>
All right, what are employees?<br>
Air typing should be safe.<br>
If we don't trust people to not hack our own website, they shouldn't be working for us.<br>
So over here the fix is simple.<br>
The motivation and the idea is really important that you get it.<br>
Because if you put this kind of statement onto user generated content, you're just waiting to be hacked her like, have your users be attacked by the person who typed in.<br>
But in this particular case, because we trust this input, it's fine.<br>
The fix as simple it is to say no, no, no, This is safe.<br>
Please don't each TML encode it.<br>
Just drop it on the page.<br>
We just save and refresh.<br>
But ah, there we go Now how we can donate to the PSF And if we click on the link Yep, We're actually over there donating.<br>
So now we've got our cool interaction happening, just like we'd expect right now, our CMS page in our data driven page, they look basically indistinguishable, right?<br>
And that's what we want.<br>
We don't want users to go.<br>
Here's the weird, funky CMS side of our site.<br>
And here's the rial side of our site.
|
|
|
show
|
1:37 |
before we move on, let's quickly summarize our HTML Jinja to template that we used to render the CMS pages and wow, are they simple?<br>
Look at this.<br>
All we have to do is set the title.<br>
Remember our view Model passes over all of its fields, including the page and HTML, and the page has a title, so we're going to set the title.<br>
That's the thing that shows up in the tab the official title that would be in search or whatever.<br>
And then we're gonna have a block for our main content.<br>
We're gonna add a padded CSS style or class so that we don't have everything just jammed up against the edges.<br>
And then he said again, the each one of the page to the title as well.<br>
And then we have to just drop the HTML on the page, and we saw that we just dropped the HTML like curly, curly HTML close.<br>
Girlies, it's going to try to protect us.<br>
Jinja to is going to say, just to be safe, we want to make sure no one has written malicious HTML are most likely JavaScript and submitted it in a way that could be shown back in like a forum or something, so we're going to encode that.<br>
So we're sure that it's safe.<br>
But remember this HTML is not entered by users.<br>
It's entered by us, the people who run and create the website.<br>
So we trust it and we want to actually put that HTML in the page as content.<br>
So we do pipe safe.<br>
So one more time, just a warning safe means that this cannot be used for you know, user generated content or you're just asking for somebody to cause problems It's definitely would be a security hole in that situation.<br>
But because we trust the input, it's fine for us to do this and that's it.<br>
This is our template we used to render the page.
|
|
|
show
|
3:52 |
what we've had the ability to list redirects in Because that's so similar listing pages, you can bet we're probably gonna fly through this.<br>
All right, so let's just clone this over here and make this pages and this will be pages.<br>
It's all looking good now.<br>
One thing.<br>
I just want to make really quick pointers I had previously when I wrote thes put it like this and the combination of the blueprints, the response decorator and this don't work in that order.<br>
So I had to switch.<br>
It's the blueprint has to appear first.<br>
I don't think it really matters which of those two pure next.<br>
But if you're following along, but not copying what we've done here, go ahead and make sure just test this admin stuff works when you're not logged in and put it second, Put the blueprints first, basically.<br>
Okay, so let's go work on these pages.<br>
We need a page is a list of your model and let's go over a view model or admin.<br>
Make a copy, as we're apt to do, call its pages, maybe make this pages and this We've already written this function all pages.<br>
Well, that was easy We're good.<br>
Good with this one.<br>
Now, we could have kind of, like, combined these and be a little bit slower, but it's admin educators.<br>
I'm OK with having to write.<br>
So we're gonna have this.<br>
We gotta import it.<br>
I didn't change the name tonight.<br>
Just the file name, not the class name pages.<br>
There we go.<br>
Now.<br>
We could import that at the top.<br>
It's close to working.<br>
Oh, be careful.<br>
Careful.<br>
This actually won't run.<br>
I don't think we try to run it.<br>
Yeah.<br>
Says the view functions overriding existing one.<br>
But that's because this is redirects.<br>
And this needs to be pages.<br>
Hey, we should be close just to get a missing template.<br>
Errors.<br>
We go over to admin.<br>
It used to be a 44 Now we just have admin pages.<br>
So let's go out that real quick, and we should be in business.<br>
Like I said, there's just mimic her mirror what we did over in the redirects or the pages.<br>
So read rex pages and this will be pages.<br>
Basically, we just got to go through and see where we talk about redirects and change it to pages, but it's really, really similar fact at home is good.<br>
This will be at a page.<br>
This doesn't exist yet, but it's going to go.<br>
And this will be peon pages.<br>
Let's see what we got going on here sort of test was Just call it visit or view called View, and it's be your URL for the page and then over here and edit.<br>
It is fine.<br>
So let's say and it page again.<br>
This doesn't exist.<br>
What's going, Teoh?<br>
That's fine.<br>
We don't need or even have a name.<br>
And then for this we just want to set this to be p dot title.<br>
All right?<br>
Unless I missed, something here.<br>
It's so far is looking good.<br>
I think they should work Ready, See if we can lister pages.<br>
Oh, sweet.<br>
Look at that.<br>
All right, so here they all are and we go back and go down again We've got a redirects.<br>
Here's our reader X and our pages now work.<br>
This will be a for four.<br>
We haven't done that yet.<br>
We're going to shortly.<br>
Same with edit.<br>
Just like with the redirects.<br>
Add a new one and edit is almost identical.<br>
But view that should work.<br>
Can we do it.<br>
Boom company history.<br>
Fantastic our team and donate to the pierce off Samos clicking right there.<br>
All right, well, those are the three pages in our site, and we can list them and view them.<br>
And we're on the precipice, the edge of being able to edit them.<br>
But no, we can't quite edit him, because that's one more thing we gotta right, but yeah, this was the next step in adding page building, edit and create pages in our CMS.
|
|
|
show
|
9:06 |
that we have our listing of are available pages.<br>
Obviously, the next thing to do is add them or edit them.<br>
So let's look at adding first.<br>
Now we can just click here, right?<br>
Maybe not so much.<br>
We have written that part.<br>
So what we're gonna do now is implement this ad page and just like the redirect version, and it is going to be basically the same thing.<br>
So we're gonna more or less start by creating stuff that hasn't with editing, and the new page will just sort of fall out of it.<br>
So let's start at the HTML side, and we're going to go and just make a copy of this and it redirect.<br>
It's pretty similar.<br>
Honestly, we'll call this edit page again.<br>
Add at it sort of same thing.<br>
So let's say back two pages and he won't go back to that pages list.<br>
And this will be if page ideas.<br>
So it's gonna work our way through and just basically replace all the stuff to do the redirect redirect with pages.<br>
For the most part, it's the same.<br>
But there's enough difference that I want to make sure we walk through it together So, you know, pages don't have names.<br>
They have titles.<br>
They don't have short and long euros.<br>
They just have a single euro, something like that.<br>
Perfect.<br>
Now, instead of having this part where we have the aura which we just did above what we actually want is we want tohave rather than input.<br>
We want a text area because to type out our page contents, it's gonna be multi line reform and George stuff.<br>
And that's not input type equals text.<br>
It's like one liners.<br>
Text area is what we want and the name is gonna be content.<br>
I d is gonna be contents.<br>
Let's make it a little wider and maybe a little taller.<br>
That's good.<br>
Let's also give it a placeholder, so people know what the type.<br>
And here's a B content a HTML of your page and just like before we're initializing it to the data center over.<br>
So let's initialize this to contents, and it's important that there's no spaces here.<br>
There's the angle bracket right there and there.<br>
Otherwise, those spaces will actually appear as if somebody type them in or anything like that.<br>
Okay, and let's see, this will be a page idea and page.<br>
Oh, okay, that was a lot.<br>
But, you know, I feel like we got it in the big difference here is this text area next door to come over here?<br>
This is our views, and we're gonna dio sort of had a redirect.<br>
We're going to add age.<br>
So let's go over here and say Page and just like before, we just work away through all right, making her way down.<br>
We're still going to create the view model, but let's hold off on that for a minute.<br>
It's gonna be create page, and this will be VM.<br>
Assume it has a title, a girl and contents.<br>
And when we're done and we don't take them to read Rex, we'll take them to yeah, pages plural.<br>
Next thing we want to do is work on that.<br>
It would also need to create this method, but let's get the data from the view models first at over here, but admin again find the closest thing that we can and make a copy.<br>
So that's this one at a page.<br>
Not when a pass in the page i d.<br>
This is going to be page title and content.<br>
All right, so far, nothing major.<br>
But we got to make sure that these do match up on the right and left And this will be contents that's going to leave this.<br>
Obviously, that's not quite what we want.<br>
And then down here in this process form, remember what we did.<br>
This is when we submitted.<br>
We're just going to reverse everything.<br>
So again, title.<br>
This is gonna be contents, but we don't want a lower case it.<br>
Oh, here we go.<br>
Right now, we're gonna just do the validation.<br>
And we should be already with their view models.<br>
No, not sure.<br>
I'm gonna require contents here.<br>
Maybe we want to be able to create the page with the title and then go back and edit it.<br>
So let's just leave it like that.<br>
And this is gonna be page I d.<br>
So do they specify a page I d to edit?<br>
But we couldn't find one.<br>
And then the page with I d whatever the page ideas doesn't exist in the reverse.<br>
If there's no page I d specified.<br>
But we can get the page by its girl.<br>
That's a problem, right?<br>
We're gonna have a conflict between two pages of it the same mural.<br>
So that's not gonna fly.<br>
So he will just say page with the same mural.<br>
All right, well again.<br>
Lots of stuff.<br>
That's really similar.<br>
But it's not seem enough.<br>
That's one of fly through it.<br>
So here we go.<br>
We got our title, Uriel.<br>
Contents were setting those up and or getting them back over here.<br>
It looks like that part's pretty good.<br>
We've got our HTML.<br>
We've got our view model, and now we just have to import it.<br>
Oh, we haven't set the class name.<br>
Just the file name again.<br>
Page.<br>
Here we go.<br>
Now we can import that.<br>
All right.<br>
Last last thing to do, I think, is gonna veto.<br>
Create this.<br>
Let's go on.<br>
Right that function.<br>
It should be very similar to the create Redirect.<br>
But let's just make a copy.<br>
All right?<br>
So if get page the Earl than it already exists, it will set the title and the contents, and here we go.<br>
Two pages said it by the euro.<br>
And you know, the honestly that might do it.<br>
We're in a good place.<br>
I think this is gonna work.<br>
There may be something I forgot, but you know, the only way to find out is to go and request it So let's click here and see who so good, so good.<br>
You see?<br>
So the title of the pages will be simple test and this would just be test.<br>
And here we'll put our contents.<br>
This is the make that bold contents of the test page down here says add.<br>
Remember, add page and page for the ad.<br>
Thing is working.<br>
Right?<br>
Fingers crossed.<br>
What we're gonna get Who?<br>
Look at that.<br>
At the bottom.<br>
There.<br>
Simple test.<br>
Oh, yes.<br>
That's actually pretty awesome.<br>
Let's go and view it.<br>
Oh, my goodness.<br>
There it is.<br>
There simple tests.<br>
This is the content.<br>
Bold ID.<br>
Not with the embedded HTML, but the effect of what we wrote.<br>
Bolder contents off the test page.<br>
Oh, yeah, that's awesome.<br>
So now we can see the pages again.<br>
We can't edit them because we haven't written that part yet.<br>
We're getting their start by ad.<br>
Then we'll do at it.<br>
But it looks like this is working right.<br>
Slash Test is gonna open this page.<br>
Perfect.<br>
So we have now gone and basically leverage what we did with the add new redirect to convert that over two pages.<br>
Now, one of the challenges we have is this is a really crummy editor to write in.<br>
We're gonna make this much, much better.<br>
There's tons of stuff we can do here.<br>
But this first pass the ability to write HTML and get it to be a page of virtual page on our website here that's working.<br>
That's great.<br>
Let's do one more thing really, really quickly.<br>
Let's just go and test that the validation here works well, I guess we can't edit.<br>
We go try another one, though we go and try to create this.<br>
You see, these fields must be created so we could say simple test to it's put in something wrong.<br>
And so we're gonna try to duplicate this right push us back the server, and down here the page with the euro slash test already exists Oh, it must be tested to.<br>
There we go.<br>
Now we have our test in our test two.
|
|
|
show
|
5:13 |
Now we can add new pages.<br>
Let's go and edit them.<br>
Yep.<br>
Okay, I start all over again, but this time it's gonna be even easier and quicker.<br>
So here we have added new page.<br>
Let's just go and copy this for our edit number.<br>
It's really, really similar.<br>
Basically, add is a subsets We're gonna go through replace and with edit all over instead of create.<br>
We want to update a page.<br>
I'll use the page.<br>
I d like that.<br>
Now, this function doesn't exist, but we're gonna work on it.<br>
One other thing we have to do, though, is in our your URL on our route.<br>
We need to pass across the page.<br>
I d so wants a page.<br>
I d like this now notice.<br>
Preterm says it's missing missing from the function.<br>
And let's be clear, this is an energy er and we can even get flash to convert it to an energy like this.<br>
And of course, we need this on both versions and here doesn't expect to pay Jaidi.<br>
Yes, it does.<br>
It just uses an empty one if you don't specify it.<br>
So let's pass that along.<br>
Oh, well, let's see if the at it get edit part will work force.<br>
Earlier, we had a 44 rulings like this.<br>
What if we click on it now?<br>
Not running.<br>
Let's see.<br>
Is it not running?<br>
Let's go ahead and just rerunning.<br>
What did we miss?<br>
Add page post.<br>
We don't want ad.<br>
We missed it at it.<br>
So while we're here, let's go ahead and add this function.<br>
This is gonna be an int the rest of strings again.<br>
This is gonna be a whole lot like updating a read the redirect so borrow from over there.<br>
Perfect.<br>
So first win a rename that page.<br>
That and the Slavic It page by I d and page I d.<br>
Beautiful pages.<br>
Get the you, Earl.<br>
I remember we were storing these by there.<br>
You or else, we got to make sure we get rid of it.<br>
Case.<br>
That's the thing that changed.<br>
This is gonna be title that strip.<br>
Okay.<br>
And contents dot strip.<br>
All right.<br>
There's a chance we can edit this now, so let's go and try again.<br>
I got to restart it one more time.<br>
Come back over here some reason it forgot about me over your page.<br>
And let's add a new test page.<br>
Best.<br>
This is to be tested and try to create it.<br>
Yes, there it is.<br>
It works big.<br>
Here's the big tests.<br>
Can we edit it?<br>
And it will that form start with the data?<br>
We expected no new.<br>
We cannot so edit pay admin slash edit page slash something What have we missed?<br>
we missed afford slash Right there.<br>
See it?<br>
So close.<br>
So close.<br>
You see?<br>
Let's wait, Dragon.<br>
All right?<br>
No, not quite.<br>
It's showing the page.<br>
If we go here and click Oh, it's because it couldn't find it.<br>
That's why.<br>
Let's go and add it again.<br>
We started, we lost, which is fine, but it's gonna know Try again.<br>
Yes.<br>
Look at that Apple T test for the title of lower case test.<br>
Let's change that to Tee.<br>
This will be test page and let's just put a little HTML.<br>
Remember, we're going to make this better, but for now, you gotta put HTML stuff in here.<br>
All right, so we've changed everything.<br>
The page title, the euro and definitely the contents.<br>
That's a view.<br>
It ceded it.<br>
Take it.<br>
Yes.<br>
Look at that.<br>
The Uriel changed.<br>
Now it's not just test its test page, and there is our bulleted list that we just added super cool.<br>
And there we have it.<br>
Our page CMS is totally working.<br>
We can create new pages.<br>
We can edit existing pages.<br>
We're not storing them in the database yet, So they go away every time we start rap, which is a little bit annoying, but we're gonna remedy that really soon.<br>
Nonetheless, we have this working form our CMS log in and create these pages.<br>
Really?<br>
Well, at least the website of things.<br>
We'll get the database stuff working soon.
|
|
|
|
41:11 |
|
|
show
|
1:06 |
For a long time we've been using our fake database, which is transient.<br>
It keep stuff in memory, but every time you restart the app, it goes away and it's not a real database.<br>
So we're going to fix that in this chapter.<br>
What we're gonna do is work on saving pages and redirects and maybe even other information to a database we're going to use.<br>
Sequel Alchemy sequel Alchemy is an O R M or object relational mapper, and it's by far the most popular way to talk to databases using Python.<br>
It's been around for a long time.<br>
It's very polished, and it's actually what we're already using for most of the website Remember, you saw we have these packages that were listed there make it big in the details.<br>
We even talked about the difference between data driven pages and CMS pages.<br>
All those data different pages are already handled with sequel alchemy and already stored and managed in the database.<br>
So what we're gonna do is actually just add on to our existing database model, so we'll start by doing a quick tour of the data model as it is, and then we'll add the few extra things we need
|
|
|
show
|
1:35 |
are you new to seek?<br>
Welcome me.<br>
Have you not used it before?<br>
I need to learn it.<br>
No problem.<br>
So in this course, we're not focused on learning sequel Alchemy.<br>
We're not teaching you all the things from scratch, just like we're not teaching the Web framework or CSS or a bunch of other things However, being able to work with the database and sequel Commie is super important And if you can't do it, it's gonna be a big problem.<br>
So here's what I've done instead of adding on a big section as part of this course where you need toe work your way through sequel coming regardless of your experience.<br>
What I've done is I've taken the lessons that we had from our data driven Web app course, where we literally built the first part of this application, the data driven part and we talk about sequel alchemy.<br>
In that course, there's two chapters in there.<br>
One called modelling Data was sick.<br>
Welcome me and the other is called using sequel Commie.<br>
And what I've done is I put that in this course, so you have access to it already in its in appendix.<br>
If you need to learn sequel Commie Pause This chapter.<br>
Go back to the course page, find the modeling with sequel Commie Chapter and get started there.<br>
This is actually the exact project that we're using here.<br>
So in that course, we built from absolutely nothing up to what we started with with this course.<br>
We build the entire Pipi I clone, including the database.<br>
So the appendix literally talks about building the data at the database access later as we're using it.<br>
So it's the perfect appendix for what you need.<br>
That said, if you already know Sequel Commie.<br>
We're not doing anything crazy.<br>
You don't need to go and watch that, but if you need to learn it, it's there.<br>
Be sure to take advantage before you move on.
|
|
|
show
|
6:23 |
well, it's time to upgrade our CMS and make all the changes were making permanent So far, I've been putting off talking about working at the database because I didn't want to really get it.<br>
Was details involved with what we're doing.<br>
I want to stay really focused on just building the CMS side of things.<br>
But now it's time to start saving things beyond just in the memory.<br>
While our APP is running, much of this application is already built on sequel Alchemy And so what I want to do in this short video is take a quick tour of how things are structured already that we can just plug into that overall pattern and framework.<br>
First, let's talk about a couple of tables, so we have a user table and we're modeling that with a user class.<br>
No surprise there with sequel alchemy.<br>
We have a shared based class, and the way that a class represents a table in our database is that it derives from this class sequel Alchemy Base.<br>
We change the name of the tables that we wanted to be singular and capital.<br>
We wanted to be the little case in users, so we set that, and then it has some pretty straightforward stuff.<br>
But as an idea, that's a imager, its auto incriminating.<br>
So we're not to mess with that.<br>
You just save something that automatically generates this primary key force.<br>
Have a name which is notable, given email, which has to be unique.<br>
And it hasn't index because it's very common when somebody tries to log in that we would say, What's your email?<br>
What's your password?<br>
Let's go find the user by email, so you want that to be super super quick.<br>
What else we have a few other things is admin.<br>
I guess it's worth mentioning here.<br>
And obviously, this is the flag that gets set in the database that indicates whether or not you are allowed to access the CMS admin section in my default.<br>
New users are not admits, as you would expect, right, so this is pretty straightforward.<br>
One.<br>
Let's look it, probably the most complicated thing we've got going on here which is the package.<br>
It's when you run the site and you look at all the packages.<br>
That's what you're seeing.<br>
So we've got the name of the package being the primary key in this case, and some other staying there stuff like this.<br>
I guess it gets interesting down here where we have a relationship between the releases for a package and the package itself.<br>
We also have this cool, multi layer order by so first order by the major version than the minor version than the build version and back.<br>
Populate the package link on individual releases as you bring him in.<br>
So you don't really need to know a whole lot about all of these things were not going to do too much with it.<br>
But I did want to show you a few things that are in place.<br>
Also notice that were using type annotations on the columns.<br>
And this is overriding what the standard type checker would think.<br>
Oh, this is a column or their relation, Yes, but at runtime, what it really looks like is a string and a list of releases.<br>
So we're going to tell Python that's what those are, and that will give us a little bit better helping the editor.<br>
Right.<br>
So there's two exemplar tables or classes models.<br>
You also will see this thing called DB session.<br>
So over here, what we're gonna do is we're going tohave initialization function that gets called right at the start up of the APP and what it does is basically, it comes down here, and it checks to see if there is a database file specified.<br>
And then it's going to create a sequel, light database or open the one that's specified in the file sequelae.<br>
Right here is the file.<br>
Sequelae is really nice because it's already built in the Python.<br>
You don't have to install anything.<br>
It doesn't run as a separate server.<br>
Just run your process and it run your Web app in ages, talks to it.<br>
That's super cool.<br>
He probably wouldn't use it for riel Professional Web APS.<br>
For those you do something maybe like post GREss or maybe even Mongo DB.<br>
But for now, it's equal.<br>
Light is working great, and we're gonna come over here, set it up and say, create all the tables based on all of the models that you have seen, and then it just records.<br>
It's initialized, so that's pretty cool.<br>
The other thing is, when it's time to talk to the database, we have to create a session.<br>
So we're gonna go over here and call this function Gonna create session, set a little typing to help things get a little bit better because normally the tooling can't figure out what the's session things are.<br>
Were also allowing you to work with objects after they've been saved to the database.<br>
That just makes things easier for us.<br>
Final thing.<br>
We have this different locations where we have to make sure we've loaded all the models before we try to interact with sequel alchemy.<br>
One clear example is right here before we say create all the tables.<br>
It has to be that we've loaded every single model into memory.<br>
How do you know for sure that you've done that?<br>
Maybe pretty clear here, but over in the Olympic world, we also have to do that.<br>
And that's not really part of this project.<br>
It gets a little more tricky.<br>
So we've got this thing over here where we're just explicitly stating every file we're using every module that has some secret alchemy classes.<br>
So when we add like a page, we're gonna come over here and have a, you know, pages or whatever we call it, and I will make sure that sequel alchemy knows about that class, and that should create tables and start working with it.<br>
This allows us to just put this in one place and not always think about how we're getting back to it.<br>
That's it.<br>
I guess we could look at one example of using it.<br>
Let's go over here to say the user service, So it's really quite straightforward.<br>
If we want to know how many users are in our database going to create a session and then we go to the session, we say We want a query based on this table or this class, this model users We want to just count how many users that are.<br>
So this is going to return a number, and we always want to explicitly close the session to make sure it's closed up right away.<br>
And we can do that with a try finally find when we're creating the user.<br>
They were to create the user object, get the session, had the usual call commit and then close it and then return the user.<br>
This part right here is where that expire on commit equals.<br>
False becomes really, really handy.<br>
All right, so using this is not hard, but you do want to fit into the existing design patterns and way we've structured stuff with our models and seek welcome and so on.<br>
So now you know all about it.<br>
Hopefully, you like how we put it together.
|
|
|
show
|
5:42 |
in orderto have a page table in our database into store pages in it using seek Welcome me.<br>
What we need to do is create a class just like the user thing.<br>
And as is generally the case here, it's easier to copy and modify one than start totally from scratch.<br>
So gonna copy and paste.<br>
It's gonna be pages plural.<br>
This will be pages, but this will be singular.<br>
Page.<br>
The class represents one.<br>
The table holds many.<br>
What a bunch stuff.<br>
Let's drop those out for a second.<br>
Hardly gonna stories.<br>
Well, there's two types of data.<br>
There's what I would call admin data, and there's a direct data.<br>
Who knows?<br>
It's not quite the right term, but we have things that are essential to the page itself.<br>
And these were the title your elf in the content to.<br>
These are what we want when we get the page back.<br>
We need to have these, but it's also useful have things like an i D So we can always refer exactly back to that one as well as it is Nice toe.<br>
Have additional information I find whenever I'm working with databases.<br>
Eventually, I want to know a this thing that's here.<br>
Why is it here?<br>
How did it get here and win?<br>
So we're gonna have to columns or two pieces of data here that allow us to store that will never really use it for interacting with users right in our Web app But it's gonna be for as we work with the right so wannabe win it that when it was created So that created date and the other one is going to be the creating user.<br>
This is who created it will probably just store like their email, not an actual relationship back to the user table.<br>
That way, in case we don't leave the user, we still have a history of Hey, here's the email.<br>
The person created this page.<br>
It's gonna look a lot like this.<br>
They're all gonna be sequel Alchemy columns, as is the case.<br>
So let's start by dropping those in there great.<br>
And then we get to say what type they are.<br>
So this is gonna be a sequel.<br>
Alchemy, Don date time we a sequel, Alchemy string and pretty much all of the rest of strings as well.<br>
Next thing we want to ask is what is required and what has to be unique So let's say the contents is not necessarily required, but that the euro must be there so we can say no level is false for the ones that are required already enforcing this in the website.<br>
But let's also enforce it in the database.<br>
Like so for a created date.<br>
We want to require it.<br>
But instead of saying you must set the value, let's say give it away to automatically figure out when it was created and just do that we don't have to deal with it.<br>
Sequel Alchemy will do it for us the way we do that as we set a default to a function which is daytime dot date time dot Now we want to pass the now function.<br>
Now be very careful Here I hit.<br>
Enter watch what happens?<br>
It writes the parentheses.<br>
What this would do would be set the default to be the time the program started Don't want that.<br>
We want the time when this individual page it was saved So we've got to give it the now function, not the value of now.<br>
When it starts down here for the girl we don't want to pages to be ableto have the same mural which paid, Would you show when they try to go to that one?<br>
So we don't Here we can say this is unique is true.<br>
Don't add an index for uniqueness.<br>
We also want to know which things we might Queary by.<br>
So we're not gonna come and say Give me the page with the title of this or the contents of that That would be weird.<br>
We probably won't even say Give me all the pages created by such and such you there.<br>
But when we coming, look for a page we go to a u.<br>
R l and say, Do we have a page for that?<br>
So we want to make sure that for those types of things, we have an index in there as well.<br>
If we have an index and you have lots of data, this could make it 1000 times faster or maybe more.<br>
It's tremendously important to have indexes for your queries.<br>
One of the cheapest, quickest, easiest things you can do to make your website much faster.<br>
That's true here.<br>
Now it's also probably true appear for the create date.<br>
It's very unlikely wanna say, Give me the page created on this day or at exactly this time, but it is probably the case.<br>
We want to show the newest ones first in our admin, and we'll therefore order by the created eight.<br>
And having an index makes that faster as well.<br>
Okay, well, this looks like we've probably got what we need for our page The final thing to do to make everything work is remember, we have this all models, and in order for something to show up here, we gotta put it in and it's super easy over here and say not page pages and drop that in before I run this.<br>
Let's go over here and on through a quicker refresh notice.<br>
There's packages, but no page.<br>
Don't really want that much information.<br>
There's a package, but no page mint.<br>
Now let me just run the website.<br>
It ran without crashing.<br>
That's actually a good couldn't sign, but let's refresh.<br>
Here we go because our package was loaded, our pages load.<br>
It was seen.<br>
Therefore, sequel alchemy new to create it, and it has all the stuff we specify.<br>
An auto incriminating primary key created date.<br>
You will notice the ones with the blue vertical things.<br>
Those have indexes.<br>
So here's our indexes and so on.<br>
All right, well, there's no data in there yet, but we're off to a really good start,
|
|
|
show
|
2:28 |
we created our page.<br>
The other thing we have to create is the redirect.<br>
Now, before I do, I'd realize I forgot to add the type annotations that'll make this just a tiny bit nicer.<br>
So it's good in here is just add those that's going to string and so are the rest.<br>
Actually, that's not only saved my thought, there we go.<br>
Okay, That way, if we say P equals page P, he died Title notice that it knows it is a string, even though it's actually not a string.<br>
It's what, These columns until it comes back from a database.<br>
But it is a string.<br>
Okay, this is decent.<br>
Let's go and create redirect based off of this.<br>
You know, Rex Plural.<br>
That's what Your name in the file here as well This is a singular redirect like that.<br>
And it turns out this is super super easy.<br>
Check this out.<br>
This is the same.<br>
This is the same Onley.<br>
These things change and we have a euro on.<br>
We have a short I do like this.<br>
Let's say this is the girl and this is the short you're out.<br>
Why would I do that?<br>
Well, the short girl is the one that has to be non knowable, unique and indexed.<br>
Right?<br>
That's the thing that we look for.<br>
They hit on our site and then we decide where we're going to send them off Teoh, it's required, but we wouldn't One index there.<br>
You're not gonna ask.<br>
Show me all the pages that could go All the redirects that could go to this URL That would be pretty weird.<br>
You guess You get added if you really wanted it and it doesn't have a content It has ah, name.<br>
This is also requires will say no level is not true.<br>
Make a false.<br>
There we go.<br>
We've got our read Rex.<br>
And remember, before they'll show up in the database, we have to put them over here.<br>
And let's try to keep them alphabetical like so run it.<br>
It ran.<br>
That's a good sign.<br>
Refresh it.<br>
There's your read, Rex.<br>
Awesome.<br>
Okay, now we both have pages and read Rex modeled in the database.<br>
That's pretty easy, isn't it?<br>
Yeah.<br>
Sequel Alchemy.<br>
Very, very sweet Love to work with.<br>
It makes creating these tables according the database.
|
|
|
show
|
8:38 |
Now that we have our redirects modeled, let's go and use them.<br>
We follow this really cool pattern as governor of use to our admin section here.<br>
We're adding to redirect.<br>
We're using our view model, get the data and a validated, and then we're just calling CMS service.<br>
Create redirect and passing the information.<br>
So what you'll see is we won't actually have to do anything to this code to make it work or just going to go over here and change what this services that's ideally services.<br>
They kind of hideaway how you talk to the database or talk to like an A p I or whatever, and you don't usually have to change too much beyond just that that's here.<br>
So let's go and look at the various redirects.<br>
We're not gonna worry about pages for the minute, and we've got I think five functions.<br>
Get a single redirect.<br>
Get all redirects, get one my i d.<br>
Great one and update one.<br>
Yeah, that's it.<br>
So let's go work on Those will save update for a little bit later, but let's work on, for example, this one.<br>
Now all of these are going to follow the same basic pattern as gonna be quite simple.<br>
What we do is we create a session by going to D B session.<br>
I'm gonna import that and we say create session.<br>
Remember that that returns one of these session objects.<br>
Then the easiest way to do this is we want to do a query, return a value and make sure that we close out the session.<br>
He's this way to do that.<br>
Say, try.<br>
And then what are we looking for?<br>
Gonna redirect here?<br>
It's in doing this.<br>
You see, It's almost just is easy to talk to.<br>
The rial database will say Sasha and not Queary locates.<br>
Query of a redirect had to import that.<br>
And this will give us all of them.<br>
We don't want all of them went of filter where the where the redirect thought short euro is equal to We called it the base.<br>
You're all here and then we're gonna return that and then we'll get say, finally session dot clothes.<br>
Okay, now this technically will give us a collection of redirects we know because of the uniqueness constraint, there's one or zero.<br>
But in terms of query syntax, we've got to express that so we could come over here and safe first, and it will either give us the first one it finds or will give us none If they ask for you, Earl, that has no associated redirect.<br>
We can even make this a little simpler and just in line it like that.<br>
So that's it.<br>
That's all we gotta do to talk to the database.<br>
Now let's go over here and say, This doesn't return an optional dictionary.<br>
But it now returns a redirect because we were working with dictionaries before, and now we're working with classes.<br>
We have to make very minor changes like there were a few places where we might say, Redirect on, get Earl and we have to say redirect dot euro Right so it is not hard, but there's a few minor things we got to dio.<br>
All right, so let's just because this is so short, let's just go knock it out for the other ones.<br>
This one is even simpler, and we're going to create this And what are we going to return?<br>
Well, first of all, the type we're specifying as a list of Reader X and here we don't need to do a filter, but we're gonna want toe show The newest ones might as well put them at the tops.<br>
Will say order by reader act.<br>
What are we gonna order by created date?<br>
We put it like this, but like this is going to give us the oldest ones first ascending.<br>
We're gonna go in and say we want the descending version and then make it a less It will say off and that's it.<br>
Okay, let's just keep rolling this one.<br>
Because the way we're storing their little fake data, this was a real mess and actually gets a whole lot better over here.<br>
And we're going to actually let me copy the prior one this one, because it's basically the same.<br>
Get redirect my i d.<br>
We're gonna go down here, and we're just going to say the I d is the redirect.<br>
I d not Be careful.<br>
This is to equal science that just my fault makes it look like one.<br>
But it's too.<br>
Do in a community or say give us the redirect where the I d matches first done.<br>
And I guess we'll do create as well.<br>
It's going to do that when a little bit different.<br>
So for our data, what we're gonna do is we're actually gonna create the redirect as a class like this and we just set the property.<br>
So we say redirect, We don't set the i d as automatically done.<br>
But we will set the euro to the Orel in the short euro to the short euro in the name do the name.<br>
And then what we gotta do down here?<br>
As we just say, session dot Add redirect session dot Commit.<br>
I don't save it back to the database.<br>
This we don't need.<br>
Go ahead and keep our check here.<br>
That's cool.<br>
It also go ahead and put a strip on these to get out of the white space and a lower.<br>
So they went to worry about that.<br>
We're really doing this other places, but you know, it's good to check it at this layer as well.<br>
And that's it we're now creating.<br>
Redirects were getting them back by D.<br>
We're giving them a list of all of them and so on.<br>
Do this again needs to be a redirect like that, and let's see what we're doing.<br>
Is this return anything You know, we might as well return the redirect right?<br>
How we created.<br>
If someone wants to work with it, they can get a hold of the idea and so on.<br>
And it looks pretty good again.<br>
We'll come back and fix that one in a little bit.<br>
Let's start by seeing if we can just add a new one to our site right now.<br>
100% sure this will work, But let's give it a try.<br>
It looks like I've got a log in again.<br>
Oh, here.<br>
Now we shouldn't have any redirects anymore because there's none in the database and we're not talking to are fictive.<br>
So let's try to add the Python bites one back again.<br>
This was just bites, and this is I don't buy it Set off them, All right.<br>
Remember, what it's gonna do is gonna go to that method.<br>
That view method is gonna go to the service and say, Create one of these and then redirect this and get the list.<br>
It's might work.<br>
Let's get her try.<br>
No, no, no, no, no, no.<br>
Look at that.<br>
Well, we said in our data model that you must specify who the creating user is, and we didn't but we should have.<br>
Let's go like that.<br>
Really quick change here.<br>
I forgot to do that because we weren't doing it before.<br>
So here, let's pass in v m dot user, not email.<br>
The reason I know that it has this user exists is because you have to be an admin to be an admin.<br>
You have to at least happy logged in.<br>
So let's go over here and say this takes a an email.<br>
Use your email or some like that redirect dot creating user.<br>
Is this all right?<br>
Well, checks to make sure that it's enforcing State of Model doesn't let's try to just submit that form again, this time passing over the user.<br>
Yes, okay, that it worked.<br>
Let's add the other one.<br>
We had courses.<br>
I think it was.<br>
hold on.<br>
We've made a mistake.<br>
We're not gonna be able to fix it because I haven't written edit.<br>
That's OK.<br>
We'll just test this one.<br>
I didn't need to put that slash their We should probably write some code that will just take it away if you put it there.<br>
But on no problem.<br>
We could almost go there, but not quite.<br>
Remember, I told You have to replace some things where we're doing don't get with just like dot, get of title or just want title and that's what's going on.<br>
But at least in terms of having the redirects here, this is working and these aren't in the database.<br>
If we go over here and look in the database, will be there.<br>
Notice.<br>
Here's the ones we created.<br>
I could go and fix that now, but of course that's not the best way to do it, but it will fix it.<br>
All right, so here's our redirecting, even see the Created A Cup.<br>
But in the end of the creator user, all the stuff that we need perfect.
|
|
|
show
|
4:42 |
remember I told you that we're gonna have to pay for this little change right here We should have just created a redirect class way back.<br>
Let me rephrase that.<br>
I should have created a redirect class instead of a dictionary But no hindsight is 2020.<br>
So let's go fix us up.<br>
You'll see because of the type.<br>
Hence it's actually pretty easy and because of you models.<br>
So let's go down to our view models here, go to the CMS, see if any errors show up.<br>
You see them because we specify that this returns a reader at class and we know what that is.<br>
My charm knows it doesn't have a get.<br>
What does it have it just has while it has the oral directly?<br>
And that's what that crash you saw in the last video was all about?<br>
Was that Let's just go quickly through the other view models here about a reader X and see what else is going on.<br>
All right, so redirect, get name becomes better.<br>
Just name and get Euro is now just euro and you guessed it for euro.<br>
Well, it's short.<br>
You're well, I think that might actually do it Let's go.<br>
Give it a shot.<br>
Refresh this notice.<br>
We re started the website.<br>
The stuff we just typed in It didn't go away It's still there.<br>
And let's test this.<br>
Oh, yeah, Look, it takes us to Python bites and this one should take us to talk by phone training.<br>
Very, very cool.<br>
Let's add one more and let's add a talk by phone line.<br>
So the talk Python And there it is.<br>
Hey, look at that.<br>
It's there now.<br>
We can't quite edit it.<br>
We should be able to pull it up.<br>
But when we hit save, remember, we haven't finished that one, so we'll go do that now.<br>
But this is good, right?<br>
We're making really good progress.<br>
But let's just go and write this last update.<br>
Redirect and say it's going to return.<br>
You redirect.<br>
This should be okay.<br>
We want to check that it exists.<br>
So we're gonna given an I d.<br>
Get it back now.<br>
This was all sorts of weird, So let's just fix it now.<br>
You would be tempted to say, Here's the redirect, so let's just make changes to that.<br>
But remember, it just came from a session that was closed.<br>
You won't let us read it.<br>
Won't let us update.<br>
It'll crash.<br>
So are trying to save it.<br>
At least will crash.<br>
So we've got to get a new one from a new session.<br>
So we're gonna go over here and rob this bid, and we're gonna that the redirect to this again?<br>
We re name this 12 db Reader Actor.<br>
I don't know this team.<br>
Redirect.<br>
We just want to do a quick check.<br>
It's probably easier to just in line it like this.<br>
There we go.<br>
Now we won't be tempted to use it.<br>
Okay, We get our redirect.<br>
And we want to make changes like we want to change the name.<br>
So we say name equals name.<br>
That's cool, right?<br>
And reader active dot Short euro equals and short Euro and Euro.<br>
People's Euro.<br>
That's it?<br>
No, we just call commit.<br>
It's been tracking the fact that we made these changes to it, so it knows it needs to be saved back.<br>
The database commit.<br>
It would redirect close it on the way out.<br>
There it goes.<br>
That's pretty cool right now.<br>
If we just rerun this, we should be able to go over here and let's say you know what this is Talk Python To Me and this will just call it talk.<br>
And let's just say question mark Mode is edited.<br>
Who knows?<br>
Whatever I enter a TV's works what it did.<br>
How cool is that?<br>
We didn't have to change the view model.<br>
We didn't have to change the view method, all those things and a new.<br>
But I guess we had to change the redirect properties from the dot get you know the dictionary access toe the properties.<br>
But other than look it, it works.<br>
Those changes not put in there hands course still goes where you would expect and keeps those little changes that we put up there.<br>
That is really cool.<br>
So we've now completely switched over to using sequel alchemy and sequel light as our database back end.<br>
Mr.<br>
Remind, you remember when we made those changes before and we re started the Web app, they went away.<br>
Now, of course, they're not going away there saved permanently in the database because that's the job of a database.
|
|
|
show
|
4:26 |
We've written the sections here so that our redirects now come out of the database.<br>
It's time to do the same thing for the pages, and you'll see it's really straightforward.<br>
Instead of doing that little part, we're just going to have our recession try.<br>
Do the query finally close the session pattern that we've been using for everything.<br>
But now he's gonna be based on pages we gotta import.<br>
And this one we're trying to find it by the earl So we'll say Page on your URL is the base euro Well, actually, that looks pretty good.<br>
And it's now going to return a page.<br>
Okay, I'm happier, That one.<br>
That's pretty straight for Let's just copy this, cause organise that over and over.<br>
All right, get a page.<br>
Should be working.<br>
Come down here and say we want all the pages again.<br>
This is even easier.<br>
We can just say that all but it would be nice to have them showing the newest ones first, cause you most likely want to work with the ones that you've just created or modified So let's go and do it.<br>
Order my page, not created date.<br>
If we do like that it's us ending.<br>
But we want the newer ones will do to sending Nice and changed it to a list of pages.<br>
And here we'll get get paged by I d.<br>
We had to do this weird, funky stuff because of our data structure, but in a real database, we don't have to be weird at all.<br>
We can say I d is.<br>
Hey, JD.<br>
All right, well, that's pretty straightforward.<br>
And again, optional page, not optional dictionary.<br>
Go to page.<br>
Okay, when I said our data and store it, But not like that time, we're gonna create a page, right?<br>
Like so and then just set the few things we have to set.<br>
Like the title is gonna be the title of that strip contents will be the contents that strip in the euro.<br>
You're all not strip and the lower case.<br>
Okay, that all looks pretty good.<br>
And let's go ahead and return the page that we created here.<br>
And we can say when you create it, you're gonna also get it back.<br>
We probably won't do anything with it, but just in case, you know, when we hit, save much we're not doing yet.<br>
We had saved it's going to set things like the created date as well as the idea is the one.<br>
I guess we also need tohave the creating user.<br>
And that's to say that these are all strings.<br>
We don't set the creating user.<br>
We already saw that crashes.<br>
Next, we gotta add this to the session and then commit the session over to the database All right, that's probably the tricky is one, but I think that we're good.<br>
Let's go down to our update page and again, we got to get this from a new session.<br>
We can't call this function, even though it would give it back to us.<br>
So let's do you copy this really similar that we're gonna create this session and get the page back, worried by page and filter by what we got.<br>
I d think we're passing in the I D.<br>
So it's use that that's the most likely to work, or it's not gonna change ever.<br>
And we'll do a little test like so I don't need any of this.<br>
We're no longer passing in the create user.<br>
That's just whoever originally created it.<br>
There's not, like a last updated by or something so we don't need that.<br>
We're sending all the things it came from the database.<br>
We're off to add it and yeah, that's it.<br>
We can say this is going to return a page.<br>
It doesn't need to be optional, cause at this point, it's definitely here.<br>
And if it's not gonna be, there's a rash is an exception.<br>
All right, well, it looks like we've updated our CMS service to now work with sequel alchemy and read and write those pages from the database.
|
|
|
show
|
3:49 |
now that we've made some changes to our CMS service for pages we've had toe pass more information to create a page, and we've changed from using dictionaries to the page class itself.<br>
We gotta go on update where we're using this page right here.<br>
You can see there's little warning from PyCharm saying There's something missing you're gonna put in the creating users So we'll just pass the email again of the logged in user like that.<br>
And then let's Joe check out the view models or at it Paige and notice, because of the type ends we see right away.<br>
What's going on here, Right?<br>
There's issues.<br>
Page classes never get.<br>
But it does have a title, you or l, and a content.<br>
That's good.<br>
Anything else?<br>
That one looks OK over here in this request view model.<br>
Let's go look and see right here.<br>
We're doing dot content are we should be doing dot contents.<br>
All right.<br>
Ah, we may be in a place for this to work.<br>
Let's go and give it a shot.<br>
All right, over here.<br>
Where?<br>
Our pages.<br>
Where did they go?<br>
Well, of course, we're no longer getting them from that fake data, and now we're going to the database.<br>
But we haven't created one, so it's gonna be empty.<br>
Can we add one?<br>
So far, so good.<br>
Let's just go and borrow the data out of our fake data here the most important one is the donate.<br>
So we'll come over here and say, donate to the PSF, and it's just donate.<br>
And the contents are just this.<br>
Okay.<br>
Look at that.<br>
The pages now in the database we could edit it may be yes.<br>
Yeah, that works.<br>
Now.<br>
Could we view it?<br>
Oh, yeah.<br>
So we go click on Donate.<br>
Now, this is coming out of her database.<br>
Fantastic.<br>
Well, let's go and add the other two as well.<br>
We had our team.<br>
That was company slash employees.<br>
Just put it back.<br>
So that worked like the rest.<br>
You know, the rest of the course what we've done so far, It had these two pages.<br>
Let's just add them in here.<br>
Perfect.<br>
We got our team in company history.<br>
All right.<br>
Does just check him out.<br>
Yeah, that one works, and that one works, and it looks just like you would expect.<br>
And of course, donate.<br>
Bernie is working as well, so that's really good.<br>
We got our admin section of your pages, our pages right there.<br>
And it looks like everything about them is working.<br>
And because we used a nice separation between the view models, the admin views and the CMS service or services in general, we really only had two.<br>
Mostly mess with the service and then patch up the view model real quick.<br>
Okay, so I think that that's pretty sweet.<br>
In order to celebrate, let's go and delete this.<br>
That says you want to make sure you're not gonna crash something.<br>
Nope.<br>
We've already stopped using that.<br>
Now we deleted the fake data, and let's just rerun it just to make sure that yeah, actually, we're not using it.<br>
We come over here, go to our admin pages.<br>
Yes.<br>
There they are.<br>
We'll go to donate.<br>
Donate still there?<br>
Of course, this is now coming out of the database.<br>
There are many things in the database.<br>
Before, we had 96 projects in 5400 releases 85 users, along with other things in there.<br>
Right when you goto boto core like all of this was already in the database when it got started, but now are read Rex, like going to visit the courses as well as the pages these air all now stored in seek welcoming our sequel Light through Sequel Alchemy.
|
|
|
show
|
1:05 |
Let's quickly review inserting something into the database.<br>
One of our CMS objects whenever working with sequel Commie it always creates.<br>
Always start by creating this thing called a session, or, in the design pattern nomenclature of sequel alchemy, a unit of work.<br>
We've put that into our DB session, class or module, and then we just call create session.<br>
It does a couple of extra little things toe make it nicer like not let it expire on creating also specifies the type of what comes back here.<br>
So we get auto complete for the rest of our editor.<br>
Both of those air, really small but super advantageous.<br>
Then within a try finally block, we're going to create the object we want to insert in this case, a page set the properties about it, title, euro contents, cleaning them up as we need Teoh and we go to the session and we say, Add that object and then we committed to the database and they are friendly block.<br>
No matter how we get out of here, we need to close the connection.<br>
So we're gonna say session dot clothes and that's it.<br>
We've now created one of these pages,
|
|
|
show
|
1:17 |
Once we have things in the database, we need to query the database so we can get them back and work with them So what we're gonna do is again the unit work pattern.<br>
So we're gonna go to the D V session and create a session.<br>
I work with that.<br>
That's their unit of work.<br>
And then we try finally pattern to make sure we close it nice and cleanly, no matter what we're gonna take.<br>
The data were trying to query with in this case, the URL and normalize it and clean it up because of its upper case, it might not match on string equals depending on the type of database using.<br>
And then we're just gonna go and do the query when a return session dot query of page gonna do a filter page where l is equal to the euro were given And then when do you just first, right?<br>
Give us one.<br>
And if you don't find it, just give us none back pretty easy, right?<br>
When we run this code, it's going to actually send a translation over to the sequel.<br>
Were language over the database, it will effectively say Select star from pages where pages dot URL equals some parameter.<br>
First primary being companies slash history assuming that that's the page that we're asking for.<br>
So it's really nice that when we write this code it gets translated over to the sequel Queer Language instead of like pulling it back and doing all memory.<br>
That's just the power of sequel Commie and here's how it
|
|
|
|
18:50 |
|
|
show
|
3:18 |
well, the CMS that we built so far with our pages and redirects.<br>
I think it's a big success.<br>
We've come a long ways we can create these really cool pages.<br>
We can create these redirects that allow us to have short little euros to send people to either other parts of our site or to external sites.<br>
But there's a problem.<br>
The problem is with HTML.<br>
You might think I want a website.<br>
Websites are written in HTML, so I have to write HTML for my CMS.<br>
Well, no, actually.<br>
So here's some HTML and this is the HTML for this page here.<br>
We wanna have this cool helpage that when we click on the help it says, Here's how you get help with Pipi.<br>
I do you need help installing Pip?<br>
Do you have the right version?<br>
Do you have permissions?<br>
Here's the instructions on what the each time we had we thought would create this page.<br>
But what it actually created was, Oh, this.<br>
What the heck is this?<br>
Why are all the words so big after it says have Pippa installed question mark, Look carefully.<br>
You can see there's something wrong with the closing tag for that age too.<br>
So here's the problem with HTML.<br>
If something goes wrong, even just a little bit, we forgot a less than angle bracket left symbol here, character here, just one.<br>
The rest of the page is broken, and not just the page that contains the content we wrote.<br>
No, this is even the additional stuff that the site might generate.<br>
Right, for example, the footer and other things.<br>
The whole site is broken.<br>
And while this may be fine for Web developers, if we're kind of right content on the Web and let non developers work on it I mean, that's one of the huge benefits of these.<br>
CMS is we can give it to marketing people or editors or authors and say Here, just go right that page right this landing page or write this marketing content We don't want them to have to get this exactly right.<br>
And even if you are a skilled Web developer, you probably also don't wanna have to get this exactly right.<br>
So do we dio well marked down to the rescue.<br>
As a developer, you probably have heard of mark down by this point, but just in case you haven't been living in a cave under a rock or something It's this format that lets you write in simplified text but then is transformed into HTML and other formats.<br>
So here we have on ordered list.<br>
Do you have pip installed?<br>
Is pip the right version?<br>
Do you have permission to install it and so on?<br>
And what's great about this is that we don't have to close the tags or anything like that, kind of for bold and stuff you do.<br>
But for the most part, things don't go either wrong at all.<br>
Or if they do, they go much less wrong.<br>
Then otherwise, now, look into this.<br>
You might think I can't hand this to a marketing person or a business person who's not a developer.<br>
That's gonna mess it.<br>
This looks crazy.<br>
Well, is that where we are for now?<br>
But as we go through this course as we integrate marked on and we're also gonna add a rich editor that supports hot keys of, bold its control or command to be what I was highlighted, that's bold.<br>
You want to make it a header.<br>
There's a hot key for that, and there's also a toolbar at the top.<br>
So we're gonna have a really nice editor to create these market on pages and then turn them into that page that we really wanted to build at the beginning.
|
|
|
show
|
4:17 |
here we are back in our app and just quick Heads up.<br>
Now we're moving over to chapter eight.<br>
I made a copy of the code.<br>
We just finished from chapter seven, moved it over to chapter eight.<br>
So follow along there.<br>
Now, here we are, in our amp we can go over and we can go to our pages.<br>
And we saw that we have this really cool way to add these pages in here.<br>
We have to write HTML.<br>
I'd rather write mark down.<br>
So that's what we're gonna do in this section.<br>
We're gonna write some mark down here and notice there's no help Page, And if I click help, it's a 404 So what we want to do is we want to create this help page, and instead of going and writing a new view method and a template and all that kind of stuff were not going to touch the code and redeploy the website.<br>
We're just going to use our CMS.<br>
That's what it's four is adding features to our site.<br>
So we want to go to slash health Here.<br>
Let's add a new page.<br>
It's getting help with Pipi.<br>
I you are.<br>
L just help.<br>
And in here, let's write some markdown.<br>
So I'm gonna write a little bit of it here, and then we're going to just drop the rest of it in, but I want to talk a little bit about the HTML so we'll have something like Do you need help installing a package?<br>
Here are a few tips now we had a We want a bulleted list of three main options burst.<br>
Do you have pip installed?<br>
Second, we're gonna put a little bulleted lists and on mark down, you make bulleted list with the stars.<br>
Or you can also use dashes either fine, but notice.<br>
Unlike Riel editor, if I hit, enter here.<br>
Well, there's no, like, continuation of the dot or anything like that.<br>
Now we have is pip from the correct Python.<br>
Right?<br>
We do have this Python two versus Python.<br>
Three thing You always gotta juggle at least of the moment.<br>
Have do you have permissions to install?<br>
Now we want to use our mark down to emphasize some things like have pip installed That's just super.<br>
Call that out.<br>
And the way we do that in Mark Duggan's we have double stars on both ends And if we want this toe, have a proper, like code.<br>
Look, we say back, take them cake.<br>
The key above your tab button there.<br>
Right, So that'll look like code.<br>
Not here.<br>
This is also like that.<br>
I have.<br>
Let's put here.<br>
It will say correct Python and permissions to install.<br>
And then we want to have a header.<br>
We could have each one.<br>
If we have one of these things and we have a title, it'll be something to the effect of you have pip installed right?<br>
Something that will be the first step.<br>
First main area we have to these Italy each two h three.<br>
This is actually gonna be that each one on the page.<br>
So we're gonna put two and so on, right?<br>
And there's a bunch more.<br>
We got it right.<br>
But notice we have to completely know this.<br>
You have to know that.<br>
Well, double stars on both ends of a set of words is going to bold them and we get even if we're good at it, we get no help.<br>
Like if I knew that, but I just want to hit this and hit command be all it does right now is bring on my bookmarks, which is not what I wanted.<br>
Right?<br>
And when I hit enter here, it doesn't continue it.<br>
I get No, there's just a lot of things.<br>
Even if you know, mark down.<br>
This is not ideal.<br>
But if you don't know mark down.<br>
This will be really frustrating.<br>
So first, let me copy over what we have for the whole page.<br>
So you have to watch me type about this documentation.<br>
Here we go.<br>
OK, see the scroll bar pasted a whole bunch of stuff here.<br>
Now we should be able to go and use our CMS to add this page.<br>
Yes.<br>
Getting help with Pipi eyes there.<br>
And if I click on this, it's gonna be pretty awesome, right?<br>
We're gonna have our nice HelpAge.<br>
Yeah, exactly what I hoped we would see.<br>
This is so nice.<br>
No, this is not nice.<br>
Obviously this is being treated as HTML.<br>
That's right.<br>
So markdown is not magic.<br>
It doesn't just turn into HTML.<br>
We have to tell our program.<br>
Hey, you're given one type of input and we want to transform that into another In this case, given mark down, let's transform that into each team l we can show on the page, but having it over in our admin section where we can go back and edit Here we can edit this mark down turns out to be a lot nicer than working directly
|
|
|
show
|
8:34 |
Well, here's our beautiful HelpAge we wrote it marked down, and it got thrown out and completely scrambled by hte email by the browser.<br>
And so what we need to do is convert this over to HTML now in Python this could be really easy or really hard.<br>
If you try to do this yourself, that would be crazy.<br>
There's already a ton of libraries that we can go and just install, and they automatically already know how to do this.<br>
And they're built to do this.<br>
So let's go over here and just add a new requirement.<br>
And when ad mark down to, there's a lot of different libraries that we can have four Python that work with mark down.<br>
But this is the one I want to use and let's just make sure that it's installed.<br>
So say, Pip, install, dash our requirements for the development version.<br>
Yeah, no, it was not.<br>
So it installed mark down to force.<br>
Well, now we can start using marked down, and it will be here recorded So other systems, Johnny's it.<br>
And then if we just go over here to our CMS, we look remember I said we're going to store our data and not just past page dot contents, but we're going to store it sort of store this variable called HTML here.<br>
And this is why what we need to do.<br>
Instead of just taking the raw contents which are marked down, we want to transform them over into HTML.<br>
So let's go and add a little function and down here invert to mark down.<br>
All right, it's gonna take some markdown text and it is going to return a string, which is going to be the HTML.<br>
So let's just go and call that and pass the content tour.<br>
All right, so then down here, how do we make this happen?<br>
What do we got to dio?<br>
Well, using Mark down to is pretty easy to say.<br>
HTML equals Mark down to and PyCharm needs to import that at the top for us.<br>
And we just say mark down and we give it the text.<br>
And for the moment, let's say safe mode is true and we'll just return our HTML now by germs saying this could be a static function.<br>
I kind of don't want it to be static.<br>
Someone told Toe not bugging me about it.<br>
Save this.<br>
Should auto restart, it does.<br>
Let's just go refresh that page and see what we got.<br>
Right?<br>
Fingers crossed and look at that man.<br>
That looks pretty good, doesn't it?<br>
All right, well, we now have our proper bulleted lists.<br>
We have our bold sections that we put with our double stars.<br>
We have our code looking pieces we did with our back slashes.<br>
We have our h one or H to do with their double hashes and so on So yeah, look at this.<br>
This is really, really good.<br>
Some of the styles were already in our CSS like the style to make code look pink.<br>
That was already in our CSS.<br>
But for the most part, this is just raw HTML generated by are marked out until we go look at the page source.<br>
Not very pretty, but there it is.<br>
That's all the stuff generated by our mark down that we wrote.<br>
And of course, if you go look at it over here, it's still written like this so we could come over and say, maybe we want to say, put little single star on both ends of you to make it italicized And if we go get help again, do you have buy and sell right?<br>
We can edit in, mark down, but then we get this rich HTML rendering that we needed.<br>
So that's beautiful.<br>
That's exactly what we want.<br>
Now there's two things to issues I guess that I want to address.<br>
The first one is performance.<br>
So what we're doing here looks beautiful and we click on help.<br>
It looks like this.<br>
You know, it looks like the site is really fast as I'm clicking around, but let's look more carefully if I go and say over the network, have and just look at hte email and we click on Let's Click on Account notice that we're getting this in super quick three milliseconds clicking a few times 33 We go over to the admin section that takes five milliseconds.<br>
We go to the home page second time for the first time, a tiny bit slower, even with all the database queries and all the stuff that's happening over here, these are quite quick right, 10 milliseconds and so on.<br>
It's going to help 53 minutes a little bit more Where's the time being spent is being spent converting to mark out.<br>
But if you look, if you look over here, that's really not that much.<br>
It's like a page and a half.<br>
What if we had more?<br>
But if we had just a little bit more so let's go and or to give it more data to here were just create a string that has an extra new line on the end.<br>
But let's multiply that by 20.<br>
So instead of having a page and a half a continent, let's have 15 pages of content.<br>
Okay, if we rerun this like over here and requests the help page again, notice the scroll bar is way longer.<br>
But more importantly, notice up here watches.<br>
I click.<br>
See it spinning computing, computing, computing Are HelpAge our admin page still super quick?<br>
All right?<br>
Or are our donate page Our campaigns, like everything other than help is fast, right?<br>
But help Brian me grind, grind very slow.<br>
And if we look at get the actual numbers, it's a new it's unacceptably slow.<br>
Look at this Who it took 860 milliseconds.<br>
That is a really long time now, You know, if you go visit a site, it might not feel about that bad that it gets back to you this quickly in practice, like to me, that still feels super slow.<br>
But maybe the sites busy, who knows?<br>
But in practice, if this is how slow the server is, there's a whole lot of other stuff going on, making it even feel more slow.<br>
And if you have a lot of users, it's gonna be really hard for the site to support a lot of users.<br>
Because it for over here and the pages were taking for milliseconds, right?<br>
It's You could handle a ton of request for second.<br>
Well, over here, this one not so much like one request a second.<br>
Basically, that's probably not good for a lot of sites.<br>
Moreover, you wanna have a fast experience for users and faster sites rank higher in Google as well.<br>
So there's all sorts of reasons this is not okay.<br>
How we gonna fix it?<br>
Well, we're gonna fix that with a little bit of help from another library later on, so I'm not going to try to solve it here in this chapter, but we're gonna come back in and get to it soon.<br>
Now let me Just leave this here for you.<br>
So you have it to play with it in case you want.<br>
But let's roll us back to the normal working Rusian.<br>
There we go.<br>
Now we got our our normal length scroll bar back on.<br>
Got our stuff.<br>
All right, so that was is you one of two issues that we caused for ourselves when converted to mark down the other is Well, our donate page doesn't look so awesome anymore.<br>
What do you think?<br>
Nice.<br>
Well, the safe mode said somebody tried to put some script in where markdown was expected.<br>
And so we took it out, right?<br>
But it didn't Just taking it out there like, I want to be clear.<br>
Just so you know, we removed all this.<br>
HTML is probably not gonna look like you expected.<br>
So the next thing to dio real quickly will just to be fixed that now we could do things with turning safe mud off, but we're not ready for that.<br>
So let's just go and actually turn this into markdown.<br>
Super easy to do.<br>
Actually, though, all that stuff is kind of done on its own paragraphs or just separate like that if we want.<br>
Ah, hyperlink.<br>
We just take the text that goes in there and for that in the rackets.<br>
And then put the destination Neural in Privacy's like that.<br>
Actually, this should be all we have to do to fix our page.<br>
Let's check out.<br>
Donate Now who are site?<br>
Looks like it's working again.<br>
Let's click on that, Steve.<br>
It does.<br>
Yes.<br>
We could donate your the PSF awesome.<br>
Well, there it is.<br>
We've now converted to mark down and our pages.<br>
Let's go.<br>
Just double check these other two pages here.<br>
Company history and getting help with Pipi I not that one.<br>
The company history and our team of those to those look good, right?<br>
They actually didn't really have any HTML.<br>
So they're fine as well to all four of our pages that are part of our CMS are now working with mark down,
|
|
|
show
|
1:53 |
If you look at the HTML that we can right over here, it's actually fairly limited.<br>
There's a base mark down that is sort of uniformly accepted And then there's extras.<br>
My github has its own extensions to mark down So, for example, notice that this is its own block of code that should be treated more richly is kind of like a whole section.<br>
That is a code call out that's not being done there.<br>
And if you wanted to write a table like tabular data gonna put a table in here, well, that doesn't work by default in the base marked out.<br>
So what we can dio super easy is we can come over here.<br>
And if you look at the mark down to documentation, there's a bunch of extra features or plug ins you can turn on.<br>
So I'm just gonna pay some here so we don't have Haitham out so we can have better line mother lists.<br>
Be more code friendly.<br>
Who doesn't want that have fenced, could blocks.<br>
That's what I was talking about, I believe, and then also have support for tables and in order to use thes all we gotta do, say the extras are these options that were passing in save Why should restart.<br>
Human is still running The little green dot in the bottom left means it is boom.<br>
Look at that.<br>
Well, we didn't have any tables that were totally broken that now work.<br>
But this code block down here looks totally different, doesn't it?<br>
Right?<br>
We still get the same code.<br>
Look here, these little bits, but not for big chunks of code.<br>
I don't know if there's more than one line now, but they would all be in the same gray box if you will.<br>
Now, if we do a quick back and forth, you can see Here's what it looked like before Hey, what it is before and after.<br>
All right, So really, it's just that could blocks the main coal blocks that are changing on this page.<br>
But like I said before, if there's a table here would be broken there, it would be fixed here and so on.<br>
All right, well, now we have a higher level of mark down that we
|
|
|
show
|
0:48 |
Let's just quickly review how we render or convert Mark down over to HTML and this is it.<br>
This is all of it.<br>
Why is it so short?<br>
Because we get to use the awesome marked down to library.<br>
We don't have to write all the tricky work to do that convergence.<br>
So we just make sure that we install and then import marked onto.<br>
We specify the extras, the extensions to standard mark down that we want to use Especially for us.<br>
It's fence code blocks in code friendly and tables, probably at some point.<br>
And then we just say, Go to the market onto Lybrand, say, mark down, give it the text, passing the extras.<br>
And for now, we're using safe mode equals true.<br>
That gives us our HTML and we just throw that in the page and boom, we have, ah, much, much nicer way to represent the content of our pages without the dangers of HTML and
|
|
|
|
13:49 |
|
|
show
|
1:55 |
so far, we've been able to write, mark down and have our website render it.<br>
I'll be a little bit slow, and we're gonna work on that soon.<br>
But what we couldn't do is edit it nicely.<br>
We had to write in just a silly text area thing in our Web page, and it knew nothing about the format.<br>
There were no hot keys like command be, wouldn't bold our code of We've selected something hit command be so we want to add that capability to our site.<br>
So the idea is we want to go from this basic text area like this, and this is already kind of advance.<br>
You can see it's like showing different sized fonts for the things and so on.<br>
But we want to go from just a text area to something like this, where it is actually rendering the text a little bit better.<br>
Where we have this toolbar and we have honkies.<br>
Of course, you can't see hockey's, but they're here, right?<br>
You can hit command, I for I, Tallis, ease or command be for Boulder control, your own Windows or Linux.<br>
So that's the goal of this chapter.<br>
Now, like many things either in Python or in general and programming.<br>
We don't want to build this.<br>
This is a lot of work we could we shouldn't.<br>
So what we're gonna do instead is we're gonna use an existing one.<br>
And I've chosen simple mde, simple markdown editor.<br>
That title seems kind of redundant there, I guess.<br>
But anyway, simple mt dot com That's what we're going to use now.<br>
Just this is not the only choice.<br>
There's a lot of markdown editors, but this one is simple.<br>
It has beautiful views.<br>
It has really nice features.<br>
It has the hockey's that I want and so on So if you find one that's better, that you like better, that works better.<br>
That's fine.<br>
This isn't the newest or the latest or the greatest, but this one is really good and really well, simple, Hank, the name said.<br>
So we're gonna plug this into our Web app, and you're going to see the back end editing experience goes from not so great, even for people who know Mark down well to a really nice editor for even people
|
|
|
show
|
3:14 |
it's time to install simple MD.<br>
Now we could just go download and copy it in, but we would like to version and be able to upgrade and manage the versions of Simple Empty.<br>
And there it's dependencies overtime.<br>
So what we're going to Dio is we're gonna go over here into the static folder notice we're in chapter nine could now, after Nine Ridge editors, I made a copy from before, as always.<br>
So over here in the static folder, what we want to do is we want to install those libraries that we're going to need.<br>
Now, we're gonna use no Js in particular in pm to do that So in order for that to get saved here, what we need to do is we need to jump out here real quick.<br>
And here we are in our static.<br>
Let's go to our aesthetic are not there.<br>
Here we go.<br>
So here, next to our CSS and our images, we need to run in PM in it now, you need to have no Js installed.<br>
If you never do anything with node, fine.<br>
Don't worry about it.<br>
It doesn't really matter.<br>
We're not gonna do anything with node we just want in PM We're just going to use it as a package manager like Pip, but for our JavaScript to we're gonna just go through here.<br>
We don't really care what the answers are.<br>
We just need to generate this package.<br>
Jason here.<br>
So when we install stuff, this is going to be treated as the top level of our application, if you will.<br>
So now, toe actually get what we want to install.<br>
Simple Mde will say in PM in B M installed Dash Dash, Save Simple MD.<br>
Let that go.<br>
It's gone and it's downloaded Simple MD.<br>
But it's also added five packages with a whole bunch of other stuff.<br>
And apparently there's an upgrade for in PM as well.<br>
But the most important thing is that we look here.<br>
We now have a node module, and if we see, do I have tree installment?<br>
We look in there, we can see that we've got code mirror.<br>
Could mere spellcheck marked simple MD, which is what we want and type of jazz.<br>
All these other things are what simple indie needs toe work, but we don't care.<br>
It just all got installed and managed by NPM So we're done with that.<br>
And over here now, notice that a bunch of stuff got added.<br>
No need to worry about this for a moment.<br>
We dig down in.<br>
These are the two files that were looking for work with a CSS and the jazz.<br>
And because these are sub folders and no dance modules is a simple, they're ecstatic both.<br>
When we go to deploy this through Injun X, and when we run it locally through flask, it will be able to serve up those JavaScript files.<br>
You want to make sure that this is somewhere within static folder.<br>
That's it.<br>
We now have simple MD and the dependencies installed we can use in PM to check for security problems and upgraded if those come along if we want a new version or anything like that again, if you want to just go download all these libraries and copy them over.<br>
That's totally fine.<br>
But I find that life is a little bit easier if we just let in PM, take care of everything and all lines up in a relative sense and so on.<br>
All right,
|
|
|
show
|
1:43 |
If you've used no GS before to manage JavaScript dependencies, then this is no big deal.<br>
But let me just run through the steps of installing simple MD to make sure that you all can follow along now to get started.<br>
You need tohave in PM and note installed.<br>
We're not actually gonna run stuff with note, but having it there allows us to do in PM stuff, which is pretty cool.<br>
So you want to solve that?<br>
Once you have it installed, we need to create one of these package not Jason files to get no Jess in PM specifically to save the installed libraries in this location Basically, you tell in P.<br>
M.<br>
This is the top level of this package you're managing.<br>
So install stuff into subdirectories year, not your user profile or something like that.<br>
We say in Puma Net we don't really care about the setting.<br>
So we just hit enter all the way through and yeah, it looks great.<br>
It creates that package, not Jason file.<br>
Finally, we say in PM, install the package dash, dash, save it downloads.<br>
You can see simple MD, but it also goes and gets four other libraries, so it added five packages from 862 contributors and then autumn for security vulnerabilities and found zero perfect.<br>
So we have a up to date simple nd then presumably is pretty safe.<br>
It's been somewhat checked, at least so we've got that installed and you can check by just saying Tree trimming the directories only four level steep and so on.<br>
And then you can see basically down here we have Simple MD, which has a debug, a dissed in the source code.<br>
We really only care about the dest part.<br>
That's all we want to work with.<br>
But it's easier to just let no Js and NPM manage it.<br>
So I'm just gonna let it install the other junk and tag along, and that's it.<br>
We have simple MD installed in our static folder and already start
|
|
|
show
|
5:44 |
Now that we have simple MD installed, let's go see it in action First.<br>
If we go over, you are make a copy.<br>
Your view one of our pages over here, like this one.<br>
Notice.<br>
There's not a lot of help going on here.<br>
Like if I enter, there's no continuation of that, right?<br>
If I come over and I highlight this and want to get bowled a hit command be just shows my bookmarks and it does nothing.<br>
No tool bars.<br>
There's no special view to show what stuff is gonna look like There's a lot of shortcomings that we've already discussed, So let's go over here and improve.<br>
It turns out it's super super simple.<br>
We've already in PM installed simple MD.<br>
So all we have to do go over to our template, the admin to the edit page we go to under the bottom.<br>
You can see we're already adding an extra block to inject the additional CSS, and it's very similar for what we want.<br>
So we're gonna go to Static.<br>
But instead of CSS want to go to nude, let's go and copy the path really quick.<br>
That will make things easier for us.<br>
Just say copy path from the content route, I think is what we want.<br>
Let's see.<br>
Oh, close.<br>
You know that thing?<br>
Perfect.<br>
So there's are known model simple indeed.<br>
Ist our CSS is gonna be there.<br>
And let's just say that that's not misspelled because we can't change it.<br>
If we look over in our shared layout, we had all right at the top this additional block for CSS at the bottom.<br>
We also have a similar one for JavaScript, so we're gonna need to put the JavaScript pieces in here.<br>
All right?<br>
Perfect.<br>
If I can keep those together, So in here, we're going to say script source equals and let's get the same thing.<br>
Make sure you got the right path.<br>
So copy content route.<br>
And then I gotta just clean it up a little bit There we go.<br>
All right, Now, this is enough to include it, but it's not enough.<br>
Toe.<br>
Activate it.<br>
If you look up here, this is our text area with I d contents.<br>
Right?<br>
What we've got to do is we have to tell it we want to create one of these contents.<br>
One of these editors focused on that contents, text area.<br>
We could do this in a separate JavaScript file, but it's so short, I'm just going to do it here just to keep things simple.<br>
We'll say Script This year, I'll say, Let Editor equals new, simple mde and into here we passed some options to start it up.<br>
Well, say element is document get element by I D and what we're gonna give it content?<br>
This is actually enough to get it going, and I'm not super fan of that.<br>
There we go.<br>
That is showing is an error because it's not actually in there so this is enough to get it started.<br>
But one thing that drives me crazy is the spell checker.<br>
It's not very rich, and you can't, like, ignore stuff.<br>
If it thinks something's misspelled, it's gonna like, make it the wrong color constantly.<br>
So I'll just say Spell, check her.<br>
It's false like that.<br>
This might be it.<br>
Let's see if I've got it right.<br>
So we include the CSS file include the JavaScript file and we create an instance of the editor and we just let it go.<br>
No, we save it.<br>
Go back to this refresh.<br>
Yes.<br>
Look at that.<br>
Look how cool this is.<br>
So here we got our editor of here.<br>
I'll make this bigger, unnoticed.<br>
All of a sudden, these start to have visual keys like the H two is larger.<br>
The bold stuff is bold.<br>
The code stuff looks like code.<br>
And if I go over here, let's say we want 1/4 bullet hit.<br>
Enter check it out.<br>
It knows as continuing a bolted list ago.<br>
This is another thing.<br>
I love it never really excited.<br>
And I want to highlight love it and make a bullet command be there it goes If I don't know about Hakkies, I can do that and just press bold, right?<br>
Also, you got a bunch of editor stuff up here that's pretty cool You can insert images and links.<br>
You can preview it right?<br>
This is the how it's gonna look like toggle between that.<br>
That's kind of cool.<br>
What I like better is the ability to do side by side editing, so side by side is cooler still right and notice.<br>
This is the same rendered version, and even as you scroll through one, it's scrolling through the others, right?<br>
It's synchronize scroll, so that's pretty awesome.<br>
And If you want it, you just preview at full screen or like this.<br>
How about that?<br>
And if you don't really know what the heck markdown is, even click this and it'll show you real quickly.<br>
This is what Mark down looks like.<br>
Like the simple, simple version of Mark down.<br>
Yeah, well, that's it.<br>
We now have this super fancy, I think, quite powerful editor built in.<br>
Now it looks it looks simple, like it's name says, but actually no ability to have hockey's ability to have the toolbar, the rendering, the side by side editing the what?<br>
You see what you get.<br>
It was a big editor.<br>
All those things are awesome.<br>
And how all we had to dio was in peer install.<br>
Simple.<br>
Andy had the CSS add the JavaScript and then instead she ate an editor pointed at the contents text area.<br>
Done.<br>
All right, we are back in content management system just got way nicer You gotta log in there and write pages in mark down.<br>
Well, it's gonna be a joy now,
|
|
|
show
|
1:13 |
I would say that simple mde lived up to its name not in its capabilities but in how it is that we set it up and incorporate it.<br>
And in order to do that, we just go to the page where we want to add the advanced Markdown editor were Carter Text Area.<br>
And first we're going to include the CSS.<br>
And when you have this shared layout, the easiest way to do that's have a block back in the shared layout where CSS goes and then render stuff into that block.<br>
So here we just added the CSS out of the distant folder for simple empty.<br>
And then we did the same thing for JavaScript.<br>
We added the simple Mde JavaScript file.<br>
And then we create a new instance of simple MD point.<br>
It say element is whatever document docket element by 80 the name or the I D Rather of that element, we also in our code, said spellchecker capital C colon false because actually, as I've used this more realized, I don't really love the spell checker, but, you know, maybe it's useful to have who knows Anyway, This is really nice and super easy to use right.<br>
And be a minute NPM install these two steps and he massively upgraded the user experience
|
|
|
|
53:04 |
|
|
show
|
4:22 |
the markdown system that we built renders pages beautifully and it looks like, Well, maybe we're done.<br>
Maybe you don't need to do anything else.<br>
After all, here's one of the pages we created, and honestly, that looks fantastic.<br>
I wouldn't change a thing about it, but there's a few problems.<br>
First of all, we saw for large pages pages that are maybe 10 times as big as this one The site is slow, and you might think, Well, doesn't get that much traffic.<br>
It doesn't matter that much, but it does matter.<br>
There's been tons of studies that showing that even something simple, like ah, 100 milliseconds longer Layton see, contributes to something like 1% fewer purchases on e commerce sites.<br>
Now think about that.<br>
If you do a lot of sales, that's a huge thing.<br>
It also is now starting to be taken into account for S E.<br>
O.<br>
So if there's a site that's five times as fast as yours and you have about the same ranking, guess who's gonna be below.<br>
You're gonna meet below your site slow.<br>
Also, your users not gonna love it.<br>
You're gonna pay more for infrastructure to host it all of these things.<br>
So optimizing websites matter.<br>
We're not gonna use Cloudflare.<br>
I just thought this little quote or this little statement from them was nice.<br>
So I put it up here.<br>
Speaking of S e o, you could actually check how your site is doing if you have it hosted on the public Internet, for example, if you go to page speed insights from Google and you throw for example talk Python train in here, you can see we get 100 out of 100.<br>
And this is stuff coming out of the database with no cashing.<br>
Not really.<br>
You can do it.<br>
You can make your site super super fast.<br>
But if you want to rank high, you're going to have to put in the effort.<br>
And a lot of the stuff that we're gonna talk about in this section actually does this automatically more or less.<br>
You won't have to even think about it.<br>
It's just we're gonna use some libraries that make this happen, and it's gonna be amazing.<br>
So I do want to drive home the importance of a high speed site, a quick, fast responding site.<br>
It's good.<br>
There are so many reasons that's good for the users.<br>
It's good for you.<br>
Easier to host.<br>
You don't need so much infrastructure and it's good for S e O all those things The other core problem I think we're going to run into on most sites is that content cannot be reused.<br>
That might sound a little bit weird, but you know where we're raising all sorts of stuff in our current site as it is that whole navigation bar across the top of the footer, the overall look and feel things like analytics we might put into that shared layout.<br>
We're using that everywhere.<br>
And so it's not unreasonable to think there should be parts of our mark down that appear in more than one location as well.<br>
Let me give you an example.<br>
Re use is actually pretty common.<br>
If you go over to the talk by the on training website, you Can you pull up various course descriptions and marketing pages that tell you about the course, whether you should be interested in and so on.<br>
Here's one for the Python for beginners.<br>
Now there's a bunch of stuff very specific to that course, right, What we cover, why you care about it, who should take the course and so on.<br>
But then there's this section here where it talks about subtitles and it says this course comes with subtitles.<br>
Here's a picture of a course with subtitles in our player and how it's gonna look.<br>
So if you want to take this course and you need subtitles Well, rest assured, they're gonna be here for you.<br>
So this little section and actually the green section above is talking about streaming in high D.<br>
P I as well, and that shared in many places.<br>
But guess what?<br>
We have other courses.<br>
Here's the data driven Web APS course.<br>
And do you know what it has?<br>
Subtitles So we have exactly the same mark down here.<br>
Talking about this course comes with subtitles.<br>
The right Python encode course also has subtitles in its lane in Page says yes, you might want subtitles.<br>
Yeah, 100 days.<br>
A Web Subtitles also Who?<br>
Here's the thing.<br>
What if I want to change the wording here?<br>
Should I have to go back toe every part of my site and re edit that somewhere in the middle of this marked on file?<br>
No, no, of course not.<br>
We don't want to do that.<br>
It's super air prone.<br>
We could easily forget one.<br>
It's a ton of work.<br>
What if we had 100 different pages instead of just 45 or 20?<br>
Right?<br>
That's totally reasonable.<br>
And yet it's not reasonable to go and rewrite that same better code everywhere.<br>
So with these markdown pages, it would be nice if we could get section and say this marked out actually something I could reuse in other parts of the site.<br>
So that's what we're gonna dio here as we're going to switch to a library that's built on top of Mark down to and does a whole bunch of cool things, including solving all these problems we've seen.
|
|
|
show
|
3:17 |
Now we've spoken about some of the limitations of Mark down slow to render it can't reuse content, things like that.<br>
I'm gonna introduce you to a library that will let us solve all of those problems and more.<br>
And the library is called markdown sub template.<br>
So this is something that I've actually created for my own sites and decided to make a project that everyone can use.<br>
So how does it work?<br>
What's good under this little overview here?<br>
We've got some marked down content here says page dot MD as a file.<br>
But as you'll see, it can just as well be out of a database in memory, something like that.<br>
And maybe we have some pieces we went to import like this could be the high d.<br>
P I.<br>
And it could be the transcript section that in the previous example that we want to reuse.<br>
So we're gonna import those, and then we can feed those to the various frameworks relevant for us into flask.<br>
Glass is going to render that into its shell.<br>
This is the shared layout.<br>
Jinja file that gives us the consistent look and feel indicates whether or not the users logged in and so on.<br>
We're gonna take this converted very efficiently over to HTML and then display it with this common look of feel and send that over to the browser.<br>
Now, let's go down to this extension bit here and follow through and see some of the interesting things happening.<br>
But the most important part here is to look at this extensive bility doc for our sake.<br>
So come down here.<br>
What we're interested in is how do we get this marked out?<br>
So by default, the library just works as if it's coming from markdown files on disk.<br>
Doesn't assume you have all the infrastructure that we built up so far in the course.<br>
And if you want to use that, all you got to do is just point it at at some folder here.<br>
Are you pointed this and put these files here and you'd be good to go.<br>
But that's not what we want, because it's harder to log in and edit files and it is just stuff or point of the database.<br>
So let's go down here where we can talk to seek welcoming We could also use Mongo, DB or some other way to store it.<br>
First thing we gotta do is we have to have some way to save a page into the database.<br>
Well, guess what?<br>
We've already done that, and it's called the page class, so we don't have to do anything there.<br>
That's good.<br>
However, what we do have to do to make this work is we've got to go over and write a tiny bit of code less than what you actually see on the screen.<br>
This is sort of the whole approach.<br>
What we've done, a lot of it can be reused to make the shorter.<br>
But what we have to do is we have to right a little function or a couple of functions that allows the markdown sub template library to know how to get and save marked out.<br>
So over here we can say, given a little girl a subdural, how did we get that?<br>
We're just going to go get the page from the database and send back the contents and so on.<br>
So in order for it to work because it doesn't know what, whether using the file system or we're using a database or maybe that database to seek welcome me or Jingo or mongo db right?<br>
It could be whatever.<br>
So it needs a little tiny bit of help.<br>
Doesn't other connection string.<br>
For example.<br>
It needs a little bit of help how to talk to the database.<br>
But once that's all set up, then we're pretty good to go.<br>
So we just have to write this a little bit of code here, and then we're gonna have a much, much better experience or are marked down.<br>
Will be able to reuse an import content, and it will be much faster as you'll see.
|
|
|
show
|
2:45 |
it's time to start bringing markdown sub templates into our project.<br>
So, first, as usual, using an external library from my P I we're going to put it into our requirements over here to say that we want to use it.<br>
So we're gonna use markdown sub template and nobody arm.<br>
It's not misspelled.<br>
So we could either installed Nashar requirements.txt or, you know, just click this button and let high time take care of it.<br>
Okay, now that that's installed, that's looking good Over here.<br>
We were converting to mark down, using our own code that we had written right.<br>
We wrote this function were using marked down to with the options.<br>
All that was buying, however, remember, it was slow.<br>
We can't reuse stuff, all the limitations.<br>
So let's not do this.<br>
Let's comment that out.<br>
And the k we're not using it and same thing here So instead of calling that what we're gonna do is we're gonna use the markdown sub template.<br>
So let's go over here and say import marked down sub template like that.<br>
If you go to mark down sub template.<br>
There's this thing called an engine and the engine we can get the page.<br>
It takes the template path.<br>
Well, we can just use the Earl passed that subdural through.<br>
It also allows us to much like Jinja, take variables and replace them in the markdown with values that were passing from code.<br>
That's that data you can see.<br>
But right now it's just an empty dictionary.<br>
We're not really using that.<br>
Like we don't have any data to pass along in this use case, so it doesn't make sense breast to pass any Data's Where is gonna leave that out.<br>
Soas faras using marked on sub template This is it.<br>
We're done.<br>
However, we're not done setting it up.<br>
There's one more thing we got to do.<br>
So let's go and try to view something over here.<br>
Let's try to go.<br>
What could help, for example, Boom.<br>
What happened?<br>
Well, illegal operation storage engine is not initialized.<br>
Okay, What does that mean?<br>
Well, what it means is we have to explicitly tell either where the files are if we're going to use markdown files off of disk like the default or we have to teach it how to talk to our database or something like Red is or even a Web service.<br>
However, we're going to talk to how we're gonna store and retrieve are marked down right now.<br>
Reason.<br>
Sequel.<br>
Alchemy in the database.<br>
We just haven't set that up yet, So it threw up his hands and said, Look, I could use the file system, but you haven't told me where the files are.<br>
And by the way, if you want to do something else, I also can't, you know, anticipate that.<br>
So the next thing we got to do is set that up, but it's really quite easy as you'll see.
|
|
|
show
|
7:48 |
we saw that marked on September lit, threw up its hands and said, I have no idea how to find this URLs content that you're asking for.<br>
So let's do the final step.<br>
Remember, we talked a little bit about this before.<br>
We have to implement a class and link it together, and it turns out to be super easy, but it is required.<br>
This step is done because that's our page class.<br>
I went off to do anything there, but for this one, we're going to need to provide some sub templates.<br>
Storage engine okay, turns out to be easy, but required.<br>
All right, so let's go over here and make a new file called Template Storage Engine and just don't put down here and put this class, and I'll just call it sub template.<br>
Just call it template storage engine like that.<br>
This we can have PyCharm import above, and we go over here and have PyCharm.<br>
Do most of the work that we have to look up or are seeing the documentation So if we go over here to say, implement abstract methods, select them all, and that's it.<br>
We just got to write a little tiny bit of code for each one of these.<br>
First of all, for this last one, there's not really anything we can do.<br>
In this case.<br>
This is more for the file version that's used some of the time, but not here.<br>
This one Super easily it needs to know is the underlying thing that I'm going to talk to.<br>
Would it work?<br>
If I were to ask the database, give me this thing or asked this thing?<br>
You give me the markdown.<br>
If we haven't initialized the secret alchemy stuff, this won't work.<br>
So we look over here, that's under this DB session thing, and you notice it will do things like we try to create session and it's not set up, it's gonna crash.<br>
And the way we record that as we set, this is initialized.<br>
All we got to do down here.<br>
It's a return D B session thought is initialized, is it?<br>
Those two are done.<br>
This one's pretty easy as well.<br>
We come over here and say We're looking for a page from the CMS Service like that, and it knows how to get a page based on a euro and template Path is the URL and that's it.<br>
We just need to return the page of we have one.<br>
One caveat, though.<br>
Notice here, returning a string and this is a page.<br>
So what we need to do is return paged, aunt content.<br>
That's that.<br>
However, there might not be a page that they could ask for something that doesn't exist, in which case this line will crash.<br>
We got to do a little test, if not page return.<br>
None.<br>
And technically, this really should be optional.<br>
There's a open issue to change the specified return type in the abstract class.<br>
There to be optional indicate, You know, if you go to the database, there's no guarantee you're going to get something back asking for it now.<br>
We also have this shared one, and at the moment it's exactly the same.<br>
But I'm gonna copy this over important and basically zero again have a different mood.<br>
If a page is shared versus not shared, in which case that we can, you know, pass that over like is shared, shared equals true, something like that.<br>
But for now, we're just gonna have the same code until we get that in place.<br>
Okay, let's see if this works.<br>
Oh, that's step one.<br>
There's one more thing we gotta do before this is gonna work.<br>
Let's go over here a little anxious to show you how cool it is.<br>
We go over here to our main.<br>
Remember this.<br>
We're doing things like setting up the D B.<br>
And now we need to say, set up templates or mark down or let's call it marked down.<br>
Then we go in past log in.<br>
All right, so let's go and put this down here in a look.<br>
Basically the same.<br>
So what we're gonna dio is very, very simple.<br>
We're gonna create, some like this.<br>
I'll call it a store, and all we gotta do is create one of those template stores TV store like that and then we're going to go to the storage, which comes from they're gonna say, set, engine are set storage store like that.<br>
And I passed the logging so we can say something to the effect of notice.<br>
Something like that.<br>
Just so when we started up, we can see what we said it to go.<br>
Set it to a template storage engine as opposed to your files or whatever.<br>
All right now.<br>
Moment of truth.<br>
Let's go back year where we had our error.<br>
Now the storage engine is initialized.<br>
Let's see if this works.<br>
Run it.<br>
Yes.<br>
How awesome is that of a click around?<br>
You can see all of our pieces are just nice and quick so we can see this is working super Super Well now.<br>
Before we had this problem where if there was a lot of content on this page it was slow.<br>
Right now, it's super fast.<br>
You can see that's not so impressive because what is fast me Let's go over here and let's tell it that if you ask for this page you're actually going to get 20 times that.<br>
That's what we did before.<br>
Right now, when I first click this, you'll see that this is gonna take a second for the Ceron.<br>
You'll see the little spinning up there going okay, and now this should be much longer if I click it again.<br>
Oh, it's that you don't even see this page.<br>
Refresh.<br>
Let's go and do a quick inspect element here.<br>
Go to the network.<br>
Good HTML, and I'm going to restart this because it's already done its magic I want you to see it from scratch.<br>
So when we first request this, it has to generate the markdown right click here.<br>
Notice it took seven almost 706 159 milliseconds to do that.<br>
And you can look in the logs and it says mark down.<br>
Sub template has an info message for you.<br>
It is generating contents from help our from this, like slash help with new data.<br>
Right.<br>
So it has different caches for what you passed It then took 635 milliseconds But if I refresh it, if I go over here first time, it's a little bit slower.<br>
Canasta.<br>
Read the file, but seeing 13 milliseconds.<br>
If I goto log in for go back.<br>
Good one of these.<br>
Hit it a few times.<br>
Very quickly.<br>
12 milliseconds.<br>
Remember, we don't want the 800 milliseconds or 600 milliseconds.<br>
We want the 12 or less.<br>
Check this out.<br>
Seven seven strife.<br>
You more 54 Can we keep going down that the awesome six notices is insanely vast This thing that was a huge blight on our site.<br>
It was like really slow.<br>
And it would like walk up the server.<br>
While requests are being made to it has now become the fastest or one of the fastest pages on our site.<br>
It is fastest log in, which does nothing.<br>
And it has all this content, right?<br>
All this stuff here.<br>
So this is super awesome.<br>
And that's just one of the things.<br>
One of the cool things that this mark down sub template takes care of forests at the moment.<br>
It does that by cashing it in memory in process, and that may be totally fine.<br>
You have to do anything about it.<br>
You can see as we request, over and over.<br>
There is no more generating content once it's done once it's done But you might want to store it in other places.<br>
You can look at the X sensibility, and you can actually store that in the database.<br>
That's what we do over talked by phone training for our sites that use this infrastructure And you could put it in readiness.<br>
Things like that, right?<br>
So there's a lot of options for away restore that That way, if you restart the site, you don't to regenerate the content, which may or may not be a big deal but nonetheless, it's cached somewhere and we don't have to worry about it.<br>
It takes care of it for us, which makes it insanely fast.<br>
How cool is that?
|
|
|
show
|
3:47 |
Well, the speed was pretty awesome.<br>
But honestly, it's not super hard for us to at that ourselves to cash the markdown content from that role method that we wrote.<br>
If we want a real simple cash, but we can do more and let's start taking advantage of another component.<br>
Remember, I showed you the reusable elements from Talk Python Training.<br>
Where on the course landing pages, you've got things like this one has transcripts, and here's a little blurb and image about what transcripts mean.<br>
And we're reason reusing that across 25 different landing pages, maybe more.<br>
We edit it in one place.<br>
It's edited everywhere.<br>
It's a thing of beauty, so we're gonna add that capability here or it's already here.<br>
Actually, we're just gonna take advantage of it now.<br>
The first thing to Dio we're gonna have to have something in the database to share So let's go at a new page and this is a B suggest fix and let's just go over here and say it's to be suggest fixed like that.<br>
Okay, so we're gonna need to use that when we talk about sharing it, and then down here, we'll just have some simple content.<br>
Let's have ah H four see a problem with this page to use a simple message please shoot us.<br>
Ah, message on Twitter.<br>
Just say there's a problem with this page and let's actually make this a URL So we could go over and sit control.<br>
Come in K and the HBs Twitter com slash of the psf preview it Make sure it works Just a little link.<br>
Yeah, that looks like that's the PSF.<br>
Here's one thing that we're going to address.<br>
We're not there yet.<br>
We'll get to in a minute.<br>
These pieces here are the pages of our website that are important to us.<br>
They make up our website.<br>
This is like a reusable thing that we could reuse somewhere.<br>
I would like to separate these two in this list.<br>
I would like to indicate here shared stuff that you shouldn't be requesting directly and hear stuff that is meant to be the top level.<br>
Okay, But for now, we don't have that in that distinction in our database And so we gotta go with this and we'll get it soon.<br>
So let's go over here and let's say go to the Donate one.<br>
I'm gonna add this now with the market on sub template.<br>
All you gotta do to add that element in there's we've got to say all caps import and then just the your else of suggest fix.<br>
Now it could be suggest slash fix.<br>
If you wanted to be like that, it doesn't really matter, Right?<br>
But so whatever we want the world to be, we put that there.<br>
We could even have more stuff here.<br>
Okay, well, let's edit or save.<br>
Go back and you are doing it and see what we got.<br>
How sweet is that?<br>
No, I only put it in one place.<br>
So it's not super impressive because, well, it's only on this page.<br>
We could have typed it right in.<br>
But remember the ideas toe, reuse it.<br>
So let's put it some other places.<br>
Let's go over here.<br>
We're gonna take this and we're just gonna put it in a few other places.<br>
Goto our company history.<br>
Say if you see a problem there, please let us know.<br>
Let's go to our team.<br>
If you see a problem there, let us know now if we dio in view all three of these as you flip through them.<br>
Notice exactly the same content.<br>
Is that cool or what?<br>
Even it could be in the middle of these can Chain up.<br>
You're gonna multiple imports.<br>
Imports can have imports itself.<br>
Right?<br>
This sort of the whole tree of dependencies you can build up and really, it's it's quite nice.<br>
So here we are, with a much more advanced system that lets us have these really cool ways to bring in potentially large, nested, reused elements of markdown toe build up our page.<br>
So if we've got stuff we were using a lot, then this will make a building and maintaining our site much easier.
|
|
|
show
|
5:05 |
Let's talk about formatting for a minute.<br>
We come back over here to our donate page or any of the pages that use this shared content.<br>
We see this section here, but really, this kind of supposed to be like an extra thing at the end It shouldn't have the same prominence as the rest of the stuff on the page to what we would like to do is just, you know, control how this looks a little bit more.<br>
Let me give you a bigger example over on Talk Python Training if we go down to our environmental renewable statement.<br>
So here's a big, bold boom.<br>
Welcome to this part of our site.<br>
Type of design says renewable energy.<br>
Our infrastructure is back with renewable energy.<br>
Okay, come down here.<br>
We've got this header or h two.<br>
Possibly.<br>
I'm not sure what size it is, but it's green.<br>
And then we have standard stuff that would totally fit well within Mark down.<br>
We've got texts, we've got some bolds.<br>
We've got links and things like that.<br>
This page is actually built on.<br>
The same basic idea is that or building for this course as well as a bunch of stuff in our our website over here.<br>
But this part, this part has not easily done with basic markdown.<br>
It requires a bunch of CSS styles, nested things and so on.<br>
So what we want to do is we'd like to be able to mix in a little tiny bit of HTML just to create thes like big moments or format a particular thing in a special way so that it fits within this whole overall mark down rendering story, but has a little bit more design or a little bit more power.<br>
Like if we want to embed some kind of like YouTube player, how would we do that mark down?<br>
So what?<br>
So let's go and try to make this better.<br>
Let's just go and add this here So we'll come over here and say, you know, one way we could do this is we could put this into a div and we could say the size So I font size is 70% the way we say that.<br>
And CSS as we say, it's 700.7 e m.<br>
And we want the color to be gray.<br>
Okay, something really simple.<br>
We could even invent that.<br>
I just can't get that one over.<br>
But we could give some indication that it's meant to be part of this, right?<br>
Let's go and see if this made it better, we go back to donate now, had to restart the web app just because the way the cashing works here to get this to notice the change.<br>
But now that I did, this looks cool, Right?<br>
So we've got our big header, and then we've got the smaller grey text.<br>
Except wait a minute.<br>
What is this?<br>
What has happened here?<br>
That's kind of hard to see.<br>
Probably certain players are certain devices, but it's just left the markdown in there are Link is gone.<br>
And what we had that was being converted to a link is just con what happened The way that marked down to works and maybe the way mark down in general works I'm not entirely sure, but certainly the way mark down to interprets it is it's as this part over here.<br>
This is fine.<br>
We're gonna turn that into convertible markdown to HTML.<br>
But anything once you have my proper HTML anything embedded within that.<br>
So this is inside that Div is now just treated as HTML as well.<br>
Okay, so it says, Look, mark down is often we're just going to drop this in the page.<br>
However, it happens to land safe mode off, basically, is the way that works.<br>
That's what's happening.<br>
So if we want to make that change and make this little tiny bit more styled and more have more features, more stylistic, we need to actually write proper HTML.<br>
So the way we would do that as we were coming out here, we'd have in a trap equals standard HTML.<br>
The link goes there, the text goes there.<br>
We could even do extra stuff like target equals blank to get it onto a new page.<br>
Now, if we could save that refresh the had to clear the cache go back over to donate.<br>
Yes, there it is.<br>
All right.<br>
So do you see the problem?<br>
Ah, here we go.<br>
Click on this and it opens into a new tab So, just like this page where some of it is HTML.<br>
But the majority of the content is actually marked down.<br>
That's what we've got going on here.<br>
This part got rendered as mark down, but this little tiny part that We wanted to control Mawr than standard mark down what we had to drop a little tiny sliver of HTML in there.<br>
So even though mark down is a little limited, this ability to add custom HTML in little tiny segments is how we get back the full power of the Web while requiring not requiring most of the people to actually go in right HTML and deal with all of the weirdness is of it.
|
|
|
show
|
6:25 |
our pages are working great from a user perspective.<br>
Over here we can click on this page and hey, we see it.<br>
Look over here.<br>
We've got our nice getting help with Pipi I And remember, it's super super fast.<br>
So that's cool as well, however, are back in admin side of things.<br>
Not so much.<br>
What pages are the actual content of our site on what are there to be reused?<br>
Well, you remember this one's reused, and these are part of the site.<br>
But how do you know?<br>
You've no idea by looking at this, that that's the intention, or even that you can't directly go up here and just type suggest picks and get well, that's not actually supposed to be a page, is it?<br>
All right, well, that's the problem.<br>
Now we gotta approach Solving it at several levels in order to display this different ways is a hero of the pages and here the reusable bits.<br>
We need to actually be able to indicate whether something is shared or not shared.<br>
So we're gonna be going and changing our page in the database.<br>
Remember, here's our page, class or story in the database trash and seek Welcome a base, All that good stuff.<br>
Here's the direct data is.<br>
So let's just let's take a shot.<br>
Let's just try to add is shared and that's gonna be a boule and this is gonna be a Boolean.<br>
And while we're at it, let's say default value is false.<br>
We don't set it all right.<br>
That seems reasonable.<br>
Let's run it again and go have a look and see how the sites working it works.<br>
Great.<br>
Wait a minute.<br>
That's not as great as I was hoping.<br>
What is the problem?<br>
Sequel.<br>
Alchemy.<br>
Operational error, which is really sequel Light Error, saying there is no column is shared.<br>
What just happened?<br>
Well, if you haven't used sequel community forums before, the problem is we've changed the definition of what the program thinks the database should look like.<br>
But the database itself didn't receive that change.<br>
Remember, sequel Alchemy will go.<br>
If we were to write a new one of these classes with a new name, it would go and create that table perfectly.<br>
But what it will not do is once a table is created and has data in it, it's not going to go back and change it.<br>
It's not gonna look at and go.<br>
Oh, I see that this has changed.<br>
So here's how I'm going to do.<br>
That is a totally different tool for fixing that called Olympic.<br>
So Olympic comes from the same folks that work on sequel alchemy.<br>
It's exactly for this job.<br>
It's job is to go look at these classes, look at the data base and then, if you change the classes, convert or migrate the database over.<br>
So these air called migrations.<br>
Now, in order to use Olympic, you have to make sure you have it installed.<br>
Its in the developer requirements, but not the runtime requirements.<br>
Because this is only a developer thing.<br>
Don't really need it for production.<br>
Probably maybe do.<br>
Maybe don't you can decide on how you install it, managed if it goes into the same virtual environment or somewhere else.<br>
But anyway, I put it over here.<br>
Once we've have installed that, which is to be all done, have been doing that all along.<br>
We'll be able to ask questions if we're in the top level directory.<br>
So for in this folder right here, where Olympic Olympic is right there, contained within here, So in this case, we can ask questions like First, which a limbic or on Windows?<br>
You would say, Where?<br>
Olympic?<br>
All right, well, that's good.<br>
It's the one out of our virtual environment.<br>
So chances, air looking good, it might might write.<br>
It might work.<br>
So we go a limbic current and ask what current version is the database that we're talking to here versus some other one?<br>
And we might point out, what is the version?<br>
It says it's seven to Devi, whatever that means.<br>
If we go open this up, you'll see there's well, right now, there's only one version we've created.<br>
We've only had to apply one migration, but you know, we're gonna do another one right now.<br>
So these files over here store all the changes that have to be applied and basically Olympic will look at the data base, figure out what versions have been applied in in the right order.<br>
Apply the new ones.<br>
If it's not upgraded, we would say Olympic upgrade head.<br>
And here you get no output, which is a little unfortunate, but what it really means, I mean, other than these info messages is hate.<br>
It's already up to date.<br>
If it were not.<br>
You would see a message about how it upgraded stuff.<br>
So in order to synchronize the database or say, look, look over at thes files and see the database and see how you gotta change the database to adapt.<br>
We're gonna right at one simple line here.<br>
Olympic revision.<br>
Now, if I were to just type like there's a little message this will be ad is shared to user the page.<br>
Sorry.<br>
If I were to run that, then it's my job to write how this upgrade is going to be done.<br>
And if we're gonna undo the upgrade, how do we do?<br>
Vent.<br>
What?<br>
Here's the thing you want to do.<br>
You want to say auto generate because you wanted to do the work.<br>
Not you would run that.<br>
And it says, Okay, great.<br>
We've realized that we've detected a column that needs to be added pages that is shared, and we've added a second migration over here.<br>
Well, look at that.<br>
You can see it's a previous version was that its current version is this and what it's gonna do if we upgraded is add.<br>
This is shared.<br>
If we downgraded, it's gonna drop.<br>
Is shared.<br>
All right, well, this doesn't do anything.<br>
I if I try to rerun this when I go back to the same page and refresh it still there, and nothing has been changed in the database.<br>
So this generates basically the steps in order that we need in order to make those changes, but it doesn't do it.<br>
So the final thing to do is this Olympic upgrade head.<br>
It goes, and it talks to the database and now over in our database.<br>
Had it open before.<br>
See, there's no shared.<br>
But if I refresh it, there's now a bowling is shared.<br>
Yes.<br>
And without even in rerunning the app, our page now works.<br>
Cool, huh?<br>
So now the database and the data models have been updated to have this is shared concept, and we've created a migration to upgrade old databases that don't have
|
|
|
show
|
5:31 |
in the database.<br>
We could now market page as shared.<br>
But over here, when we go to edit it, where do we indicate that we can't?<br>
So the next thing to do will be add like a little check box right there So let's start on the H two mouth side and we want that after the title in Europe but before the main content.<br>
So let's go in at an input.<br>
Say the type is check box.<br>
The i D.<br>
It's gonna be is shared and the name will also be is shared.<br>
That's cool.<br>
And then we also want tohave a label, and the label is gonna be four is shared, and we'll just say something like shared.<br>
Okay, let's see how that makes it better.<br>
Well, it sort of worked like that's a check box, and I guess we can check it.<br>
And the label seems to indicate clicking here on the text also changes that.<br>
But why is it so weird like this?<br>
Why is it taking up all the space?<br>
And if I, like, inspect element on it, you'll see.<br>
But it's actually taken up the whole with here.<br>
That's kind of weird is because over here.<br>
We've got to see the non gray ones.<br>
One applies.<br>
We've got inside our admin the form.<br>
If it directly contains an element of type input or text area, it's going to set the pattern and the with think if we undid that, it would go back to the way we wanted, so we could make a really quick and simple change Over here, we can say this section is not immediately contained within the form.<br>
Remember, this arrow means not just somewhere in the form, but is the next thing in the hierarchy.<br>
So we just take this away for a second, make a div and the devil be full with with some padding a match.<br>
But the stuff in it will just have it sort of natural layout.<br>
So we just make that quick change.<br>
All right, there we go.<br>
Now it looks more like we would expect we go back here and then we're to load it up with a new one, right?<br>
We've got to get it initialized and either show actually, whether the pages shared because we're not passing that information along, I'll say, if is shared Well, output checked else?<br>
None.<br>
Okay, sort of annoying that that wraps round.<br>
But let's just put it like this.<br>
Oh, ah, yeah, And got a close Those off, like so.<br>
And if there we go.<br>
All right, well, let's see how far that got us come back over here Admin page.<br>
And yeah, that didn't check.<br>
If we would just write in reverse will be able to see if it would work.<br>
Well, say, if not shared.<br>
So what's hold on?<br>
We don't want to put that they're still left over the other style.<br>
I tried.<br>
Awesome.<br>
So now you can see that if we sort of Hackett to be the opposite.<br>
So if it's not shared, that with checked.<br>
But now the way we really wanted to work is if it's not shared, doesn't check.<br>
Beautiful.<br>
So this works well, however, were not communicating this back to our website.<br>
What?<br>
I mean, if we go over to our view model here, all right, we're not actually passing down whether or not that is shared.<br>
So that's gonna be a problems.<br>
Will say Self thought is shared equals false.<br>
So we'll start out by saying No, it's not shared or new pages.<br>
If there is a page.<br>
Then we want to just go here and say self dot page that is shared to copy that over.<br>
And then similarly, when we submit the form, we got to do it in reverse.<br>
So we'll come here.<br>
Say is shared but is shared here.<br>
Now this is shared.<br>
Gets weird, huh?<br>
Because of the check boxes.<br>
Check boxes are weird in HTML for some reason.<br>
Does this come back is true or false, like you would totally think it should.<br>
Is it checked or not?<br>
True or false?<br>
No, no, no.<br>
It doesn't do that, does it?<br>
When we write the word checked, does it come back is checked or empty, right?<br>
Does it come back with that?<br>
Nope.<br>
What it comes back with is either when its checked it comes back is the string on.<br>
And if it's not checked of that check pot of that check attribute is not there it comes back is off.<br>
So what we're gonna do is just going to say if the value is on that me that shared Hey, let's just make sure everything works here.<br>
You're back in here currently shared.<br>
Now, if we I guess we could put a break point here.<br>
Probably the only way we're going to see it for this.<br>
The moment and we go and say this one is shared and we hit it.<br>
What?<br>
It is shared come back as one quick little step.<br>
Our view model is shared is true.<br>
Perfect.<br>
So it looks like it works.<br>
Because if we come over here to this request, Dichter we've got is shared is on just like I was telling you.<br>
Okay, so that works.<br>
But we're not telling the database anything about whether or not it shared.<br>
So we're gonna have to make sure we get that as well in place before this actually works.<br>
But at least from the HTML side of things interacting with our site we've got is
|
|
|
show
|
1:31 |
Well, the last step.<br>
Now that we're getting the data about whether the pain should be shared or not from whoever is working on the site passed over, we're gonna have to apply it to the patiently.<br>
They're updated here or created over here.<br>
So let's just go and add.<br>
One more argument here is shared and will be the same down on this one.<br>
And then I gotta go write it here.<br>
This one is going to be is chaired as a bull.<br>
And then we just simply have to say Page shot is shared.<br>
Equals it shared.<br>
Done.<br>
Super, super easy.<br>
And where's our create bait?<br>
Same thing, Right?<br>
Okay, so this might actually do it.<br>
We might be able to go and edit these various things here.<br>
All right, back over here.<br>
Let's turn this one into one.<br>
That is shares.<br>
If I check it off and hit saver, submit the form.<br>
Click on it again.<br>
Yes, it's shared.<br>
Figured this other one company history not shared and advice submitted still should not be shared, cause that wasn't checked.<br>
That's working pretty well.<br>
We've got whether or not the page is shared.<br>
Updated in the database when we save it.<br>
We haven't tested that.<br>
Create one.<br>
But as you can see, my child is pretty happy and was super easy to write.<br>
That good.<br>
I'm sure it's gonna work as well.
|
|
|
show
|
3:21 |
we're finally ready to make our admin section do what we've been setting out to do for a while to break these into two sections, the shared stuff and the not shared stuff.<br>
So over here, right now, we're just saying show us all the pages and then we're gonna drop out these little list items like so what we're gonna do don't have to section who have pages and or have called shared was called Shared on.<br>
I guess we could update this.<br>
These are gonna be the pages that are just what we've been working with for so long.<br>
And then these are gonna be the ones that are shared.<br>
I'm gonna set a class to be shared page because that'll make the color a little bit different.<br>
But I also want to show one more thing.<br>
I want to show you are ill because remembers the your l that you actually include now that didn't automatically make this shared set of data exist.<br>
We got to go to our view model and get it passed over.<br>
So currently we have all pages and let's go put this like so then we need to specify here the top level pages, and here are the shared ones.<br>
We can use a cool little list comprehension, we say p four p in all pages.<br>
If if Pete aunt is shared, if not shared and then we can have our shared be.<br>
If it is, we could also write database queries.<br>
If it's has got a lot of data, maybe it's faster.<br>
Makes more sense there.<br>
But, you know, honestly, I think that's gonna be fine.<br>
Let's see how this is working.<br>
Come back over here, Refresh it.<br>
Oh, yes.<br>
Look at that.<br>
Almost almost what I wanted almost.<br>
But let's go and put a little more separation here.<br>
So it's working.<br>
Take away this class that it was making in bold.<br>
What I really want is I want a whole separate ordered list.<br>
So this you Well, it was there.<br>
And have you will like this now if you refresh its little gap and may we could put a little title or something like that.<br>
So over here, let's put a H three CMS pages and this one let's give it a shared fared content.<br>
Some like that.<br>
All right, eyes one indented and the other is not.<br>
Ah, because I put it inside.<br>
I put it inside the Ah, you.<br>
Well, there we go.<br>
So here's the CMS pages.<br>
And then here's the shared content.<br>
You can see that is the share that suggested fix that thing.<br>
We have to write in our import statement in order to use it over right there Pretty cool, huh?<br>
So now we've got it.<br>
Saving the database.<br>
We've got our editor able toe edit that.<br>
So if I uncheck this and save it, it goes away.<br>
Go back and check it.<br>
It's back down there.<br>
Perfect.<br>
This pretty much is what we're looking for, isn't it?<br>
We have this cool idea of sharing content and we have the ability to indicate that some of the content is on Lee shared, and some of it is the top level content of our site.
|
|
|
show
|
5:03 |
it might look like we're done and yeah, maybe we are right.<br>
We can go over here and use this correctly.<br>
Our admin section is very helpful, but there's still one weird thing.<br>
Remember, I go over this, I can actually just go to the site and requested directly.<br>
That's weird, Isn't it?<br>
Also weird that except Spaces.<br>
But that's OK.<br>
This is probably not what we want, right?<br>
We want to be able to request donate, but not little sub elements, right?<br>
They're not put together in a way that will look like they're supposed to be part of our site.<br>
They might freak out search engines, all sorts of stuff.<br>
So the last thing to do is go over to our template engine.<br>
And remember, we had this section that didn't make a ton of sense at the very beginning, like wiser get marked down and then get marked down for shared content.<br>
So you would go over here and say, Get Paige and say is shared equals false.<br>
And this one we can say is shared is true.<br>
They also just passed true or false.<br>
But I would like to be explosive there.<br>
So what?<br>
We need to Dio is we need to tell the system that in this case I only want you to be ableto show top level pages and down here in this case, I only want you to get shared content that was explicitly set for sharing because you don't want to jam one giant page inside of another again.<br>
That's weird.<br>
Well, it's good in here, and add is shared like so and that's a Boolean not say it's false.<br>
So let's go to do with this.<br>
Let's actually hold on to this page object and will stay return page down here so we don't forget.<br>
But let's go and compare before we allowed to go back, make sure that it's not shared.<br>
So we'll say if Page Don is shared.<br>
Is not equal Teoh whether or not we wanted to be shared.<br>
So if it's public, but we wanted to be, I was only for shared or if it's shared, what were asking for public will return.<br>
None.<br>
Eso in the case that the shared state doesn't match, wouldn't say no.<br>
No, we don't want this one right.<br>
That's actually not allowed in this use case, even though it might exist in the database.<br>
Otherwise, we're going to give it back if it exists, right?<br>
This still could return nothing.<br>
But, you know, assuming I guess we'd probably be better.<br>
Be careful.<br>
Make sure that there's a page.<br>
Ah, if there is a page, we can then do this test.<br>
Right?<br>
Okay, so this is looking pretty good.<br>
I think this might do what we want.<br>
So let's go and have a look here.<br>
So, first of all, can we still get to our pages?<br>
Like getting help?<br>
No.<br>
Let's just set a break point here and see what we got wrong.<br>
We got a page?<br>
Yes.<br>
Yes, that's what I was afraid of.<br>
We have this issue where we already created a bunch of pages over here.<br>
And the way seek welcoming works is it doesn't go back and set all the ones where we didn't have a value before the migration was added.<br>
Do the default value just leaves it as none.<br>
So these minuses here mean it's none.<br>
This unchecked means it's false.<br>
And this checked means it's true.<br>
We got a couple options.<br>
We could just go update the database.<br>
Or we could just put a test in here.<br>
I'll do the test.<br>
I suppose I'll say if page and page dot is shared is none hes dot is shared.<br>
Equals false.<br>
Some like that.<br>
A little annoying, but it's probably makes more sense to update the database.<br>
But that's what I'm gonna dio in this case.<br>
Now come back, Try HelpAge.<br>
Yes.<br>
Help works.<br>
Donate works over here and be the pages.<br>
The our team should work.<br>
But we tried to view it.<br>
I guess I should probably take that button away.<br>
We tried to view it Perfect for a four Cannot pay.<br>
Find that page.<br>
However we go here, it can be used in a shared context.<br>
So let's go quickly Remove that one little piece of you I Where the admin at a page.<br>
Ah, sorry.<br>
Page list down here.<br>
Look at it is gone.<br>
Look of the pages.<br>
Yes, you can only edit the shared ones because now you cannot be them like you should not be able to write.<br>
You can't view them in line.<br>
I mean, obviously you can still view them like this, right?<br>
But you can't view him in line.<br>
Perfect.<br>
I think our richer, nicer, faster, more reusable TMS story for pages using markdown sub templates is done
|
|
|
show
|
2:05 |
Let's talk about rendering markdown content this time in a much better way.<br>
Remember Version one?<br>
We just took Mark down to the library and said, We're gonna on every request, take the page, get it's marked down content and turn into HTML.<br>
We saw, however, there was a bunch of drawbacks that one that's super slow for large pages.<br>
We want that to be faster.<br>
Another one is there's no possibility of reusing or composing marked on content from other markdown content.<br>
You can't like, do that import thing we've been doing.<br>
So we switched over to the markdown sub template package and in order to use it now it's quite simple.<br>
We just like before in our view model still get the page.<br>
But instead of just saying page dot convents is the HTML, then we moved, passing that to the mark down to library.<br>
Now we go.<br>
We let the markdown sub template library completely manage that.<br>
So we're going to go do the engines, they get Paige and give it to you girl Now for that's actually work.<br>
The markdown sub template library needs to know how to talk to our database to determine if that page exists as well as traverse the imports.<br>
Du.<br>
The replacements do the cashing.<br>
There's lots of stuff that it needs to do.<br>
So we're going to have to create a very simple class that derives from sub template storage.<br>
And that means we have to write basically four methods to meaningful ones, get markdown text and get shared markdown.<br>
And we can just delegate back toe our CMS service.<br>
So, for example, here, when they the system needs to know about a page, we just say, Give us that page from the database of exists, we return its contents.<br>
If it doesn't exist, we just say Sorry, it doesn't exist now.<br>
This is good.<br>
But in order to make the markdown sub template, use this new implementation of the storage engine We have to go and at the app start up, say create one of these and go to the markdown sub template storage and say the set the storage engine.<br>
To be this one that we wrote here, then it's off to the races.<br>
Superfast composable is really, really nice.
|
|
|
show
|
2:04 |
we're not gonna go through it in this course.<br>
But just like the storage engine has extensions you can write.<br>
We wrote one that allows us to plug in markdown sub template into our database to talk to it for content.<br>
It's really recommended.<br>
We do the same for the cashing layer.<br>
So if you go to the X sensibility section of that library, you can see it has this short conversation on why you care about it and then very, very similar to what we've done or the markdown extension where we had to write the storage engine.<br>
You can do something very similar for cashing different functions, but basically it's the same.<br>
You do a couple of secret alchemy queries to say store this or get it from the database.<br>
The reason you might want to care about cashing is if you ever need to expire Those cash is like I'm gonna change the way something's rendered or I'm gonna change one of the lower level imported pieces, but it doesn't show up until you regenerate the outer piece in the actual page.<br>
Those kinds of things, you might want to be able to do that, but typically and Web APS.<br>
They're running in more than just one server process, even on a single server.<br>
Something like micro whiskey might be running three or four copies so it can handle the parallelism.<br>
And the way it works now is it's cashing the stuff in memory.<br>
So it's cashing multiple copies, which is not terrible, probably, but it's not ideal.<br>
But what is?<br>
The problem is, if you want to reset it, there's no way to really communicate with all those different worker processes and get them all to clear out at once, not really reliably.<br>
The other problem is, if you want your site to start really quickly and be fast, right as you turn it on, if you have to deploy a new version of it and restart it, every single worker process is gonna have to regenerate every single page.<br>
So in the beginning there's gonna be some slowness, and under heavy traffic, this can actually be a problem.<br>
Have you stored in the database only gets generated once.<br>
Even when you restart, it just goes back and gets it from the database again And if you want to clear you just delete those entries out of the database and then the next request is going to start generate, again.<br>
So it's really easy to clear and reset the content.
|
|
|
|
21:16 |
|
|
show
|
1:46 |
Let's talk about logging our CMS actions.<br>
There's actually two levels that we're going to cover first.<br>
Your site.<br>
If you're adding this to an existing site, probably already has logging.<br>
If it doesn't, I'll show you some cool log in libraries and how we're using them.<br>
And then you can plug into those.<br>
So here's the log from Talk Python Training that I talked about one out of him We get all sorts of information about what people are up to, who has done what we could go back and look, you know, somebody sends us a message and say, Hey, I did this and it didn't work the way expected are or something like that.<br>
We go look in the logs and see what it was.<br>
They did So here There's a little bit of a a little bit of history of people using the A P I using the mobile APs on it looks like IOS.<br>
A couple of people on Iowa's here requesting some information by the courses, you know, like refreshing their list of courses or logging into their app or something like that.<br>
Right?<br>
So we have this kind of stuff going on in our Web app, presumably right?<br>
Presumably.<br>
If not, you can add it.<br>
But we also want to add this for the CMS to know who's taking the admin actions.<br>
And then the second layer Here is the markdown subsystem, the markdown templates, sub templates.<br>
That thing has its own logging, and we can extensively plug it into our file logging or whatever type of logging system we're doing.<br>
We can plug those in together so they make sure they go to the same place.<br>
For example, on training Doc, talk by thunder out of him.<br>
We have rotating logs that show you.<br>
Here's the log for that day, and then the next day it automatically creates a new file and puts it in there Right?<br>
So we want to take the functionality from markdown sub templates.<br>
M plug it into that system so it's all unified in one place,
|
|
|
show
|
1:04 |
There's a lot of different logging vibrators for Python.<br>
Python has a built in one.<br>
I don't really love how it works.<br>
It's kind of I'm not a huge fan.<br>
Let's just say that.<br>
So we're gonna be using this project.<br>
This package called Logbook.<br>
This is written by the same guy who created Flask, actually, and it will push notifications and messages to all sorts of fun things.<br>
So it's a really nice, simple logging thing that a log to like standard out like print.<br>
But it will also logged the files.<br>
It can even logged like messages to phones for, like critical errors or other other crazy stuff like that if you want to plug it in.<br>
So I've gone through.<br>
And I've actually already added this to our Web app because the point is not to show you how to do logging for a Web app.<br>
I'm assuming you probably have that, and if not, this is really simple.<br>
You can just take it and follow along.<br>
What we want to talk about is just making sure we're doing the Logging one and then two.<br>
We want to make sure that we want to plug in that mark down subsystem, logging into it and control it as you want it to happen.
|
|
|
show
|
5:44 |
our goal in this chapter is toe add logging to the Web app.<br>
But what I've done is actually gone and added a little bit of logging to the core Web application, the part that we're not really working on, the part that we started from in the very, very beginning.<br>
I don't think the logging was there, so went back and added that.<br>
And then we're gonna and a little bit more logging for admin section.<br>
Anytime you have something like out protected area, you probably wanna have some kind of notices of people doing things over there.<br>
And then finally, in this section, we're gonna take an integrate output that's coming from the markdown subsystem and plug it into our existing A logbook framework.<br>
So in this first section here, let's go and just look at what we've done.<br>
Let's do a quick survey of where we are.<br>
So he turning the very beginning.<br>
That's what runs when our app starts up.<br>
And what we're doing is we're gonna go over here and call configure, which is calling first, innit?<br>
Logging.<br>
It does this notice now there are different levels.<br>
So we have.<br>
I have noticed Wales have warnings.<br>
We have errors.<br>
We have critical errors.<br>
We have trace traces like very verbose.<br>
Probably don't want to see it.<br>
But sometimes if you want to see all the details, you can turn it on to be more chatty.<br>
Lots of info, right?<br>
So notices medium level of information, probably the lowest we would still run at in production, or either doing notice or info most of our production ups.<br>
So down here in the Net, logging, we're going to log book and one time for the whole application were saying your output goes to standard out.<br>
That's basically like if we did a print statement, we're also setting the level to various.<br>
Think we have the bug, noticed error and so on.<br>
The bug moons everything.<br>
And then we're going to just say load that setting for the application in production.<br>
You wouldn't do a print statement.<br>
You would save this to a file.<br>
The file would probably be changed.<br>
Every single day would have the log name plus the file.<br>
The date the you know, year, Mother Day, something like that effect, and that's what we do every day.<br>
The system automatically generates a new one, but just for our demo.<br>
We're just going to do basically print statements.<br>
Then we create this logbook longer and give it a category.<br>
Let's go and run our AB first.<br>
Notice down here.<br>
We're doing log notice.<br>
Set the mark down storage engine to this.<br>
A lot of these used to be print statements.<br>
Walk, notice the databases initialized.<br>
Blueprints were registered and we go in here.<br>
We'll see other systems, like the logger for the D.<br>
V.<br>
And these used to be a print statements as well.<br>
But now we're saying we have a notice we're connecting over here and info about whether or not already been initialized what is initializing and so on.<br>
So if we'd run this now here you can see all this stuff coming out.<br>
Now you may wonder, why is it running twice?<br>
This is because of the debug version of Flask.<br>
I believe it's like restarting in debug mode, watching the files for automatic restarts.<br>
So hey, see the time on the left?<br>
The level of message noticed.<br>
Where is coming from?<br>
AP configuring the flask cabin.<br>
There's during blueprints, and then we get involved level notice from the database that it's initializing and then notice notice that it's connected and so on.<br>
Then here we set the mark down storage engine.<br>
You can see we got these levels and we've got categories or sections over application, like AP and database and views and so on.<br>
All right, so let's go over here and we can just look at that page Let's see what we get.<br>
Then we get some markdown output from the markdowns of template library.<br>
But that is actually not going through the same system as logbook, even though they have square brackets.<br>
It's just kind of a style.<br>
It's not the same thing.<br>
What were one of the goals is to take these messages and help them go into the same system here.<br>
The reason that's important.<br>
For now, it looks like they're the same, just slightly different format.<br>
But when we go to somewhere else, like running in production Web server, these we're gonna be going to a file.<br>
This is still just gonna be printing out, which may or may not get captured, but it won't get interwoven and in the right place with the stuff that you want Okay, so we also have over in our account views.<br>
We have an Accounts section and let's see Go down here.<br>
Let's look at the register bond.<br>
So, for example, somebody tries to register.<br>
We say there's an anonymous user coming in.<br>
If there's an error, we say, Oh, they couldn't do it.<br>
Here's why we can't create the account.<br>
We send out another message saying the same thing.<br>
Then finally, we haven't noticed that the user successfully created an account when they registered right.<br>
So throughout this website, now we have basically this type of logging over in the CMS section, we have one more the CMS logger, and this one's pretty straightforward.<br>
It's a little verbose if you turn it all the way up, but every time you request a page will.<br>
So hey, here's a request for this CMS page we're processing.<br>
Or here's a redirect that we're processing or more common.<br>
Not entirely common.<br>
Info is not that high.<br>
Well, we'll say there was a request for something that wasn't found.<br>
All right, so let's see if we run this show.<br>
If we could get it to do it again, let's see you get a 44 now.<br>
I think the word brothers cashed it Every now and then, you'll see that it's getting a 404 for like, a favor icon.<br>
I guess we could ask for something that is not there.<br>
Then here, you get this warning.<br>
CMS request not found.<br>
Help, G.<br>
Okay, so this is the logging as it is in our website, and our goal is to extend this for admin section and a plug marked on sub template output into it as well.
|
|
|
show
|
3:07 |
Let's add a little bit of logging using logbook to our admin section.<br>
Now, to make things a little bit quicker so you don't watch me type a bunch of silly messages I've added a couple of to do's here.<br>
So in order to get started, we'll just say log is gonna be the logbook lager and we give it a category name.<br>
This is gonna be CMS admin or something like that.<br>
However you want indicated.<br>
And then for each one of these, we're gonna go 10 year olds say log dot and to decide the level.<br>
Somebody viewing this probably there not making any changes.<br>
But they are an admin.<br>
So it's called this an info and then copy this stuff over and drop it in Vienna about email.<br>
I am not a user that even in the area, all right, so this will let us log when someone's coming in.<br>
Let's have a quick look at that.<br>
We go over to the admin section and see now CMS admin user is viewing the index Michael at talk Python dot FM.<br>
We could do that, or we could put the name of the user.<br>
I think emails just just good.<br>
And then we're going to do that for some of the others.<br>
So for you in Read Rex, Same pages exactly the same.<br>
Say it pages.<br>
And here it gets a little more interesting because this is where we're making changes, right?<br>
We're adding new redirects and so on.<br>
So let's go down here.<br>
Se logged Aunt, is it some kind of thing going on?<br>
Probably in notice.<br>
There's some kind of they try to submit.<br>
It Didn't work.<br>
Not that are not allowed.<br>
Teoh.<br>
Just There was some kind of air.<br>
So let's record all the errors we send back to users.<br>
This is going to be VM Don't user email PVM Not air Perfect.<br>
And when they've created a redirect successfully, we're going to say something like this, and notice is probably good as well.<br>
They're making changes, right?<br>
All right.<br>
So users adding a new redirect that's looking good gonna be a very similar over here for this instead of add new gonna say at it and a copy this down as well.<br>
Edit a redirect and let's just see that this is working real quick.<br>
We'll go and edit some redirect in a non meaningful way over here.<br>
We just say that it go back and look at the output.<br>
Over here we have, ah, users editing this page, which is going to go there.<br>
You would be kind of nicer tohave it like this, but not a big deal.<br>
And then the usual goes back to view them.<br>
Right?<br>
Looks like this working.<br>
I'll go and just finish this out and you'll have it in the code to work
|
|
|
show
|
3:07 |
Let's talk about how much information is coming on these logging systems.<br>
We look at two things, actually, the overall website, with its logbook integration in markdown sub template In general, let's actually look at the overall one first.<br>
So over here you can see we're setting the level and there's some different options.<br>
Weaken said it, too, consented to debug error notice critical and warning.<br>
Now, when we run it, let's leave.<br>
Run the bug for a second.<br>
You'll see that there are some notices and some in foes coming out of it, ideas that we wanna show stuff that is this level of ah issue and higher.<br>
So if we just set this to notice and run it, notice the lower importance info stuff is gone.<br>
We say we only want to see errors.<br>
This informational stuff is gone, right?<br>
This comes out of flats.<br>
We can't control that, But all the other stuff we can hand, it's no longer coming out.<br>
So when it's over, here we go.<br>
Look at one of these Did help with five ei notice that we're getting this informational level thing.<br>
We can actually go and change this in the same manner as we are here, we can change it over here.<br>
So let's go up and from markdown subject what we had pulled out storage.<br>
We can also get logging.<br>
Go back down to our mark down and here we say, MD log.<br>
It's going to be this Get log empty dog dialogue level There's gonna be a logging dot log level.<br>
Careful, there's this one which comes from our website, and there's this one which comes from that library.<br>
They have the same name, but they're not the same.<br>
So just be sure to not cross those over that will be.<br>
I don't know what will happen.<br>
Crossing the streams probably seen Ghostbusters.<br>
It's not good.<br>
All right, so let's say we only want to see error messages out of here now.<br>
If we rerun this, we request this page a bunch of times.<br>
You'll see flash stuff that we can't ignore, cause it's in the bug, but notice there's no messages.<br>
On the other hand, if we put this at Trace and we make a bunch of requests, you'll see all sorts of output like here's generally the mark down here Drinking generated HTML.<br>
Here's using the cash and so on.<br>
So this is quite simply how we set the log level.<br>
I'm gonna put this to info and this to info.<br>
Finally, once we mix these things together, once we get the markdown sub template logging going through the logbook system, what you'll find is that the thing that actually restricts or determines what messages get out will be the more restrictive of these two for at least these messages, because it's only gonna get out of here if it passes this level.<br>
And it's only gonna get finally out of logbook if it passes that level.<br>
So whichever one is more restrictive is the one that's gonna be in effect.<br>
But here's a real simple way to control markdown subject logging.<br>
And if you just want to see nothing at all, you can just set it off.<br>
Even if there's an error, it'll shut up and leave you alone.<br>
I think it was a good level well integrated with our logbook, and that'll be great.<br>
But if you want to change it to turn it off or turn it up, feel free to do so.
|
|
|
show
|
4:37 |
if you go and look the extensive bility section of the marked on sub template just like we created a new database store and said it.<br>
What we want to do is we want to do the same thing over here.<br>
So over this log in section, we're going to say logging thought, set log on and give it a log engine.<br>
And for the moment, we don't know what to put here, so we're gonna figure out what's going on.<br>
But it's very much like this one.<br>
When a crear class derived from something implements and methods again, the easier way might just be to make a copy.<br>
So let's call this template log engine, and this is gonna be a longer if we get when we wanted to drive from that class.<br>
We don't need these.<br>
So again, just like before, can implement the abstract methods and always to do to make this work is come along and say we're trying to do a verbose message.<br>
Where do you want to send it?<br>
We're trying to do a trace message.<br>
Where do you want to send it?<br>
So we want to send it the logbook.<br>
So communions say This is a logbook log, sub templates, something like that.<br>
And then this is super easy.<br>
First thing we want to do is check.<br>
Is this system remember?<br>
You can set his logging levels well.<br>
Does it want to allow the message?<br>
And we say that I look using a basement that hearsay.<br>
If self don't should log, then we specified a level.<br>
So the log level from there in what level are we trying to send or trying to send a verbose message?<br>
It also wants us to send the text.<br>
The reason is that if it knows the message is going to send this empty, it's just going to say no, actually, don't walk that.<br>
But if it should log over both message, What we're gonna do is just say, Log is the logbook and will say, There's no verbose, but there's a trace, and that's pretty much as close as we can get.<br>
And we're gonna pass the text over.<br>
That's it.<br>
We just do this a few times over here again.<br>
This is trace this level, but traces will be gone.<br>
It's was info and logbook hasn't imposed.<br>
We'll just call that one and then we have.<br>
Here's and we can just say logbook.<br>
Are you Lada has over an error.<br>
Here's one.<br>
Now, this is great, but we do need to set that up back over here.<br>
So I said we will create one of these.<br>
And this where we're going to you.<br>
Once I imported there, you need a passage of log level.<br>
So logging dot log level and we're setting it to info now.<br>
Technically, that still works.<br>
It does, you know, I said it, but if you're gonna have to pass it here anyway, let's just get rid of this funkiness.<br>
And then off it goes.<br>
I could also do this.<br>
Walk down.<br>
Ah, log engine, too.<br>
Log engine, Something like that.<br>
All right, Now, if we run this, let's see what we get that in.<br>
Mark down luggage into template logger.<br>
That was a notice.<br>
That's cool.<br>
And if we go, I guess you get over this up.<br>
We go over here and we click on one of the pages that generates something.<br>
Notice.<br>
Now, the message looks just like our built in one's.<br>
So we have Ah, daytime.<br>
We have a level.<br>
So this is info or category is the sub templates.<br>
And then here's what's happening over there because this is info.<br>
If for some reason in the log in section up here, we only wanna have noticing above.<br>
Now we can go request that out of that page and notice there's no messages because even though the September library would send it, the underlying logbook longer says you know it or not, are not sharing those messages.<br>
That's too much detail for right now.<br>
I'll put it back on the phone.<br>
Okay, that's it.<br>
This is how we put these two things together.<br>
We can control where the logs go by creating some very simple class like this.<br>
Thank you.<br>
Itics agree.<br>
This is quite quite simple.<br>
There's not a whole lot going on here and then just plugging it in.<br>
Now our whole logging framework is together.<br>
We get a little bit more information out of the system, not a requirement.<br>
But I think if you're doing this in production, you probably wanna have some visibility into what's going on in this underlying template engine as
|
|
|
show
|
0:52 |
remember, if you want to control of the messages that come out of the logger just to the standard out just by via print is super easy to Dio.<br>
We can just go down to the markdown subsystem and get the logging and say, Give me the current longer, which is the standard out, print style logger.<br>
You have to do anything that said that of its there by default, and then you can set its level brought with do one of these log level enumeration type things.<br>
So would you say log dot log level equals this and that will only allow error and higher messages to come out?<br>
Remember, if you want to turn it all the way off, said it, the log level off.<br>
If you want to see everything, it's willing to show you say, log level dot race or verbose of her boast, I think, is the lowest eso that'll do it.<br>
You just turn it on and see what it's willing to tell you.<br>
And if you're not gonna integrate with other logging, you just want to sort of get it to chill out or give you more messages
|
|
|
show
|
0:59 |
if you do have a proper logging system in your Web app, and I recommend that you do, because it's really important to know what's going on with your certain on your with your APP on your server, you probably should go ahead and take the time to integrate markdown subsystems, logging bits with what you're already doing.<br>
So with this one class, this is basically it.<br>
You just go through and say, I want to override a couple of methods one right over I trace for bows and bow and so on, And then you just check.<br>
Should I log at this given level yes or no?<br>
And then if you should just go ahead and log that message to your logging framework of choice.<br>
Here we've created a logbook lager and in the trace one we say logbook, logbook blogger dot trace in the info one.<br>
We say it logbook longer dot info, and that means it just passes those messages on to our underlying pre configured logging system Whether that's going toe files, whether that's going to standard out or whether it's going nowhere, this will go ahead and take care of that for you.
|
|
|
|
23:06 |
|
|
show
|
1:35 |
we've come to the end of the course and you've made it to the finish line You now have merged the abilities and the powers of these data driven Web applications with that of a CMS.<br>
You no longer need something like WordPress or Jumla or some other tooling.<br>
There's a separate thing to allow you to create this great content and then have this other app type of thing where your logic lives and people can log in and do stuff.<br>
No, these convey the same thing as you've seen.<br>
So let's take this last final section in review What you learned.<br>
We started out with Pipi.<br>
I not exactly pipi I but our clone of it and it looked pretty similar and it had much of the core functionality and everything else we need to add to really make it.<br>
Pipi.<br>
I well, wouldn't have added a whole lot, right, so we started out with what was basically a rich, working, data driven Web application.<br>
That means there's a database with a bunch of entries, and the pages are structured very much around showing elements of those database entries like you can see the bottom.<br>
We have new releases, and it's showing the title and the sub subtitle where you call that little description summary of each one in this long, less down there.<br>
Right?<br>
So we took this idea, which is very common, and we added on this CMS functionality.<br>
Now we can go to the admin section in the top right log in, create new page and just start writing.<br>
We no longer have to write code.<br>
We can just use that aspect of our website toe add things where there's not too
|
|
|
show
|
4:21 |
we began talking about how we might create this CMS idea inside of our data driven Web app inside of our flask app by talking about routing.<br>
And that's because normally what we do in routing, as we say, we have these certain data driven, structured parts of our site and they look like this example, Ural, or that example your l and what we needed to do.<br>
It's somehow fit in at the very end of that.<br>
Some way to say before you say that is not found before you say it's not part of our site, let me have a look at it.<br>
Use a little bit of Python code and decide if that represents a virtual conceptual page or redirect in our CMS, and then we'll tell you whether or not it's found So at the heart of this is routing.<br>
So let's review routing in general and then how we created our CMS with it.<br>
So remember, a request comes in looking something like this in our Pipi I example it might be slash project slash sequel Commie with a query string question mark mode equals edit and to find over on the right.<br>
Here are our various views.<br>
So we have some packages one for index, which lists all of them and one for details on given one of them as well Some home views index, which is just bored slash the main site or possibly some kind of about Paige.<br>
We've registered some blueprint routes and said for the index method in home views, we want to map that, too slash ford slash That's the root of our website.<br>
If you go to the Visit Server, this is what you get.<br>
So the question is, does slash project slash sequel Commie Ignoring the query string for the moment.<br>
Does that apply?<br>
Does that match slash No, it doesn't.<br>
We also said, if you go to slash about that, goes to this home views about method, not a match slash project slash about those were not the same thing.<br>
Then we had a more interesting route slash project slash angle bracket package and that angle bracket package thing that's like a variable place where the name of the variable is package and the value is whatever's in the oral.<br>
And so does that match slash project slash seek walk me?<br>
Yes, yes, it does.<br>
So flask is gonna call this function, Gonna set up the request and say the our eggs are what the query string are here.<br>
And then it's going to call our details function.<br>
And the details function has toe have parameters in the method there to take.<br>
All the variables that are in the URL are the route.<br>
So here we say, there's a angle bracket package so you can see the details takes a package.<br>
And right now we're saying it's a string.<br>
So when the functions called in this particular example, package has the value of sequel alchemy.<br>
All right, so this is routing in general, and normally we need to find these routes.<br>
It says, Well, if there's no match here, we're just gonna say that page is not found.<br>
It doesn't exist for a four.<br>
Remember, what we want to do is extend this.<br>
So the way we are going to do this that we say we want toe handle arbitrary requests into our flats.<br>
Web app, slash sums last arbitrary slash URL and in that package before it could have a variable value like sequel alchemy or flask.<br>
But it couldn't be sequel coming slash details or something like that, right?<br>
It can't have a slash in it, but we got to do a little extra work to capture these.<br>
Full your nails like this.<br>
The way we do that is we say that the girl is not a string or an integer or anything like that, but it's a path.<br>
So here we're adding around and it's got a variable called full euro.<br>
But we're seeing it's type path, and that's the key that will capture everything, at least everything from path on Word that you could have some stuff in front of this as well and have some variations here.<br>
But this path thing means capture everything to the right.<br>
No matter what shape or form it takes in the morning.<br>
Pass it in.<br>
After that, it's pretty straightforward.<br>
We're just gonna go get the page or whatever it is we're looking for from the database and then show it or determine its A re direct and redirect them right?<br>
So the actual context here that we've got to use the thing we do is just this path.<br>
It's not that super complicated, as we saw much of what makes this an interesting project is making the management admin side powerful and interesting.<br>
Not so much capturing.<br>
But this is the way that we get into to start capturing the quest.<br>
The request to build this idea of a CMS.
|
|
|
show
|
1:14 |
once we said, If the routing we know that every single request to the website is first going to go to our regular Web application and it's going to try to go and run through the various specific date it of in pieces.<br>
But once we decide once the site decides that's not a good fit, none of those match every single request is going to hit this single CMS underscore request function view method that we wrote here.<br>
And so this is where we're both redirecting and showing pages.<br>
So what we did is we use the View model pattern, which handled a lot of the determine whether there's a user figure out whether the euro's meaningful pulling back the pages, pulling back the redirects and handling all the data access bits there.<br>
So we create this seem s request view model and we ask if there's a page, just show it.<br>
There's a redirect redirect to it.<br>
Otherwise we're going to return a 44 and so that's really all there is to it again.<br>
The actual implementation of a simple CMS if you don't care about performance and element reuse like with that import statement stuff is pretty straightforward.<br>
So here is that one function that handles the displaying for the user the consumption of
|
|
|
show
|
1:40 |
we made heavy use of this view model pattern and I use this in all of my websites.<br>
I find it massively helpful.<br>
It makes our view methods much simpler.<br>
It makes it easier to test the validation and data exchange logic.<br>
All sorts of things are beautiful about this view model pattern.<br>
So the general idea is that we have a request coming into the server.<br>
And here we have http post for register and this indicates they're submitting some form data Probably.<br>
They're filling out the register form and hitting.<br>
Sign me up.<br>
The reason I put that you're all there is the view model is most valuable.<br>
When you're doing complex data exchange and back and forth with the usual like this, it's valuable everywhere.<br>
But this is where it has the most value.<br>
A lot of times for these types of functions, what you'll see is like some huge long view or action method inside, hopefully not apt up ey along with everything else.<br>
But often that's the case.<br>
You see, some giant function that's doing everything is doing.<br>
The validation is doing the data exchange and conversion.<br>
It's doing the view stuff, all of it But with this view model pattern, we can take much of that and put it over into, ah, view model and write a much cleaner, simpler action or view method, as we just saw with that redirect, and then just let those two things talk to each other and so helps isolate the different parts of the code that we got to run.<br>
The validation data exchange can be its own thing, and then what to do with it if it's valid or invalid in the action method Also, again, it makes testing that view model stuff much easier, because if you don't have to figure out how to call the action method through the Web requests and all that kind of stuff, so it does make things simpler in that regard as well.
|
|
|
show
|
2:32 |
I appreciate all of the advantages of what we've covered in this course.<br>
You really need to be able to distinctly differentiate between data driven pages and CMS pages Here's a data driven page.<br>
It's point back the AWS Seelye and details about it noticed the or Ellis slash project slash aws cli.<br>
So we've got this very careful structure.<br>
We're gonna go and see exactly this stuff about a certain project here, the AWS Eli.<br>
But if it's another one, it's gonna look exactly the same.<br>
Just the values plugged into the little places are different.<br>
And here's our help page, which was written with our CMS again.<br>
It looks kind of the same.<br>
We've got the same navigation in general, look and feel for the site.<br>
But the stuff in the white section, the main content of the site is basically free form.<br>
We can put whatever we went there over in the data driven side.<br>
We have these places were filling out specific bits of data from one or more tables in the database.<br>
So we're calling something about user up at the top, honestly, and then the package and the releases and so on.<br>
So we're pulling different things together to build this page out of the database.<br>
So here's the name and version.<br>
Here's how you install it.<br>
Here's whether it is the latest version or not.<br>
And when that version of the latest version was released, here's that summary here.<br>
Some links about it.<br>
Here's its description, its very structure.<br>
These are the little holes that we fill out in the page based on what we get back from the database over on the CMS side on the right here.<br>
The help with Pipi, I we don't have any that we just have.<br>
Here's the text, as you know now mark down, actually off the page and just show it.<br>
However, the real value here is that, you know, we could just create static files that do that.<br>
That's fine, but the real value is that this is still plugged into our entire site.<br>
For example, the account admin log in log out features and whatever else has happened in our sight, it's all still here and present, and we can take advantage of it, so it's much closer, much more part of our Web application.<br>
Then, if we employ some third party thing like WordPress with a slightly different domain or something along those lines.<br>
Here we have two pages.<br>
They both evolved.<br>
As our site evolves.<br>
They get deployed, willing to play new ones.<br>
We have the overall look and feel changing in a consistent way, and yet it's very, very different how they're created.<br>
One has thes structured templates, the data driven ones and the other has free form
|
|
|
show
|
2:29 |
once we've got a page back from the database, we've gone to our CMS request, and we've determined that the virtual euro of the euro that maps to a virtual page exists in our database.<br>
We want to show it, it turns out, after going through the markdown processing and stuff, which happens elsewhere, the actual display of it is super, super easy.<br>
So here's the Jinja to template to make that happen.<br>
Like all of our templates, it derives or extends.<br>
Shared slash, Underscore layout.<br>
HTML.<br>
That's how it has the same look and feel.<br>
It has that same navigation bar at the top.<br>
It has things about whether you're logged in and so on.<br>
And then we have a few little blocks.<br>
Weekend fill in, weaken Set the title, which is gonna be the HTML page title.<br>
That's what shows up with the tab in your Web browser.<br>
And then we're gonna show the content, and all we have to do is come here and say the H one or the main title displayed on the pages page DOT Title, and then we're going to show the HTML.<br>
And remember, if we just say put the H two melon here.<br>
What happens?<br>
It looks like HTML view source.<br>
Hided shows us the HTML in a safe way.<br>
And that's Jinja to protecting you from users typing in bad stuff and then you showing that do other users like in a forum instead of hyping a helpful answer?<br>
A question.<br>
You might type some script vulnerability that's trying toe act the banks of the various other users that log into the site.<br>
That would be bad right to in order to make it actually work here, we have to say pipe safe so HTML pipe safe and that will show it as just raw structure in the site will put the HTML as it is into the page That's exactly what we want.<br>
But it's also a dangerous problem if we let arbitrary users type in that HTML.<br>
So remember using safe here means you cannot do this trick.<br>
You cannot use this feature for user generated content, because if you dio, it's just a matter of time.<br>
Still, someone figures out that they can type arbitrary Dr A script in here and start hacking your users for whatever reason, people hack people money because they're bored, whatever but you don't want to be involved in that right.<br>
So because we're using safe here and we're using unsafe mode in the markdown conversion all across the board, it's not eligible or is not a good idea at all to use this for user generated content.<br>
But it's exactly what we want for people we trust to go log into the back
|
|
|
show
|
0:56 |
we decided to use sequel alchemy to store our data in the database.<br>
And I definitely love sequel alchemy.<br>
If I'm working with relational databases, that's what I would use.<br>
The way seek welcoming works is it has this unit of work create the thing you make a bunch of database changes and then you all at once in a transaction, save those changes back.<br>
So that looks like this in code.<br>
We create this session saying, db session not create.<br>
We create a page object set values like the title bureau on the contents and here were normalizing or economical izing them like, for example, Ural, that stripped out lower.<br>
So just in case somebody has a little space on the end, it won't be some weird thing that looks like it should match in the database, but doesn't.<br>
Do you want to set this all up?<br>
Then go the session.<br>
I want to add the object that we created.<br>
Then we just say session not commit boom,
|
|
|
show
|
1:34 |
we started out thinking, Well, we have a CMS for a website.<br>
So what we want to do is type HTML into it and then have it show it back to the users and that was all well and good.<br>
But we saw each team.<br>
L is a little brittle and harden mostly annoying to work with.<br>
So here's the page that we hope we're going to create in our CMS After we typed it in.<br>
This is the page.<br>
We actually great with our CMS.<br>
What's the problem?<br>
Well, there's this subtle when you don't highlight it.<br>
Subtle unclos h to remember what we were typing into.<br>
It's not like an editor that would find the problems with HTML.<br>
No, it's just a text area in a Web page.<br>
This was hard to find, and that causes big problems that follow on for everything that comes after it in the site, Not just what we right, but even the content that was part of the outer shell of our general look and feel.<br>
So what we decided to do was go with mark down and we use the simple mde markdown editor and all you gotta do is take a text area include a little CSS and JavaScript and point this thing at it.<br>
It becomes in awesome little editor.<br>
Remember, we're gonna go and add the CSS at the top.<br>
We're going to add the JavaScript at the bottom in this additional Js thing.<br>
And we have a script section.<br>
We just create this simple MD And we say the element element is document dog get element bidi.<br>
Our text area had the i d contents.<br>
So we just say contents.<br>
That's it.<br>
One other thing I would do is I would say spellchecker false.<br>
Turn them off.<br>
The spell checker is not great.<br>
Yeah, I just like to turn it off cause you already got a spellchecker in here.<br>
What browser, anyway?
|
|
|
show
|
3:39 |
we saw the challenges of both writing HTML and having broken HTML that breaks our page by switching to mark down and mark down is beautiful.<br>
We used the mark down to library.<br>
We're able to pass over the mark down and have it turn into HTML so we could continuously edit the nice version markdown.<br>
But show what we have.<br>
Teoh HTML However, there was a couple of things that were either big disadvantages or features we wanted The big disadvantage was speed we saw that are marked down conversion was really, really slow.<br>
Like for a simple page 2015 20 pages long, that was gonna take 800 milliseconds, every request that is not going to scale.<br>
That is not gonna make our users happy.<br>
None of that was okay.<br>
Also, we might want to re use content, we say, Well, we're gonna have this block a code appear on, like 10 different pages.<br>
Do we want to write and maintain 10 copies of it Of course not.<br>
We want to write it in one place and have it show up all over the place.<br>
But mark down doesn't do that.<br>
So we brought in this markdown sub template library.<br>
So with markdown September what we saw that it automatically handles the cashing on Lee re compute stuff when it needs to, which makes it much, much faster.<br>
We were getting 10 milliseconds instead of 800 millisecond response times, which is really good close to 100 times faster for some of the requests we also saw.<br>
It has this import statement, which allows us to build arbitrary, really deep, nested levels of imports.<br>
Right imports can use imports and weaken.<br>
Compose these reusable elements of our CMS in a much, much better way.<br>
Also has the ability to pass in variables and replace them in the page like Jinja.<br>
But we didn't take advantage of that.<br>
So this marked down sub template library was exactly what we needed to make this work much better.<br>
Couple of things band to do in order to use it in our view model.<br>
When we were getting the content of the page, the very last line here self that HTML.<br>
Instead of just saying that's the page dot content or mark down to dot convert over the page contents.<br>
We actually just go to the markdown sub template.<br>
We say Go to the engine and get the page.<br>
Give it the URL and long is everything set up correctly.<br>
It handles it from there.<br>
You don't worry about it.<br>
Don't do anything else.<br>
It's going to go get the page from the database, figure out the contents, do the import stuff and convert it and just drop the final HTML right there in self dot HTML.<br>
Now it doesn't magically know how to talk to our database or some other thing.<br>
We have to give it a little tiny bit of helps.<br>
We created this markdown sub template DB storage class.<br>
It had four abstract method.<br>
The most important one was get marked down text.<br>
We just go to our service and say, Give me the page.<br>
There's no page, There's no contents.<br>
There's a page right out of the contents.<br>
That's it.<br>
The super super simple.<br>
But we did this because we needed toe teach markdown sub template, how to talk to our database and where our data stored.<br>
So now it knows how to go given a euro or a template path, as it calls it, how to go and actually get the underlying page that corresponds to that from the database once we got this done, this is not enough.<br>
It doesn't magically just know.<br>
Here's a class that drives him right thing.<br>
So it's gonna work with to do a tiny bit of work and laptop you.<br>
I we call on our main method.<br>
This in it marked on tablets, would just create one of these classes, goes to the markdown storage and says, Set the storage to this thing and then it will use that to figure out where the content lives, how to get it both for a regular content, shared content and so on.<br>
And that's it.<br>
Now we've made our mark down back to CMS.<br>
Much, much better.<br>
Faster.<br>
More features composable, reusable,
|
|
|
show
|
1:54 |
your Web app probably already has some kind of logging and if it doesn't, you should add it.<br>
The logging that we reason in our pipi I app and that we kept using in our CMS is logbook and low book is really, really nice.<br>
It's super easy use it does the rotating bile output with the date lost the file name and creates a new one every day.<br>
All the kind of stuff you would hope that it would easily dio.<br>
So we started out working with this and we brought us in to add additional logging to our CMS admin side so we could see what was happening there and it was really easy.<br>
But we also saw that the markdown sub temple library has logging and log reporting and diagnostic information coming out of it.<br>
So we also want to take the final step to go in.<br>
Integrate are logging system in this case, the logbook with markdown sub template.<br>
So it's all together in one place, and that was incredibly easy.<br>
We just wanted to change the level right just going toe, print it out somewhere.<br>
We want to do that.<br>
We just go to logging from the library.<br>
We can say long enough.<br>
Get log and then log, not log.<br>
Level equals.<br>
We have this new Marais shin log level so we could say error, trace and bo warnings and so on.<br>
This will just let you control how much comes out of it, but not where it goes.<br>
If you want to control where it goes, just like the database we create this class that drive from sub template logger in this case and implement a few methods trace, invoke and so on and was gonna integrate with logbook.<br>
We're gonna create a logbook here.<br>
And whenever the system asked us to do a trace long as we check that we should do that trace right.<br>
Gonna check the level there, see what level it's that were to come in and just do the logbook, Walker, trace or log book blogger dot info and just pass it through.<br>
So this allows us to adapt whatever logging system we're using and capture the output from
|
|
|
show
|
1:12 |
That's when our close things out by saying thank you.<br>
Thank you.<br>
Thank you.<br>
Thank you for taking this course with me.<br>
Thank you.<br>
Supporting all the work that I'm doing around creating educational material.<br>
And by taking this class, you're absolutely doing that.<br>
So follow me on Twitter, where I'm at M.<br>
Kennedy.<br>
Listen to the talk by thunder Me podcast if you don't already.<br>
And I hope that you can take this concept of adding a CMS to a data driven Web app and bring those two together to create the best of both worlds and whatever you're building, we definitely have done that or us over talked by phone training So a training dot talk by fund out of em when you go visit the public details about a course page or are pricing policy or environmental policy all many many of the non data driven parts of that website are powered not by something similar, but almost exactly the same thing that you see going on over here in this course And it has been working beautifully, and I can definitely recommend it, put it into your application because it adds that capability that many people need to go and edit the website without changing the code without being a developer, and I think you'll find it super, super useful.<br>
Thanks for taking the course.
|
|
|
|
54:50 |
|
|
show
|
4:07 |
One of the absolute pillars of web applications are their data access and database systems.<br>
So we're going to talk about something called SQLAlchemy and in many, many relational based web applications this is your programming layer to talk to your database.<br>
SQLAlchemy allows you to simply change the connection string and it will adapt itself into entirely different databases.<br>
When you use a local file and SQLite for development maybe MySQL for testing and Postgres for production I'm not really sure why you would mix those last two but if you wanted to, you could with SQLAlchemy and not change your code at all just simply change the connection string.<br>
So SQLAlchemy is one of the most well known most popular and most powerful data access layers in Python.<br>
SQLAlchemy, of course is open source you'll find it over at sqlalchemy.org.<br>
It was created by Mike Bayer and his site is really good.<br>
It has tutorials and walkthroughs for the various which you can work with SQLAlchemy one for the object relational mapper one for more direct data access, things like that.<br>
So why might you want to use SQLAlchemy?<br>
Well, there's a bunch of reasons.<br>
First of all, it does provide an ORM or Object Relational Mapper but it's not required.<br>
Sometimes you want to programming classes and monitor your data that way but other times you want to just do more set based operations in direct SQL.<br>
So SQLAlchemy lets you work in a lower level programming data language that is not truly raw SQL so it can still adapt to the various different types of databases.<br>
It's mature and it's very fast it's been around for over 10 years some of the really hot spots are written in C so it's not some brand new thing it's been truly tested and is highly tuned.<br>
It's DBA approved, who wouldn't want that?<br>
What that mean is, by default SQLAlchemy will generate SQL statements based on the way you interact with the classes.<br>
But you can actually swap out those with hand optimized statements.<br>
So if the DBA says well, there's no way we're going to run this all the time you can actually change how some of the SQL is generated and run.<br>
Well, the ORM is not required I recommend it for about 80%, 90% of the cases.<br>
It makes programming much simpler, more straightforward and it much better matches the way you think about data in your Python application rather than how it's normalized in the database so it has a really, really nice ORM or lots of features and this is what we're going to be focusing on in this course.<br>
I'll also use this as the unit of work design pattern and so that concept is I create a unit of work I make, insert updates, delete, etc.<br>
all of those within a transaction basically and then at the end, I can either commit or not commit all of those changes at once.<br>
Cause this is an opposition to the other style which is called active record, where you work with every individual piece of data separately and it doesn't commit all at once.<br>
There's a lot of different databases supported so SQLite, Postgres, MySQL Microsoft SQL Server, etcetera, etcetera.<br>
There's lots of different database support.<br>
And finally, one of the problems that we can hit with ORMs is through relationships.<br>
Maybe I have a package and the package has releases.<br>
So I do one query to get a list of packages and I also want to know about the releases.<br>
So every one of those package when I touch their releases relationship, it will actually go back to the database and do another query.<br>
So if I get 20 packages back, I might do 21 overall database operations separately.<br>
That's super bad for performance.<br>
So you can do eager loading and have SQLAlchemy do just one single operation in the database that is effectively adjoined or something like that that brings all that data back.<br>
So if you know that you're going to work with the relationships ahead of time you can tell SQLAlchemy, I'm going to be going back to get these so also load that relationship.<br>
And these are just some of the reasons you want to use SQLAlchemy.
|
|
|
show
|
1:35 |
When you choose a framework whether that's for a database or a web framework it's good to know that you're in good company and that other companies and products have already tested this and looked around and decided Yep, SQLAlchemy is a great choice.<br>
So let's look at some of the popular deployments.<br>
Dropbox is a user of SQLAlchemy and Dropbox is one of the most significant Python shops out there.<br>
Guido van Rossum and some of the other core developers work there and almost everything they do is in Python.<br>
So the fact that they use SQLAlchemy that's a very high vote of confidence.<br>
Uber.<br>
Uber uses SQLAlchemy.<br>
Reddit.<br>
Reddit's interesting in that they don't use the ORM but in fact they use only the core.<br>
At least, wow, hey we're using only the core aspect of SQLAlchemy, that's pretty cool.<br>
Firefox, Mozilla, more properly is using SQLAlchemy.<br>
OpenStack makes heavy use of SQLAlchemy.<br>
FreshBooks, the accounting software based on, you guessed it, SQLAlchemy!<br>
We've got Hulu, Yelp, TriMet, that's the public transit authority for all of Portland, Oregon.<br>
The trains, the buses and things like that so they use that as well.<br>
So here are just a couple of the companies and products that use SQLAlchemy.<br>
There's some really high pressure some of these are under.<br>
You know if it's working for them it's going to work well for you, especially Reddit.<br>
Reddit gets a crazy amount of traffic, so pretty interesting that they're all using it and we'll see why in a little bit.
|
|
|
show
|
2:14 |
Before we actually start writing code for SQLAlchemy, let's get a quick 50,000 foot view by looking at the overall architecture.<br>
So when we think of SQLAlchemy there's really three layers.<br>
First of all, it's build upon Python's DB-API.<br>
So this is a standard API, actually it's DB-API 2.0 these days, but we don't have that version here.<br>
This is defined by PEP 249 and it defines a way that Python can talk to different types of databases using the same API.<br>
So SQLAlchemy doesn't try to reinvent that they just build upon this.<br>
But there's two layers of SQLAlchemy.<br>
There's a SQLAlchemy core, which defines schemas and types.<br>
A SQL expression language, that is a kind of generic query language that can be transformed into a dialect that the different databases speak.<br>
There's an engine, which manages things like the connection and connection pooling, and actually which dialect to use.<br>
You may not be aware, but the SQL query language that used to talk to Microsoft SQL server is not the same that used to talk to Oracle it's not the same that used to talk to Postgre.<br>
They all have slight little variations that make them different, and that can make it hard to change between database engines.<br>
But, SQLAlchemy does that adaptation for us using its core layer.<br>
So if you want to do SQL-like programming and work mainly in set operations well here you go, you can just use the core and that's a little bit faster and a little bit closer to the metal.<br>
You'll find most people, though when they're working with SQLAlchemy it will be using what's called an Object Relational Mapper, object being classes relational, database, and going between them.<br>
So what you do is you define classes and you define fields and properties on them and those are mapped, transformed into the database using SQLAlchemy and its mapper here.<br>
So what we're going to do is we're going to define a bunch of classes that model our database things like packages, releases users, maintainers and so on in SQLAlchemy and then SQLAlchemy will actually create the database the database schema, everything and we're just going to talk to SQLAlchemy.<br>
It'll be a thing of beauty.
|
|
|
show
|
3:10 |
When you're trying to model something like PyPI a website with a database the clearer of a picture you have the better you're going to be.<br>
So let's look around this running, finished version.<br>
Remember this is not even though it looks very much like what we built this one is actually the finished one that we're going to be sort of be aiming for.<br>
Alright, now we're not going to look at the code but we'll poke around what the web looks like and we could just as well look at the real one but let's look at this.<br>
So on any given package this is pulling up the package AMQP and apparently that's a low level AMQP client for Python.<br>
Okay, great, actually I've never used this.<br>
We have a couple of things going on here.<br>
We have the name of the package, the version bunch of different versions actually a description, right here.<br>
We actually have a release history so each package has potentially multiple releases.<br>
You can see this one had many different releases and we can pull up the details about different ones.<br>
Jump back there.<br>
We have downloads, we have information like the homepage.<br>
So, right over here we can go to GitHub apparently that has to do with Celery.<br>
We could pull up some statistics about it.<br>
It has a license, it has an author.<br>
So remember, up here we have a login and register so we could actually go login to the site or create an account just as a regular user and then we could decide as Barry Pederson apparently did, to just publish a package.<br>
And then there's a relationship between that user and this package as a maintainer and it's probably a normalization table.<br>
We also have a license, BSD in this case.<br>
If we want to model this situation in a relational database let's see how we do that.<br>
PyCharm has some pretty sweet tooling around visualizing database structure.<br>
So, here we're going to have a package and it's going to have things like a summary and a description and a homepage license, keywords, things like that.<br>
It has an author, but it's also potentially has other maintainers.<br>
So we have our users, name, email, password things like that.<br>
And then I don't have the relationship drawn in this diagram but there'll be a relationship between the user id and the user id and the package id and the package id there.<br>
So this is what's often referred to as a normalization table for many-to-many relationships so that's one part.<br>
And then the package, remember, it has releases.<br>
So here, each release has an id it has a major/minor build version a date, comments, ways to download that different sizes as it changes over time.<br>
We also have licenses, that relate back there and we have languages.<br>
So here, this is going to relate back say to that id right there.<br>
Finally, we're not going to track any of this but there actually are download statistics about this about downloading all these packages and the different releases and so on so we went ahead and threw that in there.<br>
So this is what we're going to try to build but we're not going to build it in the database.<br>
We're going to build it in SQLAlchemy and SQLAlchemy will maintain the database for us.<br>
Think the place to get started is packages so let's go on and do that.
|
|
|
show
|
8:31 |
Let's start writing some code for our SQLAlchemy data model.<br>
And as usual, we're starting in the final here's a copy of what we're starting with.<br>
This is the same right now, but we'll be evolved to whatever the final code is.<br>
So, I've already set this up in PyCharm and we can just open it up.<br>
So, the one thing I like to do is have all my data models and all the SQLAlchemy stuff in its own little folder, here.<br>
So, let's go and add a new directory called data.<br>
Now, there's two or three things we have to do to actually get started with SQLAlchemy.<br>
We need to set up the connection to the database and talk about what type of database is it.<br>
Is it Postgres, is a SQLite, is it Microsoft SQL Server?<br>
Things like that.<br>
We need to model our classes which map Python classes into the tables, right, basically create and map the data over to the tables.<br>
And then, we also need a base class that's going to wire all that stuff together.<br>
So, the way it works is we create a base class everything that derived from a particular base class gets mapped particular database.<br>
You could have multiple base classes, multiple connections and so on through that mechanism.<br>
Now, conceptually, the best place to start I think is to model the classes.<br>
It's not actually the first thing that happens in sort of an execution style.<br>
What happens first when we run the code but, it's conceptually what we want.<br>
So, let's go over here, and model package.<br>
Do you want to create a package class Package?<br>
Now, for this to actually work we're going to need some base class, here.<br>
But, I don't want to really focus on that just yet we'll get to that in a moment.<br>
Let's stay focused on just this idea of modeling data in a class with SQLAlchemy that then maps to a database table.<br>
So, the way it works is we're going to have fields here and this is going to be like an int or a string.<br>
You will have a created_date which, is going to be a datetime.<br>
We might have a description, which is a string, and so on.<br>
Now, we don't actually set them to integers.<br>
Instead, what we're going to set them to our descriptors that come from SQLAlchemy.<br>
Those will have two distinct purposes.<br>
One, define what the database schema is.<br>
So, we're going to set up some kind of column information with type equals integer or something like that.<br>
And SQLAlchemy will use that to generate the database schema.<br>
But at runtime, this will just be an integer and the creator date will just be a datetime, and so on.<br>
So, there's kind of this dual role thing going on with the type definition here.<br>
We're going to start by importing SQLAlchemy.<br>
And notice that that is turning red and PyCharm says, "you need to install this", and so on.<br>
Let's go make this little more formal and put SQLAlchemy down here's a thing and PyCharms like "whoa, you also have to install it here".<br>
So, go ahead and let it do that.<br>
Well, that looks like it worked really well.<br>
And if we go back here, everything should be good.<br>
Now, one common thing you'll see people do is import sqlalchemy as sa because you say, "SQLAlchemy" a lot.<br>
Either they'll do that or they'll just from SQLAlchemy import either * or all the stuff they need.<br>
I preferred have a little namespace.<br>
So, we're going to do, we want to come here and say sa.Column.<br>
And then, we have to say what type.<br>
So, what I had written there would have been an integer.<br>
And we can do things like say this is the primary_key, true.<br>
And if it's an integer you can even say auto_increment, true which, is pretty cool.<br>
That way, it's just automatically managed in the database you don't have to set it or manage it or anything like that.<br>
However, I'm going to take this away because of what we actually want to do is use this as a string.<br>
Think about the packages in PyPI.<br>
They cannot have conflicting names.<br>
You can't have two separate packages with the name Flask.<br>
You can have two distinct packages with the name SQLAlchemy.<br>
This has to be globally unique.<br>
That sounds a lot like a primary key, doesn't it?<br>
Let's just make the name itself be the primary key.<br>
And then over here, we're going to do something similar say, column, and that's going to be sa.DateTime.<br>
I always like to know almost any database table I have I like to know when was something inserted.<br>
When was it created?<br>
That way you can show new packages show me the things created this week or whatever order them by created descending, who knows.<br>
Now, we're actually going to do more with these columns, here.<br>
But, let's just get the first pass basic model in place.<br>
Well, it's going to have a summary.<br>
It's going to be sa.Column(sa.String we'll have a summary, also a description.<br>
We're also going to have a homepage.<br>
Sometimes this will be just the GitHub page.<br>
Sometimes it's a read the docs page, you never know but, something like that.<br>
We'll also have a docs page or let's say a docs_url.<br>
And some of the packages have a package_url.<br>
This is just stuff I got from looking at the PyPI site.<br>
So, let's review real quick for over here on say SQLAlchemy here's the name.<br>
And then what, we're going to have versions that's tied back to the releases, and so on.<br>
Here's the project description we have maybe the homepage we'll also have things like who's the maintainers what license does it have, and so on.<br>
So, let's keep going.<br>
Now, here's the summary, by the way and then, this is the description.<br>
Okay, so this stuff is all coming together pretty well.<br>
Notice over here, we have an author, who is Mike Bayer and we have maintainers, also Mike Bayer, right there and some other person.<br>
So, we have this concept of the primary author who may not even be a maintainer anymore and then maintainers.<br>
So, we're going to do a little bit of a mixture.<br>
I'm going to say, author name it's going to be one of these strings just embed this in here and it will do email so, we can kind of keep that even if they delete their account.<br>
And then later, we're going to have maintainers and we're also going to have releases.<br>
These two things I don't want to talk about yet because they involve relationships and navigating hierarchies, and all that kind of stuff we're going to focus on that as a separate topic.<br>
The last thing we want to do is have a license, here.<br>
And for the license we want to link back to a rich license object.<br>
However, we don't necessarily want to have to do a join on some integer id to get back just the name to show it there.<br>
It would be cool if we could use somehow use this trick.<br>
And actually, we can, we can make the name of the license the friendly name, be just the id, right.<br>
You would not have two MIT licenses.<br>
So, we'll just say this is an sa.Column(sa.String which, is an Sa.string.<br>
That's cool, right, okay, so here is our first pass at creating a package.<br>
So, I think this is pretty good.<br>
It models pretty accurately what you see over here on PyPI.<br>
There's a few things that we're omitting like metadata and so on, but it's going to be good enough for demo app.<br>
A couple more things before we move on here.<br>
One, if I go and interact with this and try to save it into create one of these packages and save it into the database with SQLAlchemy, a couple of things.<br>
One, it needs a base class.<br>
We're going to do that next.<br>
But, it's going to create a table called Package which is singular.<br>
Now, this should be singular, this class it represents a single one of the packages in the database when you work with it in Python but, in the database, the table represents many packages all of them, in fact.<br>
So, let's go over here and use a little invention in SQLAlchemy to change that table name but, not the class name.<br>
So, we'll come down here and say __tablename__ = 'packages', like so So, if we say it's packages that's what the database is going to be called.<br>
And we can always tell PyCharm that, that's spelled correctly.<br>
The other thing to do when we're doing a little bit of debugging or we get a set of results back in Python, not in the database and we just get like a list or we want to look at it it's really nice to actually see a little bit more information in the debugger than just package, package, package at address, address, address.<br>
So, we can control that by having a __repr__ and just returning some string here like package such and such like this.<br>
I'll say self.id.<br>
So, you know, if we get back, Flask and SQLAlchemy we'd say, angle bracket package Flask angle bracket package SQLAlchemy.<br>
So, that's going to make our debugging life a little bit easier as we go through this app.<br>
Alright, so not finished yet but, here's a really nice first pass at modeling packages.
|
|
|
show
|
1:51 |
Νow we defined our package class we saw that it's not really going to work or at least I told you it's not going to work unless we have a base class.<br>
So what we're going to to, is going to define another Python file here and this is going to seem a little bit silly to have such small amount of code in its own file but it really helps break circular dependencies so totally worth it.<br>
When I create a file here called model base.<br>
And you would think if we're going to create a class it would be something like this, SQLAlchemyBase.<br>
Then we would do stuff here right?<br>
That's typically how you create a class.<br>
But it's not the only way and it's not the way that SQLAlchemy uses.<br>
So what SQLAlchemy does is it uses a factory method to at run time, generate these base classes.<br>
We can have more than one.<br>
We can have a standard one.<br>
We can have a analytics database one.<br>
All sorts of stuff.<br>
So you can have one of these base classes for each database you want to target.<br>
And then factor out what classes go to what database based on like maybe the core database or analytics by driving from these different classes.<br>
We don't need to do that.<br>
We're just going to have the one.<br>
But it's totally reasonable.<br>
So let's go over here and say import sqlalchemy.ext.declarative as dec add something shorter than that.<br>
And then down here instead of saying the class then we say the dec.declarative_base().<br>
That's it, do a little clean up, and we are done.<br>
Here's our base class and now we can associate that with a database connection and these classes.<br>
So we just come over here in the easiest way and PyCharm is just to put it here and say Yes, you can import that at the top.<br>
So it adds that line rewrite there, and that's it.<br>
This class is ready to be saved to the database.<br>
We have to configure SQLAlchemyBase itself a little bit more.<br>
But package, it's ready to roll.
|
|
|
show
|
6:01 |
Before we can interact with our packages and query any or save them to the database or anything like that, we're going to need to well, connect to the database.<br>
And a lot of the connections and interactions with the database in SQLAlchemy they operate around this concept of the unit of work.<br>
Construct inside SQLAlchemy that represents the unit of work is called a session and it internally manages the connection.<br>
So with that in mind, let's go and add a new Python file called db_session.py.<br>
So in this file, we're going to get all the stuff set up so that you can ask it for one of these sessions and commit or rollback the session and so on.<br>
So we need to create two basic things.<br>
We need a factory, and I'll just say None for the moment and we need an engine.<br>
Now the engine I don't believe we need to share but this factory we're going to need to somehow keep this around right this is kind of we'll use the engine to get the factory and so on.<br>
So let's go and let's create a little function here called global_init(db_file: str) and we're going to use SQLite.<br>
It's the simplest of all the databases that are actual relational, you don't have to set up a server, it just works with a file but it's a proper relational database.<br>
The way we do that is we pass in a db_file which is a string.<br>
So what we want to do is work with this and see if, this has been called before we don't need to run it twice so we'll do something like this.<br>
We'll say first let's just make sure that's global factory - we'll say if factory: return.<br>
No need to call it twice, right?<br>
But, if it hasn't been called let's do maybe some validation here.<br>
We'll say if not db_file or not db_file.strip() it'll raise some kind of exception here, like right, something pretty obvious.<br>
You have to pass as a database file otherwise we can't work with it.<br>
Then we're going to get an engine here.<br>
The way we get the engine is from SQLAlchemy so we're going to have to import sqlalchemy.<br>
Maybe we'll stick with this as sa so here we just say sa.create_engine.<br>
Super simple.<br>
Notice the signature here though *args, **kwargs".<br>
I utterly hate this pattern it means, you can pass anything and we're not going to help you or tell you what could possibly go in there.<br>
In fact, there is a known set of things you can pass in here, so they should just be keyword arguments.<br>
Well, anyway, that's the way it goes.<br>
So, we're going to pass a couple of things.<br>
We need to come up with a connection string and when you're working with SQLAlchemy what you do is you specify the database schema or the type of database that's part of the connection string.<br>
So we'll say sqlite:/// and then we just add on the DB file like this.<br>
Maybe just to be safe we'll say "strip", just in case.<br>
That seems like that's a pretty good one and then here we'll just pass the connection string as a positional parameter, and then we also may want to set this, so I'll go ahead and like prime the pump for you.<br>
I'll say "echo=false".<br>
If you want to see what SQLAlchemy is doing what queries it's sending, what table create statements it's sending, stuff like that you set this to "true", all the SQL commands sent to the database are also echoed out both just standard out, and standard error, I believe.<br>
But I'm not going to show that, but just having this here so you know you can flip that and really see what's going on here.<br>
So we're going to set the factory here but what we need is we actually need import sqlalchemy.orm as orm So we come in here and we say orm.sessionmaker session...<br>
maker.<br>
So this is a little bit funky, but you call this function and it creates a callable which itself when you call it, will create these units of work or these sessions.<br>
So we got this little bit of a funky thing going on here, but then we also come in here and we say "bind=engine".<br>
So when the session is created it's going to use the engine which knows the database type and the database connection, and all that kind of stuff.<br>
And that's pretty much it!<br>
We're going to use this factory after everything's been initialized.<br>
We're actually going to do a couple of iterations on this file to make it a little bit better and better as we go, but let's not get ahead of ourselves.<br>
I think this pretty much does it so let's go ahead and call this over here.<br>
Let's go - here we are, register_blueprints like, setup_db(), let's have just a function down here...<br>
So let's go ahead and create a data folder not a data data, but a DB folder.<br>
In here is where we're going to put our database file.<br>
So what we need to do is work with the OS module and we're going to actually figure out where this is.<br>
So we want to say "durname", "pathoutdurname" and we're going to give it the dunder file for apps.<br>
So that's going to be the directory that we're working in so right now we're this one, and then we need to join it with DB and some file name.<br>
Let's say "DBFile" it's going to be "OS.path.join" this directory with "db" with some database file.<br>
Let's just call it "pypi.sqlite".<br>
The extension doesn't matter but, you know maybe it'll kind of tell you what's going on there.<br>
And then we can just go up here.<br>
import pypi_org.data.db_session as db_session and come down here and just call our global_init().<br>
Pass the db_file, and that's it we should be golden.<br>
Let's go ahead and run it just to make sure everything's hanging together.<br>
Ha ha, it did, it worked!<br>
Off it goes.<br>
There it is up and running.<br>
Super super cool.<br>
Did anything happen here?<br>
Probably not yet, no, nothing yet.<br>
But pretty soon when we ask SQLAlchemy to do something, like even just verify that the tables are there, you'll see SQLite will automatically create a file there for us.<br>
Okay, great, looks like our database connection is all set up and ready to go.
|
|
|
show
|
6:26 |
Well, we've got our connection set we've got our model, at least for the package, all set up we've got our base class.<br>
Let's go ahead and create the tables.<br>
Now, notice we've got no database here even though over in our db.session we've talked to the database.<br>
We haven't actually asked SQLAlchemy to do any interaction with it, so nothing's happened.<br>
One way we could create the tables is we could create a file, create a database and open up some database design tools and start working with it.<br>
That would the wrong way.<br>
We have SQLite.<br>
We've already defined exactly what things are supposed to look like and it would have to match this perfectly anyway.<br>
So, why not let SQLAlchemy create for us?<br>
And, you'll see it's super easy to do.<br>
So, you want to use SQLAlchemyBase.<br>
Remember, this is the base class we created.<br>
Just import that up above.<br>
This has a metadata on there.<br>
And here we can say create_all.<br>
Now, notice there wasn't intellisense or auto complete here.<br>
Anyway, some stuff here, but create_all wasn't don't worry, it's there.<br>
So, all we got to is pass it, the engine.<br>
That's it!<br>
SQLAlchemy will go and create all of the models that it knows about it will go create their corresponding tables.<br>
However, there's an important little caveat that's easy to forget.<br>
All the tables or classes it knows about and knows about means this file has been imported and here's a class that drives from it.<br>
So, in order to make sure that SQLAlchemy knows about all the types we need to make sure that we import this.<br>
So, because it's only for this one purpose let's say from pypi.org.data.package import package, like this.<br>
Now, PyCharm says that has no effect you don't need to do that.<br>
Well, usually true, not this time.<br>
Let's say, look, we need this to happen and normally you also put this at the top of the file but I put it right here because this is the one and only reason we're doing that in this file is so that we can actually show it to the SQLAlchemyBase.<br>
So, first of all, let's run this and then I'll show you a little problem here and we'll have one more fix to make things a little more maintainable and obvious.<br>
So, notice over here db folder empty.<br>
We run it, everything starts out well and if we ask it to refresh itself, oo, look!<br>
There's our little database, and better than that it even has a database icon.<br>
It does not have an icon because of the extension it has an icon 'cause PyCharm looked in the binary files and said that looks like a database I understand.<br>
So, let's see what's in there.<br>
Over here we can open up our database tab.<br>
This only works in Pro version of PyCharm.<br>
I'll show you an option for if you only have the Community in a moment.<br>
If we open this up, and look!<br>
It understands it, we can expand it and it has stuff going on in here.<br>
If, if, if, if, this is a big if so go over here, and you say new data source, SQLite by default, it might say you have to download the drivers or maybe it says it down here it kind of has moved around over time.<br>
Apparently, there's an update, so I can go and click mine but if you don't go in here and click download the drivers PyCharm won't understand this so make sure you do this first.<br>
Cool, now we can test the connection.<br>
Of course, it looks like it's working fine because we already opened it and now here we have, check that out!<br>
There's our packages with our ID which is a string create a date, which is the date, time all that good stuff, our primary keys, jump to console and now, I can say select star from packages, where?<br>
All through email, homepage, ID, license there's all the stuff, right?<br>
Whatever, I don't need a where clause and actually it's not going to be super interesting because it's empty.<br>
Obviously, it's empty, we haven't put anything in there but, how cool!<br>
We've had SQLAlchemy generate our table using the schema that we defined over here and it's here up in the database tools, looking great right?<br>
Well, that pretty much rounds it out for all that we have to do.<br>
We do have some improvements that we can make on this side but that's a pretty awesome start.<br>
I did say there was another tool that you can use.<br>
So, if you don't have the Pro version of PyCharm you can use a DB Browser for SQLite that's free.<br>
And if I go over to this here I can open up the DB Browser here and say open database, and give it this file.<br>
And check it out, pretty much the same thing.<br>
I don't know really how good this tool is I haven't actually used it for real projects but it looks pretty cool, and it definitely gives you a decent view into your database.<br>
So, if you don't have the Pro version of PyCharm here's a good option.<br>
Alright, so pretty awesome.<br>
I did say there's one other thing I would like to do here just for a little debugging now let's just do print connecting to DB with just so we see the connection string when it starts up so you can see, you know a little bit of what is happening here, and that will help.<br>
And the other thing is, I said that this was a little error prone, why is this error prone?<br>
Well, in real projects you might have 10, 15, 20 maybe even more of these package type files, right?<br>
These models.<br>
And if you add another one, what do you have to do?<br>
You have to absolutely remember to dig into this function, and who knows where it is and what you thought about it, and how long?<br>
And make sure you add an import statement right here and if you don't, that table may not get created it's going to be a problem.<br>
So, what I like to do as just a convention to make this more obvious is create another file over here called __all_models and basically, put exactly this line right there.<br>
And we'll just put a note, and all the others all the new ones.<br>
So, whenever we add a new model just put it in this one file.<br>
It doesn't matter where else this file gets used or imported, or whatever, if it's here, it's going to be done.<br>
So, to me, this makes it a little cleaner then I can just go over here and just say import __all_models and that way, like, this function deep down in it's gut, doesn't have to change.<br>
It should still run the same, super cool.<br>
Okay, so that's good.<br>
I think it's a little more cleaned up.<br>
We've got our print statement so we got a little debugging and then we've got our all models so it makes it easier to add new ones.
|
|
|
show
|
5:00 |
Let's return to our package class that defines the table and the database.<br>
I said there was a few other things that we needed to do and well, let's look at a few of the problems and then how to fix them.<br>
created_date.<br>
created_date is great.<br>
What is it's value if we forget to set it?<br>
Null.<br>
That's not good.<br>
We could say it's required and make us set it but wouldn't it even be better if SQLAlchemy itself would just go right now, the time is now and that's the time it's created on first insert?<br>
Super easy to do that.<br>
But, we've got to explicitly say that here.<br>
We're here in the emails.<br>
Maybe we want to be able to search by author/email.<br>
So, we might want to have an index here so we can ask quickly ask the question: show me all the packages authored by the person with such and such email.<br>
Boom.<br>
If we had a index, this could be super, super fast.<br>
The difference in in terms of query time for a query with an index and without an index with a huge amount of data can be like a thousand time slower it's an insane performance increase to have an index.<br>
Helps you sort faster, it helps you query faster and so on.<br>
So, we're going to want to add an index on some of these.<br>
And maybe the summary is required, but the description is not required.<br>
So, we would like to express that here as well.<br>
So, SQLAlchemy has capabilities for all these.<br>
So, let's start with the default value.<br>
So, pretty easy, we're going to set defaults here and it could be something like 0 or True or False if that made sense, it doesn't for datetime.<br>
Well, what would be the value for a datetime?<br>
Well, let's use the datetime module and we can import that at the top.<br>
And use datetime.now.<br>
Now, notice if I just press end and then enter bicharm is super helpful and it puts parenthesis here.<br>
That is a horrible thing that happened.<br>
What this will do is take the current time when the application starts and say well that time is the default value.<br>
No no.<br>
That's not what we want.<br>
What we want, is we want this function now to be passed off in any time SQLAlchemy is going to put something in the database, it goes, oh, I have a default value which is a function so let me call that now to get the value.<br>
So, that will do the trick of getting the insert time exactly as you want.<br>
Here we can say, nullable=False you can say, nullable=True.<br>
Not all databases support the concept of nullability like, I think SQLite doesn't, but you don't want to necessarily guarantee that you're always working with that, right?<br>
We may also want to say, all like, all the packages or the top ten packages are the most recent ones.<br>
And, for that you might want an index cause then that makes it really fast to do that sort, so we can say index=True.<br>
And that's all you got to do to add an index it's incredible.<br>
We also may want to ask, you know, show me all the packages this person has written.<br>
So, then we'd say index is true, that'll be super fast.<br>
Also, you might ask, what are all the packages or even, how many of them are there that have say the MIT license?<br>
And, then you could do a count on it or something, right?<br>
So, this index will make that query fast.<br>
These we'll deal with when we get to relationships.<br>
But, these simple little changes here will make it much, much better and this is really what we wanted to define in the beginning, but I didn't want to overwhelm you with all the stuff at the start with.<br>
All right, so we have our database over here.<br>
Let's go and you know, and we have it here as well.<br>
Let's go and run the app, rerun it see if everything's working and if we just refresh this what's going to happen.<br>
sad face, nothing happened.<br>
Where are my indexes?<br>
Where is my null, well, nullability statements things like that.<br>
This is a problem, this is definitely a problem.<br>
The reason we don't see any changes here is that SQLite will not create or modifications to a table.<br>
It'll create new ones, great new tables.<br>
If I add a new table it'll create it like uh release it or something, you would see it show up when I ran it.<br>
But, once it exists, done.<br>
No changes, it could lose data or it could make other problems, so it's not going to do it.<br>
Leader, and this is very common, you want this but SQLAlchemy won't do it.<br>
We're going to later talk about something called Alembic which will do database migrations and evolve your database schema using our classes here.<br>
But, we're not there yet.<br>
We just are trying to get SQLAlchemy going.<br>
So, for now, what do we do, how do we solve this?<br>
We could either just delete this file, drop that table and just let it recreate it, right, we don't really have any data yet.<br>
When you get to production migrations, but for now just super quick, let's just drop that table.<br>
I'll rerun the app, refresh the schema, expando and look at that, here's our indexes and author/email creator date and license, here's our uniqueness constraint on the id which comes with part of the primary key.<br>
You can see those, blue things right there those are the indexes.<br>
So, we come over here and modify the table, you can see here's your indexes and your keys and so on.<br>
Cool, huh?<br>
All we need to do is put the extra pieces of information on here and when we enter one of these packages we'll get in and out and we'll have an index for it and so on.<br>
Super, super cool.
|
|
|
show
|
4:24 |
Now for the rest of the tables I don't want to go and build them piece by piece by piece.<br>
That'll get pretty monotonous pretty quickly.<br>
We did that for package and it's quite representative.<br>
So let's just do a quick tour of the other ones I just dropped them in here for you.<br>
So we have download and of course change the database name the table name to downloads, lower case.<br>
And again we have an id, this one is an integer which is primary key in auto-incrementing, that's cool.<br>
created_date, most of our tables will have this because of course you want to know when that record was entered.<br>
You almost always at some point want to go like actually, when did this get in here?<br>
Or all of these or something like that.<br>
So always have that in there.<br>
And then this is going to represent a download of a package like pip install flask, right, like when that happens if that hits the server we want a analytical record of that.<br>
So we want to know what package and what release we hit and we may want to query or do reporting based on that so we'll use an index here.<br>
We also might just want to track the IP address and user agent so we can tell what it is that's doing the install.<br>
That one's pretty straightforward, what's next?<br>
Languages, again wrote in this trick where the name of the language are like, Cython or Python 3 or whatever.<br>
That's going to be the primary key 'cause it was very unique and then we also have when it was put there and a little description about what that means.<br>
Licenses like MIT or GPL or whatever, same thing.<br>
One more, one more ID is the name.<br>
Or you can avoid, join potentially and get things a little quicker that way.<br>
Little description and create a date, always want that.<br>
This is an interesting one here this is for our many to many relationship.<br>
We have users and we have packages and a user can maintain many packages and a package be maintained by multiple users.<br>
So here's our normalization table we have the user ID and package ID and these are primary keys.<br>
Possibly we should go ahead and set up these as foreign key relationships, but I didn't do it.<br>
We'll do that over here, so this one hasn't changed we still got to add our relationship there at the bottom.<br>
Our releases, this one is going to have a major, minor and build version all indexed.<br>
Just an auto-increment and primary key.<br>
Maybe some comments in the size of that release and you know, stuff like this.<br>
And finally we have our user these are the users that log into our site auto-incrementing ID, the name, it's just a string email.<br>
It has an index we should also say this probably is unique.<br>
It's true as well 'cause we can't have two people with the same email address, that would be a problem when they want to reset their password.<br>
We also, speaking of passwords, want to store that but we never, never, never store just the password.<br>
That is a super bad idea.<br>
We're going to talk about how we do this but we're going to hash the password in an iterative way mix it in with some salt and store it here.<br>
So to make that super clear this is not the raw password but that is something that needs transforming we put hash password.<br>
But we also want the created date, maybe their profile and their last login just so we know like who the active users are and whatnot.<br>
That's all of the tables, or the classes that we've got.<br>
If you look over here, I've updated this.<br>
And guess what?<br>
We don't need to go change like our db_session or whoever cared about importing all these things.<br>
It's all good.<br>
Notice also that I put this in alphabetical order.<br>
That means when you go add a new class or table it's super easy to look here and see if it's listed and if it's not, you know put it where it goes alphabetically.<br>
It'll help you keep everything sane.<br>
So let's see about these tables over here we have not run this yet.<br>
Notice we just have packages, but if we rerun the app what's going to happen?<br>
It did not like that, our package singular.<br>
Let's try again.<br>
Here we go, and now if we refresh, resynchronize boom, there they all are.<br>
So we see our downloads and it has all the pieces and the indexes say on like, package ID right there our license and so on.<br>
Everything's great.<br>
So SQLAlchemy did create the new tables it did not make any changes to packages.<br>
Luckily we haven't actually changed anything meaningful about packages, so that's fine.<br>
If we did we'd have to drop the table or apply migrations, right.<br>
But it's cool that at least these new tables we're defining they do get created there and then yeah it's pretty good.<br>
All right so I think we're almost done we're almost done we just have a few more things to tie the pieces together to relationships and our data modeling will be complete.
|
|
|
show
|
7:16 |
The last thing we have to do to round out our relational database model is to set up the relationships.<br>
So far we've effectively have just a bunch of tables in the database with no relationships.<br>
We're not really taking advantage of what they have to offer so in order to work with these let's go up here I'm going to do a little bit more of an import the ORM aspect to we'll talk about relationships and Object Relational Mappers and so on.<br>
So over here, what we want to do is we want to have just a field releases and when we interact with that field we would like it to effectively go to the database do a join to pull back all the releases through this relationship that are associated with this package.<br>
So basically where the package ID on the release matches whatever ideas here.<br>
So the way that we're going to do this is we're going to go over her and say this is an orm.relation relation just singular like that and then in here we talk about what class in SQLAlchemy terms this is related to.<br>
It's going to be a release, that's good and that alone would be enough but often you want the stuff you get back through this relationship to have some kind of order.<br>
Wouldn't you rather be able to go through this lesson say it's oldest to newest or newest to oldest releases?<br>
That would be great if you had to do no effort to make that happen right?<br>
Well guess what, we can set it up so there's no effort so we can say, order_by= Now we can put one of two things here.<br>
We could say I want to order my one column on the release class so we'll just say release and import it at the top.<br>
You could say we want to say accreted data descending like this and that would be a totally fine option but what we want to do is actually show, if we go over here we want to order first by the major version then the minor version, then the build version.<br>
All of those descending so in order to order by multiple things, we're going to put a list right here like so and let's say we're going to order it by major version minor version, and build version.<br>
All right so that means we get it back it's going to go to the database and have the database do the sort.<br>
Databases are awesome at doing sorts especially with things with indexes like these three columns right here have.<br>
Okay so that's pretty good and we're also going to have a relationship in the reverse direction so package has many releases.<br>
Each release is associated with one package.<br>
So over here when I have a package for a moment I'm going to leave it empty but we're going to have this field right here.<br>
So what we can do is we can say is back populates package what does that mean?<br>
That means when I go here and I get these all filled out and I iterate over my get one of the releases off maybe I hand it somewhere else somebody says .package on that release it will refer back to the same object that we originally had that we accessed it's here so it kind of maintains this bidirectional relationship behavior between a package, it's releases and a given release and it's packaged automatically so might as well throw that on there.<br>
All right this one's looking pretty good let's do the flip side.<br>
How does it know that there's some relationship?<br>
I just said this class is related to that boom done.<br>
Well that's not super obvious what this is.<br>
So what we're going to do is like standard database stuff is we're going to say there's a package_id here and this is a field or column in the release table to maintain that relationship and this will be a sa.Column, SQLAlchemy Column and what type is it going to be?<br>
It has to correspond exactly to the type up there.<br>
Okay so this has to be SQLAlchemy.string but in addition that it'll be SQLAlchemy.ForeignKey.<br>
So it's a little tricky to keep these things straight in your mind but sometimes we speak in terms of classes sometimes we speak in terms of databases.<br>
Over here I said the class name for a relationship but in this part, the foreign key you speak in terms of the databases, it'll be packages.id lowercase right that's this thing we're referring to that and the ID.<br>
So here we're going to have that foreign key right there and then this we can set that up to be a relationship as well.<br>
So again we got to get ahold of our orm orm.relation and it's going to relate back to package.<br>
Okay, I think that might do it.<br>
We're going to run and find out but we have it working in both directions so here we can go to the releases and then we can go, this will establish that relationship and this will be that referring the thing that refers back to it.<br>
Now we've already created those tables so in order for this to have any effect we have to drop those in this temporary form or member migrations later but not now.<br>
All right, let's run it and see if this works.<br>
All right, it seems happy that's a pretty good sign SQLAlchemy's pretty picky so we go over here there really shouldn't be anything we notice about this table but here we should now have a package and notice in that blue key, even right here there's a foreign key relationship if we go back and interact with this, say modify table we now have one foreign key from package_id which references packages ID, that's exactly what we wanted.<br>
Now we don't have any data here yet so this is not going to be super impressive but let me show you how this will work.<br>
Imagine somehow magically through the database through a query which we don't have anything yet but if we did, I'm going to come over here I'm going to go give me a package, right?<br>
Now I'm just allocating a new one but you could do a query to get to it right?<br>
So then I could say print P., I don't know what ID would be the name and then I could say print our releases and say for r in p.releases that will print out, here we go we go through and print them out.<br>
All right and we would only have to do one query except when explicit query here to get that and then down here, once it's back this would go back to the database potentially depending how we define that query and then do a query for all the releases ordered by the way we said and then get them back, that's pretty cool.<br>
Maybe like notice it says you can't iterate over this it's kind of annoying, let's see if I can fix this to say this is a list of release.<br>
Import that from typing, all right.<br>
So now it's happy and if I say r.<br>
notice that so maybe this is a good idea, I'm not sure if it's going to freak it out or not but I'll leave it in there until it becomes a problem.<br>
All right, let's actually just run it real quick make sure this works.<br>
Yeah that worked, didn't crash when we did that little print out.<br>
There was nothing to print but still, pretty good.<br>
So those are the releases.<br>
Once we get some data inserted you'll see how to leverage them even for inserts they're pretty awesome.
|
|
|
show
|
4:15 |
Before we actually start using SQLAlchemy to insert data and query data, and so on let's talk about some of the core concepts we've seen and some of the fundamental building blocks for modeling with SQLAlchemy.<br>
So we started with the SQLAlchemyBase.<br>
Remember, the idea was every class we're going to store in the database derived from this dynamically defined SQLAlchemyBase class.<br>
You can call it whatever you want.<br>
I like SQLAlchemyBase.<br>
But there's other, you know, it's just a variable.<br>
Name it as you like.<br>
So I want to create this singleton base class to register the classes and type sequence on the database.<br>
Remember, there's one and only one instance of this SQLAlchemyBase shared across all of the types per database.<br>
So for example, we're going to have a package to release a new user, they all derive from this one and only one SQLAlchemyBase type here.<br>
To model data in our classes, we put a bunch of classable fields here, ID, summary, size homepage, and so on, and each one of them is a Column.<br>
SQLAlchemy.Column and they have different types like integer, string, and so on.<br>
We can see some of them are primary keys and even if it's an integer, they can even be auto-incrementing, primary keys which is really, really nice.<br>
And we can also have relationships like we do between package and releases.<br>
One really nice feature of databases is they have default values.<br>
We saw with our auto-incrementing ID our primary key, we don't have to set it.<br>
The database does that for us.<br>
So here we can pass datetime.now, the function not the value, the function, and then it's going to call that function now whenever a row is created and set that value to be, well, right now.<br>
That's super nice.<br>
We can also do that up here with more complex expressions.<br>
So in the bottom one, we literally passed an existing function, datetime.now but above, we want to define this default behavior in a more rich way.<br>
So we're passing our very own lambda expression that takes the UUID for identifier converts it to a string, and then drops the dashes that normally separate it into just one giant scrambled alphanumeric super thing.<br>
You can create these default values by passing any function, a built-in one or one of your own making.<br>
We also want to model keys and indexes.<br>
So primary keys automatically have indexes.<br>
We don't have to do anything there.<br>
Let's our uniqueness constraint as well as indexes.<br>
This created one, maybe we want to sort by the newest users, for example.<br>
Well, if we're going to do that, we very much want to put an index on that.<br>
As I pointed out, indexes can have tremendous performance benefits, it's totally reasonable to have a thousand times difference performance in a query, if you have tons of data on whether you have an index or not.<br>
Indexes do slow write time but certainly in this case the rate of user creation versus querying and interacting with them is, it's no comparison, right?<br>
We're creating far fewer users, probably than we are querying or interacting with them.<br>
We can also specify uniqueness we didn't do that in our example.<br>
We can say this email, we can't have two users with the same email, emails are very often used to reset your password and if you have two users who's going to get their password reset, all of 'em?<br>
One of 'em, who knows, none of 'em?<br>
So you might want to say there's a uniqueness constraint on the email to say only one user gets to use a particular email and that's super easy to do by just saying unique=True.<br>
Finally, once all of the modeling is done we have to actually create the tables.<br>
Now turns out that that's super easy.<br>
We import all the packages, get the connection string and we can create an engine based on the connection string and then we just go to SQLAlchemyBase to it's meta-data and say create underscore all and pass the engine, boom, everything is done.<br>
Remember though, this only creates new tables it does not modify existing ones so if you need to modify it wait till we get to the alembic chapter, the migration chapter or do it yourself or if you're just in development mode maybe deleting it and just letting it recreate itself that might be the easiest thing, that's what we did.
|
|
|
|
52:56 |
|
|
show
|
2:18 |
In this chapter, we're going to look at actually using SQLAlchemy.<br>
Previously we had modeled all of our data but we didn't do anything with it.<br>
We didn't do any insert queries, updates none of that.<br>
That's what we're going to do now.<br>
And to get started we're just going to jump right into writing some code.<br>
And so I just want to point out we are now in Chapter 10 Using SQLAlchemy, working on the final bits here.<br>
So let's switch over to PyCharm grab our new chapter and get going.<br>
This is the code from before, just carrying on.<br>
And what we're going to do is we're going to actually have over here a new directory called bin.<br>
Now, this is just a convention that I use.<br>
I've seen it in other places as well and this bin folder comes along with our website for little admin tasks and scripts that we need to run and so on.<br>
It's not directly involved in running the site but more like maintaining the site.<br>
So, for example we're going to do some importing of data.<br>
And to do so, we're just going to write some scripts here.<br>
They don't actually run normally but they're going to run here.<br>
Let's go over and add a Python file called basic_inserts.py.<br>
We're going to take two passes at showing how to insert data.<br>
First, we're going to write some example data just standard make-up stuff.<br>
And then I'm going to show you I've actually got a hold of the real PyPI data for the top 100 packages using their API and we're going to insert that.<br>
Turned out that's super, super tricky.<br>
There's lots of little nuances and typecasting and all that kind of stuff we have to do to make it work just right.<br>
We're not going to do that first we're going to do like a simple example and then I'll show you the program that'll actually generate our real database.<br>
So, here it is.<br>
We already have our database right here and if we look at it we'll see that we have our packages and releases put together.<br>
And, of course, there are the interesting ones.<br>
Actually, I'll go over here and show you a little more.<br>
Show you a visualization pop-up.<br>
It's kind of a cool feature of PyCharm.<br>
So we have our packages and this relationship between the releases.<br>
That's probably the most interesting part of our database.<br>
We didn't actually set up save, like the maintainers and what not here.<br>
This should maybe have, like some relationships and so on but we didn't set up all the relationships for our data model, just the really important ones.<br>
So, we're going to focus on just those two tables.
|
|
|
show
|
1:36 |
Now what we're going to need to do is work with our SQLAlchemy engine and the factory and the connections and all that.<br>
And remember in order for that to work we have to go to our db_session.<br>
We have to initialize it.<br>
So let me just copy over a function here.<br>
This was just like the one we worked with before.<br>
So we're going to import os.<br>
import pypi.org and we can say that's spelled correctly.<br>
And we also want our db_session like so.<br>
And now it has this global_init.<br>
So, we just have to call this somewhere.<br>
Before we try to do anything, and just to remind you over here this sets up the connection string initializes the engine, and most importantly initializes this factory right here.<br>
So, what we're going to do is we're going to have a def main.<br>
Here this is going to be like our main startup.<br>
And in here we'll call global_init for the database.<br>
And we'll use our main convention at the bottom and just run the main function.<br>
Here we go.<br>
I guess we can go ahead and test it and see that it runs.<br>
Oh, it didn't like that.<br>
Let's just use this in here we'll just go up one.<br>
That should do.<br>
Okay, great.<br>
So here we're connecting to final, dah dah dah.<br>
It might even be worthwhile to say os.path.abspath.<br>
Here we go.<br>
Now we have the absolute path, in looks right to me.
|
|
|
show
|
1:33 |
Okay off to a good start and we no longer need this so this is good.<br>
Now what we need to do, let's just say while true we're going to insert a package.<br>
We'll write a little function that will does that.<br>
So down here, this can just enter package.<br>
So how do we insert a package and maybe some releases that are related to it?<br>
Well, how would you create a package if you forgot about the database and you only thought in classes and objects?<br>
You would say this p = Package(), like so, and you would import that from pypi_org.data.package.<br>
You would set some properties like the id might be, and we could ask the user input package id, name and we could do a strip in the lower just to make sure that is all consistent.<br>
What else do we need to set?<br>
Well, let's go actually look at our package real quick here.<br>
And we can say, what do we need to set?<br>
Well this, sometimes we don't have to set the primary key.<br>
This one is not auto_incrementing so we do.<br>
This one has a default value so that's solid.<br>
These could all be set, the releases we'll deal with in a second.<br>
So let's go over here and just put a little long comment string to show us what we got to do.<br>
So it'll be p.summary = input("Package summary: ").strip() For description I think we'll just ignore that all of those we can ignore.<br>
Let's just put author name and license.
|
|
|
show
|
3:36 |
Classes model records in our database so all we have to do is go and save this back into the database and that's where this unit of work in the factory from db_session, comes from.<br>
So what we'll do is we'll say session equals db_session.factory.<br>
So, this is pretty cool.<br>
If we come over here and say db_session.<br>
notice all the cool things you can do?<br>
No, no you don't.<br>
There's none.<br>
If I actually set the type here.<br>
I'm not going to leave it like this but, if I were to import sqlalchemy.orm like this, and set it to a session all of a sudden, we have, oh look autoflush, and commit, and bind and rollback, and all the database things and add, and so on.<br>
Let's go ahead and get this set up real quick and then I'll show you what we'd actually do.<br>
We'll make this a little bit nicer.<br>
There's some stuff down the road.<br>
We're going to need to make this better anyway.<br>
All right, so, we're going to do some work and then, the way this unit of work works is you say, I'm going to make a bunch of changes in this area create the session, make a bunch of changes.<br>
No interaction with the database will have happened until line 26, when we call commit or, if we had entered some kind of query but we're not querying, we're only inserting.<br>
Let's do this.<br>
Let's come over here, and we'll say session.add.<br>
That's it.<br>
If we run this, it's going to insert it right away but let's add a couple of releases.<br>
So we'll say, r., r is a release.<br>
I'm going to import that.<br>
Let's go over to releases and see what we got to set.<br>
id auto_increment in, we don't need to set.<br>
Those, we should definitely set.<br>
created_date is its own thing.<br>
So, let's just do those three and maybe the size.<br>
So, we'll say r.majorversion equals...<br>
Now, we're just going to assume that they know how to type an integer and, if they don't, well, it's going to crash, but it's OK.<br>
It's just a little example.<br>
Minor, and build.<br>
And, last one, will be size in bytes.<br>
OK.<br>
Looks pretty good.<br>
Now, how do we let's do a quick print.<br>
Release one, something like that and let's do it again for release two.<br>
So there's actually more than one release per package, OK?<br>
How do we associate this release with this package?<br>
There's a lot of ways.<br>
We could add each release separately.<br>
So we could say session.add each time and this, and then commit it as long as we had set r.package_id = p.id.<br>
Now actually, in this case, this would be fine but normally, windows are auto-incrementing IDs.<br>
You need to first save the package and then you can set it, and it gets real tricky, right?<br>
Like, it's not super simple to do this but, what is super simple is to work with this relationship over on packages.<br>
So, let's go to here, package.<br>
Remember this, releases?<br>
It's a relationship but it kind of acts like a list.<br>
Let's just try that.<br>
What happens if I say, p.releases.append as if it were a list.<br>
You know that's going to work.<br>
It is, it's awesome.<br>
OK, so we're going to append those and we're never going to tell the session to add it but it's going to traverse the relationships and go, I see you have other records to insert into other tables, and relationships to set up.
|
|
|
show
|
2:34 |
I think we're ready to try this.<br>
Let's go ahead and run this and see what happens.<br>
Off it goes, package name let's go with SQLAlchemy to start.<br>
Summary is ORM4 for Python.<br>
Author is Mike Bayer.<br>
License, let's just guess, it's MIT.<br>
The first version is 123.<br>
And it's that many bytes.<br>
The second one is going to be 2.0.0 and it's a little bit bigger, like so.<br>
So that inserted the first one.<br>
Let's do one more and say Flask, Microframework for Python.<br>
Let's go with Armand and David, right?<br>
Armand, originally, David Lord these days.<br>
Let's just say this is BSD.<br>
I have no idea what it is.<br>
And it's 1.0.0 and 1.0.02.<br>
There we go, that one can be bigger than one byte.<br>
All right, I think we're good.<br>
Let's go ahead and stop this.<br>
Notice, there were no crashes.<br>
That's pretty killer already.<br>
That's a good chance that something worked But let's go look in the database.<br>
So if I go over to Packages and I say Jump to Console and say, select * From Packages.<br>
Moment of truth.<br>
Tada!<br>
There they are, how awesome?<br>
We didn't set some of the values but we did set many of them.<br>
You can see everything we typed in there.<br>
Pretty awesome, isn't it?<br>
What about releases?<br>
Run those, look at that.<br>
There they are!<br>
And you can see what package they come from SQLAlchemy or Flask.<br>
That's really cool and that's actually the relationship.<br>
So I could go over here and, say, where package ID equals SQLAlchemy?<br>
Is it 1?<br>
I don't think it's what it equals.<br>
Here we go.<br>
So, we can go do the query for that and this is when we actually go back and do queries with SQLAlchemy and we touch that releases folder.<br>
It's going to do, basically, this query but it's also going to add an order by major version descending.<br>
And then minor and then whatever but this should be enough.<br>
There we go.<br>
So we'll get them back exactly in the order you would want them.<br>
All right, so this is how we insert data.<br>
Super, super simple, right?<br>
We go and just treat these more or less like objects.<br>
We create them, we set their properties we click them together through their relationships and we add them to the session, create a session and add it.
|
|
|
show
|
1:20 |
I guess, real, real quick, let's make this a little bit nicer.<br>
I don't like that this doesn't give us much information about what comes out of it and it's not super easy to get that to happen, so let's do this.<br>
Let's define a function called create_session().<br>
That's more obvious.<br>
And it's going to return a session object that comes from sqlalchemy.orm and for now it's just going to say return __factory(), like this.<br>
Let's tell it that this is global, like that.<br>
Okay, this is pretty good.<br>
But of course when we now go to db_session.<br>
Uou still see it.<br>
You still see it at the top and I'd kind of like that to not be the case so let's refactor rename this to double underscore and you see it renamed it everywhere.<br>
And now, is it gone?<br>
Ah, yeah.<br>
We just have create_session and global_init.<br>
So where are we doing this factory we don't need any of this stuff anymore.<br>
That can all be gone, we just say = DBsession.createsession the type annotation on the return value there should be enough so that when we say session.<br>
Boom, there it all is.<br>
Okay, that's it.<br>
We're all good to go.<br>
We clear the session, we make the changes we call commit, beautiful.
|
|
|
show
|
5:09 |
One other thing, we also need to add system.path Append to our path, this folder right here.<br>
Because we're importing pypi.org in PyCharm this is going to totally work smooth because guess what?<br>
PyCharm does that for us right there.<br>
But if we try to run this outside without setting this up as a package or something like this it's not going to work so great.<br>
So we're going to run Python out of our virtual environment.<br>
Point it at and load data, here it goes.<br>
So in the end we found 84 users, 96 packages, 5400 releases embedded within those documents, 10 maintainers 25 languages, and 30 different licenses.<br>
All right, well, that's it.<br>
We should now have a whole lot more data over here.<br>
And if we go look real quick let's just go to the packages and jump to the console.<br>
Say select * from packages, we run it.<br>
We got a whole bunch of 'em.<br>
Here's amqp, apters, argparse, flake8 and so on.<br>
If we run it for releases you're going to see a whole bunch of stuff.<br>
And they're related to they're various packages over here on the right.<br>
Pretty awesome huh?<br>
So now when we run our app.<br>
Move here and we click on it.<br>
You can see, well, we're not quite using the data yet.<br>
But, we're going to start using all that data we just loaded up.<br>
And dropping it into these locations.<br>
So, that's going to be real awesome.<br>
We have true, accurate, realistic, or even snapshot in time real data from pypi to work with to finish building out and testing our app.
|
|
|
show
|
2:22 |
One of the core concepts of SQLAlchemy is this Unit Of Work.<br>
Let's dig into that.<br>
The Unit Of Work is a design pattern that allows ORMs and other data-access frameworks to put a bunch of work together and then at the very end decide to go and interact with the database decide now we're going to actually save this data within a single transaction.<br>
So here we have a bunch of different tables customers, suppliers, and orders.<br>
They're all providing entities into this operation this unit of work.<br>
So maybe we have a couple of customers one supplier, and one order.<br>
We've also maybe allocated some new one like we did with package and we're inserting that into the database.<br>
And maybe we've changed things about the supplier we're updating those in the database.<br>
And the order is canceled so we're calling delete on that.<br>
All that gets kind of queued up in this unit of work.<br>
And then I'll call commit in SQLAlchemy syntax and that pushes all those changes which are tracked by the unit of work the so-called dirty records the things that need to be inserted the things that need to be deleted the things that need to be updated and so on.<br>
So we can use these unit of works like that and the way we create them are with these sessions.<br>
So we've seen that we create these engines and the engine gives us this session factory that was all encapsulated within our db_session class.<br>
We do this once and then every time we want to interact with the database we create one of these sessions.<br>
So we come over here and we call that session factory it gives us a unit of work which is often called a session kind of treat this like a transaction a bunch of stuff happens in memory then it's committed.<br>
Maybe we add something, maybe we do some more queries maybe that tells us what we've got to do to add some more.<br>
We could make changes to the results of those queries either updates or deletes.<br>
Other than the query there's not actually been any interaction with the database.<br>
This add doesn't actually add it to the database it just queues it up to be added.<br>
When you call commit that commits the entire unit of work.<br>
Don't want to commit it?<br>
Don't, then nothing will happen in the database there will be no changes to your data.<br>
And that's how the unit of work pattern appears and is used in SQLAlchemy through this session factory and then committing it.
|
|
|
show
|
5:55 |
Now that we've imported the data into our database I think it's time to start using it.<br>
How many projects did we import?<br>
Negative one, unlikely.<br>
That's not typically a count of real numbers, is it?<br>
So, what we need to do is actually go query the database to fill out those sections.<br>
We also need to fill out our releases down here at the bottom, but we're going to focus on just this little stat slice as we called it.<br>
So if we go over here, and we see right now what we're doing is we're going to our package_service and we're calling a function: get_latest_packages.<br>
Well, that's pretty cool, but we could look over here this is just fake data.<br>
So let's actually put in here we're going to need to pass more data over to our template.<br>
So we go to our template, it's super nicely organized.<br>
We're in Home View, so we go into the Home folder and run the Index function, so we go to Indexing.<br>
Boom, there it is.<br>
Well, that looks like a problem.<br>
Let's pass in some data.<br>
Now, we might want to just drop the number here like, package count, that'd be okay.<br>
Except for, if there's a million packages it's just 1-0-0-0-0-0-0 with no digit grouping.<br>
So we could do a little bit better if we did a little format statement, like this.<br>
Like so, and to do the digit grouping.<br>
Now let's just put that in for the others as well.<br>
I have release count, and user count.<br>
Of course, for that to work, if we try to run this again we go to refresh it, not so much.<br>
Unsupported format type.<br>
And let's go pass this data along here.<br>
So we're going to need to have a package count and let's just make this fake for a minute.<br>
Release.<br>
And user count.<br>
This should be auto-refreshing down here at the bottom.<br>
Here we go, it's active again, super.<br>
Refresh.<br>
One, two, three, looks beautiful.<br>
I was trying to pass None to format in digit grouping.<br>
None doesn't go that way.<br>
Right, so this is working in terms of the template but it's not working in terms of the data.<br>
So let's go and change this down here I'm going to call Package_service.get_package_count Now this doesn't exist, but it will in just a moment.<br>
Release count, we're going to do users in a separate service.<br>
So we can go over here and hit Alt + Enter create this function, and it didn't really know what to do.<br>
It's supposed to return an int.<br>
And over here, we saw how to do queries.<br>
If we start by creating a session and we're going to import our db so we'll say, import pypi.org.<br>
Get our little db_session there and we'll say create_session.<br>
That's cool.<br>
And then we simply have to do a query so we're going to come over here and we're going to say, I would like to go to the session and do a query, and then you say the type.<br>
We want a query package because that's what the count we're looking for.<br>
And we might do a filter to say where the package_id is this or the publish date is such and such or the author is this person or that but all we want to do is a super simple count.<br>
That's it, that's going to be our package count, and let's going to let it write that as well and we'll just grab this bit.<br>
So this one is the same except for instead of querying package, what are we querying?<br>
We query release.<br>
Clean that up, and then finally let's go over here and figure out where we are.<br>
We also want to have a user service.<br>
So if I come over here, and just copy paste I can change that to user.<br>
Do a little cleanup.<br>
All right, that looks pretty good.<br>
Now, it might seem silly to just have this one function but of course, we're going to log in, we're going to register there's all sorts of things this user session will be doing.<br>
So now if we go back we should be able to go to our import up here.<br>
And we'll do user service as user service.<br>
And here we'll do user_service.get_user_count.<br>
Okay, moment of truth.<br>
If we run this, it should be doing those queries from the database, creating our unit of work, our session.<br>
Now, it's pretty boring, all we do is do a quick query.<br>
We're not, like, inserting and updating data yet but it still should be doing some good stuff.<br>
Let's do a Save, which should rerun it.<br>
See the little green dot, it's still running so it should've rerun.<br>
Moment of truth: refresh.<br>
Bam, look at that!<br>
How cool is this?<br>
So 96 projects, 5,400 releases, and 84 users.<br>
That's exactly what we saw earlier.<br>
And if we go over to our little inspector and we go to the network, and we say just show us HTML and we do this again a couple of times you can see that the response time even going to the database and doing three queries is 11 milliseconds.<br>
That's pretty solid, right?<br>
Not too bad at all.<br>
So our site's working fast it's using the indexes that we set and it's pulling back the data.<br>
Well, it probably doesn't use an index for a count but it would if we were doing the right kind of queries like, for the new releases.<br>
So, I think our little stat slice is up and running and that's how we're getting started using this data that we inserted, that we got from those JSON files.<br>
Lots more of that to do really soon.
|
|
|
show
|
9:03 |
We have our little stat slice working just fine but the pieces here, not so much.<br>
Remember, this is just fake data.<br>
See the desk, all right, so now we're going to write the code to get the new releases.<br>
Let's go over here and have a look.<br>
So we're not going to call this test packages anymore we're actually just going to inline it Like that so we're going to go and implement this method right there.<br>
Obviously, it's not doing any database work yet, is it.<br>
Now, as we talk about this, there's going to be several ways to do this, some of them more efficient some of them less efficient and I want to look at the output, so the first thing I actually want to do is go over to our db_session and I told you about this echo parameter.<br>
Let's make it true and see what happens.<br>
You can see all the info SQLAlchemy looking at the tables to just see if it needs to create new ones.<br>
It doesn't and if I erase this and hit the homepage you can see it's doing three queries it's doing a count, against users against releases and against packages.<br>
Where is that, that is that part right there.<br>
Okay, now I just want to have it really clear what part is doing what, so I'm going to turn these off and just have them return 200 or whatever, some random number.<br>
I'm also going to do that for the user_service.<br>
So now let's refresh, I'll clean up this here and refresh, notice there's no database access.<br>
That's good because we're going to do database access here and we need to understand it really clearly.<br>
All right so let's go over here and work on implementing get_latest_packages.<br>
In fact, we were returning packages but what we really want to do is we want to return the latest releases with ways to access the associated packages.<br>
If we look at the release, remember each release has a package relationship here.<br>
So I'm going to change this around and rename this to latest releases like that and we're going to implement something here.<br>
It's going to start like this and let's go ahead and tell it that it is going to return a list of release, release is good, import that from typing.<br>
And it's also going to have a limb and that equals 10 or something like that.<br>
So if we don't specify how many latest releases we get 10.<br>
Okay so we're going to do some work and eventually we're going to return a list right here.<br>
Well what are we going to do, well it turns out that this is actually the most complicated thing we're going to do in the entire website.<br>
It's not super complicated but it's also not super simple so let's do one more import.<br>
I'm going to import sqlalchemy.orm and because we need to change or give some hints to how the ORM works.<br>
So let's go over here and say the releases are equal to, want to create a query so we've already done this a few times session query of release, now what we want to do is get the latest ones so we're going to do an order by.<br>
So we'll come down here and say .order_by and when we do an order by we go to the type and it's the thing we want to order by and we can either order ascending like this or we can say descending like so.<br>
That's a good part.<br>
And maybe we want to only limit this to however many they pass in, 10 by default but more, right, that's the variable passed in that's the function it takes and we want to return this as a list.<br>
So snapshot this into a list we're going to just return releases.<br>
So is this going to work, first of all, is this going to work?<br>
I think it will probably work.<br>
I'm certain it will be inefficient.<br>
Let's find out.<br>
So we rerun this and just clean that up here and let's go hit this page remember these are all turned off so the only database access is going to be to derive a little bit, if I refresh it what happens?<br>
Sort of works, well it actually worked let's go fix it really quick and then we'll come back and talk about whether it's good.<br>
So here we actually had r in releases and I think we also need to pass that in from our view 'cause even though we called this releases this packages so let's make it a little bit more consistent, releases.<br>
That's not super, p is undefined okay and now we can fix this.<br>
So we have r, now remember r is a package and it doesn't have a name but it has an ID and then r, it doesn't have a version it has a major, minor and build version but it also has a property which we wrote called version text.<br>
So if we go check out version text it just makes a nice little formatted bit out of the numbers and that make up it's version.<br>
And then here want to go to the r and we're going to navigate to its package and then we're going to say summary.<br>
Let's see what we get.<br>
Ooh, is it good, it is good, it's super good.<br>
We were actually able to use that relationship that we built to go from a bunch of new releases back over to a bunch of packages.<br>
Now there is some possible issues here.<br>
We could have these show up twice.<br>
AWSCLI two versions, but maybe that's okay.<br>
We're showing the releases not just the packages.<br>
However if I pull this back up, ooh, problems.<br>
Look at all this database access.<br>
Let's do one clean request.<br>
So here we are going in to our releases and then we go to packages and packages and packages over and over again.<br>
Why is that happening?<br>
It's happening every time we touch it right here, that's a new database query.<br>
Moreover that database query is actually happening in our template, which is not necessarily wrong but to me, strikes me as really the inappropriate place.<br>
In my mind I call this function database stuff happens and by the time we leave it's done.<br>
Well, let's make that super explicit.<br>
Let's close the session here and see how it works now.<br>
It's going to work any better?<br>
Think that's not better, not so much.<br>
It's a detached instance error.<br>
The parent release has become unbound so we can't navigate its package property.<br>
Actually we don't want to do that.<br>
It's okay that we close it here, we don't want more database access happening lazily throughout our application.<br>
Instead what we want to have happen is we want to make sure all the access happens here.<br>
So we can do one cool thing, we come over here and say options, so we're going to pass to this query we can say SQLAlchemy.orm.joinedload and I can go to the release and I say I would like you to pull in that package.<br>
So any time you get a particular release also go ahead and query join against its package so that thing is pre-populated all in one database query.<br>
So by the time we're done running it we no longer need to traverse reconnect to the database for this.<br>
Is it going to work, well let's find out.<br>
Hey it works, that's a super good sign.<br>
All of the data is there and look at this.<br>
Let's do one fresh one so it's super obvious.<br>
That's it, so we come in and we begin talking to the database, we do our select releases left outer join to packages and where it's set to be the various IDs and whatnot and a limit and offset and then this rollback here is actually what's happening on line 18.<br>
So we're just, we started a transaction when we interacted with it and it says okay actually we don't need this anymore, roll it back.<br>
Which is fine you've got to close your transaction either commit or rollback so rollback I guess.<br>
We don't really try to commit anything and we didn't want to so this is good.<br>
How cool is that, huh?<br>
I think this is pretty awesome.<br>
So we've done a single database query we've solved the N plus one problem and we've got our latest releases and we used the latest releases to pull back the package names and the package summaries and so on.<br>
So that we know our database stuff is working efficiently let's go and put these queries back here.<br>
So it's working for real.<br>
Go back and pull up our inspect element.<br>
Remember we're still running the debugger but we should get some sense of performance here.<br>
There we go, 13 milliseconds.<br>
What was it, 11 before, so going and get those releases and those packages in that join barely added any effort.<br>
Now remember we're running the debugger we could probably make this faster still but this homepage is working super super well.<br>
I'm really happy with how everything's coming together.<br>
And if we have true indexes it doesn't matter if we have a decent amount of data our queries should still be quite quick.<br>
All right, awesome, homepage is done.
|
|
|
show
|
9:18 |
The last demo driven part we're actually going to write during this chapter is what happens when you click here.<br>
Right now, it's a little underwhelming.<br>
So notice, we don't even have a link.<br>
But if I were to, you know, hack it in there project/flask or something like that it just says details for flask.<br>
Let's compare that against the real one.<br>
Huh, well, those are not quite the same, are they?<br>
I mean, we've done pretty well on the homepage here going back and forth but certainly not on the details.<br>
And if we click it, it doesn't even go somewhere.<br>
So that's what we're going to focus on in this lecture here.<br>
Well, if we go to the homepage, the index this is easy to change.<br>
This is going to be /project/{{ r.package_id }} Let's just get that working now.<br>
I can click it and it at least takes us to where we intend it to go.<br>
Now, it turns out the HTML here is quite complicated.<br>
We've spent a lot of time already putting the design in there and this is just a variation on that design.<br>
We have the heroes, we have Bootstrap all the kind of stuff.<br>
So I'm not going to go over it again.<br>
I'm just going to copy some over and we can just review it really quickly.<br>
We're going to focus on getting the data back and delivering it to that template.<br>
So, towards that, let's start over here on this page.<br>
And right now we just say package details for some package name, but what we really want is we want to get the package from the package service.<br>
And we'll do something like get_package_by_id or pass package_name.strip().)lower().<br>
Okay, well, that's not so incredible.<br>
I mean, maybe we even want to do a little check here.<br>
So if not package name just so that doesn't crash we might do a return flask.abort.<br>
Status equals 404.<br>
Something like that.<br>
Okay, but let's assume this is working.<br>
And down here now.<br>
And we can go to a query.<br>
It still might not be found.<br>
So we might say, if not package, again, not found.<br>
Right?<br>
They could be they asked for a package, abc one, two, three, it doesn't exist.<br>
So we don't let that to crash.<br>
Now, let's go and have PyCharm write this function.<br>
It's going to be package_id, which is going to be a str.<br>
It's going to turn in optional package.<br>
We're going to import that from typing.<br>
It's optional 'cause, like I said you could ask for a package that doesn't exist in the database.<br>
Super.<br>
Well, how's it start?<br>
How do all of them start?<br>
They all start like this.<br>
And somewhere we say db_session.close probably.<br>
And in the middle, we do things like get us the package.<br>
And the package is going to be, again, one of these sessions.<br>
We're going to create a query a lowercase query of package filter and what we want to do is say package.id == package_id.<br>
And again, maybe this one would want to do that test.<br>
Actually something like this.<br>
It's a bit of a duplication but let's go package_id.<br>
Instead of returning abort, we'll return none which will see it as missing then it will abort it.<br>
And then here we'll just say package_id equals package_id.<br>
That's true.<br>
Okay.<br>
It's a little bit of data protection because that is user input right there.<br>
All right, so we're going to get our package.<br>
Now, if we do it like this, we get a query set back.<br>
Not what we wanted.<br>
All right, we don't a want a query set.<br>
What we want is, we actually want one package.<br>
So we'll go over here and we'll say first.<br>
And that's either going to return the package or nothing hence, the optional right there.<br>
Then we return package, like so.<br>
And we should be good.<br>
We can just do a really quick test here.<br>
And let's just do package.<br>
So this will show that we're either going to get a 404 or we'll get it back and will show its name when we click on the homepage there.<br>
Let's try.<br>
Put down, click on boto.<br>
Details for boto, woo!<br>
We got that from the database.<br>
It's pretty cool, right?<br>
And so super easy.<br>
I mean, seriously, like that is easy.<br>
However, our little package details page actually needs more information than what we have here.<br>
So we go look through this.<br>
You can see we're adding a new style sheet to the top of the page.<br>
And we're having our hero section, it has a id and package this and package that but it also has a handful of other things.<br>
So it wants to work with the releases.<br>
Now this is going to cause a tiny issue that we're going to catch and then improve.<br>
So we're going to have latest version is going to be zero.zero.zero to start, okay?<br>
We're also going to have latest release is going to be None.<br>
And we'll have to say is latest equals true.<br>
So the page adapts on whether or not you have the latest version.<br>
We're just going to say it is for now.<br>
We need to actually have the instance that is the latest release, if it exists and also the text of the version.<br>
So we'll say this, if package.releases remember this is sorted in the order of newest first.<br>
So we can say, latest release is package.releases of zero and latest version is going to be latest release version text.<br>
And we'll just leave is latest is true.<br>
Now the other thing we want to do instead of just returning the string is we want to go over here and say, remember to this?<br>
And we said, response, this was from long ago.<br>
And what was it?<br>
Template file is going to be it's going to be where is it in this folder?<br>
It's going to be packages slash details.<br>
So packages slash details.html.<br>
And then for this part, we don't return that.<br>
We return a dictionary of stuff.<br>
And there's a bunch of stuff that I got to put I here.<br>
So I'm just going to copy this over.<br>
There.<br>
So we have our package, we want to hand that off.<br>
Latest version, latest release whether or not it's the latest.<br>
Let's make this a little bit more obvious.<br>
Pass it through.<br>
And of course, a lot of this could be computed in the template.<br>
That would be wrong.<br>
The template is about taking data and turn it to HTML and not doing all this logic.<br>
It's best to get this as much ready for the view as possible.<br>
Here, we're going to talk about patterns that make this better later but right now it's already pretty good.<br>
Let's just rerun it to make sure we're all good.<br>
Over here and refresh.<br>
Now, what happened?<br>
Why did this crash?<br>
Well, if I didn't do that close inside here my package service, it wouldn't have crashed.<br>
So you might say, Well, just don't do that.<br>
Again, this means that like database query operations and lazy loading is leaking into our template.<br>
So one option is, we'll let it leak and everything will work.<br>
The other one is, well, what do we do up here, we add in one of these joined loads.<br>
We kind of basically need the same thing but in reverse.<br>
Let's put the dot here.<br>
And not there.<br>
So instead of saying I want to go to the release and load the package I want to go to the package and load the releases, plural.<br>
It should've reloaded when I saved, and ta-da.<br>
How cool is that?<br>
Look, it's already working.<br>
Yes, I copied over the HTML and the CSS.<br>
But that's not the hard part, is it?<br>
I mean, maybe it's hard at some point but that's not really the essence of this data-driven app.<br>
So here we've got our pip install boto.<br>
Here's the version.<br>
Is it the latest version?<br>
Yes, that's why it's green.<br>
You can go, here's a project description the release history.<br>
If I want to go to the homepage click on that, it takes me to the Boto3 homepage.<br>
Right?<br>
All this stuff.<br>
Let's see what we get if we put Flask up here.<br>
We have Flask, and we have all sorts of stuff like here's the license.<br>
We go to the homepage, we go to Pallets, and so on.<br>
And we don't have every bit of details in here that the main one does, but good enough for our demo app, right?<br>
This is cool, huh?<br>
We did some query against our database filtered by the ID, got the first one but then realized, oh, we're trying to navigate that relationship.<br>
So instead of doing the in plus one interactions with the database and, you know, leaking and lazy loading let's explicitly catch that by closing it.<br>
And then do a joined load to eager load it all in one query.<br>
That's pretty awesome.<br>
So now things are going really, really well.<br>
There might be times when you don't always want to do this and you might have to have a little flag you pass on whether or not you do this just because if you don't want it it's a little bit extra overhead on the database but generally, given a package, we want its releases.<br>
So I'm pretty happy to just put this right into the main method.<br>
All right?<br>
That's it.<br>
We have our data-driven package page and our homepage up and running.<br>
I'm really happy with the way the site is coming along.
|
|
|
show
|
4:03 |
We've written a few interesting queries and before we're done with this application we'll write a couple more.<br>
But let's talk about some of the core concepts around querying data.<br>
So here's a simple function that says find an account by login.<br>
We haven't written this one yet but, you know, we're going to when we get to the user side of things.<br>
It starts like all interaction with SQLAlchemy.<br>
We create a unit of work by creating a session.<br>
Here in the slides we have a slightly different factory method that we've written, but same idea.<br>
We get a session back, we're calling it s.<br>
We go to our session and we say s.query of the type we're trying to query from account, and then we can have one or more filter statements.<br>
Here we're doing two filter statements.<br>
Find where the account has this email and the hashed password is the one that we've created for them by rehashing it.<br>
And now we're calling one, which gives us one and exactly one, or None, items back and we're going to return that account.<br>
So if you actually look at what goes over to the database it's something like this: select * from account where account.email is some parameter and account.password_hash is some other parameter and the parameters are: Mike C.<br>
Kennedy, and abc.<br>
You'll see that you can layer on these filter statements, even conditionally.<br>
Like, you can create the query and then say if some other value is there, then also append or apply another filter operation so you can kind of build these up.<br>
They don't actually execute until you do like, a one operation, or you loop over them or you do a first, or anything like that.<br>
So here's returning a single record.<br>
Also, it's worth noting that the select * here is a simplification.<br>
Everything is explicitly called out in SQLAlchemy.<br>
The concept is, just give me all the records or give me all the columns.<br>
If we want to get a set of items back like, show me all of the packages that a particular person with their email has authored we would go and again get our session we would go and create a query based on package we would say filter, package.author_email equals this email.<br>
==, remember, double equal.<br>
And then we can just say, all.<br>
And that'll give us all of the packages that match that query.<br>
This one's not going against a primary key so there'll be potentially more than one.<br>
Of course, this maps down to select * from packages, where package.author email equals well, you know, the email that you passed.<br>
Super simple, and exactly like you would expect.<br>
So the double equal filter, pretty straightforward.<br>
There's actually some that are not so straightforward.<br>
So equals, obviously ==.<br>
user.name == Ed, simple.<br>
If you want not equals, just use the != operator.<br>
That's pretty simple.<br>
You can also use Like.<br>
So one of the things that takes some getting used to is these SQLAlchemy descriptor column field the how you type multipurpose things here is they actually have operations that you can do on them when you're treating the static type interacting with the static definition rather than a record from the database.<br>
So here we say, the user type.name.like or N or things like that, and so there's, you know we saw the descending sort operation on there as well.<br>
So if we want to do the Like query, this is like find the substring Ed in the name, then you can do .like and then pass the percent to operators as you would in a normal SQL query.<br>
If you want to say, I want to find the user whose name is contained in the set Ed, Wendy or Jack, then you can do this .in_ remember the underscore is because in is a keyword in Python, so in_.<br>
If you want to do not, not in, this kind of a not obvious but you do the Tilda operator at the beginning to negate it.<br>
If you want to check for Null, == None the And you just apply multiple queries.<br>
The Or doesn't work that way, if you want to do an Or you've got to apply a special Or operator to a tuple of things.<br>
So here are most of the SQL operators in terms of SQLAlchemy.<br>
You can do a lot of stuff with this.<br>
It's not all of them, but many of them.
|
|
|
show
|
0:44 |
Databases are really good at filtering and ordering.<br>
Here is a function, find_all_packages and the idea is I would like, ideally a list of all the packages in the database showing the newest ones first and the oldest ones last.<br>
So we're going to do a query on package and we don't do any filtering because like we said the in name, we want them all.<br>
But we are going do an order_by so we say, query of package.order_by and then we always express these operations in terms of the type, so package.created If we just said package.created it would order ascending by the created_date but we want descending, so we go into that descriptor created and we say .desc we call the function to reverse the sort, and then we just say give us all the packages, here they come.
|
|
|
show
|
0:49 |
In order to update existing data we start like we always do, we get a session.<br>
And then we retrieve one or more records form the database.<br>
Here we're just getting one package.<br>
When I get this package back, and if we make changes to it so we set the author value to a new name we set the author email to a new email SQLAlchemy will track within the session that that record is dirty and it needs to be updated because we've changed some fields.<br>
And then, when we're ready to actually save it push all the changes back.<br>
I could apply this to as many entities as we'd like it doesn't have to just be one.<br>
Then we're going to commit the unit of work and it's going to look at the changes do all the changes in a single transaction back to the database.<br>
We use the unit of work to do our updates just like we do the inserts.
|
|
|
show
|
1:59 |
We saw relationships are extremely powerful and let us imagine as if our code and data were just connected, almost hierarchically the way we would in a regular Python program connected not split apart like we do in a database.<br>
The way we define these we add an orm.relationship field to the class so here we have releases so the relationship is against the release type that we're speaking in terms of SQLAlchemy entities, not database and then we're going to do an order_by this can either be a single thing or a list.<br>
Probably an iterable actually.<br>
And so, we're going to pass that in and then we're going to say it back populates package.<br>
What does that mean?<br>
We want this relationship to work in both directions so if we have a package we can see the releases and if we have an individual release.<br>
We can see the single package that it corresponds to.<br>
So, over in the release we're going to do the package_id value to actually store the relationship like we would store any value that's a string or an integer whatever it corresponds to in that other field.<br>
And then we're going to say this is a foreign key and in the foreign key part we speak in terms of database, packages.id.<br>
But them we also would like to establish that relationship so we say there's ORM relationship for the package type from release back to the package and it back populates releases and it's called Package so you can see the symmetry here not too hard to set these up once you have an example.<br>
Put them side by side you go okay, here's where I fill in the pieces for my particular dataset and then you saw that when we load a package it doesn't actually load the releases unless we interact with it.<br>
So, if we touch it it'll go back to the database and do the query.<br>
We also saw that if we create new releases and put them into the release package.releases well, it becomes a list and commit those changes that'll actually insert the releases.<br>
We work in the same but in the reverse as well if we had set the package on a release so it's sort of bidirectional in that sense.
|
|
|
show
|
0:37 |
We started off this chapter by demoing how to insert data.<br>
Let's actually summarize now here at the end.<br>
So again, we're going to create a session which is the corresponding unit of work bit of syntax in SQLAlchemy.<br>
Then we're just going to allocate some objects so here we're going to create a package and set its ID and its author maybe create some releases set the release, not package value other properties similarly relates to set its package, we're going to add the package call commit, whoosh!<br>
All three that are seeing this because of the relationships get inserted into the database; super easy!
|