|
|
|
14:25 |
|
|
transcript
|
1:03 |
Welcome welcome welcome, to modern API's with FastAPI. I hope you're super excited about FastAPI. I am absolutely excited to teach it to you. To me, this is the most exciting Python web framework I've seen in a very long time. FastAPI builds on all the great work that frameworks like Flask have put in place, these simple micro-framework models, or styles of building web applications. But it does it with a special flair, a special touch of all the modern Python features. So you'll see that FastAPI is a web framework for building Python web applications, that's high performance, easy to learn, fast to code, and ready for high end production. Of all the new frameworks out there, I am certainly most excited about FastAPI, and I think as you go through this course, you're gonna be excited about using it as well. Easy to work with, but at the same time you get to use all the cool modern features of Python, meaning fewer errors, faster to code and so on. I'm looking forward to us getting started with FastAPI together.
|
|
|
transcript
|
3:25 |
Why is there so much excitement around FastAPI? Well, let's go through just some of the things that make it special. FastAPI is one of the fastest Python web frameworks available. In fact, it's on par with the performance of things like Node.js and Go, and that's largely because it actually runs on top of something called Starlette, a lower level web framework, and uses Pydantic for data exchange and data validation. So, when you think FastAPI, you can think fast to execute, fast to run. But that's not the only fast that matters, is it? One of the most important ways to be fast is to create applications fast and not spend a lot of time building them. So it's also fast to code because FastAPI does many of the mundane type of things that you would do in a web application, automatically for us, and some estimates have put it the speed of using FastAPI over things like Flask and Django at 2 to 3 times faster. That's because we can do things like just a API method and say it takes some kind of class, one of these Pydantic models, and it will automatically look and make sure all the stuff that that class says it must have is there, the types the class says it must take are either there or automatically convertible to there, so you have a class that's a location, it has a city and a state, well, it better have a city and a state, and those are gonna be strings that can be converted over and so on. So a lot of the work around like validation, data exchange, documentation, all of that is largely automatic, so you're not gonna have to spend time writing that code. Also, when you don't write code and stuff happens automatically for you, that means you might not be writing bugs. So there's also about 40% less chance of an error because you don't have to write as much validation and data exchange. Also, because of the type hints, it deeply embraces this idea of teaching the editors what type of data is being exchanged. You're passing rich objects to the API methods, all the various parts of the API itself, the framework itself, have type hints, so editors know what to do and give you automatic completion everywhere, less time in the documentation, less time debugging. It's also designed to be easy to use and learn. If you know Flask, you will be pretty close to knowing FastAPI actually, and there's not a whole lot of code you have to write. So not too much to write, as well as not too much to learn, less time reading docs, also, because of the great editor support. When we create our API's, we'll put parameters in there saying "it takes this kind of data, returns that kind of data, and it has this type". Because of all the automatic stuff that's happening for us, you'll see the framework is actually doing multiple things, like ensuring the variable is there, doing automatic type conversion, and so on. So again, less code duplication, fewer bugs. And, it comes with a production ready web server built on Async and await, so you get the highest performance production grade servers, you can just drop right into production. One of the challenges with building HTTP based API's is there's zero documentation. What's supposed to be exchanged? Who knows? Just go out there and read the docs and play with it. But with FastAPI, it automatically uses what was known as "swagger", OpenAPI, to generate documentation for all the API methods, what data is exchanged through JSON schema, and things like that. So it's really, really nice that we get automatic documentation by simply writing our program. Nothing else. So, these are just some of the reasons to be excited about FastAPI, and we're gonna explore all of them throughout this course.
|
|
|
transcript
|
2:05 |
The title of this course is "Modern API's with FastAPI". And that's no coincidence. Let's talk about some of the modern Python features that FastAPI uses to allow us to create nice, modern, Python API's. We've talked about type hints. Type hints are used all over the place. We can say, here's an API method, It takes an integer and an optional integer, It will automatically do that conversion. But with Pydantic, It actually takes this much farther as well as throughout the whole framework it has type hints on its types so you don't have to go to the documentation to figure out what's happening. It's async and await first. There's basically nothing you have to do to make FastAPI async friendly or async capable. All you gotta do is write async a few methods and use async and await within your implementation and you're done. The web server it comes with is one of these ASGI servers, so it automatically knows how to run async enabled frameworks perfectly. So you get great scalability anytime you're waiting on an external system; be that a database, another web service call, a cache, any of those types of things. Also, it takes the idea of data classes and pushes them even a little bit farther with Pydantic classes. These are ways to describe how your data is supposed to be exchanged in terms of classes with type hints, and then do that exchange and conversion automatically with Pydantic. And then the documentation is generated automatically for us and conforms to the OpenAPI documentation standard. The API's are super easy to test, so testing your code with pytest is very, very straightforward, especially because all the strongly typed data exchange that you see living in the actual API definition. So you can just call those functions and off it goes. And also because of the type hints, we get rich editor Support. Editors like PyCharm and VS Code know how to read type hints and then give us all the auto complete information we need so we're not diving around in the docs and asking questions "what's available here?", you can just look in the editor and just keep on coding. Here's a bunch of the reasons, or a bunch of the aspects of modern Python that are leveraged in FastAPI.
|
|
|
transcript
|
3:13 |
One of the questions people always ask is "Which Web framework should I use for building an API? Should I use flask? Should I use Django? Should I use Django REST framework?" like, all these different things. So let's take a moment and look at FastAPI versus other frameworks, real briefly. Well, the big two have got to be Django and Flask. Django has Django REST framework. Flask has some REST-ful extensions, you can add to it. But here's the thing, FastAPI is an API framework first. It's an async framework first. It automatically creates documentation with openAPI documentation, all those things. So it's built specifically to be what it is, an API framework, where as Django, yes it also does API's, but that's not it's main goal. Flask also does API's, but it's not got all that infrastructure there to help you make it go fast. Oh yeah, and both Django and Flask don't fully embrace the async and await style programming. At the time of this recording, Django is working on it, Flask has plans that are not really there yet. So, if you want a modern API and you're starting from now, you're starting from scratch, your starting now, why not choose the most modern framework that has some momentum behind it? We also might compare it to Pyramid or Tornado. Pyramid, I love Pyramid. I think it's a great framework, but it does not, and has no plans to, support async as far as I know. Also, it's more on the web, less on the API framework side. Pyramid's great. There's a lot of things I like about it and I actually created some open source libraries to bring those features that I like about Pyramid to FastAPI, but that sort of not exactly the main topic of this course. But Pyramid, nice. Tornado, Tornado is interesting because it's one of the few frameworks that embraces the async and await style of programming. But FastAPI is the modern version of Python's async. And also there's other specific API frameworks, right? So Django, Flask, all these, they're about building Web apps. They can also build API's. Hug, for example, built on Falcon, is one of these frameworks that's specifically about building API's. "Embrace the API's of the future", the happy Koala hugging bear things says. And Hug is actually nice, but the guy who created Hug actually talked about his admiration for FastAPI and how it's really, really special. Let's look at one more aspect of these here. Programming is not exactly a popularity contest, but when things are popular, that means there's more momentum behind it, there's more other tools to go with it, there's more tutorials and whatnot, so let's just look at the number of GitHub stars around each of these. So, Django: 54,000, Flask: 53,000, Pyramid: 3,000, Tornado: 20,000, Hug: 6,000. You look at FastAPI, It's at 22, 23,000 right now. What's interesting though, you might say, Well, "it's less popular than Django and flask", Yeah, it's only been around a year and a half, and Django and Flask have been around like 10 years. So, that tells you a sense of just how popular FastAPI is. It's way popular more than all the other ones below that have been around a while. But even for the big hitters, it's like halfway there, 1/7, 1/6 the time it's been around, so really, really exciting. There's so much momentum behind FastAPI and I do think it's because of this modern aspect that we've talked about.
|
|
|
transcript
|
2:29 |
Let's take just a moment and talk about what we're going to cover in the course. Instead of going chapter by chapter by chapter, just these are the bullet points of what we're gonna talk about. I just want to set the stage for the big ideas we're gonna cover and we're gonna weave them in and out throughout the various chapters. We're going to start by building a simple API, and I really want you just get a sense of like, here's the essence of FastAPI before we get into any of the details, so right away we're just gonna build a simple API. And then we're gonna explore these language features, these modern Python language features. What is Pydantic? What is async and await and how do you use it? All those things, type annotations, type hints, we're gonna explore the language features so you're in a position to absolutely take advantage of all of them as we go through the rest of the course. We're gonna talk about Pydantic in particular because it's such an important way to model the data exchange and the data validation. So we're gonna focus big time on Pydantic. Also, one of the things that FastAPI doesn't make immediately obvious is how do I actually have a web page? So if I build an API, it has this data exchange and not everything is even executable within a browser, potentially. You could have something that requires a post, or a delete HTTP verb, which is hard to make the browser do without a little bit of a plug-in or something, right? You just can't click the links. You'll see that we can use the same templating language as Flask has, Jinja, to actually write and serve static HTML or dynamic HTML even and then static files. So you could add a little bit of the functionality of what Django or Flask brings by default. You could do that in here is well, we're gonna focus on making that possible. So instead of having two different frameworks, one for your API and something for the Web page part, you could just do it all in FastAPI. After we get all this set up and in place, what we're gonna actually do is build a much richer application that we're gonna build throughout the rest of the course. We're gonna focus on building a rich, full featured API that takes advantage of data exchange, data validation, async and await, calling external services, all that kind of stuff. And then we're going to round out the course by taking that full featured API that we're going to build and deploying it out on the Internet on a virtual machine. So we'll take you through all you gotta do to set up Linux to run production grade FastAPI applications out there on the Internet in some cloud host. So much exciting stuff here, really looking forward to going through it all with you and so these are a lot of neat ideas, and we're gonna weave them through the course as we go through the content.
|
|
|
transcript
|
0:48 |
What do you need to know to take this course? Well, simply put basic Python. So we're assuming that you know how to write core Python. You can create functions, you can work with strings. We do talk about the advanced modern Python language features and how to put those into web applications. So we don't necessarily need you to know those, but you should have some familiarity with Python itself because we don't start from absolute the beginning and some basic understanding of HTTP. How HTTP works, how to exchange HTML, what HTTP verbs and so on. We do touch on that as well, but again, we don't go super deep into it. We just sort of talk about the aspects. So these are the two expectations that we assume. Maybe you can get away with less with a little extra research, but hopefully you know a little bit of Python at a minimum to take this course.
|
|
|
transcript
|
0:39 |
You might have been wondering, Who is this guy talking to you? It's Michael. Hey, I'm Michael Kennedy. Nice to meet you. Here I am. You can find me on Twitter where I'm @mkennedy. You may know me from the Talk Python To Me podcast or Python Bytes podcast I host with Brian Okken. I'm also the founder and one of the principal authors over at Talk Python Training. So I've been doing a lot of work in the Python space for a long time and all these different outlets give me a good view into what is important and what is happening in the Python space, and FastAPI is definitely coming up more and more often as an important part of the ecosystem throughout all of these areas. Great to meet you. Looking forward to doing this course with you.
|
|
|
transcript
|
0:43 |
Finally, before we get your machine set up and dive in to writing code and fully covering FastAPI, I just wanna let you know, I recently did a podcast interview with the creator of FastAPI, Sebastian Ramirez, over at Talk Python. So, it was called "Modern and FastAPI's with FastAPI" recorded october 4th 2020. So, if you wanna listen to the creator and me have a conversation about how it compares to these other frameworks, why he created it, and a whole bunch more, just visit "talkpython.fm/284" and listen to it, you know, throw it on while you're driving somewhere in the car, doing some housework, It'll definitely get you motivated to go through the rest of this course and take advantage of this cool thing that Sebastian built.
|
|
|
|
4:50 |
|
|
transcript
|
2:17 |
In this short little section, what we're gonna do is talk about what you need to get your machine set up to follow along. And throughout this course, I strongly encourage you to build the application you see being built during the course and to play around with slight variations of that. In order to do that, you're gonna need a few things set up on your system. First of all, would it surprise you to know that you need Python to build a Python Web framework, or build apps with the Python Web framework? Of course not. But specifically, you're going to need at least Python 3.6, so if you have something less than 3.6 it's just not going to run. FastAPI has a minimum Python requirement of Python 3.6 and honestly, the newer the better. This course, we're gonna be using Python 3.9 throughout the course. You might wonder, well, I think I have Python, but not sure, do I? You can check on Linux and macOS. You can type "Python3 -V" and get Python 3.8, 3.9, hopefully something new. If that's below 3.6 or it doesn't come back with anything, You gotta get Python. Over on windows, It's a little more complicated because sometimes there's a Python and Python3 command, sometimes there's just a Python command. Python is your best bet, so type "Python -V" and if you get output that says "Python like Python 3.8, 3.9", you're good to go. But if you run this and you get no output and yet it doesn't crash, that means that Python is not actually installed. There's this shim that Microsoft has put into Windows that if you just type Python alone it will launch the installer to go find it on the Windows store and potentially install it. But they've made this oversight where if you pass command line arguments to it, all it does is nothing, doesn't launch the installer, doesn't say I'm not really Python, It doesn't give a version. So be really careful. If it does nothing, you don't actually have Python. But if it gives you some output like this, you're good to go. Finally, if you need help installing Python, check out "realPython.com/installing-Python" they've got a guide that they're keeping up to date over there. Personally, On macOS, I use Homebrew to install Python 3, 3.9 currently, and then on Windows I use chocolatey, but you can use whatever systems you want or whatever mechanisms, There's actually a lot of ways to do so, so check it out of here at "realPython.com/installing-Python"
|
|
|
transcript
|
1:41 |
We're going to pick an editor and use it throughout this course, as you can imagine, we gotta have an editor of some sort. I'm going to use PyCharm. It's absolutely my favorite editor for working with Python projects, especially larger ones like the one that we're gonna work with here with different types of files and so on, on the Web. Now, PyCharm comes in both a free and a pro edition. The free one is free and open source, The pro one is paid, it's not too much for a personal version, but many people don't want to buy PyCharm, and that's totally fine. There's no need to. You can 100% use the free community edition for this course, and it'll be fine. There's literally four lines of code that you're gonna see me write or would have to write that with the community edition you will not get auto-complete, and with a professional edition, you get limited auto-complete. That's the only difference. So no problem about using the free version. If you do want PyCharm, I recommend you get it through the toolbox app. If you install the jetbrains toolbox, you can install multiple apps, it automatically updates them, you can cycle between versions, there's a lot of cool things, it auto updates, a lot of cool things that happen by installing this. So, if you're gonna go with that path, go with the toolbox. Finally, if for some reason you don't want to use PyCharm, the other really good editor these days is Visual Studio Code. Now, when you get Visual Studio Code, it doesn't come by default ready to work on Python. But if you go to the extensions by clicking that little box and you get Python right there, click "Install Python" and also install PyLance after that and then you'll be in good shape. Those two addons make working with Python code in VS Code quite good.. Not PyCharm good, but pretty close. So pick one of those two editors and make sure you're set up and ready to use it, you're gonna follow along.
|
|
|
transcript
|
0:52 |
Finally, make sure you get the source code and you take it with you. Over here on GitHub at "github.com/talkPython/modern-apis-with-fastapi" dashes between it, is where the source code is. You can clone this repository with Git, if you're a friend of Git, but if you're not familiar with Git or you don't have installed or just don't use it for some reason, No worries. Just see that green button? Click that, there's a way to download a zip file, you'll get the same thing. So, make sure you go over here. If you do have a GitHub account, star it and consider forking it so that you have it there to take with you. Many of the things we're starting from scratch and building on the screen, and everything you see me type on the screen will be saved in GitHub. But every now and then, you might want to just jump into the middle and grab some of the code to work with. So, this is the easiest way to do that, just get it off GitHub. Once you get the source code, be sure to follow along, you'll get a lot more out of the course that way.
|
|
|
|
30:58 |
|
|
transcript
|
0:50 |
It's time to write our first FastAPI API. We're going to create a simple application that will actually show us a ton of the moving parts of FastAPI. Now, because I want to just focus on getting everything set up, I'm gonna first have us build a simple little calculator API. You'll be able to submit a couple of numbers that will do some simple math. The programming will be as basic as it gets. But what will not be basic will be all the things around FastAPI we're doing: the types being passed in, the validation, the required fields, the error reporting, all of those types of things. We're going to focus on that and then going to come back for a second iteration and build a much more interesting and complicated API that would be, well, more realistic. But let's start by building a really cool calculator app.
|
|
|
transcript
|
3:49 |
Now for us to build our application, we need to create a new web project. Now, almost every web project that I know of depends on external libraries and anytime you have a Python library or Python application that depends on external libraries, you're gonna want to start by creating a virtual environment. And of course, this is no different. So that's what we're gonna do. here we have the demos, and right now we only have chapter three. Of course, all the chapters will be here by the time you're watching the course. Let's go over here, this will let me just pop open a terminal right there. And what we're gonna do is we're gonna create a virtual environment. So I'm gonna say "Python3 -m venv venv" and now we're gonna activate it. So on Windows, you would activate it just by saying "venv/scripts/ activate" But on Mac and Linux, you say dot, to apply it to this shell, then "venv/bin" why is it bin not scripts? Take that up with someone else. I have no idea. But we're gonna activate it like this and you'll see our prompt change either way, where it says now you're in this virtual environment. We can ask things like "which Python"? Yep, it is the one that we're working with. Another thing we wanna look at is by default, whenever we create a new virtual environment, there's a 95% chance that pip itself will be out of date. So let's just go ahead and upgrade that real quick as well. I'll just go and do these things next time and not run you through it, but first time through, I want to talk about it. Alright, everything looks like it is good and we have our virtual environment. Let's go ahead and just come over here and open this in PyCharm. Now on macOS, you could drag it onto the icon. on the other OS's, you just go to PyCharm, say "file, open directory" or Visual Studio Code, and open that directory as well. Alright, so notice down here, it says "no interpreter". There's a chance that it might pick the right one. Let's go and see which one it's after. This seems to always change, it's super frustrating, and the way it works, like Sometimes it works and finds the local one we created, sometimes it doesn't. This time it didn't. So we're gonna say go to our home directory, go to venv, bin or scripts, pick Python. Okay, now it looks like everything is working. It's gotta read through Python real quick just to make sure it understands all the types and then we'll be ready to get going. Next up, let's go and create a "main.py" That's pretty common in FastAPI to have a main that we're going to run, and I'm just going to right click and say "run" to make sure everything's working. Okay, the last thing we need to do is we're gonna need to be able to use FastAPI. And if I go and run this again, then it's not so happy about it, right. The last thing we have to do is install FastAPI, and we're going to keep track of our dependencies by having a "requirements.txt", and in here, we're gonna put "fastapi", for now, we're gonna have a bunch more later, and of course it's suggesting it could install it for us, but I'm just going to go to the terminal and show you what we would run more generally would say "pip install -r requirements.txt" with the virtual environment active, we get all the dependencies of FastAPI at this time. Alright, It looks like everything is good. I think it believes it's misspelled, which is unfortunate, but you could tell it to stop showing you that. And let's just do a print, "hello FastAPI" and run this. Alright, Perfect. So it looks like we've got our system set up, ready to run Python or running Python 3.9 at the moment. If you're unsure which version you got, you can come down here. We have 3.9.0 at the moment, but again, anything from 3.6 or beyond should be fine for what we're doing and were able to install and import FastAPI. So I think our app is ready to, well, begin writing it actually.
|
|
|
transcript
|
5:17 |
Well, this was fun, but "hello FastAPI" is not exactly what we were hoping. We were hoping to build a web application that our programs and other services could talk to. So let's go and build that. Now, if you've ever worked with Flask, FastAPI is sort of a Flask derivative style of API. It's not the same, but a lot of your intuition will work for it there. So what we're gonna do is going to create, either call it "app", or I've also seen it called "api", let's go with "api". We'll come over here and say "fastapi" and want to create a instance of FastAPI like that. We'll drop that magic there. And then we're going to define some function. This is gonna be an API endpoint. So we're gonna have a calculator, and we'll just say "calculate" like that and let's say it's gonna do something incredible like return two plus two. And then in Flask you would go over here and say "run", but that's not what happens here. What we need to do is provide an external server and there's a really awesome production level high performance one recommended here, and we're going to use "uvicorn". Now, notice there's an error here because uvicorn is not necessarily included when we install FastAPI. So that's the next thing, to go over here, again It's not misspelled. This time, I'll just press the button and let it do the install. You'll see it happen down at the bottom, and we're good. Now that's up there. And so then we just say "uvicorn run" and we pass it the api. That's it. Except how does it know that calculate has anything to do with this, and what URL should we use anyway? So the last thing we're gonna do is come over here and say "api dot" now be careful. If you've been doing flask, you might type route. That's fine. But what you really wanna probably say is, I wanna only respond to get requests, http get requests, and then we'll pass over, you can see there's a few options here, a lot of stuff going on, but our initial usage is simple, we're just gonna want to do a get against "api/calculate" like this. Alright, now, let's try to run it and see what happens. So let's just open this up and see what we get. Now, this is not the most encouraging response here. What is the response? Not found. Well, that's because nothing is listening on just the forward slash, like the basic url. So we're gonna have to go to "api/calculate" We can fix this, like opens as a crash sort of thing in a minute but, calculate, spelling is hard, but once you get it right, yes, look at that, 4, the answer is 4, and maybe we want to respond with some sort of JSON, right? That's how API's are. So we could come over here and we could say "result =" let's just say, here we go, we're gonna calculate the value then we're gonna store it into this thing that we're gonna return, and actually, let's go ahead and inline that right there, so we'll just straight up return that value, that dictionary, there. So we'll do our work and then we're going to return the dictionary. Run it again, and now you can see if we go look at the raw data we have proper JSON. So when you're talking to API's, it probably makes sense to have some kind of schema, some kind of data structure rather than returning just the number four or some string. Not always true, but generally it's a good idea. So we'll just start doing that here and we'll build on that, of course, as we go along throughout this course. So that's it. Let's just review real quick what we've got to do. We import FastAPI, we create an instance of the API, and on there we use that to decorate the functions, in this case we say we have a "calculate" function and it's going to handle requests to "/api/calculate" and right now, it doesn't take any arguments. We're gonna work on that. But right now, it just says, "Well, okay, you want some calculations? How about two plus two? That's cool". And we'll pass that back. Then we're gonna return this dictionary, which is automatically converted to JSON, and also, if you look over here and we go to the network and we do this request, and we look at this one, you can see that the response content type assumes that it's application/json. So it says this is JSON, which is all the more reason that the actual thing that we get over here should be JSON, not just the number four. So it automatically returns this as JSON if we passed the dictionary there by default, and then in order for our application to start, we're gonna come down here and say "uvicorn, run this application". And we could also add in here "port", I'll explicitly call out what is the default value so you can see if you want to adjust them. Here we go. That way if you saw, even if we put like a 1 here it'll listen on port 1 and so on, or 8001. Cool. Alright, so this is simple, right? This is incredibly simple to build a high performance api and get started, we just have to have a project, set up the dependencies FastAPI and uvicorn, create a simple method and call uvicorn run. Done. You've built an API. Pretty awesome, right?
|
|
|
transcript
|
0:45 |
Now that we've built our first FastAPI endpoint, let's just review what it takes to get a minimal API endpoint up and running in an application. Pretty simple. So we're gonna import FastAPI to use FastAPI and then we have to have a server to run it, so we're gonna use uvicorn, and we create an instance of the FastAPI object, calling it "api", create a function, some kind of method that we're going to call, and we're gonna decorate it with http verbs and their configuration. So an http get against api/calculate will run this right here. And then we just say "uvicorn.run" we pass it the API object, we say the host and we say the port and that's it, we're off to the races. We have our app up and running.
|
|
|
transcript
|
3:09 |
You can see that working with http verbs: get, post, put, and so on, all of those things are right up in front when we work with building API's with FastAPI, and understanding what verbs are out there and when they should be used is really important when you're building REST-ful API's. So let's just take a moment and talk about the four most common http verbs. There are others that we're not gonna mention here, you can go Look at this link at the bottom to see them all. The one that everyone who has interacted with a computer on the web is familiar with is "get". So get is just give me the information of this resource. Like, anytime you're using a browser, most things you're doing are just click a link, do it get. so the get requests a representation of a specified resource, in our case the result of that calculation, and it should only be used to retrieve data. One of the really important ideas around get is that it's supposed to be potentially cacheable, whether or not you access it multiple times or whatever, it shouldn't change the state of the system. There was a really interesting bug in Wikipedia way, way, way back in the early days when there was a delete button, actually had a just a get request to delete a resource, and then the web spiders like Google went through and started trying to index Wikipedia and started following those links and started deleting the pages. So, yeah, don't do that kind of stuff. Get should just return things. Think of get as "read only". If you wanna change something, if you want to modify something, use "http post". This is to submit some new object, some new data, which is going to cause a change in the server, potentially. So if you're gonna log in, you're gonna create an account, you might submit your username and your password that you want to create the account with. And of course, the state that's being changed on the server as well now there's a new account with that username and password that you can log in. Delete, similar to post in that it modifies things, but if I want to remove a resource, so if I had like a bookstore and I had "/books/book_7" and we decided, you know, we don't want book seven anymore, then the API could set it up so I do a delete request against that URL, against "books/book_7" and the server could respond by deleting book seven, no longer there. Also similar to post is we have put. Now with post you say "I have some data, I want you to create it on the server". Probably what comes back is "Great, I created this, and here is where it lives". But if you already know where you want it to be in terms of the URL, think of like a blog post, a blog post you might already know the url where you want your blog post to live, but it doesn't yet exist, you could do an http put and say "I would like to make this location have this blog post", right? You don't let the server control where the thing gets created, you say explicitly "server Put it here". This is not nearly as common as post, but sometimes you'll see it used. These are the four most common http verbs as far as writing API's and you know explicitly making them part of your API. There are a bunch of others, like I said, at the bottom, you can check out, but get for read only, post for making changes, delete to delete, put if you know where it's going.
|
|
|
transcript
|
2:14 |
http verbs are what the client is instructing the server to do and telling what the server to do. But the server has an ability to talk back to the clients say "yes, that worked" or "no, that wasn't okay because of this", or "you don't have permission". So the way the server communicates that is with http status codes. So if you are not super up on your http status codes, you're gonna need to really get those a few of those figured out to see exactly what you should tell all of your clients. So a really good place to go is "httpstatuses.com" statuses not status. There we go, http status codes. Now, This is a really cool site because it doesn't just have them grouped and categorized, but it has details. So before you saw we got a 200 OK when we did a request for our calculate. If you click on this, you get all sorts of information about when you should do that, how you should do it okay, so get represents, it's a good thing to return for a get If here's a proper representation. The payload sends a 200 response. It depends on the request method. The meaning is basically "that worked" or this is the same as get but no data and so on. Now, if you come down here, you can even see, like, some of the places you might use it. There's like constants in Python, like "http.HTTPstatus.OK" And you can use those if you like. You can also come down here and we could see created. This is much more common for a http post. You know, once you've done a post like hey, that worked, I created it, And then you're going to say where it was. So all the 200's, these are good. Over in the 400 section is another place where you definitely wanna look. So bad request. Bad request is awesome because it means you passed some data, like invalid data, or some other thing that's not good, so we're not going to process that. We come down here and say "you don't have permission to do it", or "this data was unacceptable", so on. And then finally, the ones we hope we don't see too much of are the 500 internal server errors. So this is like the server crashed or some part of our infrastructure couldn't get to another part, NGINX Couldn't talk to Gunicorn, one of those types of things. Definitely look through here when you're thinking about what should I send back to answer this request, especially if there's something that went wrong. What should I send back? "httpstatuses" is a great place to go Look.
|
|
|
transcript
|
2:59 |
So our calculator API is working. If we open it up down here, let's see what we got. Remember, we have a not found, but if we go to "api/calculate" we're getting this data back and it's 4. Well, how exciting and how generally useful is this calculator? Not at all, right? All we're ever going to get is 4. So the answer is always 4. Maybe it should have been 42, but 4 it is. So let's go and change this so we can pass some data in. Now let's say we take an "x, y, and z", those are the three things we could pass in, and the value is gonna be "x + y" like, for now we'll do times, maybe we'll do divide, It will let us do something slightly more interesting in just a moment. So we could go over here, and if we run this again, we come up and say "?x=2&y=3&z=10" What are we going to get here? Are we going to get, what did we say? X plus y is 5, and then times 10 it should be 50, are we gonna get 50? Let's find out. No, we got nothing. So we cannot multiply sequence by a string. Wait a minute. What's going on here? Let's take away the Z for a minute. Try that again. 23, 23 as a string. If you look at it real careful, notice right here, there are quotes, that is not an integer in JSON, that is a string. So what's the problem? The problem is, everything passed around on the Web is strings by default. But something needs to say "no, no, no. We expect this to be an integer". So if I go over here and I change this and I use type hints, you say this is an integer and this is an integer and we say this is an integer. Let's do this again. Also notice it didn't say anything about any of these values being required. But now, let's try it again. Well check it out. We got the value 5, and if we look at the raw data, it doesn't have quotes, it's really 5. And let's go back here and put our times z, run it again, Yes, we got 50. Okay, this is working pretty well. What happens if I omit Z? Look at that. We got an error message and if we actually look exactly what we got, it says "there's something wrong with the query string" and there's a Z that's supposed to be in there. But there's no Z in the query string, but we expected one, and the problem is the Z is required and the type of errors is that it's missing. So let's put our Z back. Okay, so you're gonna see when we pass these over, If there's no default value and there's no optional value, things like that, these become required. But we could say over here that this is a 10. Here we go. Now, we don't have to specify the Z because there's a default value for it. But if we do for the omit the y where there is no default value then hey, guess what? y is missing. We gotta pass it over. Alright, cool. So this is how we pass data at least from the query string as well as you would see the path, like we could do like X, Y like this and make that part of the URL, doesn't have to be the query string, and you would be doing this exactly the same way. Okay, so this is how we pass data over to our API method.
|
|
|
transcript
|
1:12 |
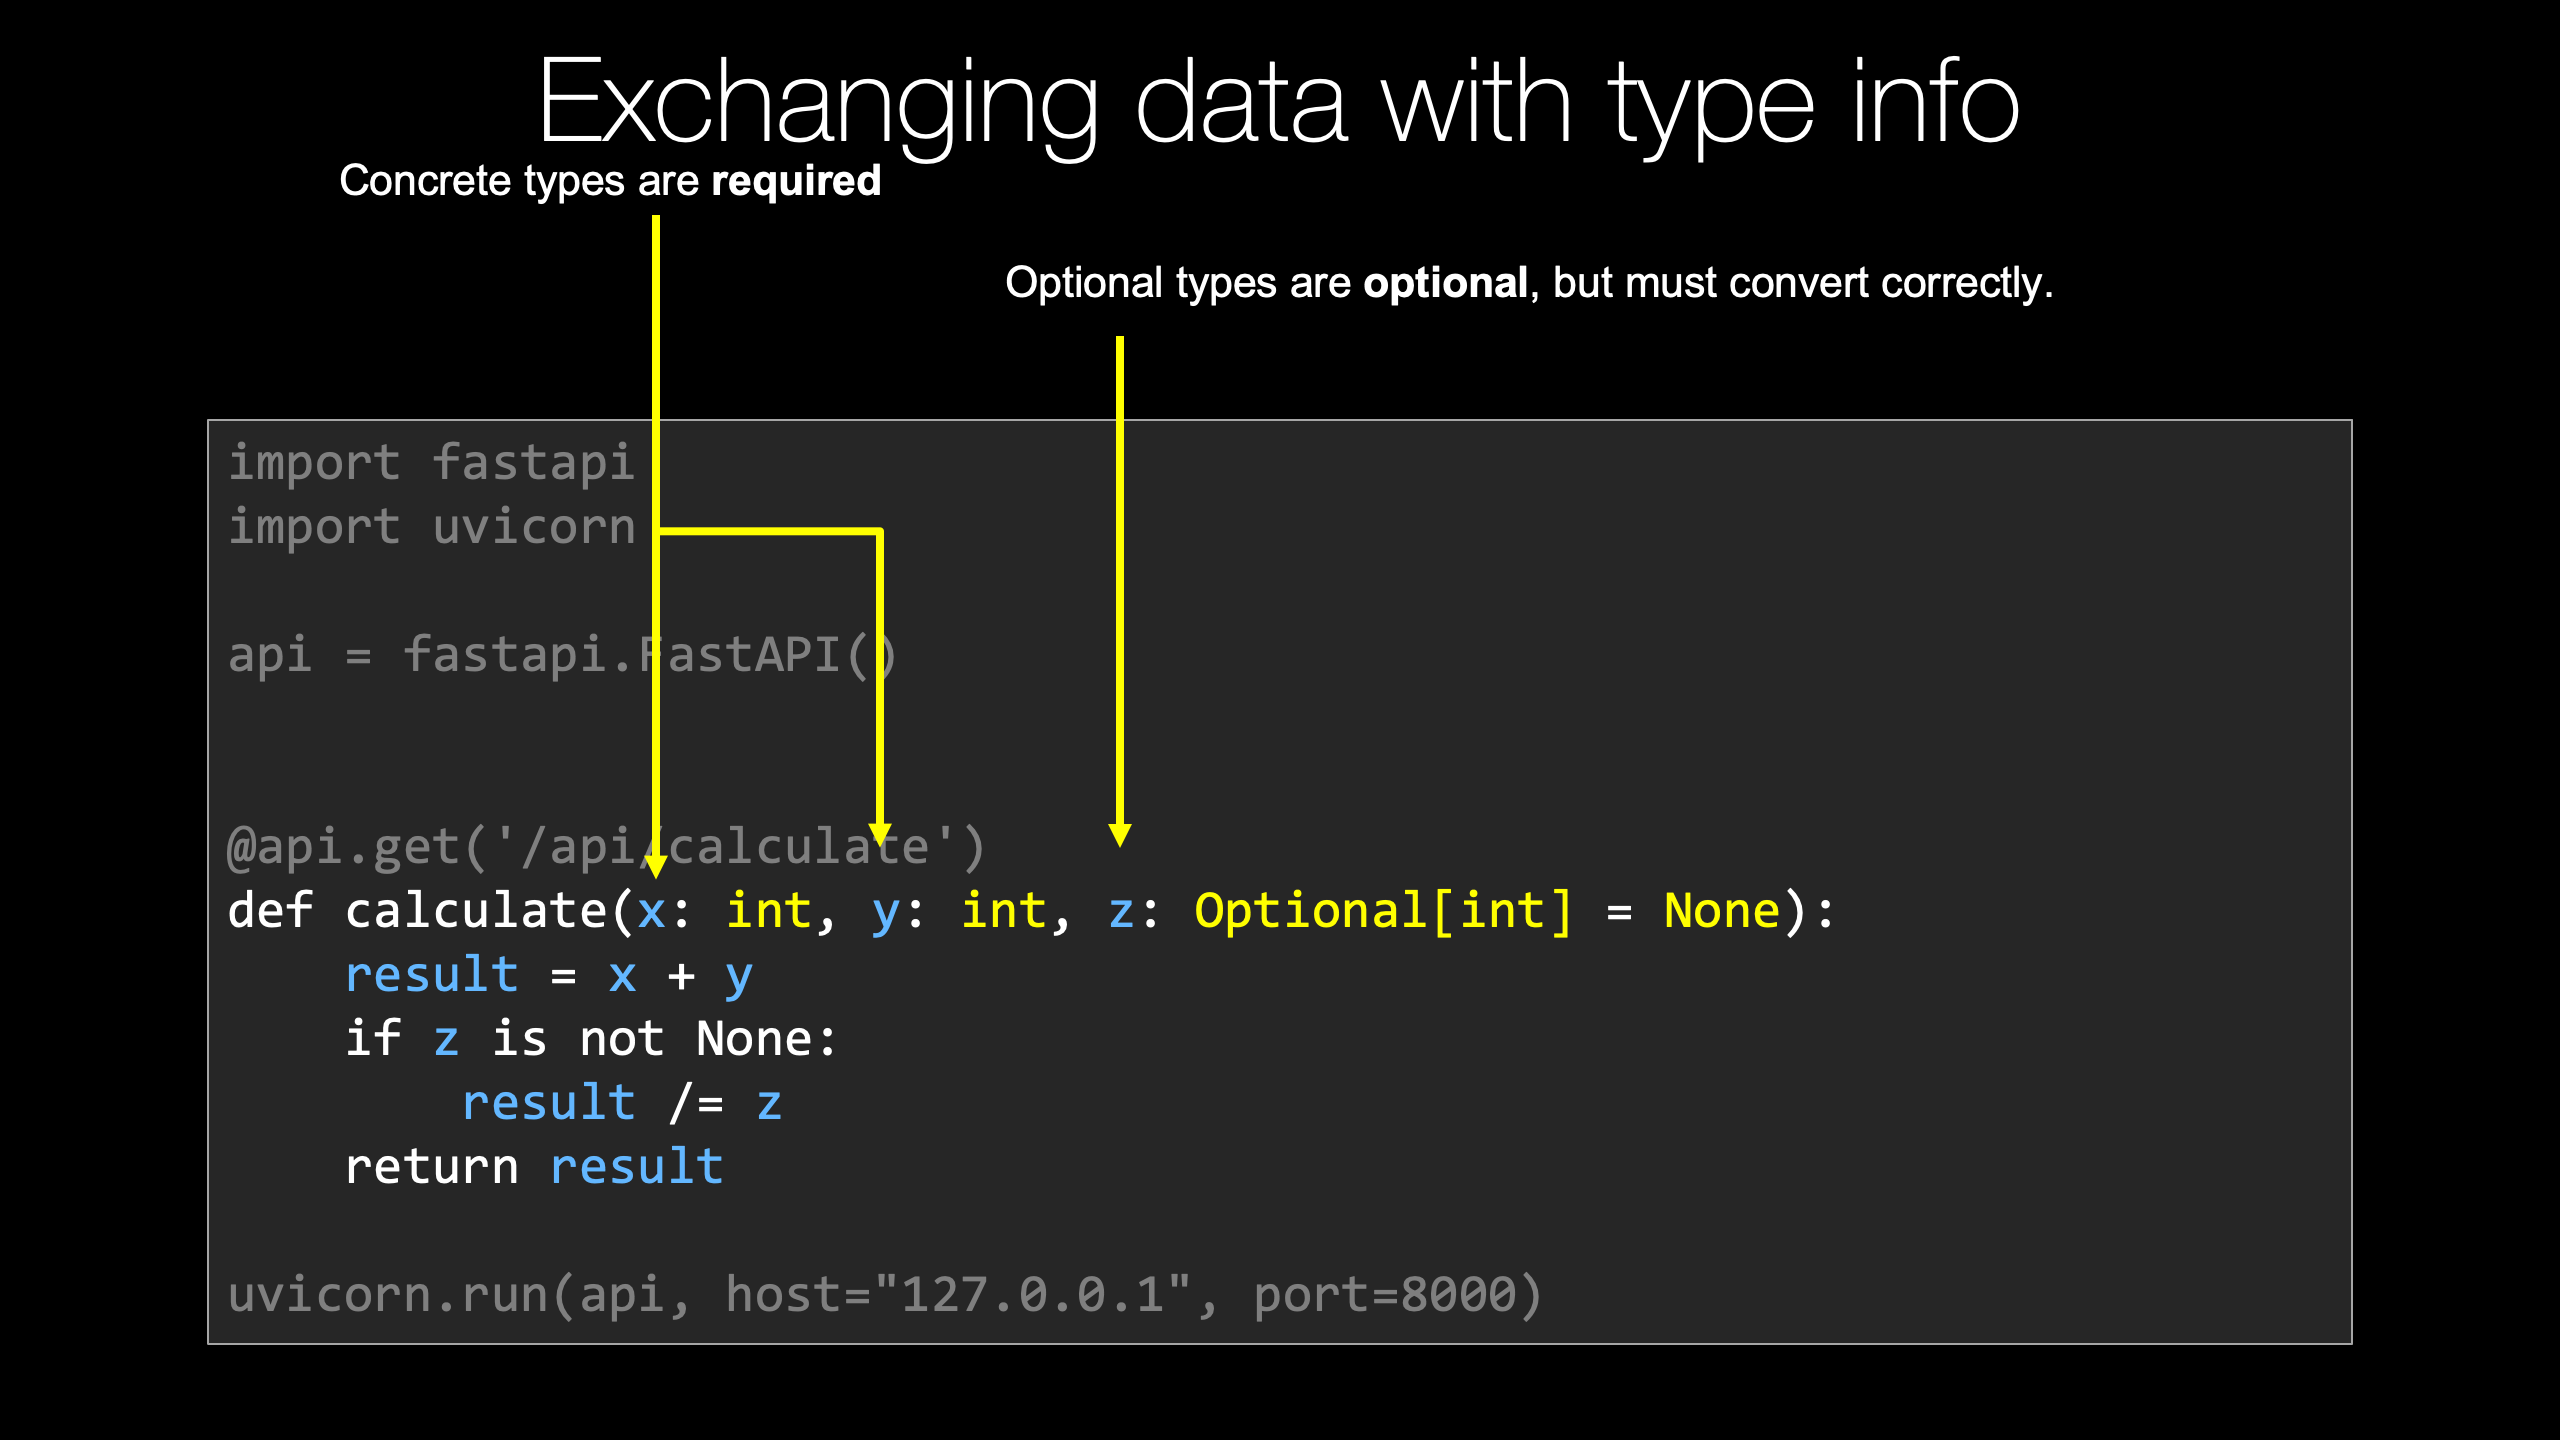
We saw that if we want to pass data, especially from the query string or part of the URL path definition, where we can put variables in there, what we have to do is create the same variables, or arguments, in our function. So here our calculate function now takes an X, Y and Z. Now we're going to specify these to have concrete types. So over here, these concrete types that have no default value these are required. We can also specify an optional integer and set it to be none. That way, we know for sure that no value was passed for Z over here. This value is optional, we could pass none or just completely omit it, and it's going to come through with its default value of none. But if we do pass some value for Z, just like X and Y, it has to be a valid integer. I don't think we saw that in the example, but if we had passed like ABC for X it would say "No, no, no, the type is wrong". X has to be an integer and we can't get an integer out of the string ABC. So we get this automatically converted to integers, and the types are validated that what we pass over are either completely missing or if they are there, they could be converted to the types that we said they should be, including Z, which is optional. It either has to be missing or it can be an integer.
|
|
|
transcript
|
5:33 |
We saw that by default our API method is going to return 200. That was great. And you can actually control it up here by setting the status code to say, like, 201 for some kind of post or something along those lines. But what if we change this a little bit and we put a divide here and let's go ahead and change this to an optional, we gotta import that, oops not like that, import it like this, an optional integer, and by default, there's nothing there. If we're going to return, or we're going to compute this, how well do you think dividing say the number 5 by none is gonna turn out? Not so well. And let's go a little step further and let's actually kind of echo back the arguments as we saw them, right? They pass something we want to say "this is what we got from what you sent us". We'll put our X, Y, and Z here, so we're gonna need to do some sort of test, right? Value is gonna be X plus Y. And then we'll say, if Z is not none, you might say if not Z, but yeah, if it's not Z, and if it's equal to zero, maybe we want to respond some other way. So if it's not none, we're going to say "value /=" you know, divide value by Z. They're going to return it. Let's try this. Alright, we do our request. Right now, Let's put a Z back first, Z equals 10, like it was before. Perfect. So we got 2 + 3 is five. Divide it by 10 is 0.5, everything's great. Well, now that Z is in there, what if we say we omit Z, that's okay, it doesn't crash, it just doesn't do the calculation. But what if we put in Z equals zero? That explicitly is not good. It's not that the Z was required, It's just that this value of Z is bad data. So how are we going to communicate that back to them? So let's go over here and right at the beginning, we'll do a test. we'll say, look, if you passed in a Z and it's exactly the number zero, well, this value is just not gonna work for us, right? How do we communicate that? Could you come over here and say "error: Zero Z"? right? return that. We return that. Well, yes, we technically could return it, but what status code is it going to send? What message is it going to communicate to the client? 200. Everything's okay. So yeah, not really. Like we could do this, but it is not going to communicate well with the API endpoints. Like especially think of a program trying to talk to this API, how is it going to know which is which, Right? So what we want to do is return a "fastapi.response" and then we could just set two things, we can set the content to "Error: Z cannot be zero", and then the status code, here's our http statuses, And let's just say 400 bad request, right? So we're gonna come in here and say, Look, if you give us zero, this is totally bad. We cannot continue. It's gonna crash. But we don't want our server to crash. We want to say the reason this has gone wrong is the data you supplied, not 500 server error, which we saw up here, internal server error, this looks like the service broke, not like they gave us bad data. It's also very unhelpful to them. So if we just rerun this now we get an error. And more importantly, more importantly, if we look at the network, 400 bad request, right, 400 bad request. But if we put like 1, now we get a 200 ok, we get our value back. And if we put no Z, that's fine, we get 200, Just a different calculation. So when we want to communicate one of these non standard responses, not everything's okay and here's your data, we're going to create a FastAPI response, set its status code, potentially set its message. Now, one of the things you might want to do, might want to consider here I'm not going to do another simple example, Maybe we'll do it later, is if you look at this over here, get our Z equals zero back, so what came back is 400 but the type it came back is plain text, whereas the normal response like this, this comes back as JSON. Let me just do it up here so you can see it actually in the network tools right? This is coming back as content application/json. So what you might consider doing is creating a dictionary in here like this, did I say I wasn't gonna do this? Let's just do this like that. It's a string, not not some JSON. And then we come over here and we could say media type equals application/ json, like so, and put the comments in the right place. There we go. And that went a little wonky, didn't it? Okay, weird indentation got in there, but let's go try this again. Here we got back this application/json. Everything was okay, but if we got an error, notice the data we get back is still JSON. This, we could look at that. The response is still JSON. So that way the clients assume it can always just get the document and look at what they got back. It's not like sometimes it's text, sometimes it's JSON. I don't know, I think that's kind of nicer. It's up to you guys whether or not you want to follow up on that and do this. But by default FastAPI returns errors that are not controlled by you as JSON. Like, remember, if we click here, we get a 404, but the 404 is actually a JSON Document. Plus the 404. So maybe it makes sense for us to factor that into our error messages as well, and pass over this application/json.
|
|
|
transcript
|
1:28 |
We saw we could create a response and return it with some content, that was JSON, with a status code, however FastAPI actually has some shortcut ways to improve upon this. So if we could go over here and say "fastapi.responses", when you look in here, notice we have a JSON response, a file response, an HTML response, plain text, redirect, etcetera, etcetera, etcetera. So that's cool. Let's go into the JSON one which is up here. And how is this different? Well, it's gonna automatically set this to the media types, so we don't have to specify that. And also, the content is going to be set to be not a string which would parse this JSON, but some kind of dictionary. Just a straight dictionary there. And then the status code, well, we're still gonna need to set that, because that's kind of error condition, like that. Okay, so let's wrap that so you all can read it. They should do exactly the same thing as we had before. We go over here and we refresh, everything is good. But now if we make it error out, notice again we get some JSON passed back here and if we look at the type, it's application/json. So same basic idea but we just have to write a little less code. We don't have to set the content type and all those things. Also, if this content you wanted to pass back had come from some other location or included other data, you'd have to use the JSON Library to turn into a string, which should be a hassle, So this is much better. If you're gonna return a JSON response, do it like this.
|
|
|
transcript
|
1:22 |
If you've received some input, some data from the user that you just can't process because it's not in the right format or something's missing, some of that is actually handled already by FastAPI. So for example, if X is passed over and the X is a string that can be converted to an integer, FastAPI will just handle that. It will return a JSON response with a dictionary that has some details about the error message. But there's other times where just certain values are required. Like, for example, you have to have a non-zero Z if Z is specified in this calculation because you'll get a divide by zero. So in this case, we got Z from the user, and it's zero, so we need to tell them "no, no, no, this is bad". If we just try to do the division, it's going to crash our server, they'll get a 500 response, still think our service is unreliable when really they sent us bad data, so we want to communicate that back. We're going to create some kind of error dictionary not shown here that we're gonna return like error is the message, you know, Z has to be non-zero for division and so on. We're going to do that as a FastAPI JSON response. We're going to set the status code to 400 or whatever status code you think is the best fit and then the content to a dictionary, which will be converted to JSON, and sent back along with the status code, and that's it. Super easy to return errors in this controlled way back to the clients.
|
|
|
transcript
|
2:20 |
There is one more thing I think we should check out and fix before we move on from this simple calculator API. Recall when we run it, we can go over and we can go to whatever this URL port is here, "/api/calculate" and pass X and Y and that works great. But if we just go to the server, something bad happens. We get a "404 not found" right? See this? And if we actually pulled up the dev tools, you would see the response code, it's 404 not found. That is not ideal for just the home page of the domain name of your API. So let's take the smallest measures here, and we'll take bigger measures later to improve upon this. So let's just do a little bit of tiny work here so that we can have something. So let's go API, and we're gonna do a get to forward slash. Whatever we write next is what's gonna happen when you just request the server by itself. So I'm gonna create something called "index" and I'm gonna just paste some text here. I'm gonna have a body which has some HTML, the body, then the head, and then a div, and maybe it even needs a "<HTML> </HTML>" to be proper, even though it would have worked before. And we can just use what we knew before, we can just return a "fastapi.responses.htmlresponse()" and we want to set the content is this body. Alright, that's it. And with we had a little continuation character there. Now, now that's it. Nothing else got messed up. Okay, good. So if we just rerun this and we click here now, Yes! Welcome to the super fancy API. And now if we click on that, it takes us over to our actual API. Because it just seemed wrong that you opened up the server, and it just says "crash, this is not working". So here's a little tiny bit of work that we can do, stuff we've already discussed of just passing back some alternative response besides JSON and, you know, hooking this. Actually, this is the gateway to having a whole bunch of pages and stuff on our site if we wanted, we're going to talk more about using things like Jinja templates, and maybe even better templates, later. But for now, this will at least let our site work in a way so it doesn't look broken, and then we can go on and work with our API here. So that's a quick introduction to FastAPI. You can see it's super clean, super easy, and there's tons of neat stuff that we haven't even gotten to yet.
|
|
|
|
36:45 |
|
|
transcript
|
3:06 |
Let's just take a moment to reflect on the title of this class. Modern API's with FastAPI. Well, what is this "modern" about? Is it just because FastAPI is new? No, it's because FastAPI embraces many of the latest Python language features and external libraries, leveraging those features, to make it easier and less error prone to write API's and do that quickly, so fast. In this chapter, what we're gonna look at are these language foundations. So in particular, what are we gonna cover? We're gonna first start by talking about type hints or type annotations. We already saw that if we specified a type which wasn't an API method to be an integer that meant that one, it was required, and two, if a value was passed, it would be automatically converted over to an integer. So it's not just that the type hints provide a clue about what type we expect, FastAPI uses those to actually convert the types themselves. So we're going to talk a little bit about this idea of type hints. One of the super cool things about FastAPI is it supports the modern async and await programming model that have made things like Node.js and Go so incredibly fast. And, if you go look at the documentation, the FastAPI folks claim that they're about as fast as Node.js and Go. Do you know why? Because they're leveraging the same underlying feature. So we're gonna look at the core idea behind async and await. Later, we're gonna actually apply that to some of our view methods in our internal libraries we're using, which would be cool. But here, we're gonna focus on just getting that idea down nice and clear. We're gonna talk about ASGI servers; Asynchronous Server Gateway Interfaces. Normally, when we work with Python Web apps like Flask and Django, they're working with what's called a WSGI or "wizgy" servers. This is an older model, or older gateway interface I guess, that doesn't allow for things like async and await programming, so it's a big limitation towards that modern, scalable stuff. That said, to use FastAPI, we've got to use, to really leverage it, we've got to use one of these more modern web servers. So we're going to talk just super briefly about that. You may have heard of data classes. And there's another set of classes, another library called "pydantic", which has similar structure as data classes and actually integrates with them in some ways, but there's a lot of the same types of validation we've already spoken around about for FastAPI. It does that for just General data Exchange. So JSON data, dictionary data and so on, and FastAPI is built upon these pydantic classes, so we're going to see how we work with them for defining our schemas, for validating what comes in, for converting the types, all that kind of stuff. And we'll see that the things we've already mentioned above, especially type hints, will provide automatic rich editor support. FastAPI has even its own PyCharm plugin. I think maybe it's just the pydantic, one of those two, pydantic or FastAPI has its own PyCharm plug in, and because they put type hints all over the libraries, the editors that can leverage type hints to give you more help will do so, and that includes PyCharm and VS Code.
|
|
|
transcript
|
3:34 |
Now we have a little bit of code to start from on this one, and that's just because there's a bunch of things that's not worth you watching me type, but we're just going to extend it with this idea of type hints. So over here have a program called "No Types Program". That means it has no type hints, no type information. None of that. And let's look at what it does. It's really simple. It has this running maximum of, basically it lets you order things off of a menu, like breakfast or dinner or whatever, and then it will figure out how much does that cost? And it'll actually keep track of what is your most expensive meal that you've had this, today. So this is the program that, given a set of things from the menu, is supposed to, does not yet, it's supposed to add up what all the items are. And then down here, we're gonna create some items, like we've got this item class, item named tuple that can have a name and a price, or name and a value, something like that. And then we're gonna create a couple of lists, and we're gonna have it to add up that, add up the dinner item, add up the breakfast items, and we'll see what the most expensive one was. It's fairly contrived, but I just want to show you some of the pieces here. So first of all, let's look at this counter. When I just look at it, the fact that this is plural maybe tells me potentially I could like loop over it. I know I'm supposed to add up the prices. We'll do "for i in items" do something. What do I get? What are these items? Now something a little bit funky is gonna happen. I think PyCharm was going to tell me what I can do if I hit "i.", what is available here? Check that out. It says it has a value and it has a name, and these come from this item. Well how the heck did it know that? Normally it wouldn't, but because it sees us creating only item lists and passing them over there, it's like "ah we're pretty sure this is gonna work". But if we happen to have not been using it, do this. Now, I come over here and say "i." what do I get? Nothing. Absolutely nothing. This is all entirely useless and not relevant. So how do I know what I can do? How do I know I can loop over these things? How do I know that I can work with it? If the program can't figure out what you're passing through the entire flow or this is a library that you've built and you hand over to somebody, it's not being used yet, how would the editors be able to help you at all? And how would they be certain that that's right. Similarly, over here, we've got this max value, running max, we want to do some kind of test. I mean, it probably looks like this. "If total is greater than running max, running max equals total", however, this is gonna crash. Why? Because you can't compare a number against none, so I'll just say, "if not running max, or" like this. Okay. So what is this running max supposed to be? Should we really set it to, is this an integer? Is it a float? I don't know. What we're gonna do is I'm gonna go ahead and just make this work here, and then we're gonna improve it by using type annotations. So let's go and put this back. We could go up and look at our definition. Oh, yeah, We have a value here. Also be "total += i.value" I should add up the prices. There's our max. And then if we go and run it, alright, give it a shot. Oh, look at that. It works great. Let's create some items. Dinner was $38. Breakfast was $23. Our most expensive meal was $38. So this is great. The program is fine. There's nothing wrong with the program, but looking at it and knowing what to do, well, didn't give us much help. And if I get it wrong, does it give me any help there? Nope. It doesn't say" there is no other", It just says "Fine, that'll probably work. We really don't know what we're doing, we can't help you". It would be nice if the editors and other tools said, "no, no, no, there's no other, this is not gonna work. I don't know what you're thinking, but it's not gonna work", right? So we can add type hints to this program to fix all of these issues.
|
|
|
transcript
|
2:41 |
Alright. Now, let's just make a copy. So we have this old version without any type hints, and I'll have one with actual hints, types. So let's just set that to run. See, it still works, but what I want to do is add some extra information. I would like to say that this can be an integer except for, hold on, PyCharm now says there's a problem. You said it was an integer like 1 or 7 or -3, that's not what none is. None cannot be interacted with as an integer, right? So when we have a type that is either none or something, we have to say this is in optional of that thing. An optional is not built into the language. Some languages have really cool syntax like that to mean it could be none, but we don't have that. So we have to import this from typing, okay? So now it lets us either have it as an integer or none, right? So now we have described this as either being an integer or being just none. Down here, let's go down, it's going to know that this could be an integer because it's set to zero. Probably don't need to do that. But remember, we saw this "i." We got some help, but only because we were calling it. Take that away for a second. And now if we say "i." again, no help. So the next thing to do is say what goes here. So what we can do is say this is an iterable. Now again, this doesn't come up just like optional. We've gotta import that from typing, and that tells us that we can put it into a loop, but it still doesn't tell you what it is, so we can say it is an iterable of this item, named tuple, if we say that, check this out. Here's our value that we're looking for. Perfect. And if we had other, all of sudden no, no, no, you can't have other. There is no other. There's item and there's name. Sorry, there's name and there's value. Again, all of this works. We might as well go over here and say this is going to return, I think if we look at the items we create, no, no, these are integers. So we can just say this returns and int, alright? Perfect. Perfect. And now if we call it down here, nothing. Nothing should be changed. But you can notice that if we were trying to pass in, like here, 7, It'll give you a warning like, "hey, 7 is not iterable, we expected something you could loop over, not a 7". Alright, so let's just run it one more time. Make sure it still works. It does. But now, not only does it work, it works better with the editors because of this kind of stuff and the validation for verifying what we're passing in and what we're getting back. Perfect. So this is the idea of type hints. It's super valuable in general, but it is extra useful in FastAPI because not only does it tell you what the program does, FastAPI actually takes that and uses it for things like type conversion and whatnot.
|
|
|
transcript
|
1:17 |
Now that you saw how useful type annotations can be, or type hints, let's just review the concept of them really quick. So here we have a function with no type information. We have some running max. It's set to nothing in the beginning. What's it supposed to be set to? I don't know some larger thing, that could be the largest order, that could be the value of the largest order, who knows, right? There's no information communicated there. Also, here's a counter function. It takes something. Based on the name being plural, I'm guessing I could loop over those things, but I'm not 100% sure. And then there is a total, probably know what to do with that, right? So this is not super helpful. Adding types lights up a lot of insight into how it's meant to be used. So now we have a optional int. So it starts out as nothing, but it's supposed to be set to an integer. And here we have a counter. It takes iterable things so I could loop over it. And what's in them? It's an item. Because it's an item, the editors know that it has a value and a name and it says "we return an integer". So just reading this code without doing anything else or seeing how it's used, we know much more about what's possible as well as our editors know what we should be able to do. So if we try to, add a, you know, some kind of field lookup or something that doesn't exist, while we're looping over the items, it will be able to help us and say, "No, you're doing that wrong. Its name or value, those are your only two choices". Cool, right?
|
|
|
transcript
|
2:30 |
Async and await is definitely one of the most exciting features added to Python in the last couple of years and FastAPI makes it really easy to use. It handles actually most of the juggling of all the asynchronous stuff, you just have to make your code asynchronous for it to be able to work with it. So let me paste the program in here, and it's gonna have two versions, a synchronous and an asynchronous version. So we're going to start with the synchronous version. Now notice it has a couple dependencies, those are all listed over here. So we're just gonna go and go into async, sync version, we're just going to run its requirements. So it's using the usual characters here. It's using beautiful soup to work with HTML, and it's using requests to make some kind of requests. So what is this thing going to do, anyway? It's going to go out to "talkpython.fm", pull up the page associated, the HTML page with that episode, it's going to download the HTML and use beautiful soup to get the header and use that to grab the title, okay? The way it works, just like you'd expect, it just goes one at a time, goes from 270, 271, 272, and so on and it says, give me the HTML for that one, process it, print it. So, easy right? Let's go do that. Notice there it goes, one, and then the next, and then the next. The Talk Python server is super fast, so it only takes five seconds to do that for 10 requests. Run it a few times just to see where it lands. Another five seconds, pretty stable. Even under five seconds, how fast. But here, let me ask you this question: Where are we spending our time? Where are you waiting for this response? I can tell you the server response time for these pages is like 50 milliseconds. But the ping time from here to the server is at least 100. So we're not even just waiting on the server, we're mostly just waiting on the vague Internet, right? Like the request making its way all the way over to the east coast of the US From the west coast, where I am. Could we do more of that? The Internet's really scalable. It would be great if we could send all these requests out at once and then just get them back as they get done. So what we're gonna do is we're gonna convert this from running in this traditional synchronous way to using the new async and await language features and the libraries that we'll actually make use of later as well.
|
|
|
transcript
|
4:08 |
Well, we've seen the traditional synchronous style with requests. How's this look if we bring in something new and fancy? And the big fancy new thing we're gonna bring in is "httpx". So this is much like requests in the way you work with it, but it actually supports async and await. So let's go over here and just see how we're using it. First of all, one thing that's pretty interesting is if we wrote code like, this was a synchronous, but it looked just exactly the same as before, you would see it's not so interesting. If I come over here and I run the old one, let's just run this real quick, you can see, it's doing exactly the same thing. It's getting an item, give you an answer, get the next item, giving the next answer, taking five seconds. But the reason is we're starting off one of these calls, and we're waiting for it. So our first thing we've got to realize is what we need to do is kick off a bunch of these asynchronous tasks here, right? So when you go to get the titles, we're gonna start all the tasks, so we're gonna go to this thing called an "asyncio event loop", you don't need to worry about this in FastAPI but when you work with it directly, you do. We're gonna create a task from some asynchronous function, right? This is stuff that FastAPI does for us. We're going to start them off and then we're gonna start them all going, and then we're gonna wait for them to finish and just process them in the order we started them. But, you know, as they all basically are working in parallel. So let's go see this "get_HTML" function. Instead of being a regular function, like this, it's an async function with the word async out front, which means we have the ability to use async and await within it. So down here we have this, not a regular with block, but a async with block from working with this httpx client. And then anytime we call something asynchronous, like if we do this get here, what we're gonna get back is not the answer, not the response, but a task or a co-routine that, when finished, would give us the response. And the way to say make the program give up its execution to anything else that needs to run while we're waiting and then give me the answer when it's done, is that right there. We just say "await this asynchronous call" and then it's up to the program to figure out, well, while we're waiting on this, maybe we could start a bunch of other calls. Maybe we could be processing the responses from other clients as those API calls get done or those http calls get done. So this basically tells the runtime, tells Python, look, "I'm waiting on this stuff. Pick me up when it's done", but in the meantime, you can go and run other code without even using threads. So this is really the magic line right there. And then we check to make sure it's ok, and we return the text. Remember, it was going "click, click, click, request, request, request, response, response" when we ran it before about every five seconds. How does it look now? They all start, they're all done. Just like that. It was five seconds before. Now it's less than one second. Let's run it a few times. They all start, They're all done. Isn't that awesome? Yeah, it puts a little bit more load on the server, but mostly we're just doing all the work while we're waiting, you know, waiting on this stuff to make it through the Internet. Right? So this is really, really cool. It is so much faster, right? It's six times faster. Well not that time. Right, there we go. Six times faster or so this time around, and all we gotta to do is write these async functions. When we had a regular call that happened to be async, we just put await in front, and now it kind of goes back to the way it was before, and that's it. I mean, let's just compare real quick. We're not using a client session on requests, so it's slightly different. But we have this, seeing a callback URL raise for status and return text. And now we have, oh wait. Call URL, raise for status, return the text. It just happens to be we're using this async client to kind of put that all together. Okay, cool right? So this is the async foundation, and you can just see it's so much faster, so much nicer, handling these requests. And this is the same way that our Web app is gonna work instead of being able to handle just one request at a time it could do 10, 20, 100 requests concurrently while maybe it's working with other API's, talking to databases, all those things. And working with async and await is what's required to unlock that potential.
|
|
|
transcript
|
2:25 |
We saw how powerful asynchronous methods can be. Let's just take a moment and review some of the core ideas around building async methods. Normally, we define a method like "get HTML" as "def get_HTML" but if you want it to be asynchronous, you say "async def get_HTML" right. We're gonna be doing that within FastAPI all over the place. And then we have this somewhat unusual construct called an "async with block" and that's probably the most unusual thing in async amd await. And what we're going to do there is the actual with Block is opening a network connection, opening a socket, and so we want to do that asynchronously. It actually takes a little bit of time if you just create these separately without the async stuff, it's quite a bit slower. So this lets us open all the sockets at the same time, and then we're gonna issue some of these requests. We're gonna say "client.get". Now normally, that's just a blocking call and you get a value back. But when you call an asynchronous method, which client.get is, what you get back is not the return value. It didn't even actually run. What you get back is something called a co-routine that if you await it, it will run and give you the value. So here, we're going to say, "await client.get", get the response, and then we just work with it normal. The big takeaway here is that where you see "async with", where you see the word "await", all of those points, if you're waiting on some external system, your program, in this case, the web scraper, more generally, probably the API server, will be able to actually handle other requests and do other work until this client gets back to us with its answer, then we pick it up and run with it. Often, people think of this async await as scaling the computation or like adding threads. Threads are not even really involved. What it lets you do is it says it lets you mark different places in your function that says "I'm waiting on something other than our program. I'm waiting on something external, you can go to other work until that gets back to us" right? So here we're waiting on the talkpython.fm server, could be a database, it could be something else. So it's this async with and await where we're marking, like, "here you can go to other work until I get this response and then please start me up and we'll keep running". And that's how async and await works, and because most Web applications are waiting on something else, they're talking to databases, waiting on them, they're talking to other API's, micro services, and so on, waiting on them, you can do a whole lot more work if you can find a way for your Web server to allow it to work on other stuff while it's waiting, and that's exactly what async and await does for us.
|
|
|
transcript
|
5:06 |
Have you ever wondered how you can write a web application in one Python framework, whether that's Flask or Django or Pyramid or even FastAPI? And then you get to choose where you run it. You could put it on Heroku and they run it somehow. Who knows? You could run it under Gunicorn. You could run it under uWSGI, UWSGI. All of these different options are available to us because these Python Web frameworks plug into a general hosting architecture. For the longest time, that architecture was called "Web Service Gateway Interface" or WSGI, and the WSGI servers, well, those are the ones I named, Gunicorn, Micro WSGI, a whole bunch of other ones. And they have a specific implementation that expects you pass function, that request is processed, the function is called, the return value is then returned, and then the server takes the next response and goes with it. So here literally is what the definition of a WSGI server is. It basically has this single request, and somehow that plugs into the Web framework, like Flask or FastAPI or whatever, starts a response, Then it gets into Flask and does all its work, and then it returns that response over the network. But what you don't see is any mechanism to handle concurrent things, to begin with some sort of async call and then respond to it and so on. So because these servers were built in a time when Python literally did not have support for async and await, and asyncio, they obviously didn't factor that in. And if you change it, it's a breaking change, right? So we don't want to change how WSGI works. So in order for us to run a asynchronous Web framework, like FastAPI, to full advantage, we have to use what's called an ASGI, or "Asynchronous Server Gateway Interface". Now there's some servers that support this, right. Uvicorn is one of them. There's others as well, and they have an implementation that looks a lot like this, and here's a little arbitrary implementation that I threw in here. Maybe we're gonna call receive and give it the scope, but we're going to await that and potentially handle other calls while this one's being handled then we're gonna, who knows what other middleware we're applying whatever, and then we're gonna work on the sending data back, okay? Because ASGI fundamentally bakes in asynchronous capabilities, we can do many requests at the same time. We have 100 out requests, all waiting on a database or some external web service or micro service or something, we can handle another request because we're actually not doing anything at all. We're just awaiting them, right? So that's really, really awesome. The reason I bring this up is many of these asynchronous frameworks will run under standard WSGI servers, but they will only run in their standard synchronous mode. They don't actually take advantage of the asynchronous capabilities, even if they have them. So if you were to run some sort of framework under a WSGI server and test the scalability, well, you're not actually doing any async and await, potentially. So what we're gonna do is we're going to make sure that we want to work with an ASGI server and the one that we've seen so far, and the one that we're going to use for the rest of this course is Uvicorn. And That's a pretty awesome logo. Come on. You can see it's a lightning fast ASGI server and it's actually built upon uvloop and httptools. Uvloop is implemented in C++ so it's very low level, very fast and so on. This has lots of good support for many of the things that you might want to do, and it's a solid production server from the same guys that built Django rest framework, the same guys that built API star and starlette itself which FastAPI is based upon. So here's Uvicorn, we're gonna be using that. This is one recommended possibility. But down here, notice I've given you some resources. If we come over here to awesome ASGI and this is just one of these awesome lists. It shows you all the servers, the frameworks, the apps and so on that fit into this space. So, for example, under application frameworks, we have channels, Django, and WOOP WOOP FastAPI. But there's also Quart, Responder, Sanic, starlette itself, which FastAPI is built upon, and so on. And coming down here we have some monitoring, realtime stuff, these are not super interesting. Until we get down to here, so we have uvicorn, that's the one we talked about. There's also Hypercorn and Daphne. All these are looking quite neat. Right now, this only supports HTTP/1 not HTTP/2. Hypercorn looks pretty good. Haven't done anything with it, but maybe it's worth checking out actually looking at this right. So it'll show you, here's how you test, like they talk about using httpx to test some of these things and so on. So if you're looking for stuff that fits into this realm, you can check out awesome-asgi. So we're not really gonna run anything exactly here but I did want to talk about the difference between WSGI and ASGI or WSGI and ASGI and that it's super important if you plan on writing code that looks like this, run FastAPI under an ASGI server, might as well run it, it's built on Starlette, might as well run it on uvicorn, which is built by the same people who build the starlette foundation of FastAPI anyway.
|
|
|
transcript
|
6:20 |
The next important language future we're going to talk about is an external library for creating classes, mapping them to submitted data, doing conversions and validations, and proper error messages, all that kind of stuff. But I want to start by looking at the hard way, how we might do that without that library, because it's easy to look at it and go "well, that's kind of short and simple", but if you see what it's actually doing for us, well, then all of a sudden it becomes super awesome. So let's do a real quick exploration of setting up some kind of class that does validation in not the easiest way, but very a natural way, you might expect. So I'm going to create a thing called "models" and in here, I'm gonna put "orders_v1" and the idea is that we're getting some kind of data submitted to us. Usually this is a post or some sort of JSON body submitted to our API in the terms of FastAPI, but what I'm going to show you actually applies just generally. So you can use it however, and whenever you'd like. So what I have here is some typical looking data, it has an order, it has an order item, created date, it has some pages that were visited, like so, if I want to do some kind of tracking, like first they saw these pages, then they decided to buy this thing. Maybe I can optimize my funnel. And here's the price in terms of dollars and cents. What I want to do is I want to create a class called "order", yeah? And I want to define some kind of initializer where I can take an item ID, I can take a created date, pages visited, and a price. Now PyCharm has this cool thing where it'll actually add these fields for us if I just ask it to. So I'm just gonna knock that out real quick. Here we go. Well, is that good? maybe. I don't know. We want to created date to be a datetime, right? So maybe even we want to specify that, like, this is a "datetime.datetime" and pages visited is going to be a list of integers, theoretically, import that. Price is easy, that's just a float. And item ID is going to be an int. Now, I know you're looking over the top and saying "that's a string" I know, I wanted it to be an int. But remember, the Internet submits things often as strings like query strings and so on. And I don't want to care that how it gets submitted. I want it to be an integer. So this is looking good, right? We can come down here and we can just do a override of the let's say, the str representation and we're just gonna return string of self dot dunder dict. So that's not beautiful, but that will show us kind of the data that we have. So let's go and actually try to create this. I'm gonna create an order, and I have to pass in values, right? If I don't, it's like missing values, It's gonna crash. And I'm going to do a cool trick where I can take a dictionary and put a double star in front of it, and what is going to do is that's going to map the keys to keyword arguments. So this is the same a saying "O equals order of let's say item ID equals order JSON dot get item ID comma get a date comma pages visited". Yeah, so pretty cool. Let's do that. And then let's just print the string representation. Print out O. See what we get. Run this. Cool. So, look, item ID is a 123, created days, fine, pages. Wait a minute. Wait a minute. Wait a minute. Wait a minute. that's supposed to be an integer, right? This is supposed to be a parsed datetime. This is supposed to be a list of integers. It is mostly but not 100%. Look at that one. So we should have converted that number. Okay. And we sort of have something of a representation, but we could do better. So let me drop in something that actually does this here. Because as you'll see, it's not super fun to write. Down here, we can go and we'll go through this beast. Okay, So what I want to do is I want to add a real quick requirement. We're gonna use "Python dash dateutil" like that and it is not misspelled. And let's just install that, because that's gonna be a really nice way to parse this string so we can get this out of dateutil. Alright, well, this sure looks more complicated. What do we got going on? So our item is coming in and we're passing none. A default value for pages visited. Because if we pass immutable type, it could get changed. It's like a big weirdness in Python. So we're doing this trick, and then also, we're converting this to an item ID, but we don't want some kind of weird, cannot convert integer. We need to have like a proper error message. The item ID could not be converted to an integer, so we're doing a try, except ValueError, raise a different exception, Maybe this could also be a ValueError, but right, that's not the point. We've got to do a decent amount of work to get that parsed over correctly or stop. created date we're gonna again parse it. Here's the float. We're gonna make sure that that's a float and then check this out, for the pages visited, we're gonna iterate each one and actually convert each individual one to an integer. If none of, there's one that's like some value that can't be an integer, it's going to crash, I'm gonna raise that. Maybe you also wanna have equals. So we're gonna do that by checking the type and then comparing dictionaries. But if you have an equals, you need a not equals, we probably should add a hash, which I haven't even bothered to do. Does it still run? Let's try. Hey, look at that. It actually works great. So notice this. This is now an integer, this is now a datetime, as you'd expect. This is now a list of actual integers, not a mix of integers and strings or whatever the heck that was. So Yeah, this works fantastically, but look how gnarly it is. Whoa. We thought there was like, a nice, simple thing. No, no, no, no, no, no, not so quick. Not in the real world. Not in the real world. So what I'm gonna show you is something that lets us have even simpler than this, and yet this cool validation that it's cool because it works and we don't have to write it, alright? So this is the motivation. Like, we want something that will take sort of semi-formed, semi-corrected data and do all the conversions for us, like we are down here. And yet we don't want, you know, have it get these weird errors. So we gonna do all this stuff manually, right? Would be ideal to just not do that. But this is probably what we really should write if we're going to try to pass this arbitrary JSON data over to this order and expect it to come to life.
|
|
|
transcript
|
4:58 |
That was rough, wasn't it? Okay, let's take a step back towards this. So we're gonna go and use this library called pydantic. Now pydantic is really, really neat. And what it lets us do is it lets us create simple classes. Here's a class. It has an ID which is an integer, a name which is a string and has a default value. A signup which is an optional datetime defaulting to not set and so on, and some external data like this, and then we create it exactly the same way. But this is all we write, right? Well, technically, we already have the external data. This is what we write. And it behaves very, very similar to what we already saw, which is killer. So let's go make that happen. In order to do that, we're going to need to use pydantic here, Yep. That's still not misspelled. Go run pip install again. Get pydantic. So what we're gonna do is I'll make a copy of this. I'll call this V2, it'll be the pydantic one. And let's get rid of this big gnarly beast here, and I'll just leave that for a minute. Let's go create our class order, and the way we use pydantic is we derive from base model, which comes from pydantic, And then it's very, very similar to data classes. If you've seen this, we'll have item ID and then we just specify the type. This is gonna be a required integer field, Okay? Say created date, which is, say this is an optional, datetime dot datetime. We just need to import that. What else do we have? We had pages visited and that was going to be a list of int. And then we had a price which was a float. Look how nice and clean that is. Even simpler than are simple version. And guess what? Unless I made a quick mistake here, it should run and it should do the same thing. So let's go and run "order_v2". Check it out. It did the same thing. Item is an ID. An integer got converted. 23 created date. The datetime got converted, pages visited. Look, even the elements in the list got converted and the price just hung in there. And we said that the datetime was optional. So what if we omit it. Well, it's just set to none. That's fine. No big deal. We did not say that the pages was optional. What happens if we omit that? it hates it! A required field is missing. What field? Pages visited. Super, Super cool. All the validation, all that conversion, everything, even a little bit better than we had. It will say you know what's required and what's not. So this is what pydantic offers for us. This really clean model of writing this that takes this external data very much like you might receive from an API from some client sending random junky, semi-correct data, like here's a sort of a three, but it's not a three, but it could be a three type of data over to us and just turn it into exactly what we want or a nice error message. Like what happens if I put ABC here? Pages visited, the second index, so third item, is not an integer. How super cool is that, and we don't have to write it. That's why it's cool. So this is exactly we want, the sort of filter we want to go through with submitting data to our API and, a little bit of a sneak peek here, If we have some order API call, instead of saying it takes in item ID, which is an int, created date, blah blah blah, we can just say this: It takes an order, which is an order, and that's it. All that automatic validation and all that cool stuff I just showed you happens before our function even gets called. It's done automatically by FastAPI, so that's super cool. This really works by default for JSON post, and can be done for others with a slight modification. You have to like, give it a certain, a certain statement here that says, Please go find this somewhere else, okay? So by default, this works when some API is being called and data is being posted to it, if you want something else as like our calculator example, we're gonna need to do something slightly different, but nonetheless, it's still super, super cool, and I guess we could even just leave this here like that. Alright, this is pydantic. Look, let's just do a quick compare. Here's what we do by ourselves, and this is actually less validation than what pydantic is doing because it doesn't say like, Oh, the created date is required and stuff like that. It'll crash if it's not there, but it doesn't say that it's required explicitly. So all of this, place down to that, that's doing even more. Pydantic derived from the base model to create those things, kind of like you would with data class. We could even come over here and say that if you don't specify these, we'll just do an empty list as the default. Super cool. So that's pydantic and you'll see it appear as we work with our API's at the exchange layer, when data is being passed to us or when we return objects, we can actually return Pydantic models right out of our API methods and they'll get converted to JSON as well.
|
|
|
transcript
|
0:40 |
So you've seen how awesome pydantic types are. Let's just review real quickly how we create them. We start by importing the base model, because that's our base class for all the types to create. We're gonna create an order derived from based model, it has an item ID, which is an integer, and a created date, which is a datetime and a float and then optional list of integers. And that's all we got to do. If we have some data we get from HTTP post to say our API or some other place we get some JSON data, a dictionary, all you gotta do is pass it by keyword argument, and it does all the conversions that you saw. Make sure the list is there, that it's a list of integers, and if it's not there, it can be just the empty list. Super, super cool.
|
|
|
|
48:24 |
|
|
transcript
|
2:08 |
We've played around a little bit with FastAPI. We built a simple calculator API and we looked at all the language foundations. Now it's time to build a realistic, legitimate API that talks to other services, that does high performance things, that takes advantage of all those language features we talked about. So, what are we gonna build? How about something on the Internet that is real time, like weather? So we're gonna build this web application here. You see, it actually has a Web page as well as the underlying API. The idea is we're gonna be able to enter our location, either just by city or potentially with country or a state, and get back some kind of report in however we ask. So, if we ask for the weather in Portland, Oregon, or Portland, United States, we'll get it back in Portland, Oregon, and we'll get legitimate real-time weather from somewhere on the Internet to be determined. So this is what we're gonna build, and we're going to focus on a couple of iterations of making this nicer and nicer. Where will we get the data? Well, "openweathermap.org". This is a super cool website. They have a free tier. I believe you get to do one million requests per day, but you can only do something like 60 requests a minute. So it's, for the free version. So it's not completely open ended, but for our example, what we're trying to do, this is gonna completely be fine. So what you'll need to do is log in over here and get an API key as part of this. But there's nothing to buy, nothing to do and yeah, we'll set it up so we'll consume this weather data, pull it back, make some changes to it, makes some adjustments to it and then return that to our users. We could also save stuff to a database, do logging, all sorts of things, but the main part is just gonna be focusing on consuming an external API. You know, think of this as an example of micro services or credit card purchases, or even talking to a database, like something external that we get to talk to that will allow us to scale our Web app using some of the cool async and await features and so on. So this is what we're gonna build, this weather service, and we're gonna back it with data coming from the openweathermap.org API.
|
|
|
transcript
|
2:36 |
Well, we're into a new part of the course, so we're going to go to a new part of our GitHub repo and come over here and just set it up from scratch. We already did this over in first API, remember? We created the virtual environment, the requirements and so on. But let's just run through it one more time real quick without nearly as much explanation. We're going to start by creating a virtual environment with Python 3. Then we're gonna activate. And of course, pip is always out of date, so pip, re-install, upgrade pip, and might as well do setuptools too. Excellent. Now let's throw this over in to PyCharm. Make sure we've got the right virtual environment, which lately is never the case. That's super frustrating. PyCharm used to do this automatically, and now not so much, but we can just go find it over here. We'll add our "main.py", and let's go ahead and do our "requirements.txt", and over here we'll have FastAPI, uvicorn. We're also gonna need some other libraries. We're gonna need httpx to consume some external library, and those three should be good. Let's just go ahead and hit install, let PyCharm do the magic, "pip install -r requirements.txt" If not, remember on the command line, and let's get our "hello world" thing going. So we'll import FastAPI and we'll import uvicorn, and we'll say "api = fastapi.FastAPI(), Hello Weather app" and that's all we got to do for this. And we'll do our little main magic, we'll say, come down here and we'll do a uvicorn, run, API, port, just be explicit, although it does default to that one, and that's it. Let's run it, make sure it works. Oh, yeah, Looks like it's working. Click on it and beautiful. Hello, weather app. Again, this is actual JSON. Well, it says the content type is JSON, even though it's well, it's just plain text, but we're not gonna worry about that. That's not where our app is staying. We got it up and running, got our little "hello weather app". Got the whole project set up and ready to go. Well, now it's time to start adding our homepage and our API features to it.
|
|
|
transcript
|
6:40 |
Well, we have our basic app working here, but the homepage leaves a little bit to be desired. Remember, we wanted a cool, HTML graphic, stylized home page, and all we got is a weird JSON response that was just a string, if that's even JSON. Anyway, this is not exactly what we want. So what we want to do is we actually want to take some HTML templates, and if you've ever done programming for Python Web applications or any really server side Web framework, you've worked with some sort of dynamic HTML template. It looks like HTML, but then there's little placeholders for a little bit of activity in, say, in this case in Python to take data and turn it into strings or to loop over data or to conditionally show or hide sections of the page. Now there's three main template languages, maybe four. I'm gonna go, I'll stick with three. But there's certainly four that come right to mind when we think about these template languages for Python, and FastAPI, being sort of flask-esque, embraces the one that comes with flask, which is Jinja2, so Jinja support is built right in. It also has the ability to use chameleon, Mako, or Django templates as well. But because Jinja is built in, I'm going to use that. It's not a big part of this. I actually think chameleon is a vastly better template language than Jinja or Django, for that matter, it's better than both of them. But let's not, let's not worry about that. We're just focus on what's built in instead of bringing more pieces into it. So in order to render a template, we first need to have some templates over here, so I'm gonna paste in some pre written HTML. As you can tell from this course, I like writing things from scratch and seeing them built up, but writing all this static HTML, just not super interesting to me. So we're gonna just drop in this piece now. One thing that's interesting is noticed this couple of things here that says it extends layout, so index only has the main content, but the layout page has like the standard look and feel for the whole site. So we're going to include a couple of CSS styles, we're gonna include bootstrap and so on, and then we're just going to right here drop in the content from the various pages. Right now, index. That's thing one that's interesting. Thing two is why is there no help for what content or syntax goes there? If I type that, no suggestions. There should be stuff going "oh, you want to do a block? You want to extend stuff? You want to do a loop?" Nope. Why is that not there? And by the way, for using the community version of PyCharm, everything we do in this course was equally supported except for this part I'm about to show you. The thing that I'm about to show you doesn't work for Community Edition. No big deal, because we're doing so little of it. But, just so you know. Alright, so how do we fix this? First, we want to tell PyCharm that this is a template folder where proper HTML lives that I should work on so I can go "mark directory as template", and it says "hold on, we don't really know what kind of project this is. It could be Jinja or chameleon or whatever, so would you like to configure that?" This is very helpful. The fact that it just randomly drops us into the settings, that is not helpful. So we gotta go over here and go for "template language" and search for that. And then down here, it says there's none, Click on HTML and say those are Jinja2, right. So these are all the template languages. Now, notice that these have highlighting and if we go over here and say "percent" we get for, we get end, extends and so on. Okay, that's super important if you have PyCharm community that you don't get auto-complete on that little tiny bit. But it is the one difference. Okay, so this is all good. We've got our template language configured. We've got our template directory. But now I want to do something like, come over here and I don't know, render that template as text. So we need to create one time a templates object that manages all these templates. So this is going to be Jinja2 templates which actually comes out as starlette, which FastAPI is built on, not FastAPI itself. And then what we have to give this is the directory, gonna be templates. Now this is based on the working directory. You could give it the full path, which would be safer, but for our sake, this is gonna be fine. And instead of returning "hello world", we're gonna come over here and say "template response" and we're going to say that we're gonna work with index.html and then what it needs is some data over here. We're gonna, it's gonna crash. When I try to run this, You see, something is missing we'll always have to pass. Super annoying, but so it is. Let's try. First of all, Jinja2 must be installed in order to use the templates. So the way FastAPI works is it has optional dependencies that you don't necessarily need to install. But if you're going to use aspects of those you have to install them. So first we'll do that. Forgot about that crash. But we're looking for another crash. try again. That's a beautiful HTML template, isn't it? Nope. No, it's not. Problem is, see, it must have a request key. So what that means is we have to somehow pass the FastAPI request object over here like this. How do we get this? Well, the way we got other things passed over was we put like X, y and Z and we said what their type was. They came from the URL path and the query string and so on. But there's other stuff like requests, if we say it is a request here, starlette request, it'll just be passed through for us. So that's the last thing that we've got to do in order to make this work. done it right? Yes, sort of. That almost looks like what I was hoping for. The one thing that's missing is, remember it had styles and colors and pictures? Well, we're off to a good start. It's not exactly finished, but we are rendering this HTML template. And if we pass in other data, I'll just pass in like a list, 1, 2, 3, we go over here to our index, and right after that, we just put an h2 with other. Restart everything so it all hangs together. Notice the live data does get passed through, and we can interact with it like we could do, something silly like, there we go, program against it in the template, Right? So 1, 2, 3, there we go. Not at all interesting yet. We're actually gonna do that later when we get some more interactive stuff going on in our Web app, in our API and so on. But for now, we just need to pass the request over so that the templates can render out to the response and so on. Excellent. So now we have much better support, at least for the HTML side of things.
|
|
|
transcript
|
1:16 |
It's unlikely that your API will not have a single HTML page whatsoever. Chances are you're gonna have some kind of page that talks about it or some extra information, maybe people can go to the API and see what their API keys are and so on. Yeah, you could do that in two web frameworks separately, but why would you if you don't have to? So it's very likely you want to render basic HTML templates, not as much as, say, Flask, Django, Pyramid and so on, but you still probably do want to work with them. And so doing that is super easy. In FastAPI, we have good built in support for Jinja. Two things we gotta do. We've got to create a templates object, which is a Jinja2 template. So we just say, when somebody asks for a template from you, go look in that purple folder called "templates", which we marked as a temple folder in PyCharm. We set the directory language and so on. And then once we're doing this, when we have some code that needs to return a template, we just need to do two things, create a template response and say the name of the template. But we also have to make sure that our API method, our HTML, our view method, gets the request object and then just forwards it on, because the underlying templates need the starlette requests in order to do their work, so just pass it on like this.
|
|
|
transcript
|
2:44 |
Recall when we rendered our HTML and I said, "It looks close, but it's missing styles and images and stuff"? Well, look down here. This is a bit of a hint on what might be the problem. Well, we got slash, the content, 200 ok, but static CSS themes, 404. Static image cloud, 404. Now, some frameworks, if you just have a static folder, it'll just start using it. FastAPI is not like that. You have to opt in to using it. So the way that we opt in is we go over here, to "api.mount" and we're gonna say where, so "/static" then how, we say "StaticFiles", and then this class we tell it where is the directory? It's going to be "static". And we also have to set a name for the mount, which will be "static". And I think this might do it. Let's go ahead and put this up here together. We're gonna organize this a little bit better in a minute, but let's just re-run this. Now, like with Jinja, it requires some base things, say the Jinja library. In order to serve static files asynchronously, we need to add something called "aiofiles" which is an async library for well, you guessed it, working with files. Let's go over to our requirements once again, put the next thing in. No PyCharm, It's not misspelled. Go. Install that. Work, try again. Okay, here we go. What has happened? Did it work? No, because I don't have anything in there yet. So it is having support for those files if they were there, let me copy them over. So now in here we have our CSS files and we have our images. We even have a favicon which we're not using yet, but we will. Now if I just go back and refresh it. Yes. Look at that. Isn't that slick? Yeah, I think it's coming along quite well. So we're off to a good start. I think having our static files in place is an important part for doing anything to do with HTML. They might make sense when you're talking about some kind of API, but you can always just do a file response there. But in our HTML, when we want to say things like "/static /css" and whatnot, we really need some way to have support for these static files, and so we got, over here, we've got our mount for the static directory, serving this up with static files using aiofiles so it's nice and quick similarly to how we did it with Jinja templates. Well, we kind of added a whole Web framework to FastAPI, which is cool. And now I think we're ready to start building the API proper, but foundation is set. We do need to do some organization on this. Like, what I really don't want is to have the entire application just written in this one main.py. That would be really bad idea, but we'll start organizing these things later as we have a little bit more to work with.
|
|
|
transcript
|
7:52 |
Well, we're off to a good start. We've got our Jinja templates. We've got our static files. We've got our homepage. We're gonna add, of course, a few more things. But before we get too involved, I want to add a little more structure, a little more organization, to what we're building here. Now, to be fair, this API, this app, is not really complicated enough to super justify this, but I would do it anyway and certainly as your API and your apps grow, you would really, really appreciate some organization. So let's go ahead and put a few more pieces in here. We're gonna do "api.get". Now remember I showed you that If we ask for a favicon it got a 404? I don't think we need request here. And all we gotta do is just do a redirect. So we're gonna return FastAPI. Whoops, this should be "favicon ico" somebody ask for that. We're gonna do "responses, redirect response". And where is it we want them to go? The URL is going to be "static/ img/favicon.ico" OK, so these are kind of related with the homepage, have to do with that. And then we're gonna have an API, let's just put weather for now, and then we're gonna have this, let's call it "weather" and let's just say it's gonna return some report for the moment. It doesn't really matter what we're returning. But as you can see, these are gonna get more complicated, especially this one. We're gonna have more API methods, and it's gonna just turn this sort of app startup file into a complete mess. So what do we do? Well, no problem. There's plenty of organization that we can do. So let's go over and make a directory called "api" and let's make one called "views". All the API implementations are gonna go in the API one and the stuff that does templates basically is going to go in the views. Over here, let's make a file called "home". Maybe we have stuff in like account management, one for I don't know, browsing weather locations and so on. But we're gonna have stuff to do with home go over here. We can just go and nab these things and drop them there. It's not gonna work yet, but it's sort of the path. And then over here, I'll add weather API. Go back, we're gonna take this one. Gonna put those there. Now, what happens if I run this? Well, Surprise, it survived. Okay, That's cool. How about now? Does it work well? No. 404. What happened? Well, the problem is how does this app know about those other things, right? We didn't import them. We haven't done anything. So maybe we could do this "from api import weather_api and from a views import home". Maybe that'll make it better. Yeah, that's not better. That's definitely not better. So we end up with this chicken and egg problem. We need to create one of these here and then over here, we need to use it. But in order to find the weather stuff we've gotta import it here, the way we would get it over there is we would import main. We'd import weather, import main, import weather, that's a circular reference. Some languages deal with that, Python doesn't. So that's not how we want to organize these things. So instead, we're going to use another concept called "API routers", put that back. So we'll go over here and say "import fastapi" we'll say a "router = fastapi.APIRouter()" like that. What is the goal of this? Well, whatever you would have done with the app or API itself, now we can do get, post, and so on. And then we add this router in to what we're doing with the main app. So let's do that with the home is well while we're here. And we also have this template thing we had going on here, which only actually makes sense in this place. So let's go and add that as well. I'm gonna need to import requests from starlette, a little bit of organization, but no more errors there. No more errors here. So the last thing we need to do, notice this where we're mounting the routes, I'm gonna improve this as well, but we need the "api.include_router()" Let's do "home.router" and weather, "weather_api.router" Just run it to see that that works. Okay, So what we do is we basically define little sub parts of our application in these routers, and we just bring them all together here. Run again. Wooo! Beautiful, beautiful! If we click this, what's going to happen? We get some report. Awesome. So our API is working as well as our home page. And, get it to refresh, Oh yeah, Check it out. We even got it to put the favicon up there. Super sweet. So we can use this. We can use these routers to have a much, much, much better organization of our code instead of cramming it all into the main.py. Final thing, let's do a little bit more organization here. Let's go and define a method called "configure" and here we're going to, I guess we'll have configure, configure routing, and let's have a function here. Why? Why would I have just one function that just calls another? Because we're gonna be doing other things. Configuring the database, configuring API keys, configuring this, so this area will grow. And now if I just run it like this, we're gonna be back to our 404. Alright, 404. So what we need to do is we need to make sure that we call configure first and this is super tricky what's going on here. A lot of times when we run in production, this code is not run in this way. So this should fix it, get it to come up. There we go. So it works again. But let's see if I could make it run the way it would in production. Come down here. We would say "uvicorn", I think it's dash, "-b main:api" like this. There we go. uvicorn. Let's see what we're supposed to do. Maybe it's just like this. There we go. Alright, It looks like it worked yeah? So should be fine. we're back to not found again. What's going on? Here's what's going on. Check this out. So it just imported this file, didn't run the main stuff, and that meant configure didn't get called. So we need to have an "else", and this is what happens in production is down here. I'm gonna do this little configure thing. Now I go down to the terminal and I uvicorn it. It's back to working, okay. And again, if I run it like this, also working. Awesome. So we've got some organization done here. We've got the structure of our main.py to help organize the startup code and like things like database connections, all that kind of stuff that we're gonna have to sort of pile on here, right? Not quite there yet, but we're getting there. And then, more importantly, we've put all the home stuff over here into the views. And we put the API pieces into their own files as well. This one thing that we could also do is we could do like this. Come over and say there's going to be all the views that have to do with home go in there. And we have a shared, that could go in there, because as we have more views, you probably wanna have some structure as well. And that means, oh look at that. PyCharm re-factored it. That is fantastic. Did it do it over here? No, no, no, no, man, if it did, that would have been awesome. Say home slash to include the directory. Let's see how this works. Yeah, it does. Layout is there. You can see you know that the layout got imported because of the CSS is still here. Yeah. Perfect. Okay, so now we've got some organization around our templates, around our API's, around our views, and our main app, our main.py, our main app start up.
|
|
|
transcript
|
1:20 |
If you're building a little toy app in some tutorial, Yeah, you just create a main.py or app.py and you cram all your stuff in there. That is doing such a disservice to people, though, to show that way. No one wants to build real apps and just have one ginormous file. So how do we build real apps? Well, we're gonna not directly use the API or the app, whatever we named that variable. Instead, we're gonna use this thing called the "APIrouter", which allows us to define routes for a section of our API. So here we have our weather API section and we're going to the router and we're saying for the weather method, it's gonna respond to "/api /weather" and notice it has a router object? In the views, say home views, we also create a router, and we say this one responds to "/" and we could even say, don't include this thing in the schema. We'll talk more about that later. Once we have all of our routers set up, then we go back to our main.py and we say import those items and say include router from home router, include router from APIrouter, and as many of these as you want. And this way we can partition our app by functionality, by use Case, allows us to work with it more simply and understand it more simply and just focus on the part of the app that we're really trying to work on, which is one of the goals of software, isn't it? Make it easy to maintain and evolve over time. Definitely recommend that you use these routers for your API.
|
|
|
transcript
|
3:29 |
Let's focus in on our API for a while here. So we have got "/api/weather" If we look over the homepage here, the way I'd like to do this is I would like to have it go "/api/weather/city" and then optionally add in some other things with a query string. So optionally add in the country, that's not clear. there's like a Stuttgart, Germany and a Stuttgart, United States. So which one do you want? And when you're speaking about the United States, you can pass in the state, like Portland, Oregon vs Portland, Maine. So this is the general structure that I'm hoping for. We'll also be able to pass over some units. So let's go and see how we would do this here. Well, first of all, for that part, that's like Portland, like this, we can just put a variable right there and then that variable is gonna go here as a string. Okay, so I'll say for, and if we go back and click that, now we get some report for Portland in slash Portland. we're not do anything yet with state or country or units. But that's easy. So, this is gonna be a required part of URL. It's "api/weather/some city name" but the other optional stuff, optional from the outside, will be the state, which is, right now I'll say It's a string, country, which is a string, and the units, which is a string. So here's the deal. If somebody specifies no units, that's OK. We're just going to give them the default. So in order for us to express that we're going to say this is an optional string. We have to give it a default value. Let's say that is metric. So if you don't ask for anything, you're getting metric. And for the country, Similarly, we're gonna make it optional, but we don't want to allow people to pass in "None". We're just gonna have a default value. So this is going to be "US" like that. And for the state, this one, we really do want this to be optional, and it's gonna be specified to "none" as well. So this is our basic structure, and let's just do some little string like this. We're just gonna return City, state, country and units just to make sure everything's working here. There we go. Portland, Oregon, US. Imperial units. But if we omit country, just Portland, Oregon. And guess what? It's still US. That's just the way I'm gonna do it, just so you can have it something work like that. And then if you omit the state, there's just gonna be no state. We need a question mark there, I suppose. Here we have no state, the default US, and imperial. So we could either put something for the units, and there's other, or we could just omit that as well. We get Portland in the US, metric, and so on. So this is going to be our signature here. There's still gonna be some other things that we need to validate. But this is starting to look long and hard to read with all the types and defaults and so on. So for now, we're gonna write it like this. Not too bad. It's a little, little bit busy, but I think that's okay, right? And if we come over here and we put in nothing, it's just going to come up as a 404. If we say we want it to require a country to be passed, and we omit that, has to be in a different order. That's okay. And we do this. It says "No, no, no. The country's required. You gotta specify". So we have a lot of control there, but I'm gonna put that back to having a default value but being required.
|
|
|
transcript
|
3:26 |
Now, one thing we can do is we can use our pydantic models to create something like this. I'm gonna write it directly here, then we'll move it. We're gonna come over here and say there's a class called "location", and the location is going to have? Well, you guessed it. City. Country that's required but has a default value of the US, and a state that is optional here, but it has to be a string, I guess pretty much everything can be a string. So it seems really natural to do something like this. Let's come down here and say that this is going to be a location which is of this type. Now, we could also put the units in there, but to me, units and a location, these are not the same. So I'm just gonna leave it separate like this, and we've got to do a quick fix up here. This will be "location dot" like that. Let's see what happens when we try to request it. Yes, exactly. So it says this thing is not a valid pydantic model. So let's make it one. Base model, import that from pydantic. Now it should work for FastAPI, except for I don't think it's gonna work. Hmm, something was missing. Well, weird. The body was missing something. By default, These pydantic models here only come from http post of bodies. And that's not what we want. We would like to just say give me this, like city out of here and give me the country out of the query string and so on. So we can set it to a value called a "depends". It's kind of a blend of dependency injection and other stuff. Let's say that FastAPI does. But if we said it the default to depends, it'll tell FastAPI to Look in the query string, Look at the URL parameters and so on. Oh yeah, Look at that. Portland non-metric. And if we go back here and refresh it by clicking that, look at that. Portland, Oregon, US imperial. And again, if we were to, like, set this to well taken on that just takes of the string, there's not a good way to omit it because it's all required. But if we took away the default value here, we don't pass a country, you can see just like before it's doing that validation say "no, no, no, that was required". So we can set one of these pydantic models here and say it depends, and you can even see that we could have further stuff like I could have other, and this is, this is like some kind of recent pydantic model, Right? It has other information about it, or like nearby I don't know. So we can actually nest these pydantic models and get that binding to flow through all of them, which is pretty awesome. But for now, we're just gonna leave it like this. Okay, Now, where do we put this? Not here, that is. We just went through all this work to do so much organization. Right? Well, let's go over here and make a directory called "models" and you can bet that we're gonna have more than one by the time we're done. It's not directory. Let's open a Python file called "location" and in here, that's good. Clean this up and we're going to get rid, import this. Alright, perfect. Don't need that. Just make sure everything's still hanging together. Yes, Yes, it is. Perfect. Okay, so this is a nicer way to organize things. You know, to be fair, we really only had in our models three things, But you could easily imagine some API that gets more and more complicated. You're only getting more value by moving over to these pydantic models.
|
|
|
transcript
|
3:28 |
Well, we've built a really cool API that echoes back what you send it. Not super useful, is it? So, of course, what we want to do here is to pass this information along and actually call the place that has the real weather report, bundle it up and re-send back. So, let's go and create another thing over here called "services". And here we'll put the "open weather service", which is gonna be the few functions we need to interact with this open weather service. And we're gonna have a function called "get_report". It's gonna be simple, let's have a city, let's go state, country, units like that, and units is gonna be a string. This is going to be an optional string. Actually, this one we made required, didn't we? But we just give it a default. And then this is going to be a string, and it's gonna return for now, let's say it just returns some arbitrary dictionary. Now what? How do we call this thing? So let's actually go over to "openweathermap.org" and you can see they're doing a ton of predictions and calls, right? So apparently two billion forecasts a day. That's a lot of forecasts. Let's go to the API. Remember you're gonna have to sign in and create an API key to do this. It's free, but you have to do it. Let's just look while we're here, pricing is free. We get a free API, key 60 calls a minute, a million calls a month. Sorry said that a day; it's a month, which is plenty for our little demo app. So let's look at this. There's a couple of options. We make a request to all of these various places here. We can do just the city, city and state, city state country. Alright, so that's what we're gonna need to do. And we'll just go down here say the URL is equal to this. Let's put https at the front, and the query equals something that goes here. Let's put, we're gonna create a little string called "Q", they we're gonna create another thing called "Key" for the API key. Those don't exist yet, so let's go over here and say "q=", well, what's required? We're gonna have "city, country", like that. And where do we pass the units over? That's right. So we can pass the units I think we pass them. Alright. And then the key is going to be "123" for the moment. Alright. So let's just say this is the URL that we're going to need to call. And we'll print out URL, and here we'll say "report equals open weather service dot get report" and pass the things on, location dot city, location dot state, location dot country and units. We're gonna return that back. So let's give this a try and see what happens. We go and click that. Well, we got nothing back, which is fine, but it says here is the URL we would go click on and close. It's close. Portland, US. But we need to get our app ID. So what I'm gonna do is I'm gonna add my app ID, but I'm not going to show it to you guys because you got to get your own. But I'll show you how we're gonna do that next. So we're pretty close to calling this API endpoint and getting stuff back, but we gotta handle this shared secret, this secret in our project.
|
|
|
transcript
|
4:38 |
Let's take a minor diversion and just give you a quick warning about putting stuff in to GitHub, especially public repo's like this one and how we might go about dealing with this API key. There's a bunch of options, I'll show you pretty straightforward and simple one. Have you heard of this? Git, as in secrets in Git? Look at this. So if we come over here and you go over to shhgit, this is, a thing that watches GitHub, all of GitHub, and you can see it's refreshing here with the various secrets that it's finding. And notice, it's already found seven or eight secrets, Django configuration files, AWS access keys, all sorts of horrible, horrible stuff. It's doing this by just hooking into overall public change log of GitHub. Something along those lines. You can read about how it works. How terrifying is that? So you really, really want to make sure that this does not get into GitHub? What we're gonna do is we're gonna go over here. I'm gonna create a file that is going to give us the structure we need, but we're gonna make sure it does not get the secret. So it's gonna be settings, we want to a settings dot JSON. We're not gonna put that in to GitHub, so we need an easy way to recreate it. We're gonna say template. Okay. And over in the template, it's gonna have two things, an API key, which will be "abc" and a kind of action. Let me copy a little bit better description for you. Really all we care about is the API key. But we want something like, Hey, copy this to settings.json and make sure it does not git committed in to GitHub. so PyCharm sometimes will automatically add this, which means it's a little suspicious. So let me close this. I'm gonna go over and add that file, make sure it's ignored in GitHub, Then we'll carry on. Alright, here we are, outside of PyCharm. I'm going to create a copy of it. Call it just settings.json. I'm gonna use, I'm a big fan of source tree, so I'm gonna go over to source tree and tell it that this is being ignored in this repo. Here we go. Alright, so now it should be safe to go back to PyCharm, and it won't automatically add that to GitHub. Notice it was there for a second then it went away. I think it will go back to gray. See this color, this golden color? That means it's ignored in Git. Now, this one is not that color, But I'm pretty sure it's gonna be fine. Yeah, There you go. Just needs some change detection. So this is ignored and not going to get into shhgit and all the other things and I'm gonna pause the video, put my API key in there, you would put yours right there, and then we'll carry on. Alright now, hiding in my settings.json is my API key, but we're not gonna talk or worry about that. What I need to do is now configure API keys like this, and that's a thing we gotta write down here. And what we're going to do is I'm just gonna do a little bit of standard file io, we're not gonna worry too much about how it works. I'm just gonna drop it in here. I'm just going to import pathlib path like so we're gonna import JSON to read the JSON. And what I've done is over here in open weather service, I've given it an API key, so we could just set that once globally and then use it for all our requests. So back here, change this to API key, so it doesn't think it's misspelled. There we go. So we're just gonna set this API key here like that with the value we got out there, and off it goes. We're gonna also check that the file exists. So if for some reason it doesn't exist, It'll give us a warning, So let's run it. If it starts up okay, Cool. It found the settings.json and it set that API key. Alright, this is one super, super simple way to handle having a secret. We just have to copy, create and copy this, like in our production, or whenever we get a new dev machine, you could also do it in environmental variables. Sometimes what I'll do is I'll have the settings directly embedded in source code, but they're encrypted and I'll just set the encryption key. That way, if there's a whole bunch of different things like mail chimp and stripe and digital Ocean and just like all these API keys, You have one setting you have to set up to get your machine ready to go and then you can decrypt all of them. But you don't want to put them in there by themselves, as you saw because of the shhgit stuff. That's scary. But we definitely, definitely don't want to be part of this little fun happening right here. Alright, so now we've got our API key. Again, you have to create an account and get a free account, get the free API key and do the same thing. Take the settings_template. json, copy the settings, put your API key in there, you'll be good to go.
|
|
|
transcript
|
4:04 |
One of the really cool and important things we can do in FastAPI is work with it's async capabilities, and I want to make sure we focus right in on that. So first we're gonna implement this without async, and then we're gonna come around and add async capabilities to it. So let's go over here, and what we're gonna do is we're gonna use requests temporarily, and we're gonna go back to something else, httpX. So, let's suppose we've got our requests here and we want to do a get against this. So have the response equals get and well, right now we have the city and country, but we're not taking into account the state, are we? So we'll say "if state is not" We'll just say "if state" we're gonna do like this. else, we're just gonna do the required values which are country and city. We're gonna pass our API key along. Our units are also required. We do need to do more validation. Like, for example, you can't put "Oregon", You have to put "or", you can't put anything for units. It has to be metric, standard, or imperial. The country has to be a two digit code and so on. We're gonna add that validation in a moment. But let's just get this kind of sort of working. So here we go over here and say URL and we'll say "response dot", First, we could say, raise for status, whoops, raise for status like that, so make sure nothing went wrong. Later, We're gonna actually want to come back and put better error handling there. But that's fine. And then we're going to get, hopefully if things went okay, we're going to go over here and say we'd like to go to our response and convert some kind of JSON response over to an actual Python dictionary. And I'm gonna print out the data and then return the data, which is not actually what we want. You'll see, it's close, but has way more information than we need. Alright, moment of truth. Click on it here, see what we get. Yes, look at that. This is what we got back for the weather in Oregon, units Imperial. So here's our location we have currently it's raining with light rain and the temperature is 56 degrees F. Want to see that in Celsius? Let's put in metric. Ah, sweet! 13.51 degrees Celsius. Light wind. I'm guessing this is meters, meters per second, kilometers an hour. I don't know. We'd have to look in the docs to see what that is, but check this out. So we've got the Portland US. We wanted to change it over to Portland, Tennessee. You could see it doesn't really show you over here, but the temperature, get it to scroll back. The locations have changed. The forecast is now clear. It's a little bit warmer, right? As you would expect being further south in the US. How cool is that? So we've got our data working, we've got our API call working. The other thing we want to do is like, see all this extra stuff? I mean, our goal is not to just pass along this information. I mean partly it's mostly just to be an example that we can use. But let's suppose that this right here is really all that we care about. This part right here. Notice that's under main. So we could go down here and say forecast with an E, there, is going to be data of main, and then we'll return forecast. Right? So let's run it one more time. Check it out. Here we go. Here it is in Tennessee, and if we don't put a state, we don't have to put a country, we can just go to Portland, how about that. Perfect the default over at open weather API is, the units are metric as well. So here's what it's like in Portland, Oregon, right now. We don't have the clouds and whatnot, but, you know, just for our simple example, let's suppose this is all that we want to return, like the current temperature and the low and the high. Pretty awesome, right? So now we've been able to return that from our get report here, which goes right out the door over there. There's more stuff that we could be doing, like converting error messages to proper responses and so on, which we're not doing yet, but we will. So there's stuff to be happening over here that's gonna make this interesting and useful, but for now, we're just passing it along. Pretty cool. We got our open weather map API integrated.
|
|
|
transcript
|
3:30 |
We're not taking advantage of one of the real killer features here in FastAPI. we can allow our Web servers code do other work while it's waiting and how much work you think we're actually doing in our code versus just waiting on getting a response from this weather service. It's like 99% waiting. If that random guess is true and I'm sure that it's close, we'll be able to get like 100 times the scalability by making this use async and await, because when we're waiting on other stuff, we could be handling other similar requests. However, in order for us to do that, this method, this get report, has to be async, and we might even want to go so far as to give it a suffix, that it's an async method, I don't know, and if you haven't worked with this before, we did touch just a bit on it, but we didn't start from scratch, what you do is you say this is an async method here, and then you have to, where you're waiting, say the word await. Great. Wait a minute. This is not working. You cannot await on response. You have to wait on a co-routine. Request doesn't support this. So what we want is httpx. And let's go back over here and put, we already got httpx, but what we don't want is we don't have requests because we don't need it. So instead, we're gonna do this, we'll say "async with httpx async client as client", and then we do these things. So we got a response where we go the client and we do get URL. That's it. That's all that changes. And we got 100 times scalability. Killer, right? Okay, again, that's a super rough estimate, but saying that we're waiting, you know, like the ping time is 100 milliseconds. It takes us one millisecond to do the processing. That would be true. So we're gonna start working with this client, and then we're going to go and say, get the URL and we just go from there. However, what happens when we run it? It's probably going to hate this. Let's try. We go over here. What did we try to do? Well, we returned what we thought was that here. But if we actually print out and report, it's not a dictionary anymore, as you will see, it is, we go to the top, It is a co-routine. And unless we don't get the value of the information out of these asynchronous methods, unless we await them. Okay, so, go back and do our await here. Fantastic. Except even though PyCharm doesn't say it, we can't actually await stuff if we're not in an async method. There you go. So in order to use this async method, we have to await it and make sure the route is async. And then internally for this to mean anything we have to use some async libraries right there. That's literally, like, three to five lines of code change. Super, Super small. Try it again. It works like a champ, But you know what? We can do a ton of requests while we're waiting on that information to come back, so super, super neat that we could do this. What's nice is you don't have to worry about async event loops or how that happens or awaiting things properly. All you have to do is say your API method is async and then leverage async things so we're leveraging async API calls. If you're working with databases, like SQLAlchemy now supports async and await. There's things that work with mongoDB, with the redis, and even files with async and await. So you do have to have libraries that support them, like httpx instead of requests, but other than that, you're good to go.
|
|
|
transcript
|
1:13 |
Let's review converting our regular API method to an async one. Well, we're gonna put async def weather instead of just def weather. We don't need to change the router or the URL or anything like that. FastAPI can just deal with both kinds and that's fine. We're going to say it's async, and then that only really makes sense to do if we're actually calling other async things. We wanna ultimately call our API, or open weather map, asynchronously. So we're gonna make that intermediate piece asynchronous as well, so then we're await, get report async, get our dictionary back, off it goes. Now, one step down, we've got our get report async and it is itself async, right? And then we need to do something interesting within it, so we're gonna work with httpx instead of response, instead of requests, I want to create an async with block and then we just await "client dot get url". Couldn't be simpler. We swapped it over from the synchronous request version over to the asynchronous httpx version by just really changing these two lines of code, sprinkling in some awaits, Good to go. A really, really nice way to add a huge amount of scalability if we're waiting on external things like openweathermap.org.
|
|
|
|
14:33 |
|
|
transcript
|
5:58 |
It may feel like we've made a lot of progress with our API, and it feels like it's working. So ship it. It's done, right? Yeah, yeah, no, not so much. You'll see there's a couple of things we need to work on. It really lacks some validation and proper error handling. We can do a huge thing for performance. And we take these errors that come in and we're not converting them correctly, so we're getting a lot of crashes, so it's sort of tied to validation, I guess. But even when there are crashes, we want to do something different than what's happening now. So let's jump over here, and I've made a copy of what we built in Chapter five and put it into Chapter six. So you have an exact copy of the chapter five way, and then now what we're doing here. And set it up here in PyCharm, ready to go. So this is exactly where we last left off in the other chapter, Chapter five. Let's look at a couple things. If I go over here and I rerun this, get it to open again. Let's go look at our API. I'll use some fancy performance tools like just this. Let's go and make a request. Well, that took 400 milliseconds. Do it again. 500 milliseconds. 400 milliseconds. How much of that time do you think is us? And by the way, 400 milliseconds, that's like we got a lot more scalability than that 100X I was telling you about, as we'll See here in a second. It turns out going over to the API and asking for the current weather, Well, that takes a lot of work. But if we're asking for the same thing like "what's the chance the weather just change right now?" Maybe refreshing that every 15 minutes would be sufficient. Maybe once an hour. So that's the first thing that we're gonna do. We're gonna add some caching. I'm gonna add a general little area to organize stuff called "infrastructure". And in there we'll put a weather cache. Yeah, it's a little bit messy, so I'm gonna go ahead and just drop in some code and then talk you through it. So over here, what are we gonna do? For this simple version, We're just gonna cache in memory, and we're doing that by just having a module level global variable, I guess. Semi-global if you ask for it. Good reason to double underscore is you can't really get to it outside, so let's just call it module level. And we're gonna say we only want to refresh the cache once an hour, so then we're going to say, "give me the weather and see if the cache has a new weather". This is exactly the same arguments as we're passing along to our open weather map API. And if we have some kind of report, so we're gonna get a dictionary back. If there's something in the cache and it's not too old, otherwise we're gonna get "none", so here you can see we tried to get it back If there's no data, none, and we'll try to go and see when the last time we put it in the dictionary was. Here's a cool little trick you can do, take the current elapsed time and divide it by a time Delta, which is set to some amount. It will tell you how many of those there are. So this little bit of math is not obvious, but that will tell us as a float how many hours have passed. And if that's less than one hour, then we're going to return that data. But if it's too old, we're just gonna return nothing. And, you know, it might even be worth going over here and saying "cache of key" just so we don't hold on to it after it's expired. Okay, so this will get us the weather. And then to do the reverse, we're gonna set it. We're going to actually create a key, which is just a tuple of all the values that actually works in a dictionary. So city, state, country, units and so on. That's gonna be the key. The value will be the time and the forecast. Alright, kind of a lot going on here. In a real one, I didn't build this from scratch, because in a real server you would probably use like Redis or a database or something. But for now, we're just gonna put it memory. I really don't want you to have to set up a server and configure that just so you can run the demo code. So, in memory it is. Now, this should be super easy for us to actually use. Could do to the API level, right? We could do it here and never even go down. But I kind of like that this thing is all about accessing the weather and whatnot and keep the view method up here simple. So let's tell this thing that it, let's make it responsible for dealing with a cache. So we'll say this, we'll say weather equal, or call it forecast, weather cache, import that. And then, come down here and just say, get weather, city, state, country, units. Is that what it wants? City, State, country, units. Yes. Say, "if forecast return forecast". So if we try to go and get it, and we could even do one of these things here with the walrus operator. Make it in line there. So we're gonna come along and say "try to get the forecast". If we already had something that was valid, it was in the cache, just give it back. Otherwise, we're gonna go to the service and create it. And before we send it back, we need to go weather cache, set weather, all of this forecast. I think that's the way it works. The value is the forecast. That way the next time we call it, it'll come out here. So let's try this again. re-run it. And the first time, it should be just similar times, you know, 300-600 milliseconds. Whatever. 700, 478. What about the second time? 2, 1 1 1 1 1 1 1 2 1 2 1. Look at that. It is now 4, 500 times faster. That is killer. Now, if we change it, if we want this in metric, obviously we can't have that same cache results because these are different things. So the next time now it's slow. But then the 2nd and 3rd and 4th time. And maybe we want this for Tennessee. Again, we've got to go back to the API once, but now it's cached and super, super fast. Cool, right? So again, I would probably put that in the database or I'd put that in Redis or somewhere, rather than sticking it in memory. But you know, honestly, maybe memory is the right place. The thing to be keep in mind is, we'll talk about this in the deployment section, is when we run this in production, there will probably be 2, 4, 8, 10 copies of this thing running on different processes on the server. So this, this won't capture everything. That's why something external, like Redis or a database would be useful. But this is already a really big boost, I think.
|
|
|
transcript
|
1:13 |
We saw that it takes 400, 700 milliseconds, almost a second, for us to get the weather report from the API. But how frequent does that information actually change? Is it good to get the forecast from 30 seconds ago or the current weather from 30 seconds ago? Five minutes ago? probably. If that's the case, we can cache that information to allow us respond much, much faster, as well as to not use up our API calls, right? You saw with a free tier we only get 60 calls a minute and a million a month. So if somebody asked for the same thing a bunch of times, let's just give them the same thing back. And we can do that by creating a cache. And we create this thing called the weather cache and the beginning of our get report We just say, "Do we have it saved and is it not too old"? Then give them that. Then we're gonna go do the async stuff with httpx. And before we return the weather, let's save it in our cache, so the next time they ask for it, they ask for it within an hour, They're going to just get that one back instead of making a new call over to the API. Again, in our weather cache, we put this in memory. That's not ideal, because in production you typically have multiple processes, multiple copies, of this app running over there. You'd probably put it in somewhere like Redis or a database, but even just putting it in memory is gonna help quite a bit.
|
|
|
transcript
|
5:08 |
Well, our weather API works. We can come over here and click this. Get a nice result here, nice response. However, what happens if there's the smallest of mistake? Like we misspell Portland to Portlnad. That doesn't seem right. So we probably shouldn't be getting a server crash 500 server error message when really what happened was there's just no city named Portlnad. So let's go fix that. So what's happening is we're getting some response back, and it's just raising a standard exception. So let's go and add a little bit more information here. We'll go over here and add a validation. We'll have a class, which is a validation error, that derives from exception. And let's give it actually a couple of things. Let's go over here and say that it's going to take an error message, string, and it's gonna take a status code, which is an integer. Let PyCharm add that to the class for us. This way, when we get one of these errors, we'll have a meaningful way to respond and let's go over here like this, Say "super dot init" and pass the error message along as well, perfect. So now we have one of these validation errors. We can raise these and catch these and so on. So, for example, instead of this, we can say if response dot, say that this is a response, like so. You can say that the status code is not equal to 200. Well, something went wrong over there. So let's raise a validation error, like that, and we'll set the error message to be like this and the status code to the status code. Let's pick an error message. Actually, let's just let the service communicate that response dot text, like that. Let's see if this gives us some kind of better result for our Portlnad. We come over here and we try again. Well, it crashed again because we're not converting that to a response. We'll do that now. So over here, let's instead of just calling this, and we can just do a return, I suppose, like that. But instead of doing this, let's say try to do it, and then we'll have an except validation error, like so, as ve. And then what we want to do is return some kind of response. So return fastapi dot response. Set the content to be ve dot error message, and the status code to be ve dot error. And I believe that's just gonna be, whoops status code. Set that to just the standard, you know, plain text response. We could put that into a dictionary, right? This could be a little bit nicer. Maybe we'll do that in the end. But let's just see what's happening now. Try again. 404 not found. And it says 404 there but that's not the super important thing. Let's look at what the network says When we make this call. There you go, 404 is the actual response whoever called our API got, which is perfect. So, we got our 400. Excellent, excellent, Excellent. There's a whole bunch of other validation that we need to add that turns out to be a lot of work. We wanna make sure that we're always passing the lower case state, maybe, in case that matters or not have spaces or potentially commas. We use two letter abbreviations instead of just random text, and so on. Now that turns out to be super error prone. So Let's go and just do this real quick. We're gonna throw this in and import a type here. So we're gonna have this thing called "validate units", which is going to take a city, state, country and unit, and it's going to return modified city, state, country and units. Yes, second one maybe needs to be optional here. So what we want to do is go and strip out the city, make it lower case. If there's no country, make it the US, otherwise lower case it, strip it, make sure it has length two, if not create an error message that says it has to be length two, and that's bad data you passed because it's not length two. So we're gonna raise a validation error just like before, but now it's gonna catch that. If there's a state, do the same thing here, the units, make sure it's lowercase. There has to be some valid units. It has to be one of these three. If it's not, say it has to be one. All that is a lot of work. I'll copy this to save a little typing. We'll go up to the top here, and I'll just say that equals validate all of those things. Okay, let's see if we could get this to work. So we got our Portlnad. That's a server error on the other side. This is valid. But what if we come over and say, country equals USA? Nope. It must be two letters, US. And look, your 400, bad data. That's fine. So we got this back good again. And what if we say "units equals metricy"? No, no, Can't be metricy, it has to be standard, imperial or metric, right? So now we've got our validation happening again and notice the status code, not just the error message is being passed along. Cool, Right? So now, instead of saying, "Oh, the server crashed", if we click up here and we got Portlnad, instead what we're getting back is error messages in terms of http status codes and meaningful messages.
|
|
|
transcript
|
2:14 |
We saw a simple mistakes or missing data or things like that, like misspelling a city would result in a server crash. That was not ideal, To be honest. The problem was we were just saying, Look, if we got some bad error from the API, crash. Well, so it did. Instead, what we probably want to do is add ways to convert exceptions and errors on the server over to FastAPI responses that communicate that back to the caller. So here we've upgraded our weather method to say "try to call the get report" and then we're gonna wait it, and if that all works, great, just return it. However, if there's a validation error, this is the error class we created that has the error message and status code. So in one place, we could say this is like a bad data error 400, this is like 404, things not found type of error. We could have created different types of errors, right? Like a validation error versus a not found error and so on. But remember, we're getting a bunch of different responses from the open weather map and we have to convert those status codes back over, and it just seemed like a big hassle. So let's just pass the error message and the status code around. So this is like the well known error, this first except block. We're gonna return a response with the message and the status code. But there's also the possibility that it wasn't a validation error. Like maybe the network socket couldn't be opened or some random thing that we tried to do really did crash, right. Like we tried to parse some JSON and they didn't give us JSON, I don't know. So we also wanna have an except block that is a general error handler. And here we're just gonna say, that kind of really did crash, status code 500. And lets us do some logging. Now we're just printing it here, But obviously you would save that in a more durable place, maybe a database, maybe just some, you know, write it to a log or something like that. But we probably wanna have this general exception as X at the very end, you know, just in case, because in production, it's gonna happen somewhere. Making these changes with more validation and the error handling and so on has made our service much more durable and really, really feels a lot more professional. We're starting to get a lot of information communicated back instead of just "sorry that didn't work", crash boom. Really, really important to put this little bit of polish on our API.
|
|
|
|
36:12 |
|
|
transcript
|
1:13 |
What we've created so far is a really nice API, and it lets people get reports on the weather in different locations. What is the current weather basically anywhere within the world and as long as we've interacted with that recently, we can do that in a super fast way, good error messages and so on. But something is missing from the API. A couple things are missing, but the most important thing that you probably care about is having an API that not just returns data but accepts data from the user and saves it back into a database or some something like a database. So in this chapter, what we're gonna do is we're gonna add the ability for users to report unique weather events like "I just saw a tornado" or "it's hailing in my neighborhood" things like that. So you'll enter a location and some sort of weather report and store that and then on the home page or through the API we'll let people see what that looks like. What is happening currently in different locations, you know, we're not going to get super advanced. Not like "show me events near me". It'll just be the recent stuff happening in the world. But obviously you can enhance it from there. So that's the idea of this chapter, is to take what we built so far and allow other systems, other users, other apps and so on to contribute back and to add data to it, not just consume data from the open weather map.
|
|
|
transcript
|
7:44 |
Let's begin our work on this writable data, this ability to accept data from users by creating the data access layer, not the API layer, but the part that the API layer will use to read and write data. So fire up a PyCharm. Now I've gone and already copied what we did in the previous chapter, chapter six error handling, over into chapter seven, moment, for inbound data. So it's just picking up exactly where we left off, and we're gonna work over here by adding some other functions, not "give us the weather" but "here's a report" and "what are the reports out there currently"? So in our services we've already got one service here for interacting with the external API. I'm gonna add another one for interacting with the data around reports. Call it "report_service". This is not Web service in that sense, this is just, like provides a service to the app, okay? Over here, we're gonna have two functions: def get reports, and this one takes no arguments. It's just going to give us all the reports or maybe the last 10 recent ones or something like that, and it's going to return a list of something. What goes there? I'm gonna have to create a class or something that goes there. But for now, let's just return nothing. And then let's also defined on add report. This is gonna take a description, it's a string. Remember, we already have over in our models, we have a location. We're gonna let, you know we need to have a location for that particular report, right? It was in Portland, or it was in New York City or whatever. So we're gonna pass that over, which means we gotta import that, and then it's gonna return something, Something up here. We're gonna say it returns something for the minute like this. But what we need to do is we're gonna define the class. The same thing we return there is the same thing that's going to be contained in these lists. Now we're going to need a database to store this in. Just like I said about the caching, we could set up interesting infrastructure. We could use mongoDB, or we could use postgres, or we could use some other system to store this, or who knows a file system, Some random thing. But because I want to keep this super, super simple for you, I'm just gonna have a empty list here. Now, we can just do return a list of the reports. Why not just return the reports itself? We don't want them to modify it, so we're going to return a copy of it. I guess we could just do reports.copy but this will have the same effect. But here's the thing, If we go to one of these and we say "dot" what's in there? We don't know. So it's gonna be good for us to define a class that holds that. And it makes sense for us to define this at different levels because it's gonna be easy for us to reuse some of it over here. Now, in practice, I'm not sure that would really happen. In practice, we might have database models and then pydantic models on the edges. But for this case, let's just go over here and create a file called "reports". And what we'll do is we'll have a class called a "report". We'll start out in one way that's not where we're gonna end up, but we'll have a base model. And what is the report gonna have? It's gonna have a description, which is a string, and it's gonna have a location. Now, this is super cool what we could do with pydantic here. Location, which is a location of that variety. So what we can do is we can say our report actually has this description and a location and we also wanna have a created date, which is an optional datetime. I've got to import a few things to make all that work. So this was "when was it created"? Perfect. This is the object that we're going to exchange. We're able to use our location already. We're here in the report services. What this is going to do is going to return a list of report. This, we still don't know what goes on here, right? We still don't get any help. But if we go up and say "this is a list of report as well" all of a sudden PyCharm and everything else knows it has a location and locations have countries and so on, right? So this is really a good idea. Put the type there, and then this is now going to return a report. So when we go and pass this data over, it's going to create this object and then send it back as well as store it into our reports list. So let's go over here and just capture what datetime dot now is, like that. And we gotta import that here as Well. Then we're gonna create a report, which is a report of this type. And notice, it takes stuff here, some arbitrary data, and the data it takes is "location equals location, description equals description, and created date equals now". And then we're gonna return the report, but we also wanna save it. Now, this is where we're simulating saving it the database because we're just having this simple thing like that. Alright, so we're gonna create one of these, put it into the report, saving location, the database type of thing, and then we'll just return it there. Alright, let's see if we can actually do a little test on this. Not terminal but the console. So let's see if we can make this happen. So from services import report service, then we can try report service dot get reports, should be an empty list. We're going to add a report. What goes in here? We have the tornado and the location. We're gonna have to import that. Hold on. Alright, let's see what happens if I run this. Oh, that's pretty cool. Alright. And then we have, this is our item here. We've got our created date and everything else, so it looks like this is great. Let's add one more report. This one is gonna be in Beaverton, a city near Portland. This is going to be hail. Now if we get the reports, we should have, it wraps wraps, wraps, wraps, right. We've got our hail and we've got our description there. Another thing that we probably want to do. When we put these in and then we ask for them back, we probably want to get the most recent ones, not the oldest ones. Right now, we're getting them in the order they were created. We probably want the most recent. So let's do, after we do this, let's do a sort here. We'll say given some kind of report, what we want to do? We want to sort by created date, reversed true. And now I guess if we, we could re-import this and do the same things, but you'll see that it's been reversed. It's getting a little clumsy to play with. So we've created this data access layer, talking to our fake database. One final thing I want to do is I wanna make this feel a little bit more real, even though I am faking it with this in-memory database. So in a real database, we would very likely wanna have an asynchronous database driver or library to talk to it like the new version of SQLAlchemy or peewee or some of these different ones. We'll make this async, and I'll just put a message that says this would be an async call here. It's not. We're not actually using the async aspect. But like this part right there, right, this would be the data call, right? This would be insert into the database and this would be query from the database. So just to give you a more real feel when we consume this in our FastAPI, this is probably what you want to aim for. So we built our models and we built our little data access layer. we should be able to create an API around this real easy now.
|
|
|
transcript
|
3:20 |
Well, we've written a way to get all the reports to git added to the system. Let's go write an API over here that will do that. So let me just borrow a little bit from there. What we're gonna do is gonna be "API slash reports". Now, remember at the beginning, we spoke about knowing your http verbs and what that means. This becomes really relevant here. So what we're gonna do is I'm gonna call this "reports" say get. Now If I go look in the documentation, you'll see that this API is registered under "reports_get" and that's not really how we want it. Maybe we just call it all reports. But I'll do it like this so you can see a feature here. We can come over here and set the name to just be "all reports", and that will actually control what shows up if you go looking like auto documentation and whatnot. So rather than just saying "reports", it'll say "all reports" or something. So that allows you to control the name separately from what the external world sees. Alright, so in order to write this code, it turns out to be pretty simple. There's nothing, you know, we're not asking for the location and reports near me, this is a simple version. All we're going to do is return a list of report, right? We don't have to put that type information there for FastAPI but it can help us. And how do we do this? Well, we say "report service", and that we got it import, like that. And then we'll just say "get reports". Return that. Now this might look like it's gonna be OK, but notice PyCharm is like, "Yeah, not so much". You're returning a co-routine. Remember, this is asynchronous. So to get the actual value, we have to await it. So we'll say await, like that. Now if we await the co-routine, what we get back is a list of reports. Let's go and just add, really quick, a few add report really quick. We'll add A and B and none. Put none there for, that should be fine. The type checking is complaining that it can't be none but should work. If we go visit "API slash reports", let's see what we get. There's that and nothing. What's going on here? What have we missed? What have we missed? Oh, I think that's not what it's saying. It's saying that we're not awaiting that call and the type checking is wrong. That was important. Okay, try again. Ah, error, Error, error. None Value. Pydantic is good and checking this for us, but, ok try one more time. Alright. Location. We need city, and we'll just say city equals Portland, city equals NYC. Alright. That should be enough to just add a little fake data and see it come back. Yes, we have it. Look at this. This is cool. So we pretty print this. Got a list of reports. Each report has a description, a created date and an embedded location. Sweet, sweet, sweet. You see? Yes. New York City and Portland. And right now that is the date and time. Cool, huh? So I just added this we could get actual data back. We don't really want that there. That's all we got to do to add this is we're gonna add another get, rename it so it has better meaning, but you'll see this is the, this is the URL, so we're going to do a get against reports. That's why I gave it that name. And then we just return a list of these right out of our fake async data server.
|
|
|
transcript
|
3:41 |
Well we've been able to get the existing reports, but in reality, we don't start with any. So let's go and add the ability to add a report. So remember our http verbs. Here we're doing, give me the information about the reports. We want to create something. Typically, that's a post. If you know exactly where it belongs, that might be a put. But that's not the case here. And I'm gonna rename this to "post", and over here this will be "add a report", something like that. So notice we might have this these ideas in terms of our API names, but what we're actually doing is we're doing get against the report resource, that gets us all the reports. We're doing a post against the report resource, and that creates one of them for us. In this case, what we're going to return is a report, not a list of them, right? So down here, we're going to go down and do an add report. We need a description and, what else? We need a location. How are we going to get that? What we did up here was we started out having a bunch of variables. Well we said you know, we could actually bind a pydantic model here. And so, we can definitely do that as well. We could actually say there's a report. I'm gonna give it a different name, sub, and that's a report, like this. And then down here, I could just do yeah, I went description. Description, and then reports service, that's why it's not working. Reports submittal, and a location is going to be the location. And that's gonna be fine, right? Come down here, see we'll get a description and a location, and then we're going to return, this thing returns a report. It seems okay, except for, let's go look at this report again. It also has this created date which we would need to set but would be potentially accepting it from the user, which is weird, because maybe it's a different time zone. Maybe they're lying to us about when it was created. We want the server to control what time it thinks this was created because it was created when it was created on the server. But this other stuff is useful. So let's do this. Let's go down and duplicate this and say this is gonna be a report submittal that has no created date. And this is now going to derive from the report. Submittal thing that is just as a created date. Okay, so we've got this is what users submit. This is what we create and store in the database and return back to them. Maybe it also has some kind of ID, right? It could have like an ID about it, but we're not gonna do that. Let's go ahead and do it, why not? This is going to be a UUID. Import that. Let's just put it as a string. We'll create out of UUID. Okay, great. So, then back here, that means we don't have to accept the full report, but we can just do this Report submittal, pass it over. It has all the information we need. This is gonna upgrade it to report and send it back. And let's go and set the ID equals to the string of UUID UUID 4. Alright, so that's a little bit of something there. It's a little messy. A real database would probably create that for us, but nonetheless, we've got it created. We've got our little fake ID to show the idea that we've got more data coming out of the database. Let's give this a shot. It's also gonna get a little interesting. We go over here and we request this. We get no data because nothing's been submitted. How do I call the other one? How do I call this over here with the post from my browser? Well, I could create a form and post it but it expects the body to be JSON right? JavaScript. No, no, no, no. There's better options. We'll look at some tools in a minute, but right now, it's only easy for us to get to this with our browser this one a little more tricky.
|
|
|
transcript
|
2:20 |
While our browser will let us do get requests really easily, over here, doing a post, while possible with some browser addon tools and whatnot, is not the best place to be doing that kind of stuff. So let's go over here to a tool called Postman. Postman is a freemium app you can check out and it lets you do all sorts of interesting requests. Like here we go like this. Let's get something back, like "weather slash portland" and run it. Here you can see our report showing up down there, right? But what we want to do is submit some data. Look at all these http verbs. We're gonna do a post and in order to do a post, well, we could send some stuff over. It's gonna say we're missing stuff. What are we missing? Just the body. There's no body submitted. Come over to the body and say this is raw JSON, make this a little bit bigger. And I happened to leave, I didn't leave that tab open. Too bad. Let's go and generate it real quickly just to get an example here. Let's go put this back. This will tell us what goes here, and look at the raw data. We got to submit one of those, basically. Put it back. Alright, So what we're gonna do is we're going to submit basically this right here. But remember, we could put a better description. We could omit the state. We could omit the country, if we wanted. ID We're not going to submit, the created date we're not going to submit. Okay, so the description is there is heavy rain, and this will be Portland. Let's go for the state is gonna be Oregon, just to be explicit. Now, if we submit that body, we might not have this missing field. Let's go. Yes. Look at that. What did we get back? Well, first of all, we got a 200 ok. That's not perfect, but that's a good sign. And then it says there's heavy rain. Here's the location. And it look, it created an ID and set the date, so it saved it to the database. And how do we know? We can come over here and do a get against that URL. get, get, get, and look. Here it is. Let's submit one more thing. Because there was that heavy rain, we saw a little bit of flooding, so we send that again. Now if I do a get request against this and see, here's the little flooding and there's heavy rain and again the sorting is working great. How cool is that? So here's how we can go and do a post and all the http verbs and really nicely work with our API and test it out.
|
|
|
transcript
|
1:31 |
Now, when we did this call here, we did this post. We passed some data that was in the body. It created this entity over here and everything worked. So what did FastAPI do? It said "great, everything worked. 200 ok". But let's drop over on our httpstatuses.com again and see about these success codes. So Okay, well, that's kind of the most generic term. And here's a representation of the resource. We actually did give that back, so it's kind of okay. But what would make more sense would be created. Over here, we're creating a new thing, we've accepted their data. It was all good. And we could either give them a location where it was created or something that describes it. And what we're doing to describe it here is this is you know, theoretically an ID You could do a lookup on in a database or some other API right? That's the idea, we're not fully fledged in this out. But a 201 created makes a lot more sense than 200. So does that mean we've got to go write more complicated code instead of just doing this? We've got a create a response and set all the information about it? No. Just like this little name up here, we could just say "status code equals 201". So if everything goes okay, that's what's getting submitted, or returned. Otherwise, it's whatever you explicitly set. So like we would up here, you know, 400 or 500 or whatever. Let's just submit this again. Boom. Check it out. 201 created. The request has been fulfilled and resulted in a new resource being created. And guess what? That new resource was returned as well. Awesome. Now we're playing nice with status codes.
|
|
|
transcript
|
1:34 |
Let's talk about how we're able to submit a weather report and all the moving pieces in our API. So we started out by using our existing location pydantic model, where it already had the validation. The city is required. The other stuff is either optional or optional with defaults. And part of the thing that they're submitting, part of the report, is the location where that happened, right? Also, we need additional information along with that location. What happened there? So instead of just taking a location and a description separately, we could actually go through pydantic and say we're going to create a report submittal class, and it has a location, and pydantic will actually do that hierarchical binding by traversing the thing that was submitted, finding its location, then binding that to a location object and so on. Beautiful. This is not the final thing we wanted to save or send back. But this is what we accepted from the user. Remember, we had a reports class that derive from report submittal. Here, we're using the location exactly to find above and pydantic binds that together. And then finally, we just have our async report post, or we gave it a name. Here it's just reports. Could be add report, something like that. It takes a reports submittal and it's not documented here, but add Report returns a proper report object. That's it. This is all we got to do, and it is super clean. Pydantic handles so much of it. Remember also, that it's not as easy to test the post API endpoints as it is to test the get ones in your browser. So you should look at something like Postman or some other tool that will let you very carefully control what gets sent over to your API and test it.
|
|
|
transcript
|
5:51 |
While it's fun to play with the API over here, let's go ahead and take it one step further and actually create a little application, a little client app, that will do this. Now, a lot of Web apps don't have stand alone clients, but imagine you're creating an iPhone app or something along those lines. We're gonna create a BIN folder and over in the BIN I'll create a report app. Something like that. I'll just set that, let's first run. Looks like the main is running. That's good. And let's run our little report app, okay. So when I just hit the button, it's gonna run this. So what's this going to do? Well, we've already seen how to consume these API's here, right? This. This is what we did. We wanted to consume it. We wrote that little bit of code to asynchronously do this. Actually, maybe we'll use requests just because it's simpler, we don't have to do the async event loop. Here we go. So what we want to do is let's just write a little bit of code, have a main method here, and it's going to say "while", let's say "choice" or, choice is fine. "Choice equals input". Do We want to report something new? Or do you wanna see them? And we'll say "while choice", we're just gonna do something, okay? We'll say "if choice dot lower, dot strip is r" we're gonna do one thing. Do another. Don't know what to do with choice. And then we're just gonna ask this question again. Great. So now what are we going to do with this? Well, we're gonna define a report event method here, and we're going to do a see events method. The see event one is probably gonna be easiest. All we got to do is go to our URL over here and do a get, right? We'll say the URL is this. Obviously you don't want local host in general, but for this example, that'll be fine. We'll say response equals requests. Get URL. Don't let it carry on if something is wrong. And then we need the data back, it comes back as JSON. So we'll just say response dot JSON. And then if you look over here, what we're getting back is a list of these things. Let me copy it over just so we can have it to work with. We'll say for, this should be a list here of reports, so r in data. Alright, I'm just gonna do something super simple. Like go to the location. Say this city has something going on right now, and we could do a lot more, but let's just go with that. And, you know, this might actually work. Let's go ahead and run it. It would work if we call it. There we go. Let's run it. Let's say I'm willing to see the reports. There are no reports. Is that right? No. There are reports right now. So what are we doing? Let's print out the data we got back. Print data. Oh, it would help if we call these, wouldn't it? Okay, so this will be report event. That will be see events. Perfect. Let's see them. Oh, yeah. Portland saw a little flooding. Let's go back over here and add something else. This will be our body that we're submitting. Here it is. Frost on the roads. Look out. If we just say I want to see reports now, look, Portland has frost on the roads and they saw a little flooding. How cool is that? The last thing to do is just do a simple little version where we submit this back. So this gets a little tiny, bit more complicated. But you just copy it from over here like this. We're gonna have the description. We'll say what's happening now and what city and here We'll just put the description, put the city, and I'm not gonna pass the state. Alright, so we've got our data, and instead of doing a get, well, we're gonna need to do a post. The URL is the same and what do we want? We want the JSON to be data. We can just say something has been happening here. Actually, we can just say, gotta grab that back, and then we come down and say, result here, dot get. Let's just say we've got a new event with this ID or something along those lines. Okay, let's make this really big, actually, let's run it outside like this. First, let's see the report. Awesome. Portland has frost and some flooding. Let's report the weather. What's happening? Sunny. Yes, it's sunny. Where is that? That is in Vancouver. Okay, that we reported some new event. We got it back from the server. How cool. Let's see that. Yeah, Vancouver is sunny. Portland has frost on the roads, and they saw a little flooding. Let's report one more thing. It's misty in Seattle. And we can see the reports, boom. Nailed it. So Seattle is misty. Let's get out of here. Hit enter, we're done. Okay, so that's a bit of a diversion. But hopefully you saw some value in creating this. Like look, it's all of 47 lines of code and it's pretty spaced out to actually write an app that interacts with this cool FastAPI that we created.
|
|
|
transcript
|
4:23 |
Well, we're able to create some reports. And if we go and run our report apps and say "show me the reports", I guess they're not there anymore. A new report. This will be in New York City now we can see them. There's some reports there. If we go to the home page, you don't see anything. Just see here's some examples of how you might call this, and we are not even documenting all the API here. But nonetheless, what I would like to do is I would like to also show those reports right here on the home page, just below this example. It doesn't necessarily make sense for this project, but just to show you sort of integrating into the templates. So let's go over here. Look at our view and our home. And over here we're returning a template response. And what else? Maybe we wanna include this is all the data that is available to the template. Maybe we wanna have events or reports or something like that. How do we get that? Well, that is super easy. We go, we put this into a separate library on purpose. Report service like that, and we just say get reports, there we go. That is it. Actually, is this async? It is async, so we need to await it. Await it, which means this needs to be async. There, that's that. And this data over here is going to be available to the template, so I'll put that maybe separate, like this. We're gonna pass this data over, and it will have events. And let's just go and add that down here, under home, under index. What do we want to do with this? After the list, after this. So if there are some recent weather events, let's just do a ul with an li inside of it. And then this we're going to repeat, we'll say "for e in events". Notice, we're not getting help here, so we probably need to set our template language to Jinja, there we go. So we're going to put in here. We're gonna put just put "e.description". Let's just put the city first "e.location.city e.location.country and a colon". Alright, so nothing happening there yet. We're gonna need to go and create one again, aren't we? Let's go back to our little client and say, I want to see the reports. Oh, no, it should be there says New York City has a report. what happened? I haven't restarted the app, and the app over here to be rerun, to do this of course, that's going to mean it's empty again, we're gonna need to do report. It's raining, raining in Seattle. Wow. And let's add another report. It's frosty in Portland. Now we see them. There's two. Over here, check that out. Recent weather events Portland, US. It's frosty. Seattle, US. It's raining. We could even do something to combine these. That might be fun. We could go and say, give us the actual temperature. And when we create these events, right. So over here, when we do this add report, we could actually store as part of the report, stuff that we get back from our weather service here, like submit a city we said, Well, let's pull up the temperature and store that we could make this really interesting and intertwined, but hopefully you get the idea. Let me add one thing. If there's no recent weather events, I would like to just not show that. So let's do that real quick. Alright, so if we refresh this, that shows up. But if I restart it which will empty out our events, now it's empty. Once we add one again reports some weather it's raining, raining Seattle. Refresh it. Boom, they come back. OK, so just to show you the data that we're working with over the API, totally makes sense to have maybe some client reporting it, but the Web app showing it. Anyway, Hopefully that diversion between creating the client and showing it here on the page was worthwhile You can see it's really, really, really easy to do. That's the HTML we had to write. That is the API or view method code we had to write. All this stuff was already done, it's just putting the larger building blocks together.
|
|
|
transcript
|
4:35 |
We're about ready to close out writing code on our API. We're gonna have to deploy it still, but other than that, we're basically done. Two really quick things I'd like to cover. First, I've added some fake data on application startup. So over here, remember our configure method? We have configure fake data, and the idea is that once the app starts, I don't want you have to go keep re-submitting reports just to get something to happen. So now over here, when the app runs, it always starts with two reports around Portland, Oregon and then as you add more, they'll show up over there, Of course. So that, just so you have it if you're wondering where that came from. But the main thing I want to actually talk about, just to wrap everything up here, is notice I've typed out some documentation here, and it's fine. We click on it and see stuff happen, and that's fine. But FastAPI is neat because one of its features is to integrate open API documentation with swagger. So if you just go over here and type "docs", check out what we get. Oh, here's your open API JSON response. And look, we've got our three things, we've got our API weather, city. If we look at that, it actually shows you it takes a city, which is a string. It takes, a query string, and which defaults to metric, and a country which defaults to US, and the state, which turns out to be optional. We could even try it and yeah, that looks all good. Execute, the city is required. Look at that, Portland, execute. And what is the response? There it is, down there. How cool is that? Right? There it is right there. So that's really neat. And if we go back, close this one up. I also wanna have get one for get reports, but check it out. You don't have any example Schema. What about this one? does it have an example, schema? It does. super cool. So we'll come back to what the example schema the other one could be, but check this out. It knows that this is a thing that we're going to submit. This is the report, submittal. Does it know what comes back? No. So we want to fix that real quick. And then Finally, do you really want to document the favicon or the homepage? No, that is not part of your stuff. So let's go and address those things. This is easy. We'll just say include in schema is false. Now if we just refresh it notice only our API endpoints are there. That's good. But if we go and look at the response value, we get no example schema. All that cool stuff about pydantic, it's going to come back and help us. So, like location there and so on. Let's go over. None of these are relevant, actually. Let's go over to our API here. What we can do is say on this one, what are we actually meant to return? What does this return? It returns a dictionary, and we don't really have a schema for that one. So I'm not gonna worry about this one because you can see how it works for all of them. But this one, we know this is a list of report. So let's go up here and say the response model is the list of reports, and here the response model is just a report. Run this again, see if it works. Seems to like it. Refresh this. So which one are we looking at here? Let's look at the get reports. This one. Look at that. It is a list of a full on response. Got the description, the location, the ID that gets generated and an example of the datetime there. If we add a report, it says it's going to take one of these. And what's it gonna return? It's gonna return the full proper version of it. Cool, huh? So we have this really nice built in documentation over here with our FastAPI, and by the fact that we're using pydantic models, or composition thereof, right? Reports which derive from submittals which have a location, and then we create a list of those, that kind of stuff. That already works really well for what we're doing. I kind of wish it would if it didn't have something here, it would look here, but whatever. It's still really nice that it generates that documentation for you. Final word is, if you're putting this into production and you don't want it to be a public API, take away the docs. Take away the docs URL. There's a way, I believe it's down when you create the app, I don't totally remember off the top of my head. But, go over here we set the docs URL to None. When you go back and try this, it's like, yeah, and there's no documentation. Right? So when you create the FastAPI app or API, you can just set it to be no documentation or have documentation or even better, maybe do it on the development situation, have it but not in production. So there it is, right. This cool little swagger UI for our API's, integrating with things like our pydantic models that are already doing the validation and the binding. It all comes together beautifully, doesn't it?
|
|
|
|
35:50 |
|
|
transcript
|
0:46 |
We've built a really nice API. It's got our weather report, it's got our ability to submit recent weather events and see those change over time. But an API is meant to be used by other people, by other applications and in order for that to happen, we need to put it on a server somewhere so applications can interact with it. And that's what this final chapter here is all about. It's about taking that application that we already built and deciding where to host it and then going through the actual steps of hosting it there. It's pretty straightforward. There's a lot of little details that you'll see, but they're just in a script that we can talk through, so it's not gonna be super intense. But that's the idea. We're going to go take this thing that we built throughout this course and put it on the internet somewhere that you can use.
|
|
|
transcript
|
5:49 |
I often get asked, where should I host my Web app? My Python Web app? People either ask me that after taking one of my courses or they'll ask me how to do that because of the podcast or something along those lines. And I have one answer that I typically give, but I want to talk about the spectrum of the options here because not everyone fits into the same bucket. So at the, probably easiest to get started and certainly easiest to operate, we have these platform as a service type of hosting environments for Python Web applications. so Heroku has been hosting many Web applications as a platform as a service, and they have great Python support. So what does platform as a service mean? It means you'll do something like point, you know, connect Heroku you to a GitHub repository. If that repository has a requirements.txt or other Python indicators right at the top it will automatically determine that it needs to run under Python. You add a file to say, "Here's the execute command" and it'll just go and create a server, set it up, make sure it runs. You push a new thing to that GitHub repo, it'll grab it, redeploy it with zero downtime, all of those kinds of things. So this is super helpful. But you don't have as much control here, right? You've got to fit into their ecosystem. You want to use a database? Great. You're probably using their hosted database, which is not that cheap, honestly, depends on where that money is coming from and what you're doing. But it's not nearly as cheap as doing it yourself, that's for sure. So Heroku is actually, if you're very unsure about working with things like running and maintaining Linux servers and virtual machines and stuff, Heroku or other platforms as a service are a really good idea to get started. My favorite place for hosting is Digital Ocean. And in fact, at the time of the recording, all of the infrastructure for Talk Python training runs over at Digital Ocean. We've got about eight servers there, and we do all sorts of interesting things with them to make all of our API's and our apps and our Web app and whatnot go. Digital Ocean just launched something like a platform as a service that Heroku who has called their App Platform. So you might consider using that, Python is definitely supported there. What I use is just there, what they call droplets. This is their virtual machines you can go create. Notice, starting at $5 a month. So for literally $5 a month, we could get this Python FastAPI up and running, no problem. We have a lot of database requirements. Maybe we gotta add a dedicated database server. If it's very, very lightweight, maybe we could actually put it on the same server. Anyway, it's quite cheap to get started. Linode is also really good, and they're comparable to digital Ocean in that they have a hosting of like these droplets, these virtual machines. They don't call them droplets, but same idea. They also, both Digital Ocean and Linode, have Kubernetes clouds or clusters if you want to run Docker. I'm not necessarily recommending that but it's, you know, if that's the way you want to go, they both have great support for that. Also, notice up of the top here this URL "talkpython.fm/linode". If you do want to go to Linode, use that and you'll get $20 off, Get a $20 credit towards your account. Not going to change the world. And I, it just lets them know that I'm sending people over. I don't actually get paid, this is just part of their sponsorship of the podcast. But, you know, it'll give you guys a little bit off so go ahead and use that if you feel like it. Next up, we have got a couple of the big ones. We've got a AWS. Now, AWS is amazing. I use AWS services for various things, like generating transcripts, the first pass of transcripts for courses, delivering some of the video content and things like that. But I don't host my service there. I think AWS is massively complicated and massively expensive. To run that $5 VM we saw over at Digital Ocean or the similar one Linode, how much does it cost? About $50-$60 a month for exactly the same thing. Yeah. And the thing is, it's super, super complicated because AWS runs extremely large scale applications, things like Netflix and so on, so all the tooling is really dialed in for these advanced use cases, which means the simple case is not so simple. But there is a simple, simplified version of AWS if you guys are over there, it's called Amazon Lightsail. And to run that $60 server over a normal AWS, you can get it for $3.50 on lightsail. Go figure. It's very weird, the fact that they have these two things. But they do, and my theory is that this is a direct response to Digital Ocean and Linode, and it's a very similar and simple way of creating things, so you might consider it. Again, I'm sticking with Digital ocean. We also have Microsoft Azure. They let you run Web apps as VM's. They let you run Web apps as a platform as a service, as well. So those are the hosting places that I would first go look at If I was hosting my stuff on the Internet. If I was trying to take this FastAPI we built put it somewhere that has good data centers, has good reputations, has good pricing at least, you know excluding the bare VM's at say AWS and Azure. But one of the uniform things about this, all of them, is that they're gonna ultimately run on Linux. So final thing, we're really, in this chapter, going to just focus on getting our FastAPI running on a Ubuntu virtual machine in the cloud. We're gonna actually create it on Digital Ocean, but that's just like a few clicks in some web app, and then you know, you won't even know what server, what host you're on. You're just gonna log into the server remotely and do a bunch of steps. So really, what we're gonna do is figure out where we're gonna run our Ubuntu virtual machine and on the platforms as a service, even when you're not directly interacting with that server, you really are running on some kind of Linux machine the vast majority of the time. So understanding what's going on under the covers is probably a good idea anyway.
|
|
|
transcript
|
3:51 |
Here we are inside my Digital Ocean account. Now over under these projects, we've got Talk Python and we've got this thing called Playground. If I were to click on Talk Python, You'd see we have a whole bunch of servers that are hosting many services and databases and all sorts of stuff going on over there. But this one is just a nice little empty space where I can work. So this should look roughly like what you would have. Now, here's the platform as a service, this apps thing. But what we're going to do is just create a droplet. A droplet is, you know, code word for "I'm going to create a virtual machine". You can see you could create a server based on many different versions of the operation system. we could do FreeBSD, Fedora, Debian and so on. And then within those you get to pick which version. I recommend if you go with Ubuntu you pick an LTS long term support version. Otherwise, you'll stop getting updates and that won't be fun. We'd also go for containers. You can go to this place called the marketplace, and it will let you, like, grab a pre-configured WordPress server or whatever. But that's not what we're doing. We're gonna create a distribution, and then you pick well, what kind of server do you want? I'm gonna pick the $5 server for this one. Now you might think, Well, this is a toy server. It's not really gonna be able to do much. But these servers can actually handle a lot. And Python does not put much of a load on these servers. It depends on what you're doing, but this little wimpy server, unless you have got some kind of crazy computation stuff going on, if it's a relatively standard Web application, it should be able to handle multiple millions of requests per month. So it's actually a pretty good starting point. The next thing we're gonna pick, we could add an extra hard drive, we don't care about that. You might need that, if you had say, like, tons of data in a database, you want to put that over there. Could make sense. We're not going to do that. Now you want to pick a data center that makes the most sense for the consumers of your application. For many of us, that probably means either Europe or the East coast of the United States. For us, our servers are in New York City. The reason is that's good for all of the United States and North America. It's also pretty good for Europe because it's a straight shot across the ocean, so that covers many of our users. We also have people all over the world, you know, places that are far from there, like Australia, New Zealand, which is not ideal. But we got to pick one place and just for us, East Coast of the US made a lot of sense. However, I'm on the West Coast. So just to keep things quick as local, we're gonna pick this, right? So you pick the one here that makes the most sense for you. Just be careful. If you're gonna create multiple servers like a Web server and a database server and you want them to talk to each other, it's much, much better If they're in the same data center. We could use VPC, virtual private networking. It's on by default, but we're not going to do anything with it. Might as well turn on monitoring. This lets us look at the server through some of the management tools here. We're going to use an ssh key which allows us to just log in, and just go ahead and type "ssh" and go and register the ssh key. We won't have any username or password to mess with. Going to turn them all on. Here's the project it's gonna go into, in playground. You could turn on backups, we're not doing that. So watch how quick this is. Oh, I should have given it a name. Oh well. Yeah, be sure to give us a better name, but I'm gonna leave this going in real time so you can see how long it takes. So I'm not going to cut anything out here. I'll just keep kind of rambling on. It should take usually about 30 seconds. So virtual machine is there. I think it's probably starting right now. Maybe some final startup script for the first time of running, and wait for it. That's it. I don't know, what was that? About 30 seconds. We can go back and check. But not very long. And so now we have a virtual machine over here. We just click that to copy the IP address. Ultimately, you want to map a domain name over there. But basically we're done with Digital Ocean. That's it. That was all of the Digital Ocean that we care about.
|
|
|
transcript
|
2:04 |
And we're going to say "ssh root at that address". Obviously, you would probably put some kind of domain name there, but first time it will say you have never been here, are you sure you want to exchange your ssh keys with them? Yes. And just like that, we're in. So the very first time you see, like, this warning and whatnot and it says, "you know you really should do apt update and then apt upgrade". This is check for updates, apt update, and then apt upgrade is apply those updates. And if you've ever put anything on the Internet, you want to know, you know that you need to patch it right away. Like here, if we log out and then log back in, notice it has 18 security problems. That's not good. So let's go and just upgrade it right now. Oh, and I believe it's like checking for its own updates the first time it came to life, so let's see how long this takes. Here we go. It was still doing like some background stuff with the upgrade system. Alright, so it should be up to date or ready to update and whenever you see these Linux headers, that means there's a new kernel upgrade as well. Okay, that took a moment because there's an insane number of updates to apply, but no big deal. Now, if we log out and just log back in, you'll see that a system restart is required. It's not always the case when you apply updates that that's true, but when you do a kernel upgrade or major things, it is. So we'll just type "reboot", wait about 5 to 10 seconds, and our machine should be completely up and running and ready for us to configure as our Web server. Perfect. So here we have our Web server up and running. It's not a Web server yet, it's gonna be made into one. But we have our Linux server running on the Internet safely because we've applied the patches. We still need to do things like set up firewall rules and other types of stuff to make it more safe. But it's a good thing to have here running that we can start working with and configuring, and we'll do that throughout this chapter.
|
|
|
transcript
|
3:18 |
Now that we've got our virtual machine running on the Internet somewhere, in this case up on Digital Ocean, what we're gonna do is talk quickly about what applications and server services on that server are going to be involved and how they fit together. So this little gray box represents Ubuntu, our server. What we're gonna first install, or first interact with when we make a request to the server at least, really we'll probably start from the inside out. But the first thing that someone coming to the server is gonna interact with is this Web server called NGINX. Now NGINX serves HTML and CSS and does the SSL and all those cool things. But it's not actually where our Python code runs. In fact, we don't do anything to do with Python there. We just say you talk to all the Web browsers, all to the applications, everything that's trying to get to the Web infrastructure. This thing is where they believe they're talking to, and it is what they're talking to. But it's not where what is happening. That's not where the action is, right. Where the action is, is going to be in this thing called Gunicorn. You saw that we use uvicorn, which is the asynchronous loop version of Gunicorn to run our FastAPI. But Gunicorn is a more proper server that is going to do things like manage the life cycle of the apps running. So, for example, if of one of the apps gets stuck in that process, freezes up, Gunicorn has a way to run in supervisor mode so it could say "actually that thing is stuck or it ran out of memory. Let's restart it" so the server doesn't permanently go down, it's just gonna have a little glitch for one user, and then it'll carry on. In order to do that, Gunicorn is gonna spin up not one but many copies of our FastAPI application over in uvicorn, which we've already worked with. And this is where our Python code that we write, our FastAPI, lives. So when you think of where does my code run? what is my Web app doing? It's gonna be this uvicorn process. And in fact, not one, but many. For example, over at Talk Python training, I believe we have eight of these in parallel on one of our servers. So when a request comes in, it's gonna hit NGINX, it's going to do its SSL exchange and all those things that the Web browsers do with Web servers. NGINX is going to realize, Oh, this request is actually coming to our FastAPI application, depending on how we've configured it. It's going to send a request either over http or Linux sockets directly. Gunicorn says okay, well, we've got this request for our application and there's probably a bunch going in parallel, which one of these worker processes is not busy and can handle requests? Well, this one. Next time a request comes in, maybe it's this one. Another request comes in, maybe those two are busy and it decides to pick this one. So it's going to fan out the requests between these worker processes based on whether or not they're busy and all sorts of stuff. So it's gonna kind of even out the load across them, especially, know if they're busy and not overwhelm any one of them. So this is what's going to be happening on our server and we're gonna go in reverse. We're gonna install uvicorn and our Python Web app, then going to set up Gunicorn to run it. And once we get that tested and working inside the app, inside the server, on Ubuntu, then we're gonna set up NGINX and open it out to the Internet and make this whole process that you see here flow through.
|
|
|
transcript
|
1:10 |
Before we start configuring our server, I want to set up "oh my zsh", or "ohmyzsh". Now, this is absolutely not required. But I find the ability to go back through history and use frequently commands and adapt them and stuff and just knowing how to work with Git, you can see like in the little screenshot here, the prompt changes based on where you are in a Git repository and things like that. It's just a lot, lot nicer. So I'm gonna go over here and I'm gonna copy this bit right there because that's how we're going to install it. And let's reconnect to the server. I renamed the host name because it was driving me crazy. So now it's "weatherserver". And in order to install this, I have to say "apt install zsh" because this is based on z shell. Then we run this. wait for a minute, make it the default. And now we have a little bit of a nicer prompt. The next time we log in, actually, gotta log out twice the first time because you log out of z shell, then log out of bash. We'll have this, You can see, our little new shell is here, and we'll see Maybe some stuff as we go through it. But this is just a nice little step. I find this a much, much nicer way to work with servers. So I encourage you to set this up. You don't have to you, but I find it makes life a little bit nicer.
|
|
|
transcript
|
3:37 |
I've copied what we built over in Chapter seven in to Chapter eight and made a few minor changes. And I did this without recording it, because you'll see they're just a bunch of config files we're gonna have to set. Like, for example, here's NGINX config file. We never type that from scratch. We find some example, and we adapt it. so that's what I did. We'll talk about that in a minute. But we also, I also put in here, there's a script that sort of takes us through these steps to set up our server. So we've done our upgrade and patch. We've installed z shell. Now we're gonna need a few other things in order to further secure our server and to make it ready, to get it ready to run Python. For example, make sure we have the Python 3 Dev tools so we can install things and so on. Let's go over here and put the build essentials, Git, Zip, and some other things. Not all of them are required, but they're all useful. Now we have things like Git setup, That's cool. Let's set up Python. On Linux, when we install Python 3, it doesn't necessarily come with pip or with virtual environment, so we're going to install all three of those now. And just talking about z shell, if I type "apt" for stuff that I could have done, because I typed sudo, didn't I? So if I type sudo, you can just see it will only cycle through the sudo stuff as you arrow, whereas bash, it just goes through the history and things like that. So there's a bunch of little nice touches. Alright, so now we should be able to run Python dash v, Python 3 dash v. There we go. 3.8.5. Now we're gonna do a couple of things here to make the system a little more secure. We're gonna do three things in particular. We're going to set up what's called "fail to ban" and to do fail to ban, what this is, is if somebody tries to log in over ssh and they fail, either through username password, which we don't have set up or through ssh keys, if they do that too many times, then they're going to be banned from attempting to log in. So this is a nice little service to avoid sort of dictionary attacks or brute force attacks against logging in. We also want to turn on a firewall. Linux Ubuntu comes with a firewall, uncomplicated firewall UFW, and what we want to do is we want to say, "allow ssh traffic and allow web traffic". So port 80 to start things off on http and 443 to allow SSL https traffic. Other than that, we want to allow nothing, and we turn it on it says if you have not allowed SSH and you say "turn on the firewall", you're never coming back. But luckily we have. So let's close this and just reconnect to make sure it's fine, it is. Then. The other thing is, what is our user? I'm root. Do you think running as root is a good idea? No. So not a good idea at all. So we're gonna install, create a new user, a user that doesn't have log in permissions, it's a wimpier user, and we're going to run our web application in that. That way, in case somebody happens to break through and take over our system, they're only gonna be able to do what API user can do, not what root can do. So that's good. We also want to create some log files, locations here, and then give that user permissions. I think I probably, they must have to exist first. So let's do that. And then we can say give them modify access to where the Web app needs to keep its logs. Alright, so we're not, we don't have our code on here yet. We don't have the libraries needed to run, set up like uvicorn, or FastAPI, but our server is much closer. We've got fail to ban, we've got the firewall running for only the ports we want to explicitly expose, the three, and then we've got our user that is a less privileged user to run our Web app as.
|
|
|
transcript
|
4:16 |
Next up, we need to get our source code on the server. Guess where the source code is? It's right on GitHub. In fact, it's right here on this public GitHub repository. So what we're gonna do is just clone it. And this is a really good way to get our code over there. You make a change, go into the server, do we git pull, restart the server. In fact, over at Talk Python training, we have a certain branch in our GitHub repository called production. And if we push that branch, we've got some infrastructure that will automatically look at that, get the new version, install the new requirements, restart, you know, take the one of the servers out of a load balancing situation, reconfigure it, start it up, then put it back in. Really, really sweet. So all we gotta do is push to GitHub, and that deploys to our Linux server. We're not going to go that far because that's fairly involved. So what we're gonna do is just manually do Git pulls if we make any changes. But that's a really nice way for us to get the source code on the server and keep it up to date. So we're going to do these two things. Now, I'm gonna clone into app repo so we don't have some huge long name. There we go. And if we see over at app repo, here's our source code and chapter eight, This is where we're working, okay? So we've got our source code over here, and you can see we've got all of our files. Now, one thing I do want to do, we're gonna need to run "pip install requirements" to set up our requirements. However, I realize I did skip a step. What we want to do is we actually want to create a virtual environment for our web application, okay? Why do we want to do that? Well, when we pip install requirements here, we're changing the server set up. And just like locally, we probably don't really want to change the server set up. Also, having a virtual environment means if something goes dramatically wrong with your Python set up, you could just erase that virtual environment and re-create it. It's not like something that you've got to reconfigure the server for. So that's a really big advantage. So what we're gonna do is we're gonna create this virtual environment and go back to our chapter eight. Here we go. Now we have our virtual environment. We can pip install -r requirements. And with that done, we should almost, almost be able to run our app. So we should be able to say "Python3 main.py", and that will run it, right? But there's a problem. It's a secret, do you remember? Our settings.json is not there. Remember we have our settings template like that, and it says you're going to need to create a settings.json file with your actual keys. so "nano settings.json", actually, let's start from our template. And then all we gotta do is we don't need this. It just says, "put your key here". So I'm going to go and put my key right there and save it. Of course, I don't wanna share my key with you, this is where your key goes. So I'm gonna pause the recording and then save this, should be able to run. You do that for your key. So our virtual environment activated, the requirements installed, and the settings.json there, we should now be able to come here and actually run our main. Yes. Look at that. How awesome. So uvicorn is running on our server as we hoped. Now, how do I test it? If I test, can't test it here because this window is, you know, it's busy. It's busy running the server, so let's go open up another window here, another terminal, and we can curl that URL. Now curl is fine, but there's a really cool library, http, httpie, "h t t p i e", that is really much nicer for doing this kind of stuff, but look at that. What have we got? These are the copyrights, Talk Python Training. Here's our weather service, a RESTful weather service, right there. So it looks like our service, our server's running, you can even see it process the get over there. So that is fantastic. We're very, very close. Now we need to find a way to make the system run this because you can see when I hit CTRL+C or if I would have logged out of my terminal, obviously the server stops. That's not good. We just want this to start when that server turns on when you reboot it just comes back. It just lives as part of the server. So we need to create a SystemD service or daemon over there so that it will run our Python Web app. But it's basically working, isn't it?
|
|
|
transcript
|
1:12 |
So, on the server, It's only purpose is to run this web application. To run this web application, we need to have the virtual environment activated. So what I'm going to show you is that, let's ask really which Python 3 real quick, so we know where it, there. Having that directory is gonna help. What I'm gonna propose is that we change our log in, so as we log in it just activates that virtual environment. Otherwise, if we do Python stuff, pip and Python and so on, It's gonna work with the system one. We almost never, ever want to change it. We almost always just want to work with this one virtual environment. So let's just make that the default. So we'd say "nano dot zshrc", go down to the bottom here and we'll say source, go to bin, Python will say activate, like that. If I exit out and I log back in, look at this. Yes, it's the right one. If I "pip list", it's all the stuff that we just installed, FastAPI and so on. That's super cool, right? So I totally recommend that you set it up so when you log into your server, it just sets up the environment for that one and Web app. If you got 20 Web apps and all sorts of things going on, maybe it doesn't make sense. In this simple world, I think this is the best thing to do.
|
|
|
transcript
|
4:13 |
Now we want our Web app to work all the time on this server. And if we try to request it, it's not running. Why? Because I logged out. That's silly. We just want it to be part of the server. And so what we're gonna use is something called a unit file, over here, to set up a SystemD server. So this is going to tell the system "Run this command when you boot", basically. So it says, go over to this directory, run this command. And let's, just let me do some line breaks here to make this mean stuff. So it says we're gonna run Gunicorn. We're gonna bind to that address. We're going to run four copies of uvicorn as workers. I talked about having multiple worker processes where our Python code, our FastAPI code is actually gonna run. So if you want 10, you put 10 there, 4 is fine though. And we're gonna run not WSGI, Gunicorn stuff, but a ASGI, uvicorn ones. We're gonna go to the main module and pull out the app API instance that's configured. Tell the process it's called that, make sure that that's the working directory, because sometimes this is little wonky. Set a log file there for access. Set an error log file there, then run it as the user "apiuser", it's a lot, right? But that has to be all one line because of the way it's issued. So I'm gonna just copy that. Now, you want to make sure this is going to work before you try to set it up as a system daemon, okay? So just making sure that line is going to do something is a good idea. And it doesn't. Why? Because there's no Gunicorn. So we got to go back over here and we've got to install Gunicorn. And Gunicorn and uvicorn on the server require these two libraries as well. So we're just gonna do those three things. Looks like a pip install wheel would have made that a little bit nicer, but I'll change the script for you all. Here we go. Anyway, installed slightly, slightly quicker. Now with those set up, let's go and try to run our command here. We're gonna run Gunicorn this. What happened? Nothing. And that's good. All the output is going to these log files, okay? So let's just make sure that we can connect over here and now we'll be able to http local host 8000. Nice. See, for example, color coding. You can see the header information, all kinds of good stuff that's better than curl, but still working. Good. So let's move that to the side for a minute and we get out of here. It looks like it works. One thing that may be helpful sometimes, especially if you're getting errors is you just try it without the logging. That way you see all the messages right here. And if we go back and do this again, you don't see that. But at least you see the start up process. Something goes wrong, often you'll see the error right there. We'll see to get out. So it looks like that command is working. That means it's likely going to work if we set it up as a system process instead of just typing it in. So what do we got to do to do that? We just copy that file over here, like this. And then we say we want to use the system control to try to start the thing called weather, because right now if we look, not there. If we try this, so this is kicked off the thing as a server in the background, now it's just running. Yes, it works! How cool is that? And you can ask, go up here you can ask "status". What's it doing? Look, there's four worker processes all running over here. That's great. Now we also want to say "do that when I reboot, not just this one time" and the way we do that is we say "enable", perfect. And now we could do a test. Reboot and just make sure when we get back things are still hanging together. So give that about 10 seconds. You don't have to do this. It would have been fine, but just, you know, peace of mind to make sure that it really is set. And it's back. Let's do our http local host. Yes, alright. We rebooted the server and now our service is running still. So perfect. We've now set up Gunicorn And uvicorn to always run our app. But you still can't get to it from the outside. Remember, it's listening on local host. But this is a huge start. Actually, this is the hardest bit of it all. If we get this working, we're pretty golden.
|
|
|
transcript
|
3:29 |
The last thing we need to do really, is to set up NGINX so you can talk to our web API from the outside. So this is super easy, we're gonna install NGINX, go back here and off it goes. It's going to install a bunch of stuff. NGINX is a fantastic front end Web server, can do all sorts of cool things with it. Okay, Now we're going to need to, just like before, copy a configuration file over because that's how this all works. And in order for this to work, what we want to do is we're gonna have a domain name. Imagine Like "weatherapi.talkpython.fm" or something, but because it's not a real thing with the real domain, just a simple demo, I'm going to just put the IP address here as well, let me actually get IP address copied here. You wouldn't normally do this, probably, but because we don't have a domain name and I don't want to mess with DNS and wait for it to propagate, we're gonna do that. So the thing basically says we're gonna set up a server to listen on port 80 to the domain and maybe IP addresses. There's a set of static files that live here. So if somebody asks for "/static", give them files out of that folder. Otherwise, anything else go and proxy pass over to Port 80 on local host. That means talk to Gunicorn, which will fan it out to the uvicorn workers, and that's about it. There's really not a whole lot else going on, but notice this change. We've got to get this up to the server. Let's go commit that and then push that to GitHub and then we'll go here and we'll cd to our apps, app repo. We'll git pull. We can see our server change there. And then we're pretty much set. We just gotta copy this file. We might as well copy paste, so you don't get it wrong. And then we need to tell it also, we want to remove the default just NGINX's installed file and make it use ours. And then we're going to tell it to start when the server starts and then we're going to restart it so it re-reads the config files. All those things are good. Now, if we try http, remember that local host 80? Port 8000? What if we just do local host? This will talk to NGINX. It's working! So, go over here, I need my IP address back. Let's go on the internet and see if this works. Fingers crossed. Yes! Look at that! Our server is up and running, and all we got to do is go to the DNS and put a proper domain name there, and we would have our thing fully on the website. Up and running on our Ubuntu server. So what does it mean to have a domain name and just go to wherever your DNS is and tell it that this IP address is where that domain name goes And make sure that that domain name is right here. You can have multiple domain names, like you can have Alright, we could have "reports.talkpython.fm", "weatherapi.talkpython.fm" and so on and so on. Whatever ones you wanna point at the server, long as they're in there, the rest will just flow through the system. So, super cool. We got this working. Let's just check that our API does its thing. Yeah, we went out to open weather map. We've got it. Put it here. Now, of course, it's using this caching. Let's actually do an inspect element. Look at the network. Make a call again, look at that, 45 milliseconds. 39 milliseconds. That's all the way to the server across the Internet. Down to San Francisco or wherever it was we picked it. Very, very cool. So our job here is basically done.
|
|
|
transcript
|
2:05 |
Alright, Final, final thing. Notice this up here says "the connection is not secure". That's weird. So browsers these days and Google and so on are making sure that we have https for almost everything. And if they're not, they're not secure. Even if this was a domain name, it would not be happy. So how do we do that? Do we go and buy an SSL certificate? That's so two years ago, no we wouldn't do that. So what we would do is we would go over here and we would add this repository, like this, over here. And once we've done that, we're going to install Python certbot NGINX. So this is going to use "Let's encrypt". Python 3, yeah, Okay, Good. Beautiful. And I'll update that as well here for you. And then we would just run certbot NGINX, like that for this domain. And it's gonna look and says "great, what's your email address?" I'm Michael at talk Python. I'm gonna put a little thing here so it doesn't actually email me or contact me because this is not really gonna work. And it says "do you accept the terms?" We do accept the terms. I don't want to share that because it's fake. So it's going to try to go get a certificate, but it's gonna fail. Why did it fail? Because it said, Alright, great. You want to set up a certificate for "weatherapi. talkpython.fm", is the place I'm running on where that URL resolves to? Like, am I actually on the weatherapi.talkpython.fm server? No, because that domain doesn't go anywhere. But if I had pointed here and waited for the DNS to resolve, this would just automatically install SSL on server and it would just keep it up to date. Beautiful. So that's all we got to do to make SSL work. But of course, it requires this DNS things you can't create fake servers elsewhere and so on. Not gonna actually go through this step by doing the DNS, but it's super simple to follow. There's a few questions about whether or not you want to redirect. If somebody hits the non-ssl one, say yes. So this is a really beautiful, free, and automatic way to keep a up to date ssl certificate on your web server.
|
|
|
|
10:40 |
|
|
transcript
|
0:26 |
That's it. We've reached the conclusion of the course. You're ready to build production grade API's with FastAPI. And you've seen how easy this is. There's so much that FastAPI does for us that we don't have to keep track of and make sure we're doing right ourselves. So in this short chapter, we're going to review what you've learned. We're going to spend about one minute per section, per chapter, and just make sure that all the main takeaways are right here for you to make sure it sticks.
|
|
|
transcript
|
0:55 |
we've seen that creating a basic, simplified, FastAPI application is really simple. So all we have to do is import FastAPI to use it and then we got to run it somehow so we're using uvicorn as the server. Then we create either app or API equals FastAPI dot FastAPI, this is very flask-like. And then we create some function and we express some kind of URL and http verb combination. So API dot get this URL and it can return basically whatever. If it returns a dictionary or a list that becomes JSON, this is also JSON, but it's just gonna be the number four, and that's it. In order to serve it, we just have to call uvicorn dot run and pass it the API and optionally we can explicitly set the host and the port this way. This might not be the best way to organize large production grade applications, but it gives you a sense of what's involved getting things up and running.
|
|
|
transcript
|
1:21 |
One of my favorite features of modern Python is type hints, the ability to put type information right into our Python code that is somewhat like the static languages that have very rigid structure, but not quite so picky. So here we had this simple example of, remember our menu ordering app that would tell us how much we spent on different meals? Well, it had a running max for the maximum order of any of our meals, instead of just saying that was none, which gave us no information at all about it, as well as the editors, that this is an optional integer and optional means it can either be an integer or none. And then we had a function that's going to work with that running max, and it's going to take some items, these are out of our menu and each one of those was an item named tuple. So here we have an iterable of item coming in, and then the return value is an integer. Now in many places in Python, this is here to help the editors and other linter tools that will go through our code and tell us if things are alright, but runtime it doesn't matter. We saw that, actually, in things like pydantic and FastAPI, this type hints, type information is taken farther to actually do things like type conversions and checking for required values, whether or not they're optional or they're non-optional and so on. So this is a really important concept in general, and it is especially important in the FastAPI world.
|
|
|
transcript
|
1:33 |
The next major thing we talked about was pydantic models that are kind of like data classes, but do all sorts of cool conversions and validation. So imagine we want to accept some kind of order. It has an item ID, a created date, a price and pages that are visited, and the item ID, the created date and the price are all required. The item ID is an int, price is a float, date is a datetime, and then there's pages visited, which could be a list of integers, or it could be nothing and has a default value of just an empty list. So if we want to describe our data like that, we can do this very concisely by just deriving from the base model. Then, given some dictionary, like this ordered JSON here, where the types are convertible too, but not exactly what we're looking for. For example, item ID is a string, but the number "123" as a string can be converted to 123 and the pages visited is a list of almost numbers which could be converted to numbers and so on. What we have to do is pass that data over using the "**" operator to turn it into keyword arguments like item ID equals the string 123 and so on. It will automatically convert that into a proper order or complain and give us a meaningful error message about what was missing, what couldn't be converted and so on. So pydantic models are super useful on their own. But we saw that FastAPI makes really important usage of it, right? We can pass it as arguments to functions and a stuff submitted to the API automatically gets converted. We can use them for documentation by setting the response model, all that kind of stuff. So pydantic plays an important role in FastAPI.
|
|
|
transcript
|
0:53 |
One of the most important things we can do for scalability and making our Web servers handle more traffic with less hardware is to take the times where we're waiting on external services and allow other code to run. Whether that's waiting on a deep database server to get back to us, calling an external API and waiting around for it to get back to us, the ping time as stuff travels through the Internet and connecting all those different things. So we saw that FastAPI natively supports async methods. It makes it super easy for us to work with them. So here to convert our weather API call to an async call, we just put the word async def instead of def to define the function. And then when we call any async operations like get report async, we just use the word await in front of it. That's it. Now we've gained tons of scalability by allowing the processing of other requests while we're waiting on the report to come back to us.
|
|
|
transcript
|
1:02 |
FastAPI is an API first framework, meaning if you just write basic view methods and return stuff, it's going to treat it as JSON data and kind of talk to in styles that typically API's and things consuming API's would expect. But that doesn't mean you can't actually do basic Web stuff, HTML stuff, there. So Flask supports Jinja templates, and that is also built into FastAPI. So we could come over here and write our index.html, which derives or extends from layout.html. In order to use it, all we have to do is come over here, create the templates object and say where the templates come from. Remember, this means we have to pip install Jinja in order to do so. And then during our function, we want to return HTML, we just say templates, template response, give it the name of the template and then some kind of dictionary with all the values being passed over. You have to have request in anything else you program against, But request is a minimum. And that's it, now you have a web framework on top of FastAPI.
|
|
|
transcript
|
1:18 |
When everything goes right, all we have to do is return some piece of data, maybe a pydantic data model or a dictionary or something like that, And FastAPI will convert that over to the data that we're going to send back in JSON typically, and it's gonna send a 200 all ok status code. But what happens if something goes wrong? We can't just return a different style of data. That's not enough. So what we're gonna do is actually return explicit responses from FastAPI. So here what we're doing is we're saying we're gonna try to do this processing and return a dictionary correctly. And if for some reason that doesn't work, we'll catch any validation errors and say, here is the error message and the status code, which is usually 400, but sometimes it's 404. And if something else goes wrong, like nothing we expected, but the server still crashed, we can convert that over to something like error processing, request status code 500 and log it and then send that back. So be sure to leverage this ability to send back meaningful http Status codes. Remember, "httpstatuses.com" tells you all about the different options, and you can go over there and pick the right one and use this style of programming here to send that back and have a meaningful, nice, well-behaved API. When something goes wrong, it tells you what went wrong rather than just crashing.
|
|
|
transcript
|
1:29 |
We spent much of the time with our API just trying to talk to it and have it give us answers. Give us the weather in a location, maybe converting that over correctly and so on. But eventually we said, Hey, it'd be great if the applications could submit data to the API, and actually make changes to our in-memory data, which ultimately would be a real database. So in order to do that, we set up a couple of pydantic models. We already had location, which derives from base model with a city, country, and state. We were using this for our search, and we said we're gonna also have the ability to submit a weather report which has a location. Notice how we're leveraging here the other pydantic model in a hierarchical way for location. It also has a description and pydantic can keep this all together. And then for our API endpoint, we just say it takes a report, which is one of these types, a report submittal we called it, and then it will automatically take that data that's submitted over, with the description and embedded location, and convert that and validate that exactly like we expected. The other thing to note is our http verb, we're no longer doing router.get, we're doing router.post, that means were changing something. Also what we ended up doing in our example, I didn't make it to the slides here, is on the router.post decorator we said the status code is 201 by default. So if things go well, don't say 200 ok, that's not normally the response from a post. 201 created so we can have it automatically do that when everything works out.
|
|
|
transcript
|
1:18 |
Finally, after building and perfecting our API, we said We want this to live on the Internet so it could be consumed by applications and all sorts of stuff like that. So we ended up picking some kind of virtual machine. We use Digital Ocean, but you could use any of them, really. And it's more or less the same. We have our Ubuntu image and we said we're gonna install NGINX and Gunicorn. Gunicorn is going to run a bunch of uvicorn worker processes like this and over in uvicorn, this is where our Python code is going to run. Our request is going to come in over https, and set up and configured by Let's Encrypt, and that's gonna internally either go through http or direct sockets on Linux and Gunicorn is going to be in charge of figuring out which worker process is not busy as these requests come in and delegate it out. So this is a really, really great architecture for hosting and serving our API. It's quite similar, actually, to what we're running over at Talk Python training. We're not using FastAPI, I wish we were, but it was written before that existed. But the general architecture of how we're doing the deployment and whatnot is quite similar. Remember, I gave you a bunch of scripts and configuration files. So mostly this is about understanding what's happening, making minor tweaks to paths, and then just running those scripts, you know, step by step to make sure everything works, and you'll have your server set up and ready to go.
|
|
|
transcript
|
0:25 |
Finally, I just want to say thank you, thank you, thank you for taking my class. It's really great that you were here and made it all the way to the end. Hopefully you've gotten a lot out of it. I hope you get to build amazing things with FastAPI. It really is a neat framework and I think you could take it a long ways. So, if you want to connect, just find me on Twitter where I'm @mkennedy. Of course you can listen to the Talk Python To Me podcast and I'll see you in the next course.
|