|
|
|
11:16 |
|
|
transcript
|
4:32 |
welcome to the course. Thank you for considering adding a CMS to your web app as one of the courses that you're going to study. Now, let's dive right in and talk about data driven pages. And CMS Page is understanding the difference between these two things will show you the value of this course and what you're gonna learn. During most Web applications we build in pyramid or other frameworks like Flask and Django. These are data driven web apps, and what I mean is the page always looks the same, no matter what thing you're looking at. Here, for example, is PyPI. I might be wrong, and we're looking at the AWS CLI package, the command line interface for working with AWS in this page. It's always gonna look like this, but little elements will be filled with parts of the data from one or more tables from the database. For example, here we have the name of the package and its version. Here we have how to pip install name of package. Over here we have whether or not it's release is the latest release. And when that was, here's a little summary that comes out of the database. Some details about links and information, the project description, all of these things. No matter what package I look at, it's always gonna be little cookie cutter stuff that fills in these pieces of information. Another example might be Amazon. You go and you had a category, then you pull open item and it showed you a picture and has the reviews in the price and that kind of stuff. Those are the data driven world. They're very, very structured. They're HTML template is all built around having this little holes where you plug in the data in. It's the data that varies. On the other hand, in the much more freeform world, we have things like WordPress and medium and other sites. Joomla, you name it. There's a bunch of these that are much more. I'm going to log in, get a text editor. I'm gonna type information that's going to create pages and blogs and articles and all that kind of stuff for WordPress. We could come here, we could log in and we would get something that looks like this is my personal blogger, WordPress here and notice. It's not just a block. It has pages. It has a navigation. It has blog posts. Of course. Here's some of the pages, and if I want to go edit him like, for example, that contact Michael one. Unlike a data driven app, I don't go and start editing source code and redeploy the website. No, I can go and pull this up and set the title and right arbitrary HTML. And here and notice on the right a bunch of capabilities to change the layout, to change the URL, to publish or not unpublish this page and so on. And then eventually, once I write and publish it, you can see here is the page that you saw in that editor. This is very different than the data driven world. You basically have a freeform editor that creates all of this content. But the most important thing is sometimes you want this behavior from the CMS, and sometimes what you want is that data driven behavior, most e-commerce or other types of apps along those lines. There the data great driven kind. They've got categories, they've got details and so on. But you probably want a little bit of this. CMS stuff as well. And the big challenges. Should we create our site in a CMS like WordPress? Or should we create our own data driven site and just suffer the deficiencies or require that developers set up the landing pages and stuff like that? And what we're going to find in this course is that it doesn't have to be either or we're gonna take our pyramid Web. App will have data driven pages and CMS pages. The data driven pages will be powered by the database with their very close structure. As you see over here, the other pages will be more like landing pages, marketing people support people can log in into a very rich editor that we're gonna add, and they're going to just write content that's going to generate our site. But the important thing is the CMS side of this story over here on the right will still have the capabilities of our website, for example, noticed in the top. This site will still know that were logged in. It will still have access to a lot of the functionality that is this rich Web application that we built, so it's not like, well, half of the site is now this weird, disjointed CMS thing. And the other half is the proper web app, no, they're the same thing, and we're just gonna learn how to add this cool CMS capability that's gonna be high performance. Has rich editing all sorts of cool capabilities plugged that into our existing data driven web app without interfering with what's happening there, but adding this great capability that non developers can contribute to the content of the site.
|
|
|
transcript
|
4:38 |
So what are we gonna cover during this course? One of the specific lessons and chapters we're going to start by focusing on routing how we describe and control which your URLs or Web site responds to. And what part of our Web app those Urals our map to? You'll see that routing is the very center point of the CMS capability. Not super complicated, but it's going to be in this one place after all the data driven stuff has happened. Or we're gonna lock in and grab onto the URL and get a chance to decide if this virtual idea of a page or a redirect or something like that belongs to our CMS or it really is just a bad request and it's a four a four. So we're gonna talk about routing specifically around how we add the capability to add CMS requesting basically catch every single request of the site. Then we're going to start from an existing app. The ideas were taking a data driven Web app as I showed you in the beginning, and we're going to add the CMS functionality to it. So we have a rich, powerful German Web app that we've already created, and we're going to do a quick tour of that. So you're able to understand it and work with it and completely know what we're working with as we start building on top of it there won't add to core CMS capabilities. First is we're gonna create some kind of redirect service, something like Bitly. So, for example, if you were to go to talkpython.fm/ YouTube, that's going to redirect you over to YouTube with some huge, terrible girl that I honestly can't remember. It's like 20 random characters. So what we'd like to do is one of the features of our CIA masses. Have the ability have simple, short, memorable URLs that we can share on social media that we can put in other places and to say, like signature of an email, something like that. And then it will actually take you to the real page, either somewhere else on the site or somewhere even external. So we're gonna take our first step into the CMS world by adding this redirect feature to this app and then more in line with Brian what you're imagining. We're gonna add basically the capabilities of WordPress to our site. And what I mean by that is the ability to create arbitrary landing pages with rich formatting with a rich editor. Control the or Els determine whether or not their public or hidden those kind of things. So we're gonna have these redirects, and then we're gonna add these pages now. Actually, having them displayed in our site is pretty straightforward, but having the admin section to properly work with them and edit them, that's gonna be a lot of what we're gonna focus on Chapters three and four. Of course, we want to save this content to the database. Up to this point, we're not actually gonna worry about the database, which could be used like bake in memory structures that will stand in for the database. But eventually we're going to say, Let's stop for a minute and store this into our database using SQLAlchemy. I'll show you how to do that. We also have an appendix on SQLAlchemy. If you're not familiar with it, you can check out the appendix, but we don't go over it in the course proper. Each team l is, ah, decent format, but It has a lot of problems. It's hard for people to make sure they make no mistakes. They close every opening Div as a closing div and so on. So for the most part, we're gonna leverage mark down. But we're also going to see that we can bring in little bits of HTML. Avi need fancy formatting like a giant image that spans the top of the page or something along those lines. We also want to have a rich editor. We're gonna need a really nice editing experience, both for beginners who are not familiar with HTML a markdown, but also something with cool hot keys and highlighting and color hence and what? Not for people who know what they're doing but just wanna have a much better experience. So we'll see that we can bring in some really powerful back in editing tools for our pages. And then we're gonna bring in a library that lets us reuse parts of mark down within other pages. It's dramatically, dramatically, faster. You'll see. We'll get, like, 100 times speed up by going from standard Markdown to this advanced markdown system and so on. So we're gonna use this other library that take some of the ideas here but makes them very high performance, more reasonable and just gives new capabilities to our whole CMS. One reason mark down and HTML. And finally, we're going to add a little bit of logging to make sure that we get good visibility to what's happening in our application. And so this is what we're gonna cover. I think it's not super hard to build, but it adds an incredible capability to our Web application that's gonna pay off for years and years as other people can log in work with our Web app. In a lot of the pages that were creating or managing, don't require developers to go change code and then redeploy it. That's just more like WordPress. You log in and you edit the page, edit the redirects, and off they
|
|
|
transcript
|
1:26 |
So what do we expect that you know, when you take this course, Obviously, beating the right expectations means you're going to get the most out of it. You'll be able to fall along everything. So we assume that you know, Python. This is not a beginner Python course. So it starts with an existing Python Web application, and we used Python to add a bunch of cool features to it. So we assume that you know, Python. What we're doing is not massively Advanced Python. It's not meta classes and all sorts of crazy programming, but you do have to be able to program in Python able to fall on. Of course, this is about the Pyramid Web framework, and we're taking a nap written in Pyramid in extending it. So you have to have a little bit of knowledge about pyramid again. You don't have to be a complete expert, but having a tiny bit of experience will go a long way, and then the core Web foundations, HTML and CSS. We use HTML. We use some CSS styles, but we don't really talk about them. We talk about some of the more advanced features we talk about some form validation and some of the things like that, how we create some forms and we could submit them back to our site For our CMS admin side of things. We use a little bit of styles. None of these air super intense again. But we don't start from scratch with us. We assume, you know, pyramid a little bit. We know you have some decent working capabilities in Python and that you're somewhat familiar with HTML and CSS. Other than that, we cover most of things you need to know. We do. You're welcome, but we have an appendix that starts from scratch there if you need to learn.
|
|
|
transcript
|
0:40 |
finally let me introduce myself. I I'm Michael Michael Kennedy. I'm the author of this course as well as a couple other things that you can follow me over on Twitter, where I'm @mkennedy. I'm the founder and host of the Talk Python To Me podcast. I also in the co founder and co host of the Python Bytes podcast. Both of these, I get a great view into the Python ecosystem, some of the experts creating the tools that we're talking about here. So it gives me a good perspective on what to recommend and whatnot Teoh. And also, I'm one of the principal authors and founder of Talk Python Training. This is me. Welcome. My course. I'm really, really excited to have you here. I know you're gonna have a fun time, and I'm looking forward to the journey together.
|
|
|
|
5:27 |
|
|
transcript
|
2:05 |
it's important that you follow along in this course and that you, Brian the code and explore these ideas on your own computer. In order to do that, you got to make sure your computer is set up to run all the code and work in the way that you're going to see us working during the course. So that's what this chapter is about. Would you be surprised to hear that you need Python for a Python Web course? Of course not. But specifically, you're going to need Python 36 or higher these days. That's pretty common. Most systems have had bite on 36 for a while. It's been out for a couple of years, but if you have 35 or lower, some things might not work. Some of the syntax that has been introduced is really nice and will probably end up using it things like f-strings and so on. You want to make sure that your Python 36 so you can go to Python dot org's Get that? How do you know whether you have Python or private on what version of Python do you have on macOS and Linux? You can heip Python three dash capital V Not lower case Capital V, and it'll output the version Something like this. It will say Python 381 on windows. Depending on how you installed Python, you may be of the type Python three dash capital V, but not every way you install Python A Windows has that feature. So you might have to say Python bash Capital V. Now, depending on your path is set up in which versions of Python you have installed you might have pipe on two and three and whichever one appears in your path burst is the one that's gonna run here. So you could say where Python on windows and I'll show you all the things got installed. You can adjust your path to have the right one. So three it is great. If 39 is out By the time you're watching this or some version down the road, that's fine. Newer is better. No problem there. Just make sure you have 36 or above. Finally, if it turns out you have an older version of Python or you don't have Python and you need to get it well, this visit real Python dot com slash installing Dash Python. They've got a list of how you could install Python and the preferred ways of doing so for all the different operating systems that would check out that article if you need
|
|
|
transcript
|
2:16 |
If you're going to follow along, probably the best thing to do is use exactly the same tools that I'm using during this course. And I'm gonna be using the editor PyCharm. This by far, in my opinion, is the best editor for Python in general and really, specifically, for data driven web apps because it has awesome database tools, really good web support as well as Python itself support. So I recommend that you're going to use PyCharm for this course The best way to get PyCharm is to get the JetBrains Toolbox App, because then it lets you automatically choose between different versions, rollback versions If you need to. It will auto-update for you and things like that. It's a free little extension. You might have to create an account, but then you could just install things. Now PyCharm has two versions, It has the Community Edition, which is great for regular Python code and the Professional version, which is actually what's needed for web development. The database tools and the Web tools are only included in the pro version. So your choices here. If you already own PyCharm Pro good use it If you don't, there's a trial. You can use the trial. If you've already used up your free trial, you can buy PyCharm Pro by the month. It costs $9 for regular users per month, so you could pay $9 once and while you're taking this course or if you're a student, you get half price so $4.50 for a month And if you have an open source project, you can get it for free Visit the site under buy and their special offers and individuals and monthly payments and all that So the point is, it's either gonna be gotten for free or very, very cheap, like $4.50 a month if your student and so on. However, if for some reason you don't want to use PyCharm, the other editor that I recommend is Visual Studio Code. So Visual Studio Code is really, really nice. It's just not as nice as PyCharm, in my opinion. But if you do get it, make sure that you install the Python extension It's the most popular one, so it should be right at the top of the list of extensions here. But you're gonna want to click that little tab and then it'll open up this thing. You can install Python because you're gonna have to have Python Of course, in order for you to do stuff with it for the Python code All right, so that's the story with editors I would recommend use PyCharm professional. If for some reason you can't or don't want to do that Visual Studio Code is a great fall back.
|
|
|
transcript
|
1:06 |
To work with this project. To take this course and follow along writing the code, You're absolutely going to have to go and get the starter project. This is a non trivial, data driven Web application that we're adding a CMS to. So unless you want to go and create the whole thing, Or you know, maybe all along but add it to your own app. If you wanted to follow along exactly, you really want to go over here and get the code, download it and have it locally to start working from. And as we work in Chapter three and four and five, you know, take the starter code for three and work it over until it's what it should be in four and then to five and so on. So you want to go to the GitHub Repo here on the screen is also listed in your course page, your student page and the course training site. So you just click to GitHub repo right there, and it'll take you straight to the GitHub repo, So that's the easiest way to do it, but make sure you either clone or download it as a zip file. Also star it and even consider forking it to your own account so that you have it saved forever. All right, So don't forget to get the source code. We're actually gonna see how to do that, coming up soon in the next chapter
|
|
|
|
14:09 |
|
|
transcript
|
2:28 |
Before we dig in all the exercises and code that we're going to write, and the concepts that we're gonna cover around adding a CMS to our Web app, let's talk about the application that we're going to start with It doesn't really make sense to start from entirely a brand new application for this course The idea is you already have this application that's like something like amazon.com or something Where it's driven by the structure of the application plus the database. So you may have, like catalogs which have items for sale that each have a details page. Those are very structured on what's in the database. But of course, our goal is to add on these more free-form writing WordPress style capabilities to that application without completely switching over to something like WordPress. So what we're gonna do is we're going to start with the application that is that data driven Web app, but has no CMS capabilities. So in this chapter, we're gonna check that out. As Python developers, we've all visited pypi.org at some point, I'm sure. This is the place that you can go over here and find all the different projects that you can use in Python. So pyramid, for example, is listed right here and currently it's 1.10.4. So this application is exactly that style, right? So we come over here, you find very packages, and these packages each have a very clear structure. They have this release history They all look just like this here, right? So they're very, very data driven. Now, let me show you a slight variation on this. Check out this page. Looks pretty similar. There's a slight different in the font width, the boldness of it. But basically this is the same site. We can come down here and we can pick one of these and go and see there are all he details about them and whatnot. But notice this is running locally here. This data driven application, which is a clone of PyPI is what we're gonna work from. So what's the data driven part? Well, we've already seen some of it, So we have the landing page that shows us all the packages and then when we go to the packages, there's details about the packages. We also have users or we can log in or we don't have an account yet, we could register and so on. All right, so we'll have, like, an admin page and account page and all that kind of stuff once we create an account in log in. So this application has none of those features that the CMS might have, but it has all the data driven stuff. So this is the application that we're going to work with.
|
|
|
transcript
|
5:35 |
Well, you saw our PyPI clone running. Now, let's look inside and look at the source code and see how it's built. This is a pyramid web application. We're not gonna talk about the foundations of Pyramid, assuming that if you're taking this course, you're at least somewhat familiar with Pyramid. We actually have a whole course where literally we build that PyPI clone in pyramid called "Data Driven Web Apps with Pyramid". So if you really want to dig in and you're completely starting from scratch, that that might be a good course to check out. Over here, I'm just gonna show you what we got going on because we're going to start from this code, and we're gonna start extending it and working with it. Now, we brought this '.bin' folder and this just has a couple of little utilities that we'll use to, like, load up the initial data into the database. It's probably already been done for the one you're working with, but if not, then you can use that. Here's where it gets interesting. We have our controllers. This is where our view methods go. So, for example, we go over to the packages controller. We clicked on one of those packages like '/project/pyramid' that we saw. This is the code that runs. Now, This is a pattern I love to use. It doesn't appear in many, many web apps, but I think you'll appreciate it. I use this concept of the view model that will exchange the data. That is necessary to show, basically render the HTML. Okay, so a lot of the work is gonna happen here, but we're gonna handle this request. We're going to basically repopulate the data. If we weren't able to find a package, we're gonna return 'Not Found'. Otherwise, we're going to return the dictionary to this 'details.pt' which is over here. Like, right there. Notice the controllers have names like packages, and then the templates have directories for those controllers. and then files HTML files for the view methods. Really nicely structured there Let's look at that view model real-quick again Same structure We have the models. Then, we have the controller name. Then, we have some kind of naming a package details view model, And what it's gonna do is, it's just going to do a little bit of base work with the request. And then it's going to get the package name that was passed over. Try to use the package name to get the package from the database. Set up some information that has to be shown like, what's the latest version and the releases and so on. And if it's able to find a package, it's going to populate that from the package and it's releases. Of course it has to have a release, or we're just going to say there's no releases All right, so that's how we're showing this content. And what else do we need to talk about? We're going to be using SQLAlchemy. So, for example, here we have the SQLAlchemy class that's stored into our database for that package, and it has things like an ID, Created Date, Summary, and a Description Homepage, Doc URL, Package Installation URL, the Authors and the Releases in a relationship. So we're gonna be working with these SQLAlchemy classes, and we can query those. And the way that we generally work with them, if we go back here notice we have this package service that has some cool methods, like 'Find Package By Name', 'Get the latest releases count', 'How many packages There are' 'How many releases are there for a given package' And then just give us all the packages. We can check this query out really quick. We're using type hints to make this nicer Now we're gonna create a DB session, and then we're just going to go and do a query So this is standard SQLAlchemy Create session and you say I want a query the package. I want to filter by the package ID is the name. That's the way we set up our models of the ID is the name. Then we only want one of those or we want to get 'None' back if there's no match for that package name So first is either going to give us the one and only one that matches or it's gonna give nothing back. And that's pretty much it. We also probably want to look at the routing really quick because that's gonna be super important. So the main start up for the whole app is in this '__init__' here for the package. So this method runs, and It's gonna come in here. It's going to set up some things that are included, like the template in language here It's going to set up the SQLAlchemy database. And then it's going to set up the URLs that are running our Web app, and that's pretty much it. This 'init routing' stuff is gonna be really interesting. And we're going to spend a lot of time in the beginning getting this extended for our CMS. So you noticed that we have a static view. We've got some routes, like when you just visit the website, it gives you the home view. If you visit '/about', it gives you that For the packages, we have a couple of things. We could go to '/project/package name', with or without the little slash on the end and that's going to go to the method that we've been looking at You can also get the releases for a package So project, the name that's passed and then releases. And then we have some stuff around 'log in', 'log out', 'site map'. We have those kind of things. We don't have it really set up yet, but we're gonna have some admin routes where we can basically go and manage our CMS and other stuff behind the scenes, and that's about it. Here's the database setup. It's just a simple SQLite database, so you don't have to have a server. Just really keep it as simple as possible You can change this bit here to talk to real databases like Postgres, MongoDB or whatever it is All right, well, that's a whirlwind tour of our Web application that we're going to be running, and you can see right here it looks just like PyPI. not exactly, It doesn't have to be 100% clone, but good enough that we have this idea of Here's our main page. Here's our data driven list of packages. Here's the details for the packages. This is the part we've been exploring just now. That's how our web app works. And this is what we're gonna use is our starting point to build from in this course
|
|
|
transcript
|
6:06 |
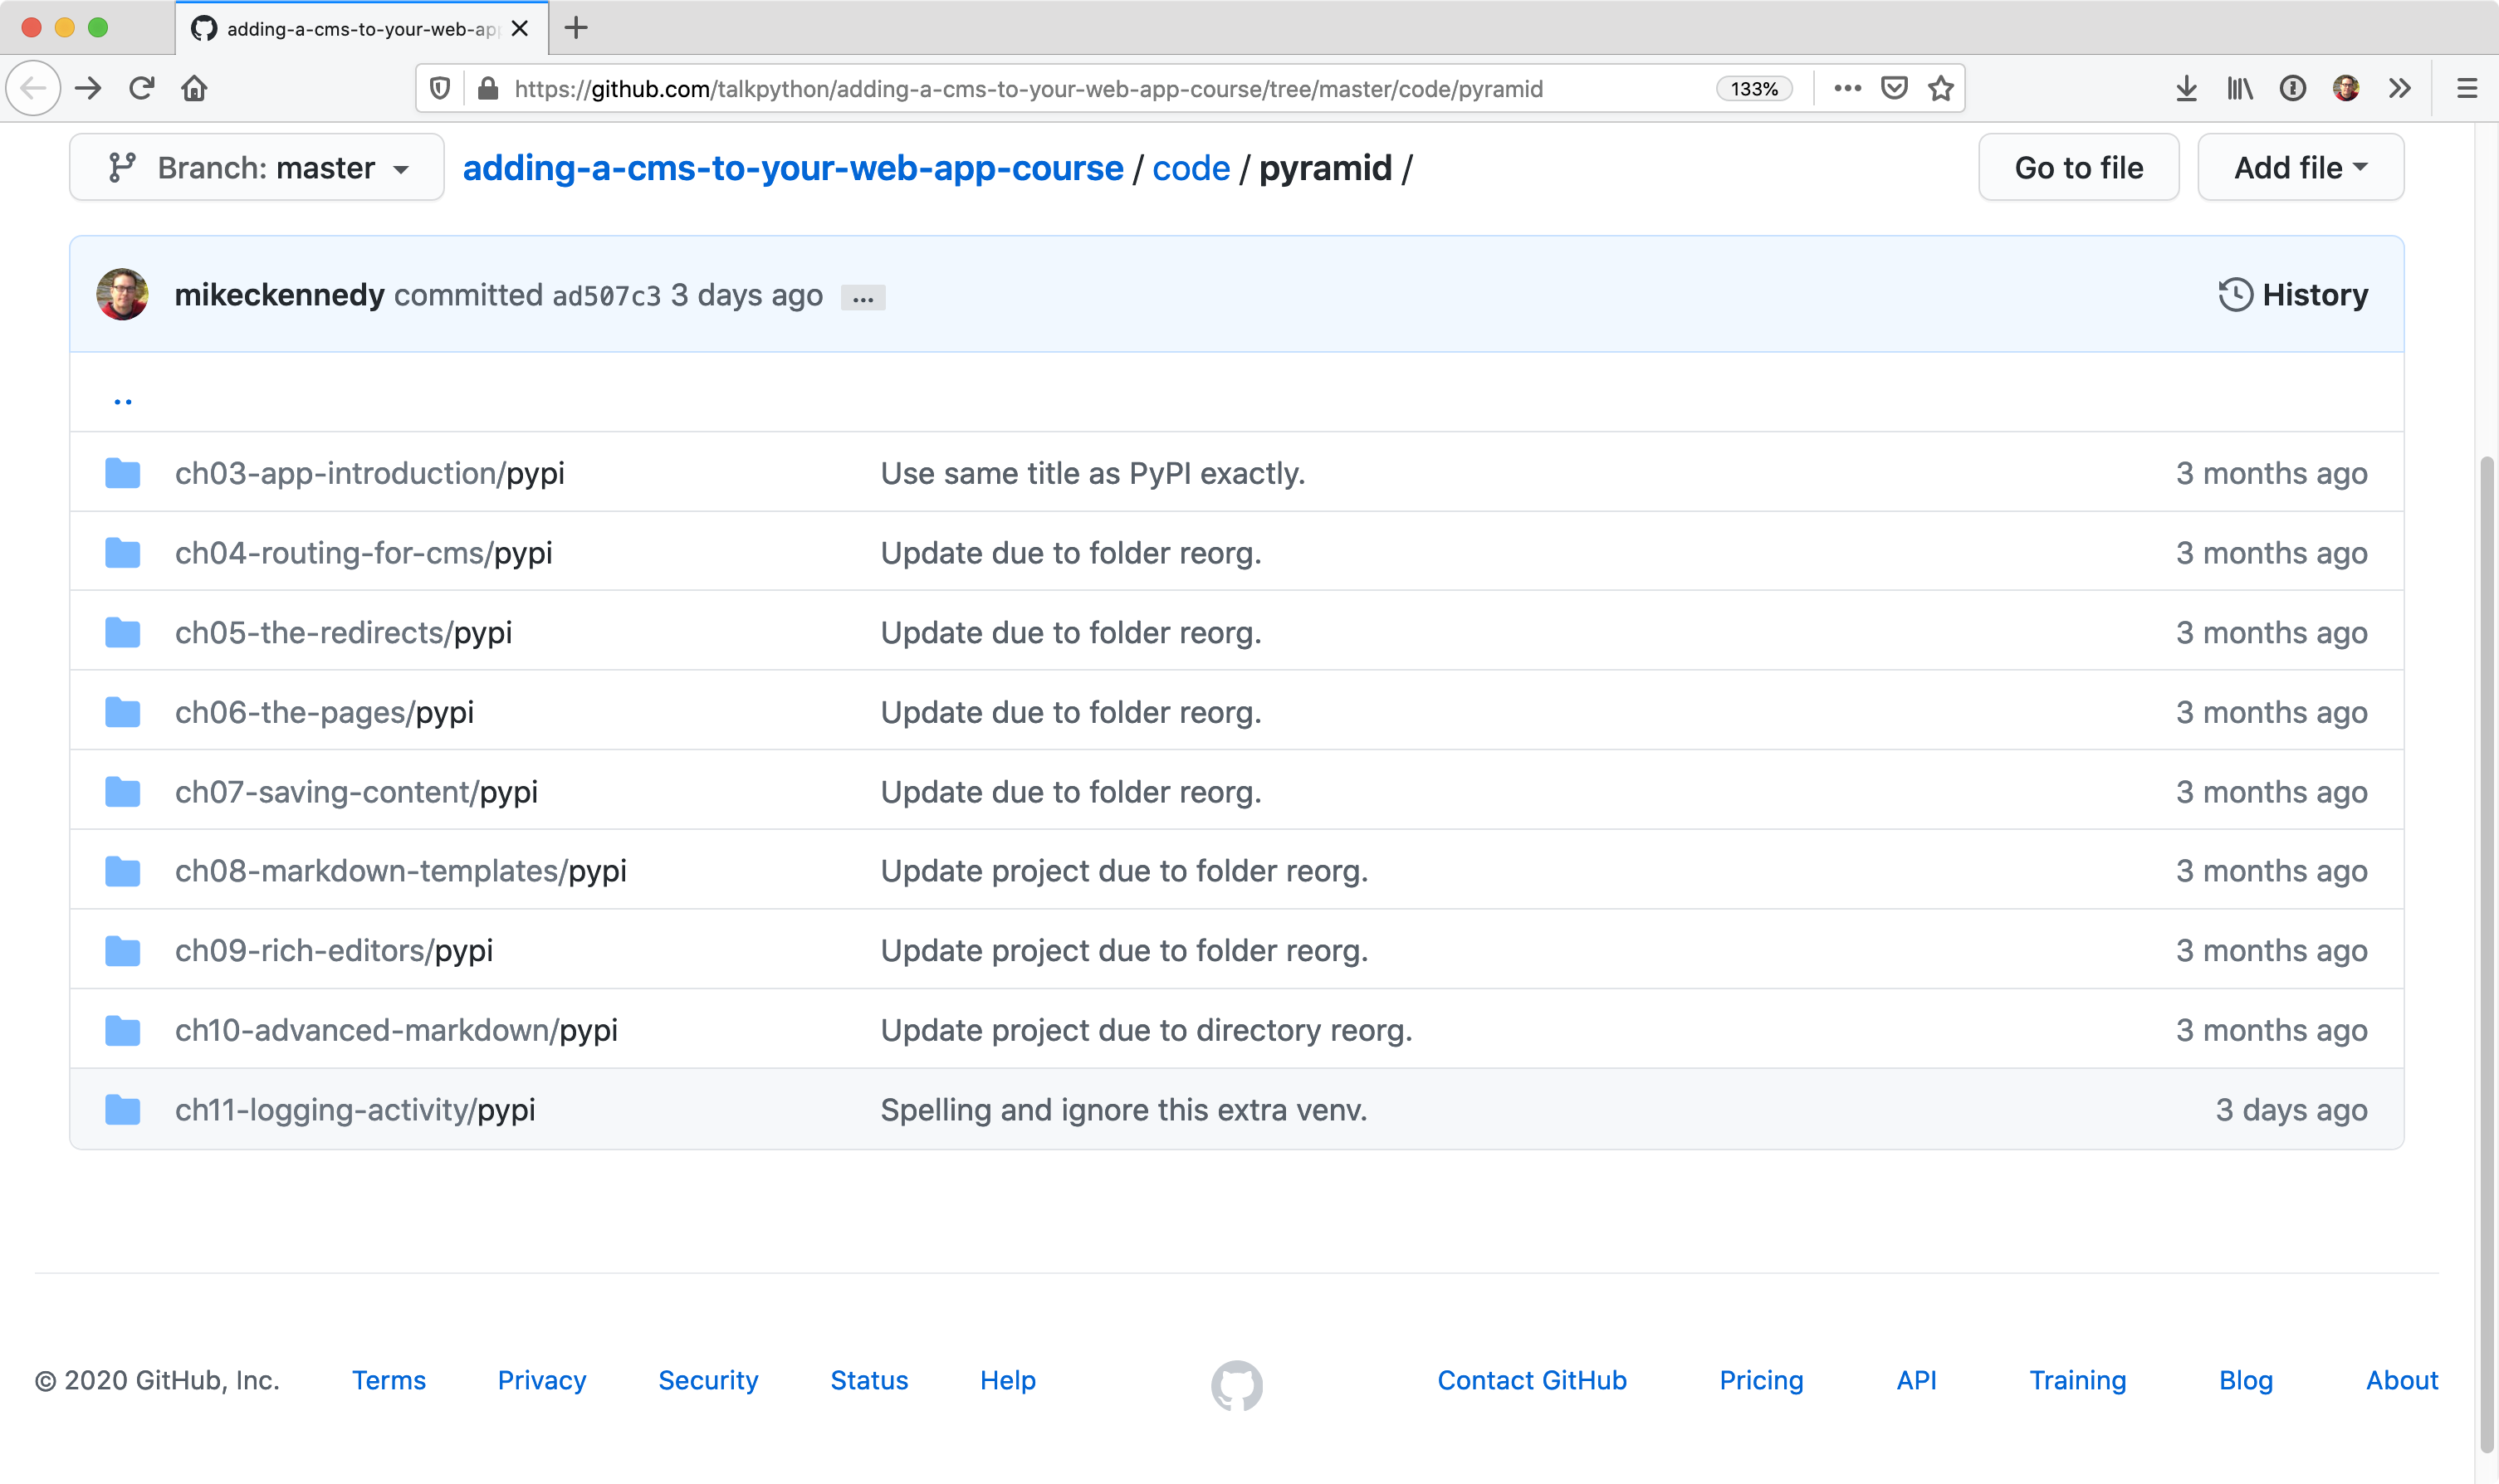
Before we move on from this topic I want to show you how to get this code up and running because we're gonna have different versions of this Web app and getting it from GitHub and then getting it configured so it'll run correctly is something you have to do a lot in this course Let's do that Now we're over here in the GitHub repository. I'm gonna copy the base URL from the top for a sec. I'm going to need that. Now if we go over here and see each chapter has starter code. And basically, the way it works is this is the code I just showed you. Over here, this is the code that we're gonna have when we're finished with chapter four. Right now it says starter code. It's a copy of the previous one. But that's because we're on Chapter 3. We're going to Chapter 4. At the end of Chapter 4 this will be the final version of Chapter 4. Then there'll be a 5, which will be the final version of Chapter 5 and so on. So, depending where you wanna or to jump around and the course you can seek through here. So what we're gonna do? You wanna clone this somewhere and I'm just gonna put it on the desktop. I don't like to keep stuff on the desktop. You can see it's nice and clean, but just for this example. We're going to 'git clone' this and it's a huge long name So I'll just say 'CMS Course' or something like that, All right and then we can go into our CMS course. Here. And here, well Surprise, the same structure. Now notice in each one of these, there's a PyPI folder. That's the top level project folder. So this is the thing you want to work with and I have this cool little extension that will let me just open command prompt here into this folder. So what we want to make sure is, when we look that this 'setup.py' is where we're working and we're in the PyPI folder it has that And I point that out because there's sub PyPI folders as well. That's just how it works with this package. So what we're gonna do is we're gonna come over here and create a virtual environment, like so. Then we're going to activate it Now, on Linux and macOS, you say 'dot' and then 'bin/activate' On Windows, you would just say 'venv /script/activate.bat'. Basically, they avoid the dot Okay, so now we're close to getting it to run. There's a couple of things we have to do for Pyramid to make it run. Now, Pyramid is what's called a Python package, and that's how it's distributed. So we need to set it up so that it will actually know about itself so that it will run here and the way that we're gonna do that is we're gonna run 'Python setup'. We're gonna run the setup.py, and want to give it the 'develop' command. What that's gonna do is going to set it up and install the dependencies that we need, such as Pyramid and SQLAlchemy and so on. Alright, it looks like that's all working. We could do a quick 'pip list' and you can see all the things that looks like we're needing, chameleon, pyramid and so on are here. And also PyPI is installed locally right there. That just means it knows about itself basically. Our pip is out of date, but that's just the way these things work. We can upgrade it, but not worth bothering about now. Okay, so we've got it set up. We have our virtual environment active, and now we just want to see if we can run it When I ran 'Python setup.py develop' it installed Pyramid. Pyramid comes with a command called 'pserve'. Like that, and what we do is we give it the '.ini' the configuration file that we want to run and we want to run, develop. In production and out on the Internet, we would run production Here, we're working on it in development, so hence development. So let's hit it with this. Now, sometimes you get this weird 'This is not found'. Watch this. This is annoying. If we deactivate our virtual environment and then we reactivated and then we try this again Well, guess what it's found. Well, thanks Python for that inconsistency, but I'm kind of glad I ran into because if you run into that problem, you could see it's super easy to fix. And now, let's just copy this and make sure it's running over here. Here we go, Up and running. Everything's working. Great. The final thing, maybe you want to see how you get this into PyCharm. We're gonna go over here and take the folder that contains a 'setup.py' and drop that into PyCharm like so. On Windows and Linux, you have to say file, open directory, macOS, you can drop it on the middle dock icon there Notice it's already found PyPI, So that's good. We should be able to run something And if we go down here, we can find our code again. Yeah, that's good. One quick little trick we can do to make things work better in our HTML files We can go over here and say 'mark directory as resource route' So when you say, like '/static', it knows to look at this folder and it'll autocomplete, like out through there. That's very nice Okay, so this looks pretty much ready to go. Let's double check that it's using our virtual environment. And yeah, it looks like that is the case. Yeah, that's the one we created. Cool Cool. It doesn't always work, and if it doesn't work you can go to the preferences or settings on the other OS's Go to the project, project interpreter, should be listed over here. If it's not, you can 'Add', then click 'Add Existing' and probably find it for you. But it worked for us, so we don't need to do that. Click 'go' running just like before There we go. We have it working in PyCharm as well All right, so that's basically the process that you need to go through each time. One quick note is, don't reuse these virtual environments This is Chapter 3, you want one for the Chapter 3, one for Chapter 4, one for Chapter 5. because when you install the project itself as the package, it points over to that location where it came from So you don't wanna have it use the old code or part of the old code and part of the new code. It's very messy, so just make sure that you always use a new virtual environment for every chapter and just go through that process and double check that PyCharm, if you're using PyCharm, is discovering it correctly You can quickly come over here in the terminal and see that it has one active And ask 'which Python'. On windows you can type 'where Python' and it will show you which one that's using. Looks like this one is all set and we're ready to go. You should be ready to start building from this demo app.
|
|
|
|
28:46 |
|
|
transcript
|
3:03 |
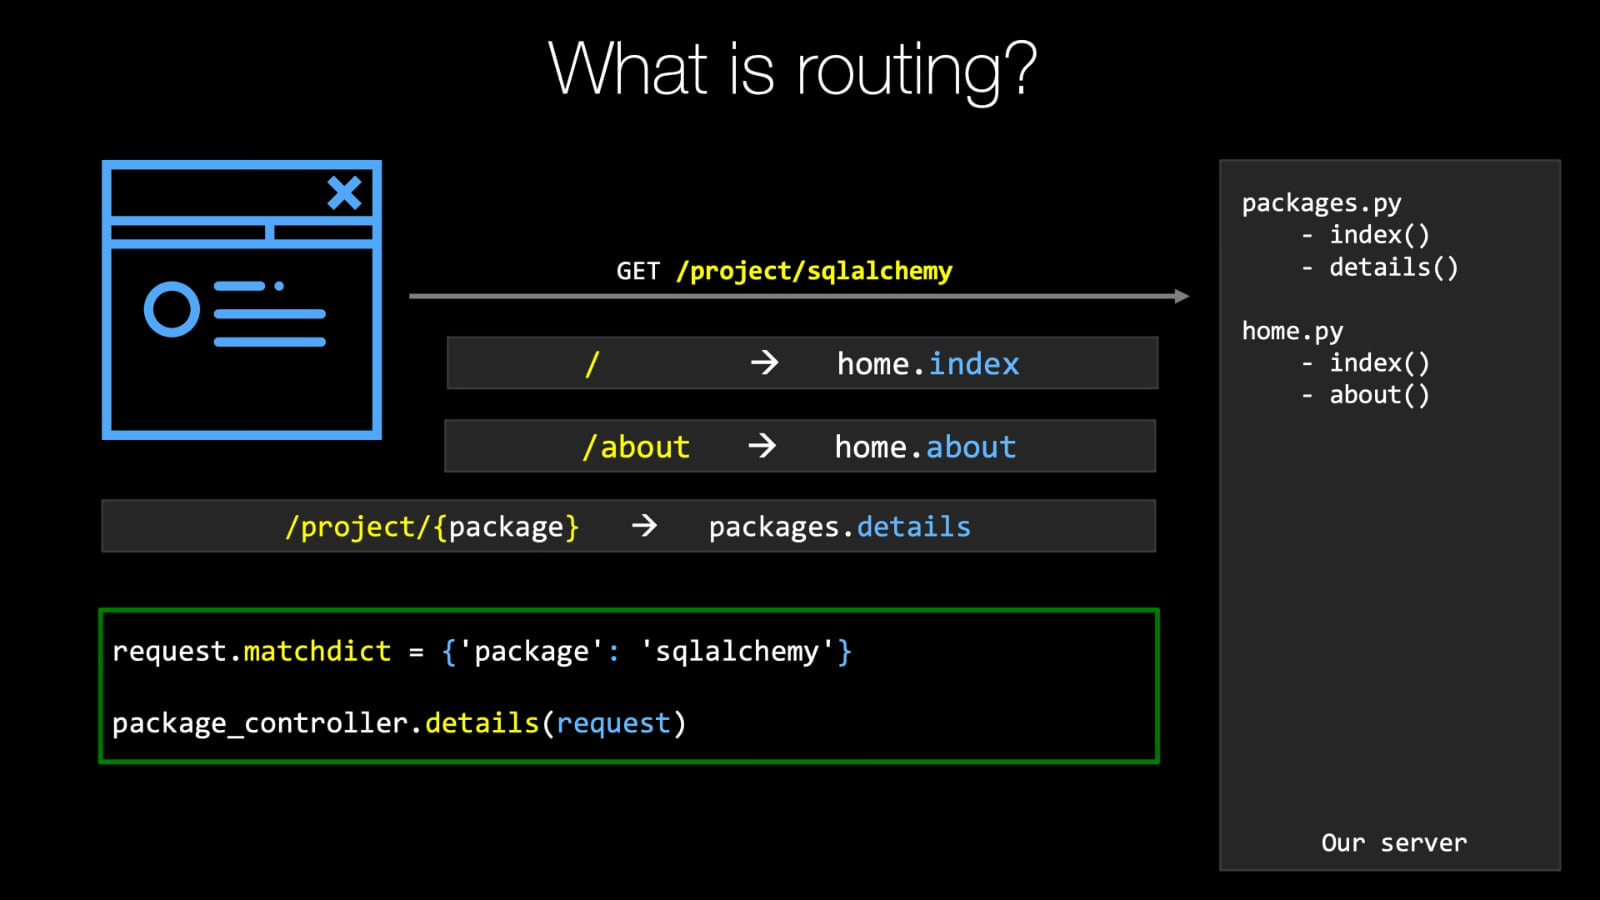
In this chapter, we're going to put one of the most fundamental elements in place for our CMS. The ability to capture an arbitrary number of different URL requests over to our website, determine through a database or something else if we want to tell the user, "Hey, there is a page here" or not. This won't depend on the structure of our website or any given files. It's just going to be a place to catch all the extra stuff that doesn't already git addressed and map somewhere. And then we can decide do we want to show them a page maybe redirect them somewhere or just tell them that "page doesn't exist". And the core concept for that is routing. So let's review, super quickly, what routing is. On the left here we have the blue web browser. This is representing the user, visiting your web site. On the right, we have this grey box. This is our server, and it has two Python files, which define the behaviors for packages and for the home, just sort of the general top level stuff. In packages you can go to 'index', which is a list of all the packages or you can specify given package and get its details. And home, you just get a '/' that goes to the index and '/about' or something like that would maybe go there. We could decide what the URL is. So with this set up The user is going to make a request to our server. We're going to do a get request for '/project/sqlalchemy' and within our Web application, we've specified many different routes. And what's going to happen with the server is it's going to go through and it's going to say, Does this match? Does this match? Does this match? So it's just going to go through its list and say, "Well, we have a route that says for '/' show 'home/index' does, '/project/sqlalchemy' match that? No. Well, let's see what else there is. Oh, we have this one '/about', and that's going to go to the 'home/about' behavior. No, that doesn't match this pattern either. Now we have another pattern that '/project/<some variable piece of data> called package. Does that match '/project/sqlalchemy'? Why, yes, It does. So what we're gonna do is we're gonna say the value of 'package' is 'SQLAlchemy' and we're going to call the view method 'packages.details' We do that. we're gonna have pyramid set up what's called a 'MatchDict', and in here we're gonna have the key being the variable name in the route package and the value of that key being what was passed in the URL, SQLAlchemy. And we're gonna take that request which is set up along with the MatchDict like this and bunch of other details. And we're just going to call that function. Well, Pyramid is going to call that function and pass the request object which has been pre-populated like this auth. An whatever that method does. it's going to do, You know, likely it pulls that information back from the database. It fills out some HTML and it sends that back to the user. This is the general idea of routing, how it works in our website, and we're going to see how we can fit into this world so that we can add our CMS routing to, catch arbitrary URLs and then just decide that those either represent virtual pages in our website or we can say they don't represent anything
|
|
|
transcript
|
4:09 |
Let's look at just a few examples that might appear in our Web application One of the things you have to do is you have to tell it you're a bunch of files you were allowed to serve up. Now, in our world, we have a static folder, and it has things like CSS files, images, JavaScript. Those kind of things. Those are not determined or created by Python. They just have to lay there and be sent back as part of the HTML that is created by Python. So what we're gonna do is I want to set up a static view. It's going to be called static. It's going to map to the static folder, just '/static'. And then we're going to say, This is good for one hour. The max age is specified in seconds. So this is one type of route that we might have, a static route. More commonly, we're going to specify this more general type of route. They all have names in pyramid. The names have to be unique because we refer to them back in other files. We say this method handles the home route, so we just give it a unique name here and we refer to it elsewhere We're gonna say home is going to be just '/'. Now, you might not type '/', but this just means if you request the website without any other URL stuff, right. Like 'talkpython.fm' would map to this. We're also gonna add one for '/help'. So we want maybe our users to build to get help using our package site. So '/help' is where they would go. These two so far are just static. They don't have any variable data or any of flexibility in them. Right? I can type '/help', and I get this page. If I don't type '/help', I don't get this page. I'm also not communicating information through the URL. It's just show me the content for help. We can extend this further, like we saw for package, and we can add our URL that in the URL has some data. So here we say the route name is 'package' and it has to be '/project/<Something something without slashes in it>'. Like 'sqlalchemy'. Like 'pyramid'. Things like that. So we're going to say there's this route and it has to match this pattern a '/project/something' and that something should be a variable, also called 'package'. Finally, we can also have some constraints on these routes. So here's one. If we say we want to get the popular packages, I would like to be able to say '/7' and get the seventh most popular package on PyPI. '/1' are the most popular one. So what we can do is we can say this is not going to match slash anything, right? It would match '/help', potentially if it appeared before, because that's '/<something>' Just the value of 'num' would not help. That's not great. So we can specify a custom predicate test, if you will. There's a lambda function, and it says I would like to go to the URL that's been specified. This info of match, I'd like to get the value for 'num' whatever is passed in, and if it's not there, just return the empty string, and I want to make sure that this is a number. So this is our way to say only '/1' '/7' '/7000000'. Those would all match this route. But '/help' or '/about', those won't match because 'about' is not a number. So you can see you have a lot of flexibility? And another thing to keep in mind is when you specify these, you want to go from the most specific to the most general. Remember, from our example before, the way it works is pyramids gonna go through this list of specified URLs and say, Does this match? Does this '/project' or whatever we specified? Whatever the URL is. Does it match 'home', which is '/'? No. Does it match '/help'? No. So next one doesn't match '/products/sqlalchemy'. Yes, that's a match. And the reason you wanted to be most specific to most General is the general ones will almost always match everything, especially in the CMS world. You're going to see that the URL pattern is going to match literally everything. So the stuff that has other purposes needs to appear before, or you're going to end up with just everything going to that general match. So it has to go from most specific to most general as the tests come through. That way, the specific ones can still catch the things that they're supposed to, and if they don't, it's gonna fall through to the more general stuff as you go.
|
|
|
transcript
|
4:06 |
Before we start adding our CMS content and our CMS routes to our website, let's just quickly review the routes that are already in place. Now I like to organize my projects more than is specified by various frameworks. So here you can see in our main method, we've got our includes, our sublibraries, optional libraries that get included, like chameleon. Over here, we've got our database initialization and then our routing. In newer versions of Pyramid, if you create a new project, it'll put this routing into a separate folder, and then include it kind of like this. That's fine, but I don't think we really I like it just this way as well. It's totally good. So down here, let's look at what we got. There's quite a bit going on, isn't there? So we have the static route here, and it's at one hour. Just give you a sense of my real websites. It's at a year, and we do some techniques to make sure the URL changes if underlying content that shouldn't be cached any more changes. So this is kinda gonna small, but that's okay. Here we have, I like to group them by controller you could tell already I like to use a lot of organization here. So here we have 'home', which has various methods like 'home' and 'about', and our templates have 'home' and 'about' our view models have something like that about page doesn't have a view model, right? So same thing here we have home or have some names 'home' and '/about'. Slash in about. And let's go over here and look how that ties back. So over here we have our 'home index' and then our 'home about'. We could just call it 'index' and 'about', but I decided to call it this. And you could see the route name right here, 'home' and 'about'. And if for some reason, this was different, like if I put a '2' there and try to run it, It's going to crash and say we looked for a route called 'about2'. Apparently in the entire 'init_route' method, The whole startup of the app, You didn't ever register a route called 'about2' So, that's how these tie together. You can see that it's pretty picky that those were actually valid. What you put there. We also happen to be saying we're using this. These various templates here and then returning a dictionary to those templates. Just standard pyramid stuff. So let's go back and look at some more. We have the package controller. This is for the various packages, So if we pull this up, you'll recall. We go and click on one of these. notice it's 'project/aws-cli'. If this was sqlalchemy, is that in our short database? It is. So you can see it pulls it up to this bit right here is passed over to that method. And the way it's done is, we say it's '/project/<SOME VARIABLE>'. We'll grab that we call it 'package_name'. Now, One thing that's annoying about Pyramid is whether or not the slashes on the end matters. So I've added a second route to say if they put the slash, same action, do the same thing. Here you can see one that has a constraint. So this actually can appear first because it's the only one with numbers in the front, so I could go over here and put '1' and see the most popular package Where as the website doesn't really pull it back It just says the 1st, 2nd, 6th, and so on. But it's not catching things like 'about' because of this constraint here. Okay, so we got that we got a package, details, some release details. And then down here, we have our account for log in, and register, and so on. One other thing let's look at the account bit right here that you work with and specifying a matching these routes. I talked about the URL matching the pattern. That's true but also the http verb. Are you just doing a request to a page which would be a GET, or are you submitting a form back to that page which would be a POST. So we can also distinguish between these two methods here on whether it's a GET or a POST, in addition to having the same route. I guess that will come up somewhere as we work on our CMS. Technically, the CMS as a consumer of it will probably be only GET. As we work on the admin section to edit our pages and whatnot, of course, we're gonna need a have both of these in place. All right, well, that's pretty much it for the routing that we have in place here I think we're, yeah. I think we're pretty much good
|
|
|
transcript
|
6:57 |
Sometimes life is full of irony and this is one of them. We've talked about all of this routing infrastructure and all of these routes that we've added. And you think, Well, this is what's here already know how much more do we have to add and work with our CMS? Well, it turns out we're only gonna add one single route for all of our CMS. And that's because the way the CMS works is it says all the stuff that didn't match any of these, just give that to me. I'm gonna take that, have a look and see if I can work with it. So it'll basically pass through our CMS method and the method is going to decide That URL you gave me, Does that match a page or some kind of redirection or something like that? Or is it something that I don't know about. It's not in my database and there is no record of it. So just go back and tell them that the page doesn't exist as if there was no CMS section. So what we're gonna do is, we're going to come in here. We're gonna have a CMS route. Now it's super important that this goes at the very end because, as I described it, The CMS route, It's gonna catch every single request period except for the ones that are preceding it. But if it is in the beginning, that means everything. So we're gonna go down here. We're gonna do this 'config.add_route()' like so, and we can call it CMS, 'cms_request'. Let's call it a request. That's what we're going to call it. Now, we've seen that over here we can have static, and we can also pass in variables like that. But what we're gonna do instead is we're gonna pass in something a little bit different and we're gonna use a star, and that just means match everything And we need to give it a name. We'll call it 'subpath'. So an example of what subpath might look like. This might be '/home', let's do this. '/company' '/history'. Right this could be a URL that we come up with, and when we pass it over That's gonna be the value of subpath. We'll have to figure that out there actually think it might be. We're gonna see I think it might come back as a set a list of 'company' and 'history' for when you ask for a '/company/history'. We'll see in a second. I'm pretty sure that's the case. But what we're gonna do is we're going to say I would like to put a pattern that's going to match everything. And then we need to take this and apply it just like we had over in these other controllers Like here, We need to apply it to one of these So just for a little quick start, I'm gonna copy that. And let's go and create a new Python file. I'll call this CMS controller, as in model view controller pattern. And let's go over here and say hi to the view config which we're gonna need to let PyCharm do a little import statement at the top, Thanks, PyCharm. You don't need this. Just 'return response', which is gonna come out of pyramid And 'body="Hello CMS"'. Here we go. So what goes here? This will be CMS request. We're not going to have a render for the minute. And let's do it like this. We'll put this down here. Comment that out. Great. So what we're doing is we're going to say, move over so it doesn't get greyed out on you. There we go. So we're gonna have this route come to. Do it like that. We're going to pass in the request, which at the moment we're not using, but we will, very soon. And we're going to say 'Hello CMS'. We're not using any of the data that's getting past. Let's see if this works. We might need to do one other quick change here. All right, so this is still working. All these were not taken over. Let's say 'Hello World'. Tada, look! Now we type whatever we want. Anything up here, it doesn't matter. All of those are matching that pattern. Now, we obviously don't want to just say 'Hello World' to anything on the Web site. That's silly, but this is the first step. Let's go a little farther and have it take that information that's passed over, get it out and do something with it. So we're gonna go over here and say sub path, go to the request Now, what can I do on the request? I don't know. Looks like nothing because, Well, PyCharm's unhelpful here. So we go over here and say this is a request and specify a type from pyramid. Ah, that's better. We go the dictionary that contains the stuff from the URL and say, Give me the subpath. Let's just print out really quick what is the subpath and what's the type of subpath. Run that again, switch over here do a quick request. All right, so it's a tuple. I almost had it right. I said it was a list. It's a tuple. So these are the things that are separated by the forward slash right? It slash on the server? Then 'hello', then slash 'world' and slash anything "!". So we probably want to get the URL and the way we'll get the URL is from this subpath. We can come over here and say Use this cool little string function. Say, given a string, I would like to take a bunch of items and use the string to turn them into other strings. Stick those this item in the middle stick the slash in the middle like they join on subpath. And that's a print out, we don't need to print out, Say 'hello world'. 'Hello CMS' you requested and let's put your URL in here as a little f-string like so. Right. Again. What are we going to get now? instead of 'hello, CMS'. If we did it right, it should be requested, this. All right, let's see. There it is! Hello, World, anything? Beautiful. Beautiful. Beautiful. So it looks like we've got this URL mapped over to this CMS method, and now we just look at the URL and decide. Do we have content to show them for that? Yes or no? This is gonna be the foundation that'll hook into this data driven web application. For the most part, it doesn't go to the CMS, right? We're over here and log in. We can register. We can go view some stuff about packages, those are, all the strict data driven, structured pages. But then, if we want to go say '/donate' well, we could create a CMS page that talks about donations. We want to talk about help, here's the CMS page that's gonna, you know, provide users help. Over here we have featured products. In featured/projects. We can use our CMS to start adding features without going and recreating very structured things in the database that are, you know, not very helpful. These are one-off pages like, Here's the featured projects. Or here's the help page or something like that. The hook to make that happen is in place. The requests gonna come in here, we're gonna figure out. Well, what do we want to show them for this URL and then send it off? It sounds simple. There's a lot of cool stuff that we're going to do to make this really, really nice and fast and easy to create these pages. But this is the shim. This is the seam in our application where we can reach in, and then we plug in our custom code that we write that will effectively be our CMS.
|
|
|
transcript
|
4:34 |
Well, our simple little CMS view method here is fun. We can request anything on the Web site, and it will give us back, you know? Hello, CMS, you requested whatever URL you requested. That is not very practical, however, is it? So let's build something better than this. Now, if you look over in the services folder subpackage, notice there's one for packages and there's one for users. And what is happening over here in these files is either all the requests, all the logic around, accessing the thing they describe. So access and users. Here's how many users air in the system is creating a new user years validating their password Here's logging them in and so on and so on. So let's create something like this for the CMS. That'll be where we talk to the database to look or what pages or other things we might want to work with are there. So I'm going to add another Python file called cms_service, And in the beginning we're going to do two very simple things. We'll have a function, so do def. It's gonna be get page, and we'll have the URL here, which is gonna be a string and we're just gonna return a dictionary for the beginning. I have that. Now another thing that's really, really helpful that we're gonna have is The ability to do redirects to make a request and send somebody somewhere else. So I'm gonna go and add get redirect. So if we wanted this to say well, I'd like you go to '/news'. and that actually goes, you know, just some complicated URL either on our site or entirely somewhere else. So that's where the idea is we can use our CMS for redirecting the other places and keeping track of those requests in addition to just having pages Now, if you look over here in this DB section, I've added a little bit of fake data. These pages, they have a title and a contents. So I'm just gonna grab this eventually that's gonna go into a database and be more proper. But let's just go over here and start with our fake data. So what we can do is we can go to our fake data and has pages, and We can try to get by the URL. Se we'll say the page is this. If it's not there is just going to turn nothing. So return the page like so perfect. this one Lets just do 'return None'. All right, so let's see if we can get the age to come back over to our CMS controller. so instead of doing all of this business, let's go and see the page is going to be CMS service. Import that and say, get page, give it the url. I'll say, if not page to raise http, I think it's like this. Not found. perfect. Otherwise, let's put the message of here something better We'll, say title, and we don't really have a view, a better way to show them this. We'll, say content just just show you that hey something's coming through. We'll say 'page.get(title)' 'page.get(contents)' if that's what we really called it. title, contents, Super. Oh, and I just noticed that I probably want to change this. The way we're requesting it. this is not gonna work. I was assuming that was a dictionary, and it's just a list. So let's put this in as a dictionary where or the key is the URL. That way we could just ask give me the value or the URL. We ask for 'company/history'. We get this, we ask for a 'company/employees'. We get this. We ask for something else, we get nothing Okay, I think we're gonna be good to go. Let's see what happens now. I go here and I slash Ask for '/ABC'? None type has no attribute. Okay, I need to work on that What about 'company/history'? Okay, great. Well, I think we did something wrong here. Let's see what's going on. Oh, have it backwards, If the page didn't come back, it's not found Let's try this again. But now I should say, not found. And if we have 'company/history'? Here's the company history. Awesome! And then, what was it, employees? Yeah, our team. And if we don't have the s, Obviously that's not a page that's specified so doesn't exist. Now, we're a long way from making this look nice, but here we're simulating going to the database based on URL were passing along. We're either getting nothing or we're getting something back from the database and we're rudimentarily communicating that back to the user that says it's not found, or giving them, like a really basic view of the data. So we have this kernel, this beginning of our CMS forming right here.
|
|
|
transcript
|
1:40 |
Let's quickly review the routing needed to add this custom CMS method, which is going to be the entry point to handling all the CMS requests. Now we saw that we can go config that around to control the way your URLs are mapped to different parts of our web application. We give it a name, and then we give it some kind of pattern to match. And the trick here for the CMS one in pyramid is say star subpath. That means match everything Just give me any URL that could possibly be typed into the website and I'm gonna handle it Now, obviously, if this goes first, here's the only page, the only request, only method that's gonna run on your site. So this one needs to go at the end. But it's kind of the one that catches the ones that are missed by all the other more structured parts of your website We're gonna map that over to a method with a view config. When I say the route name is CMS, which we put at the top. We're gonna give it away to render it itself to a page. We'll talk more about that later and we've got some method This one called a page. and here we get our subpath as a list of the pieces separated by the slash. But what we're storing the database is just a string that is the entire URL So that's what this little joint statement does. Then, we go to our CMS service, get us the page and hand it back to that template to show it to the user. And this is the basics of how do we get started handling requests for this arbitrary URLs on our website. And that's the key to making this CMS thing work. And just remember this route the top piece must go the very end of all of your route definitions because it matches everything and the matching happens from top to bottom, So this had better be at the bottom
|
|
|
transcript
|
4:17 |
Well, we're making really good progress with our Web app here, but notice if we go to something that doesn't exist, We get this underwhelming 'page not found' 404 status code error. Now it turns out having a better 404 page can be helpful and can even be a great way to catch users and help them find the thing they're looking for Check this out. Here, check out the 11 best 404 pages, and I love these really creative ones that you might go and find. So here. ""Error 404. I find your lack of navigation, disturbing", right. Here's one for hootsuite that talks about how you can't find what you're looking for. is an old school looking one. That's kind of fun The Lego 'oh no! Something's' come unglued'. Over at Talk Python, we have one that's kind of fun. Course it's a podcast and you're supposed to plug in your your ear buds and listen But if there's no page, well, maybe there's just empty air. Headphones here, something like that. So what we want to do is we want to add something fun to our site rather than this. So really, really quickly, I'm gonna show you how to do that. Why is this relevant? Well, because over in our CMS thing, right, we're catching everything and then for stuff that doesn't exist or saying it's not found right? So we want to kind of build out what happens in this section to make it slightly nicer. So I've come up with something fun that I'll go and share with you in a second. Image and whatnot I created. So here is the image that is the logo of PyPI, right. This is their logo. So I thought I'd be fun if that kind of looked broken. So what we got to do is we basically have to just say write a view method here, a special one that's gonna handle when there's a 404. We're gonna go over here or something like this. This will be 'not found'. And I'll just put it in this utilities controller and what we want is a not found view config like that. And the route name will be, let's put 404. And that this will be, I already dropped it over here 404.pt. There we go and for this, We're gonna go set the response, its status equals 404. Like that. And it turns out that we're going to need to give a little extra information over here. So we' ll say, go and get this thing called our view model or view model base. and then we'll just say, give me the dictionary. Not that one. Like, so. the reason we have to do this is there's some information like the logged in user ID Whether or not that set or not, that has to be communicated to the outer shell like the navigation and stuff And it wants me to pass the request, though it can go check the request for a logged in user. Things like that All right, well, with this little change. Run this. It doesn't love it. Oh, yeah, the 404 route name. I don't think I need to set a route name here. It's just '404'. Okay, cool Cool Now let's go try this again so we could still go around our site, right? You can see it's still working, but if we hit something like 'donate', which doesn't exist now, let's refresh the CSS. Now we get this cool page like this, "We just can't find that page, sorry". Head back to the top of the site and then here's this logo kind of broken and spilled out on the page. That's fun, right? So let's go and this one also was a 404 right? So now let's get this cool 404 page. Maybe I should put the word 404 in here. I don't know. but it seems decent, because as we work with these different pieces. We're gonna wanna have some kind of better response than just know that that blank text message. anyway he would were able to use this cool 404 page and all we had to do was add a 'not found' view config and say, here's the HTML for it. And because the HTML uses this paired layout which ask questions like down here, is there a user and as that user and admin those kinds of things, it has thio have like a little bit of bass detail that comes from the base view model So instead of recreating that, we just passed it along. Easier to make the site work that way, keeps you logged in and whatnot. Yeah, I think that's really fun, let's go play with it one more time. Yeah. I'm sorry. We just can't find that page. Here's our cool 404 page.
|
|
|
|
1:13:52 |
|
|
transcript
|
1:42 |
We're going to add a cool little feature that turns out to be pretty simple but very useful and a great building block along our way towards a richer, full featured content management system in our Web app and that's redirects. So what are we talking about? We want to be able to use short little URLs that redirect to a much longer, more complicated one either on our own website or external websites. We'll use it for both So, for example, over here at Talk Python, the podcast, website, maybe you want to talk about our Python for Absolute Beginners course. So we get enter, talkpython.fm/beginners on that site. Internally, it knows about this you're on it says they were going to send that over to this much longer URL. training.talkpython.fm/courses/explored/beginners/ some great long URL that's on the end of that that's faded out in Firefox there So this is the kind of feature that we're going to build into our CMS into our Web app now you might think, OK, this is pretty simple we're gonna keep track of just like slash beginners and the destination rural and that's it and it's done Yeah, the actual act of doing the redirect is simple However, we're gonna also do our first pass at a really important aspect of our CMS And that's having a backend admin section where people who want to edit stuff about the CMS in the database can log in and create things like the's redirects They can type it in Hey, if somebody types '/beginners' go over to this place and keep track of it, that's gonna be really important for allowing people to create an edit CMS pages We're gonna start with the simpler idea first because it'll give us a good foundation to work from
|
|
|
transcript
|
4:51 |
We have some of our CMS working here Remember, we have this super simple fake page structure that will let us look up a page by URL and either say it's not found or return the contents Let's check that out real quick. So over here we could go to 'company/history' Here's the company history without much formatting, or the 'company/employees' But if we don't go to the right place. We go to somewhere that doesn't exist, This one. We get this 404 page. So what we want to do is to be able to put in other things Like maybe we have a YouTube channel or Instagram or something like that You could just type 'YouTube' and it'll redirect you over to our YouTube place. Except for it's not. You can see clearly it's still are cool little 404 Not found page. That's what we're gonna do in this really quick example here. We can get started with that. Now over and our fake data, we do have two redirects that we can pull from Imagine they have already been created in the database. We're going to talk about storing them properly in the database shortly, but for now, we're just gonna get him from here We have a short URL, 'courses' So it will be like going to our website '/courses', and it's gonna redirect you over to all the Talk Python training courses If you type '/bytes', it's gonna take you over to the Python Bytes podcast over here. Now, let's see how this works We're gonna need to actually implement that in our CMS and this is really really simple. So we can just go over here and say 'fake_data.redirects.get' whatever the URL is. You know, we should be a little bit careful here. Maybe we wanna do some normalization on the URL and we probably should up there as well. So we'll say if url we'll say url == url.lower() So in case, somebody types 'Bytes', we don't care. We want to treat the same as 'bytes'. If they haven't have, like, a space or something, we don't care We're gonna strip off the space is gonna make it lowercase and then go ask for it. We should probably do that up here as well. That'll make it a little more normal or canonical. You don't have to exactly get the case right and whatnot. And then over here in our controller, well, there's some stuff going on, right? We're generating the little sub-url from the list of elements out of our subpath URL route that we created. So that part's already done and we're getting the pages, and it's gonna turn out to be real similar over here. We can say redirect. And we'll just say like this. 'get_redirect' and give it the URL. However, this is not exactly what we want to do. We got a kind of reverse this a little bit. So if we find a page, we just want to return that page. When I go over here like so and if we get to the end, we're going to say there's nothing here, but If there's a page, we want to return that page. We'll work on that to make it much nicer soon. If there's a redirect, we just want to send them somewhere. So how do you do that with Pyramid? Well, we can just return, We don't need to raise this one. But we can return http_found rather than not_found so we can import that here. Like that from pyramid exceptions. And what we put here is the URL So we say 'redirect.get_url'. Now let's look at our data again. We're getting this thing back. We've gotten it by its short URL. That's those things were the same, And we want to send it to where the destination is. The name is just for us to. Keep track of and know what we're up to. All right, so try to get the page. We got it? Send the page back. If there's no pages whatsoever, see if maybe there's a redirect for it. If there is, send them there. If there's no pages and there's no redirect, we have no idea what they want. Tell them the page is not found. Let's give this a try Over here we have our YouTube. That's still not going to work, which is expected. That's what we want. Let's go over here to our help. Also not working. Let's go to one of our CMS pages, company history. Okay, good. One of the things that should work is bytes. So this should take us to the Python bytes podcast over at Pythonbytes.fm. Woo! Look at that! How cool. So all we had to do is go over here and type, it went away when I hit Enter. But type r/, whatever our domain name is, 'pypi.org/bytes'. That's our little demo, that we're making at pypi.org. So we just put this on here. We're going to go along, and it's going to find that redirect and says, Okay, well, the '/bytes' short URL. Where is that supposed to go? That is supposed to go to this location. So we're going to return this redirect response instead of a text HTML response. And here we go. We're over here. Perfect! Let's try the other one, courses. There's the talkPython training one. Cool. And if we go to any other. Nope, we still just get our 404. All right, well, we've added this cool redirect feature, but like I said, there's actually a lot more to it than just this. It's gonna be fun to build on it and make things nicer and more dynamic, we can edit them, and so on.
|
|
|
transcript
|
5:49 |
It looked like we had our redirect working really well. We've got our data now, granted, this should be more dynamic and we should be able to build it out and edit it But assuming that we we're gonna get to that, we can go and ask for the existing redirects These two here and it will take us over somewhere else So are we done? Well, not quite. We're not carrying all the information forward that we could Let's have a quick look So over here, we can go to '/bytes' and it's going to take us to Pythonbytes.fm. Super, that works. Great! However, let's have another look. What if we want to communicate to Python Bytes, that this is part of a marketing campaign Or that the source came from us or any other information that they should process. Some sort of information from the user and send it back somewhere else? That's usually done with this thing called a query string. So often the URLs you'll see question mark a whole bunch of variables. That. So let's just suppose this is a marketing thing we want to promote Python Bytes. We'll say utm-campaign that's used often by Google and other sites. And then we said it's going to be equal to 'pypi-ad'. Maybe we ran an ad on PyPI and it's gonna go over to Python Bytes. We want to tell Python Bytes, Hey, here's somebody that came from the ad you ran. Now let me copy that because we're gonna need it again. What happens if I hit this? Yeah, No, we're not communicating that information over. Notice it's just the plain URL. What do we do? We're throwing it away. So what we'd like to do is come up with. So if we have it like this, we go there. We want the destination to also carry that forward. Alright, so we're going to make sure that this URL does that. So what do we have to do? Well, the first thing we can do is, over here. We're going to say if there is a redirect, we're going to send it over somewhere. Let's put, destination_url or something like that. It's gonna be this here...like that. Now we're gonna also check for the query strings. We're going to say 'if request.querystring' this comes out as just this part of it. 'events' something that was passed along Then were going to update our destination to be the destination, question mark, the query string. Like so. So we're gonna do that little check here, make sure that there's something going on, Alright. If there is a query string, we're gonna do this. We don't want to always append the question mark. Only when there's a query string. All right, let's try it again. Remember our goal is to end up with this. From... There we go. We want to use this utm campaign. This is our query string. And let's just put one more up here just so we have all the data, you know, sort of the general case because we could have multiple variables with multiple values So we'll have 'utm-source=fake-pypi'. Let's do those. Okay. So when I try to get over to pythonbytes.fm, that. Here we go give it a shot. Yes, look at that. Beautiful! It worked exactly like we hoped. Better question mark, key equals value, Ampersand key equals value. Let's just test one more thing. That was working. But now, will it still work if we don't give it a query string? Will it like put the question mark or other weird things that shouldn't do? Nope. If you give it just '/bytes', it takes you to pythonbytes.fm. If you give it a query string, it carries that forward. All right, well, now the redirection side of our CMS is pretty close. Another thing that we might want to do. We're not doing the moment, but we might want to do is record that we've received a redirect request. so something that's really helpful is if I've got some URL and I share it on social media. How many people have clicked it right? If I say Hey! Go check out the special post we've done or this episode we've done. I would like to know how many times people clicked on that redirect to follow it over to that destination. That might be really good for advertisers if this was an ad. You can do reporting to them. If it's social media, I could know what of my social media campaigns are working well. All those kind of things So doing something along the line where we actually store the fact that this request happened. Maybe the ip address of the user where the request came from. So we can say by country. Here's the people visiting the different campaigns and so on. We're not doing that right now. I don't know if we're gonna get to that later or not. I haven't quite decided yet. But this is really, really valuable to just be able to use these tiny, short little URLs to go to something much more complicated. Let me run that out with a one more example here. So we go over to talkpython.fm, and we go to '/YouTube'. So this is one of these redirects here. I don't know why I don't want to keep it, but there it is. So if we go here? It's not just 'YouTube.com/Talk Python'. No. We go here, It takes us to this really, really ugly url. So this lets us over at Talk Python say you want to go check out our YouTube channel, all you gotta type is not even this right? You don't say that. You say 'talkpython.fm/youtube'. The reality of where that destination is, is quite unpretty. It's like this huge gross url that you would never expect anyone to type in. But tell them the type talkpython.fm, sure. That's useful. And over at Talk Python, we even use that down at the bottom Like here's our YouTube channel Oh, no. We put the full one. Sometimes we do put shorter things in here for stuff and sometimes not. So anyway, having this nice little URL that we can use here that will take you somewhere much more complicated is valuable for a bunch of reasons. And now our CMS has that built right in.
|
|
|
transcript
|
1:11 |
Quickly review doing a redirect with our CMS. Because the way the URL routing works, the way the CMS works is everything gets sent to the one final route. We give all the data driven routes, like here's a package or here's the popular things or here's the user log in. But after that's done, it's like here is the one place where the URL Request gets the final say before we just say, "not found". So we're gonna check and make sure that there's not a page that we want to show first. If there is, we're gonna show it. But then we're going to say, well, no pages. Let's see if there's a redirect. So we're using our CMS service to get that. Now it gets it from fake data. Later it'll get it from the database. But this code doesn't change, and we'll say, If there is a redirect, let's quickly make sure that if there's a query string, we also pass that along. But we can adjust that destination URL. And then we just say, http found, here's the URL, Go! And that's up to Pyramid to just take that and do the magic that's done inside of http to tell your Web browser to go to that new destination. Finally, if you get through the pages and the redirect and neither of them are there, we're just gonna return http not found and show our cool not found 404 error page.
|
|
|
transcript
|
2:02 |
Now, before we move on, let's take our code that we've written and make it better make it easier to test and make all the different parts that we work with more focused And we're gonna do that following this thing called a 'view model pattern' Now the website, the data driven website, has been using view models all over the place because that was how it was built But we just started from there and we had it on the CMS thing So you might not have noticed this idea of a view model So what is this? Well, it's most useful when you're accepting user input You have an HTML form. People are filling it out. They hit, save. It goes back to the website. That data has to be synchronized back to Python. You know, what do they type into the form? Are all the required fields there? Maybe there's conversions. They typed in a string. You got to convert it to a number or a date or something like that. So the idea of the view model is we're going to take what would otherwise be a really complicated and long method here. This is like our CMS requests that we were just messing with, and as we add more validation as we add more logic, this just gets longer and longer and it's more complicated and it's harder to test. So what we're gonna do is we're gonna break it into two things. The view method that actually handles the requests that works with the Web Framework. Works with pyramid, returns the responses. And then this thing we're calling the view model. This is what we're gonna build. This is a separate Python class that knows what data should be exchanged, what is valid, what is invalid. What is the logic to do all that stuff. So instead of having that long, view method all in one, we're gonna have a view model That it's created by the view method. It gets all the data and validates everything and then it comes back and just helps the view method do its magic. Also, this is gonna help with testing if we want to write tests because it's easy to test the view model outside of the Web framework. It typically doesn't need much in terms of what's going on there, Whereas maybe the view method is much more complicated. Gotta start up the website, the Web app, and get it all up and running before it can actually do its thing
|
|
|
transcript
|
5:26 |
So here's our a few method, and it's getting kind of long and unwieldy. It's not too bad, but we're not doing that much validation yet. You'll see. Like I said, when you're in this edit mode where people can type a bunch of stuff in and then it has to be synced back and it has to be validated. This could be four or five times long as this right here. This is a more simple case, but still it's valuable to explore this idea of view models and clean this up nonetheless So let's do that. Over here. Just like we have our controllers organized and our templates organized. We have our view models organized. So we're gonna create one for the CMS controller Create a folder called CMS. Now we could just create a new Python file, start typing, but I find it much simpler to start from an existing one. So I'm just gonna copy this and paste because you'll see there's some stuff that's common all over. So we'll have CMS request view model and first thing that I'll do is change this CMS request view model. And all of these derive from the view model base. And here you can see that we're passing information that it needs along, and then we're going to set some properties fields. actually over here So what is it that we need to work with? Well, we need to have a page, and we need to have a redirect, and that's pretty much it. So let's actually copy all of this and come over here and drop it for a second. So can set the sub path like 'self.' that'll store it on a class. We can also store the URL. And to get it back here, we got to say, 'self.subpath' and 'self.url'. Now this we have to import Luckily, if we hit alt + Enter, PyCharm will just write it up here at the top for us. That's nice, and I also need to important this from Pyramid, like so. We don't exactly want it to... well I guess we don't have to do that here. We are not going to do that yet. Let's just hang onto the page for a minute And the way we wouldn't do that store it on this view model class and same for the redirect. Let's go a little bit farther for the redirect. Let's say we have a redirect URL. And the beginning is gonna be 'None' but if there's a redirect, it needs to say 'self.' I have self.redirect.url is going to be this. So and that's just going to stand in for our little destination thing. So we're gonna see if there is a redirect. The url is this because we're going to need to modify it, like so. All right, so what do we get? We're gonna go over here and we're gonna create one of these things and give it a request. And it will automatically figure out there's a page or there's a redirect. And if there is, it's going to set up the right URL for all that. So let's go and get rid of this We're going to create one of these view models. I'll just call it vm. And when that's gonna be CMS requests Noticed PyCharm is not helping. If hit ctrl + space, It doesn't help, but if I hit it a second time, it will actually import it automatically here and create that so it's pretty awesome. And we got to pass the request through If you're unsure, you hit 'cmd + p' or 'ctrl + p' and it'll tell you a request goes there. and then it's super easy, we say if vm.page, we want to return one of those responses. So we got to write that again. Response body equals whatever we had Like this, I'll just say dot, dot, dot. And we'll say If the VM found a redirect, one of those is here, then we're going to return it to the redirect URL like that. Otherwise it's not found. So, first of all, this is cleaner than what we had before. We can come over here like this and go to the local history and see the difference. You can see there's quite a bit more going on. But what's really nice is that we can take one of these and test it in lots of interesting ways without having to go through this whole routing infrastructure or trying to call,you know, creating one of these, or basically getting access to calling this route function The other thing is, as I said before, if we were accepting Maur user input, we could have as much validation in here is we want and then check the few pieces of data that we're interested in and go. We'll see that as we work on the admin side of our request redirect backend of the pages and the redirects. All right, well, last thing to do is see if this actually worked. We don't need to import that anymore. Let's go and run it and see if our page works. But we come up here and we can try our company history Just make sure that the works and yeah, it sure is. It doesn't have the body part, but that's fine, because we didn't type that back. And if we go over here and find one that's missing. No, we still get our 404 And then finally,if we do our bytes. Like that. Yeah, it looks like everything was refactored quickly changed on the inside, but not in its functionality Let's just double check that, if we do the bytes with the query string, we still get there. Yeah, we sure do over at Pythonbytes.fm slash the right information there. Awesome! So now we've refactored the logic of this over to this view model, and now we just check. If there's a page we've got to do a response. If there's a redirect, we send the http status code for redirect, otherwise we send them not found. That still belongs here but all the other parts about getting the CMS page or the redirect and building the query string URL, all that belongs down in this view model We don't have to think about it in our view method, Love it.
|
|
|
transcript
|
1:20 |
We started this chapter by taking a couple of pre-greeted fake database backed redirects and wiring them into our CMS Now, if we type '/bytes' that takes us over to the Python Bytes site. If we type '/courses', that takes us over to the courses at Talk Python Training, We even saw how to carry on marketing extras like utm source and other query string information that we might want to pass along over there Well, that's all good, But really, what we need is a system in place so that we can edit and create these redirects. We'd like to be able to be sitting on our computers and say, "Hey, I'd like to have another redirect on our site." Log in and without You're messing with the source code without touching the database. Just start typing on the website and have additional URL redirects happen. and ultimately we're gonna use the same technique for CMS pages, which will let us edit the content of the site directly. But we're gonna focus on redirects first because they're simpler. So this is what we're gonna build something that looks like this. A little back into admin section that only admin users get access to. And over in the section, we're gonna have two things: were gonna be able to list and edit redirects and list and edit pages. As I said in this first chapter just redirects. But that's where we're headed, Okay? And we're gonna get started by building this page right here.
|
|
|
transcript
|
7:11 |
here we are in our project. Now what we want to do is actually Crean Admin section and over in our controllers area we have our CMS thing that handles the pages in the redirects. We have stuff about packages and home and so on. But what we need is a whole new section. So I'm gonna create one of these in the easiest way is to just copy and paste, in my opinion, so does it say admin controller. And this is going to be admin home, something like that, and we'll give it a template. So we're gonna organize our template over here. We're getting need a new directory called Admin, and this is going to be index speak consistent. Either call them both home or both. Index will say admin index and admin there. Okay, so this is going to map over to this index function. We're going to call it admin Index. You can imagine it. Something like slash admin in the URL will get to that in a second. And we're gonna have ah template over there that's gonna show it now. We don't need much of this. First, it will be able to just return an empty directory. Our entry dictionary that's going to be haven't no data, but we're actually going to need a little bit of information about like who the user is and stuff like that. So we'll expand on that. It's super important that we don't let anyone, just anyone, access this. So we're going to do something like I have a functional say Validate is admin and we want to pass the usual. How do we get the user? Well, the easiest way, it turns out, is to create one of these view models, this view model base and give it the request. Why is that? Because if we go into RV model base, you can see that it has all this stuff for managing the user, whether or not the user exists going and getting it from the logging and cookie and things like that. So that's great. We're going to just be able to go over here and pass in the user. VM validate is the user Now. That's right. That really quick, you'll type annotation. That's gonna be a user now. What's the easiest way to do that one. We could return a value and then check it here and then send them somewhere else if they're not allowed. Or we could just raise an exception down here if it's not right. So let's say if not user, if we took out the user they have. This is admin and property, which weaken set in the database. So if they're not, first of all, if there's not a user logged an or if there's your user log jam, but they're not an admin, this is not OK, so we want to raise. They're like that. Say you don't have access this section and that's it. We just need to make sure that we call this everywhere. Now. Some other parts of the website also need access to this user and other information. So we're going to return the dictionary of that now here we can put and it turns out we can, you know, pull back information about some of the redirects or some of the pages how many pages there are, and so on. But we're not really going to put that we're just gonna have to links on this page that will take you in to, say, edit the CMS pages or edit the redirects. We're pretty close. There's two things missing We could write runnin it and you'll see the first one right away is that admin Index is not set up over in our routing. So let's go do that here. I called already had one in here called Admin home. So we just want to go to slash admin. I'll say index. Okay. These I guess we're left over from when I was fiddling with the site earlier. But these were the Urals that we're gonna need, and I'll just leave them here because But this is what we're gonna need. We need first half slash admin like that would run this and it's going to come across. Okay, let's log in here and logged in and notice it. Says admin here. The reason that is when I logged in before. If we go check out the users down at the bottom, here I am. Here's my account and I went had set that this user is an admin. If I take that away, I pushed those changes back to the database. Watch if I hit refresh this admin section appear goes away. But let's just see what happens if I try to go to slash admin for three Forbidden. Okay, that's because I'm not right now and admin. Let's go put me back as an admin. Refresh it. It comes back. And now, while it tried to get us there, right, this is the other thing we gotta fix is we need to write the h t mail that you saw in that last page. But, well, you're validating access to our admin section, so that's pretty cool. The last thing is just really quickly to throw together a bit of ah, template. That'll sort of set stage for going down that section So what do we got here? Let's just take this super simple about and throw it in here and call it Index This is gonna be admin home. We have a couple of actions that you can do. It will be able just have maybe two dibs with some hyperlinks. B slash admin slash redirects. That's one. And the other one will be pages again. We're not doing that just yet. We can't do that in a bit. We saved that. Come over here and refresh. Now we have control or site. Maybe don't want the self centered, but not a big deal. So here we go to our redirects. Here we go to our page is these are not created yet, obviously for four. Sorry, we can't find that page, But these were the two main things you're gonna be able to do from our site So we're gonna set it up so that you can come here. Let's just one quick final thing Throw in an admin CSS. You already have an admin CSS with some things set for us so that we can have, like, a cool little block that stuck in the center of the page and so on. So we come down here and say, Put these two together. See, this is an admin, Matlock. Let's put these and do some linked lists like that. These will be the things we can do. The other thing we have to do is over here. We have to include that CSS file into our site. So we want the static. CSS has to be admin like that. They were doing. We go. I guess we want one more little change to her. Yes, as here text align is left great and maybe also four of this piece as well. That was supposed to be in there. Perfect. That's our little admin section that we got for our site. The two things you can do. Are you gonna go visit the redirects and the pages? They don't exist yet, but our progress through the rest of this chapter is going to be built out ability to add, edit and control these redirects just from this page sitting messing with code or the database
|
|
|
transcript
|
4:09 |
If you look at this code, it looks pretty decent, right? We've got our index method and we're' validating the user, and we've got this. Now it turns out that this is going to require checking permissions on many different places. And I want to just show you a slightly better way We can write this If you prefer this over what I'm about to show you Just leave it. It works great But what I would like to do is I would like to take the validation out of the function here And I would like to put some kind of decorator like safe 'permissions.admin' or something like that and put this up there and say. This entire function always, always, always requires that the user is an admin and put it up here like this To me, it's a little easier to check the permissions air set this way, and you know this won't be here anymore. This will just be gone It would just write the regular code, and because this decorator is up here, it's going to do the check Turns out that that's pretty straightforward to write. Let's go over here and create a new file called permissions. Write a function called admin. Now decorators are weird If you haven't written them before. So what we have to pass is a view function We're gonna pass that in, and then what we're gonna do to create another function that adds some behavior than calls this view function and return that So it's kind of him in line replacement of functions, this function that we're going to write this checker method I don't know what you would call it checker function, It's going to have the same signature as the view function Look over here, that is, It's going to take a request just like this And we can make this explicit or not. Just mostly this is for us to remember, So in here we're going to return the value calling the view function, bypassing the request Let's write this really quick like so. Then the goal of this, this decorator here, this admin thing is to just pass back the function,that's going to be called, not call it Okay, so it passes it back, then Pyramid is gonna call this function, which is going to do some validation and then call this view in. So this is where we add our validation. We're gonna need to check the user and again, Using that view model that knows how to do all that magic is probably the easiest. So gonna say view model base do our double control space to get the magic happening. Pass the request over And we'll say 'if not vm.user or not vm.user.is_admin'. Then we're gonna do the same thing. We're gonna raise an http forbidden like this import that we could give it a message like you must be an admin. Something like that. You must be an admin to access the section and actually, this should work. So we can come over here, hide that away. We have to import this there other than we should be golden, actually So we're gonna go up here, put this decorator on here, it's gonna take this function and replace it with this outer function that does the validation plus calling itself. Let's give it a shot, we come over here. We have our admin section there and notice the admin thing here as well. Here's a regular page. Still working here's an admin page allowing it. Why? Because my user is an admin. Let's go see. Here we go. We already got that open. Let's go make me not an admin. Push that to the database. Now, if I hit refresh, it should check on I'm no longer a user. Well, first Let's see over here that my admin permission went away. See it? It's gone from here. If I refresh this, it should not let me in And just like before, It doesn't. As many times as I want. No, no, no, you don't get to go in unless you're an admin. Leave that to the database. Try one more time. Hey, look, I'm an admin, I'm in. So this is this alternate model that I'm going to use, all the things that require admin access, Or you could extend this for what other types of checks you want but if it requires admin access, I'm gonna put this decorator on it rather than doing it throughout the rest of our CMS admin section.
|
|
|
transcript
|
7:12 |
Next up on our CMS is we want this link to work. No, no, no, not 404. We want to see all the redirects So we're going to implement this /admin/redirects, Let's go over here and duplicate that real quick. So this will be admin, Remember, already have these here. So let's go see what we call them. Just redirects. Gonna be /admin/redirects like this, and we'll call that redirects as well Go and work on the template first, I guess. So Copy/Paste Call that redirects. Here will say redirects, and for each one of these, we're going to list all of them. Let's first actually put the ability to have a new one. So we'll have a little linked to admin add redirect, I guess we'll call it. I'm not gonna write that first, but might as well put it in the template. And then over here, we need to have, all of the redirects. So have ah list element a nd inside of our element, we're gonna have a couple of things We're going to have a button to test it We're gonna have a button to edit it when have the short URL and then the name So let's go here and put a button. This will be admin/edit/redirect We're gonna need to put something in here. We'll have edit. Let's do test first, do edit second. Put something in there. How do we know where the URL is, where we're gonna test it to go? But for the test, let's have it open a new page. The target equals blank, that will open a new tab for us. Over here, we're gonna edit it, and then we're gonna have a span, couple of spans. Let's put the names. Put the url and then the name. So how do we know what pieces go in here? What we're gonna do is we're going to make a copy of this for each redirect in the database, and we're gonna pass it over and use this colon repeat, You want to say 'r for r in redirects:' I'm gonna pass all the redirects over here, and we're gonna clone this and use the data from here, so it's gonna be to get the value out of it. so in chameleon, you say that. You say r.short_url Oh, no! That's going to be just url. Let me copy this one. We'll need this in a sec. It'll be r.url I'm gonna start with short_url but it really needs an ID. We'll give it that in a little bit. I guess we could just... Yeah a short URL is gonna be what we're gonna give it for now. That is the short url, and then this will be its name. Let's go look at the data real quick. When this service, we're going to this fake data. But it has a name, a short URL, and a URL and this is going to be what counts as the ID. All right, Well, actually, that looks pretty good. We go back over to our admin thing. We need a redirect list view model which doesn't exist yet, so we're gonna go and create one. Let's put that away for a sec. Now it's time to add one of these admin sections over here. And again, the easy thing to do is copy and paste. This will be a Redirect list view model. And now here's where we got to put the stuff that we want to have access to in that page. Will say self.redirects And we said there this thing called redirects. It's a list or a collection of redirect objects. and the way we access our redirects is through the CMS service. We'll say all redirects. Now, obviously that looks like an error doesn't exist yet, so we can have PyCharm write that. And let's go in and tell it that this returns a list of dictionary. So this is actually pretty easy. We have our fake data redirects that we're using. We can't return that because that's like a little bit too high level. It has the keys and then the dictionaries. What we want is just a list of these so we can return that. Like dot items or, sorry, values. There we go. That's what we want and that should return a list of these. Let's give it a shot maybe it's gonna run. Over here. We go to our admin section. I might have not put myself back as a admin. One sec. Oh, no! That's not at all what it is. Hold on, hold on, hold on. This was worth running into this error in pyramid. It happens a lot. I'm not used to running into it because in my websites, I've extended some of the pyramid functionality to catch these errors. What went wrong here? Well, we never got to that, but that doesn't really matter. What happened is, notice when I made a copy of this, I changed all this stuff. I changed this stuff. However, What I did not change his index, and it replaced that function Which means the base just /admin is gone. Yikes, I hate that pyramid doesn't check for that. So we're gonna have to rename that and try one more time. Yay! Admin is back! Now, the big question is, is our other section redirects back? Yes! Look at that. There it is. Now, this is super super cool. It's really close to what I was hoping for We got our test button. Let's test this. It should open a new tab to Talk Python Training. Notice the bottom. The URL looks like it's probably gonna work. Yes, perfect. And this one that goes to Python Bytes well it should go to Python Bytes. Yeah. It looks like our little test is working our edit won't work yet because we haven't written that section. We're not allowed. We have implemented editing. We'll get there shortly, but it looks like it works. I'd like to change the way this feels a little bit here. Let's go over to this and we're gonna just give this a few CSS classes. So we'll say classes of button, 'button-'... Uh for the test what kind of button do we want? We'll give it a green button to test it And edit it we'll give it a button, buttoned-danger. Maybe we'll make these small as well. Little bootstrap there, Cool. Now we got our buttons Still works. Of course, nothing changes about them. This also is not super clear that this is a forward slash So let's make that obvious. What that means like, forward slash here. Cool. And then also we'll say this is class equals link. Something like that. And in our CSS for our admin we'll go down here and say '.link {font-weight: bold;}' like that. There we go. Now it stands out a little bit. I'm pretty happy with this. This isn't super cool looking, but again, it doesn't really matter. Alright, this is just for us to be able to manage our website. So this is great. we can go here to our admin section, go over and see all the active redirects on our pages. We could do cool stuff like if there was tracking and like this one's been clicked 1000 times and this one 500, whatever. But we're not doing that here, right? Things we could extend it as, but we're not. And then we can test it. That already works. And a little bit of what's left is to just edit this right? The ability to, like, pull up those details, change the name into the URL. Stuff like that. Cool Cool. All right. Well, it looks like our redirect admin section is coming along well.
|
|
|
transcript
|
2:29 |
Before we get to writing the code, actually edit our redirects, or for that matter, are pages as well, I want to review this design pattern, this concept that you may be familiar with, but you might not be. And it's super nice for how we organize your code. I still see lots of Web apps out there not explicitly using this and they're way harder to understand and work with because of it. So the idea is we're going to use this get post redirect pattern to edit our things. How does that work? Well, we have our server, and we have our database. Out there somewhere, there's a user who wants to talk to our site and the assumption here, is they're going to edit one of these redirects. Or they're going to create an account or something like that. They're gonna register for an account. So the first thing that they need to do to get started is they need to see that page that has the form. Like we're gonna register. So what is your name? What is your email? What do you want your password to be? Things like that. So they're gonna do an http get request against the server for '/accounts/register', and that's gonna show the form on their page. And then they're going to say, Well, my name is Michael and my email addresses michael@talkpython.fm and so on. And they edit that locally, and then we're gonna save that back. So to do the save, their going to do an http post back to the same url. The server's gonna look at that and go, "That means they want to save stuff. Let's validate it. And then if it works, we're gonna save it". And then finally, instead of leaving them on this page, they've just registered. They've just created an account What do we want to do? Probably send them to '/accounts' or some sort of welcome page They're going to send them a redirect request an http found as we've already been doing to '/ welcome' Welcome to your account! Here's what you gotta do to get started using our service. So it's a 'get, post, redirect' that is very typically the way that this works. If for some reason the data doesn't validate, they're going to stay on Step 2-3. They're gonna get a message that you have to edit it again, post this back again. And then eventually, when it's valid, they move on to the redirect stage. This is how I think of it. I get the form. I edit the form. I save the form, and I go on. This is actually a well known pattern mentioned on Wikipedia, but they have it wrong in my opinion. They call it post, then redirect, then get. Well, what are you posting? You got to start to get the thing to actually post. So anyway, they call it post, redirect, get, but it's a very well known pattern around organizing our code and the way that we process people editing data on the web. So we're going to use this for our admin section, of course.
|
|
|
transcript
|
2:10 |
It's time to add redirects dynamically as an external user, not just typing in the source code of our website. That's how, of course we want people to work with it And we're gonna use one of two of these URLs here. In the beginning, we used add to add new ones, but eventually you want to edit them. So we're either gonna go to /admin/add-redirect to add a new one, or we're going to go to /admin/edit-redirect and then give the ID to edit that. Those obviously don't exist yet over here. So we're gonna write them. Now, these are going to require a slightly different styles. So I'm going to put a little divider here. We'll call this add redirect. Why such a divider? Because we're actually gonna have two functions. They're both gonna kind of look like this. So we'll clone that. First thing, let's go and say add redirect. And then the route is add redirect. And what are we gonna put here? It turns out that adding and editing are going to be identical. So let's just say this is going to an edit redirect. But we want a different url so we're not gonna change this or this. But it turns out the same form works for both, so we don't have to write it twice. That's cool. Now, to follow the get, post, redirect pattern, sometimes you'll see people say, if request.method equal do get such and such else do such and such. You should never do that right. That makes it super complicated. Don't do that. What we're gonna do instead, as we're gonna go over here and use the web infrastructure. Say method equals get like that. And this is going to let us hook into that. And this function will only get called if it's a GET. So because of that, we need to have different names of more than one function. We already ran into that error. We're going to have one like this, and then we're gonna have one for POST. And this is gonna be called post too. This one handles showing the form. This one handles processing the user data submitted when they save the form. Oh, and I forgot, this is request method, not just method.
|
|
|
transcript
|
6:05 |
We're gonna go and add our form or our HTML over here, and this one's probably good. Here We're gonna call it for admin, I'm going to say add new redirect. But of course, we're gonna need to change that to sometimes they add redirect, sometimes not. Yeah, Let's actually put that inside this admin block a bit there Then what we're gonna do is we're gonna have an HTML form. The action is just gonna be this page, but the method is going to be post west post And in here we're gonna put standard editing elements that you'd have in a form. So when having input type equals text and I want to give an ID of name and then it's kind of infusing a name of name what does that mean? Name is the data submitted back to the website This is going to be the value because we need name short url, long url and so on. So name equals name. Yeah, that's weird, but that's what it's gonna be. Class, we'll, say form control. that's from Bootstrap. I'll give it a placeholder. Now, this is the text that's in there that says what you want to put. Say name of the redirect. If you hover over it or use some kind of screen reader, you can get what the title is, maybe more or less the same as the placeholder. But remember, if you pre-populated this, the placeholder won't show. So duplicate that there and then we also want to set the value, and the value is currently going to be empty But it is what we're going to pass in now This is important In two times This could be the redirect that we're trying to edit later when we get to editing, but very likely if there's some kind of error like we didn't fill out this field correctly When we want to send that information back, we don't want them to have to re type the whole form We want a roundtrip that so they don't They keep the values they typed the first time. So we'll put that in like this. Finally, we can say this is a required. That'll help getting that filled out there. Well, we don't do that for a few more He's one for the short URL Here we go We have that as the URL We need one more thing, here. We also want to pass around hidden ID. Now it turns out we could get away with this most the time, certainly for adding, but when you're editing, especially if you're changing the short URL, you need some way to know which thing to go back to. It gets really tricky, but down in the bottom, I'm gonna put an input 'type=hidden'. Call it, redirect-id. We only need to show this one. I'm going to say, tau ':' condition, if there is a redirect id. So we can omit it that if there's nothing here. Let's wrap this around. There we go. we also might have an error message It could be that you hit save, and maybe this URL already exists, You can't create it So there's gonna be some kind of error message We'll have a little section that will just share the outside class error message. We're only gonna show this if there is an error. We're gonna pass that back, and the text is going to be just the text of the error. All right, well, that's pretty good. Let's get some room to look at this big beast. So we're having our. Add a new redirect. Here's the form submitting back to the same URL So whatever we got from GET or sending it back with the POST. that's the get, post, redirect pattern part of it We'll have the text for the name, the short URL, the destination URL If there's an error, we're gonna show that, and I guess we can't really do this without a button. That's going to submit our form. Create redirect and we'll give it this class of 'button' and 'button-danger' to make it a nice red button. All right, well, this is looking pretty good. Let's go back and look at our controller. See how we're doing. Here's our redirect for adding add, one for git add one for post. Let's just do, we don't want this view model anymore. We need to do an edit redirect. Now again, this is add, but the edit and the add are gonna be basically the same. We'll do that here. Right, this is going to let us edit it. We don't need all of them, but we're gonna need some pieces of information. Whatever you saw me type here like URL, short URL, so on. We need all of those over here. Okay, great. I think that's probably what we need. We also need error. It could be empty. If there is no error, but it needs to be there. The way chameleon works, the template in language, it will crash if it doesn't see these elements. So we're going to create one of these over here. Which we gotta import and then we're gonna send back those values to that template. Woo! I think we might be ready. Let's give this a shot. Go to our admin section. Put redirects. Add a new redirect. Oh, yeah, there it is. And it's required. Yeah Okay. Well, that's a good start. It actually making more happened than you think. It's doing the local validation. So it's not submitting that back. Great, so that's working pretty well. Let's go and actually do this part as well. You can just do print. We can just send back the request dictionary that was sent over. So the view model captures all this data from the form and from the URLs and so on. And it'll show it there. Let's just see what's up with this. It won't let us submit until we fill it out. So let's say we want to go to Talk Python rather than Python Bytes. So we'll just say Talk Python. We'll give that for the name there. Fill this out. something like, We want to go to a slash just say type talk and then I'll take us there. And then, of course, talkpython.fm. This is not gonna work, We're gonna try to create it and says. You know, we're just we would have but let's see what we got. There's a bunch of stuff captured from various places that don't matter. But this is the part we care about. The name is Talk Python. The short URL is talk and the URL is that. Perfect, It looks like everything is working
|
|
|
transcript
|
3:03 |
says the last thing we need to do is somehow have this view model, validate and grab that data. So here's what we're gonna do. We have a method called restore from How about this process form poster, Something like that which doesn't exist and will say if vm not error return VM not to dict. So if this were to set the error here, we're gonna return that and show it. So let's just do that real quick. And he would just say self done. Error equals test error that rerun it. Now if I hit Refresh, it's going to show. First of all, notice all of the data went away. How frustrating. Fix that in a sec. It Reese tend here who test error. Okay, that's cool. We got our test error back. Didn't let us go by The other thing that we need to do it's We need to get all of this data back. So in this view model that has a sinkhole to request dicked, it was really long to keep writing that. So I'm gonna go over here and say d equals that so we can say, Do you not get short or ill? and was gonna do that for the rest of them are going to get the u R l. And here we're going to say, if not self dot short url just add a little validation, give you a sense it might need more, but we'll get going here. You must specify a short URL. Another one that might happens would say, If CMS service don't get redirect from self dot You're all this would be the case where you try to create a new one for one that already exists in the air would be already exists or something like that. We contest that in a minute. So this is going to do to nice things is going to allow us over here Notice these Never refill themselves. They're gonna start doing that now. And let me just set on more time, self dot There equals hold tight just to make it stop for a second and still have these air conditions. So I try to submit the page again and it says hold tight. But look, now the data is coming along so I can change this to you. Talk to and the data goes back and forth, which is super helpful because we don't have to keep typing that. But let's get this little fake air handling out of the way. And we started. And that would work. Except for it would create the redirect. And then the last thing to do is to actually do the get post redirect. Not literally creating one, but just take them somewhere. So we're gonna say return http found and where we want them to go slash admin slash redirects. So we just created a new redirect. Let's show them a list of existing ones. All right, let's do that. So this put bites for a second. So that'll do our validation. Redirect with bites already exists, but not talk. No, no. So talk should work. If we hit this, it should take us to our list. Does perfect, however, didn't create it? That's the final final thing, right?
|
|
|
transcript
|
2:11 |
But let's go over here and put this CMS service. That create redirect. So we've gotten a post back, We validate the data, we're gonna do the thing, save it, and then do the redirect. So this will be a `vm.name`. `vm.short_url`, `vm.url` Yeah, I think that'll do it. Create that function. `name, short_url, url`. Great. Well, if we go over to this thing, we're gonna have a database for real in a minute. We're just going to stick something that looks like this in there. So let's go back. I'll have a data, woops. I say data equals this. So this thing is the short url, the ID. Let's just put by for a minute. We'll figure that out a second. This is gonna be the url we'll be also the short url, and this will be the name. And in here, we're just gonna go to `fake_data.redirects`. Our port url is going to be... Actually, we were had it. Let's just do it like this. It's going to be data. There we go. That's what we want. And that will put it just while it's running into our fake database. And then, you know, when we get to a real database a little bit down the road, this will be working great. So come over here. Refresh it. Add in a redirect. Now we gotta do it again. Talk Python. Talk CMS. Talk Python. Okay, this should work. When it saves it back to the database, just temporarily in memory, it should show up in our list. Let's give it a try. Oh, yeah, There it is. Check it out. Courses, bytes, and this, and check out the url. talkpython.fm. There we go. Let's add one more. Just for fun. Google, g, google.com. All right, so if we type Go up here and open up a new tab type just `/g``. Look where we are. Beautiful, very, very cool. So it looks like our ability to create these new redirects is great. It's working just fine. The only the last thing to do is edit it, but truthfully, we're basically done with that. We just need a very, very small change to keep track of the original data. And we're done with this whole redirect admin section.
|
|
|
transcript
|
4:01 |
we have our add redirect working, but it's time to edit as well. Because what if we make mistake? What if we want to change our minds? So for over here in our admin section in the redirects, we click on Edit. Well, ah, 404. And what we're trying to go to is '/admin/edit_redirect' And the ID of that object. Okay, well, that's pretty easy. We should build to do this. We've already done it for adding we should be able to edit it. There's actually not that much difference. Now noticed over here. We have an edit re direct route already. And it's going to be that one that we saw pass along is gonna come through is the redirect I d that we've already kind of been working with. So let's go and work in that here. Now I'm going to do something terrible and make it better. Terrible thing is, I'm going to make an exact copy of this and just repeat it and rename a few things. We're going to name that to 'edit'. And why is this terrible? Well, all the code, the order hiding down here is gonna be an exact copy in both places. That's not great. But there's so much similarity that let's just start this way and I'm gonna improve it. So here we go. Edit, and edit. Edit. Take that away from both of them. Actually, you don't need that would process. bit anymore. Over here, instead of 'create', we're going to call 'update' the redirect, and we need to give it one more thing at the beginning. The redirect ID. Because we need to find it by the ID and then make a change to it. Okay, So what's going to write this function first? Gotta write, Write them somewhere. So, yeah, redirect ID names. short url You're all these are all good. So how are we gonna find the one by ID? Let's go look at our data real quick. The each have an idea that gets set here, so it's not gonna be very efficient when we get to the database. It's gonna be a lot better, but we just do this And we'll just do a quick little sort here. Going through all the items. So we'll say, 'for k, v in big_data_redirects.items()' So this will give us the key, which will be the short url, and the value, let's change that to 'r' for the redirect. Now, on that item, we're gonna have the ID. So here will say, 'if r.get(ID) == redirect_id' And redirect is going to be just that thing. That's perfect. And we can break out of our loop. Super and then down here instead returning 'None' we'll just return 'redirect'. Alright Well, that looks pretty good. You could even give it a little test down here in a Python console. Actually Let's do this in two parts here. let's have the get_redirect_by_id. That's this one here will say get_redirect_by_id. 'if not redirect: return'. just out of here. There's nothing to do. Otherwise we're gonna say redirect of name equals name and just do it for all of them. There you go. That should do it. We're gonna get it back, make those changes to it and just stick it back in the database, the "database". Our little in memory thing that we're working with until we get to storing this in the database better. All right, Now, let's go over here and restart this. We'll get it by ID. We have a one. Look that. Perfect! We have a two. There it is our bytes. Do we have a three? No, we don't. Give us nothing. Excellent. Okay, so it looks like our little get that is changing. So perfect. We're still calling up here. Update by ID. This should work pretty good. Now, surprisingly, that might be all we got to do for this part.
|
|
|
transcript
|
6:01 |
Let's go over into this and write this bit of code again. Now, in the add case, there's no data initially provided. But in the edit case, remember, the URL is passing over the ID of the redirect we want to edit. And that means we can write this or maybe that rather and this will be self.request_dict. So this is going to give us the ID if we're editing one. Otherwise it's going to give us none just like we had. And here we can say, if 'self.redirect.id' then we want to set some more values, right? We want to get the id and 'self.redirect'. I guess we could go and just get this. Let's say CMSService.get_redirect_by_id. Let's make sure we're checking that this, if it's empty, redirect by id. 'if not redirect_by_id: return None'. Alright, if we pass and nothing, we expect nothing back. Just so we don't have to check it. Here you will get the redirect and we'll just say if there is a redirect, we want to actually copy those values over so they can start from seeing those values and then edit them. So this will be short URLs and the others are going to be similar. All right, get those And the redirect url, redirect ids are already set. Perfect. Think this actually might already do it? There's a few little things we're gonna have to touch up later to make it perfect, but this is really close. If I got it right. Well, let's go over here. Go to our admin section. View the redirects. We've seen we can already add them. Let's go ahead and just add test... Oh, I'll add my little talkPython one back. Right. Here it is. Let's suppose we can edit it. All right, Well ah, didn't totally work. We have our edit redirect five here. why is this not coming up? Good time to check out our debugger isn't it? Make sure that's hitting the right one. Yeah, it's coming here and you see, here is the URL. Everything looks fine with that. Redirect ID? It's five, okay. You know what I think? I think it's something super tricky. Watch this. It's going to be frustrating. Okay, so we come in here. If we look at this, you can see there's ID but notice there's no quotes on the 2. There's just the value 2. More relevantly, if we go further. You know, we just look at the redirects. Expand it. The items all have numbers, not strings. So what we're doing here is we're comparing a number to a string which is never okay, Never gonna match. So let's just do it like this. Alright, I think we should have this working. Now, let's go and do it again. Over admin, let's just edit one that exists now, so it's edit courses. Oh, yeah. Look at that. There's the courses. This will be, I'll put talkPython courses, for example, that should when I hit, 'create'. Notice, this is one of the little things we gotta work on. It will push that back to the edit should change this, let's see. Oh our validation is kicking in. Yes. So let's go and lock that. Down here we're saying if we're trying to create one, then we got to check that it already exists. We should say, 'if not self.redirect'. And this maybe like that. so 'self.redirect' What could say that's the best way to make this clear? We also need to say this if there is a redirect and it doesn't exist, redirect with URL was not found. So if they're trying to create a new one, we need to check for one like it already existing. If we're trying to edit an old one, it had better already exist. Okay, let's try this again. Resubmit our form. Maybe it'll work this time. Yeah, it does. And check it out. It's edited right there. Let's edit it some more. Let's just put all those classes. Oh yes, we need to do slightly different tests over there. Let's just edit where it goes. Question mark equals true or something like that. Alright. Now, if we test this or even look at the bottom, we've edited it. Beautiful, beautiful, beautiful. Send us over there and the title is perfect. We're able to edit that. The one thing that we saw was that we're not yet able to edit this. We're somehow not relying on that ID, which doesn't change ever. Enough! And so let's do this will say 'get_redirected_by_ID(redirect_ID)'. That's the one we want and what probably should say down here with ID whatever it is. All right, Last chance. Let's see if we can edit that URL that short URL in our thing. Otherwise it's working. OK, here's the redirects. So let's make this course is exclamation mark and, ironically, we'll call this "classes". and we'll edit this as well and say question mark final equals Yes. All right, can we change it so that we can redirect through '/classes'? Woo! It's looking pretty good. Here's the final URL, but let's the real test is typing '/classes' up here isn't it. '/classes' Ready? Course it works. Beautiful, our little CMS backend, while it took a little bit to get it up and off the ground. Maybe took a few minutes. This is the same thing we're gonna do for pages. This is like the blueprint for everything we're going to do in the rest of the class in terms of our admin backend. But we're going to extend that, of course, with rich editing and all sorts of cool stuff. When we get to pages, but there it is. We were able to go over here. Go to our admin, and now we can edit our classes. We could even put it back to courses.
|
|
|
transcript
|
1:01 |
Now I give you '/courses' that works. Reduce slash classes. Oh, it remembers and remembers the redirect too bad. Oh, you know, it's not that it remembers. I believe we're not deleting out the old one, but don't worry about it. You know, it's it's not really that big of a deal. I guess we could go in and just fix it really quick, couldn't we? Go and find the short url, that was originally there. We can remove that from our database using that command right there. Whatever. It's current. short url is, take it out and then we're gonna put it back in right here with its new one. Let's go through that one more time. So we'll go over here, edit this Change it to classes Now courses doesn't work, but 'classes' still works. Put it back. Classes should no longer work. Nope, but you know, of course, here we go.
|
|
|
transcript
|
2:15 |
before we call this officially finished and put all the redirects aside, let's check out one more thing. There's something that's not amazing. If I add a new redirect says, add new redirect, create redirect that school. But when I edit one, however, I get to add a new one and created weight that save and change of this one. So let's update this page two. Very based on whether we're editing or creating one, it turns out this is super easy. We just have to put in place over here. We say add new redirect. So what we're gonna do, we can put one of these little chameleon string testy things that weakens you Assume, say, add new, if not redirect I D. So we don't have a new i d that specified. Remember, this is the edit case we're gonna say, Add new else. We're gonna say, Edit the redirect. Yeah, let's see if that works. You hear this should split to edit at it. Redirect it does. And if we go and have new one, here's an ad, a new one. If we go and edit at perfect, we need something like that for create as well And you know what? It's the same bit of HTML our little test. They're gonna put this in this instead of add new is gonna be re eight, and this is gonna be save, save redirect at it. And if we go over here and create a new one, been a creator, redirect and add one. Maybe even we could change the color. That's totally possible. But more just gonna leave him read for both. Yeah, there we go. We've cleaned up this page over here this page so that it's a little more meaningful. Even put the name up here. Say we don't have title, do we? We have name. Here we go. Edit the Python bites, redirect or we come over here and edit the courses. Redirect. I'm not sure if I love it or not, but I'll leave it there so you'll have that flexibility now. I think this is pretty much done. You can even see are cool little title that we put in there working for the hover when we don't have it empty so you don't see the placeholder. Great. All right, Now our little editing CMS thing is
|
|
|
transcript
|
3:43 |
one final cleanup before we move on to the next chapter. Remember when we wrote this add_redirect piece here? We then turned around where he said, We're gonna just copy the exact code and make minor changes like change the name 'edit' here and here and then other change went from 'create' to 'update_redirect'. Otherwise it was the same, and that wasn't great. So let's go through and clean this up really quick. So let's look at this one. Now there's this part which is identical to this part. Remember, it's the view model that handles a lot of the setting things up and loading the data. If there is a redirect that was passed to be edited and so on, there's nothing going on here. But I'm not going to do anything with these two because they're already only two lines of code. It's just going to complicate things to try to centralized those. But let's go and write a function that does this. I'm gonna copy this part here, and I put it down the bottom. We're going to create a function and it's gonna be called add or edit redirect, and it's gonna take a request which is a request, and we're gonna drop that here. This is gonna work fine for this one appear, cause I literally just copied it. But down here, we want to do same thing. Let me just, we're gonna call update. All right, so we're gonna do the same thing here. We're gonna return whatever this generates either an error or some kind of redirect or something. So how do we address this fact that we have? Sometimes there's a thing being edited, and sometimes there's a new one. So what we're gonna do here is we're going to say 'if view_model.redirect_id' So If there is a redirect ID than that means we're in this 'cms_service.update(redirect_id)' We could just check for this. It might be a little safer. ID and then all these when you spell it right. That, else we're gonna do this and that's it. So this way we can have the same basic logic where we redirect them to how we handle all this stuff, and we don't have to have that code duplication. is it, Major no. Is it better? Probably a little cleaner Now it's only even potentially better if it actually works. Let's go running and just make sure this works. Over here, we're gonna view our redirect and we want to be able to add one and then edit one. So let's add our Google one 'G'. This will be https. Google And that's cool. We can test that it works. Let's see that. We can. Now can we edit one? This is the other side of the story, put an exclamation mark here. And let's just change that to not HTTP Google has this exclamation mark And if we click on test, well, we can't really tell. But if we go and edit it again now the S is gone. Beautiful. So it looks like that works One other really, really quick thing when we test it, we're actually going directly to the URL here, as you can see. What I would like it to do is actually really, really test typing in '/courses' or '/bytes'. So let's do that also. All right, here this is super Super fast. So here's the test button. And right now the url is the full url, but we want is the short url. We need to put a forward slash So let's go back and refresh. Notice this is '/g', ' /bytes', '/courses' But if I click, it works. All right, well, those redirects and this little redirect cms backend, I think its in a great place. And it's gonna be a really solid foundation when we move on to work with editing and creating pages.
|
|
|
|
33:22 |
|
|
transcript
|
3:39 |
Well, I'm pretty excited because we've come to the chapter where we really get to focus on what you probably consider as the core feature of a CMS, or content management system. that we're plugging into our Web app here. But what are we talking about with these CMS pages? Probably the best way to understand it is to compare them to traditional data-driven pages. And I will just look at an example, and then I'll make sense of these two for you if If you're not sure what I'm talking about. Here's one page from our website. We can go and dig into the details about a package. This one is the AWS CLI, the Amazon Web Services command line interface. Here's another one where we're getting help. We haven't created this one yet, but we're going to create this one pretty much as-is. This what you would get if you click that help link in the top of the navigation? At first glance, they look kind of the same, right? They have the same shell. The CSS style is definitely the same. Things like that. However, they're very, very different. One on the left is a data driven page. and what I mean by that is in the database, there are multiple entries or models that have certain pieces of information. and the job of this page is to, in a very structured way, pull out the specific version of that model from the database. So, in this case, pull out the AWS CLIs settings and fill them in all over the place. Like right here We have the name of the package and the current version that's shown on this page, and we have the command to install that package. Here we have whether or not it's the latest version? And when that version was released. So we pulled the package details from the database and a list or collection of releases from the database. We also have the summary of the package. Here we have a bunch of links that will take you say over the project description or the release history Or where you can download files from this all has to do with this particular package. There's links at the bottom like you can barely barely see homepage down there. That's of course, set in the database. And there's the description as well. Everything about this is just, I'm gonna have exactly this structure, but vary by the piece of data that we're getting back. A good example to think about this also might be Amazon, right? Like I'm looking at a book that looks the same for every single book. It just happens to have different details filled in. On the right. The CMS page is very different. It's probably stored in the database technically, but for all purposes, it's just a blob of text that's dropped on the page This "Hello", this "help with PyPI", "do you need help installing the package?". That whole section, there's no structure. It is, here is the text boom. Whatever they typed in its that. This is great for landing pages, for these help pages, for other parts where people just need to write informational stuff on the Web. But it's not exactly structured with a whole bunch of different things coming out of the database like this one on the left is. So you might ask, Why do I need to put that in the database? I could just create static files. I could go and create markdown. There's even whole things like Pelican, that will actually go and from a bunch of static files generate these Web pages. That would look like the thing here on the right. Well, that works for the core bit. But there's also other dynamic things. Notice we still have the fact that you're logged in or you're not logged in, whether or not you're an admin. There's a lot of stuff going on that still needs the smarts, needs the behavior of our data driven Web app. It's just this page. Why do we need to go write source code to create it? We don't. We should be able to just log into an admin section, type some stuff out, and now we have a help page on our website. So that's what we're gonna focus on in this chapter. Building the thing on the right. Basically, the white part of the right page. It should be a lot of fun.
|
|
|
transcript
|
5:25 |
so far with our CMS route method, our view method here. What we've done is we said, we use your cool little view model idea our view model pattern that's working super well and we're just going to double down on that. But we said If there's a page, we're just gonna do something super silly like, Say, here is the title. If there's a redirect. We're gonna redirect them. If there's no page and no redirect, we just say, "Not Found". But what we want to do is what you just on that last picture, a beautiful page that looks like it belongs with the rest of the site. So how do we do that? Well, that's more or less this thing I commented out over here. So we're gonna specify a renderer. And instead of doing this, we're going to save 'view_model.view_dictionary' This is close, except for we want this to be CMS, and we want this to be something meaningful, like Page. Why my calling "page" and not CMS requests like the others. Well, we're only using it for the page scenario. This one, we're not using it. And this one "404" we're not using it. So page, it's gonna be in my world. Now, let's go and create that over here. You don't have a folder yet, but we will shortly. CMS And then remember the easiest way to get one of these because they're not just from scratch pages, but in fact, they are based on this shared layout template. We want it to look like just just so we're gonna do a copy in a paste and call this page. Now, I'm gonna add one quick little CSS class here because this one we wanna have some space have padded. And actually, I'll show you what that does anything about first. So we're gonna look at real quick without the padding. Kinda bad, actually. If we go to about... Ah, it's centered, so you can't really tell, but basically. Stuff goes to the edge. It goes right to the edge, which is not amazing. So we're gonna put this little padded thing in here and it just has a little more room. Most importantly on the sides. Like I said, you can't really see it this moment. Okay, so we're gonna put that into our page template over here and then in this section, What are we gonna do? I just want to put the entire blob of text that makes up the page. Right? Well, let's do it like this. How do you put text in pyramid? You say whatever the text value is. So let's look at our view model because it tells us what is passed over. So right now we're passing a page. If you look at pages, they have a contents. Looking at our fake data for the moment, we have a contents. However, as we grow this thing, we're going to actually want to maybe have the content store to something like markdown and then generate HTML. So I'm gonna have a 'self.html = None'. And then if they'll stop page something like that, where we get the contents and set them to this HTML because this is going to get really interesting and more powerful as we go. Just kind of looking ahead. So what do we have to do over here in our little page template? We have to put HTML all right, and we probably also want to set the title and were not able to do that yet? Notice. We've got these cool little extra sections in the shared layout that weaken drop in notice right here. We're defining a slot for additional CSS. Let's go do one for the title up here. We'll call this 'htitle' or something to that effect. And if they don't fill it out, this should be there. Otherwise we can have that go. All right, So, over here. We can actually put the title. Remember we have to specify the title. Let's do it like this. That way we don't have to put title they can just put the words down here. So let's just say we had this. We had title, I believe, for our page. Let's have a quick look. Yeah, title. So we can just set it up there, maybe even make it something like this 'PyPI:TITLE OF OUR PAGE'. We don't need to send any of this, but this one, we're going to have page title. Is that what I called it, double check. Yes. Okay. This is looking pretty good. Let's go over and make sure we're using it. We're using it. Let's give it a run and make sure everything's working. We come over here we had two. These company history and company employees. It didn't love title did it? What was wrong with that? Well, where does title live? Over here. It's not called 'title'. It's on the page, right so we can say 'page.title'. Remember? Only gonna be in this page if there's on this template. If there's a proper page, here we go. "PYPI: Company History". Super and then details about our history. And then we probably want to even go and put the title again up here. Let's put like a "h1" like that. Here we go. Beautiful. Company history. Let's go to employees, our team, details about our employees. This is looking pretty good right? Now we don't have anywhere to click. Like if I click on help. That doesn't exist yet, sadly, but you can see our CMS. It's controlling the title, putting this in here and then this is just gonna be arbitrary content, not a big fan of it being centered, So we want to work on that in our CSS. But basically this is off to a really good start. There's a few things we're gonna need to keep changing, as you'll see, as we get into it. To do real stuff, but we're off to a good start showing our CMS content
|
|
|
transcript
|
4:20 |
Really quickly, I added a couple of CSS styles here. That 'h1' should still be centered, but that the main content of the page to be aligned left. If you look over here now, this is probably what we want. Everything centered is going to be super weird. So this is gonna be left-aligned and we can style the elements within here as needed. Okay, so that's off to a good start. Now, when you look at this, this is not super interesting. Employees, same. It's like a sentence that just lays it out on the page. It's not really content. But what I want to do is just like maybe let's write a little bit of content for this page so you can click on '/donate' and have something there. so for now, until we get to editign, let's go and just go to our fake data and add another one of these over. So this is gonna be the url, 'donate'. This is the same, 'donate'. The title will be "Donate to the PSF". And for content. I want to put something more real. So I'm gonna use, let's get rid of that that'll thing there. I'm going to use one of these literal strings like this and so we can have it look just like so. Now it's not amazing. Obviously not going to build out our site like this, But for now, let me just put this in here. So we're gonna strip it off so it doesn't have those bases there and there. But otherwise, we have some built in HTML, and it's gonna be awesome, right? Let me just rerun this. We go back, we make a request. The CMS service will ask the fake data for the donate data, and it will be there now, so it shouldn't 404 like it has been. If I refresh, it should be amazing. We should see that content we wrote. Yeah, hmm, that's amazing. It it does look pretty amazing to me. I did notice we probably should drop this by that part. What do you think about this? You're loving it out there. What happened? Well, pyramid and chameleon tried to protect us from users injecting data into our site. When would that kind of stuff happen? If I had a user forum and somebody said, "Hey, I'm going to type an answer or even a question" "I'm gonna go type it out." And normally you let them type HTML or something like that, and you show it and it's great. But every now and then there's gonna be some evil person that says, Well, let me put in a angle bracket JavaScript. Some thing to take over the page, right? Something nasty that's gonna like, look at your cookies Or do cross site scripting or something along those lines or even on the same site. So chameleon and pyramid Try to protect you from that. They won't let you put raw markup in there unless you explicitly say so. So we're gonna do that here in a second below its get rid of this bit. We already have the HTML, the head, the title in there. Okay, so over here, we can say I know what I'm doing. This input is safe. We can say 'structure:'. That means don't protect us. Just dropped straight in the page and let it do its thing. It's part of the HTML structure that we need. If we go over here and I saved it, hopefully I did. Ta da! There we go! "Did you know you can actually donate to the PSF? Here's their link." Click on it. And now we're over there. We could even have that open in a separate page. That's pretty cool, right? So this is working. The only caveat, the only warning is you cannot use this for user generated content. So remember, the idea for the CMS is not to let users write your site, but let you say, implement this page or this page without going and writing more source code. You just go and log into the admin tool which we're gonna build shortly. Type out the details and hit save. And now you have a donate page that everyone on your team can manage. You obviously trust people that work at your company to not hack your own website. If you can't trust them to not hack your website, they shouldn't work for you. Hey, that's just how it works. You always put logging and tracking and who's done what as well in there. So this works out great for internal systems, but be very, very careful about doing this kind of thing For external ones You can use something else like markdown. We'll get to some things that will kind of sort of work. Or if you want to let people from the outside work on this. But for now, the way this is working and this particular version of the source code. Don't let other people edit that because this is open do script injection, all sorts of badness. But it looks good, doesn't it? Looks like it's working now. It's not a super amazing right, but it is taking proper markdown with things like hyperlinks and whatnot and rendering them just like a real site would.
|
|
|
transcript
|
1:41 |
Well, there's a lot of build up to something that was actually pretty straightforward. But again, we're going to start here and build and build and build. Here is how we're rendering the CMS page. We have a couple of things we're doing. We want to set a "H1" header that has the title of the page and we want to show structured content that is HTML that is not escaped and looks like small chunks. But that actually makes it part of the page. So we're gonna wrap that in a div just a partition and doesn't really have any effect I suppose. When we say "structure:html" and that's gonna render that the one caveat. Remember that structure tag? That means this cannot be used for user-generated content. Someone could come along and type some malicious code, and you're just saying please put that malicious code right on my website. You don't want to do that, so remember. people who edit this or have access to the CMS when is working like this must not be given. It must not be given to untrusted people, right? So, in generally, the purpose of this site that's going to work great. But I just want to really, really drive that home because I don't want you to get in trouble. Have something go wrong with your site by not realizing what's happening here. Well, this is basically what we also added a little special chameleon section that lets us inject the title into the top of the page as well. And use that if you want, or you want the page to be the same. Leave it alone for SEO and just use your navigability right for creating bookmarks and whatnot. It's a good idea that explicitly set the proper title at the top of your page as well. You can add that in. But here's the essence of what we did to render CMS pages within our site. wrapped in the data driven stuff like the account log in status and so on.
|
|
|
transcript
|
3:49 |
Well to work with those pages, we definitely don't want to change some weird fake data thing or even type directly on the database. We want to have a rich admin section kind of like we had for redirects, but honestly, much better with a proper editor where you can do cool formatting and hot keys. And you've got, like, toolbar buttons to help you form at the code and all kinds of good stuff. So we're going to create an admin section for pages just like we have for redirects. But because we've already done it for redirects, we should be able to blaze through this pretty quick. So let's go over here and we're gonna have... First we had redirects. Now we have pages. Again make sure. Double Triple Quadruple make sure the admin permission requirement is on there. And this can be pages. So we wont to go down here and this should be 'page.list_view_model'. We're gonna get that by making a copy of this one. We're going to call it page page_list. And guess what? Instead of request.redirect(pages) and this will be 'all_pages'. It should be super similar to the one we have all redirects. We're going to just come down here. But our create a list of our not redirects but pages and values. And that should pretty much do it for this one, I think, other than it needs the pages list view model. and Pages. Here we go. You can import that correctly. Return it and as long as we have this template... We don't have it yet, but we will in a second. Add page. Add new page. You don't need a test instead of a test we went to visit and let's look really quick over here at our fake data. Have a URL to go visit. So that's what we're going to need here. So we can save visit instead of. This will be url. That looks good. Edit. Edit Page doesn't exist yet, but it's going to be Page ID. We can just use the url, I believe, for this one. Eh, we'll keep it at ID. It makes life better, and then you just do the title. That might do it. Really there's not a whole lot more going on. We've got our admin section into the shared layout. Let's go find out. Go to our admin, we have view redirects which, of course, still seems to be working And view page. Fingers crossed. No name error redirects. Where is that? Somewhere over here. We have a redirect still. Oh, yeah, There it is. You'll probably noticed it. And I didn't So we'll say p in pages. Save that and refresh. We have r, or should I call it p, I could call it r, but that would be wrong. dict attribute has no object, no attribute 'id' That is fine. We need to go and put those in here. We did that for the redirects. It's going to be easier to change of the url of a page instead of trying to use that. So let's go over here and just put a quick... Every one of these has an id that's gonna be one. Be too. And three. Now, we should be in business. Let's give it a shot. Tada! There we go and check it out! Here's our company history. Our team and our donate to the PSF and we could visit it. That should actually work. Shouldn't it. We could visit our team and visit the donate which of course, is the same as clicking right there. Okay. Edit. Probably not gonna be amazing yet, is it? Add new Page? No, but we do have this ability to list and see them and even visit the pages, so that's a really good start.
|
|
|
transcript
|
10:20 |
Now that we can list the pages and we have the UI to edit and create new ones. Let's make that possible. Again, it's gonna be basically a clone of what we did for the redirects. So I'm gonna just start by copying those and adjust Will say edit page remember the edit template was used both for adding and editing. And down here, we're going to change this from redirect. Anyone have a page ID. Go and just work our way through this and then name. This would be title because pages don't have names. They have titles. So this will be page. Okay, good. Ah, the name this we can make this the title. Title of the page. Okay, there's the title Just gonna keep going. The short url is just gonna be url cause there's no other concept for these. So url. Like that and this last one here is not gonna be one of these. Instead, it's going to be a text area. This is the multi-line type of input that we can have and this is gonna be contents. That's what it's called id contents as well. Columns make this wider, say 50 rows and the value is going to be structure of contents. There we go. We want to pre populate that with this. And actually, we want to be even a little a little more careful about how we do that. Because otherwise we have, like, spaces and stuff in there. Like this, so exactly the contents of the page are always going to be what... What's gonna show there, And this will be page ID create or save Page and one more bit with Paige. I think we're close, actually. Okay, so I think this template is probably done. The other thing that has to match up with this carefully is going to be the view model. So remember, down here we have a 'edit_redirect' view model. We're gonna have an edit page. It's gonna be similar. We have url, we have title, page ID. Page ID So 'get_page_by' Maybe I'm gonna pass over. Remember that allows us to maybe change the url as we're going and so on. So we're going to get it back by this ID that we're going to put in there. And there's no errors. Finally, we just need to adjust this little bit. This will be title. I also need contents. Here we go. All right. Super. And then we're also gonna have to reverse this down here like so. We'll test if they're trying to create a new page when one already exists without url. We'll, say "a page with that url already exists." Woo! finally, if there is a page, but it doesn't exist by that ID you have to create it, not edit it. Almost there. We haven't written this have we. So let's go ahead and write that function. Where's our 'get_redirect_by_id'. It's going to be basically the same, So page ID, pages, page ID. Make that a page, and I think we'll be set. We're not going to call this "r" though. That's kind of wrong. Call that page. Here we go. All right. I think this may actually work. Ah, one more thing, though. One more level of putting the pieces together. That's how the Web works. It's got all these different elements. So let's go and do an add page and add redirect. I'll put them both... I'll put them near the top. Let's give him some room. I can work on them here. Add page. Page. I'm just going to basically replace redirect with page. Alright, So that does this one. Now I got to do the post side of things We're going to have an add or edit page. Here we go and let's take away this edit part for just a minute. I'm going to work on this Just like before. We're gonna have an exact copy. So let's just do this is to be edit page view model and let's see page ID. You an update page contents and same thing here. Let's do at page and we'll go back to the pages. Well, that's a lot. Ah, lot of stuff, right. But it's just same basic template, but obviously not going to be the same HTML. So we're gonna need to change it. Alright? So update page, we're now we're gonna say page equals get page by ID page ID. We should probably raise an exception. What were we doing up here. Yeah, we're just returning as well. So we could do better error handling, and maybe we will. But now it's going to set the various value. So age page, title, url, contents, and we probably want to clean this up a little bit as well. We'll say 'for not url'. Something like that. Then we could say 'url = url.lower().strip()' Remember, don't worry about casing. If contents == content.strip() we don't want to lowercase this one. This is the real typing contents. But we don't want to have, like, spaces and stuff at the end. All right, I think that's a pretty good And let's do the same for title. You might want to require title, but nonetheless. We can put it like this and yeah, that's a good start that lets us update the page and then create. Let's go and just see the create over here. I want to create with a title, url, and contents. Still we're gonna put the I'll just put a random number here, Random. Rand-int didn't really matter what this is, but it needs the number, right? So url, title. It's gonna be title, contents, contents, And there we have it. We're creating pages We're updating pages. Kind of flew through that without too much summarizing what I'm doing and what not because it really is just the same. But I didn't want to just say, "Oh, I copied everything."" So I wanted to have you see it created. So hopefully that was a good balance for you. We're gonna see if it's working now, aren't we. We go to our admin. Go to our pages. And this one should work. This one? Not yet. We got a tiny, tiny bit more for that one. Ah, content? Not yet. So what is the challenge there? Over at our edit page view model. We never set 'self.contents = None'. We're setting it there. But only in the case it was Page. Right. So let's try again. One more time. Oh, yeah. Pretty good. Pretty good. And this one, you don't really want it to be. 'None' for contents, do we? I guess we want to put empty ''. We probably empty for all of these. One more time. Here we go. Let's put instead a placeholder for this one, and then we'll be in good shape. There you go. That's the contents of our page. And we should be able to create one. Let's go and just do a real simple on this will be simple test. All right, if everything is hanging together, this may work. No! Ah, my random int it made a long ways, but the random int. We got to put 5 to one thousand. Dumb. Let's try to submit it again then. Tada, check it out. Now a simple test if we visit it. Yeah, that's Ah, simple test. I don't think we got the contents back did we. So really, really quickly. We should check that we're doing that. Edit page. Nope. We sure are not. All right, now, I think we're gonna be in business. We could say you can't create a page without having contents, but let's just create one more. Test 2 Alright let's give it a shot. Test 2. View it. Yes, There it is. Looks like our page is working perfectly.
|
|
|
transcript
|
4:08 |
Now that we have adding new pages in place. It should be really, really quick to edit new ones. Okay, so over here we have add Page. Let's do edit page. Edit, really important that you don't forget to change that right there. It's gonna be the same template stuff there. This is gonna be edit page, page. Alright, it's gonna add or edit, and yeah, looks like that might actually do it. Let's give it a shot. Come over here. Admin. Wiew the pages. Let's create one that we can test. A test, test. "This is to be tested" All right, fingers crossed. Here we go. Ho! Sweet. It's not really that surprising that this works because, you know, we got it working in the request, the redirect one, and here's kind of a cool one but nonetheless, this is pretty cool. Now remember, this is, for the moment, pure HTML. So every time you want a line break, you got a little HTML bits here, but we can have some fun with it. Thing one Thing two and thing three page with this id was not found. I was feeling so good about us. So good about our chances here. Well, let's go back to admin and see what's going on. All right? Something is not working here, So let's go and dive in and back real quickly. I said get page, but it's just a breakpoint and have a quick look. Now, remember, because we restarted it. It's gonna lose that page. I gotta recreate it first, and then we can go to debug. What's up with it? Luckily, I copied that. So we create that and this one right here... Change that to a four. Oh, I see. So whatever is happening, this is just not making it that far. Let's go up a bit here with that breakpoint and try again. Alright, so something's happening along the way. Alright, it's in the view model. Whatever the problem is, it is in the view model. So where do we have that? Yeah, eight one... Ah said this string thing again. We're gonna find out. We got the page, and then. There it is. You see it, folks, it's not redirect by page by ID. Alright, start over. This is gonna work. Make sure I copy this again. Okay. Go to our admin. View our pages create a new one. We'll call it "Test". So we'll start out nice and simple and let's go at it again, and this time put our nice content with HTML. You ready? Woo! It looks like it might have worked. And of course it did. There it is. Silly little mistake. There's a ton of redirects to changed the page all over the place. And I unfortunately missed that one, but nonetheless do we have it? We have got this cool page. We can go over to our admin section and go. You know what? We didn't really want this to have that line break there. We just wanted to have, like this and then these. First one is going to be bold. So we can do this </strong>. And now if we visit that page Boom, There it is. We have this live website we could just go in and edit stuff. It's beautiful, except for when it's not because editing this is really error prone. So we're going to come up with a much better implementation foer our editor. But for now, it's working really, really well, isn't it?
|
|
|
|
37:06 |
|
|
transcript
|
1:06 |
For a long time we've been using our fake database, which is transient. It keep stuff in memory, but every time you restart the app, it goes away, and it's not a real database. So we're going to fix that in this chapter. What we're gonna do is work on saving pages and redirects and maybe even other information to a database. We're going to use SQLAlchemy SQLAlchemy is an ORM or object relational mapper, and it's by far the most popular way to talk to databases using Python. It's been around for a long time. It's very polished, and it's actually what we're already using for most of the website. Remember, you saw we have these packages that were listed there make it big in the details. We even talked about the difference between data-driven pages and CMS pages. All those data different pages are already handled with SQLAlchemy and already stored and managed in the database. So what we're gonna do is actually just add on to our existing database model, so we'll start by doing a quick tour of the data model as it is, and then we'll add the few extra things we need to store pages and redirects in our
|
|
|
transcript
|
1:36 |
Are you new to SQLAlchemy? Have you not used it before? Need to learn it. No problem. So in this course, we're not focused on learning SQLAlchemy. We're not teaching you all the things from scratch, just like we're not teaching the Pyramid Web framework or CSS or a bunch of other things. However, being able to work with the database and SQLAlchemy is super important. And if you can't do it, it's gonna be a big problem. So here's what I've done. Instead of adding on a big section as part of this course Where you need to work your way through SQLAlchemy in regardless of your experience. What I've done is I've taken the lessons that we had from our data-driven Web App course, where we literally built the first part of this application, the data driven part and we talk about SQLAlchemy. In that course, there's two chapters in there. One called Modelling Data with SQLAlchemy and the other is called using SQLAlchemy And what I've done is I put that in this course, so you have access to it already and its in the appendix. If you need to learn SQLAlchemy, pause this chapter. Go back to the course page, find the modeling with SQLAlchemy c hapter and get started there. This is actually the exact project that we're using here. So in that course, we built from absolutely nothing up to what we started with with this course. We build that entire PyPI clone, including the database. So the appendix literally talks about building the data at the database access layer as we're using it. So it's the perfect appendix for what you need. That said, if you already know SQLAlchemy. We're not doing anything crazy. You don't need to go and watch that, but if you need to learn it, it's there. Be sure to take advantage before you move on.
|
|
|
transcript
|
3:22 |
Now it's time for us to get started writing our pages and redirects into the database and using it as a more permanent place in this silly, fake thing that we've been using all along. You see, right here we have our PyPI database that we're going to be using. So let's just do a quick tour of a couple of the existing SQLAlchemy classes and just see how everything fits together. Then we can jump right in and start writing our page and our redirect classes to put in the database. So here's something we've been working a lot with: the users table, and it's modeled over here by having a class that derives from our SQLAlchemy Base. All SQLAlchemy works great. One of these things, and everything that derives from it automatically gets managed by SQLAlchemy. I'm using this plural lowercase convention for the table names, not calling it capital User. But because it contains many things in the database, for a collection of users like this. From here on out, it's pretty straightforward. We have an auto-incrementing ID. We have the name, email — some are nullable, some are not, indexed for things like email if you want to find a user by their email address — some passwords and whatnot going on here. Here's our Boolean is admin. People who have this set to true are allowed to get to our CMS management section. If it's not set to true, you don't get there, and you can see by default. New users are created as non-admins, which is how it should be. So this one's pretty straightforward. We're going to build something like this for our page over here may be the most complicated thing we have is our package. The package is complicated because it has a bunch of information on it. Here. You're gonna like home_page, docs_url and package_url. But it also has a fairly complicated relationship over here with an interesting default sort option and all sorts of stuff. We've got this relationship over to, like, the releases of the package and so on, and that's pretty much it — these are the classes that we're using. The other thing you've seen, probably as we've been going around, is a single DB session, and the DB session gets initialized to connect to our SQLite database. SQLite is nice because you don't need a database server. You don't need to set it up. It's automatically comes with Python. You probably wouldn't use it for real for large applications, but for our simple little example, this is the easiest thing. So we just set this up in it, creates all the tables and gets everything set up. And then whenever we want to create a session that we write to the database, we call this function. It has basically this cool little change that it makes to make it easier to work with data after we insert it. And that's about it. All we have to do is create another class like this. Users — we're gonna create a page one and a redirect one and set this up, and then it will be good to go. One other thing to notice. There's a lot of places that need to know that all these classes exist. So we have this all_models thing, and every time we create some item that's gonna go into the database, we have to put another entry for it right here, so there'd be a page one, release one. Probably some other stuff we do later. We also have Alembic over here. Alembic is for database migrations. As you change your database structure or your classes so they match. We're not gonna talk about that. It's here. You can play with it, but it's beyond the scope of what we're interested in. We're just going to create something like this and throw it into the mix and start working with pages and redirects in the database.
|
|
|
transcript
|
5:14 |
Now, in order for us to save our pages and redirect data to the database, we have to do basically what we're doing here with users. We have to create a class — it has to derive from SQLAlchemy Base, give it a name in the database and give it these field/column descriptors from SQLAlchemy. And as usual, the easiest way to build something similar to this is to make a copy. So control C Control V and want to call this page ager pages everyone else's or also the file is the poor won. The class name is going to be the single thing cause it represents one of them. But in the database again, we'll make it plural because the database holds many of them. Now let's get a bunch of that stuff out of here. We'll start from scratch. So we have two types of data that we're gonna put in here: some kind of admin, auditing, database-management type, and then the actual core data of the page. Let's do the core data first. First we have the URL. We'll figure out what it is in a second, and we're gonna go over here and have the title of the page and the contents of the page want to set. Those just wants us to add another line there. So we have that, then over here, any time I work with a database, it's very common to want to know, you know, when was that thing that's in there? When was it created? And maybe even who created it would have a created date. I'm not gonna set the value just yet. And the created user. No, Maybe we should actually set this up with a foreign key relationship over to the users. But I kind of want a history of, like, you know, the email or the name of the user that was here. There's this tension. If we have this relationship a foreign key, it has to always exist to a real user. So what if you delete the user after the page was created? It gets complicated, so I'm not gonna create a relationship, just gonna put like some information so we can track them back down. Now for the URL it's gonna be a SQLAlchemy column, as they all are. So I guess I could do that for all of them. And this one is gonna be a SQLAlchemy String. So we're gonna have a string for this one, and actually same or those and this one as well. This one is gonna be a date. Time. All right, that's off to a good start. Now we have to think about another couple of options here. Do we want to query the page by the contents? No, never. We just want to get the page. And here the contents. We don't want to query by the HTML or anything like that. Same for the title. So these don't need indexes, but it's very likely. In fact, the primary way we're going to get a page back is to say they tried to go to this. URL — do we have a page for that URL? And because we want to make queries by it frequently, we're going to set an index here. This — with lots of data — could make it 1000 times faster just by adding that little bit there. It makes it slower to write them, but it's very slow that we're creating pages and is very frequent that we're reading them to show users. Similarly, probably we don't care about filtering by the user. Maybe we do. Probably not. We can always add that later. But this one you're not gonna query by date time, But we might wanna in our admin page show the newest created pages first. So over here will have an index. True, because if you order by on index, that's also much faster. Now, down here, we can say whether or not these are required, but its nullable is false — be a little bit explicit about that one. This one obviously is required with that. Maybe the contents were not required in the beginning. Now, for the date were not putting that. Instead, we're gonna put something else. We're gonna have a default value, because, like the ID, which is auto-incrementing here, means we don't have to set it. We just save it without setting that value to get set by the database. We want to do the same thing here, so we're gonna set the default to be daytime dot date time dot now and be very careful if I hit enter notice it puts the parentheses here and it calls it. That would be basically setting the default to the time that the program started. We don't want that what we want us to give it a function the now function so that whenever a new record has entered, SQLAlchemy will call the now function at the time it was entered. Okay, so it's super easy for the editor send you down the wrong path. In that case, well, that looks like we're probably good. I think we're ready to go and create our tables here now. The final thing to do in order for SQLAlchemy to know about the page object is we have to go over to our all_models here and include it. Though super easy — we go over here and we just say import pages. Now all that does is make sure that this file is imported into the process before we go to SQLAlchemy and say, create all the tables and set up their relationships and things like that. It's possible that we don't have to do this, but under certain circumstances it's definitely required. This makes it work for the web app as well as for the Alembic migration extensions and auto-generating migrations. And whatnot — so we definitely want to make sure that it's in here. It's super easy to do. But it's also easy to forget. Just as we add something new, We added in here, and that sort of derives the rest of the app to know about it. All right, that's it. I think our page class is ready to go.
|
|
|
transcript
|
2:48 |
while we're at it, let's go ahead and add the redirect class as well. And again, copy paste is the way to go. And this turns out to be even easier. So we look over here and say, Read I Rex redirect singular green ir lower case and all this stuff actually is exactly the same. So or not, it could even change that We have a URL. And we also have a short URL in our redirect Onda. We don't have a title. We have a name. The name is required, but we're not going to search by it. The URL is required, but we're also not going to search by. This is the destination. Nobody's going to say I want to find all the redirects that might go there. Maybe maybe you will probably not eso You can add that index later, but for this one, this is super important. This is when you come and hit like slash bites or slash company slash history. We want to quickly get back and see if there's a redirect just to know if there is get that record back, though this is the one we need. The index on this. Nothing. Nothing changes about this one up here, so I think we're good on the class. And again we gotto bring it into all models here like So Now let's look at our database real quick. Oh, here we can look at it on. Do a little refresh notice. There's no re Durex and there's no pages. But when we run this, your A D V session is going to import all models. And then in this global in it, it's going to call SQLAlchemy base metadata create all because these derived from SQLAlchemy Base and they're not in the database. When we'd run it, it should create this. So let's just to restart. Graph didn't crash. That's a good sign over here into a refresh. Check that out. We got are two tables over here in the database, and they're exactly like you would expect. Here's a short URL. And that little blue thing means that hasn't index. Here's our index for that. And what? Not the same for pages, so it looks like this was created correctly in the database. One quick note about the required fields, like the notable, were using sequel light For the moment, I don't believe sequel light supports the concept of no ability or not. No ability. So it you won't see that actually show up in the database. But on MAWR official riel database servers like PostgreSQL or my sequel or Microsoft Sequel server something like that, you should see the nal ability showing up there. All right, well, were ready. Our database is now ready to store these pages here and the reader X there.
|
|
|
transcript
|
6:03 |
Now we have our redirect SQLAlchemy entity class created. I think we're ready to start using it. Now. We use this cool pattern of having services that isolated, accessing and talking to whatever type of data or dealing with the data structures for the most part. And so what that means is we have four functions over here. Get a redirect, all redirects, create a redirect, and then get one by ID. And also update. So I guess that makes it five. We have these functions, and all we have to do is rewrite these for the most part, and we want to touch any other part of the program. The only caveat is we didn't go and create a class. We had dictionaries here, So there's gonna be a very, very small thing. We have to change for that to work, you know, like the replaces always say dot get title, just say dot title when we switched to these classes. But other than that, we won't have to change how our program works at all, which is awesome. But let's say this returns a redirect here, and actually it returns an optional redirect. Optional is we don't know if the URL you're asking for exists in the database, so you might get nothing or you might get the one redirect you ask for. The other thing we're gonna do here is all of these data accessing parts are gonna have exactly the same thing where we create a session, which is going to be one of these. It's a SQLAlchemy session, and the way we do it is we say, db_session, import that, dot create, then later we're gonna say session.close, or even when we're making changes, commit, then we're gonna return something. So it here going to say the redirect is equal to something. I'm going to return the redirect. That's pretty much it. This is gonna be the pattern that we're going to go for all of these. Someone good in here. Make that plural, Redirects, redirects, create one of these, return a redirect, singular. Okay, Super. Now we also need our create session. And hey, while we're on it, let's do it more here. Okay, So let's just right. The top one here, we're coming in getting the URL and normalizing it. That's great. Now we have to do this query. So the way we talk to the database in SQLAlchemy is we say, session.query of the thing we want to get. We want to get redirects. Then we want to filter where the redirect dot, what are we asking for? By the URL, so short_url double equals what we passed as url. This will give us potentially many of them back all of them. And have this Our model is we only have one. And maybe maybe we should have gone over here. We should have actually said unique equals. True, That would be good, right? So we should probably add that, But when I got to do some migrations and I'm not gonna mess with it but in yours but unique it go through because there should be only one. So this will basically be one or zero away. To say that in SQLAlchemy is to go to the end and say first. Okay, If you knew there was gonna be one, you could say one. But if they ask for a URL, it's not there, it's going to crash. So first and that's it. We're now talking to the database, getting our redirect back here. Well, let's take this idea and just keep going. Okay? So it'll be redirects, and it's gonna be a list of redirect. We say session.query of Redirect. And maybe we just wanna give them back newest and first or something like that. We could order by redirect.added_date. That will give him oldest to newest ascending. So we want descending like this. Beautiful. All right, so that's written. I hope you see these are. Not super hard to convert, are they? Well, don't hear this one. Takes a little bit more. We're going to create a redirect. We're gonna set his values. Not set the id. But redirect.url equals url, redirect.short _url equals, you got it. We're just gonna keep going like this name like so. And then we're going to go to the session and say, had the redirect to the database and then commit those changes and give it back, and that's it. Perfect. Now we come in here, we could say on these we could say strip, tell them what they are. I can see that our strings. This one is not strip, not lower one is strip. But when we shortcut the name, just make sure there's no whitespace, no spaces or tabs or anything stuck in there. Now you might want to add a little test for these. They could crash. Technically, the editor should check if these are coming in as None and not allow it. But that's not a runtime thing. That's just a suggestion that we should probably put testing here. But for now is gonna leave it like that. We do have the required stuff on the view model side where we make sure that those things are all set that they're required. So it's pretty, pretty safe assumption. Now hear, this is quite similar coming in. We're gonna get the id. Now this is gonna end up to be an integer like so. And instead of going through and doing this loop, well, guessed it. We're going to do something like this. Get it in. The redirect is gonna be session. query a redirect, when we filter it, I want to say the redirect.id equals the redirect id that we passed in, dot first. That's it. We're going to tell this one. It gives back an optional redirect, which, of course, it does. Well, these are close. Let's work on this one here in a second the update, but it looks like the rest of them are in pretty good shape.
|
|
|
transcript
|
6:15 |
now that we've updated the CMS service to use our redirect class from SQLAlchemy rather than just dictionaries from our fake data source, this is gonna take a little tiny bit of cleanup. So let's go try to run it, and it'll just tell us where it doesn't work. So go to our admin section, click on Redirects, and how, we didn't get any back. Wow, how interesting. Let's actually look over there and see what's going on because I guess we gotta let's just try to add one. I will add a new redirect. The name of the redirect is, let's say the short_url is just gonna be talk, and it's gonna just take us to talk. Whoa, crash. Well, looks like we're not setting all the right information, that's creating user. Okay. Great. Well, ah, it was not exactly the part I expected to break, but it's really good that it did, because that means we're not setting all the data we thought we needed to over here. Now we want to, in addition to adding that information, we need to add user_name, which is a string, so we can find out where we're calling that by just saying find usages, which is right there. You remember this is making sure that we have the permissions to call it, which means we must be logged in, right? Our view model already has a user, and then we can, let's pass, maybe the email like that. Either name or email you get to pick. You were gonna create it. Now with this extra information, I mean, that looked like that was gonna work. Let's give it a try over here and resubmit the same data. Oh, you know, it's great to pass it in. You still have to set it. And we called that email, didn't we? Or we passed email. Okay, great. Try one more time. Luckily, the browser is holding on, let us submit it again. Who? Look at that slash talk first. Redirect. We edit it. Now, this is ah where we're going with this sort of thing. So we're coming over here, and this is all the places that we're doing .get, so let's go over here to this redirect, and it knows, I'm pretty sure. Yeah, it knows it's a redirect object, which is great because we told this one. It returned an optional redirect. But now we can just go there and say short _url, actually this is nicer. It just requires a change. So here there's just dot url and dot name. And then, yeah, I think that might actually be it. This .get is not from the data, it's from the submitted form, which still has to be a dictionary like this. All right, I think we might be ready. Let's go and try to edit it. Yeah, the URL of our first redirect, we'll fill in talk, and then this. We haven't yet written the part where we're actually going and updating this. We're gonna do that. But let's go and see if we can do our listing. Now our listing, It's not pages. Our redirects actually works. Great. Okay, So super super. Let's go and write that last little part here about updating the redirect. Now we have this cool trick. We got the redirect using a function we already wrote, and then we just made changes to it because it was in memory. Now, remember, we're closing the session and we don't really have access to the session when we call it this way anyway. so we kind of got a do it from scratch. Let's go over here and just take this. So down here we'll say session.close, do it like this, it'll be a little bit nicer. Try, finally, session.close. There we go. Maybe we should do that. Up here as well for some of them, but whatever, we'll leave it. Now over here, we want to set the values. So we get our session back, when I say redirect. What are we passing in? Name equals name.strip, put url.lower. Dot strip, and what's left. URL, no. In the lower cases, Maybe this one matters. Then we just say session.commit like that. We're okay. I think we're ready. So we're gonna come in here. I'm gonna get the redirect by id. If it works great, we're gonna keep changing. Otherwise, we just bail out and close the session. Now we're going to make the changes, push them back to the database. All right. I think we might be ready. Try to edit one of these. Let's edit, add a new one and edit it, but say this is gonna be Python Bytes, and this will be bite, all right, hit save. Great. Maybe we said, oh, you know, that was supposed to be bytes. So let's go over here and change it to bytes, plural. And it's exclamation mark just to show some stuff. It's changing now. Final thing to do with our redirects is to see if we go to slash bytes. It goes somewhere already. Test it. No, there's one last thing. So let's see where this went wrong. It's again. We're just thinking of the redirect as a dictionary, which it no longer is. So this is .url, I think that might be it, wasn't a lot to it, but let's go now try bytes again. it looks like our redirect stuff in the database is working. Great. Go to admin. Get a view. Redirect. We saw that we can edit it, and when we test, it goes, and I guess, Final thing. Let's just go look at the data base. Make sure it's in here. Super cool. Check that out. So we've got our id one, id two, created date is basically now, used the creating user michael at talkpython.fm. short_url. Here's the name. Yeah, this is great. We're now storing this in the database, which is, of course, the way we want to do it. Just wanted to focus on building the redirect infrastructure and admin section and all the ideas before we got to this. Well, it's great that we're here.
|
|
|
transcript
|
4:13 |
we saw it was pretty seamless to move from redirects being dictionaries under this fake data place over to actually storing redirects in the database. In fact, it was kind of as amazingly easy, which I think is great. It speaks to the patterns that we're using as well as to the power of SQLAlchemy. Well, it's the time to do the same thing for pages. So we're gonna go over here and have an optional page that we want to return from here, which is the class that we wrote. It's gonna be really similar to work on these five methods as well. So again, we're gonna say session equals db_session.create, and then session.close. And I decided I do kind of like that. Try-finally pattern, cause it lets us write things like this. Instead of getting the page and returning it down here, we could just say return whatever, this will say return session. .query, not of redirect but of page, filter where the page dot, What are we looking for? The url equals the passed in url. First has it. Now we're getting the page out of the database. Isn't that ridiculous? All right, so let's do the same thing here. We're going to get all of them, create session, want to close it, and instead of saying first or even instead of doing a filter, we're gonna do an order by page.created_date.descending again, and let's say .all. So we're sure that we get them back. When were we doing up here? In our list, .all is. Well, just to be sure looks like it was working, but nonetheless, it's always good to be explicit. Okay, so here we're getting all of the pages or getting a single page. This one is gonna be really similar to the one that we had where we're getting by url. But instead of querying by url, we're just going to say id is id, and we must be explicit about the types up here. That's not gonna be an integer. And it's gonna return an optional page. Cool. Now an update. Remember, we got to get the page, but we can't use this one cause the session's closed so we won't be able to commit it back. When I say get the page like this, and if there's not a page or not the URL we'll get out of here. So I will say url, you're great. And then go basically do this part on the inside. Lowercase url, set the contents to strip, set the title to strip, and we're gonna update it. But not like this one, just say .title, .url, and .contents, and then just say session.commit. We're almost there. Now go and copy this. It's gonna be actually similar down here. We want to set all of these things. So instead of checking for this, we're gonna trim those back. We're going to create a new page here. Page equals page like that. Set the title, and we gotta say session.add page and commit. We're not doing any tests and returning, so we don't really need this. Try-finally thing. Super. It looks like we're gonna be able to create a page. Now, remember, it's not gonna work exactly right, because in our view models, we still have to update. If you think so. Let's just jump over there and fix that up as well over on page. Noticed the type hints are already telling us They're already helping us here. So let us find all the little errors, which I just love those. So url, title, contents, and then page list? No, it doesn't look like it matters. It does look like we can clean that up a little, but nothing really to change there. And then, yeah, I think, Hey, we might be in good shape already, other than we don't need some of these things. Super. Well, it looks like we've updated our CMS to work with the database for pages instead of our fake data.
|
|
|
transcript
|
4:15 |
with the CMS service updated and the view models in place, we might be able to just have this work, not 100% sure about that. But let's give it a try. So anyway, view those pages, go to admin. All right? I've tried this, view pages, nothing broke. Let's add a page. Now, I'm gonna go borrow some of this from our fake data that we had up here. One of them was donate. We had donate and donate to the PSF and we had those contents. So this one's gonna be just donate. And we had these contents we wanted to put in there. So let's put 'em in there. See what we get, hit save. Fingers crossed. No. What do we miss? Creating user, not passed along, just like we had before. So no problem. Let's do that really quick. So create page will be user_email, and let's go and set the types on all of these. Say it returns a page. Let's return the page. There we go. Technically, we're not using it. I also noticed this is grayed out, we're not using that yet, page.creating_user equals user_email. Now we should be able to do this. Except for we're no longer calling it correctly here. This is gonna be vm.user.email again because this is only called by these ones that require admin, means you have to have a user. Don't need to check for that. Should be there. Can we create that? Page. Will donate Exist? Yes. Donate exists. And let's test it. No, page attribute has no .get, all right. Almost there. Almost there. I guess we didn't check in that part of our view models, did we? Contents. Yeah, I think that little little tiny change there might be all we needed. There it is. Check it out. Now. We're over on our site. We go to donate, get a donate to the PSF. Here is the content you can inspect element on it and it looks just like what we have in our database. How cool is that? So we have our website up and working. Let's go and go to the pages. Let's add the other two pages just so they're still around. There are fake database, and this one, company history, details about company history, and I have the employees as well, which we're gonna call our team, details about our employees. Cool. Now we should be able to go to those pages. And just like before, company slash history comes up with us, and our team as our team, open the top. Our team right there, details about our team. And, of course, the most important one we click on. The donate gives us the right thing. Finally, and let's see it in the database, of course it's gonna be there, right? But let's go open that up and here they are, created them again. Creating user is me. There's all the details you would expect. And there's even the contents of that one, which, you can see, has got the little newlines, the line breaks in it, all the kind of stuff that we would hope that it has. Perfect. We're now over in the database using SQLAlchemy as we should be, and it's time to celebrate. Let's go and delete that sucker right there. Ah, let's view the usages, so we're technically not using it, but it's still imported in the CMS service. Get rid of that, reruns. Safe delete. Okay. Yeah, I think we're ready. I don't know why I did it and already deleted. That's what that was. It's just gone. There, cool. We're no longer using fake data. Everything is stored in the SQLite database right there. We already had a ton of data in there, Remember, we had. If we go over here, like all of these things are already stored in there, like boto3 and all the details about it, those were stored in there. But now, in addition, we have our redirects and our pages also stored in the database.
|
|
|
transcript
|
0:56 |
Let's quickly review how to insert an object into the database with SQLAlchemy. It's pretty easy. We've moved the ability to create these sessions or in SQLAlchemys Nomenclature, a unit of work over to this DB session class. All we have to do is call, create, and it sets everything up just the way we like. We create one of the objects we want insert. So we want to insert a page. We just created a age variable, which is the new page. We set the things like title in the URL and the contents and make sure that you normalize them like that. The URL's lower case that makes a lot easier and so on. And then finally, we're going to add that to the session and then commit the session. That's it. Now this pages in the database and we can start going quarry to increase for it. Like give me the page by its URL. Or if you knew the i d. You got it back right set by the database. When you get it back, you could work with I D. And why not? That's it. Secret alchemy is pretty awesome, isn't it?
|
|
|
transcript
|
1:18 |
once we have objects in the database. Well, hell, we want to get them out, and getting them out is pretty similar to what we have already done. So here we're gonna again create a session and then the end, we're gonna close it. But we want to make sure that the URL is also normalized the same way as what we put into the database with a lower case and stripped URL. And then we just say, session dot query of the object we want to get. So page the type name, then we filter, but in one or more constraints, so page dot your URL is equal to the earl they passed. And because we want either one or none were going to say dot first and I'll give us if there's any records of the 1st 1 I get, which should be unique. And then otherwise we'll just get none and say, you know, there was no page with this, your l and then finally used this. Try finally block to close the session to make sure that it's cleaned up and gone. Everything's nice and put away. Now. When we run this code, it's going to convert this to the database query language Select Star from pages where page or L equals Do some parameter where the parameter is. Of course, what you pass in in this case were saying Maybe it was company slashed history for the value of the girl that got passed over. That's it. We can now go and do queries for pages from the database.
|
|
|
|
16:37 |
|
|
transcript
|
3:18 |
well, the CMS that we built so far with our pages and redirects. I think it's a big success. We've come a long ways we can create these really cool pages. We can create these redirects that allow us to have short little URLs to send people to either other parts of our site or to external sites. But there's a problem. The problem is with HTML. You might think I want a website. Websites are written in HTML, so I have to write HTML for my CMS. Well, no, actually. So here's some HTML and this is the HTML for this page here. We wanna have this cool helpage that when we click on the help it says, Here's how you get help with pip. I do you need help installing Pip? Do you have the right version? Do you have permissions? Here's the instructions on what the each time we had we thought would create this page. But what it actually created was, Oh, this. What the heck is this? Why are all the words so big after it says have pip installed question mark, Look carefully. You can see there's something wrong with the closing tag for that age, too. So here's the problem with HTML. If something goes wrong, even just a little bit, we forgot a less than angle bracket left symbol here, character here, just one. The rest of the page is broken, and not just the page that contains the content we wrote. No, this is even the additional stuff that the site might generate right, for example, the footer and other things. The whole site is broken. And while this may be fine for Web developers, if we're kind of right content on the Web and let non developers work on it, I mean, that's one of the huge benefits of these. CMS is we can give it to marketing people or editors or authors and say Here, just go right that page right this landing page or write this marketing content. We don't want them to have to get this exactly right. And even if you are a skilled Web developer, you probably also don't wanna have to get this exactly right. So do we do well marked down to the rescue. As a developer, you probably have heard of Mark down by this point, but just in case you haven't been living in a cave under a rock or something. It's this format that lets you write in simplified text but then is transformed into HTML and other formats. So here we have on ordered list. Do you have pip installed? Is pip the right version? Do you have permission to install it and so on? And what's great about this is that we don't have to close the tags or anything like that, kind of for bold and stuff you do. But for the most part, things don't go either wrong at all. Or if they do, they go much less wrong. Then otherwise, now, look into this. You might think I can't hand this to a marketing person or a business person who's not a developer. That's gonna mess it. This looks crazy. Well, is that where we are for now? But as we go through this course as we integrate Markdown and we're also gonna add a rich editor that supports hot keys of, bold its control or command to be what I was highlighted, that's bold. You want to make it a header. There's a hot key for that, and there's also a toolbar at the top. So we're gonna have a really nice editor to create these Markdown pages and then turn them into that page that we really wanted to build at the beginning.
|
|
|
transcript
|
2:33 |
here we are in our next copy of our source. Good. Here. You can see it's chapter eight mark down and templates. So it made a copy of what we had from chapter seven, and we're gonna start working on it from here Now. Quick admin note here. I've changed this around a little bit. So that were now pulling the requirements about txt file which didn't exist. Created one in and using that for their requirements. I just find it, it'll be easier to have stuff managed, especially with tools like depend about and whatnot. So we're gonna do this, Maynard. No major change, no functional change. But we now have a requirements that takes t we're gonna use as we're gonna need to start adding yet still more libraries to this whole app. Okay, so for this one, let's just enter some markdown content will just get this started so that we could actually turn it into something if we want it. So we're over here. We're automatically logged in from our cookie. We're gonna go to the admin section, go to the pages. We don't yet even have a slash HelpAge. Sorry. We can't find that page So let's go create it, though. Out of page to be getting help with high P I your l is gonna be help in the contents of the page. Well, here's where we write mark down So we just say something like this. So here are a few tips in and mark down. If we want on ordered list, we just put a star. So do you have pip installed? Now we can also make stuff bowled by putting double stars. We could make stuff look like code in line if we put these little back ticks. So that's like right above the tab button. So here's a nice little bulleted list. And then if we want headers, we have each one's like this h twos, h threes. I'm gonna go for H two because this is going to be the H one. So we'll just do you have pip installed and so on now actually wrote that whole thing out. So let's not, you know, diet the whole thing in. I just want to talk a little bit about Mark down. So here we go. Here's our page. Awesome. Let's go get some help. Yeah, that's exactly what I was hoping to build. It's beautiful, right? This is really an improvement. No, this is not an improvement. Obviously, we can't just throw markdown into the page and have that work. We have to transform it. So we're gonna talk about how we're gonna do that in the various options. We have to make that happen. Do we have the content? Now? We just have to go over here and teach our site how to transform that over to what we want over to HTML.
|
|
|
transcript
|
2:04 |
now really, really quick. There's one thing we have to address that when we moved from our fake data over to the database, we didn't quite get right. Look, if we go over to this page here and we try to edit it, it's gonna be great. We could just edit the page, right? Yeah, not so much. Well, what is the problem? The problem is this four here and says air binding parameter zero. Probably an unsupported type. And it's where page idea is equal to something. Look at our Pedro, quick. So our pages here, the i d. Is an integer. Now we're comparing that over here when we go to our view model and we say get page by i d and we're passing over the page i d And it's supposed to be an integer great. And then we do this like so however what you'll see right here This this is actually coming back as a string and Python PyCharm just wasn't able to see this mismatch. If I tell it explicit what it is, it can say. Oh, no, no, no. You actually can't do that. I don't know what you're thinking. If I put into your not doesn't. It doesn't know. So we need to convert this to an integer, which is problem. So let's say it and let's just put minus one or something. So in case there is no value, we're not going to get something that will crash. Trying to be converted to an integer It just come back is minus one, which never exists. All right, let's just try that again. Oh, no, There's still one more problem. Let's go. Actually, check this out. We made another mistake here. Where pays ideas equal to I de nu Nu Nu. This is not the function that has nothing to do. This I d. Here we go. Let's try this. My good. Now. Yes. Alright. Sorry about that. We got this working and consider just skipping over that and fixing it. But the same time, I do want to let you know if you run into that problem. What? What It was. Let's just make sure that we can also edit a redirect. Yeah, it looks like fine without oh, notice of the page that it are. Redirect. Yep. Looks like we can edit the redirect. No problem. Okay, great. Well, it looks like our admin is now working once again.
|
|
|
transcript
|
6:36 |
we've seen our page looks pretty awesome, doesn't it? No, it doesn't. We have to convert this to HTML. How do we do that? Well, you definitely don't want to go and try to convert it yourself in Python. There's many libraries, and of course, there's a great library here as well. So let's go over to our requirements, Doc here. And let's put in one called markdown2. There's a couple of different markdown libraries we can use. But this one works well, I'll just go and let PyCharm install that now. Over here, we've got our HTML is just the page contents. That's not really what we want. We want to do a little bit more than that. So what we're gonna do is we're gonna add a function. It's gonna add a function of this thing for the moment. We're going to do something pretty different later. But for now, I'm just gonna do it here, convert_to_markdown. And I guess we could say returns a string over here. We're going to write the code to convert it to markdown, and I'll just say it's gonna be nothing, and it's going to take, what do we pass over? It's going to take some contents here, so we can say self.convert_to_markdown and we'll pass over the page contents. It's going to take that and convert it well from markdown over to HTML. And it might not surprise you that we're going to use markdown2. Using markdown2 is pretty easy. In fact, we could actually do this in one line. We could say, actually, this is not, we want to call it, we'll call it md_text or something like that. It is not yet. HTML. We're gonna go over here and we could just say html equals markdown2.markdown. We give it the text, we can pass some extra features to turn on. We're gonna not do that for the minute, one is safe mode. But now I'm going to say true later. We're gonna want to really relax that a little bit, and then we just return the HTML and I think this is just complaining. That could be static. I don't really want it to be static for the moment. All right, let's give this a shot with that one change up here where we said, instead of just trying to show the contents, we're gonna take the contents and convert them to markdown and then show them, that would be great. It's gonna break the other pages, but right, that's I think that's OK. We'll deal with that in a second, but let's see if it works. Oh, that is so sweet. Now, you might be wondering maybe why these look, you know, like this red code thing here and this looks like that and whatnot? It's cause we've already added some CSS styles to render code in a certain way. So it I can't remember if I added it or if it came included. But either way, if you have code blocks, then the CSS styles are already there, it's not some sort of magic that did that. But otherwise, this looks really good and there's no way for us to break our page because, you know, worst case maybe we could leave something bold farther than we intended, but for the most part, this is it. This is really, really good. I think this came out great, and you could see that it's super, super easy to do, to convert this over. Now, There's a lot of things we need to do. We're not done. It might look, oh, like oh, yeah, we've done this and it's great. And now we're just ready to call this section done. But there's a couple of things that we want to focus on in order to get this to work better. First, we're going to need a proper editor, right? Even as somebody who is an expert in markdown, it would be nice if I could highlight this and hit command-B. And instead of having my bookmarks show up, actually turn that into bold, like, write this for me, right? Also, especially for people who are new, having the rich editor with the toolbar, that would be really helpful. Another one that's not so obvious is the general performance. Now, if we look at this, this small amount of markdown, that might be fast enough, but let's just have a look and see where we are. We'll do just this one, so we make a request here. This page is rendering and 42 milliseconds that may or may not seem okay to you. But for example, if I go over here, this one is rendering in six milliseconds. If I go over to the admin one, this one is 8, 10, 8, this one at 43, starting to get long. Now it's only, you know, two pages. Let's update. That's just a little bit. Make it more realistic for a large piece of content. How do we prevent, we're going to put, this was a little trick here. We're gonna take this. I'm gonna have 20 times as much content. All right? That's just, that's a way to, put newlines. There, we have 20 copies of this in Python. Now, if I hit refresh notice the bar here is longer. We go to help it. You can see it spinning for a second. Holy moly. Okay, let's go to inspect element and go to network and see how long it takes to go to help. Half a second, oh no, you did not just take that long. This is not gonna be OK, especially in high traffic websites. It's not OK for pages to load this slow and even on traffic sites that don't have a lot of traffic you still wanted to be super super quick. You want it to be the eight millisecond variety. Not the half a second, So we're not done. But we do have it all in place, I guess. One final thing that we could look at. Here, let me go ahead and take this off. Yeah, I'll leave this bit in for you, just in case you want to play with it. One thing to work on, I guess really quickly, is our other pages. Does this page look OK? Actually, beautiful. Hey, it does. So most of these other pages, they don't really have much, of this one, notice we have it in safe mode. So this one's not gonna work. Let's go ahead and just fix that one real quick. Edit this, instead of saying all this HTML junk, we can just write it like this in markdown. The way we have hyperlinks is we take the content that we want to show, the hyperlink text, and put it in brackets, and we put the link we want to go to in following parentheses. Here we go, save it, there we go. All right. Working again. Now we have our site using markdown. That was pretty easy, right?
|
|
|
transcript
|
1:18 |
now the markdown were allowed to write in this section is actually fairly limited, markdown2 supports, additional things like tables and larger code blocks and whatnot, which are not appearing here. So let's do a really quick addition to make this nicer, more flexible and honestly more powerful. So if you go look at the markdown2 documentation, you'll see there are all these plug ins or these extras that you can have. And I'm just gonna paste a couple that we're gonna use here list that have different sorts of alignment, a better code rendering best code blocks and then tables. There's other things you can add. You can check it out, but these were the ones we're gonna add. We just go over here, say extras equals those values were passing in. And if we just rerun it, have a look, but or HelpAge. Now things look a little tiny, bit different, like, especially around the code. This part, if you have multi line blocks of code, this is gonna be much, much nicer. Let's just do a quick back and forth. Here's the old one. Here's the new one. We're not writing any tables here. But of course, tables would not have worked here. Tables will work over here for now and so on so we can extend the type of mark down that we can right from just basic marked down to these extensions. If we go in, enable some of these extras in mark down
|
|
|
transcript
|
0:48 |
Let's just quickly review how we render or convert Mark down over to HTML and this is it. This is all of it. Why is it so short? Because we get to use the awesome marked down to library. We don't have to write all the tricky work to do that convergence. So we just make sure that we install and then import markdown2. We specify the extras, the extensions to standard mark down that we want to use. Especially for us. It's fence code blocks in code friendly and tables, probably at some point. And then we just say, Go to the markdown2 library, say markdown, give it the text, passing the extras. And for now, we're using safe mode equals true. That gives us our HTML and we just throw that in the page and boom, we have, ah, much, much nicer way to represent the content of our pages without the dangers of HTML and yet it looks like HC melon because it
|
|
|
|
14:01 |
|
|
transcript
|
1:55 |
so far, we've been able to write, mark down and have our website render it. I'll be a little bit slow, and we're gonna work on that soon. But what we couldn't do is edit it nicely. We had to write in just a silly text area thing in our Web page, and it knew nothing about the format. There were no hot keys like command be, wouldn't bold our code of We've selected something hit command be so we want to add that capability to our site. So the idea is we want to go from this basic text area like this, and this is already kind of advance. You can see it's like showing different sized fonts for the things and so on. But we want to go from just a text area to something like this, where it is actually rendering the text a little bit better. Where we have this toolbar and we have honkies. Of course, you can't see hockey's, but they're here, right? You can hit command, I for I, Tallis, ease or command be for Boulder control, your own Windows or Linux. So that's the goal of this chapter. Now, like many things either in Python or in general and programming. We don't want to build this. This is a lot of work we could we shouldn't. So what we're gonna do instead is we're gonna use an existing one. And I've chosen simple mde, simple markdown editor. That title seems kind of redundant there, I guess. But anyway, simple mt dot com That's what we're going to use now. Just this is not the only choice. There's a lot of markdown editors, but this one is simple. It has beautiful views. It has really nice features. It has the hockey's that I want and so on. So if you find one that's better, that you like better, that works better. That's fine. This isn't the newest or the latest or the greatest, but this one is really good and really well, simple, Hank, the name said. So we're gonna plug this into our Web app, and you're going to see the back end editing experience goes from not so great, even for people who know Mark down well to a really nice editor for even people who are not super knowledgeable about writing in
|
|
|
transcript
|
2:53 |
Well, let's go and install SimpleMDE for our project. So I'm gonna come over here and notice that we now have a chapter nine rich editors section. This is in our GitHub repo, and what we want to do, I guess this lost its little mark as a resource root. Doesn't really matter, but I'll add it back for consistency. So what we want to do is we want to go over to our static folder here, and we want to basically enable this website and specifically the static file section to be able to manage node_modules. Why Node.js? Well, because that's the way that we install it and the dependencies for SimpleMDE, which there are other ways as well. But that's probably the best one today. So let's go open this, I guess in Finder, for just a second over here, you can see that we've got our CSS and our images, these are the things we control. But we also want to let node manage some stuff here and then most, serve it directly out of a sub folder. So we'll just go into this folder here and again. It's in this place and we're going to say npm init. Now, this npm is the package manager. It's like pip of Python. It's pip of Node. If you haven't seen that before, and the reason we're creating a little package definition here is so that it will install the files here and whatnot, otherwise they'll go to your user account, potentially. So we don't want that. So it doesn't really matter what we put for this. And now you can see we have a package.json and it doesn't have much information in there. It's just like, here's the name of the project. We're not really going to use that. We're going to use the next thing that gets created. So now that we've done this, we can say npm install simplemde dash-dash save, save the thing right here. Okay, so we hit this. It's gonna do some work to go grab all those pieces. That was pretty quick. Now it installed five packages into the node_modules. If you look there, we have simplemde, but we also have typo .js, marked, codemirror, spellchecker, all the libraries that SimpleMDE needs to use to work. We don't have to do anything to work with them. We're just gonna work with SimpleMDE. But these do have to be installed and around for things to work. Of course. So we come back here and now you can see PyCharm automatically knows to ignore that. We have this lock file that talks about the versions of everything that got installed, most importantly, this one. But then its dependencies as well. All right, well, we've installed SimpleMDE. And whenever we want, we can use this on any part of our website. And because node_modules, if you go down here, simplemde, dist, like that. These pieces, because these are subdirectories of static, pyramid and nginx and however other ways that we happen to host it will let us serve these up directly. So this is the right place to store them without making changes to our site, to serve them from somewhere else.
|
|
|
transcript
|
1:43 |
If you've used Node.js before to manage JavaScript dependencies, then this is no big deal. But let me just run through the steps of installing SimpleMDE to make sure that you all can follow along, now to get started. You need to have npm and Node installed. We're not actually gonna run stuff with Node, but having it there allows us to do npm stuff, which is pretty cool. So you want to install that. Once you have it installed, we need to create one of these package.json files to get Node.js, npm specifically, to save the installed libraries in this location. Basically, you tell npm, This is the top level of this package you're managing. So install stuff into subdirectories here, not your user profile or something like that. We say npm init, we don't really care about the settings. So we just hit enter all the way through and yeah, it looks great. It creates that package.json file. Finally, we say npm install the package dash-dash save, it downloads. You can see SimpleMDE, but it also goes and gets four other libraries, so it added five packages from 862 contributors and then audited for security vulnerabilities and found zero, perfect. So we have an up-to-date SimpleMDE, that presumably is pretty safe. It's been somewhat checked, at least, so we've got that installed and you can check by just saying tree, trimming the directories only four levels deep and so on. And then you can see basically down here we have SimpleMDE, which has a debug, a dist, and the source code. We really only care about the dist part. That's all we want to work with. But it's easier to just let Node.js and npm manage it. So I'm just gonna let it install the other junk and tag along, and that's it. We have SimpleMDE installed in our static folder and ready to start using
|
|
|
transcript
|
5:48 |
Now that we've downloaded and saved SimpleMDE here, it's time for us to start using it in our admin page. Let's go have a look at what we have so far. Look over here to our admin section and we go to the pages and we can edit one of these. You can see here's the markdown. That's pretty cool. Scroll down. But you know, if I highlight this and I hit command-B, well, my bookmarks show up. That's not amazing. And if I hit enter here, notice, that doesn't say, oh, we're going to continue this in another bulleted list here. None of that happens. So we're gonna add that SimpleMDE markdown editor to this textarea right there. That's what we're after. Now that's this page, the edit page template, and we're going to do two things we need to add the CSS. So remember there were styles like we saw the icons and whatnot for the site, and then we also need to add the JavaScript to make it be more full featured. So let's do the first thing here. Let's add some additional script here. CSS, gonna go to static and now we're gonna go to node_modules. That's not gonna do it this way, is it? I try this maybe will give us some auto complete. Here, slash static. Here we go. node_modules. And in here we have simplemde. And in here we have a dist. And in dist! What do we have? We have simplemde.min.css, all right. And we want to tell PyCharm That's not misspelled, because you know what? It's not, and we go ahead and just change this to the styles. But I don't really like this request thing anyway. URL, perfect. So that's the style and noticed this additional CSS thing from this shared layout. Now let's go look at that real quick, over in shared. If we look, you can see there's this section where we're sticking in this extra slot, and I think we also want to say omit-tag. It's true for this one as well. I'm not sure pretty sure that matters. Yeah, so when we say that there's these additional CSS libraries, there's none here, and similar to that at the bottom. This for the little editor. If we say true here, you know, make it nicer, at the bottom we have additional JS. So we're gonna put our JavaScript libraries there as well, we'll go including this in a little bit. Probably easiest. And that's JS, and this can be true. Just noticed. Like it gets a warning on. The editors want to put that away. It would be fine to just leave it that way, but the editor is freaking out, so let's keep it happy as well. Now this section we need to use the SimpleMDE JS library. So we're gonna go over here and say there's a script and the source is equal to slash static slash node_modules, same thing. But for the JavaScript like that, we go now. We have that added, and this is close. The next thing we need to do is tell it to create one of these editors and point it at the right section. So if you go up here and look, our textarea has id contents. Okay, so I'm gonna go in here and create a little script section and we're gonna say let editor equals new SimpleMDE. Now we can pass in some extra info here, and the extra info we can pass, there's a ton of different configurations, we could override the hot keys, we could override the icons. We can control what's shown on the bars and all kinds of stuff. But all we want to do is say the element that you're looking for, that is basically the editor, it's gonna go get, it's a document.getElementById. We'll put contents. Ah, like that. Perfect. So contents, That's the text editor right there. So get it by ID. This might work. I think we might need to do a little bit more work to make this go, But let's go ahead and see if this is enough over here again. Let's go view the pages. Oh yes, look at that. Here's our cool little editor. We can take it full screen, we can do side by side, this is full screen. There you go. Look, huge editor, and then we pop it back out. We can go side by side. There's the written version, and here's what it's gonna render as Let's go over here and add one more bullet. If we enter, notice that automatically puts that bullet point there, and finally notice how if I put something like this, it'll find it, tell me that's misspelled. They have fun, and I want to emphasize have fun by saying command- I, notice it writes the star to make it italicized and even shows in the editor what it looks like. Like we could make this an h3 by having three pound signs, go back to two, one, right? So really, really nice editor here. It's not super super fancy, but at the same time, I think it really is quite nice. Let's put these back, here we go. I really like that side by side thing, though it helps really figure out what you're working on, right? Even synchronizes the scrolling. So there's a lot of these different types of editors out there. But look how incredibly easy it was for us to do that. And you can even get like help. If you're new to markdown, it'll give you help here. How easy was it? Well, to go from this really unhelpful thing to this, what I'd call pretty advanced editor. All we have to do is npm install simplemde, add the right CSS at the top of the file, add the right script at the bottom of the file. And then finally we have to go and create a new instance of this SimpleMDE editor by pointing it at the textarea. So this is up here, and down there a textarea with the right id. And that's it. Now we've taken and created a beautiful editing experience for all of our users. Those who know markdown really well, They can use the hot keys. they get the auto complete and things like carrying on lists and so on. And for those who are new, you get an even better experience.
|
|
|
transcript
|
1:42 |
Well, I would say that simple mde lived up to its name. It's a simple markdown editor, simple, and it's usage, not simple in its capabilities as you so high. It's really quite awesome. Actually, Over here we're going to go to the page that we're gonna include the editor on, and we don't want to include this CSS style sheet on every part of our site that's just going to slow things down and potentially even override some styles that we're setting. What we're gonna do instead is we're going to included on Lee on the pages that need this editor by injecting it into the layout template that shared layout page through here. We're adding a link to the CSS, and that's gonna be put at the top of the page that gives it its look and feel, and to give it the behavior it's going to have to have some JavaScript. So two things basically one we're going to include the simple mde JavaScript. This were putting in the bottom of the page just for performance reasons. Technically, it doesn't really matter where it is, but it the next line does required to be at least after the definition for the contents text area. But we're gonna include that down at the bottom here and we're gonna say creating new simple MBE editor and we're not gonna take any not to make any changes to the many, many defaults. If you go to the documentation at simple MD dot com, then go to their get home page. It's full of different things. You can do We're not interested in doing that. We're just going to go and grab it and say, Go make this thing a whole lot better by making it a markdown editor don't get contents, which is our text area I d and load it up and off it goes, and that's it. Our website feels much, much more professional for creating and editing markdown content compared to what it must have been just before we headed this right. Going to be a lot better, and people are gonna enjoy working with it way more
|
|
|
|
33:08 |
|
|
transcript
|
4:22 |
the markdown system that we built renders pages beautifully and it looks like, Well, maybe we're done. Maybe you don't need to do anything else. After all, here's one of the pages we created, and honestly, that looks fantastic. I wouldn't change a thing about it, but there's a few problems. First of all, we saw for large pages pages that are maybe 10 times as big as this one. The site is slow, and you might think, Well, doesn't get that much traffic. It doesn't matter that much, but it does matter. There's been tons of studies that showing that even something simple, like ah, 100 milliseconds longer Layton see, contributes to something like 1% fewer purchases on e commerce sites. Now think about that. If you do a lot of sales, that's a huge thing. It also is now starting to be taken into account for S E. O. So if there's a site that's five times as fast as yours and you have about the same ranking, guess who's gonna be below. You're gonna meet below your site slow. Also, your users not gonna love it. You're gonna pay more for infrastructure to host it all of these things. So optimizing websites matter. We're not gonna use Cloudflare. I just thought this little quote or this little statement from them was nice. So I put it up here. Speaking of S e o, you could actually check how your site is doing if you have it hosted on the public Internet, for example, if you go to page speed insights from Google and you throw for example talk Python train in here, you can see we get 100 out of 100. And this is stuff coming out of the database with no caching. Not really. You can do it. You can make your site super super fast. But if you want to rank high, you're going to have to put in the effort. And a lot of the stuff that we're gonna talk about in this section actually does this automatically more or less. You won't have to even think about it. It's just we're gonna use some libraries that make this happen, and it's gonna be amazing. So I do want to drive home the importance of a high speed site, a quick, fast responding site. It's good. There are so many reasons that's good for the users. It's good for you. Easier to host. You don't need so much infrastructure and it's good for S e O all those things. The other core problem I think we're going to run into on most sites is that content cannot be reused. That might sound a little bit weird, but you know where we're raising all sorts of stuff in our current site as it is that whole navigation bar across the top of the footer, the overall look and feel things like analytics we might put into that shared layout. We're using that everywhere. And so it's not unreasonable to think there should be parts of our mark down that appear in more than one location as well. Let me give you an example. Re use is actually pretty common. If you go over to the talk by the on training website, you Can you pull up various course descriptions and marketing pages that tell you about the course, whether you should be interested in and so on. Here's one for the Python for beginners. Now there's a bunch of stuff very specific to that course, right, What we cover, why you care about it, who should take the course and so on. But then there's this section here where it talks about subtitles and it says this course comes with subtitles. Here's a picture of a course with subtitles in our player and how it's gonna look. So if you want to take this course and you need subtitles Well, rest assured, they're gonna be here for you. This little section and actually the green section above is talking about streaming in high D. P I as well, and that shared in many places. But guess what? We have other courses. Here's the data driven Web APS course, and you know what it has. Subtitles So we have exactly the same mark down here. Talking about this course comes with subtitles. The right Python encode course also has subtitles in its lane in Page says yes, you might want subtitles. Yeah, 100 days. A Web Subtitles also Who? Here's the thing. What if I want to change the wording here? Should I have to go back to every part of my site and re edit that somewhere in the middle of this Markdown file? No, no, of course not. We don't want to do that. It's super air prone. We could easily forget one. It's a ton of work. What if we had 100 different pages instead of just 45 or 20? Right? That's totally reasonable. And yet it's not reasonable to go and rewrite that same better code everywhere. So with these markdown pages, it would be nice if we could get section and say this marked out actually something I could reuse in other parts of the site. So that's what we're gonna do here as we're going to switch to a library that's built on top of Markdown and does a whole bunch of cool things, including solving all these problems we've seen.
|
|
|
transcript
|
2:17 |
to solve all those problems that we talked about and actually do a whole lot more. We're gonna use this library called markdown sub template. The idea is that this lets us take standard mark out and treated like these more advanced template ing languages, Jinja or Chameleon from the Web. And we're gonna be able to plug that right into our website. So it's super easy ideas. We have some markdown content when I feed it possibly into a larger piece, right? This these pieces down here might be those subtitles in the high d. P I. And here's the overall landing page. Feed that in a pyramid number into our shared lay out our CMS page PT and then render it over to the browser. It is all sorts of cool stuff. It does the caching. It integrates with databases with a little bit of help from us, and it even has cool extensions for logging and specialized caching and so on. Okay, so what we're gonna need to do, he's good into this extensive bility section. Now, by default, it loads the contents from disk. And if you don't do anything you want to save Markdown files to a file and have them rendered as if it were CMS. Well, you're good to co that already exist. There's no problem. But what we need to do how is have it will integrate with the database. So if we come over here and look roll down a little bit, you can see that we have to do is just define some way to store our mark down in the database. And guess what? We've already done that it's called a page. We're doing that now, though, that's done. But then we've got to implement a few methods, like given a path or URL give us the markdown from. Basically, this library doesn't know the connection string to your database or that you're even using SQLAlchemy. You could be using something else so it doesn't know how you're doing that, and basically, our job is to do a tiny bit of work to make that happen, both for standard mark down. And then we could have these imported shared elements that we could treat potentially differently. For example, you might not want to let people directly request the shared content, but only use it for stuff that's allowed to be imported, but not actually directly requested. Okay, so we're gonna use this library markdown sub template. So we're gonna put that into our project, do this little bit of integration here, and we should be good to go.
|
|
|
transcript
|
1:55 |
So let's get started using this markdown sub template. The first thing we gotta do is put it into our requirements ball here and let's tell it that it's spelled correctly and PyCharm right away knows. Oh, this needs to be installed because its requirements file. So just go and hit that, See down here and wait for a second. And alright, super, it's installed and we should be able to use it. Then we're gonna come over here and we're not gonna actually use this markdown stuff. We're gonna import some other things. We're gonna import markdown sub template like that and down here and sit a saying self dot convert to mark down, which we no longer need to do. Good comment. That one out they sell thought HTML equals markdown sub template dot There's this thing called an engine. And there we can call get page are just going to give it some URL and potentially some piece of data. The or l is. Well, self dot url and the data you can see the default is an empty dictionary. So we're not gonna pass any data but like you would see over here and say this section. World War You're like passing over the URL and passing over the title. The markdown sub template allows us tohave. Variables that are replaced with content were passing in. But that doesn't really match our use case here, so we're not gonna mess with that part. So this is all we have to write. Let's give it a try. It's not gonna work as well as you want. And there's a lot of things we still got to do. They're not hard, but there's a few more steps. Let's go look at help. nope. We haven't set up the storage engine. That's too bad. So that's the next thing we have to do is we have to basically create one of these storage engines either a built in one like the file based one, and configure it or we have to create a different one. A little extension for talking to the database turns out, is really, really simple, but we do have to do that, so that's what we'll have to do to get this working next. But we're actually pretty
|
|
|
transcript
|
6:46 |
next up to use this with our database, we have to. Either we could use it with file system and we got a set that up and give it a path and basically say, Here is your top level directory. Much like to say this templates folder is right here for that part of the site. Or we have to create a separate one that implements some other way to do things like, for example, the database. So we're gonna go over here and we're gonna create a classic drive rooms storage, which comes from a sub package and the one derived from sub template storage. And there's a few methods we have to override. So let's just go do that. Well, that's the template storage engine or something like that. And the way it works is gonna create a class. I copied this from the integration section, but let's just start here, and that's going to be imported from markdown sub template, and it's gonna go like that. We say Pass says, Look, this is an abstract based class, and we want to implement all the methods. So here's what we have to do in order for this to basically plug in to mark down sub templates. And there's two very similar methods here. This is initialized. Would it really need to know Is has the underlying database so db session as that thing as that thing been initialized and we go look at it, it has. This is initialized property, which is set you may. We should even you can maybe move that down the very, very end of this method here, right? But assuming that it's set up the connection and it's gotten all the way through those steps, it's initialized. So here we can just say return TV session do the session dot is initialized this one. It's not really anything to do here for this. We're just going to ignore that one. Just do a pass and this part gets pretty interesting. So here we have to go and write the code just to get one of those pages. And guess what? We already have the CMS service, right? And it knows how to get a page on. This template path is basically the standing for the URL, so we'll get her page and notice we don't return the page. We just return a string so we'll say, if not page in a return. None. Otherwise, we're in turn page Ott contents. Now it says it returning none. And this to be optional gonna go with. We're gonna change that optional of stir so it allows us to do that. Perfect. Perfect. Okay. And then this one, this one is going to be the same. For now, we're gonna add another feature to mark our pages as being shared or not shared. So this will allow us to do a query that slightly different. But for now, when you put this Okay, this is step one. Step two, If we go back to the documentation here is we need to go in, create one of these and then set the storage engine or the markdown storage. And that's going to happen over here in this section here. So let's add a in it mark down, But configure Guess not. Really? Sure. We're gonna need to use it, but that's fine. They wouldn't call this section here. We got a storage and say set storage, and we have to give it some store thing that we're gonna create. What is it? Well, that's going to be one of these sub template Devi storage things. Just like so and that's technically feels like it's all we got to do. All right, Well, we created this class and then we're just going to go here and set it. Think we're gonna run to a problem? Let's see. No, no, no, no. It's okay. It's working. Well, maybe this is gonna be great. Let's give it a shot. We come over here and with that it's working. However, it's not just taking the mark down and displaying it like it was before. In fact, it's doing in memory, caching in a bunch of different work to make sure that this is as fast as possible. Let's go back and make this a super slow, a long thing like it took before we go over here to this engine. Yeah, I'm not really sure how we can how we can fake it to go in there. I actually maybe, yeah, yeah, Let's do this. I'll say Page equals that. And then page is not what you generally want to do, but equals pays that contents. 20 return page. There we go. So now the page will be 20 times as long you go click on this notice right now. Yet this should be a little bit slow. It'll be spin, spin, spin. It was good. Really, really long here. But now watch. Go back. Instant! Instant! We got fast. It is you can you can even see the screen Refresh. Now I want to show you some numbers really quick about how it's better. But this thing this we haven't talked about this but this cool performance analyzing the bug, Tobar actually makes it hard to see the performance. So I'm gonna go and turn that off for a second. That's turned on right there. Let's run it one more time. No, over here. Inspect Element turned on the network. Say show only HTML and persist the logs across calls The first time I hit it, it's not gonna be cache and memory, so it's going to generate it just like we basically saw before. It's gonna take about half a second and there it is. 872 milliseconds. That is some slow business. Compare that to 15 milliseconds for the home page. Quick, that is. But watch it now. Bam! Eight milliseconds. That's 100 times faster 67 more than 100 times faster to get this page, you can see all that content. Yeah, it's still totally there. All right. It's the same amount of work, but this markdown subsystem, one of its magical powers, is it knows how to cash these things and make him really quick and could even cash them to external systems like red ists or do the database or something like that. And you could look in the extension section, see how to do that same place where we're looking at for this database integration. Okay, so really nice, right? All we got to do is go over here, implement this one class, this class just more less delegates to our existing CMS service. Another win for using that, a p I or that pattern. And yeah, that's pretty much it over here. Instead of calling our own convert to mark down, we just let it do it itself. Say, give me the page and all the work you got to do to put that together, drop it in here and off it goes. And here you can see the actual marked down time that it took was 769 milliseconds. It 00 afterwards, right after it hits it the first time. It's super super fast, so this is a huge, huge improvement, and it's basically no extra work on our behalf. But it also has more features that we're gonna get to like that shared content and whatever that reusable pieces and so on.
|
|
|
transcript
|
2:58 |
Now let's see about using some of this. Shared a reasonable content basically extending Markdown, as is understood by this Markdown sub-template thing. If we come over here and let's just say, problem page something to that effect and to maybe we want to be able to let somebody cover and on the bottom of all these pages were right and say, Do you see a problem with this page? Send us a message or something like that, Right. So let's go over here and we'll just write that shared content. So what we're gonna do as we're gonna put a maybe, each four. It would be something like, See a problem. So here's some basic text, and then let's even make this. Ah, hyperlink. So we come over here and put this is a link and the link is going to be H p s twitter dot com slash the psf except looks good. Maybe there's a space there. All right, cool. Let's give it a quick preview. It looks good. They go to the right place. May the Python suffer foundation. Good, Good. All right. So it looks like this is fine. Let's go and just save it. Now, let's suppose this our team and company history and maybe even the donate, but they all want to have this little section down at the bottom. Are we gonna do that? Well, now that this is in our database, it's super easy. If we go edit this, donate one down here. All we have to do is say, import the name of the little short URL it could even have. Slash is like this if that's what the URL is, and then you could have stuff more after this if you want not gonna put that there. But if it made sense to put this in the middle of the page, it totally what's Let me copy this and save it. Now let's see that that shows up. Hit, visit, Boom. Look at that. Now. We might want us to be smaller, maybe centred and gray or something like that. We couldn't address that in a second, but that's pretty cool, right? And let's go back to the admin and put it in one more place. Go put us in the bottom of the company here and in the bottom of our team. There Now, if we go look at all these. Look at these three pages. They all have the same bit right there. Isn't that cool? So allows us to create little fragments. Now, what I don't like we're going to fix later is this page looks no different than these top level pages that are basically making up our site. So what I want to do is have a different section that shows thes shared things. We need to have a way to indicate in the database. This is a shared, reasonable piece. You shouldn't treated the same. So we're going to do that. But for now, let's just go and sort of see and appreciate how cool this is. All we got to do is write these little import statements which normal markdown doesn't support. But our library
|
|
|
transcript
|
3:32 |
well, our pages looking pretty good. But there's one thing I want to talk about and that's formatting this content. Or, to be honest, any form of content. If I want to put an image there and have it spanned the whole page exactly, regardless of the size of the image, the sides of your screen or if I want to have, like, let's say, if we want this gray and smaller tax or something along those lines. So let's go make that happen because landing pages or other sort of marketing pages are not super interesting if you don't have a lot of control over. So we wanna adjust the CMS pages, sometimes beyond what Mark down really wants us to do. So let's go to this problem section now. It might first seem like, Well, what we can do is we can put this into a A divorce, some HTML container, and then on here. We could set a style, and let's say the style is gonna be color is grey font size is 0.7 p. M. That is 70% of the normal size. Now go ahead. This and we view our donate or donate has a look. It's gray. That's awesome, like we wanted. But wait a minute. What the heck just happened here? If we expect this element, you'll see that. Well, basically, what happened down here is this section not that section. This section here it got the styles. You can see the styles and HTML are in here. But then it didn't process the mark down. Right? This basically didn't get parts by mark down. But you can see the stuff of here. Did the little header. You see a problem? Pieced it. Let's go back and look this again. Here's the deal with this library. You cannot mix HTML. Let me rephrase that. You cannot embed mark down within HTML although you can't include it. So, for example, this got processed is marked down, converted to an H four just fine. This got pastors HTML just fine. But the stuff in here didn't to. You actually can put these little slices of HTML in here like if you want have an image, you can just put the image with some styles and put it in there and that's great and the rest can be marked out. But here's the thing is the stuff inside has to be standard HTML. Right. So here we gotta put like an h ref equals slash a And then we put the pieces go in there, right? So here's the body. Next, here's the euro that goes there. Even throw in a cool target equals like that to get it to go to a new tab. Let's update this. Go back and view our donate. Now watch. This should get fixed and it does super. So here. This is the markdown part of that reuse bit. And here's a little HTML fragment we stuck in there. Yeah, it doesn't look super good. Like the way it is on the page, but that's not really the point, right? It's just that weaken style this and get it to behave the way that we'd like. So here we have a hyperlink that opens in a new tab, Super easy to do so you can do way more with these CMS pages, regardless of whether their shared like we were working on a shared section habit. It's not the fact that it shared its just the way the mark down the underlying marked down to library works does it want pars marked on within HTML fragments, So that's fine. You can do this for any page or any parts of the page, and you can put these little HTML elements in here and then you're good to go. You have all this content. Most of it's written in markdown, but these little pieces you can write in HTML have a little more control over how that small part of the page looks.
|
|
|
transcript
|
3:59 |
Well, we have this working pretty well from a functionality perspective, but not from an admin backend nice editing experience over here. When we go to our pages, I would like to see here are your top level pages and here is a piece that can be reused. And I'd like to see his little name and stuff like that in order for us to do that. Though, remember, this is all just a bunch of page objects in the database to seek. Welcome me. We need some way to indicate on that page object whether or not it's shared so we could go give that a shot. Being come down here and we can say is shared. It's going to be a Boolean who has a default value false. That seems totally reasonable, right? And yes, this is how we put it in here. Let's run the code and see how well this works. By refresh this page are we don't get a great air message here because we turned off on the bug Tobar. But it doesn't matter. Let's just go down here. And what is it going to say that that ah, it's doing some sort of query. No such column is shared. Yikes, that's not good. What's happening? Well, the database has this stuff in it and the way SQLAlchemy works, it will generate new table. So if I made a new class, it would go and create that right away. However, what it will not do is it will not update an existing table. It won't add columns to an existing table. Do it's not gonna make this change here. In order for us to do that, we have to apply migrations and the tool for sequel coming to do that is Alembic. We're gonna do a quick little bit of work with Alembic. To make this change, go across this common this out for a second. So it's in sync to start now. There's some older migrations that we don't need to apply here, and I don't think they're properly in the database. We haven't been using migrations so far because we haven't needed them. And because we weren't careful, these were kind of out of sync. So I'm just going to, save us some trouble and delete those two files, OK, and the other thing we need to do is make sure Alembic is installed. So I put that here and weaken. Just pip the requirement, Steph. And get that to install Alembic. All right, Good. Now let's ask which Alembic good? It's the one out of our virtual environment that's very good. We're gonna need important that library, which is also registered in this virtual environment, do that's important that we can do that. And if you're on Windows, you can ask where Alembic, by the way. So let's just see if we can get Alembic to. Talk to the database, we say Alembic upgrade head. That means just latest and basically says nothing. That's a good sign. We could come over here and we can put this back in, make sure we save it. And we can say Alembic revision. Dash dash auto generate with the message and is shared two pages seem s pages. Some like that. Alright, let's try this super so what it's done is it's gone and created. This file year, which has no downgrade, is fine. But if we upgrade, it's gonna go to this version. What is good and you can see right here. It's adding, the column is shared and said it to be knowable by default. All right, let's go and look at the data base. But our pages no is shared, right? Right. So the final thing to do that generated the migration, but it didn't apply a migration. So this Alembic upgrade head says, Take all the migrations you haven't here and applying to the database. Okay, let's go over here and see what we got. Refresh. Oh, yeah, There's a Boolean column and we can go back with our page now having this and run it and see what we get. Our page. It was crashing Works Great now. And of course, all the pages do as well. So what we need to do next is we need to go and update this to use that is shared property here and let's set it over
|
|
|
transcript
|
7:19 |
Now that our database supports this concept of a shared page and a standalone page, let's make that possible or visible in our editor. So all we really need to do is and one more field here, a check box that says Is it shared or not? And then just push that back into the view model and then have the view model pass it over to the CMS service when it creates or updates the page. So here we are in that page we're looking at right there. And before this text area, we're gonna start by putting a label on a check box. So we'll say input. I be cools. Check box name equals is shared. That's good animal. Do a label and it's gonna be four is shared like that. I'll just say something like shared content, nonpublic. Something like that. I say we're going to start by doing this because there is one minor change we need to make was going look and see how this looks. Well, that's weird. Like, why is that way over there? And if we look at it, why is it so super huge? See how it takes up the whole thing, and then so does, this is not quite because apparently it's display styles in line block instead of in line instead of block. But this one is really huge, and that's little bit weird. The problem that we're gonna run into is if you look over at the CSS. It says something like All the stuff in here is 100% across within the admin block. If there's a text eerie or input, it's 100% across. Now let's be a little more careful here. Let's go here and say within the form that immediately contains this. So what that means is here's a form and the very next item is either an input or text Eri and then this one We can just put it into a container to say, You know what? These need to be on one line like so let's give that a run. Ah, yeah, there we go. So we've got these nice and wide, all 100% across, but this thing right here is not causing this trouble. All right, well, this is good, but it's not being set Now. It turns out setting this check box in the community in trouble. It's a little bit annoying, actually. Really, really. Love the chameleon templates is Petey Files. I think they're super super nice. They're so clean. And what I really like about them compared to Jinja or Django is what you put in here is still valid. HTML, for example, this one will see this one here. This conditionally shows or hides the error message depending on whether there is an air. Right. Well, this is still valid markup. This doesn't make sense, but it still parses as HTML as opposed to Jinja, which has, you know, the percent percent full. if error close it off, you got to put an end if at the end I really don't like that style. But this one part right here, it would be better if there's a better way to do this. And I think it's also a limitation of the check boxes because what I want to do is I want to set the value you gotta do. You have to say check and it doesn't matter what you said it to if it if this thing is here than its checked, So there's not really a great way to say, make this attributes appear or disappear Community that I've figured out maybe all got it. But so what we're gonna do is where it's going to say that someone say we have a checked one on like this, and then we're gonna be tal Cold condition is shared and they were gonna have one that's not checked. And that one's only gonna be visible if it's not shared. So it's sort of annoying to have this duplication. Only one will ever appear at a time because here's the condition and the not condition. But nonetheless, we do have to address that now if we try to run it right away, it's not gonna work Super. Well, the reason is, if we go and refresh this, it crash. And again we turned off our deductible are so gonna look down here for the air. But the air is we're missing. This is shared here, So let's go over and work our way back up. It appears that we go over here to this edge it at a page view model, and then we have self dot is shared, equals, start false. And then if there's a page, will say self that is shared equals. Ah, self top page is shared. Remember that we already put in the database. We just need to carry it along. And then, of course, we need to do the reverse over here. We need to say self that is shared, equals careful. Gets little weird. They get It's shared. Is that what we want? What values does it have? Is it true or false? Like it probably really should be? No. Is it checked or not checked like you set over here? Check versus Not checked? No, the way this gets submitted to the form is it gets submitted back as either on or off. So we're gonna say it's shared. If the value get back, is the string on? OK, so it's a little not obvious going to just play around to figure that out. But let's give this a try. We probably can actually go and check these things over. We refresh this, we can now edit it. Ah, let's see that one says it shared. Is that what we want? Let's go back here. I did this one. Okay. This one is not shared. Yeah, This one's also not shared. Okay, cool. And if we check it off, we can save it back. But it's not getting pushed over to the database. So that's the next thing to do is over in our admin controller Over here wouldn't more calling Update Page. We need to have V. M. Bhatt is shared, and similarly, one more creating the page. We want to specify if it's shared, so let's go on. Add those two things and this should be the final step. But here's the Create Page one and the update page as well. It's good and put these type hints on here. There we go. And I guess we could go ahead and return the page just in case somebody wants the page that got updated back. All right, I think that I'll do it. Let's try. If we got everything right, we should now be able to edit whether or not our pages were shared. Okay, let's go back to the admin section. Viewer pages. Let's mark this one as shared and hit. Save if we look at it again. Yes, it's shared. If we go back here and look at this one not shared. If we update it good. Look at it again. Yep. Still not shared. Okay, it looks like that's working. We didn't do the create one, but that one will work as well, I'm sure. Now the other final thing like you can't tell looking this page summer shared and some are not shared. So we want to. Also, distinguish that. Remember, what are the primary important things about whether or not we were looking or these shared elements is we want to not pollute our structure. It says here the pages that make up your site. We don't one of these little reusable bits in there because they don't really make up our site. Exactly. We want this kind of partitioned into two lists.
|
|
|
|
18:55 |
|
|
transcript
|
1:46 |
Let's talk about logging our CMS actions. There's actually two levels that we're going to cover first. Your site. If you're adding this to an existing site, probably already has logging. If it doesn't, I'll show you some cool log in libraries and how we're using them. And then you can plug into those. So here's the log from Talk Python Training that I talked about one out of him. We get all sorts of information about what people are up to, who has done what we could go back and look, you know, somebody sends us a message and say, Hey, I did this and it didn't work the way expected are or something like that. We go look in the logs and see what it was. They did So here There's a little bit of a a little bit of history of people using the API using the mobile APs on it looks like IOS. A couple of people on Iowa's here requesting some information by the courses, you know, like refreshing their list of courses or logging into their app or something like that. Right? So we have this kind of stuff going on in our Web app, presumably right? Presumably. If not, you can add it. But we also want to add this for the CMS to know who's taking the admin actions. And then the second layer Here is the markdown subsystem, the markdown templates, sub templates. That thing has its own logging, and we can extensively plug it into our file logging or whatever type of logging system we're doing. We can plug those in together so they make sure they go to the same place. For example, on training Doc, Talk Python To Me out of him. We have rotating logs that show you. Here's the log for that day, and then the next day it automatically creates a new file and puts it in there. Right? So we want to take the functionality from markdown sub templates. M plug it into that system so it's all unified in one place, or maybe even just turn it off because we don't want to see
|
|
|
transcript
|
1:02 |
There's a lot of different logging libraries for Python. Python has a built in one. I don't really love how it works. It's kind of I'm not a huge fan. Let's just say that we're gonna be using this project. This package called Logbook. This is written by the same guy who created Flask, actually, and it will push notifications and messages to all sorts of fun things. So it's a really nice, simple logging thing that a log to like standard out like print. But it will also logged the files. It can even logged like messages to phones for, like critical errors or other other crazy stuff like that if you want to plug it in. So I've gone through. And I've actually already added this to our Web app because the point is not to show you how to do logging for a Web app. I'm assuming you probably have that, and if not, this is really simple. You can just take it and follow along. What we want to talk about is just making sure we're doing the Logging one and then two. We want to make sure that we want to plug in that mark down subsystem, logging into it and control it as you want it to happen.
|
|
|
transcript
|
5:39 |
here we are in our Chapter 11 copy of our web app. And I won't just take you on a quick tour of what we got to work with here. So I've added this logging function. Here's that initializes Logbook, over the top we've installed and then imported logbook. And then down here, we're just gonna go and tell logbook. To push to standard out. That's like the same as just doing a print when you go to production. If you really run this on real servers, obviously that's not gonna help you a lot. So you're gonna want to set this up to log to a file. Just check out the logbook documentation. It's super easy to have rotating file systems while handling there. We're going to set that up globally once. And then any time you want, we could create one of these things and give it a name like app or CMS or admin or whatever. So what about these little different levels? Right? We can set the level of our logging right now it's on log. Everything. But we could say only log like warnings and above. And then this notice would not actually appear. Okay, So that's one of the features. That's pretty cool. It would go down here when initialized just say, Hey, we initialize the logging and then for markdown, we're going to say what storage engine we put in here down to the bottom. We're gonna say how many web routes we've registered and then what? Whether or not we're initialized in the database. This one we've also, remember we had a print statement right here, and we've changed that to now log, this will right now go to print basically the same. But what's really nice is it will go to the file system when we if we ever switch it to that. So for over here we're just creating a DB session logger. We also have in the admin section, up here a CMS, this should be called admin, in IT Rio. So we have an admin section down here and you'll see at the bottom when we're, say, working with a redirect. It'll say the user so and so is adding or updating a redirect. And then after it succeeds, it says they've added or updated. We're not really distinguishing right. Remember this function is used for both. And this is just trace. Like maybe, maybe it should be higher, notice. What do you think this is? People making changes through the site, trace is? Probably a little low. Got the other one. Appears as trace as well. That's good, but I also did some places where trace makes more sense. Let's look over at our CMS controller. And over this one, we probably want to do the same thing. So we could say log equals Logbook. And we have to import that logger, and this one could be CMS. And then down here, we could just have a message for, say, log dot, this one you definitely want to be trace. Like every page we're going to tell you. This page was requested. Well, only in, like, super tell me everything mode and we want to see that, that we could say, a CMS request, get the title or something like that. Look for redirect for the short URL, and then we could also get in here. Maybe make this a little bit higher. CMS request not found. Put the URL there. Okay, let's give this a shot. See how it's working. And notice when it runs now we've got the date, the time, the level of the message. Logging initialized. This other trace is for the DB session, initializing, right, initializing, that it's going to initialize and we'll see this even if you re-initialize it. So that's why this trace but notice. Here's where we're actually connecting to once and only once. Here's the app starting up over here and then go to our admin section and now admin trace user mkennedy viewing. Admin home. They're viewing the page list. I go over here and edit it. Let's say make no real changes, now these are notices, the user mkennedy was updating the page. It was updated at this address, and then we're back looking at a list, that's pretty cool. And then finally, if we hit a page here like this, there's a couple of things that are cool. One. We're doing a CMS request for this title, this page. Maybe the URL should be involved, possibly. But notice here. This is from the markdown sub templates, and it's even though it has the square brackets, so it kind of looks the same. It's not the same right. It's not coming through this system, and how can I show you that, let's, I've made it a little more obvious, if we go down here to this logging thing, we don't set up this standard out logger, notice. All those messages are gone. They're just going basically to nowhere right, logbook's like I've got a message nowhere to put it. So throw it away. Right. And if we go look at this page, notice these are still getting generated right to the IDs. Like if we sent that to a file, these would not go. That file is set to just go to standard out. So So that's not ideal. What we want to do also to forward it, sort of round this out, if we want to take the logging coming out of our markdown subsystem, set it to a certain level. So we control that and then also put Push that out, too. Our logbook integration. But for starters, it's cool to just see that we've got super, super simple logging integrated into our system. We just change it right here to go to a different place. Like to get it to go to a rotating file or something like that. Pretty easy, huh? I love logbook.
|
|
|
transcript
|
2:59 |
the first thing we might want to do with our markdown sub template library is Just tell it. Don't show me all these messages. I want you to just show me the really important stuff. So in order to do that, we don't have to do any integration or anything like that. We can come over here and import from markdown sub template just like we did storage, logging, and in this init logging section, we can go down and we could say md log, I'll get log. So then, md log, we can just like before call these messages, we're not going to use this directly. As you'll see. We're gonna do a little integration with it, but we can set this now. This is a log level that's going to come out of Logbook. But here we can set it to trace, error, and so on. Let's just say, let's just say we want to set it to error, and let's put in underscores so we're not getting little warnings about this. So now if we run this and we go look over to the admin list with a click here, notice there's no message from it, but maybe if we can get it to have some kind of error, let's go over here and just say this one has an import like that. And if we try to view that, let's see. Do we get any message? No. Still, it probably should give us a warning like, we couldn't find this thing right here, but anyway, if something goes too wrong with it, it'll get an exception or something. You should see some kind of message out here so you can configure the levels of that thing or just turn it off. You do what you want to see. Anything you say, logging off. You'll never see a message from it again. But there's probably good anyway, this is a nice way to control that. At least a first pass to filter out some of the messages. You don't want to come in. And while we're at it, if we want to just see notices and above, we can come down here and say level notice, and now let's go, crap, run, notice. We see the notices, but we don't see higher. Let's see what we want. Yeah, we don't see the info stuff. So remember if this was info here before, we said I'm not sure info is the right level, you see, trace, right? I guess if we, that's right, we had it. We didn't have anything that was set to that level. So if we set this to trace, we should see trace and above, which is notice and trace, perfect. We see that, but we don't want to see traces. Remember, you see a lot of stuff in this one. If you're over here and you're viewing a page and you look down here, there's a bunch of traces, like you don't want to see that in production, it's even gonna slow things down. So you could go to notice or info. And now we can request the heck out of this page, and those are gonna be silent. So probably the right thing to do is, like, set these two levels like this, but they don't have to be the same. They just can't be there. Notice this didn't have a notice, does it? Go with error, info. Info is gonna be as close as we can get, I guess. Didn't notice. Here we go. Looks like it's all
|
|
|
transcript
|
5:38 |
Now, if you really care about this markdown sub template logging stuff and you're using some logging system, the only reasonable thing to do probably is to put them together. So let's just really quickly do that. And as we saw over here in our storage engine, what we did is created a class that derived from something in storage. Well, it's gonna be really similar over here for logging, and there's a bunch of stuff we're not gonna need. So let's clean this up here. This is gonna be logging. I would have to import that. It did want to give us to help there, so from markdown sub templates, import logging, I'll say logging sub template logger. Let's get rid of all of this stuff here, and for a moment, alright pass. But what I really want to do is implement these four methods that we have to do in order for us to write to logbook just like we were over in all the other places. Like over here to do that. What we did is we created one of these little logs. I'm gonna do that up here as well, and this is gonna be markdown, something like that. And you know what? This is super, super easy. So we go look at this thing, it's going to have, when you create it, you're gonna have to pass over the log level and it's gonna store it. But we don't have to really do any defining different than that. So we're just gonna hang on to it like this, and then we'll just say really quickly. Now, the way it works is you need to check somehow whether or not you're at this right level. So it has a built-in should log, and we're gonna give it a couple of things. We're gonna give it the level, and the log level that we're asking. Actually, it was a log level, however verbose, so it knows what level it's at. And we're saying, we're gonna consider to do a verbose logging. Should we do that? Given the level you're at, the other thing we want to pass along is text, and you might wonder, like, what does the text have to do with it, if the text is empty? We're not gonna write a log message for that. It will say if not this return. That's gonna happen at each one of these. I don't really know of a better way to do that, Okay? And then we're just gonna really simply come down here and say log dot, what's close to verbose? As well, trace, when I go and put out the text, you the markdown logger here. Like that. What about this one? Also trace. What about this one? This is info. Logbook has an info level, and it has an error level. Okay. And that's it. We've now integrated our markdown subtemplate system with our logbook integration just like before. The only other thing we have to do is, remember this part in the database where we initialize markdown. We came for the storage. We're gonna say log, do we already have logging here. It looks like we do. Yeah, right there, we already init. Already. Got that because we were playing with it before. We'll say logging dot get log. Sorry. Set log. And what do we want to set it to? That's it. Log engine. Oh, I didn't rename that, let's. Ah, call it logger, something like that. And we've got to import that, and we need to pass in the level, log level dot, what level do we want to do it? Let's say we're going to do info. I also had the log engine, and that's it. We could also markdown logging engine set to engine. Perfect. Well, let's give it a shot. See if this works. Okay? It's looking good. We have our notice. Notice notice here. Actually, we got to go and set that back here, let's go to trace just for a moment, just to make sure we see the messages. Okay, so let's see, We've set our markdown logging engine to sub template. Logger, if we make a request, notice a couple of things here. We didn't have to generate that page because, yes, it was already created. See? Oh, I made a mistake over here. You'll probably notice that, you're like my god. What are you doing? This? We have to adjust. This level and that level have to match. So we say trace. I say info and error. Okay, now, now we should see some CMS request. That's again. Perfect. Check this out. So we've got an info level message from the markdown system that it generated this HTML. And then our controller also has this message here, and notice that it, this part and this part, these are all going through the logbook output. So this way, if we set up file logging or rotating files, whatever, the messages coming out of the markdown sub template will also show up over there. So we visit any of these you should see. Now we're generating the markdown for this. If we visit it again, or refresh it again, we won't see the markdown output, because we're using caching or not regenerated it. But we are really requesting it over here. Perfect, right. Okay, well, it depends on what you're doing, whether or not this step is necessary or helpful to you. But if you're using a custom logging framework like logbook, which I recommend, look, it's super easy to add it here and just fold all these things together and just get a little more information about how your app's running. And that's got to be good to help you keep it running correctly and be able to diagnose stuff that goes wrong.
|
|
|
transcript
|
0:52 |
remember, if you want to control the messages that come out of the logger just to the standard out just by via print is super easy to do. We can just go down to the markdown subsystem and get the logging and say, give me the current logger, which is the standard out, print-style logger. You don't have to do anything to set that up, it's there by default, and then you can set its level by doing one of these log level enumeration type things. So you would say log dot log level equals this and that will only allow error and higher messages to come out? Remember, if you want to turn it all the way off, set it, the log level off. If you want to see everything it's willing to show you, say log level dot trace or verbose, verbose I think is the lowest, so that'll do it. You just turn it on and see what it's willing to tell you. And if you're not gonna integrate with other logging, you just want to sort of get it to chill out or give you more messages. Here's what you can do.
|
|
|
transcript
|
0:59 |
if you do have a proper logging system in your web app, and I recommend that you do, because it's really important to know what's going on with your app on your server, you probably should go ahead and take the time to integrate markdown subsystems, logging bits with what you're already doing. So with this one class, this is basically it. You just go through and say, I want to override a couple of methods, one, write over, I trace, verbose, info and so on, and then you just check. Should I log at this given level yes or no? And then if you should just go ahead and log that message to your logging framework of choice. Here we've created a logbook logger and in the trace one we say logbook, logbook logger dot trace in the info one. We say it logbook logger dot info, and that means it just passes those messages on to our underlying pre-configured logging system. Whether that's going to files, whether that's going to standard out or whether it's going nowhere, this will go ahead and take care of that for you.
|
|
|
|
19:47 |
|
|
transcript
|
1:35 |
we've come to the end of the course and you've made it to the finish line. You now have merged the abilities and the powers of these data driven Web applications with that of a CMS. You no longer need something like WordPress or Joomla or some other tooling. There's a separate thing to allow you to create this great content and then have this other app type of thing where your logic lives and people can log in and do stuff. No, these convey the same thing as you've seen. So let's take this last final section in review What you learned. We started out with PyPI. I not exactly PyPI but our clone of it, and it looked pretty similar and it had much of the core functionality and everything else we need to add to really make it. PyPI. I well, wouldn't have added a whole lot, right, so we started out with what was basically a rich, working, data driven Web application. That means there's a database with a bunch of entries, and the pages are structured very much around showing elements of those database entries like you can see the bottom. We have new releases, and it's showing the title and the sub subtitle where you call that little description summary of each one in this long, less down there. Right? So we took this idea, which is very common, and we added on this CMS functionality. Now we can go to the admin section in the top right log in, create new page and just start writing. We no longer have to write code. We can just use that aspect of our website to add things where there's not too much functionality required.
|
|
|
transcript
|
3:34 |
we started out our exploration of adding the CMS functionality by talking about routing. And the reason was it's essential that we find a way to get access to every single request that didn't correctly get processed in our site. If we slapped asked for looking like slash packages slash SQLAlchemy. Well, the data driven side of that would go and grab it and process it. But what if they ask for some other things like slash help? If that wasn't already there, normally the web framework Pyramid would return a 404 and say, too bad, that didn't work. What we want to do is look at that and say, hold on. Is there actually something in the database? Virtually, we conceptually think of as a page, even though it's not technically in the site, that we wanna return back to them. So that was routing. Let's just review routing really quick in general. So we're gonna process that HTTP GET request. This is like clicking on a link to a URL or something. And this one is to slash project slash SQLAlchemy on the right. We've got four view methods broken into two different files. We've got some URLs or routes associated with them. So we said slash home, that's going to go to our just slash. That's gonna go to home dot index, it's going to call that function and do whatever that does. So the system asks us slash project slash SQLAlchemy, does that match, the answer is no, slash about. That's another registered one. Also not a match, slash project. Curly bracket slash package. So the curly braces mean here's a variable, it could be anything, and yes, in fact, that does match. So Pyramid's going to set up this match dict. It's going to say it's got different things that matched in the URL, in particular, where we have the variable package, its value is now SQL. Alchemy, and then it's going to call the details function. Passing this request, we can process it and tell them about this page that they requested. Now setting up one of these special CMS routes, as I described, is a little bit different, in our previous example where we had curly bracket package, it couldn't be slash SQLAlchemy slash help or slash anything. The slash can't appear there, right, it's not a general thing. It's like, well, there's slash project slash a single value, what we need with our CMS world to say, give us everything. And the trick to do that in Pyramid is to put this star, that star sub path. The star says match everything after this, not just a single value between the slashes. And once we set this up, we can define a page method that's going to capture every request and then try to render a page here. So we're going to say, first, get the request dot matchdict, and we're gonna get this sub path here. The thing is that sub path actually comes back as a list of things. Strings separated by those forward slashes. So if it was slash project slash SQLAlchemy, it would be a list of two things. One being project, next string being SQL. Alchemy. To deal with that in our database. We're gonna turn that back into something separated by slashes, and then we use our little CMS service to go talk to the database and get the page back, and then we just return that back to the page. We're not really checking that case. The page might not exist, but this gives you the general idea of how it works. Remember this route. Up here, this config dot add route. It matches everything. The system will stop looking for other matches. Sooner as it finds something that is a match. So it's very important that this line, this config dot add route. CMS, that this goes at the very end of all the routing setup. Because if you put it somewhere before, then you're gonna be in trouble, that's not gonna work with anything below that, right? So do keep that in mind.
|
|
|
transcript
|
1:01 |
one of the first meaningful features we added to our PyPI app plus CMS was this ability to come up with little URLs that were redirects. Think of the bit.ly service or some URL shortener service out there. We'd rather have the ability to say a very short name that then could redirect some other site somewhere else in our website. That's much more, much longer, much more complex and so on. So we added this ability to get a redirect as part of our seem s requests and notice we could get the page, but imagine that that part doesn't match a page. So we're gonna come in and say, Let's go and see if there's a redirect at this euro and we get the response and get the euro from there, we make sure we a pen, the query string if it exists, and then we just return. And http found to that location because this one CMS method, the CMS request method captures every single request that's not already built into the website. It's the perfect place to plug in both these redirects and page responses.
|
|
|
transcript
|
1:37 |
in our Web app, and especially in the admin section where we're editing redirects and editing pages. We use this view model pattern now. This came to us from the website. It was already using this pattern, but we kept working with it, and I highly recommend you adopt this. So that idea is we have a request. Come in here, I said. It's a post to register. That means they're submitting the register form. And it's really in these forms scenarios where view model their most powerful but not the only place use him what a lot of people do A lot of coded bought examples tutorials on the Internet and other sites I've seen is they just have these huge, massive, you methods where there's all the code that's going to process this request. That is not the way we want to write our programs. It's gonna be hard to maintain. Gonna be hard to know where to look, to find what we're working on, right? If you have bugs Mike, it go duplication, and none of those things are fun. So what we decided to do instead is use this view model pattern, which takes a lot of what makes the view method, big data exchange, data conversion and data validation. We move that to its own thing, its own class called a view model. So instead we have, ah, small little method. And it works with this other class, this other bit of code called the View model to get some data into it, validate it and then get the converted data back. That means it's much easier to do unit tasked against these view models. It's much cleaner. It's obvious what the entirety of the data being exchanged with the page, all of those things. So you model pattern definitely recommended for your Web APS, and we made good use of it here.
|
|
|
transcript
|
2:18 |
At first, you might wonder what is really the difference between a data driven page and a CMS page. After all, we're kind of storing them both in the database, right? The CMS data is in the database and other things like packages and releases and users. Those were also in the database. When you talk about this, don't have a clear idea of what it is you're talking about, a comparing and the advantages of them. Most Web APS when you go learn about them, are what I'm calling data driven Web maps like this one here on the left. This is viewing the eight of us CLI package and every single page that you look at. That is one of these the AWS Eli sequel, Commie Pyramid. We'll ask whatever it is that you're pulling up, it's gonna have exactly this look. But the little places where data goes, we're going to vary. And that's the data driven stuff in the database. We have ah, project name. We have a version we have releases. We have a description and links and all those things. On the other hand, maybe we've got help. Page the help page doesn't have nearly that much structure. It's not like, Well, this help page has all these things and that HelpAge as all that No, it just use the title. And here's some text that tells you what you might need to do to be helped with working my pi p I. So the difference is we look in the left here we've got. Here's the title. The name of the project. The version years, details about installing it, whether or not so the latest version of when that one was released. Little summary for it. Things that are links about it, like the project description, the files, the home page and the description right there. We just got the text. Remember, this is just mark down that we've rendered here, but it's not pure text. There's still some logic. There's still some stuff going on. We still wanna have our overall Web application know about it because we might want to have an account section here. Or maybe there's some part of this page that we wanna have still interact with our site and not just be some static file on the Internet to the advantage of bringing these two together as we still get the stuff in the upper right here on that help page, we can still interact with our site. Nike still have logic, terming who has access to things and so on. And yet we don't have to go write code and redeploy our website every time we wanna have a help page or a donate page or anything like that. This is data driven pages on the left, CMS pages on the right.
|
|
|
transcript
|
1:33 |
for all the cool functionality and effort and polish we put into this application, rendering the page is not where that appears or where we had to use that skill. So once we've gone to that CMS request and we've determined there is a page, we're going to use this chameleon template to render it and all. We have to do it's set the title on. We passed through the View model, a page object which has the titles we say Dollar curly bracket page, not title, And then we want to put the HTML in the middle. I remember the trick is that we just say dollar early bracket HTML it encodes it. So it's like viewing the source of the HTML, not the actual display that we're hoping for. So in Pyramid and in chameleon, the way we do this is we say structure, colon, some string, and it says we're not gonna protect you from this. We're gonna drop it in exactly as it is. It's part of the page, its structure of the page. So this is what we had to do these two things, I think in a real example we also actually set the title as well. On the top of the tab, Do beware. This structure thing means you cannot take user input and then return it or render it this way, just asking for them. To hack. You are more likely hack your users to put some kind of JavaScript or scripting vulnerability into that conduct and then try to get you to show it to the other users of the site. So this is for you and your trusted people on the back end. Edit the CMS and render the data. Be careful if you try to use the same technique for users who might enter the value of HTML there.
|
|
|
transcript
|
0:56 |
we decided to use SQLAlchemy to store our data in the database. And I definitely love SQLAlchemy. If I'm working with relational databases, that's what I would use. The way seek welcoming works is it has this unit of work create the thing you make a bunch of database changes and then you all at once in a transaction, save those changes back. So that looks like this in code. We create this session saying, db session not create. We create a page object set values like the title bureau on the contents and here were normalizing or economical izing them like, for example, Ural, that stripped out lower. So just in case somebody has a little space on the end, it won't be some weird thing that looks like it should match in the database, but doesn't. Do you want to set this all up? Then go the session. I want to add the object that we created. Then we just say session not commit boom, because SQLAlchemy is awesome. This is now saved and inserted into the
|
|
|
transcript
|
1:34 |
we started out thinking, Well, we have a CMS for a website. So what we want to do is type HTML into it and then have it show it back to the users and that was all well and good. But we saw each team. L is a little brittle and harden mostly annoying to work with. So here's the page that we hope we're going to create in our CMS After we typed it in. This is the page we actually agree with our CMS. What's the problem? Well, there's this subtle when you don't highlight it. Subtle unclos h to remember what we were typing into. It's not like an editor that would find the problems with HTML. No, it's just a text area in a Web page. This was hard to find, and that causes big problems that follow on for everything that comes after it in the site, Not just what we right, but even the content that was part of the outer shell of our general look and feel. So what we decided to do was go with mark down and we use the simple mde markdown editor and all you gotta do is take a text area include a little CSS and JavaScript and point this thing at it. It becomes in awesome little editor. Remember, we're gonna go and add the CSS at the top. We're going to add the JavaScript at the bottom in this additional Js thing. And we have a script section. We just create this simple MD And we say the element element is document dog get element bidi. Our text area had the i d contents. So we just say contents. That's it. One other thing I would do is I would say spellchecker false. Turn that off. The spell checker is not great. Yeah, I just like to turn it off cause you already got a spellchecker in here. What browser, anyway? Just use that.
|
|
|
transcript
|
2:33 |
are moved to markdown had some benefits, but it also has some drawbacks. One It dramatically slowed down the website we saw for a large page, maybe 20 Web browser pages worth of content. It took 6 700 milliseconds to render that that is way, way too long. And on a busy site, it's going really slow. And on a site, even if it's not super busy is not ideal. You want it much, much quicker or like 10 milliseconds, not six 100 2 800 milliseconds. We also saw that we can't in general take some part of mark down and imported and reuse it across different parts of our site. Also could do that with HTML, right? Just it's just not built into it. So that was another one. we wanted basically better performance reusability. We could leverage this libraries idea to get variable replacements, but we didn't use it, So not really a big benefit to us here. The idea, though, was to use this markdown sub temple climber. It automatically does the caching to make things extremely fast. It does the mark down conversion. It allows you to create content and then share it and reuse it through other parts of your site. All the things we're hoping for right here. And this open source project is super easy for us to use when we integrated into our site, Really all we had to do with two things. One for the HTML. We just say markdown sub template dot engine dot get_page and give it the URL at all we gotta do there. The other one is we have to configure this thing to work with the database and with logging and things like that. So, for example, we had to create a little class that drive from sub template storage, had to implement, get markdown text and get shared markdown and a couple of other very simple things. It might sound like a lot of work, but we already wrote all that logic with our CMS service, So we just need to kind of put it together, give it over to the markdown September library so it can say they have this URL what content belongs with it. Use this class here to go ask our database. What page content? If there is any, do we have for that euro and it gives it back right here. Then we have to make sure that we set this up in the web site in the library. It doesn't just magically know about it cause we created this class. So we have to go in our app, start up in the dunder netapp I with Diogo and say, create one of these markdown sub template stores and then just go from the markdown Septima library. Say storage thought, set storage. Give it this. That's it. Everything you see on the screen here is pretty much all we had to do to integrate it.
|
|
|
transcript
|
1:54 |
your Web app probably already has some kind of logging and if it doesn't, you should add it. The logging that we reason in our PyPI app and that we kept using in our CMS is logbook and logbook is really, really nice. It's super easy use it does the rotating bile output with the date lost the file name and creates a new one every day. All the kind of stuff you would hope that it would easily do. So we started out working with this and we brought us in to add additional logging to our CMS admin side so we could see what was happening there and it was really easy. But we also saw that the markdown sub temple library has logging and log reporting and diagnostic information coming out of it. So we also want to take the final step to go in. Integrate are logging system in this case, the logbook with markdown sub template. So it's all together in one place, and that was incredibly easy. We just wanted to change the level right just going to, print it out somewhere. We want to do that. We just go to logging from the library. We can say long enough. Get log and then log, not log. Level equals. We have this new Marais shin log level, so we say error, trace and bo warnings and so on. This will just let you control how much comes out of it, but not where it goes. If you want to control where it goes, just like the database we create this class that drive from sub template logger in this case and implement a few methods trace, invoke and so on and was gonna integrate with logbook. We're gonna create a logbook here and whatever the system asked us to do a trace, long as we check that we should do that. Trace right. Gonna check the level there, see what level it's that were to come in and just do the logbook, Walker, trace or log book blogger dot info and just pass it through. So this allows us to adapt whatever logging system we're using and capture the output from markdown sub template and wrap it in
|
|
|
transcript
|
1:12 |
That's when our close things out by saying thank you. Thank you. Thank you. Thank you for taking this course with me. Thank you. Supporting all the work that I'm doing around creating educational material. And by taking this class, you're absolutely doing that. So follow me on Twitter, where I'm @mkennedy. Listen to the Talk Python To Me Me podcast if you don't already. And I hope that you can take this concept of adding a CMS to a data driven Web app and bring those two together to create the best of both worlds and whatever you're building, we definitely have done that or us over Talk Python Training. So a training.talkpython.fm out of em when you go visit the public details about a course page or are pricing policy or environmental policy all many many of the non data driven parts of that website are powered not by something similar, but almost exactly the same thing that you see going on over here in this course. And it has been working beautifully, and I can definitely recommend it, put it into your application because it adds that capability that many people need to go and edit the website without changing the code without being a developer, and I think you'll find it super, super useful. Thanks for taking the course. See a line by.
|
|
|
|
49:47 |
|
|
transcript
|
4:07 |
One of the absolute pillars of web applications are their data access and database systems. So we're going to talk about something called SQLAlchemy and in many many relational based web applications this is your programming layer to talk to your database. SQLAlchemy allows you to simply change the connection string and it will adapt itself into entirely different databases. When you use a local file in SQLite for development maybe MySQL for testing and Postgres for production. Not really sure why you would mix those last two but if you wanted to you could with SQLAlchemy and not change your code at all. Just simply change the connection string. So SQLAlchemy is one of the most well known most popular and most powerful data access layers in Python. SQLAlchemy of course is open source. You'll find it over at sqlalchemy.org. It was created by Mike Bayer. And his site is really good. It has tutorials and walk throughs for the various ways in which you can work with SQLAlchemy. One for the Object Relational Mapper one for more direct data access, things like that. So why might you want to use SQLAlchemy? Well, there's a bunch of reasons. First of all it does provide an ORM or object relational mapper but it's not required. Sometimes you want a program and classes and model your data that way but other times you want to just do more set based operations in direct SQL. So SQLAlchemy lets you work in a lower level programming data language that is not truly raw SQL. So it can still adapt to the various different types of databases. It's mature and it's very fast. It's been around for over 10 years. Some of the really hot spots are written in C. So it's not some brand new thing. It's been truly tested and is highly tuned. It's DBA approved. Who wouldn't want that? What they mean is by default SQLAlchemy will generate SQL statements based on the way you interact with the classes. But you can actually swap out those with hand optimized statements. And so if the DBA says, whoa there's no way we're going to run this all the time you can actually change how some of the SQL is generated and run. While the ORM is not required I'd recommend it for about 80%, 90% of the cases. It makes programming much simpler, more straightforward and it much better matches the way you think about data in your Python application rather than how it's normalized in the database. So it has a really really nice ORM with lots of features and this is what we're going to be focusing on in this course. It also uses the unit of work design pattern. So that concept is I create a unit of work I make, insert updates, deletes, etc. All of those within a transaction, basically. And then at the end I can either commit or not commit all of those changes at once. This is in opposition to the other style which is called active record where you work with every individual piece of data separately and it doesn't commit all at once. There's a lot of different databases supported. So SQLite, Postgres, MySQL, Microsoft SQL Server, etc. There's lots of different database support. And finally, one of the problems that we can hit with ORMs is through relationships. Maybe I have a package and the package has releases. So I do one query to get a list of packages and I also want to know about the releases. So every one of those package when I touch their releases relationship it will actually go back to the database and do another query. So if I get 20 packages back I might do 21 overall database operations separately. That's super bad for performance. So you can do eager loading and have SQLAlchemy do just one single operation in the database that is effectively a join or something like that that brings all that data back. So if you know that you're going to work with the relationships ahead of time, you can tell SQLAlchemy I'm going to be going back to get these. So also load that relationship. And these are just some of the reasons you want to use SQLAlchemy.
|
|
|
transcript
|
1:35 |
When you choose a framework whether that's for a database or web framework it's good to know that you're in good company that other companies and products have already tested this and looked around and decided yeah, SQLAlchemy is a great choice. So let's look at some of the popular deployments. Dropbox is a user of SQLAlchemy and Dropbox is one of the most significant Python shops out there. Guido van Rossum and some of the other core developers work there and almost everything they do is in Python so the fact that they use SQLAlchemy that's a very high vote of confidence. Uber, Uber uses SQLAlchemy. Reddit, Reddit's interesting in that they don't use the ORM, but in fact they use only the core at least a while ago they were using only the core aspect of SQLAlchemy, that's pretty cool. Firefox, Mozilla, more properly, is using SQLAlchemy. OpenStack makes heavy use of SQLAlchemy. FreshBooks, the accounting software based on, you guessed it, SQLAlchemy. We've got Hulu, Yelp, TriMet that's the Public Transit Authority for all of Portland, Oregon the trains, the buses and things like that so they use that as well. So here are just a couple of the companies and products that use SQLAlchemy. There's some really high pressure, some of these are under you know if it's working for them it's going to work well for you, especially Reddit Reddit gets a crazy amount of traffic. So pretty interesting that they're all using it and we'll see why in a little bit.
|
|
|
transcript
|
2:14 |
Before we actually start writing code for SQLAlchemy let's get a quick, 50,000 foot view by looking at the overall architecture. So when we think of SQLAlchemy there's really three layers. First of all, it's built upon Python's DB-API. So this a standard API, actually it's DB-API2 these days but we don't have the version here. This is defined by PEP 249 and it defines a way that Python can talk to different types of databases using the same API. So SQLAlchemy doesn't try to reinvent that they just build upon this. But there's two layers of SQLAlchemy. There's a SQLAlchemy core which defines schemas and types a SQL expression language that is a generic query language that can be transformed into a dialect that the different databases speak. There's an engine which manages things like the connection and connection pooling and actually which dialect to use. You may not be aware, but the SQL query language that used to talk to Microsoft SQL Server is not the same that used to talk to Oracle. It's not the same that used to talk to Postgres. They all have slight little variations that make them different. And that can make it hard to change between database engines. But SQLAlchemy does that adaptation for us using its core layer. So if you want to do SQL-like programming and work mainly in set operations, well here you go you can just use the core and that's a little bit faster and a little bit closer to the metal. You'll find most people, though when they're working with SQLAlchemy will be using what's called an Object Relational Mapper. Object being classes, relational, database and going between them. So what you do is you define classes and you define fields and properties on them. And those are mapped, transformed into the database using SQLAlchemy and its mapper here. So what we're going to do is we're going to define a bunch of classes that model our database. Things like packages, releases, users, maintainers and so on in SQLAlchemy and then SQLAlchemy will actually create the database, the database schema everything and we're just going to talk to SQLAlchemy. It'll be a thing of beauty.
|
|
|
transcript
|
3:10 |
When you're trying to model something like PyPI a website with a database the clearer of a picture you have the better you're going to be. So let's look around this running, finished version. Remember this is not, even though it looks very much like what we built. This one is actually the finished one that we going to sort of be aiming for. Alright, and we're not going to look at the code but we'll poke around what the web looks like. And we could just as well look at the real one but lets look at this. So on any given package this is pulling up the package AMQP. And apparently that's a low level AMQP client for Python. OK, great I actually have never used this. We have a couple of things going on here. We have the name of the package the version, bunch of different versions actually a description, right here. We actually have a release history. So each package has potentially multiple releases. You can see this one had many different releases and we can pull up the details about different ones, and jump back there. We have downloads, we have information like the homepage, so right over here we go to GitHub, apparently that has to do with Celery. You could pull up some statistics about it. It has a license, has an author. So, remember up here we have a login and register so we could actually go login to the site or create an account just as a regular user and then we could decide as Barry Peterson apparently did, to just publish a package and then there's a relationship between that user and this package as a maintainer and is probably a normalization table. Also have a license, BSD in this case. And we want to model this situation in a relational database. Let's see how we do that. PyCharm has some pretty sweet tooling around visualizing database structure. So here we're going to have a package and it's going to have things like a summary and a description and a home page, a license, key words. Things like that. It has an author but it also potentially has other maintainers so we have our users name, email, password, things like that and then I don't have the relationship drawn in this diagram but there'd be a relationship between the user ID and the user ID and the package ID and the package ID there. So this is what's often referred to as a normalization table for many to many relationships. So that's one part and then the package, remember it has releases so here each release has an ID. It has major and minor build version a date, comments, ways to download that. Different sizes as it changes over time. We also have licenses that relate back there. And we have languages. So here, this is going to relate back to that ID right there. Finally we're not going to track any of this but there actually are download statistics about this. About downloading all these packages and the different releases and so on so we went ahead and threw that in there. This is what we're going to try to build but we're not going to build it in the database. We're going to build it in SQLAlchemy and SQLAlchemy will maintain the database for us. I think the place to get started is packages so let's go on and do that.
|
|
|
transcript
|
6:50 |
It's time to bring SQLAlchemy into our application and start modeling things in the database, and actually using a database. How cool would that be? The place to start, I think, is modeling the tables with classes in SQLAlchemy. That's not actually the order, the first thing that happens in order when you execute the program. We have to do things like create the connection connect to the database, make sure the tables are configured and match the stuff that we're modeling things like that. But conceptually, the primary thing we're doing is modeling the database with these classes, so let's start there. Now, I personally like to have a separate dedicated section for the various classes. So we're going to create a sub-package. So here we have our data and let's start by modeling package, we'll call it packages, something like that. So here's how it works in SQLAlchemy. We have a class, we give it a name. Typically its name should be singular but, you know, however you want. It represents a single entity in the database anyway. It's going to derive from something here which we have to define, do that in a moment. And then into it, we're going to put a bunch of columns so it's going to be like an int. And then we'll have, say this be a name this is going to be a string, and so on. The things that we put on the right here are special SQLAlchemy values and they serve two purposes. At design time, they tell SQLAlchemy how to actually create the tables. At run time, they're effectively this integers, strings, and so on. So lets start by importing SQLAlchemy. Sometimes you'll see this as sa to keep things short so maybe we'll do that. Now notice it says this is not defined so let's install this. Cause, it's actually not defined. While we're doing that, we can go over here and also put it in the setup. Alright, now let's try it again. Oh perfect, so that's great. So we want a column, and in this column we would like. Actually, we were going to hijack the name thing and just make that the primary key. Remember the name of the package has to be unique on PyPI anyways. So let's just make this an sa.string and let's say primary key is true. Okay, starts to feel database-y right? The next thing, this is just something I like in databases is always knowing when a record was created. It lets you look at things that were recently created or see them in order, things like that. So let's add a created date. A datetime. And we're going to expand on these columns and make them a little bit nicer. But let's just get the basic structure in place first. A summary, now let me try to tie these back. So if we go over to SQLAlchemy here's going to be the name or the ID. This is the summary, right there that little tiny short thing. So we'll come over here this is the sa.column. And then, this part down here that is a big fat long description. So we'll have a description as well. We're also going to come over here and we'll have this little home page. We're going to be able to click on that so we need to model the home page. Also a string, and a docs URL some of them have the ability to say here are the documentation. and a package URL. Also you'll see that these have authors and maintainers and then, here they have an author. So the author's Mike Bayer and Mike Bayers's one of the maintainers as well but so is this person, okay? So we need to model it having a dedicated author but then also maintainers. Now we could do this to a relationship or we could put it directly on there. Maybe we want to keep it even in case they delete their account. So I'm going to put the author information here and we'll use a join to get to the maintainers. Then finally, these all have a license. Now we're going to use, oh let's see if we find the license here. Here we go. It's MIT. We're going to use a similar trick as we did here we would like to show just this simple information just the name of the license and maybe a link to it as well. Which is just the same as the title basically. So what we'd like to do is we could set this up in a way where we have to do a join on a license table because we're going to have a set of licenses. But, if we make the ID also be the name and be unique why would you have two licenses with exactly the same name? We won't. So, because the name would be unique we could use this and then this could actually both be just the string but also the relationship. So that'll avoid one join and make our table a little bit faster. That'll be sweet. So one more thing down here we're going to have releases and we're going to have maintainers. But the releases and the maintainers requires relationships. So we're going to come back to that in just a little bit but right now, things are looking pretty good for our table. If I go and start working with SQLAlchemy and saying here's my package table well one it needs a base class for this to work. But on the other, it's going to create a table called Package as a singular. I personally don't like that I'd prefer to have plural names and maybe lowercase. So we can control how this maps, so the database by putting a __tablename__ here. And we'll say lowercase packages so on the table it's going to show up as lowercase packages. But when we have one of them it's going to show up as a Package like a class would normally in Python. The other thing is sometimes nice when we're debugging this you would like to see in PyCharm without actually expanding all the bits what package you got back, and so on. So we're going to add a __repr__. And we'll just return something really simple here we'll just return. Just the ID, so it'll be package request package SQLAlchemy and so on if we're looking at a debugger output or printing a list of these things. Something like that. So that'll be a little bit helpful along the way. Alright so here's the basic concept of what we want to build.
|
|
|
transcript
|
1:56 |
Now for SQLAlchemy to work right we need to put a base class here. It needs to be a special one. Every class that maps to the same database needs to use the same base class. You can have different ones, like if you have an analytics database, and you have a core data database those might be different classes but all the ones that go into one database they should be the same. Okay, so how do we do that? Well, we're going to define a class and it's really quite simple. You sort of create one and only one of them from SQLAlchemy. So I'm going to put that into its own separate file, now. I think this one totally justifies its own file. What I'm going to do here is pushing the limit of maybe this is a little too fine grained but there's only one and it's supposed to be shared. So I think what I'm going to do is, do this. Create a model base class and then we have to import SQLAlchemy.extensions.declarative I'll just say, shorts we don't have to say too much there just, as dict then I'm going to create a class called SQLAlchemyBase. This class is the class that's going to be the base class but instead of defining it this way we use a factory method out of this place here so we say, declarative_base like that. And that's it. This is now our base type. It gets created at runtime by SQLAlchemy and then, by virtue of deriving from it, it basically means we're telling SQLAlchemy, "Here's another class that you're managing." So for example, put that here and let PyCharm import it. So for the top, we have from model base, import this and those two lines are going to pretty much be the same for all of our types. And that's it, this class can now be loaded and saved from the database once we connect to it.
|
|
|
transcript
|
4:20 |
We define our class that maps the database we have our SQLAlchemy base class. Next thing to do is actually create that connection and configure the database. So again, a new file to organize that code. Call it DBSession. So this is going to serve two purposes it's going to initialize the access to the database and it's also going to manage this overall session this unit of work design pattern so hence the name. We're going to come down here and define a class called DBSession and we're going to give it two pieces of information. We're going to have a factory and we're going to have a engine. The engine is going to manage the type of database we're talking to and the connection and the connection pooling. The factory is going to be the thing that creates sessions on demand, okay and the rule about these is there should be one and only one of them per connection okay so that's basically a singleton unless you're having multiple connections to multiple databases, in which case you got to manage that slightly differently than I'm showing you here. You want to have a static method called global_init and then we'll just make sure we call this once and only once, so we'll say if DBSession.factory and it's already been called no problem So we're also going to need to take a DB file to the string. What we're going to do is we're going to use SQLite for this. That means when you set up this code and you run it you have no database to configure install, manage, etc. In production you probably if you're using SQLAlchemy you'll want to use some like Postgres or something along those lines that's just changing the connection string should be no problem but for here we're going to let them pass in a file and that file is going to represent just the actual SQLite file on disk. That's all you need for a SQLAlchemy connection. So it's probably prudent to do a little test here. Alright, now we know we have at least something that could be a file. Now let's define the connection string. SQLite always looks like this. sqlite:///<DB file> and I always like to print this out like here's my connection string. If this had a username password in it maybe I wouldn't exactly print that I'd print you know maybe not the password for sure but let's just go ahead and print. Connecting then like this connecting to DB at the connection string and then what we're going to do is we're going to create the engine. So we'll say engine equals SQLAlchemy.create_engine. Now it takes *args **kwargs which means thanks for the help, nothing sadly but what we can do is we'll pass the connection string here and then echo equals What do we put here, let's put false for now. If you would like to see every operation every bit of SQL that is sent to the database as it happens, print it out, change that to True it's a really nice debugging technique to see what's happening. Alright so because we want one and only one of those we're going to store that here and we also need while we're at it let's go ahead and create this factory and it'll just round out this thing here so we'll say DBSession.factory say SQLAlchemy.session.orm Better import that at the top too .sessionmaker say bind equals engine I think we're in good shape. Okay so this will allow us to initialize the connection and create this factory and then later when we want to actually create the factories we'll see there's a couple of evolutions or steps of improvement that will apply to this factory thing here as well but for now this is the sort of standard starting place so what we do is we come up with a connection string we create the engine based on that and we hold onto it, one and only one of them same thing, we create the factory based on the engine and this is going to manage both the connection string as well as the dialect, the type of database we're talking to because of that right there.
|
|
|
transcript
|
7:09 |
With our connection and engine set up it's time to create the tables. One way the wrong way would be to go to the database and actually start using the database design and modeling tools to just go and model the stuff. Because we've already got that right here. In fact, we need those to match exactly. So it's better if we just let SQLAlchemy do it. So, it's actually super easy here. Let's go down after we've done this bit and if we can import our SQLAlchemyBase which we can, it has metadata right there. And on the metadata there's no help from PyCharm here but it does exist when we say, create_all and pass the engine. So, if the database doesn't exist whatever connection string info we gave it here it will create it and then it's going to create the tables and the primary keys and the relationships and all that stuff based on all of the various types that derive from this. There's one really big caveat that's easy to miss here. By the time line 27 is run every single class that derives from it must have already been imported, so SQLAlchemy has seen it. If you import those afterwards, too late those tables are not getting created. So I'm pretty sure right now, the way this is working is it's going to be failing So we need to do something kind of like this. We need to go over here and say from pypi.data.packages import package, release and user, and whatever. Alright, so we got to do this for all of 'em. So we got to do it like this. Now that, expanding out of all the ones you need turns out to be super error prone so let's add one little trick here. And add one more file. Now let's call this all_models kay, and over here I'll say, well exactly that. So we're just going to list everyone here from packages, import package and we define release and we're going to import that and we define languages, we're going to import that and let's tell PyCharm "Hold on, no this, I know it looks like this does nothing," "but for the moment, we need to have this here." "It actually has an effect that you don't realize." "So thanks for the help, but not this time." And then over here, we can just make this a little simpler. We can just import it like that, and we'll put that little, you know "PyCharm, please ignore this." So that way, we can just model it right here and it doesn't matter where where we do this import but that's a really not obvious thing but you have to basically, before you run this import every single model or it's not going to work. However, with this in place and if we call this function, it should work. So let's go to our __init__ down here we're going to include the net routing let's have a init DB config. And we'll come down here and we'll just put that at the end. And this should be pretty simple so we'll say, "DB session," import that and we'll just say, "global_init," and we'll have to give it a file. What file do we give it? Well, let's make a little folder 'cause this is SQLite, we'll just make a little folder called DB and we'll put it in here, okay? If we were using, say Postgres, like I said that we'd just give it a regular connection string like here's the server. But we're going to need this, so how do we do that? Let's say, "DB folder." We'll use the os module, yeah? So come over here and say, "path.abspath" "of some stuff, we're going to say, os.path.join" And what are we going to put in it? We'll say, "os.path.dirname of wherever we are." So, we're going to be in the PyPI folder just __init__. So we want to be in the PyPI directory and then down here, we're going to say "The next thing we want is DB." And then the next thing we want is pypi.bin or let's call SQLite, how's that? Want that right there. And we'll just pass DB let's call that file. 'Cause it's not just the folder, but it's the file. Great, now if we run it we're not using the config for now so let's put an underscore probably need it later if we say "Store different DB settings in production" "and development" here. But now we don't need it. Alright, so when we run this we should see it print out a path that's located here and actually create the database files. You'll notice there's no little expando chevron thing here. There's no files in there. Let's run it. Well it didn't crash, that's a good start. It's creating this, you can see way down there. Now, if I go over here say "Synchronize." Oh look, look look look what we got! How cool is that? Okay, so, it's really nice that this is here how do we know what's in it? Did it actually create that packages table or did it not? Well, in PyCharm that's easy to answer. So we come over here and we can drag and drop this and it'll open up if, if if if it's a big if. So you got to go here once on your machine and go "datasource SQLite serial" and then notice here it has driver. It looks like it can update the driver files but sometimes it'll say you have to download the driver files 'cause there's no file. So we can download 'em again just to show you what that looks like. Alright, apparently that's updated. That's cool. We can come down here and expand this out in the schema and main and look! There's our packages. Primary key with an index ID. Right, there's that. We got a create date, which is a datetime. Our summary which is varchar. Our license which is varchar. There's a lot of varchar happenin' around here. But there is our database with our one table and notice it's named packages plural not upper case P package singular. You go over here, say "Select," "star from Packages where author email" look at that, beautiful. Beautiful beautiful. If for some reason you don't have the pro version of PyCharm you can use this app DB Browser for SQLite. Come over here and find the file. And you get the same thing, right? So here you go, it's not. I dunno, maybe it's nicer or maybe it's not quite as nice. I haven't used it that much but this is also another thing you can get for free. Just google DB Browser for SQLite. Either way, our database is all up and running. Now this is only the beginning of course but we've created our database and we've got a lot of stuff in place. Really all we have left to do is just to expand out all the other various tables we're going to work with.
|
|
|
transcript
|
4:01 |
So our package table came out pretty well. But notice, there's a few things that you might want in a database that are missing here. For example, we always have to set the created date explicitly, and if we forget it's going to be null, which is not great. Maybe this is a required field and we don't want to allow it to be null. I think by default they're actually not nullable everything but you can control those types of things. Default values. One of the really important things that people often overlook are indexes. Indexes are incredibly important for fast and high performing databases. The difference between a large set of data with an index and without can be a thousand times the query speed. So, it's pretty important to think about it. And in turns out to be really easy to do. The primary key one already has an index by default and a uniqueness constraint. Let's just start knocking out those additional requirements. Like, I want a default value here so we can just put a default. Now, you got to be really careful with this. It can go wrong if you just make a minor, simple misstep. So what we're going to do is we're going to use datetime. So we'll import at the top. We're going to use datetime. And we want to use now, okay? It's so easy to type that. If you type that, it is going to be very bad. What that means is, the default value for when everything's created is going to be basically, app start time. But if we omit this, and we pass the function not the return value of it, then the default will be execute that function, and get the time when it's inserted. That's what we want. Maybe we want the summary to be nullable so we'll say nullable as True. That means that it's not required. Something I want to leave for the description. Same with the homepage, the doc, and the package. Maybe we don't necessarily have an author name. Well, we might not have one actually for the e-mail but if we do, we would like to be able to search and say really quickly, show me all the packages that this author has published. So we come down here and say index equals True, which is really nice. And similarly, maybe we want to know show me all the packages with MIT license. That'd be kind of crazy, but if we want to ask that question having an index here is really important. Of course, these are going to be foreign key relationships when we get them in place, but there. Now this is the table that we really wanted to build at the beginning, just didn't want to overwhelm you with all the pieces. So watch this, if I run it again I'm sure its going to be amazing. It's now, we've done that create table. Let me refresh it, and hmm. Where are my relationships? Here's something you got to learn about SQLAlchemy. It will create the tables, it will not upgrade them it will not change them, it will not modify them. Once they're created, done. No changes. What do you do? Well, in this situation, you just go over here and you just delete the database. You just delete it, and it's gone and that works really well when you're just like really quickly prototyping, getting stuff in place. But if there's data there, if it's in production, that's not going to fly. So later we're going to talk about something called Alembic which will let you do migrations to take the database from one step to the next step, to the next step to the next step, and that works really well. But for now, in this step, we're just going to delete the data, and put it back. So you can go over to here and drop the table. It's gone. Rerun our code. And if we re-sync it, package is back, but this time notice that there's a little indexy right there and there. And if we go and actually open it you can see we have an index on author email, and index on the ID of course, and so on. I don't think, I guess the SQLite doesn't store the nullability. Doesn't have the concept of non-nullability versus nullability maybe here. That's fine, we connect something like Postgres it'll convert that over, and definitely store those.
|
|
|
transcript
|
3:35 |
With our package class mostly in place I've already created the other various tables that we're going to need. So we went through creating packages in great detail and we're not quite done we still have to put some relationships on it. But, let's just quickly look at the rest because they're exactly the same and it's not really worth taking tons of time to work it out. So downloads. We're going to have a download thing. Again, it derives from SQLAlchemyBase when I altered the name here. This is interesting. We have an integer, a bigint, primary key here and we're actually telling it to auto-increment. So that way, we don't even have to set it. It's just going to set itself right? That's great. Similarly for created date. So when we insert a new record we don't have to set those two values. But, for the download we got to store the release and the package and the IP address and the user agent. And we might want to do queries by these showing me all the downloads for this release. Count the number of downloads for that package. So we have an index on those. Languages, this is like programing languages like Python 227 or something like that. So we have a little bit of info here. Pretty straightforward. Again, we're using the ID to be both the name and the ID since it has to be unique. So, that will avoid one more join. Same thing for licenses basically here. Want to have a little simple basic information. Here we have the maintainer table. And this represents the many to many relationship between the user table and the packages. So we have one user can maintain many packages and one package can be maintained by more than one user. So here we have that information. Real simple. These we already did. Releases. This is going to be a release of a package. So the release is going to have an ID. More importantly its going to have a major minor build version and a date. It also has a URL to download that version and maybe a comment on what's changed as well as the size of that download. I'm going to put a package relationship in here but, that's not in place yet. We'll get to package relationships shortly. And then finally, the user table. So we have the ID which is auto-incrementing. And we have their name, their email. Hashed password, we will never store plain text passwords. Never! So, we don't want to just put password. We want to make it super clear that this is a hashed password. Again, when do they create their account? What's their profile image? And we'll keep a record of when they last logged in. Maybe we have a table, maybe an audit table but, for now, when did we last see these people? Have they logged in recently or has it been like five years? And that's it. That's all the data that we need. Over here in our database we just have the one. But if we re-run it. We go refresh. There are all of our tables. Perfect, right? So SQLAlchemy will make the new tables but if we had made a change to packages that change wouldn't be applied. Remember, that's migrations. We'll get to that later. Alright so here we are. We pretty much have this up and running and we've got all our data modeling done. The only thing we don't have in place currently are the relationships. That's an important part of relational databases, right? So we're going to put that in place and then I think we will have our models more or less than. Oh, one more thing I didn't point out but I did kind of infer before. Now that we define these new models we have to put them all in here. I actually try and keep them in alphabetical order so I can quickly look, oh have I added licenses? Let's see. Oh yeah there it is. You can end up with many of these. So this alphabetical order thing can definitely help. But every time we add a new class, it has to go here so the SQLAlchemyBase sees it that's why that create worked.
|
|
|
transcript
|
6:35 |
One of the core relationships in this model is that we have a package and packages have releases. A release has a package and a package has many releases. Okay. So let's model that right here. Now, SQLAlchemy has a way to build in these relationships which ultimately create foreign key constraints and relationships in the database itself. So we come over here and we can just say releases is equal to and we need to go import up here... some more stuff. We need to import the orm to explicit use that. I'll just say as orm... and down here we'll say orm.relationship. The first, again it's *arg, **kwarg which I don't know, it's a pet peeve of mine. There's just a bunch of keyword arguments. Let's just explicitly set them with default values but anyway, here we have, sum value the first thing we have to pass, the first positional argument is the name of the class that we're relating to. There. I'm going to put release. What we probably want is to have a certain order here. The way it's going to work is we're going to get a package back and it's going to have a property or a field which is a list that we can just iterate over so for, r in p.releases, things like that. Having some form of order on that is going to be really important. Either descending or ascending, of course we could sort it every time we get it back but it's much better to let the database do the default sorting. If we need to change that, we can. The thing that we're going to put here is we're going to say order by, equals. Now we could put two things here. One thing is I could say release and we got to import that, and we could say major version like that and that would be ascending or I could even say descending like this. That's going to show three, two, one but then there's other parts as well right? There's the minor version, if the major version matches we want to sort by that. This is pretty common to write like this but in this case what we actually want to do is we want to put this into a list. So we're going to do major and then minor, and then build. We'll leave the comma. So that's going to do the ordering. If we go over here and look, these all have indexes so the ordering should be nice and fast. There's not that many anyway but still, good. Over on the other side, we would, if we do a query for a package, we're going to get its releases but then on each individual release we'd like to be able to navigate this relationship in code in reverse, without actually going back to the database. We can say backpopulates equals package. That means over on the release, somewhere down here we're going to have a package property which we'll do more details on that in a second. But when we get one of these packages and we interact with its releases each one of the ones that comes back is going to have that set to the package that we got from the database. Makes sense? Okay. This lets us navigate bidirectionally which is really really important. This side of things, I think is done. The releases is a little more interesting. Let's go, how do we know that a release is related to a package in the database. Well, it's going to have a package ID is equal to some SQLAlchemy thing. Right, some SQLAlchemy column here. Now, this is going to be set by the relationship but this is a field or column in the database that has to be set, and it's going to be SQLAlchemy not string. That's the way that IDs are packaged right, if we go up here and look. This is a string, so that has to be a string there, right, those match. But in addition to being just a regular string it's going to also be, a foreign key relationship. We'll say SQLAlchemy.ForeignKey. When we did our relationship back here we spoke in terms of classes, the release class. When we talk about the foreign key we talk in terms of databases so we'll say packages, not capital p package, dot ID. That is going to store the relationship in the database but we also would like to be able to navigate it in memory and code, so here we're going to do orm again we got to import that. Come down here, and this will be a relationship... To the class package and it's going to back populate releases. Let's look at that over here, and it's going to back populate this so if we get a singular release it's going to go and we interact with its package then it's going to automatically do this right so this bidirectional nature and then we're talking about this class here. It can be confusing when you're working with these relationships when you speak in database terms when you speak in Python type terms but here's how we're going to do it. Now in order for this to have any effect of course we need to go over here and drop these two tables. If we rerun it we'll see if we got it right. Encouraging, let's look again. Now over here, actually if we look at releases... if we look at releases, you can see we've got package ID... is a relationship over to over to package.ID. Alright, we have that relationship modeled there which is pretty awesome. We have our foreign key constraint right there. From package, back, did it put it on the other one as well? No, just on the releases table but that's all we need. Now that's pretty interesting to see it show up in the database but what we'll see is if we can come over here and we obviously this is not going to work, alright. This is not really a thing but let me just type it out. So if we have p as a package that we somehow got from the database then we can say p.releases say for r in releases print r dot and then off it goes right, major version or whatever. This relationship will mean that we can do a single query to get the package and then we can just navigate this relationship. Similarly if we have this we can go .package, .ID if we wanted to print out the name right? And that would navigate these two tables in the database using our classes here and that's what we've built with our ORM relationship on both sides of the story.
|
|
|
transcript
|
4:15 |
Before we actually start using SQLAlchemy to insert data and query data and so on, Let's talk about some of the core concepts we've seen and some of the fundamental building blocks for modeling with SQLAlchemy. So we started with the SQLAlchemyBase. Remember, the idea was every class we're going to store in the database derive from this dynamically defined SQLAlchemyBase class. You can call it whatever you want. I like SQLAlchemyBase, but there's other you know, it's just a variable name it as you like. So we want to create this singleton base class to register the classes and types that go in the database. Remember, there's one and only one instance of this SQLAlchemyBase shared across all of the types per database. So for example, we're going to have a package, a release, and user they all derive from this one, and only one SQLAlchemyBase type here. To model data in our classes, we put a bunch of class level fields here: ID, summary, size, homepage, and so on. And each one of them is a column. SQLAlchemy.column and they have different types like integer, string, and so on. We can see some of them are primary keys and even if it's an integer they can even be auto-incrementing primary keys which is really really nice. And we can also have relationships like we do between package and releases. One really nice feature of databases is they have default values. We saw with our auto-incrementing ID our primary key we don't have to set it the database does that for us. So here we can pass datetime.now the function not the value, the function and then it's going to call that function, now whenever a row is created and set that value to be, well, right now. That's super nice. We can also do that up here with more complex expressions. So in the bottom one we've literally passed an existing function, datetime.now but above we wanted to define this default behavior in a more rich way. So we're passing our very own Lambda expression that takes the uuid for identifier converts it to a string and then drops the dashes that normally separate it into just one giant scrambled alphanumeric soup thing. You can create these default values by passing any function a built in one or one of your own making. You also want to model keys and indexes. So primary keys automatically have indexes we don't have to do anything there. That's got a uniqueness constraint as well as a indexes. This created one maybe we want to sort by the newest users for example. Well if we're going to do that we very much want to put an index on that. As I pointed out, indexes can have tremendous performance benefits. It's totally reasonable to have a thousand times difference performance in a query if you have tons of data on whether you have an index or not. Indexes do slow write time but certainly, in this case the rate of user creation versus querying and interacting with them is you know, it's no comparison, right? We're creating far fewer users probably than we are querying or interacting with them. We could also specify uniqueness. We didn't do that in our example. We can say this email we can't have two users with the same email. You know, emails are very often used to like reset your password. And if you have two users who's going to get their password reset? All of 'em? One of 'em? Who knows, none of 'em? So you might want to say there's a uniqueness constraint on the email to say "Only one user gets to use particular email" and that's super easy to do by just saying unique equals True. Finally, once all of the modeling is done we have to actually create the tables and it turns out that that's super easy. We import all the packages. Get the connection string and we create an engine based on the connection string and then we just go to SQLAlchemyBase to it's metadata and say create_all and pass the engine. Boom, everything is done. Remember though, this only creates new tables it does not modify existing ones. So if you need to modify it wait till we get to the Alembic chapter the migrations chapter or do it yourself. Or, you know, if you're just in development mode maybe deleting it and just letting it recreate itself. That might be the easiest thing that's what we did.
|
|
|
|
50:34 |
|
|
transcript
|
8:18 |
You can see we've defined our schema and modeled those in our data classes here and everything seemed to be working just fine. However let's see what kind of data we are having over here and we can jump to the console, do a little query okay get all the packages, 0 packages. Not so interesting is it. Well I guess we're going to have to insert some data. Now the reality of inserting data is we're going to need some web forms. We're going to need people posting data to the service and things like that. We're going to do that when we get to say the user section. But for the moment we need to bootstrap this whole project and get some data in here so we can show it, things like that. Along those lines, we're going to do two things. First of all we're going to write a little bit of basic code. And notice I've made a bin folder over here. Create a new little Python file called basic_inserts. Now in this basic_inserts what we're going to do is just insert a couple of packages and maybe some releases just to see how it works and then we'll go and actually use this little data to load up all the real PyPI data using exactly the structure that we have here. Great, so let's get started. Now notice we have two new requirements Python dateutil and progressbar2. I'll go ahead and install those. PyCharm is noticing that I've updated down here but I've updated the setup so we're going to need that for this load data thing but we're not using it yet. One thing we will need is we're going to need to initialize the database. So what we're going to do is we're going to come first import os and our DBSession. And we need to import pypi as well. So we're just going to go figure out the path to that file right there. Then we're going to call DBSession.global_init. We did that previously nothing new here but you have to do this at the beginning of every process is going to talk to the database. Great, so let's define the main method that we're actually going to use. I'll do the sort of main convention that Python uses for its processes. So that's going to initialize the database. And then let's just go over here and do a method I will call it insert_some_data. So we'll just say insert a package. So what do we want to do here? Well let's figure out what we have to set in order to insert a package. So what we going to do is we're going to insert a package and we're going to give it a one or two releases. So we'll just come over here and grab some of this stuff so we can see what we need. And let's just get started. So we're going to say p = Package(). We're going to allocate one of those like that. That's the one we defined we don't need to set the ID. Actually, sorry we do is not auto-incrementing like the others. So let's say id is going to be input package name and then the created_date. We don't need to set the summary. Summary is input. Package summary. We won't set the description or the home page of the docs for now. We'll leave that alone. Say p.author and also set the email here. Okay that's going to cover that that sequence set the license that's easy. Now we're going to create two releases. So what do we need for a release. Let's drop that stuff right there. In the release, the id is going to be set automatically. We need those. We have a created_date they'll be set automatically and I will just copy this over. So let's say r1 = Release(). So here let's set the version and the created_date will be automatic. comment, url, size I guess we'll leave those all alone for now. We'll set the size to a 100k. How's that. And we can do the same for release two. Technically don't need to call it release. Just keep the same variable name but just so it all crazy. Got a little bit bigger. Okay so we've created these in memory but that doesn't put them in the database. How do we put them in the database? What we have to use is what's called a session. So here's this unit of work design pattern as opposed to active record that SQLAlchemy uses. So we come over here and we say DBSession go to that factory and that creates our session. And then later we're going to say session.commit(). Assuming we want to save it. And it's somewhere in between we'll say session.add(p) for the package. We could also go over here and say okay r.package_id = p.id. And that would associate them in the database. But we could do something more interesting now we could say p.releases.append([r1, r2]) And just put them together in memory the way we would in code. And then this will navigate that relationship. All right. Well let's give that a shot. I'll insert a couple of these. Let's go and run our basic inserts let's see if we got things working right. So far let's go with a request. requests HTTP for humans, connect, writes oops misspelled it but that's alright MIT I don't know, we'll just guess to be 1, 0, 5, 6, whatever, 2, 0, 0. Now let's do one more of these. Let's go with SQLAlchemy the ORM for Python, Mike Bayer. I'll go with BSD. I've no idea of that's what it is but I'm just going to make this up. 1, 1, 1 and 2, 2, 5. Then lets just bail out go back over to our database. I want to run a select of packages. I think I got it open again. Look at that, here we have it. It's all inserted we have requests and SQLAlchemy both inserted today. We didn't set a lot of the details but we did set many of them. Got our licenses and those now the other interesting question is what about this? What if we go over here to over here and say releases and run the same query Look at that. We have the various releases and most importantly the package ID was already set. So that's really beautiful. Let us fully leverage the object oriented nature of this. We create the package packages contain releases. So we went to the releases and we put the various releases in there release 1 and 2 and we just called add for the package and it followed the entire object graph to create these relationships for us. So you get to skip out a little bit on thinking of all the ways your data is split up in SQLAlchemy and just think of how you wanted to focus and work in memory. Now these relationships can have performance issues and we'll talk about that when I get to querying on how to fix it because SQLAlchemy does have ways around the inherent performance problems you might get here. but it's a really really nice way of working and this is how we do inserts for data. Over here we create a session. We've allocated the objects. We just add one or more of them and then call commit. All happens successfully or with a failure right there. If we wanted to make an update we could do a query. Get one of these back from one of the sessions. Talk about query, do a query make a change to it and then call commit and that'd push the changes back. Okay so this is basically how we work inserting data. And this is the real simple one and that's how it works. Inserts in SQLAlchemy, create the objects add them to the session, called commit. Boom, Inserted.
|
|
|
transcript
|
3:52 |
You saw how to insert data, now let's go through the nitty gritty details of actually inserting all the data from real sources. So there is an API for PyPI I've used that API to get most of the top 100 packages. So for example, here's click. Let's look at that real quick. And I've downloaded this and it's from Armin Ronacher, creator of Flask. Here you can see the licenses and the languages in this funky format. The author info embedded in there. You see the license, it's not set here but it's set up here, so it's kind of a kind of confusing and tricky to make this work, but that's fine. So here's a home page The maintainers right now, there's no other maintainers set. The full summary and then here are a bunch of releases for it, right? Each release has comments and so on. Now, this data is not super useful to us in this format. There's not much description but the other ones... Let me just throw one in here so you can see. It's sterling, park, parse or an alternative there. Here you can see the description has a lot more a lot more detail, it goes over to column 1,614 so that's pretty long. Right, so what we're going to do is we're going to import this data so you have actual packages, releases, users, etc. to work with, how are you're going to do that? Well, I'm not going to leave that up to you 'cause that's pretty messy but what I am going to do is I'm giving you these PyPI top 100 JSON files right here. They're going to be just at the top of your repository right there. Now, over here we're writing basically the same code. Initialize the data base, get a session and what it's going to do is it's going to go through and check if and only if there are no users, it's going to load those files and it goes through and parses out all the users and then it actually saves them to the data base and then it goes through and finds all the packages, saves them to the data base, along with their releases and languages and licenses and so on. And it prints out a little summary. So right now there's no data and I actually deleted those other two releases I put in there. So let's run this and I'm actually going to run it outside 'Cause it has a cool little progress bar. So, let's go over here and say I'm going to activate our virtual environment 'cause we need the same packages and everything there. And then we're going to say "Python," copy that path and we're going to run that right here. Let's see how we do. Beautiful! It's got some extra junk that it printed out apparently but you could take that out. Here's the final numbers it found 84 users, 96 packages- from those packages we have 5,400 releases, 10 maintainers, 25 languages and 30 licenses. Cool, now let's just go over here and do a quick query to make sure that's in there. So if we run that again, now you can see there's tons of releases. This is all AMQP, they go in order basically AsyncIO view packages there's all the packages. Right, here's Tornado and so on. These are the popular ones. Really nice, so now we have actual data to work with. You're welcome to look through this load data. It's pretty interesting, how to take these actual real world data sets and import them using SQLAlchemy. So, we've got all this JSON data now we're putting it in our data base, it's a lot of yucky details about making it work so I'm not going to go through it. But, if it's useful for you feel free to grab it we now have data in our database. And all the inserts and everything was done just the way you saw in the previous video.
|
|
|
transcript
|
2:26 |
One of the core concepts of SQLAlchemy is this Unit of Work. Let's dig into that. The unit of work is a design pattern that allows ORMs and other data access frameworks to put a bunch of work together and then at the very end decide to go and interact with the database. Decide, now, we're going to actually save this data within a single transaction. So here we have a bunch of different tables customers, suppliers, and orders. They're all providing entities into this operation this unit of work. So maybe we have a couple customers one supplier, and one order. We've also maybe allocated some new one like we did with package and we're inserting that into the database. And maybe we've changed things about the supplier. We're updating those in the database. And the order is canceled, so we're calling delete on that. All that gets kind of queued up in this unit of work and then we get, so I'll call commit in SQLAlchemy syntax and that pushes all those changes which are tracked by the unit of work the so-called dirty records, right? The things that need to be inserted the things that need to be deleted the things that need to be updated, and so on. So we can use these unit of works like that. And the way we create them are with these sessions. So we've seen that we create these engines and the engine gives us this session factoring. That was all encapsulated within our DBSession class. We do this once, right? And then, every time we want to interact with the database we create one of these sessions. So we come over here and we call that session factory it gives us a unit of work, which is often called a session kind of treat this like a transaction. A bunch of stuff happens in memory, then it's committed. Maybe we add something, maybe we do some more queries maybe that tells us what we've got to do to add some more we could make changes to the results of those queries either updates or delete. All of that work has not interacted with the database. In fact, other than the query there's not actually been any interaction with the database. This add doesn't actually add it to the database. It just queues it up to be added and when you call commit that commits the entire unit of work. Don't want to commit it? Don't, nothing will happen in the database. There will be no changes to your data. And that's how the unit of work pattern appears and is used in SQLAlchemy through this session factory, and then committing it.
|
|
|
transcript
|
5:02 |
Here we are back at our demo app and remember, this is all being driven with fake data but we're about to change that. Notice these 0 projects, 0 releases, 0 users. Not so amazing and here, these are just things that we've hacked in here. So our goal during this video, this lecture, is to actually fill out of those pieces right there. So first of all, where is it happening? Let's close some of this stuff off. Right here we're returning the test packages and in our template, we literally just have zero, zero, zero. So first of all, we need to pass that data along. So let's say package_count, release_count, user_count is zero and then we can use these over in our template. So we can put 'em like that. We could actually get a little better format if we do it like so. Like this, that way we'll get comma separators or digit grouping there. So do the same for releases and users. Let's rerun it and see how it works. Ooh, releases_count. Release, singular, count, it didn't like that. Amazing, it's still zero but now it's coming from that place. We can see if we were to put something here like 10,000, remember you've got to rerun it for the Python code to change. There we are. Now we have 10,000 projects, awesome. So it is being driven with that data. Now our goal, of course, is not to type zeros here but to go and get the data from the database. There's two ways we can do this. Well, there's probably infinitely many ways to do this but there's two obvious ways in which we can do this. One obvious way would just literally be to start writing queries inside this home index. That is not the way we want to do things. It makes it hard to test our code. It makes detangling the controller logic from the data access logic problematic and so on. So a pattern that I've settled in on is putting what I call data access services and sort of grouping them by their roles. So what we're going to do is we're going to come over here. We're going to define I guess a Python package. We'll call this services and these are not external services these are the data services I'm talking about and let's go and add Python file called package service. In here we can have some functions, def. Do a release count and let's take something similar and we'll put that in and do a user services well they're going to do many more things than count of course, but this will get us started. All right, so up here we're going to save from pypi.data, import, oh not data, sorry. services, ah, it looks like I made that in the wrong place, oops. Okay so we'll import this and then we can come down here and we can just say, .package_count and release_count and we'll do the same for users. User service, okay? Now, I think it returns None, which is probably going to crash, so let's go and actually implement these. All right, so they're all going to be basically the same. In order to interact with the database, we need session right, so we'll say session = DBSession.factory like that and later, we're going to just call close on the session. We don't actually have to do anything and we can just skip it. I think it'll get garbage collected straightaway. So we want to do a query so I'll return session.query and what do we want to do a query on? Well that's on packages, so we import that and we could do a filter. We could do an orderby but really all we care about is a super simple count. That's pretty easy, right? See the release and let's go do the user. All right, run it again. This thing should work. Let's go refresh and look at that. How many packages did we import, 96. How many releases do we have, 5,400 with 84 users, awesome. So everything is in place and now we can start doing things like get our new releases by just simply adding one more function over here. So we'll do that later but everything's coming together and our little data access piece, well it's working really nicely.
|
|
|
transcript
|
6:12 |
Now it's time to write another query. Actually we're going to write a couple queries to do something interesting and this actually might be the most complicated thing we do in the entire website. But, yeah you'll get to see a lot of stuff in action. So let's look over here real quick, here's our homepage. We're now driving that little slice out of the database. But remember this, this is just our fake data. So we want to actually go get the latest releases and then correlate those back to the latest packages and then show them here. Okay, how do we do that? Well, we're going to write a function. We want to say how many releases we want. So, we'll have a limit by default that limit is going to be 10. And it's going to return a list of package. List comes out of the typing model and the package that we already have. As always, everything starts like this and then we're going to return something down here at the end. So what happens at the middle? Well, the data model that I have chosen which was the most sort of naive and straightforward one maybe isn't the best for this site. Maybe it would have been better to have a little information on the package itself about when it was last modified but, it doesn't matter. What we're going to do is we're going to go get the latest releases find out the package IDs those correlate to and then we're going to go and get those packages out of the database. Great, so how do we do that? First we say releases is going to be and we're going to do a query. And the way that queries work is you to your session and you say I'd like to create a query based on a particular thing. Here we're querying Release. Now we can do where clauses like this, filter. We can do orderby. So we actually don't want to do a filter. We just want to say show us the newest ones. And whenever you put some sort of qualifier here like a filter or a something that you're sorting by you use the type name. Release. and then what are you going to order by? Created date descending. Now PyCharm gives a warning that says descending doesn't exist. Nevermind it definitely does. That is going to give us back the releases. And we probably want to limit those by something. We don't want to get every release that's going to be a lot. So we'll say limit, we don't know for sure if maybe there's some kind of release done really quickly on the same package. So if we want to be sure that we give them say 10 or however many they're asking for we should probably double this or something. So I'll say the limit times two. And that's because we could have a really quick release of requests and then another one of requests. And then, you know we'd have two more than just the 10 releases. Actually get the 10 distinct packages. So we've got that. Now, what I want to do is come up with just the package IDs as a list of strings. I'm going to do that with a simple list comprehension. So say r.package_id for r in releases. In fact, if we wanted to do it I could even do it as a set comprehension. and that would give us distinct packages so we don't have to check for them existing twice. Beautiful. So, we've got the latest releases and now we've converted those to the distinct set of the latest package IDs. Now all you got to do is actually get the packages. I just realized my little trick here is going to be great but we're going to need packages in order as well. So let's do this. So now we need to do a query so we go back to the session. Go to query and this time on package. And how do we say I would like all the packages that are in this set of package IDs. Turns out that's super easy. Say filter package.id.in_ Because in_ is a keyword they say in underscore you give it package IDs. That's it. That's going to give us all the matching packages. Now, we need to preserve the order. So, if all we wanted was the packages we could just kick those back. But remember, we asked for more than one so we don't get duplication, things like that. So, let's go and actually turn this into a quick dictionary. p. based on the ID. Do a little dictionary comprehension on that result and then finally we'll get these back. so we're just going to put stuff into this little results array right here and we're going to do it in order. There's probably a cool join way if I was better at data bases I could do that here but we're doing it this sort of convoluted way and it's going to work fine. Maybe not the most efficient, but not too bad. Alright, so we've got our results going through the releases in order and adding the packages in order and then we're adding them back. So this should work, but we're not calling it yet. Lets go over here, remember our get_test_packages? So we'll say, package service, not latest releases. Now, this is also not going to work because if we go over to our template it was using that fake data which had names. We don't have names, we have IDs. We actually do now have a description so let's put that in there. p.summary in here. Alright, let's give it a shot, see how we're doing. Here's where the stuff goes, we run it, Boom! Sweet, look at that. We've got 1, 2, 3, 4, 5 6, 7, 8, 9, 10. Exactly like we asked for. Awesome! So now we've got our packages right here. It looks like awscli was the most recent release out of the ones that we have. And now if we click on it, well it doesn't take us anywhere. Let's do one more thing. We have this ID here, and lets fix r href. This is project/{id}, refresh Boom. That page needs some help. But this page, this page is done. This is awesome.
|
|
|
transcript
|
2:10 |
So far we've seen our homepage is looking really sweet. We don't have that much data yet but it is data driven and this is coming out of the database. However, when we pull up the details for one of the packages under project/{package_id} well the details are not so much. So that's what we're going to focus on in this video on how to fix this. Now, the actual design for this page remember, remind you what this looks like it looks like this. It's got this little install instruction whether or not it's the latest version the ability to see all the releases the details, the homepage, the maintainers and so on, and so on. All of this stuff. It turns out the actual web design to do all that would take quite a while and we already spent a ton of time back in the adding design after the bootstrap chapter that we already did on the homepage and this is really pretty similar. So what I'm going to do is just quickly talk you through what we got here. So here is some more HTML. We're using the same, sort of, hero concept. This time we've got that little install bit. Whether or not it's the latest release and how to switch from that. Same little stats. Here instead of having the numbers though, we have the summary. And the maintainers and we have the side bar navigation thing. And then somewhere down here we have the project details. And we're using structured output HTML like stuff. Now if this was just marked down to be real easy to convert it to HTML and actually show it properly formatted but because most of it's restructured text and I haven't found a good library for that I just threw it into a pre so we can just read it, all right. So it's not going to be perfect but it's close enough. So with this in place, you think we could load it up but in fact, if I rerun it here it's going to run into some problems. 'Cause we don't have the data. Right so wait hold up, we need the actual package object from the database. You just gave us a fake name. This is not really the package object. Our goal will be to implement the data access layer and pass the right amount data over make this view happy, right. So working our package service and our controller.
|
|
|
transcript
|
6:43 |
We have our design in place but we don't really have the data being passed. Let's go fix that, so if we go over to our controller here we're just passing package name. But we actually have to pass a whole bunch of other stuff. So let's start by treating this for real and let's go over here and say package. It's going to be package_service, and find_package_by_name. Alright well that doesn't exist, does it? So PyCharm can write it for us, thank you. And this is going to be a str and it's actually going to return an optional package. Optional comes from the typing library. Okay so, what are we going to do? What we always do when talk the database. And then go here. And we're create a session, and then we'll be able to return some result of a query. Turns out this is super easy, remember the package name is also actually the ID and maybe want to strip off anything like spaces, or make this lowercase but we're just going to just do the query with it. Assuming everything comes together, so we'll just say give us a query of package, and then we're going to filter on the package.id == to package_name. What do we get if we do this? Well we get one or zero packages of course but what we actually get is a cursor into the database. Cause, it has no way of knowing that that means just one so if we want to make sure we get just the one we'll say first. So first, or None if it doesn't exist. Instead of returning like a query set thing we're going to get actually either the first package or nothing if the name doesn't match, hence the optional. Okay so now instead of checking for this package name we'll check to make sure the package is actually found. So there's a few things we're going to have to put here and it's going to be a little complicated it's going to get more complicated before it gets better. Okay, so go over here and pass the package that's not needed anymore. Now in order for this to actually work we're going to have to, let me point at some pieces here we're going to have to come and indicate whether it's the latest version, and if it's not which version it is here is the numerical value of the latest version and whether or not that numerical value is the latest, okay? And by the way, if it turns out to not be the latest we'll get a different install statement right there, okay? So, for that we got to return the latest version. Now this is the part where it gets messier before it gets better. I'm going to show you a way to vastly improve this but it adds another layer on top of things. So first of all let's just come up with the details here and then we'll clean it up in another section under validation. So we'll save the latest version we're going to default this to zero and we'll say if package.releases, remember this? Our releases' navigating that relationship. Now, right now this is going back and doing another database interaction which is not terrible but it's not awesome. We'll fix that in a minute. So we'll say r equals, let's call this latest release we need the latest version to be set to nothing. An empty sort of nothing value or the real version but we're also going to need, if that exists there is a latest release we'll actually need that object. So I'm going to say this is None. I'm going to pass that in a second. Alright so the package has releases the latest release is going to be the first one, why? We go over to the package class, notice we're sorting descending by the highest version number. Okay so it means the zeroth one is the latest release. Have the latest version text is going to be alright pass these along, it's kind of big. So let's wrap it, and we're getting close. We're also going to need to pass the maintainers we haven't dealt with that yet. So, I'm just going to pass that as an empty list so it doesn't crash. And the other thing we need to discuss is is this the latest release? And I'm just going to say it is for now remember the ability to navigate to different versions. We're just going to say is latest is true, for the moment. We don't actually take the versions here under these details exactly but down here when we look at the released version. Pull up the details, here we're passing that. So we'll come back to that. I think this might be enough, so what are we going to do? Going to go to our super simple query make sure we got something back. If we didn't, must not be found. Come up with the various data here's a little default. If we actually do have releases we'll put those here. I'm going to return these values. So one more thing we'll need when we get the more complicated bit but we're just going to say that our current version we have out there is this, is the latest version. Oh, look at that. Alright let's do quick comparison. Real, fake, real, fake. Looks like our, oh our fonts maybe are not the most amazing here we might not be bringing those in. But nonetheless, it's close enough for what we're doing. And notice here's our description right, if we could transform this restructured text that would be better, but it's not. Here's our project description, our release history. I think we might need to put a wrap there. Got the home page. Here's the awscli, here's information on the status here's the license, here's the license again. Here's all the extra metadata. So it's looking pretty good, and here our latest version. Well, it's good, it is the latest version. We're also missing a little CSS, hold on I'll fix that. There we go, now we got that wrapping and everything. Looks a little bit better I just forgot to move a little CSS over. Like I said, we're skipping over the design. It's very very similar to before but just needed a few more styles. Alright what do you think? Pretty close, again it's not exact like we don't actually have the copy feature but I think it's close enough for our little demo app that we're building. Here's the summary that was entered in the database. Here's the package ID, here's the latest release. Here's the date of the latest release that's those kind of are why we actually needed the object. And yeah, everything looks really good. So I think that's pretty much working. Let's just review it real quick here. In order to do this, all we had to throw in a filter and say package.field or column ==. I know Django and Mongoengine have equals here but in SQLAlchemy, you put the equality statement here. So you can do greater than and stuff as well. So ID equal equal the value and then to get just one of them first. And the rest was just passing the data off to the template.
|
|
|
transcript
|
7:07 |
Now, to see what I'd like to show you in this one. It's time to finally look at this echo. So far it's been false, but let's set it to be true. And rerun our code and we see a whole bunch of stuff shoot out. Look at all that. So, what we're doing is actually, SQLAlchemy is checking for the existence of various tables like downloads, languages, releases and so on. And then our app finally starts. Alright so this is when we initialize our database stuff. Now, let's go over here and load up this page. Works great. But notice all the different statements. We have over here a begin, select package stuff from packages, where package ID is some sort of limit and offset. Okay so this is getting you can see it's doing the query for the first awscli, right. So, offset is 1, sorry, offset is 0. Limit is one. Okay the thing, that's first. Great. Then, we go back to the database again and we select release stuff from releases where package ID equals some parameter. That parameter being the one we passed. And we order by these three things in that order. Two operations. Not hugely bad here. But imagine, you got a list of these packages and you looped over those packages and interacted with their releases. If you got 20 packages you're doing one query to get the 20 packages and then you're doing this query separately, 20 times. So 21 operations. That's the so-called n+1 problem which is a common anti-pattern in terms of performance for ORMs This lazy loader's nice, but if you know you're going to interact with releases, there's something we can do better. So let's turn this into a single query that would solve the n+1 problem. Great, now we're getting one package so it's not terrible like I said, but the same technique applies regards of how many you're getting back. Alright, let's have a look. So we go over here, and we have this nice, clean bit of code on line 42. Give me a query, filter it like this, first boom. However, for what we're about to do we need a little more space. So let's put some wrap in here and here and we're going to come over and say we would like to go options, and we want to call this thing subqueryload. We're going to import that from the ORM. And what we do here is we're going to put the relationship to be loaded. So package.releases. So what are we doing? We're telling SQLAlchemy, go do this query and anything you return also go ahead and use a subquery to pull out all the related releases of this one. You could also do a joinedload. I think subqueryload's a little newer and fancier but they both would accomplish more or less the same thing. We have our filter again and first. So now, if we run the same thing again we should see one, more complicated but only one contact to the database. There it is. And let's try it with joinedload. I think actually joinedload might be better here. Try again. Clean that up. There we go now we're down to one interaction with the database. That's what I wanted after all. So, we come over here and we say select the package stuff here from and then we're doing another, sort of left outer joined on releases, to give us that. So one interaction with the database. It echos out to I think a standard error. And then, just standard out. But now we've got it down to one database interaction and that's better. So you can either use subqueryload or joinedload and either will work. Okay, so, let's look at performance. I guess we haven't really talked about performance. I'm going to go back and turn off echo. 'Cause we don't want to trace out a bunch of stuff. So let me do this query a bunch of times. Now, just to be fair, over here. There's not a tremendous amount of data. I mean, there are 5000 releases but only 96 projects. It turns out, that even with tons of data we can get really good performance. But let's pull this back up. Have a look. So all that stuff happening is 62 milliseconds. Pretty decent. Let's see if I hit it a few times if I can get it better. Eh, 68, it looks like that's pretty much it. Check this out, we have our render. And we actually have SQLAlchemy. Here's that query, holy moly. That is quite the query. I guess it would be interesting to try the joinedload as well and see if we get any performance difference. Another thing, just while we have this pulled up here. If we go turn on performance and go back to history. And then we refresh this a few more times you can actually pull up performance if I click on the right part here. Pull up performance is slower because we're asking it to do more work, but look at this. Built-in profiling, so. It turns out, where does it start to get slow. Find package by name. Takes about that long, okay. Apparently to do that query, it takes a little while. Let's go back and just, you know since now we can measure let's go change a few things here. Let's try this subqueryload first of all. Do that a few times, pull up the latest. Now, this number's slower than the original but it actually, that's only because the profiling was on let's turn that off. And notice, over here we now have two SQLAlchemy interactions one for releases and one from packages. Let's try again. 20 milliseconds, how 'about that? Subquery join is actually, subqueryload is actually faster by quite a bit, that's three times faster. I guess the final thing to check would just be what if it weren't there? Let's try it one more time, and just do the relationship. And look at that. 16 milliseconds. It's a little bit of a interesting case, right? That we put that performance speed up in there and it actually made it slower. It just reminds you, always, always measure. So, I'll put a little comment here so you have that, like so. Let's put it actually over here, above. The reason I think this is faster is we're not suffering at all from the latency of talking to the database. In a real database, that probably would be slower because you've got a few milliseconds between the interactions. And this whole n+1 problem, if you have a hundred well obviously the join is going to be faster. But I guess just two independent queries is faster in this case. So, you know, measure, measure, measure. See what's up.
|
|
|
transcript
|
4:03 |
We've written a few interesting queries and before we're done with this application we'll write a couple more. But let's talk about some of the core concepts around querying data. So here's a simple function that says find an account by login. We haven't written this one yet but you know, we're going to when we get to the user side of things. It starts like all interaction with SQLAlchemy. We create a unit of work by creating a session. Here in the slides we have a slightly different factory method that we've written, but same idea we get a session back, we're call calling it s. We go to our session or we say s.query of the type we're trying to query from, account and then we can have one or more filter statements. Here we're doing two filter statements. Find where the account has this e-mail and the hashed password is the one that we've created for them by rehashing it. And now we're calling one, which gives us one and exactly one or none items back and we're going to return that account. So, if you actually look at what goes over to the database it's something like this. Select * from account where account.email is some parameter and account.passwordhashed is some other parameter and the parameters are Michael Kennedy and ABC. You'll see that you can layer on these filter statements even conditionally, like you can create the query and then say if some other value is there then also append or apply another filter operation so you can kind of build these up. They don't actually execute until you do like a one operation or you loop over them or you do a first or anything like that. So here's returning a single record. Also, it's worth noting that the select * here is a simplification, everything is explicitly called out in SQLAlchemy. The concept is just give me all the records or give me all the columns. If we want to get a set of items back, like show me all of the packages that a particular person with their email has authored. We would go and again get our session. We would go and create a query based on package. We'd say filter, package.authoremail equals this email ==, remember double equal and then we can just say All and that'll give us all of the packages that match that query. This one's not going against a primary key so there'll be potentially more than one. Of course this maps down to select * from packages where package.authoremail equals when you know the email that you passed. Super simple and exactly like you would expect. So the double equal filter, pretty straightforward. There's actually some that are not so straightforward so equals obviously ==, user.name == Ed, simple. If you want not equals, just use the not equals operator. That's pretty simple. You could also use like, so one of the things it takes some getting used to is these SQLAlchemy descriptor column field value type multi-purpose things here is they actually have operations that you can do on them when you're treating the static type interacting with a static definition rather than a record from the database. So here we say the usertype.name.like_ or in_ or things like that. So, we saw the descending sort operation on there as well. So, if we want to do the Like query, this is like find the substring ed in the name, then you can do .like_ and then pass the % operators as you would in a normal SQL query. IF you want to say I want to find the user whose name is contained in the set, Ed, Wendy or Jack then you can do this .in_, remember the underscore is because in is a key word in Python, so in_. If you want to do not, not in, this is kind of not obvious but you do the ~ operator at the beginning to negate it. If you want to check for null, == None, the and you just apply multiple queries, the or doesn't work that way. If you want to do an or, you've got to apply a special or operator to a tuple of things. So, here are most of the SQL operators in terms of SQLAlchemy. You can do a lot of stuff with this. It's not all of them, but many of them.
|
|
|
transcript
|
0:44 |
Databases are really good at filtering and ordering. Here's a function, find_all_packages and the idea is I would like really a list of all the packages in the database showing the newest ones first and the oldest ones last. So we're going to do a query on package and we don't do any filtering 'cause you know, we said in the name, we want them all but we are going to do an order by. So we say query a package.orderby and then we always express these operations in terms of the type, so package.created. And if we just said package, dot, created it would order ascending by the created date but we want descending, so we go to that descriptor created and we say, .desc, we call the function to reverse the sort and then we just say give us all the packages, here they come.
|
|
|
transcript
|
0:49 |
In order to update existing data, we start like we always do, we get a session, and then we retrieve one or more records from the database. Here we're just getting one package. We're going to get this package back, and if we make changes to it, so we set the author value to a new name and we set the author email to a new email SQLAlchemy will track within the session that that record is dirty and it needs to be updated because we've changed some fields. And then, when we're ready to actually save it, push all the changes back. I could apply this to as many entities as we'd like it doesn't have to just be one, then we're going to commit the unit to work, and it's going to look at the changes, do all the changes in a single transaction, back to the database. We use the unit of work to do our updates just like we do the inserts.
|
|
|
transcript
|
1:59 |
We saw relationships are extremely powerful and let us imagine as if our code and data were just connected almost hierarchically the way we would in a regular Python program connect it not split apart like we do in a database. The way we define these we had an orm.relationship field to the class. So here we have our releases say the relationship is against the release type that we're speaking in terms of SQLAlchemy entities not database and then we're going to do an orderby. This could be a single thing or a list. Probably an integer actually and so we're going to pass that in. And then we're going to say it back-populates package. What does that mean? If we want this relationship to work in both directions. So we have a package we can see the releases and if we have an individual release we can see the single package that it corresponds to. So over in the release we're going to do the package ID value to actually store the relationship like we would store any value that's a string or an integer whatever it corresponds to in the other field. And then we're going to say this is a foreign key and in the foreign key part we speak in terms of database packages.id But then we also would like to establish that relationship so we say there's orm relationship for the package type form released back to the package. And it back populates releases and it's called package. So you can see the symmetry here. Not too hard to set this up, once you have an example. Put them side by side, you go okay here's where I fit all the pieces for my particular data set and then you saw that when we load a package it doesn't actually load the releases unless we interact with it. So if we touch it, it would go back to the database and do the query. We also saw that if we create new releases and put them into the release package.releases what becomes a list and commit those changes that will actually insert the releases. We work on the same but in reverse as well if we had said a package on a release. So it's sort of bi-directional in that sense.
|
|
|
transcript
|
0:37 |
We started off this chapter by demoing how to insert data. Let's actually summarize now here at the end. So again, we're going to create a session which is the corresponding unit of work bit of syntax in SQLAlchemy. Then we're just going to allocate some objects so here we're going to create a package and set its ID and its author maybe create some releases, set the release not package value, other properties similarly release two, set its package. We're going to add the package, call commit whoosh, all three of those things because of the relationships get inserted into the database. Super easy.
|
|
|
transcript
|
0:32 |
I did mention this at the very beginning of the course but if you want to dig deeper into SQLAlchemy hear the backstories of the design patterns that whole concept of the unit of work and why Mike thought that was great and brought it in you can check out talkpython.fm/5 that will take you over one of the very first Talk Python episodes I did with Mike Bayer. And you can listen to the whole story about how he created it, how it's evolved over time things like that. So if you want to dig deeper, here's a quick and easy way to do it while you're driving or doing chores.
|