|
|
|
14:24 |
|
|
transcript
|
4:51 |
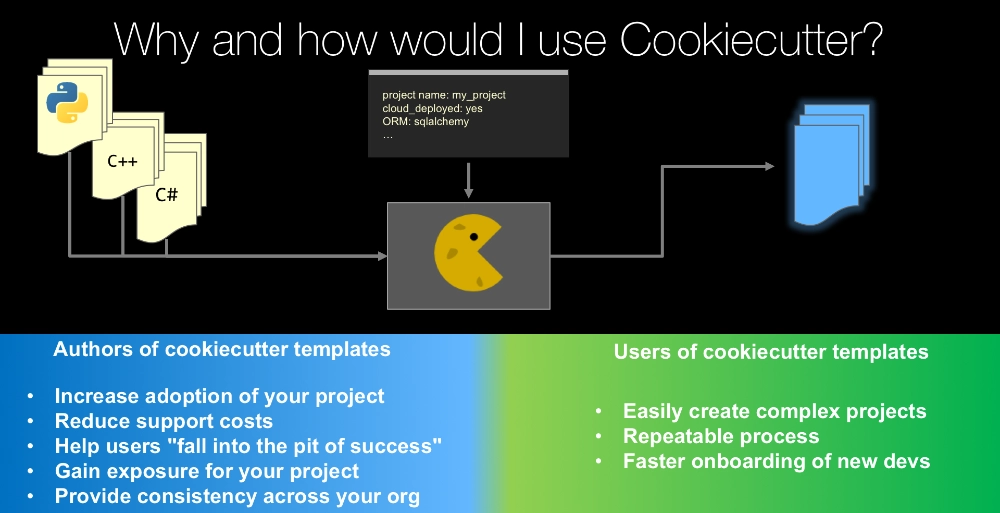
Hello and welcome to "Using and Mastering Cookiecutter". I'm really excited that you are taking this course and that you are interested into looking into Cookiecutter. It's a fantastic tool and it's really powerful, I think you are going to learn and appreciate a lot of that power, in this course. Let's begin by answering the question what is Cookiecutter? Well, we can create a template, a set of files for any given project, this could be a Python application, this could be an Apple application, this could even just be some scientific research project template that doesn't have any code at all, we're going to create this template and we're going to feed it to the Cookiecutter engine. Now, this could be Python, it could be C++, it could be C#, the language of the template is irrelevant, it's about managing files and resources and creating project structure from some source template and asking the user a certain number of questions, so things like what is your project called, are you going to deploy this to the cloud, what ORM are you going to use and so on. So we are going to take the template and feed this information into Cookiecutter and out pops a brand new shiny, ready to start project. So that is what Cookiecutter is. It takes templates called Cookiecutters, and it generates via asking the users a couple of questions, project templates for any type of app that you want to get started with. Cookiecutter was created by Audrey Roy Greenfeld, back in 2013, you may know Audrey from the Two Scoops of Django, she and her husband Danny wrote this book and it's very well known Django book, you can read Danny's announcement of the Cookiecutter project here at this url, when they first launched it, it will give you a little background information on what Cookiecutter is and why they created it. So, when and how do you use Cookiecutter? I think there is two cases, on one hand you might just be a user who wants to just consume Cookiecutter templates, I want to create a new Django project that is set up just so based on a Cookiecutter template, I want to create a new Pyramid web app based on a Cookiecutter template. So, for these types of users, there is certain benefits, first of all, you can easily create very complex and intricate projects, the Cookiecutter can be set up to create the project however it needs to be done, and all you have to do is answer a few basic questions, and instead of worrying about what files you have to create, how they are relatively located to each other, things like that, the formats, you just answer a few questions and boom, you have some new app ready to roll. It makes the process of creating projects very repeatable, and that is nice. It also is faster onboarding for new developers, so instead of teaching developers all the things you need to know about the layout and structure of a project, you can just say run this command, Cookiecutter (space) my template name, and boom, they are ready to go. On the other hand, you might want to create Cookiecutter template, maybe you work at a company and you want to create a Cookiecutter template for your team or your organization, or you might run an open source project where you want to create a template for users of that open source project. So here you can possibly increase adoption of your project, maybe it was something that was kind of hard to get started with, and now because you have a simple template to do so, it's easy, you can reduce support costs or support effort right, you won't have to answer those, well, how do I get started, how do I do this thing, or how do I set up that to get this thing to run, your Cookiecutter template will get them beyond the initial setup steps so you basically can skip a bunch of those questions and challenges. You can help users fall into the pit of success, by that I mean you can setup your project, so that everything is set up in the best possible way before they even start to touch it, and give them the guidance to get going, not just creating the file structure and so on, but actually asking them the right questions. And as you will see in the programmatic part, you can even wrap this up in a little application, that makes this process of creation even nicer. And, you could gain more exposure for your project, if it's an open source project, you could get that project listed in the Cookiecutter documentation saying here is a way to create this cool project, people might look at that and go oh, I didn't know that existed, let me check that out, and of course, it will be easy for them to do so, because they just have to run your template. Finally, if you work inside a company, this can provide a lot of consistency across your organization. If the way all new projects that your company created is by running a certain Cookiecutter template for your technology, then you can be sure that there is a minimum level of consistency across all those projects and if you have a lot of projects, a lot of developers all working in parallel, this can be super valuable if you invest into these templates. So, this is just some of the use cases and some of the reasons that you might use Cookiecutter. We'll talk about a whole bunch more as you go through this course.
|
|
|
transcript
|
4:40 |
The course is broken into three major sections. It's going to start out with just what it takes to consume Cookiecutter. You know, if I am somebody and I see a Cookiecutter template out there and I want to create a project on it, how do I do that, what are the intricacies, and sort of advanced features there. If I am like a project lead, or I run some kind of software development team, or maybe I own an open source project, there is a different set of things that I might care about around creating templates, and so on, and if I want to contribute back to Cookiecutter, make it better, make it match my workflow better, there is some edge case that I need to bring in as a feature, we'll talk about how to do that. So in the consuming Cookiecutter part, we're going to talk about what you need to just run and use Cookiecutter as a program, we're going to install Cookiecutter, we're going to learn and talk about the command line interface for Cookiecutter, we're going to survey the pantry full of cookies, which is the official set of Cookiecutter templates listed in the Cookiecutter documentation, there are many more that people didn't bother to get back into the listing, but there is quite a few interesting ones there and you will understand the power of Cookiecutter as you go through them. We'll talk about local versus remote templates, do you need internet connection, how do these two things connect, we'll about profile defaults Cookiecutter asks you lots of questions, what's your name, what's your email address, things like that, all the time, and we'll see that you don't always have to answer those, you can set up defaults for them, how to use Cookiecutter within virtual environments, replaying project creation as in answering the exact questions, the exact same way over and over again, in a reliable way, and things like that. Now, if you're a project lead, you might want to create Cookiecutter templates for your project, for your company or for your team, and so we're going to talk about how do we create Cookiecutter templates, what are the basics, we'll see that there is a Cookiecutter json file and there is a certain project structure, that we use, and that will form the template, we'll see how you can prompt the user, there is a lot of choices on user input and what the types of questions you can ask are, and we'll see that there is this concept of choice prompts so if I want to ask the user hey, pick a web framework template for this, do you want Jinja, do you want Chameleon, do you want Mako, you can give them a list like that, and we also see that you can have complex default values, one of the real powerful things about Cookiecutter are its pre and post generation hooks, this is arbitrary Python code that you write and ship with your template and it runs, either right before the files are created and transformed, but after the information has been gathered from the users, or entirely afterwards. As in the case of the post generation hook. We'll see that you might want to exclude certain files from transforms if you want to ship a Cookiecutter template as part of your Cookiecutter template that turns out to be a problem, so we'll see how to solve that problem, how you can conditionally include files and directories or maybe exclude them, so in my case of the web template framework, if you choose Mako you don't want to include the Jinja or the Chameleon templates so you might want to exclude them here. We'll do a little bit of a case study for various existing project templates, some of the popular open source projects and companies and how they are using Cookiecutter, and finally, once we've learned about how to create these templates, we'll see how you can get your template listed in the official documentation for people to discover your project. Last but not least, as somebody who is creating Cookiecutter templates, you may well want to use the programmatic interface, not the command line interface to Cookiecutter. So if you want to give your users an application that they can run that will create projects, you can internally invisibly wrap up Cookiecutter in this application, and you use whatever UI you want command line interface, GUI, web app, it doesn't really matter, you can gather a bunch of information from the users and programmatically use Cookiecutter to actually do the project's creation. Now finally, as a contributor, we're going to see how you can check out and build Cookiecutter locally, how you locally register it as a package so that Python knows how to find the source and then you can test it and things like that, we'll talk a bit about the contributor guidelines, we'll actually go through the process of adding a feature or in this case really we're going to add a bug fix but we're going to modify Cookiecutter and push that back to the open source project, so hopefully, by the time this course is done, there should be a feature that wasn't there at the beginning, because we're going to do that as part of our demo. Alright, so this is what we're going to learn about Cookiecutter so super cool project, there is a lot to cover and I hope you're excited to get started.
|
|
|
transcript
|
2:13 |
Before we start working with Cookiecutter, let's talk about its philosophy, I think you'll appreciate the design and the thought that went into this tool, first, its command line interface focused. So it provides a command line utility for creating project from Cookiecutters, it's extremely easy to use and get started with, and you won't have to think too hard about the default behavior of it. But it is flexible for more complex use cases, via optional arguments. It's API accessible. It's entirely function based and stateless, and it's usable in pieces for developers of other template generation tools, so if you understand Cookiecutter, you can build tools that create projects yourself that somehow leverage Cookiecutter itself so you don't have to do that sort of core file directory text management. It's Jinja2 specific, so if you are familiar with Jinja2 already, then you'll be able to work with it and the parts of Jinja2 that you use are honestly quite simple so even if you don't know Jinja2 it's still pretty easy to get started with. Cookiecutter is extensible, you can give it Jinja2 based extensions as well as integrated with other Jinja2 based project template tools, it's open source, you have the freedom for Cookiecutter users to build and extend, there is no officially maintained Cookiecutter templates, there is not like a packaging authority for Cookiecutters, you just put them up there on the internet as some accessible thing like a GitHub repository and Cookiecutter can directly access and use those. And Cookiecutter itself is friendly to commercial projects, it has licensing that allows for private Cookiecutters and even private Cookiecutter based tools. So feel free to use this in your commercial application. Finally, it's fast and focused, it's meant to just do one thing, take a template and transform it into a ready to run project. And you can generate these projects from the command line or from the API and that's it, and it's ultra fast, so if you want to leverage this in some kind of high performance or performance critical tooling, you should be fine with Cookiecutter, it's not slow at all. If you want to learn more about this, just check out the core committer guide here at this url.
|
|
|
transcript
|
0:35 |
Everything you see me create during this course will be available to you in this GitHub repository github.com/mikeckennedy/cookiecutter-course I think programming is best learned through examples, through trying it yourself, so I want to make sure everything that I do in this course, is saved and preserved for you. Be sure right now to go visit that url, star and fork that repository. At least star it and download it if you don't want to fork it, but make sure you save this, because this is your reference material for the things that we create during this course.
|
|
|
transcript
|
2:05 |
Welcome to your course. I want to take just a quick moment to take you on a tour of the video player and all of its features so that you get the most out of this entire course and all the courses you take with us. So you'll start at your course page, of course, and you can see that it grays out and collapses the work that you've already done. So let's go to the next video here. It opens up this separate player and you can see it as standard video player stuff. You can pause or play. You can actually skip back a few seconds or skip forward a few more. you can jump to the next or previous lecture, things like that. It shows you which chapter and which lecture topic you're learning right now. And it has other cool stuff like take me to the course page, show me the full transcript dialogue for this lecture. Take me to the GitHub repo where the source code for this course lives and even do full text search. And when we have transcripts, that's searching every spoken word in the entire video, not just titles and descriptions and things like that. We also have some social media stuff up there as well. For those of you who have a hard time hearing or don't speak English as your first language, we have subtitles from the transcripts. So if you turn on subtitles right here, you'll be able to follow along as the words are spoken on the screen. I know that can be a big help to some of you. Just because this is a web app doesn't mean you can't use your keyboard. You want to pause and play? Use your spacebar to toggle that. You want to skip ahead or backwards? Left arrow, right arrow. Next lecture, shift left, shift right. Want to toggle subtitles? Just hit S. And if you're wondering what all the hotkeys are, you can click this little thing right here. It'll bring up a dialogue with all the hotkey options. Finally, you may be watching this on a tablet or even a phone, hopefully a big phone, but you might be watching this on some sort of touchscreen device. If that's true, you're probably holding it with your thumb. So you can click right here to seek back 10 seconds, right there to seek ahead 30, and of course, click in the middle to toggle play or pause. Now on iOS, because the way iOS works, they don't let you auto start playing videos. So you may have to click right in the middle here to start each lecture on iOS. That's the player. Now go enjoy that course.
|
|
|
|
16:48 |
|
|
transcript
|
2:06 |
Let's talk about what you need to take this course, what software you need set up to get going. First of all, Cookiecutter is a Python application, that means you are going to need Python on your system. Now, depending on what operating system you're using, you may or may not have Python, you may or may not have the right version of Python, we're going to use Python 3 throughout this course except for in one section where we actually edit Cookiecutter, that is done more easily in Python 2 than it is in Python 3 because some of the dependencies. So for the most part, unless you plan on actually editing and making changes to Cookiecutter itself, as we do in one example just to show you how, at the very end of the course, you're going to only need Python 3. So you can get that at Python.org and I am going to show you how to install this on Windows, on macOS, and you already have it on Ubuntu so I won't really talk too much about that part, but I will show you how to install the editors for all three of those operating systems. So after this video, you're going to see three separate videos, one for Windows, one for macOS, and one for Linux. Obviously, only watch the one that is relevant to the operating system you are using. Okay, so if you don't have Python 3, you can go to your terminal command line and type Python -V and see what comes out, or Python3 -V and see what comes out; if you don't have Python 3, you should go install it as outlined in the next video. We're also going to need a solid Python enabled editor. Now, much of this course you don't really need much of an editor at all, you don't need to know anything about Python, but there are few sections where we do the programmatic API consumption of Cookiecutter, and where we modify Cookiecutter, those two parts, you're going to need a nice Python editor, I recommend PyCharm, I'll show you how to get it and install it, if you want to use something else, Visual Studio Code with the Python plugin, Sublime text, whatever, you can use anything you want, but I'll show you how to install the free community version of PyCharm, and that is what I'll be using throughout this course, for the demos that involve writing lots of Python.
|
|
|
transcript
|
3:49 |
Alright, let's talk about how to install the various tools, in Python on your operating system. So there is only two tools, two resources you need to take this class outside the source code on the GitHub repository. One is, you're going to need Python 3, remember, Python 3 does not come on OS 10, Python 2.7 does, but Python 3 does not, so you've got install that, as well as PyCharm, so let's go look at these. I pulled up the websites that we're going to be working with, Python.org, this is where we get Python 3, PyCharm over here in jetbrains.com, we're going to download PyCharm here and I also pulled up the other three options Sublime Text if you're interested in that, Atom, you've got to watch this video, it's very funny, a great little lightweight editor; we'll come over here, download this, click, just it defaults you to the latest of both Python 2 and Python 3 for your operating system, so pick this, download, save, I've already done that, so let's go over here and see if I type Python, you'll get something, but you'll see that Python 2.7.10 comes up, if I type Python3 there is no Python 3, so let's install Python 3 and make sure everything is set up good there. So this is what I got off Python.org, just click through, agree to whatever its going to make you agree to, okay so Python is installed, let's just try a little trick again, we can even do a Python3 --version on the end, excellent, so we have Python 3 installed, and it's the latest version. So, that is off to a good start. next, PyCharm, when you just click download it gives us a choice between what version do you want, do you want the professional or the community edition, this is up to you, I love this tool, I pay money for it, I am getting the professional, the community is free, if you're wondering what the differences are just come back here to the main PyCharm page and you can see it will show you that actually the Python features themselves there is not too much of a difference but the web development and Python web frameworks and database stuff, that is only in the professional edition. But, lucky for you, none of that is actually happening in this class so you can pick either of these that you wish. Once you have it downloaded, you'll have a dmg disk image here, and I love their little installer here is the app, drag it over here, wait a moment, and you should have PyCharm installed. Now, let's finish installing, we'll eject that and we are just going to run PyCharm. First time it will warn you this came off the internet, be aware, yeah, we did that on purpose. Make sure you get it from right place. And here is PyCharm, I've already run it before, but the first time you run it, it asks you for the settings, I like mine at this dark theme so everywhere it asks you about colors, there is two places, you can say Dracula if you want the same theme as me, or pick another one. The other two editors are just Atom, here is Atom nice and clean, and Sublime Text, again, super small, super clean. Let me show you a technique that will be helpful for opening these projects and basically work with Python projects in general. So here I have requests-master, I got this off of GitHub, this is the requests package and this is actually the source code so here you can see here is all the Python files, this is like the project based, if I want to open this in PyCharm, I just drop it on here, this is a OS 10 only feature, but if I drop it like this, it will open the whole project, you can see here is all the code that we need. You can do a similar thing for Sublime Text and you can do a similar thing for Atom. So here is all the packages, same thing. So that is a really helpful tip if you're jumping from project to project and you want to just open up this project, open up that after project, open up that before project, and so on, I am sure you will find it useful throughout the class. Alright, that's it, this OS 10 system is ready to roll, ready to work on this class.
|
|
|
transcript
|
4:08 |
Hello my Windows friends, let's get you all set up and ready to work on this class, and I have good news for you- until very recently, using Python on Windows has been actually fairly painful to get it set up and everything configured right, but with Python 3.5 the installer and the set up process is way better, so let's get to it. To get started, you're going to need two resources on Windows, you're going to need to install Python 3 which you can get at Python.org, and you're going to need to install PyCharm at jetbrains.com/pycharm Let's go over to Windows 10, here is a brand new, completely fresh install of Windows 10 I just got from Microsoft, and I've open up the various web pages we're going to be working with; first thing we have to do is install Python and as I told you, there is no Python on Windows, if I open this up and I type Python there is no Python. So we have to download Python, and we want 3.5.1 or whatever the latest version of 3 is and I've already actually downloaded it, so I won't click here, but you just click that, that's super easy, the other thing we need to download is PyCharm, so here is PyCharm, it actually comes in two editions, the professional edition and the community edition, you can pick either for this class, the community edition is totally fine, the things you'll be missing are you'll basically be missing out on web development and database management features from the professional edition, and the community for straight pure Python has the same features as professional. If for some reason you don't want to use PyCharm, you want something more lightweight, you can use Atom, at atom.io, atom is from GitHub, it's pretty cool, I really like this editor, you can see there is a little video here, I recommend you watch it, it's pretty hilarious, Sublime Text is also a super popular lightweight editor and I told you about Visual Studio so you can get Visual Studio community edition, this is now a free full-fledged version of Visual Studio, and you can get Python tools for Visual Studio, plug this together and you're doing pretty good. But, we're going to be using PyCharm in the class, so that is what I will set up here. Let's start by installing Python. So I've got it downloaded, and I'm going to run it, now it has a couple of options in the installer, let's say if you're going to try to just type Python from the command line or other tools like pip, for installing packages, you probably want to add this to your path and let's customize installation just to see what we get, we get documentation pip which manages packages, we'll talk about that in our apps, and we have the test suite and py launcher is really nice, and we don't need to install it for all the users. Let's go ahead and pre compile the standard library, that will give us a little better perf, I really don't like this big long folder here, so this app data folder is hidden in Windows, so it's kind of hard to discover where these are so I am just going to put a Python folder directly in my user profile and then in case you want to have a 64 bit or 32 bit version of Python or maybe different types 2.7, 3.5 you probably want to leave this specifier here, that seems like a good setup, let's go. Alright, Python was set up successfully, let's close this and let's just find out, if I type python --version we should see 3.5.1 and survey says, success, okay, Python is working. Last thing to set up is just PyCharm. So the installer is just a standard Windows installer, just sort of yes your way through, it's up to you whether you associate py files with it, I typically don't do that but it's your call. Okay, so it looks like we successfully installed PyCharm, that was easy, let's go and run it, brand new, nothing to import, now, normally I would log in with my JetBrains account, but for this purpose I'll just evaluate it, say okay, that's great, the first time you launch PyCharm it asks you what theme and keyword scheme you want to use, because this is Windows, I'll say Visual Studio keyboard theme and I like my code dark, the editor is dark and the code, text to be light, so I am going to pick the Dracula theme, you pick whichever you like. And there you have it, PyCharm is up and ready to roll. This brand new version of Windows 10 is ready, so without further ado, let's move on.
|
|
|
transcript
|
5:07 |
Hello my Linux friends. Let's talk about what you've got to set up on your machine to do this class, in the same way that I am at least. You'll see that you actually already have Python and Python 3 installed in Linux if you're using something like Ubuntu, so that's pretty awesome, I'll show you where to go to get it if you don't happen to have it. And, I'll show you how to install PyCharm, it works wonderfully on Linux but it's a little bit of a pain to set up so I'll walk you through that. So, here we are over in Ubuntu 15, brand new fresh version I literally just downloaded it, and we're on the PyCharm page, so we can go and download PyCharm, you'll see there is actually two versions, there is a professional and a community edition, we're going to download the professional edition, you can get a 30 day free trial and if you pay for it like I do, then obviously you could have it forever. The main difference between the community and professional edition, the community edition is always free, is the community edition does a whole bunch of cool Python stuff, but doesn't do web or database work, the professional edition does in addition to standard Python things, web frameworks, TypeScript, database, designer type things. So for this course, you can totally get by with community but for professional work, well, maybe a professional is the thing to go with. Some of the other editors you might choose, if for some reason you don't want to use PyCharm, is you could use Atom, this is a really great editor from GitHub, I really like it, and the video is hilarious so check out the video just for a laugh. Sublime Text is very popular and of course you can use Emacs or Vim that a lot of people are using. As I said, Ubuntu comes with Python 2 and 3 but for some reason if you need to download it, just come over here, Python.org, grab the latest version, it will automatically find the right thing for your operating system, you could also install it with aptitude, you can do things like apt-get install Python3-dev there is a couple of packages that you can install. So first, let's verify that I actually do have Python installed, Python 3, so I can come over here and say Python3 --version and we have 3.4.3 plus, which makes it even better than 3.4.3, awesome, and then we have PyCharm, we're going to go download it now, it's kind of big so I actually already downloaded it, go over here to my downloads folder, and we have the tarball right here, so we need to decompress this and copy it somewhere else, so I come over here, right click and say extract here, and it will extract it out, now it has the version name here, let's find, let's make a new location and let's just put it in my home I like to create a folder called bin in my home and then in here I'll make a folder called PyCharm and within PyCharm I'll put PyCharm 5.0.4. Now if you open it up you see there is nothing to run right away but there is a bin folder within there and what we want to do is we want to run this script, so I could double click it and it will just open in gedit, not the best, so I am going to come over here and just drop it, into my terminal, and run it. Now, it turns out there is a problem, PyCharm is built on the IntelliJ platform, the IDE platform, and that platform is Java based, so we need to install Java before we can carry on. So on Ubuntu, we'll just use apt get so we'll say sudo for running super user, sudo apt-get install openjdk-8-jdk And I'll put in my password, I'll wait for a moment, it says are you sure you want to do this, it might take a moment, 171 MB it's fine, go. Excellent, well, that took a minute, but now we have Java installed, let's try to run that again, PyCharm shell, now it's running, you can see it says do you want to import previous versions, well no, this is a brand new machine so no, not really. Now normally I would just login with my JetBrains account but for now, I'll just evaluate it for free, which you guys should be able to do for this class. When PyCharm first opens, it asks us what keyboard map and Visual Theme we would like, I am going to leave the keyboard map alone, but I like my code, my IDEs and Windows and stuff to be dark, not bright, so dark background, light code, so I am going to pick the Dracula theme for both, the code colors as well as IDE theme and we'll say ok, and you can't make this change unless you restart so yes, let's let it restart. Excellent, my PyCharm is running, it's nice and dark with its Dracula theme now the one other thing I'd like to do is notice it's over here, and I'd kind of like to not be running this shell script anymore, straight from the terminal, so let's run it one more time, notice it's gone from the launcher. Now, it's up and running, I can lock it to the launcher, and now this way, when it's gone, I want to launch it again, I can just come over here and launch it straight out of the launcher. Congratulations, you have PyCharm working on Ubuntu. Time to head on over and build your first app, and have a great time doing it.
|
|
|
transcript
|
1:38 |
Now that you've verified that you have Python installed, you can install Cookiecutter. Now, in order to use Cookiecutter, you don't need to know anything about Python, but it does use it as its underlying runtime so you have to have it installed. Alright, so to install Cookiecutter, we're going to use Python's package manager, we're just going to say pip3 install cookiecutter Now, this will install into Python 3, if for some reason you want to install it to Python 2 you would say pip2 install cookiecutter Now this will work, but this is going to modify the global system setup for Python, and that requires admin rights and you probably don't want to do that, so instead, we can say pip3 install --user cookiecutter and then it just installs in your local user profile, and you can just go to the terminal and type cookiecutter whatever and it will run, so this is probably the recommended way to do it, now if you're on windows, windows Python for whatever reason doesn't have a pip2, pip3 variation, similarly it doesn't have a Python 2 and Python 3 executable variation like macOS and Linux do. I don't know why they don't, it's really frustrating but you just have to make sure you use the right path to pip, so it's pip install cookiecutter but pip can mean different things, and you've got to make sure you are pointing at the version you want to install it into. If you don't know, go and install it into Python 3. Finally, if you've already installed it but you want to make sure you have the latest version, you can give it a --upgrade flag and this will install it if it's not there, and upgrade it if it is. Awesome, if you run these commands, probably the last one is the best, you will have Cookiecutter and you will be ready to start working with it throughout this course.
|
|
|
|
14:38 |
|
|
transcript
|
2:53 |
Before we get into the details of how we actually use Cookiecutter and creating some projects, let's just take a quick survey of some of what is out there. So, the power of Cookiecutter is that there is all these existing templates, and with just a single command line operation, we can create projects that will vastly propel us forward much much faster than just starting with an empty directory and starting to create Python and resource files. So, on the Cookiecutter read the docs page, there is a thing called the "Pantry Full of Cookiecutters". And here you can browse through all the ones that are there, so let's go take a quick tour. So if you are just at cookiecutter.readthedocs.io you can see here we have the Cookiecutter overall documentation and in this page, this is like really where you should start right here, and in this page, we have a pantry full of Cookiecutters, so here is a bunch, and later on in this course, I will show you how to get your project, your template here, but for now, let's just have a quick look. So here we have Audrey's Cookiecutter package to help you get started, here is one for creating a Flask project that uses Bootstrap to get started, already supports user registration, so if you want to create a Flask web app and you want to base it on Bootstrap and have user registration, this might be really sweet place to start, here is a similar one, but it actually has things like forgotten password and Heroku integration, and so on. Here is one for Bottle, we'll take that one and play with that in a little bit, a bunch here, so all these are Python ones and as we said, Cookiecutter is not a Python thing, it works for any project, and in fact, this IOS one really doesn't have any Python files, but it's for this thing called Beeware, we'll talk again about that later as well. So there is a Python section, Python Django, Python Pyramid, even some stuff for Cookiecutter metadata here, so like Cookiecutters for Cookiecutter templates and so on, but there is also C, C#, Golang, JavaScript and so on. So, technically, Cookiecutter runs on Python but it will generate any of these, right, so this is a great listing here, but I am not sure how many are here if you flip through, I don't know, a couple of hundreds or something, so let's do something else, let's go to GitHub, come over here and just type Cookiecutter, now you can see there is 1321 public repositories called Cookiecutter, okay, so there are many many more out there that people are not necessarily adding back to that pantry, like here is the Wildfish Django starter, I have no idea what that is but there it is. Cool, huh, so we could probably do a search here and then also limit this to just Python if you are just interested in Python, or if you are just working with Ruby, you could limit it to Ruby, 32 repositories there, and so on. Okay, so that is pretty cool, let's take a look at a few particular use cases out of this pantry here.
|
|
|
transcript
|
2:57 |
So let's look at the examples. Here the first one I want to talk about is Pyramid, so Pyramid is web framework in Python, and it will create a variety of starter, what are called scaffolds, basically all the starter code along with associated CSS, JavaScript, image files, and everything that you need to run this project. The way that you create these scaffolds has always been to run a built-in program when you install Pyramid called pcreate, so a little bit like the manage.py in Django. Now, in the most recent version of Pyramid 1.8.1 maybe 1.8.0, anyway, very recently, they just switched to deprecate their own built in scaffold generator and the recommended way to create new Pyramid projects going forward is to actually use Cookiecutter, so one of them is pyramid-cookiecutter-starter and that is basically the most plain and simple Pyramid web app, they have other ones based on SQLAlchemy and things like that. So this started project is in that pantry full of Cookiecutters, what's next? Reproducible science, so check this out, look how cool this is, so there is a Cookiecutter called cookiecutter-reproducible-science, and the idea is to have a very well known agreed upon structure, for how you submit reports so if you are going to do some kind of research that has computation behind it, then you will want to create one of these and use this structure so that other people can go in and find your code and run it, so here you can see they have things like the data that comes in, the internal, the process, the raw data, the external data, the docs, the notebooks, the reports, reports are like your papers, things like that, as well as the source code that you might have used to generate these papers, so how cool is that, if you're a scientist or some kind of academic this is a really cool thing to get started with. Now, how is that for a blast from the past, Atari 2600, anybody want to play some Pitfall- I remember playing this when I was a kid, I loved this game, and in fact, I am sure there are still Atari 2600s out there, but more importantly, there is probably emulators that you can get and run, so you can go and get cookiecutter-atari2600 and that will give you the assembler code that then you compile and can run on your Atari emulator, so if you are feeling nostalgic, you want to write an old school computer game the hard way, with assembly code, here, give it a shot. Finally, let's look at the meta template, so the Cookiecutter as Cookiecutter, here is a really nice Cookiecutter called cookiecutter-template and we're going to come back and look at this a number of times over, the idea is if I want to create a Cookiecutter project myself, I want to create a Cookiecutter template myself, I can use Cookiecutter on this thing and it will generate the exact project structure recommended for creating a Cookiecutter template, so there is a lot of cool things going on here we're going to study it when we get into building your own templates, but for now, just know if you want to get started with different things like Atari, with data science, or even with creating your own Cookiecutter template, there is a Cookiecutter template for it.
|
|
|
transcript
|
4:13 |
You've seen there is some really cool projects, or templates that we can grab from that pantry and go and create things. Let's look in a particular one, here we've got one that will create a Bottle web application. So Bottle is what you might call a microframework, in the Python web framework space, so we can use this template to create one along with the dependencies, and a little bit of starter code for us. Let's start over here in the pantry, and you can see right here, I've already clicked on it, cookiecutter-bottle for creating reusable Bottle projects quickly. Alright, so we can go over here and notice, this is just a public git repo, and the way you can there is some Cookiecutter stuff going on is this {{cookiecutter.stuff}} we'll see what that means later, but if you look inside here, basically these are the files that are going to be used when you run the template. Like I said, when we get to another section about creating our own templates, we'll go way into detail there, but notice, I can just take the url, not the clone url or the git url, just the url to the repo itself. And I can come over here and I can install that using Cookiecutter, so I am in our shared source so whatever I do here you will be able to get so I am going to start by saying Cookiecutter that, I am just going to give it the https url to the git repo here. Now I could also give it a path to a directory if I had for some reason downloaded and cloned this, but I don't need to, Cookiecutter will do that for us, okay, so we run it, it takes just a moment to quietly clone it in the background, it asks us what our name is, I'll go and put my name, it asks us what our email is, I'll do that as well, my GitHub, no that's not me, that is me, and what I want to call this, Super bottle web, something like that, and I'll just call it super_bottle, like that, this needs to be some kind of folder that Python could use as a web app name, so probably no spaces, things like that and you will see later that you can actually validate it, I don't know if this template does, we hit enter and if I don't want to put a description and I am willing to take whatever they put in here, if I just hit enter, any of these things in the brackets for example mybottleapp or that version of it or this, if I just hit enter that is going to be the description that is used, so everything in a bracket is just a default, we'll see how you can set up global defaults for yourself as well later but the template is giving you a default first, right, we hit enter and done. So, let's see what we got, well, we've got a super_bottle folder here, let's open it up and have a look. So if we go in here, notice we've got the manage.py we've got the README, let's go over here and cd into the super_bottle, and just look at the README here, so here you can say it's a cookiecutter template for creating this and this is the default that we saw right here, see my Super bottle web, and so on, it shows me how to get started, so Python manage.py runserver Okay, that's cool, now actually I am going to need to install these requirements here I don't have Bottle or Click or Jinja2, potentially installed, now you don't need to know any Python to use Cookiecutter, but just to show you I can take this thing and run it for that, because it's a Python web app, we got to do a really quick thing, so let me just briefly create a virtual environment so this thing doesn't actually affect my machine here, so what I am going to do is I am going to say Python3 -m venv [path] and this can be a clean place where we just install things for the rest of this class here, so that was cool, that worked, and then I got to activate it, okay, notice that my prompt has changed, okay, great, so let's go ahead and install the requirements, we'll say pip install -r requirements so it's going to download all the packages that this thing that was just created needs to run, and now, we can just say Python manage.py runserver and look at that, it's up and running, let's go see what we got here. Congratulations, our app worked, okay, great, so now go write your web app, basically, but it's setup that structure, the requirements, all that so we could get started more quickly. This is pretty cool, right, well, there is not a lot going on here, because hey, this is Bottle, it's a micro framework, if we had done this with Pyramid, you would have seen actually a lot more stuff happen and we'll do that later.
|
|
|
transcript
|
1:53 |
Now you've seen that we could use this command cookiecutter and the full path to the GitHub repo to clone our template and run it, but once we've done this, on our machine, in this user profile, we can use a much simpler version, we could just say cookiecutter and give it the short name, cookiecutter-bottle And we hit enter, again, it runs, however, if I try other ones like cookiecutter-data-science it says I have no idea what this is, and look where it is looking. So in your user profile, my username is screencaster for this recording, so if I go here and look, you can see that this is the location where that cloning gets done, so when we make this command, to the git repo, it actually clones it and stores in our profile under .cookiecutters and if we come here and say cd cookiecutter-bottle you can see that this should look exactly like hat git repo that we saw earlier, do you know why- because it is that git repo we saw earlier, it's the same thing, right, it just clones it, in fact, if I run the original command again, it says you've already cloned it here, do you want to reclone it? So, basically, you can install these things, very easily. you just run the git version or the remote version, and then once you have that you can run the simpler version, like this. So what would be cool is if there was some kind of thing like we could say list those, so if I could say cookiecutter -i for installed or something, but there is no -i Right, so maybe someday that will change, maybe even I will add that feature, I don't know, but for now, you can tell what you have installed, just by doing this. List the Cookiecutter directory in your home profile, and on Windows, you don't use the tilde of course, but this is just in your home directory in Windows as well, it's just .cookiecutters on both platforms.
|
|
|
transcript
|
2:42 |
We just ran the cookiecutter-bottle template. Let's look inside and see what happened. From the outside, we typed in cookiecutter and we gave it the git repo, it ask us a bunch of questions, we could either take the defaults or just hit enter, and then, we had a project ready to go, all we had to do is cd into, whatever we called our project, install the requirements and run the server, just like that, we had our web application running bottle, we didn't have to go and create all the files and set up the configs or anything like that, so you saw we can use cookiecutter-bottle to get started really quickly with a bottle web app. So, let's look behind the scenes. When we ran the command, cookiecutter (space) git repo, it ask for some inputs, it took those inputs either the defaults or the ones we provided and it applied those somehow to our app, first thing that happens, git clone. So, cookiecutter is going to do a git clone of that repo into our local .cookiecutter's hidden directory now this is hidden on a Mac or on Linux, on Windows it's still called .cookiecutters but the . (dot) doesn't mean hidden in Windows so it just shows up in your user profile, I guess that's probably unfortunate but it's not a big deal. now you can see if we say ls we've got cookiecutter bottle, cookiecutter template and one for Pyramid, and once those are here we no longer have to use the remote address we can just get them from here. If we happen to pass in a local template, not one on the network, but just one on our file system, it wouldn't copy it here, it would just run it out of that location. And you see once I go into the cookiecutter-bottle, my prompt changed to something recognizing it as git, why- because as you saw, this is GitHub repository, it just literally cloned it, we have all the branches and everything. If we do this on Windows, it's very similar, but we just have a .cookiecutters folder, right, but other than that, this is basically the same thing. So, regardless of the operating system you have, you're going to take this directory, you're going to feed it over to the cookiecutter engine; the cookiecutter engine is going to look at a lot of things, most importantly, cookiecutter.json and it's going to take our inputs, really that's where the prompts come from and then take the inputs from that results, feed it here and then take the directory structure plus our inputs and generate our project skeleton. And then, you're done, you're done using cookiecutter you can go now and work with your project and run it however you want. If it's a Python project you can go run it with Python if it's a C++ project, you open it up and compile it, whatever you want to do, it's now ready to roll. We also saw that once we've installed the template because it copies it and it clones it into that .cookiecutter's directory, we can just run it with the short name, so if we say cookiecutter cookiecutter-bottle it's just going to look in .cookiecutters for that project and either it will find it and run it, or it will just say I have no idea what this is. Right, but because we already ran it here, everything works like a charm.
|
|
|
|
20:08 |
|
|
transcript
|
4:11 |
Let's look at the full command line interface. We're going to dig into Cookiecutter's extra features and we'll look at how each one of them works and how you can get the most out of them. Let's just start with a quick overview, so cookiecutter --help and it's going to say here is the usage, right, we're going to create some kind of project as you know, first thing, you can say V or lower case --version to get the version, that's easy you can say --no-input, now --no-input is really interesting, each prompt that you see in that process that runs the template has a default, so if you say --no-input it will ask no questions and just take all the defaults. The place that to me seems most useful is if you want to execute a Cookiecutter template as part of a continuous integration, so you can just configure your CI build to run with whatever the defaults are, and just say --no-input and it will just run and output the results and then maybe do unittests or builds or whatever you're going to do against the result of running that template. You can say -c or --checkout to get alternate branches, we've seen that we can run directly from GitHub repos or git repos in general, and often, there is multiple branches, maybe we want to run a different branch for whatever reason, like we could be evolving our template and using the git flow so we have a feature branch for some change, right, we can run that by saying -c branch name along with the url. So that's pretty cool. Verbose, if you want to understand what Cookiecutter is doing, -v is great because it will show you all the things, especially this is really helpful when you are building your own template or working with your own sort of post processing code that will run across this, right, we have something called hooks that we'll look at later; another thing you might want to do is enter some answer, some specific value that says you're on this template but you want to do it over and over again, right, again, this is most helpful when you're doing some sort of template building, right, I want to answer the questions this way and then see what happened, delete, run it again, so you can say --replay and if you've run the template before, it will just feed all the same answers, defaults or custom answers, whatever you put into the answers for those prompts and then reexecute it, so this is really nice. Also, this could be useful for continuous integration as well. -f again, if you want to blast away the files, you want to be really careful here, if you're just a regular user, and you are just running this, this will erase whatever is there if there is a directory with the same name, so don't blow away your project, but if you know what you're doing, if you're building a template or you're doing continuous integration, that might be exactly what you want, so a little -f it will save a lot of trouble. You want to change where the files go, -o or --output-dir Cookiecutter by default puts the generated project as a subdirectory right wherever you are, your working directory so this will let you overwrite that. You can specify a configurations file, so if you run a lot of Cookiecutter templates you are going to get tired of answering the question what is your name, what is your email, what is your GitHub account name, things like that, so we can create this thing called a config file, put my email address is this, my GitHub account name is this, and then when Cookiecutter runs it will look at this config file, if you pass it like this, and it will change those default prompts to be your default values, not the default values out of the template, that is so nice. You can also say don't do that, don't run the configuration file, run without it, you might be thinking well, if you're going to just put --config-file it will run it, but just omit that, well, we'll see later that we can actually register a global config file for our user profile and not have to pass this config flag or path or anything, it will just automatically find and always use it, which is definitely recommended. But periodically you might want to say well what's this look like without my config file on a bare machine, so --default-config you can get lots of debug output kind of like verbose and you can feed that to a file so great for debugging maybe for continuous integration as well, not really sure about that but definitely good if you want to try debugging what you're working on and save it to a file. Anyone see this message -h
|
|
|
transcript
|
1:41 |
I told you that the no inputs feature might be really nice for continuous integration and this is not a CI build machine or anything, but let's go and have a look anyway. So we can run cookiecutter cookiecutter-bottle and it was going to ask us some questions, now let's just take the all of the defaults for now, so if I say yes this is my name, this is my email address, this is my GitHub user, whatever, boom, and then it's going to generate this mybottleapp. Alright, so if we go and look in here, we'll see that things like, we'll see it named it mybottle like we had said, if we look at the README you can see it's just taken the defaults everywhere, okay, so that's all going good, let's go back out for a second here, and erase this so we have nothing in this folder anymore. So now we can run this again, but this time, without it asking any questions, just say take all the defaults which is what we did anyway but I had to hit enter a bunch of times. So say --no-input and we hit enter, and bam, what happens, well it generates exactly the same thing, so if you're going to make executing a Cookiecutter template as part of something like continuous integration build or if for whatever reason you want to run it without it asking the user questions then you got this. You'll see that we can actually pass additional information to overwrite some of those values, when we run this when we get to consuming the Cookiecutter API you will see that you can pass no input but then overwrite it with stuff that maybe your program asks for, things like that, so it's pretty cool, but this is a good start, I guess the most common use case I see here really is for continuous integration or some form of testing.
|
|
|
transcript
|
1:29 |
Alright, let's quickly play with verbose mode. We've seen that we're able to run Cookiecutter with no inputs, let's try it in verbose mode, it's going to ask some questions, tell me all sorts of stuff like here is some default values we're using, we generated this context and this is what we're going to use to start asking these questions, okay, so I'll just go and give it some values, let's let it suppose that that's my username, and this is fine, we'll take this as well, and then it does a whole bunch of work, let's make this bigger, so it's great, we're searching okay it appears to be that this file is what we're going to use for the project, we're going to generate the project from that, we're rendering the directory and then we're making sure that it doesn't exist, first we create the directory then we make sure it does exist, right, okay there it goes, and it found no hooks, if there were hooks, it would say we're running the pre-generation script, the post-generation script, that's what hooks are about, so it's processing all these files that are here, it's transformed requirements to see if anything is there, change the README and it checks to see what's binary then it wrote the contents of that, which is cool, remember it uses like the summary or whatever of the project that goes there, you could just go through and see all the steps that it's going, as it's processing these files and finally there is no post-hooks either, so it didn't run that and we're done. Alright, so this verbose mode is really helpful if you need it, especially when you're creating your own templates.
|
|
|
transcript
|
0:30 |
We've seen that Cookiecutter templates have default values for us, so if I come over here and I type cookiecutter cookiecutter-model and I run this, it will provide a default, like a default name and a default email and so on, and if I don't like mybottleapp as the name, I have to type that in. If that's not my GitHub username, I have to type that in. Wouldn't it be great if we could somehow configure the system so like those defaults were ours if we had entered them- of course you can, and I'll show you how to do it.
|
|
|
transcript
|
3:24 |
Okay so here we are in chapter 4, in the source control area. Let's go ahead and try cookiecutter cookiecutter-bottle You can see it's asking various things, like these are just the defaults, let's see how we can change these, so what we can do is we can actually create a default file and the format of this file is going to be a YAML file. And you can put it wherever you want and then you point to it in Cookiecutter, but I am going to put it in that Cookiecutters folder because that's where I go for my Cookiecutter stuff. So you can call this whatever you want, it doesn't matter, there is no like convention around naming, so I am going to call mine defaults-kennedy.yaml, we open this up and what we can put in here is a couple of things, so we can start out by saying our default_context and then we set properties by doing colon here, so we can set our full name, go and set our email here, now there is no scheme or anything here, it just happens to be if the template asks you for full_name it's going to look in here to see if there is a value and use this instead of their default. So you might have fullname, you might have also fullName, right, you might have to enter these things several times, but once we have this here, we can save this and we can run the same thing with specifying the config file. Like so, let's see what we got, oh look, what is your full_name, my full name is Michael, and my email is this, and my GitHub username is this, oh so refreshing. And of course we probably don't have a default project name or app name or things like that, or a really project description, so these I don't really know how to set defaults for these unless you create almost exactly the same app all the time, so that's cool, so we can do this, now it would be great if I just ran it like this, I don't have to say the config file, it would give me my values but clearly, it's not, so there is one final step for us to do, we need to go into our profile, that starts our shell, and set an environment variable, now if you're on Windows, you have to do this in a slightly different way, you just set an environment variable under the "Advanced system settings". Okay, but for now, let's do it on my Mac and then I can show you how to do it on Windows as well. So we're going to manage our ~/.profile here and notice, I've got my path and my prompt but let's put it at the bottom, what we want to do is we just want to put export statement that says the Cookiecutter config that you use is here, /Users/screeencaster/.cookiecutters/defaults-kennedy.yaml alright, so if we go back over here, and we try to run this, it's still the same, why, because we have to exit and start over. Now, let's try one more time, okay, so we're going to say cookiecutter cookiecutter-bottle hit enter, and perfect, it's now taken our defaults, so what we had to do is we had to create that YAML file with our defaults, and then we had to set an environment variable here the name of the environment variable is COOKIECUTTER_CONFIG all caps and then just point at whatever the path is, so let's go ahead and roll with this, enter, enter, enter, oh, that felt good, I'll call this Second Bottle App, let's just call it secondbottle and a demo of default values, off it goes, and there we know we have our secondbottle created, this time, using our default values.
|
|
|
transcript
|
3:10 |
Here is a slightly richer default configuration file, for Cookiecutter. So we've seen the default context, and these are the values that get passed to the actual templates to overwrite their defaults, so we've added full name, email and GitHub username, so we don't have to type that again, we can also set some directories, right, so we can come down here and say if I don't want .cookiecutters to be the folder where it does a checkout and where it manages all my Cookiecutter data, well, I can change cookiecutters_dir put that somewhere else. Similarly, there is a replay directory that takes the inputs you give the template, we'll talk about that later, but you can overwrite that directory as well. You can also create little shortcuts, so if you want to instead of type https://bitbucket.org/something, you could just type bb:thatthing, or even if you want just a shorter version, just ps, so if I want to run Pyramid Cookiecutter starter often, I could just say cookiecutter ps enter and that would run that template over and over again. You can see, we have the little {0} string format type things to fill in pieces, so you can create really interesting little aliases here. In order for you to avoid typing the config file name all the time, just do set up an environment variable, COOKIECUTTER_CONFIG and set its value to be wherever that file lives. So on Linux or macOS you say export COOKIECUTTER_CONFIG=this and you put that into your ~/.profile, your ~/.zshrc wherever your shell startup script is. So this sets the environment variable so Cookiecutter will always use it, unless you specify --default-config and then it says I know there is this environment variable set, but just run the thing entirely from scratch, which is mostly used for when you either want to see what their defaults would have been or if you're developing your own templates and you want to make sure the defaults work okay. Now, how about on Windows, if we're going to do this on Windows, you don't have like a ~/.profile file, instead, you have a GUI for managing your environment variables, so open up the Control panel, go to System and then click on Advanced system settings, it will open up this dialogue, click on Environment Variables there, it will open up this dialogue and then you can add a New User Variable. So COOKIECUTTER_CONFIG and then you put the path to wherever you happen to want it to be, right, I put it in the .cookiecutters folder, you can put it wherever you like. Now, just, it seemed odd to me, but for some reason, I think actually I had to reboot Windows, at least log out, for it to take this value, it seems like it was really not working, like restarting my terminal or my command prompt was not enough, I had to actually reboot Windows or log out, so just be aware that you might have to give this thing a strong kick to get it to take it, maybe you will have better luck than me, I don't know. Alright, so let's see these default values in action, create that file and register the environment variable either in ~/.profile or in Windows in the environment variables, we run it, we can say hit enter, go. And now, you can see it's pulling all of our variables in, and putting them as the default, so you can just hit enter, enter, enter, and it will accept Michael Kennedy, michael@talkpython.fm, and so on. That's much better.
|
|
|
transcript
|
1:03 |
Let me show you something that I ran into that seems really touchy, with these default value files, we come over here and we can run our cookiecutter cookiecutter-bottle and it gives us our values, everything looked great, and that looked super easy, right. Well, let's go and make the most minor change, and notice that there is a line 5 that is empty here, if you are unfortunate enough to not have hit enter and then backed up one time, you're going to run into something weird, so let's leave it like this, right, all I did was remove that last blank line, I changed nothing else about it, and now let's try this again, if I hit enter, bam, unable to parse the YAML file, error, none of the patterns match for GitHub usernames, like oh what is this. So apparently, I am not sure where this touchiness lies, is this Cookiecutter's built-in YAML parser, is this actually the YAML specification, I don't know, but let me just tell you, you really need a newline there, so now if I do it again, everything works like a charm. Okay, so super important, you have a blank line there.
|
|
|
transcript
|
1:09 |
Let me show you how you can add occasional extra defaults, so this default file this is a default forever, you will always have all of those defaults, now, it might be that you want to run this, from the command line and for some reason, you want to set the app name to something else. So let's try this, if we go over here and just say app_name= and we just use key=value, and we say app_name=the_bottle and let's also say project_name="The Bottle" like this, now if we run it, we'll see that we get the defaults from our default file, Michael Kennedy, email, GitHub and now, project_name default is "The Bottle", instead of "My Bottle App", app name is the_bottle, right, so if you're going to try to automate this stuff, this is really nice and maybe even you want to give it a no inputs at this point. Alright, so here we could do this, and we could of course say --no-input and even a -f And boom, there it goes, so now we have "The Bottle", and we actually created it twice, first when I hit enter a bunch of times, the second one when I just ran that one command line.
|
|
|
transcript
|
2:30 |
Now sometimes when you're working, you want to replay exactly what you just entered, this is common if you're doing sort of template generation, like if you're building a template for your own project, or maybe even from continuous integration, so let's go over here and just look really quick at this, notice that it's the bottle, the cookiecutter for creating bottle, blah, blah, blah, right, so this was passed to this template, right, the name of here and all sorts of stuff, my name and so on, so let's erase this, and do one more time, we're going to create it just as before, but instead of doing any of this stuff, we're going to say --replay hit enter, and boom, done, if we go back over here, we now have the Bottle, if we look at this, we can see "The Bottle" like that and we have the_bottle typed like this. Those are exactly the values that we passed in, so what you can do is that you can run a template and it may have some interesting questions it was going to ask you, and we can just say --replay and it's going to store that somewhere. The question is where is this stored, well, if we look here, we now have two cookiecutters we have a ~/.cookiecutter and a ~/.cookiecutter_replay, we look in there, there is a cookiecutter-bottle.json, alright, so let's just look and see what's in there. And notice, we have cookiecutter full_name is Michael Kennedy, those three came from our defaults, I mean, we entered them into the system, but those came from the defaults. This one and that one we passed on the command line and this one was just the default out of the template and so it's stored with the final results set of all the values passed to the template before it ran it, in this file, right, so you can on a per template type basis always do cookiecutter cookiecutter-the-thing --replay and it's going to do that same this, so for example, on some sort of continuous integration thing, you could run this once and then it will store this value or technically you could little adjust create this file, and put it in the right place and then those values will be used regardless of what gets put in the template. This is also super useful if you're developing your own template, you want to type in something under certain circumstances, see what is generated, oh it didn't come out right, go make it edit, rerun it --replay make an edit, rerun it --replay you'll get the hang of it.
|
|
|
transcript
|
1:01 |
So let's look at this replay command as a concept. So I want to come over here and we'll run cookiecutter cookiecutter-bottle if we hit enter it's going to ask us a bunch of questions, right, we've go to hit enter, we've got to fill this out and so on, now, it would be nice if we wanted to exactly feed that again and again and again, into this template. Like I said, continuous integration, creating your own template, whatever, so that is what this replay is all about, so now we can just say --replay hit enter and boom, the same thing comes out and it's exactly as if we had just entered those values before, but instead, cookiecutter remembered them and played them back for us. How does it work, well, if you look in your ~/.cookiecutter_replay folder, so that is either in your home directory on macOS or Linux or similarly home directory in Windows, you'll see right here we can pull this cookiecutter-bottle.json and here are all of the values I exactly entered, so that just gets fed as a dictionary directly to the template engine.
|
|
|
|
1:00:24 |
|
|
transcript
|
4:21 |
Now we've come to the really critical part of this course. Creating templates. While it's great to use and understand Cookiecutter as a consumer, the real power is taking the concept of Cookiecutter templates and applying them to your projects, your teams, your companies and so on. So, let's go through some of the reasons why we might want to create a template. Well, first of all, they often can decrease frictions on projects that you use, so imagine you have some project and it requires some setup, certain number of files in certain place, folder structure and so on, and if this does not have some kind of scaffolding tool already, then a Cookiecutter template would be awesome for you to add, so even if you don't own that project, maybe creating a Cookiecutter that will generate it just the way you like it is a good idea, and who knows, you could submit that as a pull request back to the original team and maybe they will take that and that could become the official way to create your favorite project, so that is a really cool thing, and we all use different projects so why not, right, this applies to everyone. You can empower your team and make it easier to onboard new developers, so what do I mean by that? Well, suppose again, there is a certain way as a team you have agreed upon any project of your language should look, it should always have this folder structure, it should always have these files, it should always have this README, and some sort of startup script and so on, so you can make it easier for all new projects to come out that way and if you have a Cookiecutter that always does that when somebody new comes on the team just go this for no matter what project you are working on, this is how it's going to look, this is why it works that way. In the similar way you can start farther down the road for what I am calling integrated projects, now for this imagine you're working at a big company, and big could be 5, 10, 20, developers, it doesn't have to be huge, but a team of developers where you are all building on projects and you are all integrating with the same subsystems over and over and over; here is how we send outbound email, from any app that we use, here is how we set up continuous integration, here is how we integrate with runtime error monitoring, things like Rollbar or New Relic, things like that, so if you've got a bunch of these things, and every time you create a new project you need to install Rollbar and setup the keys and the config files, you need to create the right thing in the requirements and you need to set up this mail system and you need to install say like some package that handles the mail for you, and so on and so on, like the more of these things that you commonly use within your company, the more excellent it would be to start with the template that already integrates all those things, you push a button and zzzip, it all comes our pre integrated, so like by the time you start opening your project, the first file in an editor, it's already got the email integrated, the way it works within your data center, it's already got error monitoring, integrated with your keys, it just is ready to go. So this is a super valuable way if you work inside a company, you want to make that company more consistent, make sure things that would be like well do we really need to add error monitoring and like do we need to put that effort in and if that's just like a button press, that's just part of project creation then of course you put error monitoring, why not. If you work on the other side of the story here, on an open source, not within a company that is like very structured, but you've got some open source project that has some setup basically in my mind, if your open source project has more than two lines, on how to get started it could use a Cookiecutter template; here is how I think it should go. pip install or somehow install, right, if it's Python pip, if it's Javascript npm, install your project library, run your Cookiecutter, okay, maybe the other order, depending on how you want to do it, right, maybe the Cookiecutter could be on GitHub and it could generate the some kind of requirement listing and then you install it there, either way there should basically be two steps, if you have a whole bunch of steps in an open source project, there is a lot of people that will come along, they will try to get started and go oh this is too complicated, I am out of here, right, so you can bundle up the best practices for getting started with your open source project, as a Cookiecutter template. That's excellent. And, this can regardless of whether you're inside of a company, or you're in an open source project, this can lower the support overhead, all that startup stuff, all that initial integration that can just go away because the template does it, you start beyond that place when you create that project and start from there, rather than saying okay, here we go, create this directory, put these files here and so on, and so on, right, so it can lower the support overhead across the board.
|
|
|
transcript
|
8:14 |
So let's start this chapter by building some kind of template. And this won't really be so much programming language template, it's just to manage some files, we'll just distribute text files as you saw on the data science repeatable data science thing, these can be all sorts of stuff, HTML files, and LaTeX and Whatnot, so just to keep things simple and neutral, we'll just sort of manage a bunch of files here, so notice there is nothing in this directory, but it's chapter 5 from the source code repository so you will be able to go and check this out. So let's start over here, by just creating some structure, so the first thing that we're going to need to do, so we want to create a folder, and in this folder, this has a subset as a subdirectory and subcontent of this folder, this is where the thing we give to the users goes. Now, we have to give it a funky name, it has to be {{cookiecutter.something}} and notice this project name here is going to appear again. Okay, and then next to this, we're going to need, right next to this one, we are going to need to create a cookiecutter.json so we can say touch okay, so here we have a cookiecutter.json and let me put this into Visual Studio Code, we want to make some more files in here, so let's go in here and we're going to make a file, I'll call this colors.txt, we'll play with that throughout this section and we'll make another file called summary and this called readme.md, md for Markdown, it's pretty common, so the first thing we need to pay attention to is this cookiecutter.json so here what we put is basically a key value JSON object. Okay, and the JSON object is going to contain some keys, those keys both specify the default values and the prompt we're going to actually run, so let's start like this, and it already knows it's JSON, okay, that's good, so we're going to come in here and we'll put things like project_name and then, we could leave it blank, which is probably not a great idea, let's give it a little default here, I'll call it my_proj for now that is going to be the default, they can change this name but that is what the default is, let's also put in here creator, and I'll just put something like this, like your name. We saw that we could put this into our default file, and have this change and insert our name there, so we can go ahead and do that in a little bit. Let's just have one more thing, favorite_color, and let's just say everybody's favorite color is blue but they can enter whatever they want. So we have our project name here, let's go back to our readme, and we'll say project and then in here we can use what is in our template, so we can use these names as you can see in file structure, and here is a directory, we can have a file named, whatever that is, let's actually do that, that would be cool, so if we come in here, create a file and call this project_name, we'd like to have it this way but of course, it's going to be {{cookiecutter.project_name}}.txt and it will also be project summary or something like that and again, inside these files, we can have {{cookiecutter.project_name}}, project is like this creator it's going to be similar but it's going to be creator, and so on. So this projects will get named based on what we call the project name, this file will be named as well, its contents will be changed so I'll have this over here, let's put this like that in our readme and let's make this our little header and we'll have this is the description of the project. The creator, we'll put a little creator here, favorite color is, and we'll do favorite color, okay, so I think we're pretty good, I don't have anything in colors let's just put the favorite color here again, just to make it appear in some places, you can have content that are unchanged, you can just have plain text like this is plain text, so whatever we put here, it'll just get copied over but it finds a Jinja2 expression it's going to grab that and evaluate it. Okay, so I think we have our basic project, let's have a look. So if we look at it like this, we've got our cookiecutter.json. we've in our main project, now our main project is called just this, is that right, let's move that really quick, that is probably not the best place, so let's call this cookiecutter that is a convention to start a cookiecutter and we'll call this colors, okay, and put that as a subdirectory, okay, so this would be the root of our git repo, we could point to it or we could actually just work with the project structure here, so it looks like this and if we have let's say go to that cookiecutter thing, and just copy this directory here, we should be able to run this, alright, so let's- so you don't want to run this in the cookiecutter template, that's not going to be good at all, what we got to do is we can run it, actually I could create the project right next to it, not very common but that is what we're going to do, so we come over here and say cookiecutter and then I just give it the path to the template, so I could say ./cookiecutter-colors I could give it that full directory, I copied if it was somewhere remote like on GitHub, I could give it the URL and then we'd clone it and then I wouldn't have to know its path anymore. So let's go ahead and run this, clear the screen, go, it's going to ask what is my project let's just call it the_first_color, okay, that is going to be the name of our project, my name I'll type it in for now, we'll see that we can change this creator here, and then, let's just go with the default blue, I could put something else, but blue seems fine. Great, now if we look at the tree, you can see we have two sort of top subdirectories here, and we have this one which has this Jinja expression project name, colors, readme and this file whose name is also the Jinja expression for the project name, and look what we actually created, here is the directory named like that, and here is that file.txt that it was named. So, let's have a look at the first, so if we come down, here, if we look at colors, you can see this says blue and this is plain text so blue is the expression I put that is the default value, and this is plain that was unmodified text, this one was just an empty file, and this one if we look at it, it will say project the_first_name, we could even preview, project the first color, this is the description of project, the creator Michael Kennedy's favorite color is blue. So you see how all this works, so let's go back here to our JSON file and notice, if I put this next to the thing we ran here, notice the three values we ask here, project name, creator and favorite color, and notice right here, those were the three prompts and their values with the default we were given, so it's really this cookiecutter.json that derives the user input and then after that, it's handed off to basically just the folder structure and the static files themselves, now, it turns out, that we can actually have like in here you saw we had a Jinja expression, for the creator and the project name, you could actually have expressions that are evaluated in these things as well, so you could do sort of conditional stuff that you can do with Jinja and so we can get more advanced in what happens inside those files and have further control over that, But, even already, we have a very powerful creation mechanism, right, we can create these files and rename them, move them around, fill in default values, conditionally include or exclude fragments of code using Jinja conditional statements, things like that. So there you go, we've created our first template, I suggest that if you want to practice this, go and create a template for some project that you typically do, try to create this folder it always has cookiecutter-the name of the template and then the cookiecutter.json and then the subdirectory is always named as something to do with the project or very often is named something to do with the project and then you have all of your pieces underneath. Okay, so give this a shot and we'll keep digging into this to see many more cool features that Cookiecutter has in store for us.
|
|
|
transcript
|
2:46 |
We saw that the project folder structure is one of the core things we have to work with, when creating these templates. So here we're going to create a project, a Cookiecutter template and we're calling it your project name, probably it should be cookiecutter-your-project-name, or something to that effect, the top level directory called your project name here, this is actually the name of the Cookiecutter template, not the thing it generates, and we also have a notes.txt, a readme.md, maintainers.md, these are just files that come along with the template that will not ever make their way to the user, but whoever comes to the template they can read those they can use those, there could even be a little scripts that do things for you. We saw there is basically two things for this to be a Cookiecutter template, one we have to have our JSON file here, our cookiecutter.json, this tells Cookiecutter two things, what are the replaceable values that we can use, and what default values do they have, the other thing is what are the prompts, basically they are the same thing, what questions do we ask the user. Okay, so that is that one, we also need a project, so here we're going to have a {{cookiecutter.project_name}} thing, this is all Jinja type expressions, and then, whatever we want to copy and modify for the users, we're going to put that where ... goes, as a subdirectory, or subfiles under this directory here. Now, this is a simplified version of the template, there is actually other things like pre and post generation hooks and whatnot, but remember, we're starting from a bare directory, a bare project and we're going to get more advanced and bring these things in as they make sense. If we want to run this, we are going to come here and we're going to enter the cookiecutter and then we'll say the name or location of the template, if we've already installed it off of GitHub or somewhere like that we can say the short name, in this case pyramid-cookiecutter-starter already given the full GitHub name and it's cloned into .cookiecutters, but if we don't, of course we have to say the full name, or if it's local, we have to say the actual file path to it, and in there, there is a cookiecutter.json with a bunch of questions, project name, repo name, notice here we have an interesting pick number 1 or number 2 out of this list. That is called a choice value and we'll get the choice values later, so where do these questions come from? They come from cookiecutter.json, right, we've already seen this, the keys here in this JSON object are the questions or the replaceable values and the values in the cookiecutter.json those are the default values. So that's it, you can see it is really really simple to create these Cookiecutter templates and with all the benefits available to you that I laid out at the beginning, why not, right, this is so easy to add so much reproducibility and reliability to almost any type of software project or just file structured thing that you're doing.
|
|
|
transcript
|
3:34 |
So we've seen that the prompts come from cookiecutter.json, and cookiecutter.json as the json extension would indicate, seems very static, like if it was cookiecutter.js well, maybe we put a whole bunch of conditionals and things like that, but just a json file, that indicates static values, so let's run this Cookiecutter template cookiecutter-template, that's right, it's a meta cookiecutter-template, this is the one that we can use actually to create other Cookiecutters, I just want to look at a question it asks, so let's run this, and it says great, what's your name, my name is Michael, here is my email address, my username "this will be the funnest project template evah'", So if we say this, watch what the next prompt is. Cookiecutter-the-funnest-project-evah, now I think that little dash might be causing me trouble but let's go and give it a shot anyway. The important thing to notice is look it took this value, that I entered here and it didn't just clone it, it actually did something interesting here, it turned it into what is called a slug, or project slug, it basically lower cased it, there is probably a bug in it, should remove quotes and things like that, a punctuation, and in here it put little dashes, right, so this is a good directory name besides that little quote that got on the end, so we can keep going with this and we just pick the defaults here, notice another thing, look at that, that is actually today, right, that's the day that I am recording this. This value changes if I run this tomorrow it will say 2017, 03 10. That's really cool, and the version oh no, this is a very advanced template, it's there, do you want to copy the hooks- no, don't worry about the details here, yeah, I don't think it can take this dash, but I suppose I did it right, it would also generate a thing that we could start, so instead of one we did in a previous video with the bare template, we can start from this one, we'll come back to this, the important thing here is that we entered the value here, and it worked there, and we also have time that is live here so these are two separate concepts the first one we'e going to focus on is how did this happen, so let's go over here and we'll say cd that, right, now if we look in here, we'll see a couple of things, let's just look at this cookiecutter.json, so check this out, this is the one where I typed the funnest project evah, and down here, look what's in here, we have cookiecutter-and then we have, I'll go and just wrap it for you, obviously, that doesn't make any sense, but we have cookiecutter-{{ that's a Jinja expression, and here that relates back to that, right, and then we'e doing additional processing, lower replace cookiecutter strip replace spaces with this, I think we could do a little bit more work, we could add our dash or quotes, or things like that, punctuation we can get that out of here, that would be no problem, we'll just add it on this, so these values here they can actually be live Jinja expressions and the value available to them, basically all the values, all the questions that have been asked or prompts that have been run previously are available, in this case, particularly we're interested in project_name. The other thing that's cool is, down here released it we have % now. Okay what is % now, we'll come back and figure out what that is in a little bit.
|
|
|
transcript
|
2:11 |
So let's look at the concepts behind this dependent value thing. So if we come over here and we run the Cookiecutter template template that's the one that generates Cookiecutter templates for us, and we run it, it asks a bunch of questions: what's your name, what's your email and so on, and then it gets to this point where it asks what's the project name, and I just entered whatever I feel like, greatest thing ever; and that's cool, but the next question is where things get interesting, right, the project slug is actually a url style, a directory style name, that incorporates that, so cookiecutter-greatest-thing-ever, and then it goes on to ask us the rest of the questions. So we saw that the project name is actually adapted over to here. So, how do they do that, they did that with Jinja expressions, and that's because this cookiecutter.json is more powerful and more expressive than it initially seems, so you can see we have project_name, and we can take that project name and apply it as a Jinja template expression, so we're going to take it and we're going to put it right there, remember, it's always {{cookiecutter. }} and then it's the whole thing, right, it's whatever it's entered there we can work with this, so cookiecutter.project_name and now we can additional Python code on this. Lowercase it, strip it, replace spaces with dashes, as you saw, it maybe could use a little bit more work but not not bad at all. And then it just goes on to ask the remaining questions. So you could do very powerful and interesting things in these default values. And I find that to be super helpful, if it asks me what the name is and then what the slug is, maybe I don't even really totally understand what the slug means, I don't understand that that's actually the directory name which results in being the name of the template I am building with this template builder, but the fact that it does this for me, even though it's like one line of sort of expression Python bits here it's super helpful to me as a consumer of this template. To make sure that I fall into the pit of success, I don't enter values that are not allowed, and so on. You'll see that when we get to the hook section, we could actually do way more powerful stuff than this, but this is already really helpful because it provides the default rather than just validating what we put in, it actually provides an adapting default, which is great.
|
|
|
transcript
|
3:31 |
Let's take a moment and focus on required values. Basically making sure that user enters something. Now, we're going to try and see that we at least can get to like a blank value thing, but we won't really be able to solve this problem until we look at one more feature later on, but let's give it a shot here and then we'll come back and look at it. So I've done a little bit of reorganizing here, I've saved off the work we have done so far into cookiecutter-colors-v1 and now, this one I've changes a little bit, notice since that it had been project name we have project slug here, and over in the json, I've added that little trick to take the project name and generate a slug from it, so that we have a little more reliability, for the file or the project, the folder that we generate because, if we have things like colons and slashes and stuff it's not going to work out so well for us. So let's suppose that we want creator to be a required value, maybe we could start like this, let's suppose those two have to be required values, one possibility we say let's put in nothing and see what happens here, so if I run this, cookiecutter cookiecutter-colors it's going to ask some questions, my project I'll say the best ever and you can see the best ever how cool is that, right, so we'll take that default and creator, well, what we would like for it to do is say you must specify a creator name, you must specify color name, and now if we open up the best ever, like this, you can see up here at the top where it used to say blue, it's just empty, right, so much for required value, because, these empty values just went in as empty values. Well, we can try one more thing, maybe we can have something like required here, yeah. that is probably going to do it, let's try one more time, run the same code here, like this, alright, we'll just take the defaults blank and required, no, still nothing. Although, in a slightly better way, we should be able to see that our blue is now required. Okay, so this is not working, but the one half that we do want is we should be able to use either of these, we want to create a system where we can say creator is blank, and somehow maybe know that that is required, we want to be able to say favorite_color=required and they are not allowed to enter, something else. we could see that we could give them a choice here, and then they would have to choose from the list, like blue yellow green red, but if we want the full rainbow, the entire spectrum of colors, well, we're going to have to do something more interesting than that.
|
|
|
transcript
|
1:41 |
Blank defaults make a lot of sense, sometimes you just don't want to have a value unless they type it in, like you have no idea what the default could be, or maybe you want to have a blank one and indicate you must enter this, there is no choice but to type here something that makes sense for your project. So let's look at an example. We come here and we run this cookiecutter template, maybe it's going to come along and ask your name and your favorite color, alright, well how do we make this like a required value. Well, if we just wanted blank with no defaults, and it's going to be empty unless they put something in, this is fine, all we have to do is have our json file have empty value and you have an empty non default, but what it really means is the default is an empty string, so it still could go a little bit wrong. We saw that we tried to have some sort of keyword here like hey let's try required and of course, we put required over there, but that doesn't really do anything, so we saw that it will just use required. What is required to make this keyword work or something like that is writing a little bit of Python code in what is called a pre generation hook, we're going to talk about hooks at the end of this chapter, but a pre generation hook is code that runs after the data is collected here, but before it actually executes the process that creates the directories, copies the files, does the replacement, and you'll get a look at what is called the context, and this context is all the values, the keys and the values, basically listed in cookiecutter.json, so we could say if the value favorite color is still required, or if it doesn't seem like some kind of color we could say no, no, we're not going to run, we're going to cancel this, tell you you need to enter a favorite color, it's not amazing, but that's what it is.
|
|
|
transcript
|
2:03 |
Let's return to our attempt to making the user enter something meaningful at a given step. So we saw that blank values kind of indicate you should type something but it doesn't really mean it, if you don't type it it's just empty this required we will be able to use this at some point, using the pre generation hook to check for that value no, no, that's not actually a value, you should have typed in something. But, if this is a bounded set, let's suppose that your favorite color, you could only have like the basic colors, cyan, green, yellow, red and so on. Well, if that's the case, we can make them pick one of them, like so, we come over here and within quotes, we could put stuff so let's say red, blue, green, yellow, cyan, white and black, I don't know if that covers it, but that seems like some of the basic console colors that we can use, this is just a what is called a choice variable. Now, those of you who know Python, this is actually a Python list, right here, but really just a list in basic plain text here, of what the choices are. Now if we run this, again, it's going to be a little bit different, my project name will be with some choices, like this, creator, now I have to enter something for now, I can test this later, when we get to the hooks, look at this, boom, select a favorite color, now there is still a default, it's still going to give me red if I just hit enter, but I do love yellow, so let's go with yellow, now, if we open up the with, let's see what we got. Over here in colors, check that out, we have yellow right there, alright, and that came from our choice variable so here is a way to make the user sort of choose from a constraint set, so it's in one sense a default value, and it's pretty good, if you've got a bounded small set of things to pick from, I totally recommend this, it's very user friendly, but if you have an entirely open end of things like this that has to be answered, like what is your name, well there is not really a list for that, so we are going to have to check that in some other way.
|
|
|
transcript
|
1:08 |
Any time you have a bounded list of options and that list is pretty short, it's really nice to make that what is called a choice variable. So here we come in in Pyramid, the Cookiecutter starter example this is one of the main official cookiecutters for creating a basic more or less empty Pyramid web application, they come in here, one of the questions they have to ask you is do you want to use Jinja2 or do you want to use Chameleon as your underlying templating engine. So if we come in it will ask us things like what is the project name, and so on, and then it says select your templating language 1 for Jinja2, 2 for Chameleon. And notice that whichever you want the default to be, that one should be listed first in this list. So this works great when your options are a small set of known items, here we just have two and the chances somebody misspells Chameleon or doesn't know they can type Chameleon or Jinja 1 or 2, anybody can do that, this works really well. So in the cookiecutter.json, that is how we control these, and we saw this is really just a list of strings, so here we have a list of strings, and they get turned into number 1, number 2, number 3 for user input.
|
|
|
transcript
|
3:52 |
Remember this cool Cookiecutter template. It has some really interesting things we entered a project name and it generate the slug, and it also asks for the release statement, it said wait, that's today, this is actually when I ran it, now this is when I wrote the slide, but whatever, this is the date generated as the project or as the template is executed to generate a project, so this is not actually a part of Cookiecutter, this capability does not exist in Jinja2 either, in fact, what this is an extension to Jinja2 itself which we can plug in to Cookiecutter, let's see how that works. Over here, we have a list of extensions for Jinja, you can see it talks about how to add them, some internationalization stuff, expressions, loops, with statements, auto escaping extensions, and in fact, there is a whole API to write your own, and some people have, so if we go over to GitHub and do a search for Jinja2 extension, you can see there is at least 25 of them on GitHub, so some about time, this one we're actually going to use, some about Markdown, some about highlighting code, and some about Jinja and some about Django here, things like that. So these extensions are really helpful, and we can use them inside of Cookiecutter. Unfortunately, the way they get sort of setup is not super amazing, in order to use these extensions, you basically have to install the system, so let's give this a shot and see how it works. So over here, let's look at this first, so what I have done is I have put the syntax to generate a year month day expression based on datetime.now, right, so here you can say I'm in a run now I'm going to feed it this local time operator here and this is the extension stuff, so if I try to run this, this is not built in anywhere, this is an extension that actually comes off of a place called PyPI, the package manager for Python, it's not on my system, I can go and try to run it, and it will say no, no, we cannot do this, there is no module named jinja2_time, if I type pip list, you'll see yeah, there is Jinja but there is no Jinja time. So here is the bummer deal, if I want to do this, if I want to actually have access to these extensions, here is the thing, I have to outside of Cookiecutter pip install jinja2-time I'm just going to go and download that, put it in my system, and now if I pip list you can see Jinja2-time Okay so that is step 1, the other thing to do is something that we can do for the users, right, we need to come down here and say we're going to have an _extensions, I believe that's a list, with the proper assignment there, okay, it looks like we're missing a coma up here but, we've got our extensions and our extension is jinja2-time and now we're using it right here, notice there is some of these things are underscore that apply to Cookiecutter that are not themselves prompt, it obviously won't ask us what extension do we want here, so let's try this, alright, so let's give this a shot, oh woops, I still made a mistake here, I need actually not quite like this, I need the .TimeExtension There we go, okay, try again, excellent, it looks like it's working, right, so my project will be timed project, and it's going to say time-project, beautiful, I'll take that, the creator, I still got to work on this, it's me, created on look at that, that is today. So that comes out of our now extension, and because we've installed jinja2-time as a package and then over here, we've imported the .TimeExtension, then we're good to go and I think created right now makes a lot of sense, and you know what, I am feeling like cyan, boom, done. Now, I don't actually put this value into our files, we didn't reference cookiecutter.created_on but if we wanted to it would be the value of that string right there.
|
|
|
transcript
|
1:28 |
Jinja2 comes with the ability to write extensions for its template language, here is the officially listed extensions as well as the API that we can go to and write our own. We could also go to GitHub and do searches for those extensions, and we saw that there were 25 of those, at the time of the recording, that is pretty cool, so if we want to use the extension, we have to list it, right here in this _extensions. Now, unfortunately, this must be an installed Python package, which means pip install package-name typically depending on, there is a few intricacies around which version of pip you're using based on your path and so on, so this can get actually a little bit tricky for your users and it's too bad that it doesn't somehow install this kind of automatically, as part of the template creation, so maybe there is some work to do, on this project to say look, it requires these extensions if you either run this, this command or I can do it for you, as part of the execution, and we'll set this up in your user profile, so from now on you can use these extensions there is a little bit of a security tightrope to walk there but I think something like that would be really nice, it doesn't exist now so if you're going to do this, your users have to install jinja2-time before they could run this template. But once we put this in here as an extension, then in our project, we can say things like release date is {% now 'local' %} And that comes from the time extension, so that's really cool.
|
|
|
transcript
|
1:36 |
Let's imagine you want to create a template that will generate projects and those projects themselves need to be able to run a Cookiecutter template. Well that can pose a real problem because anything in this entire directory structure is going to be renamed and modified and so on, but as you know, we probably want our Cookiecutter to have {{cookiecutter.project_name}} for its directory and it's going to have its own cookiecutter.json and its own replacements in its files, and so on, so if you want to ship Jinja content that you want to be not modified, as part of this template generation process, you can do it and it's pretty easy. So if your project especially ships with a Cookiecutter template that is supposed to arrive in Cookiecutter template form, not process, you're going to need to take this step. So we can come over here to our projects, and you've seen the prompt bits, but the new things is we can now add copy without render, and we can apply this to a couple of things, we can say anything under the static folder, these are like big files and so on, just leave them alone, there is maybe hundreds of files, maybe our project will generate its template quicker if we just say stay out of static, there is nothing in here for you to do, we can also say don't mess with cookiecutter.json now to be clear, this is not this file, this is the file inside the project, a little bit further down. This is the file within your template and finally, you can also say if there is a directory called {{cookiecutter.project_slug}} well, leave that alone as well because that is the top level to your template maybe.
|
|
|
transcript
|
7:57 |
Several times you've heard me say things like oh, we could totally validate this, and verify it if we just had these things called hooks. So, Cookiecutter itself it's Jinja syntax here and some of its other features, is very flexible and sometimes that's all you need; but there is certain things, at least at the time of this recording that you can't do, like for example, you can't conditionally include or exclude files you can conditionally include or exclude parts of files but the files themselves you can't really do that. So imagine you’re creating a web app, and you ask a question, what kind of front-end frameworks do you want to use, do you want t use Foundation, do you want to use Bootstrap, there is all these different choices you could make and probably those have a bunch of files, css and json that go with it so without this concept of hooks, you can't really do that. So hooks are the way to basically write arbitrary code before and after project creation. So let's see how that works, so here I have opened this up into PyCharm, like I said, most of this class and to use Cookiecutter you don't need to know Python, you need to have it because it executes on top of the runtime, but other than that, you don't care. In this case, you're going to care, you're going to need to be able to write Python because that is how you do it. I do suppose there is other options, you can use a shell script, like a bash script, so if you want to write that instead, but then that locks you into unix platforms only; and there is some talk that maybe somebody adding a feature say for like a PowerShell script for Windows, something like that, but for now, the best way to do these hooks is really with Python, so how does that work? So we're going to get started by creating a new folder, called hooks, lowercase, just like that, it has to be at the top level of your template, not where the files are, or things you're actually using to give to the users are, above that, and here we're going to have a Python file and it's going to be called pre_gen_project.py Now, let's go ahead and add another one, we're not going to do anything with this yet, but let's go over here and say post_gen_project.py, and let me just do a print "Post gen hook running". Alright, so that should show up, don't you think, in our output here, and we'll just do the same for the pre gen hook. Just so we can check that everything is setup okay. Alright, so let's go over here to our working directory again, see where we are, perfect, so if we look here we have all the stuff we've created, and I've also made a backup of where we were before, just like I have a snapshot, so here is our current one, we're going to say cookiecutter to install that. And, we need to say local, alright, it's going to say where is my project, I am going to call it the-new-hooked-project, something like that, creator we'll leave empty for now, data is now, notice if I hit Enter I just choose the default for the select the favorite color, and pre gen hook is running and post gen hook is running. Now, I am not sure if that behaves the way you would expect or not. In my mind, the pre gen hook kind of just run before stuff, right, but notice that it's actually asking all of these questions, all the prompts are happening first. So what happens, the workflow is basically it gathers, it looks to those from the cookiecutter.json, it runs through the whole prompts, it feeds this data here and then in between these two lines the actual generation and processing the files happens and then the post gen hooks run. Okay, so you already have access to these things which means like creator, we could validate creator, so let's go and work on a validation thing, we're going to put post gen hook away for a little while. Okay, we probably don't want to print that out every time that runs, that's kind of not great looking, so let's do this, alright, so let's write this function called validate. We're going to come down here and this hook file actually gets its values replaced as well, which is pretty interesting, so check this out, we'll say the creator is and now what we can put in here is some kind of string like Jeff or Michael or a Jinja expression, and the Jinja expression is {{ cookiecutter.creator }} Alright, let's just do a quick print pre hook found creator of and do a little format here, okay, so if we run that and then let's just say- hold on, there is going to be one small problem, it's not going to do this, why- because we're not running it, so we could just come over here and say validate, but let's be a little better so to speak, in Python, there is a way to test if this thing is being run or if it's being imported and so there is this little convention here like so. So the name of the module is set, the dunder name is set to a __main__. It takes a little to get used to if this is new to you, but that will execute this. Okay, so now if I run this, so I'll put something for the creator, and we'll just go and choose that and you can see pre gen hook found the creator. Awesome, okay, so check that out, we can just use this and what this Python script actually sees, if we run this in some kind of verbose mode and find out where this file gets put, on some temporary location, what this sees as it executes as Python it's simply this, like that is what it sees, it's Cookiecutter itself that does the transformation of the hook file and then you run it with the values that were dropped in, so we write it like this, but effectively imagine the replacements were done before this was ever loaded by Python. Alright, so now we can do a little test here, we can say something like this, if not creator, so if it's empty or something like that, or not creator.strip(), right, I think actually because of the way we'er doing it, it's never going to be none; if it's basically empty, we'll do something like this, print("ERROR: You must specify a creator to use this template."). Now, how do we indicate that this was the problem. Okay, so what we need to do is we need to say exit and basically the way we tell Cookiecutter there is a problem, is we exit with a non zero status code, Python the way you do that is you import sys, you say sys.exit(1) let's say 1, right, 1 means there is no creator, we'll add another validation as well. Let's try this again, project name will be New project with hook and creator, it seems like a great name to me, creator, let's go without the creator first. I don't need that, who cares, boom, error, you must specify a creator to use this template, and then cookiecutter says, something with the pre gen hook didn't work so we are out of here it exit with code 1, so notice that you can send out different codes, so that when people look at it, it can mean something like your documentation for the cookiecutter template can say oh exit code 5 means there was this kind of problem, exit code 7 means that kind of problem and so on, okay, so let's run this again, we should be able to do it, the created project. And now if I say Michael, or whatever, and we just next through it, boom, done and now we have validation for this thing here which is great. So it's not just basic validation, we could do all sorts of things, like we could check to see that the favorite color maybe right now we don't support black so we can also come down here we could say something to this effect favorite_color = '{{ cookiecutter.favorite_color }}' this cookiecutter thing, and we can say if favorite_color == black print("Currently black is actually not implemented.") And let's go over here and exit let's see if we say exit 7, that means the color is invalid. So let's try it one more time. Black project, we'll never worry about this because it won't get created, j, I'm going to pick black, so we'll say 7, boom, currently black is not implemented, error stopping. So we can do all kinds of validation, we could check that this entry somehow matches this entry, so you can see these pre generation hooks, lets us look at all the data after it's been entered, and verify that everything is correct. If we want to actually mess with the files, we want to make changes to the files themselves, well then, that is going to be a post generation hook, which we'll look at in a moment.
|
|
|
transcript
|
2:52 |
You've seen that the cookiecutter.json is more powerful than it initially appears, it's not just static JSON. That said, there is plenty of advanced processing and validation and other types of things that we might want to put in here that just doesn't really fit; and so pre generation hooks and as we'll come to later post generation hooks can together solve this problem. So here we wanted to have some required input like if we are going to put nothing you must put your full name. If we're going to put just a blank name you have to put your name, like maybe it's Michael and Michael Kennedy and if we don't have a small bounded set of items using the choice variable which does make you to choose one of the things out of that choice, that is not a good option, right, maybe we want any possible color and having that list would be kind of insane, so we could put something like this required, so we could do that for full name as well, or we could just have it blank, so these are however you want to present it to the user, now if you have defaults, as a user set in your Cookiecutter defaults, it will fill out full name with your real name, and it will fill out name and I guess if you've had a favorite color you could get it to put something there as well, but let's talk about how we use pre generation hooks to validate this. So, we're going to create a folder, in our Cookiecutter template right at the top, we're going to put a hooks folder and we're going to put a pre_gen_project.py and possibly a post as well when we get to that section. And then, when we run this, we're going to come along and if we leave this empty, it's going to say no, no, you must specify a favorite color, you must specify a name, whatever we put in our pre generation hook, so the blue message comes from our code, the red messages come from cookiecutter. So think about how those two messages fit together because I don't think you can really suppress the Cookiecutter error and you can decide whether or not you put out yours, but you don't want to just exit 2, status code 2, failed, who knows what that means, you want to give them a message, so something like your favorite_color is required. Here is an example of the code we wrote for that validating required input and what you just saw in this screen. So, we say favorite_color = and name doesn't have to match, it can just be fav color, whatever, right, it's just a variable, equals quotes as a string, the Cookiecutter definition, so {{cookiecutter.favorite_color}} and we saw that this gets actually replaced by Cookiecutter before it ever executes, so this is a flat static string, this is not some kind of lookup, there is no dependencies or import statements you need to do for this. And we can just say hey did they not put a favorite color, or is the lower empty version of it required either way, you are going to have to enter something, and so we just call this function at the bottom, and notice the return values, we're returning either 1 or 2 on an error case and we're returning 0 from this function at the very bottom we're saying sys.exit() whatever validate said. Okay, if it exits 0, everything is okay, 1 or 2, not so much.
|
|
|
transcript
|
6:36 |
It's time to work on the final finish product by creating a post generation hook. So these are very useful, and one of the key reasons we might create a post generation hook would be to display instructions about getting started. So once your project is created, you might want to say hey user, thanks for creating my project, here is the next steps you have to take maybe you have to pip install the requirements, or you've got to setup your system this way, or bunches of things. So we can show a little nice message right at the end by using a post generation hook. One of the things that is very common in these templates, but is not built in to Cookiecutter at the time of this recording, is the ability to include or exclude files and directories conditionally. So, we can write a little bit of code to do that, and I've changed our project, just a tiny bit to set this up before us, so over here notice there is this folder called color_files and it has a blue_file a green_file and a yellow_file. If we look at the cookiecutter.json, I trimmed this down just for sanity sake, so we have blue, green and yellow, these three you can all create projects of that type, remember our pre generation hook already will not allow you to create a black one, because we were just playing around with that idea. So we have these three realistic options for a color. Now, when you choose a color, what we want to do is only include the blue_file, which simply says this is the file that appears only in blue projects, when you choose blue. If you choose green, we want to have only green, we want to get rid of blue and yellow, if you choose green. Okay. We could take this in a much more advanced direction but I think if you see this, this will be enough for you to sort of bring this concept of conditionally including files, directories and various things in your own projects. So, how do we do that, we don't need any of these, let's work on this file one first, and then we'll come back with the instructions second. So, let's go here and let's go and set this up to have this main convention here we'll go up here, we'll write at the top, I like to put this right at the top, have the function that orchestrates what we're going to do. So the first thing we're going to do is we're going to remove unused project files, let's say, so that is going to go here and then we are also going to display getting started instructions, so we're going to fill that out here in a minute. Okay, so how are we going to remove our files, let's try one more little helper function called delete_files, this will be file_list, and this will be a working_dir. Okay so we're going to need to use an os module in Python, so we are going to import os and let's just go down here and say for file in file_list: full_file = os.path.join(working_dir, file) we want to take the working directory and in a platform independent way combine it with this file. So this is going to be the file and then we're going to test whether it exists, so we'll say if os.path.exists(full_file):, we're going to say os.remove(full_file). So, we were given a set of files and if they exist, we want to delete them so up here we are going to choose which ones do we send to this function, which ones do we actually want to delete based on some sort of input. Let's go ahead and also here say else: print("WARNING: Could not find file to remove in hook: " + full_file) And we'll just print out the full file here. Hopefully, if we do things right, we'll never ever see that warning, but just in case. Now what we need to do is figure out the favorite_color. And as long as we spell this correctly, this will be cookiecutter.that Like so, alright, so that is going to be the color, and then we just need to test is it blue, green or yellow, and first of all, let's get the working directory that is going to be the same, so we'll say os.path.abspath(os.path.curdir) So, when our hook executes, it's going to execute in the context in the current directory, it's going to be where that template is, where the files were created, okay. Then we'll say like this, file_list = [] (is empty), we'll say if favorite_color == 'yellow' say file_list is going to be and we'll just put "blue_file.txt" and "yellow_file.txt" Sorry green_file, okay, we got "blue_file.txt" and "green_file.txt", now there is a bit of a problem in that, this current directory here is actually this directory, and we need to get into the colors file, so we could do one more step, if we know we're only working in the colors file folder, we'll just do like this. Join that directory, with color files. And then we can just say the short names here. And let's just keep going, and finally in all of these we just say delete_files(), we give it the file_list and the working_dir. Okay, if everything is working correctly, we should be able to delete these files, okay, now what we're going to do is we want to create a few projects and we should see if we choose blue, we'll only have that left, if we choose yellow, we'll only have this, and so on. Alright, let's go give this a shot. So we're going to run cookiecutter cookiecutter-colors I am in the directory that has the template that is why I can say it this way, it says my project, this will be green project, green project is good, this is going to be Michael, that's fine, let's pick green, alright, let's see what happens. Boom okay, so now we have the green project, so let's see what's in there, color_files, ta-da, we have only the green one, beautiful. Alright, let's try this again and this time let's do it with yellow. So yellow project, yellow project like this, on this date, make sure we pick yellow, and we'll say open yellow and this time, we got the color_files, here, yellow, okay, and so that is how this works, we created a post generation hook and all of these files here were copied over in the project creation, and if we had Jinja expressions in them, they would have been expanded and filled out and possibly conditionally done and so on. Then, after all that was done, we said okay, well probably some extra files were copied, like blue_files were copied, even in the yellow projects, we're just going to go and do a little bit of code here to clean them up, right, figure out what they choose and then write just a tiny bit of code to go and delete them and hey, how about that, we didn't mess up and see this warning. That's cool.
|
|
|
transcript
|
2:55 |
We've seen that we can use our post generation hook for deleting files, right, we had a certain number of files here that we only wanted to keep some of them in the situation where we picked up particular color. A real world example of this would be a web application with different types of templates, Jinja, Chameleon, Mako and so on, and you only want to keep the files that correspond to the ones selected, by the creator, the person who ran the Cookiecutter template. Now we're going to do one final thing here, we're going to display some helpful instructions for the user, okay, so when we run the Cookiecutter template, what we'd love to see is here we've created your project, we asked you the questions, and here is a friendly little getting started message so we can help people fall into the pit of success. These are the next steps you should take, if you feel lost- don't, just do this. So I've already pre created a little message here so I am just going to paste it in, so we need to somehow get the favorite color because my message says welcome to the color project, and you choose this color, the world is a rainbow, but mostly, it's this colored rainbow, okay, to get started read me, obviously you would have different types of messages here, but let's say we have this method up top here, that already is getting the color let's move this getting the favorite color out, and passed around. Like so. Down here, we can pass in this favorite color, there we go, it's not really a performance thing, this is actually just a static string, it's pre replaced with the color when they selected it, but I kind of like having this ability to get in one place and pass it around. Alright, so now we should have a nice message when we're done with this. Okay, let's create one final template, so again, it's going to be cookiecutter cookiecutter_colors, we're going to run this here, and let's see, the project is going to be final exam and of course our little dependent property here, grab that and create this, you creator is going to be me, so I'll just put MK it's created on this day, when I recorded it, I am feeling yellow again and let's go, what is going to happen, it's going to run our hook, it's going to remove the extra files, right, the blue and the green, and it's also going to give us that nice message, let's see how that works Boom, welcome to the color project, yellow, the world is a rainbow, but mostly it's yellow, so to get started, you can read the readme, how cool is that, this is a super sleek project creation experience. I run the little thing and as we'll see later, you can actually run a custom script out of your project and it could call this API, and all the stuff is happening, and then when we are done, we get this nice little message that we just added in our post generation hook.
|
|
|
transcript
|
1:22 |
Now you've seen post generation hooks in action, let's look at them as a concept. So, we can put whatever script or code we want here, you can see at the end, the very bottom I call sys.exit() clean unused color files. And, that is just going to call this function I've written above, so one of the things that is very common to do in Cookiecutter is to remove files that you don't need anymore, and maybe some day this will be built into some part of the system, I don't really know, like a conditional statement in the cookiecutter.json or something, but for now, this is left up to you, the template creator, in these hooks, so here we can write a little bit of code, it's going to grab the selected color, in this case the favorite color, we called this variable selected_color, we are using the os.path.cur_dir() to find the root of the generated project folder, and then, we are just looking in the colors directory and grabbing like the yellow.txt file if it's not needed and we're calling remove on that. Okay, and then finally, notice at the very bottom we're returning zero, maybe if there was some kind of error, we have really basically no error checking, but if we checked and there was something wrong, we could return a non zero value and we're calling sys.exit() which would actually stop and fail the project creation, if we say this hook didn't run successfully. You say it ran successfully by sys.exit() is zero and it doesn't run successfully by exiting something non zero.
|
|
|
transcript
|
2:17 |
Now you know how to create these Cookiecutter templates and I feel like I've shown you something of the hard way. And I did that on purpose, not to torture you but because I want you to really see and understand all the moving parts, but, if I was going to go create a new Cookiecutter template, there is a very good chance I would use a Cookiecutter template to do that. That's kind of circular, isn't it, but there is a template called cookiecutter-template, and its goal is to ask you the questions to generate the basic project structure for creating a Cookiecutter template. So you can get it from this URL here, let's go and run it. Alright, my name is Michael Kennedy, remember that comes from my default file, similarly my email, my GitHub user name all these things, the name of the project, let's suppose we want to do something with race cars simulations, so I'll call this Race Sim, something like that, and notice, it uses that dependent thing to generate the right naming structure, it's going to put cookiecutter- which is the convention for naming these templates, it's not required but it's the convention, and it slugifies, if you will, it creates the lower case no spaces version of the name, so perfect, let's just go with that, short description, this will be the starter template for creating race car simulations. Okay, again, today is the day we are going to do it; yes, we want to copy hooks. Boom it's done, okay, let's see what we got, it should be in cookiecutter-race-sim and there it is so let's open it up, alright, now in here, notice, we've got a Cookiecutter template, it has a cookiecutter.json and it has a directory that has got a name in there and it's going to have basically the project slug name put there when you run it, it also has a CHANGELOG, it has hooks, a post generation hook with some code already built for us, so we can use that to start, no pre gen hook but that's okay, it has a license, a README and so on. This is really nice and if you're going to get started, just make sure, you don't want to make any mistakes, so might as well just say cookiecutter cookiecutter-template And get started that way.
|
|
|
|
19:35 |
|
|
transcript
|
2:09 |
Cookiecutter is a very powerful in its own right. We've seen the pre and post generation hooks, the dependent properties in the cookiecutter.json, and so on, so there is quite a bit we can do just within Cookiecutter itself, but, there are many times we want more control over this, or we wanted to feel more native or we don't want to tell people hey you have to use Cookiecutter, just say use our application, run this command and you'll get started, but we of course don't want to do all that file management, projects, text juggling that Cookiecutter does for us. So, we can wrap the Cookiecutter API in our own application, be that Python, .Net, Java whatever, and we can use that to interact with the user, but actually use the Cookiecutter API just like you've seen all the features we've seen creating the templates, we can use that from the API to create our project in the end. So, I'll give you two quick examples, if I want to get a new project started in Pyramid, the web framework in Python, there is a whole bunch of stuff I've got to do really to get started, I've got to create the templates, I've got to create the views and maybe even I want testing, it's a Python package, so it's got to have a certain amount or structure put together so that it represents that, there is a lot of things to do to get started. And sort of just telling you to do that, they say hey you can just run this command pcreate -s (for scaffold) starter and the name of your app, and we'll go and create that for you, so then you can just run it and have a working app to start from, that's great; it turns out pcreate actually wraps the cookiecutter API and calls the started Cookiecutter template from Pyramid to do that, which is really cool. You run this command, it asks you a few questions, probably looks familiar, it doesn't have to though, because, you can ask these questions in your app and just feed the answers directly to Cookiecutter. Another example might be django-admin, maybe we want to create a new project called my site, something like this, I don't think django-admin uses cookiecutter, it may, but it's just another example of here is some part of my app, it helps you get started by generating a project that could easily be a Cookiecutter template. Right, off it goes, it does whatever it does to create your project, ideally that's with Cookiecutter.
|
|
|
transcript
|
2:10 |
For this programmatic Cookiecutter demo throughout this chapter, we're going to try to do something fun here, I am going to create an application called "game_maker", and this "game_maker" can make three types of games, it can make pong, it can make Tic-tac-toe, it can make Hi-Lo, guess the number, it's too high, too low, that game. So what we're going to do is we are going to start with the template, and we are going to write a program that wraps up the project creation and of course, leverages Cookiecutter in the internals to do so, but it's going to have a custom experience, for the user, okay. Now, first thing we want to do is I want to start with the template, I am going to just paste that in here, and it's called "cookiecutter-use-api", not a super creative name, but that is what I am calling it. Now, notice over here in the template this is a cookiecutter thing, we have a hook we have a post generation hook, we have a name, we have three games, we have Hi-Lo, we have pong, we have a readme that tells you what kind of game you've created, things like that, really, it's just a demo but you know, people can play the game if they want. Right, so the idea is we are going to have our game maker, and we are going to have this thing here, which I am going to need the path to in just a moment, and, we are going to basically ask the necessary questions that would otherwise be asked here, by Cookiecutter itself and we're going to use that to create the project, but before we do, let's just see what would happen if I ran this directly, so if I say cookiecutter and I give it the whole URL there, it's going to run, it says what is the name of my game, okay my_game, my name, I am going to pick let's say hilo, boom, great, so that was kind of an okay experience, it didn't really tell me what kind of game it was going to be or it didn't explain a lot about what cookiecutter-use-api is about, but technically, if I look here I do have a game, and I can even go into my game maybe I should have put that in source, huh, I'll move, actually no, I want it right here, so I can come down here, I could even play my game, if you want, so that's pretty cool, hey, my name is Michael, 3, 50, too low, 75 wow how was that for some luck awesome, so we played the game we created, but we can do better if we wrap this API and just use this as the kernel to create the game itself.
|
|
|
transcript
|
5:28 |
Okay let's begin having this program, which if I run it does nothing so far. Let's begin by having it have a cool little output here, so I'll call this print_welcome() or something like that, we'll create this function, and we'll put that there, let's move that below main, okay, now if we run it, it says welcome to the game creator, we'll create either hi-lo, pacman, or pong for you, so this is slightly better experience, I understand this is not that big of a deal, but, it's still cool that we have a little bit of a welcome to the game creator type thing going on here, the first thing that we're going to do is we're going to gather the inputs, so we want to ask them questions like hey what's your name, and what kind of game do you want to make, basically the things that Cookiecutter would ask and potentially other ones as well, but remember, in Cookiecutter, we have the Cookiecutter defaults so it already knows what my name is, it already knows what my GitHub username is, things like that. So as much as possible, we would like to just leverage the defaults and not even ask, right, just go hey we got the default values, but how do we do that, well, that's the first step into the Cookiecutter API. So when I come over here and say import cookiecutter and there is a bunch of stuff here, we're going to get the cookiecutter.config Now, let's go down here at the gather inputs, and we're going to say the config = cookiecutter.config.get_user_config() Now, it seems like that is what you might want to have here, okay, you might want to say this, but it turns out if we just print this out, this is actually not what we're looking for, if we look here, this is the, it's like the full thing, and then down here, there is this default context and in the default context we have our name, our email and so on, so it's really the default context that we want, so let's maybe say something like this, ctx = config.get('default_context') this is just the dictionary, so now, if we print out our context, I think that's what we're looking for, perfect, so we can grab like full name and store it. So once we have this, we can start writing code like this, so we can say if, we'll say full_name = ctx.get('full_name') right and this get function on a dictionary in Python will return none if it's not there, or it will return value for this, so we'll just say if we found a full name, let's say if we didn't find the full name, then we'll say full_name = and we'll have to ask and let's see, what else do we need to do that for. We have to figure out what type of game it is, so we can ask a similar type of question, this time, I don't really think there is a reasonable default like somebody doesn't always want to make Pacman or something and let me just tell PyCharm this is not misspelled, so it doesn't look wrong to you. So we can figure out the game type that's going to be fun, and let's figure out the package name, so we'll say do an input('What do you call your game?') Now, they might have spaces, a punctuation, all that kind of stuff, so I wrote a function here that we can take and transform package name and we'll say to package style, right, what this is going to do if you just look down here, it's going to get rid of all the white space and double spaces and things like that, it's going to kind of normalize it, it's like what we've seen before with the project slug but this is actually more robust than that. We can also ask questions like where do you want to create it, so let's come down here and ask this, we can even ask it in a loop, in case it get it wrong, now, this I am not sure how great of a user experience this is, but I am pointing this out because this is not possible in Cookiecutter, and it is possible here, so we can ask like this, we can come down here and say what is the full path to where your project, where you are going to create it, give us a directory, and if they give us something wrong, instead of just trying to create it and fail, we can go no, no, actually that directory you gave us, that didn't work, let's try it again, give us another directory, right, so because we're doing this in our own code, we have our own flexibility, and just to be clear, this doesn't have to be Python code, this could be any code, any code that we want to write this in as long as we can somehow shell out to interact with Python for the API. Okay, so let's add that to the top there, okay, so we have our working directory, and then I think we'll have everything we need to create the game. Now, one final thing I'd like to do is package this up a little bit, and I really like returning a bunch of data in the form we would have to there so let's go and create using a named collection here, let's go and create a game create info, and it's going to have a project name, full name, game type, a working dir, surprise, those are the things we needed and let's have that function here return it. so we can come down here and just say actually, let's just return this. So we'll need project name, we'll need full name, game type, and working dir. package name, not project name. So that is going to create it, and let's just make sure this first part is working, I'll just print out the create info and then I want to come back and we are going to actually do the building in a minute, let's run it see what we get. So let's come down here I want to play Pong, okay great, I am going to call it "The great ping pong", the full path will just be this, boom, we're going to create this directory and there is the full name, notice, it didn't ask me what my full name was, right, because it got it from the defaults. the game type is Pong, and the working directory is just right here. Okay great, so it looks like we're gathering the inputs perfectly well here. The next thing we need to do is actually use those inputs to build the game and this is where we're going to execute the Cookiecutter template.
|
|
|
transcript
|
7:32 |
We've welcomed the user, we've gathered their inputs about how they want to create the game and now it's time to come down here and actually use our game info to create the game. So first of all, let's start by saying something like this, hey we're building the game with info.project_name and info.game_type and notice how cool it is to be using named tuples, game type and so on. Right, that's why we did that at the beginning. Also, it can be important to use flush=True because if we get the system really busy waiting on something it might actually not put that message out straight away, so this is kind of like a hey we're busy hold on, so if we want to make sure that gets straight up so we use a flush here, now the first thing we need to do is locate the template, that folder right there. Actually that folder right there, so our game is here, let me collapse templates, so our game is here we want to go into templates and we want to go there. Now in Python, we can say we can hold the directory using os.path.abspath() and let's say we want the absolute path of os.path.dirname(), of this particular file. Wherever this file lives on the hard drive, we want to get that directory and then, we're going to say os.path.join(), and we're going to join the working directory with the templates directory. Now it's easy to type /cookiecutter-use-api but don't do that, because that will prohibit it from being cross-platform. so you want to just let the join, put all the pieces together so down here we'll say cookiecutter-use-api Okay, so now we have our template and it's time to actually execute this so it should be really straightforward to do, it's just one function call but in order to do that, we have to come up here and import cookiecutter.main so we're going to come down here and we're going to actually get back the project directory so we'll say cookiecutter.main.cookiecutter kind of annoying, all the cookiecutters in there but this is the create function and this is the package. So first thing we're going to give it is the path to the template, the next thing we're going to give it is to say no_input=True don't ask the users anything, take either the defaults or what I've collected I am about to give you here. We'll say output_directory=info.working_dir, right, remember we asked the user where do you want to create the project, we could have some defaults for them like active directory or whatever, but this is what we did, so we have to give it the output directory and then we're going to say the extra_context, now this is the data that we've gathered about them, so this is going to be a dictionary of things like project_name this is what is going to be in here. So we need to specify project_name, full_name and game_type. Okay, so we'll come down here and say put something for that in a moment, game type we'll put something and we're going to have full_name. so we can get this from our little info, so we have full_name, we've already collected that, up here we have info.project_name, and that was a little funky, wasn't it, down here we'll have info.game_type, little format, okay, it looks like we're about ready let's return project directory. Okay, so if I run this, we should be able to- let's say that is not misspelled, let's go ahead and run it. it's going to ask us for our location, so let me find the location here, maybe we can make a thing called projects, and I'll put it in there so I'll move the other one in there that my game as well, okay this is what we're going to give it for the working directory, alright, now notice, empty, let's go over here and run this, so the game maker runs, it says welcome to the game creator, woohoo, we're going to create the game either Hi-Lo, Pacman, or pong for you which one do you want? Oh I want Hi-Lo, definitely Hi-Lo, I am going to call it super hi and kind of low. Full path is going to be like this, but let's test it if I get it wrong, remember, it will ask again, oh no that doesn't exist, let's try it again, okay now we'll give it the path, boom, building the game super hi and kind of low, of type Hi-Lo just a moment, and there it is, so if we cd in there we could actually run our game as we saw before, right, my name is Michael, I am going to guess it's going to be 43, 42, too high, 22, man I am lucky these days, okay, so our thing is working really well, one final step that we could take is we could actually ask it to start our game so hey we just created for you, we just started the game we created it, you want to play it? So let's do that, let's go over here and up at the top, so we have our project directory, and let's just give a little message here, so we can say do you want to run, yes or no, we'll say we've just created the game and let's wrap that around here create the game, whatever the project name is /game.py, do you want to run it yes or no, and then, we can of course generate the path and if they said yes, or they just hit Enter to take the default, we could run that. So because it's just a bunch of subprocessed mumbo jumbo I am just going to paste it here so we are going to need to import subprocess we are going to need to import stdin and stdout because this is a console game and we want to take the input from our console and feed it over to that process and as well take the input or the output of that and show it to our users and the final trick is for this to work shell=False. Okay, so let's try this one more time, and I am going to do it like this, I am going to copy this path and I'll run it, copy this path and I am going to run it in its full glory over here so we'll say Python3 this, woohoo welcome to the game creator, we can create either Hi-Lo or Pacman or Pong, alright, so let's create Hi-Lo again, I am going to call it way high the full path is here, building the game just a moment, alright we've created way high at this crazy long location here, do you want to run it, I'll say yes so I'll take the default, boom, straight into the game, just like that, right, you can't do that with Cookiecutter but you can with the Cookiecutter API, awesome, my name is Michael, and let's see if my luck continues, oh too high, 11, 15, 18, 19, 20, 21, excellent, 21, now our app is done. So our game is done and that was the creation. Okay, so I am not necessarily saying this is the best experience we could create, we could do way better, but by wrapping up the API, by wrapping up the Cookiecutter API here and by shipping with a template installed locally we can of course run even if there is no internet connection, we can run in a way that asks the users for all sorts of interesting data and inputs in like you saw we could verify that you entered the correct thing when it came to the directory like no no that directory doesn't exist try again, things like that, that's is just not possible there, so I think this is a really cool way if you're creating a project and you are going to install some library and say somebody is going to use the library and they are going to say I'd like to start with some scaffold, some starter thing and you've got an app that will do that, I recommend you integrate Cookiecutter as long as having the requirements to execute Cookiecutter that is basically Python around this is a really easy thing to do, it's great idea.
|
|
|
transcript
|
2:16 |
The Cookiecutter API is quite rich, but also simple to use. Basically, the way it works is you ship your app with a template in some way, or I suppose if you care to depend on the internet you can even ship it straight off GitHub, right, just use the URL. And we want to call one function, cookiecutter.main.cookiecutter So, we just call this, we need to pass it an absolute path to our template so it knows where that is and in Python it's really easy, you just use the dunder file and you can sort of work out a relative path with os.path module; now you want to be sure to set no_input to True. Otherwise Cookiecutter is going to ask the questions that are in cookiecutter.json well, you don't want that, right, this is your application, it can ask those questions and it can be much smarter and conditional and retrying about the answers that it gets. You also need to specify where this is going to output the data so we're going to set-up a directory here we've already computed this actually we asked the user where that was and verified it, and then you need to pass along the questions that Cookiecutter itself would ask in the extra context here. So we've gathered all of the questions that would have been asked what is a project_name, full_name and game_type we've asked the user what that was, and then we just passed it along, so Cookiecutter just takes those and applies them directly and doesn't ask any questions. And then what comes back is the project directory and we can open that up, we can execute code in there, whatever. We also want to make sure that we're leveraging the defaults, so if somebody is using Cookiecutter already, and they have a default file, we want to be sure to use that, so we can import cookiecutter.config and then call .get_user_config(), alright, and that will give us this whole dictionary back, everything about them as far as Cookiecutter is concerned, Cookiecutter directory, the replay directory, even their aliases which are not shown in here, but the part that matters to us is the default context, so grab that and then you can use that before we even start asking questions propose that as a default, or even don't ask the question if you find it here. We've just scratched the surface of the API here there is quite a bit going on so jump over to the Read the Docs site for the Cookiecutter package and you can explore the full API here.
|
|
|
|
10:28 |
|
|
transcript
|
1:34 |
By now you're quite capable with Cookiecutter, you know all the advance uses as a user, you know how to create your own including things like hooks and conditional statements inside the cookiecutter.json, as well as how to use the API to actually wrap up the functionality of Cookiecutter with a nicer shell. So I think it's a good time to take a moment and just look around the industry and see how other people, other projects are using Cookiecutter. Now, I grabbed three projects that I'm familiar with but there are many more as you saw when we did a search on GitHub, there was quite a few options out there. So feel free to do your own exploration I'm going to take you on a tour of three particular projects first one we are going to look at is Beeware, these guys are doing really interesting cross-platform native type things with Python and Cookiecutter plays a central role in this so I think this is going to be an interesting use case here; OpenStack, OpenStack is an open source largely Python based version of more or less AWS, right, you can take and add VM capabilities, you can add storage capabilities, database capabilities, all sorts of stuff like this and it's quite a large project so working with it can be quite challenging, and so you'll see how they're using Cookiecutter on certain parts of OpenStack. Finally, we'll look at the Pyramid web framework, this is a project that I've been involved with on the Cookiecutter side as well as the web app and you'll get a look inside how these guys are moving to Cookiecutter.
|
|
|
transcript
|
3:43 |
The first place that we're going to look at, the first project is something called Beeware. So Beeware is quite the smorgasbord of various things, it's a bunch of great libraries or packages you can use, it's a number of startup projects for different platforms, and a few other utilities tossed in here and there. So let's go have a look. Here we are on the Beeware website, and there is a couple of ways you can navigate it, but probably the best way to think about this is Beeware is a set of Python native tools, so this is a Python project, it just happen to be Python as well but it could have been Node.js or whatever; anyway it's a Python native tool set for both mobile and desktop, and this is quite interesting, so let's look around. If we go over here to the project, there's a couple of ways we can explore it, we can look at the projects so they've got some applications, a little presentation thing, tooling, one that's really noteworthy is Briefcase for basically packaging your Python app into a native application so a .exe on Linux binary, .app on MacOS, things like that, and some bridges so these are some interesting cross sort of interoperability pieces, so here's something that compiled Python into Java bytecode for example, but where we want to focus is around the templates. So check this out Android templates, tvOS templates, iOS templates, macOS templates, so if I want to get started building with their tooling with their native UI framework a macOS application instead of figuring out all the stuff with like plists and .app files, and icons and whatnot, I can just take this template and run with it. So since I am on a Mac, let's take the Mac template here, so you can see standard Cookiecutter stuff going on, now I made a folder chapter seven case studies and let's make a directory Beeware and we could say cookiecutter this, this is going to generate a macOS app that has its logic implemented in Python and it's going to be all ready to go for us. Now technically, we have to plug in the Python and a few other things, but not a big deal. So it lets start, what is the name it is going to be "Beeware show off", dir_name macos is fine, bundle name is fine, okay so it's created it if we look in here we'll see there's in macOS, so let's go over to the browser and notice, look here's an app, I could double click it and run it. Now it exits immediately, so not super interesting but let's go look inside; so we can say show back its contents, look around here's that info.plist you see it's generated all the various bundle info that macOS needs to do its thing, you have resources here, README, let me change the name so I can open it, so we can come over here and see this is where your code should be placed, the native code that's starting the app is going to be looking for a __main__.py that's going to start the execution of your code. And we can go over here in the app packages, if we again rename this so I can open it, this is where we put our project dependencies other packages and whatnot. Ok, that's cool right, so if we want to get started with this, and build this Beeware show off app then we can use this Cookiecutter template and they as you have seen have a number of different types we could do this for iOS, we could do this for tvOS, we can do this for Android, I feel like I saw watch somewhere, but anyway there's a bunch of cool stuff and you could see how central Cookiecutter is to all of these things. Alright, so that's how Beeware is using Cookiecutter.
|
|
|
transcript
|
1:51 |
The next place I want to look at as a case study is OpenStack, so here you can see there's a little picture graphic showing you what OpenStack is about, it's got some kind of dashboard you've got compute resources, think of those as virtual machines as well, infrastructure as a service and platform as a service, software-defined networks, storage and so on. Like I said, this is basically AWS, you can install on your own data center and configure as you like, it's pretty cool. So let's see what they're doing with Cookiecutter. So we can come over here and the first thing is there's an install guide that you can create for various parts and they want to make sure that this comes out the same, so here's a Cookiecutter template for new install guides, here it just gives you a little info about Cookiecutter and whatnot but basically you go in here and it shows you how to create all the various documentation and settings that you need to tell people how to install your particular thing that you're going to integrate into OpenStack; ok so that's cool. Another one is Puppet, so Puppet is like a devops type thing you can manage infrastructure and whatnot with Puppet, here is a template that generates an OpenStack compliant Puppet script so it's pretty involved you can see all the various pieces like the test scripts and what not going here, you can see it it sets everything up that you need to run Puppet just so, all right, all the specifications, the details about the Puppet files and so on. So this is really nice if you want to use Puppet with OpenStack, start here of course. Finally, you can test OpenStack and the system that they use for testing is this thing called Tempest, so here's a way to create tests that run on OpenStack it shows you how to use it, how to get started and so on, pretty straightforward you guys already know because you know Cookiecutter. So, here's just three ways that they're using Cookiecutter that are official listed on their GitHub repo.
|
|
|
transcript
|
3:20 |
Next, let's look at the Pyramid web framework. So, Pyramid is one of the more popular web frameworks it fits in there somewhere between Django and Flask, it's not quite as micro of a microframework as like Bottle or Flask but it's not a big sort of building block thing that Django is. So, somewhere in the middle period. I like their little slogan here, projects with ambition start small and finish big and have to stay finished, so I really love this framework, it runs a lot of the Talk Python websites and web infrastructure so let's go look how we get started with Pyramid. So, if I come over here I can say pcreate and pcreate is the tool, we just talked about having the API in a tool or our game maker wrapping the API and this is kind of serving that purpose, it sort of uses a Cookiecutter but it didn't until recently and I'm not sure if it actually uses Cookiecutter or if it's just the same files that come out but it's not really important as you'll see so what we can do is we can counter a pcreate I want to use the scaffold starter and let's call it first web app something like that something real simple and if we run this watch what happens ok it looks like some the wrong there's a sorry at the end but it really, welcome to the Pyramid, sorry for the inconvenience now let's go back to the top, bunch of stuff happened, but check this out note, as of Pyramid 1.8, which basically just came out, this is actually deprecated this pcreate concept, instead you should be using cookiecutter all right it shows you how to go look for all the cookiecutter things so we come over here and do a search, that search didn't go so well, did it? Let's try again, here we go, so we have pyramid-cookiecutter-alchemy, pyramid-cookiecutter-starter and so on so the thing I just created with a starter we can come over here and get this, now let's copy that, so we talked about the hooks here are some things to do with hooks pre impose generation come down here to the repo, there's a template folder here that has the various templates and notice we have Jinja, Mako and a .pt — these are Page Templates or Chameleon templates, now originally this one shipped with just Jinja, but somebody here added Chamelon support and another guy that works on the project Mako support, ok so these three got added and the tricks I showed you about using the hooks and modifying the files and so on you can actually see those in here, about deleting non used files and what not so we can come down and achieve basically the same thing here, we got our first web and Beeware, let's make a dir Pyramid and move first web into Pyramid okay so we come in here in cookiecutter, install this one I've already installed it but I need to re-clone it because it now has to Mako support, yay!, so it's going to run Pyramid scaffold and now it asks uses the choice template, let's say Chameleon that is the best; boom and then here is that little welcome message welcome to the project, here's how you get started. Well the first thing I would do is I'd cd in here, and then I'd run this and then I would run that etc. etc. Okay, so very cool project here, and the fact that they're using Cookiecutter, they haven't been for long time, but they are moving to it, I think that's pretty interesting.
|
|
|
|
15:17 |
|
|
transcript
|
0:44 |
Now, you've been able to create your own template you probably want to share it with the world. I suppose there's two different paths you might be on with this template itself one remember what I called the working farther with integrated systems that might happen inside of your company and you probably wouldn't want to do that but if you are working on anything open source or out in the public you will very much likely want to have your Cookiecutter listed on the Cookiecutter home page, of course you'll have it in your documentation and you'll have it on your website and so on, but you go ahead and put it to here so everybody can find it. Right, so what we're going to talk about is how we take a template that we create and get it listed here, as well as just generally make it available to the world.
|
|
|
transcript
|
4:08 |
Of course the first step with sharing your template is having a template, so let me show you the template that I have created created both for some of my other courses or just for the community and sort of spurred on to do it at this moment, for this particular course. So if we look over in my Cookiecutters, there is a thing I'm calling cookiecutter-pyramid-talk-Python-starter so Pyramid is a web framework, and they use Cookiecutter by default they have three or four different starter templates, and they all pretty basic, and so you start very close to the beginning of a project it doesn't have a lot of integrated things and I wanted to create one that came from my Python For Entrepreneurs course that has many more integrations and is a much more well structured in my opinion than what you start with, so if we look here you can see I've got things like view models and template organizations and I'm using a lot of stuff there. I'm using Bower to manage the components rather than just point them off a CDNs, we have a database integrated, we have MailChimp, we have Rollbar, we have lots of cool stuff integrated, so I want to use this template as the example here so let's go in just run it to see what we get; so I'll say cookiecutter and give it this, and I'm going to have some kind of required name here, this will be a show off the web app just to show you what's going on actually, let's do it like this so we'll do it like this and of course we use a dependent property here to generate a valid Python package name which is necessary so we call this Talk Python the domain is talkpython.fm notice contact@talkpython.fm as a default so that's really nice, description goes at the top of the pages and then it ask you some questions about integration so like there's no real way to say pause, show them something so it's just going to be blanks as I press Enter, so I'll just put a few things you can see where this goes, it asks you what is your MailChimp API what's the key there so if you have the key you can put this in and automatically MailChimp will start working and this will be list 7, if you have an outbound email server you can set that up so this will be admin, and this is going to be root, I'm just making up stuff right, the server is going to be localhost (127.0.0.1) port take the default for encrypted, and Rollbar I'll just put some random stuff there so now we have this template here, this thing is created by the template so what we can do to get started, the way Pyramid works is it works with package, it basically is a package and you have to register it, so for that reason I'm going to go ahead and create a virtual environment and set everything up here so give me a second and I'll zoom ahead in the presentation so I created the virtual environment, I activated it, now I just need to run the setup.py to install everything, the dependencies as well as this package okay, so everything is set up and registered and installed just fine now we just need to run it, so we just run the server, say pserve and give it the configuration file, perfect no problems here, sometimes it says the package that I just installed isn't found and I exit and log back in, so let's go over here, load this up and see what we got ok so this is what was generated by my package as the show off app up here, you can see down here it has a MailChimp support so I could put my email address and I could register now it turns out that's not going to work because I didn't give it a real key for MailChimp, but that's ok. So we come to here we have a few things, so notice this is the company name I put, this is the app name, if I was actually to open it up, you would see that this is the package name it's used throughout, let's look at one thing here, let's look at the development.ini so you can go through this and see that it's been configured our SMTP settings we gave it are configured this is configured, it looks like it might have a bug here about the list id versus API key, here's the Rollbar, everything that we need, right. So this is great, this is a really good way to get started with this web app. Now my goal is to share this template with the world and get it listed on the Cookiecutter homepage.
|
|
|
transcript
|
3:16 |
In order to share your Cookiecutter template you're going to need somewhere where you can put it online and people can access it. It could be like a zip file in Dropbox they could download, but probably the best place to put it would be somewhere to like GitHub, because remember, you can take the GitHub URL directly and to just say cookiecutter that, and so this is super easy for people to consume; so if I want to share my template cookiecutter-pyramid-talk-Python-starter obviously in needs to be on GitHub, and here it is. Step number one is to get your thing publicly accessible, next we're going to want to get it into this Cookiecutter documentation page, in particular we want to get it right here, so the way we're going to do this is it says, it kind of assumes you know a lot about gitflow and whatnot but it says make your own template and then submit a pull request adding yours to the list, so what does that mean? Well if we go to the top of this page, and we say edit on GitHub, this is the page they are talking about. We can come over here and we can fork this, so the way it works is if we want to create pull request we have to fork the repository, check it out ourselves, make a change to our own copy, push that back and then use GitHub to do a pull request. So that's what we're going to do. So, step number one, fork, let's go here so we're forking it, it takes just a few seconds, it's true, excellent, you can see up here, mikeyckennedy/cookiecutter and you can see it's forked from audreyr/cookiecutter project. So now we need to clone this somewhere, so I am going to come over here and let's take a step back, and what I am going to do is I am just going to git cloned it right here so you have exactly what I made, what changes I made here, so git clone that, that was easy, right, so then, we'll go in cookiecutter and look around. So if we go down here, we look at README.rst and let's just open this, let's open this with Atom is fine, alright, there is a bunch of stuff here, if we go and we look down, we say make your own and submit a pull request, okay, great, so what is this section here, we have Python and your job is to either create a section or figure out what section is the right one for your project, so let's scroll down here, we have Python-Django, that's not us, Python-Pyramid, aha now we're getting somewhere, so what we want to do is we want to create one of these here. So let's just duplicate this line, and let's remember what I called it, name matters here, right, so I called it this, cookiecutter-pyramid-talk-Python-starter and that's going to go there, let's also make the copy of this, you need to give it the URL here so let's copy that, then we need to give it a description here, so this seems like a decent description, close enough. Alright, so if we save this, it's possible that I've messed up something, but that I think I got it right, we went to Python-Pyramid, we created the cookiecutter-pyramid-talk-Python-starter, we've given it the description and we've given it the link here. Excellent, so we've forked the repository, first we put our stuff up on GitHub, we forked the repository, we checked it out, we cloned it, and we've now made the change to the README.rst; next up, we're going to have to submit a pull request.
|
|
|
transcript
|
4:08 |
So, we've made the change to the restructured text to put our cookiecutter link in here. Next what we need to do is just create the pull request so we've already made the change here, and we've already cloned it over here so let's go back to this folder right here cookiecutter is what we want to work with now you can do whatever you want for managing these files in git, I very much like Sourcetree. At first it was overwhelming with too many buttons and knobs but once I got used to it I really liked it a lot better than command line or any of the other UI tools. So I'm going to come over here and basically register this inside a source tree so then I open it up, it already knows about my repository, the history like here you can see all the forked history and whatnot because that came from the original one, so I'm going to come down here and say adds this to the Python-Pyramid cookiecutter template now you want to be really clear here because this is going to be part of the message that Audrey and the whole Cookiecutter team will see Okay so I check it in and I'm actually going to push that back to GitHub, excellent so we have that done, now we go back over to GitHub here to our fork, the mikeckennedy not the audrey one and I refresh, it's going to say hey look this branch is one commit ahead of master create a pull request, let's do that first of all let's compare to just see what's going on here, we've made a change to one file ok that's cool, what is that one change, we didn't mess up anybody else's stuff, but we added this one and we added it here, and what is this deal with down below I'm not really sure I think it's just some random formatting or something yeah that doesn't look really changed to me, it just looks like some sort of funky detection thing going on there about the diffs okay great so we've added this, and we've added this okay so now that I feel happy, I'm not going to break what they have let's double check in, we still have we still have TF module yes okay I feel confident that I'm not going to break this I'm going to click create pull request, and notice here it adds cookiecutter to pyramid cookiecutter template so I'm going do it like so, just put a little message maybe make this into a link so they can review it ok this pull request adds cookiecutter-pyramid-talk-Python-starter to the Python-Pyramid cookiecutter templates let's do a preview, make sure it all looks good, maybe even double check the link, it looks like it went somewhere cool and I think it's ready to send off so now if they accept this PR, it's going to just merge back and show up right there on our page okay the pull request is open that doesn't mean they're going to accept it they kind of look through and they're going to say you did it well, you messed up something I'm not sure it's going to run some continuous integration you can come back and check that in a little bit assuming we did this correctly they'll approve it and it should pretty soon show up in that pantry. Oh, one more thing I want to tell you before we move on you saw me editing that restructured text file and I want to make sure that everything came together correctly so it would look all right; once I committed it I can go back to my clone my fork of cookiecutter, I can come down here and I can click on that restructured text file and notice if I scroll down and you can notice that I added this so we can come down until we get to the templates or the pantry full templates okay, so we got this, we come down to until we get to the pyramid one and notice right here Python-Pyramid the last one is cookiecutter-pyramid-talk-Python-starter there's that and if I click the link- boom, it looks like it works okay so just the point is you can come back to GitHub and verify that everything still looks the same as you would expect. All right so long as they approve this, and you can participate in the conversation over here as there is the back and forth long as they approve this, you should have your Cookiecutter template in the pantry.
|
|
|
transcript
|
3:01 |
Let's review the steps that we went through to create our template, get it online, share it and submit it to the pantry. So step one is having a template, period. So create some kind of template I recommend using the cookiecutter-template cookiecutter template because that's the one that helps you get started here I've created one for Pyramid, we've already talked about it and I want to share it, so I created the template, that was step one and this was quite a bit of work this is complicated, we have app and it needs a lot of documentation, so I spent at least half a day working on this template, but you know it depends on what kind of template or building, how much effort this step is. Next I put it on GitHub, so already I can use this in my documentation I can use it in training videos or instructional videos say you want to get started with my version of a Pyramid web app well you just cookiecutter space that URL and you're off to the races. Having it somewhere online, GitHub is probably the best place, is the first step, right hopefully people come along, submit pull request to my template make it even better; next we go to the official cookiecutter template that's github.com/audreyr/cookiecutter and we fork it. So we fork this to our own repository so after we have it forked we check it out to edit it locally I suppose if it's just restructured text if it's just those two lines you could technically do this online, but you probably want to have a working copy locally anyway, so you do a git clone, notice this is my url, not theirs, that's very important so we clone it, it comes down, we're ready to go now we can go and edit this folder right basically that one file is surely all we got to edit in this case all right so like I said, make sure that that's your username not audreyr. Next there's a whole bunch of files here this is the entire project that generates and runs Cookiecutter as well as its documentation but the only one we care about is this README here so, because I'm working on a Python project I went to the Python section and I'm going to add an entry here if I was working on assembly I would have gone to that section right, or if I was working on- not sure or section that doesn't exist, but if there's a section that really makes sense for your type of work, and it doesn't exist make one right, like Python on lines 299 and 300, do that for yours, so once we've edited it we've put our entry in there we've checked it in, here we've committed our changes back to our repository we're going to want to create a pull request based on this so we should have when we first do this a button right here that says create a new pull request, or just new pull request I don't call it the exact verbiage but because I've already done it that button is gone, right, you saw me do that in the previous video but you are going to have this ability to create a new pull request back to audreyr and that's it, if you've done everything right, they like your addition they will accept it and you will be part of the pantry, congratulations.
|
|
|
|
28:05 |
|
|
transcript
|
2:35 |
Let's add a feature, really a bugfix in some sense, an enhancement to Cookiecutter. There's a number of reasons why you might want to develop and change Cookiecutter, maybe you want to take Cookiecutter as it is and modify it to be your own custom version for some other project; maybe you want to enhance it for everybody or maybe you just need to have a local working copy as part of your due diligence for your company, who knows. But I'm going to assume in this case that we want to add a public feature back to Cookiecutter. So, as I have been going through this course and working on templates lately I have been keeping a list of things that annoy me, and when something annoys me I put it in the list somewhere and say this is a thing I could add to this project, so we're going to do that for Cookiecutter, and let me introduce the thing that annoys me here. So let's come over here and go to a working folder here ok, so we're in this test folder let's try this cookiecutter cookiecutter-template see how it asks for my name, remember that name comes from the default YAML file okay cool, so let's have a look at that default YAML file. So, over here and remember I notice on line five here, we have a blank newline, remember how annoying it was if that is not there let me try the same thing, all I did was it's hard to see, I deleted that blank line right there okay. Let's run the same command again, oh that YAML file again, unable to parse configuration no pattern matches github_username. So that I think is super frustrating for beginners, how would you know that you have to have that newline there this error is completely indecipherable, so what I want to do is put this back just to show you if this were back here run it again, it works; so that's cool, what I want to do is I want to make it so it doesn't matter whether this newline is here or not in Cookiecutter, I'm going to basically have Cookiecutter add that newline if it's missing and because the parsing depends upon an external third party YAML parser, and maybe we can go back and fix that as well, but for now, let's just make Cookiecutter forgiving okay. So, in this chapter, what we're going to do is we're going to go through the process of getting Cookiecutter locally on my machine being able to develop it, add this feature and going through the git flow pull request process to get it at least submitted back to the Cookiecutter project, and we'll see if they accept it.
|
|
|
transcript
|
1:23 |
Now, our first step is going to be getting writable source code, we could clone this repository but we're not allowed to check into it we're not core contributors, so the right flow here is to go fork it, so we're going to fork this repository, and then we're going to create a feature branch do our work on the feature branch on our repository, check that back in, and do a pull request back here, ok. So I've already forked this, and so I'm going to come over to my fork here all right, so I've been fiddling around with it a little bit, you can see that it's this one I've submitted some changes, this is an unrelated thing, but what we want to do is, we want to check this out. So this one belongs to me, so I have right access to it cool. So, let's go over, I think I'll just check this out here, I don't want to put this into the source repository because you'll be able to link back to it on my system and you have the whole cookiecutter thing as a sub directory which I don't think it's a great idea so I'm going to just clone that here so we'll say git clone, and you give it the path, of course you have git installed, but I'm assuming that you guys can do that it's kind of out of the scope of this course okay so here we can open a Cookiecutter project so now we have the source code on our machine next thing is to install it, so that we can actually run the code run the Cookiecutter module or package.
|
|
|
transcript
|
4:27 |
Next step is to actually run cookiecutter, so if I type which cookiecutter you'll see this is the one actually installed into Python 3.6 and installed into my machine at least my user profile now, couple of things to note here, one if you're on Windows, you want to type where cookiecutter on Linux and MacOS it's which, so those are basically equivalent commands but not exactly the same. Second, cookiecutter runs both on Python 2 and on Python 3, but it's a little easier to develop under Python 2, so we're going to create a Python 2 virtual environment, all right, so let's look here, we want to go into the cookiecutter folder and here we are in the cookiecutter folder, and we're going to create a virtual environment so we want to have, we want to say which virtualenv now you probably don't have this command, see I don't have it here for example, so I want to install it but I want to make sure that it gets installed into Python 2, so we'll say pip2 install virtualenv to keep things simple I could even just do that to my user profile. Now on windows, you can't say pip2, they for some reason don't have those aliases so either create an alias or just make sure you run pip from Python 2. Okay, so this should install it, great, it's already installed. Next, after this we want to create the virtual environment, and again, to make sure that this is using Python 2 instead of Python 3, I want to be careful so I'm going to say instead of just saying virtual environment create the directory I am going to say Python2 -m virtualenv .env (-m for module) So, when we say .env, it's going to create one right at the root of the cookiecutter which we're going to ignore that, okay great, it's creating it here in this folder, I want to make sure that I next actually activate this, so right now, if I ask which or where Python2, it's the global one, so what I want to do is, I want to say (dot) on Windows you don't need to do the (dot) but on Mac and Linux you do, so we'll say .env/bin/activate and it's activate.bat on windows, notice how my prompt changed, now if I ask the same question, which Python, you can see now it is this Python, okay so we've installed the virtual environment, we've activated our virtual environment, the final thing to do here is when we're in the folder with the setup is to register it, so if I ask which cookiecutter, right now, it's still this one, that's not cool, so that's the globally installed one, we're not modifying we want to have only run cookiecutter to run the code that's in this folder cool so what we're going to do, is we're going to say Python and you might want to double check which Python, that's the one in our virtual environment, okay cool, Python setup.py develop now the develop says don't copy this over to the system but just leave it here, and point here when you run it like run it straight from our modifiable source here ok so go- beautiful, now let's ask the question again which cookiecutter Perfect, so now we're going to run the one that is here, and if we actually try notice, if we actually try to change directories into there ok perfect so now you can see that we have our cookiecutter installed and ready to go and let's just say cookiecutter -V for version oh notice this how it says it's not found, sometimes this happens and it's super annoying, I'm not quite sure why but I think if I exit my terminal, this is not always required, but I think in this case it might be I am going to exit the terminal, reactivate the environment, and I think it should find cookiecutter again. Reactivate the virtual environment, alright, so it looks good, there we go, yeah I don't know why, you sometimes have to restart the shell but whatever, it doesn't matter it's working fine, so you can see we have this, and it's from this location and it's running on Python 2.7, so at the end of this step you should have it, so it says cookiecutter whatever the version you got was from your virtual environment location or really where you checked out the code and just say Python 2.7, 3.6, 3.5, something like that so now we can run cookiecutter locally, which is great, now let's go add our feature.
|
|
|
transcript
|
2:35 |
Now that we have cookiecutter working here, you're going to be tempted to want to just start adding your feature, get in there and get into that source code, but let's take one step really quick so that things are a little simpler for us in order to add this feature on a feature branch so we can make multiple features, have them all in flight at the same time, things like that. So I'm going to switch out of the terminal to my favorite git client which is Sourcetree, so I'm going to open this directory so I can get hold of it, go over here, let's come to source tree, and let's just put cookiecutter right there ok that's my cookiecutter on GitHub, notice here you can see it's just got all the features from when was the last from what they did, here we go, this is the last branch as you can see, these are all modified by me on my local version this is the last branch in sync with cookiecutter itself. When you do this, it'll probably be right at the top, so you just want to branch from there, but I'm going to find the latest one that's in sync with the official cookiecutter repo and I'm going to create a branch because what I want to do is do all of the work only for that feature on that one branch, so let's do that. So we'll come over here, and we'll say branch, now here's a cool trick that you can use if you use your name or your user name or basically if you separate with slashes you can make a hierarchy of features, so I am going to say this I'll say mikeyckennedy that's my GitHub name and then I'm going to say forgiving YAML fix, so forgiving YAML formats not super annoying, hey you need a newline there, you forgot that version so I'm going to checkout to this particular commit, and I'm going to go ahead and check out that new branch so I'll start working from there ok and notice, with the / here, this will actually create like a little tree of things, which is pretty cool, so we're over here now notice, when we did that checkout it said hey there's this virtual environment here, I don't want that, so what I'm going to do is I'm going to say ignore everything under .env, if this pull request gets accepted you probably won't have to do this, we'll see but we're going to just update the .gitignore to say don't check in that virtual environment it's not cross-platform anyway so I'll just add that in real quick, ignore virtual env directory, ok, so now everything is clean in our feature branch right here, if we go over here you can see that we have that one checked out we're on the forgiving YAML fix directory we're ready to make the code itself actually do the code change that makes this forgiving YAML.
|
|
|
transcript
|
8:11 |
Okay let's go back to the folder here basically I want to open up this directory in the editor so I click show in finder and it'll take me where the .gitignore was which actually is right where I want to be, so I want to open this in PyCharm, and on MacOS you can do that really nicely by just dragging and dropping the root into PyCharm. In Linux or in Windows you have to actually go file, open directory go find this thing. So, you don't have to use PyCharm, I like it the best, it's totally up to you on whether you want to do it or not. PyCharm has built-in source integration, so let's say add root here here you see all the things that we're going to work with and this folder is actually where we're most interested so let's let it do its little indexing, so we have autocomplete and then we'll be ready to roll. First thing I'd like to be able to run this inside PyCharm, so there's a couple of options, let's go to this configuration, say add a new Python run, and normally, you would put the script here, you could even right click and say run it but this is a package so that makes it kind of tricky so we'll say script parameters, oops, not there, interpreter options -m and then what are we going to do- we're going to say cookiecutter and then who knows what we're going to give it here, right now I just run the help ok So notice the right virtual environment was found because of the naming convention PyCharm knows to load that one up, also unnamed is probably not the best name let's just call this cookiecutter, and we'll say single instance of that okay, now if we hit run, we should see at the bottom error, no template that's good that's actually okay right, that's what we wanted we could pass in like -h for help or whatever but you'll see like it's running down here now. The other thing we can do if we want to fiddle with it is we can run it in the terminal, notice the terminal automatically activates the virtual environment so we can just say cookiecutter -V to see which one and it's the same one out of the same place ok, so we are ready to run, this thing is set up locally it's in our editor, let's go make a change. Now, the part that we care about, the part I want to start exploring from is from the CLI, so if you look at the CLI here, you can see it's using click which is a thing to basically manage the command line interface for you and down here, there's a bunch of stuff happening right, is going to come down here and run of the cookiecutter for us. And you can go see the various pieces that are being called, and I would encourage you to sort of explore the flow from here on down so you understand how all the pieces fit together, there is some documentation and so on, but I've already done this, I've already figured out where I want to go, so I'm going to go edit this location okay, down here notice this is the stuff about config files remember we're working on the YAML thing, that's the default config for the user; here is where we're working, at the very root of everything, whether we use a default config, a pass config, a user config, we're going to be getting into this get_config() here, okay, we actually will find that the error happens right here, so let's go ahead and set-up our system, so we can try that, let's see if we can make this thing fail basically, so I want to say cookiecutter and I give it little output folder here, cookiecutter cookiecutter-template -o ~/Desktop/test/ and let's just do something simple, cookiecutter-template, alright, that runs, everything looks great. Now, let's try that again, but first let's edit and make our YAML defaults broken. It doesn't matter if this is our default file or some other one, it's just by default this will be the one selected. So I deleted that little bit there, let's try it again. Let's see what mistake did we make- oh there is no pattern for github_username what is going on, and if we see where that is, that's in config line 61, which is right here, this is basically in this try accept block. So what we need to do is add a little fix right here, so let's do this, let's add a function, right up above here, so we're going to call this function fix_missing_endline_in_yaml() We're going to do that here, and what I actually want to do is I want to sort of separate this out a bit here so I want to say yaml_lines this is going to return actually a set of lines of text here we want to pass this and instead of passing in here like so, we want to create a yaml_text = "".join(yaml_lines) put the lines back together, yaml text, okay. So our goal now is to somehow get this value passed in here, make some changes, get it back, so say yaml lines equals this we'll say read lines which instead of returning the whole string, the whole thing as a string, and we're going to actually return a bunch of lines it's a little easier to work with it that way, so we'll come down here and we'll say get all the lines from the original file and then potentially modify them and then turn that back into a flat single string which this was expecting, before. Ok, so all we got to do is write this little function here and what do we need to check for- let's go ahead and pass in our yaml_lines, we'll return our yaml_lines, ok so we're going to say if yaml lines we don't want to crash if for some reason that's not there, and if the yaml_lines the last entry is not equal to just a Newline, and it's Python 2 so Unicode, if the last line in this file is not just a blank line, all we have to do is say append a Newline, that's it, this should actually fix our code, this should fix that annoying little bug in Cookiecutter and it's six, eight lines of code, not too bad. Let's try this now, let's just verify that we do have the missing piece here, and let's try this again; ta-da, fixed. How do I know it's fixed, what if I skip this little part right here try it again, it crashes; put it back- fixed. Okay, so I think this is a pretty cool little feature, this is not much work PyCharm thinks this is misspelled, so I am going to say it's not, so everything looks ok, the one thing that we should probably do is let's go ahead and document this, add some document strings here and some there so let's go ahead and add some docstrings here as well, just so people come along know what this thing is about, like why is this weird thing adding a Newline, maybe in some time when poyo doesn't need it then we could take this away right. Alright, so there is a little description I wrote beforehand so it says if the YAML configuration file does not end with a single blank line a cookiecutter exception invalid configuration is thrown with an indecipherable error I think we can all agree that's the current state, this method fixes that by adding a trivial Newline if it is missing. Save one more thing here, alright, it looks like it's still working, fabulous. Okay, so let's go ahead and submit this back. Now, probably it should be running the test here, right, we should run all of our tests here, so running our tests, with tox, give it a moment, ok so it looks like all the tests ran fine, I don't have Python 3.3 or 3.4 but when we do the check in, the continuous integration and automated build system has all of this stuff set-up, so you see like flake 8, PyPy, Python 3.3 and 3.4 didn't quite work but they'll work in the final version, as you'll see in a little bit, but at least we saw it worked on Python 2.7 and Python 3.5 and that gives me a lot of confidence that we didn't break anything during this process. So, we just pip install tox, and then I just type tox and it runs all these tests, perfect. So now we're ready, we've added our feature, created our feature branch, added feature we've run the test we're ready to check this in and create a pull request.
|
|
|
transcript
|
4:14 |
We've run our tests, we've added our feature, we're pretty confident with the work we've done, let's submit this back to Cookiecutter. We'll come over to our source control here, this is our Cookiecutter repo, not theirs and we're in our feature branch which means that we can possibly make other pull request, and other changes to Cookiecutter without this code being part of that, right, we probably want to do this, isolate on their website reasonably so it says please submit only one feature at a time with any given pull request, one change, and the easiest way to do that is have one branch per change. So, we're going to check into this, and this is super easy but what we want to do is give it a nice description so I'm going to write a little description here and zoom ahead, and then tell you about it. So, notice I'm even using Markdown here because people are going to read this and decide whether or not it should be added to that project, so you want to format this as best as you can, so it will show up on GitHub. So what I am going to say is if the YAML file config does not end with a single blank line a cookiecutter exception invalid configuration exception is thrown with an indecipherable error, this pull request pretty much took this code from my docstring, fixes that error by adding a trivial line to the config YAML file if it is missing, okay. So let's go ahead and check that in, now if we go back to GitHub, notice right now we already have this I didn't even refresh the page I just found this says okay, mikeyckennedy in forgiving YAML fix less than a minute ago, and here's the compare and pull request so we want to submit this, notice I am up in mikeyckennedy I want to submit this to audreyr and everybody that works on this project to say here's my fix, I want you to take. So I'll click this, it's going to come down here, and we should be able to take this change, let me go and copy that, and I am going to use that basically that same text here, if the YAML file does not contain a Cookiecutter and do this little shortening thing but I'm going to put it back, exception this pull request fixes that okay. So okay I'm going to give it a nice little subject up here, fix this trivial error of config file when it does not end in a newline has a description, let's preview it here, it has a little code bit for that thing, alright I think it's good, let's go down here, make sure the changes we've had don't change something else we've got our .gitignore, and we've got our change to cookiecutter so we've added the fix missing end line in YAML, got our little bits there, and then in our git config, notice I had just this straight read here before and now we're doing it across a few lines where we get the actual lines we apply our fix, we turn it back into straight text and then we do what they did before with the straight text, this time though it automatically fixes it. Alright, so it looks like everything is good, make sure that you have read the guidelines for contributing to this repository verify that we can merge with master we're not out of sync or something so that's really important, people don't want to do them merge conflict stuff if at all possibly, you should do sort of rebase, get the new version, apply your change again, to the latest if that happens. Alright, let's go. Now we're over in audreyr, you can see we have the 49th pull request, actually 49 active, 917th pull request and here it is, my changes, my description, files that have changed, the two commits, and notice, I talked about the test being run, about the flake 8 and Python 3.3, 3.4, notice here this is updates live, there is a continuous integration for app veyor, I think is for Windows builds and Travis CI for Linux and Mac I'm pretty sure that's how that works, but these are running and these will automatically give the maintainers of Cookiecutter some feedback to say this change that we just made, it either broke something or it didn't break something with regard to code coverage with regard to tests and whatnot, right. So now we just wait and you'll be able to come here and check out a pull request 917 after you watch this class and see if this change was accepted or not accepted.
|
|
|
transcript
|
4:40 |
Now that we've worked through actually adding a feature or enhancement to Cookiecutter let's go back and review the core concepts or steps that we needed. So, we're going to start by forking the Cookiecutter repo so github.com/audreyr/cookiecutter and we're going to fork that to our own repository. Next, we want to clone that locally so we can work with the source so git clone our cookiecutter fork- downloads and then we're ready to go, just make sure that that is your user name not audreyr, because if it's audreyr you probably can't make changes and submit fixes back to the repository. Next, we're going to create a feature branch. This is partly optional, but I strongly recommend you create a feature branch, and this whole PR work flow, so probably you can just go to the top of the list I have changes on mine I had to go back a little bit because I tweaked my fork for some other reasons you can read them there in the list but I went back to this one that's highlighted and I said create a branch from there and you saw my convention, my GitHub name / feature or fix branch name make sure it's all underscores or something like that so we checked it out and it was ready for us to start working on it. Next, we have to create a virtual environment; technically is not required but you probably don't want to run your dev version of Cookiecutter as your main thing on your computer maybe you do, but let's go ahead and create a virtual environment here so we're going to make sure we have, in Python 2 we have virtualenv remember on Windows pip2 doesn't exist, you just have to make sure you use pip out of Python 2. Okay, so we've installed it, next we can create the virtual environment again making sure we're using the Python 2 version so Python2 -m virtualenv .env (-m for module) and then we activated it, and notice how when we activated the prompt changed okay so now we're ready to basically register the local dev package as something we can run. So we're going to do that when I register the dev package so we just say Python setup.py develop, not install or any of these things, Python setup.py develop, so that means the local it's going to basically run out of our source directory so as we make changes, those changes will immediately appear in this virtual environment, so if we run this it does a whole bunch of work to install the dependencies and then finally when it's done we have cookiecutter 1.5.1 or whatever version you have registered and ready to run from the command line. Finally we go and make our change, we've got it ready to run locally so we can test it, we've got our branch checked out for our feature in our case I was really bugged by that missing by that weird pars error in YAML and so I went and fixed that by adding a newline at the end if there wasn't one right, it didn't really make a change to the contents of the file but it made it parseable even if it wasn't there. Make sure you follow the conventions that they use in Cookiecutter and notice the u for Unicode, so we were using Python 2 because it's little less forgiving and some other the things and it's a little easier for me, at least to remind myself I'll put the u for Unicode rather than in Python 3 where it's not required ok so we made our change here, then we're going to check in our change and we're going to give it a detailed description notice we have a detailed description for the people reviewing the PR and were pushing the changes to mikeyckennedy/ in this case forgiving YAML fix, whatever the name of our feature branch is. Finally, once that's done, we go back to GitHub to our repo click the button to create the pull request, and boom, then our pull request is here, one final note, notice down here at the bottom, there is 3 checkins with my picture next to it, it says if the YAML config file does not end with the single blank line, it has an X now I ran the tox tests and I guess I didn't look carefully enough, I just figured oh no, I don't have flake 8 installed or whatever, and that didn't work, but it actually didn't work when I checked it in here, this comes from the continuous integration, on the server, on the git repo, that they have configured, and what happened was, I had actually my docstring was 83 characters long and they have a restriction that says 79 columns or fewer in any given line, so notice I actually made another change I fixed that format in the docstring and I just checked it back into my repo, to that branch and it automatically updates the pull request, and finally, it went all green everything was happy, everything passed. Alright, do you have a great idea to make Cookiecutter better, now you know how to develop and do contributions back to it.
|
|
|
|
5:20 |
|
|
transcript
|
5:20 |
Congratulations, you've made it to the end of this course, and not only did you make it through the course you now have a new magic power- it's called cookiecutter. So the question is what are you going to build now? I think you should take this moment, pause this video and write down three things you think could be made better with cookiecutter and then make a plan to create at least one of those over the next month if we all did that, think how many cool things we could create with cookiecutter in just a really short time. So congratulations, I hope you feel as you've gained a lot of knowledge about cookiecutter that you can now use this new tool to do amazing things both with your own project, as well as other cookiecutter templates that people have already created and published to the pantry full of cookies. Let's do a quick lightning review. So we started out in this course by discussing what is cookiecutter and when to use it and you saw that cookiecutter is a project template creation framework we can take these templates, we can run them we can create any sort of project it doesn't have to be Python even though the implementation is Python. We saw that we can create Atari games C++ applications JavaScript apps all sorts of stuff; we talked about some of the advanced features, running cookiecutter with no inputs, great for continuous integration and unit tests, things like that; running it with the replay option so that it just reruns whatever we configure it to run, again this is good for when you're building your own template it's good when you're doing continuous integration and you don't want to take the default we also saw that it can be annoying to type in answer questions like what's your name, what's your e mail what's your GitHub account name and things like that continuously so we can create a global default file that solves that once and for all. We talked about creating templates, we'd start with the cookiecutter.json file that has the prompts as well as things like extensions, files that we should not transform, copy without render things like that we talked about the folder structure naming our folder things like {{cookiecutter.project_name}} something like this we saw that we can create dependent properties that the cookiecutter.json is not just a static thing but it kind of comes to life as it evaluates top to bottom so we can put Jinja expressions in here and do a lot of cool things there for the most advanced features we would use hooks, we have a pre generation hook and a post generation hook and we also have a choice variable if you've got a small restricted set of things like the template engine you want to use for a web framework a choice variable would be great. We saw that we can take this concept of creating templates in a program and make it even better, recall we made our game maker application and it can make hi-lo, it can make pong, and it can make hangman and instead of just having the general prompts and inputs that cookiecutter gives we actually wrote a program that would take in that information verify it if it was wrong it asked the question again and get everything ready to go and then it would create the game using the underlying cookiecutter template programmatically so we would call cookiecutter.main.cookiecutter one as a package one as a sub package, the final part is the method we would call that and of course we want to leverage the default values so we could work with the config sub module and pull in the default values for whoever joining this minimize a number of questions or at least make it nicer for them and we created our little app the game maker, and it presented itself more nicely as sort of a project creation thing I didn't have to know anything about project creation for the most part because it just delegated all that information and that functionality to cookiecutter; we went through a few case studies we talked about Beeware, OpenStack and Pyramid and how all three of these projects are making heavy use of cookiecutter and how there's some really interesting stuff happening there; we shared our template, in fact, I can tell you that the time of this recording now my template that I used as an example in this section is now officially part of the pantry full of cookies on the cookiecutter site, so that process I took you through that work for me at least, that was great. And finally we talked about modifying cookiecutter there was a feature that I- or behavior let's say, not a feature, behavior I didn't like and I've talked about it throughout the course that the yaml file, the parsing of is too strict and having a new line at the end is really frustrating we went through and we saw how we could fix that in fact I did a little bit of back and forth with those guys and now that is also accepted and should be officially part of cookiecutter so that shouldn't be a problem anymore, you can use that technique to modify cookiecutter for whatever your needs are. Look at that, this is a ton of stuff that you've learned and now you should be really empowered to do cool stuff with cookiecutter. But, before you go don't forget to take the code with you visit github.com/mikeyckennedy/cookiecutter-course, and star this and fork this so that you have everything that we've done, everything we've created throughout the course with you forever. I've done a small amount of reorganization because I noticed as I was doing things live it got a little messy sometimes I had multiple projects generated next to the template itself and so it might not look identical but it should be very very similar and self explanatory to what you saw us do together on the screen. Thanks so much for taking this course I'll see you online! Bye.
|